

Page 1
Safety Instructions ........... 2, 3
Operating Instructions
Additional Controls ............. 7
Control Knob Models ........... 6
Normal Operating Sounds ....... 7
Touch Pad Models ............ 4, 5
Care and Cleaning
Air Filter ...................... 8
Grille and Case ................. 8
Outdoor Coils .................. 8
Installation Instructions
Through-the-Wall
Installation--Optional .......... 15
Window Installation .......... 9-14
Troubleshooting Tips .......... 16
ge.com
AEE23
AE/!I 8"
AEH25*
AEM I S *
AEM25*
AEQ24
AEWI 8"
AE W25 *
Climadseur
0
L;
Consumer Support
Consumer Support ..... Back Cover
Ownership Registration for
Customers in Canada only .... 17, 18
Warranty for Customers
in Canada .................... 20
Warranty for Customers
in the U.S.A ................... 19
*ENERGY STAR ® labeled product
I
ENERGYSTAR
As an ENERGY STAR ® [)artneI; (;E has
determined that this product meets
tile ENERGYSTAR® guidelines for
energ T eft]cleric>
Write themodel andserial numbershere:
La section fran_'aise commence ?_la page 21
Acondicionador
o
de alre
La secci6n en esJ)a_ol empieza en la pdgina 41
<
Model #
Serial #
Find these numbers on a label on tile
side of tile air conditioner
In Canada, contact us at:
ww_c GEAppliances.ca
49-7610 12-08JR
Page 2
iMPORTANTSAFETYINFORMATION.
READALLiNSTRUCTiONSBEFOREUSING.
WA ,!
Foryour safety, the information in thismanual must be followed to minimize the risk of fire, electric shock
or personal injurg
SAFETYPRECAUTIONS
iiiil}i
Use this appliance only fi)r its intended
purpose as described in this Owner's
Manual.
iii}i}}li_
This air conditioner must be properly
installed in accordance with the Installation
Instructions befbre it is used.
iii}i}}li_
Never unplug your air conditioner by pulling
on the power cord. Always grip plug firmly
and pull straight out flora the receptacle.
iii}i}}li_
Replace immediately all electric service
cords that have become flayed or othendse
damaged. A damaged power supply cord
must be replaced _dth a new power supply
cord obtained from the mamtfhcturer and
not repaired. Do not use a cord that shows
cracks or abrasion damage along its len_h
or at either the plug or connector end.
}} ff the receptacle does not match tim plug,
the receptacle must be changed out by a
qualified electrician.
}}Turn the unit OFFand unplug your air
conditioner before making any repairs
or cleaning.
NOTE: Westronglyrecommendthatanyservicing
be performedby a qualified bdividual.
::_For your s_ety...do not store or use
combustible materials, gasoline or other
flammable vapors or liquids in the x,icinity
of this or any other appliance.
::_All air conditioners contain refiigerants,
which under federal law must be removed
prior to product disposal, ffyou are getting
rid of an old product with refiigerants,
check _dth the company handling disposal
about what to do.
HOWTOCONNECTELECTRICITY
Do not, under any circumstances, cut or remove
the third (ground) prong from the power cord, For
personal safety, this appliance must be properly
grounded,
BO NOT use an adapter plug with this appliance.
The power cord of this appliance is equipped
with a 3-prong (grounding) plug which mates
_dth a standard 3-prong (grounding) wall
outlet to minimize the possibility of electric
shock hazard from this appliance.
Power cord includes a current interrupmr
dex,ice. A rest and reset button is prox,ided on
the plug case. The dex,ice should be tested on a
periodic basis by first pressing the rESrbutmn
and then the RESETbutton while plugged into
the outlet, ff the rESTbutton does not trip
or if the RESErbutmn _dll not stay engaged,
discontinue use of the air conditioner and
contact a qualified ser_,ice technician.
Hmre the wall outlet and circuit checked by a
qualified electrician to make sure the outlet is
properly grounded.
Where a 2-prong wall outlet is encounmred,
it is your personal responsibility and obligation
m have it replaced _dth a properly grounded
3-prong wall outlet.
The air conditioner should always be
plugged into its own in(fix_idualelectrical
outlet which has a voltage rating that matches
the rating plate.
This prox_ides the best perfbrmance and also
prevents overloading house wiring circuits
which could cause a fire hazard from
overheated wires.
See the Installation Instructions, Electrical
Requirements section for specific electrical
connection requirements.
2
Page 3
WARNING!
EXTENSIONCORDS
CAUTION:
DO NOT use an extension cord with any of the
230/208 volt models.
READANDFOLLOWTHISSAFETYINFORMATIONCAREFULLY
SAVETHESEiNSTRUCTiONS
ge.corn
3
Page 4
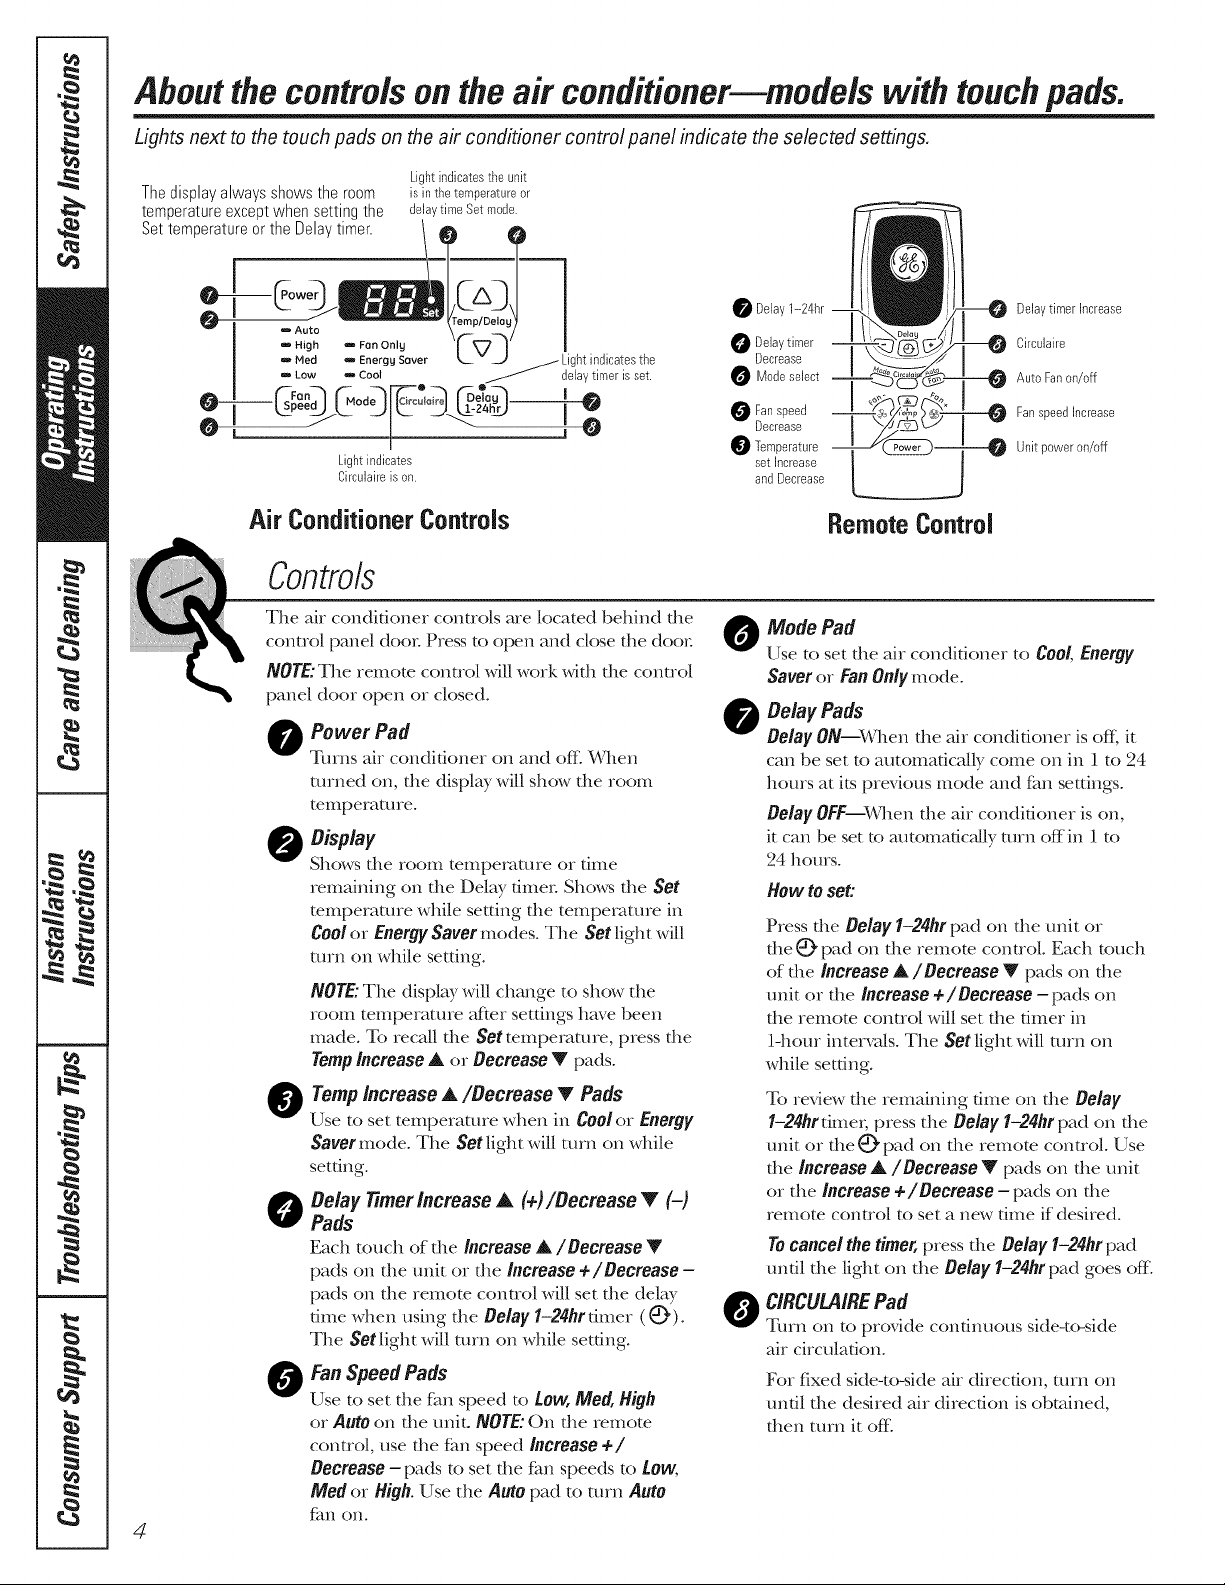
Aboutthecontrolsonthe air conditioner--models with touchpads.
Lights next to the touch pads on the air conditioner centre/panel indicate the selected settings,
Thedisplayalwaysshowsthe room is inthe temperatureor
temperatureexceptwhensetting the delaytimeSetmode
Settemperature°_r th2 Delay_tmqer 1,.____
Lightindicates
Circulaireis on
Lightindicatesthe unit
Air ConditionerControls
Controls
The ah conditioner conuols are located behind die
conuol panel door Press to open and close file do(m
NOTE:The remote conuol will work wifll file conuol
panel door open or closed.
O ower Pad
Turns air conditioner on and (fie X&,qlen
turned on, the display will show the room
temperature.
O
Shows die room temperature or time
remaining on file Delay timer Shows die Set
mmperamre while setting the temperature in
Coolor EnergySavermodes. The Setlight will
mrn on while setting.
NOTE:The display will change [o show the
room temperature after settings have been
made. To recall the Set temperature, press the
Yempincrease A or Decrease V pads.
O emp Increase A/Decrease T Pads
Use to set temperature when in Cool or Energy
Saver mode. The Set light will mrn on while
setting.
O Delay Bmer/ncrease A (+l/Decrease V (-I
Pads
Each touch of the increase A/Decrease Y
pads on the unit or the Increase +/Decrease-
pads on the remora conuol will set the delay
time when using the Delay 1-24hrfimer (_).
The Set light will mrn on while setdng.
Fan Speed Pads
Use to set the f_m speed to Low, Med, High
or AUtOon the unit. NOTE:On the remora
conuol, use the f_m speed Increase +/
Decrease -pads to set the tim speeds to tow,
Med or High. Use the Auto pad to mrn Auto
4
f_til on.
Delaytimer increase
Decrease
O Modeselect
O Fanspeed
Decrease
set Increase
andDecrease
Circulaire
Auto Fanon/off
FanspeedIncrease
Unit power on/off
Remote Control
O ede Pad
Use to set the air conditioner to Cool, Energy
Saver or Fan Only mode.
Delay Pads
0
Delay ON--When the air conditioner is off; it
can be set to automatically come on in 1 to 24
hours at its previous mode and tim settings.
Delay OFF--When the air conditioner is on,
it can be set to automatically mrn off in 1 to
24 hours.
How to set
Press file Delay 1-24hrpad on die trait or
die @_ pad on file remote conuol. Each touch
of the Increase A/Decrease Y pads on the
unit or the Increase +/Decrease - pads on
the remote control will set the diner in
1-hem intervals. The Set light will mrn on
while setdng.
To review die remaining dine on file Delay
1-24hrdmei; press the Delay 1-24hrpad on file
unit or the _ pad on the remote control. Use
the Increase A/Decrease Y pads on the unit
or the Increase +/Decrease- pads on the
IeHlo[e conQol [0 set a new Qine if desired.
Tocancelthe timer,press dae Delay1-24hrpad
until die light on the Delay 1-24hrpad goes off
CIRCULAIREPad
0
Turn on to provide continuous side-to-side
air circulation.
For fixed side-to-side air direction, mrn on
until the desired air direction is obtained,
then turn it off
Page 5

Do Not Operate in Freezing Outdoor Conditions
This cool-only air conditioner was not designed for
fleezing outdoor conditions° It must not be used in
fleezing outdoor conditions.
CoolMode
ge.corn
Use file Cool mode at LOW, Med,H_ghor AutoFan
Speed for cooling. Use the Temperature Increase A /
Decrease V pads to set the desired wmperamre
between 64°F and 86°F in ]°F increments.
AJ_ electronic dlemlostat is used to maintain file
room temperature. The compressor will cycle on
and 0_" 10 keep file room at die set level of comK>rt
Set die flleI]IIosta[ a a lower mmlber and die indoor
air will become cooler Set die dlerIllOStat at a higher
mmlber and die indoor air will become wamler
NOTE:ff theairconditionerisoffendis thenturnedon
whilesettoa Coolsettingorif turnedfromafansetting
toa Coolsetting,it maytakeapproximatdg3minutes
forthecompressortostartandcoolingtobegin.
Energy Saver Mode
Controls the fan.
0N---The fan will cycle on and offwidl die
compressor This results in wider variations of room
mmpemmre and humidity: Normally used when the
room is unoccupied° NOTE: Thefan maycontinue to run
fora short time after the compressorcycles off
OFF--The fan runs all the time, while file
compressor cycles on and ore
Cooling Descriptions
For Normal Cooling--Select the COOlmode and
High or Med fan with a middle set temperature.
ForMaximumCooling--Select die Coolmode
and Highfan widl a lower set temperature.
ForQuieter& NighttimeCooling--Select tile
Coolmode and LOWfan widl a middle set
temperature°
FanOnlyMode
Use the Fan Only Mode at LOW,Med or High fan
speed to provide air circulation and filtering
without cooling° Nnce fan only settings do not
provide cooling, a Set temperature cannot be
enmred. The room mmpemmre will appear
in the display°
NOTE:AutoFanSpeedcannotbeusedwheninthe
FanOnlyMode.
Power Outage Recovery Feature
In die case of a power outage or interruption, file
unit will automatically re-start in the settings last
used after the power is restored. If the Belay 1-24hr
Remote Control
To ensure proper operation, aim file remote
control at tile signN receiver on the air
conditioner
Tile remote control signal has a range of
up to 20 feet
Auto Fan Speed
Set to Auto fan speed for the fan speed to
automatically set to the speed needed to provide
optimum comfort settings with the set tempelamre.
If die room needs more cooling, die fan speed
will automatically increase, ff the room needs less
cooling, the fan speed will automatically decre_kse.
NOTE:AutoFanSpeedcannotbeusedwheninthe
FanOnlyMode.
fe.amre was set, it will resmne cotmtdown. You may
need to set a new time if desired.
Make sure nodling is between file oh conditioner
and tile remora conUol that coukt block the
signN.
Make sure batteries are flesh and installed
correcdy _ksindicated on the remora control.
5
Page 6
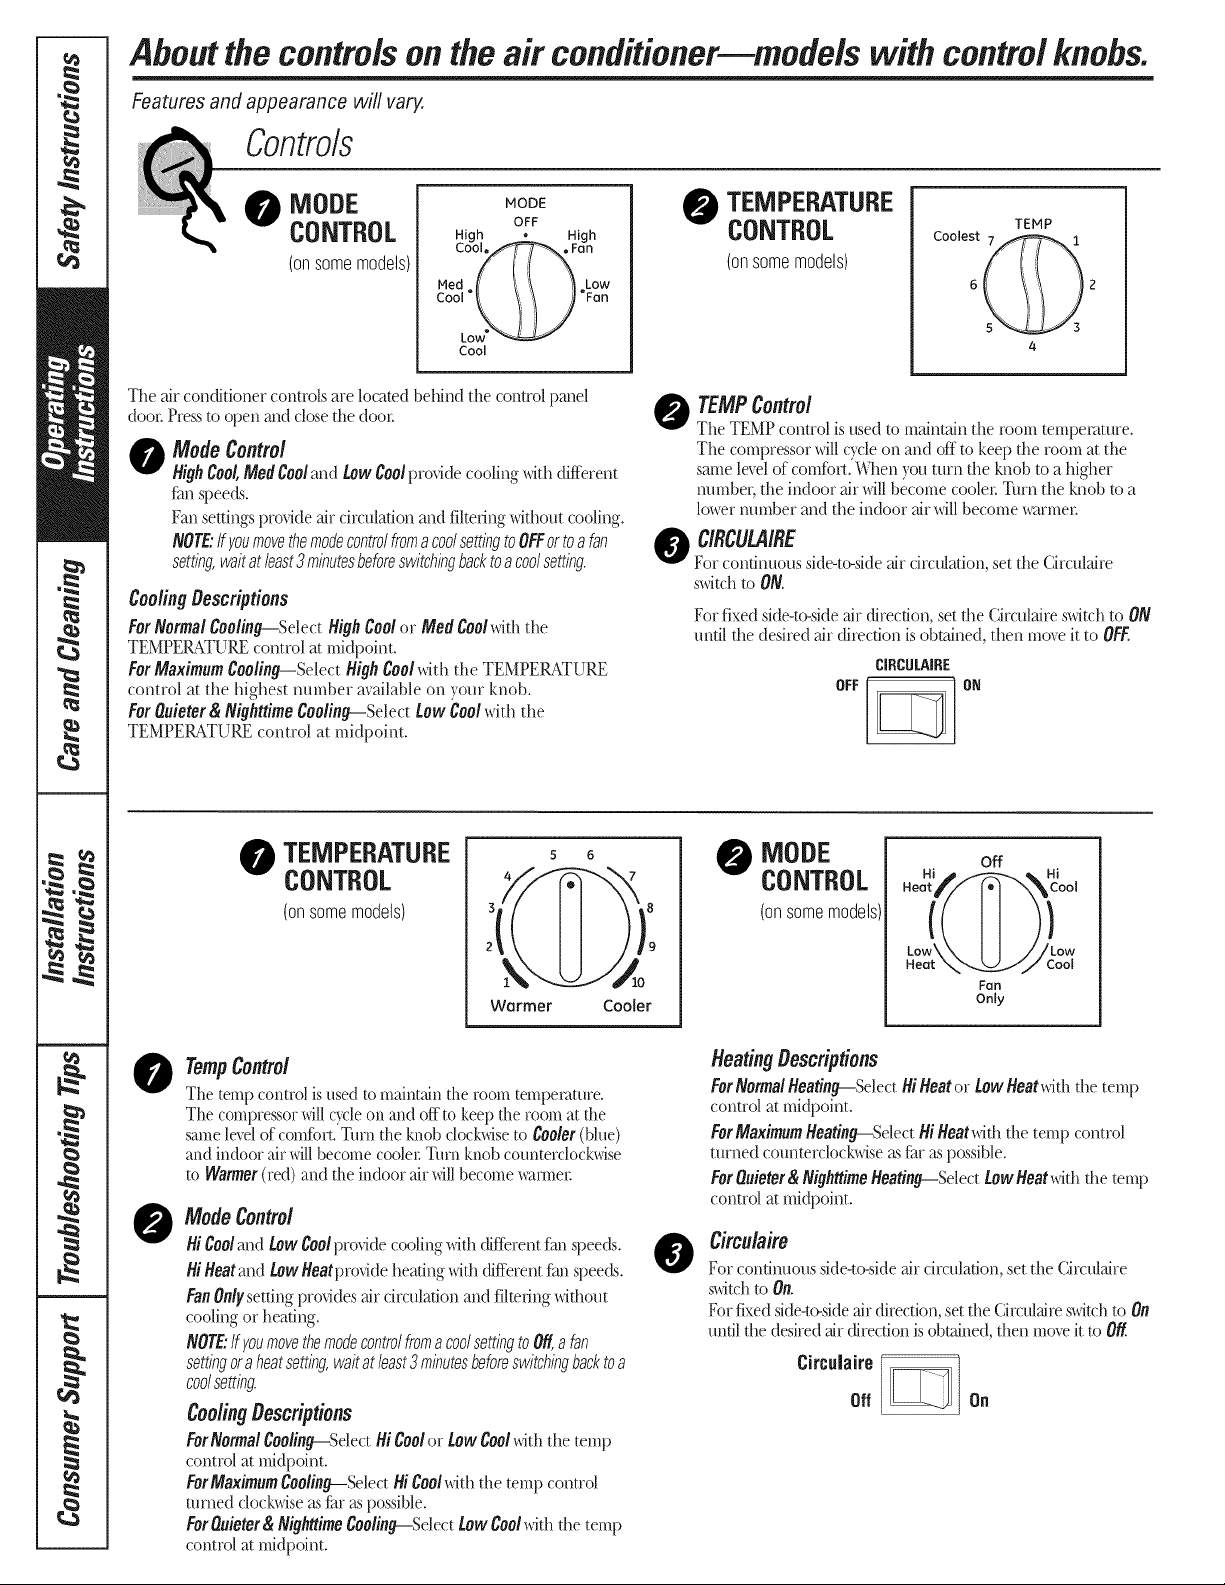
About the controls on the air conditioner--models with control knobs.
Features and appearance will vary.
Controls
MODE
OFF
High • High
(onsomemodels)
Tile air condkioner controls are located behind tile control panel
doo_:Press to open and close tile doo_:
ModeControl
t1
HighCool,MedCooland LowCoolprovide cooling with difii_rent
fhn speeds.
Fan settings provide air circulation and filtering without cooling.
NOTE:IfyoumovethemodecontrolfromacoolsettingtoOFFortoa fan
setting,waitatleast3minutesbeforeswitchingbacktoacoolsetting.
Cob_Fan
Ned I/ \ _\ ]1 Low
Cool "_ "Fan
Low"
Cool
CoolingDescriptions
ForNormalCooling--Select HighCoolor MedCoolwithtile
TEMPERATURE control at midpoint.
ForMaximum Cooling--Select High Cool with tile TEMPERATURE
control at the highest number available on your knob.
ForQuieter & Nighttime Cooling--Select Low Cool with tile
TEMPERATURE control at midpoint.
TEMPERATURE
CONTROL
(onsome models)
C°°lelt
TEMPControl
O
The TEMP control is used to mah-ltain the room temperature.
Tile compressor will cycle on and off to keep the room at tile
same level of comfbm _A]lenyou mrn the knob to a higher
number, tile indoor air willbecome cooleL Turn tile knob to a
lower number and tile indoor air will become _trmeL
O C/RCULAIRE
For condnuous side-to-skle air circulation, set tile CircuMre
switch to ON.
For fixed side-to-side air direction, set tile Circulaire switch to ON
until tile desired air direction is obtained, then moxe it to OFF.
CIRCULAfflE
OFF ON
TEMP
4
TEMPERATURE
CONTROL
(onsome models)
K /o
Warmer Cooler
TempControl
0
The temp control isused to maintain the room tempecamre.
The compressor will cycle on and off to keep the room at the
same level of comfbrt. Turn the knob clockwise to Cooler (blue)
and indoor air will become cooler: Turn knob counterclockwise
to Warmer (red) and the indoor air will become warmer:
ModeControl
@
HiCooland tOW Coo/provide cooling with dif;ferent fan speeds.
HiHeatand LowHeatprovide heating with difli_rentfan speeds.
FanOnlysetting provides air drculadon and filtering wkhout
cooling or headng.
NOTE:IfyoumovethemodecontrolfromacoolsettingtoOff,a fan
settingoraheatsettingwaitatleast3minutesbeforeswitchingbacktoa
coolsett/ng
CoolingDescriptions
ForNormalCoolino--Sdect Hi Coolor LowCoolwkh tile temp
control at midpoint.
ForMaximumCoolino--Sdect HiCoolwith tile temp control
turned clockwise itsfhr its possible.
ForQuieter& NighttimeCooling--Select LowCoolwith tile temp
control at midpoint.
5 6
MODE
CONTROL
(onsomemodels)
Hea(( * ?i°°'
Lo_\\ I I //Lo_
Heat \N_-.__V___/ Cool
off
Hi ,0 _-"_. % Hi
Fon
Only
HeatingDescriptions
ForNormalHeating--Select Hi Heator Low Heatwith tile temp
control at midpoint.
ForMaximumHeatinN--Select Hi Heatwith tile temp control
turned counterclockwise its fhr its possible.
ForQuieter& NighttimeHeating--Select LOWHeatwith tile temp
control at midpoint.
Circu/aire
@
For continuous side-to-side air circulation, set tile CircuMre
switchto On.
For fixed side-to-side air direction, set the CircuMre switch to On
until tile desired air direction is obtained, then move it to Off.
Circulaire
Off On
Page 7

Additional controls, ge.com
Vent Control
The vent control is located above tlle control
panels.
When set at CLOSE, only the air inside the room
will be circulated and conditioned. When se[ at
OPEN,some outside air is let into the room.
Toopen the vent, push the lever to the right,
Toclose it, push it to the left.
Air Direction--Up and Down
Fingertip pressure on tile horizontal louvers
adjusts tile air direction up or down.
Control Panel Door
Press to open and close tile door
NOTE:Tile remote conaol (on some models) will
work with tile conuol panel door open or closed.
Normal operatingsounds.
You may hear a pinging noise caused by
water being picked up and fluown against file
condenser on rainy days or when die humidiD_
is high. This design feature helps remove
moisture and improve efficiency.
You may hear die thermostat click when die
compressor cycles on and (fie
Water will collect in die base pan during
high humidity or on rainy days. Tile wamr may
overflow and drip flom the outdoor side of
the unit.
Tile fan may run even when die compressor
does not.
Page 8
Careand cleaning ofthe air conditioner.
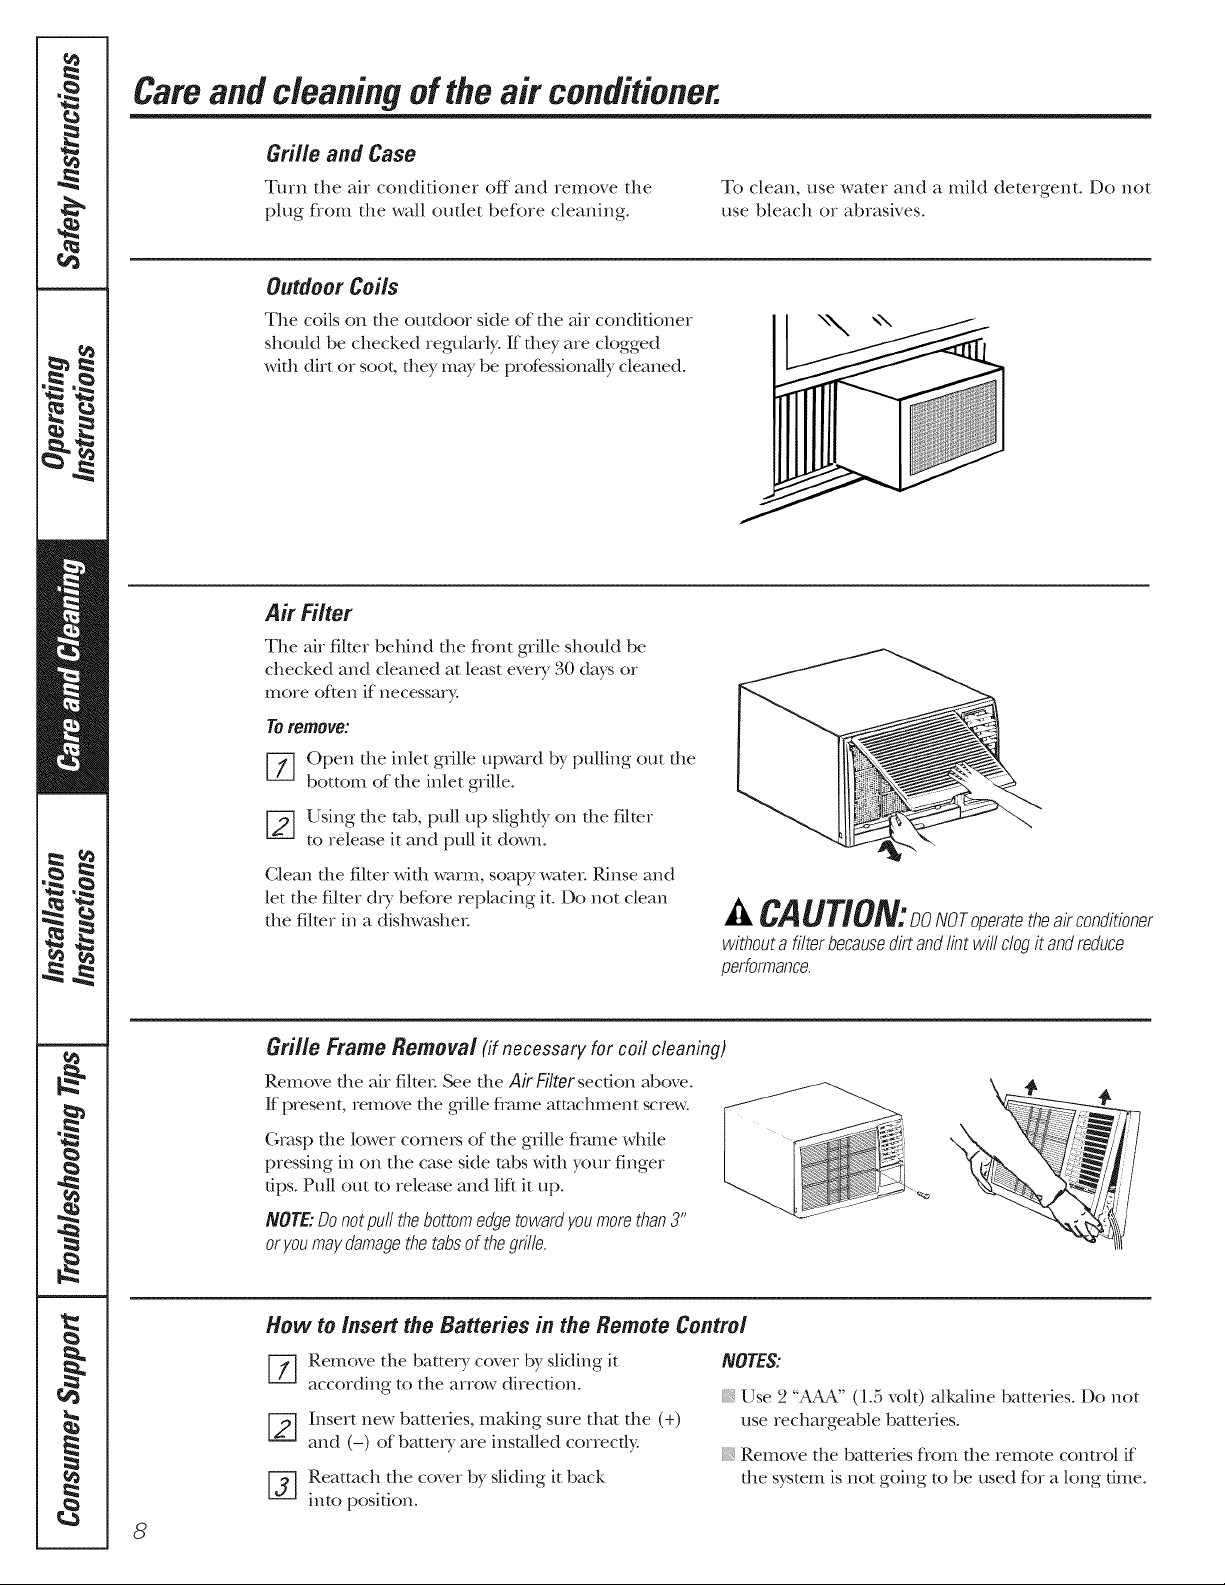
Grille and Case
Turn the air conditioner off and remove the To clean, use water and a mild detergent. Do not
plug flom the wall outlet before cleaning, use bleach or abrasives.
Outdoor Coils
The coils on the outdoor side of the air conditioner
should be checked regular|y: If they are clogged
with dirt or soot, they mW be profe.ssiona/ly cleaned.
Air Filter
The oh filter behind the flont grille shouM be
checked and cleaned at least eve,T 30 days or
more often if necessa_>
Toremove:
[-_ Open the inlet grille upward by pulling out the
bottom of the inlet grille.
[_ Using the rob, pull up slightly on the filter
to release it and pull it down.
Clean the filter with warm, soapy water Rinse and
let the filter &T before replacing it. Do not clean
the filmr in a dishwasher
Grille Frame Removal (if necessary for coil cleaning)
Remove the air filter See the Air Filter section above.
If present, remove the gqille flame attachment screw.
Grasp the lower cornex_ of the grille flmne while
pressing in on the case side robs with your finger
tips. Pull out to release and lift it up.
NOTE:Donotpullthebottomedgetowardyoumorethan3"
oryoumaydamagethe tabsofthegrille.
How to insert the Batteries in the Remote Control
[_ Remove the battery cover by sliding it
according to the arrow direction.
[_ Insert new batteries, maMng sure that the (+)
and (-) of batte_ T are installed correcdy.
[_ Reatmch the cover by sliding it back
into position.
^,u=CAUTION: Noroperatetheairconditioner
withoutafilterbecausedirtandlintwillclogit andreduce
performance.
NOTES:
., Use 2 "AAA" (1.5 volt) alkaline batteries. Do not
use rechargeable batmfies.
Remove tlle batteries flom the reIilote control if
the sysmm is not going to be used for a long time.
8
Page 9
I st II ti
structi
Ai Conditio
BEFORE YOU BEGIN
Read these instructions completely
and carefully.
• IMPORTANT - Savethese
instructions for local inspector's use.
• IMPORTANT - Observeall
governing codes and ordinances.
• Note to Installer- Be sure to leave these
instructions with the Consumer.
• Note to Consumer- Keep these
instructions for future reference.
• Skill level - Installation of this appliance
requires basic mechanical skills.
• Completion time- Approximately 1 hour
• We recommend that two people install
this product.
• Proper installation is the responsibility
of the installer.
Product failure due to improper installation
is not covered under the Warranty.
You MUST use al! supplied parts and use
proper installation procedures as described
in these instructions when installing this
air conditioner.
- CAUTION:
Do not, under any circumstances, cut or
remove the third (ground) prong from the
power cord.
Do not change the plug on the power cord
of this air conditioner.
Aluminum house wiring may present special
problems--consult a qualified electrician.
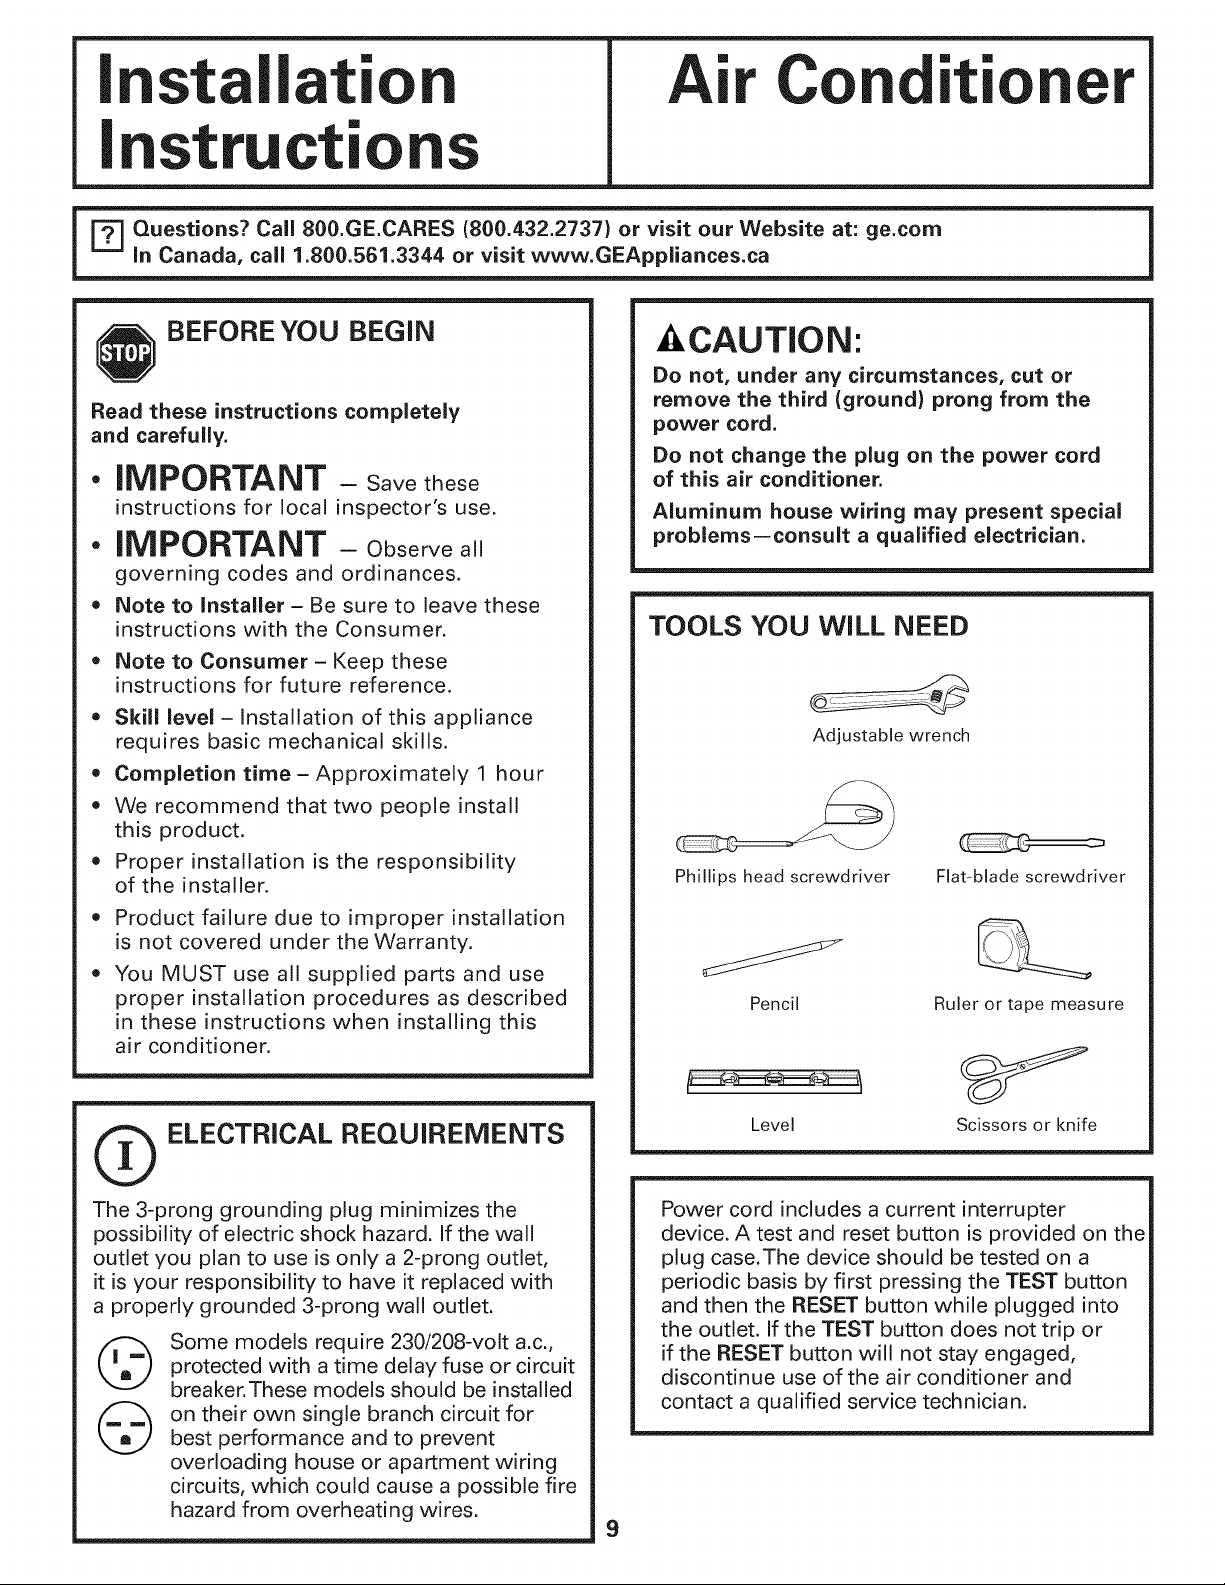
TOOLS YOU WILL NEED
Adjustable wrench
Phillips head screwdriver
Pencil
Flat-blade screwdriver
Ruler or tape measure
_ ELECTRICAL REQUIREMENTS
The 3-prong grounding plug minimizes the
possibility of electric shock hazard. If the wall
outlet you plan to use is only a 2-prong outlet,
it is your responsibility to have it replaced with
a properly grounded 3-prong wall outlet.
Some models require 230/208-volt a.c.,
©
protected with a time delay fuse or circuit
breaker.These models should be installed
on their own single branch circuit for
best performance and to prevent
overloading house or apartment wiring
circuits, which could cause a possible fire
hazard from overheating wires.
Level
Power cord includes a current interrupter
device. A test and reset button is provided on the
plug case.The device should be tested on a
periodic basis by first pressing the TEST button
and then the RESET button while plugged into
the outlet. If the TEST button does not trip or
if the RESET button will not stay engaged,
discontinue use of the air conditioner and
contact a qualified service technician.
9
Scissors or knife
Page 10
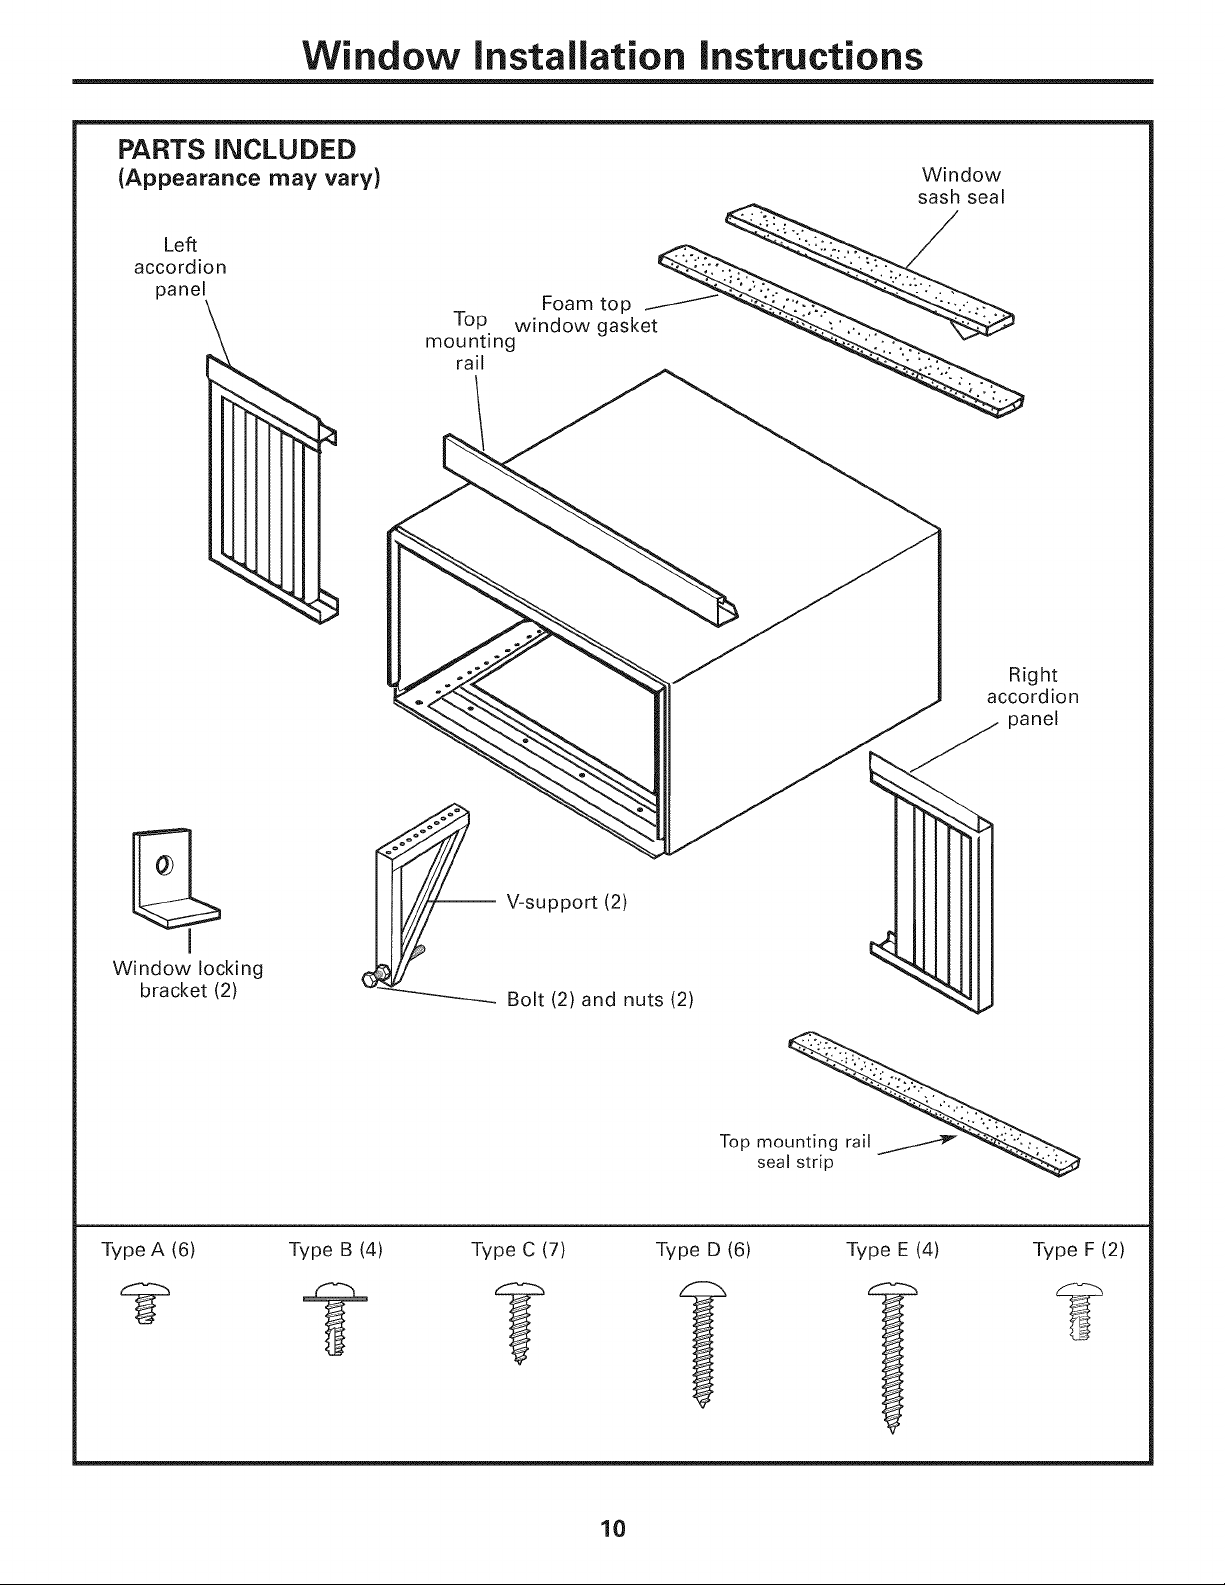
Window Installation instructions
PARTS iNCLUDED
(Appearance may vary)
Left
accordion
panel
Window
sash seal
•Foam top _..:'_..
Top wtndow gasket --__
mounting
rail
Right
accordion
panel
-- V-support (2)
I
Window locking
bracket (2)
Type A (6) Type B (4) Type C (7) Type D (6) Type E (4) Type F (2)
Bolt (2) and nuts (2)
Top mo "_
seal strip
10
Page 11
Window Installation instructions
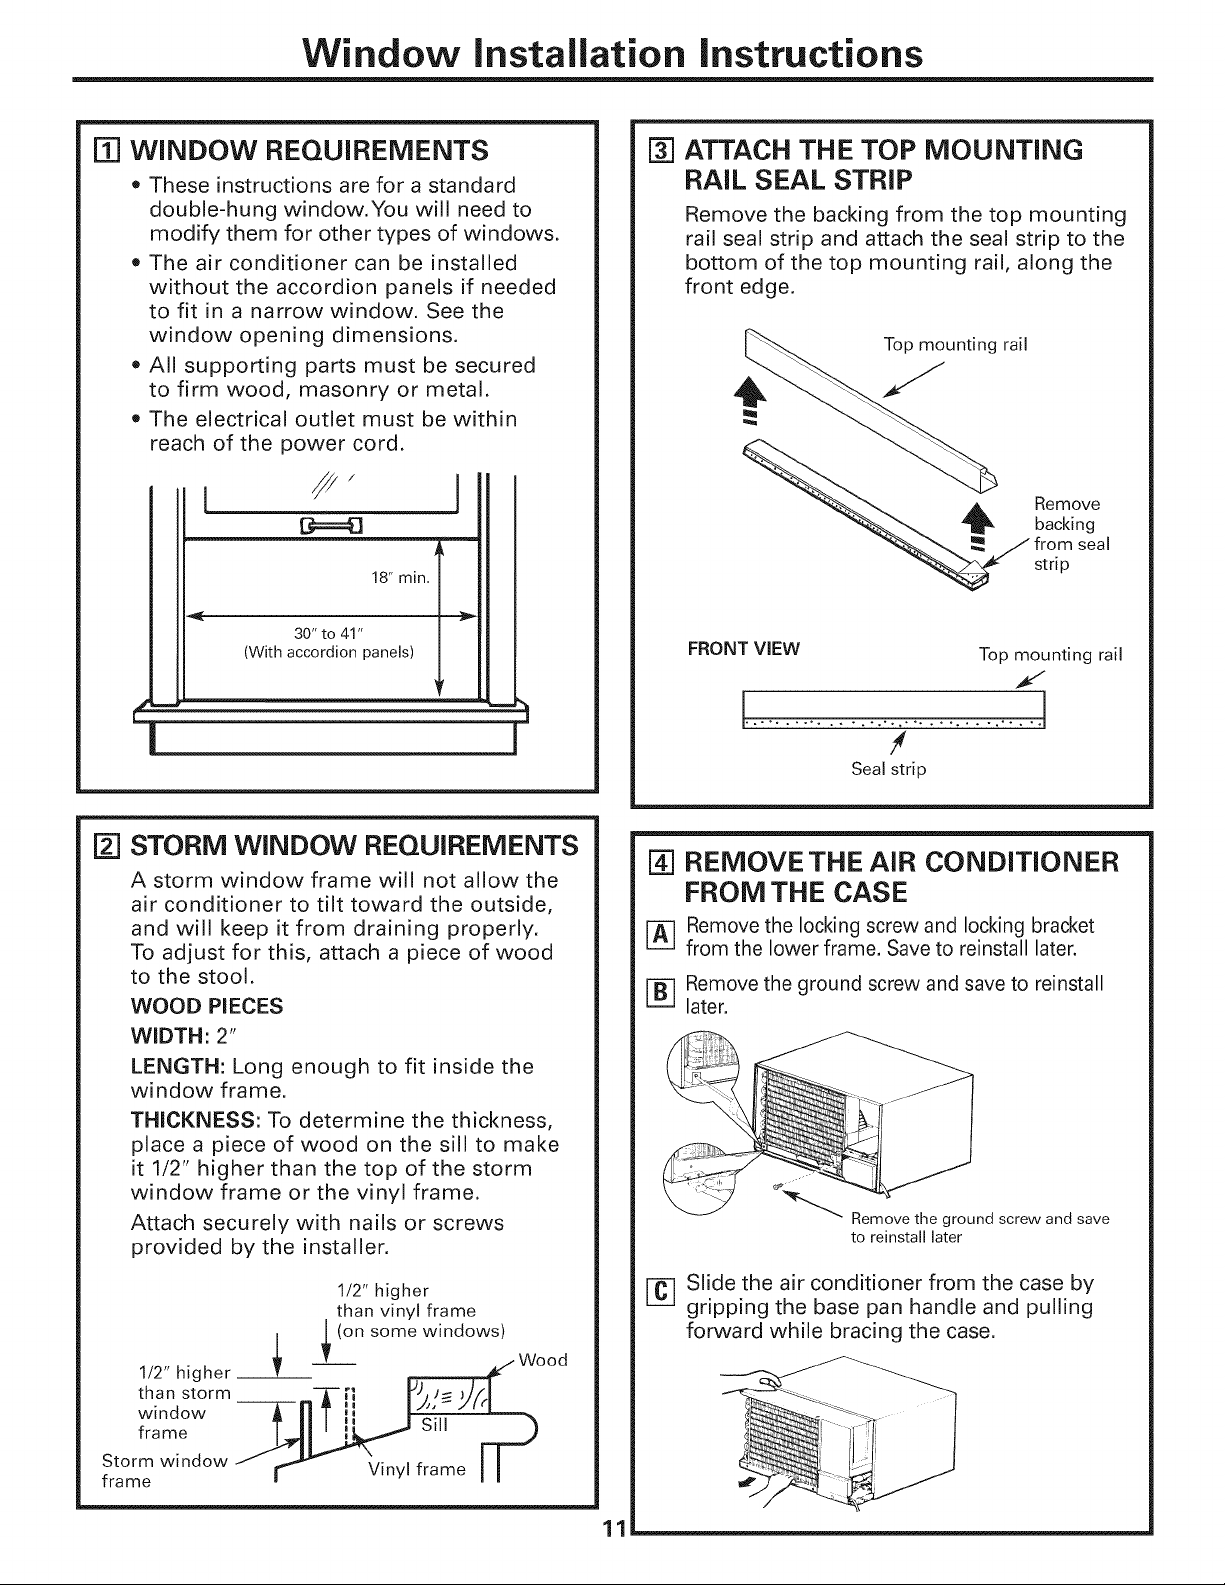
IT] WINDOW REQUIREMENTS
• These instructions are for a standard
double-hung window.You will need to
modify them for other types of windows.
• The air conditioner can be installed
without the accordion panels if needed
to fit in a narrow window. See the
window opening dimensions.
• A!l supporting parts must be secured
to firm wood, masonry or metal.
• The electrical outlet must be within
reach of the power cord.
18" min.
30" to 41"
(With accordion panels)
[] ATTACH THE TOP MOUNTING
RAIL SEAL STRIP
Remove the backing from the top mounting
rail seal strip and attach the seal strip to the
bottom of the top mounting rail, along the
front edge.
Top mounting rail
I
m
FRONT VIEW Top mounting rail
Remove
backing
from seal
strip
121STORM WINDOW REQUIREMENTS
A storm window frame will not allow the
air conditioner to tilt toward the outside,
and will keep it from draining properly.
To adjust for this, attach a piece of wood
to the stool.
WOOD PIECES
WIDTH: 2"
LENGTH: Long enough to fit inside the
window frame.
THICKNESS: To determine the thickness,
place a piece of wood on the sill to make
it 1/2" higher than the top of the storm
window frame or the vinyl frame.
Attach securely with nails or screws
provided by the installer.
1/2" higher
than vinyl frame
L (on some windows)
/
w
Seal strip
R-]REMOVE THE AIR CONDITIONER
FROM THE CASE
[] Remove the locking screw and locking bracket
from the lower frame, Save to reinstall later.
F-_ Remove the ground screw and save to reinstall
L._
later.
_r-_ Remove the ground screw and save
to reinstall later
[] Slide the air conditioner from the case by
gripping the base pan handle and pulling
forward while bracing the case.
than storm
1/2"higher ______ _Wood
window I'!
frame _ Sill IT _
Storm window
frame F r_ Vinyl frame I I
11
Page 12
Window Installation instructions
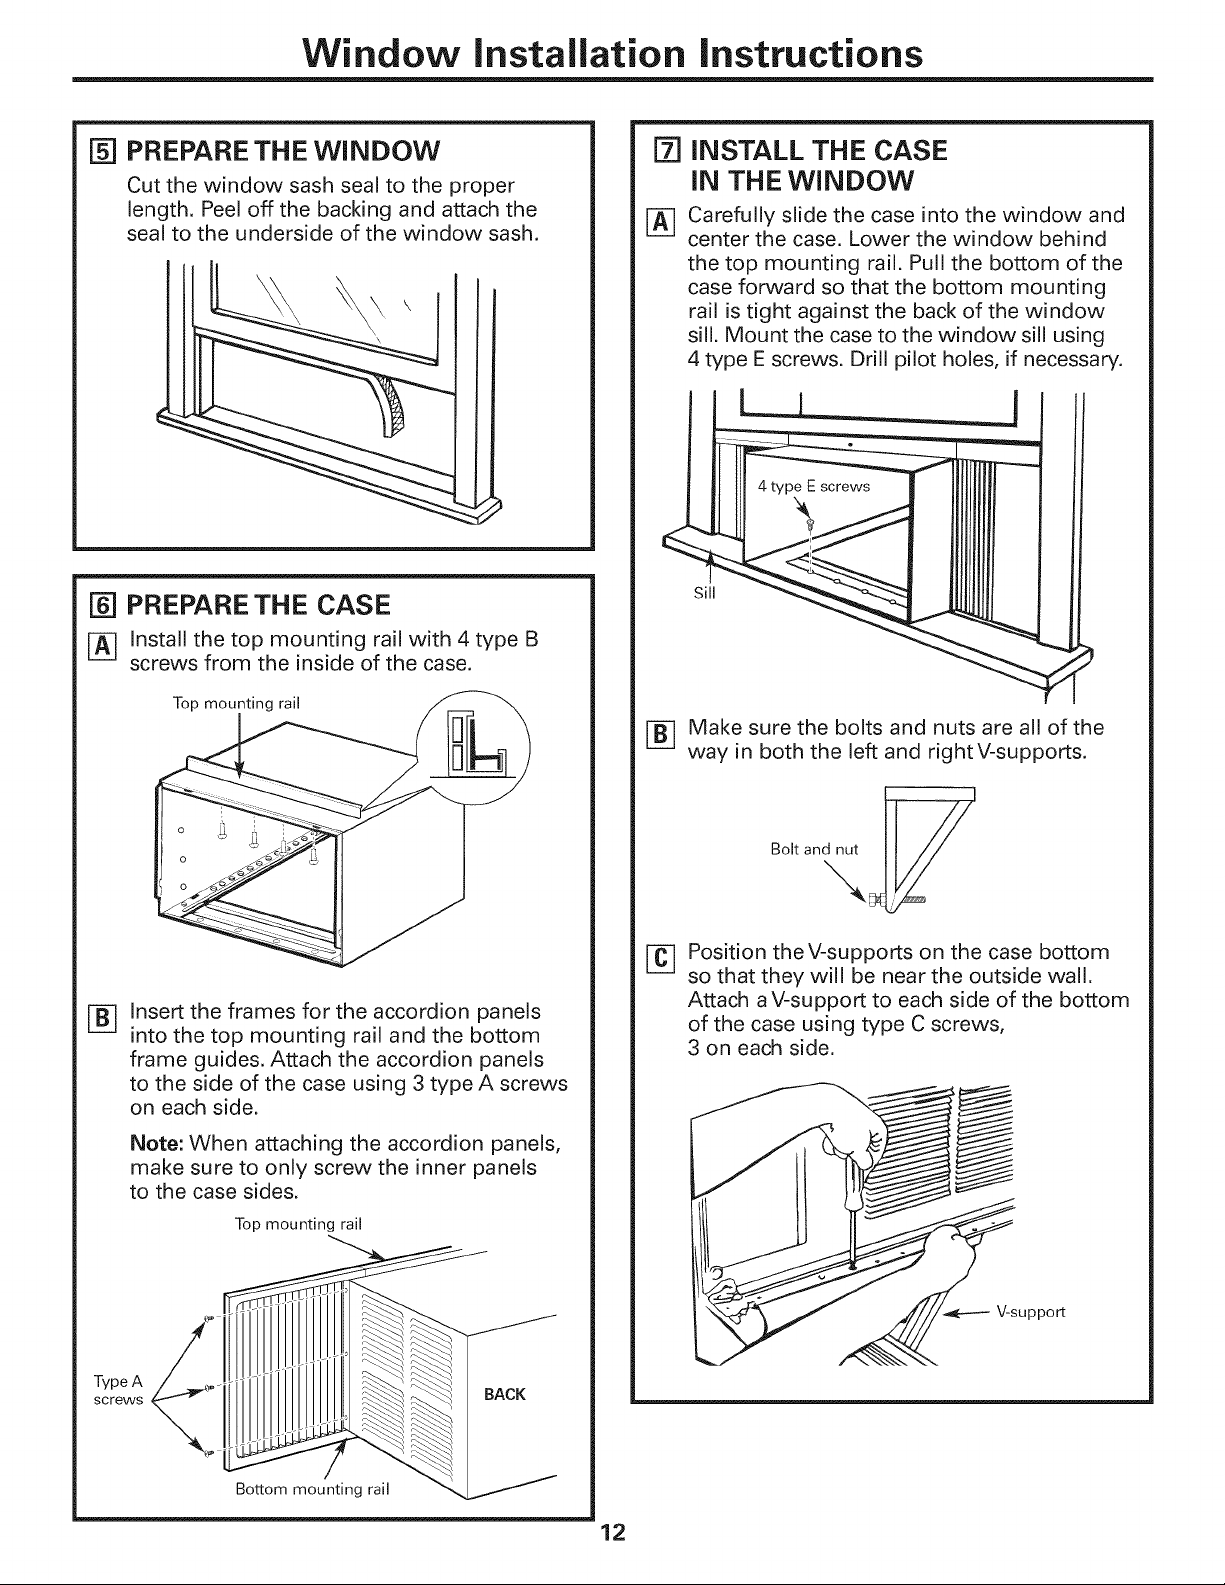
F51PREPARE THE WINDOW
Cut the window sash seal to the proper
length. Peel off the backing and attach the
seal to the underside of the window sash.
[] PREPARE THE CASE
I-_ Install the top mounting rai! with 4 type B
screws from the inside of the case.
[71INSTALL THE CASE
IN THE WINDOW
Carefully slide the case into the window and
%
center the case. Lower the window behind
the top mounting rail. Pull the bottom of the
case forward so that the bottom mounting
rail is tight against the back of the window
sill. Mount the case to the window sill using
4 type E screws. Drill pilot holes, if necessary.
L.J _J
Sill
Insert the frames for the accordion panels
into the top mounting rail and the bottom
frame guides. Attach the accordion panels
to the side of the case using 3 type A screws
on each side.
Note: When attaching the accordion panels,
make sure to only screw the inner panels
to the case sides.
Top mounting rail
I-B-I Make sure the bolts and nuts are al! of the
way in both the left and rightV-supports.
Position the V-supports on the case bottom
[]
so that they will be near the outside wall.
Attach a V-support to each side of the bottom
of the case using type C screws,
3 on each side.
V-support
TypeA
screws
BACK
Bottom mounting rail
12
Page 13
Window Installation instructions
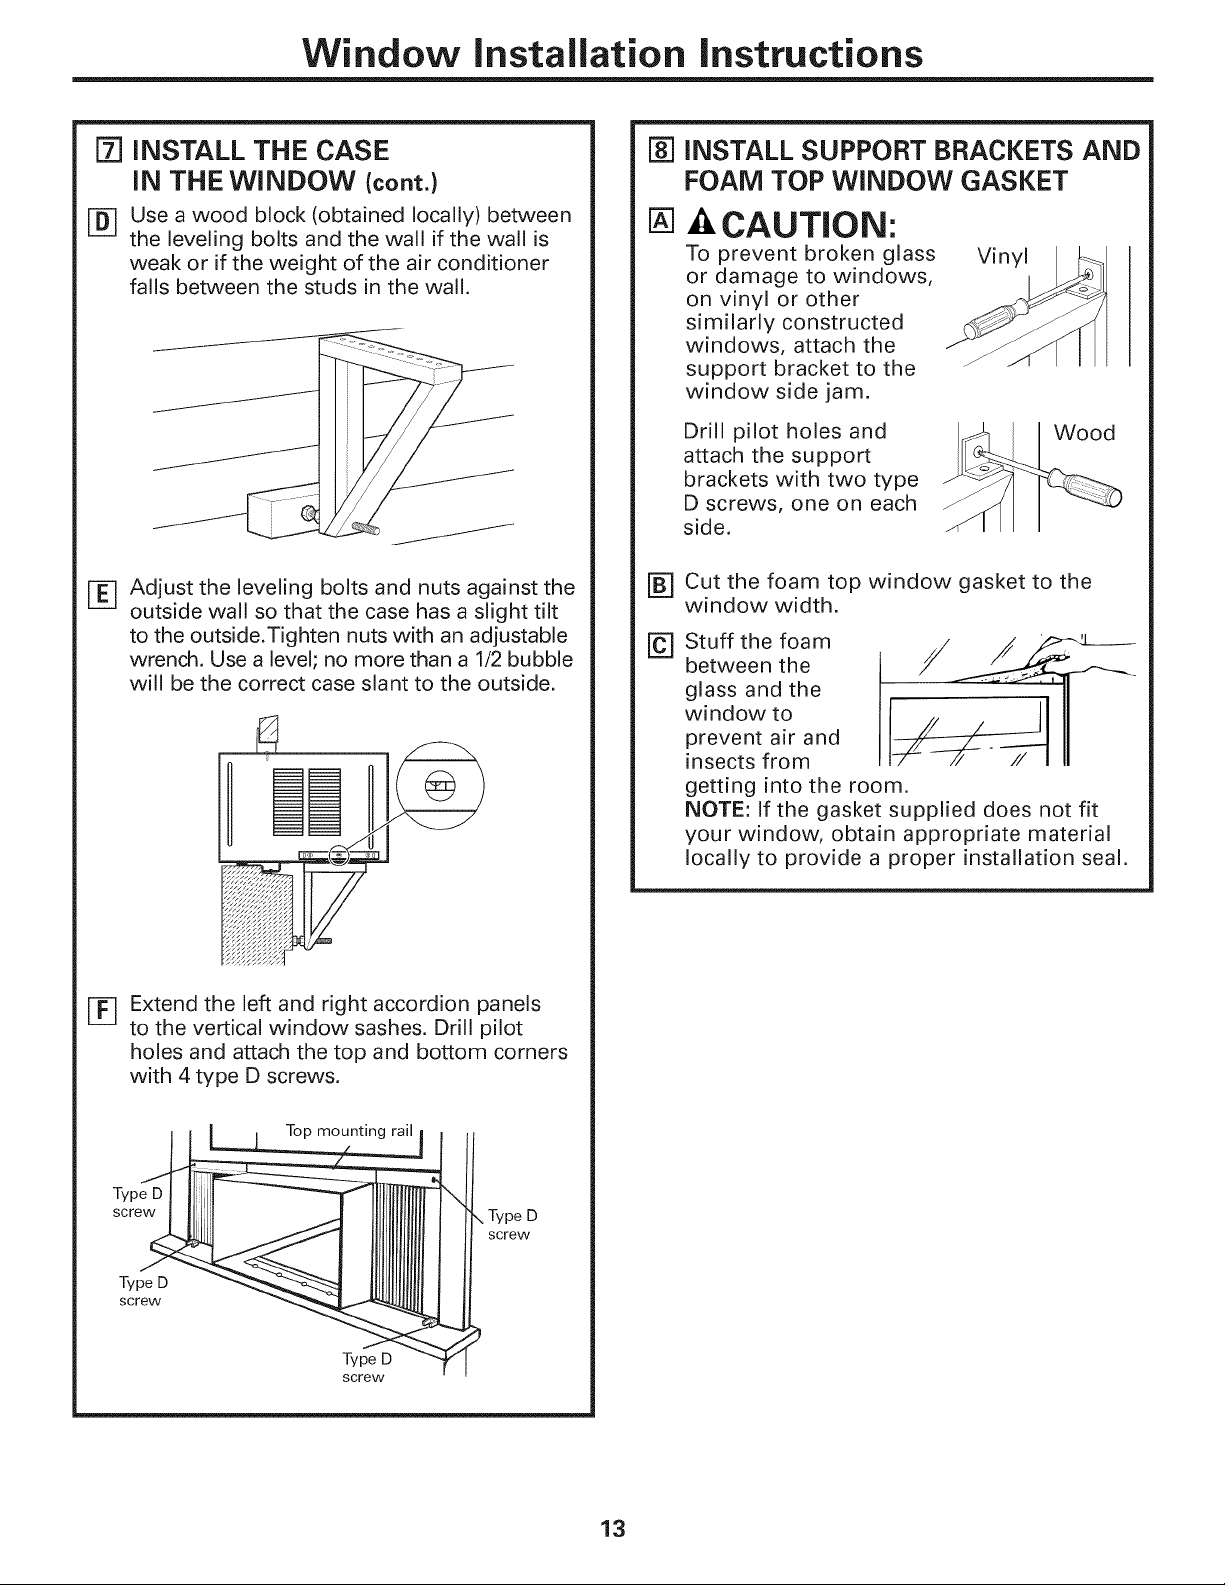
[] INSTALL THE CASE
iN THE WINDOW (cont.)
[] Use a wood block (obtained locally) between
the leveling bolts and the wall if the wall is
weak or if the weight of the air conditioner
falls between the studs in the wall.
I-_ Adjust the leveling bolts and nuts against the
outside wall so that the case has a slight tilt
to the outside.Tighten nuts with an adjustable
wrench. Use a level; no more than a 1/2 bubble
will be the correct case slant to the outside.
F_ INSTALL SUPPORT BRACKETS AND
FOAM TOP WINDOW GASKET
@
-&CAUTION:
To prevent broken glass
or damage to windows,
on vinyl or other
similarly constructed
windows, attach the
support bracket to the
window side jam.
Drill pilot holes and
attach the support
brackets with two type
D screws, one on each
side.
Cut the foam top window gasket to the
[]
window width.
Stuff the foam
@
between the
glass and the
window to
prevent air and
insects from
getting into the room.
NOTE: If the gasket supplied does not fit
your window, obtain appropriate material
locally to provide a proper installation seal.
Vinyl
F_ Extend the left and right accordion panels
to the vertical window sashes. Drill pilot
holes and attach the top and bottom corners
with 4 type D screws.
Top mounting rail
Type D
screw
Type D
screw
Type D
screw
Type D
screw
13
Page 14

Window Installation instructions
[] iNSTALL THE AiR CONDiTiONER
iN THE CASE
I-_ Make sure the ground
wire is off to the side
and slide the air _ii
conditioner into the :_
case. Do not push
on the controls or the
finned coils. Make
sure the air
conditioner is
firmly seated.
[_ Reinstall the locking bracket and screw
removed earlier.
Reconnect the ground wire to the air
conditioner using the screw removed earlier.
IMPORTANT: The ground wire must be
reinstalled to ensure a proper ground.
iNSTALL THE AIR CONDITIONER
IN THE CASE (cont.)
Pull the coiled power cord from its shipped
position in the air discharge area. Attach the
front grille frame to the case by inserting the
tabs on the grille frame into the slots
on the front top of the case.
Guide the lever carefully
through the grille frame
as you push it in,
Press the grille frame in around the power
cord on the right side. Secure the grille with
a type F (painted) screw on each side and a
type C screw in the front.
Type F
screw
Press the ground wire against the unit to
prevent it from being pinched when
installing the front grille
Remove the front grille from its box and
®
remove the shipping tape.
Grasp the inlet grille at the bottom corners
%
and pull it forward. Unhook it from its top
hinges and set it aside.
F-_ Using the tab, pull up slightly on the filter
to release it and pull it down and out.
,/
Type F
screw
\
Type C screw
IT] Reinstall the filter.
[] Reinstall the inlet grille. Connect power.
14
Caulk or weather-strip any gaps or openings
to the outside to seal the installation.
Page 15
Through-the-Wall Installation Instructions--Optional
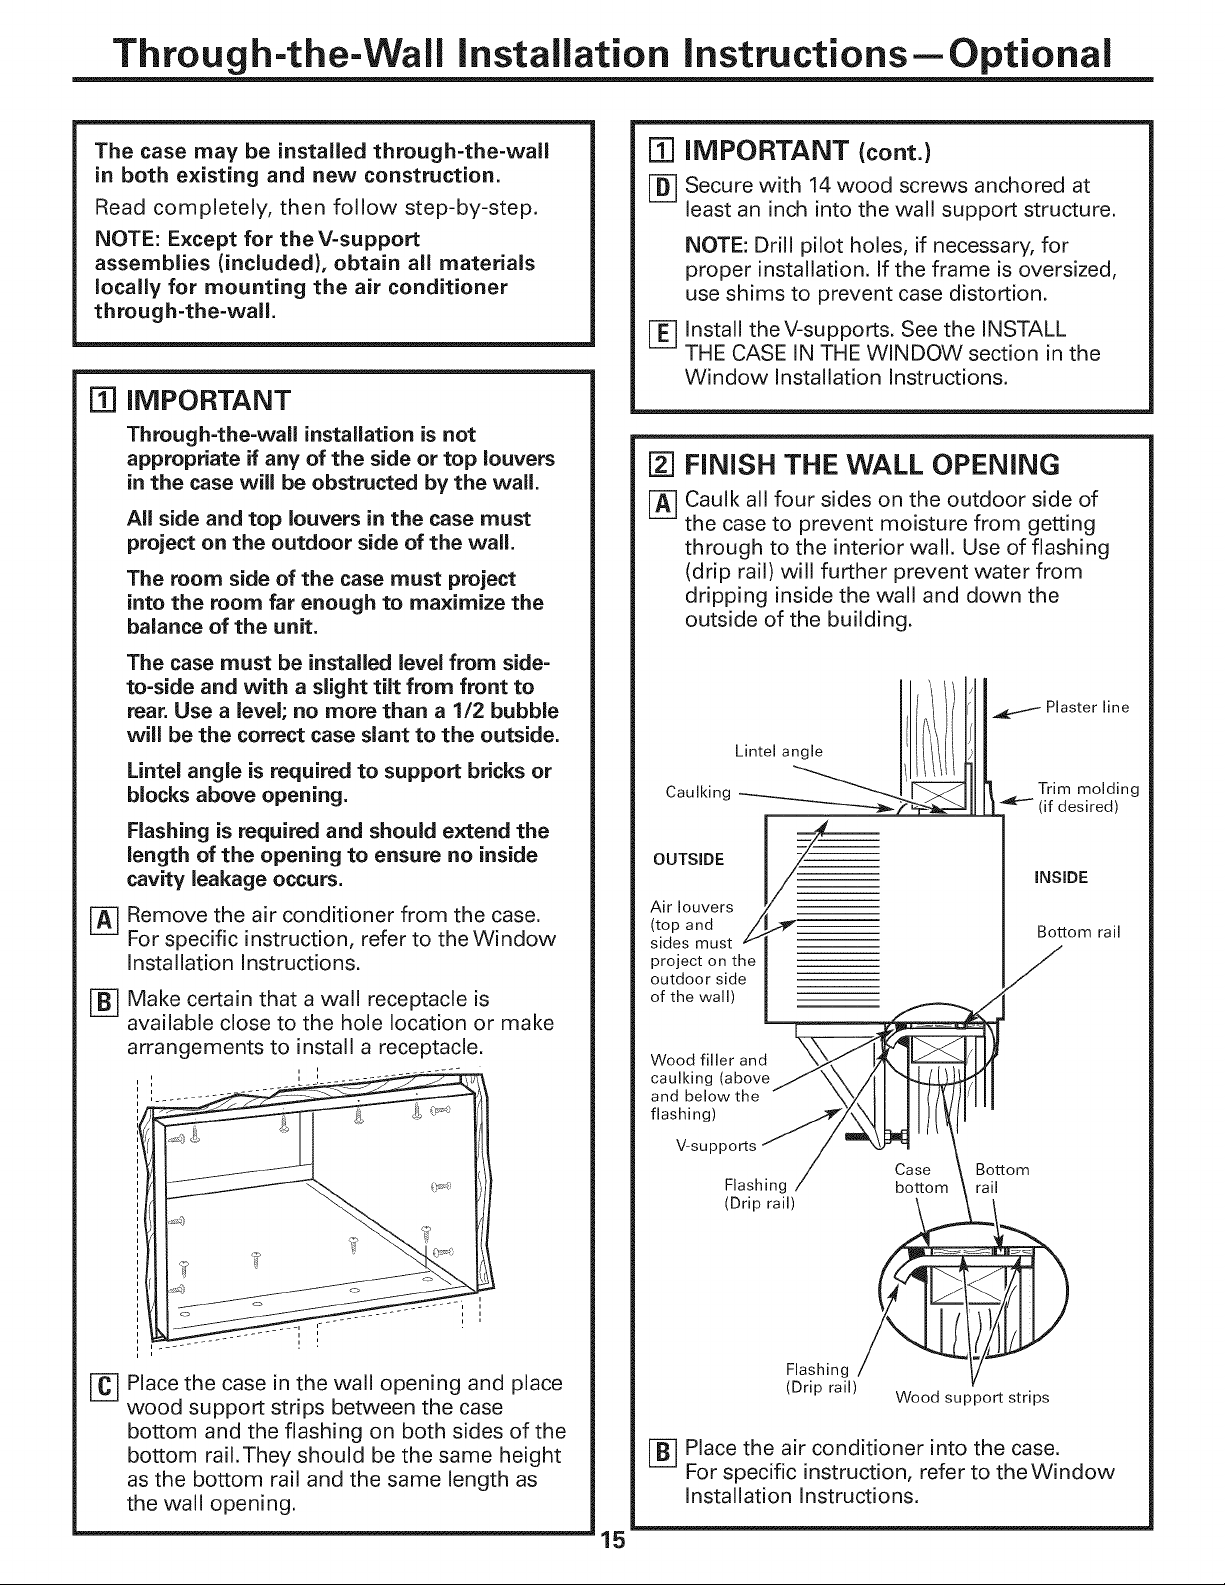
The case may be installed through-the-wall
in both existing and new construction.
Read completely, then follow step-by-step.
NOTE: Except for the V-support
assemblies (included}, obtain all materials
locally for mounting the air conditioner
through-the-wail.
%
IMPORTANT
Through-the-wall installation is not
appropriate if any of the side or top louvers
in the case will be obstructed by the wail.
All side and top louvers in the case must
project on the outdoor side of the wall.
The room side of the case must project
into the room far enough to maximize the
balance of the unit.
The case must be installed level from side-
to-side and with a slight tilt from front to
rear. Use a level; no more than a 1/2 bubble
will be the correct case slant to the outside.
[T] IMPORTANT (cont.)
F-B--1Secure with 14 wood screws anchored at
L---,J
least an inch into the wall support structure.
NOTE: Drill pilot holes, if necessary, for
proper installation. If the frame is oversized,
use shims to prevent case distortion.
I-_ Install the V-supports. See the INSTALL
THE CASE IN THE WINDOW section in the
Window Installation Instructions.
[] FINISH THE WALL OPENING
F-A-] Caulk all four sides on the outdoor side of
the case to prevent moisture from getting
through to the interior wall. Use of flashing
(drip rail) will further prevent water from
dripping inside the wall and down the
outside of the building.
Lintel angle is required to support bricks or
blocks above opening.
Flashing is required and should extend the
length of the opening to ensure no inside
cavity leakage occurs.
Remove the air conditioner from the case.
%
For specific instruction, refer to the Window
Installation Instructions.
Make certain that a wall receptacle is
available close to the hole location or make
arrangements to install a receptacle.
?
Trim molding
(if desired)
Wood filler and
caulking (above
and below the
flashing)
V-supports
Case Bottom
Flashing bottom rail
(Drip rail)
[] Place the case in the wall opening and place
wood support strips between the case
bottom and the flashing on both sides of the
bottom rail.They should be the same height
as the bottom rail and the same length as
the wall opening.
Flashing
(Drip rail)
F_ Place the air conditioner into the case.
I'--I
For specific instruction, refer to the Window
Installation Instructions.
Wood support strips
15
Page 16
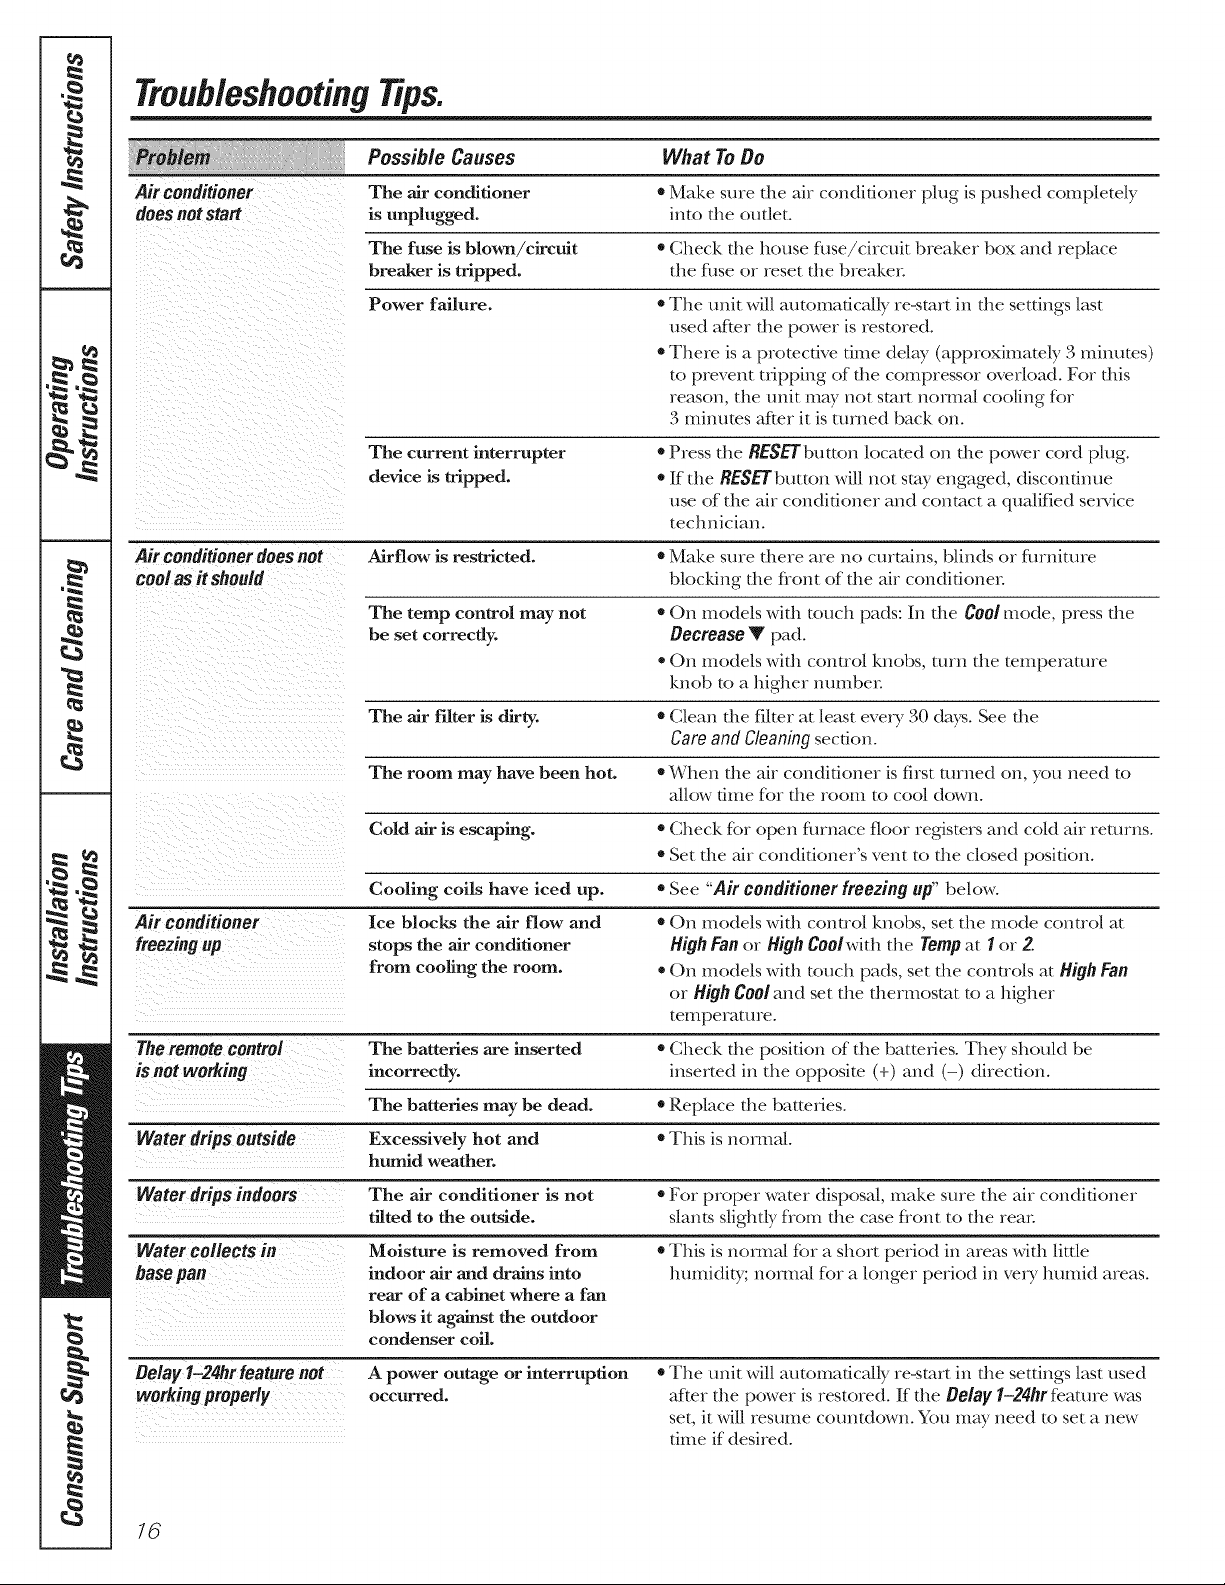
TroubleshootingTips.
Possible Causes What ToDo
Airconditioner The air conditioner • Make sure tile ah conditioner plug is pushed completely
does not start is unplugged, hm_die outlet.
The fuse is blown/circuit • Check file house filse/circuit breaker box and replace
breaker is tripped, the fllse or reset tile breake/:
Power failure. *The unit will auton/adca/ly re-start ill file settings last
used after the power is restored.
• There is a protective time del W (approximately 3 minutes)
to prevent tlipping of the conlpressor overload. For this
reason, tile unit mW not start nomla/coofing for
3 minutes after it is turned back on.
The current interrupter *Press tile RESEYbutton located on tile power cord plug.
device is tripped. *If tlle RESErbutton will not stay engaged, discontinue
use of tlle air conditioner and contact a qualified service
technician.
Air conditioner does not Airflow is restricted. *Make sure there are no curtains, blinds or fllrnimre
cool as it should blocking tile flont of tile air condifionel:
The temp control may not *On models with touch pads: Ill the Cool mode, press the
be set correctly. Decrease V pad.
=On models wkh control knobs, turn tile temperature
knob to a higher numbe/:
The air filter is dirty. *Clean tile filter at least evelT 30 days. See tile
Careand Cleaningsection.
The room may have been hot. * When tile air conditioner is first turned on, you need to
aUow time for tile roon/to cool down.
Cold air is escaping. * Check for open fllrnace floor registers and coM air returns.
• Set tile air conditioner's vent to tile closed position.
Cooling coils have iced up. * See "Air conditioner freezing up" below.
Air conditioner Ice blocks the air flow and *On models with control knobs, set tile mode control at
freezing up stops the air conditioner High Fanor High Coolwith tile Temp at 1 or 2.
from cooling the room. * On models with touch pads, set the controls at High Fan
or High Cool and set tile dlermosmt to a higher
temperature.
The remote control The batteries are inserted
is not working incorrectly.
The batteries may be dead.
Water drips outside Excessively hot and
humid weather.
* Check file position of the batteries. They should be
inserted in tlle opposite (+) and (-) direction.
* Replace tile batteries.
* This is normal.
Water drips indoors The air conditioner is not * For proper water disposal, make sure the air conditioner
tilted to the outside, slants slightly flom tile case flont to the rear
Water collects in
basepan
Moisture is removed from
indoor air and drains into
*This is hernial if>ia short period ill areas with little
humidity; hernial for a longer period ill veIT humid areas.
rear of a cabinet where a fan
blows it against the outdoor
condenser coil.
Delay 1-24hrfeaturenot
workingproperly
16
A power outage or interruption
occurred.
*The unit will automatically re-start ill tile settings last used
after the power is restored. If tile Delay 1-24hrfe.amre w_ks
set, it will resume countdown. You may need to set a new
time if desired.
Page 17
Please place in envelope and mail to:
Veuillez mettre dans une enveloppe et envoyez _:
OWNERSHIPREGJSTRATJOH
P.O. BOX1780
MISSJSSAUGA,OHTARJO
L4Y4G1
(FORCAHADJAHCOHSUMERSOHLY)
17
Page 18
For Canadian
Customers
Pour les
Consommateurs
Canadiens
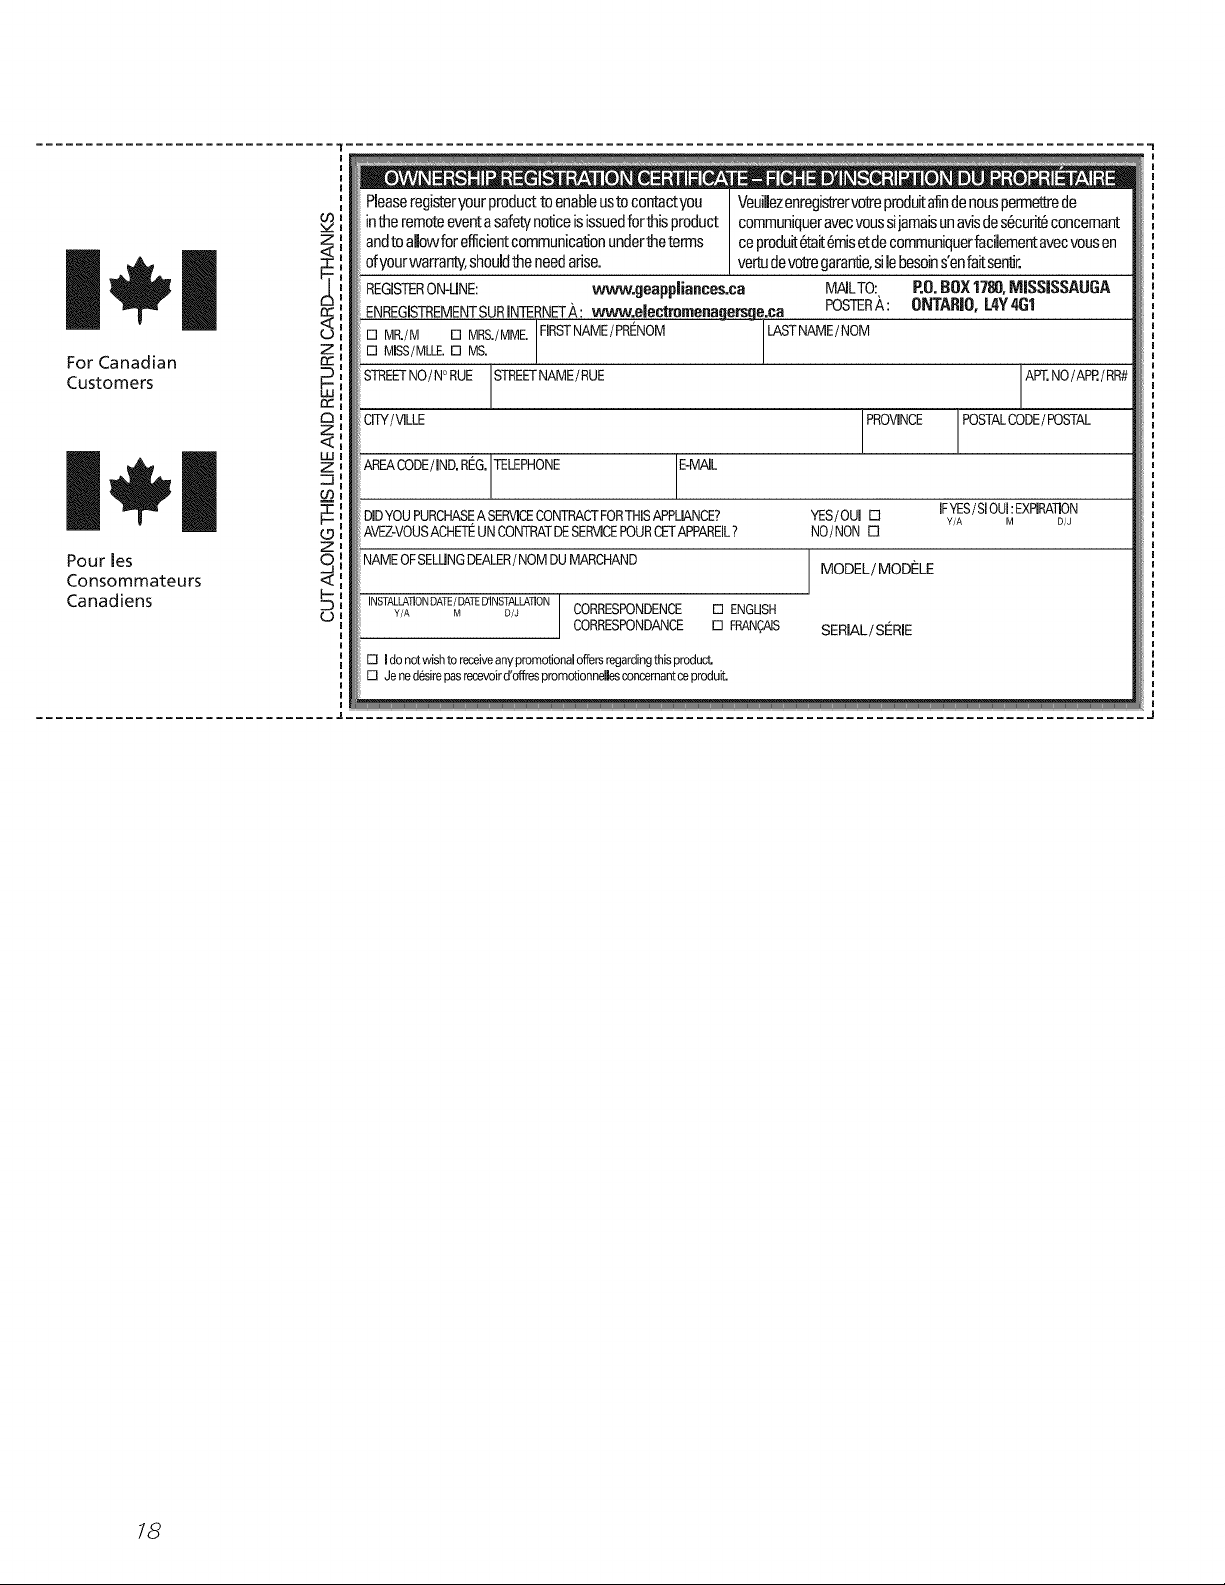
Pleaseregisteryourproducttoenableustocontactyou Veuillezenregistrervotreproduitafindenouspermettrede
in the remote event a safety notice is issued for this product communiquer avec vous sijamais un avis desOcur_ concemant
and to allow for efficient communication under the terms ce produit _ait _mis et de communiquer facilement avec vous en
of your warranty, should the need arise, vertu devo1_egarardJe,si le besoin s'en fair senlJr.
REGISTERON-UNE: www.geappliances.ca MAILTO: P.O.BOX1780,MISSISSAUGA
ENREGISTREMENTSURINTERNET,&,: www, ele_ramenage_sge,ca POSTERA: ONTARIO,L4Y401
Z
[][] MISS/MLLE.MR'/M[][] Ns.MRS'/MNE"FIRSTNAME/PRENOM LASTNAME/NOM
rr
STREETNO/N° RUE STREETNAME/RUE
rr
C_
CITY/VlLLE
w
Z
J
E OOOE,,NOREOIT LEPHONE
co
DIDYOUPURCHASEASERVICECONTRACTFORTHISAPPLIANCE?
AVEZ-VOUSACHETt_UN CONTRATDESERVICEPOURCETAPPAREIL?
0
Z
C
NAMEOF SELUNGDEALER/NOM DU MARCHAND MODEL/MODELE
b
INSTALLA_ONDATE/DATED'INS_ALLA]ION
©
Y/A M D/J CORRESPONDENCE [] ENGUSH
CORRESPONDANCE [] FRAN_AIS SERIAL/SERIE
[] Ido notwishto receiveanypromotionaloffersregardingthisproduct.
[] Jenedesirepasrecevoird'offrespromotionneHesconcemantceproduit.
PROVINCE POSTALCODE/POSTAL
YES/OUI [] IFYES/ SIOUhEXPIRATION
NO/NON D
Y/A M D/J
APT.NO/APP./ RR#
18
Page 19

GEAir Conditioner--One- YearLimitedWarranty.(Foro,stozer,i, theU.S.AJ
Aft warranty service provided by our Factory Service Centers,
or an authorized Customer Care_ technician, To schedule service
visit us on-fine at ge,com, or carl 800,GE,CARES (800,4322737),
Have serial number and model number available when calling
for service,
GE Will Replace:
one
Fromthedateof the
erigina!purchase
Service trips to your home to teach you how to
use the product.
Improper installation, delivery or maintenance. If you
have an installation problem, or if the air conditioner
is of improper cooling capacity for the intended use,
contact your dealer or installer. You are responsible
for providing adequate electrical connecting facilities.
Failure of the product resulting from modifications to
the product or due to unreasonable use including failure
to provide reasonable and necessary maintenance.
In commercial locations, labor necessary to move the
unit to a location where it is accessible for service
by an individual technician.
Any part of the ah conditioner which fhils due to a def;ect m materials or workmanship.
During this limited one-year warranty, GE will also provide, free of charge,all labor and related
service to replace the defective part.
Staple your receipt here.
Proof of the original purchase
date is needed to obtain service
under the warranty.
Replacement of house fuses or resetting of circuit
breakers.
Failure due to corrosion on models not corrosinn-
protected.
Damage to the product caused by improper power supply
voltage, accident, fire, floods or acts of God.
Incidental or consequential damage caused by possible
defects with this air conditioner.
Damage caused after delivery.
EXCLUSION OF/MPLIEB WARRANTIES--Your sole and exclusive remedy is product repair as provided in this
Limited Warranty. Any implied warranties, including the implied warranties of merchantability or fitness for a
particular purpose, are limited to one year or the shortest period allowed by law.
This warranty is extended to the original purchaser and any succeeding owner for products purchased for home
use within the USA, If the product is located in an area where service by a GEAuthorized Servicer is not available,
you may be responsible for a trip charge or you may be required to bring the product to an Authorized GEService
location for service. In Alaska, the warranty excludes the cost of shipping or service calls to your home,
Some states do not allow the exclusion or limitation of incidental or consequential damages, This warranty gives
you specific legal rights, and you may also have other rights which vary from state to state, To know what your
legal rights are, consult your local or state consumer affairs office or your state's Attorney General,
Warrantor: General Electric Company. Louisville, KY 40225
19
Page 20

GEAir Conditioner--One- YearLimitedWarranty.(Foroustoze inCanada)
Aft warranty service provided by our Factory Service Centers,
or an authorized Customer Care_ technician. For service, carl
1.800,561.3344.Please have serial number and model number
available when calling for service.
Mabe Will Replace:
OneYear
Fromthedate ofthe
originalpurchase
Service trips to your home to teach you how to
use the product.
}_Improper installation, delivery or maintenance. If you
have an installation problem, or if the air conditioner
is of improper cooling capacity for the intended use,
contact your dealer or installer. You are responsible
for providing adequate electrical connecting facilities.
Failure of the product resulting from modifications to
the product or due to unreasonable use including failure
to provide reasonable and necessary maintenance.
In commercial locations, labor necessary to move the
unit to a location where it is accessible for service
by an individual technician.
Anypartof file ah conditioner which fidls due to a defect in materials or workmanship.
During fills limitedone-yearwarranty,Mabe will also provide, freeof charge,all lal)or and related
service to replace the defe.ctive part.
Staple your receipt here.
Proof of the original purchase
date is needed to obtain service
under the warranty.
Replacement of house fuses or resetting of circuit
breakers.
Failure due to corrosion on models not corrosinn-
protected.
Damage to the product caused by improper power supply
voltage, accident, fire, floods or acts of God.
Incidental or consequential damage caused by possible
defects with this air conditioner.
Damage caused after delivery.
EXCLUSION OFIMPLIEB WARRANTIES--Your sole and exclusive remedy is preduct repair as provided in this
Limited Warranty.Any implied warranties, including the implied warranties of merchantability or fitness for a
particular purpose, are limited to one year or the shortest period allowed by law.
This warranty is extended to the original purchaser and any succeeding owner for products purchased in Canada
for home use within Canada. In-home warranty service will be provided in areas where # is available and deemed
reasonable by Mabe to provide.
Some provinces do not allow the exclusion or limitation of incidental or consequential damages, so the above exclusion
may not apply to you. This warranty gives you specific legal rights, and you may also have other rights which vary from
province to province. To know what your legal rights are in your province, consult your local or provincial consumer
affairs office.
Warrantor:Mabe Canadainc.,
Burlington, Ontario
2O
Page 21

Consignes de s&_ritF ............ 22, 23
Consignes d 'utilisation
Commandes supplF.mentaires .......... 27
Bruits normaux de fl)nctionnement ..... 27
Modales dotO.s de boutons
de commande ................... 26, 27
Mod&les dotO.s touches
it eftleurement ................... 24, 25
Entretien et nettoyage
Filtre it air .......................... 28
Retrait du cadre de la grille ........... 28
Serpentins Ext4rieurs ................ 28
Instructions de montage ........... 29-35
Conseils de dFpannage .............. 36
Service & la clientOle
Service it la clientele .................. 40
Garantie ............................ 39
Enregistrement du titre
de propriO.tO. ..................... 37, 38
AEE23
AEHI 8"
AEH25*
AEM IS *
AEM25*
AEQ24
AEWI 8 '_
AE W25 *
* Produits
]lomo][ogu_s ENERGY STAR ®
ENERGYSTAR
En rant que partenalre d'ENERGY STAR ®,
GE a d&ermin_ que ce produit &ait
conforme aux exigences d'efIicacit_
&_erg&ique d'ENERGY STAR ®.
/nscrivezici les numerosdemode/e etde s&ie :
IVumerodemode/e:
/VumerodeSerie :
Vous trouverez ces nmn&os sur ]'_tiquette
appos_e sur le c6t_ du climatiseur.
Au Canada, visitez-nous au •
www.electromenagersge.ca
21
Page 22

F F
/MPORTANTESCONS/GNESBESECUR/TE.
VEU/UEZt/RE TOUTESLESCONS/GNESAVANTUT/USAT/ON.
!
m
Pour votre s#curit#, les informafions contenues dans ce manuel doivent #tre suivies afin de minimiser
les risques d'incendie, de chocs filectriques ou deblessures corporefles.
CONSIGNESDESE-CUfllTE
}}N'utilisez cet appareil qu'aux fins pr&_ms }}
d_crites dans le mamml d'udlisadon.
iii}i}i
Ce climatiseur dolt _tre correctement
install_ corffbrm_ment aux Instructions
d'Installadon infant toute udlisadon.
iii}i}}li_
Ne d_branchezjamais votre climadseur en
iii}i}i
drant sur le cordon d'a|imentadon. Prenez
toqjours refinement la fiche en main et drez
pour la sordr de la prise.
iii}i}}li_
Remplacez imm&liamment tout cordon
iii}i}}li_
_lectrique us_ ou endommag_. Un cordon
d'alimentadon endommag_ dolt atre
remplac_ par un nouveau cordon
d'alimentation obmnu &l fhbricant. Ne
iii}i}}li_
r@arez pas le cordon endommagd. N'udlisez
pas un cordon fissur4 ou pr4sentant des
dommages &_saux ffottements soit sur
sa longueur ou aux extr_mit_s &l c6t_
de la fiche ou &l raccord.
Si la prise de courant est d'un tbrmat
dirt>rent de la fiche, cette prise dolt _tre
chang_e par un _lectricien qualifi_.
Eteignez votre climatiseur et d_branchez-le
m,'ant d'effecmer des r@aradons ou de le
nettoyer.
REMARQUE: Nousvousrecommandonsde faire
effectuer la maintenancepar untechnicienqualifi_.
Pour votre sdcuritd, ne stockez pas et
n'udlisez pas de matdriaux combustibles,
d'essence ou d'autres vapeurs et liquides
inflammables dans les parages de cet
appareil ou de rout autre appareil.
Tousles climadseurs contiennent des fluides
fligorigbnes qui, corfformdment, itla
l_slation t_d&ale doivent Otre redr_s avant
la mise au rebut de l'appareil. Si vous mettez
au rebus un ancien appareil contenant des
fluides frigorigbnes, v&ifiez la procd&lre it
suivre aupras de la compagnie responsable
de l'41iminadon.
22
BRANCHEMENTSELECT.RIOUES
Ne coupez pas ou n'enlevez pas, sous aucun
pr#texte, la troisi#me broche de mise _ la terre
du cordon d'alimentafion. Pour des raisons
de s#curit#, cet appareil dolt gtre correctement
mis _ la terre.
N'utilisez PAS d'adaptateur avec cet appareil.
Le cordon d'alimentadon de cet appareil
est _quip_ d'une fiche it trois broches (pour
une mise it la terre) qui s'adapm a la prise
de courant standard it 3 broches (pour une
mise it la terre) pour minimiser les risques
de chocs _lectriques par cet appareil.
Le cordon d'alimentadon est _quip_ d'un
dispositif d'intermpdon du courant. Un
bouton d'essai et de r_enclenchement est
fi)urni sur le boider de la prise. Vous devez
roster le mdcanisme rdguli_rement en
appuyant d'abord sur le bouton rest(Ess.i)
puis sur le bouton RESET(R_enclenchement)
lorsque l'appareil est branch,. Si le bouton
TEST(Ess.i)ne bascule pas ou si le bouton
RESET(Rdenclenchement) ne reste pas
enclenchd, cessez d'utiliser votre dimadseur
et appelez un technicien de ser_,ice qualifid.
Faites vdrifier la prise murale et le circuit
dlectrique par un dlectricien qualifid pour
s'assurer que le systbme est correctement
mis it la terre.
Dans le cas d'une prise biphasde,
l'installateur a la responsabilitd et l'obligadon
de la remplacer par une prise triphasde
correctement mise it la terre.
Le climatiseur dolt toujours _tre branchd
it sa propre prise dlectrique d'une mnsion
nominale correspondant it celle indiqude
sur sa plaque signalddque.
Ceci permet d'obtenir un meilleur rendement
du climafiseur et &ite de surcharger les circuits
dlectriques du domicile qui risque
d'occasionner un incendie en surchmNant.
Consultez les Consignes d'lnstallations, dans
la secdon Exigences Electriques pour les
exigences de branchements dlectriques
pardculiers.
Page 23

www.electromenagersge.ca
_A VERTISSEMENT!
UTILISATIONOEflALLONGES
MISEENGARDE:
N'UT/USEZ PAS de ra/Ionge avec un mod#/e
230/208 Volts.
LISEZETSUIVEZSOIGNEUSEMENTCESCONS/GNESOESECUfllTE.
CONSERVEZCESiNSTRUCTiONS
23
Page 24

P proposdescommandesduc/imatiseur
mode/esdotesdetouchesa effleurement.
Les tfimoins lumineux _ cOtfi des touches _ effleurement sur le tableau de commandes du climatiseur indiquent
les r@lages sfilectionn#s.
L'6cranaffichetoujoursla temp6rature Programmationde la temperatureoudu delai
delapi6cesaufIorsquevousprogrammez
latemp6ratureoulaminuterie.
Le temoin lumineuxindiquequela minuterieest programmee
C0mmandesduCJimatiseur
Commandes
Les commandes de dimatiseur sent situdes derriere la
porte du Ltblem/de commandes. Appuyez pour ouwir
et fermer la porte.
NOTE:La t_l_comntande uavaiHera avec la porte du
tablem/de commande ouverte ou fortune.
O ouched'a/imentation
Met le climatiseur en position de marche
ou d'arrOt. L'_ccan afliche la temp&atme
de la piOcelorsque l'appmeil est ntis en tnarche.
O ffichage
A#iche la temp&amre de la piece on le/crops
cesLmt avant la raise en marche o,d]'arrOt de
l'appareiL M_iche ]a temp&amce de r_glage ]ors
de ]a progranm_ation de ]a temp&ature pour ]es
modes Cool (refloidissen)ent) on EnergySaver
(ecop.omie d'energie). Le t&noin ]umineux Set
(progranm_5) s'allun)e lots du cSdage.
REMRROUE:[.'&ran atfi&era ]a temp&amre
de ]a pi&ce;t]a fin des r_glages. Pour rappeler
la mmp&amre c_gl_e, appuyez sur les touches
Temp Increase(m/gmemation temp&atuce) A
Oil Decrease (r_duction de ]a temp&atme) V.
O ouchesTempIncrease(Augmentationtemp&ature)A
/Decrease(Reductiondelatemp&atum)T
Sontuti]is_espour programmer la temp&ature
dans les modes Coolou EnergySaver.Le t&noin
Mmineux Set s'alh,me lots du r_glage.
O TouchesDelay 7_merIncrease(augmentationdu
delai)A (+)/Decrease(Diminutiondudelai)V (-)
Chaque lois que vous effleurez les to,robes
Increase A / Decrease Y sur ]'appareil ou les
touches Increase ÷/ Decrease - de ]a
t_l_commande, vousprogrammez la dm_e
du d&fi lots de l'utilisation de la minumrie Delay
1-24hr(d_lai de 1-24h) @. Le t&noin h/mineux
Set s'aliume lots du c_giage.
O ouchesde vitesseduventilateur
Sent utilis_es pore r_glec lavitesse du _entilateur
de l'appareil sin LOw(fidble), Med (moyenne),
High(elev_e) on Auto (auton_aique). REMAROUE:
Sur la t_l&(>mmmMe, udlisez les tot,ches
Increase + / Decrease - pore r_gler la vitesse
(It, venfi]ateur sur Low, Meg,ou High.
Ufilisezla touche Auto pour alh_mer
24
le ventilateur en mode Auto.
Let0moin indique queI'appareil est en mode
0%lai 1-24hr
O Reduction , Augmentationdu delai
dudelai [
O Selection , Marche/Arr_t automatique
du mode du ventilateur
Reductionde mentationde la vitesse
O la vitesse du du ventilateur
ventilateur de
Augmentation I'appareil ON/OFF
etReductionde (marche/arrSt)
latemp0rature
programmee Tel6c0mmande
ToucheMode
O
Est utilis_e [)our programmer le dimatiseur sur
les modes Cool, EnergySaverouFanOnly
(ventilateur uniquement).
TouchesdeOelai
0
DelayON(d#laidemise enmarehe)---l_orsque
le climatisem est _teint, il peut &tceprogcamm6
pour d&narrec mm>matiquen_ent dans un d_lai
de l {t24 hemes {tses c_gtages pr_c6dents
(mode, vitesse du ventiiatem).
DelayOFF(dolaid'arrOt)---l_orsquele climafiseur
est en fonc/ionnement, il peut _tre programm(:
pc>ms'mr_ter automatiquement dans un d_lM
de l _'t24 hemes.
Commentleprogrammer:
Appuyez sur la totmhe Delay 1-24hr(D_lai de 1
?t24 hemes) de l'apparei] ou sin"la *(roche O
de la t_l_commande. Chaque lois que vous
effleurez les touches Increase A / Decrease
sin l'appareil ou les touches Increase+ /
Decrease - de la t_l_commande, vous
programmez la dm_e du d_lai par intervalle
de l heme. Le t&noin h_mineux Sets'alh_me
lots du r_dage.
Pore connai'tre ]e temps cestant sur ]a mitre*erie
Delay 1-24hr,app,gez st**la *(roche Delay 1-24hr
de Fapparei] ou sur ]a totmhe @ de ]a
t_l_commande. Utifisez ]es touches Increase A /
DecreaseV sur l'appareil ou les t(mches Increase
+/ Decrease - de la t_l_commande pour
programmer un nouveau d_lai si n_cessaire.
Pourannuletlaminuterie, appuyez sur la touche
Delayf-24hrjusqu';t ce que le voyant lumineux
sur la touche Delay 1-24hrs'_teigne.
O ToucheCIRCULAIRE
Ac/i_ezcette_bnction pour une circulation
d'air en continue d'un c6t_;t Fautre.
Pour une direction fixe de Fair d'un c6t_ ?t
Fm_tce,activez cet/e fonction jusqu'?t ce que
la direction d&irSe de Fair soit obtenue puis
d&activez-la.
Page 25

www.e/ectromenagersge.ca
Ne faites pasfonctionnervotre appami/ Iorsqueles temp&atumsext&ieures sent
en dessousde 0 °C(32 %
Ce climatiseuF floid seul n'est pas con(u pouF
f()nctionner avec des temp&atmes ext&iemes en
dessous de 0 °C (32 °F). I1 ne dolt pas _tre utilis_
Mode Cool (refroidissement)
Udlisez le mode Cool (tefloidissement) avecla vitesse
du ventilateuF s/it Low (f:aible), Med (moyenne),
High (elev_e) on Auto (m/tc)matique) pore refloidir
Appuyez s/it les touches TempeFatute Increase
(atlgmenmtion de la temp&atme) & / Decrease
(diminution de la temp&au/Fe) V pout pFogFammer
la temp&aU/Fe souhait6e entre 18 °C et 30 °C
(64 et 86 °F) pay incv&nems de 0,5 °C (1 °F).
Un thetmosmt _lecuonique pemlet de mainmnit la
mmp&auue de la pi0.ce. Le comptessem se met en
tamdie et s'mT0.te _tinmtvalles t_guliers pout maintenit
la [etnp_tatute de la pi&ce _tun niveau de cotlf}.)tt
choisi. Rdglez le themlosmt ;'tune valeut pills basse et
l'ait mnbiant se Fefioidita. R_glez le thetmosmt _tune
valeur plus _le%e et l'air mnbiant se r&hmd_fbra.
Mode Energy Saver (economie d_nergie)
Contr61e le venfilatem
ON (activ#.)--Le venfilatem se met en ntaFche et
s'att_te en m_t/le romps que le compressem- Ceci
permet une pills gtande vatiafion de la temp&ature et
d//[at/x d'humidit_ darts la pi0.ce. Est en g&l&al utilis_
lorsque la piece est inoccup_e.
lorsque les temp&atmes ext&iemes sent en dessous
de 0°C (32°F).
REMARQUE:$//eclircafiseur_teintestaflurc_alorsqu'ilest
prograrcrc_surunr_glageCoo/ousivouspassezd'unmode
Ventilation_unmodedeRefroidissercent,il faudraenviron
3rcinutespourquelecorcpresseurserercetteenmarcheet
recorcrcence_refroidir.
DescriptionsduRefmidissement
Pourun RefroidissementNormal- S_lectionnezle mode
Coolavec lavitesse du ventilatem s/it Medou High
et un r_glage _ttitle temp&aUue moyenne.
Pourun RefmidissementMaximal-- S_]ectionnez
le mode Coolavec]avitesse du ventilatem s/it Highet
un t_glage _tune temp&aU/te plus basse.
Pourun RefmidissementplusSilencieuxouDurantlaNuit
-- S_lectionnez le mode Coolavecla vitesse du
ventilatem s/it LOWet un r_glage _'tune temp&atme
tlloyenne.
REMARQUE:Levenfilateurpeutcontinuer_foncfionner
quelquesinstantsapresquelecorcpresseursesoitarr_tg
OFF(desacti@)_l_eventilatem foncdonne en condnu,
a|ots que le comptesse/u se met en mardie et s'att_te
_'tinterv;dles r_gulievs.
Mode Fan Only (ventilateur uniquement)
Ufilisez le mode FanOnly avec une vitesse de
ventilateuF t_gl_e s/it LOW, Med ou HighpouF f:ahe
circuler l'air et le filtreF sans le tefioidit'. Etant donn_
que le mode Fan Onlyne permet pas de
reficfidissement, le t_glage de la temp&amFe n'affidte
pas. La temp&ature de la piece s'affiche _tl'&ran.
REMARQUE:Lavitesse de venfilatem ram) ne peut _tre
utilisSe lorsque le climatisem est s/it le mode FanOnly.
Auto Fan Speed (vitesse du ventilateur auto)
R_glezlavitesse&t _endlateur sur auto pour que
lavimssedu x_ndlamur se r_gle amomatiquentent _lla
vimssen&essaire ;l l'obmndon des r_glages appormnt un
niveau de con%rt optimal _lla mmp&'ature progt'anmt_e.
Sila pi&cedemande un tef_oidissement suppl&nenmite,
lavimssedu xendlamur augmenm autontadquenmnt. Si
lapi&cedemande moins de ref_oidissement, lavimssedu
_endlamur diminue autontadquentent.
REMARQUE: Lavitessedevenfilateurautonepeut_treufilis_e
IorsqueleclircafiseurestsurlemodeFanOnly.
Fonction de conservation des r_.g/ages apres une coupure de courant
En cas de panne on d'intemlption de comant,
l'appateil Fed&narte aummatiquement apt&
F_tal)lissement de l'alimenmtion _lectrique et censerre
les demievs r_glages utilis&. Si la fonction Delay 1-24hr
(D_lai de 1 fi 24 hemes) _mit utilis_e, l'appareil
reprend son compm ixFeboms. Vous muez peut-_tre
besoin de programmer une nouvelle heme.
T_./_.commande
PouF vous aSS/IFeF d'un l_}_nc/lOllllell/ellt COFFect,
poinmz la t61_commande versle r6cepmur de signal
&_climafiseun
Lc ivty(md'action de la/61_commande s%mndjusqu'fi
6,4 m (20 pieds).
Assurcz-vousqu'aucun obstacle pouvant bloquer
le signal ne se trouve entre le climatiseur et
la tOl_commande.
Assurcz-vousque les piles sent rOcentcset correc/cment
ins/all_es dens la/_l_commande.
25
Page 26

A proposdescommandosdu climatiseur--
modelesdotesde boutonsde commando.
Los fonctions et I'aspect peuvent varlet.
Commandes
10 COMMANDES
DUMODE
(surcertainesmodeles)
Ned _' t '\ _} Low
Cool *_ *Fan
I,es commandes de climatiseur sent situEes derriere la porte du tableau de
commandes. Appu?ez pour omrir et _elmer la porte.
O Commandosdumode
I,es rEglages High Cool(Fort retioktissement), Med Cool
(Rcfloidissement Moyen) et LowCool(P.efloidissenleilt fidble)
tournissent des refloidissements _ des vitesses (tifl_rentes pour le
ventilateur
I,es rEglag_s du ventilamur permettent aussi de filtrer et de fidre
circuler l'air sans le reli'oidir
REMAflOUE:g vouspassezd'unmodederefroidissementsurArrgtou9unmode
deventilatinn,attendezaumains3minutesavantderepasser9unmodede
refroidissement
Descriptions duRefroidissement
Pourun refroidissementNorma/--SElectioimez High Coolou Med Coolavec
un rEglag'e sill"une temp&amre mmenne
PourunrefroidissementMaximal_SElectionnez HighCoolavec un rEglage
de la temp&ature sial"le chifli'e le plus dlev&
PourunRefroidissementplusSilencieuxouDorantlaNuit--SElectionnezle
mode LOWCoolaxecun rEglage sial"une temp&'ature mo_enne.
MODE
OFF
High • High
Cob_Fo n
Low"
Cool
COMMANDESDE
LATEMPERATURE
Coolest 7
TEMP
(surcertainesmodeles)
6
5
@ Contr_lede/a TEMP
I,e contr#_lede la temperature estutilisEpour maintenir la temp&'ature
dela piece,l,e compiesseur se met ell marche et s'arr_te _'lintervalles
rEgulierspour maintenir lapiece _'_un niveaude confi:lrtconstant.
I,orsquew)us tournez le bouton silk"une_deur plus Elev&,l'air
ambiant serefloidira. I,oisquexous tournez lebouton sur une valour
plus bass< Fair ambiant ser&hauttcra.
O CIRCULAIRE
Mettez le commutateur circulaire sur ON(Marcfle)pour une circulation
d'air ell continue d'un c_StE_l'autre.
Pour une direction fixe de l'air d'un cgtE _'ll'autre, mettez le
commutateur sur ON (Marche)) jusqu'.l ceque la direction d&irEe de
l'air salt obtenue puis basculez le commutateur sial"OFFNrrOt).
CIRCULAiRE
OFF [ _ ON
COMMANDESDE
5 6
LATEMPERATURE
(surcertainesmodeles)
Warmer Cooler
Commandode/a Temp&ature
O
I,es commandes de la temp&'ature sent utilisEespour maintenir
la temp&ature de la piece. Le compresseur semet ell marche et
s'arr&e fiintervalles rEguliers pour maintenir la piece _'lun niveau
de confort constant. Tournez le bouton darts le sons des aiguilles
d'une montre vers Cooler(Plusfroid)(bleu) et l'air ambiant se
refloidira. Tournez le bouton dens le sells inverse des aiguilles
d'une nlontre sur Warmer(Pluschaud)(rouge) et l'air ambiant se
rEchauffbra.
Commandos du Mode
@
Hi Cool (Fortrefroidissement) et tow Cool (Refroidissement bible)
permettent de refloidir _'_des vitesses de ventilation ditt_rentes.
I,es rEglages N Heat(Chauffagefort)et LOWHeat(Chauffagefoible)
permettent de r&haufti_r _'_des vitesses de _entilation (tiffi_rentes.
I,e rEglage Fan Only (Ventilateur uniquement)permet aussi de fidre
circuler l'air et de le filtrer sans le refioidir oule rEchauflcr.
REMARQUE:Si vouspassezd'unmodederefroidissementsurArr_t, 9un
modedeventilationou9 unmodedechauffage,attendezaumoins3 minutes
avantderepasser9unmodedemfroidissement.
Descriptionsdes Modes deRefroidissement
PourunrefroidissemontNormaL-SElectionnezHiCod
(Fortrefroidissement)ou LowCool(RefroidissementFaMe)avccun
i%tage sur one temp&amre moFnne.
26
COMMANDES
@
DUMODE
(surcertainesmodeles)
7(1"ti°°'
Off
Hi ,#, N--_. _. Hi
Lo_\\ I I //Low
Heat _'_.J...__.....// Cool
PourunrefroidissementMaxima_SElectionnez HiCool(Fort
refroidissement)avecle beulah de rEg'lag'ede la temp&'amre
tournE au maximum dans le sons des aiguilles d'une montre.
PourunRefroidissementplus$ilencieuxouDurantlaNuit-4_lecd_,nnez
le mode LowCool(RefroidissementFoible)av< un i%lagesur one
_elnp&aturemoyenne.
Descriptions des modesdechauffage
PourunchauffageNorma/_SElectionnez Hi Heat (Chauffagefort)ou
Low Heat(ChauHagefaihle)avec un rEglage sur une temp&ature
131()_ ellne.
PouronchauffageMaximal_SElectionnez Hi Heat(Chauffagefort)
avec le beulah de rdglage de la temp&'ature tournE an maximum
darts le sons inverse des aiguilles d'une montre.
PourunChauffageplus$ilencieux ou Ourantla Nuit SElectionnez
le mode LOWHeat (ChauHage foible) a\'ec un rEglage sur one
temp&amre moyenne.
Circulaire
@
Mettez lecommue_teur Circubdresial"On(Marche)v_urline drculation d'ab"
elkcondnue d'un cgtE _'ll'auu'c.Pc_urtree dir<tion fixe (leFair d'un c6tE
l'autre, mettcz lecommutatcur s/_ On(MaR:h0)i/tq:lU'_'_ceque la direction
d&ir& & l'air _)it obtcntlc puisbasculez lecorl/illtllSflctlrSill" O_(_n'Ot).
Fan
Only
Circulaire
Off On
Page 27

Commandessupp/ementaires.
Commande d_.vent
La commande d'_vent se trouve au-dessus du
panneau de commande°
Lorsque cette commande est r_gl_e sur CLOSE
(ferme), seul Fair _ l'int_fieur de la piece est
ciimads_ et mis en circulation. Lorsqu'elle est
r4gl4e sur OPEN (ouvert}, de Fair ext4fieur est
admis darts la piece.
Direction de I'air- Vers le haut/vers le has
Une 15gOre pression du bout des doigts sur
les pet_iennes vous perlnet de rSgler la direction
de Fair ve,_ le haut ou vers le bas.
Couvercle du tableau de commande
Pour ouvdr I'6vent, poussez le levier vers la droite,
Pour le fermer, poussez-le vers la gauche,
Appuyez sur le couvercle pour le f0.mler et l'ouvri_:
RE.MARQUE:La t614commande (sur certains
modules) fbncfionne avec le couvercle du tableau
de commande ouvert ou f0.rm_.
Bruitsnormauxde fonctionnement.
Vous pouvez entendre un cliquefis dO _ de
l'eau qui est absorbSe et est prqjet6e contre
le condensamur lesjom_ de pluie oh quand
il y a beaucoup d'humidit6. Cetm caract6risfique
diminue l'humidit6 et amSliore le rendement.
Vous pouvez entendre le claquement du
thermostat quand le compresseur se met en
marche et s'arr&.m.
De l'eau s'amasse darts le plateau du bas pendant
les p&iodes de gmnde humidit4 ou s'il pleut.
Cette eau peut d4border et couler de l'appareil
du c6t_ ext_Jem;
Le venfilateur peut tourner m0_me quand
]e compresseur ne foncfionne pas.
27
Page 28

Entretienet nettoyageduclimatiseur.
Grille et Bo#ier
Eteignez et d_branchez le climatiseur avant tout
nettoyage.
Serpentins Exterieurs
[,es se_]_)enfinssire& du c6t_ ext&iem du
climadsem doivent &ue rSguli&rement @rifiSs. S'ils
sont obstm& par des poussi&res ou de la suie, il est
possible de les fhire nett(ger par des profe.ssionnels.
Filtre a Air
Le filtre Z_ah deni_re la grille flonta/e dolt _tre
v&'ifi_ et nettoy_ au bout de 30jours de
fbncdonnement ou plus souvent si n_cessaire.
Pourretirerle filtre:
[_ Ouvrez la grille (t'enu_e vers le haut en tirant
sur le bas de cette grille.
Pore le netto_er, utilisez de l'eau et un d_tergent
doux. N'utilisez pas d'eau de Javel on de nettoyants
abrasifk
28
_-]A l'aide de la languette, tirez 15g&rement le
filtre vers le haut pour le lib&er puis tirez-le
vers le bas.
Amapez la languette sur le filue et drez-la ve,_
le bas pour redrer le filtre. M/SEENGAROE:Nfraises
fonctionnerleclimatiseursanslefiltresouspeinedele
boucheravecdelapoussbreetdelacharpieetderMuire
sonefficacitd.
Retrait du Cadre de ia Grille (si n#cessaire pour le nettoyage desserpentins)
Retirez le filtre {tair R_f>rez-vous {_la secdon Filtro
Air ci<tessus. Redrez les vis de fixations de la grille
si le climadseur en est _quip&
Amapez les deux coins int>riems de la grille tout
en appuyant sur les cGt_s du logement avec le bout
des doigts. Thez ve_ vous pour lib&er la grille puis
sormz-la en levant.
REMARQUE: Aletirezpaslebordinfdrieurversvous
deplusde3poouvousrisquezd'endommagerleslanguettes
delagrille.
Comment ins&er les Piles dans ia Telecommande
F_] Retirez le couvercle du logement des piles
en le fhisant glisser darts le sens indiqu5 par
la fl&che.
REMARQUES:
}_Udlisez 2 piles alcalines _ d' 1,5 Volt.
N'utilisez pas de piles rechargeables.
_-] Ins&ez les nouvelles piles en vous assurant que
les p61es (+) et (-) de la pile sont orientSs darts
la bonne direction.
FS] Remettez le couvercle en le faisant glisser
}_ Redrez les piles de la tS15commande si vous
pr&'oyez de ne p_s ufiliser voue climadseur
pendant un certain temps.
Page 29

I structi
Cli tis r
ntage
I F_ Questions? Composez le 1.800.561.3344 ou visitez notre site web a •www.electromenagersge.ca j
AVANT DE COMMENCER
Lisez ces instructions entierement et
attentivement.
• iMPORTANT - Conservezces
instructions pour I'inspecteur electrique local.
• iMPORTANT - Respecteztousles
codes et reglements en vigueur.
• Remarque pour I'installateur - Assurez-vous
de remettre ces instructions au client.
• Remarque pour le client - Conservez ces
instructions pour toute ref6rence future.
• Niveau de competence - Einstallation de cet
appareil demande des connaissances de base
en mecanlque.
• Belai d'e×ecution - Environ 1 heure
• Nous recommandons que I'installation de ce
produit soit effectuee par deux personnes.
• Einstallateur est responsable de I'installation
correcte de I'appareil.
• La panne de !'appareil due a une mauvaise
installation nest pas couverte par la garantie.
• Vous DEVEZ utiliser toutes les pieces
fournies et suivre les procedures correctes
d installation decrites dans cette notice lots
de I'installation de ce climatiseur.
- MISE EN GARDE :
Ne coupez pas ou n'enlevez pas, sous aucun
prete×te, la troisieme broche de raise a la
terre du cordon d'alimentation.
Ne changez pas la fiche du cordon
d'alimentation du climatiseur.
Un c_blage en aluminium du domicile peut
occasionner des problemes particuliers--
consultez un electricien qualifi&
OUTILLAGE NI_CESSAIRES
Tournevis cruciforme Phillips
CI6 _ molette
Tournevis _ t&te plate
R_gle ou m&tre
Crayon
EXIGENCES i_LECTRIQUES
La fiche triphasee avec terre reduit le risque de
choc electrigue. Si la prise murale que vous
envisagez d utiliser est biphasee, vous avez la
responsabilite et I'obligation de la remplacer par
une prise triphasee correctement mise a la terre.
Certains modeles n@essitent une prise
©
@
mise a la terre de 230/208Volts AC,
prot6gee par un fusible a action differ6e ou
par un disjoncteur. Ces modeles doivent
_tre instal|es sur leur propre circuit deriv6
pour @iter de surcharger les circuits
_lectriques du domicile ,qui peut
occasionner un risque d mcendie par
surchauffe des cables.
29
Niveau
Le cordon d'alimentation est equip6 d'un dispositif
d'interruption du courant. Un bouton d'essai et
de reenclenchement est fourni sur le bo_tier de
la prise. Vous devez tester le m@anisme
regulierement en appuyant d'abord sur
le bouton TEST (Essai) puis sur le bouton RESET
(Reenclenchement) Iorsque I'appareil est branch&
Si le bouton TEST (Essai) ne bascule pas ou si le
bouton RESET (Reenclenchement) ne reste pas
enclenche, cessez d'utiliser votre climatiseur et
appelez un technicien de service qualifi&
Ciseaux ou couteau
Page 30

instructions de montage darts une fen_tre
Pli_CES INCLUES
(L'aspect peut varier)
Panneau en
accord6on
gauche
Joint d'6tanch6it6 de la fen6tre
guillotine (fin, adh6sif au dos)
Joint d'6tanch6it6 sup6rieur __
Rail .de:mm°ni_i: de Is fen6tre ___
superleur
Support en V (2)
I
Ferrure de
verrouillage de
la fen6tre (2)
Type A (6) Type B (4) Type C (7)
Boulons (2) et 6crous (2)
Type D (6)
Panneau en
accord6on
droit
Bande d_
du rail de .montage __
superleur
Type E (4) Type F (2)
?
y
30
Page 31

instructions de montage darts une fen tre
I_] iNSTRUCTION RELATIVEA LA
FENETRE
Ces instructions sont valables pour une fen_tre
standard a guillotine a deux ch&ssismobiles. Vous
devrez modifier les instructions pour les autres
types de fen_tres.
• Le climatiseur peut 8tre installe sansles panneaux
en accordeons si la fen_tre est etroite. Ref6rez-vous
aux dimensions de lafen_tre indiquees dans le
croquis a droite.
• Toute laferrure de montage dolt _tre solidement
fixee au bois, a la magonnerie ou au metal.
• La prise d'alimentation electrique dolt se trouver
portee du cordon d'alimentation.
• Suivez les dimensions indiquees pour votre modele
dans letableau et sur le croquis.
[ I
B====8
18po rain.
_ 41po
(Aveclespanneaux
30 po L_
en accord6on)
i_ m _
I I
F_ FIXATION DE LA BANDE
D'i_TANCHEITi_ DU RAIL
DE MONTAGE SUPi_RIEUR
Retirezla pellicule de la bande d'6tanch6ite du rail de
montage superieur et apposezcette bande d'etanch6it6
sur le basdu rail demontage superieur, lelong du bord
avant.
Railde montagesup6rieur
pellicule de
la bande
_ etirez la
VUE FRONTALE montage
d'6tanch@it@
Railde
sup6rieur
]
/
Bande
d'6tanch_it6
I_1INSTRUCTIONS RELATIVE A LA
CONTRE-FENETRE
Le cadre de la contre-fen_tre emp6che le
climatiseur de pencher vers I'exterieur, et donc de
se drainer correctement. Pour regler ce probleme,
fixez un morceau de bois au rebord de la fen_tre.
MORCEAU DE BOB
LARGEUR: 2 po
LONGUEUR : Suffisamment long pour se Ioger
I'interieur du cadre de la fen_tre.
CPAISSEUR: Pour determiner I'epaisseur, placez un
morceau de bois sur le rebord de la fenStre de
fagon a ce que le morceau de bois soit 1/2po plus
elev6 que le dessus du cadre de la contre-fen_tre
ou du cadre en vinyle.
Fixezsolidement a I'aide de vis ou de clous fournis
par I'installateur. 1/2po plus 61ev6 que le cadre en
vinyle (sur certaines fen6tres)
1 L "_ Bois
/2 po plus 61ev6 ___ -
que le cadre de T rl rJJ )_ _J/.I
lacontre-fen_tre _ ReborI_' "d[_
Candteed:_at_ e _ Cadre'envinyle I I
R-] RETRAIT DU CLIMATISEUR
DE SON LOGEMENT
I-A-I Retirez les vis et les ferrures de verrouillage du
cadre inferieur. Mettez-les de c6te pour les
reinstaller plus tard.
I-B-I Retirez la vis de mise a la terre et mettez-la de
c6te pour la reinstaller plus tard.
'_x,,x Retirez la vis de mise @la
mettez-la de c6t@pour la r@installer
plus tard
I-_ Sortez le climatiseur de son Iogement en le
faisant glisser et en attrapant la poignee du
conteneur de fond et en tirant vers vous tout en
maintenant le Iogement.
terre et
31
Page 32

instructions de montage darts une fen tre
F5] PRI::PARATION DE LA FENETRE
Decoupez le joint de la fen@re
guillotine a la largeur de la fen@re et
collez le c6te adhesif sur le bas du cadre.
Joint d'6tanch_it6 de
la fen&tre _ guillotine
[_ PREPARATION DU LOGEMENT
Installez le rail de montage superieur avec
[_ 4 vis de type B de I'interieur du Iogement.
171INSTALLATION DU LOGENIENT
DANS LA FENETRE
Fakes delicatement glisser le Iogement dans
%
la fen@re et centrez-le. Abaissez la fen@re
derriere le rail de montage superieur.Tirez
le bas du Iogement vers I'avant de fagon
ce que le rail de montage inferieur soit
plaque contre I'arriere du rebord de la
fen@re. Fixez le Iogement au rebord de
la fen@re en utilisant 4 vis de type E.
Percez des trous de guidage si necessaire.
L_.Z __J
Rebord
Inserez les cadres pour les panneaux en
accordeon dans le rail de montage sup@ieur
et dans les guides du cadre inf@ieur. Fixez
les panneaux en accordeon sur les c6tes du
Iogement a I'aide de 3 vis de type A de
chaque c6t&
Remarque : Lorsque vous fixez les panneaux
en accordeon, assurez-vous de ne visser que
les panneaux interieurs aux c6tes du
Iogement.
Rail de montage sup_rieur
Assurez-vous que les boulons et les ecrous
soient compl@ement enfonces dans les deux
supports en V gauche et droit.
Boulon et ec,__
Positionnez les supports en V sur le fond du
Iogement pour qu'ils soient proches du mur
exterieur. Fixez les supports en V sur le fond
du Iogement, de chaque c6te, a I'aide de
3 vis de type C de chaque c6t&
Vis de
Type A
Suppo_ en V
Rail de montage inf_rieur
32
Page 33

instructions de montage darts une fen tre
[] iNSTALLATiON DU LOGEMENT
DANS LA FENETRE {suite)
[] Utilisez une piece de bois (obtenue
Iocalement) entre les boulons de mise de
niveau et lemur si le mur West pas solide
ou si le poids du climatiseur se trouve entre
deux clous dans le mur.
I-_ A!ustez les boulons et les ecrous de mise de
nweau contre lemur exterieur de fagon a ce
que le Iogement soit legerement incline vers
I'exterieur. Resserrez les boulons a I'aide
d'une cle a molette. Utilisez un niveau,
environ 1/2 bulle donnera la pente correcte
vers I'exterieur.
[] iNSTALLATION DE FERRURES
DE SUPPORT ET DU JOINT
D'i_TANCHEITE SUPERIEUR
EN MOUSSE DE LA FEN[ETRE
[] AMISE EN GARDE
Pour preventez la verre
brisez dans les fen6tres,
attachez une ferrure de
support a la c6te du
fen6tre.
Percez les trous de
guidage et fixez la
ferrure de support
I'aide d'une vis de type
D, une de chaque c6te.
[]
Decoupez le joint d'etancheite superieur en
mousse a la largeur de la fen6tre.
Inserez la mousse
entre la vitre et la
fen6tre pour
emp6cher I'air et
les insectes de
penetrer dans la
piece.
NOTE : Si le joint d'etancheite fourni ne
s'adapte pas a votre fen6tre, procurez-vous
Iocalement I'article approprie afin
d'obtenir une etancheite adequate de
I'installation.
=
=
Vinyle
Bois
F-_ Etirez les panneaux en accordeons gauche
et droit jusqu au cadre vertical de la fen_tre
guillotine. Percez des trous de guidage et
fixez les coins superieurs et inferieurs a I'aide
de vis de type D.
Rail de montage
sup6rieur I
Vis de
type D
Vis de
type D
Vis de
type D
Vis de
type D
33
Page 34

Instructionsde montage dartsune fen tre
[] INSTALLATION DU CLIMATISEUR
DANS SON LOGEMENT
Assurez-vous que le fil
%
de mise a la terre est
place sur le c6te
et faites glisser le
climatiseur dans son
Iogement. N'appuyez
pas sur les commandes
ni sur les serpentins
ailettes. Assurez-vous
que le climatiseur est
correctement positionne.
J-B-] Reinstallez la ferrure de verrouillage et la vis
retiree plus t6t.
Rebranchez le fil de mise a la terre au
climatiseur a I'aide de la vis retiree plus t6t.
IMPORTANT • Le {il de raise a la teEe dolt
_tre remis en place pour garantir une raise
la terre adequate.
NIINSTALLATION DU CLIMATISEUR
DANS SON LOGEMENT {suite)
Tirez le cordon d'alimentation enroule
de sa position d'expedition dans la zone
d'evacuation de Fair, Fixez le cadre de la
grille frontale en inserant les languettes
du cadre de la grille dans les fentes situees
dans la pattie superieure avant du Iogement.
Enfoncez le cadre de la grille autour du cordon
[]
d'alimentation sur le c6te droit. Fixez la grille
avec une vis de type F (peinte) de chaque c6te
et une vis de type C sur le devant.
Vis de
type F
Enfoncez le fil de mise a la terre contre
I'appareil pour I'emp6cher d'6tre pince en
installant la grille frontale.
Retirez la grille frontale de sa boTte
d'emballage et retirez le ruban adhesif utilise
pour I'expedition.
Attrapez la grille frontale par les coins
inferieurs et tirez vers I'avant. Decrochez-la
par ses charnieres superieures et mettez-la
de cSte.
Fg] En utilisant la languette, tirez legerement le
LL_I
filtre vers le haut pour le liberer puis tirez
vers le bas.
Vis de
type F
Vis de type C
Fr ] Reinstallez le filtre.
J-_ Reinstallez la grille d'entree. Branchez
I'alimentation.
/
\
34
Calfeutrez ou garnissez de caoutchouc
d'etanch6it6 tousles interstices ou
ouvertures donnant sur I'exterieur pour
rendre votre installation etanche.
Page 35

Instructionsdemontagepouruneinstallationatraversun mur-En option
Le Iogement peut _tre installe a travers un
tour darts une habitation e×istante ou neuve.
Veui!lez lire entierement ces instructions,
puis les suivre @ape par etape.
REMARQUE : Excepte pour les supports en V
(fournis), veuillez obtenir tous les materiau×
Iocalernent pour I'installation du climatiseur
travers un tour.
N-I IMPORTANT
Une installation atravers un tour West pas
appropriee si une ou plusieursdes persiennessur
le c6te ou sur le dessussont obstruees par lernur.
Toutes les persiennes sur le c6te ou sur le dessus
doivent depasser du c6te exterieur du tour.
Le c6te interieur du Iogement dolt depasser
suffisamrnent dans la piece pour equilibrer
rappareil.
Le Iogement dolt _tre installe de niveau de droite
gauche et legerement penche de I'avant vers
rarriere. Utilisez un niveau, environ 1/2 bulle
donnera la pente correcte vers I'exterieur.
Une corniere de linteau est necessaire pour
rnaintenir les briques ou les blocs au-dessus
de rouverture.
Un solin est necessaire et dolt se prolonger
le long de I'ouverture pour eviter toute fuite
vers I'interieur du tour.
[] IMPORTANT (suite)
[] Fixez le Iogement a I'aide de 14 visa bois ancrees
d'au moins un pouce dans la structure du mur,
REMARQUE • Si necessaire, percez des trous de
guidage pour permettre une installation correcte.
Si le cadre est trop grand, utilisez des cales pour
eviter toute distorsion.
[-_ Installez lessupports enV.Consultez la section
INSTALLATION DU LOGEMENT DANS LA FEN[:TRE
dans les Instruction de Montage dans un fen_tre.
FINITION DE L'OUVERTURE DANS
LE MUR
Calfeutrez les quatre c6tes du c6te ext@ieur
du Iogement pour eviter que I'humidite ne
pen@re par lemur interieur. Lutilisation
d'un solin (rail d'ecoulement) permettra
davantage d'eviter que I'eau ne s'ecoule
dans lemur et le long du mur exterieur.
Couche de
pl_tre
Corniere de linteau
Calfeutrage
EXTC:RIEUR I/--
Moulure
(s'il y a lieu)
INTI_RIEUR
Retirez le climatiseur de son Iogement. Pour
%
des instructions particuli@es, veuillez vous ref@er
aux Instructions de Montage dans une fen@re.
[_] Assurez-vous qu'une prise murale se trouve
proximite de I ouverture ou installez-en une.
[] Positionnez le Iogement dans I'ouverture dans
lemur et placez les bandes de maintien en bois
entre le bas du Iogement et le solin des deux
c6tes du rail inf@ieur. Elles doivent @re de la
m_me hauteur que le rail inf@ieur et de la m_me
Iongueur que I'ouverture dans le mur.
Rail inf_rieur
/
Remplissage des
trous et calfeutrage
(au-dessus et en
dessous du solin)
Supports
Solin (Rail
d'6coulement)
Solin (Rail
d'_coulement) Bande de maintien en bois
I-_ Placez le climatiseur dans le Iogement. Pour
des instructions particulieres, veuillez vous
referer aux Instructions de Montage dans
une fen_tre.
Rail
inf_rieur
35
Page 36

Avantd'appelerle service...
Causespossibles Quefaim
Lec/imatiseurnese Le climatiseur *Assurez-vousque la fiche du climatisem soit bien bcanch(_e
metpas onmarche est ddbrancb& dans laprise mmvtle.
Le fusiblea saut4/ * \_vifiez la boite fifl/sible/;t disjonctems et remplacez le flJsible
le disjoucteur est ouvert, ou rebcanchez le di_onctem:
I1y aune panne de courant. * S'il se produi/nne panne de comvtnt,(Db,>tnchezle climafiseur
en le metmnt en position OFF(anOt). Quand le couvant ,efient,
atten(Dz 3 minutes avant de mmettre en malvhe leclimafisem;
pour &'iterde (Dclencher la smvhar,gedu con_ptessem:
Le mdcanisme d'interruptiou *Appuyezsnr le N)uton RESET(remiseen mmvhe) sire(_sur la fiche
de courant est ddclanch& du cordon (qechique.
• Si le Nmton RESETneresin pas enR)nc6,arr_tez le climatisem
d'air et appelez un technicien qualifi6.
Leclimatisenrne refroidit La circulation d'air est bloqu_e. * Assmez-vonsqu'il n'y a pas de fideau, de s/ore on de meuble
pasautantqu'illedevra# qui bloque le (levant du climatisem:
Le coutr61ede tempdrature *En mode COOL(flais) appuyez sur la touche DECREASEY pad.
n'estpas bieu rdgl& *Sur les modules dot_s de boutons de commandes, tournez le
bouton de temp(_lvtturesur une valem plus (qev(_e.
Le filLreh air est sale. *Nettoyez le ill/re au robins musles 30jom_. Consulter la section
Instructionsdefonctionnement.
La cbambre 6tar cbaude. *Aprbs avoir misen marche le climatisem, attendez que
L'air froids%chappe * \_vifiez les ,grillesfire,gis/rede plancher et les reprises d'air floid.
de lacbambre.
Les serpentins sent gelds. * Consultez "Leclimatiseurd'airgele" ci<lessous.
Leclimatiseur
ge/e
Lateleoommande Les piles ne sont pas insdrdes * \%vifiezla position des piles. Ellesdoivent ins&des de f_tqon_tce
nofonctionnepas correctement, que lesp6les (+) et (-) de la pile soient orient,s dans des
DeI'eaucouleaI'exto'rieur 11far tr_schaud et humide. * C'es/nom_al.
Be/'eau _ule a I'interiew Le climatiseur n'est pas * Pour obtenir une bonne &acuation de l'eau, assurez-vous
Eeaus'amasse dans L'humidit6 est extraite de * C'es/nom_al pendant une p(_viodecourte dans des r_gions
/eplateaudefond Fair de la chambre et passe peu humkles; nom_al pendant des pdvio(tespins longues
La glace bloque la circulation
d'ak et emp_che le dimafiseur
de refroidk la chambre.
Les piles sont peut&tre *Remplacer les piles.
d4chargdes.
incfin_vers l'ext_rieur, que le climatiseur soit l(%brement inclin(_de l'a_vmt
dans le plateau du fond. dans des rdgions trbs humides.
la chambre se refloidisse.
*Sur les modules dot& de boutons de commande, r(_,glezlemode
sm HighFan(Vi/esse du _enfilatem _lev(_e)ou HighCool(Fort
refloidissement) a_ec la mmp&'amre r(_gl_esur 1ou 2.
*Sur les modules dot& de touches _tefl]eurement, r(_glezles
commandes sin HighFan(Vitessedu _enfilateur _lev(_e)ou High
Cool(Fort refioidissement) et r(_glezle them_os/at sin une
temp_catme plus _lev(_e.
directions oppos(_es.
du boitier vers l'arri_re.
LafonctionBelay1-24hr
(OelaideI a24heures)ne
fonctionnepaseorreotement
3_
I1y a une panne ou
une coupure de courant.
*L'appareil re(t&narreca automafiquement ax_c lesdernie_
r(_glagesutilis&lo,_que l'alimenmfion _lectfique seca r(_mblie.
Sila f(mcdon Delay1-24hr(OelaideI a24heures)_mitufilis_e,
l'appmeil reprend son compte ;trebom_. \.bus amez peut-,_tre
besoin de progcammer une nom_lle heme.
Page 37

Please place in envelope and mail to:
Veuillez mettre dans une enveloppe et envoyez _ :
OWNERSHIPREGJSTRATJOH
P.O. BOX1780
MISSJSSAUGA,OHTARJO
L4Y4G1
(FORCAHADJAHCOHSUMERSOHLY)
37
Page 38

For Canadian
Customers
Pour les
Consommateurs
Canadiens
Pleaseregisteryourproducttoenableustocontactyou Veuillezenregistrervotreproduitafindenouspermettrede
in the remote event a safety notice is issued for this product communiquer avec vous sijamais un avis desOcur_ concemant
and to allow for efficient communication under the terms ce produit _ait _mis et de communiquer facilement avec vous en
of your warranty, should the need arise, vertu devo1_egarardJe,si le besoin s'en fair senlJr.
REGISTERON-UNE: www.geappliances.ca MAILTO: P.O.BOX1780,MISSISSAUGA
ENREGISTREMENTSURINTERNET,&,: www, ele_ramenage_sge,ca POSTERA: ONTARIO,L4Y401
Z
[][] MISS/MLLE.MR'/M[][] Ns.MRS'/MNE"FIRSTNAME/PRENOM LASTNAME/NOM
rr
STREETNO/N° RUE STREETNAME/RUE
rr
C_
CITY/VlLLE
w
Z
J
E OOOE,,NOREOIT LEPHONE
co
DIDYOUPURCHASEASERVICECONTRACTFORTHISAPPLIANCE?
AVEZ-VOUSACHETt_UN CONTRATDESERVICEPOURCETAPPAREIL?
0
Z
C
NAMEOF SELUNGDEALER/NOM DU MARCHAND MODEL/MODELE
b
INSTALLA_ONDATE/DATED'INS_ALLA]ION
©
Y/A M D/J CORRESPONDENCE [] ENGUSH
CORRESPONDANCE [] FRAN_AIS SERIAL/SERIE
[] Ido notwishto receiveanypromotionaloffersregardingthisproduct.
[] Jenedesirepasrecevoird'offrespromotionneHesconcemantceproduit.
PROVINCE POSTALCODE/POSTAL
YES/OUI [] IFYES/ SIOUhEXPIRATION
NO/NON D
Y/A M D/J
APT.NO/APP./ RR#
38
Page 39

C/imatiseurGE Garantie LimiMe An.
Les services sous garantie sont dispens#s par nos centres de
r@aration ou par nos r@arateurs Customer Care_ autoris#s.
Pour obtenir le service, appelez le 1.800.561.3344.Veuillez foumir
le num#ro de s#rie et le num#ro de mod#le Iorsque vous appelez
pour obtenir le service.
Nous remp/acemns "
Uneannee
A compterde ladate
d'achat initial
Les d6placements de service & votre maison pour vous
apprendre a utiliser le produit.
Un montage, une livraison ou un entretien
d6ficient. Si vous avez un problbme de montage
ou si le climafiseur n'a pas la bonne capacit6 de
refroidissement pour son usage pr6vu, appelez votre
revendeur ou votre installateur. _Sus &tes respousable
de fournir une installation de raccordement &lectrique
convenable.
Les pannes occasionn6es par des modifications
au produit ou une utilisafion non raisonnable, en
particulier une absence d entretien raisonnable
et n&cessaire.
Toute piP.Ca de le climatiseur manifestlmt un vice de mat_riau ou de fabrication. Dinant cette
p_riode de garantie limit#e d'une annee, Mabe K_mnira aussi, gratuitement, la main-d_oeuvre
et le service de r_parafion connexe pour le remplacement de la piece d_fectueuse.
Agrafez le reGud'achat ici.
Pour obtenir le service sous
garantie, vous devrezfoumir la
preuve deI'achat original.
Le remplacement des fusibles de la maison ou la
r&acfivafion des disj oncteurs.
Les pannes occasionn6es par la corrosion sur les
modules qui ne sont pas prot&g&s contre la corrosion.
Les dommages occasionn_s par un mauvais voltage de
l'alimentafion _lectrique, un accident, un incendie, une
inondafion ou une calamit6 naturelle.
Les dommages indirects et cons6cufifs & la propri&t6
personnelle occasionn&s par des vices possibles de
ce dimafiseur.
Les dommages occasionn&s par la livraison.
Daus les emplacements commerciaux, la main-d'oeuvre
n6cessmre pour d6m6nager l'appareiljusqu'& un
emplacement oh il est accessible par un technicien
parficulier.
EXCLUSIONBE GARANTIES IMPLIC/TES- Votre seul et unique recours est la r#paration duproduit
selon les dispositions de cette Garantie limit#e. Toutesles garanties imp#cites, incluant les garanties
de commercial## et d'ad#quation a tin usage sp#cifique, sont limit#es a une ann#e ou a la p#riode
la plus courte autoris#e par la legislation.
Cette garantie est valable pour le premier propri#taire et tout autre propri#taire @ pro@it s'il achet# au Canada pour
utilisation domestique dans Canada.Le service # domicile sous garantie sera foumi I_ o# il est disponible et dans les
r@ions que Mabe considfire que I'offre de service est raisonnable.
Dans certaines provinces, il est interdit d'exclure ou delimiter les dommages directs ou indirects, fl est alors possible
que les limitations ou exclusions ci-dessus ne s'appliquent pas dans votre ca& La pr#sente garantie vous conffire
des droits juridiques sp#cifiques. Vouspouvez b#n#ficier d'autres droits, qui varient d'une province _ I'autre. Pour
connaTtreles droits dont vous b#n#ficiez dans votre province, communiquez avec le bureau des relations avec les
consommateurs de votre r@ion.
Garant: Mabe Canada inc.,
Burlington, Ontario
39
Page 40

Assistancea/a clientele.
SiteIntemetGE www.electromenagersge.ca
pal Internet au site www.eleetromenagersge.ea 24 heures parjoui; tous lesjoui_ de l'annSe.
Vousavez une question ou vous avez besoin d'aide pour votre appareil 51ecuom&_ager? Contactez-nous
Serviceder_parations
Service de r_parafions GE est tout [)__s de vous.
Pour f_d,e r_parer voue 51ectrom&_ager GE, il suffit de nous tS16phonei-
1.800.561.3344
Studiodeconceptionr_aliste www. electromenagersge, ca
Sur demande, (;E peut fournir une brochuie sur l'am&_agement d'une cuisine pour los pei_onnes
{_mobilit_ r_duite.
Ec,ivez: Directetm Relations avec les consolIlIIlamuis, Mabe Canada Inc.
Bureau 310, 1 Factoi y Lane
Moncton, N.B. E1C 9M3
Prolongationdegarantie www.electromenagersge.ca
Achetez un contrat d'enuetien GE event que vot_e garantie n'expi_e et b&_ficiez (t' un rabais substantiel.
Ainsi le service apr&s-vente GE sera tot{jours 1_apr&s expiration de la garande.
Visitez notre site Web ou appelez-nous au 1.888.261.2133.
Pibceset accessoires
www. electromenagersge, ca
Ceux qui d&irent r6pare_ eux-m&mes leurs &lecuom&lagers peuvent iecevoii pi6ces et accessoires
direcmment {_la maison (carms \qSA, MasmrCmd et Discover accept6es).
Losdirectivesstipulees densle presentmanuelpeuvent_tre e#ectueesparn'impertequelutilisateur.Losautres
reparationsdoiventgeneralement_treeffectueesparun technicienqualifie.Seyezprudent,carune reparation
inadequatepoutaffecterle fenctiennementsecuritaire derappamil.
\fous trouverez dans les pagesjaunes de voue annuaire le num&o du Centre de service Mabe le plus
proche. Autrement, appelez-nous au 1.800.5611.3344.
Contactez-nous
Si vous n'6tes pas safisf_fitdu service apr&_vente dent vous avez b6n6fici6 :
Premi_rement, communiquez avec les gens qui ont r_par_ voue appareil.
EnsuRe, si vous n'_tes toujouIs pas safisf_dt envoyez tousles d&ails--num&o de t_l_phone compris--au
Directetm Relations avec les consolIlIIlamui3, Mabe Canada Inc.
Bureau 310, 1 Factoi T Lane
Moncton, N.B. E1C 9M3
Inscrivezvotreappareildectrom_nager
Inscrivez votre apparei161ectrom6nager en direct, aussitSt que possible. Cela amdliorera nos
communications et noue seevice apr&s-vente. Vous pouvez dgalement nous envoyer pal la poste
le fbmmlahe d'inscriptionjoint _ votre documentation.
www. electromenagersge, ca
www. electromenagersge, ca
40
Page 41

Instruccionesdeseguridad........... 42-43
Instrucciones de operad6n ........... 44-47
Modek)s con teclas t_cfiles ............ 44, 45
Modek)s con botones de control .......... 46
Controles adickmales ................... 47
Sonidos de operaci6n normales ........... 47
Cuidado y limpieza
Bobinas para extefiores ................. 48
Filtro de aire .......................... 48
Remoci6n del armaz6n
de la parrilla ........................... 48
Instrucdones de instalad6n ......... 49-55
Soludonar problemas ................. 57
Setwicio al consumidor
Garantfa .............................. 60
Servicio al consumidor .................. 59
@
co
ea
AEE23
AEHI 8"
AEH25*
AEM l 8"
AEM25*
AEQ24
AEWI 8 '_
AE W25 *
* Producto etiquetado *ENERGY STAR®
ENERGYSTAR
Como socio de ENERGY STAR ®,
(;E ha confirnlado que este
producto cumple las directrices
de ENERGY STAR ® relafivas al
rendimiento energ_fico.
g
ea
Escribalos numerosdemodelo
y serie aqui:
# de Modelo
# de Serie
Puede encontrar estos nfimeros
en tma etiquem en el cosmdo
del acondicionador de aire.
41
Page 42

/NFORMACIONIMPORTANTEBESEGUR/DAD.
LEATODAS/.ASINSTRUCC/ONESANTESBEUSAR.
&iAOVERTENC/A!
Por su seguridad, se debe seguir la informacidn en este manual para minimizar el riesgo de incendios,
descarqas elfictricas o lesiones personales,
PRECAUCIONESDESEGURIDAD
}}Use este electrodomF.sdco solamente para }}
el prop6sito determinado seg_n se describe
en el Manual del propietario.
}}Este acondicionador de aire debe instalarse }}
correctamente de acuerdo con las
Instrucciones de instalaci6n antes de su uso.
iii}i}i
Nunca desenchufe su acondicionador de
aire drando del cable elF.ctrico. Siempre
agarre firmemente el enchufe y tire de
F.1directamente hacia afuera.
iii}i}}li_
Reemplace inmediatamente todos los cables
elF.ctricos que se hayan pelado o que se
hayan dafiado de alguna otra manera.
Un cable de corriente dafiado no debe
repararse, sino que debe ser sustituido por
uno nuevo que se adquiera del fhbricante.
No use un cable elF.ctrico que muestre
ex,idencias de deterioro, o dafios de abrasi6n
en su superficie en alguno de sus extremos.
iii}i}i
iii}i}}li_
Si el receptaculo no coincide con el
enchufe, un electricista calificado debe
reemplazar el receptaculo.
Apague la unidad (OFF)ydesenchufe, el
acondicionador de aire antes de efF.ctuar
reparaciones o la limpieza.
NOTA:Recomendamosenf#ticamenteque
un t#cnicocalificadorealice/asreparaciones.
Por su seguridad...no almacene ni use
materiales combustibles, gasolina u otros
vapores o lfquidos inflamables en la
proximidad de F.steo algSn otro
electrodomF.stico.
Todos los acondick)nadores de aire
contiene refrigerantes, los que por i,ey
Federal deben ser remo_,idos ante.s de
desecharlos. Si usmd planea deshacerse de
alg0n producto que contenga refkigerantes,
p6ngase en contacto con la compafifa que
se encarga de recoger su basura para que
le indiquen quF. hacer.
42
COMOCONECTARLAELECTRICIDAD
Bajo ninguna circunstancia, corte o remueva la
tercera pOa (tierra) del cable el#ctrico, Enpos
de la seguridad personal, este electrodomfistico
debe siempre conectarse a tierra,
NO use un enchufe adaptador con este
e/ectrodom#stico.
E1cable elF.ctrico de este electrodomF.stico esta
equipado con un enchufe de tres pdas (tierra)
que combina con un tomacorrienm estandar
de tres u)mas de pared para minimizar la
posibilidad de una descarga elF.ctrica.
E1cable de alimentaci6n incluye un
dispositivo para inmrmpci6n de corriente.
Se incluye un bot6n de prueba y de reinicio
en el dispositivo. E1dispositivo debe ponerse
a pmeba peri6dicamenm: primero se presiona
el bot6n de rEST (prueba) y luego RESET
(reinicio) mientras se encuentra enchufhdo al
mmacorriente. Si el bot6n TESTno se dispara
o si el bot6n RESETno queda enganchado,
deje de utilizar el acondickmador de aire y
comunfquese con un tF.cnico calificado.
Pida a un tF.cnico que inspeccione el
tomacorriente y el circuito para cerciorarse
de que el tomacorriente esta conectado a
tierra de la manera apropiada.
Donde exista un tomacorriente de dos
tomas, es su responsabilidad y obligaci6n
personal hacer que dicho tomacorriente
sea reemplazado por uno de tres tomas
con conexi6n a tierra.
E1acondicionador de aire deberfa siempre
estar conectado a un tomacorriente indix,idual
con su circuito de volta.je correspondiente.
Esto proporciona el mayor rendimiento y
ademas ex,itaque los circuitos del resto de
la casa se sobrecarguen, lo cual podrfa causar
incendios por el sobrecalentamiento del
cableado.
Ver las Instmcciones de instalaci6n, en la
secci6n Requisitos El_ctricos para los requisitos
especfficos de conexi6n.
Page 43

_e. COrn
iABVER' I
f
USODECABLESDEEXTENSION--Modelosde115voltiossolamente
I
_, PRECAUC/ON:
NO USEun cab/e de extensioncon ninguno
de/os mode/os de 230/208 vo/tios.
LEAYSIGAESTASINSTRUCCIONESDESEGURIDADCUIDADOSAMENTE.
GUARBEESTASINSTRUCCIONES
43
Page 44

Pcerca de loscontro/esen el acondicionador
de aire--Modeios conteclas tacti/es.
Las luces al lade de las teclas de toque en el panel de control del acondicionador de aire indicar#n los ajustes seleccionados.
La pantalla muestra siempre la La luz indicaque la unidadesta en el modede
temperature ambiente, excepto al Ajuste de temperaturao de Tiempo de retardo
configurarla temperaturaUefinida
o elSincronizadorderetardo.
O 1-24 h deretardo
Aumentode sincronizadorde
unidad
Laluz indicaque eltemporizador
de retardoesta configurado
Contr01esdel ac0ndici0nad0rde aire
Contro/es
de retardo retardo
O Selecci6ndemode Encendido/apagado
Reducci6ndevelocidaddel ! ",f&_,/o_p_ ___%.!__._
ventilador [ _,_ r_ _ I : Aumentode velocidad Sol
O Aumentoy reducci6n __ u...........L......__ ventilador
de ajuste de temperatura [ _ [ V Encendido/apagadodela
I ,o__ _o I automa_icod_iwotilador
ControJremote
44
i,os conUoles del acondicionador de aire estfin
ubicados detrds de la puerto del panel de control
Presione para abrir y cermr la puerto
NORA:E1 control remote flmcionar_ con la puerto
del panel de conuol abierm o cermda.
Tecla de Power (Encendido)
O
Apaga y prende el acondicionador de aire.
A1 encende_e, la pantalla mostmr_ la
mmperamm ambiente.
Pantalla
0
Muestra la temperatma ambiente o
el dempo resmnte en el Sincronizador de
remrdo. Muestra la temperature Befinida al
configurar la temperature en los modes Cool
(Frio)o de EnergySaverNhorro deenergia).
La luz de Ajuste se encenderg durante
la configumcidn.
NORA:la panta/la cambim5 para mesaat la
temperature ambiente una vez que se haya
realizado la configmacidn. Pare resfimir la
temperamra Befinida, pulse las teclas de romp
(Temperature) Pumento A o Reduction V.
TeclasdeTempPumentoA/Reduction V
@
Usado pare _{jusmr la temperamra cuando
se encuentre en el mode Cool (Frio)o Energy
Saver (Phorro de energia), ia luz de Pjustese
encender_ dumnm la configmacidn.
reties deSincmnizadorde retardoPumentoA
0
(÷)/Reducci6nV (-)
Coda vez que toque los teclas PumentoA /
Reduction V de la unidad o los teclas Aumento
+/Reduction - en el control IelIlOtO definirfi
el dempo de remrdo al udlizar el Delay 1-24hr
diner (Sincronizador de retardo 1-24 h) (_).
ia ]uz de Ajuste se encenderg durante la
configmacidn.
Tee/as de FanSpeed(Wlocidadde/ventilador)
0
Usado pare _tjusmr la velocidad del vendlador
a tow (Bale), Med (Medio), HLqh(Alto)o Auto
(Automatica) en la unidad. NorA: en el cormel
remote, utilice las teclas Pumento +/ReductiOn
- velocidad de vendlador para @mmr la
velocidad del ventilador en LOW(Bajo},Mad
(Medio) o High (Alto). Udlice la tecla Auto para
acdvar el vendlador automfitico.
recla deMODO
0
Usado pare ;_iusmr el acondicionador de aire
a/mode Cool(Frio),EnergySaver(Ahorrode
energia)o FanOnly (Soloventilador).
Tec/as de Delay (Retardo)
0
Delay ON (ENCEND/BO Retardo)--( ]uando
el acondicionador de aire est;_ apagado,
puede _iusmrse para que se encienda
automfidcamenm denuo de 1 a 24 heros en el
mode y configmacidn de vendlador anterior
Delay OFF (APAGADO Retardo)----( :uando el
acondicionador de aire estfi encendido, puede
_jusmrse pare que se apague automfiticamenm
dentro de 1 a 24 heros.
Comerealizarel ajuste:
Pulse latecla Delay1-24hr (Retardo1-2411)en
la unidad o en la tecla @_del control remote.
Cada toque de los teclas Aumento A /
Reducci6n Ven la unidad o los teclas Aumento
+/Reducci6n - en el control remote definir_
el mmpofizador en inmrva/os de 1 hem.
la luz de A]llste se encenderfi durante
la configumcidn.
Pare revisar el dempo restmKe en el
Nncronizador de retardo 1-24 h, pulse la mcla
de Delay 1-24hr (Retardo 1-24h) en la unidad o
en la tecla @_ del control remote. Udlice los
mclas Aumento A/ReductiOn Yen la unidad
o losteckks Aumento +/Reduction - en el
control remote pare definir un nuevo
dempo, silo desea.
Pare canceler el sincrenizader, pulse la mcla
Delay 1-24hr (Retardo 1-24h) haste flue la luz
de dicho control se apague.
Boron CIRCULAIRE
0
Enci&_da/o pare obtener circulaci6n de aire
condnua de lade a lade.
Para tma direccidn de aire fija de lade a lade,
enci&_dalo hasm obtener la direccidn de aire
deseada y luego ap_iguelo.
Page 45

No use en ias condicionesextemas debajo
el punto decongelacion
Estc acondici(mador de aire no es disefiado paca usar en
mmpemmms exmrnas deb@) el punto de congelacidn.
Mode Cool (/:rio)
go.corn
No use en las condiciones ex/ernas deb@) el punto
de congelacidn.
Use el mode Cool (Friola Low (Bajo), Med (Medio),
High (Alto) o Auto Fan Speed (Ve/ocidad de venti/ador
automatica) para enfliar Use las teclas de
Temperature(remperatura) Aumento A (+1/Reduccion
V (-)para _justar a la temperamra deseada entre
64°F y 86°F en incrementos de I°E
Se usa un temlosmto electrdnico para mantener
la temperature ambienm. E1 compresor har_
ciclo enue apagado y encendido pare mantener
la habimcidn a la mmpemmra deseada. Aj usm el
mrmosmto a tm nfimero menor y el aire inmrno
se enfliarfi m_Ls.N lo _j usm atm nfimero mayoi;
la temperature del rare interne se cMenmrfi mils.
NOra: si elacondicionadorde aire est_apagado}/se
enciendemientras estdconfiguradoen unajuste Cool (Frio)
o si se cambiade unajuste de ventiladora unode Cool
(Frio), puede quepasenaproximadamenteunos 3minutos
hastaque el compresorarranque}/comience el enfriamiento.
Energy SaverMode (Mode deahorm de energia)
Controla el ventilador
ON (ENCENOIOO)--E1 ventilador har_i un cido
de encendido y apagado con el compresor Esm
resulm en variaciones mayores en la mmpemmm
de la habimcidn y en la humedad. Norma/menm
usado cuando la habimcidn no est_i ocupada.
Oescripciones de enfriamiento
Para enfriamiento normaI--Seleccione el mode
Cool (Frio)y ventilador High (Alto) o Med (Medio)
con una temperamra de ;_juste media.
Para enfriamiento maximo--Seleccione el mode
Cool (Frio)y venfilador High (Alto) con una
mmpemmra de _jusm men(m
Para enfriamiento silencioso y enfriamiento nocturne--
Seleccione el mode CO0!(Frio)y ventilador tOW
(Bajo) con una temperamra de ;_juste media.
NO use on/as oendioiones extemas debajo el punto
de congelacion
Este acondicionador de aire no es diseflado para
usar en mmperamras exmrnas deb;_jo el punto de
congelacidn. No use en las condiciones exmrnas
deb;_jo el punto de congelacidn.
NOra: puede que el ventiladorsiga funcionandodurante un
corto tiempodespudsde desactivarseel ciclodel compresor
OFF(APAGADO)_EI ventilador flmciona rode el
fiempo, mienUas que el compresor pasa per los
ciclos de encendido y apagado.
Mode de Fan Only (Solo ventilador)
Use el mode Fan only (Solo ventiladoO a vek, cidad
tow (Baja), Med (Media)(, High (A/ta)pam
proporciomu circulacidn de aire y filtracidn
sin enfliamiento. Debido a que los niveles
de venfilador Onicmnenm no proporcionan
enfliamiento, no se puede inuoducir una
mmpemmm Oefinida. Aparecerfi en
panm/la ]a temperature ambiente.
NOra:/a Velocidaddeventiladorautomdticanopuede
ufilizarseenelmodoFanonly(Soloventilador).
Funcion de recuperation de p&dida de energia
En case de la p&dida de la enetgfa o interrupcidn,
la unidad reiniciard autom_ficamente en las
flmciones de la dlfima vez que fl_e usado tma
vez la energfa sea restablecida. Si la flmcidn del
Control remote
Pare garanfizar una operacidn apropiada, oriente
el control remote hacia el receptor de serial del
acondicionador de aire.
E1 receptor de serial fiene un range mdximo
de 20 pies.
geiocidad de ventilador automMica
Indique la opcidn en Velocidad de ventilador
autom_ifica pare definir automfificamenm la
velocidad necesafia pare proporcionar una
configumcidn de comodidad 6pfima con la
mmpemmra elegida.
Si la habimcidn necesim mils enfliamiento,
la velocidad del venfilador aumenmrd
automfificamente. Si la habimcidn necesim
menos enfliamiento, la velocidad del venfilador
descenderd automfificamente.
NOra: la Velocidadde ventiladorautomdticanopuede
ufilizarseenelmodoFanonly(Soloventilador).
Belay 1-24hr (Retardo 1-24h) estaba definido,
confinuar_ la cuenm regresiva. Es posible que usmd
necesim @1star un fiempo nuevo si asf lo desea.
Cercidrese de que no haya nada enue el
acondicionador de aire y el conuol remote
que pueda bloquear la serial.
Cercidrese de que las bamrf_ks sean flescas
y se insta/en correctamenm segOn se indica
ell el COIl[]'Ol ieIIlO[O.
45
Page 46

Pcerca de loscontrolesen el acondicionador
de aire modeios conbotonesde control
Las funciones y el aspecto pueden verier.
Controles
CONTROL
DEMODO
(enalgunos
modelos)
Ned _J \, '\ _1Low
MODE
OFF
High _ High
Coo_Fa n
t//. oo
Low"
Cool
Los controles del acondick)nador de aire est>hlubicados detr_s de la puerto del
panel de control Presione para _ffwir} cerrm 1>_puerta.
O Contro/de roodo
High Cool(FrioAlto),Med Cool(FrioMedio)_ Low Cool(FrioBale)
proporcionan enfl'iamiento con diibrentes velocidades del ventilador
I,os @lstes del ventilador proporcionan circuladdn de aire y filtracidn
sin enfiian
NOTA:Siust_drouevoel controlderoodedeunnivetfdeaOFF(Apagado)oaun
hive/deventi/ader,esperepor/omenos3minutosantesdeearobiarotraveza unhive/
deenfriamiento.
Descripcionesdeenfriamiento
Paraenfriamientonorroal--SelecdoneHighCool(FrioAlto) o MedCool(/:rioMedia)
con el control de TEMPE[_&TU IL&en el media.
Pareenfriamientom#xiroo---_SeleccioneHighCool(/:rioAlto) con el control de
TEMPE[LkTU IL&en el ndmero m>_vordisponible en su mclado.
Paraenfriamientosilenoiosodumntela noche_eleccione Low Cool(/:rioBale)
con el control de TEMPEI&&TU[_&en el nix'el media.
CONTROLDE
TEMPERATURA
TEMP
(ellalgunosmodelos)
C°°lelt 0
4
ControldeTEMP
E1control de TEMPes us_(to pm'>_mmltener la mmperatura mnbiente. E1
compresor hanl ciclo entre encendkto y _paga(to para manmner el
mismo nive] de tempetamra en la haNtacidn. Cuando usmd gila el bo_dn
hacia un ndmero ma)on el aire interne se enti_ian_mils. Silo @_sma un
nfimero menot; la mmperatm'a del aire interne se calentani m_is.
CIRCULAIRE
una drcuhci6n de aire contim=, de lade alade, accione el
interrupter de Circulaire en ON(encendido).
Para tma direccidn de aire fija de lade a lade, accione el interrupter de
Circuhire en ON (encendido) basra alcanzar la direccidn de aire deseada v
luego (tespl_icelo a OFF(apagado).
CIRCULAJRE
OFF ON
CONTROLDE
TEMPERATURA
(enalgunosmodelos)
Warmer
Controlde teroperatora
0
E1control de temperatura se utiliza para mantener la temperatura de
la habitacidn. E1compresor se encenderfi y apagan; para mantener la
habitacidn con el mismo nivel de contort. Gire la perilla en sentido de
las agujas del rel_!]a Cooler(rodsfrio)(color _zul) y el aire interior seni
m_h flfo. (;ire la perilla en sentido contrario alas agujas del reh!i a
Warmer(rodstibia)(colormio)Yel aire interiorse entibianL
Controlde roodo
0
HiCoolffrioalto)y LowCoolffriobale)bfindan r_fiiger, ci&_ con (]ii_rentes
velocidades de ventihldor.
N Heat(cam alto)y LowHeat (ca/orbale)brindan calefilccidn con
dif_rentes velocidades de ventilador.
[.a configllraci{Sn FanOnly(sOloventiladoOoflvce circulacidn y filt_ode air_
sin refl'igeracidn o calefitccidn.
NON: Siusteddesptazael controldemodedeunaconfiguracl_nfrb a Off
(apagado),unaconflgurac/_)nde venfi/adero deca/efaccl_)n,espereper/omanes
3mbutosantesdecambiaraunaconfigurac/bndefifo.
Oescripcionesderefrigeracbn
Para una refrigeracion norroaI--Seleccione Hi Cool (frioalto) o LowCool
(frio bale)con el control de temperatura en ]a posicidn media.
Paraunarefrigeracionroaxiroa Seleccione N Cool(#io alto)con el control
de temperature gi_a(loen sentido de lasagt!jas del reloj en su posicidn
46
maxima.
5 6
Cooler
CONTROL
DEMODO
(enalgunosmodelos)
ParaunarefrigeracionsilenciosaYnocturna--SeleccioneLowCool(frio
bale)con el control de teml)ernmra en laposMdn media.
Oescripcionesdecalefeccion
Paraonecalefeccionnorroal--Seleccione Hi Heat(caloralto)o LowHeat
(cam bale)con el conuol de temperature en h posicidn media.
Paraonecalefaccionroaxiroa Seleccione HiHeat(cam alto)con el
control de tempenltum gimdo en sentido contmrio alas agujas del reloj
en S/I pOSlClOn inaxlma.
Paraunacalefaccionsilenciosa y nocturna--Seleccione LowHeat(cam
bale)con el control de temI)eramra en la posMdn media.
Circdaire
@
Para una circulacidn de airy continua de lade a lade, accione el
interrupter de Circulaire en On (encendido¢.Para una direccidn de aire tiia
de lade a lade, accione el interrupter de Circulaire en On(encendi_0) hasm
alcanzar la dir_ccidn de aire deseada, luego desplffcelo a Off(apagado).
Hi ,4e/_"_-'-_ %, H[
q'(l
Low\\ I I //Low
Heat _U______// CoN
Fan
Only
Circulaire ]Off _ On
Off
Page 47

Contro/es adiciona/es, g .oo
Control de ventilaci6n
E1control de ventilaci6n se encuentia sob,e
los paneles de conuol.
Cuando se configu_e en CLOSE(cerrado},s61o se
hmd ci_vulm y se acondicionmd el ahe de la
habimci6n. Cuando se configu,e en OPEN(abierto},
un poco de abe exm_io_ ing_esa a la habimci6n.
Direcci6n dei aire - Arriba y abajo
Mediante una p_esi6n de los dedos sobie las
pe_ianas hodzonmles, la diFecci6n del abe puede
;j usm_e en dbecci6n ascendente o descendente.
Puerta del panel de control
P_esione pma ab_i_ o cenm la pue_ta.
NOTA:E1conuol _emoto (en algunos modek_s)
funciona con la pue_m del panel de cont_ol abie_m
o cenada.
Para abrir la ventilaci6n, presione la palanca hacia la
flerecha, Para cerrarla, presi6nela hacia la izquierfla,
Sonidosde operaci6nnorma/es.
Quiz_s escuche un sonido met_ilico causado po_
el agua tomada y fin_da contra el condensado,
en los dfas lluviosos o cuando la humedad es aim.
Esm camcte_fsdca de disefio ayuda a _emove,
la humedad y mejont la eficiencia.
Quizds escuche que el temlosmto hace clic
cuando el comp_eso_ hace cido enue encendido
y apagado.
E1agua se acumula en la bandeja dumnte dfas
lluviosos o con mucha humedad. E1agua po&fa
denama_e y gomm desde el lado exmmo de
la unidad.
}}_E1vendlado_ po&fa fimcionm aun si el compreso_
no lo hace.
47
Page 48

Cuidadoy fimpieza de/acondicionador de aim.
Rejil/a y caja
Apague el acondicionador de ahe y redre el
enclmfe del tomacorfiente de la pared antes
de limpiar
Bobinas para exteriores
Se deben inspeccionar con flecuencia las bobinas
en el lado exterior del acondicionador de aire. Si
las mismas est;hl obstruid_L_ con suciedad u hollfi_,
podrfan limpia_e profe.sionahnenm.
Filtro do aim
E1 filtro de aire detrgs de la rejilla flonml debe
inspeccionarse y limpim_e pot lo menos cada
30 dfas o m_is a menudo si flmse necesario.
Para retirarlo:
Para limpiai; use agua y tm detergente suave.
No use cloro o materiales abrasivos.
48
[-_ Abra la parfilla de entrada hacia arriba
tirando de la parte infe.rior de la misma.
[-_ Utilizando la lengfiem, tire del filuo
ligeramente hacia arfiba para liberaflo
y tire hacia ab_io.
i Jmpie el filuo con agua tibia yjabdn. EI_ju@mlo
y permim que se seque anms de cokmaflo otto vez
en su lugar. No lave el filtro en un lavav@llas.
A PRECAUC/ON:NoOF'fRfe/
acondicionadorde aim sinel filtro debidoa qua la suciedad
y/as pelusas Io obstruirdn y reducirdnsu rendimiento.
Remocion dol armazon de la parrilla (sihiciera falta limpiar los serpentinas)
Quite el filtro de aire. Consuke la seccidn FilFo
de aire de arriba. Si lo lmbiera, quite el tornillo
de st{jecidn del armazdn de la parrilla.
Tome las esquinas inferiores del am_az6n
de la parfilla mienmks presiona hacia adenuo
las lengfietas latera/es con sus dedos. Tire hacia
afimra para liberar y lev_inmlo.
NOTA:Notiredelbordeinferiorhaciaustedrodsde3"
porquepuededafiarlaslengEletasdelaparrilla.
Comoinsertar las pilas en el control remoto
-_ Retire la cubierm de la pila deslizfindola
de acuerdo con la direccidn de la flecha.
Inserte pilas nuexas cerciorfindose de que los
polos positivos (+) y negativos (-) estfin
orientados correctaHlente.
[-_ Cok_que la cubierm otra vez desliz_indola
en su lugar
NOTA&
}i_Use 2 pilas alcalinas "_" de 1,5 voltios.
No use pilas recargables.
Retire las pikLs del control remoto si no _,a
a usar el sistema pot un perfodo prokmgado.
f
Page 49

n
st |
m
st
|
=_ _Preguntas? Llame 800.GE.CARES (800.432.2737) o visite nuestra pagina en la red en: ge.com J
I
Ace i i
[]
e |
ANTES DE INICIAR
(_ REQUISITES ELECTRICOS
Lea estas instrucciones completa ¥
cuidadosamente.
• IMPORTANTE - Goardeestas
instrucciones para uso del inspector local.
• IMPORTANTE - Observetodos
los c6digos y 6rdenes de Jey.
• Nora al instalader- AsegOrese de dejar
estas instrucciones con el consumidor.
• Nora al consumider- Conserve estas
instrucciones para referencia futura.
• Nivel de destreza - La instalaci6n de este
aparato requiere de destrezas mecanicas
basicas.
• Tiempe de ejecuci6n - Aprox. 1 hera
• Recomendamos dos personas para
la instalaci6n de este producto.
• La instalaci6n apropiada es la
responsabilidad del instalador.
• La falla del producto debido a una
instalaci6n inadecuada no esta cubierta
per la garantia.
• Cuando instale este acondicionador
de aire, DEBE usar todas las piezas
suministradas y usar procedimientos
adecuados de instalaci6n come describe
en estas instrucciones.
El enchufe de tres pOas con conexi6n a tierra
minimiza la posibilidad de descargas electricas. Si
el tomacorriente de la pared que usted planea usar
solamente tiene 2 tomas, es su responsabilidad
hacer que un tecnico Io reemplace por uno de tres
tomas con conexi6n a tierra.
AIgunos modelos requieren 230/208
voltios, de corriente alterna, protegidos
por un fusible de dilataci6n de tiempo
o un cortacircuitos. Estos modelos
deberian instalarse en un ramal exclusivo
del circuito para un rendimiento mas
notable y para prevenir sobrecargas en
los circuitos de cableados de su casa o
apartamento, Io cual podria representar
un riesgo de incendio por el
sobrecalentamiento de los alambres.
El cable de alimentaci6n incluye un dispositivo
para interrupci6n de corriente. Se incluye un
boton de prueba y de reinicio en el dispositivo.
El dispositivo debe ponerse a prueba
peri6dicamente: primero se presiona el boton de
TEST (prueba) y luego RESET (reinicio) mientras
se encuentra enchufado al tomacorriente. Si el
boton TEST no se dispara o si el bot6n RESET
no queda enganchado, deje de utilizar el
acondicionador de aire y comuniquese con
un tecnico calificado.
A PRECAUCION:
Bajo ninguna circunstancia certe e remueva
la tercera pfia (cone×i6n a tierra) del cable
electrice.
No cambie el enchufe en el cable electrico
de este acendicienader de aire.
Los cables caseres de alurninio podrian
presentar preblernas especiales. Consulte
a un tecnico electricista calificade.
49
Page 50

Instrucciones de instalaci6n en una ventana
HERRANllENTAS QUE NECESITARA
Un destornillador de estrella
PARTES INCLUIDAS
(Apariencia puede variar}
Panel de
acorde6n
izquierdo
Llave ajustable
Tijeras o cuchilla
Empaque superior de
espuma de la ventana
Riel de montaje
superior
Un destornillador
con hoja plana
Nivel
L_piz
Una regla o cmta m6trica
Sello del marco de la ventana
(fino, con adhesivo
en la parte posterior)
de montaje
superior
Soportes en V (2)
Soporte para bloqueo
de ventana (2)
Tornillo (2) y tuercas (2)
Tipo A (6) Tipo B (4) Tipo C (7)
Y
Panel de
acordeon
derecho
Tipo D (6) Tipo E (4) Tipo F (2)
50
Page 51

Instrucciones de instalaci6n en una ventana
REQUISITOS PARA LA VENTANA
%
®
Estas instrucciones son para una ventana
estandar de dos pliegues. Usted necesitara
modificar el proceso para otros tipos de ventanas.
® El acondicionador de aire puede instalarse sin
los paneles de acorde6n para ajustarse a una
ventana mas estrecha. Vet las dimensiones de
la abertura de la ventana.
®Todas las partes de apoyo deben quedar
totalmente aseguradas a algQn metal,
mamposteda o a la madera.
® El tomacorriente electrico debe estar al alcance
del cable electrico del acondicionador de aire.
30" a 41" (con
paneles de acorde6n)
18" min.
-3
!
121REQUISITOS DE UNA VENTANA
DE TORMENTAS
Un marco de ventana de tormentas no permitira
que el acondicionador de aire se incline hacia el
exterior y evitara que drene apropiadamente. Para
solucionar este problema, adhiera un pedazo de
madera a el umbral.
PEDAZOS DE MADERA
ANCHO: 2"
LONGITUD: Lo suficientemente largo como para
ajustar en el interior del marco de la ventana.
GRUESO: Para determinar el grueso, coloque un
pedazo de madera en el umbral para hacerla 1/2"
mas alta que la parte superior del marco de la
ventana de tormentas o del marco vinilo.
Peguelo firmemente con clavos o con tornillos
proporcionados por el instalador.
F31PEGUE LA BANDA DE SELLADO
DEL RIEL DE MONTAJE SUPERIOR
Retire la parte posterior de la banda de sellado
del riel de montaje superior y pegue la banda de
sellado al fondo del riel de montaje superior a Io
largo el borde delantero.
Rielde montaje superior
la parte
_ etire
VISTA FRONTAL Riel de montaje superior
posterior
de la banda
de sellado
/
l..................................1
/
Bandade sellado
[] QUITE EL ACONDICIONADOR
DE AIRE DE LA CARCASA
Quite el tornillo de fijaci6n y soporte de fijaci6n
del armaz6n inferior. Conservelos para volver
a instalarlos.
I-B-1Quite el tornillo a tierra y conservelo para
instalarlo mas tarde.
| 1/2" mas alto que el
queelmarco _ JMadera
de ventana " ,
Marco de
de tormentas _
ventana de
tormentas
_ marco vinilo (en algunas1/2" m_s alto '--_-ventanas)
\
Quite el tornillo a tierra y cons6rvelo
para instalarlo m_s tarde
Deslice el acondicionador de aire de la carcasa
tomando la manija de la bandeja inferior y
tirando hacia adelante mientras se sujeta
la carcasa.
51
Page 52

Instrucciones de instalacion en una ventana
[] PREPARE LA VENTANA
Corte el sello del marco de la ventana
a Io ancho de esta y pegue la cinta
adhesiva en la parte inferior del marco.
PREPARE LA CARCASA
Instale el tie! de montaje superior con
"" 4 tornillos tipo B desde la parte interior
de la carcasa.
Riel de montaje superior
171INSTALE LA CARCASA EN
LA VENTANA
Con cuidado, deslice la carcasa dentro de
%
la ventana y centrela. Baje la ventana detras
del riel de montaje superior.Tire de la parte
inferior de la carcasa hacia adelante para que
el riel de montaje inferior quede firme contra
la parte trasera del alfeizar de la ventana.
Instale la carcasa en el alfeizar de la ventana
utilizando 4 tornillos tipo E. Perfore orificios
piloto, si fuera necesario.
__J
AIf6izar
I-B-I AsegQrese de que los tornillos y tuercas
esten bien introducidos en los soportes
en V izquierdo y derecho.
Introduzca los armazones para los paneles
en acordeon dentro del riel de montaje
superior y las 9uias del armaz6n inferior.
Sujete los paneles en acorde6n al costado
de la carcasa utilizando 3 tornillos tipo A en
cada lado.
Nota" Cuando sujete los paneles en
acorde6n, aseg_rese de s61o atornillar los
paneles internos a los lados de la carcasa.
Riel de montaje superior
Tornillos
tipo A
Tornilloytuerca II //
\
I-_ Coloque los soportes en V en la base de
la carcasa para que esten cerca de la pared
exterior. Sujete e! soporte en V a cada lado
de la parte inferior de la carcasa utilizando
tornillos tipo C, 3 de cada lado.
Sopo_e en V
PARTE
TRASERA
Riel de montaje inferior
52
Page 53

Instrucciones de instalaci6n en una ventana
[71 INSTALE LA CARCASA EN
LA VENTANA (cont.)
F-B-] utilice un b!oque de madera (obtenido en
forma local) entre los pernos de nivelacidn
y la pared si esta es debil o si el peso del
acondicionador de aire cae entre las
columnas de la pared.
I-_ Ajuste los pernos de nivelaci6n y tuercas
contra la pared exterior para que la carcasa
tenga una ligera inclinaci6n hacia el exterior.
Ajuste las tuercas con una Ilave ajustable.
Utilice un nivel; la inclinaci6n correcta de
la carcasa hacia el exterior no debera set
de mas de 1/2 burbuja.
[]
INSTALE LOS SOPORTES DE
APOYO Y LA JUNTA SUPERIOR
DE ESPUNIA DE LAVENTANA
%
APRECAUCION:
En ventanas construidas Vinilo
de vinil o de similar
construcci6n, conecte el
soporte a el marco de la
ventana para prevenir
da_o a la ventana y vidro
quebrado.
Perfore orificios piloto y
sujete los soportes de
apoyo con dos tornillos
tipo D, uno en cada lado.
[_ Corte la junta de espuma superior de la
ventana al ancho de la ventana.
Rellene la espuma
entre el vidrio y la
ventana para evitar
que aire e insectos
se introduzcan en la
habitaci6n.
NOTA: Si la junta provista no es adecuada para
su ventana, obtenga el material apropiado
Iocalmente para realizar una adecuada
instalaci6n de sellado.
Madera
Extienda los paneles en acordedn izquierdo
[_ y derecho hacia los marcos verticales de
la ventana. Perfore orificios piloto y sujete
las esquinas superiores e inferiores con
4 tornillos tipo D.
Riel de montaje
superior
Tornillo
tipo D
Tornillo
tipo D
Tornillo
tipo D
Tornillo
tipo D
53
Page 54

Instrucciones de instalaci6n en una ventana
[] INSTALE EL ACONDICIONADOR
EN LA CARCASA
I-_ Aseg@esede queel cable
a tierra este haciaun lado
y desliceel acondicionador
de aire dentro de la
carcasa.No haga presi6n
sobre los controles o las
serpentinas de aletas.
Verifique que el
acondicionador de aire
seencuentre firmemente
asentado.
I-R-] Vuelva a instalar el soporte de fijacion y eltornillo
removidos con anterioridad.
"L
[-C-I Vuelva aconectar el cable a tierra al acondicionador
de aire utilizando el tornillo quitado con anterioridad.
INIPORTANTE:Elcablea tierra debereinstalarse para
garantizar unaadecuada cone×i6na tierra.
INSTALE EL ACONDICIONADOR
EN LA CARCASA (cont.}
I-_ Tire del cable electrico enrollado desdesu posici6n de
envio enel areade descargade aire. Sujete el armaz6n
de la parrillafrontal ala carcasaintroduciendo las
leng0etasdel armaz6nde la parrilladentro de las
ranurasde la partesuperior frontal de la carcasa.
Presioneel armaz6n de la parrilla hacia adentro
alrededor del cable electrico sobre el lado derecho.
Fijela parrilla con un tornillo tipo F(pintado) en cada
lado y un tornillo tipo Cen el frente.
Tornillo
tipo F
j111t_
Presioneel cable a tierra contra la unidad para evitar
que seaapretado al instalar laparrilla frontal.
Quite laparrilla frontal de su caja y elimine
la cinta de envio.
I-_ Tome la parrilla de entrada desde lasesquinas
inferiores y tire haciadelante. Desenganchela
de sus bisagrassuperiores dejela aun costado.
F-_ Utilizando la leng(Jeta,tire del filtro ligeramente hacia
arriba para liberarlo, tire hacia abajo y quitelo.
Tornillo
tipo F
iTI Reinstaleel filtro.
I-_ Reinstale la parrilla de entrada. Conecte
la electricidad.
/
\
Tornillo tipo C
54
Coloquejunta calafateadao burletesen espacios
o aberturas con salidaal exterior para sellar
la instalaci6n.
Page 55

Instrucciones de Instalacion aTraves de la Pared-Opcional
La carcase puede instalarse a traves de la pared en
construcciones existentes y nuevas.
Lea per complete y luego siga todos los pesos.
NOTA: Con exception de los montajes de soportes
en V (incluidos}, obtenga todos los materiales en
forrna local pare reenter el acondicionador de aire
a trav@s de la pared.
[f] IIVIPORTANTE
La instalacibn a traves de la pared no es apropieda
sialguna de [as persianas [aterales o superiores
de lacarcase quedaran obstruidas per la pared.
Todaslaspersianas laterales y superiores de
la carcase deben proyectarse sobre la pared
exterior de la pared.
El lade interior de la carcasedebe proyectarse
dentro de la habitacion Io suficiente pare potenciar
a[ rnaxirno el equilibrio de la unided.
La carcasedebe ester instalada de lade a lade y
con una pequeffa inclinacibn del frente hacia la
parte trasera. Utilice un nivel; la inclinacibn correcta
de lacarcase hacia el exterior no debera ser de
rnas de 1/2 burbuja.
Se requiem un angulo de dinte[ pare sostener
ladrilloso bioquessobre laabertura.
Se requiere un revestirniento de aislacion que
debe extenderse per la Iongitud de la abertura
pare asegurar que no haya perdidas en las
cavidades internes.
Quite el acondicionador de aire de la caja.
%
Pare instrucciones especificas, consulte las
Instrucciones de instalaci6n en una ventana.
AsegQrese de que haya un tomacorriente cerca
de la ubicaci6n del orificio o efectQe arreglos
pare instalar un tomacorriente.
[f] IMPORTANTE (cont.}
Fije con 14tornillos para madera sujetos por Io menos
una pulgada dentro de laestructura de soporte de
la pared.
NOTA:Pefforeorificios piloto,sifuera necesario,pare
una instalaci6n adecuada.Si elarmazon esmas grande,
utilice cu_as pareprevenir ladeformaci6n de lacarcasa.
Instale los soportes en V.Verla secci6n INSTALELA
%
CARCASAEN LAVENTANA en las Instrucciones de
instalaci6n en una ventana.
TERIVIlNE LA ABERTURA
[]
DE LA PARED
Utilice calafateo en los cuatro costados del lade
%
exterior de la carcase pare que no ingrese
humedad ala parte interne. El use de
revestimiento de aislaci6n (riel de goteo) evitara
aQn mas el ingreso de ague dentro de la 3ared
yen la parte exterior del edificio.
( _ Linea
Angulo
Calafateo
de aoi:._---- / Moldura
__ _ (si se desea)
EXTERIOR I
Persianasde / INTERIOR
aire (la parte
_UsP::'s_rac_°s/_'_" Riel inferior
deben _l
proyectarse I /
sobre el [ado [ /
externo de
[a pared) I
Relleno de madera
y calafateo (por
encima Y dmebe
de revesti
de aislaci6n)
en V Parte inferior ielSoportes
Revestimiento
de aislaci6n
(riel de goteo)
de la carcase inferior
de yeso
Coloque la carcase en la abertura de la pared
I-C-ly coloque guias de soporte de madera entre
la parte inferior de la carcase y el revestimiento
de aislaci6n sobre ambos lades del riel inferior.
Deben ser de la misma altura del riel inferior y
de la misma Iongitud de la abertura de la pared.
Revestimiento de
aislaci6n (riel de g
Gules de soporte de madera
Coloque el acondicionador de aire dentro de la
carcase. Pare instrucciones especificas, consulte
las Instrucciones de instalaci6n en una ventana.
55
Page 56

Notas.
56
Page 57

So/ucionarpmb/emas.
Causasposib/es Quehater
Elacondieionador de aim E1acondicionador de afire * Cerci6rese de que el acondicionador de aire es/;i
noenoiende esN desconectado, enclmf_t(lo totalmente en el tomacorriente.
El fusible se dispar6 / * [nspeccione los fusibles / c_!ia de inmrruptores de la casa
el cortacircuitos se dispar6, y reemplace cualquier fltsible o re_usm el inmrrupt(,:
Interrupcidn en el
suministro d6ctrico.
El disposifivo de interrupcidn * Presione el botdn RESETubicado en el cable de alimentaci6n.
de corriente se ha acfivado. * Si el botdn RESETno se mantiene en su lugal; no utilice m_s
ElacondMonadordeaire El flujo de afire estfi restringido. * Cercidrese de que no exis/e ninguna cortina, persiana o
noenfriacomodeberia mueble bloqueando el flente del acondicionador de aire.
El control de temperatura no * En los modelos con teclado: En el modo Cool (Frio),presione la tecla
estfi ajustado apropiadamente. ReductiOnT.
El Ntro de aire estfi sucio. * [Jmpie el filtro cada 30 (lfas pot lo menos. \._r la seccidn
La habitacidn podria haber . Cuando el acondicionador de aire se enciende, usted
estado caliente, necesita darle tiempo pala que enfl-i_ la habitaci6n.
El aim frio se estfi escapando. + Cercidrese de que los regis/ros de la calefitccidn no est_n
Las bobinas de enfriamiento * X,_r"AeondMonadorde aireeongeNndose" m_s adelante.
se congdaron.
E/aoondicionadordeaire
se esta conge/ando
Elcontrolremoto Las baterias est_ insertadas * [nspeccione la posicidn de las baterias. Deben esmr
nofunciona incorrectamente, insermdas en la posicidn indicada, (+) y (-).
Hagaguagoteando afuera Tiempo hfimedo y caliente. * Es/o es normal.
Hayaguagoteando on el El acondicionador de aire * Pal'a drenar el agua apropiadamente, cercforese de que
El hMo bloquea el flujo
de afirehacia el acondicionador
de afireevitando que se enfrie
la habitacidn.
Las baterias estfin agotadas. * Reemplace las bamrfas.
interiordelahabitation no estfi inclinado hacia afuera, el acondicionador de aire es/fi inclinado ligeramenm
* l[a unidad se reiniciar5 automSficamente con la configumci6n
utilizada por 61tima ;_z luego de reesmblecer la electficidad.
* Exism un rettaso de tiempo por promccidn (de aproximadamenm
3 minutos) pata e:vimr la desconexi6n por sobrecarga del compresox:
Por esm mzdn, es posible que la unidad no comience a enfl-iar de
ffmna nomml hasm ttanscurri(bs 3 minutos desde que voM6 a
encendexNe.
el acondicionador de aire y'comunfquese con tin t&nico calificado.
• En los modelos con botones, gire la mmpelatula a un ndmero mayol:
de Cuidadoylimpieza.
abiertos y se encuenttan retornando el aire fl-fo.
* En modelos con los botones de control, coloque el control
de modo en HighFan(gentiladorAlto)6 HighCool(FrioAlto)con
la mml)emn/m en 16 2
. En los modelos con teclas de toque, colo que los controles en
HighFan(gentiladorAIto) 6 High Cool(FrioAlto)y @/ste el termostato
a una temperature m_s alta.
desde el flente hacia atl'_s.
Soacumula agua en La humedad removida del afire * Esto es nom_al pot un corto perfodo en _reas con poca
labandeja y se drena hasta la bandeja, humedad; nom_al por un perfodo de tiempo m_s posmiga(lo
en _reas m_s hfimedas.
Lacamcteristicade
demorade 1-24h.
nofuncionabien
Ha ocurrido un corte o
una interrupcidn de energia.
* Cuando se resmblece la energ/a, la unidad volverd a encenderse
automfificamente en las configuraciones que se usaron pot
fildma vez. N se configur6 la camcmr/sdca de demora 1-24/7.
(Oelay 1-24hr),se reanudarfi la cuenm regresiva. Si lo desea,
usmd puede configurar una Imeva hora.
57
Page 58

Garantiadesuacondicionadordeaim garantia /imitadadeuna#o.
Todos los servicios de garanfia los proporcionan nuestros Centros
de ReparaciSn de F#brica o nuestros t#cnicos Customer Care®
autorizados. Para concertar una cita de reparaci6n, en linea,
24 horas al dia, visftenos al ge.com, o flame a1800.GE.CARES
(800.432.2737).Cuando flame para soficitar servicio, pot favor
Grape aqui su recibo.
Serequiere facilitar prueba
de la fecha de compra original
para obtener un servicio
bajo la garantfa.
tenga a mano el n6mero de serie y el n6mero de modelo.
GE reemplazara:
{In afio Cualquierpartede! _condidon_,dor de _dre que f_dledebido _ defectos en los m_tedales o en
A partir dela fecha ].,_f.,d)i.ic.,_ci6n.Dur_nte est_ garantia/im#ada de unafio, GS t_mbiSn proporcion_r_, sincosto
dela Compraoriginal a/guno,tod_ 1_ mm, o de obr_ y el seI,'icio rel_cion_d(_p_r_ _eempl_z_r p_rtes def_ct/los_ks.
Viajes de servido a su casa para mostrarle c6mo
fundona el equipo.
Instalaci6n o entrega inapropiada, o mantenhniento
impropio. Si usted fiene un problema durante la
instalaci6n, o si su acondidonador de alre no fiene la
capaddad de enfriamiento que usted necesita, p6ngase
en contacto con nuestro distribuidor o instalador.
Usted es responsable de propordonar las facilidades
de conexi6n el_ctrica necesarias.
Fallo del producto resultante de modificaciones al
producto o debido a uso irrazonable incluyendo no
propordonar mantenhniento razonable y necesario.
En locales comerciales, la mano de obra necesaria para
refirar la mfidad hacia un lugar para revisi6n pot parte
de un t_cnico individual.
Reemplazo de fusibles de la casa o reajuste del sistema
de circuitos.
Fallos debido a la corrosi6n en modelos que no estan
protegidos contra la corrosi6n.
Da6o al producto causado por voltaje inapropiado hacia
el equipo, accidentes, incendios, inundaciones o actos
de la naturaleza de fuerza mayor.
Dafios inddentales o consecuendales causados por
defectos posibles con este acondidonador de alre.
Dafios despuSs de la entregao
EXCLUSIONBE GARANTJAS IMPL/C/TAS--$u #nico y exclusivo derecho es la reparacifn de/pmducto, ta/ y
como se indica en esta Garantia lira#aria. Cualquier 9arantia implicita, incluyendo /as garantias implicitas de
comerciaflilidad o adecuacion para un fin determinado, esMn limitadas a un a#o o el periodo de tiempo mas
breve permitido por la ley.
Esta garantia se extiende al comprador original y cualquier comprador posterior @ productos comprados para uso
residencial dentro de Estados Unidos. Si el producto est# situado en un #rea que no dispone de servicio por parte
de un proveedor de servicio autorizado de GE,podrfa tener que hacerse cargo de los costes de envfo o bien podrfa
soficit#rsele que fleve el producto a una centro de servicio de GE autorizado para realizar la reparaci6n. En Alaska,
la garantia excluye el costo de envfo o las visitas de servicio a su casa.
Algunos estados no permiten la exclusidn o las limitaciones de dafios incidentales o consecuenciales. Esta garantfa
da derechos legales especificos, y usted podria tener otros derechos que variarbn de estado a estado. Para saber cubles
son sus derechos legales, consulte a la oficina de asuntos del consumidor local o la oficina del Attomey General en
su Iocalidad.
Garante: General Electric Company. Louisville, KY 40225
58
Page 59

Soporteai consumidor.
P_ginaWebde GEAppliances
dTiene alguna pregunta sobre su electrodom_sdco? ;Pmebe la Digina Web de GE Appliances 24 horns a/
dfa, cualquier dfa del aflo! Para mayor conveniencia y servicio m_s r_pido, ya puede descargar los Manua/es
de los Propiem_ios, pedir piezas o incluso hacer una cim en lfnea para que vengan a reaUzar una
reparaci6n.
Soliciteunareparacidn
E1servicio de expertos GE est_ia tan s61o un paso de su puerto, iEntre en lfnea y solicite su reparaci6n
cuando le venga bien 24 horas al dfa cualquier dfa del aflo! O llame al 800.GE.CARES (800.432.2737)
durante horas normales de oficina.
RealLifeDesignStudio(Estudiodedisefioparalavidareal)
GE apoya el concepto de Disefio Universa/--productos, servicios y ambientes que pueden usar genre de
to&ks 1asedades, tamaflos y capacidades. Reconocemos la necesidad de diseflar para una gran gama de
habilidades y dificulmdes fYsicasy menm/es. Para rods demUes cobre las aplicaciones de GE Diseflo Universal,
incluyendo ideas de diseflo para la cocina para pex_onas con discapacidades, mire nuesua pdgina Web hoy
mismo. Para persom_s con dificulmdes auditivas, favor de llmnar a/800.TDD.GEAC (800.833.4322).
garantfasamplbdas
Conlpre una garantfa ampliada y obtenga demlles sobre descuentos especiales disponibles mientras su garantfa
est_iaOn activa. Puede comprarla en lfnea en cualquier momento, o llamar al (800.626.2224) durante horas
normales de oficina. GE Consumer Home Services esmr_i adn ahf cuando su garantfa termine.
ge.corn
ge.corn
ge.corn
ge.corn
Piezasyaccesorios
Aquellos individuos con la caUficacidn necesaria para repaint sus propios elecuodom4sdcos pueden
pedir que se les manden las piez_s o accesorios directamenm a sus hogares (aceptamos las m_jetas
\qSA, MasterCard y Discover). Haga su pedido en lfnea hoy, 24 horas cada dfa o llamar pot ml£fbno
a/ 800.626.2002 dumnm hon_s noitll{-des de oficina.
tas instruccionesdescritasen estemanualcubmn lospmcedimientos a seguirper cualquier usuario.Cualquier
otrareparaciondeberia,per mglageneral,referirsea personalcalificado autorizado.Debeejercerse pmcaucion
ya que/asreparacionesincorrectas puedencausarcondiciones defuncionamientoinseguras.
P6ngaseencontactoconnosotros
Si no est_i satisfe.cho con el servicio que recibe de GE, pdngase en conmcto con nosotros en nuestra pggina
Web indicando todos los demlles asf como su nfimero de tel_fbno o escrfbanos a:
General Manage_; Customer Relations
GE Appliances, Appliance Park
Louisville, KY 40225
Registresuelectrodom_stico
iRegistre su nuevo dectrodom6sfico en linea---euando usted prefiera! E1 registrar su producto a fiempo le
proporcionar£ si surgiera la necesidad, una mejor comunicacidn y un servicio m_s r_pido b_jo los t_mflnos
de su garantfa. Tdmbi&_ puede enviar su mrjem de registro pre-impresa que se incluye en el mamriN
de emba/_je.
ge.corn
ge.corn
ge.corn
59
Page 60

ConsumerSupport.
GEAppliancesWebsite IntheU.S.A.ge.com
Have a question or need assistance with your appliance? Try tile GE Appliances Website 24 hours a day,
any day of tile year! For greater convenience and faster service, you can now download Owner's Manuals,
order parts or even schedule service on-line. In Canada: www.GEApplianees.ea
ScheduleService /ntheU.S.A.ge.com
Expert GE repair service is only one step away f}om your door Get on-line and schedule your service at your
) " C
c( nvemence 24 hours any day of the year! Or call 800.GE.CARES (800.432.2737) during nomml business hom_.
In Canada, call 1.800.561.3344
RealLifeDesignStudio In the U.S.A.ge.com
GE supports the Universal Design concept--products, services and envhonments that can be used by people of all
ages, sizes and capabilities. We recognize the need to design for a wide range of physical and mental abilities and
impaimlents. For derails of GE's Universal Design applications, including kitchen design ideas for people with
disabilities, check out our Website today. For the hearing impaired, please ca/1 800.TDD.GEAC (800.833.4322).
In Canada, contact" Manage_; Consumer Relations, Mabe Canada Inc.
Suite 310, 1 FactoIT Lane
Moncton, N.B. E1C 9M3
ExtendedWarranties
Purchase a GE extended warranty and learn about special discounts that are available while your warranty is still
in effect. You can purchase it on4ine an?<ime, or call 800.626.2224 during nomml business hotn_. GE Consumer
Home Se,a'ices will still be there after your warranty expires. In Canada, call 1.888.261.2133
PartsandAccessories
Individuah quaUfied to service flleir own appliances can have parts or accesscnJes sent directly to their homes
(VISA, MasmrCard and Discover cards are accepmd). Order on-line today, 24 hours every day or by phone at
800.626.2002 during ncmnal business ]louis.
instructions contained in thismanual cover procedures to be performed by ang user. Other servicing generally should he
referred to qualified service personnel. Cautionmust be exercised, since improper servicing may cause unsafe operation.
Customers in Canada should consult the yellow pages for the nearest Mabe service cente,; or ca/1 1.800.561.3344.
ContactUs
If you are no[ satisfied wit1 file service you receive flom (;E, contact us on our Websim wit1 all file details
including your phone numbe_; or w_Jm to: General Manage_; Customer Relations
GE Appliances, Appliance Park
Louisville, l_f 40225
In Canada: www.GEApplianees.ea, or wlJte to: Direct(n; Consumer Relations, Mabe Canada Inc.
Suim 310, 1 Factory Lane
Moncton, N.B. E1C 9M3
In the U.S.A.ge.com
In the U.S.A.ge.com
In the U.S.A.ge.com
RegisterYourAppliance IntheU.S.A.ge.com
Register your new appliance on-line--at your convenience! Timely product registration will allow for enhanced
communication and prompt se_a'ice under the temls of your warranty; shoukt the need arise. You may also mail
in the pre-printed registration card included in the packing material. In Canada: www.GEApplianees.ea
Printed in China
 Loading...