

Page 1
GE Energy
D400 Substation Data
Manager
User's Manual
994-0089
Version 1.00 Revision 2
General
Page 2

GE Energy
Copyright Notice
© 2006-2007, General Electric Company. All rights reserved.
The information contained in this online publication is the exclusive property of General Electric Company, except as otherwise
indicated. You may view, copy and print documents and graphics incorporated in this online publication (the “Documents”)
subject to the following: (1) the Documents may be used solely for personal, informational, non-commercial purposes; (2) the
Documents may not be modified or altered in any way; and (3) General Electric Company withholds permission for making the
Documents or any portion thereof accessible via the internet. Except as expressly provided herein, you may not use, copy, print,
display, reproduce, publish, license, post, transmit or distribute the Documents in whole or in part without the prior written
permission of General Electric Company.
The information contained in this online publication is subject to change without notice. The software described in this online
publication is supplied under license and may be used or copied only in accordance with the terms of such license.
Trademark Notices
GE and are trademarks and service marks of General Electric Company.
* Trademarks of General Electric Company.
Basler is a registered trademark of Basler Electric Company. CompactFlash is a registered trademark of SanDisk Corporation.
ERNI is a registered trademark of ERNI Elektroapparate GMBH. Hyperterminal is a registered trademark of Hilgraeve,
Incorporated. IEC is a registered trademark of Commission Electrotechnique Internationale. IEEE is a registered trademark of the
Institute of Electrical and Electronics Engineers, Inc. Internet Explorer, Microsoft, and Windows are registered trademarks of
Microsoft Corporation. JAVA is a registered trademark of Sun Microsystems, Inc. Maxell is a registered trademark of Hitachi
Maxell, Ltd. MiniSQL is a trademark of Hughes Technologies. Netscape is a registered trademark of Netscape Communications
Corporation. Modbus is a registered trademark of Schneider Automation Inc. Panduit is a registered trademark of Panduit Corp.
Saft is a registered trademark of SAFT société anonyme. SEL is a registered trademark of Schweitzer Engineering Laboratories,
Inc. Sonnenschein is a registered trademark of Deutsche Exide GMBH. Tadiran is a registered trademark of Tadiran Israel
Electronics Industries Ltd. Toshiba is a registered trademark of Kabushiki Kaisha Toshiba, doing business as Toshiba Corporation.
VESA is registered trademark of Video Electronics Standards Association Corporation.
Other company or product names mentioned in this document may be trademarks or registered trademarks of their respective
companies.
This printed manual is recyclable.
Please return for recycling where facilities exist.
Page 3

GE Energy
Contents
About this Document 5
Product Support 7
1 Before You Start 9
2 Installing the D400 19
3 Setting up Communication Cards 24
4 Connecting to Devices and Networks 44
5 Powering Up the D400 63
6 Configuring the D400 74
7 Servicing the D400 79
A Standards & Protection 86
B Ordering Guide 89
D400 Substation Data Manager User's Manual 3
Page 4

GE Energy
994-0089–1.00–2, General
4
Page 5

GE Energy
About this Document
Purpose
This manual provides information about installing, setting up, using and maintaining your
D400 Substation Data Manager. This manual does not provide any procedures for
configuring the software of the D400.
Note that some product features are not yet available and so these are marked as
“Future” in the manual.
Intended Audience
This manual is intended for use by field technicians and maintenance personnel who are
responsible for the installation, wiring and maintenance of SCADA equipment. This guide
assumes that the user is experienced in:
• Electrical utility applications
• Electrical wiring and safety procedures
• GE Energy automation products
• Related other manufacturers’ products, such as protective relays and
communications equipment
Additional Documentation
For further information about the D400, refer to the following documents.
• D400 Product Information (PRPI-0049)
• Wiring schematics, as available
• D400 Software Configuration Guide (SWM0066)
• D400 online help
D400 Substation Data Manager User's Manual 5
Page 6

GE Energy
How to Use this Guide
This guide describes how to install the D400 and get it up and running for the first time.
Procedures are provided for all component options available for the D400. The
components included in your D400 depend on what was ordered for your substation
application. Follow only the procedures that apply to your D400 model.
The software-related procedures in this guide are based on using a computer running
Windows
XP or Windows 2003.
®
2000. Some steps and dialog boxes may vary slightly if you are using Windows
Document Conventions
This manual uses the Système International (SI) and the Microsoft® Manual of Style as a
basis for styles and conventions.
The following typographic conventions are used throughout this manual:
Bold face is used for:
• Names of software program menus, editors, and dialog boxes; also for the names of
menu commands, keyboard keys, icons and desktop shortcuts, and buttons and
fields in editors and dialog boxes
• Names of hardware components
• User input that must be typed exactly
Italic face is used for:
• Emphasis
• Cross-references to sections, figures and tables within this manual and for titles of
other documents
•
• File and directory names; examples of directory paths are generally given in the
Windows format
• Placeholders for user input that is specific to the user. May also include angle
brackets around the placeholder if the placeholder is already in italic text. For
example, c:\<product>\product.def
• References to a parameter or field value shown
Monospace font is used for source code examples and symbols.
994-0089–1.00–2, General
6
Page 7

GE Energy
Product Support
If you need help with any aspect of your GE Energy product, you have a few options.
Search Technical Support
The GE Energy Web site provides fast access to technical information, such as manuals,
release notes and knowledge base topics. Visit us on the Web at:
www.ge.com/energy
Contact Customer Support
The GE Energy Customer Service Center is open 24 hours a day, seven days a week for
you to talk directly to a GE representative.
In the U.S. and Canada, call toll-free: 1.800.361.3652
International customers, please call: +1 403.214.4600
Or e-mail to ge4service@ge.com
Product Returns
A Return Merchandise Authorization (RMA) number must accompany all equipment being
returned for repair, servicing, or for any other reason. Before you return a product, please
contact GE Energy to obtain an RMA number and instructions for return shipments.
D400 Substation Data Manager User's Manual 7
Page 8

GE Energy
Have the following information ready to give to Customer Service:
• Ship to address (the address that the product is to be returned to)
• Bill to address (the address that the invoice is to be sent to)
• Contact name
• Contact phone number
• Contact fax number
• Contact e-mail address
• Product number / serial number
• Description of problem
The Customer Service centre will provide you with a case number for your reference. This
case number is not the RMA number. You will be sent the RMA number and RMA
documents via fax or e-mail. Once you receive the RMA documents, attach them to the
outside of the shipping package and ship to GE.
Note: Product returns will not be accepted unless accompanied by the Return
Merchandise Authorization number.
994-0089–1.00–2, General
8
Page 9

GE Energy
1
Before You Start
Before you begin installing and using the D400, review the information in this chapter,
including the following topics:
• Safety precautions
• Product overview
• Product specifications
• Storage recommendations
Read and thoroughly understand this guide before installing and operating the unit. Save
these instructions for later use and reference.
Warning! Failure to observe these instructions may result in serious injury or death.
1.1 Safety Precautions
Follow all safety precautions and instructions in this manual.
Only qualified personnel should work on the D400. Maintenance personnel should be
familiar with the technology and the hazards associated with electrical equipment.
• Never work alone.
• Before performing visual inspections, tests, or maintenance on this equipment, isolate
or disconnect all hazardous live circuits and sources of electric power. Assume that
all circuits are live until they have been completely de-energized, tested, and tagged.
Pay particular attention to the design of the power system. Consider all sources of
power, including the possibility of back feed.
• Turn off all power supplying the equipment in which the D400 is to be installed before
installing and wiring the D400.
• Beware of potential hazards and wear personal protective equipment.
D400 Substation Data Manager User's Manual 9
Page 10
GE Energy
• The successful operation of this equipment depends upon proper handling,
• All AC voltage and current terminals are protected from accidental contact by a
• All electronic components within the D400 are susceptible to damage from
• Hazardous voltages can cause shock, burns or death. To prevent exposure to
• If the D400 is used in a manner not specified in this manual, the protection provided
Warning Symbols
The following table explains the meaning of warning symbols that may appear on the
D400 or in this manual.
installation, and operation. Neglecting fundamental installation requirements may
lead to personal injury as well as damage to electrical equipment or other property.
mechanical safety shield.
electrostatic discharge. Observe standard precautions for handling electronic
components.
hazardous voltages, disconnect and lock out all power sources before servicing and
removing components.
by the equipment may be impaired.
Symbol Meaning
!
The relevant circuit is direct current.
The relevant circuit is alternating current.
CAUTION: Refer to the documentation for important operating and
maintenance instructions. Failure to take or avoid a specified action could
result in loss of data or physical damage.
WARNING! Dangerous voltage constituting a risk of electric shock is
present within the unit. Failure to take or avoid a specific action could
result in physical harm to the user.
CAUTION: Class 1M Laser (IEC 60825-1 Safety of laser products)
CAUTION: Hot surface
Earth (Ground) Terminal
Protective Earth Terminal
994-0089–1.00–2, General
10
Page 11
GE Energy
1.2 Regulatory Compliance Information
CE Mark Compliance
The D400 is rated as CISPR 11 Group 1 Class “A” equipment.
Note: To provide higher EMC immunity and maintain CE Mark compliance, the serial
cables used for permanent RS-232 and RS-485 connections must comply with the
following requirements:
• Cables must be shielded
• D type connector covers must provide EMC shielding (e.g. metalized plastic or die cast
metal covers)
Warning
Class “A” equipment is intended for use in an industrial environment. The equipment
generates, uses and can radiate radio frequency energy and, if not installed and used in
accordance with these instructions, may cause interference to other devices in the
vicinity. If this equipment does cause interference with other devices, which can be
determined by turning the equipment off and on, the user is encouraged to try to correct
the interference by one or more of the following measures:
• Reorient or relocate the receiving device
• Increase the separation between the equipment
• Connect the equipment into an outlet on a circuit different from that to which the
other device(s) is connected
• Consult the manufacturer or field service technician for help
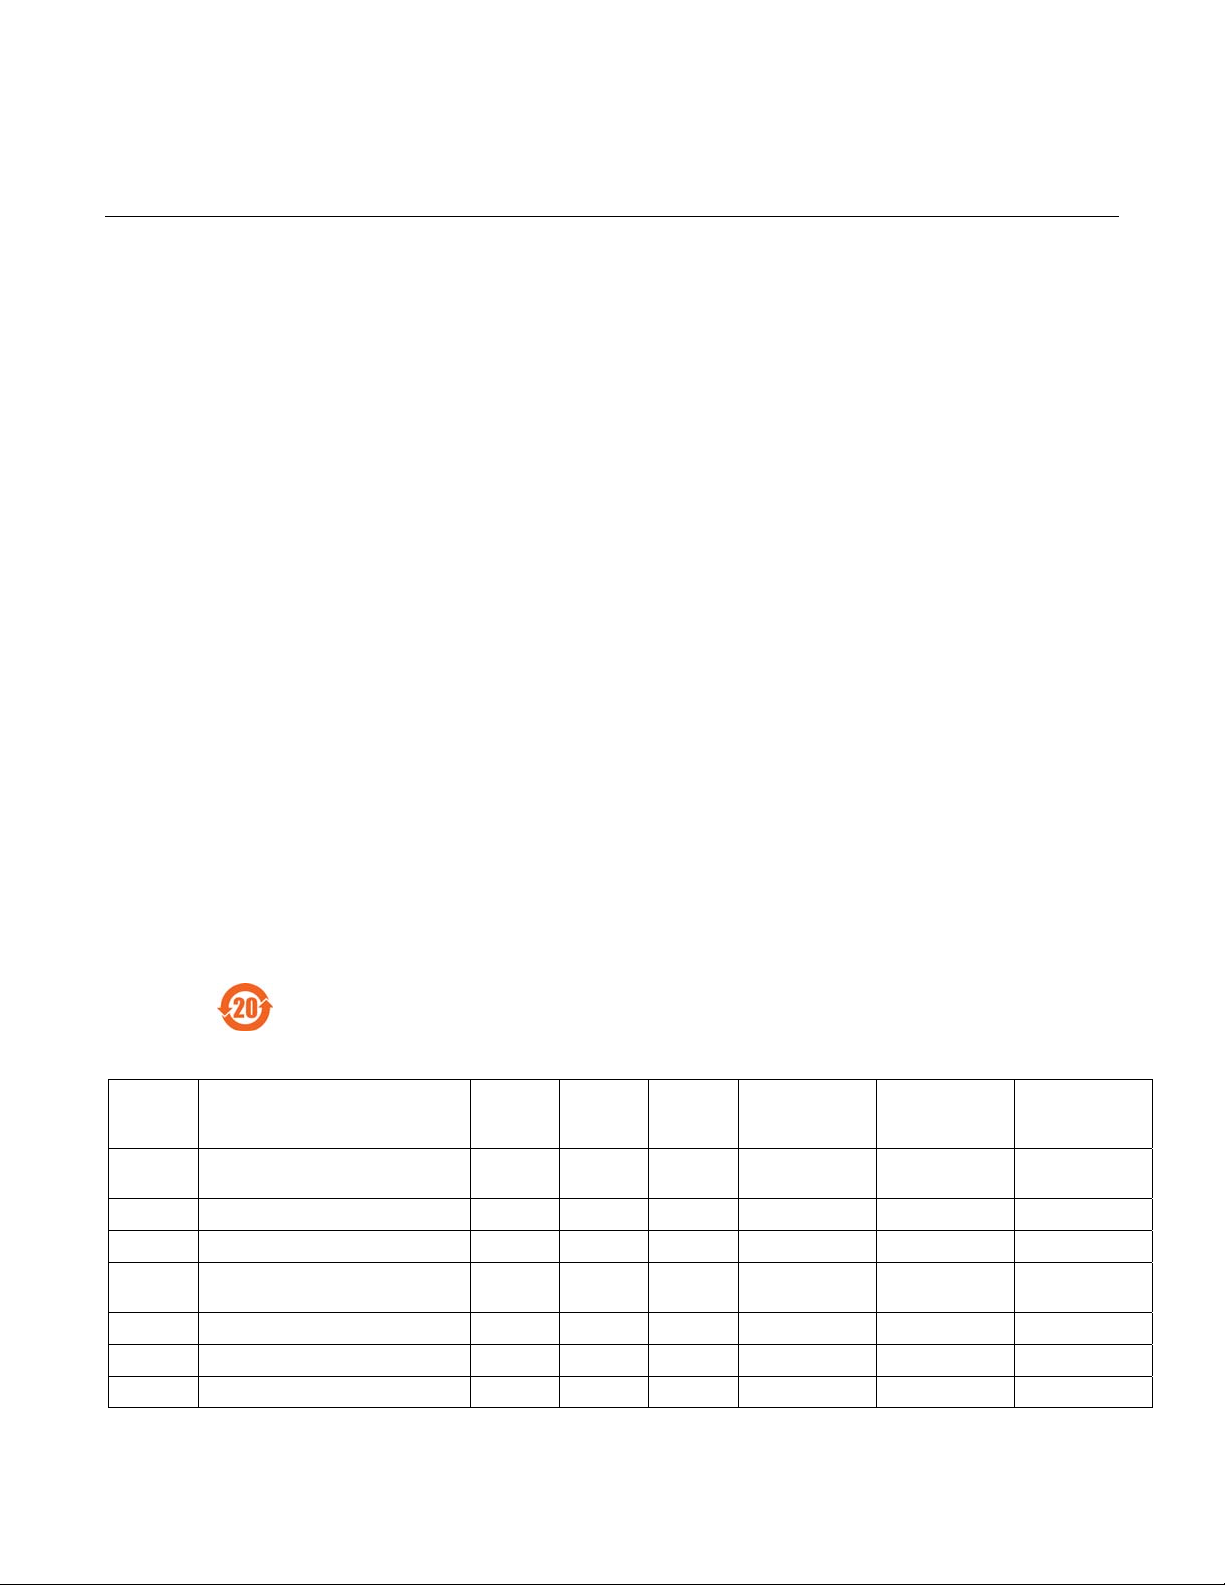
Restriction of Hazardous Substances (RoHS)
The environmental protection use period (EPUP), as defined in SJ/T11363-2006, for
the D400 hardware assemblies listed in the table below is in excess of 20 years.
RoHS Material Declaration Data Content by Assembly
GE Part # Description Lead (Pb) Mercury
500-0340 D400 Substation Data Manager
Chassis Assy
520-0190 D400 Power Supply Blank Assembly O O O O O O
520-0191 D400 Adapter Blank Assembly O O O O O O
520-0204 D400 650 MHz Celeron w Single
Ethernet
520-0206 D400 USB KVM Assy X O O O O O
520-0207 D400 RS-232 IO Assy X O O O O O
520-0208 D400 RS-485 IO Assy X O O O O O
X O O TBC TBC TBC
X O O O O O
(Hg)
Cadmium
(Cd)
Hexavalent
Chromium
(Cr(VI))
Polybrominated
biphenyls (PBB)
Polybrominated
diphenyl ethers
(PBDE)
D400 Substation Data Manager User's Manual 11
Page 12
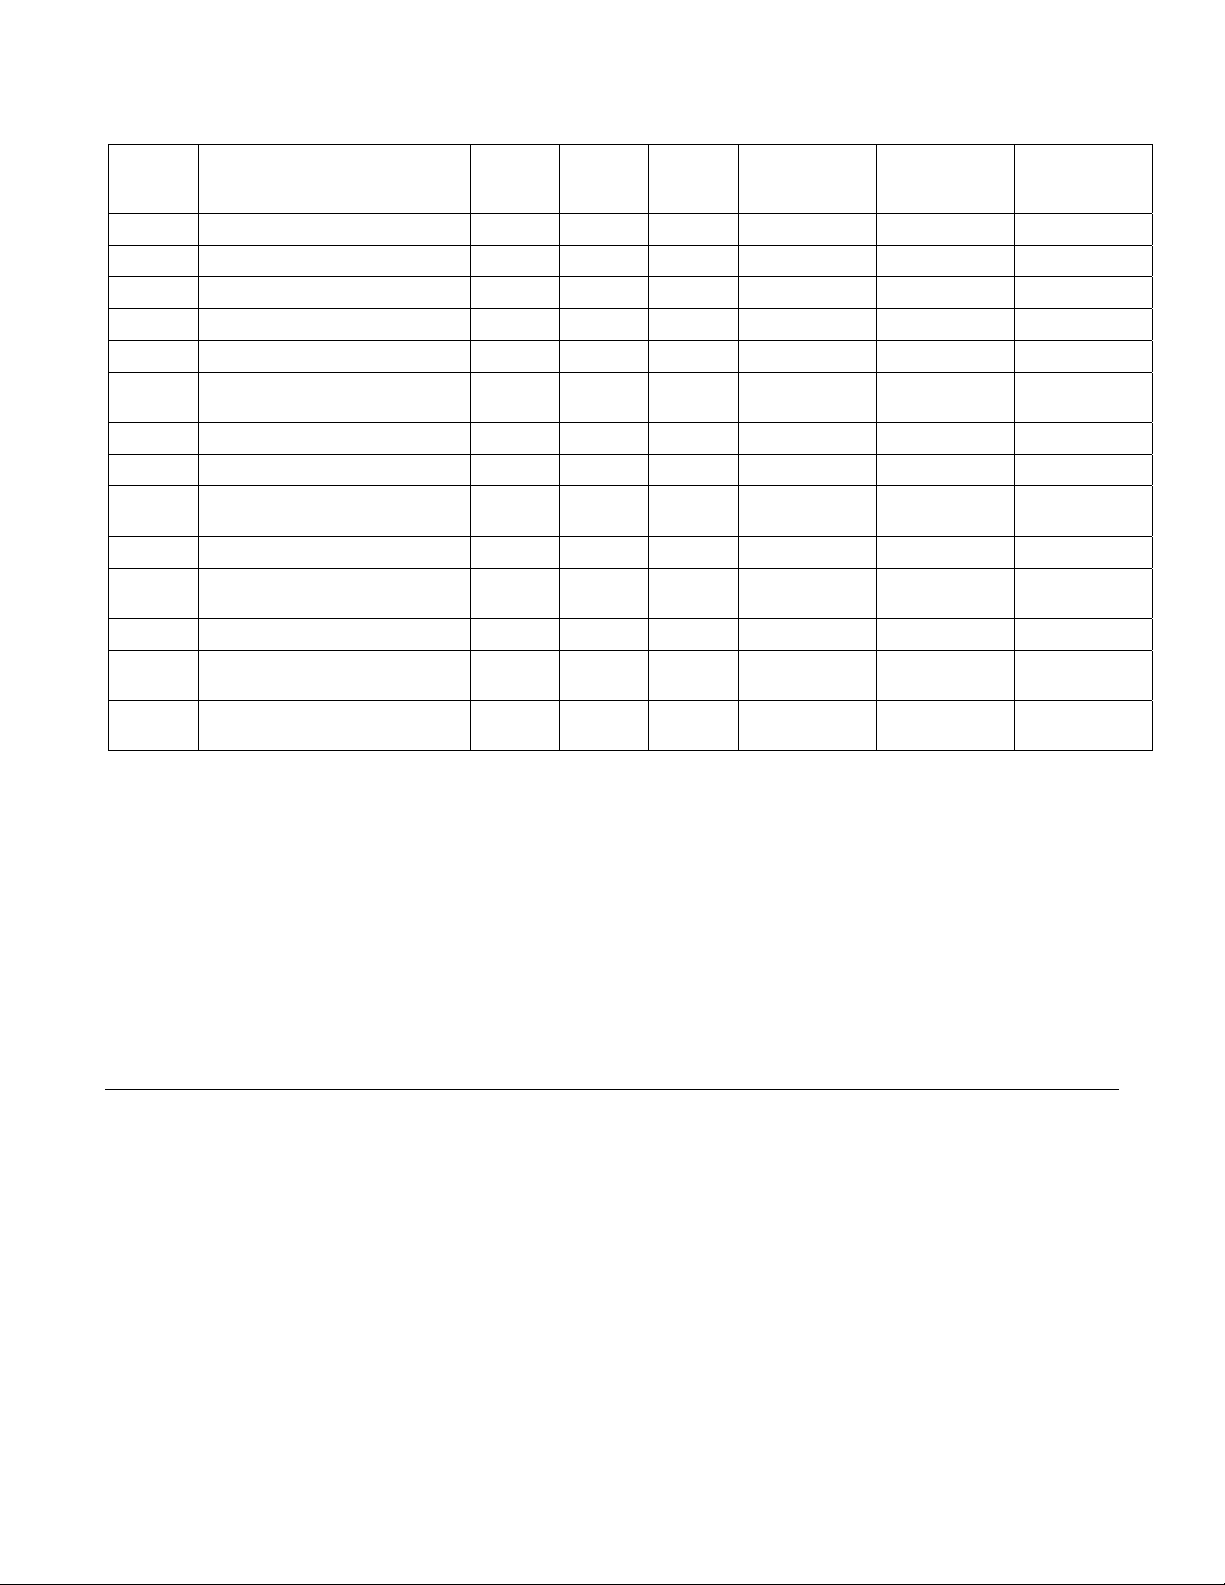
GE Energy
GE Part # Description Lead (Pb) Mercury
520-0209 D400 Glass Fiber Optic IO Assy X O O O O O
520-0210 D400 Plastic Fiber Optic IO Assy X O O O O O
520-0211 D400 IRIG-B Input Assy X O O O O O
520-0212 D400 IRIG-B Distribution Assy X O O O O O
520-0213 D400 Ethernet 4 Port Switch Assy X O O O O O
520-0214 D400 Hot Standby Ethernet Glass
520-0216 D400 DC-DC Supply 5V 12A Assy TBC O O TBC TBC TBC
520-0217 D400 AC-DC Supply 5V 12A Assy TBC O O TBC TBC TBC
520-0218 D400 Redundant TP Ethernet +
520-0219 D400 COM2 Port Assy X O O O O O
580-2717 PC/104-Plus 10/100 Base-TX
975-0122 Cable Assy, MOD IV 12SKT-12SKT X O O O O O
9770209/60
9770529/72
Fiber Optic Assy
COM2 Port Assy
Ethernet RTL8139C
Cable, UTP Patch Cord Stranded, 60
Inch
Cable, Null Modem DB9F-DB9F, 80°C,
150V, 72 Inch
X O O O O O
X O O O O O
O O O O O O
O O O O O O
O O O O O O
(Hg)
Cadmium
(Cd)
Hexavalent
Chromium
(Cr(VI))
Polybrominated
biphenyls (PBB)
Polybrominated
diphenyl ethers
(PBDE)
O: Indicates that this toxic or hazardous substance contained in all of the homogeneous materials for this part is below the
limit required in PRC SJ/T11363-2006 and EU Directive 2002/95/EC (RoHS)
X: Indicates that this toxic or hazardous substance contained in at least one of the homogeneous materials used for this
part is above the limit requirement in PRC SJ/T11363-2006 and EU Directive 2002/95/EC (RoHS)
TBC: To be confirmed with third-party parts manufacturer
The maximum concentration limits (MCV’s) apply.
Lead 0.1% by weight = 1000 mg/kg = 1000 ppm
Mercury (Hg) 0.1% by weight = 1000 mg/kg = 1000 ppm
Cadmium (Cd) 0.01% by weight = 100 mg/kg = 100 ppm
Chromium VI (Cr VI) 0.1% by weight = 1000 mg/kg = 1000 ppm
PBB, PBDE 0.1% by weight = 1000 mg/kg = 1000 ppm
1.3 Product Overview
The D400 Substation Data Manager is a secure, substation hardened and CE Marked
communications gateway that polls metering, status, event and fault report data from
intelligent electronic devices (IEDs). It summarizes the data from IEDs and makes it
available to a master station or host computer over standard SCADA protocols. TCP/IP
network connections are supported over the built-in 10/100 MB Ethernet interface and a
dedicated Modem port (external modem required).
The D400 comes with a built-in human machine interface (HMI)/annunciator as part of
the base software - no external software or licensing is required to operate the D400. The
substation HMI can be accessed locally through the Keyboard, Video, Monitor interface,
or remotely over a standard secure Web browser (HTTPS) connection.
994-0089–1.00–2, General
12
Page 13
GE Energy
The D400 can be configured “online” through a standard Web browser or “offline”
through the Offline Configuration Manager (OCM) - Future.
Hardware Overview
The D400 is built on a flexible, high-performance, expandable platform powered by a 650
MHz processor. It is distinguished by the noticeable lack of a hard drive and fan,
employing instead the rugged and reliable CompactFlash mass storage solution.
The D400 supports various communication media types through a choice of input/output
(I/O) adapter cards –
• Serial (up to 8 configurable 2-port adapter cards): RS-232, RS-485, Fiber Optic (Glass
or Plastic)
• Ethernet: 10/100BaseT, 10BaseFL or 100BaseSX
Features
• Secure Web server (128-bit encryption)
• Secure SCADA communications through Secure Sockets Layer or Transport Layer
Security (SSL/TLS)
• Secure access using SSH (Secure Shell)/SCP (Secure Copy)/HTTPS
• Secure terminal server, gateway, and/or data concentrator using SSL/TLS
• User configurable security levels/access
• Support for remote user authentication
• Built-in alarm annunciator
• Support for time synchronization signals, including Network Time Protocol (NTP) and
IRIG-B
• Support for multiple SCADA protocols for communications to multiple masters
• High-performance real-time database engine
D400 Substation Data Manager User's Manual 13
Page 14

GE Energy
• Internal Mini SQL™ database for archival of SOE and alarm records
• Built-in basic math/logic functions
• IEC 61131-3 soft logic engine - Future
• Event notification (e-mail)
• Portable memory device plug-in
• Dual CompactFlash cards for system and user storage
• Dual hot swappable power supply units
• Hot swappable communication adapter cards
994-0089–1.00–2, General
14
Page 15
GE Energy
1.4 Product Specifications
The D400 adheres to the following system, communications, electrical, physical and
environmental specifications. Additional Standards and Protection are listed in Appendix
A - Standards & Protection.
System
Processor
Memory
Storage
Operating system
Real-time database
Embedded Mini SQL
database
LED indicators Main module
650 MHz Embedded CPU with 33 MHz PCI bus
512 MB of PC133 SDRAM
No hard drive
512 MB System CompactFlash card
256 MB User CompactFlash card
Both expandable to 2 GB
Linux
Up to 131,072 data points/128 IEDs
16 MB NVRAM standard for persistent event storage
guaranteeing no loss of events
Up to 20,000 SOE reports archived
Up to 10,000 alarm records archived
System status: Power, Ready, IRIG-B and Network port status
Serial port status: Transmit and Receive status per port
Power Supplies
Power
Communications
Protocols supported
Network connections
D400 Substation Data Manager User's Manual 15
DNP3.0 Serial and UDP/TCP/IP, SEL Fast Meter
Modbus® Serial and TCP/IP, IEC 870-5-101/104/103, Spabus,
INCOM, GE Modem, BECO 2200, ASCII, SEL ASCII, IEC 61850 Future
DHCP, Telnet, NTP, HTTPS, SFTP, SSH, SSL, CHAP
Single or dual redundant Ethernet interface
Fiber Optic and/or Twisted Pair
10/100BaseT (Isolated RJ-45 connector)
10BaseFL and 100BaseSX (Fiber Optic: 820-850 nm, 50/125
µm and 62.5/125 µm multimode duplex fiber cable-ST
connectors)
Page 16

GE Energy
Serial communications
Time synchronization Input Module
16 channels: RS-232/RS-485/Fiber optic
Data rate: 300 to 115.2 Kbps
RS-232
Configurable for DCE/DTE operation
Galvanic isolation
Can drive IRIG-B signal to RS-232 ports (with optional IRIG-B
Input card)
RS-485
2-Wire/4-Wire support
Galvanic isolation
Fiber Optic
Glass Optical Fiber serial port: (820-850 nm) 50/125 µm,
62.5/125 µm, 100/140 µm and 200 µm HCS multi-mode fiber
with ST connectors
Plastic Optical Fiber (POF) serial port: (660 nm), 1 mm core
with Agilent Versatile Link Simplex connectors
Software configurable ambient state (ON/OFF)
HCMOS or TTL (demodulated), BNC connector (modulated),
Fiber Optic (820-850 nm) ST connector
CPU time sync for internal database time stamping
Distribution Module
Can drive IRIG-B TTL signal for 16 IEDs
Signal Propagation
Propagated to all 16 RS-232 ports for devices
Propagated to the distribution module
KVM & Audio
User connections
Three USB v1.1 compliant Type A ports for connecting
keyboard and mouse
HD D-Sub 15 socket for connecting an industrial SVGA
display (in accordance with VESA
3.5 mm stereo audio jack for substation alarms
Front Ethernet port for local network connection
Two USB v1.1 compliant Type A ports for portable memory
device plug-in
Front serial communication port (RS-232) for local
maintenance
®
Plug & Display Standard)
994-0089–1.00–2, General
16
Page 17
GE Energy
Electrical
Rated power supplies
Peak inrush current at
25 °C on cold start
Rated frequency (AC-DC)
Contact closures
Physical
Overall height
Width
Depth
AC-DC
100-240 VAC (±10 %) 127 VA maximum
100-300 VDC (±10 %) 135 W maximum
DC-DC
AC-DC
AC-DC
DC-DC
20-55 VDC (±10 %) 135 W maximum
26.5 A
40 A
35 A
(< 145 VAC / 205 VDC)
peak
(< 264 VAC / 370 VDC)
peak
(< 60 VDC)
peak
47 to 63 Hz (50/60 Hz)
Solid-state photo-MOS device
Output ratings at maximum ambient temperature:
– Continuous current: 0.1 A continuous at 300 VAC / 300 VDC
– Peak current: 0.28 A peak for 10 ms
– Maximum on resistance: 35 ohm
2U (3.47”) [88.12 mm]
19” rack mount [482.59 mm]
12.24” [310.95 mm] for chassis and rear connectors
13.04” [331.34 mm] with front clearance for protruding parts
2U [3.47" /88.12 mm]
1
9
"
r
a
c
k
m
o
u
n
t
[
4
8
2
.
5
9
m
m
]
"
8
1
.
1
1
]
m
m
5
0
.
4
8
2
[
D400 Substation Data Manager User's Manual 17
Page 18
GE Energy
Environmental
Operating temperature
Humidity rating
Environmental rating
Installation / overvoltage
category
Pollution degree
Use
Altitude
Software
Firmware
Human machine interface
Configuration
Soft logic
-20 °C to +65 °C
Maximum ambient temperature is +50 °C for unit to fully
comply with IEC 61010-1 Section 10.1 regarding surface
temperature limits for protection against burns.
5 % to 95 % relative humidity, non-condensing
Ingress protection: IP30 (IEC 60529)
CAT III
2
Indoor use only
Maximum altitude 10,000 ft [3000 m]
Embedded application dependent
Built-in graphical user interface (Web browser-based)
Built-in graphical user interface (Web browser-based)
Offline Configuration Manager (PC-based) - Future
IEC 61131-3 soft logic engine - Future
LogicLinx* Editor (if using LogicLinx)
1.5 Storage Recommendations
Storage Conditions
Always store the D400 in an environment compatible with operating conditions.
Recommended environmental conditions for storage are:
• Temperature: -40 °C to +90 °C
• Relative humidity: 5 % to 95 %, non-condensing
Exposure to excessive temperature or other extreme environmental conditions might
cause damage and/or unreliable operation.
Battery Life
To maintain the life of the battery, you should remove the battery if the D400 will be
powered down or stored for more than six months.
See section “7.2 Replacing the Battery”.
994-0089–1.00–2, General
18
Page 19

GE Energy
2
Installing the D400
This chapter covers the following topics:
• Overview of the steps and tools required to install the D400
• Tour of the product features
• How to physically install the D400 in a rack or substation panel
CAUTION: Before you install and operate the D400, read and follow the safety guidelines
and instructions in section “1.1 Safety Precautions”
2.1 Installation Steps
The installation procedure will vary depending on the components ordered and shipped
with your D400. Follow the procedures in this manual that apply to the specific hardware
configuration of your D400.
» Follow these main steps to install and set up the D400:
1. Mount the D400 in the rack or panel. See section “2.5 Physical Installation”.
2. Set up the communication cards. See chapter “3 Setting up Communication Cards”.
3. Make device and network connections. See chapter “4 Connecting to Devices and
Networks”.
4. Make power connections and verify operation. See chapter “5 Powering Up the
D400”.
5. Install the supplied battery on the D400 main board. See chapter “7.2 Replacing the
Battery”.
6. Set up communications with the D400. See chapter “6 Configuring the D400”.
D400 Substation Data Manager User's Manual 19
Page 20

GE Energy
2.2 Required Tools
Before beginning the installation procedures, have the following tools and equipment
available:
• Ethernet cable(s)
• Flathead screwdriver with 0.6 mm by 3.5 mm blade (for terminal block wiring)
• Flathead screwdriver with 0.3 mm by 2.5 mm blade (for removing and installing the
adapter cards and changing switch positions)
• #1 Phillip screwdriver (for power terminal block wiring and adapter card removal)
• #2 Phillip screwdriver (for rack mounting the unit)
• Needle-nose pliers
• Wire cutters
• Wire strippers
• Wire-crimping tool (Panduit
• 6 fork connectors, Panduit part number PV14-6F for 14-16 AWG wire or PV18-6F for
18-22 AWG wire (or equivalent) for terminal block connections
• 1 ring connector, Panduit part number PV10-14R for 12 AWG wire (or equivalent) for
protective earth terminal
• Approved network settings for the device (default IP-Address: 192.168.168.81; default
Subnet Mask: 255.255.255.0)
• Windows-based PC with HyperTerminal
software) installed
®
CT-1525 or equivalent)
®
(or any Windows-based terminal emulation
994-0089–1.00–2, General
20
Page 21

GE Energy
2.3 Unpacking the D400
Shipping Inspection
Inspect the shipping package before opening it to see if it has sustained any damage
from impact or water. If there are visible signs of damage, report it immediately to the
carrier without opening the box.
Unpacking
Carefully remove the D400 from its packaging. Visually inspect the unit to ensure it has
not sustained any visible damage during transit. If there are visible signs of damage,
report it immediately to the carrier.
Package Contents
The following items are provided as part of your D400 shipment:
• D400 Substation Data Manager unit (Product ID 400-XXXXXXXXXXXXXXXX)
• Ethernet cable (GE Part No. 977-0209/60) for local network connection
• Serial null modem cable (GE Part No. 977-0529/72) for local maintenance connection
• ½ AA 3.6 V Lithium Battery (GE Part No. 980-0038)
• User’s Manual (GE Part No. 994-0089)
• Mini SQL Proof of License
Verify that you have received all items. GE parts include a unique GE part number,
typically in the format XXX-XXXX, that can be used as a reference.
Verify the hardware configuration of the D400 using the Product ID number. For an
explanation of the Product ID, see Appendix B, “Ordering Guide”.
D400 Substation Data Manager User's Manual 21
Page 22
GE Energy
2.4 First Look at the D400
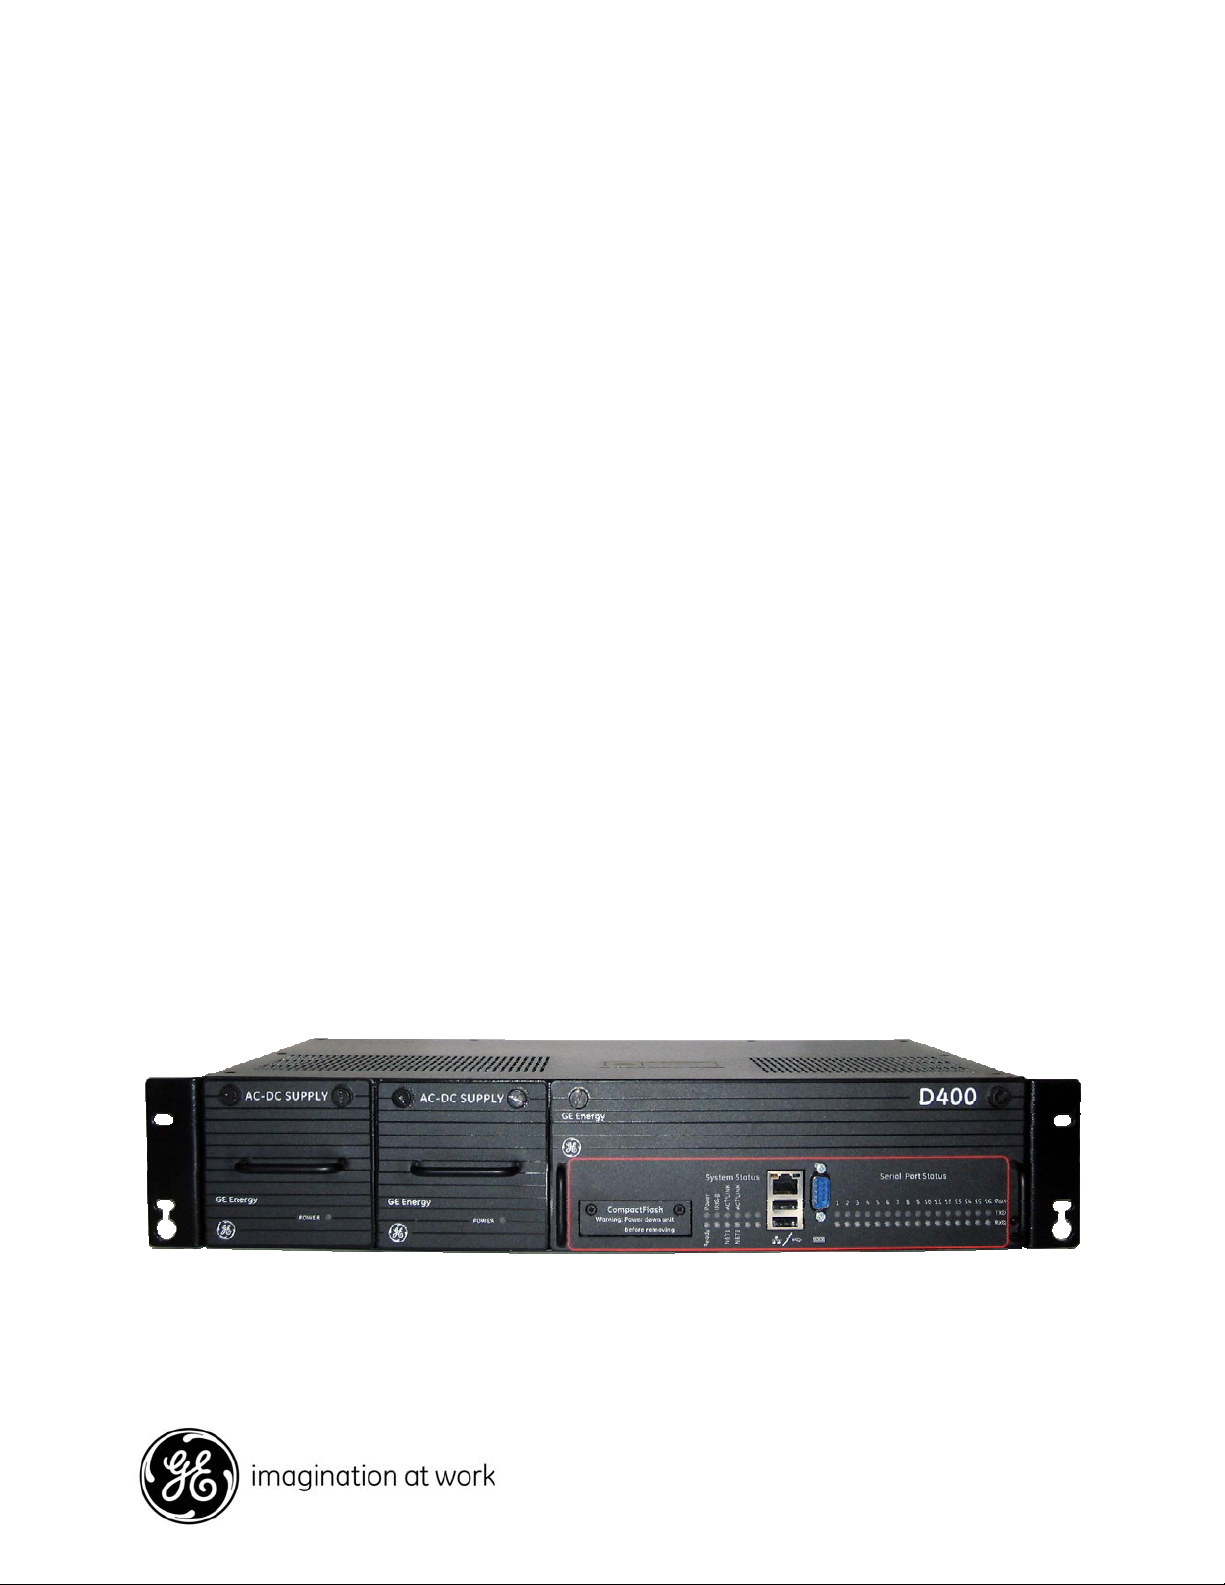
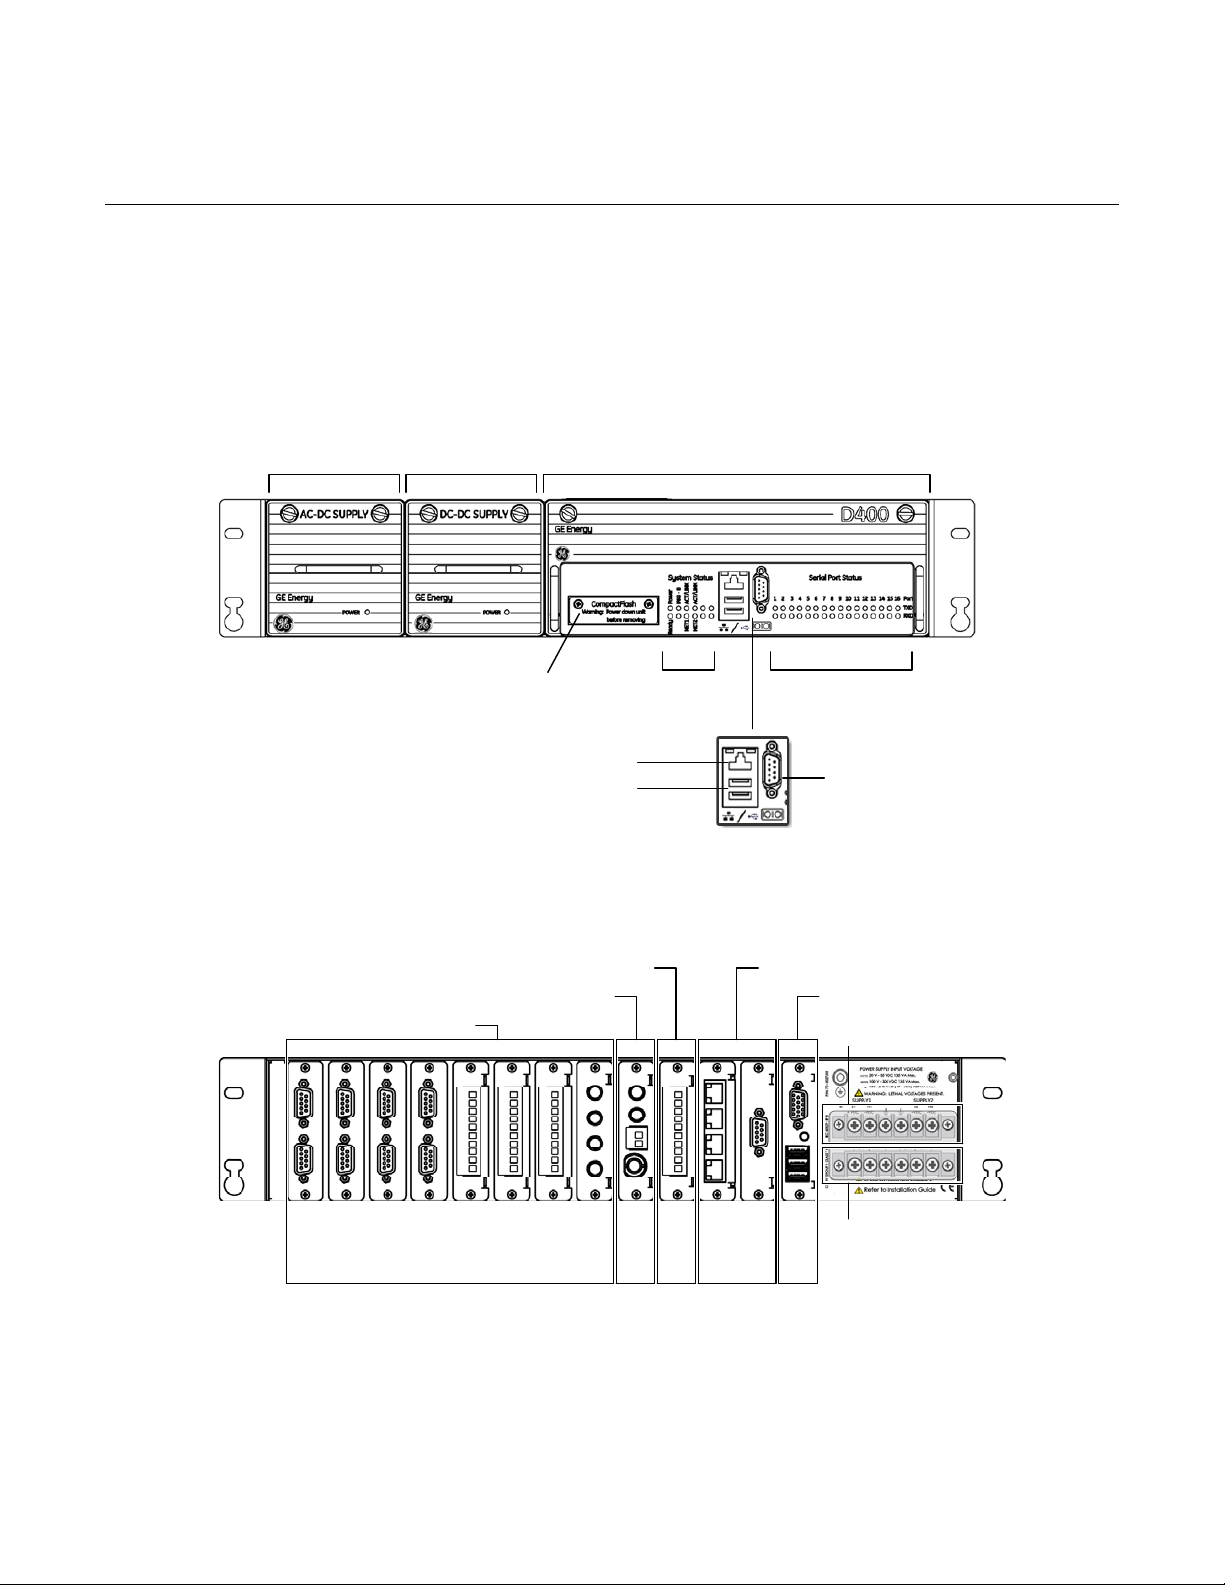
Front Panel
The front panel of the D400 provides easy access to the status indicators, user
connections and power supply units.
Power
Supply
Two USB Type A ports for portable memory device plug-in
Optional Redundant
Power Supply
User CompactFlash
access panel
Ethernet port for local network connection
D400 Main Module
System Status
LED indicators
Serial Port Status
LED indicators
Serial communication
port for local
maintenance
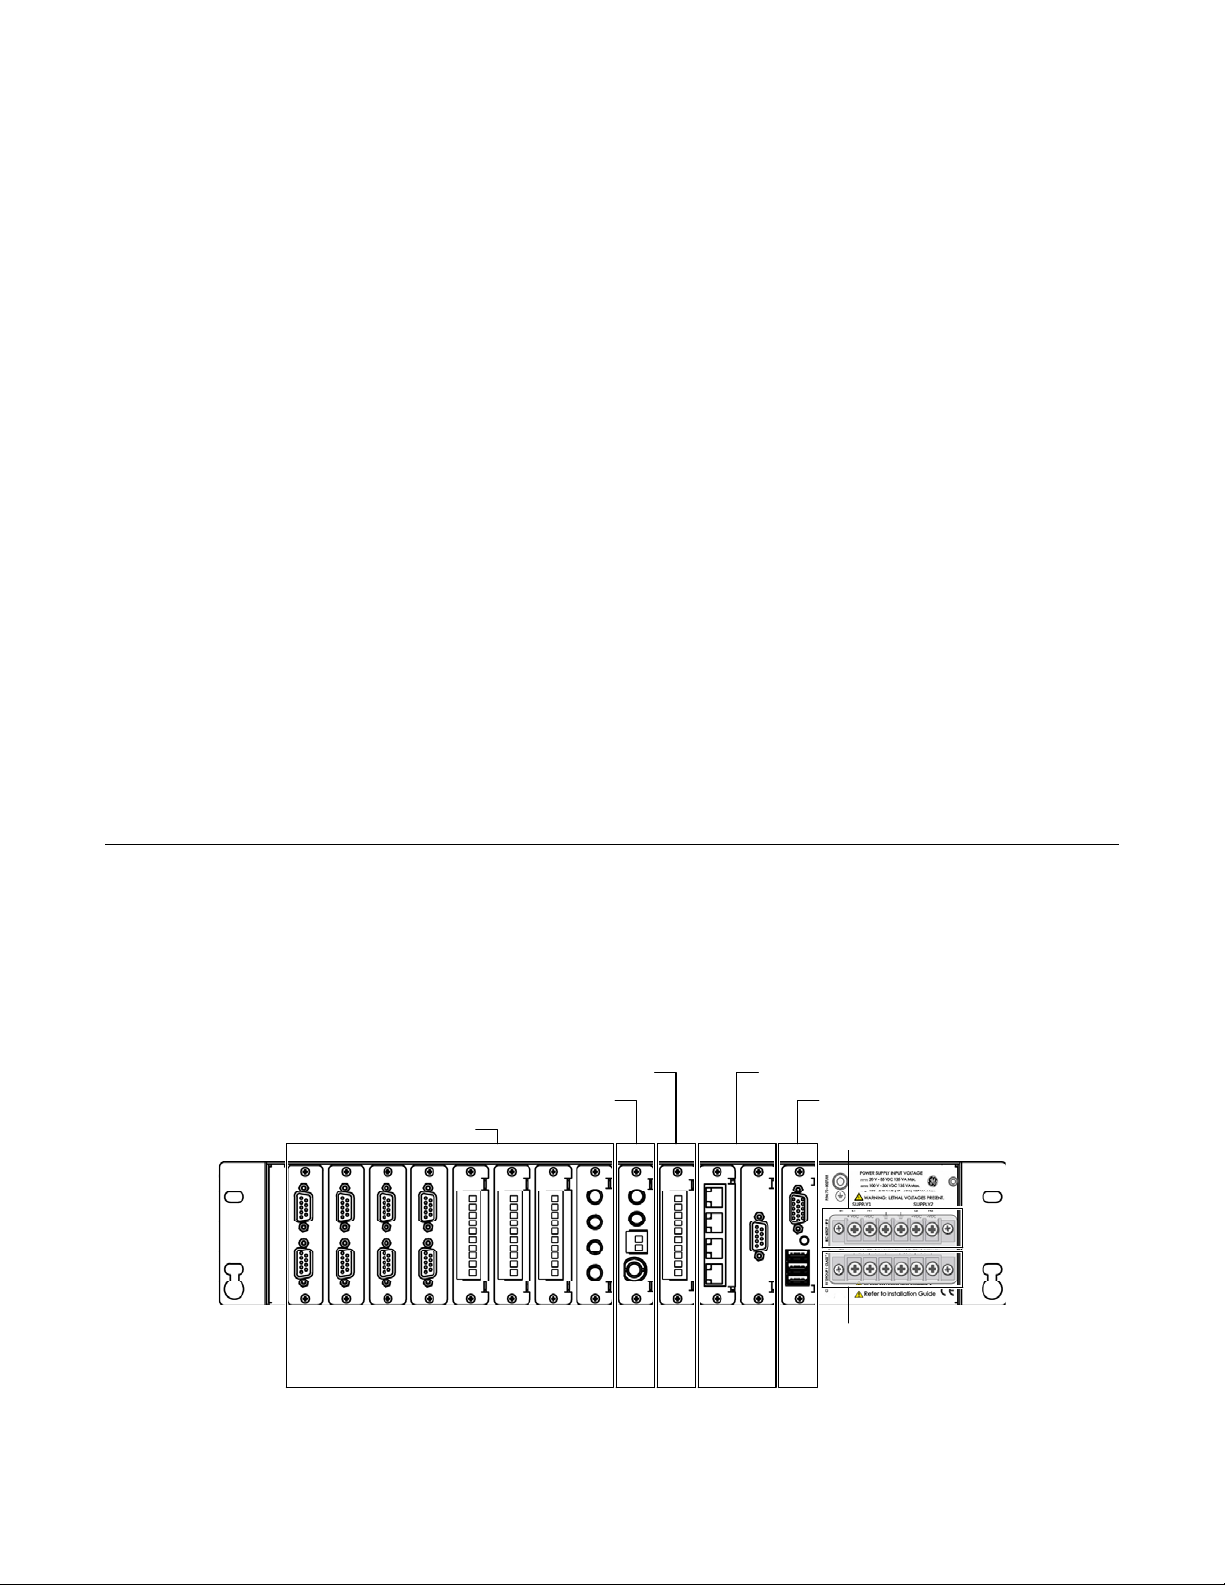
Rear Panel
The rear panel provides access to the communication ports, field wiring connections and
power connections.
IRIG-B Distribution Slot Network Slots
IRIG-B Input Slot
Serial Communication Slots
USB KVM Slot
External Power Source
Power Supply Alarms
Slot 1
Slot 2
Slot 3
Slot 4
Slot 5
Slot 6
Slot 7
Slot 8
Slot 9
Slot 10
Slot 11
Slot 12
Slot 13
The D400 contains 13 I/O adapter card slots for the communication cards. The
communication cards are powered from the backplane of the D400. The types of
communication cards included in your D400 depend on what was ordered for your
substation application.
994-0089–1.00–2, General
22
Page 23
GE Energy
2.5 Physical Installation
The D400 can be installed in a standard 19-inch rack or substation panel.
Rack Mounting
The D400 mounts directly into an industry-standard 19-inch [482.6 mm] equipment
mounting rack with EIA universal mounting rail hole spacing.
The top cover of the D400 can get hot during peak operation. Ensure
that there is at least 1U (1.75 inch [44.45 mm]) of free space above the
D400 unit for proper ventilation.
When the unit is operating above the 50 °C ambient temperature, safe
handling precautions are recommended to prevent burns.
» To mount the D400 on a rack:
1. Position the D400 in the rack.
2. Holding the D400 firmly in the rails of the mounting rack, insert and tighten the four
rack screws.
The recommended tool torque settings for zinc-plated mounting screws are:
– 10-32 UNF screws use 22.2 in-lb [2.50 Nm]
– 12-24 UNC screws use 31.0 in-lb [3.51 Nm]
– M5x0.45 screws use 18.1 in-lb [2.04 Nm]
– M6x0.5 screws use 33.3 in-lb [3.76 Nm]
Panel Mount
» To mount the D400 in a panel:
If you are using a panel cutout, use the following cutout dimensions:
[4.1 mm]
3.50 in.
[88.90 mm]
.162 in.
1.75 in.
[44.46 mm]
18.3 in. [464.8 mm]
17.5 in. [444.5 mm]
Cutout for panel mounting
D400 Substation Data Manager User's Manual 23
Page 24
GE Energy
3
Setting up Communication
Cards
This chapter describes the D400 communication cards and how to change the card
settings for the different configuration options. The communication cards are factory
installed in the D400 with default settings.
3.1 Communication Cards
All communication cards plug into I/O adapter card slots at the rear of the D400 chassis.
The communication cards are powered from the backplane of the D400.
D400 I/O Adapter Card Slots
IRIG-B Distribution Slot Network Slots
IRIG-B Input Slot
Serial Communication Slots
USB KVM Slot
External Power Source
Power Supply Alarms
Slot 1
Slot 2
Slot 3
Slot 4
Slot 5
Slot 6
Slot 7
Slot 8
Slot 9
Slot 10
Slot 11
Slot 12
Slot 13
D400 Substation Data Manager User's Manual 24
Page 25

GE Energy
Types of Communication Cards
The types of communication cards included in your D400 depend on what was ordered
for your substation application. The following types of communication cards are available
for the D400:
Serial (Slots 1 to 8)
• RS-232
• RS-485
• Fiber Optic Serial (glass or plastic)
IRIG-B (Slots 9 and 10)
• IRIG-B Input
• IRIG-B Distribution
Network (Slots 11 and 12)
• 4-Port Twisted-Pair Ethernet Switch
• Hot Standby Fiber Optic Ethernet Switch
• Redundant Twisted-Pair Ethernet + COM2 Port
• COM2 Port
USB KVM (Slot 13)
• Keyboard, Video and Mouse
D400 Substation Data Manager User's Manual 25
Page 26

GE Energy
3.2 Changing Card Settings
The communication cards are factory installed with default settings. You may want to
adjust individual card settings to work with your specific system set up. The
communication cards are hot swappable -- this means you do not have to power down
the D400 unit to remove and install the communication cards.
» To change the settings on a communication card:
1. At the rear panel of the D400, using a flathead or Phillips screwdriver loosen (but
don’t completely remove) the two screws from the top and bottom of the
communication card.
2. Using the flathead screwdriver, gently pry the top of the card from the slot and
remove it from the chassis.
3. Refer to the instructions in the following sections to make any required changes to
the switch settings on the card.
Tip: Use a small flathead screwdriver (same as used to remove the communication
card screws) to change switch positions.
4. Slide the card into the same slot you removed it from, and tighten the two screws.
CAUTION: For proper transient protection, the recommended tool torque settings for
communication card screws are 2.6 in-lb [0.294 Nm].
994-0089–1.00–2, General
26
Page 27

GE Energy
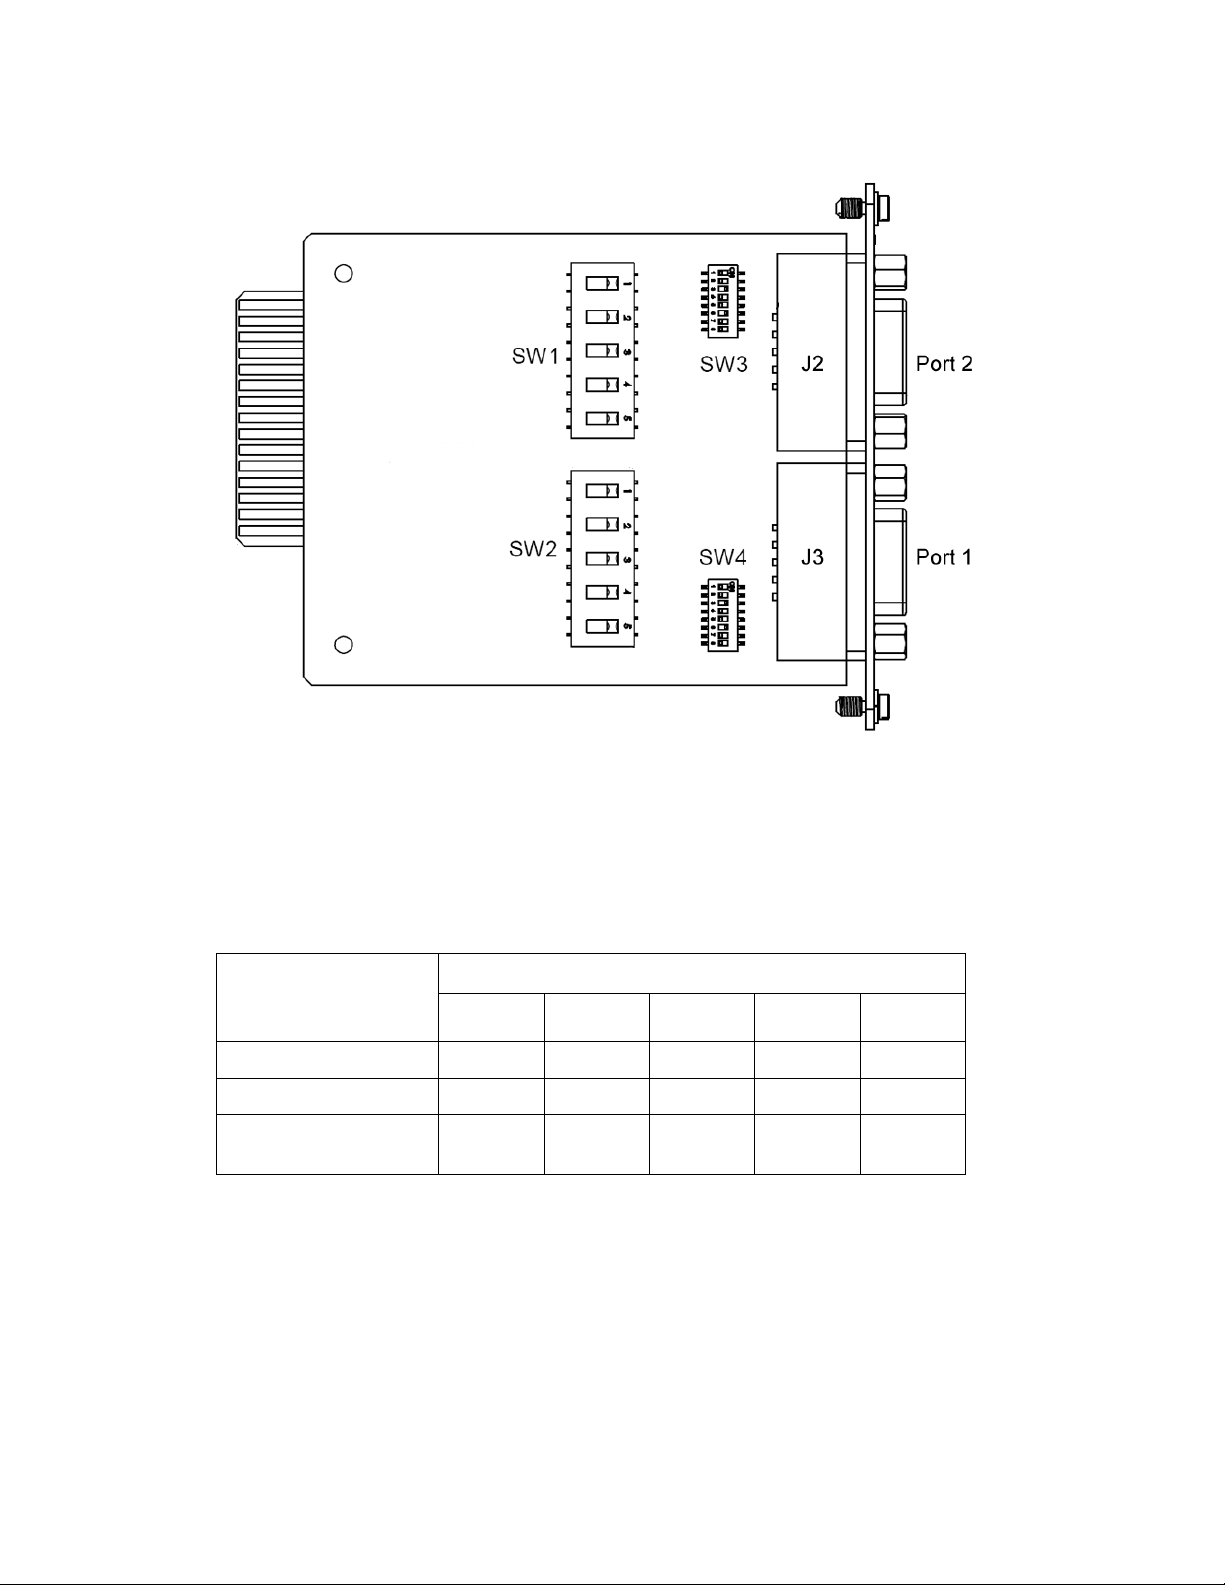
3.3 RS-232 Adapter
The RS-232 Adapter (GE Part No. 520-0207) is a standard RS-232 serial I/O adapter card
that plugs into any serial communication slot (slots 1 through 8) on the D400. It contains
two independently isolated RS-232 serial ports (Port 1 J3 and Port 2 J2) each with a DB-9
connector.
See section “4.3 RS-232 Connections” for typical cable connections.
Configuration Options
The RS-232 card supports the following configuration options on each port:
• DCE (Data Communications Equipment) – as a peripheral
• DTE (Data Terminal Equipment) – as a PC
• +5 V (320 mA) output
In addition, the RS-232 card is configurable to provide an IRIG-B signal (on pin 4) and
Ground (on pin 6).
The signal type and pin options for each port are selectable via two sets of switches on
the RS-232 card:
• Port 2 (J2) is configured by switches SW1 and SW3
• Port 1 (J3) is configured by switches SW2 and SW4
Follow instructions for setting the switches to select the appropriate functions for each
port.
Factory Default
The factory default setting is DTE on each port.
D400 Substation Data Manager User's Manual 27
Page 28
GE Energy
RS-232 Adapter Top Side
Switch SW1/SW2 Configuration
Switches SW1 (for Port 2) and SW2 (for Port 1) control the signal type of the RS-232 port.
Each switch contains five switch positions that can each be set to position A or B to select
the appropriate port option.
RS-232 Card Switch SW1/SW2 Settings
SW1/SW2 Switch Positions
Port Option
1 2 3 4 5
DTE (default) A A A A A
DCE A B B B B
+5 V (320 mA) isolated
source
*Use DTE or DCE settings as appropriate
Note: +5 V is an independently isolated and fused output (320 mA at 65 °C).
B * * * *
994-0089–1.00–2, General
28
Page 29

GE Energy
DTE (default)
12345A
B
DCE
12345A
B
Switch SW3/SW4 Configuration
Switches SW3 (for Port 2) and SW4 (for Port 1) control the signals on Pins 4 and 6 of the
RS-232 port. Each switch contains four switch positions that can each be set to ON or
OFF to select the appropriate function for the port option. See illustrations below showing
the switch positions for each setting.
RS-232 Card Switch SW3/SW4 Settings
Function
DTE (default)
DCE DTR
IRIG-B
Enable
Signal
DSR Input OFF OFF ON OFF
Output
Ground OFF OFF OFF ON
Pin 6
SW3/SW4 Positions SW3/SW4 Positions
1 2 3 4
OFF ON OFF OFF DSR Input OFF OFF ON OFF
Pin 4
Signal
DTR
Output
IRIG-B
Output
5 6 7 8
OFF ON OFF OFF
ON OFF OFF OFF
D400 Substation Data Manager User's Manual 29
Page 30

GE Energy
DTE (Pin 4 DTR Output and Pin 6 DSR Input)
ON
123
DCE (Pin 4 DSR Input and Pin 6 DTR Output)
4 5678
ON
123
IRIG-B Enable (on Pin 4) and Ground (on Pin 6)
4 5678
ON
123
994-0089–1.00–2, General
30
4 5678
Page 31

GE Energy
3.4 RS-485 Adapter
The RS-485 Adapter (GE Part No. 520-0208) plugs into any serial communication slot
(slots 1 through 8) on the D400. It contains two independently isolated RS-485 channels
on a single terminal block TB1: Channel 1 on terminals TB1-1 through TB1-5 and Channel
2 on terminals TB1-6 through TB1-10.
See section “4.4 RS-485 Connections” for typical cable connections.
Configuration Options
The RS-485 card supports two configuration options on each channel:
• 2-wire
• 4-wire
Pull-up/pull-down and line termination selection is available for the RS-485 signals.
The signal mode for each channel is selectable via two sets of switches on the RS-485
card:
• Channel 1 (TB1-1 to TB1-5) is configured by switches SW2 (top side) and SW4 (bottom
side).
• Channel 2 (TB1-6 to TB1-10) is configured by switches SW1 (top side) and SW3
(bottom side).
Follow instructions for setting the switches to select the appropriate functions for each
channel.
Factory Default
The factory default setting is 4-wire on each channel without pull-up/pull-down or line
termination resistors selected.
Switch SW1/SW2 Configuration
Switches SW1 (for Channel 2 on TB1-6 through TB1-10) and SW2 (for Channel 1 on TB1-1
through TB1-5) control the signal mode for each channel. Each switch contains two
switch positions that can each be set to ON or OFF to select the appropriate channel
option.
RS-485 Card Switch SW1/SW2 Settings
SW1/SW2 Switch Positions
Channel Option
1 2
2-Wire ON OFF
4-Wire (default) OFF ON
D400 Substation Data Manager User's Manual 31
Page 32

GE Energy
RS-485 Adapter Top Side
RS-485 Adapter Bottom Side
994-0089–1.00–2, General
32
Page 33

GE Energy
Switch SW3/SW4 Configuration
Switches SW3 (for Channel 2 on TB1-6 through TB1-10) and SW4 (for Channel 1 on TB1-1
through TB1-5) contain ten DIP-switches that control pull-up and pull-down resistors for
the differential data lines and provide line termination between the differential data pairs.
Each DIP-switch can be set to ON or OFF to select the appropriate function for the switch.
That is, if all pins are set to ON, switch is ON. If all pins are set to OFF, switch is OFF.
If termination/pull up is selected, the TX+ and RX+ signals have a 680 ohm pull-up
resistor, the TX- and RX- signals have a 680 ohm pull-down resistor, and the RX and TX
signals have a 120 ohm termination.
RS-485 Card Switch SW3/SW4 Settings
SW3/SW4 Pin Pin Position Function
1
2
3 Not connected
4
5
6
7
8 Not connected
9
ON Pull-up for TX+
OFF No pull-up for TX+
ON Pull-down for TX-
OFF No pull-down for TX-
ON Pull-up for RX+
OFF No pull-up for RX+
ON Pull-down for RX-
OFF No pull-down for RX-
ON Line termination between TX+ and TX-
OFF No Line termination between TX+ and TX-
ON Line termination between TX+ and TX-
OFF No Line termination between TX+ and TX-
ON Line termination between RX+ and RX-
OFF No Line termination between RX+ and RX-
10
ON Line termination between RX+ and RX-
OFF No Line termination between RX+ and RX-
D400 Substation Data Manager User's Manual 33
Page 34

GE Energy
3.5 Fiber Optic Serial Adapter
The Fiber Optic Serial Adapter is available in two variants:
• Glass Optical Fiber (GOF) Serial with 820-850 nm ST connectors
(GE Part No. 520-0209)
• Plastic Optical Fiber (POF) Serial with 660 nm Agilent Versatile Link connectors (GE
Part No. 520-0210)
The Fiber Optic Serial cards include two pairs of channels for signal transmission
(TX1/TX2) and reception (RX1/RX2) through ST or Versatile connectors. The cards plug into
any serial communication slot (slots 1 through 8) on the D400.
See section “4.5 Fiber Optic Connections” for typical cable connections.
Configuration Options
The Fiber Optic Serial card supports the following configuration options for each channel:
• Standard state
• Inverted state
The state for each channel is selectable via a single two-position pin switch SW1 on the
Fiber Optic Serial card.
Follow instructions for setting the switch to select the appropriate state for each channel.
Note: The fiber optic channel settings on the D400 must match the set up of the other
end of the fiber optic communications channel.
Factory Default
The factory default setting is Standard state on each channel.
Switch SW1 Configuration
Switch SW1 controls the state of each fiber optic channel. The switch contains four twoposition pins that can each be set to A or B to select the appropriate state.
Fiber Optic Serial Card Switch SW1 Settings
SW1 Switch Positions
State Option
1 2 3 4
Standard (default) B A B A
Inverted A B A B
Note: In Standard state fiber is lit when a “1” is transmitted. In Inverted state fiber is lit
when a “0” is transmitted.
994-0089–1.00–2, General
34
Page 35

GE Energy
Glass Optical Fiber Serial Adapter
Plastic Optical Fiber Serial Adapter
D400 Substation Data Manager User's Manual 35
Page 36

GE Energy
3.6 IRIG-B Input Adapter
The IRIG-B Input Adapter (GE Part No. 520-0211) plugs into a dedicated IRIG-B slot (slot 9)
on the D400. The IRIG-B Input card accepts an IRIG-B signal in one of three input formats
through a corresponding connector type:
• Modulated IRIG-B through a BNC connector J2
• Demodulated IRIG-B (TTL) through a terminal block TB1
• Fiber Optic through a Receive (RX) 820-850 nm ST connector U12
The IRIG-B signal (TTL) can be subsequently distributed to attached IEDs through one of
the following output methods:
• IRIG-B Distribution Adapter (GE Part No. 520-0212). See section “3.7 IRIG-B Distribution
Adapter”
• RS-232 Adapter (GE Part No. 520-0207). See section “3.3 RS-232 Adapter”
• On-board fiber optic output (TX) on 820-850 nm ST connector U13
See section “4.6 IRIG-B Connections” for wiring instructions.
Configuration Options
The input signal formats and output options are selectable via three switches on the IRIGB Input card:
• IRIG-B state option is configured by switch SW1
• Input signal format is configured by switch SW2
• Fiber optic TX option is configured by switch SW3
Follow instructions for setting the switches to select the appropriate IRIG-B signal formats
and functions
.
Factory Default
The factory default setting is the Standard state on each channel.
Switch SW1 Configuration
Switch SW1 controls the state option for the IRIG-B Input card. It contains two switch
positions that can be set to ON or OFF to select the appropriate IRIG-B state option.
IRIG-B Input Card Switch SW1 Settings
SW1 Switch Positions
IRIG-B State Option
1 2
Standard (default) ON OFF
Inverted OFF ON
994-0089–1.00–2, General
36
Page 37

GE Energy
IRIG-B Input Adapter
Switch SW2 Configuration
Switch SW2 controls the signal option for the selected state option (SW1). It contains
three switch positions that can be set to ON or OFF to select the appropriate signal.
IRIG-B Input Card Switch SW2 Settings
SW2 Switch Positions
Input Signal Option
1 2 3
Fiber Optic (RX) ON OFF OFF
TTL (TB1) (default) OFF ON OFF
BNC (J2) OFF OFF ON
Switch SW3 Configuration
Switch SW3 controls the state option for the IRIG-B fiber optic TX input. It contains two
switch positions that can be set to ON or OFF to select the appropriate state.
IRIG-B Input Card Switch SW3 Settings
SW3 Switch Positions
Fiber Optic TX Option
1 2
Fiber RX (default) ON OFF
Inverted OFF ON
D400 Substation Data Manager User's Manual 37
Page 38

GE Energy
3.7 IRIG-B Distribution Adapter
The IRIG-B Distribution Adapter (GE Part No. 520-0212) is an optional IRIG-B output card
to supply an IRIG-B (TTL) signal passed from the IRIG-B Input card to attached IEDs. The
IRIG-B Distribution card provides four channels on a single terminal block. Each channel
is capable of supplying a signal to up to four IEDs, for a total of 16 IEDs. The IRIG-B
Distribution card plugs into a dedicated IRIG-B slot (slot 10) on the D400.
See section “4.6 IRIG-B Connections” for wiring instructions.
Configuration Options
There are no selectable options on the IRIG-B Distribution card.
IRIG-B Distribution Adapter
994-0089–1.00–2, General
38
Page 39

GE Energy
3.8 4-Port Twisted-Pair Ethernet Switch
The 4-Port Twisted-Pair Ethernet Switch (GE Part No. 520-0213) is a 10/100BaseT network
switch that plugs into the NET1 or NET2 slot (slots 11 and 12) on the D400. It provides
local area network connections for up to five Ethernet connections: four RJ-45
connectors on the rear panel and one RJ-45 connector on the front panel.
If two Ethernet switches are installed in the NET slots, the D400 may be used in a dual-IP
redundancy mode. That is, each switch can be configured with a different IP address to
provide a backup network connection if the primary channel fails.
See section “4.7 Network Connections” for typical cable connections.
Configuration Options
There are no selectable options on the 4-Port TP Ethernet card.
4-Port Twisted-Pair Ethernet Switch Card
D400 Substation Data Manager User's Manual 39
Page 40

GE Energy
3.9 Hot Standby Fiber Optic Ethernet Switch
The Hot Standby Fiber Optic Ethernet Switch (GE Part No. 520-0214) is a 100BaseSX (820850 nm) network switch that supports single-IP redundancy for the D400. It provides
automated fail over between two Ethernet fiber optic network connections (RX1/TX1 and
RX2/TX2) that share a single MAC address.
When the primary port (Fiber Optic Channel 1) receives no signal, or detects a fault signal
from the remote link partner, the D400 switches to the secondary port (Fiber Optic
Channel 2) if it has a valid link. The D400 reverts to the primary port if the primary link is
restored or no signal is present on the secondary port.
The Hot Standby Fiber Optic Ethernet Switch can be installed in the NET1 or NET2 slot
(slots 11 and 12) on the D400.
See section “4.5 Fiber Optic Connections” for typical cable connections.
Configuration Options
There are no selectable options on the Hot Standby Fiber Optic Ethernet Switch card.
Hot Standby Fiber Optic Ethernet Switch Card
994-0089–1.00–2, General
40
Page 41

GE Energy
3.10 Redundant Twisted-Pair Ethernet + COM2 Port Adapter
The Redundant TP Ethernet + COM2 Port card (GE Part No. 520-0218) provides two local
area network connections with unique MAC addresses through Ethernet RJ-45
connectors. The LAN input routes to a three-port Ethernet switch and the WAN input
routes to the PC/104-Plus Ethernet Module. The Ethernet switch can support a dualredundancy network option on the D400. The card also provides an RS-232 DCE
connection through a DB-9 connector. The Redundant TP Ethernet + COM2 Port card can
only be installed in the NET1 slot (slot 11) on the D400.
Note: Use of the Redundant TP Ethernet + COM2 Port card requires the installation of the
Dual Redundant Ethernet D400 CPU option, which includes the PC/104-Plus 10/100BaseT
Ethernet module (GE Part No. 580-2717). The COM2 Port requires an external modem to
provide dial-up functionality.
See sections “4.7 Network Connections” and “4.8 Modem Connections” for typical cable
connections.
Configuration Options
There are no selectable options on the Redundant TP Ethernet + COM2 Port card.
Redundant TP Ethernet + COM2 Port Adapter Card
D400 Substation Data Manager User's Manual 41
Page 42

GE Energy
3.11 COM2 Port Adapter
The COM2 Port Adapter (GE Part No. 520-0219) provides a single DB-9 connector (P2)
wired for an RS-232 DCE signal. The COM2 Port card can support serial connections for
the following dial-up interfaces:
• External modem
• Point-to-point protocol (PPP) services
• Wide area network
The COM2 Port Adapter plugs into any NET slot (slots 11 and 12) of the D400.
Note: The COM2 Port requires an external modem to provide dial-up functionality.
See section “4.8 Modem Connections” for typical cable connections.
Configuration Options
There are no selectable options on the COM2 Port card.
COM2 Port Adapter
994-0089–1.00–2, General
42
Page 43

GE Energy
3.12 USB KVM & Audio Adapter
The USB Keyboard, Video, Mouse Adapter (GE Part No. 520-0206) plugs into the USB KVM
slot (slot 13) on the D400. The card provides connections for setting up a permanent local
workstation, including:
• Three USB v1.1 compliant Type A ports (P3-P5) for keyboard, mouse or other USB
device
• Single 3.5 mm audio jack (P2) for stereo audio output
• High-density D-sub 15-socket connector (J1) for video output
See section “4.9 Local HMI Connection” for typical cable connections.
Configuration Options
There are no selectable options on the USB KVM card.
USB KVM Adapter
D400 Substation Data Manager User's Manual 43
Page 44

GE Energy
4
Connecting to Devices and
Networks
This chapter provides guidelines for making physical connections between the D400 and
substation and network devices.
4.1 Connection Types
The D400 can accommodate a wide range of devices and network connections through
a variety of communication card options.
For more information about the types of communication cards and configuration options,
see chapter “3 Setting up Communication Cards”.
Serial
The D400 can support up to 16 serial connections (up to 8 serial adapter cards with 2
ports each) to a variety of GE and other vendor devices, including:
• Protective relays
• Meters
• Programmable logic controllers (PLCs)
• Remote terminal units (RTUs)
• Monitoring equipment
• Digital fault recorders (DFRs)
• Sequence of event (SOE) recorders
• Load tap changers (LTCs)
994-0089–1.00–2, General
44
Page 45

GE Energy
The following types of serial connections are supported in single or multi-dropped set
ups:
• RS-232
• RS-485 (2-wire or 4-wire)
• Fiber Optic Serial (glass or plastic)
Network
The D400 can support up to eight network connections to host and network clients,
including:
The D400 can support up to eight network connections.
• SCADA master station
• Substation LAN
• Enterprise network (Corporate wide area network)
The following networking connections are supported:
• Ethernet (Twisted pair or Fiber optic)
• COM2 (for dial-up)
Time Synchronization
The D400 accepts a time synchronization input (IRIG-B) from GPS receivers that can be
subsequently distributed to connected devices.
Local Substation Computer
A substation computer can be set up with the D400 through the USB KVM connections to
access the HMI locally.
Optionally, a portable PC can be connected to the front Ethernet port to access the HMI
locally.
Local Maintenance
A local PC can be directly connected to the D400 through a front serial communications
port to perform system maintenance.
D400 Substation Data Manager User's Manual 45
Page 46

GE Energy
4.2 Cabling Overview
The D400 provides a series of I/O adapter cards for connecting cables and wiring from
substation devices and network interfaces. All physical connections are made to easily
accessible connectors on the rear panel of the D400.
D400 Field and Network Connections
IRIG-B Distribution Slot Network Slots
Serial Communication Slots
IRIG-B Input Slot
USB KVM Slot
External Power Source
Power Supply Alarms
Slot 1
Slot 2
Slot 3
Slot 4
Slot 5
Slot 6
Slot 7
Slot 8
Slot 9
Slot 10
Slot 11
Slot 12
Slot 13
The types of communication cards included in your D400 depend on what was ordered
for your substation application.
For a list and detailed description of the types of communication cards available, see
chapter “3 Setting up Communication Cards”.
General Cabling Requirements
Cabling required to make physical connections to the D400 are as follows:
Media Designation Cabling Connector
Single Fiber Optic
Ethernet
Single Twisted Pair
Redundant Twisted Pair
PPP Serial Over External
Modem V.90 (56 Kbps)
10BaseFL
100BaseSX
10/100BaseT UTP– Unshielded Twisted
10/100BaseT UTP– Unshielded Twisted
RS-232 Standard RS-232 cable DB-9
62.5/125 µm or
50/125 µm multi-mode
fiber cable
Pair – CAT 5 or better
Pair – CAT 5 or better
ST Connectors
(820-850 nm)
RJ-45
RJ-45
994-0089–1.00–2, General
46
Page 47

GE Energy
High-Voltage Installations
To provide higher EMC immunity and maintain CE Mark compliance, the serial cables
used for permanent RS-232 and RS-485 connections must comply with the following
requirements:
• Cables must be shielded
• D-type connector covers must provide EMC shielding (e.g. metalized plastic or die
cast metal covers).
D400 Substation Data Manager User's Manual 47
Page 48

GE Energy
4.3 RS-232 Connections
The D400 accepts connections to RS-232 type devices through the RS-232 Adapter. The
RS-232 Adapter (GE Part No. 520-0207) is a standard RS-232 serial I/O adapter card that
plugs into any serial communication slot (slots 1 through 8) on the D400. It contains two
independently isolated RS-232 serial ports (Port 1 and Port 2) each with a DB-9
connector.
The required RS-232 cable is a serial null modem, DB-9F to DB-9M cable. The cables must
be shielded and DB-9 connector covers must provide EMC shielding (e.g. metalized plastic
or die-cast metal covers).
See section “3.3 RS-232 Adapter” for configuration options.
» To connect RS-232 type devices to the RS-232 Adapter, use the following cable
connection:
6
7
8
9
1
2
3
5
5
1
2
3
5
5
6
7
8
9
RS-232 Port DB-9 Connector Signal Definitions
Pin
Number
1 DCD IN DCD IN
2 RXD IN TXD OUT
3 TXD OUT RXD IN
4 DTR OUT DSR IN
DTE (default) DCE
Function Signal Flow Function Signal Flow
Relay
5 Signal GND - Signal GND -
6 DSR IN DTR OUT
7 RTS OUT CTS IN
8 CTS IN RTS OUT
9 Not connected - Not connected -
994-0089–1.00–2, General
48
Page 49

GE Energy
4.4 RS-485 Connections
The D400 accepts connections to RS-485 2-wire and 4-wire type devices through the RS485 Adapter. The RS-485 Adapter (GE Part No. 520-0208) plugs into any serial
communication slot (slots 1 through 8) on the D400. It contains two independently
isolated RS-485 channels on a single terminal block: Channel 1 on terminals TB1-1
through TB1-5 and Channel 2 on terminals TB1-6 through TB1-10.
See section “3.4 RS-485 Adapter” for configuration options.
Cabling Requirements
The recommended total maximum length for RS-485 cables is 4000 ft [1300 m] when
operating at 115 kbps. Refer to the manual of the connecting device for its recommended
maximum cable length.
The cables must be shielded and the shield of each RS-485 cable section should be
grounded at one end only. This prevents circulating currents and can reduce surgeinduced current on long communication lines.
2-Wire Connections
» To connect RS-485 2-wire type devices to the RS-485 Adapter, use the
following wiring connection:
Note: Before wiring devices, ensure that the RS-485 Adapter is configured to 2-wire
mode (see section “3.4 RS-485 Adapter”).
Relay
RS485+
RS485-
D400 Substation Data Manager User's Manual 49
Page 50

GE Energy
RS-485 2-Wire Terminal Block Signal Definitions
RS-485 Channel Position
Number
Channel 1
Channel 2
1 TX1+ IN/OUT
2 TX1- IN/OUT
3 FGND 1 -
4 RX1- -
5 RX1+ -
6 TX2+ IN/OUT
7 TX2- IN/OUT
8 FGND 2 -
9 RX2- -
10 RX2+ -
Function Signal Flow
2-Wire
Note: The terminal block positions are numbered from 1 to 10 starting from the bottom
of the card.
994-0089–1.00–2, General
50
Page 51

GE Energy
4-Wire Connections
In 4-wire mode, the RS-485 Adapter supports a maximum of 32 transceivers per channel
(64 devices per RS-485 Adapter card).
See section “3.4 RS-485 Adapter” for configuration options.
» To connect RS-485 4-wire type devices to the RS-485 Adapter, use the
following wiring connection:
Note: Before wiring devices, ensure that the RS-485 Adapter is configured to 4-wire
mode (see section “3.4 RS-485 Adapter”).
Device 1
RX- RX+ TX- TX+
Device 2
RX- RX+ TX- TX+
Device 3
RX- RX+ TX- TX+
D400 Substation Data Manager User's Manual 51
Page 52

GE Energy
RS-485 4-Wire Terminal Block Signal Definitions
RS-485 Channel Position
Number
Channel 1
Channel 2
1 TX1+ OUT
2 TX1- OUT
3 FGND 1 -
4 RX1- IN
5 RX1+ IN
6 TX2+ OUT
7 TX2- OUT
8 FGND 2 -
9 RX2- IN
10 RX2+ IN
4-Wire (default)
Function Signal Flow
Note: The terminal block positions are numbered from 1 to 10 starting from the bottom
of the card.
994-0089–1.00–2, General
52
Page 53

GE Energy
4.5 Fiber Optic Connections
For devices located some distance from the D400, they may be connected using glass or
plastic optical fiber cables. Fiber optic cabling also offers superior performance in
electrically noisy environments.
Glass Optical Fiber
You can use the following glass optical fiber (GOF) cabling with the D400 Glass Optical
Fiber Serial adapter:
• 50/125 µm core/cladding multi-mode (gradient index) cable
• 62.5/125 µm core cladding multi-mode (gradient index) cable
• 100/140 µm core/cladding multi-mode (gradient index) cable
• 200 µm core Hard-Clad Silica (HCS) multi-mode (step index) cable
You can use the following fiber optic terminations for D400 cabling:
• ST Connectors
When calculating cable length, consider the following optical power levels:
• Glass optical fiber transmitter power is –19.0 ± 2 dBm
• Glass optical fiber receiver sensitivity is typically –25.4 dBm
Warning: LED transmitters are classified as IEC 60825-1 Accessible Emission
Limit (AEL) Class 1M. Class 1M devices are considered eye safe to the unaided
eye. Do not view directly with optical instruments.
Plastic Optical Fiber
You can use 1 mm plastic optical fiber (POF) cabling with the D400 Plastic Optical Fiber
Serial adapter. The recommended termination is the Agilent Versatile Link Simplex
Connector.
When calculating cable length, consider the following optical power levels:
• Plastic optical fiber transmitter power is –9.0 ± 4.5 dBm
• Plastic optical fiber receiver sensitivity is typically –39 dBm
D400 Substation Data Manager User's Manual 53
Page 54

GE Energy
See section “3.5 Fiber Optic Serial Adapter” for configuration options.
» To connect fiber optic links to the Fiber Optic adapters, plug fiber optic cables
into the corresponding TX and RX connectors.
Hot Standby Fiber Optic Connections
The Hot Standby Fiber Optic Ethernet Switch (GE Part No. 520-0214) is a 100BaseSX (820850 nm) network switch that supports single-IP redundancy for the D400. It provides
automated fail over between two Ethernet fiber optic network connections (RX1/TX1 and
RX2/TX2) that share a single MAC address.
Warning: LED transmitters are classified as IEC 60825-1 Accessible Emission
Limit (AEL) Class 1M. Class 1M devices are considered eye safe to the unaided
eye. Do not view directly with optical instruments.
The Hot Standby Fiber Optic Ethernet Switch can be installed in the NET1 or NET2 slot
(slots 11 and 12) on the D400.
If two Hot Standby Ethernet switches are installed in the NET slots, the system may be
used in a dual-IP redundancy mode. That is, each switch can be configured with a
different IP address to provide a back up network connection if the primary channel fails.
You can use the following glass optical fiber (GOF) cabling with the D400 Glass Optical
Fiber Serial adapter:
• 50/125 µm core/cladding multi-mode (gradient index) cable
• 62.5/125 µm core cladding multi-mode (gradient index) cable
• 100/140 µm core/cladding multi-mode (gradient index) cable
• 200 µm core Hard-Clad Silica (HCS) multi-mode (step index) cable
You can use the following fiber optic terminations for D400 cabling:
• ST Connectors
When calculating cable length, consider the following optical power levels:
• Glass optical fiber transmitter power is –19.0 ± 2 dBm
• Glass optical fiber receiver sensitivity is typically –31.0 dBm
Warning: LED transmitters are classified as IEC 60825-1 Accessible Emission
Limit (AEL) Class 1M. Class 1M devices are considered eye safe to the unaided
eye. Do not view directly with optical instruments.
994-0089–1.00–2, General
54
Page 55

GE Energy
Fiber Optic Connector Signal Definitions
Connector Function
TX1 Primary Fiber Optic Transmit Port
RX1 Primary Fiber Optic Receive Port
TX2 Hot Standby Secondary Fiber Optic Transmit Port
RX2 Hot Standby Secondary Fiber Optic Receive Port
See section “3.9 Hot Standby Fiber Optic Ethernet Switch” for more information.
4.6 IRIG-B Connections
The D400 uses a pair of IRIG-B adapter cards, the IRIG-B Input Adapter and the IRIG-B
Distribution Adapter, to accept an IRIG-B signal from a GPS receiver then distribute the
signal to connected IEDs.
See sections “3.6 IRIG-B Input Adapter” and “3.7 IRIG-B Distribution Adapter” for more
information.
IRIG-B Input Adapter
The IRIG-B Input Adapter (GE Part No. 520-0211) plugs into a dedicated IRIG-B slot (slot 9)
on the D400. The IRIG-B Input card accepts an IRIG-B signal in one of three input formats
through a corresponding connector type:
• Modulated IRIG-B through a BNC connector
• Demodulated IRIG-B (TTL) through a terminal block
• Fiber Optic through a Receive (RX) 820-850 nm ST connector
The IRIG-B signal can be distributed to an attached IED through the fiber optic output (TX)
on 820-850 nm ST connector.
When calculating cable length, consider the following optical power levels:
• Glass optical fiber transmitter power is –19.0 ± 2 dBm
• Glass optical fiber receiver sensitivity is typically –25.4 dBm
Warning: LED transmitters are classified as IEC 60825-1 Accessible Emission
Limit (AEL) Class 1M. Class 1M devices are considered eye safe to the unaided
eye. Do not view directly with optical instruments.
D400 Substation Data Manager User's Manual 55
Page 56

GE Energy
IRIG-B Input Adapter
IRIG-B Distribution Adapter
The IRIG-B Distribution Adapter (GE Part No. 520-0212) is an optional IRIG-B output card
to supply an IRIG-B (TTL) signal passed from the IRIG-B Input card to attached IEDs. The
IRIG-B Distribution card provides four channels on a single terminal block. Each channel
is capable of supplying a signal to up to four IEDs, for a total of 16 IEDs. The IRIG-B
Distribution card plugs into a dedicated IRIG-B slot (slot 10) on the D400.
IRIG-B Distribution Adapter
IRIG-B Distribution Terminal Block Signal Definitions
Channel Terminal Block
Position
Channel 1 1 IRIG-B TTL OUT
2 GND -
3 FGND -
Channel 2 4 IRIG-B TTL OUT
5 GND -
Channel 3 6 IRIG-B TTL OUT
7 GND -
8 FGND -
Channel 4 9 IRIG-B TTL OUT
10 GND -
Function Signal Flow
Note: The terminal block positions are numbered from 1 to 10 starting from the bottom
of the card.
994-0089–1.00–2, General
56
Page 57

GE Energy
4.7 Network Connections
The D400 supports a network interface through Ethernet connections to the 4-Port
Twisted-Pair Ethernet Switch or Redundant Twisted-Pair Ethernet + COM2 Port Adapter.
All RJ-45 connectors have the same signal definition. However, the rear Ethernet ports
are auto MDI/MDIX and can support a straight-through or crossover cable.
See sections “3.8 4-Port Twisted-Pair Ethernet Switch” and “3.10 Redundant Twisted-Pair
Ethernet + COM2 Port Adapter” for more information.
» To connect the D400 to network devices, plug network cables into the D400
Ethernet ports.
Front Network Port
To access the D400’s built-in HMI, a local or portable PC can be directly connected to the
network port located on the front panel of the D400.
» To connect a local PC to the D400:
Connect a straight-through Ethernet cable to your computer’s network communications
port and to the D400's front Ethernet port.
D400 Substation Data Manager User's Manual 57
Page 58

GE Energy
Ethernet RJ-45 Connector Signal Definitions
Ethernet Crossover Cable (RJ-45) Pin Out
Position Function Signal Flow Color
1 RX+ IN White w/ Orange
2 RX- IN Orange
3 TX+ OUT White w/ Green
4 P1+ - Blue
5 P1- - White w/ Blue
6 TX- OUT Green
7 P2+ - White w/ Brown
8 P2- - Brown
Shield - -
D400 Switch/Hub
Name Pin Pin Name
TX_D1+ 1 3 RX_D2+
TX_D1- 2 6 RX_D2-
RX_D2+ 3 1 TX_D1+
RX_D2- 4 2 TX_D1-
BI_D3+ 5 7 BI_D4+
BI_D3- 6 8 BI_D4-
BI_D4+ 7 4 BI_D3+
BI_D4- 8 5 BI_D3-
Ethernet Straight-Through Cable (RJ-45) Pin Out
D400 PC
Name Pin Pin Name
TX_D1+ 1 1
TX_D1- 2 2 RX_D2-
RX_D2+ 3 3 TX_D1+
RX_D2+
RX_D2- 4 4 TX_D1-
BI_D3+ 5 5 BI_D4+
BI_D3- 6 6 BI_D4-
BI_D4+ 7 7 BI_D3+
BI_D4- 8 8 BI_D3-
994-0089–1.00–2, General
58
Page 59

GE Energy
4.8 Modem Connections
A COM2 port is provided on the COM2 Port Adapter or the Redundant TP Ethernet + COM2
Port Adapter. The COM2 port can support serial connections for the following dial-up
interfaces:
• External modem
• Point-to-point protocol (PPP) services
• Wide area network
The COM2 port provides a single DB-9 connector wired for an RS-232 DCE signal. The
COM2 Port Adapter plugs into any NET slot (slots 11 and 12) of the D400. The Redundant
TP Ethernet + COM2 Port Adapter plugs into the NET1 slot (slot 11).
Note: The COM2 Port requires an external modem to provide dial-up functionality.
See section “3.11 COM2 Port Adapter” for more information.
» To connect a modem to the COM2 Port Adapter, use a straight-through
modem cable (not supplied with the D400):
1
2
3
6
9
1
5
4
5
6
7
13
14
20
22
25
Modem
D400 Substation Data Manager User's Manual 59
Page 60

GE Energy
COM2 Port DB-9 Connector Signal Definitions
Pin
Number
1 DCD IN
2 RXD IN
3 TXD OUT
4 DTR OUT
5 Signal GND -
6 DSR IN
7 RTS OUT
8 CTS IN
9 Not connected -
Function Signal Flow
DCE
COM2 Port DB-9 to DB-25 Pin out
Signal DB-9
Pin #
TD 2 3
RD 3 2
DB-25
Pin #
RTS 4 20
CTS 5 7
DSR 6 6
DCD 7 4
DTR 8 5
GND 9 22
994-0089–1.00–2, General
60
Page 61

GE Energy
4.9 Local HMI Connection
A permanent local workstation can be set up with the D400 to access the D400’s HMI
(human machine interface). The computer peripherals connect to the USB KVM Adapter
located on the rear panel of the D400. The D400 supports the following peripheral
connections:
• Three USB v1.1 compliant Type A ports for USB keyboard, mouse or other USB device
• Single 3.5 mm audio jack for stereo audio output to speakers
• High-density D-sub 15-socket connector for video display
To connect to the HMI through the front Ethernet port, see section “4.7 Network
Connections”.
» To connect a local substation computer to the USB KVM Adapter:
Note: Ensure the D400 is powered down before connecting devices to the USB KVM card.
1. Connect the monitor to the video port.
2. Connect the keyboard and mouse to the USB ports.
3. Connect speakers (if available) to the audio jack.
Tip: If the keyboard stops responding during use, simply unplug and re-connect the
keyboard cable.
D400 Substation Data Manager User's Manual 61
Page 62

GE Energy
4.10 Front Maintenance Port
The serial communications port on the front panel of the D400 provides a local
connection with the D400 to perform the initial setup of the D400 and to carry out
maintenance and diagnostic procedures. The front maintenance port provides a direct
serial connection to a PC using a serial null modem cable (GE Part No. 977-0529/72),
which is supplied with the D400.
See section “6.1 Connecting to the D400 for the First Time” for more information on
setting up communications with the D400.
» To connect your computer to the D400:
Connect the supplied serial null modem cable (GE Part No. 977-0529/72) to your
computer’s serial communications port and to the D400's front communications port.
D400 Front Serial Port DB-9 Pin Out
Pin # Signal
1 DCD
2 RX Data
3 TX Data
4 DTR
5 GND
6 DSR
7 RTS
8 CTS
9 Not Connected
Minimal Required Connection
The minimal cable connection required to establish successful communication between
your PC and the D400 is as follows:
PC Pin # D400 Pin # Signal
9-Pin Female
2 3 TX
3 2 RX
9-Pin Female
(w/o Converter)
5 5 GND
994-0089–1.00–2, General
62
Page 63

GE Energy
5
Powering Up the D400
This chapter describes the power supplies and how to make power connections.
5.1 Power Supply Options
The D400 supports one or two power supplies that provide 5 V to the D400 main module.
The following power supplies may be provided in the Power Supply slots:
• AC-DC power supply (GE Part No. 520-0217)
• DC-DC power converter (GE Part No. 520-0216)
Power Supply
Slot 1
Power Supply
Slot 2
D400 Substation Data Manager User's Manual 63
Page 64

GE Energy
Redundant Power Supply
The D400 may be provided with an optional redundant power supply unit in Power
Supply Slot 2. The second power supply provides continuous power to the D400 in the
event the primary power supply unit fails.
Additional protection can be provided if a secondary external power source is available.
In the event the primary power source fails, an automatic switchover will take place to
the redundant power source to ensure continuous power to the D400.
Power Configurations
The D400 supports the following power configurations:
• Single External AC Power Source
• Single External DC Power Source
• Two External AC Power Sources with optional redundant D400 AC-DC Power Supplies
• Two External DC Power Sources with optional redundant D400 DC-DC Power
Power Input Ranges
Converters
AC-DC Power Supply
Rated voltage range
Rated power
cold start
Rated frequency
DC-DC Power Supply
Rated voltage range
Rated power DC
Inrush current at 25 °C
100-240 VAC / 100-300 VDC with overvoltage protection of
110 % to 150 %
If the unit is… Then the rated power is…
AC 127 VA maximum
DC 135 W maximum
AC-DC 26.5 A
AC-DC 40 A
47 to 63 Hz (50/60 Hz)
20-55 VDC with overvoltage protection of 110 % to 150 %
135 W maximum
DC-DC 35 A
(< 145 VAC/205 VDC) Inrush current at 25 °C on
peak
(< 264 VAC/370 VDC)
peak
(< 60 VDC)
peak
994-0089–1.00–2, General
64
Page 65

GE Energy
5.2 Power Connections
The D400 accepts power connections through two terminal blocks on the rear panel:
• Terminal block TB1 is reserved for connecting power from one or two external
sources to the D400.
• Terminal block TB2 provides contact closure outputs for power supply fail and system
fail alarms.
Protective Earth
Terminal
Power Supply
Connections
Power Supply
Alarms
Wiring Requirements
The supply wiring for the D400 must be a minimum of 18 AWG (0.79 mm²), 3-conductor
cable with an external insulation jacket, and a minimum certified voltage rating of 600 V.
The protective conductor must be minimum 16 AWG (1.3 mm²) wire with (green-&-yellow)
insulation. Recommended conductor size is 12 AWG.
The wires must be terminated with an insulated #6 Forked Terminal.
The clear plastic protective barrier provided with the terminal strip connector must be in
place once wiring of the mains is completed.
D400 Substation Data Manager User's Manual 65
Page 66

GE Energy
External Power Requirements
Before connecting an external power source to the D400, ensure that the following
external power requirements are met:
• An IEC 61010 qualified primary disconnect device and over current protection not
• All current carrying conductors must be switched, including neutral (for AC) and
• Primary disconnect device must be rated for the proper voltages (AC and/or DC), as
• Protective earth conductor must be connected to the provided protective earth
• The primary disconnect device shall be in close proximity to the D400 equipment and
• The primary disconnect device shall be marked as the disconnecting device for the
exceeding 15 A must be externally provided in the AC/DC mains supply system.
negative (for DC).
well as inrush currents for the power supplies. See section “5.1 Power Supply
Options” for peak inrush current.
terminal before any mains power conductors.
within easy reach of the operator.
D400 equipment.
» To connect the power source to the D400:
1. Remove the terminal block TB1 protective plastic cover.
2. Connect power source as follows:
If your power supply is… then…
AC
DC Connect the DC power supply, observing the correct
For proper connection, the recommended tool torque settings for power terminal
screws are 10.8 in-lb [1.22 Nm]
See also wiring diagrams below for different power configurations.
Connect the AC line connection to the L connection
point(s) and the AC neutral connection to the N
connection point(s) on terminal block TB1
polarity, to the +VDC and -VDC connection point(s) on
terminal block TB1
994-0089–1.00–2, General
66
Page 67

GE Energy
Power Source Configurations
Power Source Connection Wiring Diagram
Single External AC
Power Source
Single External DC
Power Source
Two External AC
Power Sources with
Optional Redundant
D400 AC/DC Power
Supply
Connected to
SUPPLY1 and
SUPPLY2 input
terminals.
Connected to
SUPPLY1 and
SUPPLY2 input
terminals.
First source
connected to
SUPPLY1
terminals.
Second source
connected to
SUPPLY2
terminals.
AC Power Source
DC Power Source
AC Power Source #1
Supply 1
L
N
GND
Supply 1
+
-
Supply 1
L
N
GND
Supply 2
Supply 2
Supply 2
GND
AC Power Source #2
L
N
D400 Substation Data Manager User's Manual 67
Page 68

GE Energy
Power Source Connection Wiring Diagram
Two External DC
Power Sources with
Optional Redundant
D400 DC Power
Converter
3. Connect protective earth wire to the Protective Earth terminal
First source
connected to
SUPPLY1
terminals.
Second source
connected to
SUPPLY2
terminals.
DC Power Source #1
Supply 1
+
-
DC Power Source #2
Supply 2
+
-
on the rear panel.
The terminal is an M5 threaded stud with M5 nut and washers. The recommended
order for stacking the washers on the chassis is: flat washer, ground wire ring
terminal, toothed washer, M5 nut.
For proper transient protection, the recommended tool torque settings for M5 nut is
18.1 in-lb [2.04 Nm].
Note: It is recommended to terminate 12 AWG green & yellow wire with a Panduit
PV10-14R or equivalent ring terminal.
4. Verify that Power LEDs on the power supplies and the D400 main module are lit.
5. Replace the terminal block protective plastic cover.
994-0089–1.00–2, General
68
Page 69

GE Energy
5.3 Power Supply Alarms
The D400 includes connections for two power supply alarms:
• Power Fail to indicate one of the two power supplies or one of the two power feeds
has failed
• System Fail to indicate system operation status
Terminal block TB2 on the rear panel of the D400 provides contact closure outputs for
connection to an external circuit, for example, to connect an external LED indicator or
audible alarm.
The contact closure used for alarm outputs is a solid-state photo-MOS device. Contact
closure output ratings at maximum ambient temperature are:
• Continuous current: 0.1 A continuous at 300 VAC / 300 VDC
• Peak current: 0.28 A peak for 10 ms
• Maximum on resistance: 35 ohm
Power Fail Alarm
The Power Fail contact closure provides for an external LED indicator (lamp) or audible
alarm upon loss of power.
The indicator or audible alarm can be wired to operate as follows:
• ON when power is present
• ON when a power failure has occurred
The Power Fail contact closure provides three contacts (terminals 1, 2 and 3) on terminal
block TB2.
!
Caution: Contact closure rated for 0.1 A @ 300 V maximum.
» To connect the Power Fail contact closure:
1. Remove the terminal block protective plastic cover.
2. Wire a lamp or audible alarm to terminals 1, 2 or 3 on terminal block TB2 as follows
(see figure):
To enable the indicator when power is… Wire the lamp between…
Present Terminals 1 and 2
Absent Terminals 2 and 3
For proper connection, the recommended tool torque settings for power terminal
screws are 10.8 in-lb [1.22 Nm].
3. Replace the terminal block protective plastic cover.
D400 Substation Data Manager User's Manual 69
Page 70

GE Energy
p
Power Fail Alarm Connection
Station Battery / Power Source
Light ON when
erational
o
Light ON after
failure
System Fail
The D400 includes a System Fail contact closure to provide an external LED indication on
the system or LAN status.
The LED notification can be wired to operate as follows:
• ON when system is functioning properly
• ON when system failure has occurred
The System Fail contact closure provides three contacts (terminals 4, 5 and 6) on terminal
block TB2.
!
Caution: Contact closure rated for 0.1 A @ 300 V maximum.
» To connect the System Fail relay:
1. Remove the terminal block protective plastic cover.
2. Wire a lamp to terminals 4, 5 and 6 on terminal block TB2 as follows:
To enable the indicator when power is… Wire the lamp between…
Functioning properly Terminals 4 and 5
Failed Terminals 5 and 6
For proper connection, the recommended tool torque settings for power terminal
screws are 10.8 in-lb [1.22 Nm].
3. Replace the terminal block protective plastic cover.
994-0089–1.00–2, General
70
Page 71

GE Energy
System Fail Alarm Connection
Station Battery / Power Source
Light ON when
operational
Light ON after
failure
D400 Substation Data Manager User's Manual 71
Page 72

GE Energy
5.4 Front Panel LEDs
Once the D400 is powered up, the LED indicators on the front panel of the D400 become
active. The indicators provide status information on the operation of the D400.
D400 Front LEDs
System Status LEDs
The System Status LEDs indicate the unit’s operational status:
LED Display Status Description
Power is correctly supplied to the unit (+5 V present on the D400
Main Board).
Initialization (boot-up and self-diagnostics) of the D400 is
complete and the unit is ready to process data.
IRIG-B signal is being correctly processed.
Link integrity for the Ethernet Switch in NET1 and NET2 slots.
Transmission activity for the Ethernet Switch in NET1 and NET2
slots.
994-0089–1.00–2, General
72
Page 73

GE Energy
Serial Port Status LEDs
The Serial Port Status LEDs provide a visual indication of the status for each serial
communication port. For a given serial communication port:
LED Display Status Description
TXD Serial transmission activity on the serial port
RXD Serial reception activity on the serial port
Notes:
• If a pair of LEDs is not lit, it does not indicate a problem, only that the connected
device is not active at that moment.
• If a serial communication card slot is empty, (that is, no card is installed) the serial
Receive (RXD) LED may be lit.
D400 Substation Data Manager User's Manual 73
Page 74

GE Energy
When you receive your D400, it is configured with default communication settings. To
enable the D400 to communicate over your network, you must change the settings as
required by your system.
6
Configuring the D400
6.1 Connecting to the D400 for the First Time
To perform the initial set up of the D400, you need to plug directly into the D400 through
the front serial communications port. The front communications port provides a local
connection and terminal session with the D400 used to perform system administrative
and maintenance procedures.
» To connect to the D400:
1. Connect the supplied null modem cable (GE Part No. 977-0529/72) to your
computer’s serial communications port and to the D400's front communications port.
See section “4.10 Front Maintenance Port” for cabling information.
2. From the Windows Start menu, select Programs > Accessories > Communications >
HyperTerminal.
The HyperTerminal window opens and a connection wizard starts.
3. In the Connection Description dialog box, enter a Name for the connection. Click OK.
Note: The name you choose is not important.
4. In the Connect to dialog box, select your computer's communication port (typically
COM1) in the Connect using list. Click OK.
994-0089–1.00–2, General
74
Page 75

GE Energy
5. In the Port Settings dialog box, select the following options, and then click OK:
Bits per second
Data bits
Parity
Stop bits
Flow control
19200
8
None
1
None
6. On the File menu, click Properties. On the Settings tab, select the following options,
and then click OK:
Under Function, arrow …
Emulation
Telnet terminal ID
Backscroll buffer lines
Terminal keys
Auto detect
VT 100
500
7. In the main terminal window, type login and press Enter.
8. At the D400 login prompt, type the default username root and press Enter, and then
type the default password geroot and press Enter.
Note: When you enter the password, it may not be visible on the screen.
The D400#>> system prompt displays.
D400 Substation Data Manager User's Manual 75
Page 76

GE Energy
You are now online with the D400.
» To configure the network interface:
1. At the D400 #>> prompt, type D400cfg and press Enter.
The D400 Configuration Utility menu appears.
2. Type 2 and press Enter to select 2. Configure Network Interface.
The Network Interface screen displays.
994-0089–1.00–2, General
76
Page 77

GE Energy
3. Type 2 and press Enter to select 2. Configure Static IP Address.
The Static IP Address screen displays and lists the available Ethernet interfaces
according to the number of Ethernet cards installed in the D400.
In this example, only one Ethernet interface card is installed in the D400 so only one
Ethernet interface is available for configuration.
4. Select 1. eth0.
5. Type the IP address of the D400 and press Enter.
D400 Substation Data Manager User's Manual 77
Page 78

GE Energy
The default IP address is 192.168.168.81.
6. Enter the Subnet Mask of the D400.
The default Subnet Mask is 255.255.255.0.
7. Enter the DNS Server address. If the DNS Server address is not required, press Enter
8. Enter the Gateway IP address. If the Gateway IP address is not required, press Enter
A summary of the configured settings displays.
to continue.
to continue.
9. Do one of the following:
• To accept the settings, enter Y.
• To change the settings, enter N and repeat Steps 2 to 8 to make the necessary
changes.
10. When you return to the D400 Configuration Utility Menu, select 8. Quit to exit the
configuration utility and return to the D400 prompt.
11. At the D400#>> prompt, type reboot and press Enter.
The D400 restarts and is updated with the new network settings.
Refer to the D400 online help and D400 Software Configuration Guide for information on
configuring the D400 software.
994-0089–1.00–2, General
78
Page 79

GE Energy
7
Servicing the D400
The D400 does not require any scheduled maintenance. However, you may need to
replace the following parts occasionally:
• System battery
• CompactFlash card
A periodic inspection is also suggested to ensure that:
• Unit has sustained no accidental physical damage
• Airflow is not obstructed
• Connectors and cables are intact and firmly attached
• Battery condition is good
Only trained personnel should perform maintenance on the D400.
D400 Substation Data Manager User's Manual 79
Page 80

GE Energy
7.1 Removing the D400 Main Module
You need to remove the D400 main module from the chassis to access the system
battery and the system CompactFlash card for maintenance.
D400 Main Module
» To remove and re-insert the D400 main module:
1. Power down the D400.
2. Hand-loosen the two screws on the front panel of the D400 main module.
3. Grasping the two handles, pull out the D400 main module.
4. Make the necessary changes.
5. Slide the main module back into the chassis.
Note: Ensure the connectors at the rear of the main board are firmly seated.
6. Hand-tighten the two screws on the front panel.
7. Power up the D400 and verify that the Power LED is illuminated.
994-0089–1.00–2, General
80
Page 81

GE Energy
7.2 Replacing the Battery
The lithium battery maintains power to the D400's built-in Real-Time Clock and NVRAM if
there is a power disconnect. The D400 is supplied with a 1/2AA 3.6 V 0.9 Ah Lithium
battery that you must insert on the D400 main board when the D400 is installed. To
ensure the battery is good, it is recommended you replace the battery every five years.
You can access the battery compartment by removing the D400 main module from the
chassis. The battery holder BT1 is located near the front corner of the board, behind the
two rows of Serial Port Status LEDs.
D400 Battery Location
BT1
D400 Substation Data Manager User's Manual 81
Page 82

GE Energy
Before You Remove the Battery…
Note the following items before you begin battery replacement.
CAUTION
• Disconnect power to the D400 before changing the battery.
• Avoid exposure to high temperatures, such as soldering or spot-welding
• Avoid excessive force to terminals
• Use extreme caution and proper procedures for servicing electro statically sensitive
Note: Removing the battery will cause the internal clock to reset.
Supported Battery Types
The D400 is supplied with a 1/2AA 3.6 V 0.9 Ah Lithium non-rechargeable battery. The
following battery types may be used as a replacement.
Supported battery replacements
components. Electro statically sensitive components are located near the battery.
Manufacturer Mfg. Part
No.
Tadiran® TL-2150
Tadiran TL-4902
Tadiran TL-5101
Tadiran TL-5902
Toshiba® ER3V
Toshiba ER4V
Saft® LS-14250
Saft LS-14250C
Sonnenschein® SL-350
Sonnenschein SL-750
Maxell® ER3
XENO Energy XL-050F
994-0089–1.00–2, General
82
Page 83

GE Energy
» To insert or replace the D400 battery:
Warning! Ensure that all hazardous live circuits are isolated or disconnected
before attempting battery replacement
1. Power down the D400.
2. Remove the D400 main module from the chassis.
3. Using a plastic or other non-conductive tool, pry the black plastic clip holding the
battery away from the battery holder BT1. When free, the battery and clip can be
removed together.
4. Remove the clip from the battery and keep it.
5. Place the new battery into the battery holder, ensuring polarity is correct.
6. Replace the clip and press down until it clicks into the retaining notches in the battery
holder.
7. Replace the D400 main module.
8. Power up the D400.
Checking Voltage
To check battery voltage, use a meter or other measuring device that has a high input
impedance (10 Mohm or higher).
.
Cleaning and Handling Lithium Batteries
• Wear gloves or finger caps when handling batteries to keep them clean.
• Use non-conductive cleaning solution to prevent deterioration of battery
performance
• Dry batteries at a temperature below 85 °C to prevent seal deterioration that may, in
turn, result in leakage
Disposing of Batteries
The D400 lithium battery contains harmful chemicals.
The Lithium battery is recyclable. Dispose of battery according to local waste
management regulations.
Battery Life
If the battery is disconnected, or if the D400 is never powered down, the life of the battery
should exceed five years. The life of the battery will be severely shortened if the battery is
left connected while the D400 is powered down for extended periods or stored.
For long-term storage:
• Keep the equipment at temperatures and humidity below normal
• Avoid shorting or loading while stored
D400 Substation Data Manager User's Manual 83
Page 84

GE Energy
7.3 Changing the CompactFlash
CompactFlash cards are designed with flash technology, a non-volatile storage solution
that can retain data indefinitely without a battery. The cards are solid state, meaning
they contain no moving parts, and provide much greater protection of data than
conventional magnetic disk drives.
The D400 contains two CompactFlash cards on the main board to store software and
data:
• System CompactFlash card located at connector P2 stores system firmware
• User CompactFlash card located at connector P1 is accessible from the front panel
and stores system data such as event logs
User CompactFlash Access Panel
» To change the System CompactFlash card:
1. Power down the D400.
2. Remove the D400 main module from the chassis.
3. At connector P2, press the Eject button to eject the CompactFlash card.
4. Insert the new CompactFlash card.
5. Replace the D400 main module.
6. Power up the D400.
» To change the User CompactFlash card:
1. Power down the D400.
2. Using a Phillips Screwdriver, remove the screws from the CompactFlash slot cover
located on the front panel of the D400 main module.
3. Press the Eject button to eject the CompactFlash card.
4. Insert the new CompactFlash card into the slot.
5. Replace the CompactFlash slot cover and secure it with the screws.
6. Power up the D400.
994-0089–1.00–2, General
84
Page 85

GE Energy
7.4 Replacing the Power Supply
The power supply module is accessible and easily replaced from the D400 front panel.
The D400 may be supplied with an optional redundant power supply (in Slot 2) to provide
dual hot swappable power supplies. If the D400 contains dual power supplies, you can
replace one power supply unit without having to power down the D400, as long as the
other power supply unit is operational.
Note: The D400 power supplies do not contain user replaceable fuses. The entire power
supply module must be replaced if the fuse has failed.
D400 Power Supply Unit
Before You Remove the Power Supply…
Note the following items before you begin power supply replacement.
• Ensure the other power supply unit (if available) is functioning (the green Power LED is
illuminated) to ensure that the D400 doesn’t power down during replacement.
• Make sure that the unit is wired in accordance with section “5.2 Power Connections”.
» To replace a D400 power supply unit:
1. If only a single power supply unit is installed (in Slot 1), power down the D400. If dual
power supplies are installed (in Slot 1 and Slot 2), ensure that the secondary unit is
functioning.
2. Hand-loosen the two screws on the front panel of the power supply unit.
3. Pulling on the handle, slide the power supply unit out of the chassis.
4. Slide the new power supply unit into the chassis.
5. Hand-tighten the two screws on the front panel.
6. Verify that the Power LED is illuminated on the replaced power supply unit.
D400 Substation Data Manager User's Manual 85
Page 86

GE Energy
A
Standards & Protection
This Appendix lists the standards with which the D400 has been tested for compliance.
D400 Standards and Protection
Category Standard Name Description
Emissions Standards
Immunity Standards
EN55011 (CISPR 11)1 ISM RF equipment – Electromagnetic
disturbance characteristics
IEC 60255-25 Electromagnetic emission tests for
measuring relays and protection
equipment
IEC 61000-3-2 Limits for harmonic current emissions
(equipment input current <= 16 A per
phase)
IEC 61000-3-3 Limitation of voltage changes, voltage
fluctuations and flicker in public lowvoltage supply systems, for equipment
with input current <= 16 A per phase
and not subject to conditional
connection
IEC 61000-4-2
IEC 60255-22-2
®
C37.90.3
IEEE
Electrostatic discharge (ESD) immunity
test
IEC 61000-4-3
IEC 60255-22-3
IEEE C37.90.2 (10 V/m)
IEC 61000-4-4
IEC 60255-22-4
IEEE C37.90.1
Radiated, radio-frequency
electromagnetic field immunity test
Electrical fast transient/burst
immunity test
D400 Substation Data Manager User's Manual 86
Page 87

GE Energy
Category Standard Name Description
IEC 61000-4-5 Surge immunity test
IEC 61000-4-6
IEC 60255-22-6
IEC 60255-22-1 1 MHz burst immunity test
IEC 61000-4-8 Power frequency magnetic field
IEC 61000-4-12 Ring wave immunity test
IEC 60255-22-1
IEEE C37.90.1
Ontario Hydro
A-28M-82
IEC 61000-4-11 Voltage dips, short interruptions and
IEC 61000-4-16 Test for immunity to conducted,
IEC 61000-4-17 Ripple on DC input power port
IEC 61000-4-29+ Voltage dips, short interruptions and
Immunity to conducted disturbances,
induced by radio-frequency fields
immunity test
Damped Oscillatory and Ring wave
voltage variations immunity tests
common mode disturbances in the
frequency range 0 Hz to 150 kHz
immunity test
voltage variations on DC input power
port immunity test
This standard only applies when using
high voltage DC as the source (100
VDC-300 VDC).
Safety Publications
Environmental Standards
IEC 60255-11 Interruptions to and alternating
component (ripple) in DC auxiliary
energizing quantity of measuring
relays
IEC 61010-1 Safety requirements for electrical
equipment for measurement, control
and laboratory use - General
requirements
IEC 60255-5 Insulation coordination for measuring
relays and protection equipmentRequirements and tests
IEC 60068-2-1 Environmental Testing - Cold
IEC 60068-2-22 Environmental Testing - Dry Heat
IEC 60068-2-6
IEC 60255-21-1
IEC 60068-2-27 Environmental Testing - Shock
IEC 60068-2-29 Environmental Testing - Bump
Environmental Testing – Vibration
(sinusoidal)
D400 Substation Data Manager User's Manual 87
Page 88

GE Energy
Category Standard Name Description
IEC 60068-2-30 Environmental Testing - Damp heat,
cyclic (12 h + 12h cycle)
IEC 60068-2-31 Environmental Testing - Drop and
topple
IEC 60255-21-2 Shock and bump tests
Communication Standards
IEEE 802.3 CSMA/CD Access Method (and physical
layer specifications)
IEC 61850-3 Communication networks and
systems in substation – General
requirements
1
To comply, the D400 BIOS Spread Spectrum clock setting must be set to “disable”. This is the factory default.
2
To comply, the D400 BIOS DRAM clock setting must be set to “HCLK-33M”. This is the factory default.
994-0089–1.00–2, General
88
Page 89

GE Energy
B
Ordering Guide
Product Identification
The D400 comes with an ID number that identifies the supplied options and hardware
configuration of the unit. This ID number is composed of 400- followed by 16
alphanumeric characters that are determined by the options selected. The ID number is
listed on a label located next to Slot 1 on the rear panel of the D400.
D400 Substation Data Manager User's Manual 89
Page 90

GE Energy
D400 Ordering Guide
Product Identification Number 400-
CPU OPTIONS
A – 650 MHz CPU, 512 MB RAM, SINGLE ETHERNET A
B – 650 MHz CPU, 512 MB RAM, DUAL REDUNDANT ETHERNET1 B
POWER SUPPLY SLOT 1
A – 100-240 VAC (47-63 Hz), 100-300 VDC (±10 %) A
B – 20-55 VDC (±10 %) B
POWER SUPPLY SLOT 2
A – 100-240 VAC (47-63 Hz), 100-300 VDC (±10 %) A
B – 20-55 VDC (±10 %) B
X – NONE X
SERIAL COMMUNICATIONS SLOTS 1-8
1 – RS-232 (2 CHANNELS) 1 1 1 1 1 1 1 1
2 – RS-485 (2 CHANNELS) 2 2 2 2 2 2 2 2
3 – GLASS FIBER OPTIC (2 CHANNELS, 850 nm, 62.5/125 µm) ST CONN. 3 3 3 3 3 3 3 3
4 – PLASTIC FIBER OPTIC (2 CHANNELS, 600 nm, 1 mm) VERSA LINK CONN. 4 4 4 4 4 4 4 4
X – NONE X X X X X X X X
IRIG-B INPUT CARD OPTIONS
A – IRIG-B INPUT CARD A
X – NONE X
IRIG-B DISTRIBUTION CARD
B – IRIG-B DISTRIBUTION CARD (IRIG-B INPUT CARD REQUIRED) B
X – NONE X
NETWORK SLOT 1
1 – ETHERNET 4 PORT 10/100 MB TP SWITCH 1
2 – ETHERNET FIBER OPTIC (HOT STANDBY) 2 PORT 10/100 BASE-SX 2
4 – ETHERNET REDUNDANT 10/100 MB TP 1 4
NETWORK SLOT 2
1 – ETHERNET 4 PORT 10/100 MB TP SWITCH 1 1
2 – ETHERNET FIBER OPTIC (HOT STANDBY) 2 PORT 10/100 BASE-SX 1 2
3 – COM2 PORT (REQUIRES EXTERNAL MODEM) 3
X – NONE X
USB KVM, AUDIO
A – USB KEYBOARD, VIDEO, MOUSE, AUDIO CARD2 A
X – NONE X
1
CPU option B is required when Network Slot 1 option 4 is selected and Network slot 2 is empty or both Network Slot 1 and
Network Slot 2 are filled with option 1 or 2.
2
Required for local HMI setup
994-0089–1.00–2, General
90
Page 91

GE Energy
Modification Record
Version Rev. Date Author Change Description
1.00 0 July 12, 2006 S. Tessari Document created.
1.00 1 Nov. 17, 2006 E. Stuhr
S. Tessari
Dec. 20, 2006 S. Tessari Converted to single-source. 1.00 2
Feb. 28, 2007 S. Tessari Added RoHS and recycling info, updated RS-485
Revisions as required by TUV.
Deleted Supported Devices sections.
Moved signal definitions to Chapter 4 and added
more connections information.
Edited whole document for consistency and
correctness to current product specs.
Added Chapter “Setting Up the D400.”
channel numbering order
Authentication Record
Version Rev. Date Authenticator Scope of Authentication
1.00 2 Feb. 28, 2007 E. Stuhr Chapters 1-5, 7, Appendices A and B
D400 Substation Data Manager User's Manual 91
Page 92

 Loading...