

Page 1
98063
EasyCam
Instruction Manual
™
For technical support contact Jasco Products at 1-800-654-8483 or
www.jascoproducts.com
Page 2

EasyCam User’s Manual
User’s Manual
Table of Contents
1. Getting Started
a. Package Contents ...................................................................................02
b. System Requirements………………………………………………………..02
c. EasyCam Camera View Nomenclature....................................................02
d. Verifying USB Presence...........................................................................03
e. How To Install and Use EasyCam ...........................................................04
f. How To Use Your PC Camera……………………………………………….05
2. Getting Started With ArcSoft VideoImpression……..……………...….…06
3. Getting Started With ArcSoft PhotoImpression………..…………..….…13
4. How To Install NetMeeting……………………………………………………15
5. How To Install MSN Messenger………………………………………………16
6.Product Specifications………………………………..……..…………..….…17
1
Page 3

Package Contents
EasyCam and stand
●
USB connector cable
●
Quick Start Guide
●
Installation CD-ROM
●
Camera Driver
○
Application Software
○
ArcSoft VideoImpression 2.0
●
ArcSoft PhotoImpression 5.0
●
User’s Manual
○
System Requirements
Intel Pentium III 800MHz or equivalent
●
256MB System RAM
●
Windows 98SE/Me/2000/XP/Vista
●
CD-ROM drive
●
16-bit true color display or higher
●
Optional for VideoConference
Full- or half- duplex sound card
●
Modem for dial-up connection (or corporate internet)
●
An authorized Internet account (user ID or IP address).
●
EasyCam Camera View Nomenclature
1. Unpacking the EasyCam package and checking components
Open your EasyCam package and check the components based on the packing list.
Focus Ring
USB Connector Cable
2
Page 4

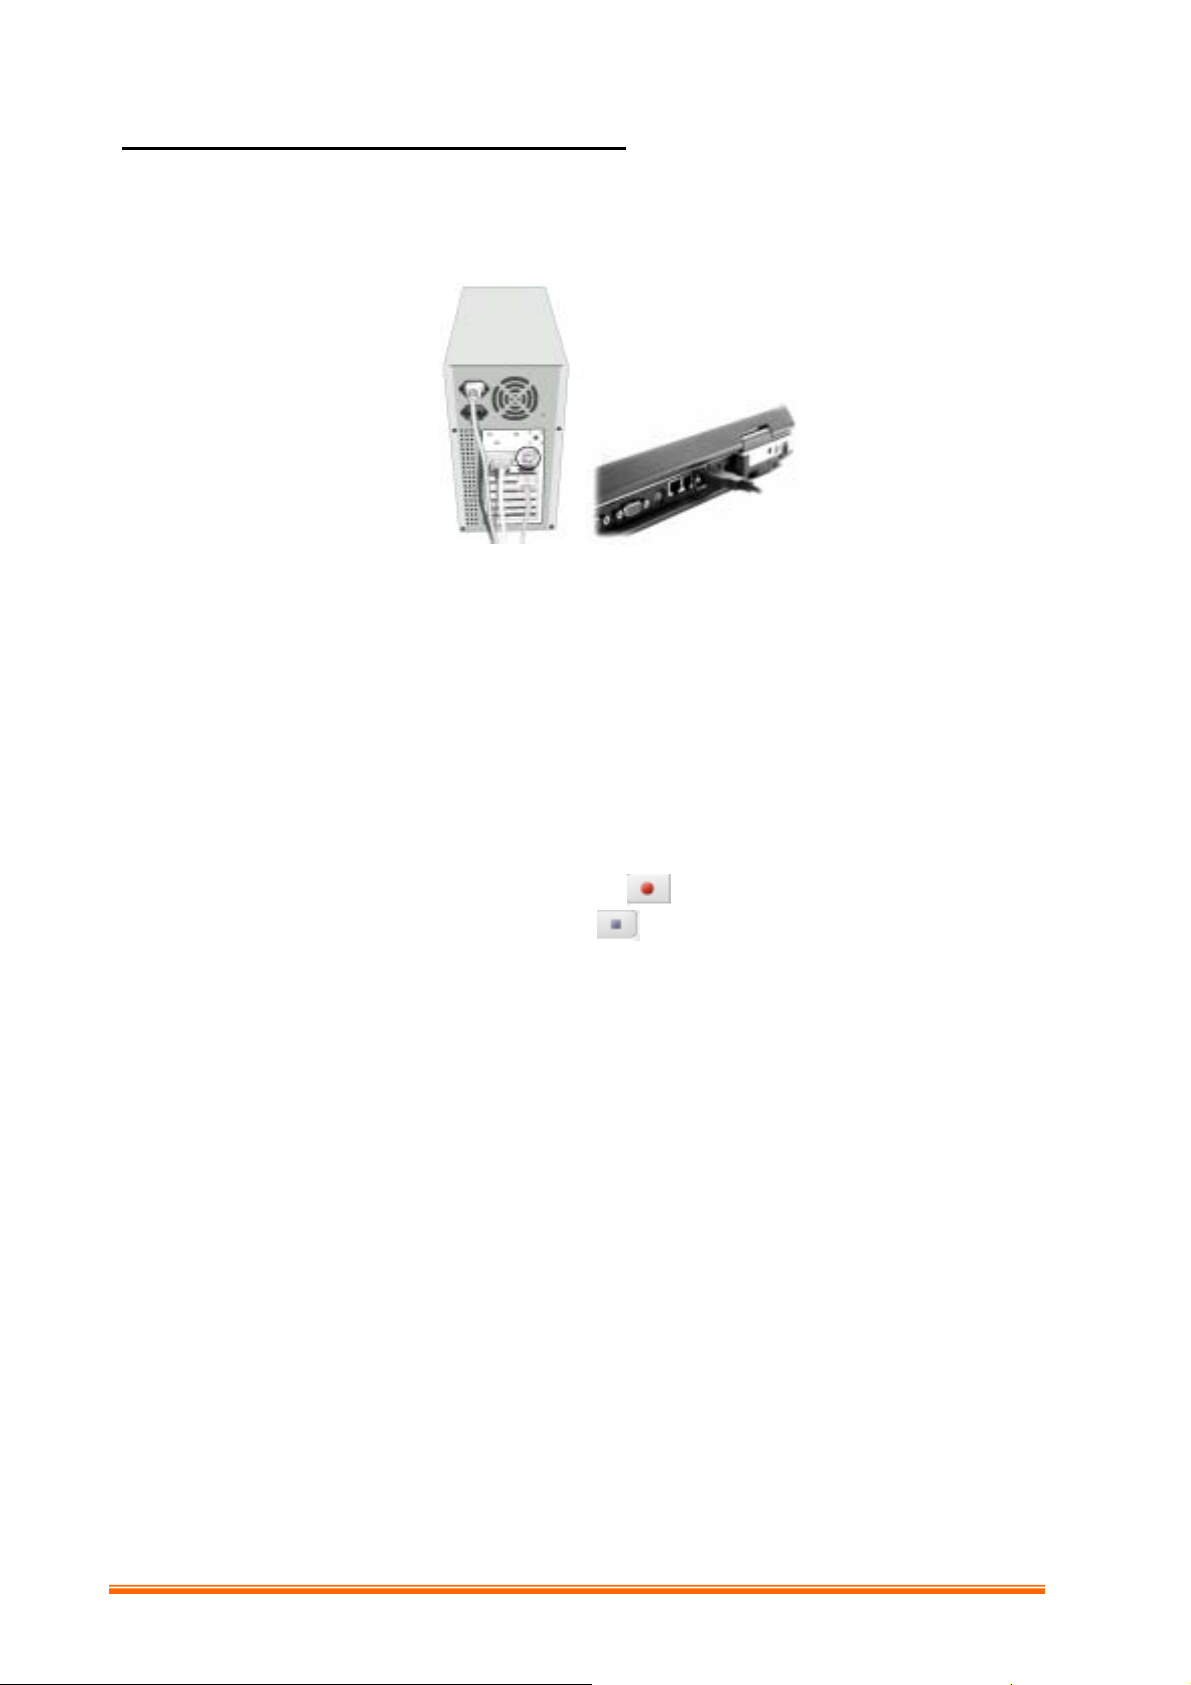
Verifying USB Presence
Power up your computer and check to see if USB is implemented. Visually inspect the
USB ports of your computer. If you cannot find the USB ports at the back of your
computer (See Figure 1), read the documentation that came with your computer main
board.
For computer main board with USB supported:
Enter BIOS settings and enable USB, see the documentation that came with your
computer.
Normally, when the computer power is turned on, before starting windows, the computer
will hint you to press some keys for displaying BIOS menu.
For computer main board without USB:
In this case, USB can be implemented by an USB add-on card. The BIOS settings for
main board type USB are not required.
Figure 1
3
Page 5

How To Install and Use The PC Camera
There are two ways to install Camera Driver:
1.1 Use Installer to install camera driver (Recommended)
Don’t connect the camera to your computer yet!
1.1.1 Install Driver
Insert the CD into your CD-ROM drive; the installer screen will automatically come
up. Click the "Install Device Driver" button to start installing.
Note #1: If the installer screen does not come up automatically, click Start,
then Run and execute the file “launch.exe” on the CD to start the
installer program.
1.1.2 Install Application Software
Check the box in front of the Software you would like to install, then click the
"Install Application Software" button to start installing, then follow the instructions
to proceed installation.
When installation completes, the Application Software group will appear as a
folder on the Programs Menu. To start the Application software, click "Start", point
to "Programs", and then click the Application software.
4
Page 6
1.2 How To Use Your PC Camera
1.2.1 Plug PC camera's connector to the USB port on your computer.
1.2.2 Set the Focus
1. Start VideoImpression.
2. Select “Capture Video”
3. Turn the focus ring until image becomes sharp.
1.2.3 Video Recording:
1. Start VideoImpression.
2. Select “Capture Video”
3. To start video recording, click on “Record ” .
4. To stop video recording, click on “Stop ”.
5. To save captured video, Produce → Drive → Microsoft AVI file, type filename and
press ”Start” button
5
Page 7

Getting Started With VideoImpression
When you first run the program, a window will appear that lets you choose the type of
project you want to make (you can also open previously saved projects). Choose “Create a
New Video.” A new window will appear. It will contain multiple options for gathering your
video content.
For this walk-though, choose “Get From Album.” Even if you choose one of the other
options, you’ll end up at your albums soon or later. Albums contain shortcuts to files stored
on your system. You’ll grab most of your “media” for movie construction from your albums.
6
Page 8

1 MEDIA
This first step is where you select the “media” (still images, videos, and sound clips) that you
want to use to create your movie. All you need to do is choose the components you want
and add them to the Storyboard. When you save—or “produce”—your movie, all the
components on the Storyboard will be combined together into a single video file.
Let’s look at the Storyboard again:
Video Clips & Still Images
Transitions Audio Tracks
The Storyboard
The large squares are reserved for still images and video clips. The two horizontal bars
beneath are reserved for audio tracks. The smaller squares between the still image/video
clip components are for “transitions.”
7
Page 9

2 EDIT
You’re now ready to touch up and modify your movie components. Different editing options
are available depending on the component type.
2.1 MODIFYING IMAGE AND VIDEO BRIGHTNESS/CONTRAST
1. Single-click the desired still image or video clip on the Storyboard.
2. Click and drag the sliders to your liking. You can preview the effect within the Player.
2.2 TRIMMING VIDEOS AND AUDIO
1. Select the desired video or audio clip on the Storyboard.
2. Drag the Starting Mark to the spot where you would like the clip to begin playback.
3. Drag the Ending Mark to the spot where you would like the clip to end.
8
Page 10

3 EFFECTS-TRANSITIONS
The third step in the creation process lets you add cool scene transitions between each still
image or video component on the Storyboard.
Transitions are effects that occur as one movie component changes to another. You can
add/delete transitions in the same way that you add/delete media components. Click the
“Randomize” button to automatically add a random transition to each spot. You can go back
to Step 2 to modify the display time for your transitions as well.
4 TEXT
This step lets you add text over any still image or video component on the Storyboard. Click
on the component you want, then type in your text. You can modify all the standard
parameters, such as font, size, style, alignment, and color.
You can also add a shadow. To do this, check the Shadow box. Click and drag within the
preview to position the shadow behind the text. Use the sliders to adjust the shadow blur
and intensity.
9
Page 11

5 NARRATE
In addition to being able to add audio files to the Storyboard, you can also record audio
directly within the program. To record audio:
1. Click the Audio Settings button and verify the audio configuration (in general, higher
settings will yield higher audio quality but larger file sizes).
2. Click the red Record button.
3. Set the file name and save location for the recorded file. If you want, you can have
the file automatically added to an album for easy access in another project.
4. Click the Start button and begin your narration. Press the Stop button to stop
recording.
5. Click the Add button to add the recorded audio to the Storyboard.
10
Page 12

6 PRODUCE
The final step lets you save your movie in a variety of ways. Consult the Help file for details
on the specifics of each case. For this guide, we’ll save a movie as a VCD. When you do
this, you can pop the CD into most commercial DVD players to see your movie on your TV!
1. Click on the CD tab.
2. Select the device/drive to which the movie will be written or “burned.”
3. Choose the burn speed.
4. Choose the file type. (Remember, we’re creating a VCD, so choose “Video CD File.”)
5. Click Start when you’re ready!
11
Page 13

7 Getting Help
VideoImpression provide an extensive online help. If you need more information or
instructions on how to use a specific feature or tool, click the [Help] button on the upper
corner of the screen.
12
Page 14

Getting Started With PhotoImpression
1.1 Connect your camera and your PC with the supplied USB cable.
1.2 Click StartÆ Select ProgramsÆ PhotoImpression
1.3 PhotoImpression main Screen will appear on your desktop.
2 Viewing Camera Images through PhotoImpression
2.1 To capture a video from the camera to the PhotoImpression main screen .
2.2 Click the [Digital Camera/Scanner ] button.
2.3 Click the [Soc PC Camera ] button.
13
Page 15

3 PHOTO VIEW OPTIONS
When viewing a single photo, use the set of tools along the top of the screen to zoom in/out,
skip to other photos stored in the same location, and rotate the current picture left or right.
4 ENHANCING PHOTOS
When you’re ready to edit a photo, bring it up on the screen and then proceed to the Enhance
module. From there, you can perform various types of modifications.
5 Getting Help
PhotoImpression provide an extensive online help. If you need more information or instructions
on how to use a specific feature or tool, click the [Help] button on the upper corner of the
screen.
14
Page 16

How to Install Microsoft NetMeeting
1 How To Install NetMeeting (XP includes as standard)
1.1
For Windows 98/Me Users
Click Start, point to Programs, point to Accessories, point to Internet Tools and then click
NetMeeting.
For Windows 2000 Users
Click Start, point to Programs, point to Accessories, point to Communications, and click
NetMeeting.
1.2 Click
1.3 Click
1.4 Click
1.5 Click
Next
Address, Location
NOTE:
Next
check box (this is optional), and then type the name of the directory server in the
Server Name
click to select the
Next
Next
After you run NetMeeting for the first time, you can modify the information you
entered about yourself or the directory server name that you want to connect to. To
do so, click
appropriate information. Also, you can run the Audio Tuning Wizard again, and to do
so, click
If you can't install the NetMeeting from your PC directly, please log on to
http://www.microsoft.com/windows/netmeeting/
, type the appropriate information in the
, and
The
Location
, click to select the
dialog box. If you do not want your name to be visible in the directory,
Do not list my name in this directory
, and then select the appropriate location for the shortcuts.
, follow the instructions in the Audio Tuning Wizard, and then click Finish.
Options
Audio Tuning Wizard
Comments
and
on the
Comments
Log into a directory server when NetMeeting starts
Tools
on the
dialog boxes, and then click
information is optional.
menu, click the
Tools
First Name, Last Name, E-Mail
.
Next
check box.
General
menu.
to download.
tab, and then enter the
2 How To Start With The Camera
2.1. Plug the camera into your PC first.
2.2. Click the "
button, then you can start working with NetMeeting.
2.3. If you need more information or instruction on how to use a specific feature or tool,
click the "
NetMeeting
" button in the upper right-hand comer of the screen.
Help
" to go to the main screen, and then click "
15
Start Video
"
Page 17

How to Install MSN® Messenger
2.1 How To Install MSN Messenger
2.1.1 For Windows Vista/XP/2000/Me/98 Users
2.1.1.1 Please log on to http://messenger.msn.com to download.
After the installation package is downloaded to your computer, it will start
installing MSN Messenger. All you have to do is follow the instructions.
2.1.1.2 After the installation is completed, click Start, point to Programs, and click MSN
Messenger.
2.1.1.3 After you run Messenger for the first time, you can add friends to your list and
send instant messages.
2.2 How To Start With PC Camera
2.2.1 Plug the PC camera into your PC first.
2.2.2 Click the “Messenger” to go to the main screen
2.2.3 Click the Webcam icon during a conversation.
–or–
2.2.4 Click the Actions menu on the main window, click Start a Webcam
Conversation, select the name of the person you want to send video to, and
then click OK.
For a 2-way webcam conversation, both participants must have a Web camera
and each person must invite the other.
2.2.5 To stop sending your video image during a conversation, click the arrow under
your video window, and then click Pause Webcam or Stop Webcam. You can
continue to receive the other person's image, but your image will freeze in your
contact's conversation window.
16
Page 18

Specifications
Sensor CMOS with 352X288 (100K) Pixels
Color Depth 24 Bits, 16.7 million RGB true color
Interface USB V1.1
White Balance & Gain Automatic
Exposure Automatic
Focus Range Manual, 10cm~infinity
View Angle 52° (diagonal)
Aperture F/2.4
Shutter Electronic shutter
Anti-Flicker Yes
CIF(352X288), QVGA(320X240),
Video Output
QCIF(176X144), QQVGA(160X120)
Video Frame Rate Max. 30 fps
Video Data Format RGB24, I420
JPEG (still image)
File Format
AVI (streaming video)
Contrast, Brightness, Saturation,
Camera Control Settings
Sharpness, Exposure
68mm(L)X85mm(W)X83.5mm(H)
Dimension
Driver Compliance Video for Windows, WDM, TWAIN
OS support MS Win 98SE/2000/ME/XP/Vista
w/stand
17
Page 19

Two Year Limited Warranty
Jasco Products Company warrants this product to be free from manufacturing defects for
a period of two years from the original date of consumer purchase. This warranty is limited
to the repair or replacement of this product only and does not extend to consequential
or incidental damage to other products that may be used with this unit. This warranty is
in lieu of all other warranties express or implied. Some states do not allow limitations on
how long an implied warranty lasts or permit the exclusion or limitation of incidental or
consequential damages, so the above limitations may not apply to you. This warranty
gives you specifi c rights, and you may also have other rights which vary from state to
state. If unit should prove defective within the warranty period, return prepaid with dated
proof of purchase to:
Jasco Products Company
10 East Memorial Dr
Oklahoma City, OK 73114
FCC Statement
Notice: Federal Communications Commission (FCC) requirements, Part 15
This equipment has been tested and found to comply with the limits for a class B digital
device, pursuant to part 15 of the FCC Rules. These limits are designed to provide
reasonable protection against harmful interference in a residential installation. This
equipment generates, uses and can radiate radio frequency energy and, if not installed
and used in accordance with the instructions, may cause harmful interference to radio
communications. However, there is no guarantee that interference will not occur in a
particular installation. If this equipment does cause harmful interference to radio or
television reception, which can be determined by turning the
equipment off and on, the user is encouraged to try to correct the interference by one or
more of the following measures:
• Reorient or relocate the receiving antenna.
• Increase the separation between the equipment and receiver.
• Connect the equipment into an outlet on a circuit different from that to
which the receiver is connected.
• Consult the dealer or an experienced radio/TV technician for help.
CAUTION: Any changes of modifi cations not expressly approved by the grantee of this
device could void the user’s authority to operate the equipment.
This device complies with Part 15 of the FCC Rules. Operation is subject to the
following two conditions: (1) this device may not cause harmful interference, and
(2) this device must accept any interference received, including interference that may
cause undesired operation.
Distributed for GE
by Jasco Products Company
10 E. Memorial, Oklahoma City, OK 73114
www.jascoproducts.com
 Loading...