

Page 1
For Customer Assistance Please Call: 1-877-207-0923
840112700
Retractable Cord
Hand Mixer
g
Hand Mixer Safety 2
Know Your Hand Mixer 3
Using Your Hand Mixer 5
Cleaning Your Hand Mixer 7
Recipes 7
Troubleshooting 9
Customer Assistance 10
www.gehousewares.com
840112700 ENv00 2/21/03 3:00 PM Page 1
Page 2

2
IMPORTANT SAFEGUARDS
Hand Mixer Safety
This appliance is intended for household
use only.
This appliance is equipped with a polarized
plug. This type of plug has one blade wider
than the other. The plug will fit into an
electrical outlet only one way. This is a safety
feature intended to help reduce the risk of
electrical shock. If you are unable to insert
the plug into the outlet, try reversing the
plug. If the plug should still fail to fit, contact
a qualified electrician to replace the obsolete
outlet. Do not attempt to defeat the safety
purpose of the polarized plug by modifying
the plug in any way.
WARNING: To reduce risk of per-
sonal injury, always unplug mixer before
inserting or removing beaters.
1. Read all instructions.
2. To reduce the risk of electrical shock, do
not put cord, plug, or mixer body in
water or other liquid.
3. Close supervision is necessary when any
appliance is used by or near children.
4. Unplug from outlet when not in use,
before putting on or taking off parts,
and before cleaning.
5. Avoid contacting moving parts. Keep
hands, hair, and clothing, as well as
spatulas and other utensils, away from
beaters during operation to reduce risk
of injury to persons, and/or damage to
mixer.
6. Remove beaters from mixer before
washing.
7. Do not operate any appliance with a
damaged cord or plug, or after the
appliance malfunctions or is dropped
or damaged in any manner. Call our
toll-free customer service number for
information on examination, repair or
electrical or mechanical adjustment.
8. The use of attachments not
recommended or sold by General
Electric for use with this model may
cause fire, electric shock or injury.
9. Do not use outdoors.
10. Do not place on or near a hot gas or
electric burner, or in a heated oven.
11. Do not let cord hang over edge of table
or counter. Do not let cord contact hot
surfaces, including stove.
12. Do not place on or near a hot gas or
electric burner, or in a heated oven.
13. Check that control is off before plugging
cord into wall outlet. To disconnect, turn
control to OFF, then remove plug from
wall outlet.
14. Do not use appliance for other than
intended purpose.
When using electrical appliances, basic safety precautions should always be followed,
including the following:
SAVE THESE INSTRUCTIONS!
Consumer Safety Information
840112700 ENv00 2/21/03 3:00 PM Page 2
Page 3
3
Before First Use
Wash attachments in hot, soapy water.
Rinse and dry
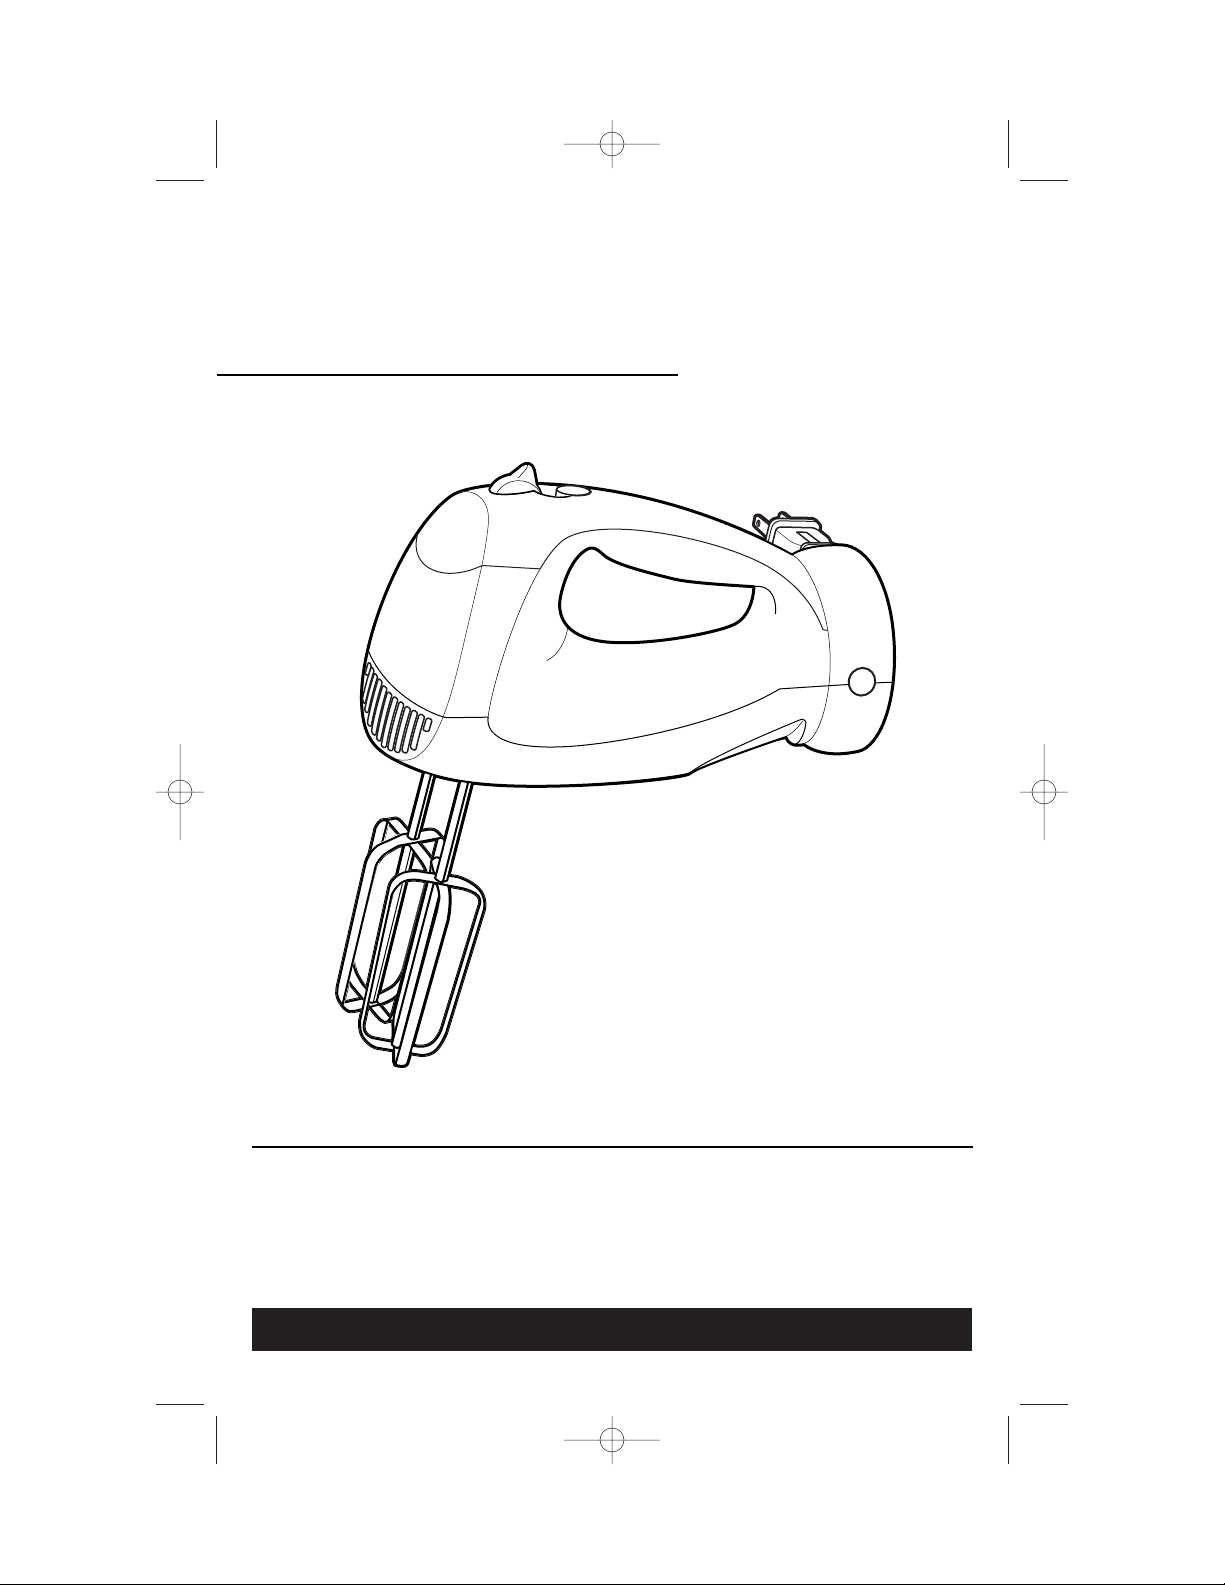
Know Your Mixer
Parts and Features
1
2
3
4
Speed Control (ON/OFF) and Eject –
To select mixing speed and to
remove attachments.
Burst Button – Provides a burst of
extra mixing power when pressed.
Mixer Body
1
2
3
4
Hand Mixer Stabilizer
Retractable Cord Release Button –
Press to retract cord.
Retractable Cord – For convenient
storage.
Storage Case – For convenient
storage of mixer and attachments.
5
6
6
7
5
7
840112700 ENv00 2/21/03 3:00 PM Page 3
Page 4
Hand Mixer Stabilizer
This feature can be used on most large
mixing bowls. Use the Hand Mixer
Stabilizer
while adding
ingredients or
checking a recipe.
To use, TURN
MIXER OFF, then
set the mixer on
the edge of the
bowl.
CAUTION:
• Never use Hand Mixer Stabilizer when
the mixer is on.
• Do not use Hand Mixer Stabilizer
on small (11⁄
2 quart) mixing bowls
or plastic mixing bowls.
4
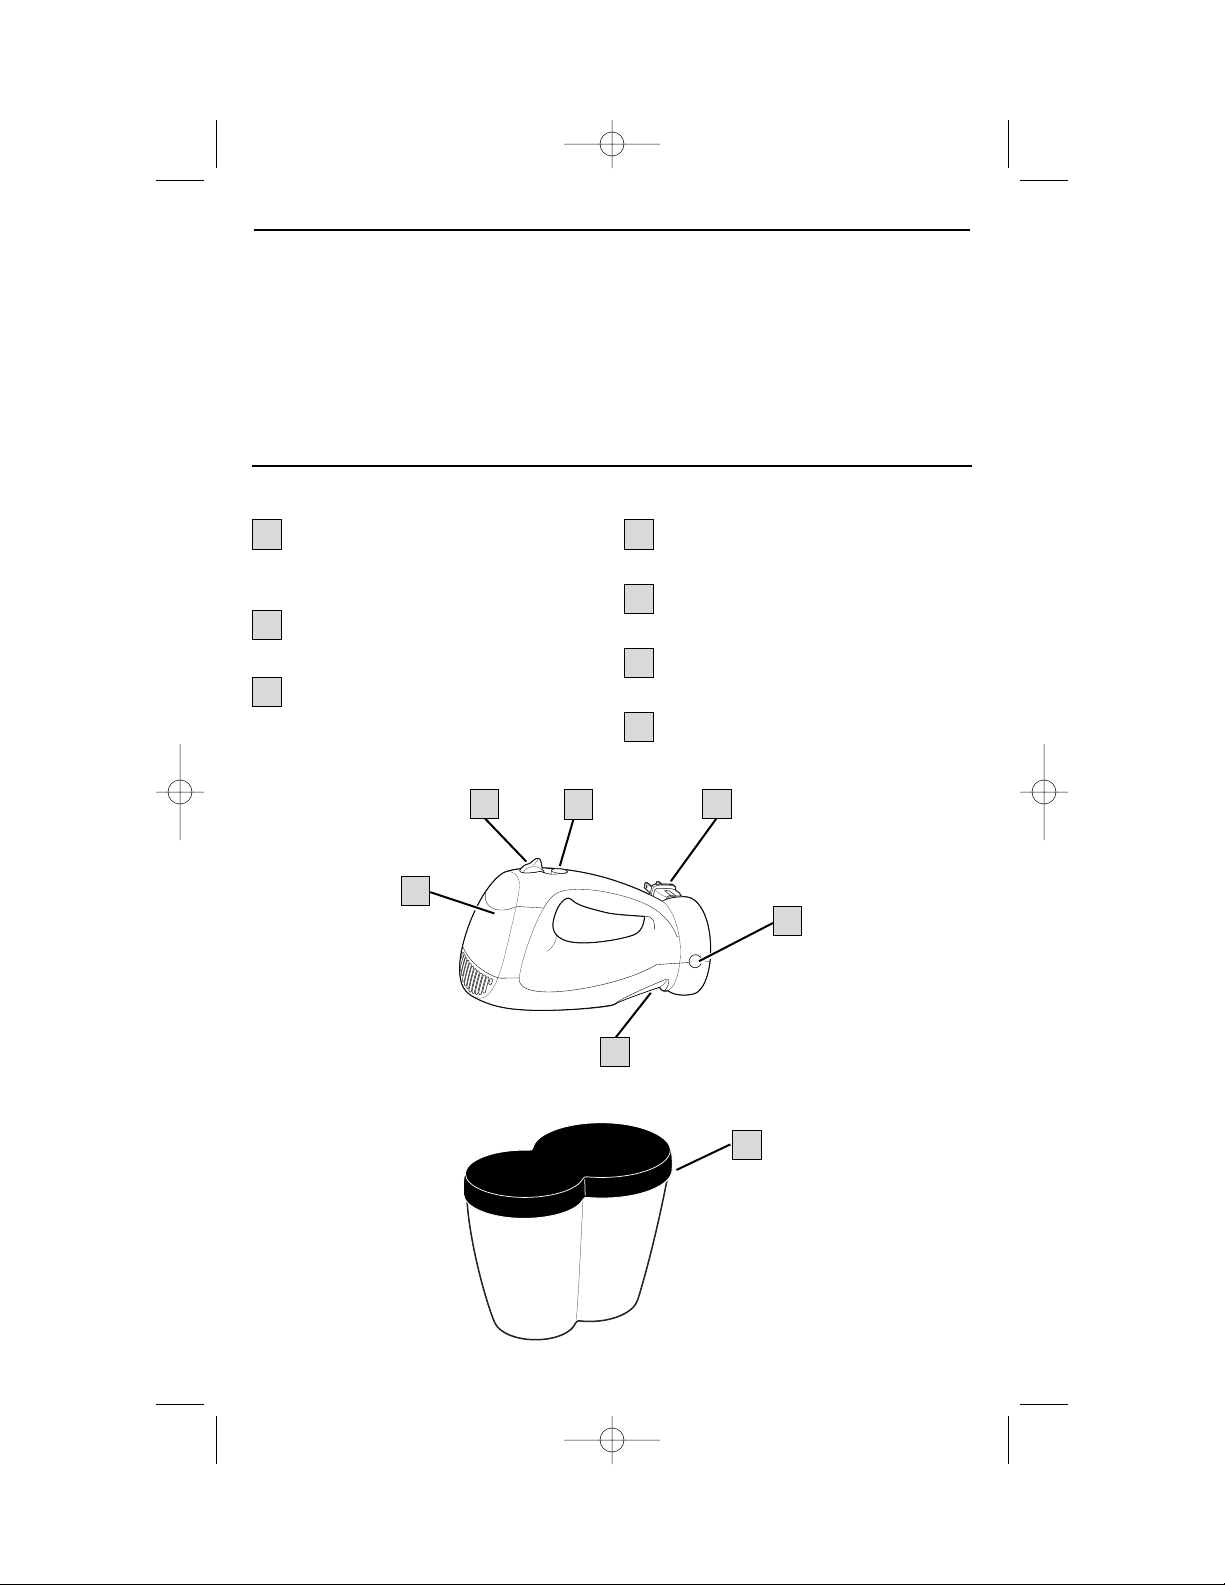
Optional Attachments and Features
(available on selected models)
Before first use, wash beaters or other attachments in warm, sudsy water;
rinse and dry.
To reduce the risk of injury, unplug mixer from electrical outlet before inserting or
removing attachments.
This mixer comes with 1 or more of the following attachments:
Description
The flat beaters are designed for general
mixing purposes.
The single whisk is perfect for whipping
cream. The whisk may be inserted into
either opening.
The twisted wire beaters, which have
no center post for ease in cleaning, are
designed for mixing thick batters and
cookie dough.
The dough hooks can perfectly knead
a one loaf bread recipe. Always use dough
hooks on speed 4, 5, or 6.
Attachment
Retractable Cord
1. Pull cord to desired length. Do not
unwind beyond indicator on cord.
2. To store cord, press and hold the
cord release
button while
guiding the
cord. (See
illustration.)
NOTE: If the cord jams during storage,
unwind slightly and then press cord
release button and guide the cord
into place.
840112700 ENv00 2/21/03 3:00 PM Page 4
Page 5
5
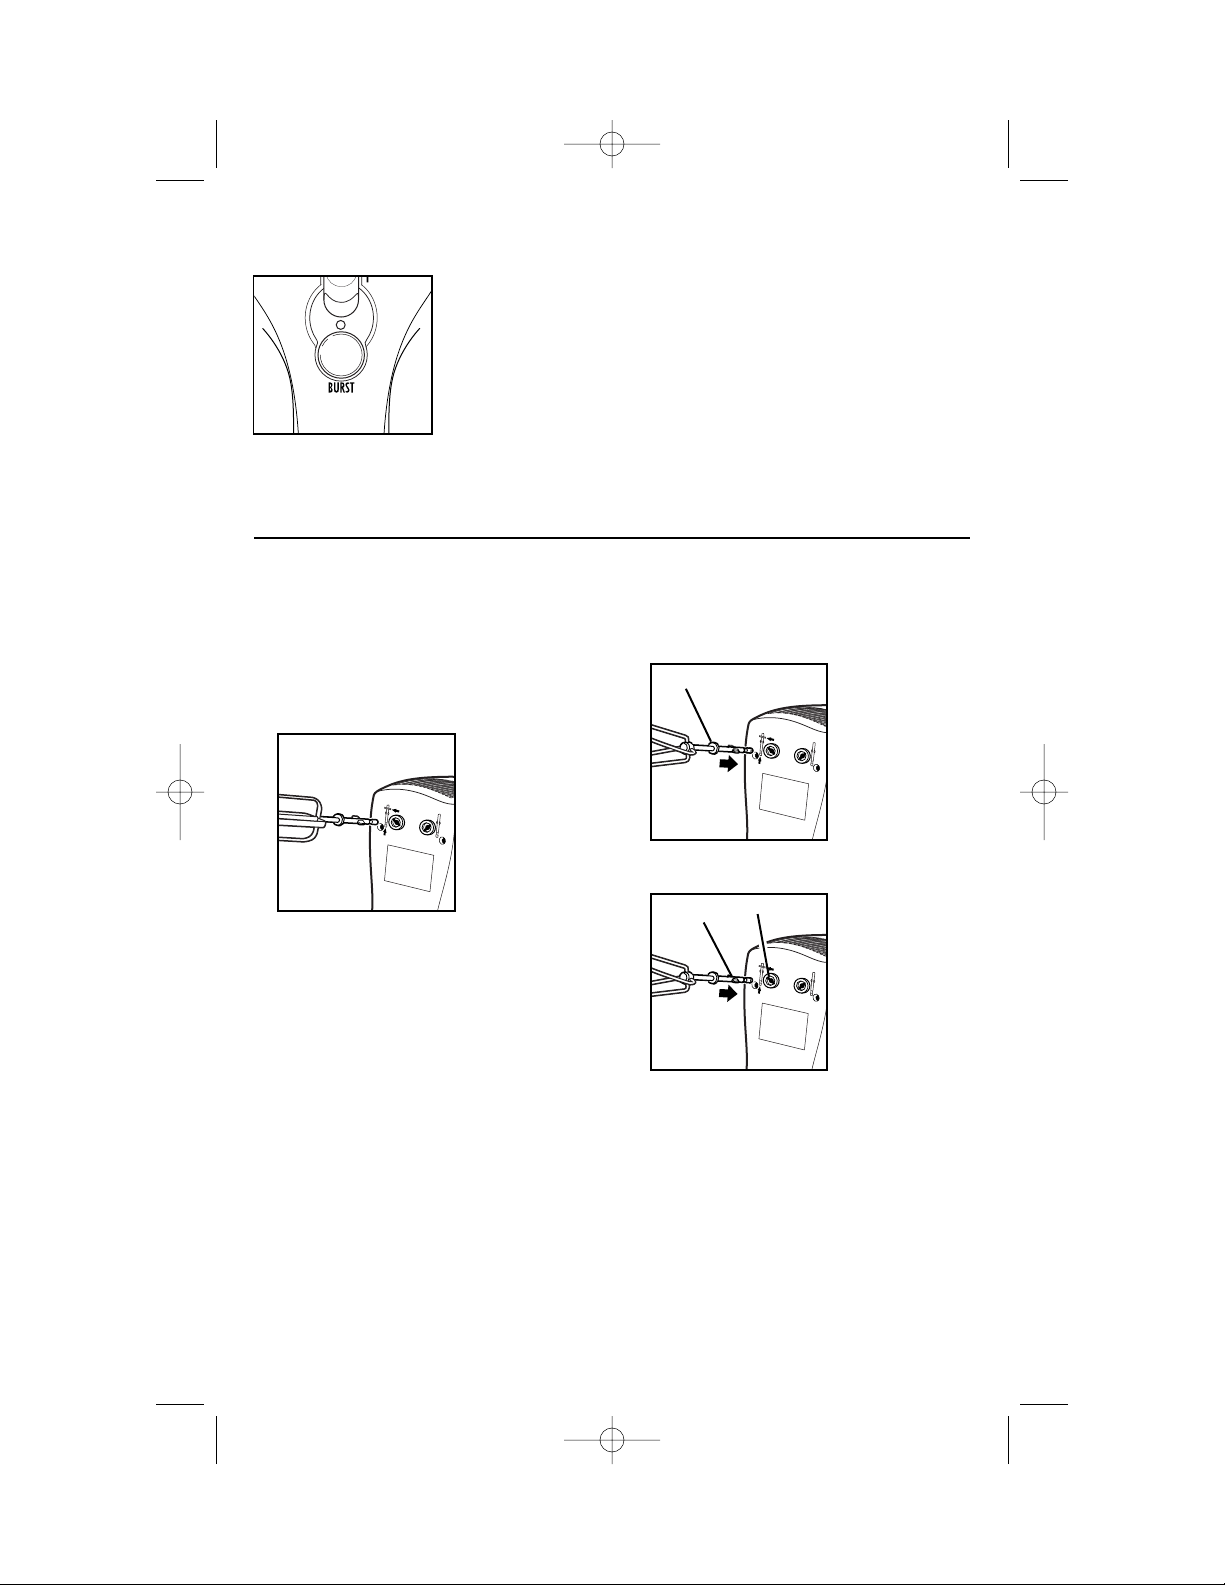
Flat Beaters and Whisk
1. Make sure mixer is unplugged and
speed control is set to OFF.
2. Insert a beater or attachment into an
opening on the bottom of the mixer.
Push until it clicks into place. Repeat
with other
beater or
attachment.
Twisted Wire Beaters and
Dough Hooks
1. Insert the wire beater or the dough
hook with the
collar into
the opening
indicated by
the illustration
on the mixer.
2. Align tabs on the beater or dough
hook with the
slots in the
opening.
Push until it
clicks into
place. Repeat
with other
beater or
dough hook.
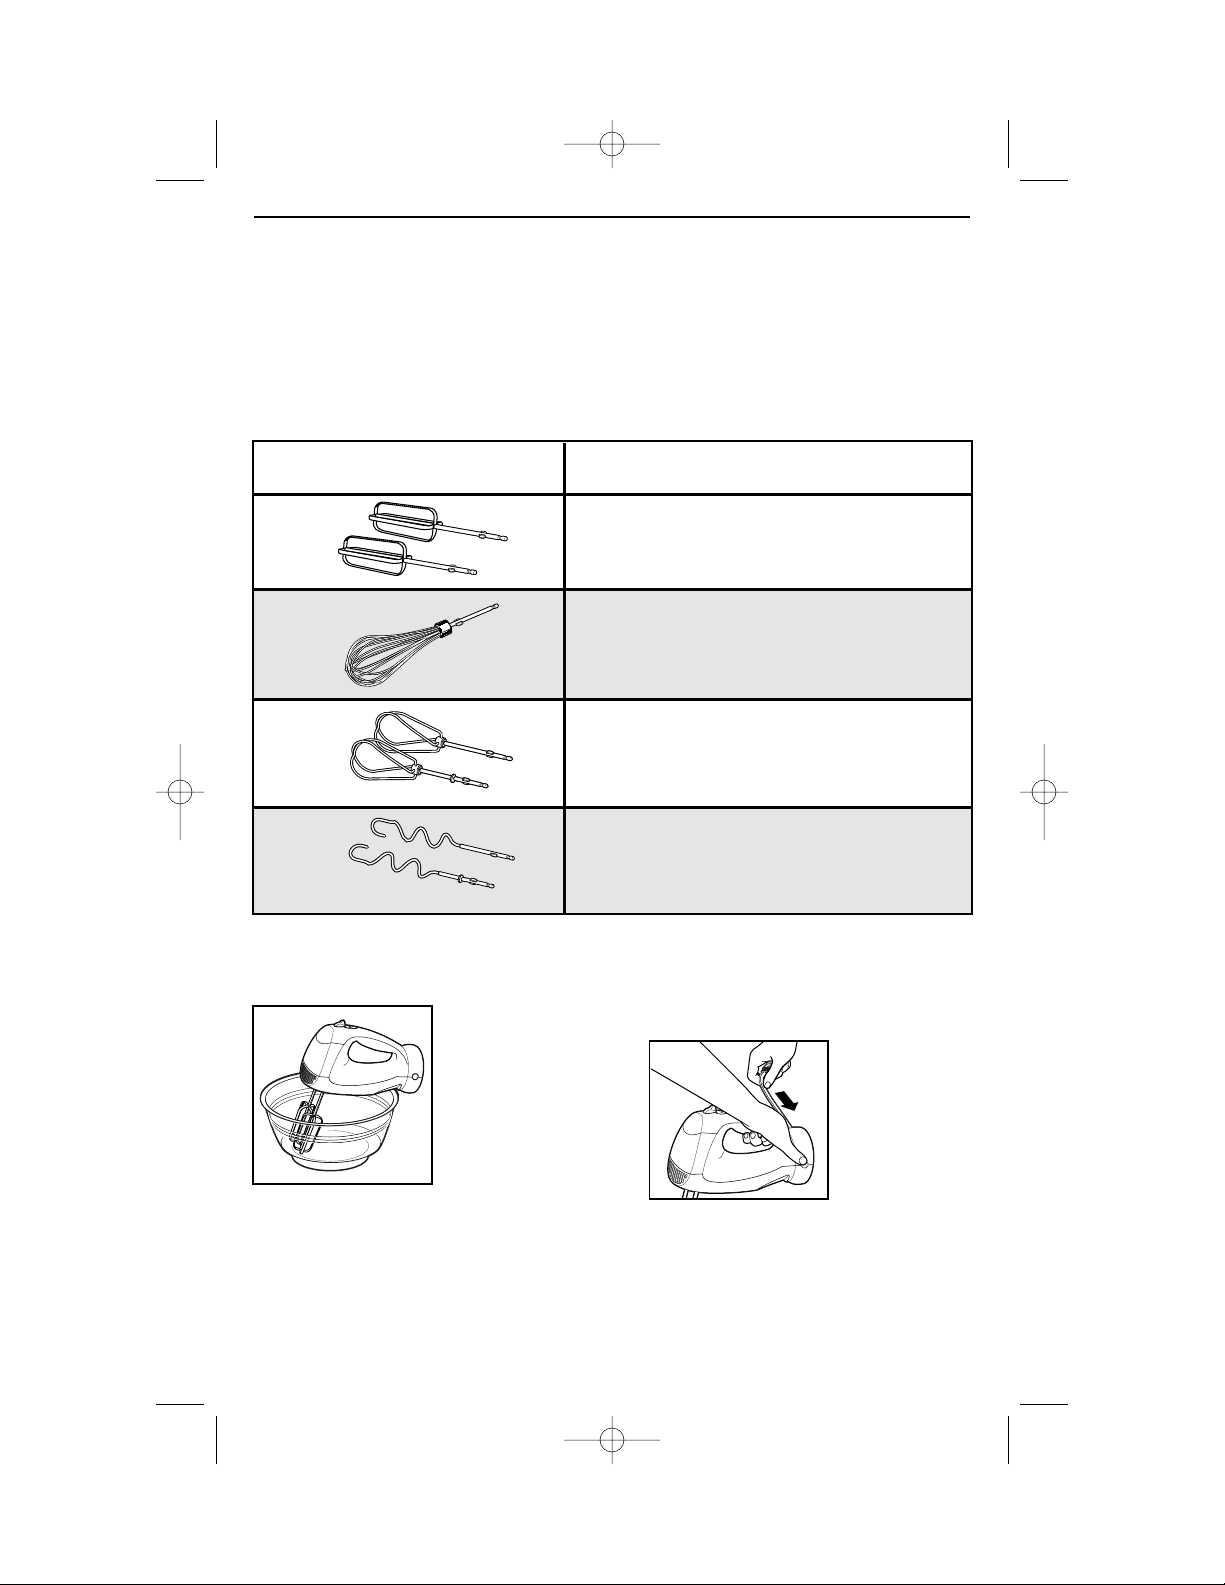
To Insert Attachments
Burst
Press and hold down the button for
additional power
at any speed.
NOTE: Do not use
Burst for more
than two minutes
at a time or
motor may
overheat.
Collar
Tab
Slot
840112700 ENv00 2/21/03 3:00 PM Page 5
Page 6
6
Using Your Mixer
1. Make sure mixer is unplugged and
speed control is set to 0 (OFF).
Insert beaters.
2. Plug mixer into electrical outlet.
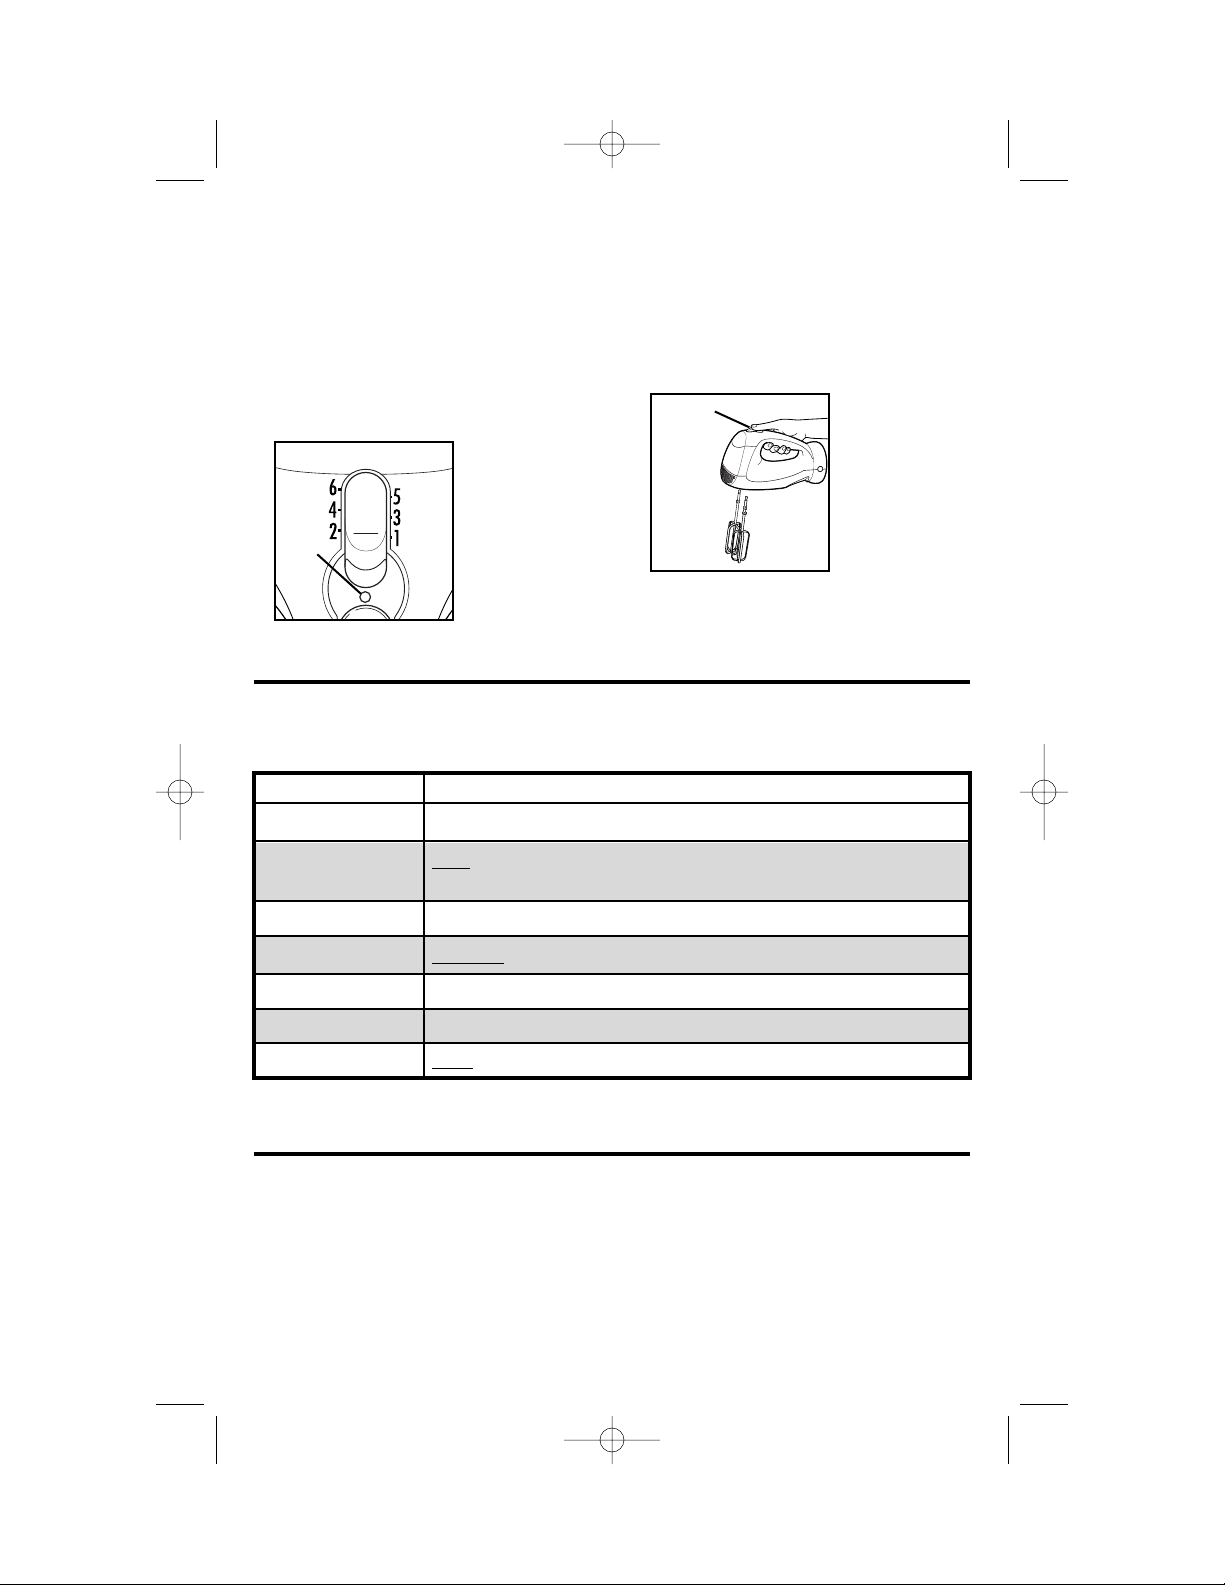
Place beaters into bowl.
3. Move the speed control to desired
speed, starting
at 1 and
increasing to
a higher speed
as necessary.
4. When finished mixing, move the
speed control to 0 (OFF) and
unplug mixer.
5. To eject beaters, with speed control
set at 0 (OFF)
push straight
down on the
speed control.
Speed
Control
OFF
The following mixing guide is a suggestion for selecting mixing speeds for the
6 speed mixers. Begin on speed 1 and increase to desired speed depending
on the recipe consistency.
Mixing Guide
Cookie dough is one of the thickest
doughs to mix. Make it easier by
following these tips:
• Use a large mixing bowl so that the
ingredients spread out for easier
mixing.
• Have butter or margarine at room
temperature.
Mixing Tips
• Add ingredients one at a time and
thoroughly mix after each addition.
• Add flour one cup at a time.
• To add chips or nuts to a very thick
dough or batter, we recommend
stirring them in by hand at the very
end of the recipe.
FUNCTION
OFF and/or Eject
LOW speed for folding or mixing in dry ingredients, muffins,
or quick breads
To cream butter and sugar; most cookie dough
MEDIUM speed for most packaged cake mixes
Frosting and mashed potatoes; kneading dough
Beating egg whites; kneading dough
HIGH speed for whipping cream; kneading dough
6 SPEED
0
1
2
3
4
5
6
840112700 ENv00 2/21/03 3:00 PM Page 6
Page 7

7
1. Always turn off and unplug mixer
from electrical outlet before ejecting
the attachments.
2. Wash attachments in hot, soapy
water; rinse and dry.
3. Wipe the mixer body and cord with
a clean, damp cloth.
NOTE: Do not use abrasive cleaners
or scouring pads. To reduce the risk
of electrical shock do not immerse the
mixer body or cord in water or other
liquid.
Recipes
Baked Spinach-Parmesan Dip
10-ounce package frozen
chopped spinach, thawed
1 cup mayonnaise
3-ounce package cream
cheese, room temperature
1
⁄2 cup onion, minced
Squeeze spinach to remove liquid. In a medium bowl combine spinach, mayonnaise,
cream cheese, onion, garlic, parmesan, and pepper. With hand mixer, beat
ingredients at MEDIUM speed until well blended, about one minute. Spoon the
mixture into a three or four cup baking dish that has been sprayed with vegetable
spray. Sprinkle evenly with paprika. Bake at 350°F until hot in center and lightly
browned on top, about 25 to 30 minutes. Serve hot to spread on baguette slices.
Zesty Mashed Potatoes
8 large baking potatoes
(peeled, cubed, cooked, and drained)
1
⁄2 cup sour cream
8-ounce package cream cheese,
room temperature
Place hot potatoes into a large bowl. Start mixing the potatoes at MEDIUM speed
until they are smooth. Add sour cream, cream cheese, butter, milk, garlic, salt,
and pepper and continue beating until thoroughly mixed. Pour into a greased
9x13-inch baking dish. Baked uncovered for 30 minutes at 400ºF.
Makes 8 servings.
1 clove garlic, minced
1 cup grated parmesan cheese
1
⁄8 teaspoon pepper
1
⁄2 teaspoon paprika
2 baguettes, thinly sliced
1
⁄2 cup butter, room temperature
1
⁄2 cup milk
1
⁄2 to 1 teaspoon minced garlic
Salt and pepper to taste
Cleaning Your Mixer
840112700 ENv00 2/21/03 3:00 PM Page 7
Page 8

8
1 teaspoon almond extract (optional)
1 cup whipping cream
3 cups flour
Wedding Cookies
1 cup butter, room temperature
4 tablespoons sugar
2 teaspoons vanilla
In a medium bowl, cream butter and sugar on MEDIUM speed with hand mixer.
Add vanilla and continue mixing on MEDIUM. Add flour and mix on LOW until
blended. Pour in pecans and continue mixing on LOW until completely blended.
Roll dough into 1-inch balls and place on an ungreased baking sheet. Bake for
25 minutes at 325ºF. Place a paper towel over a wire rack. Remove cookies onto wire
rack. Place confectioners sugar into plastic or paper bag. Drop 3 or 4 cookies into
bag. Shake bag to coat cookies and return cookies to rack to cool completely.
Continue until all cookies have been coated with confectioners sugar. Before
storing cookies, shake cookies in bag of confectioners sugar one more time.
Makes 41⁄2 dozen.
* 2 cups pecan halves or pieces is equivalent to 2 cups finely chopped.
Triple Chocolate Cookies
1
⁄4 cup flour
1
⁄4 cup unsweetened
baking cocoa
1
⁄4 teaspoon baking powder
1
⁄8 teaspoon salt
6 tablespoons butter,
room temperature
Combine flour, cocoa, baking powder, and salt in a medium bowl. Set aside. With
mixer, beat together butter, sugar, and eggs at MEDIUM speed until smooth. Add
melted chocolate and continue mixing on MEDIUM speed until blended. Reduce
speed to LOW and add dry ingredients. Add chocolate chips and walnuts; mix well.
Drop by tablespoons onto cookie sheets, one inch apart. Bake at 350ºF until cookies
look dry and cracked, but feel soft when lightly pressed, about 11 minutes. Let
cookies stand on sheet for 5 minutes. Transfer to racks and cool completely.
Makes about 2 dozen.
Pound Cake
1 cup butter, room temperature
3 cups sugar
6 eggs
1 teaspoon vanilla extract
In a large mixing bowl, cream together butter and sugar on MEDIUM speed.
Add eggs, one at a time, and beat thoroughly after each addition. Add vanilla and
almond extracts and continue mixing. Reduce speed to LOW and alternately add
cream and flour. Pour batter into a greased and floured 10-inch tube pan. Bake for
about 1 hour and 20 minutes at 325ºF, or until tests done.
7 tablespoons sugar
2 eggs
8 ounces semisweet baking chocolate,
melted and cooled
1 cup milk chocolate chips
1 cup chopped walnuts
1
1
/2 cups flour
2 cups finely chopped pecans*
11/2 cups confectioners sugar
840112700 ENv00 2/21/03 3:00 PM Page 8
Page 9

9
Creamy Peanut Butter Pie
1 cup butter
1 cup packed brown sugar
1 cup peanut butter
12-ounce container frozen
whipped topping, thawed
In a medium saucepan, combine 1 cup butter and brown sugar. Cook over medium
heat until butter is melted and mixture is smooth, stirring frequently. Refrigerate 10
minutes. In large bowl, beat peanut butter and brown sugar mixture at LOW speed
until blended. Increase speed and beat one minute at HIGH speed. Reduce speed
to LOW and add whipped topping; beat one additional minute. Pour into graham
crust and refrigerate. In a small saucepan over low heat, melt chocolate, 2
tablespoons butter, and milk. Stir constantly until smooth. Cool slightly then
spread over top of pie. Refrigerate for several hours or overnight before serving.
Makes one 9-inch pie, cut into 8 servings.
Orange Pineapple Cake
181⁄4-ounce box yellow cake mix
4 eggs
11-ounce can mandarin oranges,
undrained
1
⁄2 cup vegetable oil
151⁄4-ounce can crushed pineapple,
undrained
In a large bowl, blend cake mix, eggs, oranges, and oil at MEDIUM speed for 3 to 5
minutes. Divide batter into two greased and floured 9-inch round cake pans. Bake
approximately 45 minutes to 1 hour at 325ºF. Let cake cool on wire racks. To make
icing, in a medium bowl, beat pineapple, pudding, and whipped topping mix at
LOW speed for 3 minutes. Ice the cooled cake and store in the refrigerator.
(Tip: Cake flavor is enhanced if left overnight in refrigerator.)
1-ounce box vanilla sugar-free instant
pudding
12-ounce container frozen light
whipped topping, thawed
9-inch graham crust
2 ounces semi-sweet baking chocolate
2 tablespoons butter
1 tablespoon milk
840112700 ENv00 2/21/03 3:00 PM Page 9
Page 10

10
2/03
840112700
WAL★MART Stores, Inc.
Bentonville, AR 72716
gis a trademark of
General Electric Company
and is used under license by
WAL★MART Stores, Inc.
Bentonville, AR 72716
Two-Year Limited Warranty
If you have a claim under this warranty, please call our Customer Assistance Number.
For faster service please have model, series, and type numbers ready for operator to
assist you. These numbers can be found on the bottom of your stand mixer.
MODEL: ________________ TYPE: _________________ SERIES: __________________
Customer Assistance Number 1-877-207-0923
Keep this number for future reference!
Customer Assistance
What does your warranty cover?
• Any defect in material or workmanship.
For how long after the original purchase?
• Two years.
What will we do?
• Provide you with a new one.
How do you make a warranty claim?
• Save your receipt.
• Properly pack your unit. We recommend
using the original carton and packing
materials.
• Return the product to your nearest
WAL
★
MART store or call Customer
Assistance at 1-877-207-0923.
What does your warranty not cover?
• Glass parts, glass containers, cutter/strainer,
blades and/or agitators.
• Commercial use or any other use not
found in printed directions.
• Damage from misuse, abuse, or neglect.
• Products purchased or serviced outside
the USA.
How does state law relate to this warranty?
• This warranty gives you specific legal rights,
and you may also have other rights which
vary from state to state.
•
WAL★MART expressly disclaims all responsi-
bility for consequential damages or
incidental losses caused by use of this
appliance. Some states do not allow this
exclusion or limitation of incidental or
consequential losses so the foregoing
disclaimer may not apply to you.
What if you purchased your product in the
U.S., Canada or Mexico and encounter a
problem while using it outside the country
of purchase?
• The warranty is valid only in the country of
purchase and if you follow the warranty
claim procedure as noted.
840112700 ENv00 2/21/03 3:00 PM Page 10
Page 11

Para asistencia al cliente, por favor llame al: 1-877-207-0923
840112700
Batidora de mano con
cable retráctil
g
Seguridad de la batidora de mano 2
Conozca su batidora de mano 3
El uso de su batidora de mano 5
La limpieza de su batidora de mano 7
Recetas 7
Solución de problemas 9
Asistencia al cliente 10
www.gehousewares.com
840112700 SPv00 2/21/03 3:02 PM Page 1
Page 12

2
SALVAGUARDIAS IMPORTANTES
Seguridad de la batidora de mano
Este aparato ha sido diseñado solamente
para uso doméstico.
Este aparato está equipado con un enchufe
polarizado. Este tipo de enchufe tiene una
clavija más ancha que la otra. El enchufe
encajará en un tomacorriente de una sola
manera. Ésta es una propiedad de seguridad
destinada a reducir el riesgo de choque eléctrico. Si no puede introducir el enchufe en
el tomacorriente, trate de invertir el enchufe.
Si aún no encaja, comuníquese con un elec-
tricista competente para cambiar el tomacorriente obsoleto. No trate de hacer caso
omiso del propósito de seguridad del
enchufe polarizado, modificándolo de alguna manera.
ADVERTENCIA:Para reducir
el riesgo de heridas personales, siempre desenchufe la batidora antes de introducir o
quitar las aspas.
1. Lea todas las instrucciones.
2. Para protegerse contra el riesgo de
choque eléctrico, no sumerja el cable, el
enchufe ni el cuerpo de la batidora en
agua ni en algún otro líquido.
3. Es necesario que haya buena supervisión
cuando los niños utilicen aparatos o
cuando éstos se están utilizando cerca
de niños.
4. Desenchúfela del tomacorriente cuando
no la esté usando, antes de colocar o
sacar alguna pieza y antes de la limpieza.
5. Evite todo contacto con piezas móviles.
Mantenga las manos, el cabello y la ropa,
así como las espátulas y otros utensilios
lejos de las aspas durante la operación
para reducir el riesgo de lesiones a
personas y/o averías a la batidora.
6. Saque las aspas de la batidora antes de
lavarlas..
7. No opere ningún aparato electrodoméstico si el cable o el enchufe están
averiados, después de un mal funcionamiento del aparato o si éste se ha
caído o averiado de alguna forma. Llame
a nuestro número gratuito de servicio al
cliente para obtener información sobre
el examen, la reparación o el ajuste
eléctrico o mecánico.
8. El uso de accesorios no recomendados
por General Electric para usarse con este
modelo puede causar incendio, choque
eléctrico o lesiones.
9. No la use al aire libre.
10. No coloque el aparato sobre o cerca de
una fuente de gas caliente o de un quemador eléctrico, ni dentro de un horno
caliente.
11. No deje que el cable cuelgue sobre el
borde de una mesa o mostrador o que
toque alguna superficie caliente,
incluyendo la superficie de la estufa.
12. No coloque el aparato sobre o cerca de
una fuente de gas caliente o de un quemador eléctrico, ni dentro de un horno
caliente.
13. Verifique que el control esté en la
posición apagada antes de enchufar el
cable en el tomacorreinte de la pared.
Para desconectar, coloque el control en
la posición apagada (O) y luego saque el
enchufe del tomacorriente de la pared.
14. No use el aparato para ningún otro fin
que no sea el indicado.
Cuando use aparatos electrodomésticos, se deben seguir siempre todas las precauciones de
seguridad que incluyen lo siguiente:
¡GUARDE ESTAS INSTRUCCIONES!
Información para la seguridad del consumidor
840112700 SPv00 2/21/03 3:02 PM Page 2
Page 13

3
Antes del primer uso
Lave los accesorios en agua caliente con
jabón. Enjuague y seque.
Conozca su batidora
Piezas y características
1
2
3
4
Control de velocidad (Encendido/
Apagado) y expulsión – Para
seleccionar la velocidad de batido
y para quitar los accesorios.
Botón de aumento de potencia –
Suministra un estallido adicional
de potencia de batido cuando se
oprime.
Cuerpo de la batidora
1
2
3
4
Estabilizador de la batidora de mano
Botón liberador del cable retráctil –
Oprima para replegar el cable.
Cable retráctil – Para fácil
almacenamiento.
Estuche de almacenamiento – Para
fácil almacenamiento de la batidora
y los accesorios
5
6
6
7
5
7
840112700 SPv00 2/21/03 3:03 PM Page 3
Page 14

Estabilizador de la batidora
de mano
Esta característica se puede usar en
la mayoría de los tazones de batido
grandes. Use el
estabilizador de la
batidora de mano
mientras añade
ingrediente o
revisa una receta.
Para usarlo,
APAGUE LA
BATIDORA, luego
asiéntela en el
borde del tazón.
PRECAUCIÓN:
• Nunca utilice el estabilizador de la
batidora de mano cuando la batidora
esté encendida
• No use el estabilizador de la batidora de
mano en tazones pequeños (1
1
⁄2 cuarto)
o en tazones de batido de plástico.
4
Accesorios y Características optativas
(disponibles en modelos selectos)
Antes del primer uso, lave las aspas y otros accesorios en agua tibia con jabón,
enjuague y seque.
Para reducir el riesgo de heridas, desenchufe la batidora del tomacorriente antes
de introducir o quitar los accesorios.
La batidora viene con uno o más de los accesorios siguientes:
Descripción
Las aspas planas se han diseñado para batir
en general.
El aspa para batir es perfecta para batir
crema. El aspa puede insertarse en
cualquiera de los orificios.
Las aspas torcidas, que no tienen postes
centrales para una limpieza fácil, están
diseñadas para batir mezclas espesas y
masa para galletas.
Los ganchos para masa pueden amasar
perfectamente la receta para una hogaza
de pan. Siempre use los ganchos para masa
en la velocidad 4, 5 ó 6.
Cable retráctil
1. Jale el cable al largo deseado. No
desenrolle más allá del indicador en el
cable.
2. Para guardar el cable, presione y
sostenga el
botón liberador
mientras guía el
cable. (Vea la
ilustración.)
NOTA: Si el cable se atora cuando lo esté
guardando, desenrolle un poco, luego
presione el botón liberador del cable y
guíe el cable a su lugar.
Accesorio
840112700 SPv00 2/21/03 3:03 PM Page 4
Page 15

5
Aspas planas y aspa para batir
1. Verifique que la batidora esté desench-
ufada y que el control de velocidad esté
en apagado (O).
2. Introduzca un aspa o accesorio en la
abertura de la
parte inferior
de la batidora.
Empuje hasta
que haga clic y
quede firme en
su lugar. Repita
con la otra aspa
o accesorio.
Aspas torcidas y ganchos para masa
1. Introduzca el aspa torcida o el gancho
para masa con
el collarín en la
abertura indicada por la
ilustración de la
batidora.
2. Alinee las lengüetas del aspa o gancho
para masa con
las ranuras en
la abertura.
Empuje hasta
que haga clic y
quede firme en
su lugar. Repita
con la otra aspa
o gancho para
masa.
Para introducir los accesorios
Aumento de potencia (Burst)
Oprima y sostenga el botón para potencia
adicional en
cualquier
velocidad.
NOTA: No use
el aumento de
potencia por más
de dos minutos
seguidos ya que el
motor se puede
recalentar.
Collarín
Lengüeta
Ranura
840112700 SPv00 2/21/03 3:03 PM Page 5
Page 16

6
El uso de su batidora de mano
1. Verifique que la batidora esté
desenchufada y que el control de
velocidad esté en la graduación
O (apagado). Inserte las aspas.
2. Enchufe la batidora en el tomacorriente. Coloque las aspas en el tazón.
3. Mueva el control de velocidad a la grad-
uación deseada,
comenzando
con 1 y
aumentando a
más velocidad
según lo
requiera.
4. Cuando termine de batir, mueva el
control de velocidad a O (apagado) y
desenchufe la batidora.
5. Para expulsar las aspas, con el
control de
velocidad en la
graduación O
(apagado),
empuje el
control de
velocidad
completamente hacia
abajo.
Control de
velocidad
Apagado
La siguiente guía para batir es una sugerencia para seleccionar entre las 6
velocidades de la batidora. Comience en la velocidad 1 y aumente a la velocidad
deseada según la consistencia de la receta.
Guía para batir
La masa para galletas es una de las masas
más espesas para batir. Esta tarea se puede
hacer más fácil siguiendo estas sugerencias
:
• Use un tazón de batido grande para que
los ingredientes se puedan esparcir y sea
más fácil mezclarlos.
• La mantequilla o la margarina deben
estar a temperatura ambiente.
Sugerencias para el batido
• Agregue los ingredientes uno por uno y
mezcle bien después de cada adición.
• Agregue una taza de harina a la vez.
• Para agregar trozos de chocolate o
nueces a una masa o pasta muy espesa,
recomendamos mezclarlos a mano al
final de la receta.
FUNCIÓN
0 APAGADO y/o Expulsar
Velocidad BAJA para agregar o mezclar ingredientes secos,
panecillos o panes rápidos
Para batir mantequilla, azúcar y la mayoría de masas para galletas
Velocidad MEDIANA para la mayoría de las mezclas
preparadas para pasteles
Para glaseado y puré de papas; masa para pan
Para batir claras de huevo; masa para pan
Velocidad ALTA para batir crema; masa para pan
6 VELOCIDADES
0
1
2
3
4
5
6
840112700 SPv00 2/21/03 3:03 PM Page 6
Page 17

7
1. Siempre apague y desenchufe la
batidora del tomacorriente antes
de expulsar los accesorios.
2. Lave los accesorios en agua caliente
con jabón, enjuague y seque.
3. Limpie el cuerpo de la batidora y el
cable con un paño limpio y húmedo.
NOTA: No use productos de limpieza
o esponjillas abrasivos. Para reducir el
riesgo de choque eléctrico no sumerja
el cuerpo de la batidora ni el cable en
agua ni en ningún otro líquido.
Recetas
Dip de espinaca y queso parmesano al horno
1 Paquete de 10 onzas de espinaca
congelada, picada y descongelada
1 taza de mayonesa
1 paquete de 3 onzas de queso crema
a temperatura ambiente
1
⁄2 cebolla finamente picada
Exprima la espinaca para extraer el líquido. En un tazón grande combine la espinaca,
mayonesa, queso crema, cebolla, ajo, queso parmesano y pimienta. Con su batidora de
mano bata los ingredientes a velocidad MEDIA, aproximadamente un minuto, hasta
que esté todo bien mezclado. Coloque la mezcla a cucharadas en una fuente para
hornear con capacidad de tres a cuatro tazas y engrasada con aceite vegetal en aerosol.
Espolvoree la páprika en forma pareja. Hornee a 350°F hasta que el centro esté
caliente y la superficie ligeramente dorada, entre 25 y 30 minutos. Sirva caliente ara
untar en las rebanadas de pan tipo baguette.
Sabroso puré de papas
8 papas grandes para hornear (peladas,
cortadas en cubitos, cocidas y escurridas)
1
⁄2 taza de crema agria
1 paquete de queso crema de 8 onzas a
temperatura ambiente
Coloque las papas calientes en un tazón grande. Comience a batir las papas a
velocidad MEDIA hasta que queden suaves. Agregue la crema agria, al queso crema,
la mantequilla, la leche, el ajo, la sal y pimienta y continúe batiendo hasta que queden bien mezclados. Vierta en una fuente aceitada de 9 x 13 pulgadas. Hornee sin
cubrir por 30 minutos a 400°F.
Rinde 8 porciones.
1 diente de ajo finamente picado
1 taza de queso parmesano rallado
1
⁄8 cucharadita de pimienta
1
⁄2 cucharadita de paprika
2 panes tipo baguette en rebanadas
muy delgadas
1
⁄2 taza de manteca a temperatura
ambiente
1
⁄2 taza de leche
1
⁄2 a 1 cucharadita de ajo picado
Sal y pimienta al gusto
La limpieza de su batidora
840112700 SPv00 2/21/03 3:03 PM Page 7
Page 18

Galletas para bodas
1 taza de mantequilla a temperatura
ambiente
4 cucharadas de azúcar
2 cucharaditas de vainilla
En un tazón mediano, con su batidora de mano bata a velocidad MEDIA la
mantequilla y el azúcar. Agregue la vainilla y continúe batiendo a velocidad MEDIA.
Agregue la harina y bata a velocidad BAJA hasta que se mezcle. Agregue las nueces y
continúe batiendo en BAJA hasta que se mezclen completamente. Haga bolitas de
masa de 1 pulgada y colóquelas en una hoja de hornear no engrasada. Hornee por
25 minutos a 325°F. Coloque una hoja de papel absorbente en un estante de
alambre. Retire las galletas y colóquelas en el estante. Ponga el azúcar glass en una
bolsa de plástico o de papel. Coloque tres o cuatro galletas en la bolsa. Sacuda la
bolsa para que las galletas se cubran con el azúcar glass y regrese las galletas al estante
para que se enfríen completamente. Continúe hasta que todas las galletas estén
cubiertas con el azúcar glass. Antes de guardar las galletas, agítelas en la bolsa con
azúcar glass una vez más.
Se obtienen 41⁄2 docenas.
* 2 tazas de nueces lisas en mitades o enteras equivale a 2 tazas de nueces lisas
finamente picadas.
Galletas de chocolate triple
1
⁄4 taza de harina
1
⁄4 taza de cacao sin azúcar para hornear
1
⁄4 cucharadita de polvo para hornear
1
⁄8 cucharadita de sal
6 cucharadas de mantequilla a temperatura
ambiente
Combine la harina, cacao, horno para hornear y la sal en un tazón mediano.
Ponga a un lado. Con la batidora, bata la mantequilla, azúcar y huevos juntos a
velocidad MEDIA hasta que queden suaves. Agregue el chocolate derretido y
continúe batiendo a velocidad MEDIA hasta que quede mezclado. Disminuya la
velocidad a BAJA y agregue los ingredientes secos. Agregue las chispas de chocolate
y las nueces y mezcle bien. Ponga cucharadas de la masa en una hoja de hornear a
una pulgada de distancia entre cada una. Hornee a 350°F hasta que las galletas se
vean secas y cuarteadas, pero se sientan suaves cuando se presionan ligeramente,
aproximadamente 11 minutos. Deje reposar las galletas en la hoja por 5 minutos.
Páselas a un estante de metal y déjelas enfriar.
Se obtienen alrededor de 2 docenas.
8
7 cucharadas de azúcar
2 huevos
8 onzas de chocolate para hornear
semidulce, derretido y enfriado
1 taza de chispas de chocolate de leche
1 taza de nueces picadas
1
1
/2 tazas de harina
2 tazas de nueces lisas* finamente
picadas
11/2 tazas de azúcar glass
840112700 SPv00 2/21/03 3:03 PM Page 8
Page 19

9
Pastel inglés “pound cake”
1 taza de mantequilla a temperatura
ambiente
3 tazas de azúcar
6 huevos
1 cucharadita de extracto de vainilla
En un tazón grande, bata la mantequilla y el azúcar juntas a velocidad MEDIA.
Agregue los huevos, uno por uno y bata después de añadir cada uno. Agregue el
extracto de vainilla y de almendras y continúe batiendo. Disminuya la velocidad a
BAJA y agregue la crema y harina alternadamente. Vierta la mezcla en un molde de
rosca de 10 pulgadas engrasado y con harina. Hornee aproximadamente 1 hora y 20
minutos a 325°F o hasta que esté listo.
Pay cremoso de mantequilla de cacahuate
1 taza de mantequilla
1 taza de azúcar morena
(medida compacta)
1 taza de mantequilla de cacahuate
12-envase de 12 onzas de crema
batida congelada, descongelada
En una sartén mediana combine 1 taza de mantequilla con el azúcar morena.
Cocine a fuego medio mezclando frecuentemente hasta que se derrita la
mantequilla y la mezcla esté suave. Refrigere por 10 minutos. En un tazón grande
bata la mantequilla de cacahuate y el azúcar morena a velocidad BAJA hasta que
estén mezcladas. Aumente la velocidad a ALTA y bata por un minuto. Reduzca la
velocidad a BAJA y agregue la cubierta batida, bata por un minuto más. Vierta en la
costra de galletas tipo graham y refrigere. En una sartén pequeña derrita a fuego
lento el chocolate, 2 cucharadas de mantequilla y la leche. Revuelva
constantemente hasta que la mezcla esté suave. Enfríe ligeramente y luego unte
sobre la superficie del pay. Refrigere por varias horas o por toda la noche antes de
servir. Rinde un pay de 9 pulgadas, partido en 8 porciones.
Pastel de naranja y piña
1 paquete de 181⁄4-onzas de mezcla
comercial para pastel amarillo
4 huevos
1 lata de 11 onzas de naranjas sin escurrir
1
⁄2 taza de aceite vegetal
En un tazón grande, bata la mezcla para pastel, huevos, naranjas y aceite a velocidad
MEDIA por 3 a 5 minutos. Divida la mezcla en dos moldes en rosca de 9 pulgadas
engrasados. Hornee aproximadamente de 45 minutos a 1 hora a 325°F. Deje que se
enfríe en el molde. Para hacer el glaseado bata en un molde mediano la piña, el
budín y la mezcla de crema batida e velocidad BAJA por 3 minutos. Cubra el pastel
frío con el glaseado y guarde en el refrigerador.
(Consejo: El sabor del pastel se enriquece si se deja reposar en el refrigerador toda
la noche)
1 cucharadita de extracto de almendras
1 taza de crema batida
3 tazas de harina
1 lata de 15
1
⁄4-onzas de de piña aplastada
sin escurrir
1 paquete de 1 onza de budín
instantáneo de vainilla sin azúcar
1 envase de 12 onzas de crema batida
congelada, descongelada
1 costra de galletas tipo graham de 9
pulgadas
2 onzas de chocolate semiamargo para
hornear
2 cucharadas de mantequilla
1 cucharada de leche
840112700 SPv00 2/21/03 3:03 PM Page 9
Page 20

10
2/03
840112700
WAL★MART Stores, Inc.
Bentonville, AR 72716
Asistencia al cliente
Si desea hacer un reclamo bajo esta garantía, sírvase llamar a nuestro Número de
Asistencia al Cliente. Para un servicio más rápido es importante que tenga los
números de modelo, serie y tipo listos para que el operador lo pueda ayudar. Estos
números se pueden encontrar en la parte inferior de su batidora de pie.
MODELO: ______________ TIPO: _________________ SERIE: __________________
Número de Asistencia al Cliente: 1-877-207-0923
¡Guarde este número para referencia futura!
ges una marca de comercio
de General Electric Company
usada bajo licencia por
WAL★MART Stores, Inc.
Bentonville, AR 72716
Garantía Limitada de Dos Años
¿Qué cubre su garantía?
• Todo defecto de material o mano de obra.
¿Por cuánto tiempo después de la
compra inicial?
• Dos años.
¿Qué haremos?
• Le suministraremos una unidad nueva.
¿Cómo hacer un reclamo bajo garantía?
• Guarde su recibo.
• Empaque su unidad debidamente.
Recomendamos usar la caja y los
materiales de empaque originales.
• Devuelva el producto a su tienda
WAL
★
MART más cercana o llame al
Número de Asistencia al Cliente al
1-877-207-0923.
¿Qué es lo que la garantía no cubre?
• Partes de vidrio, envases de vidrio,
cortador/colador, cuchillas y/o agitadores.
• Uso comercial o cualquier otro uso que no se
encuentre en las instrucciones impresas.
• Daños debido al mal uso, abuso, o
negligencia.
• Productos comprados o reparados fuera
de los Estados Unidos.
¿Cuál es la relación entre las leyes estatales
y esta garantía?
• Esta garantía le otorga derechos legales
específicos, y es posible que usted también
tenga otros derechos que varían de un estado
al otro.
• WAL
★
MART expresamente niega toda
responsabilidad por daños consecuentes o
pérdidas incidentales causadas por el uso de
este aparato. Ciertos estados no permiten esta
exclusión o limitación de pérdidas incidentales o consecuentes de manera que es
posible que el descargo de responsabilidad
que antecede no corresponda en su caso.
¿Qué sucede si usted adquirió su producto en
los Estados Unidos, Canadá o México y encuentra un problema cuando lo está usando fuera
del país de compra?
• La garantía es válida solamente en el país de
compra y si usted sigue el procedimiento de
reclamo bajo garantía que se indica.
840112700 SPv00 2/21/03 3:03 PM Page 10
 Loading...