

Page 1
For Customer Assistance Please Call: 1-877-207-0923
840104500
Stand Mixer
g
Important Safeguards ............................ 2
Parts and Features.................................. 3
How to Assemble Your Mixer ............ 4
How to Use Your Mixer ........................ 5
Cleaning Your Mixer.............................. 6
Recipes...................................................... 7
Customer Assistance .......................... 12
Digitally signed by Elizabeth DeMerchant
cn=Elizabeth DeMerchant, ou=Product Information Center, o=HB/PS, c=US
Date: 2002.08.15 13:19:59 -05'00'
Reason: I am approving this document
5.5 x 8.5, English, Spanish, black ink, no bleeds, 24 page, Flip
840104500 ENv00 8/12/02 1:47 PM Page 1
Page 2

2
IMPORTANT SAFEGUARDS
SAVE THESE INSTRUCTIONS!
When using electrical appliances, basic safety precautions should always be observed,
including the following:
1. Read all instructions.
2. To protect against risk of electrical
shock, do not put the cord, plug, or
Mixer body in water or other liquid.
3. Close supervision is necessary when any
appliance is used by or near children.
4. Unplug from outlet when not in use,
before putting on or taking off parts, and
before cleaning.
5. Remove beaters and other attachments
from the Mixer before washing.
6. Do not operate any appliance with
a damaged cord or plug or after the
appliance malfunctions or is dropped
or damaged in any manner. Call our
toll-free customer service number for
information on examination, repair, or
electrical or mechanical adjustment.
7. The use of attachments not recommended
or sold by the appliance manufacturer for
use with this model may cause fire, electric
shock or injury.
8. Avoid contacting moving parts. Keep
hands, hair, and clothing, as well as
spatulas and other utensils, away from
beaters during operation to reduce risk
of injury to persons, and/or damage to
the Mixer.
9. Do not use outdoors.
10. Do not let cord hang over edge of table
or counter. Do not let cord contact hot
surfaces, including stove.
11. Do not place on or near a hot gas or
electric burner, or in a heated oven.
12. Check that control is off before plugging
cord into wall outlet. To disconnect, turn
control to RESET/OFF, then remove
plug from wall outlet.
13. Do not use appliance for other than
intended purpose.
This appliance is intended for household use
only.
This appliance is equipped with a groundedtype 3-wire cord (3-prong plug). This type of
plug will only fit into an electrical outlet
made for a 3-prong plug. This is a safety
feature intended to help reduce the risk of
electrical shock. If the plug should fail to fit
contact a qualified electrician to replace the
obsolete outlet. Do not attempt to defeat the
safety purpose of the grounding pin by
modifying the plug in any way.
To avoid an electrical circuit overload do not
use another high wattage appliance on the
same circuit with the mixer.
The length of the cord used on this appliance was selected to reduce the hazards
of becoming tangled in, or tripping over a
longer cord. If a longer cord is necessary an
approved extension cord may be used.
The electrical rating of the extension cord
must be equal to or greater than the rating
of the mixer. Care must be taken to arrange
the extension cord so that it will not drape
over the countertop or tabletop where it can
be pulled on by children or accidentally
tripped over.
An extension cord should be connected to
the appliance first, before it is plugged into
the outlet.
Consumer Safety Information
840104500 ENv00 8/12/02 1:47 PM Page 2
Page 3
3
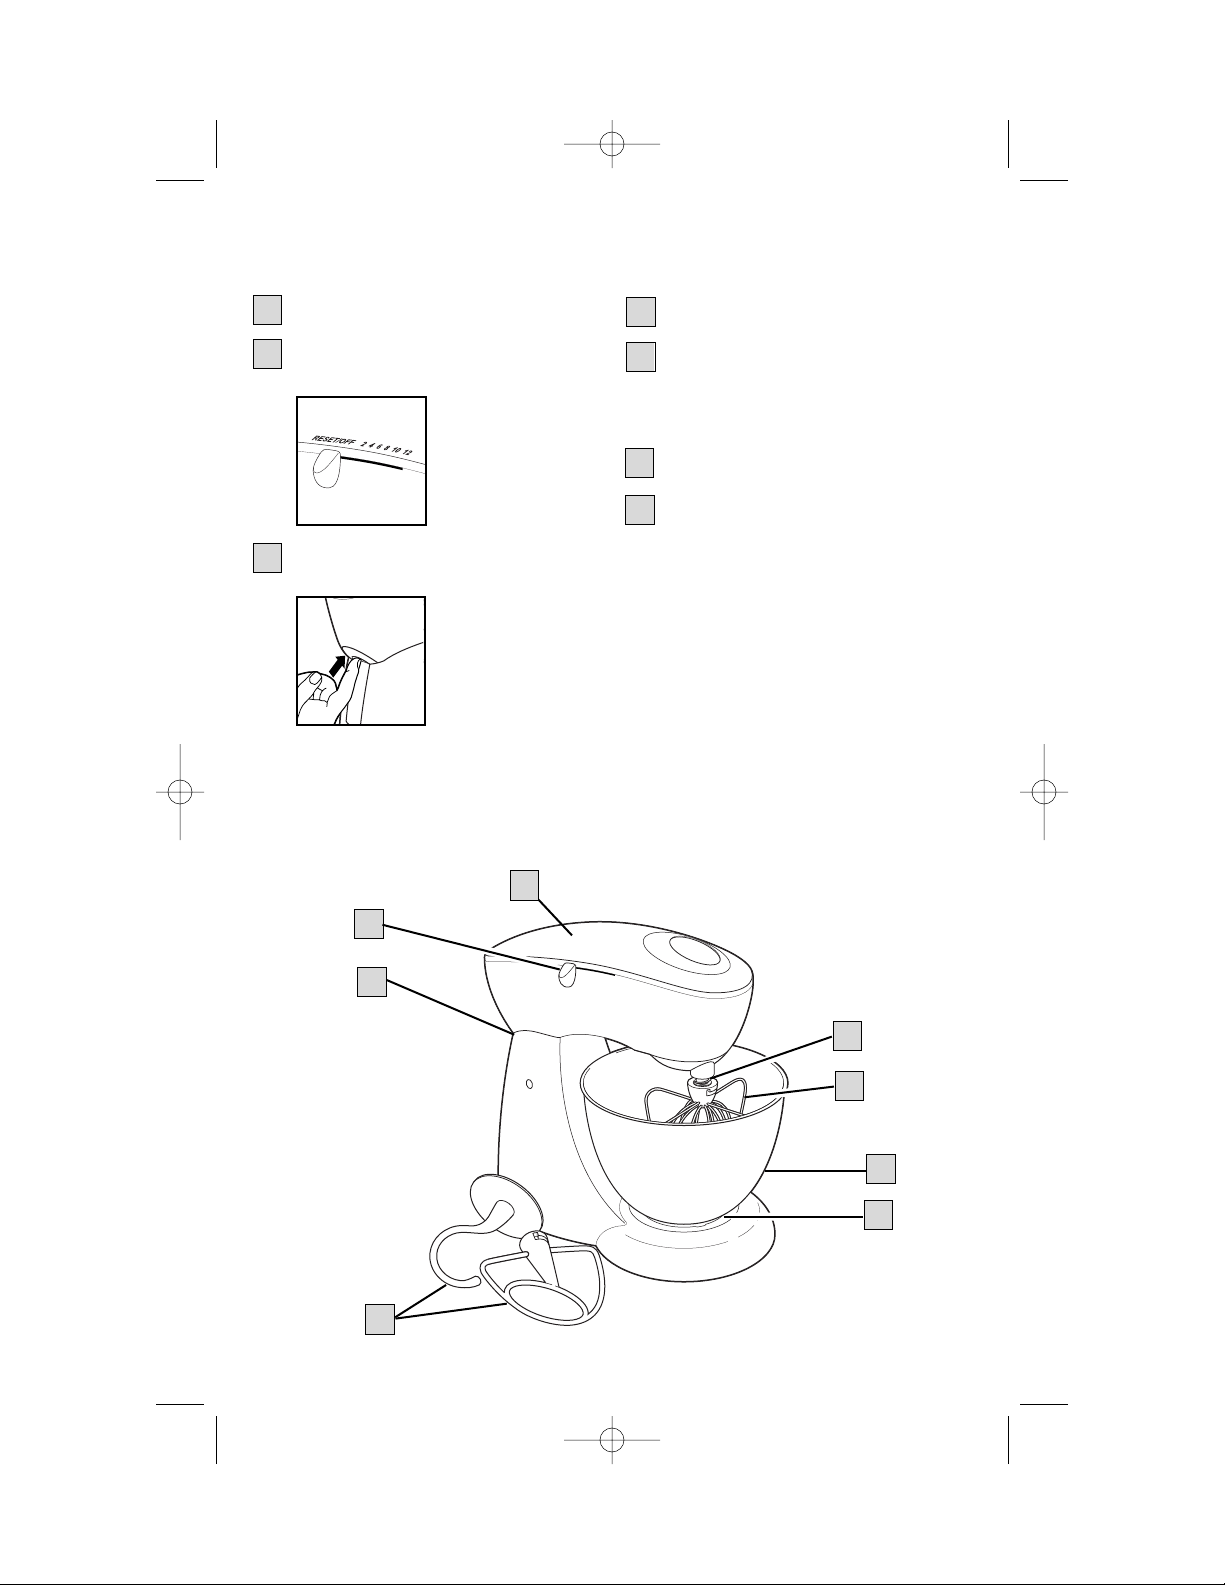
Mixer Head
Setting Control
Select a setting from 2 to 12. The
setting of the
mixer increases
with the numbers.
Mixer Release Button
This button locks the Mixer Head
down to ensure
thorough mixing.
When the Mixer
Head is raised,
it locks in the
upright position.
Hold the Mixer
Head when lowering it into the
bowl. Press up on the button to
release the Mixer Head.
Parts and Features
1
1
2
3
3
2
Attachment Shaft
Attachments
Mixer attachments include a flat
beater, a wire whisk, and a dough
hook.
41⁄2 Quart Mixing Bowl
Bowl Lock
4
5
6
7
4
5
7
5
6
840104500 ENv00 8/12/02 1:47 PM Page 3
Page 4

4
To Attach the Bowl
1. Make sure that the Setting Control is
set to RESET/OFF and the Mixer is
unplugged.
2. Press the Mixer Release Button and
tilt the Mixer Head up.
3. Place Bowl on turntable and turn
clockwise until Bowl locks into place.
4. Plug Mixer into electrical outlet.
To Remove:
1. Make sure that the Setting Control is
set to RESET/OFF and the Mixer is
unplugged.
2. Press the Mixer Release Button and
tilt the Mixer Head up.
3. Turn Bowl counterclockwise to
unlock.
How to Assemble the Mixer
wWARNING
Injury Hazard
• Unplug mixer before inserting or removing beaters.
• Unplug mixer before cleaning. Failure to do so can result in broken bones or cuts.
To Attach the Beater, Wire Whisk, or Dough Hook
1. Make sure that the Setting Control is
set to RESET/OFF and the Mixer is
unplugged.
2. Press the Mixer Release Button and
tilt the Mixer Head up.
3. Insert Attachment onto Beater Shaft
and press upward as far as possible.
4. Turn the Attachment to the right,
hooking beater over pin on shaft.
5. Plug Mixer into electrical outlet.
840104500 ENv00 8/12/02 1:47 PM Page 4
Page 5

5
Cookie Tips
Use
the flat beater attachment to mix
cookie dough.
Cookie
dough is one of the
thickest doughs to mix.
Make it easier by
following these tips:
• Have butter or margarine at room
temperature.
• Add ingredients one at a time, thoroughly
mixing after each addition.
• Add flour one cup at a time.
• If the mixer seems to struggle, increase
the setting.
Mixing Guide
The following mixing guide is a suggestion for selecting mixing settings. Begin on
setting 2 and increase to desired setting depending on the recipe consistency.
FOOD ATTACHMENT SETTING
Cakes (mixes and from scratch) Flat Beater 4-6
Cookie Dough Flat Beater 4-6
Mashed Potatoes Flat Beater 6-8
Frosting Flat Beater 6-8
Egg whites (for meringues, etc.) Whisk 10-12
Whipped Cream Whisk 12
Instant Pudding Whisk 2
Bread Dough Hook 2-4
How to Use Your Mixer
1. Before first use, wash bowl and
attachments in hot, soapy water.
Rinse and dry.
2. Make sure the Setting Control is set
to RESET/OFF and unplugged.
3. Press the Mixer Release Button and
tilt the Mixer Head up. Insert an
Attachment.
4. Lock Bowl onto the base using the
“Bowl Lock” feature.
5. Plug Mixer into electrical outlet.
Select desired setting. Prepare recipe
according to instructions.
6. When finished, turn Setting Control
to RESET/OFF. Unplug from outlet.
7. Press the Mixer Release Button and
tilt the Mixer Head up.
8. Remove Attachment.
840104500 ENv00 8/12/02 1:47 PM Page 5
Page 6

6
Cleaning Your Mixer
1. Turn the Setting Control to RESET/
OFF. Unplug cord from outlet.
2. Press Mixer Release Button and tilt
Mixer Head up.
3. To remove Attachment, press the
Attachment up as far as possible
and then turn to the left. Pull the
Attachment off shaft.
4. The Mixer Bowl and Attachments
can be washed in hot, soapy water or
in a dishwasher.
5. Wipe Mixer Head and Base with a
damp cloth.
Notes About Your Stand Mixer
• The Mixer Head locks down for
thorough mixing.
• When mixing thin batters use medium
speeds and frequently stop the mixer
to scrape the sides of the bowl with a
spatula. Place liquid ingredients in the
bottom of the bowl first and then add
dry ingredients.
• Always stay near Mixer during use.
• If a spoon is accidentally caught in an
attachment or the motor stalls, slide
the Setting Control to RESET/OFF
then unplug. Clear the obstruction or
reduce the amount of mixture in the
bowl. Let the motor cool for 5 minutes
before continuing.
Use the dough hook on settings 2-4 to
knead yeast bread
recipes.
• Bread can be shaped into any shape
and baked in almost any pan. The only
thing this affects is the baking time.
• When yeast is dissolved in warm water,
the water temperature should be 105°
to 115°F. This is usually very warm tap
water.
• Bread rises best in a moist, warm
environment. For a perfect place to
raise bread, place bread in a microwave oven or regular oven with a pan
of steaming water. Do not turn oven
on, but close the door.
• Knead yeast bread dough until the
dough has a satin appearance.
Bread Tips
840104500 ENv00 8/12/02 1:47 PM Page 6
Page 7

7
Recipes
Cinnamon Raisin Quick Bread
Topping:
2 tablespoons sugar
1 teaspoon cinnamon
1 tablespoon butter
Preheat oven to 350ºF.
Topping: In a small cereal bowl combine sugar, cinnamon, and butter. Mash with
a fork until crumbly. Set aside.
Bread: Place dry ingredients and raisins in mixing bowl. Using the flat beater
attachment, mix on setting 1 until just mixed (about 10 seconds). Add buttermilk,
oil, eggs, and vanilla. Mix on setting 1 until blended then on setting 2 for about 1
minute. Pour batter into a greased 9x5-inch pan. Sprinkle cinnamon topping over
batter. Bake for 50 minutes or until tests done with a toothpick. Remove from pan
and let cool on rack. Makes 12 servings.
Roasted Red Pepper Dip
8-ounces cream cheese, softened
3
⁄4 pound Monterey Jack cheese,
shredded
1 cup mayonnaise
Preheat oven to 350ºF. Using the flat beater attachment, combine cream cheese,
Monterey Jack, and mayonnaise. Mix on setting 3 until blended. Add red pepper,
onion, and mustard. Continue to mix on setting 3 until blended. Spoon into a
greased, 2-quart baking dish. Bake for 20 minutes or until bubbly. Serve with crackers
or thinly sliced baguettes. Makes 4 cups.
Chicken ’n Basket
8 ounces cream cheese, softened
1 can chicken, drained
1 small onion, chopped
1
⁄4 teaspoon salt
1
⁄4 teaspoon pepper
Preheat oven to 375ºF. With flat beater attachment, mix cream cheese, chicken,
onion, salt, pepper, tarragon, and parsley at a medium setting until well blended.
Unroll crescent rolls, tear apart, and place on cookie sheet. Spoon mixture onto
the center of the dough. Roll starting with the wide end of the dough. Ensure
dough covers filling. After all have been assembled, roll in Parmesan cheese and
bake for 15 to 18 minutes or until golden brown. Makes 16 servings.
Bread:
2 cups flour
1 cup sugar
2 teaspoons baking powder
1
⁄2 teaspoon baking soda
1 teaspoon salt
1 teaspoon cinnamon
1
⁄2 cup raisins
1 cup buttermilk
1
⁄4 cup vegetable oil
2 eggs
1 teaspoon vanilla
7-ounce jar roasted red pepper,
drained and diced
2 tablespoons finely minced onion
2 tablespoons Dijon mustard
1
⁄4 teaspoon tarragon
1
⁄2 teaspoon parsley flakes
2 cans refrigerated crescent rolls
1
⁄2 cup Parmesan cheese
840104500 ENv00 8/12/02 1:47 PM Page 7
Page 8

8
Meat-Za-Pie
1 pound lean ground beef
2
⁄3
cup evaporated milk
1
⁄2 cup bread crumbs, fine
1 teaspoon garlic salt
Preheat oven to 375ºF. With flat beater attachment, mix ground beef, evaporated
milk, bread crumbs, and salt on a medium setting until well blended. Spread into
9-inch pie plate. Add a layer of tomato paste, cheese, Parmesan cheese, and
oregano. Bake for 30 minutes. Makes 6 to 8 servings.
* Or use cheese of your choice.
Savory Twice-Baked Potatoes
3 medium potatoes
4 ounces cream cheese
4 ounces sharp cheddar cheese,
shredded
4 tablespoons butter
Preheat oven to 400ºF. Bake 3 potatoes for 1 hour or until done. While potatoes
are still warm, slice lengthwise and scoop potato out of skin. With flat beater
attachment, mix the potatoes, cream cheese, cheddar cheese, and butter at a low
setting until smooth. Add remaining ingredients and mix at a medium setting
until well blended. Spoon mixture into the potato skins, place on cookie sheet
and bake for 30 minutes or until peaks are golden brown. Makes 6 servings.
Decorator’s “Buttercream” Icing
1 cup solid vegetable shorting
2 tablespoons water
1 teaspoon vanilla extract
In the bowl, combine shortening, water, and vanilla. With the flat beater
attachment, mix at a low setting until well blended. With the mixer on a medium
setting, add sugar, one cup at a time. Add corn syrup and mix at high setting
until frosting is light and fluffy. (If pure white icing is desired, use clear vanilla
and a tiny drop of blue food coloring.) Makes 3 cups.
• For chocolate icing, add 3⁄4 cup of cocoa and 2 additional tablespoons of water.
• Use paste food coloring to tint the icing.
• For a thinner consistency icing, add 2 to 3 additional tablespoons of corn syrup.
1 egg, slightly beaten
2 tablespoons chopped onion
1 teaspoon chopped parsley
1
⁄2 teaspoon salt
1
⁄2 teaspoon pepper
1
⁄2 teaspoon butter extract
4 cups sifted confectioners sugar
2 tablespoons light corn syrup
1
⁄3 cup tomato paste
1 cup cheddar cheese, shredded*
2 tablespoons of Parmesan cheese
1
⁄2 teaspoon oregano
840104500 ENv00 8/12/02 1:47 PM Page 8
Page 9

9
Creamy Peanut Butter Pie
1 cup butter
1 cup brown sugar, packed
1 cup peanut butter
12-ounce container frozen
whipped topping, thawed
In a medium saucepan, combine 1 cup butter and brown sugar. Cook over medium
heat until butter is melted and mixture is smooth, stirring frequently. Refrigerate 10
minutes. Using the flat beater attachment, beat peanut butter and brown sugar
mixture at setting 4 until blended. Increase speed and beat one minute at setting 8.
Reduce to setting 1 and add whipped topping; beat one additional minute. Pour into
graham crust and refrigerate. In a small saucepan over low heat, melt chocolate,
2 tablespoons butter, and milk. Stir constantly until smooth. Cool slightly then spread
over top of pie. Refrigerate for several hours or overnight before serving. Makes one
9-inch pie, cut into 8 servings.
Angel Food Cake
11⁄4 cups confectioners sugar
1 cup cake flour
1 2⁄3 cups egg whites,
at room temperature (12 to 14 eggs)
Preheat oven to 375ºF. In a small bowl, mix confectioners sugar and cake flour; set
aside. In the mixing bowl, mix egg whites and cream of tarter until soft peak forms.
Add salt, reduce to medium setting and gradually add sugar. Mix on highest setting
until sugar is dissolved and stiff peaks form. With rubber spatula, fold in flour mixture and extracts just until they disappear. Pour mixture into an ungreased 10-inch
tube pan. Bake 30-35 minutes until cake springs back when lightly touched. Invert
cake in pan on bottle. Cool completely. Loosen side of cake from pan to remove.
Pineapple Cream Cake
8 ounces cream cheese, softened
15-ounce can crushed pineapple,
undrained
18.25-ounce package yellow cake mix
Preheat oven to 350ºF. In the mixing bowl, use the flat beater attachment to combine
cream cheese and pineapple on speed 2. Add cake mix, pudding, oil, and eggs. Mix
on setting 2 until mixed, then on speed 4 for 2 minutes. Pour batter into greased
tube or Bundt pan. Bake for 1 hour or until tests done. Let cool in pan 10 minutes
then remove and let cool. Makes 12 servings.
3.4-ounce package instant vanilla pudding
1
⁄2 cup vegetable oil
3 eggs
9-inch graham crust
2 ounces semi-sweet baking chocolate
2 tablespoons butter
1 tablespoon milk
1
1
⁄2 teaspoons of cream of tarter
1
⁄2 teaspoon salt
11⁄4 cup sugar
21⁄2 teaspoons vanilla
840104500 ENv00 8/12/02 1:47 PM Page 9
Page 10

10
Applesauce Cake
18.25-ounce package yellow cake mix
3.4-ounce package vanilla instant pudding
4 eggs
1 cup applesauce
1
⁄2 cup water
Preheat oven to 350ºF. In bowl, combine cake mix, pudding mix, eggs, applesauce,
water, oil, cinnamon, and nutmeg with flat beater for one minute on low setting and
then three minutes on medium setting. Stir in raisins. Spread batter in a greased
and floured Bundt pan. Bake for 60 minutes or until done.
Magic Cookies
1 cup butter
1 cup sugar
1 cup light brown sugar
2 eggs
2 cups flour
1 teaspoon baking soda
Preheat oven to 350ºF. With flat beater attachment, cream together butter, sugar,
and brown sugar at a medium setting until well blended. Mix in vanilla and eggs.
Reduce speed and gradually add flour, baking soda, baking powder, and salt mix
until smooth. On a low setting, mix in oatmeal, chocolate chips, and coconut
until well mixed. Drop rounded spoon full onto ungreased cookie sheet. Bake on
middle rack of oven for 12 to 14 minutes. Makes 3 dozen cookies.
Brownie Cookies
2
⁄3 cup shortening
11⁄2 cups brown sugar, packed
1 tablespoon water
1 teaspoon vanilla
2 eggs
Preaheat oven to 375ºF. With flat beater, cream shortening and brown sugar on
medium setting until blended. Add water, vanilla, and eggs and mix. Add flour,
cocoa, baking soda, and salt and beat at a medium setting until thoroughly mixed.
Stir in chocolate chips on low setting. Drop tablespoons of dough on ungreased
baking sheets. Bake 7 to 9 minutes. Do not overcook. Makes 36 cookies.
1
⁄2 teaspoon baking powder
1
⁄2 teaspoon salt
2 cups oatmeal
1 tablespoon vanilla
12 ounces chocolate chips
11⁄2 cups coconut
1
⁄4 cup vegetable oil
11⁄2 teaspoon cinnamon
1
⁄
2 teaspoon nutmeg
1 cup raisins (optional)
1
1
⁄2 cups flour
1/3 cup unsweetened baking cocoa
1
⁄4 teaspoon baking soda
1
⁄2 teaspoon salt
12 ounces semi-sweet chocolate chips
840104500 ENv00 8/12/02 1:47 PM Page 10
Page 11

11
1 teaspoon vanilla
3
⁄4 teaspoon salt
11⁄2 cups flour
1 teaspoon baking soda
“Soft” Peanut Butter Cookies
1
⁄
3 cup vegetable shorting
1
⁄2 cup peanut butter
11⁄4 cup light brown sugar
1 egg
Preheat oven to 275ºF. Using the flat beater attachment, beat shortening, peanut
butter, brown sugar, egg, and vanilla at a medium setting until well blended.
Reduce speed to low and gradually add dry ingredients until blended. Dough will
be crumbly. Roll 3 tablespoon-size portions of the dough into a ball. Place on
ungreased cookie sheet. Press to 1⁄2-inch thick. Bake 18 to 20 minutes.
Do not overcook. Makes 16 cookies.
Grasshopper Cheesecake Bars
2 8-ounce packages cream cheese
11⁄2 cups flour
2
⁄3 cup sugar
2
⁄3 cup unsweetened cocoa powder
12 tablespoons butter or margarine
Preheat oven to 350ºF. Remove cream cheese and butter from refrigerator and let
stand at room temperature about 30 minutes. In a small bowl, stir together flour,
2
⁄3 cup of sugar, and cocoa powder. With a fork, mix in butter until mixture resembles fine crumbs. Remove 2 cups of this mixture, for topping. Take remaining
mixture and press into two 8x8x2-inch baking pans. Bake for 15 minutes. With flat
paddle, cream together cream cheese and 1⁄2 cup sugar until fluffy. Add eggs, peppermint extract, milk, and food coloring and beat well on medium setting. Spread
mixture over the crust and sprinkle top with remaining crumb mixture. Bake for 20
to 25 minutes. Cut into bars and chill prior to serving. Makes 50 bars.
Pet Treats
1 cup oatmeal
1
⁄3 cup or margarine
11⁄4 cups hot water
1
⁄
4 cup meat or tuna fish juice
(bullion may also be used)
Preheat oven to 350ºF. Pour hot water over oatmeal and margarine and let stand
5 minutes. With the dough hook attachment, mix in meat juice, powered milk,
cornmeal, and egg. Add and mix in the flour 1 cup at a time. After all three cups
of flour have been added, knead dough for 3 minutes, adding more flour if necessary. Dough should be very stiff. Pat or roll dough to
1
⁄
2-inch thickness and cut into
desired size. Place on a greased cookie sheet. Bake 50 minutes. Allow to dry until
hard. Makes 2 pounds of treats.
1
⁄4 cup powdered milk
3
⁄4 cup cornmeal
1 egg, beaten
3 cups whole wheat flour
1
⁄2 cup sugar
2 eggs
1 teaspoon peppermint extract
8 drops green food coloring
1
⁄2 cup milk
840104500 ENv00 8/12/02 1:47 PM Page 11
Page 12

8/02
840104500
Two-Year Limited Warranty
If you have a claim under this warranty, please call our Customer Assistance Number.
For faster service please have model, series, and type numbers ready for operator to
assist you. These numbers can be found on the bottom of your stand mixer.
MODEL: ________________ TYPE: _________________ SERIES: __________________
Customer Assistance Number 1-877-207-0923
Keep this number for future reference!
E-mail inquiries: www.gehousewares.com
Customer Assistance
12
WAL★MART Stores, Inc.
Bentonville, AR 72716
gis a trademark of
General Electric Company
and is used under license by
WAL★MART Stores, Inc.
Bentonville, AR 72716
What does your warranty cover?
• Any defect in material or workmanship.
For how long after the original purchase?
• Two years.
What will we do?
• Provide you with a new one.
How do you make a warranty claim?
• Save your receipt.
• Properly pack your unit. We recommend
using the original carton and packing
materials.
• Return the product to your nearest
WAL
★
MART store or call Customer
Assistance at 1-877-207-0923.
What does your warranty not cover?
• Glass parts, glass containers, cutter/strainer,
blades and/or agitators.
• Commercial use or any other use not
found in printed directions.
• Damage from misuse, abuse, or neglect.
• Products purchased or serviced outside
the USA.
How does state law relate to this warranty?
• This warranty gives you specific legal rights,
and you may also have other rights which
vary from state to state.
•
WAL★MART expressly disclaims all responsi-
bility for consequential damages or
incidental losses caused by use of this
appliance. Some states do not allow this
exclusion or limitation of incidental or
consequential losses so the foregoing
disclaimer may not apply to you.
What if you purchased your product in the
U.S., Canada or Mexico and encounter a
problem while using it outside the country
of purchase?
• The warranty is valid only in the country of
purchase and if you follow the warranty
claim procedure as noted.
840104500 ENv00 8/12/02 1:47 PM Page 12
Page 13

Para comunicarse con Asistencia al Cliente, llame al 1-877-207-0923
840104500
Batidora de pie
g
Salvaguardias importantes .................. 2
Piezas y características........................ 3
Cómo ensamblar su batidora .............. 4
Cómo usar su batidora .......................... 5
La limpieza de su batidora .................. 6
Recetas...................................................... 7
Asistencia al cliente............................ 12
840104500 SPv00 8/12/02 1:47 PM Page 1
Page 14

2
SALVAGUARDIAS IMPORTANTES
¡
GUARDE ESTAS INSTRUCCIONES!
Cuando use aparatos eléctricos, es importante seguir todas las precauciones de seguridad que
incluyen lo siguiente:
1. Lea todas las instrucciones.
2. Para protegerse contra el riesgo de
choque eléctrico, no sumerja el cable, el
enchufe ni el cuerpo de la batidora en
agua ni en ningún otro líquido.
3. Es necesario que haya buena supervisión
cuando los niños utilicen aparatos o
cuando éstos se estén utilizando cerca
de niños.
4. Desenchúfela del tomacorriente cuando
no la esté usando, antes de colocar o
sacar alguna pieza y antes de la limpieza.
5. Saque las aspas y otros accesorios de la
batidora antes de lavarlos.
6. No opere ningún aparato electrodoméstico si el cable o el enchufe están
averiados, después de un mal funcionamiento del aparato, o si éste se ha caído o
averiado de alguna forma. Llame a nuestro
número de llamada gratis de servicio al
cliente, para obtener información sobre el
examen, la reparación o el ajuste eléctrico
o mecánico.
7. El uso de accesorios no recomendados ni
vendidos por el fabricante de electrodomésticos para usar con este modelo
puede causar incendio, choque eléctrico
o lesiones.
8. Evite todo contacto con piezas móviles.
Mantenga las manos, el cabello y la ropa,
así como las espátulas y otros utensilios
lejos de las aspas durante la operación
para reducir el riesgo de lesiones a personas y/o averías de la batidora.
9. No la use al aire libre.
10. No deje que el cable cuelgue sobre el
borde de una mesa o de un mostrador,
o que toque alguna superficie caliente,
incluyendo la superficie de una cocina.
11. No la coloque sobre un quemador a gas
o eléctrico caliente ni cerca de uno, ni
dentro de un horno caliente.
12. Verifique que el control esté en la posición apagada antes de conectar el cable
al tomacorriente de pared. Para
desconectar, coloque el control en
RESET/OFF (Reajuste/Apagado) y
luego saque el enchufe del tomacorriente de pared.
13. No use el aparato para ningún otro fin
que no sea el indicado.
Este aparato ha sido diseñado solamente
para uso doméstico.
Este aparato viene equipado con un cable de
3 terminales conectado a tierra (enchufe de
3 terminales). Este tipo de enchufe encajará
solamente en un tomacorriente hecho para
un enchufe de 3 terminales. Esta es una
propiedad de seguridad destinada a reducir el
riesgo de choque eléctrico. Si el enchufe no
encaja en el tomacorriente, comuníquese con
un electricista competente para cambiar el
tomacorriente obsoleto. No trate de hacer
caso omiso del propósito de seguridad de la
clavija de tierra modificando el enchufe de
alguna manera.
Para evitar una sobrecarga en el circuito eléctrico, no use ningún otro aparato de alto
voltaje en el mismo circuito que la batidora.
El largo del cable usado con este aparato fue
seleccionado para reducir los riesgos de
enredarse o tropezarse con un cable más
largo. Si se necesita un cable más largo, se
puede usar un cable eléctrico de extensión
aprobado. La clasificación nominal eléctrica
del cable de extensión deberá ser igual o
mayor que la de la batidora. Debe tenerse
cuidado para arreglar el cable de extensión
de manera que no cuelgue sobre el borde de
la mesa o mostrador, donde pueda ser jalado
por los niños o donde alguien pudiese
tropezarse con él accidentalmente.
Un cable de extensión deberá conectarse
primero al aparato, antes de ser enchufado
en el tomacorriente.
Información para la seguridad del consumidor
840104500 SPv00 8/12/02 1:47 PM Page 2
Page 15

3
Cabeza de la batidora
Control de ajuste
Seleccione un ajuste de 2 a 12.
El ajuste de la
batidora aumentará con los
números.
Botón para desprender la batidora
Este botón traba la cabeza de la
batidora hacia
abajo para asegurar
un mezclado a
fondo. Cuando
la cabeza de la
batidora esté
levantada, se
quedará trabada en la posición
vertical. Sostenga la cabeza de la
batidora cuando la baje hacia el
tazón. Presione hacia arriba el
botón para desprender la cabeza
de la batidora.
Piezas y características
1
1
2
3
3
2
Eje de acoplamiento
Accesorios
Los accesorios de la batidora
incluyen un aspa plana, un aspa de
alambre y un gancho para masa.
Tazón para mezclar de 41⁄2 cuartos
Traba del tazón
4
5
6
7
4
5
7
5
6
840104500 SPv00 8/12/02 1:47 PM Page 3
Page 16

4
Cómo sujetar el tazón
1. Asegúrese de que el control de ajuste
esté fijo en RESET/OFF (Reajuste/
Apagado) y que la batidora esté
desenchufada.
2. Presione el botón para desprender
la batidora e incline la cabeza de la
batidora hacia arriba.
3. Coloque el tazón en la bandeja
giratoria y gírelo hacia la derecha
hasta que encaje en su lugar.
4. Enchufe la batidora en un
tomacorriente.
Para quitar:
1. Asegúrese de que el control de ajuste
esté fijo en RESET/OFF (Reajuste/
Apagado) y de que la batidora esté
desenchufada.
2. Presione el botón para desprender la
batidora e incline hacia arriba la
cabeza de la batidora.
3. Gire el tazón hacia la izquierda para
destrabarlo.
Cómo ensamblar la batidora
wADVERTENCIA
Peligro de lesiones
• Desenchufe la batidora antes de insertar o quitar las aspas.
• Desenchufe la batidora antes de la limpieza. El no seguir estas instrucciones
puede resultar en fractura de huesos o cortaduras.
Para sujetar el aspa, el aspa de alambre o el gancho para masa
1. Asegúrese de que el control de ajuste
esté fijo en RESET/OFF y de que la
batidora esté desenchufada.
2. Presione el botón para desprender
la batidora e incline la cabeza de la
batidora hacia arriba.
3. Inserte el accesorio en el eje del aspa
y presione hacia arriba tan lejos como
le sea posible.
4. Gire el accesorio hacia la derecha,
enganchando el aspa sobre el
enganche del eje.
5. Enchufe la batidora en el
tomacorriente.
840104500 SPv00 8/12/02 1:47 PM Page 4
Page 17

5
Sugerencias para galletitas
Use el aspa plana para mezclar la masa
de galletitas. La masa
de galletitas es una de
las masas más espesas
para mezclar. Hágalo
más fácil siguiendo
estas sugerencias:
• La mantequilla o la margarina deben
estar a temperatura ambiente.
•Agregue los ingredientes uno por uno y
mezcle bien después de cada adición.
• Agregue harina una taza por vez.
• Si la batidora parece hacer mucha fuerza,
aumente el ajuste.
Guía para batir
La siguiente guía para batir es una sugerencia para seleccionar los ajustes de batido.
Comience en el ajuste 2 y aumente hacia el ajuste deseado, según la consistencia
que indique la receta.
ALIMENTO ACCESORIO AJUSTE
Pasteles (mezclas comerciales y caseros) Aspa plana 4-6
Masa para galletitas Aspa plana 4-6
Puré de papas Aspa plana 6-8
Glaseado Aspa plana 6-8
Claras de huevo (para merengues, etc.) Aspa de alambre 10-12
Crema batida Aspa de alambre 12
Budín instantáneo Aspa de alambre 2
Pan Gancho para masa 2-4
Cómo usar su batidora
1. Antes de usarla por primera vez, lave
el tazón y los accesorios en agua
caliente y jabonosa. Enjuague y seque.
2. Asegúrese de que el control de ajuste
esté fijo en RESET/OFF (Reajuste/
Apagado) y de que la batidora esté
desenchufada.
3. Presione el botón para desprender la
batidora e incline la cabeza de la batidora hacia arriba. Inserte un accesorio.
4. Trabe el tazón en la base usando la
opción “Traba del tazón”.
5. Enchufe la batidora en el tomacorriente
y seleccione el ajuste deseado. Prepare
la receta según las instrucciones.
6. Cuando haya terminado, gire el
control de ajuste a RESET/OFF
(Reajuste/Apagado). Desenchufe
del tomacorriente.
7. Presione el botón para desprender
la batidora e incline la cabeza de la
batidora hacia arriba.
8. Quite el accesorio.
840104500 SPv00 8/12/02 1:47 PM Page 5
Page 18

6
La limpieza de su batidora
1. Gire el control de ajuste a RESET/OFF
(Reajuste/Apagado). Desenchufe el
cable del tomacorriente.
2. Presione el botón para desprender
la batidora e incline la cabeza de la
batidora hacia arriba.
3. Para quitar un accesorio, presiónelo
hacia arriba tanto como le sea posible, y luego gírelo hacia la izquierda.
Jale el accesorio del eje.
4. El tazón y los accesorios de la batidora
pueden lavarse en agua caliente y
jabonosa, o en una lavavajillas.
5. Limpie la cabeza y la base de la
batidora con un paño húmedo.
Notas acerca de su batidora de pie
• La cabeza de la batidora se traba hacia
abajo para obtener un batido profundo.
• Cuando esté batiendo pastas poco
espesas, use velocidades medias y
detenga frecuentemente la batidora
para raspar los lados del tazón con una
espátula. Coloque los ingredientes
líquidos en el fondo del tazón
primero, y luego agregue los ingredientes secos.
• Siempre quédese cerca de la batidora
durante el uso.
• Si se engancha accidentalmente una
cuchara en un accesorio, o si se atasca
el motor, deslice el control de ajuste
hacia RESET/OFF (Reajuste/
Apagado), y luego desenchufe. Saque
lo que esté obstruyendo o reduzca la
cantidad de mezcla que hay en el
tazón. Deje que el motor se enfríe por
5 minutos antes de continuar.
Use el gancho para masa en los ajustes
2-4 para amasar recetas
de pan con levadura.
• Puede darle al pan cualquier forma
y hornearlo en cualquier molde.
Lo único que se afectará será el
tiempo de horneado.
• Cuando disuelva la levadura en agua
tibia, la temperatura del agua deberá
ser de 105° a 115°F. Generalmente,
ésta es el agua del grifo bastante tibia.
• El pan crecerá mejor en un ambiente
tibio y húmedo. Para obtener el mejor
lugar para dejar que el pan crezca,
colóquelo en un horno de microondas
o común con un molde de agua
humeante. No encienda el horno,
pero cierre la puerta.
• Amase la masa de pan con levadura
hasta que ésta tenga una apariencia
satinada.
Sugerencias para el pan
840104500 SPv00 8/12/02 1:47 PM Page 6
Page 19

7
Recetas
Pan rápido de pasas y canela
Baño:
2 cucharadas azúcar
1 cucharadita canela
1 cucharada mantequilla
Precaliente el horno a 350°F.
Baño: En un tazón para cereal pequeño combine el azúcar, la canela, y la mante-
quilla. Aplástelos con un tenedor hasta que se desmenucen. Déjelos a un lado.
Pan: Coloque los ingredientes secos y las pasas en un tazón para mezclar. Usando el
aspa plana, bata en el ajuste 1 hasta que estén apenas mezclados (por unos 10
segundos). Agregue la leche agria, aceite, huevos y vainilla. Bata en el ajuste 1 hasta
que queden mezclados, y luego en el ajuste 2 por 1 minuto más o menos. Vierta la
pasta en un molde engrasado de 9x5 pulgadas. Espolvoree el baño de canela sobre
la pasta. Hornee por 50 minutos o hasta que al insertar un mondadientes, éste salga
seco. Sáquelo del molde y déjelo enfriar sobre una rejilla. Se obtienen 12 porciones.
Dip de pimiento rojo asado
8 onzas queso crema, ablandado
3
⁄4 libra queso Monterey Jack, asados,
escurridos y cortados en cubitos rallado
1 taza mayonesa
Precaliente el horno a 350°F. Usando el aspa plana, mezcle el queso crema, el
queso Monterrey Jack y la mayonesa. Bata en el ajuste 3 hasta que queden mezclados. Agregue el pimiento rojo, cebolla y mostaza. Continúe batiendo en el ajuste
3 hasta que queden mezclados. Vierta con una cuchara en un molde de horno
de 2 cuartos. Hornee por 20 minutos o hasta que aparezcan burbujas. Sirva con
galletas saladas o rodajas delgadas de pan francés. Se obtienen 4 tazas.
Pollo a la canasta
8 onzas de queso crema, ablandado
1 lata de pollo escurrido
1 cebolla chica picada
1
⁄
4 cucharadita sal
1
⁄4 cucharadita pimienta
Precaliente el horno a 350°F. Usando el aspa plana, mezcle el queso crema, pollo,
cebolla, sal, pimienta, estragón y perejil en el ajuste medio hasta que queden bien
mezclados. Desenrolle los cuernitos, sepárelos y colóquelos en una charola galletera.
Vierta la mezcla con una cuchara en el centro de la masa. Enrolle comenzando por el
extremo más ancho de la masa. Asegúrese de que la masa cubre el relleno. Después
de que hayan sido armados, páselos por queso parmesano y hornee por 15 a 18 minutos o hasta que estén dorados. Se obtienen 16 porciones.
Pan:
2 tazas de harina
1 taza de azúcar
2 cucharaditas polvo de hornear
1
⁄2 cucharadita bicarbonato de soda
1 cucharadita sal
1 cucharadita canela
1
⁄2 taza pasas
1 taza leche agria
1
⁄4 taza aceite vegetal
2 huevos
1 cucharadita vainilla
1 frasco de 7 onzas de pimientos rojos
asados, escurridos y cortados en cubitos
2 cucharadas cebolla finamente picada
2 cucharadas mostaza Dijon
1
⁄4 cucharadita estragón
1
⁄2 cucharadita hojuelas de perejil
2 latas de masa refrigerada para
cuernitos de pan
1
⁄
2 taza queso parmesano
840104500 SPv00 8/12/02 1:47 PM Page 7
Page 20

8
Pay-pizza de carne
1 libra carne molida sin grasa
2
⁄3
taza leche evaporada
1
⁄2 taza pan rallado fino
1 cucharadita sal de ajo
Precaliente el horno a 375°F. Usando el aspa plana, mezcle la carne molida,
leche evaporada, pan rallado y sal en el ajuste medio hasta que queden bien
mezclados. Coloque en una fuente para pay de 9 pulgadas. Agregue una capa de
pasta de tomate, queso, queso parmesano y orégano. Hornee por 30 minutos.
Se obtienen de 6 a 8 porciones. * O use el queso de su elección.
Papas sabrosas horneadas dos veces
3 papas medianas
4 onzas queso crema
4 onzas queso cheddar fuerte, rallado
4 cucharadas mantequilla
Precaliente el horno a 400°F. Hornee las 3 papas por 1 hora o hasta que estén
cocidas. Con las papas todavía calientes, córtelas a lo largo y saque las papas de
la cáscara con una cuchara. Con el aspa plana, mezcle las papas, queso crema,
queso cheddar y mantequilla en el ajuste bajo hasta que queden suaves. Agregue
el resto de los ingredientes a la mezcla y mezcle en el ajuste medio hasta que
queden bien mezclados. Vierta la mezcla en las cáscaras de las papas, coloque en
una charola galletera y hornee por 30 minutos o hasta que el tope quede dorado.
Se obtienen 6 porciones.
Glaseado para decorador "de crema de manteca"
1 taza manteca vegetal sólida
2 cucharadas agua
1 cucharadita extracto de vainilla
En el tazón, combine la manteca vegetal, agua y vainilla. Con el aspa plana,
mezcle en el ajuste bajo hasta que quede bien mezclado. Con la batidora en el
ajuste medio, agregue el azúcar, una taza por vez. Agregue el sirope de maíz y
mezcle en el ajuste alto hasta que el glaseado quede liviano y esponjoso. (Si desea
un glaseado puramente blanco, use vainilla clara y una gotita de colorante para
alimentos de color azul). Se obtienen 3 tazas.
• Para glaseado de chocolate, agregue 3⁄4 taza de cocoa y 2 cucharadas adicionales
de agua.
• Use colorante para alimentos en pasta para darle color al glaseado.
• Para obtener una consistencia más líquida en el glaseado, agregue de 2 a 3
cucharadas adicionales de sirope de maíz.
1 huevo batido ligeramente
2 cucharadas cebolla picada
1 cucharadita perejil picado
1
⁄2 cucharadita sal
1
⁄2 cucharadita pimienta
1
⁄2 cucharadita extracto de mantequilla
4 tazas azúcar glass cernida
2 cucharadas sirope de maíz claro
1
⁄3 taza pasta de tomate
1 taza queso cheddar, rallado*
2 cucharadas queso parmesano
1
⁄2 cucharadita orégano
840104500 SPv00 8/12/02 1:47 PM Page 8
Page 21

9
Pay cremoso de mantequilla de cacahuate
1 taza mantequilla
1 taza azúcar morena (medida compacta)
1 taza mantequilla de cacahuate
1 envase (12 onzas) crema batida
congelada, descongelada
En una sartén mediana combine 1 taza de mantequilla con azúcar morena. Cocine
a lumbre mediana hasta que se derrita la mantequilla y la mezcla esté suave,
mezclando frecuentemente. Refrigere por 10 minutos. Bata la mantequilla de
cacahuate con la mezcla de azúcar morena con el aspa plana en el ajuste 4 hasta
que estén mezcladas. Incremente la velocidad y bata en el ajuste 8 por 1 minuto.
Reduzca el ajuste a 1 y agregue la cubierta batida. Bata por un minuto más. Vierta
en la costra de galletas tipo graham y refrigere. En una sartén pequeña derrita
chocolate, 2 cucharadas mantequilla y leche a lumbre baja. Revuelva
constantemente hasta que la mezcla esté suave. Enfríe ligeramente y luego unte
sobre la superficie del pay. Refrigere por varias horas o toda la noche antes de
servir. Rinde un pay de 9 pulgadas, partido en 8 porciones.
Pastel a base de claras tipo Ángel
11⁄4 tazas azúcar glass
1 taza harina para pastelería
12⁄3 tazas claras de huevo, a temperatura
ambiente (de 12 a 14 huevos)
Precaliente el horno a 375°F. En un tazón pequeño, mezcle el azúcar glass y la harina para pastelería; deje a un lado. En el tazón de mezclar bata las claras de huevo y
el cremor tártaro hasta que se formen picos suaves. Agregue la sal, reduzca el ajuste
a medio y agregue gradualmente el azúcar. Mezcle en el ajuste más alto hasta que se
disuelva el azúcar y se formen picos más firmes. Con una espátula de goma, agregue
la mezcla de harina y extractos y revuelva en forma envolvente sólo hasta que desaparezcan. Vierta la mezcla en un molde de rosca sin engrasar de 10 pulgadas.
Hornee por 30-35 minutos o hasta que no quede una marca al tocar ligeramente la
superficie con el dedo. Invierta el pastel aún en el molde sobre una botella. Deje
que se enfríe completamente. Separe los lados del pastel del molde para sacarlo.
Pastel cremoso de piña
8 onzas queso crema, ablandado
1 lata de 15 onzas de piña aplastada,
sin escurrir
1 paquete de mezcla comercial para
pastel amarillo de 18.25 onzas
Precaliente el horno a 350°F. En el tazón de mezclar, use el aspa plana para combinar el queso crema y la piña en la velocidad 2. Agregue la mezcla para pastel, budín,
aceite y huevos. Mezcle en el ajuste 2 hasta que queden mezclados, luego en velocidad 4 por 2 minutos. Vierta la pasta en un molde de rosca o molde tipo Bundt
engrasado. Hornee por 1 hora o hasta que esté listo. Deje que se enfríe en el molde
por 10 minutos, luego sáquelo y deje que se enfríe. Se obtienen 12 porciones.
1 paquete budín instantáneo de vainilla
de 3.4 onzas
1
⁄2 taza aceite vegetal
3 huevos
1 costra de galletas tipo graham de
9 pulgadas
2 onzas chocolate semiamargo para
hornear
2 cucharadas mantequilla
1 cucharada leche
1
1
⁄2 cucharaditas cremor tártaro
1
⁄2 cucharadita sal
11⁄4 tazas azúcar
21⁄2 cucharaditas vainilla
840104500 SPv00 8/12/02 1:47 PM Page 9
Page 22

10
Pastel de puré de manzana
1 paquete de mezcla comercial para
pastel amarillo de 18.25 onzas
1 paquete budín instantáneo de
vainilla de 3.4 onzas
4 huevos
1 taza puré de manzana
Precaliente el horno a 350°F. En el tazón, bata la mezcla para pastel, mezcla para
budín, huevos, puré de manzana, agua, aceite, canela y nuez moscada con el aspa
plana por un minuto en el ajuste bajo y luego por tres minutos en el ajuste medio.
Agregue las pasas. Vierta la pasta en un molde tipo Bundt engrasado y enharinado.
Hornee por 60 minutos o hasta que quede hecho.
Galletas mágicas
1 taza mantequilla
1 taza azúcar
1 taza azúcar morena clara
2 huevos
2 tazas harina
1 cucharadita bicarbonato de soda
Precaliente el horno a 350°F. Con el aspa plana, acreme la mantequilla, azúcar y
azúcar morena en el ajuste medio hasta que queden bien mezcladas. Incorpore a
la mezcla la vainilla y los huevos. Reduzca la velocidad y agregue gradualmente la
harina, bicarbonato de soda, polvo de hornear y sal. Mezcle hasta que quede
suave. En un ajuste bajo, mezcle la avena, chispas de chocolate y coco hasta que
queden bien mezclados. Vierta a cucharadas llenas sobre una charola para galletas sin engrasar. Hornee en la rejilla del medio del horno por 12 a14 minutos.
Se obtienen 3 docenas de galletas.
Galletas de chocolate tipo brownies
2
⁄3 taza manteca vegetal
11⁄2 tazas azúcar morena, medida compacta
1 cucharada agua
1 cucharadita vainilla
2 huevos
Precaliente el horno a 375°F. Con el aspa plana, acreme la manteca vegetal y el
azúcar morena en el ajuste medio hasta que se mezclen. Agregue agua, vainilla y
huevos y mezcle. Agregue la harina, cocoa, bicarbonato de soda y sal y bata en el
ajuste medio hasta que se mezclen bien. Vierta las chispas de chocolate en el ajuste
bajo. Coloque la masa a cucharadas sobre charolas galleteras sin engrasar. Hornee
de 7 a 9 minutos. No cocine en exceso. Se obtienen 36 galletas.
1
⁄2 cucharadita polvo de hornear
1
⁄2 cucharadita sal
2 tazas avena
1 cucharada vainilla
12 onzas de chispas de chocolate
11⁄2 tazas coco
1
⁄2 taza agua
1
⁄4 taza aceite vegetal
11⁄
2 cucharaditas canela
1
⁄2 cucharadita nuez moscada
1 taza pasas (opcional)
11⁄2 tazas harina
1
⁄3 taza cocoa para hornear sin azúcar
1
⁄4 cucharadita bicarbonato de soda
1
⁄2 cucharadita sal
12 onzas chispas de chocolate
semiamargo
840104500 SPv00 8/12/02 1:47 PM Page 10
Page 23

11
1 cucharadita vainilla
3
⁄4 cucharadita sal
11⁄2 tazas harina
1 cucharadita bicarbonato de soda
Galletas "blandas" de mantequilla de cacahuate
1
⁄
3 taza manteca vegetal
1
⁄2 taza mantequilla de cacahuate
11⁄4 tazas azúcar morena clara
1 huevo
Precaliente el horno a 275°F. Usando el aspa plana, bata la manteca vegetal, mantequilla de cacahuate, azúcar morena, huevo y vainilla en el ajuste medio hasta que
queden bien mezclados. Reduzca la velocidad a baja y agregue gradualmente los
ingredientes secos hasta que queden mezclados. La masa parecerá como migas
grandes. Tome 3 cucharadas de masa y forme una bolita. Repita con el resto de la
masa y coloque las bolitas en una charola galletera sin engrasar. Presiónelas hasta
que queden de 1⁄2-pulgada de grueso. Hornee por 18 a 20 minutos. No cocine en
exceso. Se obtienen 16 galletas.
Barras saltamontes de pastel de queso
2 paquetes de 8 onzas queso crema
11⁄2 taza harina
2
⁄3 taza azúcar
2
⁄3 taza polvo de cocoa sin azúcar
12 cucharadas mantequilla o margarina
1
⁄2 taza azúcar
Precaliente el horno a 350°F. Saque el queso crema y la mantequilla del refrigerador y deje a temperatura ambiente por unos 30 minutos. En un tazón pequeño,
revuelva la harina, 2⁄3 taza de azúcar y polvo de cocoa. Con un tenedor, agregue y
mezcle la mantequilla hasta que la mezcla quede como migas finas. Quite 2 tazas de
esa mezcla para la capa final. Tome la mezcla sobrante y presiónela en 2 moldes de
8x8x2 pulgadas. Hornee por 15 minutos. Con el aspa plana acreme el queso crema
con 1⁄2 taza de azúcar hasta que quede esponjoso. Agregue los huevos, extracto de
menta, leche y colorante para alimentos y bata bien en el ajuste medio. Vierta la
mezcla sobre la corteza y espolvoree la superficie con la mezcla sobrante con consistencia de migas. Hornee por 20 a 25 minutos. Corte en barras y enfríe antes de
servir. Se obtienen 50 barras.
Delicias para mascotas
1 taza avena
1
⁄3 taza margarina
11⁄4 taza agua caliente
1
⁄4 taza jugo de carne o de atún
(también puede usarse caldo en cubitos)
Precaliente el horno a 350°F. Vierta el agua caliente sobre la avena y la margarina,
y deje reposar por 5 minutos. Con el gancho para masa, mezcle el jugo de carne,
leche en polvo, harina de maíz y huevo. Agregue la harina y mezcle de una taza
por vez. Después de que haya agregado las tres tazas de harina, amase por 3 minutos, agregando más harina si es necesario. La masa debe estar bien firme. Golpee
suavemente o estire con un rodillo la masa a un grosor de 1⁄2-pulgada y corte del
tamaño deseado. Coloque en una charola galletera engrasada. Hornee por 50
minutos. Deje que se seque hasta que esté duro. Se obtienen 2 libras de galletas.
1
⁄4 taza leche en polvo
3
⁄4 taza harina de maíz
1 huevo batido
3 tazas harina integral
2 huevos
1 cucharadita extracto de menta
8 gotas colorante para alimentos de
color verde
1
⁄2 taza leche
840104500 SPv00 8/12/02 1:47 PM Page 11
Page 24

12
8/02
840104500
WAL★MART Stores, Inc.
Bentonville, AR 72716
Asistencia al cliente
Si desea hacer un reclamo bajo esta garantía, sírvase llamar a nuestro Número de
Asistencia al Cliente. Para un servicio más rápido es importante que tenga los
números de modelo, serie y tipo listos para que el operador lo pueda ayudar. Estos
números se pueden encontrar en la parte inferior de su batidora de pie.
MODELO: ______________ TIPO: _________________ SERIE: __________________
Número de Asistencia al Cliente: 1-877-207-0923
¡Guarde este número para referencia futura!
Solicitud de información por e-mail: www.gehousewares.com
ges una marca de comercio
de General Electric Company
usada bajo licencia por
WAL★MART Stores, Inc.
Bentonville, AR 72716
Garantía Limitada de Dos Años
¿Qué cubre su garantía?
• Todo defecto de material o mano de obra.
¿Por cuánto tiempo después de la
compra inicial?
• Dos años.
¿Qué haremos?
• Le suministraremos una unidad nueva.
¿Cómo hacer un reclamo bajo garantía?
• Guarde su recibo.
• Empaque su unidad debidamente.
Recomendamos usar la caja y los
materiales de empaque originales.
• Devuelva el producto a su tienda
WAL
★
MART más cercana o llame al
Número de Asistencia al Cliente al
1-877-207-0923.
¿Qué es lo que la garantía no cubre?
• Partes de vidrio, envases de vidrio,
cortador/colador, cuchillas y/o agitadores.
• Uso comercial o cualquier otro uso que no se
encuentre en las instrucciones impresas.
• Daños debido al mal uso, abuso, o
negligencia.
• Productos comprados o reparados fuera
de los Estados Unidos.
¿Cuál es la relación entre las leyes estatales
y esta garantía?
• Esta garantía le otorga derechos legales
específicos, y es posible que usted también
tenga otros derechos que varían de un estado
al otro.
• WAL
★
MART expresamente niega toda
responsabilidad por daños consecuentes o
pérdidas incidentales causadas por el uso de
este aparato. Ciertos estados no permiten esta
exclusión o limitación de pérdidas incidentales o consecuentes de manera que es
posible que el descargo de responsabilidad
que antecede no corresponda en su caso.
¿Qué sucede si usted adquirió su producto en
los Estados Unidos, Canadá o México y encuentra un problema cuando lo está usando fuera
del país de compra?
• La garantía es válida solamente en el país de
compra y si usted sigue el procedimiento de
reclamo bajo garantía que se indica.
840104500 SPv00 8/12/02 1:47 PM Page 12
 Loading...