

Page 1
We bring good things to life.
Purchase Date ______________
Name of Store ______________
FOR YOUR SAFETY
The AC power plug is polarized (one blade is wider than the other) and only fits
into AC power outlets one way. If the plug won’t go into the outlet completely, turn
the plug over and try to insert it the other way. If it still won’t fit, contact a qualified
electrician to change the outlet, or use a different one. Do not attempt to bypass
this safety feature.
IMPORTANT BATTERY INFORMATION
• When storing the unit or unplugging it from the AC outlet for a day or more, be
sure to remove the battery because it can leak and damage the unit.
• Batteries may leak electrolyte if inserted incorrectly, if disposed of in fire, or if
an attempt is made to charge a battery not intended to be recharged.
• Discard leaky batteries immediately. Leaking batteries can cause skin burns or
other personal injury.
• Dispose of batteries, according to federal, state, and local regulations.
Install battery as follows:
1. Remove battery compartment door (located on the back of the radio) by
applying thumb pressure to area indicated on battery door and then lift the door
out and off the cabinet.
2. Connect a 9-volt battery to battery connector plug.
3. Insert battery in compartment and replace compartment door.
NOTE: Alkaline (NEDA 1604A) batteries are recommended. Carbon-zinc
(NEDA 1604) batteries may be used but memory holding time will be substantially reduced. Memory holding time for a fresh alkaline battery is approximately 8 hours (if radio or alarm are not operated), which should take care of
short, nuisance-type AC power failures. To preserve battery life, the radio
should remain plugged into an AC outlet. As batteries get older, their voltage
drops and memory may be lost. Be sure to replace the battery periodically.
Battery should be removed if the radio will be stored for more than one day.
Leaky batteries can badly damage the clock radio.
POWER FAILURE INDICATOR
When AC power is interrupted (disconnected) for a short period both time and
alarm settings will change (unless optional battery is installed). After AC power is
restored (reconnected) the Digital Display will blink to indicate that power was
interrupted and you must readjust the TIME and ALARM settings. To stop display
from blinking, press the HOUR or MIN button.
OPERATE THE RADIO
1. Plug the power cord into any 120-V AC household outlet.
2. Turn the FUNCTION SELECTOR to ON.
3. Slide the AM/FM BAND switch (located on the back of the unit) to the desired
broadcast band.
4. Turn TUNING knob to select a station.
5. Adjust the VOLUME control to your preferred listening level.
6. To turn the radio off, slide the FUNCTION SELECTOR to OFF.
BUILT-IN AFC
The Built-In Automatic Frequency Control (AFC) works only on FM. It helps to
reduce drift on FM reception and to keep the radio locked in on the FM station to
which it is tuned.
When tuning in FM stations, you may notice that often the station you desire can
be heard on two or three nearby points on the dial. Always tune carefully to the
loudest and clearest point.
ANTENNAS
AM Antenna - A built-in ferrite rod antenna eliminates the need for an outside
antenna for AM reception. Rotating the unit slightly may improve reception of
distant AM stations.
FM Antenna - The power cord acts as your FM antenna. The power cord picks up
moderate to strong stations and eliminates the need for an external antenna in
most strong signal areas. Be sure the power cord is stretched out to its full length.
Do not coil or bunch the cord together. Changing position of the power cord may
improve reception.
SERVICE
This product should be serviced only by those specially trained in appropriate
servicing techniques. Attach your sales receipt to the booklet for future reference or
jot down the date this product was purchased or received as a gift. This information will be valuable if service should be required during the warranty period.
Spacesaver™ Digital Clock Radio
User’s Guide
“NO WORRY” BATTERY BACKUP
This clock radio is equipped with a memory holding system that can be powered
with a customer-installed 9-volt alkaline battery (not included). The power failure
protection circuit will not operate unless battery is installed.
When normal household power is interrupted, or AC line cord is unplugged, the
battery will power the clock radio to keep track of time and alarm settings programmed into memory. When on battery power, the digital display will not light;
however, should WAKE TIME occur during the power interruption, the radio will
operate or the alarm will sound if remaining battery power is adequate. Normal
operation will resume after AC power is restored so you will not have to reset time
or alarm.
SET THE TIME
Your digital clock timer operates on a 12-hour cycle. The AM indicator on the left of
the display will light up to let you know if the display is reading AM time.
1. Press the HOUR button to get the correct AM or PM hour.
2. Press the MIN button to get to the exact minute time.
P.O. Box 1976, Indianapolis, IN 46206
© 1996 Thomson Consumer Electronics, Inc.
Trademark(s) ® Registered
Marca(s) Registrada(s)
Models 7-4812/7-4813
347A8235-0001 (Rev. 0 E/S)
96-12
Printed in China
7-4812 (White)
7-4813 (Black)
WARNING:
TO PREVENT FIRE
OR ELECTRICAL SHOCK HAZARD,
DO NOT EXPOSE THIS PRODUCT
TO RAIN OR MOISTURE.
SEE MARKING ON BOTTOM / BACK OF PRODUCT
CAUTION
RISK OF ELECTRIC SHOCK
DO NOT OPEN
THE EXCLAMATION
POINT WITHIN THE
TRIANGLE IS A
WARNING SIGN
ALERTING YOU OF
IMPORTANT
INSTRUCTIONS
ACCOMPANYING
THE PRODUCT.
THE LIGHTNING
FLASH AND ARROWHEAD WITHIN THE
TRIANGLE IS A
WARNING SIGN
ALERTING YOU OF
"DANGEROUS
VOLTAGE" INSIDE
THE PRODUCT.
CAUTION: TO REDUCE THE
RISK OF ELECTRIC SHOCK,
DO NOT REMOVE COVER
(OR BACK). NO USERSERVICEABLE PARTS INSIDE. REFER SERVICING
TO QUALIFIED SERVICE
PERSONNEL.
MINUTES AND SECONDS TIME DISPLAY
For a display of time in minutes and seconds:
1. Press and hold the WAKE button.
2. While holding down WAKE button, momentarily press the SLEEP button. The
hour digits will display minutes; the minute digits will display seconds and start
to increment. Release WAKE button to return to the hour and minute display.
FCC INFORMATION
This device complies with Part 15 of the FCC Rules. Operation is subject to the
following two conditions: (1) This device may not cause harmful interference, and
(2) this device must accept any interference received, including interference that
may cause undesired operation.
In accordance with FCC requirements, changes or modifications not expressly
approved by Thomson Consumer Electronics could void the user’s authority to
operate this product.
This device generates and uses radio frequency (RF) energy, and if not installed
and used properly, this equipment may cause interference to radio and television
reception.
If this equipment does cause interference to radio or television reception (which
you can determine by unplugging the unit), try to correct the interference by one or
more of the following measures:
• Reorient the receiving antenna (that is, the antenna for the radio or television
that is “receiving” the interference).
• Move the unit away from the equipment that is receiving interference.
• Plug the unit into a different wall outlet so that the unit and the equipment
receiving interference are on different branch circuits.
If these measures do not eliminate the interference, please consult your dealer or
an experienced radio/television technician for additional suggestions. Also, the
Federal Communications Commission has prepared a helpful booklet, “How To
Identify and Resolve Radio TV Interference Problems.” This booklet is available
from the U.S. Government Printing Office, Washington, DC 20402. Please specify
stock number 004-000-00345-4 when ordering copies.
LIMITED WARRANTY
What your warranty covers:
• Any defect in materials or workmanship.
For how long after your purchase:
• One year.
(The warranty for rental units begins with the first rental.)
What we will do:
• Provide you with a new, or at our option, a refurbished unit.
• The exchange unit is under warranty for the remainder of the original product’s warranty
period.
How to make a warranty claim:
• Properly pack your unit. Include any cables, etc., which were originally provided with the
product. We recommend using the original carton and packing materials.
• Include in the package evidence of purchase date such as the bill of sale. Also print your
name and address and a description of the defect. Send standard UPS or its equivalent to:
Thomson Consumer Electronics, Inc.
Product Exchange Center
32 Spur Drive
El Paso, Texas 79906
• Pay any charges billed to you by the Exchange Center for service not covered by the
warranty.
• A new or refurbished unit will be shipped to you prepaid freight.
What your warranty
does not
cover:
• Customer instruction. (Your Owner’s Manual provides information regarding operating
instructions and user controls. For additional information, ask your dealer.)
• Installation and set-up service adjustments.
• Batteries.
• Damage from misuse or neglect.
• Products which have been modified or incorporated into other products.
• Products purchased or serviced outside the USA.
• Acts of God, such as but not limited to lightning damage.
Product Registration:
• Please complete and mail the Product Registration Card packed with your unit. It will make
it easier to contact you should it ever be necessary. The return of the card is not required
for warranty coverage.
How state law relates to this warranty:
• This warranty gives you specific legal rights, and you may have other rights which vary
from state to state.
If you purchased your product outside the USA:
• This warranty does not apply. Contact your dealer for warranty information.
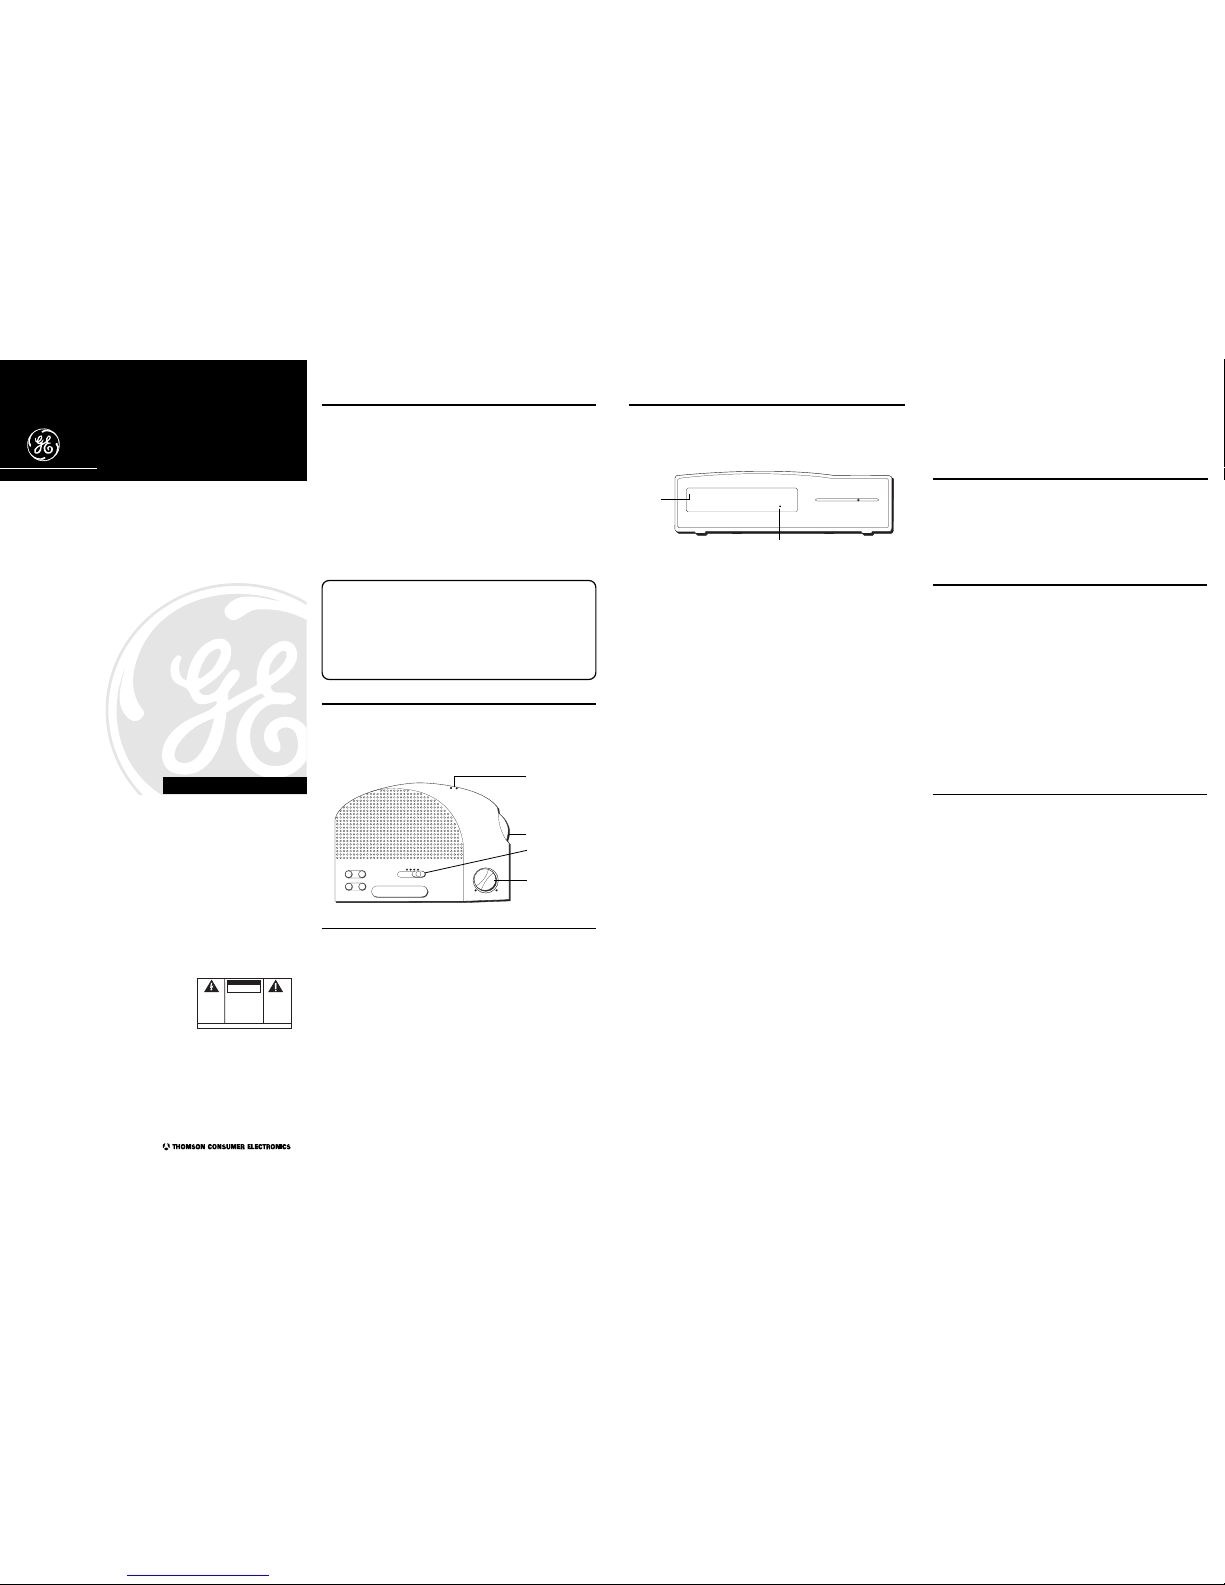
ALARM
MUSICOFF
SNOOZE
HOUR MIN
WAKE SLEEP
ON
MIN
MAX
VOLUME
TUNING
FM
AM
Volume
Tuning
Function selector
Band switch
AM
88 • 92 • 96 • 100 • 104 • 108
550 • 650 • 800 • 1000 • 1300 • 1600
12:00
AM
•
WAKE
AM
indicator
Wake (alarm on)
indicator
SET THE WAKE TIME
1. Press and hold WAKE button.
2. While holding the WAKE button, use the HOUR and MIN buttons to change the
display to desired AM or PM wake-up time.
3. Release WAKE button and the current time is displayed again. Wake time is set.
WAKE TO MUSIC
1. Select an AM or FM station
2. Set wake time (See SET THE WAKE TIME directions).
3. Set FUNCTION SELECTOR to MUSIC position. (The WAKE INDICATOR in the
display will light.)
The radio will turn on at the wake time you set and will turn itself off after approximately 2 hours. To turn the radio off sooner, set FUNCTION SELECTOR to OFF.
WAKE TO ALARM
1. Set the wake time.
2. Place the FUNCTION SELECTOR in the ALARM position. The WAKE
INDICATOR in the display will light.
The tone alarm will sound at the wake time you set and turn itself off after approximately 2 hours. To turn the alarm off sooner, set FUNCTION SELECTOR to OFF.
Your clock radio has a 24-hour timer. When FUNCTION SELECTOR is left in MUSIC
or ALARM wake mode, it will turn itself on, sound for approximately 2 hours, turn
itself off, and turn on again at the same time the following day.
The WAKE INDICATOR in the display lights when the clock radio is in a WAKE mode.
SLEEP TO MUSIC
You can drift off to sleep to music knowing that the radio will turn itself off automatically. Simply:
1. Set the FUNCTION SELECTOR to the OFF position.
2. Press and hold the SLEEP button. The time display will exhibit 0:59. The radio
will turn on automatically.
3. While holding SLEEP button, press the MIN button and time will start to count
down. Select any sleep time between 59 minutes and 1 minute. For sleep time of
more than 59 minutes, up to 1 hour and 59 minutes, momentarily press the
HOUR button (while holding down the SLEEP button). The display will exhibit
1:59. Then, press MIN button to select the desired amount of sleep time in
excess of 1 hour.
4. Release SLEEP button and the current time is once again displayed. The radio is
now on and you can select your station in the usual way. Play will be for the
chosen length of time (up to 1 hour 59 minutes), and then the radio will turn
itself off. If you decide to turn the radio off sooner, press the SNOOZE button.
SLEEP TO MUSIC AND WAKE TO MUSIC OR ALARM
You can set your digital clock radio to lull you to sleep, turn itself off, than awaken
you at a preset time - all automatically.
1. Set the wake time.
2. Follow the steps under WAKE TO MUSIC or WAKE TO ALARM.
3. Then, proceed with Steps 2 through 4 under SLEEP TO MUSIC.
NOTE: Be sure the FUNCTION SELECTOR is in either MUSIC or ALARM
WAKE position.
SNOOZE ALARM OPERATION
The Snooze-Alarm control has three functions:
1. It allows extra sleep time after the radio comes on in the WAKE TO MUSIC
mode. Press SNOOZE bar to silence the radio. About 9 minutes later, the radio
will play again.
2. It allows extra sleep time in the WAKE TO ALARM mode. When the alarm
sounds, touch the SNOOZE bar to silence the alarm. About 9 minutes later, the
alarm will sound again. You can use the SNOOZE feature repeatedly for up to
two hours, after which the radio or alarm will turn off until the next day.
3. It shuts off the sleep cycle. (See SLEEP TO MUSIC.)
Page 2
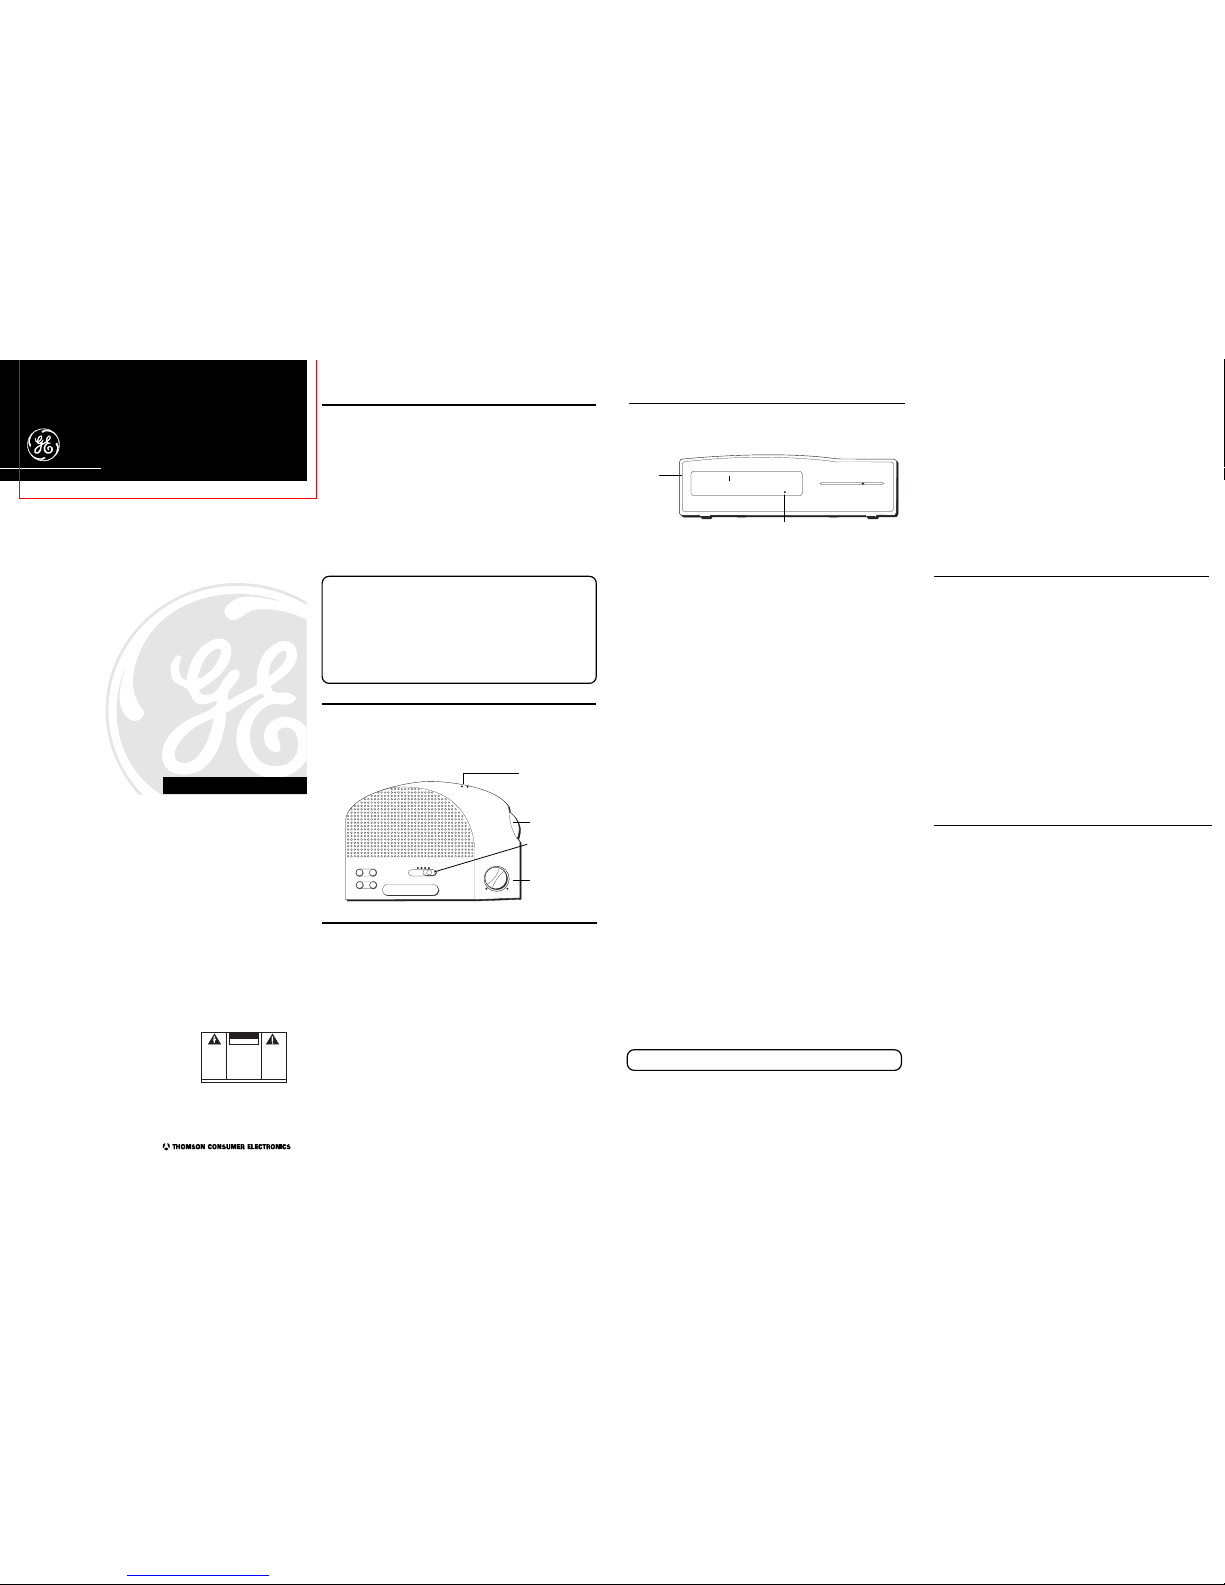
AM
88 • 92 • 96 • 100 • 104 • 108
550 • 650 • 800 • 1000 • 1300 • 1600
12:00
AM
•
WAKE
ALARM
MUSICOFF
SNOOZE
HOUR MIN
WAKE SLEEP
ON
MIN
MAX
VOLUME
TUNING
FM
AM
Creamos cosas buenas para la vida.
PARA SU SEGURIDAD
El enchufe de alimentación eléctrica de corriente alterna está polarizado (es decir,
una hoja es más ancha que la otra) y sólo encaja en la toma eléctrica de corriente
alterna de una sola manera. Si el enchufe no entra completamente en la toma,
gírelo e intente insertarlo de la otra manera. Si aún así no encaja en la toma, entre
en contacto con un electricista cualificado y cambie la toma o utilice una toma
diferente. No intente saltarse esta característica de seguridad.
INDICADOR DE FALLA DE ENERGIA
Cuando la energía CA (Corriente Alterna) sea interrumpida (desconectada) por un
período corto, las indicaciones de la hora y de la alarma cambiarán (a no ser que
Ud. haya instalado una pila opcional). Después de que la energía CA será
restablecida (reconectada), la Pantalla Digital parpadeará para indicar que la
energía fue interrumpida y que Ud. deberá reajustar las indicaciones de la HOUR y
de la ALARM. Para parar el parpadeo en la pantalla, oprima el botón de la HOUR o
el de los MIN.
EXHIBICION DE LOS MINUTOS Y LOS SEGUNDOS
Para mostrar la hora en minutos y segundos:
1. prima y mantenga presionado el botón del WAKE.
2. ientras presiona el botón del WAKE, oprima momentáneamente el botón SLEEP.
Los dígitos de la hora indicarán los minutos; los dígitos de los minutos
mostrarán los segundos, y empezarán a aumentar. Suelte el botón del WAKE
para volver a mostrar la hora y los minutos.
SERVICIO DE REPARACIONES
Este producto deberá ser reparado solamente por aquellas personas entrenadas
especialmente en la técnica de su funcio namiento. Para instrucciones en como obtener
servicio, refiérase a la Garantía en esta Guía. Adjunte el recibo de venta a este manual para
una referencia futura, o anote la fecha en que este producto fue comprado o reci bido como
regalo. Esta información es importante si alguna reparación fuera necesaria durante el plazo
de la garantía.
Fecha de Compra ______________________________
Nombre de la Tienda ___________________________
Spacesaver™ Radio Reloj Digital
Guía del Usuario
“NO PREOCUPARSE” SISTEMA DE APOYO DE LA PILA
Esta radio/reloj viene equipada con un sistema retentivo memorizador, el cual
puede ser activado con una pila alcalina de 9 voltios (no incluída), instalada por el
usuario. El circuito de protección contra una falla de energía eléctrica no funcionará
a menos que una pila haya sido instalada.
Cuando la energía doméstica normal sea interrupida, o el cordón de la línea CA se
desconecte, la pila mantendrá las indicaciones de hora y alarma ya programadas
en la memoria. Cuando la unidad esté funcionando con la energía de la pila, la
pantalla digital no se encenderá. Sin embargo, si la hora de WAKE TIME ocurriera
durante la interrupción de energía eléctrica, la radio funcionará y la alarma sonará
si la energía que queda en la pila es suficiente. Una operación normal empezará de
nuevo después de reestablecerse la energía CA; de esta manera Ud. no tendrá que
reprogramar la hora o la alarma.
Banda AM/FM
PARA PONER LA HORA
Su reloj despertador digital funciona en un ciclo de 12 horas. Los indicadore AM a
la izquierda de la pantalla encenderán para indicar la hora AM.
1. Oprima el botón de la HOUR para cambiar la AM o PM hora.
2. Oprima el botón de los MIN para Ilegar al tiempo minutos correcto.
P.O. Box 1976, Indianapolis, IN 46206
© 1996 Thomson Consumer Electronics, Inc.
Trademark(s) ® Registered
Marca(s) Registrada(s)
Modelos 7-4812/7-4813
349A8235-0001 (Rév. 0 E/S)
96-12
Impresso en China
INFORMACION IMPORTANTE PARA LA BATERIA
• Si no va a usar su reproductor por un mes o más tiempo, asegúrese de sacar
las baterías porque pueden derramar y dañar la unidad.
• Disponga de las baterías en la manera apropiada, según las leyes federales,
estatales y locales.
• Cualquier batería puede derramar electrólito si se mezcla con otro tipo de
batería, si se inserta incorrectamente, si todas las baterías no se cambian al
mismo tiempo, si se bota en el fuego, o si se trata de recargar una batería que
no es recargable.
• Descarte inmediatamente las baterías derramadas. La baterías derramadas
pueden causar quemaduras en la piel u otros daños físicos.
ADVERTENCIA:
PARA
PREVENIR EL RIESGO DE UNFUEGO O DE
UNA SACUDIDA ELECTRICA, NO EXPONGA
ESTE APARATO A LA LLUVIA O A LA HUMEDAD.
VEA ADVERTENCIA EN LA PARTE POSTERIOR/BASE DEL PRODUCTO.
ATTENTION:
RIESGO DE SACUDIDA
ELÉCTRICA NO ABRA
EL RELÁMPAGO Y LA
PUNTA DE FLECHA
DENTRO DEL TRIÁNGULO ES UNA SEÑAL
DE ADVERTENCIA,
ALERTÁNDOLE A
UD. DE QUE HAY
"VOLTAJE PELIGROSO" DENTRO
DEL PRODUCTO.
CUIDADO: PARA REDUCIR
EL RIESGO DE UNA SACUDIDA ELÉCTRICA, NO
QUITE LA CUBIERTA
(O PARTE POSTERIOR) NO
USE PARTES DE REPUESTO DENTRO. CONSULTE A
ALGUNA PERSONA CALIFICADA DEL SERVICIO DE
REPARACIONES.
EL SIGNO DE EXCLAMACIÓN DENTRO
DEL TRIÁNGULO ES
UNA SEÑAL DE
ADVERTENCIA,
ALTERTÁNDOLE A
UD. DE QUE EL
PRODUCTO, TRAE
INCLUCIDO, IN
STRUCTIONES MUY
IMPORTANTES.
Instale la pila de la siguente manera:
1. uite la puertecilla del compartimiento de la pila (ubicado en la parte trasera de
la radio) presionando con el pulgar la área indicada en la puertecilla; y luego,
levante la puertecilla fuera del gabinete.
2. onecte una pila de 9 voltios al conectador en el compartimiento.
3. oloque la pila en el compartimiento y ponga de nuevo la puertecilla.
NOTE: Se recomiendan pilas alcalinas (NEDA 1604A). Se pueden usar pilas de
carbono-zinc (NEDA 1604), pero el tiempo que mantendrá la memoria será
reducido substancialmente. Una nueva pila alcalina mantendrá la memoria por
aproximadamente 8 horas (si la radio o la alarma no son operados), lo cual
debe ser suficiente para una falla normal de energía CA. Para preservar la vida
de la pila, la radio deberá quedar enchufada en un tomacorriente CA. Al
envejecerse la pila, el voltaje se reducirá y pueda que la memoria se pierda.
Asegúrese de reemplazar la pila periódicamente. La pila debe ser quitada si la
radio quedará desenchufada por más de 1 día. Una pila desgastada podría
soltar líguidos químicos causando daños severos a la radio reloj. La pila no
viene incluída con esta radio reloj.
OPERANDO LA RADIO
1. Enchufe el cordón de energía en un tomacorriente doméstico de 120 voltios.
2. Ponga el FUNCTION SELECTOR en la posición de PRENDIDO (ON).
3. Deslice el conmutador de la AM/FM BAND (ubicado en la parte trasera de la
unidad) a la posición de la frecuencia deseada.
4. Gire la perilla de TUNING para seleccionar una estación.
5. Ajuste el control de VOLUME a su preferencia.
6. Para apagar la radio, ponga el FUNCTION SELECTOR en la posición de
APAGADO (OFF).
CAF INTEGRADO
El Control Automático de Frecuencia (CAF) funciona sólo en FM. Ayuda a reducir el
desvio en la recepción FM y a mantener la radio en la estación FM a la cual haya
sido sintonizada.
Al estar sintonizando estaciones FM, Ud. podrá notar que a menudo la estación que
Ud. desee podrá ser escuchada en dos o tres puntos cercanos sobre la escala.
Siempre sintonice al punto más fuerte y más claro.
ANTENAS
Antena AM - Una antena de fierro integrada a la radio elimina la necesidad de una
antena exterior para la recepción AM. Girando ligeramente la radio puede mejorar
la recepción para estaciones de AM distantes.
Antena FM - El cordón de energía funciona como su antena FM. El cordón de
energía como antena selecciona las estaciones de mediana a alta potencia y
elimina la necesidad de una antena exterior en la mayoría de áreas con señal
fuerte. Asegúrese de extender el cordón de energía lo más posible. No enrolle o
doble el cordón de energía sobre di-mismo. Cambiando la posición del cordón de
energía puede mejorar la recepción.
PARA PONER LA HORA DE DESPERTARSE
1. Oprima y mantenga presionado el botón del WAKE.
2. Mientras mantiene el botón del WAKE, use los botones de la HOUR y de los MIN
para cambiar la pantalla a la hora AM o PM.
3. Suelte el botón del WAKE y se verá de nuevo la hora correcta.
Ud. acaba de establecer la hora de despertarse en la memoria.
PARA DESPERTARSE CON MUSICA
1. Seleccione una estación AM o FM.
2. Ponga la hora de WAKE. (Vea las instrucciones en “PARA PONER LA HORA DE
DESPERTARSE.)
3. Deslice el FUNCTION SELECTOR a la posición MUSIC. (El INDICADOR WAKE se
encenderá en la pantalla.)
La radio se prenderá a la hora que Ud. puso en la memoria y se apagará después de
aproximadamente 2 horas. Para apagar la radio más pronto, ponga el FUNCTION
SELECTOR en la posición de APAGADO (OFF).
PARA DESPERTARSE CON ALARMA
1. Ponga la hora de DESPERTARSE.
2. Deslice el FUNCTION SELECTOR en la posición ALARM. El indicador WAKE se
encenderá en la pantalla.
La alarma sonará a la hora que Ud. puso en la memoria y se apagará después de
aproximadamente 2 horas. Para apagar más pronto la alarma, ponga el FUNCTION
SELECTOR en la posición denominada OFF.
Su radio reloj tiene un cronómetro de 24 horas. Cuando el FUNCTION SELECTOR se
queda en el modo de despertarse con MUSIC o ALARM, la unidad se prenderá,
sonará por aproximadamente 2 horas, se apagará y después, volverá a prenderse al
mismo tiempo el día siguiente.
El WAKE INDICATOR se enecenderá en la pantalla cuando el reloj se encuentre en
un modo de WAKE.
PARA DORMIR CON MUSICA
Ud. puede dormir con música sabiendo que la radio se apagará automáticamente.
Simplemente:
1. Ponga el FUNCTION SELECTOR en la posición de APAGADO (OFF).
2. Oprima y mantenga presionado el botón SLEEP. La pantalla exhibirá 0:59. La
radio se prenderá automáticamente.
3. Mientras mantiene presionado el botón SLEEP, oprima el botón de los MIN y el
tiempo empezará a correr en forma regresiva. Seleccione cualquier tiempo de
dormir entre 59 minuots y 1 minuto, según el tiempo que quiera que la radio
funcione. Para un tiempo de dormir de más de 59 minutos, hasta 1 hora y 59
minutos, oprima momentáneamente el botón de la HOUR (mientras mantiene
presionado el botón SLEEP). La pantalla exhibirá 1:59. Después, oprima el botón
de los MIN para seleccionar la cantidad deseada de dormir en exceso de una
hora.
4. Suelte el botón SLEEP y el tiempo correcto se mostrará nuevamente. Ahora la
radio está funcionando y Ud. puede seleccionar su estación de la manera usual.
La música se escuchará durante el tiempo programado (Hasta 1 hora y 59
minutos) y luego la radio se apagará. Si Ud. decide apagar la radio más pronto,
oprima el botón del SNOOZE.
P
ARA DORMIR CON MUSICA Y DESPERTARSE CON MUSICA O ALARMA
Ud. puede programar su radio reloj digital para adormecerse, apagarse y después
despertarlo a un tiempo preestablecido - todo automáticamente.
1. Ponga la hora de WAKE.
2. Siga los pasos en PARA DESPERTARSE CON MUSICA o PARA DESPERTARSE
CON ALARMA.
3. Después, continue con los Pasos 2 hasta 4 en PARA DORMIR CON MUSICA.
I
NFORMACION REQUERIDA POR LA COMISION FEDERAL DE COMUNICACIONES
Este dispositivo cumple con la Parte 15 de las reglas de la Comisión Federal de
Comunicaciones (FCC). El funcionamiento está sujeto a las dos condiciones siguientes: (1)
Este dispositivo no debe causar interferencia perjudicial, y (2) este dispositivo tiene que
aceptar cualquier interferencia recibida incluyendo interferencia que pueda causar un
funcionamiento no deseado.
De acuerdo con los requisitos de la Comisión Federal de Comunicaciones (FCC), cambios o
modificaciones no aprobadas explicitamente por Thomsom Consumer Electronics, podrían
anular el derecho del usuario para operar este producto.
Este aparato genera y usa energía en radio frecuencia (RF) y si no se instala y usa
adecuadamente este equipo puede causa r interferencia a la recepción de radio y televisión.
Si este equipo causa interferencia a la recepción de radio o televisión (lo cual se determina
activando y desactivando el equipo), trate de corregir la interferencia mediante una o más de
las siguientes medidas:
• Reoriente la antena receptora (esto es, la antena de la radio o televisión que esta
“recibiendo” la interferencia).
• Cambie la posición de la unidad con respecto al equipo de radio o televisión receptor de
interferencia.
• Aleje la unidad del equipo receptor de interferencia.
• Enchufe la unidad a un tomacorriente de otra pared para que así la unidad y el equipo
receptor de interferencia e stén en circuitos diferentes.
Si estas medidas no eliminan la interferencia, favor de consultar al distribudor o un técnico
experto en radio/televisión para sugerencias adicionales. También, la Comision Federal de
Comunicaciones ha preparado un manual útil, “Como Identificar y Resolver los Problemas de
Interferencia Radio/Televisión” (“How to Identify and Resolve Radio TV Interference
Problems”). Este manual puede obtenerse en: U.S. Government Printing Office, Washington,
D.C. 20402. Favor de especificar el número 004-000-00345-4 al pedir las copias.
OPERACION DE LA ALARMA-SNOOZ
El control de la Alarma-Snooz tiene tres funciones:
1. Permite más tiempo para dormir después de que la radio se haya prendido en el
modo DESPERTARSE CON MUSICA. Oprima la barra del SNOOZE para silenciar
la radio. Después de aproximadamente 9 minutos, la radio se prenderá
nuevamente.
2. Permite más tiempo para dormir en el modo DESPERTARSE CON ALARMA.
Cuando la alarma suene, toque la barra del SNOOZE para silenciar la alarma.
Después de aproximadamente 9 minutos, la alarma sonará nuevamente. Ud.
puede usar la característica del SNOOZE repetidas veces hasta dos horas;
después, la radio o la alarma se apagará hasta el día siguiente.
3. Apaga el ciclo de dormir. (Vea PARA DORMIR CON MUSICA.)
NOTA: Asegúrese de que el FUNCTION SELECTOR esté en la posición de
DESPERTARSE CON MUSICA o ALARMA.
GARANTÍA LIMITADA
Su garantía cubre:
• Todo defecto de materiales o mano de obra
Vigencia de la garantía:
• Un año a partir de la fecha de compra
(La garantía para aparatos de alquiler comienza a partir de la fecha en que se alquila por primera vez).
Responsabilidad de la compañía:
• Brindarle un aparato nuevo o, si lo consideramos necesario, un aparato reacondicionado.
• El aparato que se entrega en este caso estará cubierto hasta que termine la garantía del aparato
original.
Reclamo por garantía:
• Embalar el aparato como corresponde, incluyendo los cables y otros accesorios que se suministraron
con el producto. Recomendamos utilizar la caja y el material de embalaje que vinieron de fábrica.
• Colocar en el paquete una prueba de compra que contenga la fecha, como la factura. Además, escribir
en letra de imprenta el nombre y la dirección del remitente y la descripción de la falla. Enviar el
paquete por un servicio de mensajería corriente, como UPS u otro similar a la dirección siguiente:
Thomson Consumer Electronics, Inc.
Product Exchange Center
32 Spur Drive
El Paso, Texas 79906
• Pagar todos los cargos que le cobre el Centro de Canjes por los servicios no cubiertos por la garantía.
• Se le enviará un aparato nuevo o reacondicionado con porte pagado.
Aspectos no cubiertos por la garantía:
• Instrucción a los clientes. (Su Manual de Instrucciones le brinda información sobre el funcionamiento
del aparato y de los controles. Para más detalles, póngase en contacto con su representante).
• Instalación y ajustes de configuración
• Pilas
• Daños debidos al abuso o descuido.
• Productos que han sido modificados o incorporados en otros productos.
• Productos adquiridos o reparados fuera de los EE.UU.
• Casos fortuitos, como daños por descargas eléctricas, etc.
Registro del producto:
• Sírvase completar y enviar la tarjeta de registro del producto, que viene con su aparato. El registro
facilitará el contacto, si fuera necesario. El retorno de la tarjeta no se requiere para la aplicación de la
garantía.
Leyes estatales que se aplican a la garantía:
• Esta garantía cubre sus derechos legales específicos, pero es posible que usted tenga otros derechos
si cambia de estado.
En caso de comprar el producto fuera de los Estados Unidos:
• Esta garantía no se aplica. Solicite a su distribuidor información sobre la garantía.
7-4812 (Blanco)
7-4813 (Negro)
Sintonizacion
Volumen
Selector de
funciones
Indicador Wake (alarma comenzar)
Indicadore
AM
 Loading...