

Page 1
m.
ï/Sf & CARE GUIDER
Page 2

SECTION
INTRODUCTION
.............................................
A. Parts Checklist....................................
B. Cordless Telephone
Characteristics...................
C. Setting the Security Code
qqNTROLS snd FEATURES
.................
---------------
.......................
A. Cordless Telephone
Features
..............................................
B. Cordless Telephone
Controls
INSTALLATION
A TV-. I I". V-> ^ m t 111 Pt
/\ . leicpi
.......................................
..............................................
® "
Requirements......................................°
n loe+oiiatinn for Desk or
D. Q Q
Table Top use................................» ' ^
Q. Wall Mounting the
Base Unit (optional).................^ ]l
D. Charging the Battery Pack... 12
TELEPHONE OPERATION . . - - • 13
. Porpivinn UellS . I'J
A. MaKuiy aiivj 1 ................-
B. Redial.....................................................
n Coct
D. Changing Channels
p . Handset Volume Control . - • • 1_
R Temporary Tone Feature
G. The Flash Button..................................
H Distinctive Ring Feature
1. How to Save Battery Power .. 16
j. Tone Signals...........................................
........
...............................................
K. Paging the Handset
............................
..............
...............
.............................
^AI PAGE
btU I turi -------
Tcri cou/OWP MFMORY
/ 1 *—
^
OPERATION
A .qtnrino a Number into
^
B. Changing a stored
--
5
C. Pause Function
D. Chain Dial from Memory
^
t'nUUU^I
A. Battery Replacement
□ nonprpi Product Care
U
. iw* -— -
®
IN CASE OF DIFFICULTY
-----
-----------------
..................................................
----------------------------------------------Memory
Number
..............................................
.............................................
................................
---------------
I^~r /^A DP 19
......
......................................
.......................
.....................
.........................
Troubleshooting Chart..............................>
cPOX/inF ................................................................
I r i
....
............................................
WARFIANTY
.................................................
FCC REGISTRATION
imphrMATION
f i Wf W* - - -
INFORMAI lun...........................
..
HEARING AID
COMPATIBILITY
. y-.y-*r-^r‘/-»DV' nonFR
15
‘o
form
..............................................
........................
..................
I -------------
BACK COVER
..
............................
__________
BACKUUVtH
...
1 ^
17
''
1^
18
18
iy
20
21
23
mVFR
FOLD-OUT
WARNING; to prevent fire
^1-. r-i f-r'Toir^ QMonK HA21ARD,
UM d-dV./i niw
DO NOT EXPOSE THIS PRODUCT
r-IAIkl
HJ riMlIN wn
^"T 1 I R P .
-
------
A
Ak
Tuc lightning
FLASH AND ARROW
HEAD WITHIN THE
TRIANGLE IS A
___ »..A.y« CiriW
WAHNIM'J
alerting you of
••dangerous
VOLTAGE" INSIDE
THE PRODUCT.
SEE MAR^
r^0FEL£CTTiCSHOWI
1 DONCTCPEN J
CAUTION; TO REDUCE THE
RISK OF ELECTRIC SHOCK,
00 NOT REMOVE COVER
(OR BACK). N0 USERccovirFARLE PARTS IN-
srOE,'refer SERVICING
TO QUALIFIED SERVICE
PERSONNEL.
(INC ON aOnOM/BACK OF PRODUCI _
THE EXCLAMATION
M>Kiktr UitTUlM TH^
Kum 1 n 1»• Ml. • • TRIANGLE IS A
WARNING SIGN
alerting you of
IMPORTANT
INSTRUCTIONS
accompanying
THE PRODUCT.
A
Page 3
INTRODUCTiON
Thank you for purchasing the GE 900 Megahertz Cordless Telephone. Your new
telephone is a carefully engineered, high-quality, durable product with natural sound
quality, modern features and elegant styling. It is designed to give you the quality
and convenience you expect in a cordless telephone. '
To familiarize yourself with all the features of your telephone, please read the
followinq instructions carefully. Retain this Guide for future reference.
FCC NUMBER IS LOCATED ON THE BOTTOM OF THE BASE
LOAD NUMBER IS LOCATED ON THE BOTTOM OF BASE
OTHER IMPORTANT INFORMATION ON BACK COVER OF THIS GUIDE
I
I
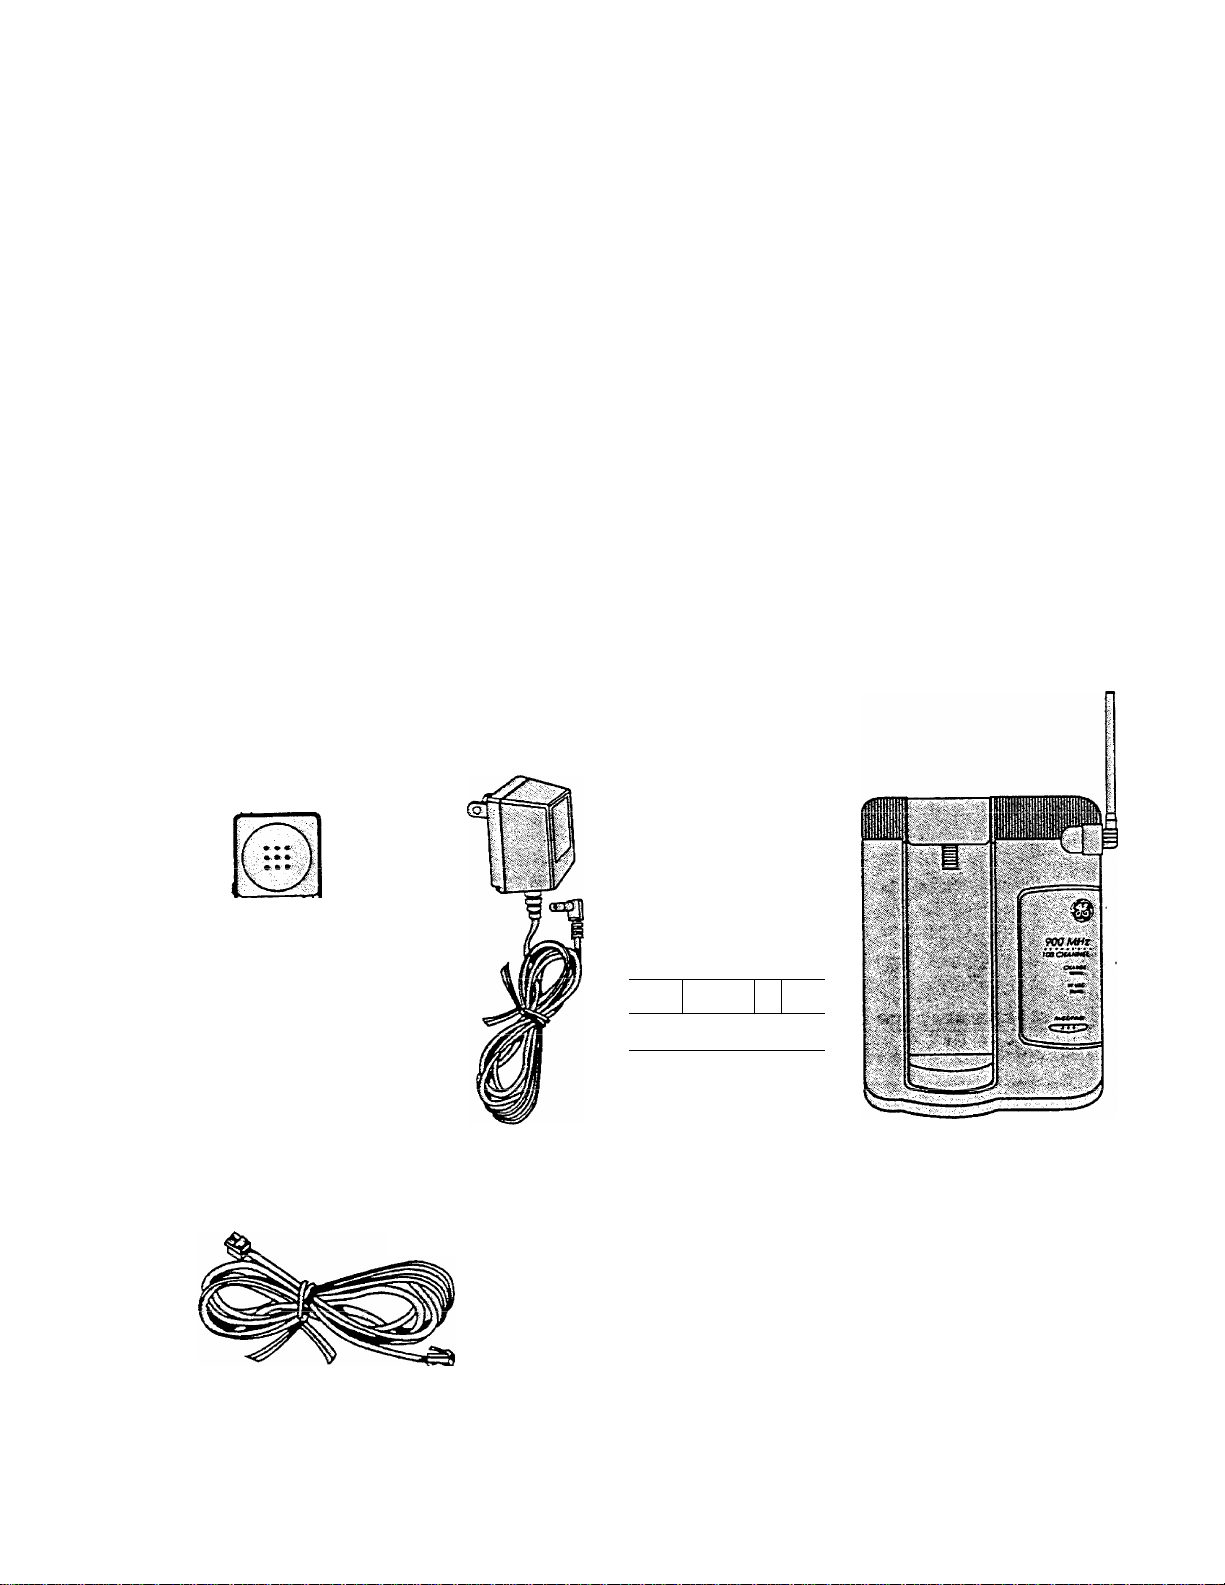
Carefully remove unit from the package. Check this list to
be ce.rtain ai! components are included. Remember to
save your sales receipt in case you ever need warranty
service.
HANDSET
(¿rdTiS
n
\
Lnnnt
BRACKET
I :n
__
A. Parts
Check List
1
AC POWER SUPPLY
t A #ff^l I I
tifigli Cl IDDI V
Wlin rUVVtn ow»rri-i
Wll n I
CORD
LONG
TELEPHONE
BASE UNIT
bMum
TELEPHONE
LINE CORD
Page 4

INTRODUCTiON
This 900 Megahertz Cordless Telephone utilizes state of
the art technology. It operates on the 902 - 928 MHz
frequency band. There are three main advantages to this
technology: — More channels
— Clear reception
— Interference free
A cordless telephone offers convenience, ease and
mobility during telephone communications. Its use,
however, is dependent upon the availability of AC power.
Any interruption of electrical power at your location would
prevent your placing or receiving calls. Therefore, a
cordless telephone should not be installed as
the only phone in your home.
“Full Power” means that your telephone is designed to operate
at the maximum power allowed by the Federal
Communications Commission (FCC).
The range at which you can use the cordless Handset away
from the Base is dependent upon many factors. The
telephone Base is like a radio transmitter in that it transmits
telephone line signals via radio waves to the Handset.
Therefore, the location of the Base is importa.nt in order to
obtain maximum Handset range for the power allowed.
In som.e areas, installing the Base on the second floor will
provide greater range than a ground floor installation.
Reception can be adversely affected by such things as
aluminum siding, appliances (refrigerators, stove, etc.),
insulation foil backing, heating ducts and other metal
construction which acts to shield radio signals.
Atmospheric conditions also play an important role in the
performance of your cordless telephone.
Always keep the Base antenna raised.
B, Cordless
Telephone
Characteristics
Above all, keep within the range of the Base.
Whenever you place the handset on the base unit, the unit
automatically verifies its security code. This code helps to
avoid unauthorized use of your telephone line by another
cordless telephone in your area.
Note: Whenever a power outage occurs, batteries are
replaced, or communication is lost between handset and base,
the handset may have to be returned to the base for 15 - 20
seconds to reset the security code.
4
c. Setting the
Security
Code
Page 5

^ ^ k I -T- r-1 I r»
v^UfN I nuL.o ariu rcMiunco
_____
I rr* AT I I r“i>
Full Range Cordless System
Crystal Clear Sound'*' with Compandor extends the
effective range of your cordless telephone and virtuairy
eliminates static and interference
Digital Security System prevents
— f*imOin/n fr/^rn oth^r
iâi;3c; iiiiyiiiy iiv>iii v^....w.
cordless telephones .
Page/Find
Charge Light
in Lise Light .
Tone/Pulse Switchable
.<>11
_____
wan or UeSR «HJUIUC1UIC Ljaoti
High Performance Base Antenna
Dual Wave™ Noise Filter; A two stage filtering system that
removes unwanted signals
0/^A<ic>'tAra/^
ncyiOlCldJ
UL Listed
emote Handset Features
100 Channel Scan automatically selects a channel that is
likely to be clear
10 Number Memory for frequently called numbers
Volume Control
A High Performance Flexible Antenna
One-Touch Redial of last number dialed
Fast Redial: Just push redial while on-line to redial a
number _
Auto Answer capability when handset is in base
___ r\^ir\*4 O.k/i+i'h /Ratfprv
ningtlîr wil/vyii SJVVIIV#II
-----
Phone In Use light
DctLlCiy fc-WT* Iiyiii. ^ ^
I mai linht
Consumer replaceable rechargeable nickel cadmium
batter^
Temporary Tone allows Pulse/Rotary users to easily
access tone services
Distinctive Ring
Chain Dialing capability
One-Year Limited Warranty
A. Cordless
Telephone
Features
Page 6
Page 7

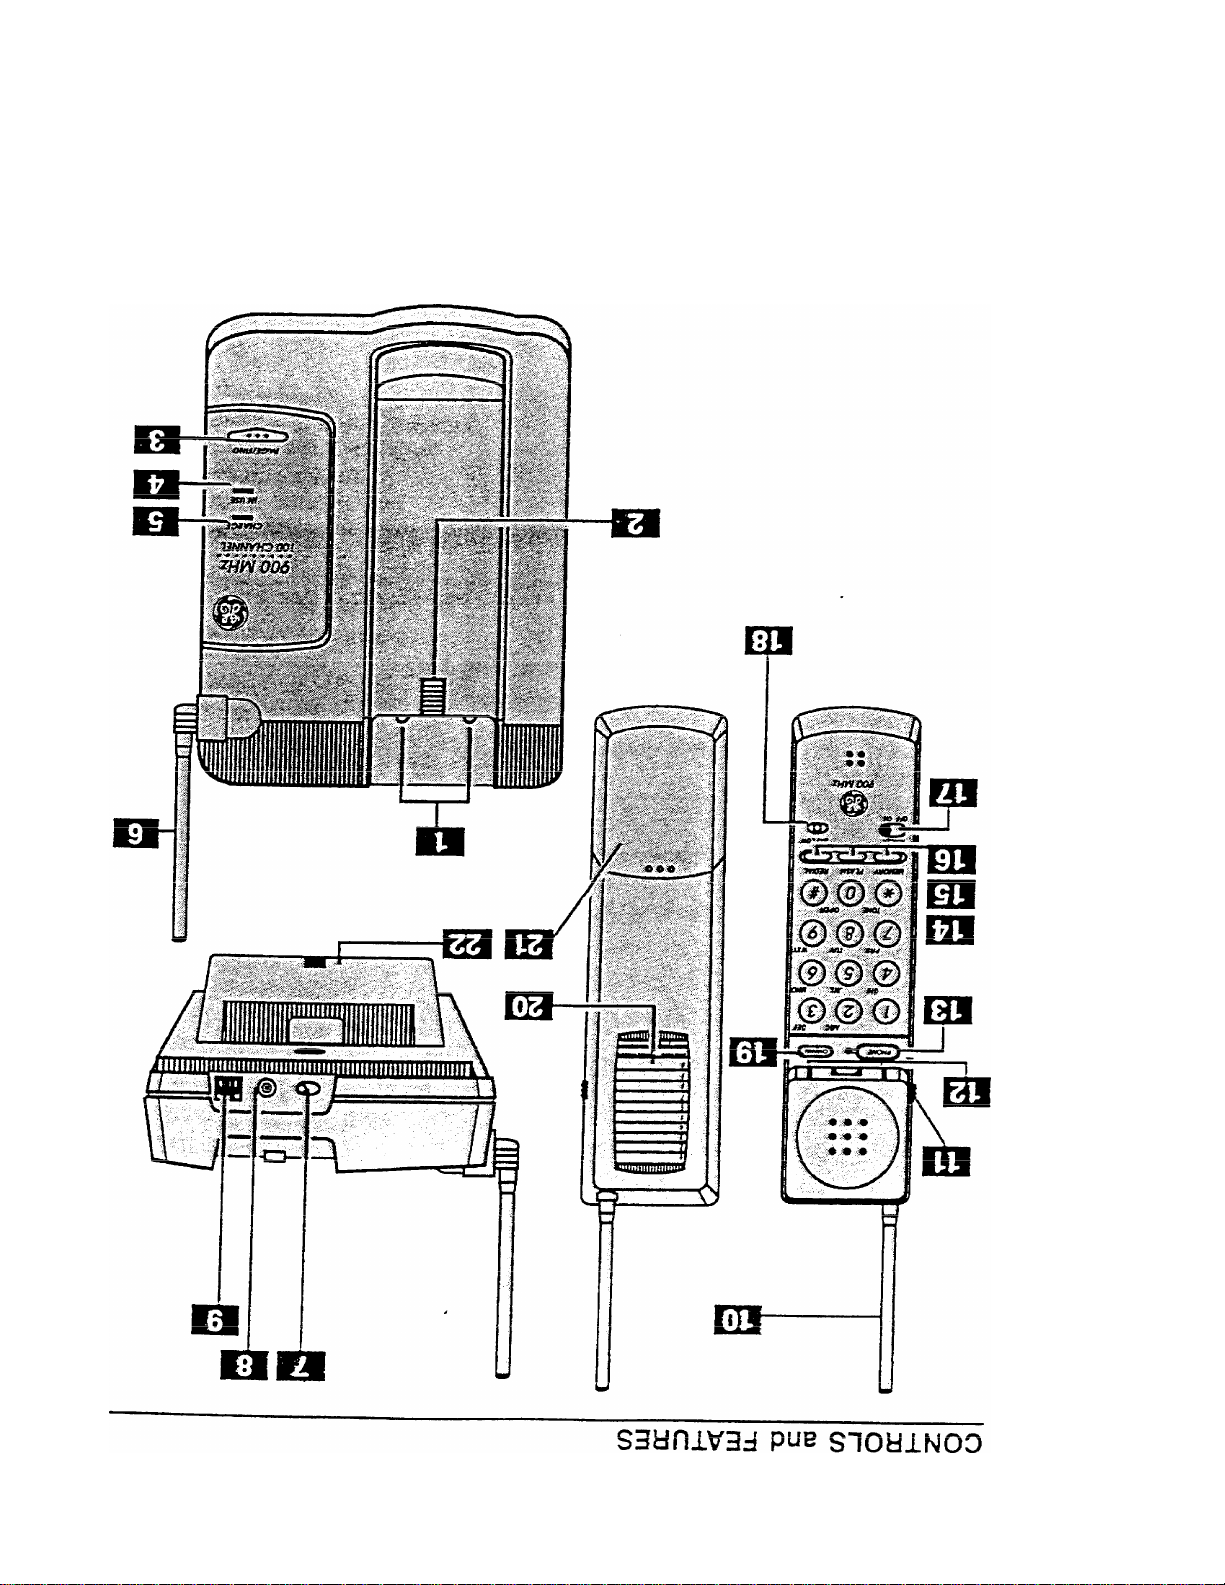
CONTROLS and FEATURES
1. BASE RECHARGE CONTACTS
riMi^U^CZ i nuwr\
when wail mounted.
3. PAGE/FiND BUTTON
A !M IIQP I tm-fT
#J V w
5. HANDSET CHARGE LIGHT
6. HIGH PERFORMANCE BASE ANTENNA
*mM
%p«ff
9
f
7. PULSE/TONE SWITCH — Sets the dialing mode for
either Tone or Pulse (Rotary) service.
8. AC POWER SUPPLY CONNECTION
y. I tZLC^nunC UMi^n
10. HIGH PERFORMANCE HANDSET ANTENNA
11. HANDSET VOLUME CONTROL SWITCH
12. HANDSET RECHARGE CONTACTS
HO aur^kic aiiTrnM -»«W IM IIQP I inHT
14. MEMORY BUTTON — Used to store numbers into
memory and dial numbers from memory.
B. Cordless
Telephone
Controls
I
I
15. FLASH BUTTON
16. REDIAL BUTTON — Redials the last number called.
17. RINGER ON/OFF SWITCH — Convenient battery
saver feature.
18. BATTERY LOW INDICATOR LIGHT
19. CHANNEL BUTTON — Allows the user to choose the
clearest channel for best reception.
20. MEMORY DIRECTORY
Index for numbers stored in the corresponding
MEMORY LOCATION.
OH n^TTPOV nnMPARTMENT
^ I « t i 9 t
Contains consumer replaceable Nickel Cadmium
Battery Pack.
22. DESK MOUNT BRACKET
-- --- ------ •
Page 8
IMCTAI I ATI/^M
iyni.L./AI
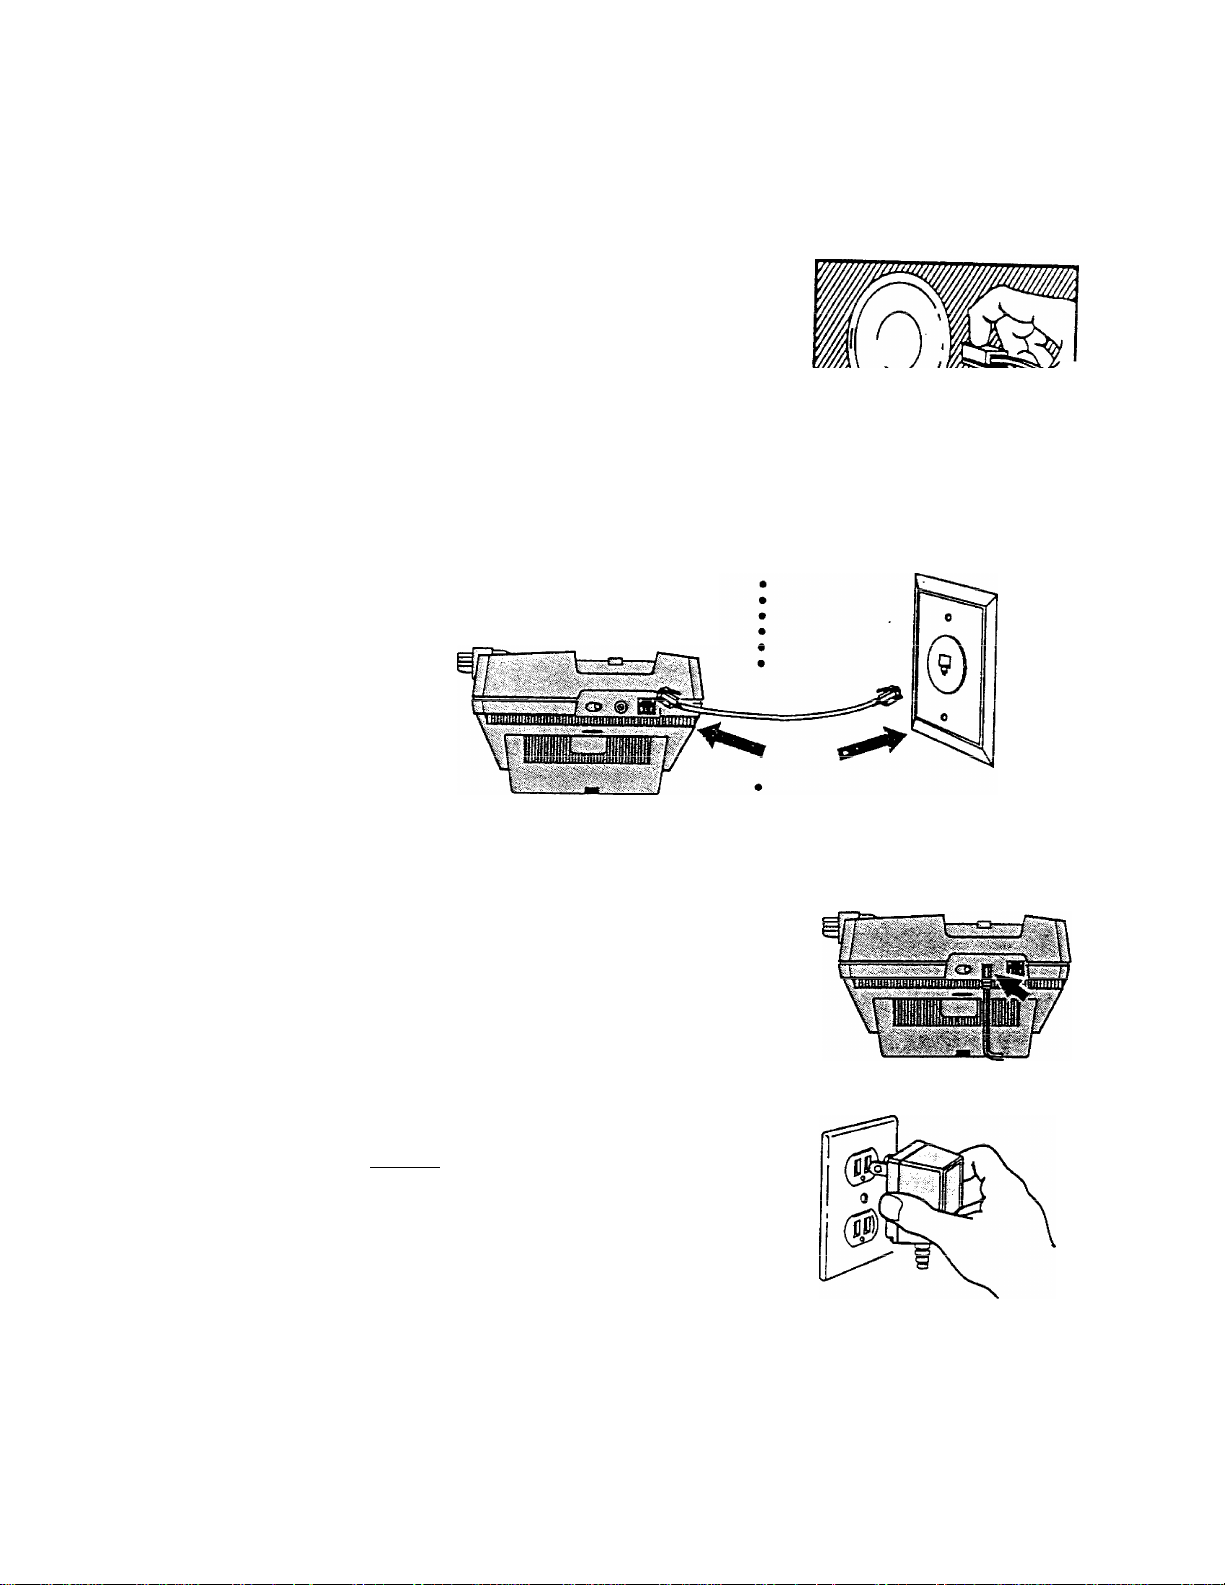
A moduiar (Universai Service Order Code)
USOC: RJ11C outlet jack (illustrated) is required.
Installation of this telephone in locations with
4-prong jacks or with hard-wired outlets will
require additional Converters (not included). The
dealer from whom you purchased your phone or
V* iwi ouppijr oiuic oai I auvioc; yuu
regarding the proper Converter.
1. First, install the desk adapter by snapping it
into place. Then plug TELEPHONE LINE
CORD into jack on the back of BASE UNIT.
Plug the other end of the TELEPHONE LINE
CORD into Moduiar wall jack.
A. Telephone Outlet
Requirements
77777
8\^Tr
B. Installation for Desk or
Table Top use
2. Plug the small “L” shaped end of the AC
POWER SUPPLY into back of unit.
Note: Use only THOMSON AC power supply
Model #5-2352 with this product.
3. Plug other end of the AC POWER SUPPLY
into an electrical outlet which cannot be
switched off. Do not use an outlet that
can be turned on and off by a wall switch.
Note; Whenever a power outage occurs, or
batteries are replaced
have to be returned to the BASE to reset the
security code.
tho A/O.QP’7" ma\/
8
Page 9
4. Raise BASE ANTENNA.
5. Set TONt/E'ULSE SWiTCH on the BASE to
the position compatible with your telephone
_____
nt nr\t euro rhprk with VOUf
tiOiVIOC. til yuu lo I iwi
local telephone company.)
ino IMLUMI lun
...... j------
6. Place HANDSET in BASE to charge battery.
Notes: Before initial use of CORDLESS
HANDSET, battery should be charged for 12
or more hours, See, “Charging the Battery
Pack”.
The Ringer switch must be “ON” for the
UAKinQPT tn rinn
/ {y-w If f w ■ ■ ■ •a*
_
.. . ___
To ensure mat me seoumy uuuc »o —
1C» eat lift tho
HANDSET from the recharge BASE. Then,
[JIClUC u
to 20 seconds.
uAMnaPT hank In the BASE for 15
.....
................. “
j".
L t M9MH»
1
-
1 k ‘=»
Page 10

INSTALLATION
1. First, be sure that the desk adapter is NOT
attached to the base. Then plug the SHORT
TELEPHONE LiNE CORD into jack on the back
of the BASE UNIT
2. Connect ADAPTER to the BASE UNIT.
I i M ..>•« ^ ..«II <i|M ^ ^ A
riuy me small l snapea eno or me /\u
POl^EF? SUPPLY into back of unit.
Guide AC POWER SUPPLY CORD through
Channel on top so cord threads down and
hsjnrrc m 1+ Hrvf+nm r\i
< lUAI WUV U fV^ W^./kkWIII \Jl U
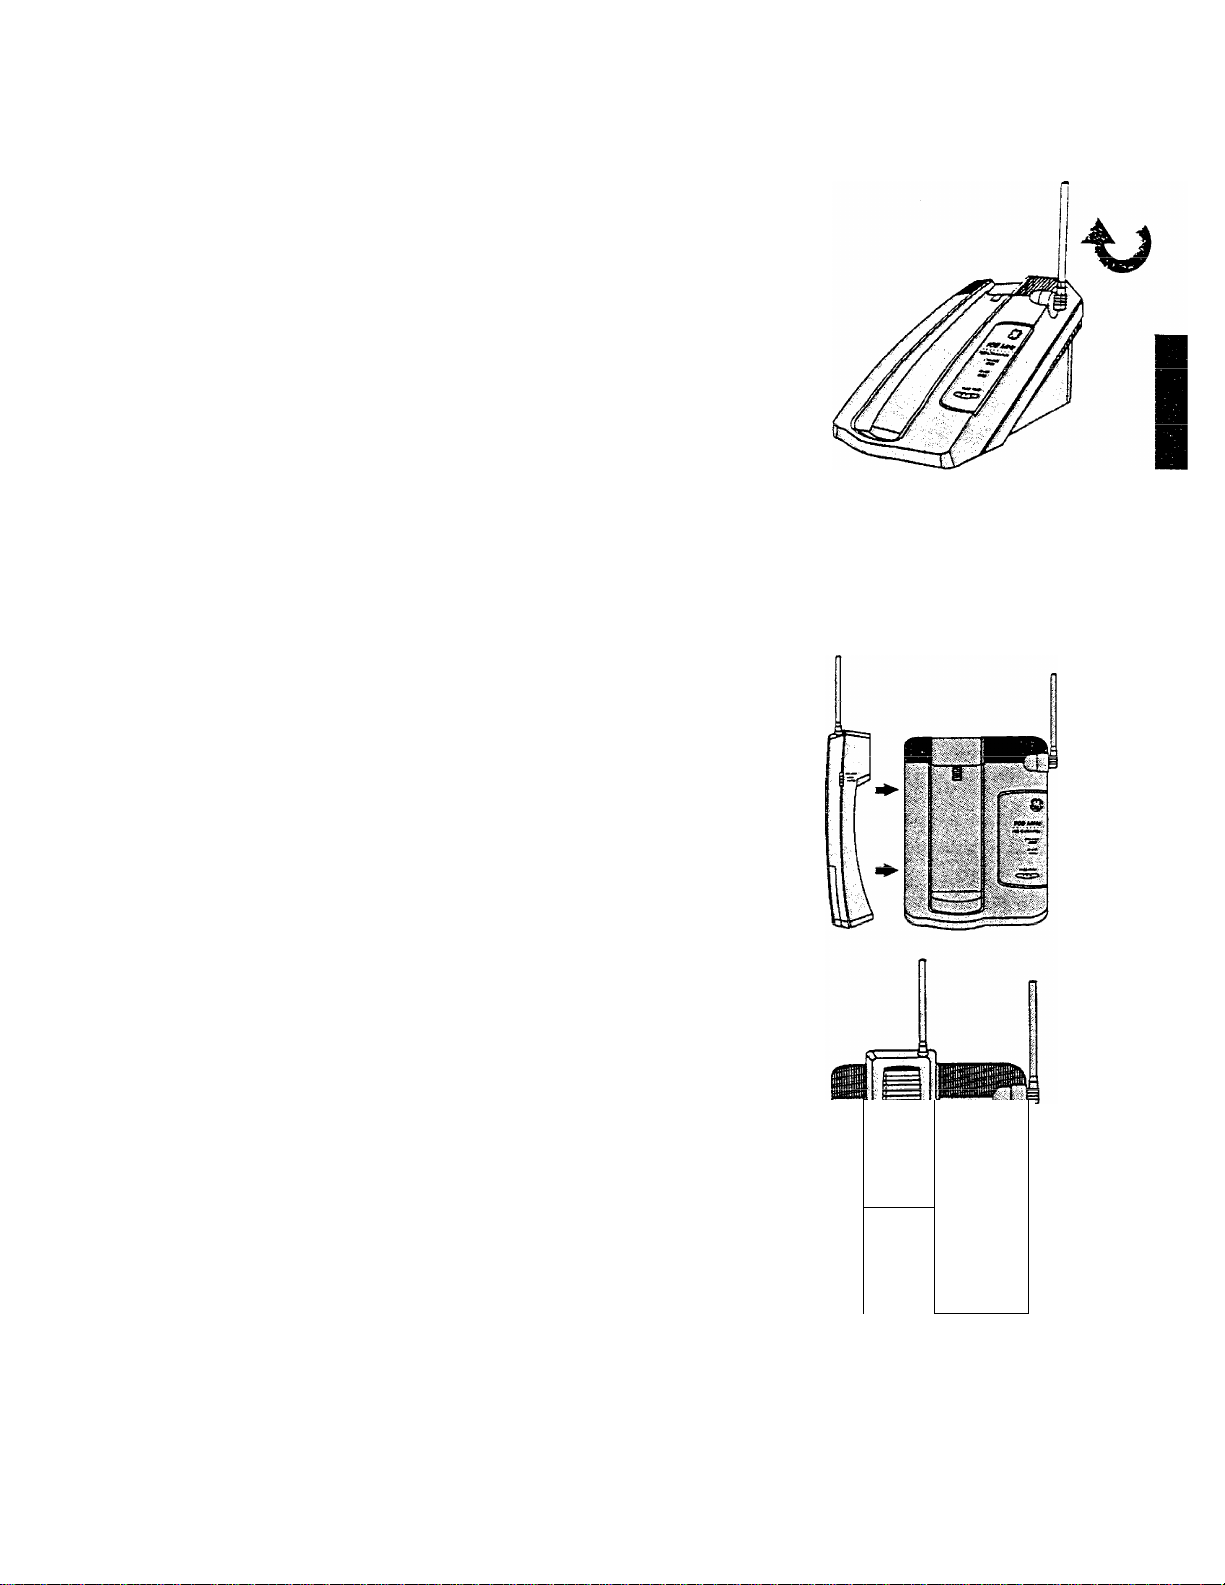
C. Wall Mounting the
Base Unit (optional)
3. Reverse the Handset Hook
' Firmly slide the HANDSET HOOK out of the
base. Rotate it 1/2 turn and slide it back into the
10
Page 11

4. Connect the short Telephone Line Cord
muuuicu ^luy lU rraii WWWW4
Mount the BASE UNIT to the watt PLATE
Slip mounting holes of BASE (on back of
unit) over wall plate posts and slide BASE
down until unit is firmly in place.
______________
¡NblALLATiON
6. Plug the AC POWER SUPPLY into a standard
household outlet. Do NOT use an outlet that
can be turned on and off by a wall switch.
____ ^4. *1.,:.^ /^/-*/^1 iri+1/ /'rvHra ¡c cot
lo enbure mcti uic ;scvyuui.y
the HANDSET from the recharge BASE.
Thon nlflrp the HANDSET back in the BASE
, I
...........
..................
for 15 to 20 seconds.
lift
11
Page 12

IMITAI I ATinNJ
I I 1 ^ I ^ I I I 'I
V/^iir C Q/^/^ ^/1 UJ rf rIr» <r* 1/^ y-\ n ^ /^/^ rv^/-4 r*
i\j\j\
V-4L«
^\j\j
ivij 1^ v^uiuicao ^unico
with a nickel cadmium rechargeable battery pack
(located in Handset), Charging takes place when
the HANDSET is placed in the BASE. When
fully charged, the battery pack provides suffi
cient power to enable the HANDSET to be left
out of the BASE for prolonged periods and still
function properly. However, to maintain adequate
power, you will need to recharge the BATTERY
/S A I
i
A » ^4 M * « A W« * ^ A 4 I I < w« ^ L«
cvciy JCW U<iyb uy itilUriMIiy Ulti
HANDSET to the BASE. The HANDSET will
beep and the battery low light will come on
when the battery is low and needs recharging.
To Recharge the Batter/
Be sure the AC POWER SUPPLY is plugged
into a standard electrical outlet.
2. Place HANDSET in the BASE.
3. Before initial use, let charge for 12 hours or
more.
me UMAHut uum win oe
battery is charging.
UN wnen tne
I 1
• \>/i icii ^11ulc;
Battery Pack
f
IMPORTANT: Although you can leave the
HANDSET out of the BASE for extended
periods, you will need to return it to the
BASE periodicaiiy to keep the battery
pack charged. Periodicaiiy clean the charging
contacts on the HANDSET and BASE with a soft
cloth.
NOTE: Leaving the handset charging in the
base will NOT damage the battery pack.
12
Page 13

;lephone operation
When the HANDSET is in the BASE.
To Receive a Call
1. When phone rings, lirt the HANDStiT. The phene in
use ligni will iurn win anu ywu V"- —
. . -Ml. /-on rollf r Ai itn
Answer Feature)
2. If you press the PHONE button by accident within 2-3
seconds of lifting the HANDSET out of the base, the
_i_...in i xtr^iir H fAftpr 2-3 seconds
pnone win lyiiUic yuui
......
............ V — —
you will disconnect the line.)
_ _ _ii l: i „ — -«y-l nn on av+oncinn Ohone Snd
3. IT tne can is nrsi cuiawcicu cm ,
you wait 10 seconds after the last ring to lift the
,.nrnii.ooc wA.vn.cpr won will have to press the PHONE
UUI •1/'^—
.....................
•
button to talk.
A \A/u^^ ii-inKnH lA/ith toipnhnne conversation, press
¿4*. VVIICII mnoiicui tviui
---
' - .
PHONE button to hang up.
To Make a Call
1 Pinlf I in th(3 HANDSET.
I. I H4W
......................
— — -
2. Press PHONE button, (phone light will turn “ON”)
3. Wait for dial tone.
4. Dial telephone number.
5. When finished, press PHONE button to hang up.
--------
—
A. Making
and
Receiving
Calls
©0©
am jxt: mtc
© ©©
Pw fw _Hr;n
© © ©
■ ■ ■ ■ rate OP€!t
ilEUOftr
: FUSf: Sfoat::
O
0® ©
>T~i>
i.<FlOVir
OS
When the HANDSET is out of the BASE:
To Receive a Call
1. When phone rings, pick-up the HANDSET.
2. Press PHONE button (phone light will be “ON”).
3. When finished, press PHONE button to hang up.
To Make a Call
1. Pick up the HANDSET.
2. Press PHONE button, (phone light will turn “ON”)
3. Wait for dial tone.
A rM„«»j f/-IIna niimhpr
U'IctI
5. When finished, press PHONE button to hang up.
90QMUZ
13
Page 14

TELEPHONE OPERATION
Your СоггИйЯЯ Няпг1яй1 Ьяя I Mimhpr RprIinI mpmnn/
---- ---
-----------------------------
----------------- .
The number will remain in the handset's REDIAL memory
UIIUI GJ iwti 1^1 iiuiliu^i Ю UIOICU.
To REDIAL the last number called
1. Pick-up HANDSET.
О DfQir^i4 DUr^MCr
C-. I I COO WIN .
3. Wait for Dial Tone.
4. Press REDIAL.
if you want to keep dialing a busy number in rapid succes-
I m, t M ...:4U r~A (''"T nr~r\IAI «A/l
aiuii yvju uaii uu i>u wim г/^^Di nczuiML. vvrien you near me
_______ I
_____
^1
busy signal, just press the REDIAL button. The phone will
redial the busv number Pres<i REDIAL to trv ennin
Your 900 MHz Cordless Telephone is capable of accessing
up to 100 channels.
Channel Scan
1.1_-I
vvniie me ringer switcn is win , your coroiess pnone
automatically selects a channel that is likely to be clear
P\yor\/timo vnn anc\«Qr nr malra a r'all
WTWI JWIIIIW VAI »W V f S« !'i Wl lltVAINW
___________ «... ! _ ( ( AIM
D a/-l! I
I I^UIdl
пже
_
opfi»
ИЕИ0ЯГ- fusH яешс
■«^ 11II r
ялс/я
о
Of#:- ■ ••
<n>
яаомнг
mm
C. Fast Redial
D, Changing
Channels
To change channels
You can change channels if you experience static and/or
noise.
Press and Release CHANNEL button on Cordless Handset.
• Unit will advance to next Channel.
Notes;
Phone must be "ON” to change the channels.
Phone must be within operating range to change channels.
The handset’s receiver volume control can be adjusted for
listening need or preference. Simply slide the VOLUME
CONTROL until you have reached a comfortable listening
volume.
14
E. Handset
Volume
Control
Page 15

TELEPHONE OPERATION
If you have PULSE (rotary) service, you can still access
those special services (such as electronic banking, calling
cards, telephone answering equipment, etc.) which require
tone signals for operation.
Dial the local access number in the normal way. Then, press
the key to activate TEMPORARY TONE. Your phone
will then generate the required tone signals as you dial the
numbers or symbols needed to complete your call.
When finished, hang up. The phone will automatically return
to PULSE (rotary) service.
Note: The TEMPORARY TONE feature is only for use by
those who have PULSE (rotary) service.
Tone service, you do not need to use the TEMPORARY
TONE feature.
This button is used to activate customer calling services available
through your local phone company, such as Call Transfer and Call
............... .
-r~t -______________
Waiting, etc. i nese services g«i i«i any i chum c oi ■ .... ,,j
If you subscribe to any of these services, please refer to the phone
inctriirtinn^ nn how to US6 Fissh,
Notes: Do not use the PHONE button to try to access calling
UCVCIUO^ y\j\A »»III t-'
Do not use the FLASH button to hang-up phone.
______
..;n lt>,
\/^iI vA/iii h^nn«iin thfi ohon©,
iifn
on Qv+ro mr\nthl\/ foo
-------
----
Г. Temporary
Tone
Feature
, T&f£ _
000
уеиойг ялзн дЕоа
OOP
ямс» ujism
О <s>
9oaMHz
••
• •
r*l__u
ЧЛ. па&п
_тдае
___
opEst^'
(q\(§\
ывит' ПЛ9Г кик:'
япает:-:^-
О
ОЛТ т-
;.v :
1<П>1
9самяг
The CORDLESS HANDSET\s capable of receiving the distinctive
rinainq patterns generated through your local telephone company
® ® ^
as a Special service, i ms ousium uamuy ociv.v,.^^ ^—j
____
i-—, ie a\/oilahl0 r»nlv
through your local telephone company.
I I. uidimuuvc
Ring
15
Page 16

TCI CnU/^KIC /M^rrr* A-ri/^ki
I i-i-i-i-i iv-zMc: wrcnMMVJiN
The CORDLESS HANDSET has the ability to save battery
power when in or out of the BASE.
10 reduce battery usage, slide the RINGER switch to the
“OFF” position. However, the Handset will not ring when
there IS an incoming call. This battery saving feature is most
convenient when another extension phone is within hearing
distannp
CORDLESS HANDSET
A short beep when key is
pressed.
A short beep every 8 seconds
in PHONE “ON” (Battery low
light will be “ON”)
A long warblinn tone with
RINGER “ON”:
. ^ u ___
liiryti Deeps wnen me
_
......
Key tone feedback.
The batteries need charging
_
Q
GUI ^cin.
— uut of range warning.
PHONE button is pressed
“ONJ”-
I.
How to
Save
Battery
Power
J. Tone
Signals
ueuoitY
o
Off OH
fUSH flfout
w
900 MHz
m m
m •
<n>
Your GE CORDLESS PHONE allows you to page your CORD
LESS HANDSET from the BASE. This comes in handy when
you are trying to get the attention of the person using the
HANDSET, or if you're just trying to locate the HANDSET.
To Page the HANDSET from, the BASE UNÎT
Press the PAGE/FIND button on the BASE UNIT.
Each time t.he .PAGE/FIND button is pressed, the
will sound the Page signal. '
16
k'
X* ■ ilic
Handset
Page 17

TELEPHONE MEMORY OPERATION
Your Cordless Phone can store up to ten (10) telephone
numbers of up to 16 digits long that can be dialed
automatically.
Memory Storage must be done with the phone “OFF”.
STORING
^ LJ A МГЛССТ
1. riCK up I .
2. Press MEMORY.
3. Enter the number to be stored.
4. Press MEMORY.
5. Press a numbered key {0-9 Memory Location).
C \A/»>l+n fkiQ
u. V VI UC U Hi Jicuriw V/» ^
noma
r\r nnmhor of ПЯГЛ'и «itnrPd ¡П тбтОРУ
...............................
location on Memory Directory Card (on back of handset).
-► CAUTION
WHEN MAKING TEST CALLS TO EMERGENCY NUMBERS:
1. Remain on the line and briefly explain to the
dispatcher the reason for the call before hanging up.
2. Perform such activities in the off-peak hours, such as
aor*l\/ mnrninri hntir4 nr latfi PVftninQ.
I j lliwiim.jj ..WW.,. —. .......
......
..........^
A. Storing a
Number in
Memory
J
© © ©
'__rtW ''^TC»--_Wïr
f YTS /лЧ ем\
[
L неиот":Ялз0^'киш.
JKt
<п>
DIALING
1. Press PHONE “ON”.
2. Press MEMORY button.
3. Press {0-9 Memory Location).
1. Pick up HANDSET.
2. Be sure that phone is “OFF”.
3. Press MEMORY button.
4. Dial new telephone number.
5. Press MEMORY button again.
6. Press (0 - 9 MEMORY LOCATION) on the handset
kevoad.
9оамиг
В. Changing a
Stored
Number
H ШКМГ- 'плт' mut.'
tl/j Vi
О
• : OFT
Off
9Ml^
d>
«VQMH3T
17
Page 18

T"FTI С!!* n LJ ^ к I Г“ A-тг i л к i
I CUCrnoiMC IVICIVlVjriT UKCMAIJUN
used ror storing a momentary deiay in the dialing sequence
of a stored telephone number. This is generally used when a
I ^wvjL- to Lu wau lui d ujcti luiiti (ti.y. diitir uiaiing
9 for an outside line) or a computer tone (e.g. for some long
distance services).
At point where pause is required. . .press FLASH.
Note; You may have to store two or three pauses at the end
of a stored number.
I his feature allows you to dial in succession a chain of
numbers in different memory locations. This is useful when
you must dial more than one number in memory to complete
a call, such as with frequent calls via an independent
.^Arvirp ^An Mr^.l nr Qnrint^
------ yw.y, ...VA. w.
Example: Memory Location
I 4
t-uv^ai rvutAcacs iNumutir Ul UUiiy
_________
distance company, and 2 or 3
pauses at end, press
Authorization Code (ID), press
I nnn Hictanr'o nhrinci niii-nhiai'
I w kwi I I Vif iwi i\,>
............................................
............................
7
8
press........................................................................9
U. Pause
Function
J uesKUff fusf ясоиц.
1 «L >
I MMG^
IS?
1
900MHz
1
It
• •
- —
D. Chain Dial
from
Memory
1^- — V
Ш i r—^ 1 i./
<s>
To initiate Chain Dialing
1. Press MEMORY.
2. Press 7, then wait for the access tone.
3. Press MEMORY.
4. Press 8, then wait for the access tone.
5. Press MEMORY
6. Press 9.
Note: When dialing other phone numbers please wait for the
dialing to end. For example, press MEMORY, press 7 (wait
i/^r HACTAA/^nW O A.+A.
IVJI Uldllli^ lU Cliuy piCAA IVIi^lVI\^n I , )JI CAO O CIO.
18
Ф.
iwol
[4
A*—^.-5”
жшж^-ftjtsm^' вгш£ i
Page 19

A Rechargeable Nickel Cadrriium battery pack is installed in
each Cordless HANDSET to provide power for operation. If the
battery needs replacing, follow the steps below:
TV.
lU ncfjiai^c uaiiciy.
1. Make sure the PHONE LIGHT on the HANDSET is “OFF”.
2. Open BATTERY COMPARTMENT on back of HANDSET by
aentiv slidina down door.
3. Remove SCREW from battery holder. Remove HOLDER.
4. Slide BATTERY PLUG down and out of plug clip, (Do not
pull on the wires.)
5. Lift BATTERY PACK out.
6. Properly dispose of Battery Pack. When discarding
batteries, be sure to dispose of them in the proper manner,
according to your state and local regulations.
— • _ i
Л Klug in repiacemeni oauery гаик
_ ____ __
_ __ __ _ __ _
1,
_ __ _
*
ac.
PRODUCT CARE
8. Replace BATTERY HOLDER and screw to secure.
9. Replace BATTERY COMPARTMENT Cover.
10. Charge the HANDSET in the BASE for 12 or more hours
before use. (To ensure that the security code is set, lift the
handset from the recharge base. Then, place the handset
back in the base for 15 to 20 seconds.) ,
Battery Safety Precautions
r—
_
♦'Uz-iort nrci/'oi itione*
ГОГ your Saieiy, piecist? luiiuw mcoc; oimpi^ pi uv.n ю.
• Do not recharge, disassemble, mutilate, puncture, wet or
dispose of Battery in. fire. Like other batteries of this type, if
it is burned or punctured, it could release toxic material
which could cause injury.
• Keep Battery out of reach of children.
• Replace only with Cat. #5-2358. Accessory Order Form
included in this guide.
I
■
Page 20

PROniinj rARF
To kf^po vour tolonhnnp wnrkino and lookina aood. follow
-
^ J
...........................................
these few simple rules.
^
.
....
.....
^ J
-----
J
1 I I u I
Product
Carp
Avoid putting cordless phone near heating appliances and
devices that generate electrical noise (i.e., motors, fluo
rescent lamps).
• Cordless phone should not be exposed to direct sunlight
or moisture.
Avoid dropping the Handset as well as other rough
treatment to the phone.
Clean phone with a soft cloth dampened with water. (Re
member to first unplug phone from wall outlet.)
Never use a strong cleaning agent or abrasive powder, as
this will damage the finish.
/SN
18
(5)
Retain the original packaging, should you need to ship
the phone at a later date.
Periodically clean the charge contacts on Handset and
Base with a soft cloth.
20
XJV
Page 21

IN CASE OF
DIFFICULTY
In case of difficulty,
PROBLEM
No Dial Tone
Dial Tone but can’t
dial out
Handset does not
ring
check the Troubleshooting Chart below before seeking service.
1. Check Installation:
— Is BASE POWER CORD connected to a working outlet?
— Do not use an outlet that can be turned ON and OFF by a wall
switch.
— Is TELEPHONE LINE CORD connected firmly to the base unit
and phone outlet?
— is BASE ANTENNA raised?
2. is CORDLESS HANDSET out of range of the base?
3. маке sure BATTERIES are properly charged (12 Hours).
4. Is the BATTERY PACK installed correctly (see page 19)?
5. Did the CORDLESS HANDSET beep when you pressed the phone
button? Did the phone light come on? If not, your cordless may
need to be, charged.
6. Disconnect CORDLESS PHONE and connect another phone to the
same jack. If no dial tone, then the problem may be in your wiring
or local service.
7. Reset security code by placing handset in base unit, (see page 9)
8. If you have pulse service on your line, your TONE/PULSE Switch on
the Base must be set on Pulse.
9. Make sure RINGER Switch on Handset is “ON”.
10. Do you have too many extension phones on your telephone line? Try
unplugging some other phones.
11. Perform checks 1,2,3,4,5,6 and 7 above.
You experience
static, noise, or fading
in and out
Memory Dialing
Problems
12. Try changing the channel, (see page 14)
13. Is BASE ANTENNA raised?
14. Is HANDSET out of range from the BASE? Move closer to BASE.
15. Does the BASE need to be relocated?
16. Is CORDLESS BASE plugged into an outlet with household
appliances? If so, move the appliance or telephone.
17. Check installation per #1 above.
nhoroo RATTFRY for 1? hours.
4^1 lUJ у 1* "W.
19. Clean charging contacts on HANDSET and BASE with a soft cloth.
20. Check installation per #1 above.
21. Replace BATTERY.
22. Did you program the memory correctly (see page 17)?
23. Did you follow proper dialing sequence (see page 17)?
24. See above.
25. Did you reprogram numbers into memory after power outage? (See
Ppop 17^
_____________
_
21
Page 22

btiHVlUt:
______________________________________
,
FCC requires this produ'ct be serviced only by the manufacturer or its authorized
service agents. In accordance with FCC requirements, changes or modifications not
expressly approved by Thomson Consumer Electronics could void the user's
authority to operate this product. For instructions on how to obtain service, refer to
tho \A/arrs>nt\y inr»hi/Hnri in fhie
I III uiK? \j\ oaii wuMoumcri nnuimclUUH l•OUU-440-Usj¿У.
nr nnll n m «m r r»-ii- I ^ ^ ^ 4 nnn a a
Attach your sales receipt to the booklet for future reference or jot down the date this
nrnHiirt u/ac nijrnhQcaH nr mnaix/oH ae o niff Thin infnrmofi/^r-* t^^Mt l
TfUAw I V^I IWWW4VW\J CAJ a. yni, I I no Jl IIVI H ICXUUl J WIU UV VclIUctUI© IT
service should be required during the warranty period.
_____________________
Name of store ______________
22
Page 23

To fulfill your communicating needs and enhance
your lifestyle, a wide range of GE extension phones,
main phones, cordless phones and answering
systems is available.
Just stop by your nearest retailer and ask to see the
zvide range of GE telephone products.
All are carefully engineered to offer you high
quality and dependability, modern easy-to-use
features, and elegant styling at an affordable price.
Should you wish to purchase, insist on the GE
brand for all your communicating needs.
ArrCQQnDV OPnPO CDnA;i
^ ^ W I I « WI IWWI I I I IVi/lVI
Page 24

2-9910
ACCESSORY ORDER FORM
CATALOG NUMBER
DESCRIPTION
5-2358 L I NICKEL CADMIUM
f
------
-yj I BATTERY PACK
5-2352 AC POWER
. j ADAPTER
For credit card purchases
Your complete charge card number, its expiration
u3î0 Snd your signature are nscessary to process
all charge card orders.
Copy your complete account number from your
VISA card.
1
---1--
r
My card expires:
Copy your complete account number from your
MasterCard,
PRICE EACH
QUANTITY
TOTAL
$10.95
$9.95
Shipping, Handling, and Insurance $
Total Amount Enclosed
Use VISA or MasterCard preferably. Money order
or check must be in U.S. currency only. No COO
or CASH.
All accessories are subject to availability. Where
applicable, we will ship a superseding model.
Prices are subject to change without notice. Mail
order form and money order or check (in U.S.
CUrrGncy) mauG p ayable to Thomson Consumer
Electronics, Inc. to:
Consumer Electronics
Mail Order Department
P.O. Box 8419
r~iwi ifvay
This is your return label. Please print clearly.
DA 1‘7i;7'l.nA1Q
I i t ^ i
.........................
VT • w
$
__________
Copy the number above your
name on the MasterCard
My card expires:
Authorized Signature
Prices are subject to change without notice.
Total Merchandise
Sales Tax
We are required by law to collect the appropriate sales
tax for each individual state, county, and locality to
which the merchandise is being sent.
................................................
.................................
$
------------
$
------------
To:
Name
----
-----------------------------------------------------------------
Apt...
City
Please make sure that this form has been filled
CUSTOMER: CUT ALONG DOTTED LINE-CCT"
State
ZIP
Page 25

ONE YEAR LIMITED WARRANTY
What does your warranty cover?
• Anv rlAfprt in mpfprisi nr wnrkmAnshiO.
-
, ,, , j
.... ... ..
.... ... ... ... .. ... ... ... .. ... ... ... ... .. ... ... ..
For how long after the original purchase?
• One year.
• The warranty for rental units begins with the first rental.
What will we do?
• Provide you with a new, or at our option, a reconditioned unit.
• The exchange unit is warranted for the remainder of your product’s original one-
year warranty period.
How do you make a warranty claim?
• Properly pack your unit. Include any cables, etc., which were originally provided
with the product. We recommend using the original carton and packing materials.
• Include in the package a copy or tne saies receipt or other evidence of date of
original purchase. If the unit was a gift, provide a statement specifying the date
received. Also print your na.me and address and a description of the defect.
• Ship the unit standard UPS or equivalent to:
Thomson Consumer Electronics, Inc.
Product Exchange Center
32 Spur Drive
El Paso, Texas 79906
• Pay any charges billed to you by the Exchange Center for service not covered by
the warranty.
• A new or reconditioned unit will be shipped to you prepaid freight.
What does your warranty not cover?
• Customer instruction. Your Owner's Manual provides information regarding
_
___
1.:_r__i—._i:___
operating insirucuoris <inu usei uunuuio. rui auumuucu III I I ici.iiv.fi I, civjrv jrv/vii Vjciaic
• Installation and set-up service adjustments.
• Batteries.
• Damage from misuse or neglect.
• Products which have been modified or incorporated into other products.
• Product purchased or serviced outside the USA.
How does state law relate to this warranty?
• This warranty gives you specific legal rights, and you may also have other rights
which vary from state to state.
What if you purchased your unit in Canada?
• Refer to the Canadian Warranty.
.... ... ... .. ... ... ... .. ...
w.
.... .. .
.... ... ... ... ... .. ... ... ... ... ... ... ... ... ... ,
_ ..J o I ■ oti/'in ool/’ Hciolc
I
For products purchased outside the United States and Canada, see dealer for
warranty.
Thomson Consumer Electronics, Inc.
23
Page 26

FCC REGISTRATION INFORMATION
Your GE telephone equioment is registered with the Federal Communications Commission and is in comoliance wits
parts 15 and 68. FCC .Rules and Regulations,
1 Notification to the Local Telephone Company
On the bottom of this eauipment is a label indicating among other information, the FCC Registration number and Rincer
Equivalence Number (REN) for the equipment. You must, upon request, provide this information to your telephone company
The REN is useful to determine the number of devices you may connect to your telephone line and still hnye all th^-devices ring when your telephone number is called. In most (but not all) areas, the sum of the REN's of ail devices connected
to one line should not exceed 5. To be certain of the number of devices you may connect to your line as determined
by the REN, you should contact your local telephone company.
NOTES: This equipment may not be used on coin service provided by the telephone company.
Party lines are subject to state tariffs, and therefore, you may not be able to use your own telephone equipment if you
are on a party line. Check with your local telephone company. ^
Notice m ust be given to the telephone company upon permanent disconnection of your telephone from your line
2. Rights of the Telephone Company.
Should your equipment cause trouble on your line which may harm the telephone network, the telephone company shall
where practicable, noiihy you that temporary discontinuance of service may be required, where prior notice is not practicable
and the circumstances warrant such action, the telephone company may temporarily discontinue service immediately
In case of such temporary discontinuance, the telephone company must: (1) promptly notify you of such temporaiv
discontinuance, (2) afford you the opportunity to correct the situation and (3) inform you of your .right to brin" a com-'i-'int
to the Commission pursuant to procedures set forth in Subpart E of Part 68. FCC Rules and Regulatioi^s”
The telephone company may make changes in its communications facilities, equipment, operations of procedures where
such action is required in the operation of its business and not inconsistent with FCC Rules and Requiations If thes»
changes are expected to affect the use or performance of your telephone equipment, the telephone company must give
you adequate notice, in writing, to allow you to maintain uninterrupted service. ^
f MTCDCCDCKir^C 1МСГЧО*Л ATI/^M
I i-.ru l_i M^r^^niVlAAl
This device complies with Part 15 of the FCC Rules. Operation is subject to the following two conditions- (1) This device
may not cause harmful interference, and (2) This device must accept any interference received, includino interfemn''p
that may cause undesired operation. ' '
This equipment has been tested and found to comply with the limits for a Class В digital device, pursuant to Part 15 of
the FCC Rules. These limits are designed to provide reasonable protection against harmful interference in a residential
iristaliation.
This equipment generates, uses and can radiate radio frequency energy and, if not installed and used in accordance
with the instructions, may cause harm ful interference to radio communications. However, there is no guarantee that
¡nt0rf0r0nra vvjn nnf occuf 1п 3 pErticu!3f Inst3!!3ticri
If this equipment does cause harmful interference to radio or television reception, which can be determined by turning
the equipment off and on, the user is encouraged to try to correct the-interference by one or more of the following
measures:
• Reorient or relocate the receiving antenna (that is, the antenna for radio or television that is “receiving” the interference).
• Reorient or relocate and increase the separation between the telecofnmunicaitons equipment and receiving antenna.
• Connect the telecommunications equipment into an outlet on a circuit different from that to which the r0CSiyin^ 3fii0fiMa
is connected. ' ""ошсмиа
• Consult the dealer or an experienced radio/TV technician for help.
If these measures do not eliminate the interference, please consult your.dealer or an experienced radio/television
technician for additional suggestions. Also, the Federal Communications Comm ission has prepared a helpful booklet,
"How To Identify and Resolve Radio/TV Interference Problems”. This booklet is available from the U.S. Government '
Printing Office, Washington, D.C. 20402. Please specify stock number 004-000-00345-4 when ordering copies.
HEARING AID COMPATIBILITY
This telephone system meets standards for Hearing Aid Compatibiitv.
Model 2-9910
349A1673-0001 (Rev.
94-20
Printed in Singapore
Page 27

rTnWITT^TnirffiT??!
UmJMEMORY
1. Phone MUST BE OFF
2. Press MEMORY
3. Enter the number to
be stored
4. Press MEMORY
C /n nl
j. fu-:?/ or
desired memory
location
6. Make note of stored
number on memory
card
TO DIALA
l Press PHONE (ON)
n m m^m
rress mtzmunr
3. Press "0“-“9“ (Memory
Location) .
• Charge handset
12 HOURS before using
• If interference is
present, press
CHANNEL
• Clean charge contacts
^c;f iuu/ua/i/
• See Use and Care
guide for more
detailed information
III M
Page 28

: î '•
^......
|Л^^- ,,
\ АЯЕА Ш)£ : - : РНОМ£МШа£К
MEMORY DIAL ШГООМАШН INSIDE
saiSNi tjotivmom та Aaotviiiii
■>: ■
V3BnnN3N0IU
rÄfK
!-=
. *'
3003V3UV
-,.ö
''"'í
-"-5
/
9
S
Г
Z
L
 Loading...