

Page 1

Page 2

TABLE OF CONTENTS
SECTION
INTRODUCTION
A. Parts Checklist
B. Operational Summary
FEATURES and CONTROLS
A. Answerer Features
B. Answerer Controls
INSTALLATION
A. Setting Up The Answerer..................8
ANSWERER OPERATION . . tO
A. Answerer On/Off
B. Setting The Time/Oay Stamp
C. Recording And Playback Of
Outgoing Announcements (OGAs). 12
0. Selection Of Announcement
1 or 2..............................................13
E. Typical Announcements That Refer
Callers To Mailboxes
F. Recording A Memo
G. Messa^ Counter Display
Operation
H. Automatic Answering Operation . 15
1. Setting The Answerer For Incoming
Messages Time Limit
J. Vblume Control
K. Screening Your Calls
L. Setting The Ring Select Switch 17
M. Playing Your Messages
N. Reviewing Messages.....................19
O. Skipping Messages
P. Instant Replay
Q. Erasing Individual Messages
R. Erasing All Messages
S. Stopping Message Playback
T. When Memory Is Full.....................21
U- Answerer Reset
........................................
................
......................
....................
..........................
........................
..........................................
............................
.....................
........................
.......................................
.....................
..............................
.....................
........................
................................
...................
............................
PAGE SECTION
. . . 3
6-7
..........
.................
.........
.........
3
4
5
5
8
10
10
13
14
14
15
16
16
18
19
19
19
20
20
21
PAGE
A. Introduction and Secunty
Code Information ...........................22
B. Outgoing Announcement
(OGA) Bypass
C. Using The Remote Voice Menus .23
D. Remote Voice Menus.....................24
E. Remote Message Retrieval
Commands .. 25
F. Remote OGA Commands
G. Recording A Remote Men>o .... 26
H. Turning The Answerer On Or Off
From A Remote Location
I. When Memory Is Full
IN CASE OF DIFFICULTY
PRODUCT CARE
A. General Product Care
SERVICE
LIMITED WARRANTY .............................31
REMOTE POCKET CARDS . . FOLD OUT
.................................................
A. Service Information
................................
..............
...............
.....................
..................
....................................
.....................
.........................
28-29
22
26
27
27
30
30
.22REMOTE OPERATION
30
30
WARNING: to prevent fire
OR electric shock hazard.
DO NOT expose this PRODUCT
to rain OR MOISTURE.
CAUTION
fBCCFafcmc a<xx|
A
THC IIGHTHINQ
FlâSH AND AMOWH£A0 WITHN THC
rt«ANa.E l$ A
«ARMNC SION
alCRtns you of
' OANGEflOUS
VOLTACE' mSQE
ThC «OOUCT
SEE MAPWING OS son OV1 ,■ 8ACKOF PHOOUCT
I OONOTCVOI
CAUnON: TO SEOUCC Int
RIM OF ClCCTRlC SHOCK.
DO NOT RCMOVE COVCR
(OR BACK) NO USERSERV1CCABLE FARTS IN
SIDE REFER SERViCiNO
to OUAIIFIED SERVICE
FERSONNEl
A
THE EIClAHAtlON
POINT WITHIN THE
triancee is a
WARNING SiCN
alerting you of
IMPORTANT
INSTRUCTIONS
ACCOHPAHTINC
THE PRODUCT
Page 3
INTRODUCTION
Your new GE Model 2>9876 Answerer is designed to record messages using a digital
memory. This system eliminates the need for tapes while it provides an expanded
range of answering system features.
Please read this USE AND CARE GUIDE carefully to familiarize yourself with all the
features of your new Answerer. Retain this guide for future reference.
FCC NUMBER IS LOCATED ON THE BOTTOM OF THE BASE
LOAD NUMBER IS LOCATED ON THE BOTTOM OF BASE
OTHER IMPORTANT INFORMATION ON BACK COVER OF THIS GUIDE
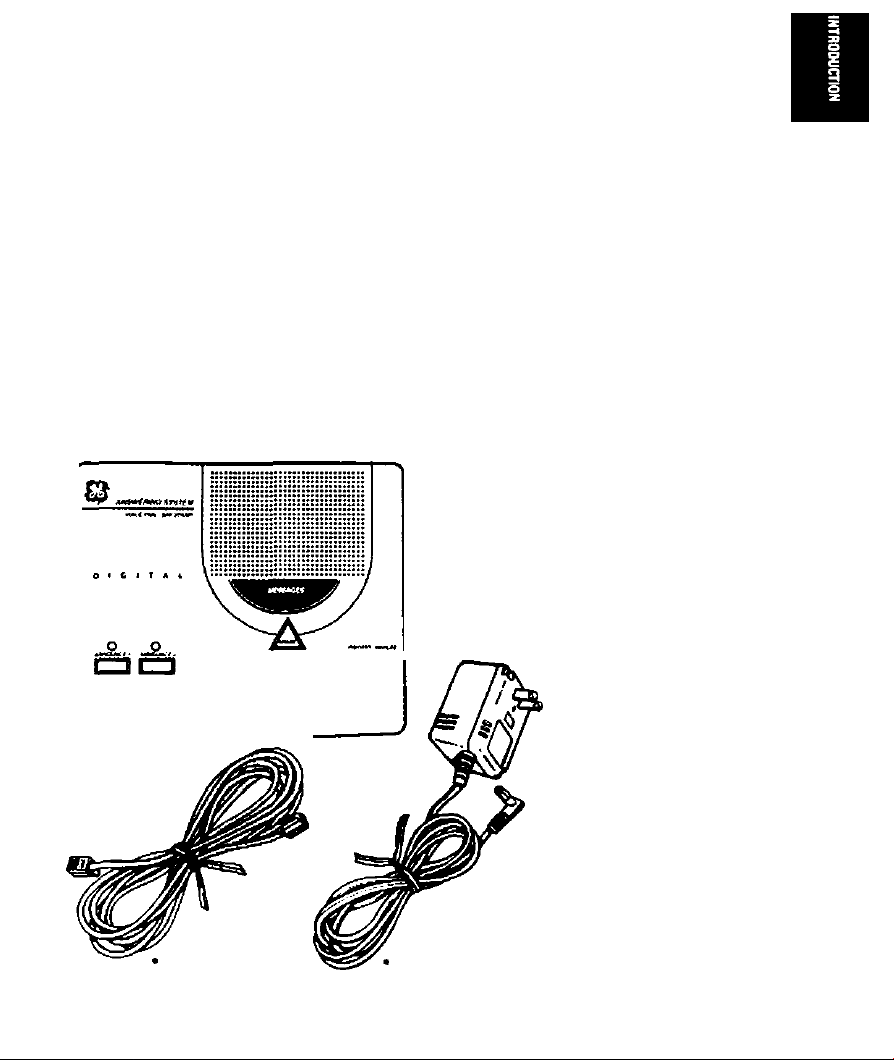
Carefully remove the unit from the package. Check this list
to be certain all components are included. Remember to
save your sales receipt in case you ever need warranty
service.
ANSWERER
O
O
Ò Ò Ò
A. Parts
Check List
ONE TELEPHONE
LINE CORO
AC POWER SUPPLY
WITH POWER CORD
Page 4

INTRODUCTION
Your new GE Model 2-9876 Answerer has digital memory. It
eliminates the need for tapes and provides a full range of
features. The answering system can hold up to 14 minutes of
messages or a maximum of 40 individual messages.
Three individual Mailboxes in the unit allow the caller to
leave a message for a specific party. If you do not wish to
separate messages, you may use the Main Mailbox only. Two
outgoing announcements may be recorded.
When you are at home, you can use your new system to;
• Answer calls when you cannot answer the telephone.
• Screen incoming calls when you do not want to be
disturbed.
« Take messages from callers.
• Record memos directly using the unit's built in
microphor>e.
• Erase or save all messages. Erase or save selected
messages.
Super VOX allows the Answerer to disconnect automatically
if a calling party hangs up or stops talking. The unit also
places a time and day stamp on each incoming message or
memo.
When you are away, you can use any touch tone phone to:
• Listen to messages in any mailbox.
• Bypass the announcement and leave a message
quickly.
• Erase selected messages from mentory.
• Skip through or repeat your messages.
• Turn your answering system on or off.
• Change your announcements.
• Leave a memo.
A three digit, factory set security code is written on the
underside of the Answerer. Your security code must be
entered to use any remote functions. This code prevents
unauthorized use of remote operation.
B. Operational
Summary
A voice menu is programmed into your new Answerer to
guide you through remote operations.
Page 5

CONTROLS and FEATURES
Fully Digital (Tapeless recording)
• Better reliability than tape.
• No moving parts to break, jam, or wear out.
• Instant playback of incoming messages—no need to
wail for a tape to fast forward or rewind.
Fourteen minutes of total recording time or a maximum of
40 messages.
Voice Time/Day Stamp answerer will lelt you the time and
day each message was received.
Digital Message Counter tells you the number of messages
you have received.
Auto Disconnect stops answerer when any phone extension
is picked up.
Super VOX Time Out stops answerer when a caller hangs
up; when a dial tone is heard: or when call progress
signals (computer or FAX signals) are heard.
Two Outgoing Announcements for added convenience.
Three Mailboxes to allow the caller to leave a message for
any orte of three parties.
Skip messages, forward or backward, instantly with the
tap of a button. Message counter will tell you what
message number is playing.
Selective erase message (unction lets you save important
messages, or messages for other people.
Instant Replay plays back the last 8 seconds of a message
you're listening to.
Beeperless remote message retrieval with 10 functions and
a voice menu to assist you. Messages are automatically
saved unless you intentionally erase them.
Call Screening Speaker
Memo Recording—aWows local message recording.
Toll Saver—tor remote operation.
Message Control—aWows you to set the Answerer to either
accept messages up to two minutes or four minutes.
Battery Back-up—ho\6s messages, time/day clock
and announcements during temporary power outages
(9 volt battery required.)
Battery Lo Indicator digital display flashes "Lo‘* when
battery needs to be replaced.
Two-Year Limited Warranty
A. Answerer
Features
Page 6
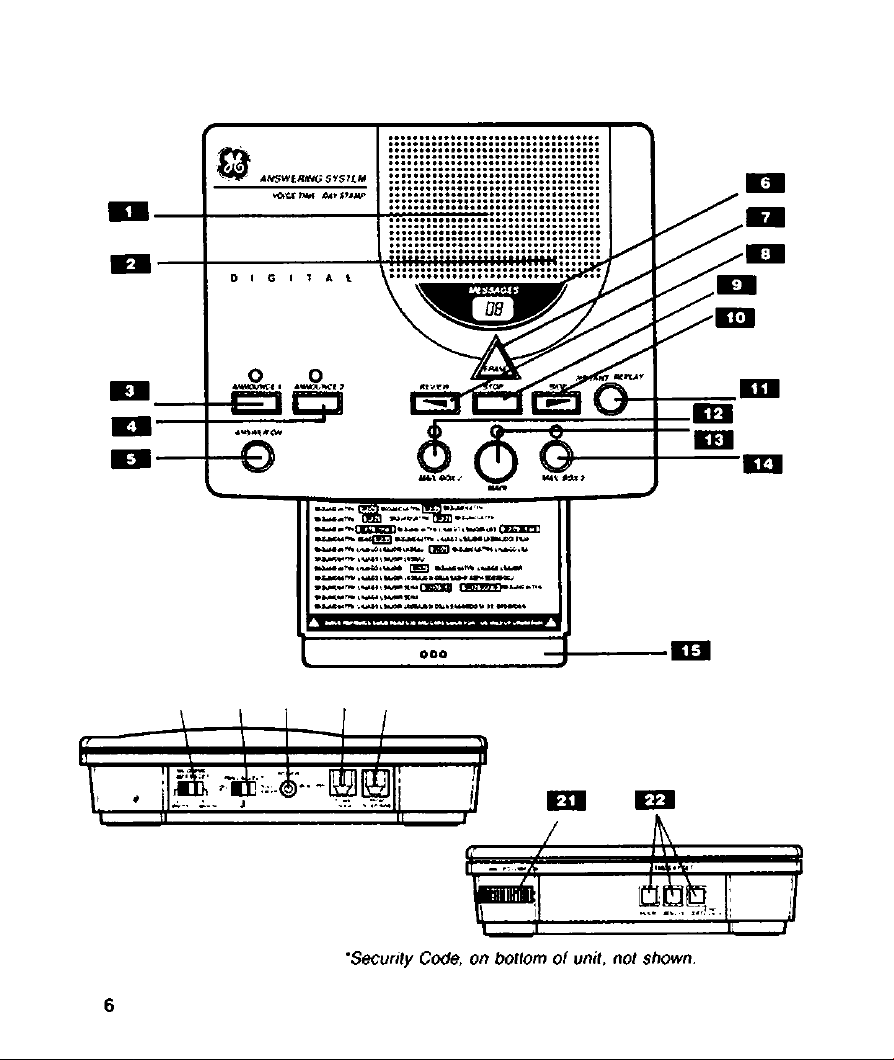
CONTROLS and FEATURES
Page 7

CONTROLS and FEATURES
1. Speaker — plays back messages and announcements.
2. W/c—microphone picks up voice to record announcements
or messages.
3. Announce 7—tapping selects and plays outgoing
announcement (OGA)# 1.Press and hold to record new
greeting.
4. Announce 2—tapping selects and plays OGA tf 2. Press
and hold to record new greeting.
5. Answer On—turns answer function on or off. (Message
indicator displays ”
----------
” for off.)
6. Message Indicator Display
7. Erase—allows you to erase selected messages or all
messages.
8. ffewew—during playback, replays an earlier recorded
message in sequence.
9. Stop Button-stops functions.
10. Skip—during playback, skips message and moves to the
next in sequence.
11. Instant flep/ay—plays back the last 8 seconds of a
message you're listening to.
12. Mailbox 2—Tap to play messages in mailbox # 2.
13. Afam—Tap to play messages m main mailbox (Mailbox 1).
14. Mailbox 3—Tap to play messages in mailbox # 3.
15. Slide Out Tray—contains Quick Reference Guide.
16. Incoming Messages—sets answerer to record messages
up to 2 minutes or 4 minutes in length.
17 Ring Select—seiects number of rings (2. 4. or Toll Saver)
for answer function pick-up. The machine will answer on
the number ring selected.
18. Power Jack—AClOC Adapter input jack. Also provides
Answerer reset.
19. Line Jack—connects to telephone wall jack.
20. Line Jack—connects answerer to telephone.
21. Volume—sets volume for unit.
22. Time/Day Sef—allows setting of time/day stamp which is
added after incoming messages
• Hour Button—sets the hour.
• Minute Button—sets the minute.
• Oay/Time Check Button—sets day of the week. Also
provides audible time/day setting report.
• Three Digit Security Code—allows you to call your GE Model 2-S876
Answerer from another tocaiKirt (Security Code can be found on the
bottom of the answerer)
• 9 volt battery compartment — locaieo on the bottom o< the answerer
B. Answerer
Controls
Page 8

INSTALLATION
Follow these steps to set-up your new Desktop GE Model
2-9876 Answerer for proper operation.
1. Install the 9 Volt Battery
The 9 volt battery will provide back up power durirtg
temporary power outages. Using a pointed object, insert
in opening of battery compartment on bottom of BASE
and pop up. Insert battery and snap into place. Replace
battery cover.
2. Connect the Line Cord
Plug one end of the telephone line cord into the *'TO
WALL OUTLET" jack at the rear of the unit. Plug the
other end into the telephone outlet. An RJllC or an
RJ14C (two line) outlet jack is required. If you don't have
this type of outlet jack, an adapter can be purchased
from any telephone store.
Note: If a two line system is used the answerer will provide
both signals to the "FROM TELEPHONE” jack but will only
answer calls on Line One.
A. Setting Up
The
Answerer
3. Connect your Telephone (If you do not want to connect
a telephone to the Answerer, go to step 3.) Plug your
telephone cord to the "FROM TELEPHONE” jack at the
rear of the unit.
Page 9
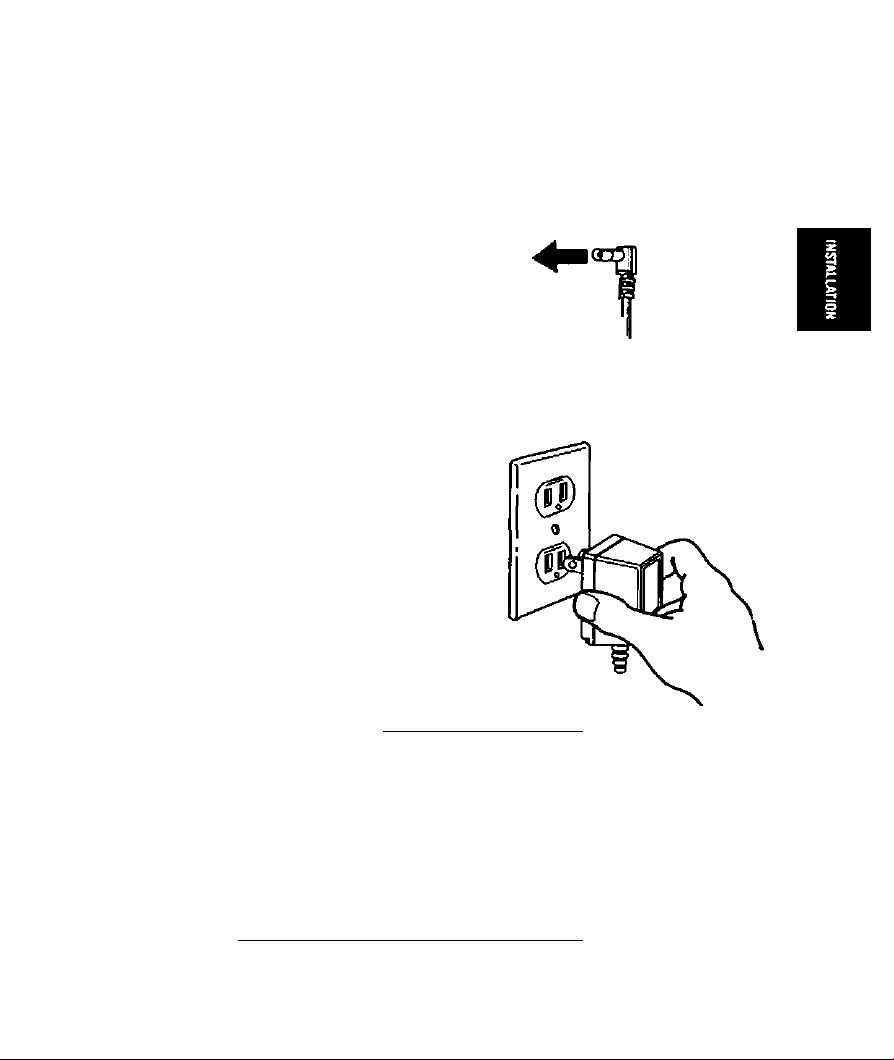
4. Connect the Power Cord
Plug the right angle plug on the power cord
in to the "POWER" jack at the rear of the
unit.
5. Plug In the Power Supply
Plug the power supply into the 110 VAC
power outlet. A power-up tone will be heard
and the MESSAGES display will read "00".
The ANNOUNCE 1 and ANNOUNCE 2 LED's
will flash.
Note: If message display flashes "00" and
"Lo". then the unit does not detect a fresh 9V
battery in place.
INSTALLATION
0 1 6 1 r A 1
o o
MMMCV f 4MCM*Cr/
cncn
o
«rvrv
omtAm
C3I=3[H3
o o O
6 o o
Page 10
ANSWERER OPERATION
1. Rotate the VOLUME control to a comfortable level (usually
midway).
2. To turn off, press ANSWER ON. Voice will announce
■'Answer functions are off.” The MESSAGES display will
indicate ”
Note: The messages arn] settir>g contained within the
Answerer will not erase when the unit is off. The unit
simply does not answer incoming calls.
3. To turn on. press ANSWER ON. (If you are plugging in
the unit for the first time, it should turn 'on* automatically.)
Voice will announce' Answer functions are on.” The
MESSAGES display will indicate the total number of
messages stored in the unit
The Time/Day is added to the end of each message or
memo. Before using your new Answerer, the time/day stamp
should be properly set.
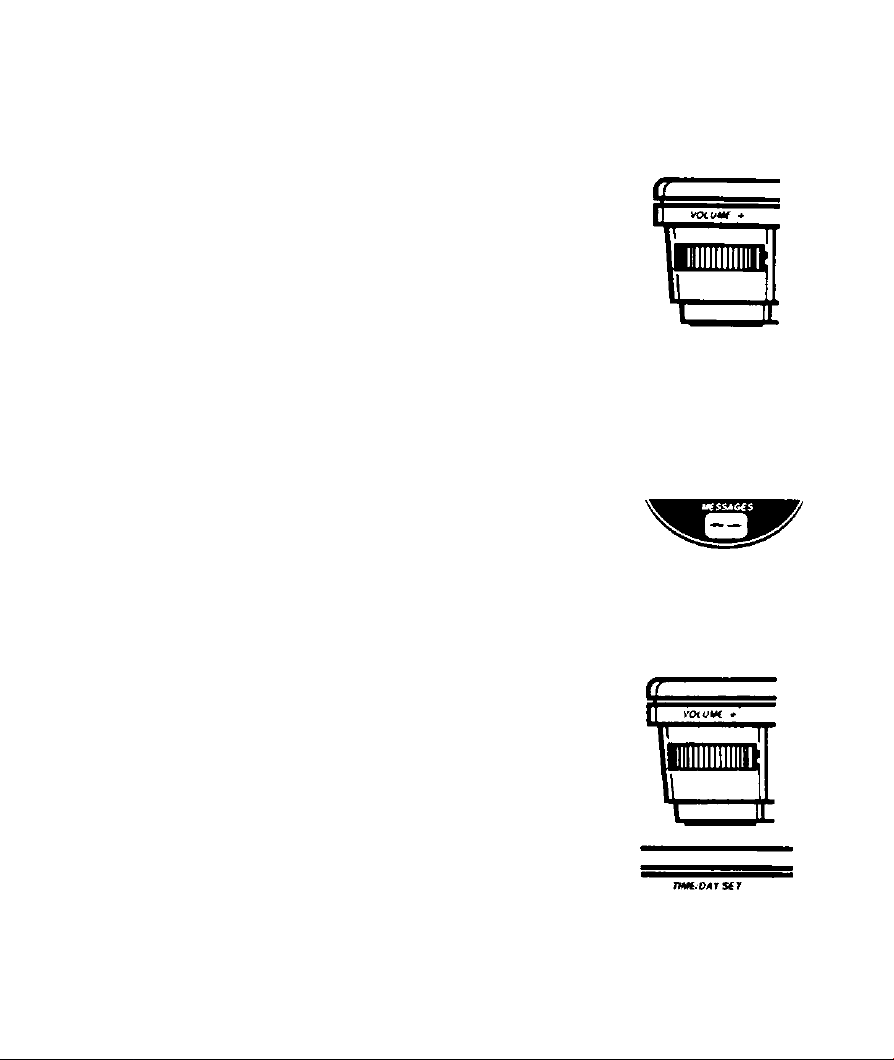
t. Rotate the VOLUME control to a comfortaWe level
(usually midway.)
2. The Time/Day Stamp controls are located on the side of
the Answerer,
3. Set hour
---------
a) Advance the hour by pressing ar>d holding or tapping
the HOUR button until the Voice indicates the
appropriate hour. M2.
Note; Votce will announce “AM” or “PM” as it reaches
one o'clock while advancing hours.
b) Release the button when the correct hour is voiced.
A. Answer
On/Off
B. Setting The
Time/Oay
Stamp
10
o
on
Mwrt DAr/JS.-
Page 11

4. Sef Minute
a) Advance the minute by a combination of pressing and
holding or tapping the MINUTE button until the Voice
indicates the correct minute. 0-59.
b) Tapping the button advances minute by single digits 0.
1. 2. 3..59.
c) Pressing and holding the button advances minute by
increments of five. 0, 5, 10. 15...55.
5. Sef Day
a) Advance the day by pressing and holding the
DAY/TIME CHECK button until the Voice announces
each day in sequence.
b) Release the button at correct day.
6. Checking the Time/Day Stamp:
a) Tap the DAY/TIME CHECK button.
b) The Voice will respond with the current time and day.
Note: A time check can be made at anytime answering
system is not in use.
ANSWERER OPERATION
nuMurser
HOUR mmtn oatIomi
Important: If the Time/Day Stamp has not been set. the
voice system will announce the following during
a time check and at the end of each message
play: “1:00 AM Monday”
11
Page 12

ANSWERER OPERATION
Your new Answerer is equipped with the capability of
selecting one of two outgoing announcements (CX3A). Before
using you should record an OGA. This is the announcement
the caller will hear when the unit answers a call.
t Announcement 1 recording/playback
a) To record an announcement, press and hold
ANNOUNCE 1 button Wait for a beep Speak clearly
and close—about 9 inches—to the microphone
Recording will stop when button is released and
another beep will sound
b) The LED above the button will stay ON.
c) Tap ANNOUNCE 1 button and the unit will play back
your OGA.
2. Announcement 2 recording/playback
a) To record an announcement press and hold
ANNOUNCE 2 button Wait for a beep. Speak clearly
and close to the microphone Recording will stop when
the button is released and another beep will sound.
b) The LED above the button will stay ON.
c) Tap ANNOUNCE 2 button and the unit will play back
your OGA.
3. 7b record a new announcement, simply record over the
old one.
Recording
c.
And
Playback Of
Outgoing
Announce
ments
(OGAs)
o
ANNOUHCi IoANHOVNCCi
□ Q
12
Page 13

ANSWERER OPERATION
1 The selected OGA will have the LED ON over the button.
Tap the ANNOUNCE 1 or ANNOUNCE 2 button to selea
2
which announcement you wish to greet caller. (The OGA
will playback when selected.)
3.
If both anrKMjncement LED's are flashing, there are no
valid recorded announcements, in which case the unit's
built in default outgoirtg announcement of "Please leave
message after tone" will be used to answer the phone
Since your new answerer has the advanced feature of being
suppli^ with three Mailboxes (Main Mailbox. Mailbox 2. and
Mailbox 3) a calling party using a touch tone telephone may
choose to leave a message in a particular mailbox. (A p>arty
calling from a rotary phone can only leave a message in the
main mailbox.)
For a calling party to leave a message into a particular
mailbox, the party is required to press 'V for the main
mailbox, '2' for mailbox 2. or '3* tor mailbox 3, from the
calling phone, if pressed during the OGA or within five
seconds after the beep at the end of the OGA. the unit wilt
announce "Leave Message." beep, and then start recording
for that particular mailbox. If no key is pressed the message
will go into the main mailbox.
Example Greetings
Example A: "Hello, we cannot come to the phone right r>ow
If you are calling from a touch tone phone, press '2' to leave
a message for Mary, press '3' to leave a message for Kathy,
or wait for the tone and leave a message in our Main
Mailbox. Thank you."
Example B: "Hello, this is XYZ company. We cannot take
your call right now. It you are calling from a touch tone
phone, press '1* to leave a message for the receptionist,
press *2' to leave a message for accounting, or press *3* to
leave a message for sales, or wait for the tone and leave a
message in our Main Mailbox. Thank you."
Note: The fourteen minute all digital memory is shared
between the announcements and all messages and memos
The briefer your announcements, the more memory there will
be left for messages
Selection Of
D,
Announce
ment 1 or 2
o
ANMOVNCCtoANNOONCet
E.
Typical
Announce
ments That
Refer
Callers To
Mailboxes
13
Page 14

ANSWERER OPERATION
Press and hold the desired MAILBOX button. Recording will
start after the beep. Speak into the microphone and release
the MAILBOX button when finished. Another beep will
indicate the end of the recording and the MESSAGES
indicator will be advanced by one count.
Note: A recorded MEMO is then treated like any other
message stored in a specific mailbox.
O O
The MESSAGES indicator will display the following in the
two digit display
1. If answerer is ON, the total number of messages in
memory in all mailboxes will be displayed, 00 to 40.
2. If answerer is OFF. the LED display will show “
3. If answerer is not receiving AC power, the display will
be blank.
4. If a mailbox is selected to play, the total number of
messages in that mailbox will be displayed
momentarily. Then, the display will show the message
number being played.
5. If the battery needs to be replaced or there is no
battery installed, the LED display will flash "Lo".
6. If memory is full, the display will flash rapidly.
--------------
F. Recording
A Memo
«MAT
0 0 O
O o
G. Message
Counter
Display
Operation
14
Page 15

ANSWERER OPERATION
If the message indicator reads “
button to turn answerer on.
When the system answers a call, the caller hears the
selected outgoing announcement followed by a beep.
After the caller leaves a message, the answerer notes the
time and day at the end of the message. The message is
stored in the selected mailbox and the MESSAGES window
displays the total number of messages currently stored in the
answerer.
------------
”, tap ANSWER ON
1. The Auto Disconnect Feeture
Lifting the HANDSET on any telephone on the same line
while the answerer is recording a phone message will
automatically interrupt and stop the answerer portion of
the unit. This allows you to screen your c^ls (see page
16.)
2. The Super "VOX“ Feature
Super VOX is a sound recognition feature built into the
electronics of your answerer. This feature saves memory
space by hanging up when; the caller hangs up; it hears
a dial tone; or, call progress signals (computer or FAX
signals) are heard.
Note: Message recording will be terminated in any one
of the following conditions:
1. The STOP button is pressed.
2. An extension phone is picked up.
3. Super VOX times out.
4. The maximum message length time is reached
(2 minutes or 4 minutes).
5. Recording memory is full (14 minutes total).
6. Dial tone is detected.
H. Automatic
Answering
Operation
ANSWER ON
Setting the INCOMING MESSAGES switch on the back
of the Answerer to 2 MINUTE position allows the caller to
leave messages up to 2 minutes in length.
Setting the INCOMING MESSAGES switch on the back
2.
of the Answerer to 4 MINUTE position allows the caller to
leave messages up to 4 minutes in length.
I. Setting The
Answerer
For
Incoming
Messages
Time Limit
INCOAKNG
tteSSAGSS
rMDl
mm/Tt MMure
15
Page 16

ANSWERER OPERATION
You can use the volume control on the side of the Answerer
to adjust the volume of the system's speaker. Rotate the
knob until you find a comfortable volume level.
7Wo settings are essential to using the Answerer's Call
Screening feature
1. Turn the Answerer ON.
2. Set the VOLUME to a level that can be heard from
wherever you are.
If a call comes in that you decide to take, lift the handset of
any telephone on the line. The system will stop recording
and you may speak to the caller. No further message space
will be used by the call.
J. Volume
Control
K. Screening
Vour Calls
AHSWERON
16
Page 17

ANSWERER OPERATION
Set the RING SELECT switch on the back of your Answerer
to 2, 4. or Toll Saver to choose the number of rings before
the system answers.
1. Position '2' — the unit will ansvrar on the second ring.
2. Position '4' — the unit will answer on the fourth ring.
3. Position TOLL SAVER — the unit will answer on the
second ring if you have new messages and answer on
the fourth ring if there are no new messages.
Use the TOLL SAVER setting when you will be calling from
another location to check for messages. If you have new
messages waiting the system will answer on the second
ring. If there are no new messages, the phone will answer
on the fourth ring. You can then hang up on the third ring to
avoid paying long distance charges.
L. Setting The
Ring Select
Switch
«WCJfUCr
i
17
Page 18

ANSWERER OPERATION
1. Before playing your messages, set SPEAKER volume to
an appropriate level with S^LUME control.
2. Determine what mailbox to play messages.
The answerer has three mailbox buttons: MAIN:
MAILBOX 2: AND MAILBOX 3.
If a MAILBOX LED is lit this indicates there are messages
in that MAILBOX.
3. To play messages and memos, tap the desired MAILBOX
button.
The answer system begins playing the first message
stored in mailbox memory to the end. The VOICE will add
the message number to the beginning and the time/day
stamp to the end of each message. The MESSAGES
indicator will show the number of the message being
played.
Example:
"Message l". (message.
"Message 2". (message.
"End of Messages"
Note: All messages are saved unless the ERASE button is
pressed. (To erase messages, see pages 19 and 20.)
). "Hour, Minute, Day"
). "Hour. Minute. Day” ETC.
M. Playing Your
Messages
18
Page 19

ANSWERER OPERATION
1. To review a message from the beginning, tap REVIEW
button during that message. The unit will move back to
the beginning of that message.
2. To review any previous message, tap REVIEW button
during the message. Continued tapping of REVIEW
button will move back through the previous messages to
the first message and start playback.
3. To reverse through a specific message, press and hold
the REVIEW button. Release when at the desired point in
the message.
1. To advance to next message, tap SKIP button at any time
during the message. The unit will stop playing and move
forward to the next message. If there are no more messages,
the unit will say. “End of Messages."
2. To advance through a specific message, press and hold the
SKIP button. Release when at the desired point in the
message.
lb have instant replay, tap the INSTANT REPLAY button at
anytime while a message is being played. The unit will move
back and instantly replay the previous 8 seconds of that
message.
N. Reviewing
Messages
IB]
O. Skipping
Messages
f
IBI
P. Instant
Replay
IN$TAHTR£filAY
To erase a message, tap the ERASE button at anytime while
a message is being played. This will stop the message,
erase the message, beep, and start the next message. The
message cannot be retrieved once it has been erased.
If REVIEW is used to back up over an erased message, the
unit will announce “Message (number) Erased."
Q. Erasing
Individual
Messages
19
Page 20

ANSWERER OPERATION
All messages can be erased at once,from a single mailbox.
7b erase all of a mailbox’s messages, perform the
following
1. Press ERASE button. The display goes blank and all 3
mailbox LED's flash;
2. Then press the desired MAILBOX button.
The messages have now been erased from that mailbox and
unit will display total number of messages left in other
mailboxes.
To stop playback, tap STOP button at any time. To start
again, tap the MAILBOX button and the unit will start at the
beginning.
R. Erasir^g Alt
Messages
S. Stopping
Message
Playback
stop
Q
20
Page 21

The memory full condition is indicated by rapid flashing of
the MESSAGES display. Memory full condition occurs if 14
minutes of announcements and messages have been
recorded, or if 40 messages have been recorded. Erasing
messages will eliminate this condition. “Memory Full" will be
voiced at the start of any mailbox play when condition exists.
Note: When memory is full, unit will only answer after 10th
ring and will not record any new messages. (See page 27.)
if the unit does not seem to be functioning properly;
disconnect telephone tine cord and pull the AC/DC POWEfi
CORD from the POWER 9VDC JACK on the back of the
Answerer. Remove the 9 volt battery, wait at least 5 seconds
and plug back in. All messages/memos and announcements
will be erased. Time and Day have to be re-entered and the
announcements re-recorded.
Note; Disconnecting the AC/DC POWER SUPPLY at the
110V AC wall plug will not reset the answerer.
ANSWERER OPERATION
When
T.
Memory
is Full
Answerer
u.
Reset
21
Page 22

REMOTE OPERATION
When you call your GE Model 2-9876 Answerer from another
location, using a touch tone phone you can enter your three
digit security code. (This code is factory preset and written
on the bottom of the unit.) You may then listen to your
messages or enter a command to request one of the other
features normally available to you at home.
Note: Remote operation can be terminated locally by
pressing the STOP button or by picking up any phone on the
same line.
From a remote location you can bypass the outgoing
announcement (OGA) that you have recorded on the
Answerer. Press any key on the touch tone phone from
which you are calling. The OGA will stop and the Answerer
will emit a transfer tone after which you may leave a
message or enter your 3-digit security code to access other
remote operations.
Note: While pressing any key will bypass the OGA, pressing
keys 1, 2, or 3 will also take you directly into a mailbox to
record. If you do not wish to leave a message at this time,
avoid these keys when bypassing the OGA.
A. Introduction
and
Security
Code
Information
B. Outgoing
Annouce*
ment (OGA)
Bypass
22
Page 23

REMOTE OPERATION
The GE 2-9876 Answerer has been programmed to be “user
friendly” while you are away from home. For your
convenience, remove the remote wallet card (attached to the
back of this guide), fill in security code from bottom of unit.
arHj store in your wallet or purse for reference when you use
remote functions.
When you call from a remote touch tone phone
1. Listen to your OGA or bypass it by pressing any key.
Wait for a transfer tor>e (long beep).
Enter your 3-digit security code. (The factory preset
number written on the bottom of the unit.)
The VOICE will tell you the total number of messages
from all mailboxes, then you will hear another 3 short
beeps.
5.
Whenever the 3 beeps play, the unit will wait 3
seconds for commands. If none are entered, the unit
will start voice MENU (as a reminder of the menu
command). The unit will then allow 7 more seconds
for a commarKJ. if none are entered the unit will hang
upPressing '9' will begin the voice MENUS. Further
pKessing of ‘9‘ will advance to the next MENU pages.
There are a total of 5 MENU pages. Each MENU is
ended with the three short beeps prompt.
At the completion of any function, you will again hear
7.
3 beeps meaning the answerer is awaiting your next
command.
Note: Vbu may enter arty function number at any time.
You don't have to listen to the entire menu nor do you
have to be in the menu where the desired rentote
function is located.
8. if an invalid commartd is entered, the unit will play the
3 short beeps prompt.
Note: There may be times when you will encounter
phone line disturbances, or “noise on the line". These
disturbances may interfere with the clear transmission of
your touch tone keypad commands. If you suspect this to
be occurring, press ♦ (star button) from the remote
location to “silerKe” the unit. Then enter your remote
commarKf.
c. Using The
Remote
Voice
Menus
23
Page 24

REMOTE OPERATION
1st Menu
Press ♦ (STAR) lo slop functions,
Press 7. 1 to play messages for Number One,
Press 7. 2 to play messages for Number Two.
Press 7. 3 to play messages for Number Three.
Press 9 for other functions, (remote beep prompts)
2nd Menu
while playing message,
Press 7 to play previous message.
Press 8 to repeat message.
Press 9 to skip message,
Press STAR to stop messages,
Press 0 to erase message.
Press 9 for other functions. (rerr>ote beep prompts).
3rd Menu
Press 4. 1 to record message for Number One,
Press 4, 2 to record message for Number Two.
Press 4. 3 to record message for Number Three,
Press 9 for other functions, (remote beep prompts).
4th Menu
Press 8. 1 to turn on and play announcement one.
Press 8. 2 to turn on and play announcement two.
Press 5. 1 to record new announcement one.
Press 5. 2 to record new announcement two.
Press 9 for other functions,
(remote beep prompts). .
Sth Menu
Press 6 to turn on.
Press # (pound) to turn off.
Press 9 for other functions,
(remote beep prompts).
D. Remote
Voice
Menus
24
Page 25

REMOTE OPERATION
Remote Message P/ay—Provided you have entered the
security code.
Pressing ‘7’ and the mailbox number will cause the unit to
voice number of messages in the selected mailbox and then
start playing all messages in that mailbox from beginning to
end. The VOICE will give you the message number, you will
hear the message, then the VOICE will tell you the time and
day the message was received.
To play messages in Main Mailbox press 7, ^
To play messages in Mailbox Two press 7. 2
To play messages in Mailbox Three press 7, 3
Message Erase—After each message is played in full, you
will hear the VOICE say "Press 0 to erase message." You
will have 3 seconds to erase the preceding message before
the Answerer begins playing the next message.
Pressing “0" during message play will erase that message.
Message Stop —Pressing * (for 'STOP') at anytime will
terminate message playback. You will then hear the 3 tone
prompt, after which you may enter another command.
Remote Message Repeat—During message playback.
Pressing 8 (for 'REPEAT') will cause the unit to restart the
same message.
Remote Message Skip —During message playback.
Pressing 9 (for 'SKIP') will cause the unit to slop playing the
present message and start playing the next message.
Reviewing Messages — During message play.
Pressing 7 will terminate present message and play previous
message. You may continue pressing 7 to return to any
previous message.
E. Remote
Message
Retrieval
Commar>ds
25
Page 26

REMOTE OPERATION
Remote Recording of an Announcement
Press: ‘5’ and then select 'V or ‘2’ for OGA number,
recording will start after beep. Press * key or hang up
phone to stop recording. The new announcement is now the
active announcement upon phone answering.
To record Announcement 1:
—press; 5. 1
To stop recording:
—press; * or hang up
To record Announcement 2:
—press; 5. 2
To stop recording:
—press: * or hang up
Remote Announcement Playback/Selection
Press '8' and then select ‘V or '2' to play and activate
desired announcement. If there is no recorded
announcement in selection, the unit will speak; "Please
leave message after tone."
To Play/Select Announcement 1:
—press; 8. 1
To Play/Select Announcement 2:
—press: 8. 2
You may remotely record a memo into a selected mailbox.
Press ‘4’ and then select '1‘ or '2' or ‘3’ for proper mailbox
number, recording will start after beep.
Press * key or hang up to stop recording.
To record a memo In Main Mailbox: press 4, 1
—to stop recording press; * or hang up
To record a memo in Mailbox TWo: press 4, 2
—to stop recording press; * or hang up
To record a memo In Mailbox Three: press 4, 3
—to stop recording press * or hang up
F. Remote
OGA
Commands
G. Recording A
Remote
Memo
26
Page 27

REMOTE OPERATION
Remote Turn Off: Press # to turn answer mode OFF.
Remote Turn On: Press '6' to turn answer mode ON.
When the system's memory is full, H answers on the tenth
ring. The unit wilt answer and the VOICE will announce
"Memory is full. Please enter security code after tone.",
followed by a beep. It will allow 7 seconds for the security
code to be entered. If the code is not entered, the unit will
hang up.
To make room for new messages, you can use the remote
features to listen to your ntessages and press 0 deleting
some or all messages.
H. Turning The
Answerer
On Or Off
From A
Remote
Location
I. When
Memory Is
Full
27
Page 28

IN CASE OF DIFFICULTY
If your Answerer does not work properly, follow the service check list. Also
disconnect the Answerer from phone jack and plug a phone you know to be working
into the same jack. If the phone doesn't work, the problem is with the telephone line.
If it is the telephone line, notify the telephone company for service. If the Answerer
continues to malfunction, please make sure you have followed all the instructions in
this manual to correct the problem. If you cannot correct the problem, you can
RESET the unit by disconnecting telephone line cord and removing the 9 volt battery
and unplugging the POWER SUPPLY CORD from the POWER 9V DC JACK on the
back of the unit. (See "Answerer Reset", page 21.) Wait at least 5 seconds and plug
it back in. This will reset the Answerer. The Answerer will return to the "set-up stage"
deleting all messages, outgoing announcements (OGA's), and clear the time clock.
ANSWERER
PROBLEM
1. Display is blank, no
LED’s on.
2. ANNOUNCE 1/
ANNOUNCE 2
LED's flashing
3. Can't hear
messages, beeps,
or time/day.
4. Display shows ‘‘Lo.’’
$. Display shows
6. Display is flashing
7. Time/Day Stamp at
1:00am Monday.
8 Incoming messages
are incomplete
SOLUTION
• Unit not receiving power, check proper connections (page
9).
• Is outlet working?
• No personal OGA's have been recorded (unit will use
default OGA, page 13).
• Adjust volume
• Battery needs to be replaced or installed.
• Answer mode is turned off (page 10).
• Memory full condition (page 21).
• Time clock needs to be set (page 10).
• Was an extension phone picked up?
• Was 2 minute or 4 minute time exceeded?
• Was STOP button pressed?
• Did memory become full?
28
Page 29

ANSWERER
PROBLEM
IN CASE OF DIFFICULTY
SOLUTION
9. Unit won't answer
until 10th ring.
10. Unit won’t answer
calls.
11. Unit answers a call
even if an
extension phone is
picked up.
12. System does not
respond to remote
commands.
• Is answer mode oH? (See page 10.)
• Is nr)emory full? (See page 21.)
• Is phone line working and connected to unit?
• Is power working and connected to unit?
• See #9 above.
• If a phone is picked up at the same time the answer
machine does, the disconnect may r>ot work. To stop
answer machir>e. press STOP button or press and release
telephone hook switch on telephor>e being used.
• Must use touch lone phone: pulse or rotary dial will rK)t
work.
• Must enter correct Security Code (page 23) after the long
tone has finished.
• Has unit hung up? The unit will hang up if no keys are
entered for 7 seconds; there will always be a long tone
prior to hang up.
• Press buttons firmly.
« It there is noisy line interference, try pressing * (STAR)
prior to remote commands-this will silence the unit and
accept codes better.
29
Page 30

PRODUCT CARE
To keep your Answering System working and looking good,
follow these few simple rules.
• Avoid putting Answering System near heating appliances
and devices that generate electrical noise. (i.e., motors,
fluorescent lamps.)
• Answering System should not be exposed to direct
sunlight or moisture.
• Avoid dropping the unit as well as other rough treatment.
• Clean unit with a soft doth damper>ed with water. (Re
member to first unplug AC adapter from wall outlets.)
• Never use a strong cleaning agent or abrasive powder, as
this will damage the finish.
• Retain the original packaging, should you need to ship
the unit at a later date.
• Do not bring magnetic or metal objects, such as a
screwdriver, near the head assemblies, as such objects
could magnetize the heads.
• Do not oil arty part of the unit.
• When usirtg liquid clearter, unplug AC adapter from wall
outlet and allow 30 minutes drying time.
SERVICE
FCC requires this product be serviced only by the
manufadurer or its authorized service agents. In accordance
with FCC requirements, changes or modifications rK)t
expressly approved by Thomson Consumer Eledronics could
void the user’s authority to operate this produd. For
instrudions on how to obtain service, refer to the warranty
included in this Guide or call customer service, telephone
number: 800-448-0329.
Attach your sales receipt to the booklet for future reference
or jot down the date this produd was purchased or received
as a gift. This information will be valuable if service should
be required during the warranty period.
A. General
Product
Care
A. Service
Information
Purchase date
30
Name of store
Page 31

LIMITED WARRANTY
What does your warranty cover?
• Any defe^ in material or workmanship.
For how long after the original purchase?
• Two years.
• The warranty for rental units begins with the first rental.
What will we do?
• Provide you with a new. or at our option, a reconditioned unit.
• The exchange unit is warranted for the remainder of your product's
original two-year warranty period
How do you make a warranty claim?
• Properly pack your unit. Include any cables, etc., which were
originally provided with the product. We recommend using the
original carton and packing materials.
« Include in the package a copy of the sales receipt or other evidence
of date of original purchase. If the unit was a gift, provide a statement
specifying the date received. Also print your name and address and
a description of the defect.
• Ship the unit standard UPS or equivalent to:
Thomson Consumer Electronics. Inc.
Product Exchange Center
32 Spur Drive
El P^. Texas 79906
• Pay any charges billed to you by the Exchange Center for senrice
rK>t covered the warranty.
« A new or reconditioned unit will be shipped to you prepaid freight.
What does your warranty not cover?
• Customer instruction. Your Owner’s Manual provides information
regarding operating instructions and user controls. F^r additional
information, ask your dealer,
• Installation and set-up service adjustments.
• Batteries.
• Damage from misuse or neglect.
• Product which have been modified or incorporated into other
products.
• Product purchased or serviced outside the USA.
How does state law relate to this warranty?
• This warranty gives you specific legal rights, and you may also have
other rights which vary from state to state.
What if you purchased your unit In Canada?
• Refer to the Canadian Warranty.
For products purchased outside the United States and Canada, see
dealer for warranty.
Thomson Consumer Electronics. Inc.
TWO YEAR
31
Page 32

FCC REGISTRATION INFORMATION
you* OE tel«pl>oo« «quipm*»! it re90i»r«d wilh the Fcdeiti Conmumceiiont Commissaon and is ei cofnplianct with
pant 1&J and 68. FCC Rule« and Ft^laiiont
1. NotiUettlon to (Ae local MepAone Companj'
On the bottom o( tlM equipment it a tabel ind«ating among other inlormdion. the FCC Ragolraiion number artd
Ringer Equwalence Number (REN) tor the oquipmera You mutt, upon requett. provtoe ttm intormabon to your
leiaphorte con^any
The REN « uae<iP to determine me number of devicet you may connect to your leiephorte ime and etiii have aa
mete devKet rirtg «men your tetophone number it caned in moti (but not an) areaa. me turn of me REN't of an
devwet connected to one ime tnouto not exceed S ib be certain of the number of devicet you may connect to
your line as determined by me REN. you should contact your local tetephorte company
NOTES; This equipment may rtoi be used on com tennee provided by the telephone company
Party lines are subject lo siaie larifis. and thereloie, you may noi be able lo use your own tetephone equipment if
you are on a party hne. Chack with your local telephone company.
Notice must ba grvan to the telephone company upon permanent diseoiviection ol your lelephont from your line
2. AfgAts of (Aa tofepAone Company.
Should your aquipmeni causa iroubia on your line wtuch may harm the telephone network, the taiaphona company
thaa. where practicable, nodty you mat temporary ditcontmuanee of semce may be required Where pnor notice it
not practicsbia and me circumstances werrani su^ acbon. the taiaphone company nuy tamporanty deconimua
tervtoe immediatety in case of such lenHwrafy dAContmuance. me tetephone company must (1) promptly notify
you of auch lemporary discontmuanca. (2) afford you the opportunity to correct me situation and (3) inform you of
your right to brmg a compiamt to the Comm«sion purauam to procedures set forth m Subpart E at Part 6& FCC
Rules and Reguiaiions
The leiephona company may make changes m its communications facilities, equipmani. operations oi pfocedures
where such acbon i$ required in me operation of its pusmess and not mcdnsisteni with FCC Rules and
Regutoi«ns If those changes are expected to affect me use or performance of your telephone equipment, the
telephone company must gne you adequate notice, m wntmg. to allow you to maimam uniniarrupied service
RADIO INTERFERENCE
This equtornent has been tested and tound to comply w«m me limits tor a Class в digital device, pursuant to Part t$ of
the FCC Rules These tenits are designed to provide reasonable protection agamst harmful iMarlareiKe m a residential
instaliaiton
This equipmeni gerwates. uses and can radíale radio Irequertcy er>orgy and. if not installed and used in accordance
with the instructions, may causa harmful intarfererKe to rad« communications However, mere « no guaramae that
interference wnd not occur wi a particular insteHation
H tine equipment does cause harmful mterfarenca to rad« of television reception, which can be determined by turnmg
the equipment oft and on. the user « encouraged to try to correct me mierference by one or more of me tottowmg
meesures
• Reorient or retocase the receiwtg anienrta (that is. the antenna
• irKrease the separation befween the equipmerk and recener
• Connect the equipmeni mio an outtti on a circuit different from that to which the receiver is
connected
• Consult me dealer or an experienced radio/TV lechnician for help
If these meesures <M not ehmmaie the mierference. pieaee consult your dealer or an experienced radtodeteviston
technician lor additional suggestions Also, the Federal Communicstions Commission has prepared a hetpfui booklet.
"HOW lb Identify and Resolve Radio/TV interference Probiame" Thia booklet la avariabie from me U.S Government
Prmtmg Office. WaNtingion. OC 20402 Please specify stock number 004ЦХ)О00Э4&-4 when ordering eoptos
htod*i 2-99788
949Л1348-9001 (Rev. 1)
93-18
Printed in Sfeieyaie
Page 33

DIgitsI
Telephone Answerer
MODEL 2-9$76
Dial leiepnone numbar and wait
for system to ar»wer.
Press any key for OCA
(Outgoing ArwKxincement) bypass.
A Enter 3-digit secunty code
^ after transfer tone,
Q Enter Touch Tone ConwnarKl.
^ Har>g up.
„ or
Press [9] for Vbice Menu.
□ □□
Write SKJign security code In boxes.
Dlgllal
Telephone Answerer
MODEL 2’9876
O ^ telephone number and wail
for system to answer.
Press any key for OGA
(Outgoing Announcement) bypass.
A Enter 3-digit security
after transfer tor>e.
Q Enter Touch Tone Command.
^ Hang up.
_ or
Press for Voice Menu.
code
V.
□ □□
Write 3-digit secunty code *n boxes.
Page 34

OPTIONS AFTER
Э8ЕЕР SIGNAL
TOUCH TONE
COMMAND
eypeSSAnnOuncenWnl ANYKEY
For Vo<c* Menu Prompt
Advance to Next Мели
Play Messages QewQerQorQ
Record Messages f4lnwn|T|or[71or[n
Erase Messages
Stop Q
Play Announcement [8]»*"Q*'[1]
Record New pti nn
Announcement
Turn System ON
Turn System OFF m
OPTIONS DURING TOUCH TONE
MESSAGE PLAYBACK COMMAND
Repeat Message
Skip Message
Review Previous Message fTl
Erase Message
Stop [3
OPTIONS AFTER
3 BEEPSIGNAL
Bypass Announcemeni anykey
For Voice Menu Prompt flTI
Advance to Next Menu [9]
Play Messages QewnQe'QwQ
Record Messages f71sunfT|arr2]orfyi
Erase Messages
Stop (*]
Play AncwurKement f9le»m[T|arnr]
Record New rsn rr^ rxi
Announcement t^“w"[1Jor[^
Turn System ON
Turn System OFF
ОРТЮНв DURING TOUCH TONE
MESSAGE PLAYBACK COMMAND
Repeat Message
Skip Message
Review Previous Message
Erase Message
Slop
TOUCH TONE
COMMAND
 Loading...