

Page 1

Model: 2-9435
PROSERIES
Speaker Phone
2-Line/32 Number Memory
(Pulse/Tone Switchable)
4 “AA” size batteries required.
NOT included.
Use and Care Guide
NOTE
Page 2

INTRODUCTION
CONGR ATU LATIONS... Your GE speakerphone is a carefully engineered,
high-quality, durable product with natural sound quality, modern features and
elegant styling. It is designed to give you the quality and convenience you expect
in a Speakerphone.
To familiarize yourself with all of its features of your telephone, please read the
following instructions carefully. Retain this Guide for future reference.
FCC NUMBER IS LOCATED ON THE BOTTOM OF TELEPHONE BASE
REN NUMBER IS LOCATED ON THE BOTTOM OF TELEPHONE BASE
OTHER IMPORTANT INFORMATION ON BACK COVER OF THIS GUIDE
IMPORTANT SAFETY INSTRUCTIONS
Some of the following information may not apply to your particular
product; however, when using telephone equipment, basic safety
precautions should always be followed to reduce the risk of fire, electric
shock and injury to persons, including the following;
1.
Read and understand all instructions.
2.
Follow all warnings and instructions marked on the product.
3.
Unplug this product from the wall outlet before cleaning. Do not use
liquid cleaners or aerosol cleaners. Use a damp cloth for cleaning.
4.
Telephones should not be used while you are in a bathtub, shower or
pool. Immersion of the telephone or handset in water could cause an
electrical shock.
Slots and openings in the cabinet back or bottom are provided for
5.
ventilation, to protect it from overheating. These openings must not be
blocked or covered. The openings should never be blocked by placing
the product on the bed, sofa, rug, or other similar surface. This product
should not be placed in a built-in installation unless proper ventilation
is provided.
This product should be operated only from the type of power source
6.
indicated on the marking label. If you are not sure of the type of power
supply to your home, consult your dealer or local power company.
Do not allow anything to rest onthe power cord. Do not locate this
product where the cord will be abused by persons walking on it.
Do not overload wall outlets and extension cords as this can result in
8.
the risk of fire or electric shock.
Never push objects of any kind into this product through cabinet slots
9.
as they may touch dangerous voltage points or short out parts that
could result in a risk of fire or electric shock. Never spill liquid of any
kind on the product.
Page 3

IMPORTANT INFORMATION
10. To reduce the risk of electric shock, do not disassemble this product,
but take it to a qualified serviceman when service or repair work is
required. Opening or removing covers may expose you to dangerous
voltages or other risks. Incorrect reassembly can cause electric shock
when the appliance is subsequently used.
11. Do not expose the telephone to extreme temperatures such as found
near a hot radiator or stove, or in a car parked in the summer sun.
12. Do not place lighted candles, cigarettes, cigars, etc., on the telephone.
13. Never touch uninsulated telephone wires or terminals unless the
telephone line has been disconnected at the network interface.
14. Never install or modify telephone wiring during a lightning storm.
15. Never install telephone jacks in wet locations unless the jack is
specifically designed for wet locations.
16. Use caution when installing or modifying telephone lines.
17. Unplug this product from the wall outlet and refer servicing to qualified
service personnel under the following conditions:
A. When the power supply cord or plug is damaged or frayed.
B. If the product has been exposed to rain or water.
C. If the product does not operate normally by following the operating
instructions.
D. If the product has been dropped or the cabinet has been damaged.
E. If the product exhibits a distinct change in performance.
18. Avoid using a telephone (other than a cordless type) during an
electrical storm. There may be a remote risk of electric shock from
lightning.
19. Do not use the telephone to report a gas leak in the vicinity of the leak.
20. Do not place this product on an unstable cart, stand or table. The
product may fall, causing serious damage to the product.
IF YOUR PRODUCT UTILIZES BATTERIES, THE
FOLLOWING ADDITIONAL PRECAUTIONS SHOULD BE
OBSERVED:
1. Use only the type and size battery(ies) specified in the user manual.
2. Do not dispose of the battery(ies) in fire. They may explode. Check
with local codes for possible special disposal instructions.
3. Do not open or mutilate the battery(ies). Released electrolyte is
corrosive and may cause damage to the eyes or skin. It may be toxic
if swallowed.
4. Exercise care in handling batteries in order not to short the battery with
conducting materials such as rings, bracelets, and keys. The battery
or conductor may overheat and cause burns.
Page 4

IMPORTANT INFORMATION
5. Do not attempt to recharge the battery(ies) provided with or identified
for use with this product that are not intended to be charged. The
batteries may leak corrosive electrolyte or explode.
6. Do not attempt to rejuvenate the battery(ies) provided with or identified
for use with this product by heating them. Sudden release of the
battery electrolyte may occur causing burns or irritation to eyes or
skin.
7. When replacing batteries, all batteries should be replaced at the same
time. Mixing fresh and discharged batteries could increase internal
cell pressure and rupture the discharged battery(ies). (Applies to
products employing more than one separately replaceable primary
battery.)
8. when inserting batteries into this product, the proper polarity or
direction must be observed. Reverse insertion of batteries can cause
charging, and that may result in leakage or explosion.
9. Remove batteries from this product if the product will not be used for
a long period of time (several months or more) since during this time
the battery could leak in the product.
10. Discard “dead” batteries as soon as possible since “dead” batteries
are more likely to leak in a product.
11. Do not store this product, or the batteries provided with or identified
for use with this product, in high-temperature areas. Batteries that are
stored in afreezerorrefrigeratorforthe purpose of extending shelf life
should be protectedfrom condensation during storage and defrosting.
Batteries should be stabilized at room temperature prior to use after
cold storage.
12. If your product uses a rechargeable battery, charge the battery(ies)
only in accordance with the instructions and limitations specified in the
User Manual.
SAVE THESE INSTRUCTIONS
Page 5
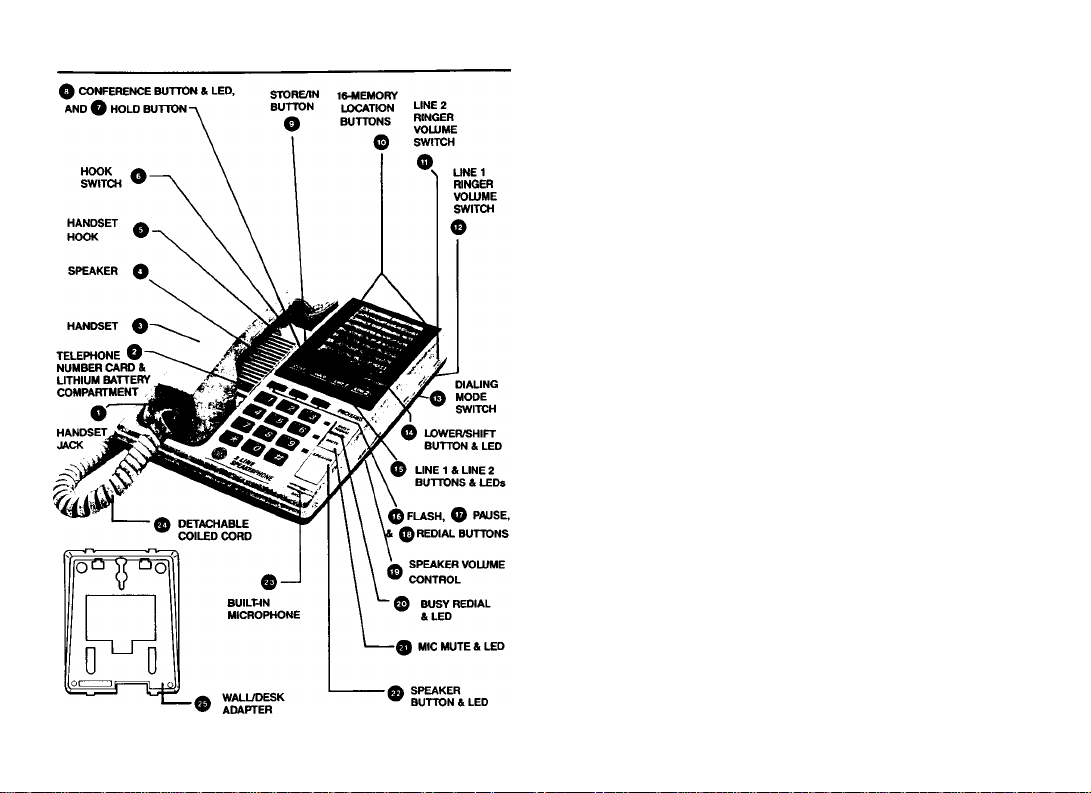
CONTROLS AND FEATURES
CONTROLS AND FEATURES
HANDSET UACK
Plug in coiled cord to connect handset to
base unit.
NUMBER CARD/LITHIUM
BATTERY COMPARTMENT
• Card tor your telephone number.
• Battery provides memory back-up power.
HANDSET
SPEAKER
О
HANDSET HOOK
e
Adjustable hook holds handset to base
unit in Wall Mount Mode.
HOOK SWITCH
о
Hangs up phone (after call, using
Handset, is completed).
HOLD
о
Enables you to hang up without termi
nating call and then pick up on same
phone or another on same line. LINE 1
or LINE 2 LED fl£ishes to indicate call
on "hold”.
CONFERENCE
о
Enables you to carry on a conversation
on LINE 1 and LINE 2 simultaneously.
STORE/IN
о
Stores phone number in a memory
location.
32 MEMORY LOCATIONS
о
One touch dialing of 16 numbers in
memory. An additional 16 numbers can
be stored and auto dialed (1 at each
location) using the lower/shift button.
LINE 2 RINGER VOLUME SWITCH
о
Adjusts the volume of the ringer (Hi or
Lo) or to turn ringer off for LINE 2.
LINE 1 RINGER VOLUME SWITCH
о
Adjusts the volume of the ringer (Hi or
Lo) or lo turn ringer off for LINE 1.
DIALING MODE SWITCH
ф
Sets the dialing mode tor either Tone or
Pulse (for rotary service).
LOWER/SHIFT BUTTON & LED
о
Accesses lower memory store position
(LED lights).
LINE 1 & LINE 2 BUTTONS & LEDs
ф
Press to use desired line. LED lights
indicating line activated.
FLASH
Ф
Activates custom calling services (of your
local telephone company) such as call
transfer or call waiting.
PAUSE FUNCTION
Ф
Inserts a 4 second delay in dialing
sequence when storing numbers in
memory. Can be programmed tor 1-5
seconds delay.
REDIAL
Ф
Redials the last number called.
SPEAKER VOLUME CONTROL
Ф
Adjusts loudness of voice received
through Speaker.
BUSY REDIAL & LED
Automaticaily redials a busy number every
30 seconds up to 10 times.
MIC MUTE & LED
Allows you to exclude the party on the
line from a conversation at your location.
SPEAKER BUTTON & LED
Activates Speaker Function enabfing you
to talk without using the Handset. LED
lights when Speaker function “ON".
BUILT-IN MICROPHONE
During Speaker Phone operation, your
voice activates microphone placing phone
in transmit mode.
EXTRA LONG CORD
Ф
Connects the handset to the base unit.
(Cord can be stretched to a maximum
of 10 feet.)
WALL/DESK ADAPTER
Ф
Adjusts to provide proper tilt depending
upon whether phone is mounted on Wall
or Desk.
2 TELEPHONE LINE CORDS (See pg. 7)
Connects phone to telephone line jacks.
CABINET BOTTOM
BATTERY COMPARTMENT
For 4 "AA” size batteries to maintain
Speaker volume level, Line-In-Use Indica
tors. Busy redial and supplement power for
Speakerphone operation.
(Batteries not included.)
For corwenience, keep this page open while reading Instructions
Page 6

FEATURES
2-Line Telephone
Permits use of 2 separate telephone lines.
32 Number Memory
Includes 16 accessed with "One-touch" plus 16
additional memories for frequently called
numbers.
SwHchable Pulse/Tone Dialing
Touch Tone or Pulse dialing, or any combination
of Tone and Pulse, for access to long distance
services.
Electronic Hold Function
Remote release of Hold lets you continue your
conversation from any other phone on same
line.
Two Separate Ringers
Separate sounding ringer for each line.
Conference Function
Allows you to carry on 3-way conversations
using both telephone lines.
Flash Function
Makes it easy to use special phone company
features like call waiting.
Long-Life Lithium Battery
Provides Memory Back-up (Battery included)
Extra Long Cord
10' (3 m) foot replaceable coiled cord for
convenience.
Wall/Desk Mountable
Full Speaker Phone Capability
Allows hands-free conversation from anywhere
in the room.
TABLE OF CONTENTS
INTRODUCTION.......................................................................................................... 2
IMPORTANT SAFETY INFORMATION...................................................................... 2
CONTROLS AND FEATURES.................................................................................... 3
QUICK SET-UP OPERATIONS................................................................................... 8
TWO-LINE PHONE.................................................................................................... 10
• LED Une-Status Indicators................................................................................. 10
• Dual Ringer Tones.............................................................................................. 10
MAKING & RECEIVING CALLS.................................................................................11
SWITCHING PHONE MODES...................................................................................12
ONE TOUCH REDIALING..........................................................................................12
AUTOMATIC BUSY REDIAL..................................................................................... 13
• Busy Redial is Cancelled.................................................................................... 13
MIC MUTE.................................................................................................................. 13
HOLD BUTTON.......................................................................................................... 14
FLASH BUTTON.........................................................................................................14
CONFERENCE BUTTON...........................................................................................15
MEMORY.....................................................................................................................IS
• Storing................................................................................................................. 15
• Dialing................................................................................................................. 16
OTHER STORING PROCEDURES............................................................................17
PAUSE FUNCTION................................................................................................... 18
CHAIN DIALING ........................................................................................................ 18
LINK DIALING.............................................................................................................19
PROGRAMMABLE PAUSE........................................................................................19
WALL MOUNTING......................................................................................................20
TELEPHONE LINE CORD WRAP.............................................................................21
TELEPHONE OUTLET REQUIREMENT...................................................................21
BATTERIES FOR SUPPLEMENTARY POWER
BATTERY BACK-UP FOR MEMORY
BATTERY SAFETY PRECAUTIONS.........................................................................23
PRODUCT CARE........................................................................................................24
TROUBLE OR MALFUNCTION..................................................................................25
SERVICE CHECKLIST...............................................................................................25
SERVICE.....................................................................................................................27
GE FULL TWO-YEAR WARRANTY...........................................................................27
ACCESSORIES......................................................................................................Insert
IMPORTANT INFORMATION
........................................................................
.................................................................
.......................................................
BACK COVER
22
23
Page 7

QUICK SET UP, STEP 1
Install the batteries:
A. Pull out and discard red plastic tab from the Lithium Battery Compartment
under the Telephone Number Card.
The Lithium battery (included) is installed in the phone to provide back-up power
for retaining numbers in memory.
B. Install the required “AA” size batteries (not included) in the Battery Com
partment under the Wall/Desk Adapter. See Page 21 for step-by-step in
stallation instructions.
The “AA” batteries are required to power:
• AUTO BUSY REDIAL feature.
• LINE 1 and LINE 2 IN-USE Indicator Lights,
and to provide supplementary power to:
• Maintain Speakerphone volume level for the simultaneous use of the
Speakerphone and an extension phone in another room.
• Ensure power for Speakerphone use under certain telephone line
conditions.
Page 8
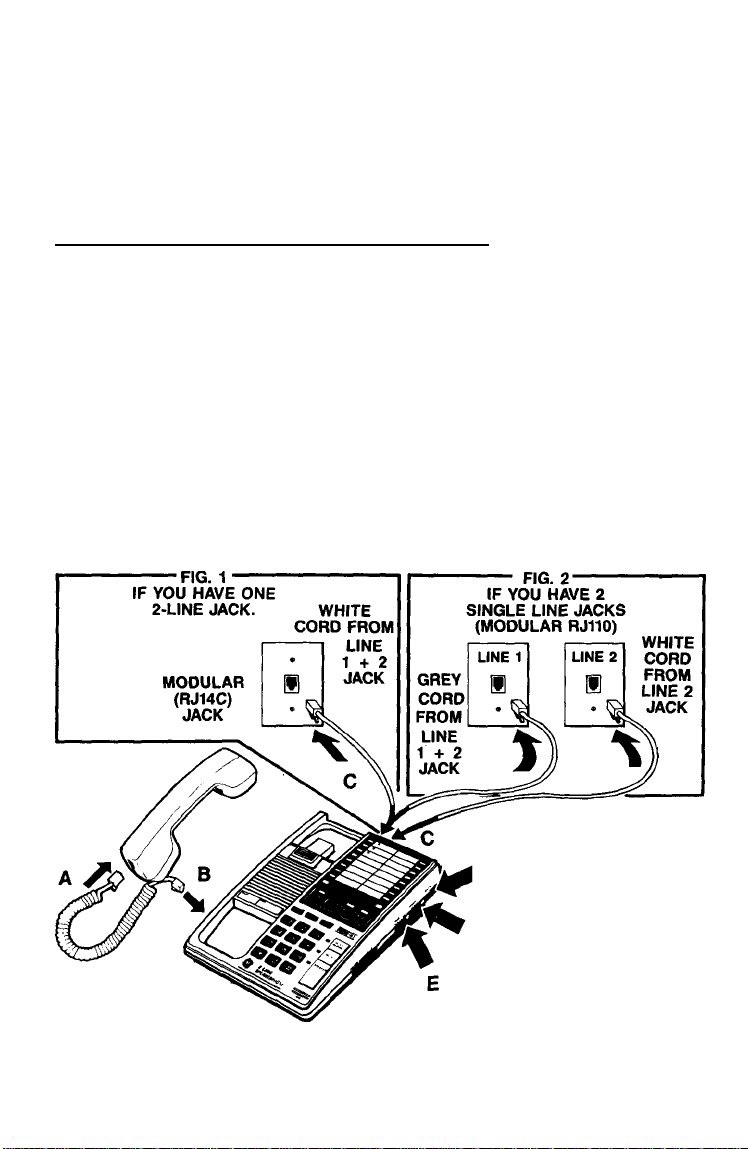
QUICK SET-UP, STEP 2
NOTE: A coiled Handset Cord and a grey straight telephone cord are packed
in the carton. A second straight telephone cord (white) is located in
side the Wall/Desk Adapter.
Connect your telephone as shown below:
A. Plug one end of Handset cord into
Handset.
B. Plug opposite end into side of
telephone base.
C. If you have one 2-line jack:
• Plug the white telephone straight
cord into LINE 1 + 2 jack in Base.
Plug into Modular RJ14C (dual
line) jack (Fig. 1) . . .
— or —
If you have 2 single-line Jacks:
• Plug the grey telephone straight cord
into LINE 1 + 2. Plug the white
straight cord into LINE 2 jack in the
base. Then, plug opposite ends into
Modular RJ11C (single line) jacks
(Fig. 2).
D. Set Ringer 1 and Ringer 2 switches
to “HI”.
• "LO” = sound will be lower.
• “OFF” = telephone will not ring.
E. Set Mode Switch to “TONE”.
If dialing cannot be accomplished,
switch to “PULSE”.
You are now ready to try your new
telephone.
i D RINGER 2
D RINGER 1
TELEPHONE
BASE
For further details, proceed to the following pages.
Page 9

TWO'UNE PHONE
A two-line phone provides you the convenience of accessing two separate telephone
lines (each obtained from the telephone company and having its own phone
number) from one phone. This is generally useful for small businesses, home
-offices, and even for homes that need the convenience of two telephone lines.
To choose a line:
PRESS I LINE 1 I or | LINE 2 |
When Handset is picked up or Speaker button is pressed, a red light above
the button will come on indicating the line in use.
LED LINE-STATUS INDICATORS
Above each Line button is an LED which informs you of the status of each line.
LED STATUS
Solid Red Line in use.
(The Line is currently being used by you [if you’ve lifted
the Handset off hook or activated the Speaker
Button] or by another extension on the same line.)
Flashing Green
Incoming Call.
(This is a visual “ring” indicator to inform you as to
which Line a call is coming in on.)
Flashing Red Line is on Hold.
(See “Hold Function” to terminate.)
DUAL RINGER TONES
In addition to the visual “ring" indicators to tell what line an incoming call is on,
your GE Speakerphone has separate and distinct ringer sounds for Line 1 and
Line 2.
This will allow you to determine (audibly) the line of an incoming call, even if you’re
in another room.
10
Page 10

MAKING AND RECEIVING CALLS
NOTE: When using the Speaker Phone, keep in mind that it works somewhat like
a two-way radio; i.e., only one-way conversation is possible at a time. When
you talk, the phone is in the transmit mode. When you are listening, it is
in the receive mode. Speak clearly and a little slower than you normally
would when using the Handset.
Using Handset:
1. PRESS I LINE ) 1 or 2.
2. PICK-UP Handset.
3. Wait for DIAL TONE.
4. DIAL Phone Number.
5 When finished, HANG UP.
Receiving A Caii
(Make sure ringer volume switch
is not on “OFF”)
1. Phone will RING.
• Line 1 or Line 2 LED will
flash rapidly indicating
line of incoming call.
2. PRESS corresponding | LINE | .
3. PICK-UP Handset. TALK.
4. When finished, HANG-UP.
Using Speaker Phone:
Making A Call
1. PRESS I LINE I 1 or 2.
2. PRESS fSPEAKER |
3. Wait for DIAL TONE.
4. DIAL phone number.
5. Adjust VOLUME (as needed).
6. When finished,
PRESS SPEAKER |
(Make sure ringer volume switch
is not on “OFF")
1. Phone will RING.
• Line 1 or Line 2 LED will flash
rapidly indicating line of
incoming call.
2. PRESS corresponding | LINE | .
3. PRESS] SPEAKER |and TALK.
4. Adjust VOLUME (as needed)
5. When finished, PRESS
SPEAKER I .
See “HOLD BUTTON” paragraph for instruction on how to place or answer a call
on the alternate line without terminating the first call.
11
Page 11

SWITCHING MODES
To Speaker Phone
(After dialed number rings or
during conversation.) during conversation.)
1. PRESS SPEAKER | button.
• LED lights.
2. HANG-UP Handset.
• Unit then switches
to SPEAKER Jmode.
(After dialed number rings or
To Handset
1. PICK-UP Handset.
ONE TOUCH REDIALING
The telephone automatically remembers the last number dialed (up to 16 or more
digits).
The number will remain in “REDIAL” until another number is dialed.
To redial the last number called:
1. PICK-UP Handset or PRESS | SPEAKER |
2. Wait for DIAL TONE.
3. PRESS I Redial | .
12
Page 12

‘AUTOMATIC” BUSY REDIAL
If phone number dialed is busy, your telephone will automatically redial the number
every 30 seconds up to 10 times.
When you receive a busy signal:
1. PRESS
2. Hang-up Handset. SPEAKEI^ operation automatically disconnects.
• LED will flash between Redial attempts.
3. When ring-through is accomplished, you will hear other party’s telephone
ring.
4. Press SPEAKEI^ button or pick up Handset.
Busy redial is cancelled
when...
1. You PRESS
2. Number is still busy after 10 tries. (LED will go out.)
3. You pick up Handset or PRESS | SPEAKER | to place call or answer
incoming call.
4. The line stops being busy and either rings or is answered.
(NOTE: Phone automatically switches to | SPEAKER | phone mode under most
conditions.
BUSY
REDIAL
BUSY
REDIAL
again.
MIC MUTE
Deactivates microphones (both Handset and Speaker Phone) so you can converse
at your location and not be overheard by party on the line (you will still hear them).
To use:
1. PRESS MUTE I to deactivate microphone.
2. PRESS MUTE {again to continue conversation.
NOTE: Switching from Handset to Speaker phone and vice versa, also
_______
releases
MUTE I.
13
Page 13

HOLD BUTTON
Enables you to interrupt conversation without terminating call, i.e., to answer a
call on the alternate line. Call can then be picked up on the same phone or on
* another extension on the same line. Line Button will release and LED flashes when
HOLD is functioning.
Using Handset
To place party on HOLD
Using Speaker Phone
PRESS I HOLD I and HANG UP.
PRESS I HOLD I
^SPEAKE^ operation
automatically disconnects.
To continue converstation
1. LIFT Handset.
2. PRESS I LINE | on Hold
and talk.
— at this phone —
1. PRESS SPEAKER
2. PRESS j_LINE |on Hold
and talk.
— from another phone —
(same line)
Pickup Handset Pickup Handset
TO ANSWER OR PLACE CALL
on Aiternate Line
(Without Terminating First Call)
1. Place first call on | HOLD | .
2. PRESS alternate | LINE | .
to answer or place call.
3. When finished, Hang Up.
Then, follow directions under “To Continue Conversation” (above) to return to first call.
1. Place first call on | HOLD | .
2. PRESS alternate [ LINE | .
SPEAKER~| button to3. Press
answer or place call.
4. When finished, press
SPEAKER
FLASH BUTTON
Similar to depressing hook switch. Used for activating custom calling services from
your local phone company, such as call transfer and call waiting (generally requiring
an extra monthly fee). If you subscribe to any of these services please refer to
the phone company’s instruction on how to use.
FLASH duration is set at the factory for .6 seconds. However, you can program
FLASH for a duration of .1 - .9 seconds to match your phone company’s system.
14
Page 14

FLASH BUTTON (continued)
1. PICK-UP Handset or PRESS | SPEAKER | .
2. PRESS I STORE/in | # | 1-9 | i
Numbered Button Equal to duration
in tenths of a second
3. HANG-UP Handset, or PRESS | SPEAKER |
CONFERENCE BUTTON
Enables you to carry on 3-way conversation using Lines 1 and 2 simultaneously.
STORE/in
_________________
FLASH I
To initiate:
(Place 1st party on HOLD)
1. PRESS alternate | LINE | .
2. PRESS and RELEASE hook switch.
3. DIAL phone number for 2nd party.
4. PRESS CONF | and TALK to both parties.
5. When finished, PRESS Line 1 or 2 button to cancel CONF j .
6. Then, HANG UP or PRESS | SPEAKER | .
MEMORY
Each of the 16 MEMORY buttons is capable of storing 2 separate telephone
numbers of up to 16 digits. Each MEMORY button accesses an UPPER and a
LOWER memory store position. The telephone numbers stored in the upper position
can be automatically dialed with one touch. Those in the lower position are
automatically dialed with two touches (Shift + Memory Location).
STORING
Upper Store Positions:
1. PICK-UP Handset, or PRESS | SPEAKER |
2. PRESS I STORE/in | Phone Number #
3. HANG-UP Handset, or PRESS | SPEAKER |
4. WRITE Name or number of party stored in corresponding
memory iocation on white section of
(NOTE: To remove Directory Plastic Cover, pull up on latch located at
center top edge of Directory and lift off cover.)
15
store/IN
1
J MEWlOflY
OWECTOHVCARD
Page 15

MEMORY (continued)
STORING CONTINUED
Lower Store Positions
1. PICK-UP Handset, or PRESS |SPEAKER)
2. PRESS ISTDRE/in| Phone Number it|store/IN| ^ I SHIFT | ^
3. HANG-UP Handset, or PRESS |SPEAKER!
4. WRITE Name or number of party stored in corresponding
memory location on shaded section of
-►CAUTION ◄-
WHEN MAKING TEST CALLS TO EMERGENCY NUMBERS:
1. Remain on the line and briefly explain to the dispatcher the reason for the
call before hanging up.
2. Perform such activities in the off-peak hours, such as early morning hours
or late evenings.
ONECrOirr CAM)
LOWER
UOWER
MEMORY
LOCATKM
DIALING
One-Touch (Upper Store Positions)
1. PRESS I LINE I 1 or 2.
2. PICK-UP Handset, or PRESS |SPEAKER)
3. Wait for DIAL TONE
4. PRESS
Two-Touch (Lower Store Position)
1. PRESS [line) 1 or 2.
2. PICK-UP Handset, or PRESS [SPEAKER)
3. Wait for DIAL TONE.
4. PRESS I SHIFT ) ►press
MEMORY
LOCATION
• MEMORY
16
Page 16

OTHER STORING PROCEDURES
Storing the Last Dialed Number (Redial Memory Transfer)
You can quickly and easily store into memory the very last phone number dialed
by using the redial function.
1. PICK-UP Handset, or PRESS |SPEAKER)
2. Wait for DIAL TONE.
3. PRESS|STORE/in| ■» | REDIAL| 1» |store/IN|
LOCATION
or
MEMORY
4. HANG-UP Handset, or PRESS | SPEAKER |
Changing a Stored Number:
1. PICK-UP Handset, or PRESS [SPEAKER)
New
2. PRESS jSTORE/in) Phone # jstore/IN)
Number
3. HANG-UP Handset, or PRESS [SPEAKER)
Correcting an Error While Storing:
^ 1. HANG-UP Handset, or PRESS [SPEAKER)
2. Repeat Procedure for Storing Numbers in Memory.
SHIFT
MEMORY
LOCATION
or
[SHIFT) #
LOWER
MEMORY
LOCATION
LOWER
MEMORY
LOCATION
17
Page 17

PAUSE FUNCTION
Used for storing a momentary delay in the dialing sequence of a stored telephone
number. This is generally used when a “PAUSE” is needed to wait for a dial tone
(e.g. after dialing 9 for an outside line) or a computer tone (e.g. for some long
distance services).
At point where pause is required
..................
PRESS PAUSE
(See Programmable Pause
NOTE: When storing PAUSE in MEMORY, each pause counts as one stored digit.
______
Page 16)
CHAIN DIALING
Allows you to dial in succession a chain of numbers in different memory locations.
This is handy when you must dial more than one number in memory to complete
a call, such as with frequent calls via an independent long distance service. (e.g.
MCI or SPRINT).
For Example:
Local Access Number of Long Distance Service and
two (or three) Pauses at end.........................................................is in 7
Authorization Code (ID Number)
Long Distance Phone Number you wish to call
......................................................
.............................
is in
is in 9
To Initiate Chain Dialing:
1. PICK-UP HANDSET or PRESS SPEAKER
Memory
Location
2. PRESS O 7
Memory Location 7
MEMORY
LOCATION
Dials # in
8
MEMORY
LOCATION
Dials # in
Memory Location 8
18
9
Dials # in
Memory Location 9
Page 18

LINK DIALING
You can link together a dialing sequence of phone numbers stored in different
memory locations by storing the dialing sequence in one memory location for onebutton automatic dialing.
To Store:
1. PICK-UP Handset, or PRESS ( SPEAKER |
7 8 9
2. PRESS |STORE/in|
3. HANG-UP Handset, or PRESS | SPEAKER |
store/IN I #
------
* laeui^tM/
10
To Dial:
1. PRESS LINE 1 or 2
2. PICK-UP Handset, or PRESS | SPEAKER |
10
3. PRESS
NOTE: This feature also works with Lower Memory
iMEMORY
LOCATION
PROGRAMMABLE PAUSE
Pause is pre-set for 4-second delay. However you can program PAUSE to be a
delay from 1-5 seconds in order to match the waiting period for your telephone
(for dial or computer tone) service...
(Phone dials number in memory location 7. followed by
memory location 6, followed by memory location 9).
SHIFT I
► ^
LOWER
MEMORY
LOCATION
______________
1. PICK-UP Handset, or PRESS ] SPEAKER )
2. PRESS I STORE/in ] # D3 •
Numbered
Button Equal
to delay in seconds.
3. HANG-UP Handset, or PRESS | SPEAKER |
19
store/ll^
PAUSE I
Page 19

WALL MOUNTING
Your GE telephone can easily be mounted on a wall phone plate.
Turn Handset Hook:
HANDSET HOOK
Mount Base to Wall:
1. PICK-UP Handset.
2. SLIDE Handset Hook up and off cradle.
3. ROTATE a half turn and slide back into slot.
• Hook now extends over edge.
1. Turn phone around so back side faces you.
2. Press down and out on the two snap tabs
located on top of Wall/Desk Adapter
3. Plug white straight cord into Base jack
marked “Lines 1 +2”, and wrap excess
cord.
4. Reverse the Wall/Desk Adapter so that the r
deepest part is at the bottom of the 1
telephone. Place modular plug and about \
3' of the straight telephone line cord j
through opening in center of Wall/Desk ■
Adapter.
5. Reconnect it to the base by putting top end
in first © and snapping in bottom ©
20
Page 20

6. Connect white straight telephone line cord
to wall phone outlet.
1
7. Slip Adapter mounting holes over wall plate
posts © and slide telephone down ©
so Adapter/Base assembly is firmly in place.
8. Return Handset to base.
TELEPHONE LINE CORD WRAP
This telephone is equipped with a Cord Wrap
for the white straight telephone line cord. The
Cord Wrap is located on the bottom of the
Base. To get to it, remove Wall/Desk Adapter
according to previous section. Wrap excess
cord around Cord Wrap. Reconnect Wall/Desk
Adapter to base according to desired mounting
configuration (Wall or Desk).
TELEPHONE OUTLET
REQUIREMENTS
A modular USOC: RJ11C or 2-line RJ14C
outlet jack (example illustrated) is required.
Installation of this telephone in locations with
4-prong jacks or with hard-wired outlets will
require additional Converters (not included).
The dealer from whom you purchased your
phone or a telephone supply store can advise
you regarding the proper Converter.
21
Page 21

BATTERIES FOR SUPPLEMENTARY POWER
4 “AA”-size alkaline batteries (not included) provide the increased power required to:
• Maintain Speaker Phone volume level for the simultaneous use of the Speaker
Phone and an extension phone in another room.
• Provide the required supplementary power needed for Speaker Phone use
under certain line conditions.
• Provides power for Line 1 and Line 2 In-Use Indicator LED’s.
• Provides power for AUTO BUSY REDIAL feature.
1. If telephone is wall mounted, remove from
mounting.
2. UNPLUG Modular jack from phone wall
outlet.
3. Remove Wall/Desk Adapter to expose
battery compartment.
4. To remove cover, place a coin or screw
driver blade behind battery cover tabs at
top and twist slightly to pop open.
5. Remove cover.
6. Install 4 “AA”-size batteries as indicated on
the battery diagram.
7. To replace cover, place small tabs at bottom
center of each cover inside battery com
partment. Swing coyer and snap in place.
8. PLUG phone into Modular phone
outlet.
Be sure to replace the batteries periodically to maintain full performance of
your Speakerphone. Also, worn out batteries may leak chemicals which can
damage the cabinet and circuitry of your telephone.
22
Page 22

BATTERY BACKUP — MEMORY
A consumer replaceable long-life Lithium Battery (3V) is installed in the phone to
provide back-up power for retaining numbers in memory. The Lithium Battery
compartment is located under the telephone number card.
To Replace Battery:
1. UNPLUG Modular Jack from phone wall
outlet.
2. Remove Handset from cradle.
3. Remove Telephone Number plastic cover
and card to expose battery compartment.
4. Insert a screwdriver blade under either end
of the battery cartridge and pop up.
5. Slide battery cartridge out and dispose of
immediately. (Do Not Touch Battery.
See: “Battery Safety Precautions”.)
Battery
6. Insert replacement battery cartridge and
snap into place. Replace Telephone
Number Card and plastic cards.
NOTE: Cartridge can be inserted only one
way.
7. Plug phone cord into modular phone
outlet.
8. It may be necessary to reprogram some or
all numbers into memory.
Battery Safety Precautions
For your safety, please follow these simple precautions:
• Do not recharge, disassemble, mutilate, wet or dispose of Battery in fire.
• Keep Battery out of reach of children.
• Replace only with GE Catalog Number 5-192a (Accessory Order FOrm included in this guide.)
23
Page 23

PRODUCT CARE
Avoid putting telephone near
heating appliances or other
high temperature sources.
Try to avoid placing telephone
near devices that generate
electrical noise, (i.e., motors,
fluorescent lamps.)
Telephone should not be
exposed to direct sunlight or
moisture.
Avoid dropping the Handset as
well as other rough treatment
to the phone.
Clean telephone with a soft
cloth dampened with water.
(Remember to first unplug
phone from wall outlet)
Never use a strong cleaning
agent or abrasive powder, as
this will damage the finish.
Retain the original packaging,
should you need to ship the
phone at a later date.
24
Page 24

TROUBLE OR MALFUNCTION
Should your phone not operate properly, follow the Service Check List. If still inoperative,
disconnect the phone and try another phone (if one is available) or another cord to determine
whether the problem is in the telephone, the cord or the line. If in the phone, discontinue
its use and follow the SERVICE procedure in this manual. If in the line, notify the teiephone
company immediately. The telephone company will charge for a service call if the problem
is attributable to equipment you own.
SERVICE CHECKLIST
In case of difficulty, check the following before seeking service.
PROBLEM
1. No dial tone/
will not dial out.
2. You cannot be heard by
other party
3. Phone does not ring
4. Incoming and outgoing
voice volume too low or
none at all
5. Light and tone feedback
flutter when dialing in
Pulse mode
6. Memory Dialing
Problems
7. Loss of Memory • Does 3V Lithium Battery need to be replaced?
8. Line LED does not turn
on/off properly.
9. AUTO BUSY REDIAL
does not work.
10 If Flash does not work
properly
• Check Cords: Are they inserted properly and securely?
• Check HOOK SWITCH: Does it fully extend from base
• Check SPEAKER button. Is LED off?
• Is appropriate Line Button depressed?
• Check MODE switch. Is it in TONE position which may not be
compatible with your local dialing service?
• Check Mic Mute.
• Is handset cord inserted properly and securely?
• Is RINGER SWITCH in OFF position?
• Are you using too many phones on one line? (The total REN of all
phones on the same line should not be greater than the maximum
REN for your calling area. Usually 5. See FCC Registration on back
cover.)
• Perform checks under #1.
• Are other phones off hook at same time?
If so, this is normal condition as volume drops when additional phones
are used at once.
Speaker Phone only.
• Check setting of volume control.
• Have you installed “AA” batteries? Do they need to be replaced?
• This is normal as power is fluctuating with phone outpulsing.
• Did you program numbers correctly?
• Did you follow proper dialing sequence?
(Review Memory Section)
• Is replacement 3V Lithium Battery installed correctly?
• Are all of the phones on this line off/on hook?
• Are “AA” batteries installed correctly? Need replacing?
• Try switching line cord jacks for Lines 1 and 2.
• Have you installed “AA” batteries? Do they need to bo replaced?
• Be sure setting is correct for your phone system. Check with phone
company for proper duration.
Are they damaged?
SOLUTION
when Handset is removed?
25
Page 25

NAMES & NUMBERS
26
Page 26

To fulfill your communicating needs and enhance your
lifestyle, a ivide range of extension phones, main
phones, cordless phones and answering systems is
available.
Just stop by your nearest retailer and ask to see the
wide range of GE telephone products.
All are carefully engineered to offer you high quality
and dependability, modem easy-to-use features, and
elegant styling at an affordable price.
Should you loish to purchase, insist on the GE brand
for all your communicating needs.
Page 27

ACCESSORIES
CATALOG
NO,
5-1923
UTHIUM CARTRIDGE
Li/Mn02 cell. 3 volt (CR2032).
a
For Models with "MEMORY STORE"
To pay by credit card
(check one)
Account No.
Expiration Date
□
DESCRIPTION
IbUl merchandise.....................................S .
Add Sales Tax
Insurance...............................................S .
Postage and Handling
lotal amount enclosed
Send check or mor>ey order (in U.S. currency made
payable to Thomson Consumer Electronics) or use bank
credit card.
Please allow up to 6 to 8 weeks for delivery.
......................................
No postage stamps, CD.D.'s or cash, please.
PRICE
EA.
$2.95
..............................
................................
Prices subject to change without notice.
OUAN. TOTAL
3M
$ .
$ .
Signature
CUSTOMER: CUT ALONG DOTTED LINE
PLEASE: Print or type your name and address clearly. A complete arxj correct order will
save you days of waiting.
Name
______________________________
typ* or print)
Street.
City
__
State.
Zip Code.
Mail completed order form to: CONSUMER ELECTRONICS
Mail Order Department
P.O. Box 2000
Woodbury, N.J. 08096-2000
please NOTE: Is your name and address printed or typed dearly? Have you tilled in order form compMely?
Enclosed your remittance?
Page 28

SERVICE
FCC requires that telephones be serviced only by those specially trained in
appropriate servicing techniques. For instructions on how to obtain service, write
to: GE Telephone Products, Consumer Electronics Products, Manager, Consumer
Relations, P.O. Box 1976, Indianapolis, IN 46206.
Attach your sales receipt to the booklet for future reference or jot down the date
this product was purchased or received as a gift. This information will be valuable
if service should be required during the warranty period.
Purchase date_____________________________________________________________
_____________________________________
Name of store
RECORD SERIAL NUMBER:
According to some State laws, and in the event service should be required, you
may need both Model and Serial Numbers. Please record the Serial Number
(located on the bottom of the Base) in the space below:
SERIAL NO: _______________________________________________________________
_____________________________________________________________
GE FULL TWO-YEAR WARRANTY
This product is warranted to be free of manufacturing defects for a 2-year
period after the original date of consumer purchase or receipt as a gift.
This warranty does not include damage to the product resulting from
accident, misuse, improper installation or operation, or unauthorized repair
or alteration. If the product should become defective within the warranty
period, we will repair or replace it free of charge at our option. Repiacement
product supplied under this warranty may be new or rebuilt at our option.
For instructions on how to obtain warranty service, write to: GE Teiephone
Products, Consumer Electronics Producto, Manager, Consumer Relations,
RO. Box 1976, Indianapoiis, IN 46206.
The consumer’s sole remedy shall be such repair or replacement as is
expressly provided above, and we shall in no event be liable for any
incidental or consequential damages arising out of the use or inability to
use this product for any purpose whatsoever.
Some states do not allow the exclusion or limitation of incidental or
consequential damages, so the above limitation or exclusion may not apply
to you.
This warranty gives you specific legal righto. You may also have other righto
which vary from state to state.
For products purchased outside the United States, see dealer for warranty.
Thomson Consumer Electronics, Inc.
27
Page 29

FCC REGISTRATION INFORMATION
Vbur GE telephone equipment is registered with the Federal Communications Commission and is in
compliance with parts ISJ and 68, FCC Rules and Regulations.
1. Notification to the Local Telephone Company
On the bottom of this equipment is a label indicating among other information, the FCC Registration
number and Ringer Equivalence Number (REN) for the equipment. You must, upon request, provide
this information to your telephone company.
The REN is useful to determine the numbers of devices you may connect to your telephone line
and still have all these devices ring when your telephone number is called. In most (but not all) areas,
the sum of the REN's of all devices connected to one line should not exceed 5. To be certain of the
number of devices you may connect to your line as determined by the REN, you should contact your
local telephone company to determine the maximum REN for your calling area.
NOTES: This equipment may not be used on coin service provided by the telephone company.
Party lines are subject to state tariffs, and therefore, you may not be able to use your own telephone
equipment if you are on a party line. Check with your local telephone company.
Notice must be given to the telephone company upon permanent disconnection of your telephone
from your line.
2. Rights of the Telephone Company.
Should your equipment cause trouble on your line which may harm the telephone network, the
telephone company shall, where practicable, notify you that temporary discontinuance of service
may be required. Where prior notice is not practicable and the circumstances warrant such action,
the telephone company may temporarily discontinue service immediately. In case of such temporary
discontinuance, the telephone company must: (1) promptly notify you of such temporary
discontinuance, (2) afford you the opportunity to correct the situation and (3) inform you of your right
to bring a complaint to the Commission pursuant to procedures set forth in Subpart E of Part 68,
FCC Rules and Regulations.
The telephone company may make changes in its communications facilities, equipment, operations
of procedures where such action Is required in the operation of its business and not inconsistent
with FCC Rules and Regulations. If these changes are expected to affect the use or performance
of your telephone equipment, the telephone company must give you adequate notice, in writing, to
allow you to maintain uninterrupted service.
INTERFERENCE INFORMATION
This equipment generates and uses radio frequency energy which may interfere with residential radio
and television reception if not properly installed and used in accordance with instructions contained in
this manual. Reasonable protection against such interference is ensured, although there is no guarantee
this will not occur in a given installation. If interference is suspected and verified by switching this
equipment on and off, the user is encouraged to try to correct the interference by one or more of the
following meetsures: Reorient the radio/television receiver's antenna, relocate the equipment with respect
to the receiver, plug the equipment and receiver Into separate circuit outlets. The user may also wish
to consult a qualified radio/television technician for additional suggestions. This equipment has been
fully tested and complies with all limits for Class B computing devices pursuant to part 15, Sub-part J,
FCC Rules and Regulations.
HEARING AID COMPATIBILITY
This telephone is judged to be hearing aid compatible per FCC standards.
EM-KP8968-02(00)0
Model 2-94358
318A8039-B001 (Rev. 1)
90-13
Printed In Hong Kong
 Loading...