

Page 1

Call Waiting
Caller ID Speakerphone
User’s Guide
29391
We bring good things to life.
Page 2

IMPORTANT INFORMATION
NOTICE: The Industry Canada label identifies certified equipment. This certification means
that the equipment meets certain telecommunications network protective, operational and
safety requirements. The Industry Canada does not guarantee the equipment will operate to
the user’s satisfaction.
Before installing this equipment, users should ensure that it is permissible to be connected to
the facilities of the local telecommunications company. The equipment must also be installed
using an acceptable method of connection. The customer should be aware that compliance with
the above conditions may not prevent degradation of service in some situations.
Repairs to certified equipment should be made by an authorized Canadian maintenance
facility designated by the supplier. Any repairs or alterations made by the user to this
equipment, or equipment malfunctions, may give the telecommunications company cause to
request the user to disconnect the equipment.
Users should ensure for their own protection that the electrical ground connections of the
power utility, telephone lines and internal metallic water pipe systems, if present, are
connected together. This precaution may be particularly important in rural areas.
CAUTION: Users should not attempt to make such connections themselves, but should
contact the appropriate electric inspection authority, or electrician, as appropriate.
NOTES: This equipment may not be used on coin service provided by the telephone company.
Party lines are subject to telephone company tariffs and, therefore, you may not be able to
use your own telephone equipment if you are on a party line. Check with your local
telephone company.
INTERFERENCE INFORMATION
This equipment generates and uses radio frequency energy which may interfere with
residential radio and television reception if not properly installed and used in accordance
with instructions contained in this manual. Reasonable protection against such interference
is ensured, although there is no guarantee this will not occur in a given installation. If
interference is suspected and verified by switching this equipment on and off, the user is
encouraged to try to correct the interference by one or more of the following measures:
Reorient the radio/television receiver’s antenna, relocate the equipment with respect to the
receiver, plug the equipment and receiver into separate circuit outlets. The user may also
wish to consult a qualified radio/television technician for additional suggestions. This
equipment has been fully tested and complies with all limits for Class B computing devices
pursuant to part 15 FCC Rules and Regulations. This apparatus does not exceed the class B
limits for RF noise emissions specified in the RFI regulations of the Industry Canada.
HEARING AID COMPATIBILITY
This telephone system meets FCC/Industry Canada standards for Hearing Aid Compatibility.
INDUSTRY CANADA NUMBER IS LOCATED ON THE CABINET BOTTOM
2
REN NUMBER IS LOCATED ON THE CABINET BOTTOM
Page 3

TABLE OF CONTENTS
IMPORTANT INFORMATION ....................... 2
INTERFERENCE INFORMATION ................... 2
HEARING AID COMPATIBILITY .................. 2
INTRODUCTION ..................................... 4
BEFORE YOU BEGIN .............................. 5
PARTS CHECKLIST ............................. 5
MODULAR JACK REQUIREMENTS ......... 5
INSTALLATION & SETUP ......................... 6
IMPORTANT INSTALLATION INFORMATION 6
INSTALLING THE BATTERIES ................. 6
DESKTOP INSTALLATION ...................... 8
WALL MOUNT INSTALLATION .............. 9
SETTING UP THE CALLER ID MENU ... 10
SETTING YOUR LOCAL AREA
CODE ..................................... 11
SETTING THE CID DISPLAY
LANGUAGE ............................. 12
SETTING THE DISPLAY CONTRAST .. 13
SETTING THE DIAL MODE ............. 14
EXITING SETUP .......................... 14
SUMMARY SCREEN ......................... 15
CALLER ID WITH CALL WAITING ........ 15
CALLER ID FEATURES.......................... 15
RECEIVING AND STORING CALLS ........ 16
REVIEWING CALL RECORDS ............... 16
DELETING CALL RECORDS ................ 17
DIALING BACK ................................ 17
IF YOU PROGRAMMED YOUR LOCAL
CODE IN THE SETUP MENU .. 18
AREA
IF YOU DID NOT PROGRAM YOUR LOCAL
CODE IN THE SETUP MENU .. 19
AREA
MESSAGE INDICATORS ......................... 20
USING THE SPEAKERPHONE .................. 21
SPEAKERPHONE LOCATION ................ 21
SPEAKERPHONE USE ....................... 21
WARNING:
OR ELECTRICAL SHOCK HAZARD,
DO NOT EXPOSE THIS PRODUCT
TO RAIN OR MOISTURE.
TO PREVENT FIRE
ELEPHONE BASICS............................. 22
T
RECEIVING A PHONE CALL ................ 22
PLACING A PHONE CALL .................. 22
SWITCHING BETWEEN SPEAKER AND
HANDSET ............................... 22
TEMPORARY TONE DIALING ........... 23
VOLUME CONTROL .......................... 23
REDIAL .......................................... 23
ONE -TOUCH REDIAL ....................... 24
HOLD ............................................ 24
FLASH ........................................... 25
MEMORY........................................... 26
STORING QUICK DIAL NUMBERS ....... 26
STORING FREQUENTLY CALLED
NUMBERS ...................................... 27
REVIEWING NUMBERS STORED IN
MEMORY ....................................... 27
QUICK DIAL NUMBERS ................. 27
FREQUENTLY CALLED NUMBERS ..... 28
CHANGING A STORED NUMBER ......... 28
ERASING A STORED NUMBER ............ 28
STORING A PAUSE IN MEMORY ......... 28
DIALING A QUICK DIAL NUMBER ....... 29
DIALING FREQUENTLY CALLED
NUMBERS ...................................... 29
TROUBLESHOOTING TIPS ...................... 30
GENERAL PRODUCT CARE .................... 32
INDEX ............................................... 33
TELEPHONE NETWORK INFORMATION...... 35
REN NUMBER ................................... 35
SERVICE ............................................ 36
CAUTION
RISK OF ELECTRIC SHOCK
THE LIGHTNING
FLASH AND ARROW HEAD WITHIN THE
TRIANGLE IS A
WARNING SIGN
ALERTING YOU OF
"DANGEROUS
VOLTAGE" INSIDE
THE PRODUCT.
DO NOT OPEN
CAUTION: TO REDUCE THE
RISK OF ELECTRIC SHOCK,
DO NOT REMOVE COVER
(OR BACK). NO USERSERVICEABLE PARTS INSIDE. REFER SERVICING
TO QUALIFIED SERVICE
PERSONNEL.
SEE MARKING ON BOTTOM / BACK OF PRODUCT
THE EXCLAMATION
POINT WITHIN THE
TRIANGLE IS A
WARNING SIGN
ALERTING YOU OF
IMPORTANT
INSTRUCTIONS
ACCOMPANYING
THE PRODUCT.
3
Page 4

INTRODUCTION
Your Caller ID phone stores and displays specific information, provided by
your local telephone company, to subscribers of Caller ID or similar caller
identification services. You must subscribe to one of these services in
order to use this unit.
Your Caller ID phone enables you to:
• Identify callers before you answer the phone.
• View the time and date of each incoming call.
• Record up to 60 Caller ID messages sequentially.
• Know who called while you were away.
IMPORTANT: In order to use this unit, you must subscribe to either the
standard Name/Number Caller ID Service or Caller ID with Call Waiting
Service. To know who is calling while you are on the phone, you must
subscribe to Caller ID with Call Waiting Service.
4
Page 5
BEFORE YOU BEGIN
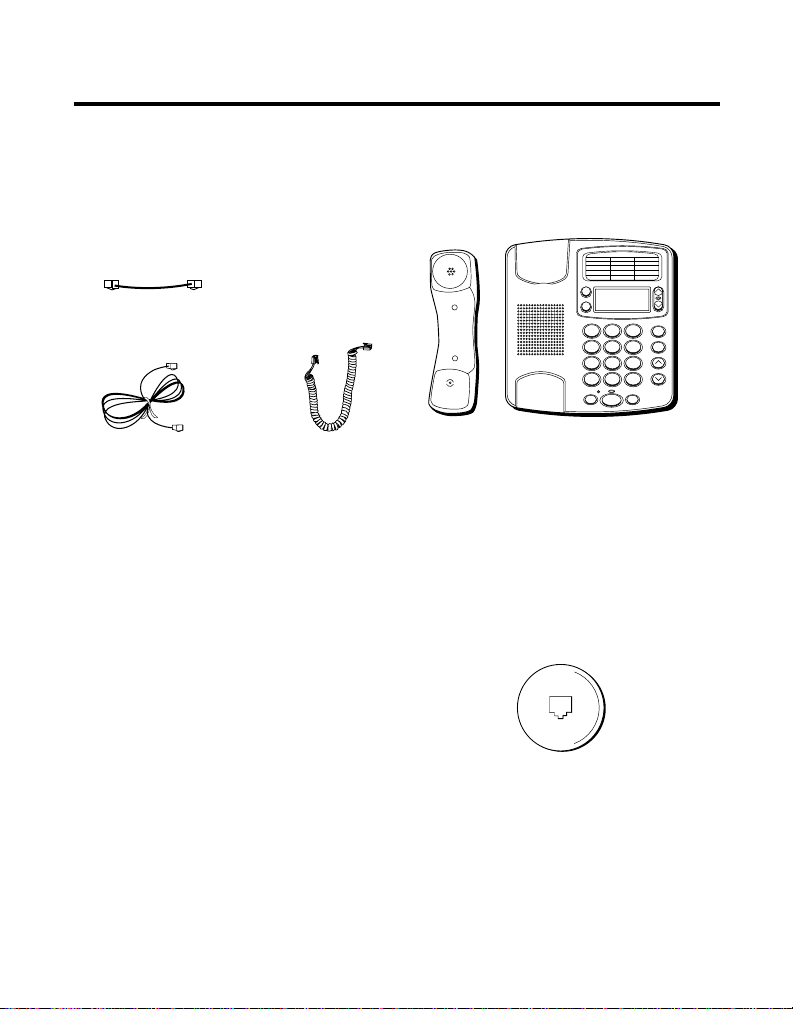
PARTS CHECKLIST
Make sure your package includes the following items:
Short telephone line cord
Telephone line cord
Coiled cord
Handset
MODULAR JACK REQUIREMENTS
You need an RJ11(CA11A) type modular
jack, which is the most common type of
phone jack and might look like the one
pictured here. If you don’t have a modular
jack, call your local phone company to find
out how to get one installed.
OPTIONS A B
DIAL
1
GHI4JKL5MNO
PQ
RS
7
8
0
*
HOLD FLASH
SPEAKER
Base
ABC2DEF
TUV
PER
REVIEWDELETE
STORE
3
REDIAL
6
WX
YZ
9
VOLUME
#
5
Page 6

INSTALLATION & SETUP
IMPORTANT INSTALLATION INFORMATION
• Never install telephone wiring during a lightning storm.
• Never touch uninsulated telephone wires or terminals, unless the
telephone line has been disconnected at the network interface.
• Use caution when installing or modifying telephone lines.
INSTALLING THE BATTERIES
Your Caller ID phone uses 4 AA-size alkaline batteries for receiving and
storing Caller ID records and for the numbers you use for memory dialing.
IMPORTANT: You will have approximately 60 seconds to replace the batteries
before the memories stored are lost. Please read the instructions before
replacing the batteries and have the batteries ready to be inserted beforehand.
1. If the line cord is already connected, disconnect it from the base unit.
2. Use a screwdriver to pry up the battery compartment door on the
bottom of the phone.
3. Insert 4 AA-size alkaline batteries as shown on the diagram in the
battery compartment.
4. Snap the battery compartment door back into place.
5. If the line cord was previously connected, re-attach it to the unit and
check your memory locations.
6
Page 7
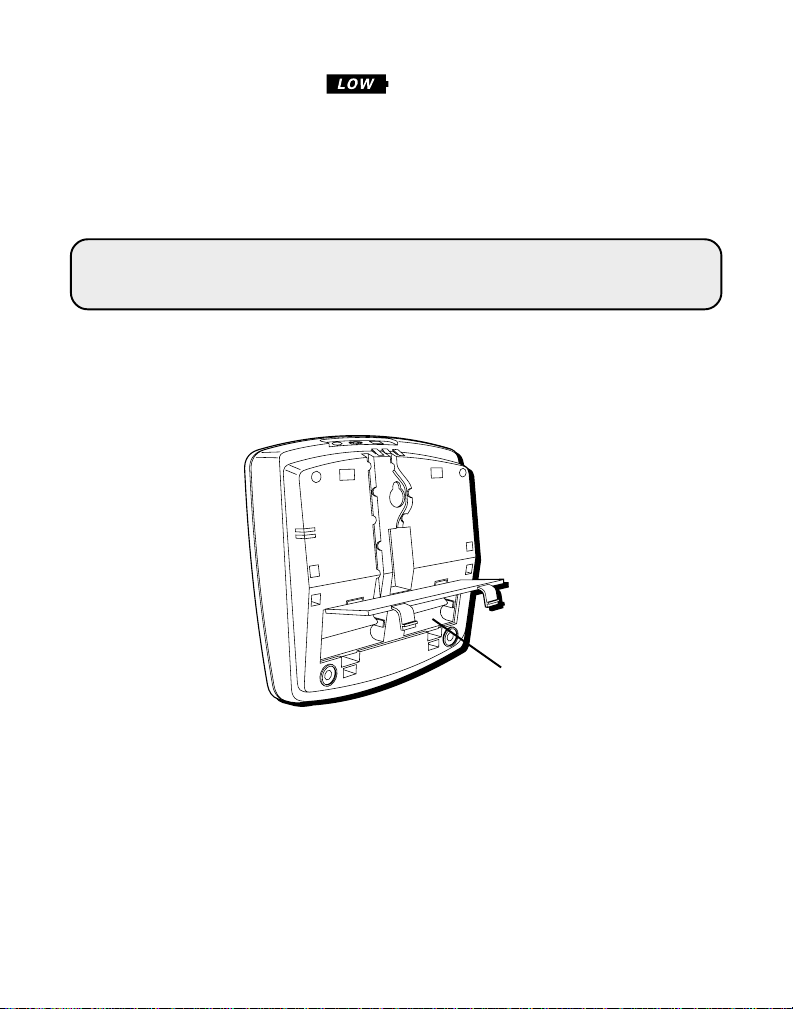
NOTE: If the low battery icon appears in the display, you need to
replace the batteries. It is important that you replace the batteries as soon as
possible in order to maintain Caller ID operation.
During the replacing of batteries, a backup circuit in the unit will retain your
stored information for up to 60 seconds. Write down any stored information
you do not want erased.
IMPORTANT: If you’re not going to use the telephone for more than 30 days,
remove the batteries because they can leak and damage the unit.
Battery
compartment
7
Page 8
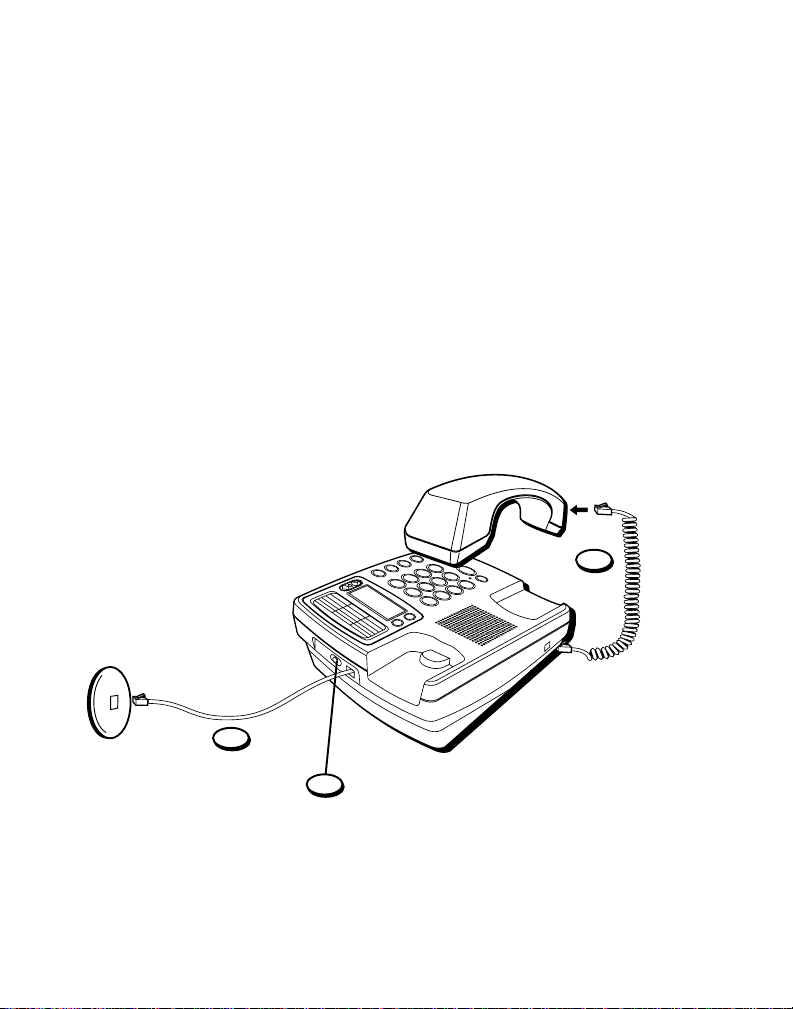
DESKTOP INSTALLATION
1. Plug the coiled cord into the handset. Plug the other end into the jack on
the side of the base. Place the handset in the cradle on the base.
2. Plug the line cord into jack on the back of the base. Plug the other end
into a wall jack.
3. Set the RINGER switch on the base to the desired loudness.
• HI = Default, loudest sound.
• LO = Sound will be lower.
• OFF = Telephone will not ring.
1
2
3
8
Page 9
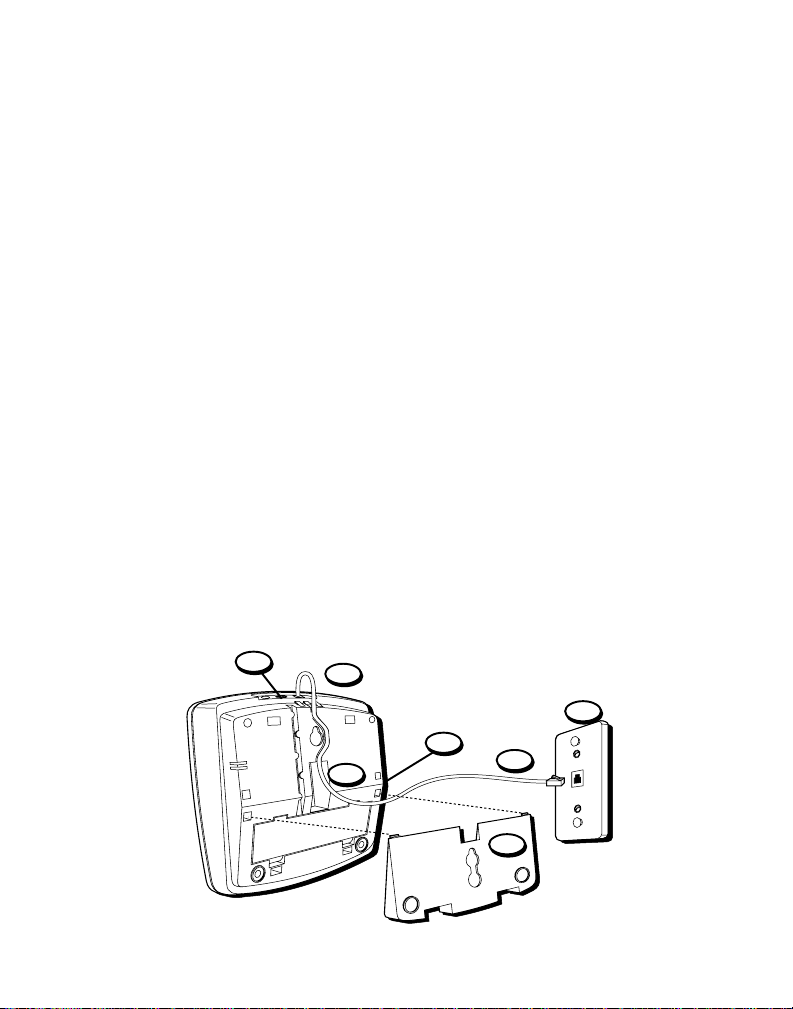
WALL MOUNT INSTALLATION
1. Carefully turn the phone over. Detach the wall mount bracket from the
two sets of top grooves by pressing the tabs in. Pull the bracket from
the phone and turn it around so that it looks like the diagram below.
Gently press the bracket into the two sets of bottom grooves until it
snaps into place.
2. Plug the short line cord into the jack on the back of the base.
3. Feed the line cord through the grooves provided so that the base area is
flat and ready to mount on the wall.
4. Connect the other end of the line cord into the wall phone jack.
5. Place the handset in the cradle of the base as soon as possible to hang
up the phone.
6. Plug the coiled cord into the handset. Plug the other end into the jack on
the side of the base.
7. Slip the mounting holes of the base (on bottom of unit) over the wall
plate posts and slide the base down until the phone is firmly in place.
8. Set the RINGER switch on the base to the desired loudness.
• HI = Default, loudest sound.
• LO = Sound will be lower.
• OFF = Telephone will not ring.
8
2
7
6
3
4
1
9
Page 10
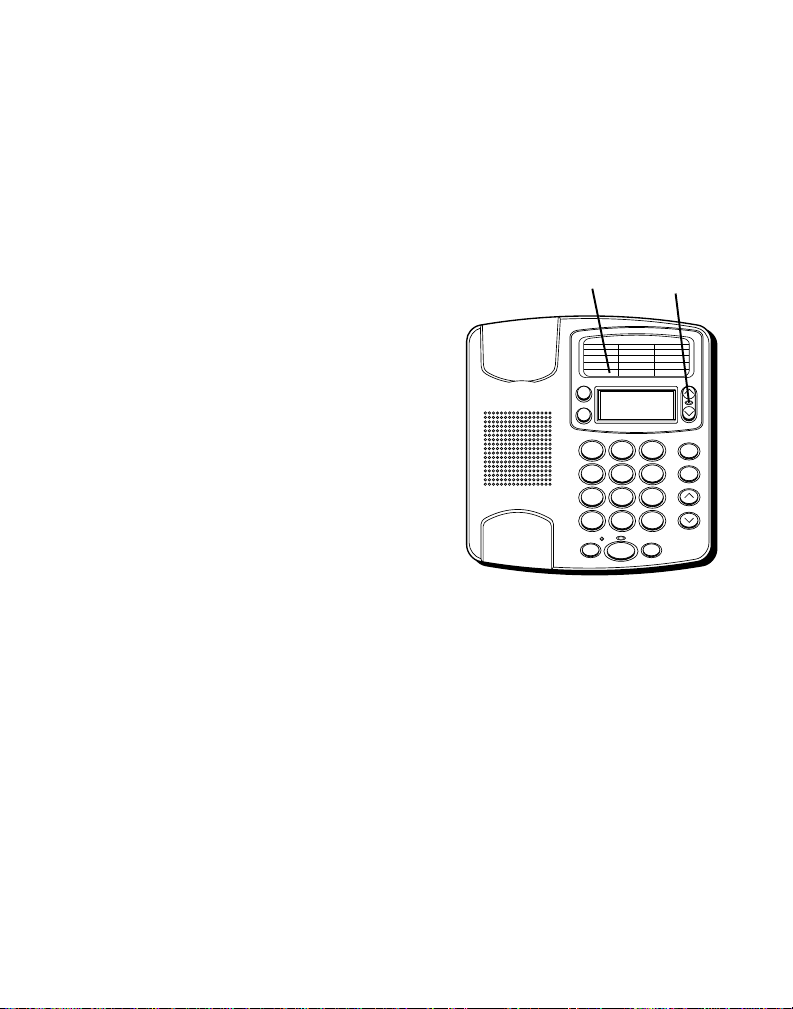
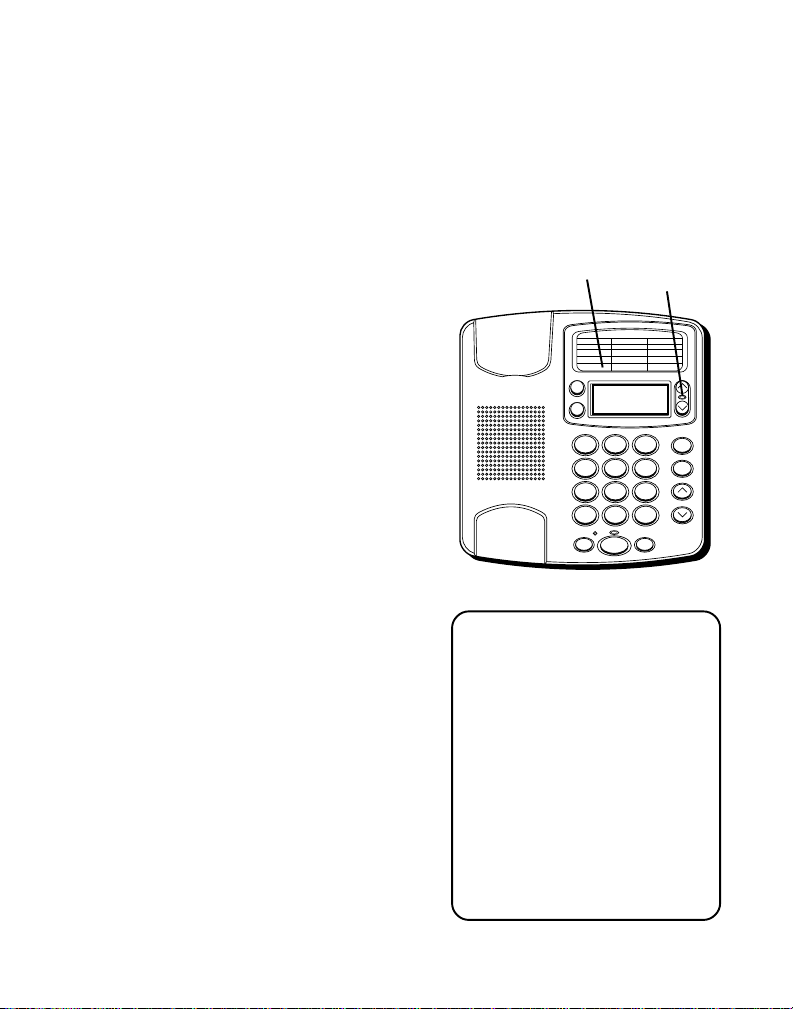
SETTING UP THE CALLER ID MENU
You should not plug the telephone into the
wall line jack while setting up the Caller ID
menu. An incoming call may invalidate the
change if it was not yet saved. The phone
must display
enter the setup menu.
1. Press the OPTIONS button.
MENU ^ v
2. At this point you can press either
REVIEW up or down button to scroll
among the 6 menu screens, which are:
• # 1 OPTIONS MENU ^ v
• # 2 LOCAL AREA CODE (default - - -)
• # 3 LANGUAGE (default English)
• # 4 (LCD) CONTRAST (default 3)
• # 5 T/P DIAL MODE (default tone)
• # 6 EXIT OPTIONS
3. You have 10 seconds following any key
press before the phone will
automatically return to the Summary
Screen.
xx CALLS
appears.
before you can
OPTIONS
OPTIONS
button
AM
PM
REVIEW
buttons
OPTIONS A B
10/1912:30
DIAL
315 - 555 - 1324
SMITH JOHN
ABC2DEF
1
GHI4JKL5MNO
PQ
TUV
RS
7
8
PER
0
*
HOLD FLASH
SPEAKER
REVIEWDELETE
STORE
3
REDIAL
6
WX
YZ
9
VOLUME
#
10
Summary Screen
Page 11

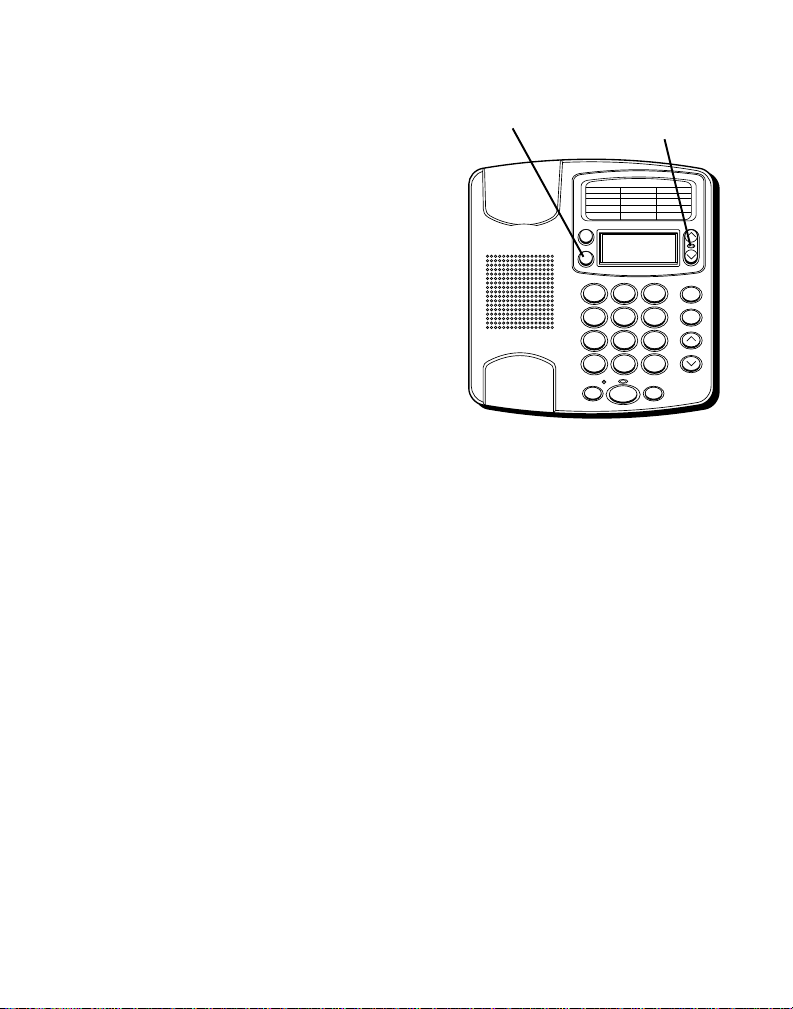
SETTING YOUR LOCAL AREA CODE
The telephone uses the programmed area
code to determine the number format to
display when a valid Caller ID signal is
received and is also used for the Dialback
feature.
1. Press the OPTIONS button.
MENU ^ v
appears.
2. Press the REVIEW up or down buttons
until
LOCAL AREA CODE
3. To enter and change the area code,
press OPTIONS again. The display
shows the present area code stored. The
left-most digit or a minus sign (-)
flashes, indicating it is ready to accept
the area code entry.
4. Press 1-9 on the key pad for the first digit.
To clear the digit, press either * or #.
5. When the desired digit is flashing, press
either REVIEW button to advance to the
next digit.
OPTIONS
appears.
OPTIONS
button
OPTIONS A B
DIAL
315 - 555 - 1324
1
GHI4JKL5MNO
PQ
RS
7
*
HOLD FLASH
REVIEW
buttons
10/1912:30
SMITH JOHN
ABC2DEF
3
6
TUV
8
9
PER
0
SPEAKER
REVIEWDELETE
STORE
REDIAL
WX
YZ
VOLUME
#
11
Page 12

6. Repeat steps 4 and 5 until all the digits
for your area code are correct.
If you make a mistake, you can simply
retrace the previous steps until your
area code is set.
7. Press OPTIONS once again to store the
area code and return to the “LOCAL
AREA CODE” display.
SETTING THE CID DISPLAY LANGUAGE
This adjustment changes the Caller ID
prompts to be displayed in English or
Spanish.
1. Press the OPTIONS button.
MENU ^ v
appears.
2. Press the REVIEW up button until
LANGUAGE
appears.
3. To enter and change the language, press
the OPTIONS button. The display shows
the current language. The default is
English.
4. Press either REVIEW button to change
the setting.
5. Press OPTIONS once again to store the
setting and return to the
“LANGUAGE” display.
OPTIONS
OPTIONS
button
OPTIONS A B
10/1912:30
DIAL
315 - 555 - 1324
SMITH JOHN
ABC2DEF
1
GHI4JKL5MNO
PQ
TUV
RS
7
8
PER
0
*
HOLD FLASH
SPEAKER
3
6
WX
YZ
9
#
REVIEW
buttons
REVIEWDELETE
STORE
REDIAL
VOLUME
12
Page 13

SETTING THE DISPLAY CONTRAST
This adjustment allows optimization of
the contrast and viewing angle of the
display.
1. Press the OPTIONS button.
MENU ^ v
appears.
2. Press the REVIEW up button until
CONTRAST
appears.
3. To enter and change the contrast, press
the OPTIONS button. The display
shows the current contrast setting.
There are 5 levels of contrast, with the
default set to 3.
4. Press either REVIEW button to change
the setting.
5. Press OPTIONS once again to store the
setting and return to the
“(LCD) CONTRAST” display.
OPTIONS
(LCD)
OPTIONS
button
OPTIONS A B
10/1912:30
DIAL
315 - 555 - 1324
SMITH JOHN
ABC2DEF
1
GHI4JKL5MNO
PQ
TUV
RS
7
8
PER
0
*
HOLD FLASH
SPEAKER
3
6
9
#
WX
YZ
REVIEW
buttons
REVIEWDELETE
STORE
REDIAL
VOLUME
13
Page 14
SETTING THE DIAL MODE
This adjustment allows you to select tone
(touch-tone) or pulse (rotary) mode dialing.
1. Press the OPTIONS button.
MENU ^ v
appears.
2. Press the REVIEW up button until
DIAL MODE
appears.
OPTIONS
T/P
3. To enter and change the dial mode,
press the OPTIONS button. The display
shows the current setting. The default is
set to tone.
4. Press either REVIEW button to change
the setting.
5. Press OPTIONS once again to store the
setting and return to the
“
T/P DIAL MODE
” display.
EXITING SETUP
To exit the Setup menu after your changes
have been made, you can immediately exit
by selecting the "EXIT OPTIONS" menu
and pressing the OPTIONS button.
OPTIONS
button
OPTIONS A B
DIAL
315 - 555 - 1324
SMITH JOHN
1
GHI4JKL5MNO
PQ
RS
7
8
0
*
HOLD FLASH
SPEAKER
10/1912:30
ABC2DEF
TUV
PER
REVIEW
buttons
3
6
WX
YZ
9
#
REVIEWDELETE
STORE
REDIAL
VOLUME
14
Page 15
CALLER ID FEATURES
AM
PM
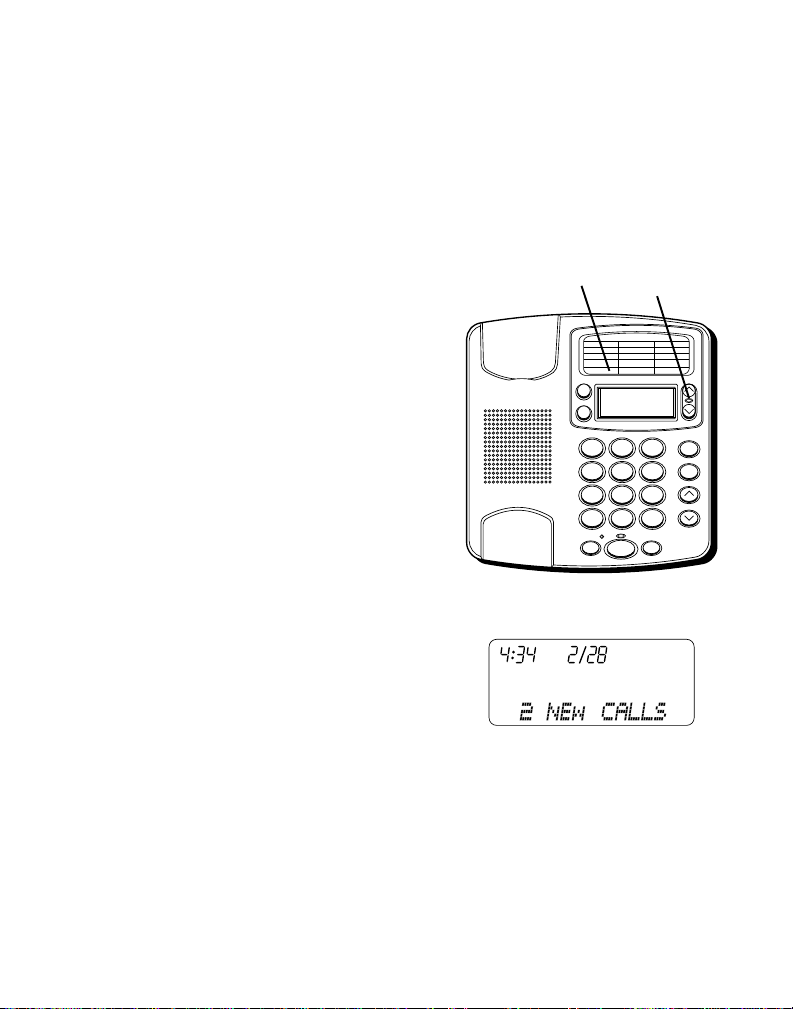
SUMMARY SCREEN
The Summary Screen shows the current
time, date, and number of new calls to be
reviewed. It is displayed until the REVIEW
or OPTIONS buttons are pressed or a Caller
ID record is received. Within 10 seconds of
receiving a new call, the Summary Screen
is displayed and the New Call LED flashes.
NEW CALL
indicator
NOTE: The number of new calls is displayed
until all new calls have been reviewed.
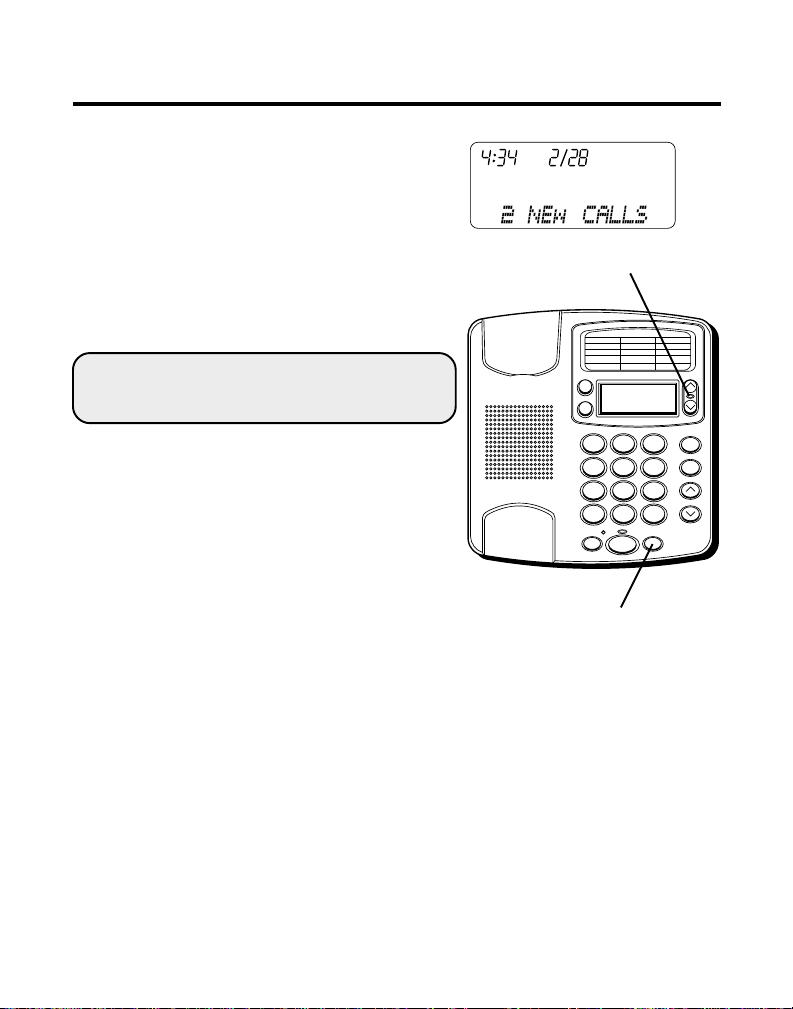
CALLER ID WITH CALL WAITING
Provided your telephone company is able to
integrate Caller ID and Call Waiting services,
you are able to see who is calling when you
hear the call waiting beep. The caller
identification information appears in the
display after you hear the tone.
• Press the FLASH button to put the
current person on hold so that you can
answer the incoming call.
OPTIONS A B
10/1912:30
DIAL
315 - 555 - 1324
SMITH JOHN
ABC2DEF
1
GHI4JKL5MNO
PQ
TUV
RS
7
8
PER
0
*
HOLD FLASH
SPEAKER
FLASH
button
REVIEWDELETE
STORE
3
REDIAL
6
WX
YZ
9
VOLUME
#
15
Page 16

RECEIVING AND STORING CALLS
This unit receives and displays information
transmitted by your local phone company.
This information can include the phone
number, date, and time; or the name,
phone number, date, and time. The unit can
store up to 60 calls for later review. When
the memory is full, a new call automatically
replaces the oldest call in memory.
NEW
appears in the display for calls received
that have not been reviewed.
REVIEWING CALL RECORDS
• Press the REVIEW down button to scroll
through the call records from the most
recent to the oldest.
• Press the REVIEW up button to scroll
through the call records from the oldest
to the newest.
• When all of the messages have been
viewed, START/END appears in the
display.
OPTIONS A B
10/1912:30
DIAL
315 - 555 - 1324
SMITH JOHN
ABC2DEF
1
GHI4JKL5MNO
PQ
TUV
RS
7
8
PER
0
*
HOLD FLASH
SPEAKER
REVIEW
buttons
3
6
WX
YZ
9
VOLUME
#
REVIEWDELETE
STORE
REDIAL
16
Page 17
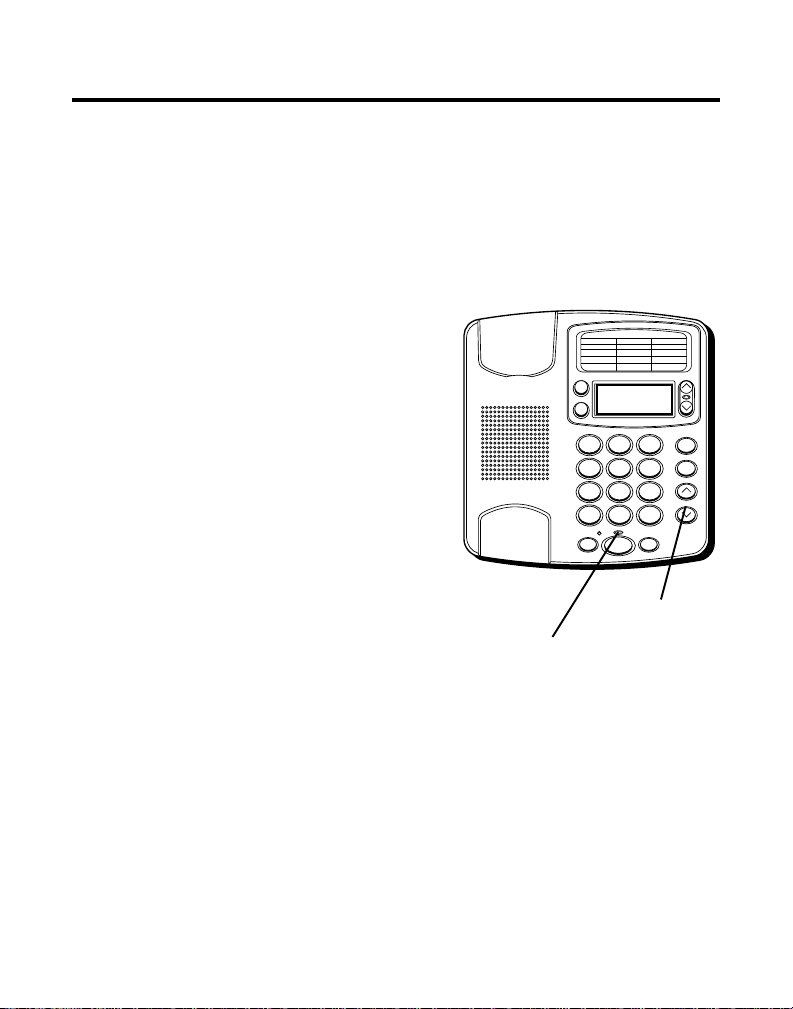
DELETING CALL RECORDS
• To delete the record shown in the display,
press the DELETE button once.
• To delete all records while reviewing,
press and hold the DELETE button for
about 3 seconds.
DELETE ALL?
appears
in the display. Press DELETE again to
complete.
DIALING BACK
When reviewing Caller ID records, you can
dialback the numbers shown on the display
by pressing the DIAL button.
NOTE: You must press DIAL before you pick
up the handset.
NOTE: If only PICKUP PHONE shows on the
display, no other changes to the number can
be made. The information sent from the
telephone company is known to be a valid
number for dialing back (utilized only in
very limited areas). Once you pickup the
phone or press SPEAKER the number will
be automatically dialed.
Dial button
DELETE button
OPTIONS A B
10/1912:30
DIAL
315 - 555 - 1324
SMITH JOHN
ABC2DEF
1
3
GHI4JKL5MNO
6
PQ
TUV
RS
7
8
9
PER
0
*
HOLD FLASH
SPEAKER
SPEAKER button
REVIEWDELETE
STORE
REDIAL
WX
YZ
VOLUME
#
17
Page 18
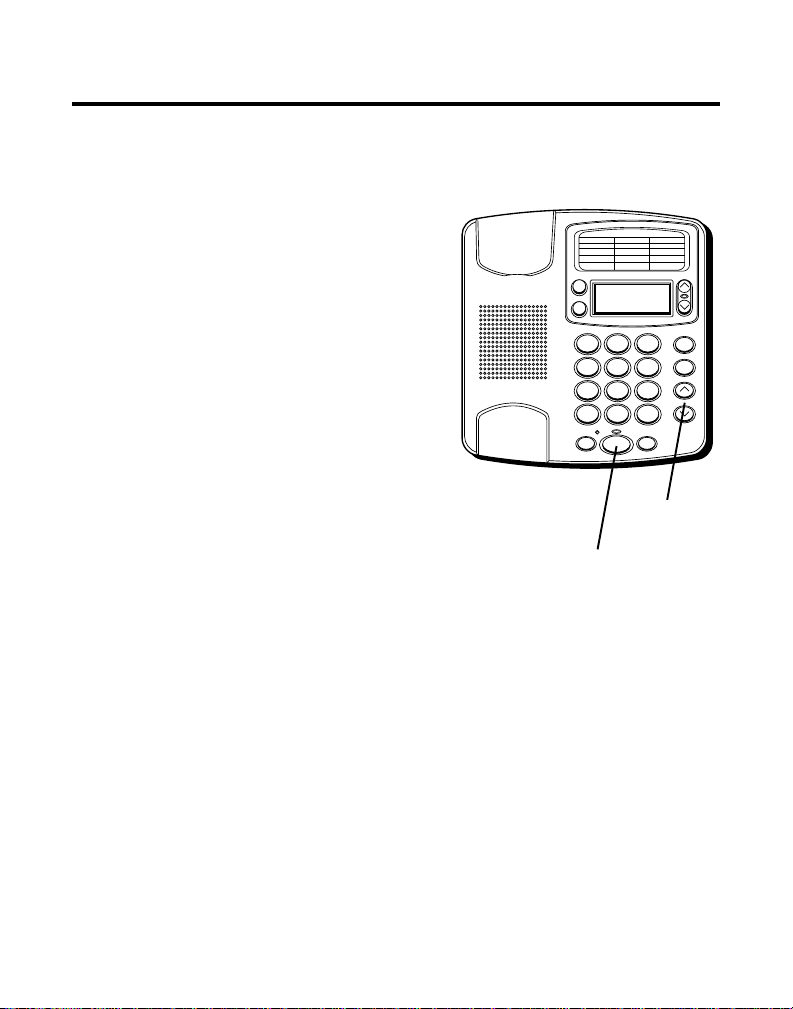
IF YOU PROGRAMMED YOUR LOCAL AREA
CODE
IN THE SETUP MENU
1. Use the REVIEW up and down buttons to
display the number you want to dial.
• If you see a number with 7 digits (i.e.
555-1234), then the call was received
from within your area code. However,
this does not guarantee the call is a local
call.
• If you see a number with 11 digits (i.e. 1234-555-1234), then the call received was
not from your area code.
2. To adjust the phone number, press the
OPTIONS button. For instance, a 7-digit
local number sometimes cannot be
dialed because it requires a 10-digit or
11-digit format. Press the OPTIONS
button repeatedly to scroll through the 7,
10, and 11-digit numbers.
7-digits:
10-digits:
11-digits:
OPTIONS
button
OPTIONS A B
DIAL
1
GHI4JKL5MNO
PQ
RS
7
*
HOLD FLASH
10/1912:30
315 - 555 - 1324
SMITH JOHN
ABC2DEF
3
6
TUV
8
9
PER
0
SPEAKER
REVIEW
buttons
WX
YZ
#
REVIEWDELETE
STORE
REDIAL
VOLUME
7-digit telephone number
(i.e. 555-5555)
3-digit area code + 7-digit
telephone number (i.e.
425-555-5555)
long distance code 1 + 3digit area code + 7-digit
telephone number
(i.e. 1-425-555-5555)
18
Page 19
3. Press the DIAL button and the display
shows
timer will also start at this point on the
PICKUP PHONE
. A 10 second
DIAL button
upper right side of the display, letting
you know the time until the unit will
return to the Caller ID record.
• If you adjust the number to be dialed, the
timer will reset after each adjustment.
4. Pick up the handset or press SPEAKER
before the timer reaches 0.
DIALING
shows in the display and the
NOW
number is dialed.
IF YOU DID NOT PROGRAM YOUR LOCAL
CODE IN THE SETUP MENU
AREA
1. Use the REVIEW up and down buttons to
display the number you want to dial. You
will only see 10-digit numbers (i.e. 234555-1234).
2. See steps 2 through 4 in the above
section to complete the dialback
sequence.
REVIEW
buttons
OPTIONS A B
10/1912:30
DIAL
315 - 555 - 1324
SMITH JOHN
ABC2DEF
1
GHI4JKL5MNO
PQ
TUV
RS
7
8
PER
0
*
HOLD FLASH
SPEAKER
REVIEWDELETE
STORE
3
REDIAL
6
WX
YZ
9
VOLUME
#
19
Page 20

MESSAGE INDICATORS
The following special messages indicate the status of a message or the
unit:
NO CALLS
The caller memory is empty.
UNKNOWN
CALL
BLOCKED CALL
ERROR
NO DATA
START/END
The incoming call does not have Caller ID service or
their service area is not linked to yours. If
CALL
appears along with a calling number, the name
information for that number was not available.
The caller of the incoming call is registered as “Private
Number” and their Caller ID information is withheld.
Caller information has been interrupted or corrupted
during transmission.
No Caller ID signal has been detected, or Caller ID service
has not been activated.
You are at the beginning or the end of the Caller ID
memory log.
Battery power level is low.
UNKNOWN
20
Page 21
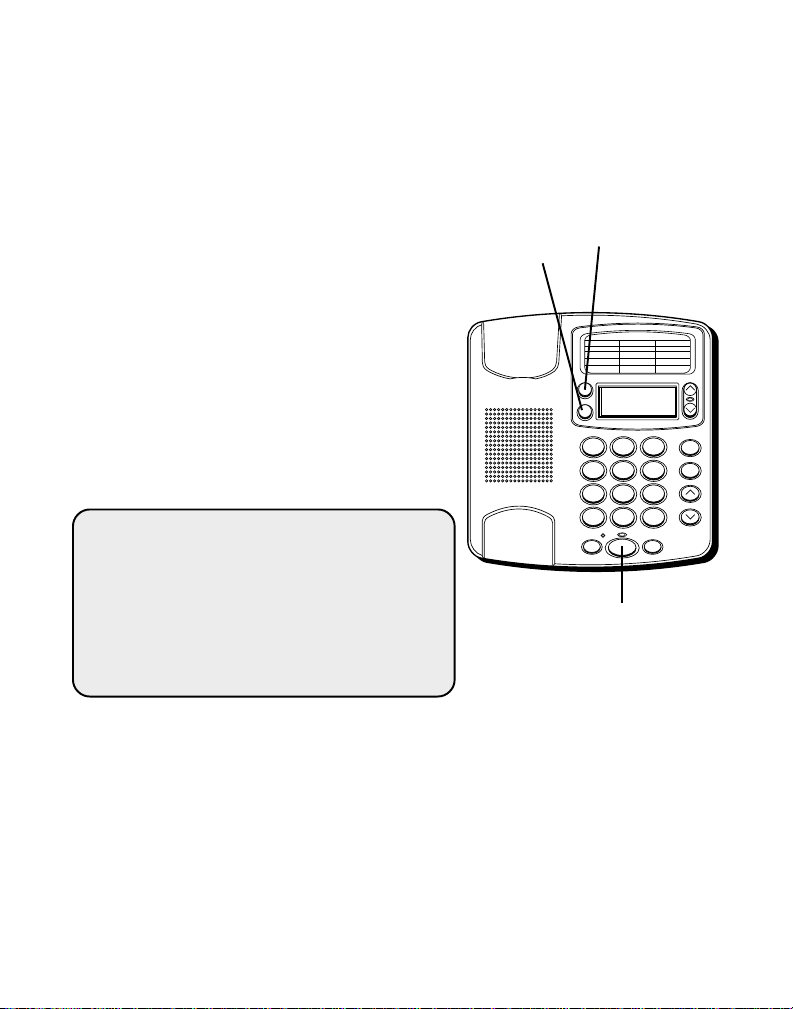
USING THE SPEAKERPHONE
SPEAKERPHONE LOCATION
For best speakerphone performance, avoid
the following:
• Areas with high background noise. (The
microphone might pick up these sounds
and prevent the speakerphone from
going into the receiving mode when you
finish talking.)
• Surfaces affected by vibration.
• Recessed areas such as in a corner,
under a cupboard, or next to a cabinet,
which can generate an echo effect.
SPEAKERPHONE USE
Note the following guidelines when using
the speakerphone:
• The speakerphone works similar to a
two-way radio in that you can only listen
or talk at one time.
• Stay reasonably close to the phone so
that you can be clearly heard by the
person to whom you are talking.
• You can adjust the speaker volume by
pressing the VOLUME up or down
buttons.
• The speakerphone indicator light comes
on when the speakerphone is in use.
Speaker Phone
Indicator
OPTIONS A B
10/1912:30
DIAL
315 - 555 - 1324
SMITH JOHN
ABC2DEF
1
3
GHI4JKL5MNO
6
PQ
TUV
RS
7
8
9
PER
0
*
HOLD FLASH
SPEAKER
VOLUME buttons
REVIEWDELETE
STORE
REDIAL
WX
YZ
VOLUME
#
21
Page 22
TELEPHONE BASICS
RECEIVING A PHONE CALL
1. Be sure the RINGER switch is set to the
HI or LOW position.
2. When the phone rings and the caller’s
information shows on the display, lift
the handset or press the SPEAKER
button and begin your conversation.
3. You can adjust the volume of the
caller’s voice by pressing the VOLUME
up or down buttons.
4. Set the RINGER switch to the OFF
position when you do not want to be
interrupted by the phone ringing.
PLACING A PHONE CALL
1. Lift the handset or press the SPEAKER
button and wait for a dial tone.
2. Dial the telephone number you wish to
call.
3. You can adjust the volume of the
caller’s voice by pressing the VOLUME
up or down buttons.
OPTIONS A B
10/1912:30
DIAL
315 - 555 - 1324
SMITH JOHN
ABC2DEF
1
3
GHI4JKL5MNO
6
PQ
TUV
RS
7
8
9
PER
0
*
HOLD FLASH
SPEAKER
VOLUME
buttons
SPEAKER button
REVIEWDELETE
STORE
REDIAL
WX
YZ
VOLUME
#
SWITCHING BETWEEN SPEAKER AND HANDSET
You can switch between speakerphone and handset while the phone is
dialing a number, or anytime during a conversation.
• Speaker to Handset — Pick up the handset.
• Handset to Speaker —
22
Press SPEAKER, then hang up handset.
Page 23

TEMPORARY TONE DIALING
If you have pulse service, you can
temporarily change from pulse to tone
service. After dialing the telephone number, press and release the * button on the
telephone. This allows access to phone
services that require a tone, such as
banking and long-distance services. After
you hang up the handset, the telephone
automatically returns to pulse service.
VOLUME CONTROL
This feature allows you to increase the
listening volume in the receiver of the
handset when speaking with your party.
When needed, press the VOLUME up and
down buttons.
REDIAL
If the number you dialed is busy, or you
want to call the last number dialed again,
press REDIAL. The number shows on the
display and dials automatically.
REDIAL button
OPTIONS A B
10/1912:30
DIAL
315 - 555 - 1324
SMITH JOHN
ABC2DEF
1
GHI4JKL5MNO
PQ
TUV
RS
7
8
PER
0
*
HOLD FLASH
SPEAKER
REVIEWDELETE
3
REDIAL
6
WX
YZ
9
VOLUME
#
VOLUME
buttons
STORE
23
Page 24

ONE -TOUCH REDIAL
If the last call you dialed was busy, you can
redial it immediately by just pressing the
REDIAL button without hanging up the
handset.
NOTE: The Redial feature stores in memory
all the numbers you press. If you press any
numbers after dialing the phone number
you last called (for example, when accessing
a voice mail system), those numbers are also
dialed when using Redial. This may cause
the phone to try to dial all the numbers at
once.
HOLD
1. To place a call on hold, press the HOLD
button and hang up the handset. (If you
were in speakerphone mode, the unit
automatically puts the call on hold.) The
HOLD indicator blinks until you resume
your conversation.
2. To resume your conversation, lift the
handset or that of any extension phone
on the same line or press the SPEAKER
button.
REDIAL
button
HOLD button
and indicator
OPTIONS A B
10/1912:30
DIAL
315 - 555 - 1324
SMITH JOHN
ABC2DEF
1
3
GHI4JKL5MNO
6
PQ
TUV
RS
7
8
9
PER
0
*
HOLD FLASH
SPEAKER
SPEAKER button
REVIEWDELETE
STORE
REDIAL
WX
YZ
VOLUME
#
24
Page 25

FLASH
This feature is used to activate customer
calling services available through your
local phone company, such as Call Waiting.
These services generally require an extra
monthly fee. If you subscribe to any of
these services, please refer to the phone
company’s instructions on how to use
FLASH. See the "Caller ID Features" section
for more information on Caller ID with Call
Waiting.
1. While having a conversation, another
party calls and you hear a tone.
2. Press the FLASH button once and
release. The first conversation is placed
on hold and the second call can be
answered.
3. Press FLASH again and release. The first
caller can be spoken to again and the
second call is placed on hold.
OPTIONS A B
10/1912:30
DIAL
315 - 555 - 1324
SMITH JOHN
ABC2DEF
1
GHI4JKL5MNO
PQ
TUV
RS
7
8
PER
0
*
HOLD FLASH
SPEAKER
FLASH button
REVIEWDELETE
STORE
3
REDIAL
6
WX
YZ
9
VOLUME
#
25
Page 26

MEMORY
Before you store any telephone number
into memory, make sure the dial mode is
correct for the type of telephone you’re
using. The default dial mode is tone
(touch-tone), so if you have pulse (rotary)
service, you must first change the dial
mode. See “To Set the Dial Mode.”
The following buttons can be stored into
any memory location: 0-9, *, # and PAUSE
(REDIAL). See "Storing a Pause in Memory"
and "Temporary Tone Dialing".
STORING QUICK DIAL NUMBERS
1. Pick up the handset or press the
SPEAKER button.
2. Press STORE.
3. Enter the telephone number (up to 20
digits). If you make a mistake, hang up
and repeat the procedure for storing
from the beginning.
NOTE: It will not actually call the number
in this mode.
Quick Dial
buttons
OPTIONS A B
10/1912:30
DIAL
315 - 555 - 1324
SMITH JOHN
ABC2DEF
1
GHI4JKL5MNO
PQ
TUV
RS
7
8
PER
0
*
HOLD FLASH
SPEAKER
SPEAKER button
3
6
9
WX
YZ
#
STORE
button
REVIEWDELETE
STORE
REDIAL
VOLUME
4. Press STORE.
5. Press selected Quick Dial location A or B.
6. Hang up the handset or press SPEAKER
again.
7. Write the name or number of party
stored in the memory location on the
directory card.
26
Page 27

STORING FREQUENTLY CALLED NUMBERS
1. Pick up the handset or press the
SPEAKER button.
2. Press STORE.
3. Enter the telephone number (it will not
actually call the number in this mode). If
you make a mistake, hang up and repeat
the procedure for storing from the
beginning.
4. Press STORE.
5. Press 0-9 for the memory location.
6. Hang up the handset or press SPEAKER
again.
7. Write the name or number of party
stored in the memory location on the
directory card.
REVIEWING NUMBERS STORED IN MEMORY
QUICK DIAL NUMBERS
1. Make sure the handset is hung up.
2. Press Quick Dial A or B. The number
shows on the display.
Quick Dial
buttons
OPTIONS A B
DIAL
315 - 555 - 1324
SMITH JOHN
1
GHI4JKL5MNO
PQ
RS
7
*
HOLD FLASH
SPEAKER
SPEAKER
button
10/1912:30
ABC2DEF
TUV
8
PER
0
3
6
9
#
WX
YZ
STORE
button
REVIEWDELETE
STORE
REDIAL
VOLUME
27
Page 28

FREQUENTLY CALLED NUMBERS
1. Make sure the handset is hung up.
2. Press DIAL.
3. Press 0-9 for the memory location. The
number shows on the display.
CHANGING A STORED NUMBER
Repeat the storage sequence. The new
number replaces the old number at the
memory location.
ERASING A STORED NUMBER
1. Pick up the handset or press SPEAKER.
2. Press STORE.
3. Press STORE again.
4. Press the location (A, B, 0-9) to be
erased.
DIAL button
STORE button
OPTIONS A B
10/1912:30
DIAL
315 - 555 - 1324
SMITH JOHN
ABC2DEF
1
GHI4JKL5MNO
PQ
TUV
RS
7
8
PER
0
*
HOLD FLASH
SPEAKER
REVIEWDELETE
STORE
3
REDIAL
6
WX
YZ
9
VOLUME
#
STORING A PAUSE IN MEMORY
The REDIAL button becomes a pause
function when the STORE button has been
pressed first. It is valid only when storing a
number into memory locations.
Use the PAUSE (REDIAL) button to insert a
pause when a delay is needed in an
automatic dialing sequence. For example,
when you must dial a 9 to get an outside
line or when you enter codes to access you
long distance company.
28
SPEAKER button
REDIAL button
Page 29

You may need to adjust the length of the
pause duration. It can be adjusted from 1 to
9 seconds. The default setting is 4 seconds.
1. Pick up the handset or press SPEAKER.
2. Press the STORE button.
3. Press 1-9 (1=1 second, 2=2 seconds, etc.)
DIAL button
4. Press STORE again.
5. Press the PAUSE (REDIAL) button to
save.
DIALING A QUICK DIAL NUMBER
1. Pickup the handset or press SPEAKER.
2. Press the Quick Dial location A or B. The
number shows on the display and dials
automatically.
DIALING FREQUENTLY CALLED NUMBERS
1. Pick up the handset or press SPEAKER.
2. Press DIAL.
3. Press 0-9 for the memory location. The
number dials automatically.
STORE button
Quick Dial buttons
OPTIONS A B
DIAL
315 - 555 - 1324
SMITH JOHN
1
GHI4JKL5MNO
PQ
RS
7
8
0
*
HOLD FLASH
SPEAKER
10/1912:30
ABC2DEF
TUV
PER
REVIEWDELETE
STORE
3
REDIAL
6
WX
YZ
9
VOLUME
#
SPEAKER button REDIAL button
29
Page 30

TROUBLESHOOTING TIPS
NO DIAL TONE
• Check all cabling to make sure that all connections are secure and not
damaged.
• Check hook switch: Does it fully extend when handset is lifted from cradle?
NO DISPLAY
• Replace batteries.
• Check for proper battery installation.
NO INFORMATION IS SHOWN AFTER THE PHONE RINGS
• Did you order Caller ID service from your local telephone company?
This unit requires that you subscribe to Caller ID service in order to
work.
• Be sure to wait until the second ring before answering.
ERROR MESSAGE IS DISPLAYED
•
ERROR
Caller ID information during the silent period after the first ring. This
message indicates either the presence of noise on the line, or that an
invalid message has been sent from the telephone company.
PHONE DOES NOT DIAL OUT
• Check the dial mode in the setup menu. Is it set to tone, which may not be
compatible with your local dialing service?
appears in the display if the unit detects anything other than valid
30
Page 31

PHONE DOES NOT RING
• Is the ringer switch in the OFF position?
• Are you using too many phones on one line? (The total REN of all
phones on the same line should not be greater than the maximum REN
for your calling area. See FCC Registration Information)
• Perform the checks under the first problem (Number 1). Is the hook
switch depressed fully when handset is in cradle?
INCOMING AND OUTGOINGVOICE VOLUME LOW
• Are other phones off hook at same time? If so, this is normal condition
as volume drops when additional phones are used at once.
TONE FEEDBACK FLUTTER WHEN DIALING IN PULSE MODE
• This is normal as power is fluctuating with phone outpulsing.
31
Page 32

GENERAL PRODUCT CARE
To keep your phone working and looking good, follow these guidelines:
• Avoid putting near heating appliances and devices that generate
electrical noise ( for example, motors and flourescent lamps).
• DO NOT expose to direct sunlight or moisture.
• Avoid dropping and other rough treatment of the unit.
• Never use a strong cleaning agent or abrasive powder because this
will damage the finish.
• Retain the original package in case you need to ship it at a later date.
32
Page 33

INDEX
B
Before You Begin 5
C
Caller ID Features 15
Caller ID with Call Waiting 15
Changing a Stored Number 28
D
Deleting Call Records 17
Desktop Installation 8
Dialing a Quick Dial Number 29
Dialing Back 17
Dialing Frequently Called Numbers 29
E
Erasing a Stored Number 28
Exiting Setup 14
F
Flash 25
Frequently Called Numbers 28
G
General Product Care 32
H
Hearing Aid Compatibility 2
Hold 24
I
If you did not program your local area
code in the 19
If you programmed your local area code
in the setu 18
Important Information 2
Important Installation Information 6
Installation & Setup 6
Installing the Batteries 6
Interference Information 2
Introduction 4
M
Memory 26
Message Indicators 20
Modular Jack Requirements 5
O
One -Touch Redial 24
P
Parts Checklist 5
Placing a Phone Call 22
Q
Quick Dial Numbers 27
33
Page 34

R
Receiving a Phone Call 22
Receiving and Storing Calls 16
Redial 23
REN Number 35
Reviewing Call Records 16
Reviewing Numbers Stored in
Memory 27
S
Service 36
Setting the CID Display Language 12
Setting the Dial Mode 14
Setting the Display Contrast 13
Setting Up the Caller ID Menu 10
Setting Your Local Area Code 11
Speakerphone Location 21
Speakerphone Use 21
Storing a Pause in Memory 28
Storing Frequently CalledNumbers 27
Storing Quick Dial Numbers 26
Summary Screen 15
Switching between Speaker
and Handset 22
T
Telephone Basics 22
Telephone Network Information 35
Temporary Tone Dialing 23
Troubleshooting Tips 30
U
Using the Speakerphone 21
V
Volume Control 23
W
Wall Mount Installation 9
34
Page 35

TELEPHONE NETWORK INFORMATION
Should your equipment cause trouble on your line which may harm the
telephone network, the telephone company, where practicable, may notify
you that temporary discontinuance of service may be required. Where
prior notice is not practicable and the circumstances warrant such action,
the telephone company may temporarily discontinue service immediately.
The telephone company may make changes in its communications
facilities, equipment, operations or procedures where such action is
required in the operation of its business. If these changes are expected to
affect the use or performance of your telephone equipment, the telephone
company will likely give you adequate notice to allow you to maintain
uninterrupted service.
Notice must be given to the telephone company upon termination of your
telephone from your line.
REN NUMBER
On the bottom of this equipment is a label indicating, among other
information, the FCC Registration number and Ringer Equivalence Number
(REN) for the equipment. You must, upon request, provide this information
to your telephone company.
The REN is useful in determining the number of devices you may connect
to your telephone line and still have all of these devices ring when your
telephone number is called. In most (but not all) areas, the sum of the
RENs of all devices connected to one line should not exceed 5. To be
certain of the number of devices you may connect to your line as
determined by the REN, you should contact your local telephone company.
35
Page 36

SERVICE
Thomson Consumer Electronics Canada, Inc. warrants to the purchaser or gift
recipient that if any manufacturing defect becomes apparent in this product within
1 year from the original date of purchase, it will be replaced free of charge,
including return transportation.
This warranty does not include damage to the product resulting from accidents,
misuse or leaking batteries.
Should your product not perform properly during the warranty period, either:
1. Return it to the selling dealer with proof of purchase for replacement,
2. Remove the batteries (where applicable), and pack product complete with
accessories in the original carton (or equivalent).
— Mail prepaid (with proof of purchase) and insured to:
Thomson Consumer Electronics Canada, Inc.
Distribution Centre
7400 A Bramalea Road
Mississauga, Ontario L5S 1X1
The provisions of this written warranty are in addition to and not a modification of
or subtraction from the statutory warranties and other rights and remedies
contained in any applicable legislation, and to the extent that any such provisions
purport to disclaim, exclude or limit any such statutory warranties and other rights
and remedies, such provisions shall be deemed to be amended to the extent
necessary to comply therewith.
If you are unable to find a qualified servicer for out of warranty service, you may
write to:
Thomson Consumer Electronics Canada, Inc.
P.O. Box 0944
Indianapolis, Indiana, U.S.A., 46206-0944
Attach your sales receipt to this booklet for future reference. This information is
required if service is needed during the warranty period.
PURCHASE DATE ____________________________________________________________
NAME OF STORE ____________________________________________________________
OR
Model 29391A
15403030 (Rev. 1 E/F)
99-39
Printed in China
© 1999 Thomson Consumer Electronics, Inc.
Trademark(s) ® Registered
Marque(s) ® déposée(s)
Page 37

Téléphone mains libres
à afficheur avec appel en attente
Guide de l'utilisateur
29391
Les bonnes choses de la vie.
Page 38

RENSEIGNEMENTS IMPORTANTS
AVIS: L’étiquette d'Industrie Canada permet d’identifier les appareils certifiés. Cette
attestation signifie que l’appareil répond à certaines normes de protection, d’utilisation et de
sécurité prévues pour les télécommunications. Le ministère ne garantit pas, cependant, que
l’appareil fonctionnera de façon satisfaisante pour l’utilisateur.
Avant d’installer cet appareil, l’utilisateur doit vérifier s’il est permis de le raccorder aux
installations de la compagnie locale de télécommunications. L’installation doit de plus
respecter les méthodes de raccordement approuvées. L’abonné doit savoir que le respect
des conditions mentionnées ci-dessus n’empêche pas nécessairement la détérioration du
service dans certaines situations.
La réparation des appareils certifiés doit être confiée à un service de maintenance canadien
dûment autorisé, désigné par le fournisseur. Toute réparation ou modification effectuée par
l’utilisateur peut amener la compagnie à exiger le débranchement de l’installation.
Par mesure de sécurité, les utilisateurs doivent s’assurer du raccordement réciproque des
circuits de mise à la terre du service public d’énergie, des lignes téléphoniques et — s’il y a
lieu — des systèmes intérieurs de conduites d’eau métalliques. Cette précaution peut
s’imposer particulièrement dans les régions rurales.
ATTENTION: Les utilisateurs ne doivent pas essayer de faire eux-mêmes ces
raccordements. Ils doivent communiquer avec le service d’inspection compétent ou faire
appel à un électricien, selon le cas.
NOTES: Cet appareil ne peut être utilisé pour le service payant (monnaie) fourni par la
compagnie de téléphone.
Les lignes partagées sont assujetties à des tarifs imposés par les compagnies de téléphone;
il se peut, par conséquent, que vous ne puissiez utiliser votre propre appareil téléphonique
si vous avez une ligne partagée. Renseignez-vous auprès de la compagnie de téléphone de
votre localité.
RENSEIGNEMENTS SUR L’INTERFÉRENCE
Cet appareil produit et utilise l’énergie radiofréquence qui peut gêner la réception radio et
télévision résidentielle s’il n’est pas installé ou utilisé conformément aux instructions
contenues dans ce guide. Une protection raisonnable est assurée contre une telle
interférence, mais rien ne garantit qu’un appareil donné ne produira pas d’interférence. Si
on soupçonne et confirme une interférence d’une ou plus des façons suivantes: réorienter
l’antenne du récepteur radio ou télévision, éloigner l’appareil du récepteur ou brancher
l’appareil et le récepteur dans des prises de circuits différents. L’utilisateur peut aussi
demander conseil à un technicien en radio-télévisìon compétent. Cet appareil a été mis à
l’essai et répond à toutes les limites des appareils informatiques de Classe B, conformément
à l’alinéa 15, des Règlements de la FCC. Cet appareil ne dépasse pas les limites de classe B
pour les émissions de bruit RF prescrites par le règlement RFI du min d'Industrie Canada.
C
OMPATIBILITÉ AVEC LES PROTHÈSES AUDITIVES
Ce téléphone est conforme aux normes FCC/Industrie Canada en matière de compatibilité
avec les prothèses auditives.
LE NUMÉRO D’INDUSTRIE CANADA SE TROUVE À LA BASE DE L’APPAREIL
REN (facteur d’équivalence de sonnerie) SE TROUVE À LA BASE DE L’APPAREIL
2
Page 39

TABLE DES MATIÈRES
VOIR LES INDICATIONS EN DESSOUS OU À L’ARRIÈRE DU PRODUIT
ATTENTION
RISQUE DE DÉCHARGE
ÉLECTRIQUE NE PAS OUVRIR
AVERTISSEMENT : POUR
ÉCARTER TOUT RISQUE D’INCENDIE
OU DE DÉCHARGE ÉLECTRIQUE, NE
PAS EXPOSER CE PRODUIT À LA
PLUIE OU L’HUMIDITÉ.
L’ÉCLAIR FLÉCHÉ À
L’INTÉRIEUR DU TRIANGLE VOUS AVERTIT
DE LA PRÉSENCE
D’UNE «TENSION
DANGEREUSE» À
L’INTÉRIEUR DU
PRODUIT.
ATTENTION : POUR DIMINUER LE
RISQUE DE DÉCHARGE ÉLECTRIQUE
NE PAS RETIRER LE CAPOT (OU
LE
PANNEAU ARRIÉRE). AUCUNE
PIÈCE RÉPARABLE PAR
L’UTILISATEUR À L’INTÉRIEUR
CONFIER LES
RÉPARATIONS À
UN AGENT TECHNIQUE QUALIFIÉ.
LE POINT D’EXCLAMATION
À L’INTÉRIEUR DU
TRIANGLE VOUS
AVERTIT
D’INSTRUCTIONS
IMPORTANTES
ACCOMPAGNANT CE
PRODUIT.
RENSEIGNEMENTS IMPORTANTS ....................... 2
RENSEIGNEMENTS SUR L’INTERFÉRENCE ............ 2
COMPATIBILITÉ AVEC LES PROTHÈSES AUDITIVES .. 2
INTRODUCTION ............................................. 4
LISTE DE PIÈCES ....................................... 5
PRISE MODULAIRE ................................. 5
AVANT DE COMMENCER .................................5
INSTALLATION ET PROGRAMMATION .................. 6
RENSEIGNEMENTS IMPORTANTS SUR
L
’INSTALLATION ......................................... 6
INSTALLATION DES PILES ............................. 6
INSTALLATION SUR BUREAU ......................... 8
INSTALLATION AU MUR ............................... 9
PROGRAMMATION DU MENU D’AFFICHEUR .... 10
PROGRAMMATION DE L'INDICATIF
RÉGIONAL ..................................... 11
PROGRAMMATION DE LA LANGUE
D'AFFICHAGE ................................. 12
PROGRAMMATION DU CONTRASTE DE
L'AFFICHEUR .................................. 13
PROGRAMMATION DU MODE DE
COMPOSITION ................................ 14
POUR QUITTER LA PROGRAMMATION ..... 14
CARACTÉRISTIQUES DE L’AFFICHEUR................ 15
ÉCRAN SOMMAIRE ................................... 15
AFFICHEUR AVEC APPEL EN ATTENTE ........... 15
RÉCEPTION ET MÉMORISATION D’APPELS ...... 16
CONSULTATION DES DOSSIERS D’APPELANT .. 16
SUPPRESSION DES DOSSIERS D’APPELANT .... 17
RAPPEL ................................................. 17
SI VOUS AVEZ PROGRAMMÉ L’INDICATIF
RÉGIONAL
DANS LE MENU DE
PROGRAMMATION
SI VOUS N’AVEZ PAS PROGRAMMÉ
L
’INDICATIF RÉGIONAL DANS LE MENU DE
PROGRAMMATION
INDICATEURS DE MESSAGE ............................ 20
UTILISATION DE LA FONCTION MAINS LIBRES .... 21
EMPLACEMENT DU HAUT-PARLEUR .............. 21
UTILISATION À MAINS LIBRES .................... 21
............................ 18
............................ 19
FONCTIONS DE BASE DU TÉLÉPHONE ............... 22
COMMUTATION ENTRE LE HAUT-PARLEUR
ET
LE COMBINÉ ............................... 22
RECEVOIR UN APPEL ................................22
FAIRE UN APPEL ..................................... 22
COMPOSITION PAR TONALITÉ TEMPORAIRE 23
COMMANDE DE VOLUME .......................... 23
RECOMPOSITION ..................................... 23
RECOMPOSITION MONOTOUCHE ................ 24
GARDE ................................................. 24
FLASH .................................................. 25
MÉMOIRE .................................................. 26
MEMORISATION DES NUMEROS A
COMPOSITION ABREGEE ........................... 26
MEMORISATION DES NUMEROS SOUVENT
APPELÉS ............................................... 27
RÉVISION DES NUMÉROS MÉMORISÉS ........ 27
NUMÉROS À COMPOSITION ABRÉGÉE ..... 27
MÉMORISATION DES NUMÉROS SOUVENT
APPELÉS ....................................... 28
REMPLACEMENT D'UN NUMERO
MEMORISE ............................................ 28
POUR EFFACER UN NUMERO MEMORISE..... 28
MEMORISATION D'UNE PAUSE EN
MEMOIRE .............................................. 28
COMPOSITION D'UN NUMERO A
COMPOSITION ABREGEE .......................... 29
COMPOSITION DES NUMÉROS SOUVENT
APPELÉS ............................................... 29
CONSEILS DE DÉPANNAGE............................. 30
SOINS ET ENTRETIEN ................................... 32
INDEX ....................................................... 33
INFORMATION SUR LE RÉSEAU TÉLÉPHONIQUE ... 35
FACTEUR D’ÉQUIVALENCE DE SONNERIE ........... 35
SERVICE APRÈS-VENTE ................................. 36
3
Page 40

INTRODUCTION
Ce téléphone à afficheur mémorise et affiche l’information sur l’appelant,
fournie par la compagnie de téléphone, aux abonnés au service d’afficheur
ou autres services similaires d’identification d’appelant. Vous devez être
abonné à l’un de ces services pour pouvoir utiliser cet appareil.
Ce téléphone à afficheur permet :
• D’identifier les appelants avant de répondre au téléphone.
• De voir l’heure et la date de réception de chaque appel.
• D’enregistrer un maximum de 60 messages d’afficheur en séquence.
• De savoir qui a appelé durant votre absence.
IMPORTANT : Pour utiliser cet appareil, vous devez être abonné au service
d'afficheur de nom/numéro standard ou au service d'afficheur avec appel en
attente. Pour savoir qui appelle pendant que vous êtes au téléphone, vous
devez être abonné au service d'afficheur avec appel en attente.
4
Page 41

AVANT DE COMMENCER
LISTE DE PIÈCES
Assurez-vous que la boîte contient les articles suivants :
Court cordon téléphonique
OPTIONS A B
DIAL
ABC2DEF
1
GHI4JKL5MNO
PQ
TUV
RS
7
Cordon téléphonique
Cordon spiralé
Combiné
*
HOLD FLASH
Base
8
PER
0
SPEAKER
4 AA piles
PRISE MODULAIRE
Une prise modulaire RJ11 (CA11A), le type le plus courant
de prise téléphonique qui ressemble à celle ci-contre, est
requise. Si aucune prise modulaire n’est installée, en
faire installer une par la compagnie de téléphone.
REVIEWDELETE
STORE
3
REDIAL
6
WX
YZ
9
VOLUME
#
5
Page 42

INSTALLATION ET PROGRAMMATION
RENSEIGNEMENTS IMPORTANTS SUR L’INSTALLATION
• N’installez jamais le câblage téléphonique durant un orage électrique.
• Ne touchez jamais les fils ou les bornes téléphoniques non isolés, sauf
si la ligne téléphonique a été débranchée à l’interface réseau.
• Installez et modifiez avec soin les lignes téléphoniques.
INSTALLATION DES PILES
Ce téléphone à afficheur utilise 4 piles alcalines AA pour recevoir et
mémoriser les dossiers d’appelant et les numéros utilisés pour la
composition-mémoire.
IMPORTANT : Vous disposez d’environ 60 secondes pour remplacer les piles
avant que les informations mémorisées soient perdues. Veuillez lire les
instructions avant de remplacer les piles, et ayez les piles à portée de la main si
vous devez les remplacer.
1. Si le cordon téléphonique est déjà raccordé, débranchez-le de la base.
2. Utilisez un tournevis pour ouvrir le porte du logement à piles à la base
du téléphone.
3. Insérez 4 piles alcalines AA tel qu’indiqué dans le schéma du logement.
4. Remettez la porte en place.
5. Si le cordon téléphonique étaient précédemment branché, rebranchezle dans l’appareil et vérifiez vos emplacements-mémoire.
6
Page 43

REMARQUE : Vous devez remplacer les piles si l’icône de piles faibles
est affiché. Il faut remplacer les piles dès que possible afin de maintenir le bon
fonctionnement de l’afficheur.
Durant le remplacement des piles, un circuit de sauvegarde maintient
l’information mémorisée pendant un maximum de 60 secondes. Inscrivez
l’information mémorisée au cas où celle-ci serait effacée.
IMPORTANT: Si vous ne prévoyez pas utiliser le téléphone pendant plus de 30
jours, retirez les piles afin d’éviter les fuites et d’endommager l’appareil.
Logement à piles
7
Page 44

INSTALLATION SUR BUREAU
1. Branchez le cordon spiralé dans le combiné. Branchez l’autre extrémité
dans la prise sur le côté de la base. Placez le combiné sur la base.
2. Branchez le cordon téléphonique dans la prise à l’arrière de la base.
Branchez l’autre extrémité dans une prise murale.
3. Réglez le sélecteur RINGER de la base à l’intensité désirée.
• HI = Par défaut. Son le plus élevé.
• LO = Son le plus faible.
• OFF = Le téléphone ne sonne pas.
1
2
3
8
Page 45

INSTALLATION AU MUR
1. Tournez soigneusement le téléphone sens dessus dessous. Détachez le
support mural des deux languettes supérieures en enfonçant celles-ci.
Dégagez le support du téléphone et tournez-le tel qu’illustré ci-dessous.
Enfoncez doucement le support dans les deux rainures inférieures
jusqu’à ce qu’il soit enclenché en place.
2. Branchez le court cordon téléphonique dans la prise à l’arrière de la base.
3. Acheminez le cordon téléphonique dans les rainures de sorte que la
base soit à plat et prête pour être fixée au mur.
4. Raccordez l’autre extrémité du cordon téléphonique dans la prise
téléphonique murale.
5. Placez le combiné sur le socle de la base dès que possible pour
raccrocher le téléphone.
6. Branchez le cordon spiralé dans le combiné. Branchez l’autre extrémité
dans la prise sur le côté de la base.
7. Glissez les trous de montage de la base (au bas de l’appareil) sur les
tiges de la plaque murale et abaissez la base jusqu’à ce que le téléphone
soit solidement en place.
8. Réglez le sélecteur RINGER de la base à l’intensité désirée.
• HI = Par défaut. Son le plus élevé.
• LO = Son le plus faible.
• OFF = Le téléphone ne sonne pas.
8
2
7
6
3
4
1
9
Page 46

PROGRAMMATION DU MENU
AM
PM
’AFFICHEUR
D
Ne branchez pas le téléphone dans la prise
murale quand vous programmez le menu
d’afficheur. Un appel reçu peut invalider le
changement si vous ne l’avez pas encore
sauvegardé. Le téléphone doit afficher xx
CALLS avant que vous programmiez le menu.
1. Appuyez sur la touche OPTIONS.
OPTIONS MENU ^ v
2. À ce point, appuyez sur la touche
REVIEW avant ou arrière pour faire
défiler les 6 écrans du menu :
• # 1 OPTIONS MENU ^ v
• # 2 LOCAL AREA CODE (défaut - - -)
• # 3 LANGUAGE (anglais par défaut)
• # 4 (LCD) CONTRAST (3 par défaut)
• # 5 T/P DIAL MODE (tonalité par
défaut)
• # 6 EXIT OPTIONS
3. Vous disposez de 10 secondes après
l'enfoncement d'une touche avant que le
téléphone retourne automatiquement à
l'écran Sommaire.
apparaît.
Touche
OPTIONS
Touche
REVIEW
OPTIONS A B
10/1912:30
DIAL
315 - 555 - 1324
SMITH JOHN
ABC2DEF
1
GHI4JKL5MNO
PQ
TUV
RS
7
8
PER
0
*
HOLD FLASH
SPEAKER
L'écran Sommaire
REVIEWDELETE
STORE
3
REDIAL
6
WX
YZ
9
VOLUME
#
10
Page 47

PROGRAMMATION DE L'INDICATIF RÉGIONAL
Le téléphone utilise l’indicatif régional
programmé pour déterminer le format de
numéro à afficher quand un signal
d’afficheur valide est reçu et est utilisé avec
la fonction Rappel.
1. Appuyez sur la touche OPTIONS.
OPTIONS MENU^ v
2. Appuyez sur la touche REVIEW avant ou
arrière jusqu’à ce que
CODE
apparaisse.
3. Appuyez de nouveau sur OPTIONS pour
entrer et changer l’indicatif régional.
L’afficheur indique l’indicatif régional
actuel. Le chiffre à l’extrême gauche ou
un signe de soustraction (-) clignote pour
indiquer qu’il est prêt à accepter l’entrée
de l’indicatif régional.
4. Appuyez sur 1 à 9 au clavier comme
premier chiffre. Pour effacer le chiffre,
appuyez sur * ou #.
5. Quand le chiffre désiré clignote, appuyez
sur l’une ou l’autre touche REVIEW pour
passer au chiffre suivant.
apparaît.
LOCAL AREA
Touche
OPTIONS
OPTIONS A B
DIAL
1
7
*
HOLD FLASH
Touche
REVIEW
10/1912:30
315 - 555 - 1324
SMITH JOHN
ABC2DEF
3
GHI4JKL5MNO
6
PQ
TUV
RS
8
9
PER
0
SPEAKER
REVIEWDELETE
STORE
REDIAL
WX
YZ
VOLUME
#
11
Page 48

6. Répétez les étapes 4 et 5 jusqu’à ce que
tous les chiffres de l’indicatif soient
programmés.
En cas d’erreur, recommencez les étapes
précédentes jusqu’à ce que l’indicatif
soit exact.
7. Appuyez encore une fois sur OPTIONS
pour mémoriser l’indicatif régional et
retourner à l’affichage “LOCAL AREA
CODE”.
Touche
OPTIONS
Touches
REVIEW
PROGRAMMATION DE LA LANGUE D'AFFICHAGE
Ce réglage permet d’afficher les messages
en anglais ou espagnol.
1. Appuyez sur la touche OPTIONS.
OPTIONS MENU^ v
2. Appuyez sur la touche REVIEW avant
jusqu’à ce que
3. Pour entrer et changer la langue,
appuyez sur la touche OPTIONS.
L’afficheur indique la langue actuelle. La
langue par défaut est l’anglais.
4. Appuyez sur l’une ou l’autre touche
REVIEW pour changer le réglage.
5. Appuyez de nouveau sur OPTIONS pour
mémoriser le réglage et retourner à
l’affichage “LANGUE D’AFFICHAGE”.
apparaît.
LANGUAGE
apparaisse.
OPTIONS A B
10/1912:30
DIAL
315 - 555 - 1324
SMITH JOHN
ABC2DEF
1
GHI4JKL5MNO
PQ
TUV
RS
7
8
PER
0
*
HOLD FLASH
SPEAKER
REVIEWDELETE
STORE
3
REDIAL
6
WX
YZ
9
VOLUME
#
12
Page 49

PROGRAMMATION DU CONTRASTE DE L'AFFICHEUR
Ce réglage permet d’optimiser le
contraste et l’angle de visionnement de
l’afficheur.
1. Appuyez sur la touche OPTIONS.
MENU DE PROGRAMMATION ^ v
apparaît.
2. Appuyez sur la touche REVIEW avant
jusqu’à ce que
apparaisse.
3. Pour entrer et changer le contraste,
appuyez sur la touche OPTIONS.
L’afficheur indique le réglage de
contraste actuel. Il existe 5 niveaux de
contraste, 3 étant celui par défaut.
4. Appuyez sur l’une ou l’autre touche
REVIEW pour changer le réglage.
5. Appuyez de nouveau sur OPTIONS
pour mémoriser le réglage et retourner
à l’affichage “ CONTRAST (ACL)”.
CONTRAST (ACL)
Touche
OPTIONS
OPTIONS A B
10/1912:30
DIAL
315 - 555 - 1324
SMITH JOHN
ABC2DEF
1
GHI4JKL5MNO
PQ
TUV
RS
7
8
PER
0
*
HOLD FLASH
SPEAKER
3
6
WX
YZ
9
#
Touches
REVIEW
REVIEWDELETE
STORE
REDIAL
VOLUME
13
Page 50

PROGRAMMATION DU MODE DE COMPOSITION
Ce réglage permet de sélectionner la
composition par tonalité (Touch-Tone) ou
par impulsions (cadran rotatif).
1. Appuyez sur la touche OPTIONS.
DE PROGRAMMATION ^ v
apparaît.
MENU
2. Appuyez sur la touche REVIEW avant
jusqu’à ce que
MODE DE COMPOSITION
apparaisse.
3. Pour entrer et changer le mode de
composition, appuyez sur la touche
OPTIONS. L’afficheur indique le réglage
actuel. La tonalité est réglée par défaut.
4. Appuyez sur l’une ou l’autre touche
REVIEW pour changer le réglage.
5. Appuyez de nouveau sur OPTIONS pour
mémoriser le réglage et retourner à
l’affichage “MODE DE COMPOSITION”.
POUR QUITTER LA PROGRAMMATION
Sélectionnez le menu “QUITTER LA
PROGRAMMATION” ou appuyez sur la
touche OPTIONS pour quitter
immédiatement le menu de
programmation.
Touche
OPTIONS
OPTIONS A B
DIAL
315 - 555 - 1324
1
GHI4JKL5MNO
PQ
RS
7
*
HOLD FLASH
10/1912:30
SMITH JOHN
ABC2DEF
TUV
8
PER
0
SPEAKER
Touches
REVIEW
3
6
WX
YZ
9
#
REVIEWDELETE
STORE
REDIAL
VOLUME
14
Page 51

CARACTÉRISTIQUES DE L’AFFICHEUR
AM
PM
ÉCRAN SOMMAIRE
L'écran Sommaire indique l'heure actuelle,
la date et le nombre de nouveaux appels à
revoir. Il est affiché jusqu'à ce que la
touche REVIEW ou OPTIONS soit enfoncée
ou qu'un dossier d'appelant soit reçu. Dans
les 10 secondes suivant la réception d'un
nouvel appel, l'écran Sommaire est affiché
et le voyant des nouveaux appels clignote.
REMARQUE : Le nombre de nouveaux
appels est affiché jusqu'à ce que tous les
nouveaux appels soient revus.
AFFICHEUR AVEC APPEL EN ATTENTE
Dans la mesure où votre compagnie de
téléphone peut intégrer les services
d’afficheur et d’appel en attente, vous
pouvez voir qui appelle quand vous
entendez le signal d’appel en attente.
L’information sur l’appelant apparaît dans
l’afficheur après la tonalité.
• Appuyez sur la touche FLASH pour
mettre le premier appelant en garde et
répondre au second appelant.
Indicateur de NOUVEAUX APPELS
OPTIONS A B
10/1912:30
DIAL
315 - 555 - 1324
SMITH JOHN
ABC2DEF
1
GHI4JKL5MNO
PQ
TUV
RS
7
8
PER
0
*
HOLD FLASH
SPEAKER
Touche FLASH
REVIEWDELETE
STORE
3
REDIAL
6
WX
YZ
9
VOLUME
#
15
Page 52

RÉCEPTION ET MÉMORISATION
’APPELS
D
Cet appareil reçoit et affiche l’information
transmise par la compagnie de téléphone.
Cette information peut comprendre le
numéro de téléphone, la date et l’heure ; ou
le nom, le numéro de téléphone, la date et
l’heure. L’appareil peut mémoriser un
maximum de 60 appels pour consultation
ultérieure. Quand la mémoire est pleine, un
nouvel appel remplace automatiquement le
plus ancien en mémoire.
NEW
apparaît
dans l’afficheur pour les appels reçus mais
non consultés.
CONSULTATION DES DOSSIERS
’APPELANT
D
• Appuyez sur la touche REVIEW arrière
pour faire défiler les dossiers, du plus
récent au plus ancien.
• Appuyez sur la touche REVIEW arrière
pour faire défiler les dossiers, du plus
ancien au plus récent.
• Quand tous les dossiers ont été
consultés,
l’afficheur.
DEBUT/FIN
apparaît dans
OPTIONS A B
10/1912:30
DIAL
315 - 555 - 1324
SMITH JOHN
ABC2DEF
1
GHI4JKL5MNO
PQ
TUV
RS
7
8
PER
0
*
HOLD FLASH
SPEAKER
Touches
REVIEW
3
6
WX
YZ
9
#
REVIEWDELETE
STORE
REDIAL
VOLUME
16
Page 53

SUPPRESSION DES DOSSIERS
’APPELANT
D
• Pour supprimer le dossier affiché, appuyez
une fois sur la touche DELETE.
• Pour supprimer tous les dossiers pendant
la consultation, maintenez la touche
DELETE enfoncée pendant environ 3
secondes.
EFFACER TOUT?
apparaît dans
l’afficheur. Appuyez de nouveau sur
DELETE pour confirmer.
RAPPEL
Quand vous consultez les dossiers
d’appelant, vous pouvez rappeler les
numéros affichés en appuyant sur la
touche DIAL.
REMARQUE : Vous devez appuyer sur
DIAL avant de décrocher le combiné.
Touche DIAL
Touche button
OPTIONS A B
10/1912:30
DIAL
315 - 555 - 1324
SMITH JOHN
ABC2DEF
1
3
GHI4JKL5MNO
6
PQ
TUV
RS
7
8
9
PER
0
*
HOLD FLASH
SPEAKER
REVIEWDELETE
STORE
REDIAL
WX
YZ
VOLUME
#
REMARQUE : Si seulement PICKUP
PHONE est affiché, vous ne pouvez
apporter aucun autre changement au
numéro. L'information envoyée par la
compagnie de téléphone est reconnu
comme un numéro valide pour rappel
(utilisé seulement dans de rares régions).
Le numéro est composé automatiquement
quand vous avez décroché le téléphone ou
appuyé sur SPEAKER.
Touche SPEAKER
17
Page 54

SI VOUS AVEZ PROGRAMMÉ L’INDICATIF
RÉGIONAL
PROGRAMMATION
1. Utilisez les touches REVIEW avant et
arrière pour afficher le numéro à
composer.
• Si vous voyez un numéro à 7 chiffres
(ex.: 555-1234), l’appel provient du
même indicatif régional. Toutefois, il ne
s’agit pas nécessaire d’un appel local.
• Si vous voyez un numéro à 11 chiffres
(ex.: 1-234-555-1234), l’appel ne provient
pas du même indicatif régional.
2. Appuyez sur la touche OPTIONS pour
régler le numéro de téléphone. Par
exemple, un numéro local à 7 chiffres ne
peut être composé parce qu’il exige un
format à 10 ou 11 chiffres. Appuyez
plusieurs fois sur la touche OPTIONS
pour faire défiler les numéros à 7, 10 et
11 chiffres.
7-chiffres:
10-chiffres:
11-chiffres:
DANS LE MENU DE
Touche
OPTIONS
DIAL
Numéro de téléphone à 7 chiffres (ex. : 555-5555)
Indicatif régional à 3 chiffres + numéro de téléphone à 7 chiffres
(ex. : 425-555-5555)
Code d’interurbain 1 + indicatif régional à 3 chiffres + numéro de
téléphone à 7 chiffres (ex. : 1-425-555-5555)
OPTIONS A B
10/1912:30
315 - 555 - 1324
SMITH JOHN
ABC2DEF
1
3
GHI4JKL5MNO
6
PQ
RS
7
*
HOLD FLASH
SPEAKER
WX
TUV
YZ
8
9
PER
#
0
Touches
REVIEW
REVIEWDELETE
STORE
REDIAL
VOLUME
18
Page 55

3. Appuyez sur la touche DIAL ; l’afficheur
indique
DECROCH/ REGLER
. Une
minuterie de 10 secondes se met en
marche à ce point dans le coin supérieur
droit de l’afficheur, pour indiquer le
temps restant jusqu’à ce que l’appareil
retourne au dossier d’appelant.
• Si vous réglez le numéro à composer, la
minuterie se remet à zéro après chaque
réglage.
Touche DIAL
Touches
REVIEW
4. Décrochez le combiné ou appuyez sur
SPEAKER avant que la minuterie atteigne
0. NOW DIALING apparaît dans
l'afficheur et le numéro est composé.
SI VOUS N’AVEZ PAS PROGRAMMÉ
L
’INDICATIF RÉGIONAL DANS LE MENU DE
PROGRAMMATION
1. Utilisez les touches REVIEW avant et
arrière pour afficher le numéro à
composer. Vous verrez seulement les
numéros à 10 chiffres (ex. : 234-555-1234).
2. Voir les étapes 2 à 4 ci-dessus pour
exécuter la séquence de rappel.
OPTIONS A B
10/1912:30
DIAL
315 - 555 - 1324
SMITH JOHN
ABC2DEF
1
GHI4JKL5MNO
PQ
TUV
RS
7
8
PER
0
*
HOLD FLASH
SPEAKER
REVIEWDELETE
STORE
3
REDIAL
6
WX
YZ
9
VOLUME
#
19
Page 56

INDICATEURS DE MESSAGE
Les messages spéciaux ci-dessous indiquent l’état d’un message ou de
l’appareil :
PAS D'APPEL
La mémoire d’appelants est vide.
APPELANT
BLOQUE
APPEL BLOQUE
ERREUR
AUCUNE
DONNEE
DEBUT/FIN
L’appelant n’est pas abonné au service d’afficheur ou
la région n’est pas reliée à la vôtre. Si
BLOQUE
téléphone, l’information sur le nom pour ce numéro n’est
pas disponible.
L’appelant utilise un “numéro confidentiel” et
l’information d’appelant est retenue.
L’information d’appelant a été interrompue ou corrompue
durant la transmission.
Aucun signal d’afficheur n’a été détecté, ou le service
d’afficheur n’a pas été activé.
Vous êtes au début ou à la fin du répertoire-mémoire.
Les piles sont faibles.
apparaît en même temps que le numéro de
APPELANT
20
Page 57

UTILISATION DE LA FONCTION MAINS LIBRES
EMPLACEMENT DU HAUT-PARLEUR
Pour obtenir un meilleur rendement, évitez
ce qui suit :
• Les endroits très bruyants. (Le microphone
peut capter les bruits et empêcher le
haut-parleur de passer en mode Réception
quand vous cessez de parler.)
• Les surfaces sensibles aux vibrations.
• Les endroits en retrait, comme un coin,
sous une armoire ou près d’un meuble,
pouvant produire un effet d’écho.
UTILISATION À MAINS LIBRES
Notez les lignes directrices suivantes quand
vous utilisez le téléphone à mains libres :
• Le haut-parleur fonctionne comme une
radio bidirectionnelle en ce sens qu’on
ne peut qu’écouter ou parler à la fois.
• Restez raisonnablement près du
téléphone afin d’être clairement entendu
de votre interlocuteur.
• Vous pouvez régler le volume du haut-
parleur à l’aide des touches de VOLUME.
• L’indicateur de haut-parleur s’allume
quand le haut-parleur est utilisé.
Indicateur de
téléphone à mains
libres
OPTIONS A B
DIAL
1
GHI4JKL5MNO
PQ
RS
7
*
HOLD FLASH
Touches VOLUME
10/1912:30
315 - 555 - 1324
SMITH JOHN
ABC2DEF
3
6
TUV
8
9
PER
0
SPEAKER
REVIEWDELETE
STORE
REDIAL
WX
YZ
VOLUME
#
21
Page 58

FONCTIONS DE BASE DU TÉLÉPHONE
RECEVOIR UN APPEL
1. Assurez-vous que le sélecteur RINGER
est à HI ou LO.
2. Lorsque le téléphone sonne et que
l’information de l’appelant est affichée,
décrochez le combiné ou appuyez sur la
touche SPEAKER et commencez à parler.
3. Vous pouvez régler le volume de la voix
de l’appelant à l’aide des touches de
VOLUME.
4. Réglez le sélecteur RINGER à OFF pour
ne pas être importuné par la sonnerie du
téléphone.
Touches SPEAKER
FAIRE UN APPEL
1. Décrochez le combiné ou appuyez sur SPEAKER et attendez le signal de
manœuvre.
2. Composez le numéro de téléphone désiré.
3. Vous pouvez régler le volume de la voix de l’appelant à l’aide des
touches de VOLUME.
OPTIONS A B
10/1912:30
DIAL
315 - 555 - 1324
SMITH JOHN
ABC2DEF
1
3
GHI4JKL5MNO
6
PQ
RS
7
*
HOLD FLASH
SPEAKER
WX
TUV
YZ
8
9
PER
#
0
Touches VOLUME
REVIEWDELETE
STORE
REDIAL
VOLUME
COMMUTATION ENTRE LE HAUT-PARLEUR ET LE COMBINÉ
Vous pouvez passer du haut-parleur au combiné pendant que le téléphone
compose un numéro, ou en tout temps durant une conversation.
• Haut-parleur au combiné - Décrochez le combiné.
• Combiné au haut-parleur - Appuyez sur SPEAKER, puis raccrochez le
combiné.
22
Page 59

COMPOSITION PAR TONALITÉ
TEMPORAIRE
Si vous êtes abonné au service à impulsions,
vous pouvez temporairement changer de la
composition à impulsions à la composition à
tonalité. Après avoir composé le numéro de
téléphone, appuyez sur la touche * du
téléphone. Vous pouvez ainsi accéder aux
services de téléphone exigeant une tonalité,
comme les services de banque ou
d’interurbain. Quand vous raccrochez le
combiné, le téléphone retourne
automatiquement au service à impulsions.
Touche REDIAL
OPTIONS A B
DIAL
1
GHI4JKL5MNO
PQ
RS
7
*
HOLD FLASH
10/1912:30
315 - 555 - 1324
SMITH JOHN
ABC2DEF
3
6
TUV
8
9
PER
0
SPEAKER
REVIEWDELETE
STORE
REDIAL
WX
YZ
VOLUME
#
COMMANDE DE VOLUME
Cette fonction permet de monter le volume
du récepteur du combiné pendant que vous
parlez. Au besoin, appuyez sur les touches
VOLUME haut ou bas ou SPEAKER.
RECOMPOSITION
Si le numéro composé est occupé, ou pour
recomposer le dernier numéro appelé,
appuyez sur REDIAL. Le numéro est affiché
et est composé automatiquement.
Touches VOLUME
23
Page 60

RECOMPOSITION MONOTOUCHE
Si le dernier numéro appelé était occupé,
vous pouvez le recomposer immédiatement
en appuyant sur la touche REDIAL sans
raccrocher le combiné.
REMARQUE: La fonction Recomposition
mémorise tous les chiffres composés. Si
vous avez appuyé sur des chiffres après avoir
composé le dernier numéro (par exemple,
pour accéder à la messagerie vocale), ces
chiffres sont aussi composés. Le téléphone
peut ainsi tenter de composer tous les
chiffres à la fois.
GARDE
1. Pour mettre un appel en garde, appuyez
sur la touche HOLD et raccrochez le
combiné. (Si vous étiez en mode Mains
libres, l'appareil met automatiquement
l'appel en garde.) L'indicateur HOLD
clignote jusqu'à ce que vous repreniez la
conversation.
2. Pour reprendre la conversation, décrochez
le combiné ou un poste sur la même ligne,
ou appuyez sur la touche SPEAKER.
Touche REDIAL
Touche HOLD
et indicateur
OPTIONS A B
10/1912:30
DIAL
315 - 555 - 1324
SMITH JOHN
ABC2DEF
1
3
GHI4JKL5MNO
6
PQ
RS
7
*
HOLD FLASH
SPEAKER
WX
TUV
YZ
8
9
PER
#
0
Touche SPEAKER
REVIEWDELETE
STORE
REDIAL
VOLUME
24
Page 61

FLASH
Cette fonction permet d’activer les services
d’appel du client offerts par la compagnie
de téléphone, comme l’appel en attente.
Ces services entraînent généralement des
frais mensuels supplémentaires. Si vous
êtes abonné à l’un de ces services, consultez
les instructions de la compagnie de
téléphone sur la façon d’utiliser la touche
FLASH. Voir la section “Caractéristiques de
l’afficheur” pour en savoir plus sur
l’afficheur avec appel en attente.
1. Pendant une conversation, un appelant
appelle et vous entendez une tonalité.
2. Appuyez une fois sur la touche FLASH.
La première conversation est mise en
garde et vous pouvez répondre au
second appelant.
3. Appuyez de nouveau sur FLASH. Vous
pouvez parler de nouveau au premier
appelant, et le second est mis en garde.
OPTIONS A B
10/1912:30
DIAL
315 - 555 - 1324
SMITH JOHN
ABC2DEF
1
3
GHI4JKL5MNO
6
PQ
TUV
RS
7
8
9
PER
0
*
HOLD FLASH
SPEAKER
Touche FLASH
REVIEWDELETE
STORE
REDIAL
WX
YZ
VOLUME
#
25
Page 62

MÉMOIRE
Avant de mémoriser un numéro de
téléphone, assurez-vous que le mode de
composition correspond au type de
téléphone utilisé. Le mode de composition
par défaut est la tonalité (Touch-Tone),
alors si vous êtes abonné au service à
impulsions (cadran rotatif), vous devez
d’abord changer le mode de composition.
Voir “Pour programmer le mode de
composition”.
Les touches suivantes peuvent être
mémorisées à tout emplacement-mémoire :
0 à 9, *, # et PAUSE (REDIAL). Voir
“Memorisation d'une Pause en Memoire”
et “Composition par tonalité temporaire”.
MEMORISATION DES NUMEROS A COMPOSITION ABREGEE
1. Décrochez le combiné ou appuyez sur la
touche SPEAKER.
2. Appuyez sur STORE.
3. Entrez le numéro de téléphone (maximum de 20 chiffres). En cas d’erreur,
raccrochez et répétez les étapes de mémorisation depuis le début.
REMARQUE : Le numéro ne sera pas automatiquement composé dans ce mode.
Touches de composition
abrégée
OPTIONS A B
DIAL
315 - 555 - 1324
SMITH JOHN
1
GHI4JKL5MNO
PQ
RS
7
*
HOLD FLASH
SPEAKER
Touche SPEAKER
Touche STORE
REVIEWDELETE
10/1912:30
ABC2DEF
TUV
8
PER
0
STORE
3
REDIAL
6
WX
YZ
9
VOLUME
#
4. Appuyez sur STORE.
5. Appuyez sur la touche d’emplacement à composition abrégée A ou B.
6. Raccrochez le combiné ou appuyez de nouveau sur SPEAKER.
7. Inscrivez le nom ou le numéro de la personne dont le numéro est
mémorisé à cet emplacement sur la carte-répertoire.
26
Page 63

MEMORISATION DES NUMEROS SOUVENT APPELÉS
1. Décrochez le combiné ou appuyez sur la
touche SPEAKER.
2. Appuyez sur STORE.
3. Entrez le numéro de téléphone (le
numéro n’est pas composé dans ce
mode). En cas d’erreur, raccrochez et
répétez les étapes de mémorisation
depuis le début.
4. Appuyez sur STORE.
5. Appuyez sur 0 à 9 pour l’emplacementmémoire.
6. Raccrochez le combiné ou appuyez de
nouveau sur SPEAKER.
7. Inscrivez le nom ou le numéro de la
personne dont le numéro est mémorisé
à cet emplacement sur la carterépertoire.
RÉVISION DES NUMÉROS MÉMORISÉS
Touches de composition
abrégée
OPTIONS A B
DIAL
315 - 555 - 1324
1
GHI4JKL5MNO
PQ
RS
7
*
HOLD FLASH
Touche SPEAKER
Touche STORE
REVIEWDELETE
10/1912:30
SMITH JOHN
STORE
ABC2DEF
3
REDIAL
6
WX
TUV
YZ
8
9
VOLUME
PER
#
0
SPEAKER
NUMÉROS À COMPOSITION ABRÉGÉE
1. Assurez-vous que le combiné est
raccroché.
2. Appuyez sur Quick Dial A ou B. Le
numéro est affiché.
27
Page 64

MÉMORISATION DES NUMÉROS SOUVENT APPELÉS
1. Assurez-vous que le combiné est
raccroché.
2. Appuyez sur DIAL.
3. Appuyez sur 0 à 9 pour l'emplacementmémoire. Le numéro est affiché.
REMPLACEMENT D'UN NUMERO MEMORISE
Répétez la séquence de mémorisation. Le
nouveau numéro remplace l'ancien à
l'emplacement-mémoire.
POUR EFFACER UN NUMERO MEMORISE
1. Décrochez le combiné ou appuyez sur
SPEAKER.
2. Appuyez sur STORE.
3. Appuyez de nouveau sur STORE.
4. Appuyez sur la touche d’emplacement
(A, B, 0 à 9) à effacer.
Touche DIAL
Touche
SPEAKER
Touche STORE
OPTIONS A B
10/1912:30
DIAL
315 - 555 - 1324
SMITH JOHN
ABC2DEF
1
GHI4JKL5MNO
PQ
TUV
RS
7
8
PER
0
*
HOLD FLASH
SPEAKER
Touche
REDIAL
REVIEWDELETE
STORE
3
REDIAL
6
WX
YZ
9
VOLUME
#
MEMORISATION D'UNE PAUSE EN MEMOIRE
La touche REDIAL devient la touche de pause
quand la touche STORE a été d’abord
enfoncée. Elle est valide uniquement quand
vous mémorisez un numéro.
Utilisez la touche PAUSE (REDIAL) pour
insérer une pause dans une séquence de
28
Page 65

composition automatique. Par exemple, si
vous devez faire le 9 pour obtenir une ligne
extérieure ou entrer un code pour accéder à
la compagnie d’interurbain.
Il se peut que vous deviez régler la durée
de la pause. La pause peut être réglée de 1
à 9 secondes. Le réglage par défaut est 4
secondes.
Touche DIAL
1. Décrochez le combiné ou appuyez sur
SPEAKER.
2. Appuyez sur la touche STORE.
3. Appuyez sur 1 à 9 (1 = 1 seconde, 2 = 2
secondes, etc.).
4. Appuyez de nouveau sur STORE.
5. Appuyez sur la touche PAUSE (REDIAL)
pour sauvegarder.
COMPOSITION D'UN NUMERO A COMPO-
SITION ABREGEE
1. Décrochez le combiné ou appuyez sur
SPEAKER.
2. Appuyez sur Quick Dial A ou B. Le
numéro est affiché et est composé
automatiquement.
Touche STORE
Touche
SPEAKER
Touches de composition
abrégée
OPTIONS A B
DIAL
315 - 555 - 1324
SMITH JOHN
1
GHI4JKL5MNO
PQ
RS
7
8
0
*
HOLD FLASH
SPEAKER
10/1912:30
ABC2DEF
3
6
TUV
9
PER
Touche
REDIAL
REVIEWDELETE
STORE
REDIAL
WX
YZ
VOLUME
#
COMPOSITION DES NUMÉROS SOUVENT APPELÉS
1. Décrochez le combiné ou appuyez sur
SPEAKER.
2. Appuyez sur DIAL.
3. Appuyez sur 0 à 9 de l’emplacementmémoire. Le numéro est composé
automatiquement.
29
Page 66

CONSEILS DE DÉPANNAGE
AUCUN SIGNAL DE MANŒUVRE
• Vérifiez tous les câbles pour vous assurer que toutes les connexions
sont bonnes et ne sont pas endommagées.
• Vérifiez l’interrupteur-crochet : ressort-il complètement quand le
combiné est décroché ?
AUCUN AFFICHAGE
• Remplacez les piles.
• Vérifiez l’installation des piles.
AUCUNE INFORMATION AFFICHÉE QUAND LE TÉLÉPHONE SONNE
• Avez-vous commandé le service d’afficheur offert par la compagnie de
téléphone ? Cet appareil exige que vous soyez abonné au service
d’afficheur pour fonctionner.
• Attendez après la seconde sonnerie avant de répondre.
MESSAGE D’ERREUR AFFICHÉ
•
ERREUR
l’information d’appelant valide durant le silence suivant la première
sonnerie. Ce message indique la présence de bruit sur la ligne, ou
qu’un message invalide a été envoyé par la compagnie de téléphone.
apparaît dans l’afficheur si l’appareil détecte autre chose que
LE TÉLÉPHONE NE COMPOSE PAS
• Vérifiez le mode de composition dans le menu de programmation. Est-il
programmé à Tonalité, réglage qui peut ne pas être compatible avec
votre service de composition local.
30
Page 67

LE TÉLÉPHONE NE SONNE PAS
• Le sélecteur de sonnerie est-il à OFF ?
• Utilisez-vous trop de téléphones sur la même ligne ? (Le facteur REN
total pour tous les téléphones sur la même ligne ne doit pas dépasser le
facteur REN maximal de la région. Voir l’information sur
l’enregistrement FCC.)
• Effectuez les vérifications au premier point. L’interrupteur-crochet est-il
complètement enfoncé quand le combiné repose sur le socle ?
VOLUME FAIBLE DE LA VOIX DE L’APPELANT ET DE L’APPELÉ
• Est-ce que d’autres téléphones sont décrochés en même temps ? Si
oui, cette situation est normale car le volume baisse quand d’autres
téléphones sont utilisés en même temps.
FLUCTUATION DE TONALITÉ EN MODE DE COMPOSITION PAR IMPULSIONS
• Situation normale, car le courant fluctue quand le téléphone compose.
31
Page 68

SOINS ET ENTRETIEN
Voici quelques conseils simples pour préserver le bon fonctionnement et
l’apparence de ce téléphone :
•Éviter de placer le téléphone près d’un appareil de chauffage ou d’un
appareil produisant du bruit électrique (ex. : moteurs, lampes
fluorescentes, etc.).
• Ne pas exposer le téléphone directement au soleil ou à l’humidité.
•Éviter d’échapper le combiné et de l’utiliser abusivement.
• Ne jamais utiliser un nettoyeur puissant ou une poudre abrasive afin de
ne pas endommager le fini.
• Conserver l’emballage original pour utilisation ultérieure.
32
Page 69

INDEX
A
Afficheur avec appel en attente 15
Avant de commencer 5
C
Caractéristiques de l’afficheur 15
Commande de volume 23
Commutation entre le haut-parleur et le
combiné 22
Compatibilité avec les prothèses
auditives 2
Composition des Numéros Souvent
Appelés 29
Composition d'un Numero a
Composition Abregee 29
Composition par tonalité temporaire 23
Conseils de dépannage 30
Consultation des dossiers d’appelant 16
E
Écran sommaire 15
Emplacement du haut-parleur 21
F
Facteur d’équivalence de sonnerie 35
Faire un appel 22
Flash 25
Fonctions de base du téléphone 22
G
Garde 24
I
Indicateurs de message 20
Information sur le réseau
téléphonique 35
Installation au mur 9
Installation des piles 6
Installation et programmation 6
Installation sur bureau 8
Introduction 4
L
Liste de pièces 5
M
Mémoire 26
Memorisation des Numeros a
Composition Abregee 26
Memorisation des Numeros Souvent
Appelés 27
Mémorisation des Numéros Souvent
Appelés 28
Memorisation d'une Pause en
Memoire 28
N
Numéros à Composition Abrégée 27
33
Page 70

P
Pour Effacer un Numero Memorise 28
Pour Quitter la Programmation 14
Prise modulaire 5
Programmation de la Langue
D'affichage 12
Programmation de L'indicatif
Régional 11
Programmation du Contraste de
L'afficheur 13
Programmation du menu d’afficheur 10
Programmation du Mode de
Composition 14
R
Rappel 17
Réception et mémorisation d’appels 16
Recevoir un appel 22
Recomposition 23
Recomposition Monotouche 24
Remplacement d'un Numero
Memorise 28
Renseignements importants 2
Renseignements importants sur
l’installation 6
Renseignements sur l’interférence 2
Révision des Numéros Mémorisés 27
S
Service après-vente 36
Si vous avez programmé l’indicatif
régional dans l 18
Si vous n’avez pas programmé l’indicatif
régional 19
Soins et entretien 32
Suppression des dossiers d’appelant 17
U
Utilisation à mains libres 21
Utilisation de la fonction mains libres 21
34
Page 71

INFORMATION SUR LE RÉSEAU TÉLÉPHONIQUE
Si cet appareil provoque des dérangements sur la ligne et, par
conséquent, sur le réseau téléphonique, la compagnie de téléphone
signalera, s’il y a lieu, qu’elle doit temporairement interrompre le service.
Si elle est dans l’impossibilité de le faire et que les circonstances dictent
une telle mesure, la compagnie de téléphone peut immédiatement
interrompre le service pendant un certain temps.
La compagnie de téléphone peut apporter des changements à ses installations de télécommunications, à son équipement, à son exploitation ou à
ses politiques si la poursuite des affaires nécessite de tels changements. Si
l’on croit que ces changements influeront sur l’utilisation ou le rendement
du téléphone, la compagnie doit donner un préavis suffisant pour
permettre de maintenir le service.
Il faut aviser la compagnie de téléphone si l’on désire déconnecter son
téléphone de façon permanente.
FACTEUR D’ÉQUIVALENCE DE SONNERIE
L’étiquette sous l’appareil indique notamment le numéro d’enregistrement
FCC et le REN (facteur d’équivalence de sonnerie) de l’équipement. Vous
devez, sur demande, fournir cette information à la compagnie de
téléphone.
Le REN permet de déterminer le nombre d’appareils que vous pouvez
raccorder à votre ligne téléphonique et qui sonneront quand votre numéro
de téléphone est composé. Dans la plupart des régions (mais pas toutes),
la somme des REN de tous les appareils raccordés à une ligne ne doit pas
dépasser 5. Pour connaître le nombre d’appareils que vous pouvez
raccorder à votre ligne, compte tenu du REN, communiquez avec votre
compagnie de téléphone.
35
Page 72

SERVICE APRÈS-VENTE
Thomson Électronique Grand Public du Canada, Inc. garantit à l’acheteur de cet
appareil ou à la personne qui le recevrait en cadeau, que si cet appareil présente
un défaut de fabrication pendant l'année suivant la date d’achat, il sera remplacé
sans frais. Les frais de transport de retour sont payés.
Cette garantie ne couvre pas les dommages attribuables aux accidents, à une
mauvaise utilisation ni à des piles qui fuient.
Si cet appareil ne fonctionne pas convenablement pendant qu’il est sous garantie:
1. Le retourner au marchand vendeur avec la preuve d’achat pour être remplacé.
OU
2. Retirer les piles (s’il y a lieu) et emballer l’appareil et les accessoires dans la
boîte originale (ou l’équivalent).
— Le faire parvenir port payé (avec la preuve d’achat) et assuré à :
Thomson Électronique Grand Public du Canada, Inc.,
Centre de distribution
7400 A Bramalea Road
Mississauga, Ontario L5S 1X1
Les dispositions de cette garantie s’ajoutent (sans les modifier ni les restreindre)
aux garanties légales et autres droits ou recours prévus par toute législation
applicable; pour autant que ces dispositions tendront à rejeter, exclure ou limiter
toute garantie légale ou tout autre droit et recours, elles seront considérées
comme modifiées dans la mesure nécessaire pour s’y conformer.
S’il est impossible de trouver un réparateur qualifié pour effectuer une réparation
non garantie, écrire à :
Thomson Électronique Grand Public du Canada, Inc.
B.P. 0944
Indianapolis, Indiana, É.-U., 46206-0944
Joindre le reçu de caisse à ce guide pour référence ultérieure. Cette information
pourrait être demandée s’il faut faire réparer l’appareil pendant qu’il est sous
garantie.
DATE D’ACHAT ______________________________________________________________
NOM DU MAGASIN _________________________________________________________
Modèle 29391A
15403030 (Rév. 1 E/F)
99-39
Imprimé en Chine
© 1999 Thomson Consumer Electronics, Inc.
Trademark(s) ® Registered
Marque(s) ® déposée(s)
 Loading...