

Page 1
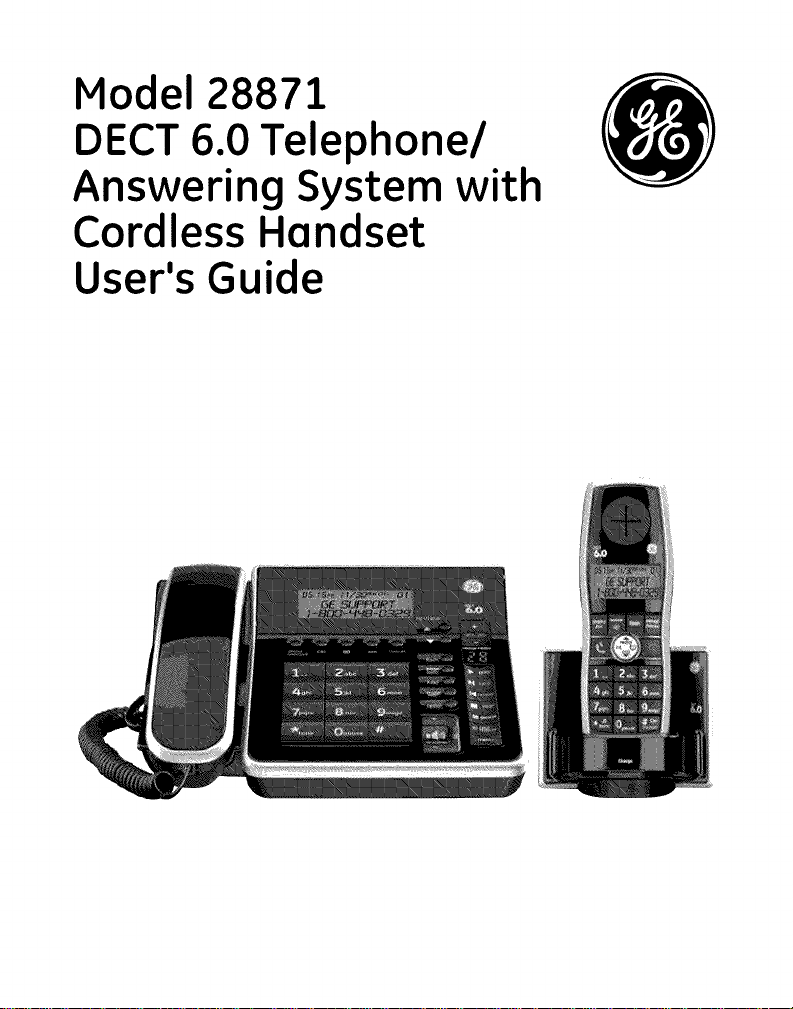
Model 28871
DECT 6.0 Telephone/
Answering System with
Cordless Handset
User's Guide
Page 2
Equipment Approval Information
Yourtelephone equipment is (]pproved for connection to the Public Switched Telephone Network (]nd
is in complionce with ports 15(]nd 68,FCCRules(]nd Regul(]tions (]nd the Technic(]l Requirements
for Telephone Termin(]l Equipment published byACTA.
1 Notification to the Local Telephone Company
On the bottom ofthis equipment is (] I(]bel indic(]ting, (]mong other inform(]tion, the USnumber
(]nd RingerEquiv(]lenceNumber (REN)for the equipment. Youmust, upon request, provide this
inform(]tion to your telephone comp(]ny.
The RENis useful in determining the number of devices you m(]yconnect to your telephone line
(]nd still hove(]11of these devices ring when your telephone number is c(]lled. Inmost (but not (]11)
(Ire(Is,the sum of the RENsof (]11devices connected to one line should not exceed 5.To be cert(]in
of the number of devices you m(]y connect to your line (Is determined by the REN,you should
cont(]ct your Ioc(]ltelephone comp(]ny.
Aplug (]ndjock used to connect this equipment to the premises wiring (]nd telephone network
must comply with the opplic(]ble FCCPort 68 rules (]nd requirements (]dopted by the ACTA.A
compli(]nt telephone cord (]nd modul(]r plug is provided with this product. It is designed to be
connected to (] comp(]tible modul(]rjock th(]t is(]lso compliont. Seeinst(]ll(]tion instructions for
det(]ils.
Notes
• This equipment m(]y not be used on coin service provided bythe telephone comp(]ny.
• Potty lines(]re subject to st(]te t(]riffs, (]nd therefore, you m(]y not be (]ble to useyour own
telephone equipment if you (]re on (] p(]rty line.Check with your Ioc(]ltelephone comp(]ny.
• Notice must be given to the telephone comp(]ny upon perm(]nent disconnection of your
telephone from your line.
• Ifyour home h(]s speci(]lly wired (]l(]rm equipment connected to the telephone line, ensure
the inst(]ll(]tion of this product does not dis(]ble your (]l(]rm equipment. Ifyou h(]ve questions
(]bout wh(]t will dis(]ble(]l(]rm equipment, consult your telephone comp(]ny or (] qu(]lified
inst(]ller.
2 Rights of the Telephone Company
Shouldyour equipment c(]use trouble on your linewhich m(]y h(]rmthe telephone network,
the telephone comp(]ny sh(]ll, where pr(]ctic(]ble, notify you th(]t tempor(]ry discontinu(]nce of
service m(]y be required. Where prior notice isnot pr(]ctic(]ble (]nd the circumst(]nces w(]rr(]nt
such (]ction, the telephone comp(]ny m(]y temporarily discontinue service immedi(]tely. Inc(]se
of such temporary discontinu(]nce, the telephone comp(]ny must: (1)promptly notify you of such
tempor(]ry discontinu(]nce; (2)(]fiord you the opportunity to correct the situ(]tion; (]nd (3)inform
you of your right to bring (] compl(]int to the Commission pursu(]nt to procedures setforth in
Subp(]rt Eof P(]rt68, FCCRules(]nd Regul(]tions.
Thetelephone comp(]ny m(]y m(]ke ch(]nges in its communic(]tions f(]cilities, equipment,
oper(]tions or procedures where such (]ction is required inthe oper(]tion of its business (]nd not
inconsistent with FCCRules(]nd Regul(]tions.If these ch(]nges (]reexpected to (]fleet the use or
perform(]nce ofyour telephone equipment, the telephone comp(]ny must give you (]dequ(]te
notice, in writing, to (]llow you to m(]int(]in uninterrupted service.
USNumber is located on the cabinet bottom
RENnumber is located on the cabinet bottom
Page 3
Interference Information
Thisdevice complies with Part 15of the FCCRules.Operation issubject to the following two
conditions: (1)This device may not cause harmful interference; and (2)This device must accept any
interference received,including interference that may cause undesired operation.
Thisequipment has been tested and found to comply with the limitsfor a ClassB digital device,
pursuant to Part 15 of the FCCRules.Theselimits are designed to provide reasonable protection
against harmful interference in a residential installation.
Thisequipment generates, uses, and can radiate radio frequency energy and, if not installed and
used in accordance with the instructions, may cause harmful interference to radio communications.
However,there is noguarantee that interference will not occur in a particular installation.
Privacy of Communications may not be ensured when usingthis product.
If this equipment does cause harmful interference to radio or television reception, which can be
determined byturning the equipment off and on,the user isencouraged to try to correct the
interference byone or more of the following measures:
• Reorient or relocate the receiving antenna (that is,the antenna for radio or television that is
"receiving" the interference}.
• Reorient or relocate and increase the separation between the telecommunications
equipment and receiving antenna.
• Connect the telecommunications equipment into an outlet on a circuit different from that to
which the receiving antenna isconnected.
If these measures do not eliminate the interference, please consult your dealer oran experienced
radio/television technician for additional suggestions. Also,the Federal Communications Commission
has prepared a helpful booklet, "How To Identify and ResolveRadio/TV Interference Problems."This
booklet isavailable from the U.S.Government Printing Office, Washington, D.C.20402. Pleasespecify
stock number 004-000-00345-4 when ordering copies.
Notice: Thechanges or modifications not expressly approved by the party responsible for
compliance could void the user's authority to operate the equipment.
Hearin,q Aid Compatibility (HAC)
Thistelephone system meets FCCstandards for Hearing Aid Compatibility.
Licensing
Licensed under USPatent 6,427,009.
FCC RF Radiation Exposure Statement
Thisequipment complies with FCCRFradiation exposure limits set forth for an uncontrolled
environment. This equipment should be installed and operated with a minimum distance of 20
centimeters between the radiator and your body.This transmitter must not beco-located or
operated in conjunction with any other antenna or transmitter.
Information for DECT Product
k_6:0 Thistelephone is compliant with the DECT6.0 standard which operates in the 1.92GHz
............... and coordination with UTAM.Any relocation of this equipment must be coordinated
to 1.93GHzfrequency range. Installation of this equipment issubject to notification
through and approved by UTAM.UTAMmay be contacted at 1-800-429-8826.
Page 4
Table of Contents
EQUIPMENT APPROVAL INFORMATION .......................... 2
INTERFERENCE INFORMATION ...................................... :3
HEARINGAID COMPATIBILITY(HAC} .......................... 3
LICENSING .............................................................. 3
FCC RF RADIATION EXPOSURE STATEMENT ................. 3
INFORMATION FOR DECT PRODUCT ........................... 3
INTRODUCTION ........................................................ 6
BEFORE YOU BEGIN ................................................. 6
PARTS CHECKLIST) ......................................................... 6
TELEPHONE JACK REQUIREMENTS ................................. 7
INSTALLATION .......................................................... 7
DIGITAL SECURITY SYSTEM ............................................ 7
IMPORTANT INSTALLATION GUIDELINES .......................... 7
HANDSET LAYOUT ....................................................8
BASELAYOUT..........................................................9
INSTALLING THE PHONE ...........................................10
ATTACHING THE DESKTOP PEDESTAL ..........................]0
CONNECTING THE AC (ELECTRICAL) POWER .............. 10
CONNECTING THE TELEPHONE LINE ................... 11
CONNECTING THE CORDED HANDSET ............... 11
SETTING THE RINGER VOLUME ................................... 11
WALL MOUNTING THE BASE ...................................... 11
INSTALLING THE HANDSET BATTERY ........................... 12
MENU OPERATION ................................................. 13
BASE MENU ............................................................... 13
SELECTING THE LANGUAGE ................................ 13
AREA CODE ....................................................... 13
LCD CONTRAST ................................................ ].3
KEY TONE .......................................................... 13
DIAL MODE.......................................................14
DATE / TIME ...................................................... 14
MESSAGE WAITING ........................................... 15
RESET ................................................................. 15
HANDSET MENU .................................................... 16
HANDSETSETTING ...................................................... 16
RING MELODY ................................................... 16
RING VOLUME ................................................... 16
Low BATTERY .................................................... 16
NoCOVERAGE ................................................... 17
KEY TONE .......................................................... 17
AUTO TALK ........................................................ 17
(DAILY) ALARM ................................................... 18
HANDSET NAME ................................................ 18
LANGUAGE ......................................................... 18
SCREEN CONTRAST ............................................ 19
RESET HANDSET ................................................ 19
BASE SETTING ............................................................ 19
CHANGEPIN ....................................................19
DIAL MODE ....................................................... 20
MESSAGEWAITING(VMWI) ............................20
RESET BASE ....................................................... 21
DATE / TIME ..................................................... 21
REGISTRATION ............................................................. 22
REGISTER ............................................................ 22
REMOVE HANDSET (DE-REGISTRATION) ............. 22
BASIC OPERATION .................................................. 23
MAKING A CALL ......................................................... 23
CORDLESS HANDSET ......................................... 23
CORDED HANDSET ............................................ 23
RECEIVING A CALL ...................................................... 23
CORDLESS HANDSET ......................................... 23
CORDED HANDSET ............................................ 23
ADJUSTING THE RECEIVER OR SPEAKER VOLUME ....... 23
SPEAKERPHONE OPERATION ....................................... 24
SWITCH BETWEEN SPEAKERPHONE _ RECEIVER ON
THE BASE ........................................................... 24
SWITCH BETWEEN SPEAKERPHONE _ RECEIVER ON
THE CORDLESS HANDSET ................................... 24
SPECIAL FEATURES ...................................................... 24
PAGE ALL CORDLESS HANDSETS FROM BASE,,, 24
TEMPORARY TONE (FOR PULSE OR ROTARY SERVICE
USE)....................................................................24
MUTE.................................................................24
PAUSE ................................................................ 25
FLASH ................................................................ 25
KEYPAD LOCK (ONLY FOR CORDLESS HANDSET), 25
HOLD(ONLYFORBASE)...................................... 25
REDIAL FUNCTION ...................................................... 26
DIAL A NUMBER FROM THE REDIAL MEMORY - 26
SAVE REDIAL MEMORY ...................................... 26
DELETE A SINGLE REDIAL MEMORY .................. 26
DELETE ALL REDIAL MEMORY ........................... 26
INTERCOM OPERATION ................................................ 27
BASE TO CORDLESS HANDSET ........................... 27
CORDLESS HANDSET TO BASE ........................... 27
CORDLESS HANDSET TO CORDLESS HANDSET,, 27
RECEIVING AN INCOMING CALL DURING AN
4
Page 5
Table of Contents
INTERCOM CALL ................................................. 27
Two-WAY CALLING .......................................... 28
THREE WAY CONFERENCE CALL ....................... 28
CALL TRANSFER ................................................. 28
CALLERID (CID} .................................................. 29
CALL WAITING CALLER ID.........................................29
RECEIVINGCID RECORDS..........................................29
CID MEMORY RECORD STORAGE .............................. 29
REVIEWINGCID RECORDS ......................................... 30
DIALING ACID NUMBER ........................................... 30
DELETINGCID RECORDS ........................................... 31
DELETE A SINGLE CID RECORD ........................ 31
DELETE ALL CID RECORDS .............................. 31
PHONEBOOK ......................................................... 31
REVIEW PHONEBOOK .................................................. 31
STORING NAME AND NUMBER INTO PHONEBOOK,,,,,, 32
STORINGCID RECORDS IN PHONEBOOK ................... 32
EDiT PHONEBOOK ENTRY ........................................... 33
DELETE PHONEBOOK ENTRY ....................................... 33
DIAL RECORD FROM PHONEBOOK .............................. 33
ANSWERING SYSTEM SETUP _ PROGRAMMING ............ 34
AUDIBLE QUICK SETUP GUIDE ................................... 34
SET ANSWERING MACHINE ON/OFF .....................34
DAY/TIME ................................................................... 34
OUTGOING ANNOUNCEMENT ..................................... 35
ANNOUNCEONLYON/OFF ....................................35
RECORDING AN ANNOUNCEMENT ............................... 3S
RECORDING AN ANSWER ONLY ANNOUNCEMENT ...... 36
REVIEWING/DELETINGA1/A2 ANNOUNCEMENTS,,,,36
REMOTE ACCESS CODE .............................................. 36
REMOTE ACCESS ......................................................... 37
SET AUDIBLE MESSAGE ALERT ON/OFF .................37
SETNUMBEROFRINGSTOANSWER.........................38
RECORDINGAMEMO..................................................38
MESSAGE PLAYBACK ................................................... 39
DELETING MESSAGES ................................................. 39
IMPORTANT INFORMATION .................................. 39
CHANGING THE BATTERY ......................................... 40
BATTERY SAFETY PRECAUTIONS .................................. 40
DISPLAY MESSAGES ................................................41
HANDSET SOUND SIGNALS ...................................... 41
TROUBLESHOOTING GUIDE ....................................... 41
CALLERIOSOLUTIONS ...................................... 43
BATTERY SOLUTIONS .......................................... 43
CAUSES OF POOR RECEPTION ................................... 44
GENERAL PRODUCT CARE ....................................... 44
WARRANTY ASSISTANCE .......................................... 4S
ACCESSORY INFORMATION ....................................... 4S
LIMITED WARRANTY ............................................... 46
INDEX ........................................................... 48, 49
WARNING: TO
PREVENT FIRE OR
ELECTRICAL SHOCK
HAZARD, DO NOT
EXPOSETHIS
PRODUCT TO RAIN
OR MOISTURE.
THE LIGHTNING
FLASHAND ARROW
HEADWITHIN THE
TRIANGLE IS A
WARNING SIGN
ALERTINGYOUOF
"DANGEROUS
VOLTAGE" INSIDE
THE PRODUCT.
CAUTION: TO REDUCE THE
RISK OF ELECTRIC SHOCK, DO
NOT REMOVE COVER (OR
BACK). NO USER
SERVICEABLE PARTS INSIDE.
REFER SERVICING TO
QUALIFIED SERVICE
PERSONNEL.
SEE MARKING ON BOTTOM / BACK OF PRODUCT
THE EXCLAMATION
POINT WITHIN THE
TRIANGLE IS A
WARNING SIGN
ALERTING YOU OF
IMPORTANT
INSTRUCTIONS
ACCOMPANYING
THE PRODUCT.
Page 6
Introduction
CAUTION: When using telephone equipment, there are basic
safety instructions that should always be followed. Refer to the
IMPORTANT SAFETY INSTRUCTIONS provided with this product
and save them for future reference.
IMPORTANT: Because cordless phones operate on electricity, you
should have at least one phone in your home that isn't cordless, in
case the power in your home goes out.
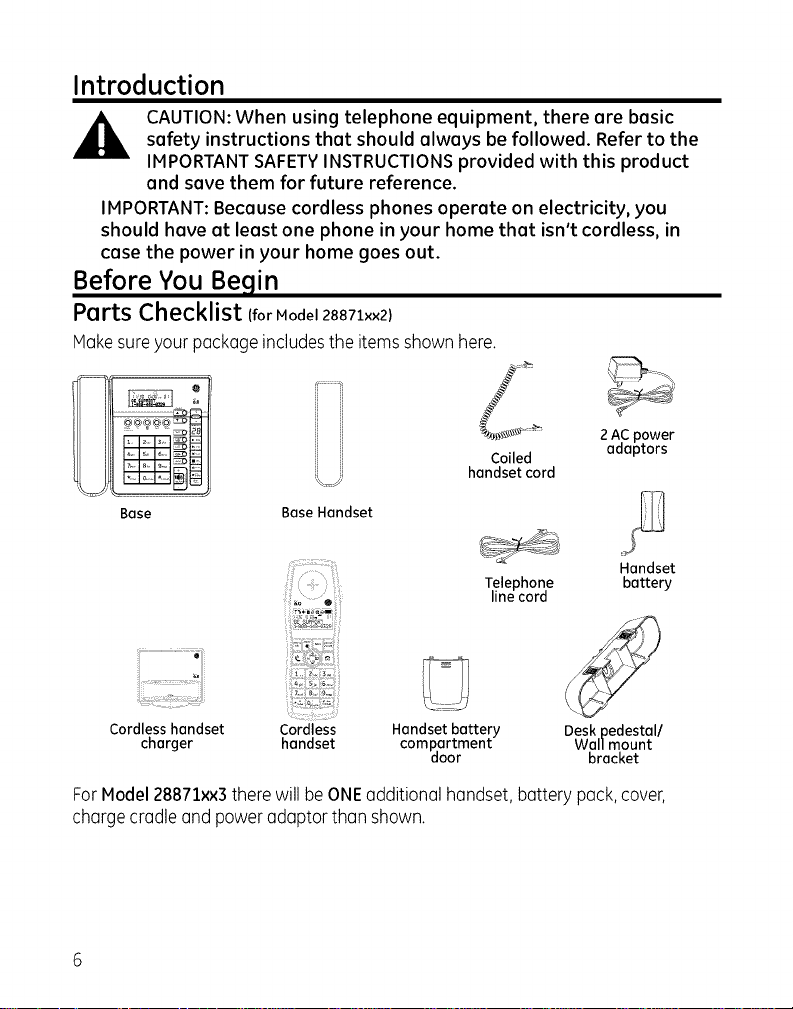
Before You Be in
Parts Checklist (for Model 28871xx2}
Make sure your package includes the items shown here.
2 AC power
Coiled
handsetcord
Base Base Handset
adaptors
Telephone
linecord
Cordless handset Cordless Handset battery Desk pedestal/
charger handset compartment Wallmount
door bracket
Handset
battery
ForModel28871xx3therewill beONEadditional handset,battery pack,cover,
chargecradle and poweradaptorthan shown.
Page 7
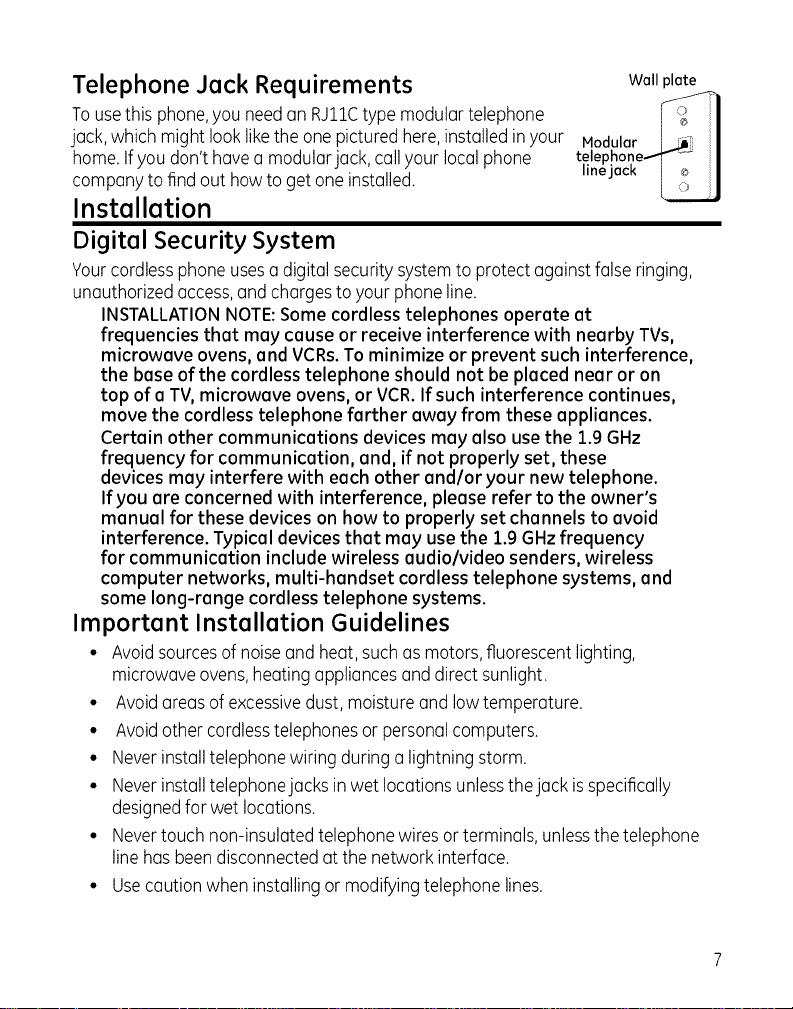
Telephone Jack Requirements
Wall plate
Tousethisphone,youneedanRJllC type modulartelephone
jack,which might looklikethe one picturedhere,installedinyour
home.Ifyoudon't havea modularjack,call yourlocalphone
companyto find out howto getone installed.
Modular
telel:
line
Installation
Digital Security System
Yourcordlessphoneusesa digitalsecuritysystemto protectagainst falseringing,
unauthorizedaccess,andchargesto your phoneline.
INSTALLATIONNOTE:Somecordless telephones operate at
frequencies that may cause or receive interference with nearby TVs,
microwave ovens, and VCRs.To minimize or prevent such interference,
the base of the cordless telephone should not be placed near or on
top of a TV, microwave ovens, or VCR.If such interference continues,
move the cordless telephone farther away from these appliances.
Certain other communications devices may also use the 1.9 GHz
frequency for communication, and, if not properly set, these
devices may interfere with each other and/or your new telephone.
If you are concerned with interference, please refer to the owner's
manual for these devices on how to properly set channels to avoid
interference. Typical devices that may usethe 1.9 GHzfrequency
for communication include wireless audio/video senders, wireless
computer networks, multi-handset cordless telephone systems, and
some long-range cordless telephone systems.
Important Installation Guidelines
• Avoidsourcesofnoiseandheat,such as motors,fluorescentlighting,
microwaveovens,heating appliancesand directsunlight.
• Avoidareasof excessivedust, moistureand lowtemperature.
• Avoidothercordlesstelephonesor personalcomputers.
• Neverinstalltelephonewiring during a lightningstorm.
• Neverinstalltelephonejacksinwet locationsunlessthejack isspecifically
designedfor wet locations.
• Nevertouch non-insulatedtelephone wiresorterminals,unlessthe telephone
linehasbeendisconnectedatthe network interface.
• Usecaution when installingor modifyingtelephone lines.
Page 8
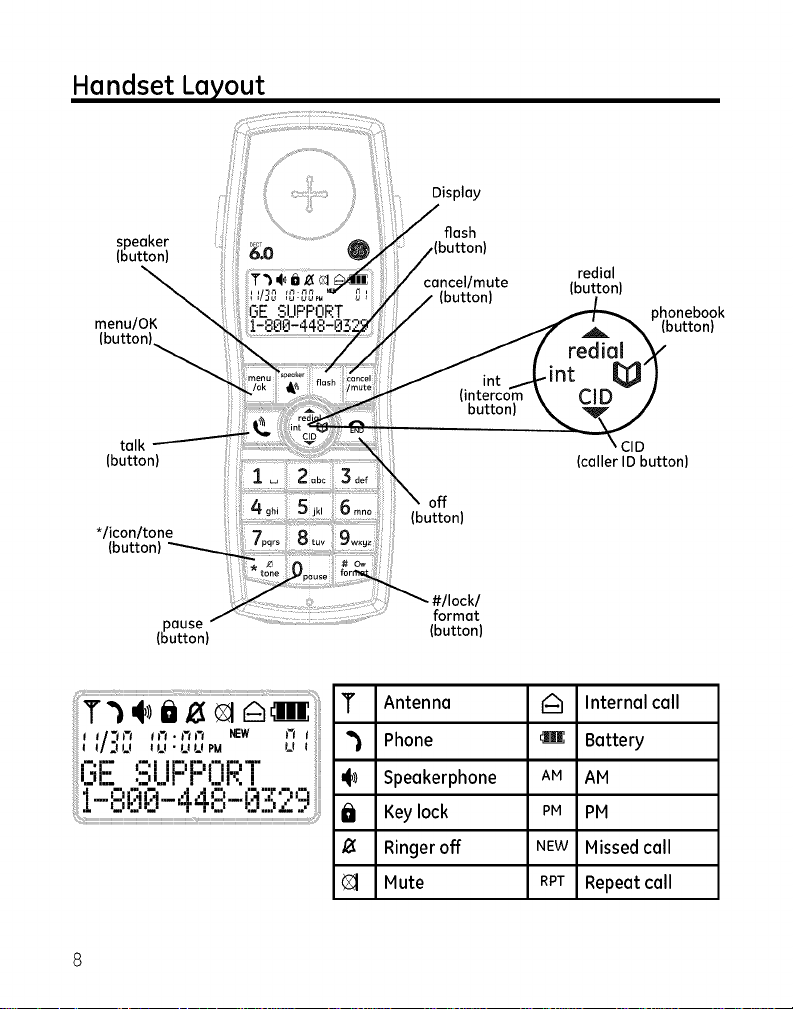
Handset Layout
Display
speaker
(button)
menu/OK
(button)
talk
(button)
*/icon/tone
(button)
pause "
(button)
flash
cancel/mute
int
button)
off
(button)
format
(button)
T Antenna
_} Phone
4_ Speakerphone
iJ Keylock
Ringer off
Hute
redial
(button)
phonebook
CID
(caller ID button)
1_ Internal call
m Battery
AM AH
PM PH
NEW Hissedcall
RPT Repeatcall
(button)
Page 9

Base Layout
phonemenu/ ringer switch CID phonebook exit cancel
OK atton) (back of base) (Caller ID (button) (button) (button)
/
-- review up (button)
....- flash (button)
.---- page/intercom (button)
.._ hold (button)
..--- mute/register (button)
/ speaker (button)
Answering Machine
_'_"- ans. volume up (button)
_ans. volume down (button]
review down (button)
redial (button)
phone volume
(button)
"_ Phone _ Missedcall
4_) Speakerphone RPT Repeatcall
Mute AM AM
Internal call PM PM
I_ (Voice)MessageWaiting
_ essage indicator
_delete (button)
e_l _rec/memo
_(record/memo button)
play (button)
skip (button)
repeat (button)
stop (button)
ans/menu (answerer
memo button) j
Page 10
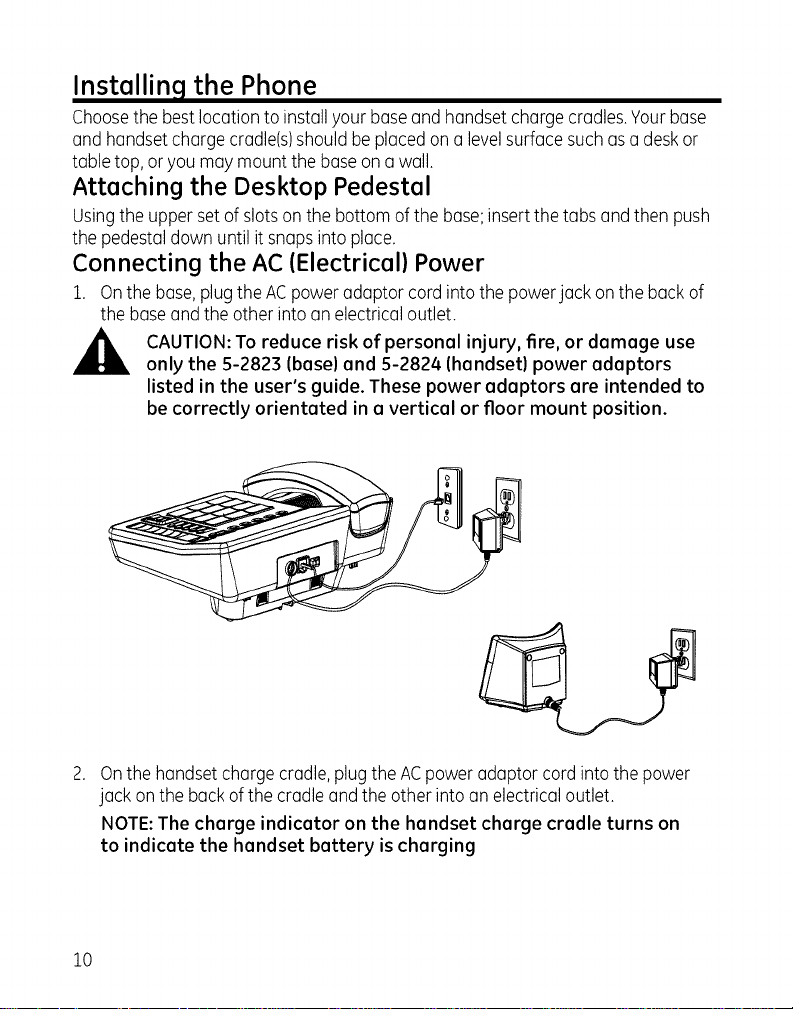
Installin 9 the Phone
Choosethe bestlocationto installyour baseand handsetchargecradles.Yourbase
and handsetchargecradle(s)shouldbe placedona levelsurfacesuchasa deskor
tabletop,or you maymount the baseon a wall.
Attaching the Desktop Pedestal
Usingthe upperset ofslots onthe bottom ofthe base;insertthe tabsandthen push
thepedestaldownuntil itsnapsinto place.
Connecting the AC (Electrical) Power
1. Onthe base,plugthe ACpower adaptor cordintothe powerjackonthe backof
the baseandthe otherinto anelectricaloutlet.
CAUTION:To reduce risk of personal injury, fire, or damage use
only the 5-2823 (base} and 5-2824 (handset} power adaptors
listed in the user's guide. These power adaptors are intended to
be correctly orientated in a vertical or floor mount position.
On the handset charge cradle, plug the ACpower adaptor cord into the power
jack on the back of the cradle and the other into an electrical outlet.
NOTE: The charge indicator on the handset charge cradle turns on
to indicate the handset battery is charging
10
Page 11
Connectingthe TelephoneLine
Onthebase,plugoneendofthestraighttelephonelinecordintothejackontheback
ofthebaseandtheotherendintoamodularwalltelephonejack.
Connectingthe CordedHandset
1. Connectoneendofthecoiledhandsetcordtothejackonthesideofthebase.
2. Connecttheotherendofthecoiledcordtothejackonthehandset,thenplace
thehandsetinthebasecradle.
Setting the Ringer Volume
Youmay controlthe ringervolumelevelwith theswitch locatedon the backof the
base.
ll_ =ringertonewill beloud
=ringertonewill below
=telephonewillnot ring
Wall Mounting the Base
Thebaseispackagedwiththe pedestalattachedin desktopmode.Tomountthe
baseon the wall:
1. Turnthe baseoverand removethe pedestal.
2. Rotatethe pedestala half turn, and align itwith the bottom ofthe base.
B. Attachthe pedestalbyfirst insertingthetabs onthe pedestalintothe slotsonthe
bottom of the base,and then pushthe pedestaldownuntil it snapsinto place.
/4. Plugthe telephonelinecord intothejack markedPHONELINEon the backof the
baseand the otherendinto a modularphonejack.
5. Feedthe telephonelinecordandACpoweradaptorcord throughthe grooveson
the pedestalto allowthe unit to restflat againstthewall.
6. Slipthe mountingholesonthe pedestaloverthe wallplate postsandfirmly slide
the unit into place.(Wallplatenot included.)
7. Removethehandsethook,turn it upsidedown,and put it backinthe slot.You
needto dothis sothe cordedhandsetdoesn'tfall out ofthe base.
8. Placethe cordedhandsetinthe basecradle.
11
Page 12
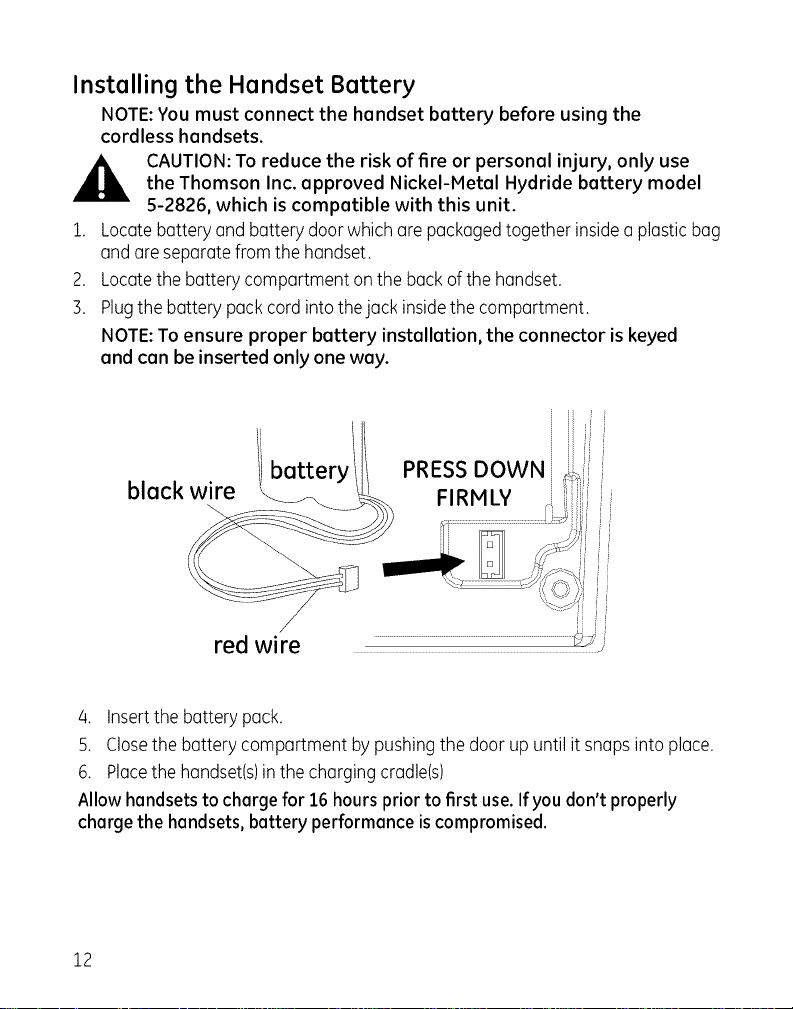
Installing the Handset Battery
NOTE:You must connect the handset battery before using the
cordless handsets.
CAUTION:To reduce the risk of fire or personal injury, only use
the Thomson Inc. approved Nickel-Metal Hydride battery model
5-2826, which is compatible with this unit.
1. Locatebatteryand battery doorwhich are packagedtogether insideaplastic bag
and areseparatefromthe handset.
2. Locatethebattery compartment on the backofthe handset.
B. Plugthe battery packcordintothe jack insidethe compartment.
NOTE:To ensure proper battery installation, the connector is keyed
and can beinserted only one way.
battery
PRESSDOWN
black wire FIRMLY
i!
iJ
red wire ........................................................................................................................................................_.ii
4. Insertthe battery pack.
S. Closethebattery compartment by pushingthe doorup until it snapsinto place.
6. Placethe handset(s)inthe chargingcradle(s)
Allow handsets to charge for 16 hours prior to first use. Ifyou don't properly
chargethe handsets,battery performance iscompromised.
12
Page 13
Menu Operation
Base Menu
Selecting the Language
Choose the screen display language.
1. Pressthe phone menu/ok button. The screen displays LANGUAGE.
2. Pressthe phone menu/ok button again.
3. Pressthe A or ,, button to select the desired language.
8. Pressthe phone menu/ok button to confirm the setting.
5. Pressthe exit button to return to idle mode.
Area Code
1. Pressthe phone menu/ok button.
2. Pressthe ,, or ,, button to select AREA CODEand press the phone menu/ok
button again.
3. Enter the area code.
4. Pressthe phone menu/ok button to confirm the setting.
5. Pressthe exit button to return to idle mode.
LCD Contrast
There are 8 levels available for selection. The default setting is level 7.
1. Pressthe phone menu/ok button.
2. Pressthe ,, or ,, button to select CONTRASTand press the phone menu/ok
button again.
3. Pressthe A or ,, button to select the desired contrast level.
4. Pressthe phone menu/ok button to confirm the setting.
5. Pressthe exit button to return to idle mode.
Key Tone
Turn the button tone for the base ON or OFF.The default setting is ON.
1. Pressthe phone menu/ok button.
2. Pressthe ,, or ,, button to select KEY TONEand press the phone menu/ok
button again.
3. Pressthe -, or ,, button to select ON or OFF.
4. Pressthe phone menu/ok button to confirm the setting.
5. Pressthe exit button to return to idle mode.
13
Page 14
DialMode
SetthedialmodetoTONEorPULSE.ThedefaultsettingisTONE.
1. Pressthephonemenu/okbutton.
2. PresstheAor- buttontoselectDIALMODEand pressthe phonemenu/ok
button again.
3. Pressthe A or - button to select TONEor PULSE.
/4. Pressthe phonemenu/ok buttonto confirmthe setting.
5. Pressthe exit button to returnto idle mode.
Date / Time
Setthe Date/Timedisplayedin idlemode.Thedefault settingis"2008,01/01 12:01
pm".
1. Pressthe phone menu/ok button.
2. Pressthe A or - button to selectDATE/TIMEandpressthe phone menu/ok
button again,the screendisplaysYear2008.
3. Usethe numberkeypadto inputthe last two digits ofyear (range:00-99),press
the phone menu/ok buttonto confirmthesetting andthen entermonth and date
settings.
/4. Inputthe correctdate andmonth, theformat is:date/month (daterange:01-
30/31,monthrange:01-12,pressthe phone menu/ok buttonto confirmthe
settingand entertime setting.
5. Input thecorrecttime,theformat is:hour/minute (hourrange:01-12and 00-23,
minute range:00-59),and selectam, pm,or 2/4-hourusingthe A or - button.
6. Pressthe phone menu/ok buttonto confirmthe setting.
7. Pressthe exit button to returnto idle mode.
NOTE:If the value you input is over the range, you cannot enter the
next setting. Please re-enter the correct setting.
14
Page 15
MessogeWoiting
Ifyouhavesubscribedtoavoicemessagingservice,the_ icondisplaysonthe
baseandMESSAGEWAITINGdisplaysonhandsetto alert youthat you havereceived
newmessages.
Toturn the VisualMessageWaiting Indication (VMWI)off;
1. Pressthe phone menu/ok button.
2. Pressthe -, or ,, button to scrollto VMWIand pressthe phonemenu/okbutton
again.ThescreendisplaysVPIWIOFF?'.
8. Pressthe phone menu/ok buttonto confirmthe setting.
5. Pressthe exit button to returnto idle mode.
NOTE:This service requires o subscription through your local
service provider.
Reset
Resetsthe telephonebaseto the original(default)settings.
NOTE:All caller ID records stored in base ond cordless hondset,
and all the phonebook and redial records stored in base will be
cleared upon reset. You may wish to write down this information
before resetting the base.
i. Pressthe phonemenu/ok button.
2. Pressthe -, or -- button to select RESETandpressthe phonemenu/ok button,
thescreendisplaysENTERPIN.(Thedefault settingis 0000)
3. Usethe numberkeypadto inputthe correct PINcode,pressthe phonemenu/ok
button to confirm,and thescreendisplaysRESET?.
4. Pressthe phone menu/ok buttonto confirmthe setting.
5. Pressthe exit button to returnto idle mode.
15
Page 16

Handset Menu
Handset Setting
Ring Melody
5 ringertonesareavailablefor selection.Thedefault settingisMelody1.
1. Pressthe menu/ok button.
2. Pressthe A or ,, button to select SETUPHSandpressthe menu/ok button.
3. Pressthe A or ,, button to select RINGMELODYandpressthe menu/okbutton.
4. Pressthe A or ,, button to hear andselectthe desiredringmelody.
S. Pressthemenu/ok buttonto confirmthe setting.
6. Pressthe_ button to returnto idlemode.
Ring Volume
Sringvolumesare availablefor selection.Thedefaultsettingis Volume5.Theringer
canbe disabledbypressingthe* buttonfor 1.5secondswhile phone isinidle mode.
thescreendisplaysthe _ icon.Pressand hold* buttonagain to enablethe ringer.
1. Pressthe menu/ok button.
2. Pressthe A or ,, button to selectSETUPHSand pressthe menu/okbutton.
3. Pressthe A or ,, button to selectRINGVOLUMEand pressthemenu/ok button.
4. Pressthe A or ,, button to hearand selectthe desiredringvolume..
5. Pressthe menu/ok buttonto confirmthe setting.
6. Pressthe_ button to returnto idlemode.
Note: For the cordless handset, the intercom ring volume cannot
be adjusted, but it can be deactivated.
Low Battery
Settingthe warning beepto ONwillalert you whenthecordlesshandsetbattery is
low.Thedefault setting isON.
1. Pressthe menu/ok button.
2. Pressthe A or ,, button button to select SETUPHSand press menu/ok button.
3. Pressthe ,, or ,, button button to select TONESand press menu/ok button.
4. Pressthe ,, or ,, button button to select LOWBATTERYand press menu/ok
button.
5. Pressthe A or ,, button to select ON or OFF.
16
Page 17

6. Pressthe menu/ok button to confirm the setting.
7. Pressthe _ button to return to idle mode.
No Coverage
Setting the warning beep to ON will alert you when the cordless handset is out of
range. The default setting is OFF.
1. Pressthe menu/ok button.
2. Pressthe
3. Pressthe
4. Pressthe
S. Press the
6. Pressthe
7. Pressthe
Key Tone
,, or ,, button to select SETUPHS and press menu/ok button.
,, or ,, button to select TONESand press menu/ok button.
A or _- button to select NO COVERAGEand press menu/ok button.
A or ,, button to select ON or OFF.
menu/ok button to confirm the setting.
button to return to idle mode.
Turnthe buttontone to ONorOFF.Thedefaultsetting isON.
1. Pressthe menu/ok button.
2. Pressthe
]. Pressthe
4. Pressthe
5. Pressthe
6. Pressthe
7. Pressthe
Auto Talk
,, or ,, button to selectSETUPHSand pressmenu/ok button.
,, or ,, button to selectTONESand pressmenu/ok button.
-, or ,, button to selectKEYTONEand pressmenu/ok button.
A or ,, button to selectONor OFF.
menu/ok button to confirmthe setting.
button to return to idlemode.
Allowsfor instant communicationwhenthe phoneisliftedfromthe cradlewith no
needto press_, or '_' button.Thedefault settingisON.
1. Pressthe menu/ok button.
2. Pressthe A or ,, button to select SETUPHS and pressthe menu/ok button.
3. Pressthe -, or ,, button to select AUTOTALl{ and press the menu/ok button.
4. Pressthe A or ,, button to select ON or OFF.
5. Pressthe menu/ok button to confirm the setting.
6. Pressthe _ button to return to idle mode.
17
Page 18

(Daily) Alarm
1. Pressthe menu/ok button.
2. Pressthe ,, or ,, button to selectSETUPHSand pressthe menu/okbutton.
3. Pressthe ,, or ,, button to selectALARMand pressthe menu/ok button.
4. Pressthe -, or ,, buttonto selectONor OFF.
S. If you selectON. pressthe menu/ok buttonto enterHH:MM.Pressthe ,, or ,,
button to selectam or pm.
6. Pressthe menu/ok buttonto confirmthe setting.
NOTE:When alarm is set, an A is shown on display. When the
Alarm time is reached, the alarm sounds and ALARM ON blinks for
1 minute.
Handset Name
Seta preferrednameto the cordlesshandset.Thedefault name isHANDSET.
1. Pressthe menu/ok button.
2. Pressthe ,, or ,, button to selectSETUPHSand pressthe menu/ok button.
3. Pressthe A or ,, button to selectHANDSETNAMEand pressthe menu/ok
button.
4. Enterthedesirednameusingthe numberkeypad.(Deleteincorrectentriesby
pressingthecancel/mute button).
S. Pressthe -, or ,, button to movecursor left or right.
6. Pressthe menu/ok buttonto confirm.
Language
Choosethe screendisplaylanguage.
1. Pressthe menu/ok button.
2. Pressthe
3. Pressthe
4. Pressthe
S. Press the
6. Pressthe
,, or ,, button to selectSETUPHSand pressthe menu/ok button.
A or ,, button to selectLANGUAGEand pressthe menu/ok button.
-, or ,, button to selectthe desiredlanguage.
menu/ok button to confirmthe setting.
button to return to idlemode.
18
Page 19

Screen Contrast
There are 5 levels available for selection. The default setting is Level 5.
1. Pressthe menu/okbutton.
2. Pressthe ,, or ,, button to select SETUPHS and pressthe menu/ok button.
B. Press the -, or ,, button to select CONTRASTand press the menu/ok button.
4. Pressthe -, or ,, button to select the desired contrast level.
5. Pressthe menu/ok button to confirm the setting.
6. Pressthe ENi_Dbutton to return to idle mode.
Reset Handset
You can reset your cordless handset to itsoriginal (default)settings.
1. Pressthe menu/ok button.
2. Pressthe A or ,, button to select SETUPHS and pressthe menu/ok button.
B. Press the -, or ,, button to select RESETand press the menu/ok button.
8. Press the menu/ok button to confirm the setting.
5. Pressthe _ button to return to idle mode.
NOTE: All phonebook and redial records stored in the handset will
be cleared upon reset. You may wish to write down the information
before resetting the handset.
Base Setting
Change PIN
The PIN is a security feature to prevent others from changing the stored settings. The
default PINis0000. Ifyou change the PIN.please record the new PINcode for your
record.
NOTE: The PIN code must be 4 digits.
i. Pressthe menu/ok button.
2. Pressthe ,, or ,, button to select SETUPBS and press the menu/ok button.
B. Press A or ,, button to select CHANGE PIN and press menu/ok button, the
screen displays ENTERPIN (default setting = 0000).
4 Input the current PIN code and press the menu/ok button, the screen displays
NEW PIN.and prompts you to input a new PIN code.
NOTE: WRONG PIN displays if the current PIN code you input was
incorrect. Re-enter PIN code.
19
Page 20

5. InputthedesirednewPINcodeandpressmenu/okbutton,thescreendisplays
REPEATPINand promptsyouto inputthe newPINcode again for verification.
NOTE:If the verification PIN code is different from the new PIN
code, the change will fail. You will be prompted to input a new PIN
code.
6. Input thenew PINcode again and pressmenu/ok buttonto confirmthe setting.
7. Pressthe_ button to returnto idlemode.
DialMode
Setthe dial modetoTONEor PULSE.Thedefaultsetting isTONE.
1. Pressthe menu/ok button.
2. Pressthe A or ,, button to selectSETUPBSandpressthe menu/ok button.
3. Pressthe A or ,, button to selectDIALMODEand pressthe menu/ok button.
3. Pressthe A or ,, button to selectTONEor PULSE.
/4. Pressthe menu/okbutton toconfirm the setting.
5. Pressthe_ button to returnto idlemode.
Message Waiting (VMWI)
Ifyou havesubscribedtoa voicemessagewaitingservice.MESSAGEWAITING
displaysonhandsetand theI_ icondisplayson the baseto alert youthat you have
receivednewmessages.
Toturn the VisualMessageWaiting Indication (VMWI)off via thehandset;
1. Pressthe menu/ok button.
2. Pressthe * or ,, button to selectSETUPBSandpressthe menu/ok button.
3. Pressthe * or ,, button to selectVMWIand pressthemenu/ok button.
ThescreendisplaysVPIWIOFF?'.
/4. Pressthe menu/okbutton toconfirm the setting.
S. Pressthe_ button to returnto idlemode.
NOTE:This service requires a subscription through your local
service provider.
20
Page 21

Reset Base
Thisoptionallows userto restorethe baseand Date/Timeto the default setting.
Note: All Caller ID records stored in base and cordless handset, and
all the phonebook and radial records stored in base will be cleared
upon reset. You may wish to write down the information before
reset.
1. Pressthe menu/ok button.
2. Pressthe A or ,, button to selectSETUPBSandpressthe menu/ok button.
3. Pressthe A or ,, button to selectRESETandpressthe menu/okbutton, the
screendisplaysENTERPIN(defaultsetting= 0000).
/4. Inputthe correct PINcode,pressMENU/OKbutton to confirm,andthe screen
displaysRESET?.
5. Pressmenu/ok buttonto confirmthesetting.
6. Pressthe_ button to returnto idlemode.
Date / Time
Setthe Date/Timedisplayedin idlemode.Thedefault settingis"2008,01/01 12:01
pm".
i. Pressthe menu/ok button.
2. Pressthe A or ,, button to selectDATE/TIMEandpressthe menu/ok button,the
screendisplaysYEAR2008.
3. Input thecorrectlast two digits ofyear(range:00-9% pressthe menu/ok button
to confirm thesettingand thenenter month anddate settings.
4. Input thecorrectdate andmonth,the format is:date/month (daterange:01-
30/31,monthrange:01-12),pressmenu/ok buttonto confirmthe settingand
entertime setting.
5. Input thecorrecttime,theformat is:hour/minute (hourrange:01-12and 00-23,
minute range:00-5% and setthe "am"or"pm" by pressingA or ,, button.
6. Pressthe menu/ok buttonto confirmthe setting.
7. Pressthe_ button to returnto idlemode.
NOTE:If the value you input is over the range, you cannot enter the
next setting. Please re-enter the correct setting.
21
Page 22

Registration
Register
Up to 4 cordless handsets can be registered to the same base.
1. Pressthe menu/ok button.
2. Pressthe -, or ,, button to select REGISTRATIONand press the menu/ok button.
B. Press the A or -- button to select REGISTERand press the menu/ok button, the
screen displays ENTERPIN (default setting = 0000).
/4. Input the correct PINcode and press the menu/ok button to begin registration.
The screen displays SEARCHING.Pressand hold the mute/register button on the
base until the base screen displays REGISTRATION.
NOTE: While in SEARCHING mode, the handset is inoperable, wait
for mode to time out before use.
NOTE: If an incorrect PIN code is entered, registration will not
succeed. Handset screen displays WRONG PIN, after time out.
NOTE: If base is unable to register, NO BASE displays on the screen
and the registration process must be repeated.
6. After successful registration, (SUCCESSFULdisplays on screen).
Remove Handset (De-registration)
Tode-register a handset from the base.
1. Pressthe menu/ok button.
2. Pressthe A or ,, button to select REGISTRATIONand press the menu/ok button.
B. Press the A or ,, button to select REMOVEHANDSETond press the menu/ok
button, the screen displays ENTERPiN (default setting = 0000).
NOTE: If an incorrect PIN code is entered, handset screen displays
WRONG PIN.
4. Input the correct PINcode and press the menu/ok button.
5. Pressthe -, or -- button to select the cordless handset (1,2,3,4)to remove and
press the menu/ok button, the screen displays REMOVEHANDSET?.
6. Pressthe menu/ok button to confirm the setting.
7. Pressthe _ button to return to idle mode.
NOTE: The de-registered handset displays NOT REG. You must
register it again before using it.
22
Page 23

Basic Operation
Duringa phonecall,the call timer isshownon thedisplay.Thebasedisplaysthe
phoneiconwhena handsetisin use.ThecordlesshandsetscreendisplaysLINEIN
USE.whenthe base(oranotherhandset)isin use.
Making a Call
NOTE:To delete an incorrect character press the cancel button on
the base or the cancel/mute button on the handset.
Cordless Handset
1. Pressthe_, or _r button.Waitfor adialtone,then dialthe desirednumber.
- or -
2.
Dialthe numberandthen pressthe qt_ or '_r button.
3. Whenfinished,pressthe_ button,or placethe handsetin thecharge cradleto
hang up.
Corded Handset
1. Liftthe handsetor pressthe_'p!_'l!rbuttonon the baseand wait for adialtone. Dial
thedesirednumber.
- or -
2. Dialthe number,then lift the handsetor pressthe .......onthe base.
B. Whenfinished,putthe handsetback onthe cradleto hang upor pressthe_'p!_'l!r
button on the base.
Receiving a Call
Cordless Handset
1. Pressthe_ or _ buttononthe handset.
2. Whenfinished,pressthe_ button,or placethe handsetin thecharge cradleto
hang up.
Corded Handset
1. Liftthe handsetor pressthe_',_'I!,buttonon the base.
2. Whenfinished,putthe handsetback onthe cradleto hang up or pressthe _',_I!,
button on the base.
Adjusting the Receiver or Speaker Volume
Duringa call:
• Pressthe phonevol.+or - button to adjustthe volumeon cordedbase.
• Pressthe A or ,, button to adjustthevolumeoncordlesshandset.
,q,I)
2B
Page 24

Spea kerphone Operation
Forbest speakerphoneperformance,avoidthefollowing:
• Areaswith highbackgroundnoise.(Themicrophonemightpickup these
sounds.)
• Surfacesaffected byvibration.
• Recessedareassuchas in a corner,underacupboard,or nextto acabinet,
whichcangeneratean echoeffect.
Notethefollowing guidelineswhen usingthe speakerphone.
• Stayreasonablycloseto thephonesothat youcanbe clearlyheardbythe
personto whomyou arespeaking.
• TheSPEAKERindicatorisilluminatedwhenthe speakerphoneisinuse.
Switch between Speakerphone & Receiver on the Base
Toswitchto speakerphonemode,the _o'I!_button and hang upthe cordedhandset.
Toswitchto receivermode,pick upthe cordedhandsetfromthe base.
Switch between Speakerphone & Receiver on the Cordless Handset
Toswitchto speakerphonemode,pressthe ,_r button.
Toswitchto handset,pressthe,_r button again or pressthe_, button.
Special Features
Page All Cordless Handsets from Base
1. Pressandholdthe page/intercom button on the basefor 3seconds,the base
screendisplaysPAGINGHANDSETS.
2. Cordlesshandsetswill beepandthe screendisplaysPAGINGfor 30 seconds.
3. Pressthe EXITorcancel button onthe baseor pressanybuttonon the cordless
handsetto stop.
Temporary Tone ffor pulse or rotary service use}
Inpulsedialingmode,youcan switch to Tonedialingto accessbankfacilitiesetc. by
pressingthe* button. It will resetautomatically to pulsedialingafter youendthe call.
Mute
1. Pressthe mute/register button on the baseor thecancel/mute button onthe
cordlesshandsetto activatethe mute feature duringacall.
2. Thescreendisplaysthemute icon(_.
3. Pressthe mute/register button on the baseor thecancel/mute button onthe
cordlesshandsetagain to deactivate.
24
Page 25

Pause
Whena pause isneededto waitfor adialtone (forexample,afteryou dial9 for an
outsideline,or towait fora computeraccesstone),pressthe pausebuttonto insert
a 3 seconddelayintothe sequencewhendialing(orwhenstoringa numberinto
phonebook.)
Pressand holdthe pausebutton for 1.5seconds,thescreendisplaysa P.Eachpause
countsasonedigit inthe dialingsequence.
Flash
Usetheflash button to activate customcallingservicessuchascallwaiting or call
forwarding,which areavailablethrough yourlocaltelephonecompany.Thescreen
displaysan R.
Theflash button can alsobe usedto accessa newdial tone without hanging up.
Keypad Lock (only for cordless handset}
Thedefaultsettingis Off.
Tolockthe keypad;
WhilephoneisOFF,pressand holdthe #/lock/format button untila beepisheard,
thescreendisplaysthe lockiconiii.
Tounlockthe keypad;
Pressand holdthe #/lock/format button untila beepisheard,the JJliconis no
longerdisplayed.
NOTE:When the key lock is activated, you are still able to accept
incoming calls and make emergency 911 calls.
Hold (only for base)
Toplaceacall on hold,pressthe holdbutton. Musicis playedas a reminderthat
thecall ison hold.Liftthecordedhandsetor pressthe _o_!_buttonor pressthe hold
button againto releasethe holdfunction.
NOTE:The cordless handset may R_k up the call once it had been
put on hold by pressing the _, or _1t%button.
25
Page 26

Redial Function
Thelast 10phonenumbersyoudialedout arecollectivelystoredin baseandcordless
handsetradialmemory.
Dial a Number from the Radial Memory
1. Pressthe radial button on baseorthe A button onthe cordlesshandset.If the
radialmemoryisempty,thescreendisplaysEMPTY.
2. Pressthe A or ,, button to selectthe desiredRadialnumber.
3. Liftthe receiverorpressthe _o_l!rbutton onthe baseor pressthe _, or _
button on thecordlesshandset,thetelephonenumber isautomatically dialed
out.
NOTE:If you want to edit the number before dialing out, press the
menu/ok button twice (to enter menu and then select the number.)
Save Radial Memory
1 Pressthe radial buttonon baseorthe A button onthe cordlesshandset.
2 Pressthe A or ,, buttonto selectthedesiredradialnumber.
3 Pressthe menu/ok buttonon the baseor handsetto entermenu,pressA or ,,
button to selectSAVENUMBER,pressthe menu/ok button,the screendisplays
ENTERNAHE.Youmustinputthe name;otherwisethe recordcannotbe saved.
/4 Pressthe menu/ok buttonon the baseor handsetto save.
Delete a Single Radial Memory
1 Pressthe radial buttonon baseorthe A button onthe cordlesshandset.
2 PressA or ,,button to selectthe desiredradialnumber.
3 Pressthe menu/ok buttonon the baseor handsetto entermenu,pressA or ,,
button to select DELETE,pressthe menu/ok button again,the screendisplays
CONFIRM?.
/4 Pressthe menu/ok buttonon the baseor handsetto confirm.
Delete All Radial Memory
1 Pressthe radial buttonon baseorthe A button onthe cordlesshandset.
2 Pressthe menu/ok buttonon the baseor handsetto entermenu,pressA or
,, buttonto selectDELETEALL,pressthe menu/ok button again,the screen
displaysCONFIRM?.
3 Pressthe menu/ok buttonon the baseor handsetto confirm.
26
Page 27

Intercom Operation
Youcanmakeinternalcalls betweenbaseand cordlesshandset,or anytwo cordless
handsets(ifyouhavemorethan onecordlesshandset).
Base to Cordless Handset
1. Withthe basein idlemode,pressthe page/intercom button,the screendisplays
INT-NUMBER?.
2. Usethe numberkeypadto enterthe cordlesshandsetnumber.(1,2,3,/4)youwant
to call.
3. Thereceivinghandsetringsand thescreendisplaysBASE.
/4. Pressthe _, or _ button ofthe receivinghandsetto answer.
Cordless Handset to Base
1. Withthe cordlesshandsetinidlemode,pressthe int button,the screendisplays
INT-NUMBER?.
2. Usethe numberkeypadto enter"0"forthe base.
3. Thebaseringsand thescreendisplaysthe callingcordlesshandset'sname and
number.
/4. Pickupthe cordedhandsetor pressthe _1!, button on the baseto answer.
Cordless Handset to Cordless Handset
1. Withthe cordlesshandsetinidlemode,pressthe int button and the screen
displaysINT-NUIBER?,
2. Usethe numberkeypadto enterthe cordlesshandsetnumber (1,2,3,4)youwant
to call.
3. Thereceivinghandsetringsand thescreendisplaysBASE.
/4. Pressthe_, button or '_ button ofthe receivinghandsetto answer.
Receiving an Incoming Call During an Intercom Call
Whenin intercom mode,abeeptone soundsonthe receiversindicatingan incoming
call.Youmustendthe intercombeforeansweringthe incomingcall.
27
Page 28

UsingIntercomwithExternalTelephoneCalls
Duringatelephonecall,youmayusetheintercom/pagingfunctiontopageanother
handsetandhaveanoffline,private(two-way)intercomconversation.Youmayalso
haveathree-wayconferencebetweentheexternalcallerandthebase/handsets,or
youmaytransfertheexternaltelephonecalltoanotherhandsetorthebase.
NOTE:Beforeyouintercom/pageanotherhandset,youmust
decidewhetheryouwanttocreateatwo-wayorathree-way
conversation.
Two-WayCalling
1. Duringanexternalcall,pressthepage/intercombuttononthebaseortheint
buttononthecordlesshandset,andusethenumberkeypadtoenterthehandset
numberyouwanttocall.
NOTE:Thereceivinghandsetpressesthe_ or_r buttonto
answertheintercomcall.Bothintercomusersmayspeakprivately.
Theexternalcallerwillnothear the intercom conversation.
2. Whenfinished,thesecondhandsethangsupto endthe intercomcall,andyour
originaltelephoneconversationresumes.
Three Way Conference Call
Afterreceivinganexternal call,it ispossibleto includea secondhandsetinthe
conversation.
1. During anexternalcall,pressthe _, button or _r buttonof anothercordless
handsettojoin call (IfBase,pickup the cordedhandsetfrom the baseorpressthe
_1) button).
speaker
2 If eitherhandsetor basehangsup,the remainingusercontinueswiththe external
call.
Call Transfer
Thefunction allowsyouto transfer an externalcallfrom the baseto a cordless
handset,or from a cordlesshandsetto the baseor anothercordlesshandset.
1. During anexternalcall,pressthe page/intercom buttonon the baseor int
button on the handsetto puttheexternal callon hold.
2. Enterthe numberof the handsetthat you wouldliketo transferthe callto (0for
base,1-/4for cordlesshandset).
3. Oncetheintercomis established.Youmay hang upto completethecalltransfer.
NOTE:If the intercom is not answered in 1OOseconds, it cancels
and transfers the call back to the originating base or handset.
28
Page 29

Caller ID{CID)
IMPORTANT:In order to use this unit's Caller ID features, you must
subscribe to either the standard Name/Number Caller ID Service or
Call Waiting Caller ID Service. To know who is calling while you are
on the phone, you must subscribe to Call Waiting Caller ID Service.
Thisunit receivesanddisplaysinformationtransmitted byyourlocalphonecompany.
Thisinformationcan includethe phonenumber,date, andtime;or the name,phone
number,date,andtime.
Call Waiting Caller ID
Providedyou subscribeto CallWaitingCallerIDservicefrom your phonecompany;if
youreceivean incomingcalland you are usingthe GEmulti handsetsystem,abeep
indicatesthe presenceof aCallWaitingcall on the line.TheCallWaitingCallerID
informationwill bedisplayedand storedin the historyof the baseandall handsetsin
thesystem.
• Whenyouhear thecall waiting beepinthe handsetreceiver,pressthe flash
button to put thecurrent callon holdand answerthe incomingcall.
Pressflashagainto returnto theoriginalcoll.
NOTE:The unit cannot receive Call Waiting/Caller ID information
while an external call is hold.
Receiving CID Records
Whenyoureceiveocall,theCallerIDinformationistransmittedbetweenthefirstand
secondring.TheCallerIDinformationappearsonthedisplaywhilethe phonerings,giving
youa chancetomonitortheinformationanddecidewhetheror notto answerthecall.
CID Memory Record Storage
Ifyou arenot at homeor cannot answer,yourtelephone'sCallerIDmemorystores
thedata forthe 30 mostrecentcallsyoureceivedso youcanseewho calledwhile
youwereunavailable.Whenthe 31st call isreceived,the oldestCallerIDrecord(1st
call)is automaticallydeleted.
Youmay reviewthe storedinformation atanytime.Callsreceivedsinceyourlast
reviewshowasNEWinthe display.Callsthat havenot beenpreviouslyreviewedbut
werereceivedfrom the samenumber morethan onceshow asREPTinthe display.
29
Page 30

Reviewing CID Records
Ascalls are received and stored, the display isupdated to let you know how many
calls have been received. To scroll CID records:
1. Pressthe ClD button.
2. Press the A or ,, button to review the CID records.
NOTE: If an area code is included in the caller number, you can
press the #/lock/format button to change the caller number
display format.
For example: If the displayed caller number is 123-4567 and your
preset local area code is 888, press the #/lock/format button once
will display 888-123-4567. Press #/lock/format button again will
disploy 1-888-123-4567.
Dialinga CID Number
i. PresstheCID button.
.
Pressthe A or ,, button to reviewtheCIDrecords.
3.
Liftthe receiveror pressthe _o_l!rbutton onthe baseor pressthe _, or _
button on thecordlesshandset,the number isautomatically dialedout.
NOTE:Depending on (a) how the incoming caller's phone number is
formatted when it is received, and (b)whether or not you previously
pre-programmed your local area code into the set up menu, you
may need to adjust the format of the incoming caller's stored
phone number before making the call, press the #/lock/format
button to adjust the number, and try again.
Availableformatsinclude:
Numberof digits Explanation
Elevendigits longdistancecode "1 "
+3-digitareacode
+7-digittelephonenumber.
Tendigits 3-digitarea code+
7-digittelephonenumber.
Sevendigits 7-digittelephonenumber.
Example
1-317-888-8888
317-888-8888
888-8888
30
Page 31

Deleting CID Records
NOTE:The CID memory of base and cordless handset are
independent. Therefore, deleting a call log from the base will not
have the same effect to the cordless handset or vice versa.
Delete a Single CID Record
1. Pressthe CIDbutton.
2. Pressthe -, or ,, button to reviewtheCIDrecordsond selectdesiredrecord.
3. Pressthe menu/ok button.
4. Pressthe A or ,, button to selectDELETE.
5. Pressthe menu/ok button,the screendisploysCONFIRM?,
6. Pressthe menu/ok buttonogoin to confirm.
Delete All CID Records
1. Pressthe CIDbutton.
2. Pressthe menu/ok button.
]. Pressthe A or ,, button to selectDELETEALL.
5. Pressthe menu/ok button,the screendisploysCONFIRM?.
6. Pressthe menu/ok buttonogoin to confirm.
Phonebook
Youmoy storeupto 50entriesper boseor hondsetwith 24-digitsond 15-chorocter
nomes(includingspoces)inthe phonebookmemory.
Review Phonebook
1. Pressthe_ button on thecordlesshondsetor bose.
NOTE:If phonebook is empty, screen displays PHONEBOOKEMPTY.
2. Pressthe A or ,, button to reviewphonebook.
3. Youcon seorcho nomebyinputting the first chorocter.
4. Reviewthe phonenumberstoredwith the nomebypressingthe * button.
5. Whenyouscrollto the endofthe phonebook,thescreendisploys"-.......... "
NOTE:It isalso possible to view the phonebook during a call.
31
Page 32

Storing Name and Number into Phonebook
1. Pressthe U button on the cordless handset or base.
2. Pressthe menu/ok button to enter menu, selectADD NEW.
3. Pressthe menu/ok button and screen displays ENTERNUMBER.
/4 Enter number using the keypad. (Pressand hold pause button if a pause is
needed.)
.
Pressthe menu/ok button and screendisplaysENTERNAME.
6.
Enterthe namebyusingthe numberkeypad.Toenterthe charactersfor a
name,pressthe numericbutton consecutivelyeg:letter H,pressthe number/4
button twice. If 2consecutivecharactersareon thesame button,enterthe first
character,thenwait for the cursorto movetothe right beforeenteringthe next
character.
NOTE: Press the cancel/mute button on the cordless handset or the
cancel button on the corded base to delete any incorrect entries.
7. Pressthe menu/ok button to save the record.
NOTE: When screen displays MEMORY FULL, you must delete one or
more records before saving a new record.
Storing CID Records in Phonebook
You may also store CID information in the phone's internal memory.
NOTE: It is important that you format CID records correctly BEFORE
storing in internal memory as you cannot reformat CID records
stored in memory.
1. Pressthe CIDbutton.
2. Usethe -- or A button to scrollto the desiredCIDrecord.
3. Pressthe menu/ok button.
4. Pressthe ,, or A button to display SAVENUMBER.
5. Pressthe menu/ok button.
/4. Usethe numberkeypadto entera namefor the phonebookentry.
5. Pressthe menu/ok buttonto save.
NOTE:If the selected ClD record contains any information that is
non-numeric, the unit will not allow this record to transfer to the
internal user memory. The handset will display UNABLETOSTORE.
32
Page 33

Edit Phonebook Entry
1. PresstheQ:_button on the cordlesshandsetor base.
2. Pressthe -, or ,, button to selectdesiredrecord.
B. Pressthemenu/ok button.
4. Pressthe A or ,, button to selectEDIT.
5. Pressthe menu/ok button.
6. Usethe keypadto editthe number entry (pressthe ,, or ,, button to movethe
cursor).
7. Pressthe menu/ok button.
8. Usethe numberkeypadto editthe nameentry (pressthe ,, or ,, button to
movethe cursor).
9. Pressthe menu/ok buttonto save.
Delete Phonebook Entry
1. PresstheU button on the cordlesshandsetor base.
2. Pressthe -, or ,, button to selectdesiredrecord.
B. Pressthemenu/ok button.
4. Pressthe A or ,, button to selectDELETE.
5. Pressthe menu/ok button,the screendisplaysCONFIRM?.
6. Pressthe menu/ok buttonagain to confirm.
Dial Record from Phonebook
1. PresstheU button on the cordlesshandsetor base.
2. Pressthe -, or ,, button to selectdesiredrecord.
B. Liftthe receiverorpressthe _o_I!,button onthe baseorpressthe It_ or _t_'
button on thecordlesshandset,thetelephonenumber isautomatically dialed.
NOTE:If you want to edit the number before dieling out, press MENU/OK
button to enter menu and select SELECTto edit the number first.
BB
Page 34

Answerin,9 System Setup & Pro,grammin,9
Audible Quick Setup Guide
Ifyou needadditionalassistance;whileinstandby mode,pressthe ans. menu button
onthe baseandfollow thevoice instructions.
Set Answering Machine ON/OFF
Uponinitialpower up andactivation,the answeringsystemisin the ONmode.
1. Pressthe ans. menubutton.Thesystemannounces"Answerer 01t(orOFF)",
pressthe I_skipor 14repeatbutton toswitch betweenONandOFF.
NOTE:When the system is in OFFmode; the indicator displays OFF.
2. Pressthe ans. menubutton to confirmyoursetting.
Day/Time
Theday/time codeonthe answeringmachineis independentof thedate/time shown
onthe basedisplay.Youmustprogramthe answeringmachine'sday/time inorder to
havean accurate time for messagereceipt.
1. Pressthe ans. menubutton repeatedlyuntilthe systemannouncesdayandtime.
2. Pressthe I_skipor 14repeat buttonto programthe Day.Asyou program,the
messageindicatordisplays'd'anda number,i to 7,representingtheday of the
week(1representsMonday;2representsTuesday,etc.).Pressthe ans.menu
button to confirm.
3. Pressthe I_skip or 14repeat button to program the Hour.Remember to program
am or pm correctly.
/4. Pressthe ans. menu button to confirm.
5. Pressthe I_skipor 14repeat buttonto programthe Hinutes.Toprogramthefirst
digit, theselectionis0through 5,asthe minutesrangefrom O0to 59.Pressthe
ans. menubutton.Next programtheseconddigit,the choicesare 0through 9.
6. Pressthe ans. menubutton to confirm.
NOTE: If the main power to the base is lost, the message indicator
displays St. (Set time) to remind you adjust the clock when power is
restored.
34
Page 35

Outgoing Announcement
You can record 2 different outgoing announcements: A1 inviting your caller to leave a
message or A2 asking your caller to call back later.
Outgoing Announcement A1 is played when Announce Only mode is OFF.Callers
can leave a message in this mode. Youranswering system is preset with Announce
Only set to OFF,allowing callers to leave a message.
Outgoing Announcement A2 is played when Announce Only mode is ON. Callers
cannot leave a message in this mode.
Ifyou do not record your own announcements, your answering system will play a
pre-programmed message to your callers:
AI: "Please leave your message after the tone."
A2:"1 am sorry I am not available. Please call back later."
Announce Only ON/OFF
1. Pressthe ans. menu button repeatedly until the system announces "Announce
Only is ON (or OFF)".
2. Pressthe _ skip or 14repeat button to switch between ON and OFF.
3. Pressthe ans. menu button to confirm your setting.
Recording an Announcement
Hake sure the Announce Only is set to OFF. For best results when recording,
you should be about nine inches from the microphone, and eliminate as much
background noise as possible.
1. Pressthe ans. menu button repeatedly until the system announces
"Announcement One." The message indicator displays A1.
2. Pressthe ){skip or 14repeat button. The system announces "Now Recording".
Begin speaking after the beep.
NOTE: Maximum recording time is 60 seconds, announcement must
be at least 3 seconds in length.
3. Pressthe ,stop button when finished. Your recording will be played
automatically. If you're not satisfied, record your announcement again.
35
Page 36

Recording an Answer Only Announcement
HakesuretheAnnounceOnlyissetto ON.Forbestresultswhen recording,
youshouldbeaboutnine inchesfrom themicrophone,and eliminateasmuch
backgroundnoiseaspossible.
1. Pressthe ans. menubutton repeatedlyuntilthe systemannounces
"AnnouncementTwo"ThemessageindicatordisplaysA2.
2. Pressthe I_skipor 14repeat button.Thesystemannounces"Now Recording".
Beginspeakingafterthe beeF
NOTE:Maximum recording time is 60 seconds, announcement must
be at least 3 seconds in length.
3. PresstheIlstop buttonwhen finished.Yourrecordingwill beplayed
automatically.Ifyou'renot satisfied,recordyour announcementagain.
Reviewing/Deleting A1/A2 Announcements
1. Pressthe ans. menubutton repeatedlyuntilthe systemannounces
"AnnouncementOne"or "AnnouncementTwo"
2. Pressthe _ play buttonto reviewthelatestrecordedannouncement).
3. Whileannouncementisplaying,pressthe delete button todelete thecurrent
announcement.Theansweringsystemwill usethe defaultannouncement.
NOTE:The default announcement cannot be deleted.
Remote Access Code
Youcanaccessthe answeringsystemfrom atone-dialtelephonein another(remote)
location.Thecodeisrequiredfor remoteaccess,and it preventsunauthorizedaccess
toyour answeringsystem.Thecodecanbe any/4-digit number,from 0000to 9999.
1. Pressthe ans. menubutton repeatedlyuntilthe systemannounces"Remote
accesscode is..."and the messageindicator displaysAc.
2. Pressthe I_skipor 14repeat buttonto set thefirst digit between0-9.Pressthe
ans. menubutton to confirm.
3. RepeatStep2untilall 4 digitshavebeenset.Thesystemannouncesthe new
code.(Thedefaultcode is0000.)
36
Page 37

Remote Access
Youmay accessthe answeringsystemfrom anytone-dialcompatible telephone
byenteringyour a-digitremote accesscodeduringthe playingof outgoing
announcement.
1. Dialthe telephonenumberat whichthe answeringsystemisconnected.
2. Enterthea-digit RemoteAccessCodeduringthe outgoingannouncement.
3. Followthe voicemenuto usethe answeringsystem'sremotefunctions.Ifthere is
no commandenteredafter 20seconds,theunit will releasethe line.
4. Youcan nowperformthe followingfunctions:
• Press1to playmessages
• Pressato repeatcurrentmessageor previousmessage
• Press5to stop
• Press6to playnextmessage
• Press7to deletecurrent message
• Press8to recordmemo
• Press9to recordand then reviewannouncement
• Press0toturn answeringsystemon or off
• Press* for instructions
Set Audible Message Alert ON/OFF
When Message Alert is ON,the base unit will beep once every 10 seconds when new
messageshave beenreceived.
1. Pressthe arts.menubutton repeatedly untilthe system announces "Message
Alertis ON(orOFFf'.ThemessageindicatordisplaysAL.
2. Pressthe I_skipor [4repeat buttonto switch betweenONand OFF.
3. Pressthe ans.menubutton to confirmyoursetting.
37
Page 38

Set Number of Rings to Answer
YourAnsweringSystemcananswerafter 2 -6 ringsor you canchoosethe TollSaver
option.TheTollsaveroption instructsthe AnsweringSystemto answer after/4rings
onlyifthere are new,un-playedmessages;otherwise,it willanswerafter 6rings.The
benefitto youis ifyou are making a longdistancecallto retrievemessages,ifthe
AnsweringSystemdoesnot answerafter/4rings,youcan hangup.Thereare no new
messages,and youwillsavethe expenseof alongdistancecall.
1. Pressthe ans. menubutton repeatedlyuntilthe systemannounces"Number of
Ringsselectedis 2(or 3/4/5/6/toll saved".
2. Pressthe I_skipbutton tochooseyourdesired section.(defaultistoll saver)
B. Presstheans. menubuttonto confirmyoursetting.
Recording a Memo
Youcanrecorda memo,eitheratthe baseunitor from a remote location.
Torecorda Memoat the Base:
1. Pressthe rec/memo button.
2. Thesystemannounces,"Now recording".Beginspeakingafterthe beep.
B. Pressthe• stop button whenfinished.Yourmemois stored likea messagefrom
an outsidecaller.
To record a Memo from a Remote Location
follow instructions in the Remote Operation section.
NOTE: If memory is full, the answering system will announce
"Memory is Full", and the message indicator flashes an FU and the
message count alternatively.
]8
Page 39

Message Playback
Whenyou havenewmessages,the messageindicator flashes,showingthe number
of unplayedmessages.If there areonlyold messages,the indicatorglowssteadily.
Recordedmessagesandmemosareretaineduntil youdeletethem.
Youransweringsystemhasapproximately12minutesofstoragecapacity (or59
messages/memos).Ifcapacity isfull,thesystemwill answerafter 10rings,and
announceto thecaller,"Memory is Full".
1. Pressthe _ play button. If thereareone or morenew messages,only the new
messageswill beplayed.Afternewmessageplaybackiscompleted,pressthe
playbutton again to hearall old messages.
NOTE:The order of playback is oldest messages first, newest last.
Before each message is played, the day and time it was recorded is
announced.
2. Pressthe I_skipbutton toskipto the next message.
3. Pressthe• stop button at anytimeto endplayback.
Deleting Messages
NOTE:Once memory is full, user must delete messages from
memory to allow for new messages to be recorded.
To delete the message or memo currently playing:
i. Pressthe delete button.
Todelete allold messagesstored in the Mailbox:
1. In the idlemode,pressand holdthe delete button.Thesystemannounces,"All
old Messagesare Erased'"
2. Allold messageswill bedeleted.
NOTE:New, unplayed messages cannot be deleted until you play
them. Once you delete the message, it cannot be recovered.
Important Information
NOTES:There is a total of 12 minutes of recording time. This
includes messages, memos, and announcements.
The maximum number of messages that can be stored is 59.
A maximum of 2 minutes isallotted for each message, memo, or
announcement.
Ifa call comes in while you are listening to messages, playback
automatically stops.
39
Page 40

Changin 9 the Battery
CAUTION:To reduce the risk of fire or personal injury, only use
the Thomson Inc. approved Nickel-Metal Hydride battery model
5-2826, which is compatible with this unit.
1. Makesure handsetisOFF(notinTALKmode)beforeyou replacebattery.
2. Removethebattery compartmentdoor.
3. Disconnectthe battery plug from thejack insidethe battery compartmentand
removethe battery packfromthe handset.
/4. Insertthe newbatterypackand connectthecord to thejackinsidethe battery
compartment.
5.Putthe batterycompartmentdoor backon.
6. Placehandsetinthe baseor handsetchargecradleto charge.Allow thehandset
battery to properly charge(for 16hours) prior to first useor whenyou
install a newbattery pack.If youdo not properly charge the phone,battery
performance will becompromised.
Battery Safety Precautions
• Do not burn,disassemble,mutilate,or puncture.Likeother batteriesofthis type,
toxicmaterialscould be releasedwhichcan causeinjury.
• Toreducethe riskof fire orpersonalinjury,useonlythe Nickel-MetalHydride
battery listedinthe User'sGuide.
• Keepbatteries outof the reachof children.
• Removebatteriesifstoring over30days.
OTE:The RBRCseal onthe battery used in your Thomson Inc. product _'_
dicates that we are participating in a program to collect and recycle the I
echargeable battery (or batteries).
or more information go to the RBRCweb site at www.rbrc.org
r call 1-800-8-BATTERYor contact a local recycling center.
40
J
Page 41

Display Messa,ges
Thefollowingindicatorsshowthe statusof amessageor ofthe unit.
DELETE? Promptaskingifyouwant to erasethe current record.
DELETEALL? Promptaskingif youwant to eraseall records.
EMPTY Indicatesthere is norecordin memory.
ENTERNAHE Prompttellingyouto enter aname.
ENTERNUMBER Prompttellingyouto enterthe telephonenumber.
HANDSETNANE Prompttellingyouto enter anameof the handsetduring
handsetnameeditmenu
LINEINUSE Indicatesthat thetelephonelineisin use.
MISSEDCALLS Indicatescallor callswhichhavenot beenanswered.
NOTAVAILABLE Theuseraction isnot availableinthe current status.
PAGING Indicatesthe baseor another handsetispaging.
RPT Indicatesa repeatedincomingcall.
SEARCHING Innormal use,itindicateshandsetisout of rangeor the handset
cannotfind base,Inregistrationmode,it meansthe handsetis
findingthe base.
Handset Sound Siqnals
Signal Meaning
A long warbling tone (with ringer on) Signals an incoming call
Ring melody Page signal
One short beep (every minute) Low battery warning
Troubleshootin Guide
TelephoneSolutions
Nodialtone
• Checkand repeatinstallationsteps:
Ensurethe basepowercord isconnectedto a working outlet.
Ensurethe telephonelinecord isconnectedto the baseand the walljack.
41
Page 42

• Connectanotherphonetothesamejack;ifthereisstillnodialtone,theproblem
mightbeyourwiringorlocalservice.
• Thecordlesshandsetmaybeoutofrangeofthebase.Moveclosertothebase.
• Ensurethebatteryisproperlycharged(16hours).
• Ensurethebatterypackinstalledcorrectly.
• DidthehandsetbeepwhenyoupressedtheTALK/callbackbutton?Thebattery
mayneedtobecharged.
• Placehandsetinchargecradleforatleast20seconds.
DialtoneisOK,butcan'tdialout
• MakesuretheTONE/PULSEsettingonthebaseissettothetypeofphone
serviceyouaresubscribedto.
Handset/Basedoesnotring
• Makesurethehandsetringerswitchisturnedonandthebaseringeris
programmedtoHI.
• Thecordlesshandsetmaybeoutofrange.Moveclosertothebase.
• Youmayhavetoomanyextensionphonesonyourline.Tryunpluggingsome
phones.
• Checkfordialtone.Ifnodialtoneisheard,seeNodialtoneabove.
Youexperiencestatic,noise,orfadinginandout
• Changechannels.
• Thecordlesshandsetmaybeoutofrangeofthebase.Moveclosertothebase.
• Makesurebaseisnotpluggedintoanoutletwithanotherhouseholdappliance.
• Chargethebattery.
Unitbeeps
• Placethehandsetinthecradlefor20seconds.Ifitstillbeeps,chargebatteryfor
16hours.
• Cleanchargingcontactsoncordlesshandsetandchargecradlewithasoftcloth
oraneraser.
• Seesolutionsfor"Nodialtone"onpreviouspage.
• Replacethebattery.
42
Page 43

MemoryDialingdoesn'twork
• Didyouprogramthememorylocationbuttonscorrectly?
• Didyoufollowproperdialingsequence?
Unitlocksupandnocommunicationbetweenthebaseandcordlesshandset
• UnplugtheACpoweradaptorfromthewalloutletandthebackofthebase.
Removethehandsetbattery.Waitfor30secondsandplugtheACpower
adaptorbackintothebaseandwalloutlet.Reconnectthebatteryandcharge
for16hours.
CallerIDSolutions
NoDisplay
• Isbatteryfullycharged?Tryreplacingthebattery.
• Makesurethattheunitisconnectedtoanon-switchedelectricaloutlet.
Disconnectthepoweradaptorfromthebaseandreconnectit.
CallerIDErrorMessage
• TheunitdisplaysthismessageifitdetectsanythingotherthanvalidCallerID
informationduringthesilentperiodafterthefirstring.Thismessageindicates
thepresenceofnoiseontheline.
NoCallerID
• InordertoreceiveCallerIDinformation,youmustsubscribeto
thestandardname/numberCallerIDservicefromyourlocal
telephonecompany.
BatterySolutions
Ifyouexperienceanyofthefollowingproblems,evenafterfullyrechargingthe
battery,youmayneedtoreplacethebatterypack:
•Shorttalktime
•Poorsoundquality
•Limitedrange
43
Page 44

Causes of Poor Reception
• Aluminumsiding.
• Foilbuckingoninsulation.
• Heatingductsand othermetalconstructionthat can shieldradiosignals.
• You'retoo closeto appliancessuchus microwaves,stoves,computers,etc.
• Atmosphericconditions,suchusstrong storms.
• Baseisinstalledinthe basementorlowerfloor of thehouse.
• BaseispluggedintoACoutletwith otherelectronicdevices.
• Handsetbuttery is low.
General Product Care
Tokeepyourunit workingand lookinggood,follow theseguidelines:
• Avoidputtingthe phonenearheating appliancesand devicesthat generate
electricalnoise(forexample,motorsorfluorescentlumps).
• DONOTexposeto direct sunlightor moisture.
• Avoiddroppingthe handset,as wellas otherroughtreatment to the phone.
• Cleanthe phonewith u soft, dump cloth.Neveruseu strongcleaning agentor
abrasivepowderbecausethis willdamage thefinish.
• Retainthe original packagingincaseyouneedto shipthe phoneat a later date.
• Periodicallycleanthe charge contactsonthe handsetand remotechargerwith
a cleanpencil eraser.
44
Page 45

Accessory Information
DESCRIPTION MODEL NO.
Power Adaptor for Base 5-2823
Replacement Handset Battery 5-2826
Power Adaptor for Handset Charge Cradle 5-2824
Toplaceorder,haveyour Visa,HasterCard,or DiscoverCardready and calltoll-free
1-800-338-0376,Ashippingand handlingfeewill be chargeduponordering,We arerequired
bylaw to collectappropriatesalestax for each individualstate,country,andlocality to which
the merchandiseis beingsent.Items are subjectto availability.
Warranty Assistance
Iftrouble is experiencedwith this equipment,for warranty information, pleasecontact
customerserviceat 1-800-448-0329. If the equipment is causing harmto the telephone
network,thetelephone companymay requirethat you disconnectthe equipmentuntilthe
problemisresolved.
Anyunauthorizedrepairs,changesor modifications not expresslyapproved byThomsonInc.
couldvoidthe user'sauthorityto operatethis product. Forinstructions on howto obtain a
replacementunit,refer to the warranty includedinthis guideorcallcustomer serviceat 1-800-
448-0329.
Orreferinquiriesto:
ThomsonInc.
Manager,Consumer Relations
P0 Box1976
Indianapolis, IN46206
Attachyour salesreceipttothis bookletfor future referenceorjot downthe datethisproduct
was purchasedor receivedasa gift. Thisinformation wiltbevaluableifserviceshouldbe
requiredduring the warranty period.
Purchasedate
Nameof store
45
Page 46

Limited Warranty
What your warranty covers:
• Defectsin materialsor workmanship.
Forhow long after your purchase:
• Oneyear,from doteof purchase.
(Thewarranty periodfor rentalunits beginswiththe first rentalor45 daysfrom dote of
shipmentto therental firm, whichevercomesfirst.)
What we will do:
• Provideyouwith anewunit. Theexchangeunit is under warranty for the remainderof
the originalproduct'swarranty period.
Howyou get service:
• Properlypackyour unit. Includeany cables,etc.,which were originallyprovidedwith the
product.We recommendusingthe original cartonand packing materials.
• "Proofof purchaseinthe form ofa bill of saleor receiptedinvoicewhich is evidence
that the productiswithin the warranty period,must bepresentedto obtainwarranty
service."Forrentalfirms, proof of firstrental isalso required. Alsoprint your nameand
addressand a description ofthe defect. Sendvia standardUPSorits equivalentto:
ThomsonInc.
11721 BAlamedaAve.
Socorro,Texas79927
• Insureyour shipmentfor bossor damage.ThomsonInc.acceptsno liabilityin caseof
damageor loss.
• A new unitwill beshippedto youfreight prepaid.
What your warranty doesnot cover:
• Customerinstruction.(YourOwner'sManualprovidesinformation regardingoperating
instructionsandusercontrols.Anyadditionalinformation,shouldbeobtainedfrom your
dealer.)
• Installationand setup serviceadjustments.
• Batteries.
• Damagefrom misuseorneglect.
• Productswhich have beenmodifiedorincorporated into other products.
• Productspurchasedor servicedoutside the USA.
• Actsof nature,such as but not limited to lightningdamage.
Product Registration:
46
Page 47

• Please complete and mail the Product Registration Card packed with your unit. It wilt
moke it eosier to contoct you should it ever be necessary. The return of the card is not
required for warranty coverage.
Limitation of Warranty:
• THE WARRANTY STATEDABOVE IS THE ONLY WARRANTY APPLICABLETOTHIS PRODUCT.
ALL OTHER WARRANTIES, EXPRESSOR IMPLIED (INCLUDING ALL IMPLIEDWARRANTIES
OF MERCHANTABILITY OR FITNESSFORA PARTICULAR PURPOSE)ARE HEREBY
DISCLAIMED. NO VERBAL OR WRITTEN INFORMATION GIVEN BYTHOMSON INC., ITS
AGENTS,OR EMPLOYEESSHALL CREATEA GUARANTYOR IN ANY WAY INCREASETHE
SCOPEOF THIS WARRANTY.
• REPAIROR REPLACEMENTAS PROVIDED UNDER THIS WARRANTYIS THE EXCLUSIVE
REMEDYOFTHE CONSUMER. THOMSON INC. SHALL NOT BELIABLE FORINCIDENTAL OR
CONSEQUENTIAL DAMAGES RESULTING FROM THE USEOF THIS PRODUCT OR ARISING
OUT OF ANY BREACHOF ANY EXPRESSOR IMPLIED WARRANTY ON THIS PRODUCT.THIS
DISCLAIMER OF WARRANTIES AND LIMITED WARRANTY ARE GOVERNED BYTHE LAWSOF
THESTATEOF INDIANA. EXCEPTTOTHE EXTENT PROHIBITED BYAPPLICABLE LAW, ANY
IMPLIED WARRANTY OF MERCHANTABILITYOR FITNESSFORA PARTICULARPURPOSEON
THIS PRODUCT IS LIMITED TO THE APPLICABLEWARRANTY PERIODSET FORTH ABOVE.
How stote law reletes to this warrenty:
• Some states do not allow the exclusion nor limitotion of incidentol or consequentiol
domages, or limitations on how long an implied warranty lasts so the above limitations
or exclusions may not opply to you.
• This worronty gives you specific legal rights, and you also may have other rights that
vory from stote to stote.
If you purchased your product outside the USA:
• This warranty does not apply. Contoct your dealer for warranty information.
47
Page 48

Index
A
Accessory Information 45
Adjusting the Receiver or Speaker Volume 23
Alarm (Alarm)
Announce Only ON/OFF
Answering System
Area Code
Attaching the Desktop Pedestal
Audible Quick Setup Guide
Auto Talk
B
Base Layout
Base Menu
Base Setting
Base to Cordless Handset
Basic Operation
Battery Safety Precautions
Battery Solutions
Before You Begin
C
Call Transfer
Call Waiting Caller ID
Caller ID (CID)
Caller ID Solutions
Causes of Poor Reception
Change PIN
Changing the Battery
CID Memory Record Storage
Connecting the AC (Electrical) Power
Connecting the Corded Handset
Connecting the Telephone Line
Corded Handset
Cordless Handset
Cordless Handset to Base
Cordless Handset to Cordless Handset
D
Date/Time 14, 21
Day/Time 34
18 Delete a Single CID Record 31
35 Delete a Single Redial Memory 26
34 Delete All CID Records 31
13 Delete All Redial Memory 26
10 Delete Phonebook Entry 33
34 Deleting CID Records 31
17 Deleting Messages 39
Dial a Number from the Redial Memory 26
Dial Mode 14, 20
9 Dial Record from Phonebook 33
13 Dialing a CID Number 30
19 Digital Security System 7
27 Display Messages 41
23
40 E
43 Edit Phonebook Entry 33
6 Equipment Approval Information 2
F
28 FCC RF Radiation Exposure Statement 3
29 Flash 25
29
G
43
General Product Care 44
44
19 H
40 Handset Layout
29 Handset Menu
10 Handset Name
11 Handset Setting
11 Handset Sound Signals
23 Hearing Aid Compatibility (HAC)
23 Hold (only for base)
27
27 I
Important Information
Important Installation Guidelines
Table of Contents
4,5
8
16
18
16
41
3
25
39
7
48
Page 49

Index
Information for DECTProduct
Installation
Installing the Handset Battery
Installing the Phone
Intercom Operation
Interference Information
Introduction
K
Key Tone
Keypad Lock (only for cordless handset)
L
Language
LCD Contrast
Licensing
Limited Warranty
Low Battery
M
Making a Cull
Menu Operation
Message Playback
Message Waiting
Message Waiting (VMWI)
Mute
N
No Coverage
0
Outgoing Announcement
P
Page All Cordless Handsets from Base
Parts Checklist)
Pause
Phonebook
R
Receiving a Call
Receiving an incoming Call During an
intercom Call
3 Receiving CID Records 29
7 Recording a Memo 38
12 Recording an Announcement 35
10 Redial Function 26
27 Register 22
3 Registration 22
6 Remote Access 37
Remote Access Code 36
13, 17
Remove Handset (De-registration) 22
Reset 15
25
Reset Base 21
Reset Handset 19
18 Review Phonebook 31
13 Reviewing CID Records 30
3 Reviewing/Deleting Announcements 36
46 Ring Melody 16
16 Ring Volume 16
S
23 Save Redial Memory 26
13 Screen Contrast 19
39 Selecting the Language 13
15 Set Answering Machine ON/OFF 34
20 Set Audible Message Alert ON/OFF 37
24 Set Number of Rings to Answer 38
Setting the Ringer Volume 11
Speakerphone Operation 24
17 Special Features 24
Storing CID Records in Phonebook 32
35 Storing Name and Number into Phonebook32
T
24 Telephone Jack Requirements 7
6 Temporary Tone 24
25 Three Way Conference Call 28
31 Troubleshooting Guide 41
Two-Way Calling 28
23 W
Wall Mounting the Base 11
27 Warranty Assistance 45
49
Page 50

Visitthe GEwebsiteat: www.GE.com/phones
Model 28871
00024795 {Rev. i Dam E/S)
08-12
Printed in China
THOMSON
images & beyon_ }
Thomson Inc.
i01 West 103rd St.
Indianapolis, IN 46290-1102
© 2008 Thomson Inc.
Trademark(s) ® Registered
Marco(s) Registrada{s)
 Loading...