

Page 1
Model 28517/28527
P/N:480-96021-000002
MEX.E Version 1.1 09/2010
Printed in China
© 2010 CCT Tech Global Limited
Introduction
CAUTION: When using telephone equipment, there are basic safety
instructions that should always be followed.
Refer to the Important safety instructions section in this book and
save them for future reference.
IMPORTANT: Because cordless phones operate on electricity, you should have
at least one phone in your home that isn’t cordless, in case the power in your
home goes out.
Before you begin
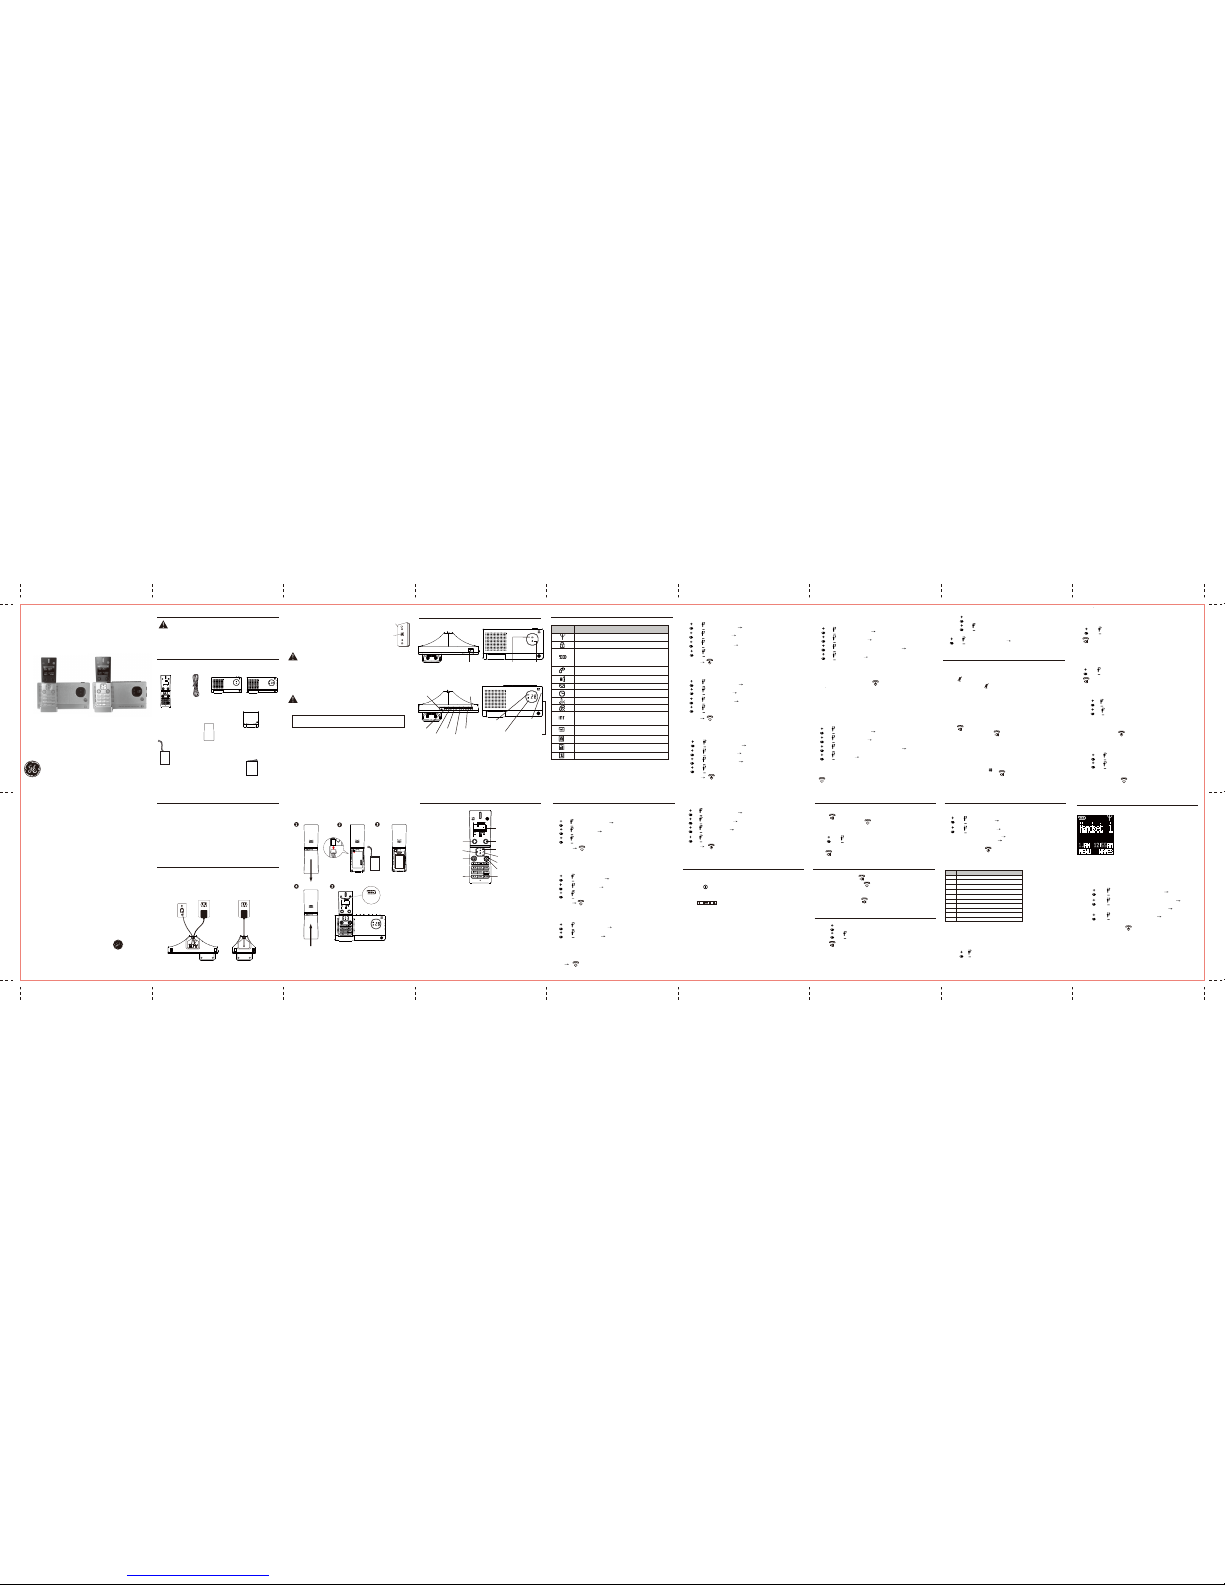
Parts Checklist
Make sure your package includes the items shown here.
Installation
Important Installation Guidelines
• Avoid sources of noise and heat, such as motors, fluorescent lighting,
microwave ovens, heating appliances and direct sunlight.
• Avoid areas of excessive dust, moisture and low temperature.
• Avoid other cordless telephones or personal computers.
• Never install telephone wiring during a lightning storm.
• Never install telephone jacks in wet locations unless the jack is specifically
designed for wet locations.
• Never touch non-insulated telephone wires or terminals, unless the telephone
line has been disconnected at the network interface.
• Use caution when installing or modifying telephone lines.
Installing the phone
Telephone base and charging cradle installation
Install the telephone base and charging cradle(s) as shown below. Make sure that
the electrical outlet is not controlled by a wall switch.
If you have DSL high speed internet service, a DSL filter is required (not included).
Contact your DSL service provider for more information about DSL filter.
POWER 7.5V DC
!
Modular
telephone line
jack
Wall plate
Telephone Jack Requirements
To use this phone, you need an RJ11C type modular
telephone jack, which might look like the one pictured
here, installed in your home. If you don’t have a
modular jack, call your local phone company to find
out how to get one installed.
1. If the battery compartment cover is on the handset, slide the cover to remove.
2. Plug the battery connector securely into the socket inside the handset battery
compartment
3. Place the battery and the wire inside the battery compartment
4. Align the cover flat against the battery compartment, then slide it towards the
center of the handset until it clicks into place
5. Charge the handset by placing it in the telephone base or charging cradle. The
battery icon on LCD is scrolling when the handset charges.
Installing the Handset Battery
CAUTION: Use only the power adaptor that came with this unit.
(Base: IW507, 100-240Vac/7.5Vdc/500mA.
Charger: IW507, 100-240Vac/7.5Vdc/500mA).
Using other power adaptors may damage the unit.
CAUTION: To reduce the risk of fire or personal injury, use only the CCT
Tech Global Limited approved model SL-422943 Li-polymer battery,
which is compatible with this unit
RISK OF EXPLOSION IF BATTERY IS REPLACED BY AN INCORRECT TYPE.
DISPOSE OF USED BATTERIES ACCORDING TO THE INSTRUCTIONS.
Please Fully Charge Before Using!
For optimum battery performance, charge the battery for 16 hours before use.
Battery
indicator
Battery
R
e
d
B
l
a
c
k
W
h
i
t
e
Scrolling
Handset layout
Soft Key: Press to select a menu item displayed above the key.
Up/Redial: Press to review the redial list when the telephone is not in use. While in a
menu, press to scroll up. During a call, press to increase the listening volume.
Down/CID: Press to show the CallerID history when the telephone is not in use.
While in a menu, press to scroll down. During a call, press to decrease the listening
volume.
Intercom: Set up the intercom between handset to handset.
Delete: Press to delete the last input number or letter. While in a menu, press to
return the upper level without making changes.
Flash: During a call, press to answer an incoming call when you receive a call
waiting alert.
Talk/Speakerphone: Press to make or answer a call. During a call, press to switch
between speakerphone and handset.
End/Power off: During a call, press to hang up. During a programming, press to exit
without making changes. Press and hold to power off the handset
*/Ringer off: Press and hold to set the Ringer off when the telephone is not in use.
#/Ringer off: Press and hold to set the keylock.
Talk/Speakerphone
Menu
# / Keylock* / Ringer Off
Display
Phonebook
Back/Delete
End
Up/Redial
Flash
Down/Caller ID
Intercom
Display
Handset Display Items
Initial settings
Display language
You can select change the display language.
1. [MENU]
2. [ ]/[ ]: “HANDSET SETTING” [SELECT]
3. [ ]/[ ]: “LANGUAGE” [SELECT]
4. [ ]/[ ]: Select the desired setting
5. [SELECT] [ ]
Ringer Tone
1. [MENU]
2. [ ]/[ ]: “HANDSET SETTING” [SELECT]
3. [ ]/[ ]: “HANDSET TONE” [SELECT]
4. [ ]/[ ]: “RINGER TONE” [SELECT]
5. [ ]/[ ]: Select the desired setting (MELODY 1 to 15)
6. [SELECT] [ ]
Note: If Ringer off is selected, there is no preview during the ringer melody selection.
Answering System Setup (Availiable for 28527)
This section shows you how to set up your answering system to receive
incoming calls. Before you begin the set up process, you must turn on the
answering system.
• Press the [ ] on the base to change the answering system status.
(on, off and answer only mode)
Base Volume
Use the [ ] buttons to adjust speaker volume on the base to
a comfortable level.
Level 0 is the minimum speaker volume and Level 9 is the maximum.
Outgoing Announcement
When the unit answers a call, an outgoing message is played to callers
You can use either:
- your own outgoing message
- a pre-recorded outgoing message
Pause (for PBX/long distance service users)
A pause is sometimes required when making calls using a PBX or long
distance service. When storing a calling card access number and/or PIN in the
phonebook, a pause is also needed.
Example: If you need to dial the line access number “9” when making outside
calls with PBX:
1. Press [ 9 ], then long press [ ]
2. Dial the phone number and press [ ]
Note: A three seconds pause is inserted each time, repeat as needed to
create longer pauses
Programming the Telephone
Standby Screen
Programmable settings
You can customize the unit by programming the following features using
the handset.
Programming by scrolling through the display menus
1. [MENU]
2. Press [ ] or [ ] to select the desired main menu. [SELECT]
3. Press [ ] or [ ] to select the desired item in sub-menu 1. [SELECT]
• In some cases, you may need to select from sub-menu 2. [SELECT]
4. Press [ ] or [ ] to select the desired setting. [SELECT]
• This step may vary depending on the feature being programmed
• To exit the operation, press [ ]
visit our website:
www.thehomephones.com
Character Table for the entering names
Key Character
[1] Space 1 @ _ # = < > ( ) & € £ $ ¥ [ ] { } ¤ §
[2] A B C 2 Á Ä Ç Å Æ
[3] D E F 3 È É Δ Φ
[4] G H I 4 Ì Г
[5] J L K 5 Λ
[6] M N O 6 Ň Ō Ő
[7] P Q R S 7 β Π Θ Σ
[8] T U V 8 Ū Ű
[9] W X Y Z 9 Φ Ω Ξ Ψ
[0] . 0 , / : ; “ ‘ ! ¡ ? ¿ * + - % ^ ~ |
Correct the mistake
Press [CLEAR] to delete the characters or numbers
Dialing mode
If you cannot make calls, change this setting according to your telephone line
service. The default setting is “TONE”
1. [MENU]
2. [ ]/[ ]: “ADVANCED SET” [SELECT]
3. [ ]/[ ]: “DIAL MODE” [SELECT]
4. [ ]/[ ]: Select the desired setting
5. [SELECT] [ ]
Date and time
1. [MENU]
2. [ ]/[ ]: “CLOCK & ALARM” [SELECT]
3. [ ]/[ ]: “DATE & TIME” [SELECT]
4. Enter the current time, date, month and year by selecting 2 digits.
Pressing [2] represent “AM” and pressing [7] represent “PM”
Example: May 16, 2010 3:15PM
Press [0],[3],[1],[5],[7],[1],[6],[1],[0]
5. [OK] [ ]
Note: You can change date and time display format
Date format
1. [MENU]
2. [ ]/[ ]: “CLOCK & ALARM” [SELECT]
3. [ ]/[ ]: “SET FORMAT” [SELECT]
4. [ ]/[ ]: “DATE FORMAT” [SELECT]
5. [ ]/[ ]: Select the desired setting (MM/DD OR DD/MM)
6. [SELECT] [ ]
Time format
1. [MENU]
2. [ ]/[ ]: “CLOCK & ALARM” [SELECT]
3. [ ]/[ ]: “SET FORMAT” [SELECT]
4. [ ]/[ ]: “TIME FORMAT” [SELECT]
5. [ ]/[ ]: Select the desired setting (12 HOURS OR 24 HOURS)
6. [SELECT] [ ]
Ringer Volume
1. [MENU]
2. [ ]/[ ]: “HANDSET SETTING” [SELECT]
3. [ ]/[ ]: “HANDSET TONE” [SELECT]
4. [ ]/[ ]: “RINGER VOLUME” [SELECT]
5. [ ]/[ ]: Select the desired setting (VOLUME 1 to 5, ASCENDING and OFF)
6. [SELECT] [ ]
Note: If Ringer off is selected, LCD will show “RINGER OFF” and [ ] will turn on.
1. [MENU]
2. [ ]/[ ]: “ANSWER MACHINE” [SELECT]
3. [ ]/[ ]: “OUTGOING MSG” [SELECT]
4. [ ]/[ ]: “ANSWER & RECORD” OR ‘ANSWER ONLY” [SELECT]
5. [ ]/[ ]: “RECORD OGM” [SELECT]
6. After a beep sounds, hold the handset about 6 inches away and speak clearly
into the microphone (2 minutes max.)
7. Press [STOP] to stop recording
8. Handset shall play back the new record OGM
9. Press [STOP] to stop play and press [ ] return to idle
Recording Outgoing Announcement
You can record the outgoing message (OGM) through handset microphone
Using a pre-recorded Outgoing Announcement
If you erase or do not record your own outgoing message, the unit plays a
pre-recorded message asking callers to leave a message.
Resetting to a pre-recorded Outgoing Announcement
If you want to use a pre-recorded outgoing message once you record your own
outgoing message, you need to erase your own outgoing message.
1. [MENU]
2. [ ]/[ ]: “ANSWER MACHINE” [SELECT]
3. [ ]/[ ]: “OUTGOING MSG” [SELECT]
4. [ ]/[ ]: “ANSWER & RECORD” OR ‘ANSWER ONLY” [SELECT]
5. [ ]/[ ]: “DELETE” [SELECT]
6. The handset shall play back the pre-recorded outgoing message
7. The handset shall display “WAITING” for a few seconds and
have a beep sound when finish
8. [ ]
Answering calls
When a call is being received, the LCD and keypad backlight flash rapidly
1. Lift the handset and press [ ] when the unit rings
2. When you finish talking, press [ ] or place the handset on the base unit
or charger
Conference
To join the conversation, press [ ] when other handset is on an outside call.
Adjusting the receiver volume
Press [ ] or [ ] repeatedly while talking
Speakerphone
Press [ ] to toggle between handset mode and speakerphone mode
Making calls
1. Lift the handset and dial the phone number
To correct a digit, press [CLEAR]
2. Press [ ]
3. When you finish talking, press [ ] or place the handset on the base unit
or charger.
Making a call using the redial list
The last 5 number dialed are stored in the redial list (each 24 digits max)
1. Press [ ] when handset not in use
2. press [ ] / [ ]: Select the desired phone number
3. Press [ ]
Erasing a number in redial list
1. Press [ ]
2. Press [ ] / [ ]: Select the desired phone number and press [SELECT] to
show the redial detail
3. [ ]/[ ]: “DELETE” or “DELETE ALL [ OK ]
4. Press [ OK ] to confirm
Phonebook
Adding record
1. [MENU]
2. [ ] / [ ]: “PHONEBOOK” [SELECT]
3. [ ] / [ ]: “ADD RECORDS” [SELECT]
4. Enter the name (max. 14 character) [OK]
5. Enter the number (max. 24 digits) [OK]
6. Select VIP melody and press [SELECT]
7. Record saved and press [ ] return idle
IMPORTANT: In order to use this unit’s VIP melody features, you must subscribe
to either the standard Name/Number Caller ID Service.
View a phonebook record
1. Press [NAMES] when handset not in use.
2. Press [ ]/[ ] to select desired record
3. Press [SELECT] to view the name and number
Make a call from phonebook
1. [NAME]
2. [ ] / [ ] : Select the desired record
3. [ ]
Searching by first character
1. [NAME]
2. Press [1] – [9] which contains the character you are searching for
3. [ ] / [ ] : Select the desired record if necessary
4. [ ]
Editing entries
1. Press [MENU], then
2. Press [ ] / [ ] to select “PHONEBOOK” and press [SELECT], then
3. Press [ ] / [ ] to select “EDIT ENTRY” and press [SELECT], then
4. Edit the name if necessary and press [OK], then
5. Edit the number if necessary and press [OK], then
6. Edit the VIP melody if necessary and press [SELECT], then
7. Entries edited and press [ ] return to idle
Erasing entries
1. Press [MENU], then
2. Press [ ] / [ ] to select “PHONEBOOK” and press [SELECT], then
3. Press [ ] / [ ] to select “DELETE ENTRY” and press [SELECT], then
4. Press [OK] to confirm delete, then
5. Entries deleted and press [ ] return to idle
Other Feature during a call
Mute
While mute is turned on, you can hear the other party, but the other party
cannot hear you.
1. Press [ ] during the call
2. To return the call, Press [ ] again
Note: LCD will show “MUTE ON” when mute feature activated
For Call waiting or Call Waiting Caller ID service subscriber
To use call waiting, you must subscribe to call waiting from your service provider.
This feature allows you to receive calls while you are already talking on the phone,
you will hear a call waiting tone. If you subscribe to both Caller ID and Call Waiting
with Caller ID services, the 2nd caller’s information is displayed after you hear the
call waiting tone on the handset.
1. Press [ ] to answer the 2nd call
2. To switch between calls, press [ ]
Base layout
Find
Repeat
Volume down
Volume up
Charge Indicator
Power Indicator
Play
Stop
Forward
Answer On/Off
Find
Delete
Basic Base
Base with answering system
Find: Press to page all system handsets
Find: Press to page all system handsets.
Delete: Press to delete the message during playback or press and hold to delete
all old message.
Repeat: Press to repeat a message or press twice to play previous message.
Play: Press to play message.
Stop: Press to stop message playback.
Forward: Press to skip to the next message.
Answer on/off: Press to turn the answering system on and off
Volume up/down: Press to adjust the volume during playback and call screening.
Charge Indicator: On when handset is charging.
Power Indicator: On when the base power on.
Charge Indicator Power Indicator
Charging cradle with adaptor
(1 for 28517xE2 & 28527xE2,
2 for 28517xE3 & 28527xE3,
3 for 28517xE4 & 28527xE4)
Telephone
base 28517
Telephone
base 28527
OR
Battery compartment cover
(1 for 28517xE1 & 28527xE1,
2 for 28517xE2 & 28527xE2,
3 for 28517xE3 & 28527xE3,
4 for 28517xE4 & 28527xE4)
Telephone
line cord
Battery
(1 for 28517xE1 & 28527xE1,
2 for 28517xE2 & 28527xE2,
3 for 28517xE3 & 28527xE3,
4 for 28517xE4 & 28527xE4)
Handset
(1 for 28517xE1 & 28527xE1,
2 for 28517xE2, & 28527xE2,
3 for 28517xE3 & 28527xE3,
4 for 28517xE4 & 28527xE4)
User’s
manual
User’s manual
DECT 6.0
Cordless Telephone
Your new GE telephone system is EXPANDABLE up to 5 handsets
(by purchase of optional Model 28507 handset with charge cradle)
User’s Guide
model 28517/28527
• Turn on when base unit in range.
• Blinking when base out of range or not subscribed.
• Turn on when keypad is locked.
• Scrolling when handset is charging.
• Display steadily for capacity indication.
(Full, 2 blocks, 1block or Empty)
• Battery frame flash when battery is discharged.
• Blinking when there is incoming call.
• Steady on during a call.
• Steady on when speakerphone is on.
• Blinking when there is Voice mail
• Turn on when Alarm set
• Turn on when ringer off set
• Blinking when there is a missing call
• Blinking when there is an internal incoming call or an
internal call is heldwhen there is a missing call.
• Turn on when an internal call is connected.
• Turn on when answering machine on.
• Blinking when there is new message.
• Text input in upper case during edit mode.
• Text input in lower case during edit mode.
• Digit input only during edit mode.
Item Meaning
is a trademark of
The General Electric Company
and is under license by
CCT Tech Global Limited,
Central, Hong Kong
Page 2
Alarm tone:
You can select from 3 alarm melody
1. [MENU]
2. press [ ] / [ ] to select “CLOCK & ALARM” [OK]
3. Press [ ] / [ ] to select “ALARM TONE” [OK]
4. Press [ ] / [ ] to select the desired setting (VOLUME 1 to 3) [OK]
5. Alarm volume set and press [ ] return to idle
Alarm tone:
You can select from 3 alarm melody
1. [MENU]
2. press [ ] / [ ] to select “CLOCK & ALARM” [OK]
3. Press [ ] / [ ] to select “ALARM TONE” [OK]
4. Press [ ] / [ ] to select the desired alarm tone [OK]
5. Alarm tone set and press [ ] return to idle
Alarm
An alarm sounds at the set time for 1 minute once or daily. Alarm can be set for
each handset.
Important: Set the date and time beforehand
1. [MENU]
2. press [ ] / [ ] to select “CLOCK & ALARM” [OK]
3. Press [ ] or [ ] to select “ALARM” [OK]
4. Press [ ] / [ ] to select the desired alarm option [OK]
OFF: Turns alarm off. (Go to step 6)
ON ONCE: An alarm sounds once at the set time
ON DAILY: An alarm sounds daily at the set time.
5. Set the desired time.
6. Alarm set (or turned off) and press [ ] return to idle
Answering system (Available for 28527)
The answering system can answer and record calls for you when you are
unavailable to answer the phone.
Important:
Only 1 person can access the answering system via handset or base at a time.
When callers leave messages, the unit records the day and time of each
message. Make sure the date and time have been set correctly.
Recording capacity (including the outgoing message)
The total recording capacity is about 14 minutes. A maximum of 59 messages
can be record
Answer mode
There are two answering mode. “ANSWER & RECORD” mode means the answering
system will record message when no one pick up the call. “ANSWER ONLY” mode
means the answer system will play the outgoing message only but not record the
message.
Remote operation
Using a touch-tone phone, you can call your phone number from outside and
access the unit to listen to messages or change answering system setting.
Secure remote access code
Your answering system use PIN as the remote access code to access your
messages while away from home. The default PIN is “0000”
To change the PIN code, please refer the PIN section
Using the answering system remotely
1. Dial your phone number from a touch-tone phone.
2. After the outgoing message finish, Press [ ] and the answering system will
ask you input the remote access code. Please input the remote access code
after the message played.
3. The voice guide will be played if you input the remote access code correctly.
Keys Description
[1] Repeat the Voice Guide
[2] Play new message
[3] Play all message
[4] Skip to the previous message
[5] Delete the playing message
[6] Skip to the next message
[7] Stop message playback
[0] Set answer mode
Voice mail service
The [ ] on LCD flash when you receive a new message from your
service provider.
IMPORTANT:
In order to use this unit’s Visual Message Waiting Indicator (VMWI) feature,
you must subscribe to this service from your phone company.
Changing the battery
CAUTION: To reduce the risk of fire or personal injury, use only the CCT
Tech Global Limited approved model SL-422943 Li-Polymer battery, which
is compatible with this unit.
1. Make sure the telephone is OFF (not in TALK mode) before you replace the battery.
2. Remove the battery compartment door.
3. Disconnect the cord attached to the battery pack and remove the battery pack
from the handset.
4. Insert the new battery pack and connect the cord to the jack inside the battery
compartment.
5. Put the battery compartment door back on.
6. Place handset in the base or handset charge cradle to charge. Allow the
handset battery to properly charge (for 16 hours) prior to first use or when
you install a new battery pack. If you do not properly charge the phone,
battery performance will be compromised.
Battery Safety Precautions
• Do not burn, disassemble, mutilate, or puncture. Like other batteries of this
type, toxic materials could be released which can cause injury.
• To reduce the risk of fire or personal injury, use only the battery listed in the
User’s Guide.
• Keep batteries out of the reach of children.
• Remove batteries if storing over 30 day
Troubleshooting guide
Telephone general use
Problem
The handset does not turn on
even after installing battery pack
The unit does not work
Cannot hear a dial tone
Handset does not ring
You experience static, noise, or
fading in and out
Cause/solution
- Place the handset on the base unit or charger to turn
on the handset.
- Make sure the battery pack is installed correctly.
- Fully charge the battery. Check the connections.
(for 16 hours)
- Unplug the base unit's AC adaptor to reset the unit.
Reconnect the adaptor and try again.
- The handset has not been registered to the base unit.
Register the handset.
- The base unit's AC adaptor or telephone line cord is not
connected. Check the connections.
- Disconnect the base unit from the telephone line and
connect the line to a known working telephone. If the
working telephone operates properly, contact our service
personnel to have the unit repaired. If the working
telephone does not operate properly, contact your service
provider/telephone company. The ringer volume is turned
off. Adjust the ringer volume.
- The handset may be out of range of the base.
Move closer to the base.
- The handset may be out of range of the base.
Move closer to base.
- You are using the handset or base unit in an area with
high electrical interference. Reposition the base unit and
use the handset away from sources of interference.
Problem
The unit does not record new
message
Cannot operate the answering
system
Cannot operate the answering
system remotely.
Cause/solution
- The answering system is turned off. Turn it on.
- The message memory is full, Erase unnecessary messages.
- Someone is using the unit. Wait for other user finish.
- A caller is leaving a message. Wait for the caller finsih.
- The handset is too far from the base unit. Move closer.
- The remote access is deactivate, activate the remote
access.
- You are entering the wrong remote access code.
- You must use a tone-dial phone. This phone does not
support pulse (rotary) dialing
Answering System (28527 only)
Problem
Caller information is not displayed
Caller information is displayed late
The 2nd caller's information is not
displayed during an outside call
Cause/solution
- You must subscribe to Caller ID service from your
service provider/telephone company.
- If your unit is connected to any additional telephone
equipment such as a Caller ID box or cordless
telephone line jack, plug the unit directly into wall jack.
- If you use a DSL/ADSL service, we recommend
connecting a DSL/ADSL filter between the base unit
and the telephone line jack. Contact your DSL/ADSL
provider for details
- The name display service may not be available in
some areas. Contact your service provider/telephone
company for details.
- Other telephone equipment may be interfering with
this unit. disconnect the other equipment and try again.
- Depending on your service provider /telephone
company, the unit may display the caller's information
at the 2nd ring or later.
- Move closer to the base units.
- In order to use Caller ID, call waiting, or Call Waiting
Caller ID (CWID), you must first contact your service
provider/telephone company and subscribe to the
desired service.
Caller ID
General product care
To keep your unit working and looking good, follow these guidelines:
• Avoid dropping the handset, as well as other rough treatment to the phone.
• Clean the phone with a soft cloth.
• Never use strong cleaning agents, paint thinner, abrasive powder, alcohol,
or other chemical products to clean the unit. Doing so will damage the finish.
• Retain the original packaging in case you need to ship the phone at a later date.
• Periodically clean the charge contacts on the handset and base with a clean
pencil eraser.
C. The product does not operate normally by following the operating instructions.
D. The product’s cabinet has been damaged.
E. The product exhibits a distinct change in performance.
20. Avoid using a telephone (other than a cordless type) during an electrical storm. There may
be a remote risk of electric shock from lightning.
21. Do not use the telephone to report a gas leak in the vicinity of the leak.
22. Do not place this product on an unstable cart, stand, or table. The product may fall,
causing serious damage to the product.
23. Only use attachments/accessories specified by the manufacturer.
24. Unplug this apparatus during lightning storms or when unused for long periods of time.
IF YOUR PRODUCT UTILIZES BATTERIES, THE FOLLOWING ADDITIONAL
PRECAUTIONS SHOULD BE OBSERVED:
1. Use only the type and size battery(ies) specified in the user manual.
2. Do not use this product if the battery door is removed or missing.
3. Replace batteries that appear to be swollen or have damaged wiring.
4. Do not dispose of the battery(ies) in fire. They may explode. Check with local codes for
possible special disposal instructions.
5. Do not open or mutilate the battery(ies). Released electrolyte is corrosive and may cause
damage to the eyes or skin. It may be toxic if swallowed.
6. Exercise care in handling battery(ies) in order not to short out the battery(ies) with
conducting materials such as rings, bracelets, and keys. The battery(ies) or conductor may
overheat and cause burns.
7. Do not attempt to recharge the battery(ies) provided with or identified for use with this
product that are not rechargeable. The battery(ies) may leak corrosive electrolyte or explode.
8. Do not attempt to rejuvenate the battery(ies) provided with or identified for use with this
product by heating them. Sudden release of the battery(ies) electrolyte may occur causing
burns or irritation to eyes or skin.
9. When replacing battery(ies), all batteries should be replaced at the same time. Mixing fresh
and discharged batteries could increase internal cell pressure and rupture the discharged
battery(ies). (Applies to products employing more than one separately replaceable primary
battery.)
10. When inserting battery(ies) into this product, the proper polarity or direction must be
observed. Reverse insertion of battery(ies) may result in leakage or explosion.
11. When inserting battery(ies) into this product, do not twist or pinch the wires or allow wires
to become pinched in battery door.
12. If storing over 30 days, remove battery(ies) from this product because the battery(ies)
could leak and damage the product.
13. Discard “dead” battery(ies) as soon as possible since “dead” batteries are more likely to
leak in a product.
14. Do not store this product, or the battery(ies) provided with or identified for use with this
product, in high-temperature areas. Batteries that are stored in a freezer or refrigerator
for the purpose of extending shelf life should be protected from condensation during
storage and defrosting. Batteries should be stabilized at room temperature prior to use
after cold storage.
15. If your product uses rechargeable battery(ies), charge the battery(ies) only in accordance
with the instructions and limitation specified in the User Guide.
Important safety intructions
Some of the following information may not apply to your particular product;
however, when using telephone equipment, basic safety precautions should
always be followed to reduce the risk of fire, electric shock and injury to persons,
including the following:
1. Read and understand all instructions.
2. Follow all warnings and instructions marked on the product.
3. Unplug this product from the wall outlet before cleaning. Do not use liquid cleaners or
aerosol cleaners. Use a damp cloth for cleaning.
4. Telephones should not be used while you are in a bathtub, shower or pool. Immersion of
the telephone or handset in water could cause an electrical shock.
5. Slots and openings in the cabinet back or bottom are provided for ventilation, to protect it
from overheating. Do not block or cover these openings. Do not block the openings by
placing the product on a bed, sofa, rug, or other similar surface. Do not place this product
in a built-in installation unless proper ventilation is provided.
6. Only operate this product from the type of power source indicated on the marking label.
If you are not sure of the type of power supply to your home, consult your dealer or local
power company.
7. Plug the adaptor into an easily accessible electrical outlet near the equipment.
8. Do not allow anything to rest on the power cord. Do not locate this product where the
cord will be abused by persons walking on it.
9. Do not overload wall outlets and extension cords as this can result in the risk of fire or
electric shock.
10. Never push objects of any kind into this product through cabinet slots as they may touch
dangerous voltage points or short out parts that could result in a risk of fire or electric
shock. Never spill liquid of any kind on the product.
11. Never spill liquid of any kind on the product.
12. To reduce the risk of electric shock, do not disassemble this product. If service or repair
work is required, take it to a qualified serviceman. Opening or removing covers may expose
you to dangerous voltages or other risks. Incorrect reassembly can cause electric shock
when the appliance is subsequently used.
13. Do not expose the product to extreme temperatures such as areas near a hot radiator,
stove or in a hot car. Do not place product upon other consumer electronic products such
as; computer monitors, power amplifiers, etc.
14. Do not place lighted candles, cigarettes, cigars, etc., on the telephone.
15. Never touch uninsulated telephone wires or terminals unless the telephone line has been
disconnected at the network interface.
16. Never install or modify telephone wiring during a lightning
17. Never install telephone jacks in wet locations unless the jack is specifically designed for
wet locations.
18. Use caution when installing or modifying telephone lines to prevent electrical shock
and/or fire.
19. Under the following conditions, unplug this product from the wall outlet and refer servicing
to qualified service personnel:
A. The power supply cord or plug is damaged or frayed.
B. The product has been exposed to rain or water.
Remote commands
You can press dial keys to access certain answering system functions.
ANS SETTINGS
ANSWER MODE
RECALL TIME
SET DATE/TIME
ANSWER ONLY
ANSWER & RECORD
PLAY
PHONEBOOK
AREA CODE
TIME FOMRAT
SET FORMAT
DATE FORMAT
RECORD MEMO
ANSWER OFF
ANSWER ONLY
RING DELAY
REMOTE ACCESS
HS SCREENING
ALARM
ALARM VOLUME
ALARM TONE
DELETE ALL
DIAL MODE
CONFERENCE
ADVANCED SET
ANSWER MACHINE
(28527)
CALL BARRING
CHANGE PIN
REGISTRATION
DE-REGISTER
RESET
OUTGOING MSG
ANSWER & RECORD
BASE SETTINGS
Sub-menu 1 Sub-menu 2
NEW ENTRY
LIST
EDIT ENTRY
DELETE ENTRY
HANDSET NAME
RING VOLUME
RINGER TONE
HANDSET TONES
KEY TONE
LANGUAGE
DELETE ALL
CLOCK & ALARM
HANDSET SETTING
SELECT MELODY
CONFIRM TONE
BACKLIGHT TIME
DIM MODE
AUTO HANG-UP
AUTO ANSWER
SELECT BASE
RING VOLUME
RING MELODY
Main Menu
Deregistering a handset
1. Press [MENU], then
2. Press [ ] / [ ] to select “ADVANCED SET” and press [SELECT], then
3. Press [ ] / [ ] to select “DE- REGISTER” and press [SELECT], then
4. Enter you PIN (default PIN: 0000) and press [OK], then
5. Press [ ] / [ ] to select the desired handset and press [SELECT], then
6. Selected handset de-registered and press [ ] return to idle
Delete a CID record
1. [ ]
2. [ ] / [ ]: Select the desired record and press [SELECT] to show call details
3. Press [MENU], [ ] / [ ]: “DELETE” or “DELETE ALL” [ OK ]
4. Press [ OK ] to confirm
5. [ ]
Using Caller ID service
IMPORTANT: In order to use this unit’s Caller ID features, you must subscribe
to either the standard Name/Number Caller ID Service or Call Waiting Caller
ID Service. To know who is calling while you are on the phone, you must
subscribe to Call Waiting Caller ID Service.
This unit receives and displays information transmitted by your local phone
company. This information can include the phone number, date, and time; or
the name, phone number, date, and time.
Receiving CID Records
Caller ID records are stored in the order that they are received.
Storing CID Records (In CID Memory)
If you are not at home or cannot answer, your telephone’s Caller ID memory
stores the data for the 10 most recent calls. When the 11th call is received, the
oldest Caller ID record (1st call) is automatically deleted.
Reviewing CID Records and call back
As calls are received and stored, the display is updated to let you know how
many calls have been received. To scroll CID records:
1. [ ]
2. Press [ ] to search from the most recent call, or [ ] to search from
the oldest call.
3. To Call back, press [ ]
To Exit, press [ ] return to idle
Store a CID record
1. [ ]
2. [ ] / [ ]: Select the desired record [MENU]
3. [ ] / [ ]: “SAVE NUMBER” [ OK ]
4. Enter the name and number [ OK ]
5. [ ]
To select the answering mode
On handset:
1. Press [MENU], then
2. Press [ ] / [ ] to select “ANSWER MACHINE” and press [SELECT], then
3. Press [ ] / [ ] to select “ANSWER MODE” and press [SELECT], then
4. Press [ ] / [ ] to select the desired setting, then
5. Press [SELECT] and press [ ] return to idle
On base unit:
Press [ ] to change the answering mode. The sequence is “ANSWER & RECORD”
>”ANSWER ONLY”>”ANSWER OFF”.
Note:
When the answering system is turned on, the LED counter on the base light up with
number of message.
When the answering system is in answer only mode, the LED counter will show
[ ] then change to [ ]
When the answering system is off, the LED counter will off.
Call screening
1. When the answering system answers the call, listen while the caller leaves
a message (to determine who is calling).
2. To speak to the caller, press the [ ]
The answering system automatically stops recording when you activate the
handset or pick up an extension phone.
Note:
To turn off the call screening, Press [ ] to set the volume off
Playback the messages using the base unit
When the new message have been recorded, the message indicator on the
base unit flashes
Press [ ]
• If new messages have been recorded, the base plays new messages only,
press again to play all messages
Playback the messages using the handset
When the new messages have been recorded:
- “NEW MESSAGE” is displayed
- The message indicator on the handset flashes slowly.
To listen to new message:
1. Press [PLAY] when there aew new messages
or
1. Press [MENU], then
2. Press [ ] / [ ] to select “ANSWER MACHINE” and press [SELECT], then
3. Press [ ] / [ ] to select “PLAY” and press [SELECT], then
4. Press [OPTIONS] to select the operation during playback or
press [STOP] to stop playback
Memo Recording
You can record the memo as a new message through handset.
1. Press [MENU], then
2. Press [ ] / [ ] to select “ANSWER MACHINE” and press [SELECT], then
3. Press [ ] / [ ] to select “RECORD MEMO” and press [SELECT], then
4. When display show “RECORDING”, you should move 9 inches from the handset
microphone and speak clearly into the handset microphone. (2 minutes max)
5. Press [STOP] to stop recording
Turning on the answering system remotely
If the answering system is off, you can turn it on remotely.
1. Dial your phone number from a touch-tome phone.
2. Let the phone ring 20 times
- An OGM will be played
3. Press [ ] and enter the remote access code within 8 seconds, then
4. You will enter the remote access and press [0] to turn on the answering system
Answering system settings
Number of rings before the unit answers a call
You can select the number of rings you want the phone to ring before the
answering system answers a call.
1. [MENU]
2. [ ] / [ ]: “ANSWER MACHINE” [SELECT]
3. [ ] / [ ]: “ANS SETTINGS” [SELECT]
4. [ ] / [ ]: “RING DELAY” [SELECT]
5. [ ] / [ ]: Select the desired setting [SELECT]
6. [ ]
NOTE:
If you select Toll Saver (TS) the unit answers after the 3rd ring if there are NEW
messages, OR the unit answers after the 5th ring if there are NO new messages.
This allows user to access their answerer from another location and then hang
up after 4 rings to avoid long distance charges.
Handset locator
You can locate a misplaced handset by paging it.
1. Base unit: [ ]
All register handsets beep for 1 minute.
2. To stop paging:
Base Unit: Press [ ]
Handset: Press [ ]
Intercom
Intercom calls can be made between handsets
Note:
If you receive an outside call while talking on the intercom, you hear beep.
To answer the call with the handset, long press [*] to switch the outside call
and intercom
While paging a handset, the paged handset beeps for 1 minute.
Making an intercom call
1. [ int ]
2. [ ] / [ ]: Select the desired handset setting [SELECT]
3. When you finish talking, press [ ]
Answering an intercom call
1. Press [ ] to answer the page
2. When you finish talking, press [ ]
Transferring calls
Outside calls can be transferred or a conference call with an outside party
can be made between 2 handsets.
1. During outside call, press [
int ]
2. [ ] / [ ]: Select the desired handset setting [SELECT]
3. Press [ ]
4. The call will transfer to the paged handset
For conference call
1. During the intercom, long press [
int ]
2. LCD will show “CONFERENCE”
Erasing all messages
1. [MENU]
2. [ ] / [ ]: “ANSWER MACHINE” [SELECT]
3. [ ] / [ ]: “DELETE ALL” [SELECT]
4. Press [OK] to confirm
5. All message deleted and press [ ] return idle
PIN (Personal Identification Number)
Important: If you change the PIN, please make note of your new PIN.
The unit will not reveal the PIN to you. If you forget your PIN, please reset your phone
To change PIN:
1. Press [MENU], then
2. Press [ ] / [ ] to select “ADVANCED SET” and press [SELECT], then
3. Press [ ] / [ ] to select “CHANGE PIN” and press [SELECT], then
4. Input the old 4 digits PIN (Default: 0000) and press [OK], then
5. Input the new PIN and press [OK], then
6. Confirm the new PIN and press [OK]
7. A beep sound emit and display show “NEW PIN SAVED”
Registering a handset
Additional handset
The base unit of this telephone can support up to a total of 4 cordless handsets.
The handsets that ship with your main base are pre-registered in the factory.
To add or re-register a handset:
Handset:
1. Press [MENU], then
2. Press [ ] / [ ] to select “ADVANCED SET” and press [SELECT], then
3. Press [ ] / [ ] to select “REGISTRATION” and press [SELECT], then
4. Press [ ] / [ ] to select base and press [SELECT], then,
5. Enter you PIN (default PIN: 0000) and press [OK], then
6. Handset will show “WAITING”
Base:
7. Press and hold the [ ] for 5 seconds, the base LED will blink slowly.
Handset:
8. Handset will have a long beep when success register
Important:
The unit shall able to register with 28507xxx-A only
Operating the answering system during playback
Key Operation
Adjust the speaker volume
Erase currently play message
Repeat message
Play message
Stop playback
Forward
On/Off Switch
Erasing all messages
Long Press [ ] while the unit is not in use
Used equipment must be disposed of in compliance with current environmental
protection regulations. You should return it to you reseller or dispose of it in an
approved recycling cnetre.
Environment
Do not attempt to open the batteries as they contain chemical substances.
In the event of leakage, avoid contact with the skin, eyesand mouth. In the
event of contact, rinse the affected part for several minutes in running
water. Clean the product with absorbent paper or a dry cloth and contact
your reseller for replacement batteries.
This 28517/28527 telephone is compliance with the DECT6.0 standard
which operates in the 1.92MHz to 1.93MHz frequency range.
WARNING: TO PREVENT FIRE OR ELECTRICAL SHOCK HAZARD, DO NOT EXPOSE
THIS PRODUCT TO RAIN OR MOISTURE.
CAUTION
RISK OF ELECTRICAL SHOCK, DO NOT OPEN
THE LIGHTING
FLASH AND ARROW
HEAD WITHIN THE
TRIANGLE IS A
WARNING SIGN
ALERTING YOU
OF “DANGEROUS
VOLTAGE” INSINDE
THE PRODUCT.
CAUTION: TO REDUCE THE
RISK OF ELECTRICAL SHOCK,
DO NOT REMOVE COVER
(OR BACK). NO USER
SERVICEABLE PARTS INSIDE.
REFER SERVICING TO
QUALIFIED SERVICE
PERSONNEL.
THE EXCLAMATION
WITHIN THE
TRIANGLE IS
WARNING SIGN
ALERTING YOU OF
IMPORTANT
INSTRUCTIONS
ACCOMPANYING
THE PRODUCT.
SEE MARKING ON BOTTOM / BACK OF PRODUCT
 Loading...