

GE 22 Models, 24 Models, 27 Models, Profile 22, Profile 24 Use And Care & Installation Manual
...Page 1

Use and Care&Installation Guide
Refrigerator
❑
●
❑
T
●
w
Iiin
.-,
“<
‘-,. ,,,
English Version . . . . . . . . . . . . . . . . . . . . . . . . . . . . . . . . . .
2
Version franchise . . . . . . . . . . . . . . . . . . . . . . . . . .
23
Version en
espaiiol
. . . . . . . . . . . .
45
Safety instructions . . . . .
.
............3
Operating
Instructions,Tips
Automatic
lcemaker
& Dispenser . . ..5–7
Energy-Saving Tips . . . . .............................2
Food Storage Suggestions .........................8
Shelves~.............~...
..ti.
. . . . . . . 10
Storage Drawers . . . . . . . ...........................9
Temperature Controls . . ............................4
Careand Cleaning
Behind the Refrigerator. . . ......................11
Cleaning–lnside and Outsid e..................
ll
Drawer and Cover Remova l.... . . . . . . . ..12
Light Bulb Replacement ..............12
Under Refrigerator . . . . . ..............11
Water Filter Accessory ................................7
GE Appliances
Problem Solver . . . . . . .
.
.... 17-19
Normal Operating Sound s . . . . . . . . . . .
.
17
More questions ?...ln the United States call
GEAnswerCenter@ 817~626.2000
lnCanada consultyourlocaltelephone
dkectoryforthe
Cameo Service Center
Preparation
Clearances . . . . . . . . . . . . . . . ...........13
Levehng . . . . . . . . . . . . . . . . . ........................13
Location
....ti
. . . . . . . . . . . .
.........ti.
13
Moving &Vacation . . . . ...............13
RoHers........~....~ti....
...........13
Water Supply to
Icemaker
. . . . . . . . . . ..13
Installation
InstatiationHH==tiHHHHH.H..-. ............. 14-16
Adapter Plug . . . . . . . . . . . . . ..................14
Electrical Requirements.. . . . . . . . . . . . 14
Extension Cord . . . . . . . .............14
Grounding . . . . . . . . . . . . . . . . .................14
Water Line installation . . ........ 15, 16
Consumer Services . .
.
...........20
Appliance Registration ................2
ModeIand Serial Numbers .........................2
Warranty forCanadian Customers
........2l
WarrantyforU. S.Customers ......Back Cover
Profile:SidebySide2z
24and27
Models
—
Page 2
HELP US HELP YOU...
Write down the model
and serial numbers.
YoL1’11
see them cm a label on the
wall be~icle
the
top
drawer or at the bottom, just
inside (he
fresh
food
compartment door.
These numbers
tire
also on the Con\umer
Product Ownership Registration Card that
came
with
your refrigerator.
Before sending in this card,
please write
thew
numbers here:
Model Number
Serial Number
Use these
numbel”s
in any
corre~pondence
or
service
call~
concerning your refrigerator.
Read this book carefully.
It i~ intended to help you operate and
maintain your new refrigerator properly.
Keep
it
handy
for answers to your questions.
If
yOLI don-t understand something or need
more help.
write
(include your phone number):
In the United States:
Con\umer
Affair$
GE Appliance\
Appliance Park
Louisville. KY
40225
In Canada:
Munager.
Con\umer Relations
~&$5
ShV
mark .4\ e.,
Mis\is$a’uga.
Ontario
Canadti L4W 4H2
If you received a damaged
refrigerator . . .
Immediately contact the dealer (or builder)
that sold you the refrigerator.
Save time and money.
Before you request service . . .
Check the Problem Solver section in this
book. It lists minor operating problems that
you can correct yourself.
ENERGY-SAVING TIPS
● Location of your refrigerator
i~
important. A\oid locating it next to
● Be sure the doors are closed tightly. Before leaving the house or
your range.
u
heating vent or
where
the
iLIn will shine directly on it.
retiring
for
the night, check to be sure the doors haven’t been
left
●
Close the doors as soon
tii
posiible, particularly i n hot, humid weather.
open accidentally.
●
Keep foods covered to reduce moisture buildup inside the refrigerator.
IF
YOU NEED SERVICE
To obtain
~ervice.
see the Consumer Scr\ icei
For- Customers in the United States:
page in the back of
thi~ booh.
FIRST,
contuct
[he people who serviced your
We’re
proud of our
W\’iCe
and want J
011 to
appl
itince.
Explain
why
you are not pleased.
be pleased.
It’ for some reuwm JOLI
are
nc)t
In
mo~t
caiei
thi$ will \ol\e
the problem.
happy with the
wnicc
yOLI
rccei~’e. here are
NEXT,
if’
you are \till not pleased.
write
3 steps
to
follow
for further help.
all the
de[ails-including your phone
llLllllbel’—tO:
M~nager,
Con\umer
Re]ation$
GE
Appliance\
Appliance park
Louis\illc. KY
40225
FINALLY. if
your
problem is \till not
resol \ cd. u
rite:
Nl:ljor
Appliance Con\urner
Action
Panel
70 Not-[h Wacher Dri \ e
Chicago. IL 60606”
For Customers in Canada:
FIRST. contact the people who serviced your
appliance. Explain why you are not pleased.
In most cases this will solve the problem.
NEXT, if you are still not pleased, write
all
the details—including your phone number—to:
Manager, Consumer Relations
Z64S Skymarh
Ave.,
Missi$%iuga,
Ontario
Canada L4W 4H2
2
Page 3
IMPORTANT SAFETY INSTRUCTIONS
Read all instructions before using this appliance.
A
WARNING—When
using this appliance,
always exercise basic safety precautions,
including the following:
●
Use this appliance only for its intended purpose
as
described in this Use and Care Guide.
This refrigerator must be properly
installed and located in accordance
with the Installation Instructions
hefore
it is used.
Never unplug your refrigerator by
pulling on the power cord.
Always
grip plug firmly and pull straight out
from the outlet.
c
Repair or replace immediately all electric
service cords that have become frayed or
otherwise damaged.
Do not use a cord that
shows cracks or abrasion damage along its length
or at either the plug or connector end.
●
When moving your refrigerator away from the
wall?
be careful not to roll over or damage the
power cord.
●
Do
not allow children to
climb?
stand or
hang on the shelves in the refrigerator.
They
could damage the refrigerator and seriously
injure themselves.
a
●
If your old refrigerator is still around
\,
the house but not in
use?
be sure to
=\
remove the doors.
This will reduce the
possibility of danger to children.
@
After your refrigerator is in
operation7
do
not touch the cold surfaces in the freezer
compartment? particularly when hands are
damp or wet.
Skin may adhere to these extremely
cold surfaces.
●
If your refrigerator has an automatic
icemaker?
avoid contact with the moving parts of the ejector
mechanism, or with the heating element that
releases the cubes. Do not place fingers or hands
on the automatic icemaking mechanism
while
the
refrigerator is plugged in.
●
Don’t refreeze frozen foods which have thawed
completely.
The United States Department of
Agriculture in Home and Garden Bulletin
No. 69 says:
“..
.You
may safely refreeze frozen foods that
have thawed if they still contain ice crystals or if
they are still cold—below
40”F. (4”C.).
“..
.Thawed
ground meats, poultry or fish that
have any off-odor or off-color should not be
refrozen and should not be eaten. Thawed ice
cream should be discarded. If the odor or color of
any
food is poor or questionable, get rid of it. The
food may be dangerous to eat.
“Even partial thawing and refreezing reduces the
eating quality of foods, particularly fruits,
vegetables and prepared foods. The eating quality
of red meats is affected less than that of many
other foods. Use refrozen foods as soon as
possible to save as much of their eating quality as
you can.”
q
. Unplug your refrigerator before
cleaning and making repairs.
J
NOTE:
We strongly recommend that
any servicing be performed by a
qualified individual.
●
Before replacing a burned-out light
bulb,
the
refrigerator should be unplugged in order to avoid
contact with a live wire filament. (A burned-out
light bulb may break when being replaced.)
NOTE:
Turning control to OFF position does
not remove power to the light circuit.
c
Do not store or use gasoline or other flammable
vapors and liquids in the vicinity of this or any
other appliance.
SAVE THESE
INSTRUCTIONS
3
I
L
n
A
9
.
d
h
h
Page 4

OPERATING YOUR REFRIGERATOR
Set the Temperature Controls (appearance ma
y
vary)
The temperature controls let you regulate the temperature in the fresh
food
and freezer compartments.
At first, set the Fresh Food control at “5” and the Freezer control at “C”.
Allow 24 hours for the temperature to stabilize, whether you are
\etting the
con[rols for
the first time or adjusting them later. Then, if
you want colder or warmer temperatures in either compartment, adjust
the controls one step
at
a time.
NOTE: Moving the Fresh Food control to OFF turns off cooling in
both compartments-fresh food and freezer—but does not shut off
power to the refrigerator.
I
——
Freezer Control
C
is
Initial
Setting
E is Coldest
I
O~F
i“3”5”i”9
Fresh Food Control
5
is Initial Setting
9 is Coldest
How to Test Temperatures
Use the milk test for the fresh food compartment. Place a container Use the ice cream test for the freezer compartment. Place a
of milk on the top shelf in the fresh food compartment. Check it a day container of ice cream in the center of the freezer compartment. Check
later. If the milk is too warm or too cold, adjust the temperature controls. it after a day. If it’s too hard or too soft, adjust the temperature controls.
Always allow 24 hours for the refrigerator to reach the
temperature you set.
Automatic Energy Saver System No Defrosting
You won’t find an “energy saver” switch on this refrigerator.
It is not necessary to defrost the freezer or fresh food compartments.
Warm liquid from the refrigerator’s condenser is automatically
Your refrigerator is designed and equipped to defrost itself automatically.
circulated around the front edge of the freezer compartment to help
keep moisture from forming on the outside of the refrigerator during
humid weather.
Many refrigerators use special electric heaters, This refrigerator needs
none. That’s why there is no “energy saver” switch.. there’s no need
for it.
If you turn your household thermostat below 60°F.
(16°C.)
at night...
. . . you may want to move the freezer control one
step colder. Cooler temperatures in the house may
cause the compressor to operate less frequently, ,
,.’ ‘t
thus allowing the freezer compartment to warm
somewhat. To protect your frozen food supply,
leave the freezer setting at this colder setting for
@
Moving the freezer control to colder setting should have no effect on
,,, ,, ,,
your fresh food compartment. However, if freezing occurs, move the
go
fresh food control one step warmer.
:
-,
When you stop turning the thermostat down, turn the refrigerator’s
,,
,. .
controls back to their regular settings.
the entire winter or for as long as you keep
youf
thermostat turned down.
4
Page 5
AUTOMATIC ICEMAKER & DISPENSER
(on some mode]s)
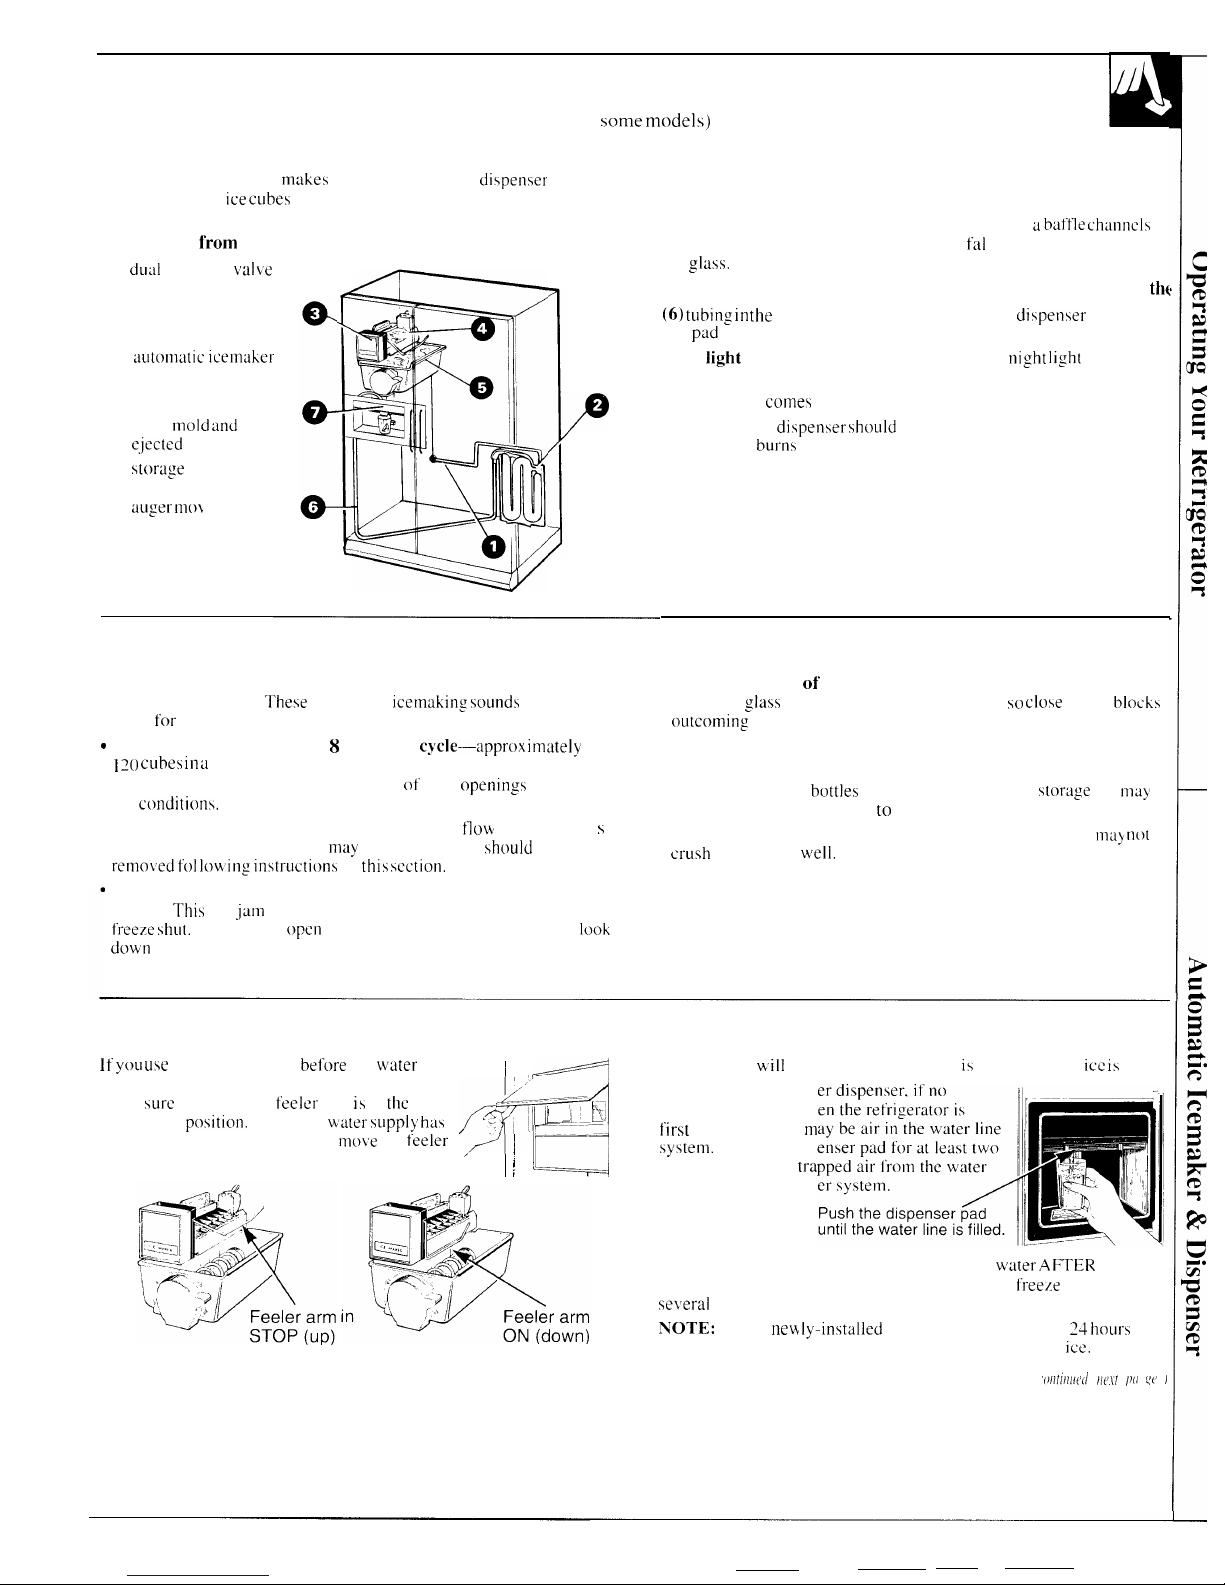
How They Work
The automatic icemaker
makes
ice continual y. The
di~penser
dispenses water,
ice cube~
or crushed ice through the freezer
compartment door. Here’\ how they work.
Water flows
f’rom
the household supply through a
(1)
dual
solenoid La]le
to the
(2) water tubing and
to the
(3)
automdtic
icemaher
as needed.
Water is frozen in the
(4)
(5)
cube
mold and
ejected into the
stortige
bin where
a motor-powered
auger mo}
es
cubes forward.
P
Cubes fall through the chute in the door when the dispenser
pad is pressed.
When CRUSHED is selected (on some models).
a
baftle
channcl~
cubes through the crusher and crushed ice
fal
Is through a chute into
the
,gltiM.
When WATER is selected, (on some models) water flows through
tht
(6) tubing in
the
door and is dispensed when the diipenjer
ptid
is pressed.
(7) A
light
switch (on some models) turns the
night light
in the
dispenser on or off.
The light also
come~
on when the dispenser pad is pressed.
The light in the
di~pen~er $hould
be replaced with a 7 watt maximum
bulb when it
burn$
out.
Important Facts about Your Ice & Water Dispenser
● If this is your first icemaker you’ll hear occasional sounds that
may be unfamiliar.
The\e are normal
icemaking wund~
and are not
cause
for
concern.
“
Your icemaker will produce 8 cubes per
cycle-approx irnately
] 20 cLlbe~ in a
24-hour period-depending on freezer compartment
temperature. room temperature. number
of door
opening~
and other
use
ct~nditioni.
● Intermittent dispensing of ice is normal. If ice
flow
interruption i
~
more than brief. ice clump($)
ITMy
be the cause and
~hou]d
be
remo~ed fo] lowi n: instruction~
in
this wxtion.
Avoid overfilling glasses with ice and using narrow or extra-tall
glasses.
Thi\ can jam the chute or cause the door in the chute to
f’reeze ~hut.
Periodically
open
the freezer compartment door and
100L
down
into the chute. If ice is blocking the chute. poke it through with
a wooden spoon.
● To help keep bits
of’
ice from being sprayed beyond the glass,
place the
gla$s
close to the ice chute-but not w) clofe that it
blochs
outcoming
ice.
● Fill glasses with ice before adding soda or other beverage mixes.
● Beverages and foods should not be quick-chilled in the ice
storage bin. Cans.
bott]es
or food packages i n the ftorage bin
m~}
cause the icemaker or auger to jam.
● Do not add ice from trays or bags to the storage bin. It
may n~~t
cl”ush
or dispense
well.
Before Using Your Icemaker and Dispenser
1~
yoLl uw
your refrigerator
bef’ore
the water
1
~
~
At first there
will
be a delay before water ii dispensed and
ice is
made.
arm to ON (down) position.
connection is made. raise the ice access door and
make
sure
the icemaker feeler arm i~ in
the
STOP (up)
po~ition.
When the water
JLipply ha~
been connected to the icemaker,
mo~e
the feeler
“~
d’
On models with a wat
2/
:&_K
‘
4—-;:
water is dispensed wh
first
installed, there
nl
/
!
G
sy~tem.
Press the disp
minutes to remove
tra
line and to fill the wat
position position
The ice cube mold will automatically fill with
wrater AFTER
cooling
to freezer temperature. The first cubes normally
freeze
after
se\Jeral
hours.
in
NTOTE:
With a
new
Iy-in\talled refrigerator, allow about 24 hourj
for the freezer compartment to get cold enough to make
ice.
((
’()!ltlllllt’(1
)If’lt
[)(1 Y(’ )
5
Page 6
AUTOMATIC ICEMAKER & DISPENSER
(continued,)
Once Your Icemaker and Dispenser are in Operation
Throw
away
the firft few batches of ice cubes ( 16 or 24
cube~).
Thi\
To make sure the bin fills with ice, level the cubes occasionally.
will
flush away
any impurities in the water line.
DCJ
the
wlme
thing When cubes fall into the
bin
they may pile up close to the icemaker
after
~’acations
or extended periods when
icc lm”t u~ed.
and push the feeler
arm to
the STOP (up) position before the
bin
gets
On models
with a water dispenwr. pour the
tir$t 6 gla~sful$
of water in
full. Keeping the
cubes
level allows the icemaker to fill the bin.
the kitchen
sink.
The
fir$t
water through
the ~~ stem pich~
LIp a
\light
‘bpltistic”
taste from the
w:iter
tubing.
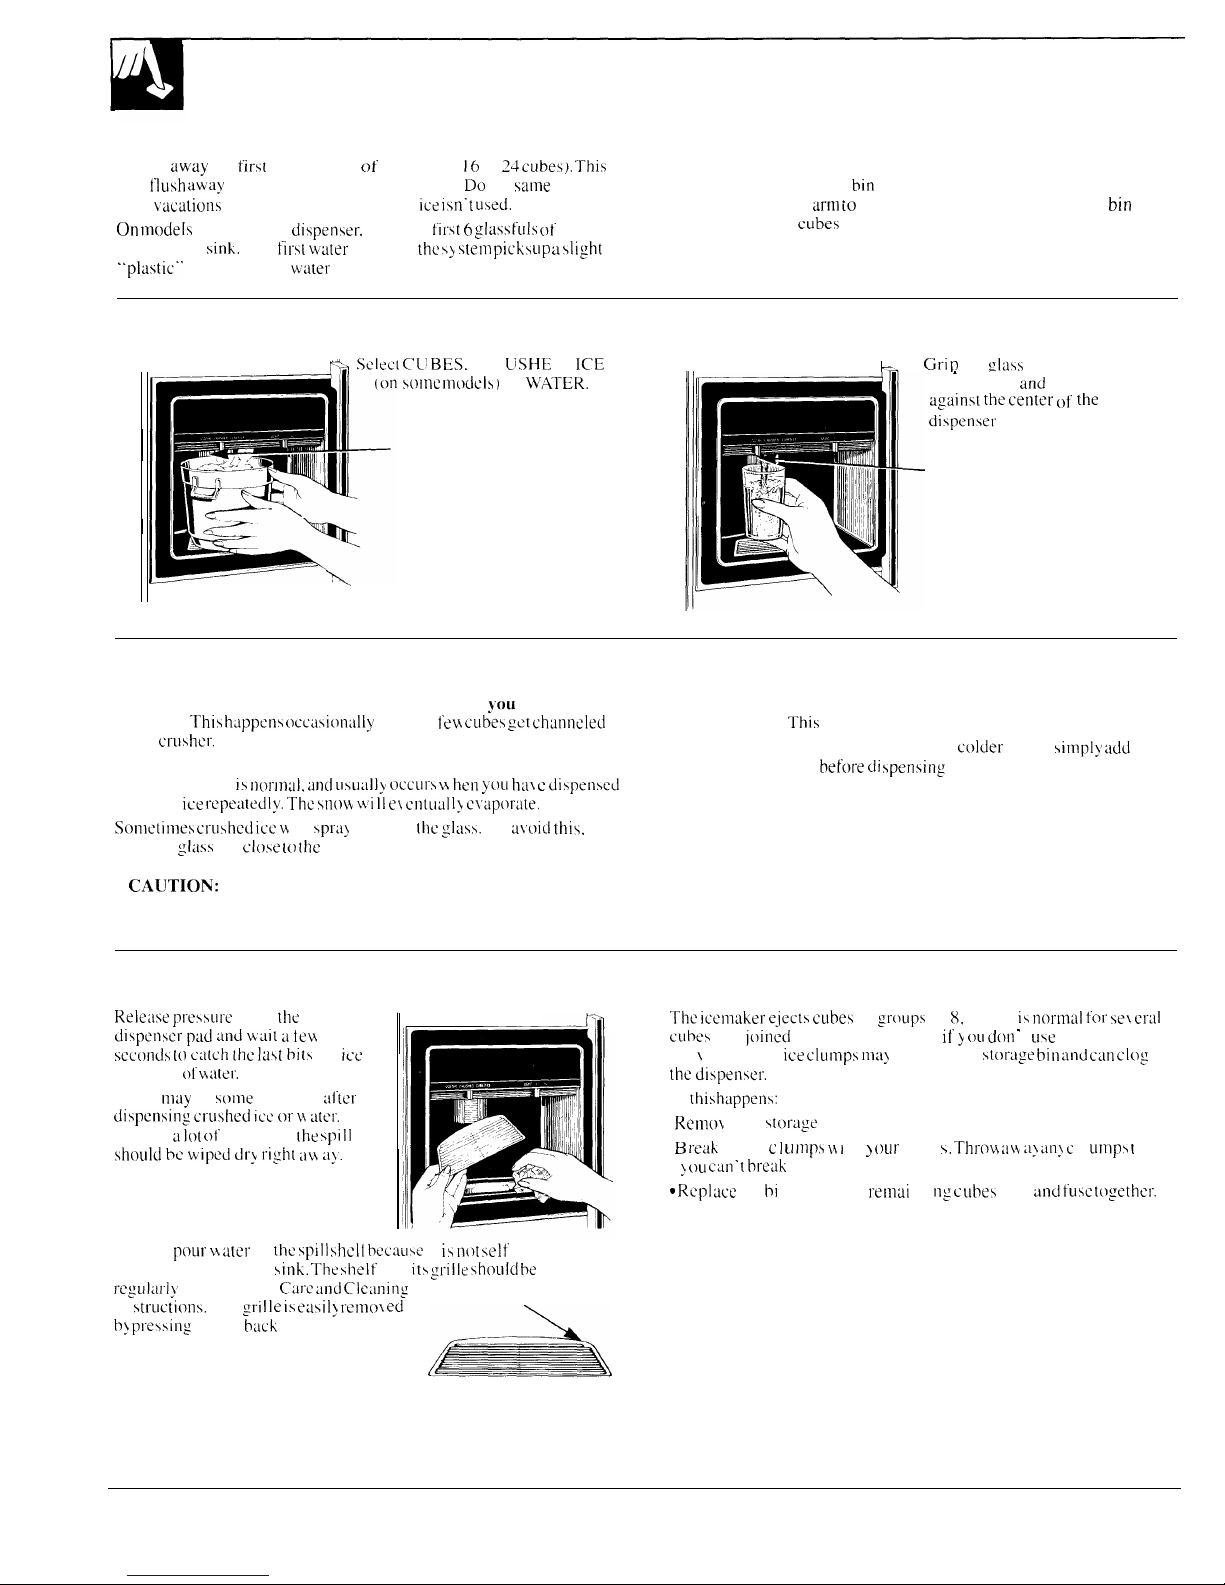
To Dispense Ice and Water
II
F%%
●
Select CL~ BES.
CR
LjSHE;
D
ICE
III
L
●
Gri P
the clafs or other container
1
wlnc
Inodcis
)
or
WATER.
I
Dispenser
pad
I
.
near the rim
and
press the rim
against the cent~r of’ [he
di~penier pad.
Dispenser
pad
When Dispensing Ice...
When Dispensing Water...
Some crushed ice may be dispensed even though
JOU
selected The first glass of water dispensed may be warmer than the
CUBES.
Thi\
h.ippcn~ occa~ion;dly
when a
few cube~ get chiinncled
following ones. Thi\ is normal.
to the
cruiher,
Dispensed water is cool, not iced. For
colder water.
~impl) add
Sometimes a mound of snow will form on the door in the ice chute.
crushed ice or cubes
before di $pen$ing
water.
This condition
i~ nor]nu]. and Li\Ll;llly occL]r\ w hen yoL[
hal c
di~penwd
crushed
ice repeatedly. The in(~w w’i ]1
ei
cntual 1}
cluporate,
Sonlttimes
cru~hed ice w
ill
~pra>
beyond
the :ltl\\.
To
~~oid thi~.
hold the
@;lSS
Up c]ow
[() the
chute.
CALJTION:
Never put fingers or other objects into the
dispenser opening.
To Stop Dispensing
If Ice Clumps Form in the Storage Bin...
Re]eme
pressLII”c
from the
difpenwr
pad :md wait a
tew
sccondi [()
c:~[ch the la~t
biti of
ice
01”
drop\ of m iiter.
There
muy
be wme dripping
;ti’ter
di~pensing cru~hed icc or M :iter.
If
there is
a 10L
of dripping.
the ipil]
should h wiped dry right
au a!.
—f%
.——
The
iccmaker ejects cubej in
group~
of 8, and it i~
norimai for W! cral
cLIbe\
to be joined together. How c\ er, if
y (JLI don -
t
Llw
the
ice
\
ery often.
ice clump~ ma>
form in the
~tortige bin and
cm
clog
the dispenwr.
It’
this
happenf:
● Renlo\ e the
~torage
bin from the freezer.
●
B reah
up ice c 1 L]
IJlp$ M I
[h ]
tlL]r
hand $.
Thro\$ ;iw a} an> c
1 ump\ 1 hat
>
OU
can’t
break
Lip.
o
Rcpl tice
the bl n before the
rem~i
n i ng c
ubef
melt
Lmd
fuw
tc~gethcr.
Do not
poLIr u
ater in tht
ipil] shelf
bccauw it i~
not
\e]f draining--
pour it in the kitchen
\inh. The
\llelf and
it~ grille ihou]ct be
cleaned
J“~~U]:U”])’
accord in: to
CtiJ”~ and Clc;ming
Press here to remove grille
in
ftruction~.
The
gri IIe if euii 1> rcnlo~ ed
b) pre~sing
on the
bach
right corner.
[d
6
Page 7
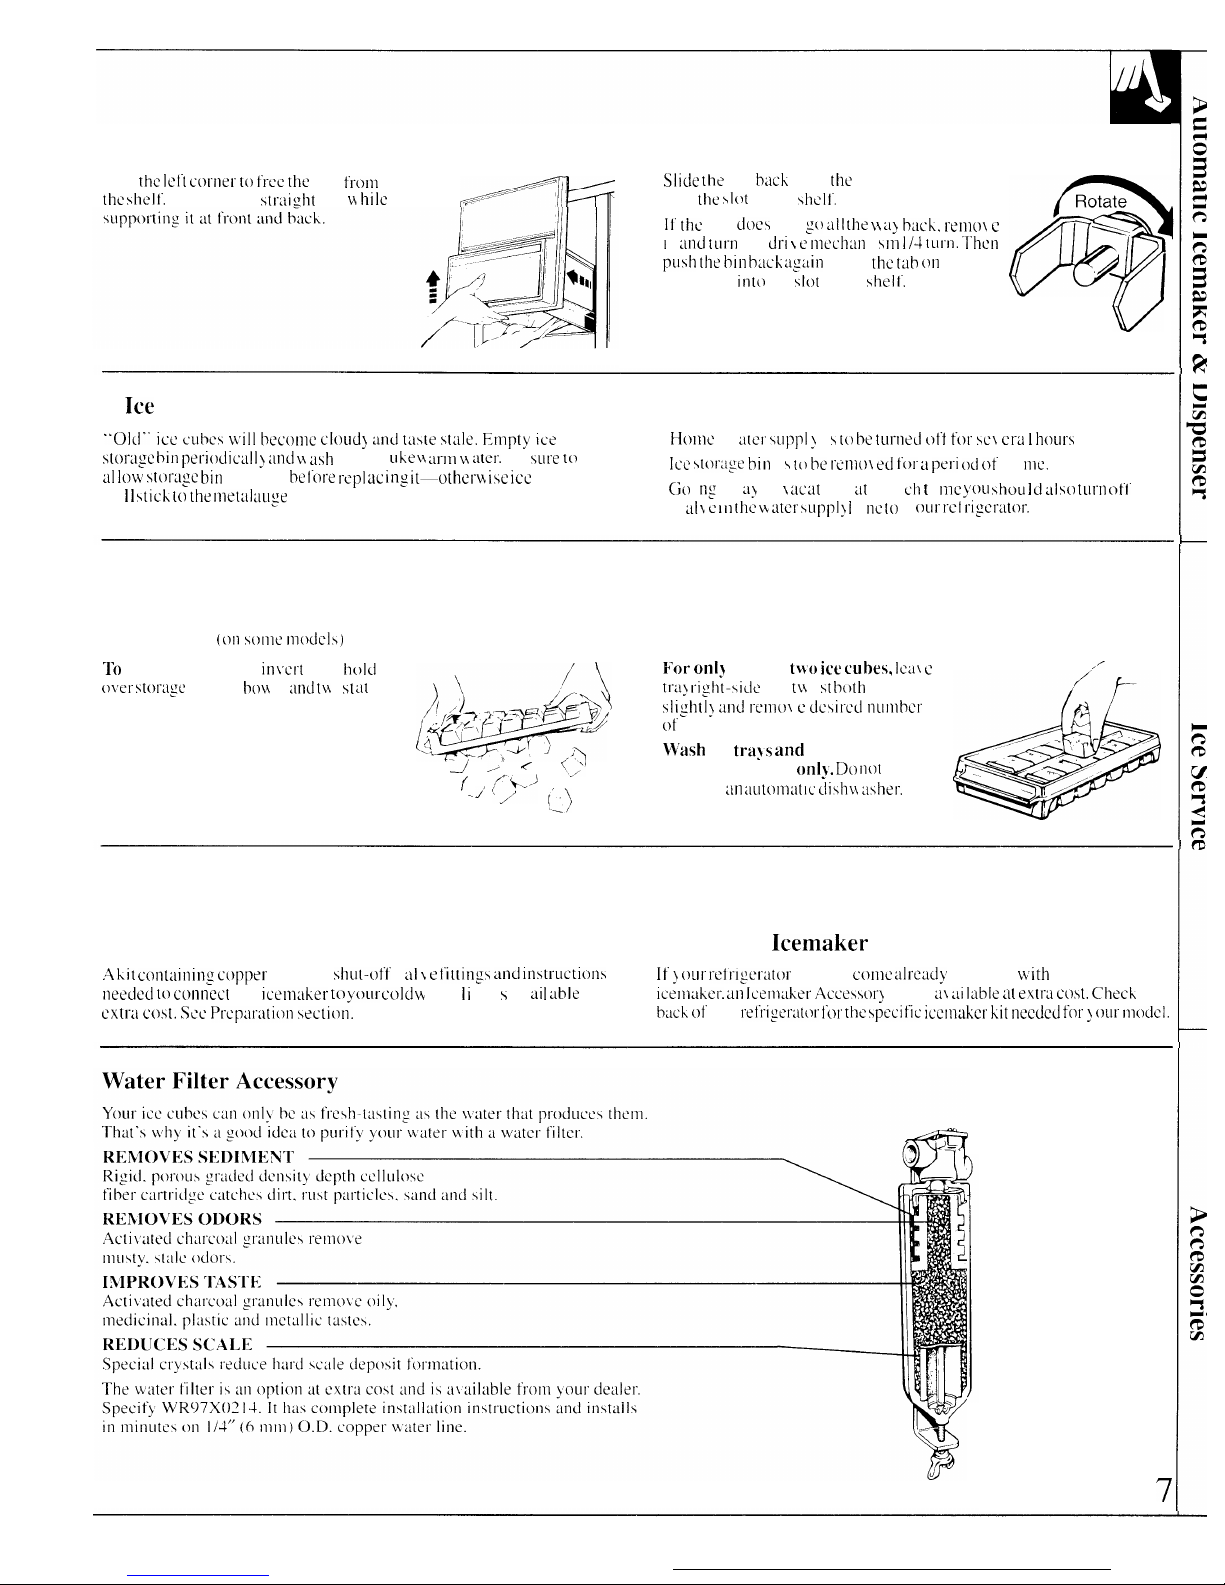
To Remove Ice Storage Bin To Replace Ice Storage Bin
Lift
the Iei’t
comer to
free the
bin
from
the ~helt’.
Pull the bin itraisllt out w
hi]c
Slide the
bin
bach
until
the
tab on the bin loch\
into
the
\lot in the \hclt.
Ii’ the
bill dm$ not
:()
all the )!
J}
h:lch. renlo~ c
1
t
mld turn
the
dri \ f-’ nlechan
i inl
]/~ tul”n. Then
pu~h [he bln b:lch ;I::iin
until
the t:lb on
the
bin loch\ into the
\lot
in the \helt.
Drive
Mechanism
(/
If
Ice
Is Not Used Often . . .
Move Feeler Arm to STOP (up) Position when...
“01(1” ice
CLIbM
mill
become
cloud~
:md
ta\te \tale. Empty ice
●
Home
\\
:I[el’
\Ll]?Jl] !
i \ to k
tlll”lled
ot’f fol” \L2\ c[-a 1
hoLll”\
stor;ly
bin periodic:ll [j :md y$ a$h
i t in 1
uhey! M-m w :mr.
Be jure
to
●
Ice ~t(~r:~ge bin
i \
[() be I.CINOI d t’or :t pet”i od
of t i
me.
LII low \tot-+ze bin
to cool” be
lot-e t-q] ac
in: it—othem
i$e icc
cube\
wi
1 ]
\tich
[() the met:~]
;LLI:e
I”.
●
C;{)
i
n:
d\\
:Ij
on I
xat
ion. at \\ h I ch t i mc
}:OU
\hou ] d JI w) tum ofl’
the
\
Lil\ (2
111 []1(? W LLtCI” \Ll[2p]> i
i
llC
to \
OLI1- l-Ct
l“i:O”dtol”.
ICE SERVICE
Ice Trays
(~)tl wtllc tll(~~t]~j
1’0
release ice cubes, in\crt tin},
hold
it
()\er \tot-:~gc
bin 01”
bow
1. md [w i \t
Llt
both end\.
\
For onl~
one or
two ice cubes, lcLI\ c
,/
trii}
righ-\ide Lip. tw i \t
both
end\
Y
$Iightl> Jnd r-crno~ c dcjird nunlbcl”
[!*
of
cube\.
V$rash
ice
tra~s and
storage bin in
-J ,) ~
<:>
lukewarm water
on]!. Do not
put
f /
(;)J
,
. .
them in an
:~utomatlc diih~i aiher.
0
ACCESSORIES
Water Supply Kit
Automatic
Icemaker
Accessory Kit
,4
kit corrt:lining copper
tubing.
\hut-ot’t’
\
iil L e t’ittin:~ and
in\tmctions
It’
j
our mir-l:er:ltor”
did not
come dmd>
quipped
with
an automatic
needed to
conned the
icemaher- to
yoLII”
cold w alter Ii ne i \ a\
tii I
uble
at
icer)~tiher-.
m
lcenl:Lher” ACCe\\OI-}
Kit i\ aI
:li Itible at extm co$t. Ckh
the
cxtr”d co$t. SW Pmpamtion
valion.
bxh
of’
the
mt’nymt(w for the \pccitic icermikm kit naxlcd fm” j ouI” mock].
7
Page 8

FOOD STORAGE SUGGESTIONS
Suggested storage times for meat and poultry*
Eating quality
DAYS IN
MONTHS
IN Eating quality
DAYS IN
MONTHS IN
drops after
REFRIGERATOR FREEZER
drops after
REFRIGERATOR FREEZER
time shown AT 35° to 40°F.
AT O“F.
time shown
(2°
to
4°c,)
AT 35° to 40°F.
AT O“F.
(-18°C,)
(2° to
4“C.)
(-lll”c.)
Fresh Meats
Roasts (Beef & Lamb). 3 to 5.......... ,,..............6 to 12
Roasts (Pork
&
Veal).
3 to 5 . . . . . . . . . . . . . . . . . . ...4 to 8
Steaks (Beef) .3 to 5.
..6
to 12
Chops (Lamb). .3 to 5 . . . .
.....6
to 9
chops
(Pork) 3 to 5.. ., .3 to 4
Ground & Stew Meats
..””,::....::::..
1 to 2... . . . . . . . . . . .,...,,,,. .3 to 4
Variety Meats 1 to 2 . . . ...3 to 4
Sausage (Pork). . . . . 1 to 2 . . . . . . . . . . . . ...... ....1 to 2
Processed Meats
Bacon 7 . . . . . . . . . .. ....1
Fresh Poultry
Chicken
& Turkey (Whole). ..... ........1 to 2.. ...........................12
Chicken (Pieces) . . . . ..,, ............ .....1 to
2.... ....... . .. .. .......9
Turkey (Pieces) ,,.,. ..., 1 to 2, .6
Duck & Goose (Whole) . . . . . . . . . . . . . . . . . . . . . 1 to 2. . . . . . . . . . . . . . . . . . . . . .
...6
Giblets.. . . .1 to 2 . . . . .3
Cooked Poultry
Pieces
(Covered
w[th
Broth) . . 1 to 2.... . . . . . . . . . . . . . . . . . . ... .6
Pieces (Not Covered) ,. ..,,,,...,, 3 to 4 . . . . . . . . . ..1
Cooked Poultry Dishes ...... .... ......3 to 4.. .. ..... .. .... ......4 to 6
Fried Chicken
..,,
3 to 4.. . ...... ....4
(Other than for meats & poultry)
FREEZER
Ham (Half) ‘ 3 to 5.. ..... ...... ........1 to 2
Most fruits and vegetables.. .... .8-12 months
Ham
(Sllces).
,.. 3,,.. . . . .... . ........1 to 2
Lean fish. . ...... .....6-8 months
Luncheon Meats.
3 to 5.......
.Freezmg
not recommended.
Fatty fish, rolls and breads, soups, stew, casseroles ... .....2-3 months
Sausage (Smoked). 7.. .. Freezing not recommended.
Cakes,
pies.
sandwiches, leftovers (cooked),
Sausage (Dry & Semi-Dry) 14 to 21
.Freezlng
not recommended.
Ice
cream
(orlglnal
carton) ,. ., .. ...1 month max
Cooked Meats
Cooked Meats and Meat Dishes.. .. ..3 to 4. .... ....... . ........2 to 3
Meats. fish
and
poultry purchased
from
the store vary in
yualit> and
age:
consequently, safe storage time in
~our
refrigerator will vary.
Gravy & Meat Broth .... ...1 to 2 . . . . . ....2 to 3
*U.S. Department
of
Agriculture
Fresh Food Storage Tips
To store vegetables:
● As
z
further aid to freshness,
Cheese:
●
Llse
the vegetable drawers—they have
prepackaged
vegetable$
can be
● Wrap well
w ith
wax paper or
aluminulm
been designed to preserve the natural
stored in their original wrapping.
foil. or put in a plastic
bag.
moisture and freshnefs of produce.
Unfrozen meats, fish, and poultry:
● Carefully wrap to expel air and help
● Co\
crl ng
vegetables with a
moist
towel ●
Alwzys
remove store wrappings.
prevent mold.
help\ maintain cri\pne\\.
● Rewrap in
foi
1. plastic wrap or
wax
paper
● Store prepackaged cheese i n its own
and
refrigerate immediately.
wrapping
if
yOLI
wi~h.
Tips on Freezing Foods
There are 3 es\ential requirements for efficient home freezing.
1. Initial quality. Freeze only top-quality food\. Freezing retain\
quality
and
fla\or: it
cannot
improve quality.
2. Speed. The quicker fruits
and
\egetables are
fro~en
after picking,
the better the
frozen
product will be. You’ 11
wi~e
time,
too,
with
le$$
culling
and
\orting 10 do.
3.
Proper packaging. [J\e
focxl
wrap\
de$igned
especially
t’LN-
freezing.
To freeze meat,
fish
and poultry, wrap
well
in
freezel--weight toil
(or
other heavy-duty wrapping material ). forming it carefully to the
~hape
of the
contentj. Thi\ expel\ air.
Fold
and crimp
ends
of
the
package to
pro\ide a
good,
lasting wal.
Don’t
refreeze meat that has been
completely
thaw ed;
meat. whether raw or cooked, can be frozen
succe\sfull}I only
once.
Fine-quality ice cream, with high cream content, will normally
require
\lightly
lower temperature~
than more “’airy” already
-packtiged
brandf
with low cream content,
● It w i I I
be
necessary m experiment to determine the freezer
compartment location
and
temperature control \etting to
keep
your
ice cream at the
right
ser\ i ng temperature.
● The rear of
[he f’reezer
compartment i \ SI
ightl
y colder than
the
front.
~[~>~,
t~(}l}liql~~,~
(iI-~ (ofl\f(illt[}
heifl<s d(>i’(’lop~d.
Cotl.~ilit
tllc’ coi{~lt>”
Ex[cnsiofi
.knic’e ot- ivitr
loc(il Utilit> ComplitlJ
for
the
lfite.~[
itlfi)rm~itio?l OH fr(~e:in,g (id .~tori)l,q fimis.
8
Page 9

STORAGE DRAWERS
Fruit & Vegetable
Drawer
4
Convertible
s’
Meat Keeper
-
Fruit & Vegetable Drawer (cm some
model$)
Convertible Meat Drawer (on some models)
This refrigerated drawer keeps unwrapped foods fresh by retaining the
The Convertible Meat Drawer has its own
natural moisture content of foods such as:
cold
air duct to allow a stream of cold air
II
-1
●
Artichokes● Cherries
●
Plums
●
Asparagus
from the freezer compartment to
flow
/
●
Corn
around the drawer.
●
Radishes
●
Beets, topped● Currants
The variable temperature
●
Rhubarb
●
Blueberries● Greens, leafy
●
Spinach
control regulates the air flow from
●
Carrots
●
Lettuce
●
Tomatoes, ripe ● Celery
the freezer compartment.
-M
–G
=--44’
&
. Parsley
●
Peas, green
As in any refrigerated storage area, it is recommended that foods with
strong odors be stored wrapped—foods such as:
●
Broccoli
●
Cabbage
. Parsnips
●
Brussels sprouts
●
Cauliflower
●
Turnips
●
Green onions
Storage time will depend upon the type of food and its condition when
placed in the drawers.
Excess water that may accumulate in the bottom of the drawer should
be emptied and the drawer wiped dry. The drawer is partially sealed
by gaskets attached to the cover. Always replace the drawer in this
cover and push the drawer all the way in.
Set control lever to MEATS or to
II
II
u
the coldest setting to store fresh meats.
If lever is left in this position for a long
period of time, some frost may form on
the inside of the drawer.
Set control lever to VEG or away from the coldest setting to convert
the drawer to normal refrigerator temperature and provide extra
vegetable storage space. Cold air duct is turned off.
Variable settings between these extremes can be selected.
Sealed Snack Pack (on some models)
The sealed Snack Pack—and shelf to which it is attached—can be relocated within the Fresh
Food compartment. The sealed drawer retains sufficient humidity for convenient storage of
lunch meats, cheese, hors d’oeuvres, spreads and snacks.
9
Page 10

SHELVES
How to Rearrange Your Shelves
Shel\ m in
the t’re~h ttmcl
compartment
are adju~tabie,
enabling
yLJLi [o mt~he et’ficien( \helt’ w-rangementf to fit >our farnily’$ food
Stol”age
nceLi\.
To
remove
shel~es:
Tilt the
shelf’ LIp N
front.
then lift it up
wld
out of
[he
tr:lcks
on
the r-ear- w:lll 01”
the ret’riger:itor.
To relocate shel}es:
Select
ckired \hclt’
hcisht.
With
\helf front raiwd
slightly,
eng:lge the tt~p
hooks
in the trwh\
:it the
rear of
the
cabinet.
T“hcn
lower
the front
ot’
the
~helf
until it
lochs
into po\ition.
1
EI-rgage
J(’G
❑
~jr
top hook
‘1
❑
2
~owe,to
~~~
‘k
1
lock into place
,
-’14’”
,1
II
Quick Space Shelf
This
\helt’
\plits in
h:df
and ~lide\ under it\ell” I-clr
\torfige [Jt t:il
I
item
on the
\helf
below.
Slide-Out Spillproof Shelf
(OJ1 ~OInt nlodt’li~
The \lide-out \helf
allo\$
\
you to rc:wh
iten-r\ stored bchlnd others. ‘l-he spcci :Ll
——.- ——
‘
edge~ are
designed [o help pre\ en!
\pi 1 If trom dr-i
ppi ng to lower
\hel \e\.
Make fure
YOLI
pu\h the \}lc]\ cs :1]] the
Removable Wine Rack
The wine rach
is de\igned to
bold a
bottle on
it~ \i&.
A
good locution for
the
wine r:lch
i\ the
Quich Space
Shell-.
Freezer Baskets
(c)n
wrne nlmie!~)
Wire \lide-out
frec~er b~i\kct\
c:m be
pulled
OU[ {or cu~> acce~~ to
frozen
tood\.
Bins on Fresh Food Compartment Door
Multi-Position Shelves In Freezer Compartment
(on
some
models)
(on
\onle
nl(xicl\)
Adjust:lb]e bin$ can ea\il)
be carried
l’r-om
refrigerator to
wor-h ar-ea.
Shelf
\upp[)r’t\ w \
wIOLI\ ]CI
cl\ in
the t’ree~cl” ctlnlp:~[”tnlent let > {)11
To
remove:
Lift bin
\tr:~ight
up until
m(mnti
n g
hooh\ d
i \engagc.
To replace or relocate:
Select de~ir-ed \helt’
height.
engtigc
bin’\
hooh
in
\lot~
on
the
tr:ich\ of
the door.
and
push in.
Bin
\\ i II
loch
in
pluce.
The divider (on \onle models) help\ prevent tipping.
spilling or
Juice
Can
Rack
(otl WIW
]lloLk]\)
Can\ of
f’ro/cn .IUICC M-C
emily ac~es~ible w hen \t(wed
in the
rack
on
[he tt-ce~er
❑
2
compartment
doi)r.
Addltlonal
To
load
it,
place the t
ir\t
cans go here –
can in the bottom of
the
sliding of’
~rn:ill items ~tor-ed on the
door \helf. Place index finger and
rach.
Then
load
ddi(i{)n:[l
c:ms
into
the rack i’rom
❑
1
middle
finger
on either- \ide of the divider near the front
and simply
the top.
Place first
mo\e it
back ;md forth to fit
your
need~.
can here —
10
Page 11

CARE AND CLEANING
Cleaning—Outside
The water and ice dispenser spill shelf
(on
mme
rnodel$)
\hould
be
wiped dry immediately to pre\ent spotting. Water
left
on
the
shelf
may
lea\e deposits that you
can
rerno\ e by foaking with undiluted
\’inegar.
You
can
also use a
pa~tc of’
non-precipitating water softener
(such a\
Calgon
brand) and water. or 1
tea~poon
(5 ml) of citric
acid
powder per pint (500 ml) of hot tap water.
ScMk
until
the
deposit
disappear$
or become\
]Oo$e enough
to
t“inw aW ay. (~~ua[ly 30
rninutej soahing
time i\ adequate. A\ oid
u~ing wax
on the \pill
\helf’ and
trim.
The dispenser pad
cm be cleaned b}
u\ing
a
warm
water
and btiking
Joda
solution-about a tablespoon ( I S
m]) of baking Joda
to a quart ( ] L)
of water.
Rinse
thoroughly
with
water
und
wipe
dr}.
The door handles and trim (on some model\)
can be
cleaned uith
a
cloth dampened with u
w)lution
of mild liquid
di~hwadling
detergent and
water. Dry with
a
~oft
cloth. Don’t use wax on the door handles and trim.
The
sof’t
door handles (on wme
rnodel~
) are
eas}
to keep
clean
if
they
are
waxed ever)
few month~.
U w ir
!lou\ehold wax \uch a$
Pledge
brwd or jubilee
brand
to
coat the
handle\. Soil
will then
ea\i 1] w ash
i~ff
with a di \h detergent and water
~~r a
nomahras i\
c
al
]-pur-pose
cleaner.
Keep the finish clean. Wipe with a clean cloth lightly dampened with
kitchen appliance
wax
or mild liquid
dishwashing
detergent. Dry and
polish with
a
clean, soft cloth. Do not wipe the refrigerator with a
soiled
di~hwashing
cloth or wet towel. These may lea\ e a residue that
can erode the paint. Do not use scouring pads, powdered cleaners,
bleach or
cleaner-$
containing
bleach
because these productj can
scratch and weaken the paint finish.
Protect the paint finish. The finish on the outside of the refrigerator
is a high quality, baked-on paint finish. With proper care, it will
sta>r
new-looking and rust-free
for
years. Apply a coat of kitchen/appliance
wax
when the refrigerator is new and then at least twice a year.
Appliance Polish Wax & Cleaner is available from Service and
Part\ Centers.
I
I
Cleaning—Inside
Inside the fresh food and
f’reezer
compartments \hould be cleaned
at least
once a year.
Unplug [he
refrigerator
before clcanlng.
If this
i~
not
prtictical,
wring exce\\ moisture out of
sponge
or
cltxh
when
cleaning around
\w
itches,
Iighti
or controlj.
U$e wurm
water and
baking
soda
w]u[ioll-about a
tablespoon
(
15
ml) of
baking mla
to a quart ( 1 L) of
water.
Thi\ both
cleans
and
ncutralizc~ odors.”
Rinw thorou:hlj
with
water and
wipe dr-].
Other parts of the refrigerator—incluc
ling (ioor
ga\hct\.
meat and
\egetabie drawer\,
ice
\torage bl n and a] 1
pia~tic
partf--can
be
cleaned the
same wa}’.
A
I’ter clean
i ng door
ga~het\.
apply a thin 1
aj’er-
of petroleum jel Iy to
the
door
ga~het~
at the hln:e \
ide.
Thi \
help$
heep the gashet\
from
\tiching and
bcrlding
out of
~,hape.
Do not
LIW
clean\ing powder\ or other
~br,~\i \ e
cleaner\.
A\ oid
cletinin:
cold gla\\
shel\ e\ \\
ith
hot \$
a[er
becauw
the
extreme
temperature
dif-fcl”ence ma)
caLIw
them tc~ breah.
To help prevent odors, leave an open box of
tmking soda
in the
rear of the
r-efrigerator.
on the top shelf. Change the box e\ery
3
months. An open box of baking
soda
in the freezer will absorb \tale
freezer odors.
Do not wash any plastic parts from your refrigerator in
your automatic dishwasher.
Drain opening in freezer compartment.
Dur”ing
yearly cleaning, remove bottom freezer ❑ ==
ba~ket
and
flush
a solution of baking soda —
I
teaspoon (5 ml) and 2 cups (500 ml) of hot
(not boiling) water— through the drain
line
with
--—
the
help
of a meat baster. Thi\ will help eliminate
odor and reduce the 1 ikelihood of a clogged drain
line. If drain become\ clogged.
L~se
a meat
ba~[er
and baking-soda-and-water \olution to force the
\B-
~L =--
.jl
l—t
+
II
I
—
\
clog through the drain line.
I
I
Behind Refrigerator
(’are
shoLIld
be
taken
in nlo\
in: y(mr refrigel”ator aw’a)
from the
wall.
,411
typej of
floor
co\ering\
can be damaged,
particularly
cu~hioned
co\ eri
ng~
and thow w
ith
embos\ed
{urface}.
PLI1 1
(he ret rigera[or
\trai gh t out
and
return it
t~>
po\ i tion b} pu\hi ng i t
~traight
in. Movi
n:
>
our
ret
rigerator in a
side
direction may
rc\Lllt
in damage to }
OLII- floor
LIO\
eri ng or refrigerator.
wh~[~
pLl\hil~g (he r~irlger~tol”
back.
nlake
\Llre yoLk
don’t
1“0!1 ()\/et”
the
po\kcr
cord
~)r iccma~cr
\uppl)
line (on \(Jmc
model\).
Under Refrigerator
For mo\t efficient operation,
you need to keep the area under
the
refrigerator clean. Remove the base
c71-1 ] ]c
arid either
~weep away Or
~A
\ acLIum
up du\t that i$ readily
acce~sib]e.
For best
re~u
Its. use a
bru~h
specially designed for this
purpo$e.
It is a\
ailable
at mo\t
appl
i ancc parts
~tores.
This easy
cleaning operation should be done
-.
at lea\t once a year.
Clean the condenser coIls
at least once a
year.
11
I
-.
Page 12

CARE AND CLEANING
(cont]nued)
Drawer Removal
Drawer\ will stop bel’(ire
coming all
the w
tiy
out of
the
refrigerator
to
help prevent content\
from ~pilling
onto the
floor.
Drawers
can easily
be remo\red by
tilting up slightly
and
pulling past
the “~top”
location.
To
remove drawers when the refrigerator door cannot be opened
all the way:
1.
2.
3
-.
4.
5
-.
6.
—
Remo\ e
l’~md
from
the
drawer
and it~ co\Jcr. If’
]our relrigerutor ha\
:ld]u\tab]e \hc?]\
cj,
rcmo\’e food
from
[he bottom
\helf
and
temporarily
reloc:tte
it higher up in cabinet.
Rcmo\ e the
flexible ga\ket at
the
rear
of
the
top drawer. Li
fi e:~ch
end
\traight
LIp
until
the
\lot\ on
the ::l~het are t’ree ol’
the drawer
—
————n————.=——
\Llpp(M”t tdb~.
pu]]
the
dr:~wer pat-tw a}
Ollt.
Retich
in. push the rear of the :1 ass Lip: at
the ~L~me time,
pLIsh
it
b:tch
until it
clem
t’rent-corner retainer\.
Tilt ~nd rcmo~c the cover,
“?iii!!mR
Pull
the dr~iwer [m-u w-d. Iii’1 the
front to
CICM
\top\, and remo\ e the
drawer.
If’ the refrigerat(~r dtx~r
d(>e\n’t open
completely, pull the
dr:[w c[-
OLI[ Llnti
I it hit\ the
d(>or.
Then
lift the dra\\’er
up until it is
higher [h~ln
the
dr:~wcr ~upportj, [Ilt
it and
tahe
it
(ILI[.
11’ tape hold\
the
Con~ertlblc
Metit
Drawer
(on
some
model~) co\er to
the
drawer- fupportf,
remove
the
tape. PLI!I Lh-awel”
partway out. Reach
“d
in.
pu$h
the
re~m
of the
glu$s
up and.
at the \
mne
t i me,
b:ick,
unti 1 it c
lcar~
front -cxlrncr
re[ainer\.
7. Tilt
and
remo\ e the co\er.
A\
oid
cleanin: the
cold gla~s
cover
with hot
water becau\e the extreme
temperatul-e
difference
Inay
caLIsc
it
to
brcah.
8.
Tilt mcf remo\ e the drawer.
Af[er cletinlng.
replace in
re~ erse
order.
When
rcplxi ng
the
drtiw cr
rn;dw sure yOLI
\lide it through both
dr~i\$~r
guide\ on the
left \ide,
When drawer-\
and co\er\
are
back
in
place, rein~t~ill gti\het
at the rear
ot’
the
top
draw er.
Fit the
end
of
the
pla\tic
druwer $upport
into the
$lot
on the
g~~\het, with
the rubber
ga~hct flap
facing yoL]. Make
sure
the
gafhet
\nap\
Into place.
Light Bulb Replacement
Fresh Food Compartment-Lipper Light
1. Llnplug rcf’riger:itor.
2. PuII
ot”t”
the
telllpel”2tL11-e Contl”ol”
hnob\.
3. Pull b(~ttt~tn
01’
the light ~hield
down and t’orwm
-d. then
rot:ite
(tic top up
ilnd off.
After
replacing
with wunc \i~c
bulb. reinjtall
the light
\hield.
Fresh Food Compartment-Low er Light (on some models)
Thi\
light i~ l[w~~ted
behind a \hield at the
rear-
of the
f’resh
fmd
Lmlpmnmt
1.
Unplug the ref’riger~tor.
2. Gra\p the top edge of’ the \hield and lift it up
and
forward to
f’ree
it\
top edge.
3. After
replacing with the
\Lune
\ize bulb. hooh the top of the
shield
b:lch
in
pltice.
Freezer Compartment
1.
[Jnplu,g the refrigerator.
2. Remo\e
the
Jhelfju$l
below
light
shielci. (The
Jhelf
w
ill be
e~i$ier to remo}
e if it i~ emptied
fir~t.
)
3. Pull
the
light ~hielcl
toward jou to
reach
the bulb.
After
replacing
with wrtne
size bulb.
rein$tfill ~helf
and
plLIg
the
refrigerator
bach in,
12
Page 13

Preparing for Vacation
Preparing to Move
For shorter vacations,
renlo~e
perishable
foods and le:I\ c
controlf Disconnect power
cord
from wall
out]ct.
remove
all food, and cle:in
at
regu
I W“
\ett
i
ngs. HOW e\’er.
it’ room temperature i $ expected
to
and
dry the interior.
drop
below
60cF. (
1
(>”C.
),
foll~w >arnc
instructims
in
Tmpmlure
Secure
all
loose items such as
grille.
\hcl\ es
ond storage
panj
by
Control
section.
uipi n,g
them
\ectrrely
in place to prevent
damage.
For long vacations or absences,
remove food
and
~hut
off power
to
Be
\LIre
refrigerator \tays in
Upt-igh[
positio?l during
actu:l] mo\ ing
and
refrigerator.
Mo\ e the
Fre\h
Food
control to
OFF
position
:intf clean
in \
tin.
Refrigerator must be \ecLIrd in
tan t(>
pre\Jent mo\’enlent.
interior
w
ith bah
ins \oda \olution of I tablespoon ( 15 m I ) of
wxkr to
1 quart ( 1 L) of
water.
Wipe
dry. To
pre\ent odorj.
]ea\ e
open box of
Protect {~utside of” ref’ri:erator with
blmhet.
soda in
refriger~tor. Leti\
e
doors
open.
Mo\e the icelnaher
(t~n wlme
modc]\) feeler arm to STOP (up)
po\ition
and be
sure to
~hu[
off
wttter
\uppl)
tc) the refrlgerutor.
Refrigerator Location
Clearances
Do not install refrigerator where temperature will be below
Allow the
follo\\
ing cleurance~ ft)r
caw of
in\ttillation,
proper air
60’’1”.
(
16”C.
) because it
will
not run
often enough [o m~intain
cvrcu
1 ation. plumbing
and
electrical connect
ic~ns.
proper
tenlperature~.
Side\
5/8” ( 15
mm)
. . . . . . . . . . . . . . . . . . . . . . . . . . . . . . . . . . . . . . . . . . . . . . . . . . . . . . . . . . . . . . . . . .
.
Do install it on a floor strong enough to support a fully loaded
Top
. . . . . . . . . . . . . . . . . . . . . . . . . . . . . . . . . . . . . . . . . . . . . . . . . . . . . . . . . . . . . . . . . . .
.
1“ (25 mm)
refrigerator.
(If
{Il(ilt-ifl, (11[()~1
7/8’’ [22
mfllj,fot-
hi)l<qe
(ol’ers.
)
Also wc
Energ}-S:lving I’ip\
regarding
loc:ltion.
Bach . . . . . . . . . . . . . . . . . . . . . . . . . . . . . . . . . . . . . . . . . . . . . . . . . . . . . . . . . . . . . . . . 1“
(25
mm)
Ii’ the
refrigerator i\ again\t a
w:L1l
on either side.
allow
the
follow
in:
door” clearances:
fi~r 22’ and 24’ model$
. . . . . . . . . . . . . . . . . . . . . . . . . . . . . . . . . . . . . . . 3/4” (
19
mm)
for
27’
model\ . . . . . . . . . . . . . . . . . . . . . . . . . . . . . . . . . . . . . . . . . . . . . . . . . .
I /“ (38 mm)
Rollers
Leveling
Adiu\tab{t_’ r(~ller\
behind the haw
I
I
I
>.
I
To adjust rollers,
remove
the ba\c
II
Turn the roller adjusting screws
clochw
i w
to
rai
\e
the
refrigerator.
counterc l(x’hw
i w to
IOU el”
it. L] w
:m
:td.justable wrench
(3/8” [ 9 mm]
hex
he:ld
bolt) or
plier$.
when ]e\ eiing.
you can Inlpro\ e
Lk)or uio\LIre
by
l“:ll
SiIlg the
f’mnt
:ippro Y i mate
1}
5/8” ( 15 m m )
f’rom the tloor.
To replace base grille,
align
prongj on
bach
of
grille with cltimp$
in
cabl net :ind pu\h f-orm
ard
untl ] :1”1 ]]c
\n:lp\ into pi
ace.
Water Supply to Icemaker
(~)tl ~(~nlt nl~xJ~[\)
If
your
refriger:ttor h:l~ m
iccnltihcl”. or it }
C)LL
pldn to add an iwmaher” later.
the Icemaher u III h~lt c
to be
connected to a
cold
\\
’atcr Ilnc.
A
\\’:lter \uppl}
hit
conti~lnin: copper
tubln:. ~hu-(~f’t’
I
al~ c.
f’itting~ and inilructlon~ I\ :I\ aI I able at ektra
c~>~l f’rotn J
OLII” dt?:iler.
There \h(Juld be \uff’lulen[
tubing
tor the
icemikcr
fI”c)nl
[he cold M alter
\upp]! to alio\J > OU to
nlo\ c
the ret’rigeralor out
t’rom
the u all
\e\ eral feet
( :~ppro<[nl:itcl> S
f’ce~ [ 244 cm] of” I
/4” [ 6
tnn] ] ~x)ppcr tubing
in
thrtw i
()-inch
[25 ctn I
diameter
col
l\
).
13
4
———
—
—
Page 14

INSTALLATION REQUIREMENTS
IMPORTANT... PLEASE READ CAREFULLY
How to Connect Electricity
m–..
--
.1
–c–.
-
.L:–
r or
personal saltny, uns
appliance must be
properly grounded.
The
rN~W
er
cord of thi~
appl
i
tince Is
equipped w i th
a
3-prOrlg
(grounding)
plug
which mate\ w
ith
a \tandal
d
3-prOII:
(
groLlnding) wall
(Jllt]et to ml n I mi zc the
po\\ibillty of electr]u \hoch
hazard from
thi\ appliance.
Preferred method
proper
Ing
exists
using.
,
Have the wall outlet and circuit checked by a qualified electrician
to
make sure the outlet is properly grounded.
Where a standard 2-prong wall outlet is encountered, it is your
personal responsibility and obligation to have it replaced with a
properly grounded 3-prong wall outlet.
DO NOT, UNDER ANY CIRCUMSTANCES, CUT OR REMOVE
THE THIRD (GROUND) PRONG FROM THE POWER CORD.
I
I
Use of Adapter Plug
Becauw
01’ potential
hwards LInder
certain
condition\,”
\k
e
\trOngly
I-ccom mend agal n \t
Ll\C
of
an adapter plug.
How
c\ cr. it’
>OLI
still
elect
to
Li\e
an adapter, \\ here
local
LX)dc\
permit. a
TEMPO
RAR}7
CONNEC’l”ION m.~j bc
made to
a
proper-l}
(mm ndcd
2-prong
~+
M ;li ~
OLl(l
Ct bj
U\L? of
:1 [11.
ll\tcd adapter
avai
Iabic at
mo\t
lociiI
hardware \torc\.
Temporary Method
u
Insure proper grounding and firm
connection exists before use.
The
Iar:cr
\lc)I in the adapter mu\t
be
aligned with the larger \lot in
the \$ all (~utlct t[~ prtJ\ ide pr(~per
polarity in the connection of’ the
po\\ cl” cord.
Uw 01” ~n
adapter
plug will
increase the clearance needed
for
the back
of the rc
l’rigerat(~r.
CAUTION: Attaching the adapter ground
terminat
to a
wall
outlet
cover screw does not ground the appliance
unleis the
cot’er wrew if
rneta!,
and not insulated. and the wall outlet is grounded through the
house wiring. You should have the circuit checked by a qualified
electrician to make sure the outlet is properly grounded.
When disconnecting the power cord from the adapter,
alwayf 1101(J
the adapter in place with one hand while pulling the power cord
plug
with the other hand. If this is not done, the
~dapter gi”ound
terminal is
very likely to break with repeated use.
Should the adapter ground terminal break,
DO
NOT USE the
appliance until a proper ground has again been established.
Electrical Requirements
Use of Extension Cords
The refrigerator should always be plugged into its own individual
Because of potential
safety
hazards under certain condition\.
me
electrical
outlet
which
has a \
oltage
rating that matches the rating plate.
strongly recommend against the use of an extension cord. Howe\ U. it’
‘l-his
prt)\ide\
the be\t performance and
also
prevents overloading house
you still elect to use an extension cord, it is absolutely nece\sar} that it
wiring
circuits \\
Jl]ich could cause
a
fire hazard
from overheated wires.
be a
UL-listed 3-wire grounding type
apptiance exten~ion
cord ha\ing
a grounding
type plug and outlet and that
the
electrical
rating
of the
cord be 15 amperes (minimum) and 120 volts.
Page 15

WATER LINE INSTALLATION INSTRUCTIONS
I
I
I
I
CAUTION:
● If you use your refrigerator before connecting
the water line, make sure the icemaker feeler arm
is kept in the STOP (up) position.
c
Do not install the icemaker tubing in areas
where temperatures fall below freezing.
●
When
using
any electrical device (such as a
power drill) during installation, be sure the device
is insulated or wired in a manner to prevent the
hazard of electric shock.
● All installations must be in accordance with
local plumbing code requirements.
WHAT YOU WILL NEED
● A cold water supply is required for automatic
icemaker operation. The water pressure must be
between 20 and 120
p.s.i.
●
Power drill,
unless you have a self-piercing valve.
● Copper tubing, 1/4” (6 mm) outer diameter to
connect the refrigerator to the water supply. Be
sure both ends of the tubing are cut square.
To determine how much copper tubing you need:
measure the distance from the water valve on the
back of the refrigerator to the water supply pipe.
Then add 8 feet (244 cm). Be sure there is
sufficient extra tubing (about 8 feet [244 cm]
coiled into
3
turns of about 10 inches [25 cm]
diameter) to allow the refrigerator to move out
from the wall after installation. Do not use plastic
tubing or plastic fittings because the water supply
line is under pressure at all times. Also, certain
types of plastic tubing may become brittle with
age and crack, resulting in water leakage.
s
Shutoff valve to connect to the cold water line.
The shut-off valve should have a water inlet with a
minimum inside diameter of 5/32” (4 mm) at the
point of connection to the COLD WATER LINE.
Saddle-type shut-off valves are included in many
water supply kits. Before purchasing, make sure a
saddle-type valve complies with your local
plumbing codes.
c
Two
1/4”
(6 mm) outer diameter compression
nuts and 2 ferrules (sleeves)—to connect the
copper tubing to the shutoff valve and the
refrigerator water valve.
c
If your existing water line has a flared fitting at
the end, you will need an
adapter
(available at
plumbing supply stores) to connect the water line
to the refrigerator OR—you can cut off the flared
fitting with a tube cutter and then use a
compression fitting.
WARRANTY INFORMATION
This water line installation is not warranted by
the refrigerator or icemaker manufacturer.
Follow these instructions carefully to minimize
the risk of expensive water damage.
❑
SHUT OFF THE MAIN WATER SUPPLY.
Turn on the nearest faucet long enough to clear
the line
of
water.
~
INSTALL THE SHUTOFF VALVE ON THE
NEAREST FREQUENTLY USED DRINKING
WATER LINE.
Typical ways to connect to water supply
I
Through floor
Under sink
Through wall to
In crawl
to basement
tO
cold
utlllty
room cold
space under
cold water pipe
water pipe
water
pipe
house
a.
Choose a location for the valve that is easily
accessible. It is best to connect into the side of
a vertical water pipe. When it is necessary to
connect into a horizontal water pipe, make
the
connection to the top or side, rather than at the
bottom, to avoid drawing off any sediment from
the water pipe.
b. Drill a 1/4” (6
mm)
hole in the water pipe,
using a sharp bit. Remove any burrs resulting
from drilling the hole in the pipe. (Do not drill a
hole if the valve is a self-piercing type.)
c. Fasten the
shutoff valve to
the cold water pipe
with the pipe clamp.
d. Tighten the
t
clamp screws until the
sealing washer begins to
Vertical
swell. Do not overtighten
or you may crush the
T
cold water
pipe
copper tubing.
15
Page 16

WAmR
LINE INSTALLATION
JPJSTRUCTIONS
(continued)
❑
ROUTE THE COPPER TUBING BETWEEN THE
COLD WATER LINE AND THE REFRIGERATOR.
Route the tubing through a hole drilled in the
floor or wall (behind the refrigerator or adjacent
base cabinet) as close to the wall as possible. Be
sure there is sufficient extra tubing (about 8 feet
[244
cm]
coiled into 3 turns of about 10” [25 cm]
diameter) to allow the refrigerator to move out
from the
wall
after installation.
I
❑
CONNECT THE COPPER TUBING TO THE
SHUTOFF VALVE.
t
Place the compression
nut and ferrule (sleeve)
onto the encl of the
tubing and connect it to
the shutoff valve.
.Make
sure the tubing is
fully
inserted into the valve.
Tighten the compression
~u~l,~v~[~ 1 I
‘
Ferrule
nut securely.
(sleeve)
~
TURN ON THE WATER AND FLUSH OUT
THE TUBING.
a. Turn the main water supply on and flush out
the tubing until the water is clear.
b.
Shut the water off at the water valve after
about one quart of water has been flushed
through the tubing.
E
CONNECT THE COPPER TUBING TO
THE REFRIGERATOR.
Before making the connection to the
refrigerator, be sure the refrigerator power
cord is not plugged into the wall outlet.
We
recommend installing a water filter
(available at Service and Parts Centers) if your
water supply has sand or particles that could
clog
the screen of the refrigerator’s water valve. Install
it in the water line near the refrigerator.
a.
Remove the plastic flexible cap
from,
the
water valve.
b.
Place
the
compression nut
and ferrule
(sleeve) onto the
end of the tubing
as shown.
c.
Insert the end
of the copper
tubing into the
water
valve
1/4” (6 mm)
Tubing
Copper tubing
clamp
connection as far
I
Refrigerator connection
as possible. While holding
the tubing, tighten the fitting.
d. Fasten the copper tubing into the clamp
provided to hold it in a vertical position. You may
need to pry open the clamp.
❑
TURN THE WATER ON AT THE
SHUTOFF VALVE.
Tighten any connections that leak.
❑
PLUG THE REFRIGERATOR POWER CORD
INTO A GROUNDED ELECTRICAL OUTLET.
I
~
SET THE ICEMAKER FEELER ARM TO THE ON
(DOWN) POSITION.
The icemaker
will
not begin to operate
until
it
reaches its operating temperature of 15” E (-9” C.)
or below. It will then begin operation automatically
if the icemaker is in the
OJN
(down) position.
N-OTE:
The
icemaker may double-cycle when it
first starts, causing some water spillage from the
icemaker into the ice bucket. This is normal and
should not happen again. The first few batches of
cubes should be thrown away, so that remaining
impurities in the water line will be flushed out.
I
❑
MOVE THE REFRIGERATOR BACK TO
THE WALL.
Arrange the coil of copper tubing so that it does
not vibrate against the back of the refrigerator
or
against the wall.
16
Page 17

QUESTIONS?
USE THIS PROBLEM SOLVER
PROBLEM
REFRIGERATOR
DOES NOT OPERATE
MOTOR OPERATES
FOR LONG PERIODS
MOTOR STARTS &
STOPS FREQUENTLY
VIBRATION OR
RATTLING
POSSIBLE CAUSE
● May be in defrost cycle when motor does not operate for about 30 minutes.
. Temperature control
in OFF position.
●
If
interior
light is
not on, refrigerator may not be plugged in at wall outlet.
● If plug is secure and the refrigerator still fails to operate, plug a lamp or a small
appliance into the same outlet to determine if there is a tripped circuit breaker or
burned out fuse.
●
Modern refrigerators with more storage space and a larger freezer
compartment require more operating time.
“
Normal when refrigerator is first delivered to your home—usually requires 24
hours to completely cool down.
● Large amounts of food placed in refrigerator to be cooled or frozen.
● Hot weather—frequent door openings.
● Door left open.
● Temperature controls are set too cold. Refer to instructions for use
of Temperature Controls.
● Grille and condenser need cleaning. Refer to Care and Cleaning page.
● Check Energy-Saving Tips.
● Temperature control starts and stops motor to maintain even temperatures.
●
If refrigerator vibrates, more than likely it is not resting solidly on the floor and
front roller screws or front leveling legs need adjusting, or floor is weak or uneven.
Refer to Rollers section on Installation Requirements page.
● If dishes vibrate on shelves, try moving them. Slight vibration is normal.
NORMAL OPERATING SOUNDS
These
sounds are normal and do not indicate a need for service.
The
new high efficiency compressor runs faster and will have a higher
pitch hum or pulsating sound while operating.
Defrost timer and refrigerator control clicks on and off.
The fan circulating air inside the freezer which keeps the
feeler arm to the
STOP
(up) position.
Thk+
will stop the buzzing.
(co)ltitlud
?It.xt pqe)
The sound
of cubes dropping into the bin and water running in pipes as icemaker refills.
17
Page 18

PROBLEM SOLVER
(continued)
PROBLEM
HOT AIR FROM
BOTTOM OF
REFRIGERATOR
DOOR NOT CLOSING
PROPERLY
FRESH FOOD OR
FREEZER COMPARTMENT
TEMPERATURE
TOO WARM
FOODS DRY OUT
FROST OR ICE
CRYSTALS ON
FROZEN FOOD
SLOW ICE CUBE
FREEZING
ICE CUBES HAVE
ODOR/TASTE
(on
some
models)
AUTOMATIC
lCEMAKER
DOES NOT WORK
(on some models)
CUBE DISPENSER
DOES NOT WORK
(on some models)
POSSIBLE CAUSE
“
Normal air flow cooling motor. In the refrigeration process, it is normal that heat
be expelled in the area under the refrigerator. Some floor coverings will discolor
at these normal and safe operating temperatures. Your floor covering supplier
should be consulted if you object
to
this discoloration.
● Door gasket on hinge side sticking or folding over. To correct, put a small
amount of petroleum jelly on face of gasket.
●
Temperature control not set cold enough. Refer
to
Temperature Control section.
Q
Warm weather—frequent door openings.
● Door left open for long time.
● Package may be holding door open.
“
Foods not covered, wrapped or sealed properly.
. Door may have been left ajar or package holding door open.
. Too frequent or too long door openings.
● Frost within package is normal.
● Door may have been left open.
Q
Turn temperature of freezer compartment colder.
● Old cubes need to be discarded.
● Ice storage bin needs to be emptied and washed,
● Unsealed packages in refrigerator and/or freezer compartments may be
transmitting odor/taste to ice cubes.
. Interior of refrigerator needs clean
ing—
refer to Care and Cleaning section
Q
Poor-tasting incoming water. Install a water filter—see Water Filter
Accessory section.
c
ON-STOP control in STOP (up) position.
● Water supply turned off or not connected.
Freezer compartment too warm.
Cubes too small—water shutoff
valve
connecting refrigerator to home
water line may be clogged.
Sometimes cubes fuse to the side
of
the ice mold and hold the feeler arm
STOP (up) position. Remove this ice to restart the icemaker.
in the
When reaching for cubes by hand, you may have pushed the feeler arm into the
STOP (up) position by mistake.
Piled up cubes in storage bin may cause icemaker to shut off too soon. With
icemak& feeler arm in-STOP (up) position, level cubes in bin.
Q No
ice cubes. Remove storage container. If cubes are frozen to wire arm,
remove cubes.
e
No ice cubes. Icemaker turned off or water supply turned off.
● Irregular ice clumps in storage container. Break up as many as you can with
fingertip pressure and discard the remaining clumps.
18
Page 19

PROBLEM
WATER HAS POOR
TASTE/ODOR
(on
some models)
WATER IN FIRST
GLASS IS WARM
(on some models)
W’”ATER
DISPENSER
DOES NOT WORK
(on
some models)
DIVIDER BETWEEN
FRESH FOOD AND
FREEZER COMPARTMENTS FEELS WARM
MOISTURE FORMS
ON OUTSIDE OF
REFRIGERATOR
MOISTURE
COLLECTS INSIDE
WATER ON KITCHEN
FLOOR OR ON
BOTTOM OF FREEZER
REFRIGERATOR
HAS ODOR
INTERIOR LIGHT
DOES NOT WORK
POSSIBLE CAUSE
Q
lf the water dispenser has not been used for a long time, dispense water
in regular manner until all water in the system is replenished with fresh water.
● Poor-tasting incoming water. Install a water filter—see Water Filter section.
● Allow about 24 hours for water to cool to proper temperature after
refrigerator is first installed.
●
●
If water dispenser has not been used for a long time, water in first
glass will not be as cool as in succeeding glasses.
If
the water system has been drained, allow several hours for replenished
supply to chill.
● Water supply line turned off or not connected.
● Supply line may be clogged with sediment.
● If no water is dispensed when the refrigerator is
first
installed, there may be air
in the water system. Press the dispenser pad for at least two minutes to remove
trapped air from the water line and to fill the water system.
● Normal warmth is created by automatic energy saver system circulating warm
liquid around front edge of freezer compartment to help prevent condensation
on outside of refrigerator in hot, humid weather.
● Not unusual during periods of high humidity.
● Too frequent or too long door openings.
● In humid weather, air carries moisture into refrigerator when doors are opened.
● The drain in the bottom of the refrigerator may be clogged. Remove any ice on
the freezer bottom and clean the drain. Refer to Care and Cleaning section.
. When using the dispenser use a glass no taller than six inches
(15
cm) tall. A taller
glass may be jamming cubes in the funnel chute. They can fuse inside the chute
and drop out later, leaving water or ice on the floor.
● Foods with strong odors should be tightly covered.
● Check for spoiled food.
● Interior needs cleaning. Refer to Care and Cleaning section.
● Defrost water system needs cleaning.
c
Keep open box of baking soda in refrigerator; replace every 3 months.
● No power at outlet.
● Light bulb needs replacing. See Care and Cleaning section.
If you need more help...
In the United States call, toll free:
GE Answer Center”, 800.626.2000 consumer information service
In Canada: Manager, Consumer Relations
?~45 Skymark
Ave., Mississauga, Ontario,
Canada L4W’
4H2
—
Page 20

We’ll Be There
with
the
~JL11-ch2ise ofyotll.” new (~~
appliance,
rtxeile the
assurance that
if~ou evel- need infimmuim
or
assistance from GE,
MW’11 be there.
All you have to do is call-or write!
In-Home Repair Service In the UnitedStates:800-GE-CARES(800-432-273~
In Canada consult
yourlocaltelephone
di}ectoryforthe Cameo Service or AuthorkedService Center
nearest you.
GEAnswer Center@
h the United
States:801162E2000
In Canada contact
Managec
Consumer Relations, Cameo, Inc., 2645 SkymarkAvenue, Mississauga,
Ontario, Canada L4W4H2
kr
Customers With Special Needs...
In
the UnitedStates:8011626.2000
Service
Contracts
In the United
States:800-626-2224
800-461-36361n Canada
Parts
andAccessories
In the United
States:800-626-2002
Individuals qualified to service their own appliances
cal]
halt’
]lccdc’d p~u ti {)] ‘WC (~w)lic~
wilt dii CXIII t( ) (11(’il
Ilo]nt’. 1 II(’ ( ;1’. p,II ti \I \(C>III
l)r( n
i(lt~ a{
ct>i~
t()(n(r47,()()()
p;irti...2 u]d all
( ;E (;enuinc
Rt>neu:tl Ih-ts ;ire fL]ll\ um-r.m [e(l.
f-IS.-\, \la~[t’r(
;,uYI
a[ld
Disc(n C’I ( .il CIJ ,~1 t’
iic’c C’pt(’(1
User maintenance instructions contained in this booklet cover procedures intended to be performed by any user. Other servicing generally
should be referred to qualified service personnel. Caution must be exercised, since improper servicing may cause unsafe operation.
In Canada consult your local telephone directory for the Cameo Service
orAuthoriedService Center
nearest you.
20
Page 21

CONSUMER WARRANTY
(for customers In Canada)
FIRST YEAR
CAMCO warrants the replacement or repair of all parts of this Refrigerator which prove to be
defective in material or workmanship, for one
year
from
the
date of purchase. Such pafls will be
repaired or replaced at
the
option of Cameo without charge, subject to the terms and conditions
set out below.
The DEALER warrants to provide the service labor for the repair or replacement of all parts of
this Refrigerator which prove to be defective in material or workmanship for one year from the
date of purchase.
NEXT FOUR YEARS
CAMCO warrants the hermetically sealed refrigerator system (namely: Evaporator, Condenser,
Motor Compressor, interconnecting Tubing, Drier and Refrigerant Charge) against defects in
material or workmanship for an additional four years. These parts will be repaired or replaced
at the option of Cameo without charge, subject to the terms and conditions set out below.
The DEALER warrants for the next four years to provide the service labor necessary to repair
or replace the hermetically sealed refrigeration system, subject to the terms and conditions set
out below.
TERMS AND CONDITIONS
1.
This warranty applies only to single family domestic use in Canada when the Refrigerator has
been properly installed according to the instructions supplied by Cameo and is connected to
an adequate and proper utility service. Damage due to abuse, accident, commercial use, and
alteration or the removal or defacing of the serial plate, cancels all obligations of this warranty.
Service during this warranty must be performed by an Authorized Cameo Service Agent.
2. Neither Cameo nor the Dealer is liable for any claims or damages resulting from any failure of
the Refrigerator or from service delays beyond their reasonable control.
3. To obtain warranty service, purchaser must present the original bill of sale. Components
repaired or replaced are warranted through the remainder of the original warranty period only.
4. This warranty does not cover expense involved in making this appliance readily accessible
for servicing.
5. This warranty gives you specific legal rights. Additional warranty rights may be provided by
law in some areas.
Cameo Service is available coast-to-coast. See preceding page for service information.
If further help is needed concerning this Warranty, contact:
Manager, Consumer Relations
Cameo Inc., Consumer Service
2645 Skymark Avenue,
Mississauga, Ontario
L4W 4H2
E!EEEEl
Side by Side 22, 24 and 27 Models
Page 22

YOUR GENERAL ELECTRIC REFRIGERATOR
Staple sales slip or cancelled check
WARRANTY
here. Proof of original purchase date
is needed to obtain service
II
(for customers in the United States)
under warranty.
I
I
WHAT IS COVERED
FULL ONE-YEAR WARRANTY
For one year from date of original
purchase, we will provide, free of
charge, parts and service labor in
your home to repair or replace
any
part
of
the
refrigerator that fails
because of a manufacturing defect.
FULL FIVE-YEAR WARRANTY
For five years from date of original
purchase, we will provide, free of
charge, parts and service labor in
your home to repair or replace any
part of the sealed refrigerating
system (the compressor, condenser,
evaporator and all connecting
tubing) that fails because of a
manufacturing defect.
LIMITED LIFETIME WARRANTY
For the life of the refrigerator, we
will replace, free of charge,
any
see-through pan or drawer made
from
LexarP polycarbonate
resin
and furnished with the refrigerator if
the pan or drawer breaks during
normal household use. Drawer
covers are not included. The drawers
can be exchanged at a GE Service
and Parts Center, or by writing to the
address below.
This warranty is extended to the
original purchaser and any succeeding
owner for products purchased for
ordinary home use in the 48 mainland
states, Hawaii and Washington,
D.C.
In Alaska the warranty is the same
except that it is LIMITED because you
must pay to ship the product to the
service shop or for the service
technician’s travel costs to your home.
All warranty service will be provided
by our Factory Service Centers or by
our Authorized Customer
Care@
servicers during normal working hours.
Should your appliance need service,
during warranty period or beyond, call
800-GE-CARES (800-432-2737).
WHAT
IS
NOT COVERED
● Service trips to your home to
. Improper installation.
teach you how to use the product.
If you have an installation problem,
Read your Use and
Care
contact your dealer or installer.
material. If you then have any
You are responsible for providing
questions about operating the
adequate electrical, plumbing and
product, please contact your
other connecting facilities.
dealer or our Consumer Affairs
office at the address below, or
call, toll free:
GE Answer
Cente@
800.626.2000
consumer information service
● Replacement of house fuses or
resetting of circuit breakers.
Q
Failure of the product if it is used
for other than its intended purpose
or used commercially.
● Damage to product caused
by accident, fire, floods or acts
of God.
● Loss of food due to spoilage.
WARRANTOR IS NOT
RESPONSIBLE FOR
CONSEQUENTIAL DAMAGES.
Some states do not allow the exclusion or limitation of Incidental or consequential damages, so the above limitation or exclusion
may not apply to you.
This warranty gives you specific legal rights, and you may also have other rights which vary from state to state.
To know what your legal rights are in your state, consult your local or state consumer affairs office or your state’s Attorney General.
Warrantor: General Electric Company
If further help is needed concerning this warranty, write:
Manager—Consumer Affairs, Appliance Park, Louisville, KY 40225
This book is printed on recycled paper.
Part No. 162 D7734PO02
Pub. No. 49-6784
11-94 CG
I
4.
Side by Side 22, 24 and 27
Models
Printed in the United Stat
 Loading...