

Page 1

40-Channel 900 MHz Combination
Call Waiting Caller ID Corded
Speakerphone with Answering
System and Cordless Telephone
User’s Guide
26958
1
We bring good things to life.
Page 2

FCC REGISTRATION INFORMATION
Your telephone equipment is registered with the Federal Communications Commission and is in compliance with
parts 15 and 68, FCC Rules and Regulations.
1 Notification to the Local Telephone Company
On the bottom of this equipment is a label indicating, among other information, the FCC Registration number
and Ringer Equivalence Number (REN) for the equipment. You must, upon request, provide this information to
your telephone company.
The REN is useful in determining the number of devices you may connect to your telephone line and still have
all of these devices ring when your telephone number is called. In most (but not all) areas, the sum of the
RENs of all devices connected to one line should not exceed 5. To be certain of the number of devices you may
connect to your line as determined by the REN, you should contact your local telephone company.
Notes
• This equipment may not be used on coin service provided by the telephone company.
• Party lines are subject to state tariffs, and therefore, you may not be able to use your own telephone
equipment if you are on a party line. Check with your local telephone company.
• Notice must be given to the telephone company upon permanent disconnection of your telephone from
your line.
2 Rights of the Telephone Company
Should your equipment cause trouble on your line which may harm the telephone network, the telephone
company shall, where practicable, notify you that temporary discontinuance of service may be required.
Where prior notice is not practicable and the circumstances warrant such action, the telephone company may
temporarily discontinue service immediately. In case of such temporary discontinuance, the telephone
company must: (1) promptly notify you of such temporary discontinuance; (2) afford you the opportunity to
correct the situation; and (3) inform you of your right to bring a complaint to the Commission pursuant to
procedures set forth in Subpart E of Part 68, FCC Rules and Regulations.
The telephone company may make changes in its communications facilities, equipment, operations of
procedures where such action is required in the operation of its business and not inconsistent with FCC Rules
and Regulations. If these changes are expected to affect the use or performance of your telephone equipment,
the telephone company must give you adequate notice, in writing, to allow you to maintain uninterrupted
service.
INTERFERENCE INFORMATION
This device complies with Part 15 of the FCC Rules. Operation is subject to the following two conditions: (1) This
device may not cause harmful interference; and (2) This device must accept any interference received, including
interference that may cause undesired operation.
This equipment has been tested and found to comply with the limits for a Class B digital device, pursuant to Part
15 of the FCC Rules. These limits are designed to provide reasonable protection against harmful interference in a
residential installation.
This equipment generates, uses, and can radiate radio frequency energy and, if not installed and used in
accordance with the instructions, may cause harmful interference to radio communications. However, there is no
guarantee that interference will not occur in a particular installation.
If this equipment does cause harmful interference to radio or television reception, which can be determined by
turning the equipment off and on, the user is encouraged to try to correct the interference by one or more of the
following measures:
• Reorient or relocate the receiving antenna (that is, the antenna for radio or television that is “receiving” the
interference).
• Reorient or relocate and increase the separation between the telecommunications equipment and receiving
antenna.
• Connect the telecommunications equipment into an outlet on a circuit different from that to which the
receiving antenna is connected.
If these measures do not eliminate the interference, please consult your dealer or an experienced radio/television
technician for additional suggestions. Also, the Federal Communications Commission has prepared a helpful
booklet, “How To Identify and Resolve Radio/TV Interference Problems.” This booklet is available from the U.S.
Government Printing Office, Washington, D.C. 20402. Please specify stock number 004-000-00345-4 when
ordering copies.
HEARING AID COMPATIBILITY
This telephone system meets FCC standards for Hearing Aid Compatiblility.
2
FCC NUMBER IS LOCATED ON THE CABINET BOTTOM
REN NUMBER IS LOCATED ON THE CABINET BOTTOM
Page 3

TABLE OF CONTENTS
FCC REGISTRATION INFORMATION ........... 2
INTERFERENCE INFORMATION ................... 2
HEARING AID COMPATIBILITY .................. 2
MODULAR JACK REQUIREMENTS ................. 5
BEFORE Y OU BEGIN ...................................... 5
PARTS CHECKLIST ..................................... 5
DIGITAL SECURITY SYSTEM ........................ 6
INTRODUCTION ............................................. 7
CALLER ID .......................................... 7
CALL W AITING ..................................... 7
CALL W AITING CALLER ID ..................... 7
DESKTOP INSTALLATION ............................. 8
INSTALLATION ............................................... 8
WALL MOUNT INSTALLATION .................... 10
ANSWERING SYSTEM SETUP .................... 13
VOICE INSTRUCTIONS .......................... 13
SETTING THE SPEAKER V OLUME ............ 13
SETTING THE RING SELECT ................... 14
USING T OLL SAVER ............................. 14
RECORDING THE OUTGOING
ANNOUNCEMENT ................................ 15
REVIEWING ANNOUNCEMENT ................ 16
ANSWERING SYSTEM OPERATION .................. 17
MESSAGES INDICATOR ............................. 17
SCREENING CALLS FROM
THE
BASE .......................................... 17
MESSAGE PLAYBACK ............................... 18
MEMORY FULL ....................................... 19
ERASING MESSAGES ............................... 19
LEAVING A MEMO .................................. 20
REMOTE ACCESS ........................................ 21
USING THE CORDLESS HANDSET ............... 22
ANSWERING SYSTEM INDICATOR ........... 22
SCREENING CALLS
FROM
THE CORDLESS HANDSET ............. 23
MEMORY FULL ....................................... 24
ACCESSING THE ANSWERING SYSTEM FROM
ANOTHER LOCATION ........................... 25
WARNING: TO PREVENT FIRE OR
ELECTRICAL SHOCK HAZARD, DO
NOT EXPOSE THIS PRODUCT TO
RAIN OR MOISTURE.
CHANGING THE SECURITY CODE ................ 26
CALLER ID SETTINGS .............................. 27
SETTING THE DISPLAY LANGUAGE .......... 28
SETTING THE DISPLAY CONTRAST .......... 29
SETTING THE LOCAL AREA CODE ........... 30
SETTING THE CURRENT DAY/TIME .......... 31
VOLUME CONTROL ................................. 33
CORDED HANDSET .............................. 33
SPEAKERPHONE AND ANSWERING
SYSTEM ........................................ 33
CORDLESS HANDSET ........................... 33
TELEPHONE OPERATION ............................... 34
IN USE INDICATOR .................................. 34
RECEIVING A CALL .............................. 34
MAKING A CALL ................................. 35
MANUAL CHANNEL SELECTION ................. 36
DURATION COUNTER ............................... 36
AUTO STANDBY ..................................... 36
RINGER SWITCH ..................................... 37
FLASH .................................................. 37
LAST NUMBER REDIAL ............................ 38
BASE UNIT ........................................ 38
CORDLESS HANDSET ........................... 38
HOLD ................................................... 39
PAGING THE CORDLESS HANDSET .............. 40
MUTE ................................................... 40
PRIVACY MODE ...................................... 41
ENABLING PRIVACY MODE ................... 41
DISABLING PRIVACY MODE................... 42
TEMPORARY T ONE DIALING ...................... 43
(Table of Contents continued on the
following page.)
CAUTION:
RISK OF ELECTRIC SHOCK
DO NOT OPEN
THE LIGHTNING FLASH
AND ARROW HEAD
WITHIN THE TRIANGLE
IS A WARNING SIGN
ALERTING YOU OF
“DANGEROUS
VOLTAGE” INSIDE THE
PRODUCT.
CAUTION: TO REDUCE THE RISK OF
ELECTRIC SHOCK, DO NOT REMOVE
COVER (OR BACK). NO USER
SERVICEABLE PARTS INSIDE. REFER
SERVICING TO QUALIFIED SERVICE
PERSONNEL.
SEE MARKING ON BOTTOM / BACK OF PRODUCT
THE EXCLAMATION
POINT WITHIN THE
TRIANGLE IS A
WARNING SIGN
ALERTING YOU OF
IMPORTANT
INSTRUCTIONS
ACCOMPANYING THE
PRODUCT.
3
Page 4

FULL DUPLEX SPEAKERPHONE OPERATION ...... 44
USING THE BASE UNIT SPEAKERPHONE ...... 44
RECEIVING A CALL WITH SPEAKERPHONE ..... 45
MAKING A CALL WITH SPEAKERPHONE ....... 46
SWITCHING BETWEEN SPEAKER AND
HANDSET .......................................... 47
INTERCOM OPERATION ................................. 48
INTERCOM CALLING ................................. 48
USING INTERCOM ................................... 48
FROM THE BASE ................................. 48
FROM THE CORDLESS HANDSET ............ 49
ADVANCED INTERCOM FEATURES ............... 50
HANDLING AN INCOMING T ELEPHONE
CALL DURING AN INTERCOM CALL ..... 50
USING INTERCOM W HILE Y OU HAV E A
TELEPHONE CALL ............................... 51
SETTING UP A T WO-WAY INTERCOM
CONVERSATION WHILE Y OU HAV E A
TELEPHONE CALL ........................... 52
AT THE BASE UNIT ............................. 53
AT THE HANDSET ................................ 53
SETTING UP A T HREE-WAY
CONVERSATION USING INTERCOM ..... 53
MEMORY ................................................... 55
STORING A NAME/NUMBER IN MEMORY .... 56
INSERTING A PAUSE IN THE DIALING
SEQUENCE ........................................ 58
REVIEWING, CHANGING OR DELETING
STORED NUMBERS ............................. 58
DIALING A STORED NUMBER DURING
REVIEW ............................................. 60
DIALING A STORED NUMBER .................... 60
CHAIN DIALING FROM MEMORY ................ 62
CALLER ID OPERATION ................................ 64
RECEIVING AND STORING CALL RECORDS ... 64
REVIEWING CALL RECORDS ...................... 65
DIALING A CALLER ID NUMBER ................ 67
DELETING THE CURRENT CALLER ID
RECORD ............................................ 70
DELETING ALL CALLER ID RECORDS .......... 71
CALLER ID ERRORS ................................ 71
CALL WAITING CALLER ID ....................... 72
SETTING A N EW SECURITY CODE FROM THE
BASE .................................................... 73
SETTING A N EW SECURITY CODE FROM THE
HANDSET ............................................... 74
CHANGING THE BATTERY .............................. 75
BATTERY SAFETY PRECAUTIONS ............ 76
MESSAGE INDICATORS ................................. 77
HANDSET SOUND SIGNALS .......................... 78
TROUBLESHOOTING GUIDE ........................... 79
GENERAL PRODUCT CARE ............................ 82
CAUSES OF POOR RECEPTION ....................... 83
SERVICE .................................................... 83
INDEX ....................................................... 84
LIMITED W ARRANTY .................................... 86
ACCESSORY ORDER FORM ........................... 87
4
Page 5
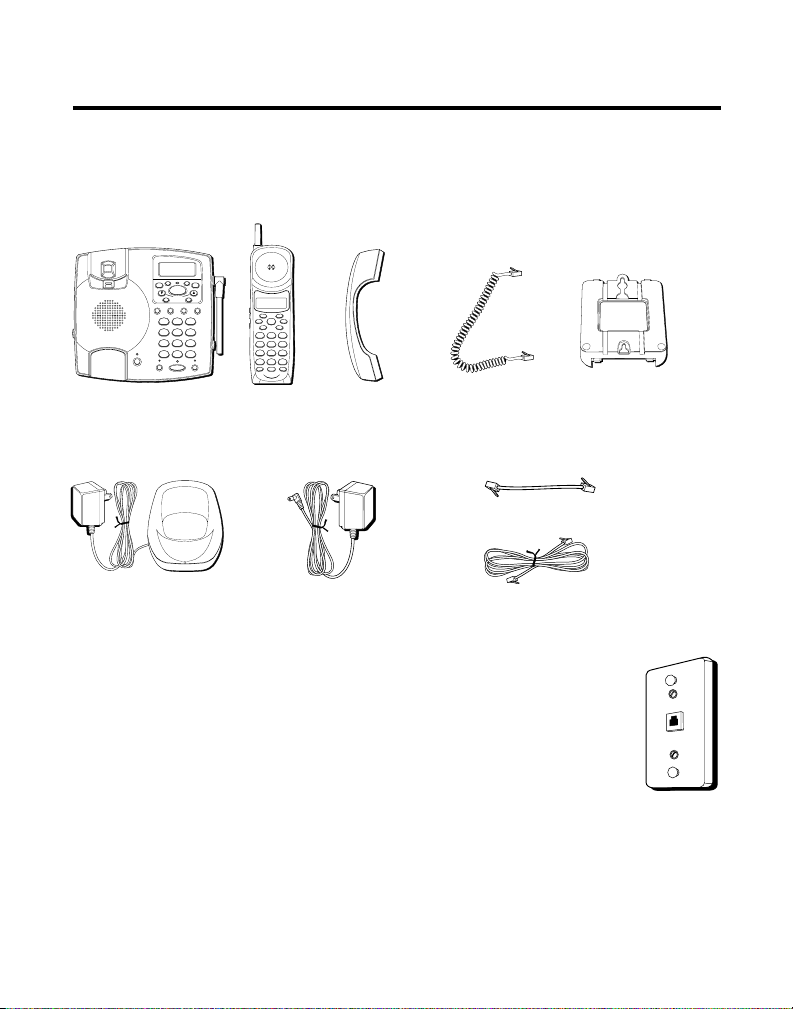
BEFORE YOU BEGIN
PARTS CHECKLIST
Make sure your package includes the items shown here.
FORMAT ANNOUNCE
A
S
G
S
E
E
S
DELETEDIAL
M
PLAY/STOP
R
E
V
W
I
E
M
E
S
D
I
S
A
R
G
E
L
E
L
S
/
A
C
MEMO ANSWER
ON/OFF
HANDSET
REDIAL/
VOLUME
PAUSE MEMORY FLASH
PROG
DEF3ABC
21
MNO6JKL5GHI
4
WXYZ9TUV
PQRS
8
7
IN USE
OPER0TONE
#
*
MUTE HOLD
PAGE/INTERCOM
SPEAKER
Base Corded
CHARGE
PROG
FORMAT MUTE
TALK
PAUSE
REDIAL MEM
S
I
/
E
V
T
Y
W
E
O
A
R
L
P
P
21
4
PQRS
8
7
A
S
R
E
E
OPER0TONE
*
ANSW
CHANNEL FLASHINT
Cordless
Handset
DELETEDIAL
I
K
P
S
DEF3ABC
MNO6JKL5GHI
WXYZ9TUV
#
Coiled Handset
Handset
Cord
Short telephone line cord
Mounting
bracket
Cordless handset
AC power supply
Long telephone line cord
charger
MODULAR JACK REQUIREMENTS
You need an RJ11 type modular jack, which is the most
common type of phone jack and might look like the one
pictured here. If you don’t have a modular jack, call your local
phone company to find out how to get one installed.
5
Page 6
DIGITAL SECURITY SYSTEM
Your cordless phone uses a digital security system to protect against false
ringing, unauthorized access, and charges to your phone line.
IMPORTANT: In order to use this unit, you must subscribe to either the
standard Name/Number Caller ID Service or Caller ID with Call Waiting
Service. To know who is calling while you are on the phone, you must
subscribe to Caller ID with Call Waiting Service.
CAUTION: When using telephone equipment, there are basic safety
instructions that should always be followed. Refer to the IMPORTANT
SAFETY INSTRUCTIONS provided with this product and save them for
future reference.
6
Page 7

INTRODUCTION
Your Caller ID phone stores and displays specific information, provided by
your local telephone company, to subscribers of Caller ID or similar caller
identification services.
CALLER ID
This feature allows you to see the number or name and number of the
person calling before you answer the phone.
CALL WAITING
This feature allows you to answer incoming calls while you are talking on
the phone.
CALL WAITING CALLER ID
Also known as Type II Caller ID, this feature allows you to see the name
and number of a call that beeps in while you are talking on the phone with
someone else.
7
Page 8
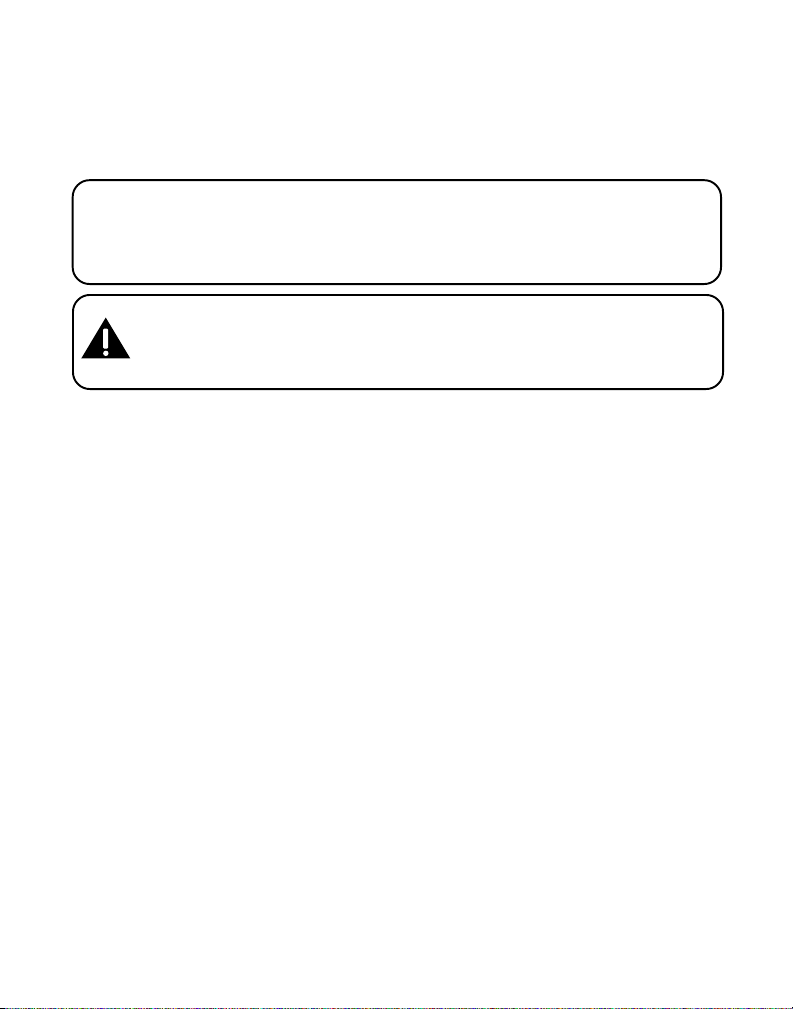
INSTALLATION
6
7
2
5
8
4
3
1
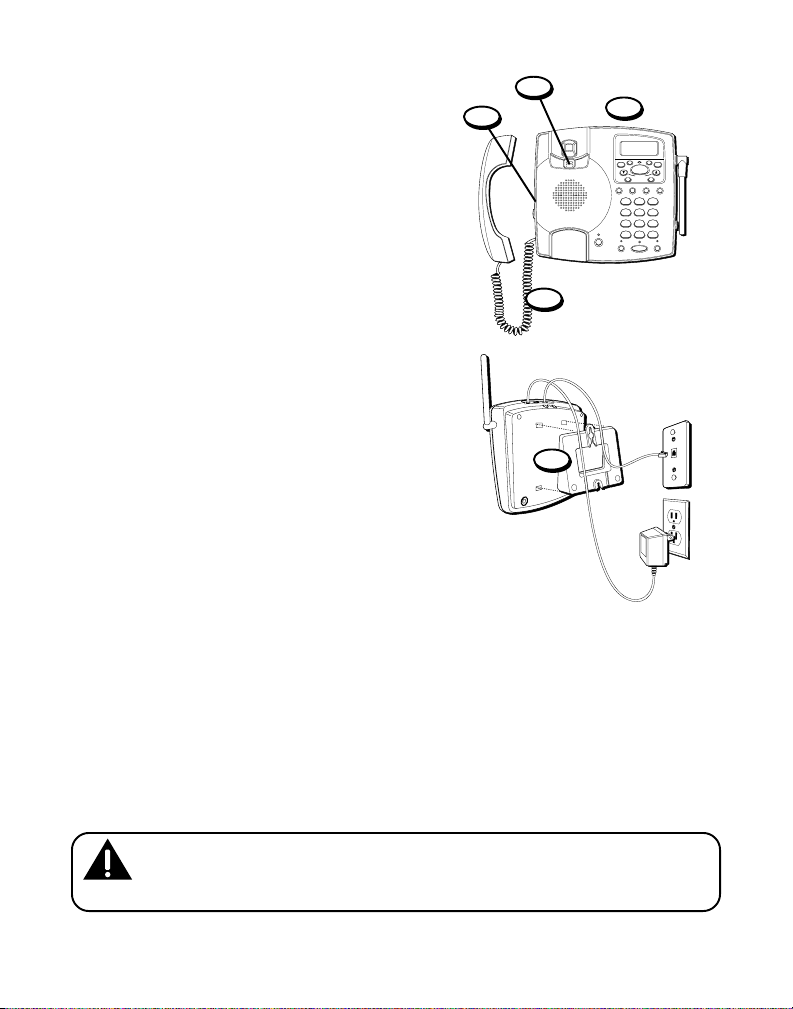
DESKTOP INSTALLATION
1. Make sure the mounting bracket is securely fastened to the bottom of
the base.
2. Set the TONE/PULSE switch to TONE for touch-tone service, or PULSE
for rotary service. If you don’t know which type of service you have,
check with the phone company.
3. Set RINGER switch (on the handset) to HI.
4. Plug the coiled cord into the corded handset and the other end into the
into the jack on the side of the base.
5. Place the corded handset in the base.
6. Plug the power supply cord into the POWER 12V DC jack on the base
and the other end into an AC electrical outlet.
7. Plug the long telephone line cord into the PHONE LINE jack on the back
of the base, and plug the other end into a modular phone jack.
8. Raise the base antenna.
Installation continued on next page.
CAUTION: Use only the ATLINKS USA 5-2510(black)/5-2511(white)
power supply that came with this unit. Using other power supplies may
damage the unit.
8
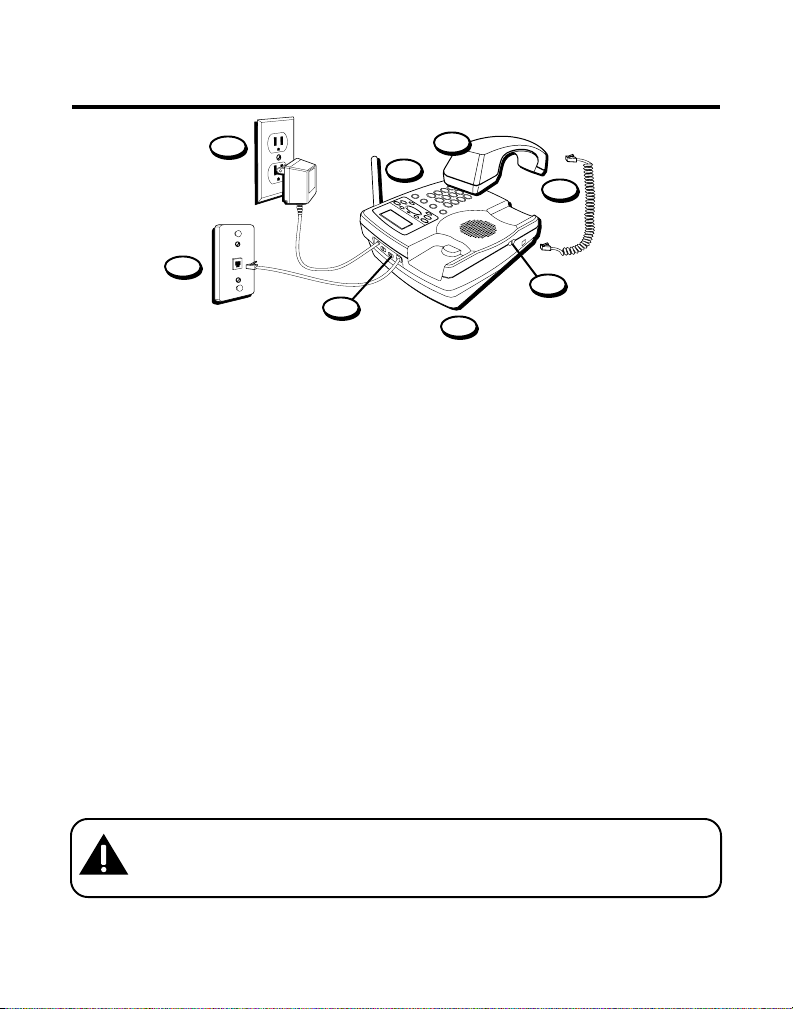
Page 9
9. Set the RINGER switch on the cordless
handset to ON.
10. Plug the power supply cord from the
cordless handset charger into an AC electrical
outlet.
11. Place the handset in the recharge cradle and
charge for 12 hours. The CHARGE indicator
(on the recharge cradle) comes on to indicate
that the battery is charging. If you don’t
charge the handset battery properly (for
12 hours) when you first set up the
phone, performance of the battery will
be compromised.
10
9
PROG
FORMAT MUTE
DELETEDIAL
TALK
PAUSE
REDIAL MEM
11
I
S
E
I
/
K
P
V
T
Y
W
S
E
O
A
R
L
P
P
DEF3ABC
21
MNO6JKL5GHI
4
WXYZ9TUV
PQRS
8
7
A
S
E
R
E
OPER0TONE
#
*
ANSW
CHANNEL FLASHINT
CHARGE
VERY IMPORTANT: You must complete the corded base unit connections
before the cordless handset can be used. Otherwise, it WILL NOT work. See
steps 1-8 of this section.
INSTALLATION NOTE: Some cordless telephones operate at frequencies that
may cause interference to nearby TVs and VCRs. To minimize or prevent such
interference, the base of the cordless telephone should not be placed near or on
top of a TV or VCR. If interference continues, moving the cordless telephone
farther away from the TV or VCR will often reduce or eliminate the interference.
9
Page 10
WALL MOUNT INSTALLATION
Because it is necessary to charge the
cordless handset for 12 hours prior to
connecting the phone line for use the first
time, it is better to plug the power supply
from the cordless handset recharge cradle
into an AC electrical outlet. Then place the
cordless handset in the recharge cradle and
charge for 12 hours prior to installing the
base unit.
1. After initial charging of the cordless
handset remove the mounting bracket
from the base unit; turn it upside down
and snap it back on the unit.
2. Set the TONE/PULSE switch to TONE for
touch-tone service, or PULSE for rotary
service. If you don’t know which type of
service you have, check with the phone
company.
3. Set the RINGER switch on the base to HI.
4. Plug the coiled cord into the corded
handset and the other end into the jack
on the side of the base.
5. Remove the handset hook on the base,
turn it over, and put it back into the slot.
You need to do this so the corded
handset doesn't fall out of the base.
Installation continued on next page.
5
PAGE/INTERCOM
IN USE
2
FORMAT ANNOUNCE
S
S
E
M
PLAY/STOP
R
E
V
M
E
S
S
A
G
E
S
MEMO ANSWER
HANDSET
REDIAL/
VOLUME
PAUSE MEMORY FLASH
PROG
4
PQRS
7
OPER0TONE
*
MUTE HOLD
SPEAKER
A
G
E
S
DELETEDIAL
I
E
W
D
I
R
E
L
L
/
C
A
ON/OFF
DEF3ABC
21
MNO6JKL5GHI
WXYZ9TUV
8
#
3
4
1
10
CAUTION: Use only the ATLINKS USA 5-2510(black)/5-2511(white)
power supply that came with this unit. Using other power supplies may damage
the unit.
Page 11
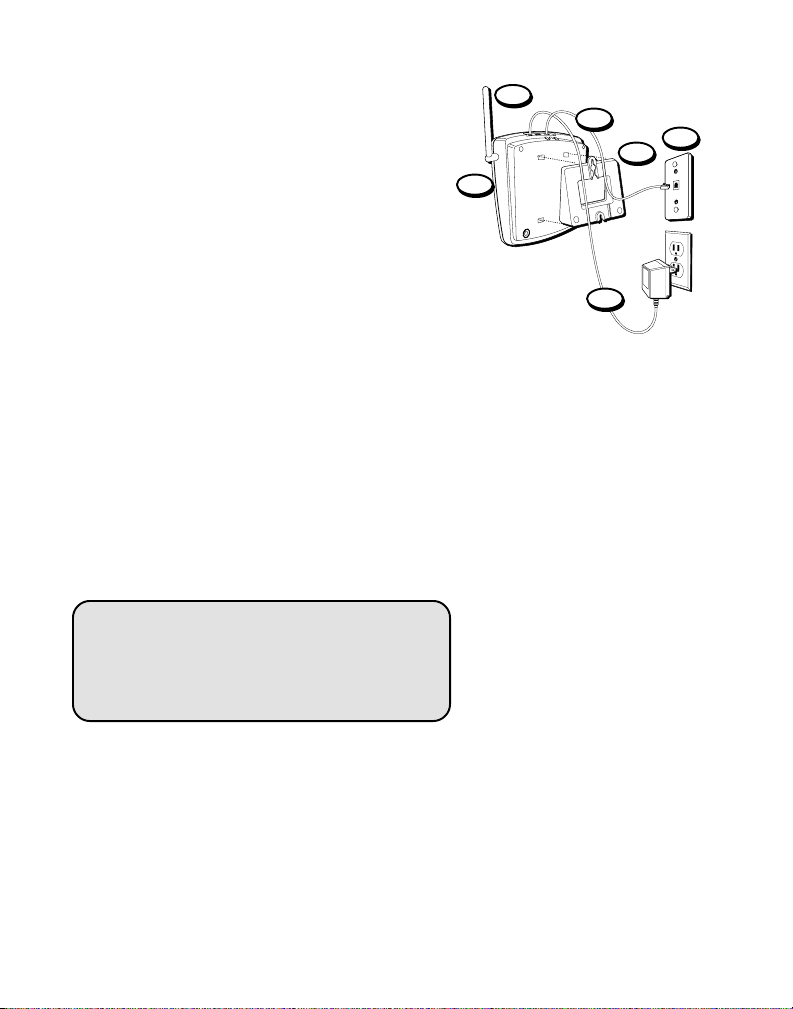
6. Place the corded handset in the base.
7. Plug the power supply cord into the 12V
DC power jack on the back of the base
and the other end into an AC electrical
outlet.
8. Plug the short telephone line cord into
the PHONE LINE jack on the back of the
base.
9. Feed the short line cord through the
grooves provided so that the base area
is flat and ready to mount on the wall,
and plug the other end of the line cord
into a modular phone jack.
10. Slip the mounting holes on the base
over the wall plate posts and slide the
unit down firmly into place. (Wall plate
not included).
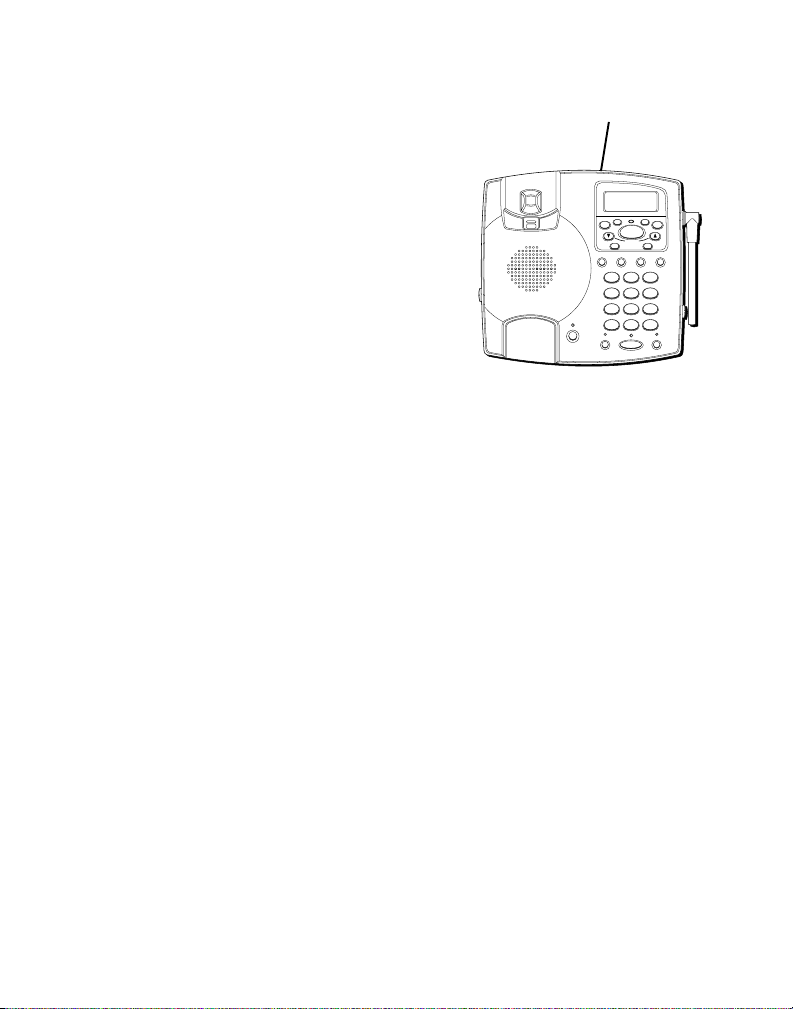
11. Raise the base antenna.
Installation continued on next page.
VERY IMPORTANT: You must complete
the corded base unit connections before the
cordless handset can be used. Otherwise, it
WILL NOT work. See steps 1-8 of this
section.
11
8
6
7
10
9
11
Page 12
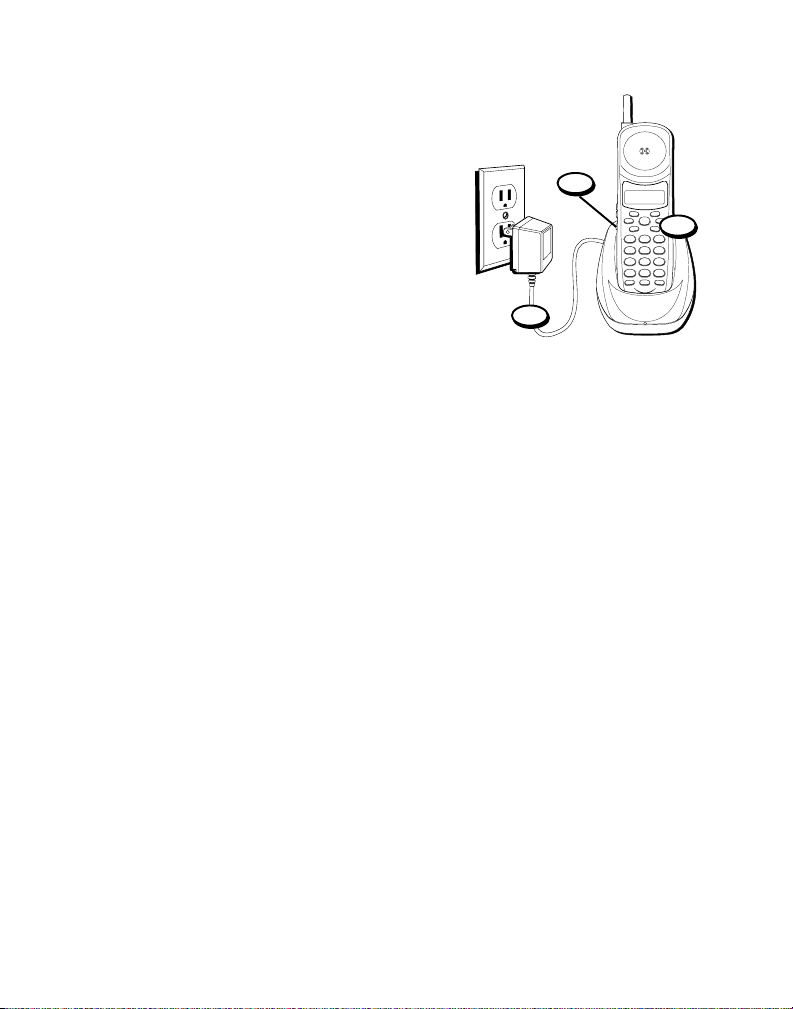
12. Set the RINGER switch (on the cordless
handset) to ON.
13. Plug the power supply cord from the
cordless handset charger into an AC
electrical outlet.
14. Place the cordless handset in the
cordless handset charge cradle and
charge for 12 hours. The CHARGE
indicator comes on, indicating the
battery is charging.
Allow the phone to charge for 12 hours
before first use. If you don't charge the
phone properly when you first set up
the phone, performance of the battery
will be compromised.
13
12
FORMAT MUTE
PAUSE
REDIAL MEM
I
E
V
W
E
R
4
PQRS
7
*
ANSW
CHANNEL FLASHINT
PROG
DELETEDIAL
TALK
14
S
I
/
K
P
T
Y
S
O
A
L
P
P
DEF3ABC
21
MNO6JKL5GHI
WXYZ9TUV
8
A
S
E
R
E
OPER0TONE
#
CHARGE
12
Page 13

ANSWERING SYSTEM SETUP
WXYZ9TUV
8
PQRS
7
MNO6JKL5GHI
4
DEF3ABC
21
#
OPER0TONE
*
M
E
S
S
A
G
E
S
FORMAT ANNOUNCE
DELETEDIAL
PLAY/STOP
HANDSET
VOLUME
REDIAL/
PAUSE MEMORY FLASH
PAGE/INTERCOM
MUTE HOLD
SPEAKER
IN USE
PROG
MEMO ANSWER
ON/OFF
R
E
V
I
E
W
M
E
S
S
A
G
E
S
/
C
A
L
L
E
R
I
D
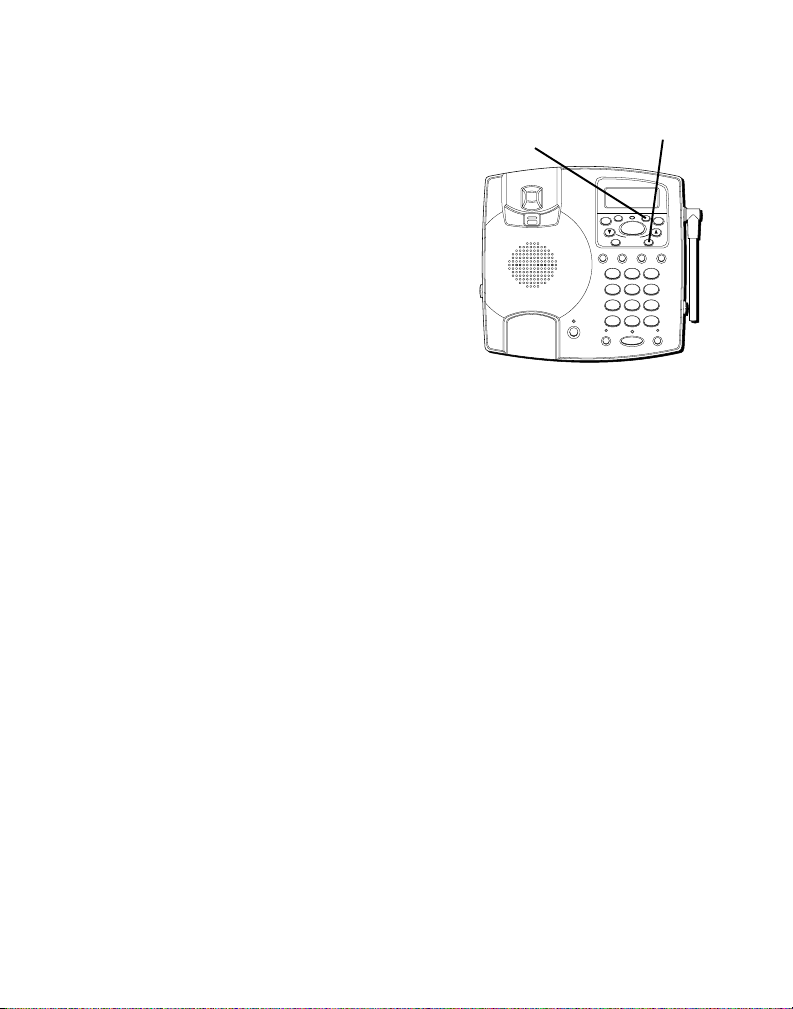
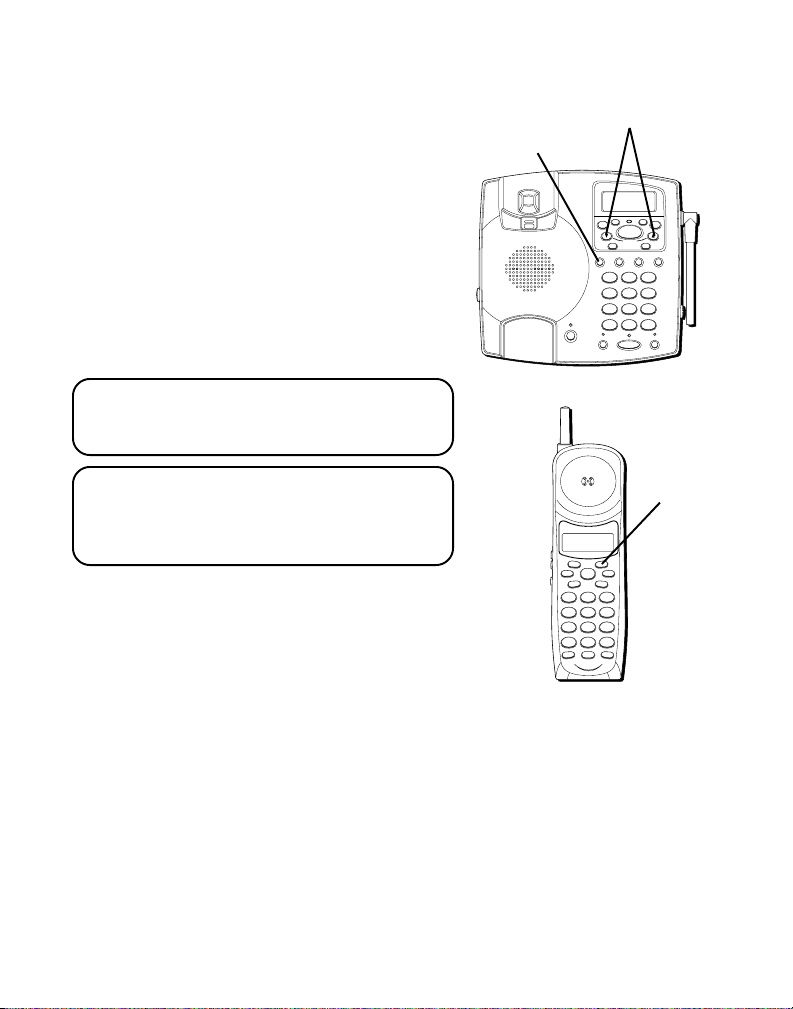
This section shows you how to set up your
answering system to receive incoming
calls. Before you begin the setup, you must
turn on the answering system.
• Press the ANSWER ON/OFF button to
turn the answering system on and off.
The MESSAGES indicator lights when
you have new messages.
NOTE: The LCD displays “ANS.ON” or
“ANS.OFF” to show the status of the
answering system.
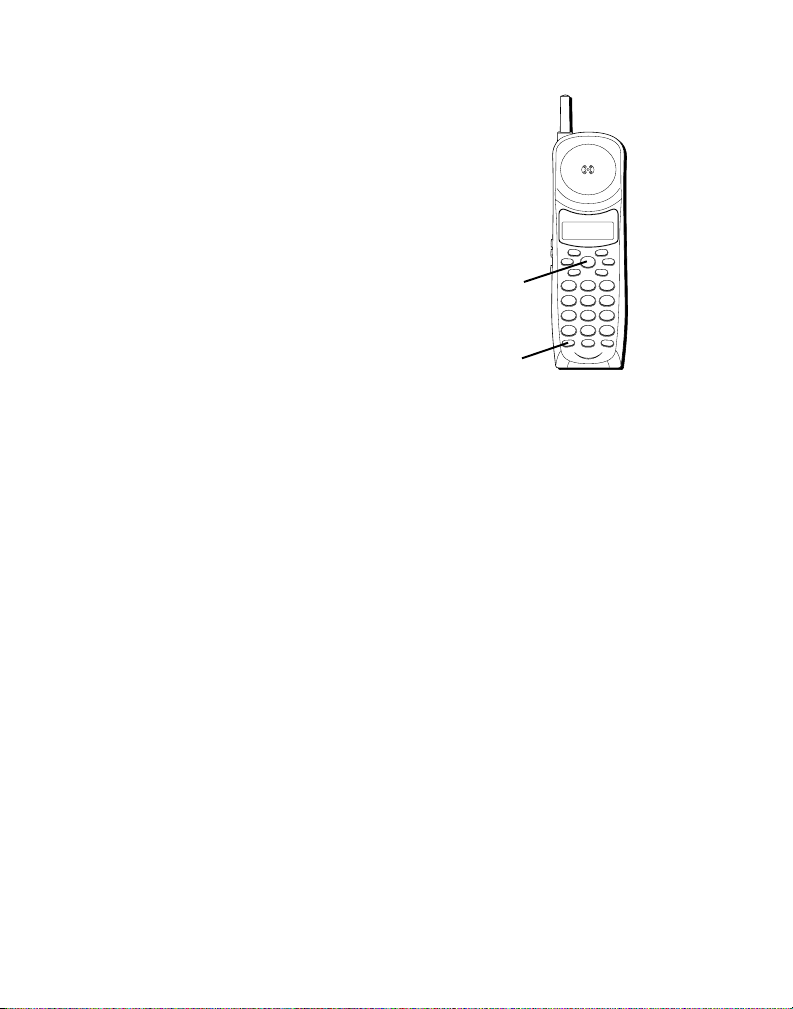
VOICE INSTRUCTIONS
If you need additional assistance, press the
MEMO button when you plug in the
answerer and follow the voice instructions.
SETTING THE SPEAKER VOLUME
Use the volume slide switch to adjust the
speaker volume to a comfortable level.
MESSAGE
indicator
ANSWER ON/OFF
button
MEMO button VOLUME switch
13
Page 14
SETTING THE RING SELECT
WXYZ9TUV
8
PQRS
7
MNO6JKL5GHI
4
DEF3ABC
21
#
OPER0TONE
*
M
E
S
S
A
G
E
S
FORMAT ANNOUNCE
DELETEDIAL
PLAY/STOP
HANDSET
VOLUME
REDIAL/
PAUSE MEMORY FLASH
PAGE/INTERCOM
MUTE HOLD
SPEAKER
IN USE
PROG
MEMO ANSWER
ON/OFF
R
E
V
I
E
W
M
E
S
S
A
G
E
S
/
C
A
L
L
E
R
I
D
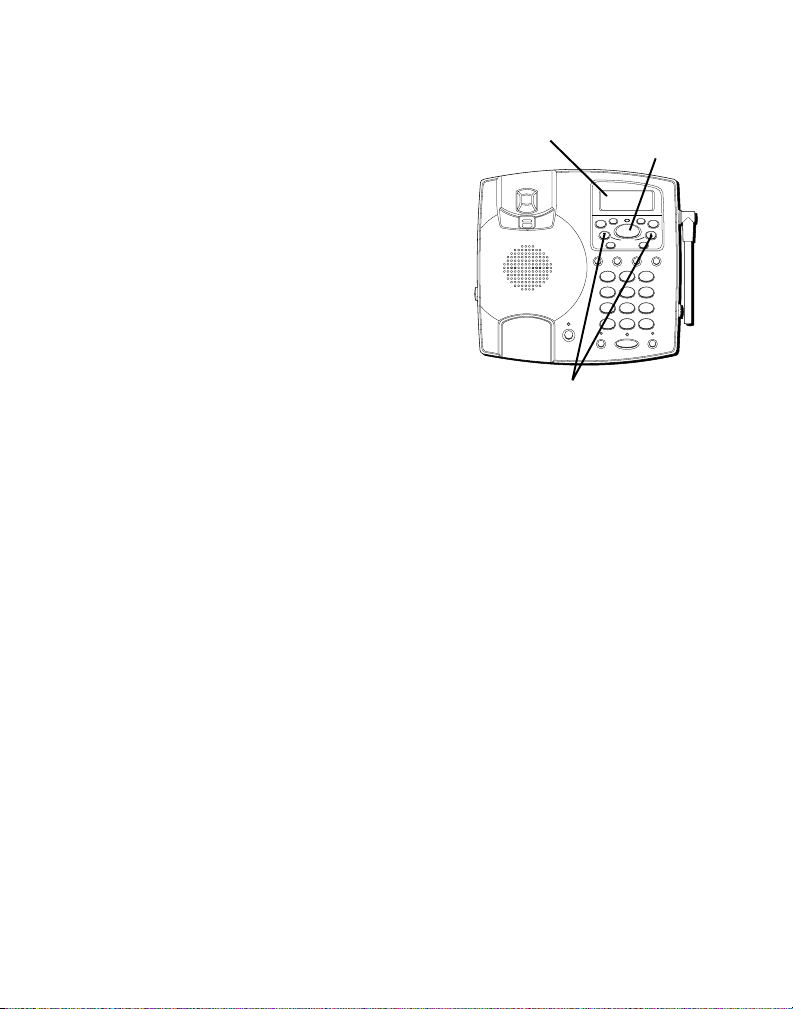
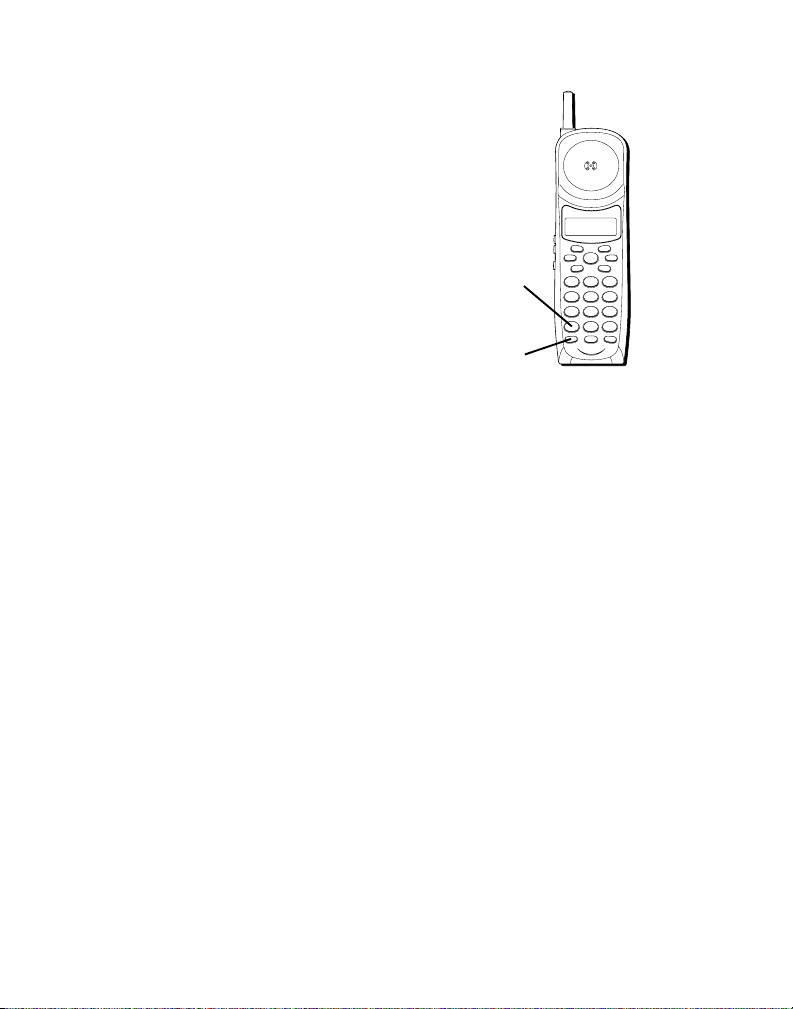
Set the RING SELECT switch on the back of
the unit to choose the number of times you
want the phone to ring before the system
answers the call. You can choose 2 rings, 5
rings, or TOLL SAVER.
USING TOLL SAVER
Toll Saver can save you the cost of a call
when you access your messages from
another phone:
• If you have new messages, the unit
answers after the 2nd ring.
• If you have no new messages, the unit
answers after the 5th ring.
You can hang up after the 3rd or 4th ring
and save the pay telephone or long
distance charge.
Ring select switch
14
Page 15
RECORDING THE OUTGOING
WXYZ9TUV
8
PQRS
7
MNO6JKL5GHI
4
DEF3ABC
21
#
OPER0TONE
*
M
E
S
S
A
G
E
S
FORMAT ANNOUNCE
DELETEDIAL
PLAY/STOP
HANDSET
VOLUME
REDIAL/
PAUSE MEMORY FLASH
PAGE/INTERCOM
MUTE HOLD
SPEAKER
IN USE
PROG
MEMO ANSWER
ON/OFF
R
E
V
I
E
W
M
E
S
S
A
G
E
S
/
C
A
L
L
E
R
I
D
ANNOUNCEMENT
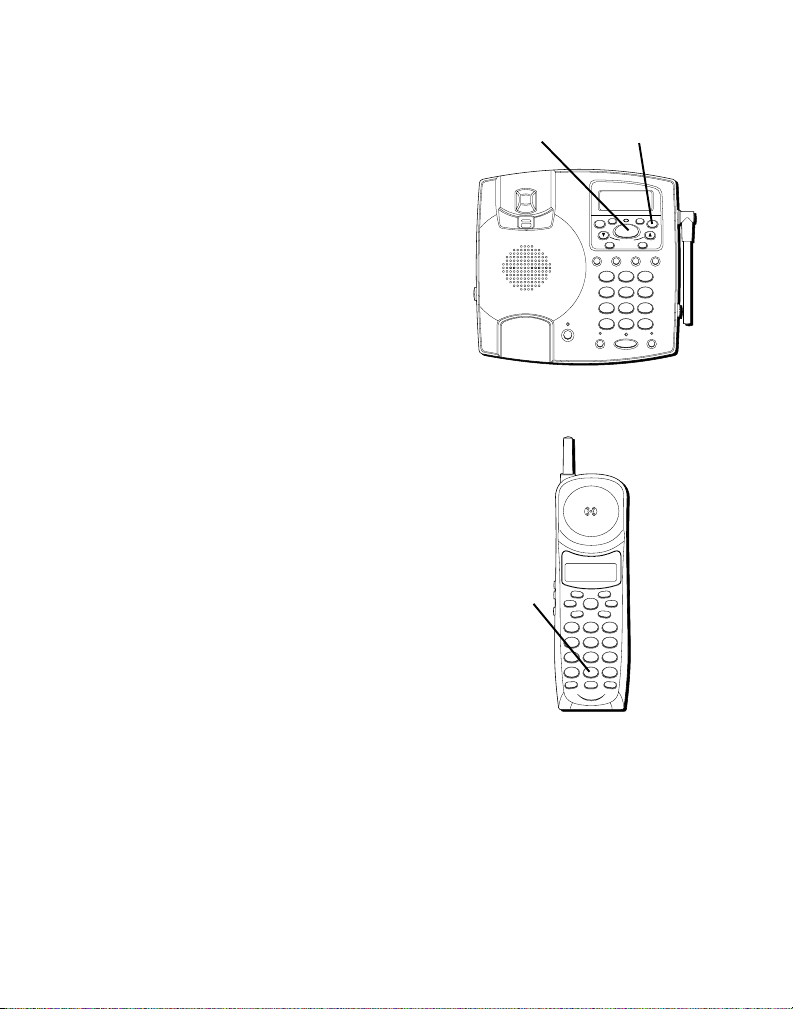
For best results when recording, you
should be about 9 inches from the
microphone (which is the small hole
located on the base front), and eliminate as
much background noise as possible.
1. Make sure the answerer is ON.
2. Press and hold the ANNOUNCE button.
You need to hold the button until you
finish the announcement.
3. Begin talking after you hear the beep.
4. Release the button when you finish your
announcement.
ANNOUNCE
button
ANSWER ON/OFF
button
15
Page 16

If you choose not to record an outgoing
WXYZ9TUV
8
PQRS
7
MNO6JKL5GHI
4
DEF3ABC
21
#
OPER0TONE
*
M
E
S
S
A
G
E
S
FORMAT ANNOUNCE
DELETEDIAL
PLAY/STOP
HANDSET
VOLUME
REDIAL/
PAUSE MEMORY FLASH
PAGE/INTERCOM
MUTE HOLD
SPEAKER
IN USE
PROG
MEMO ANSWER
ON/OFF
R
E
V
I
E
W
M
E
S
S
A
G
E
S
/
C
A
L
L
E
R
I
D
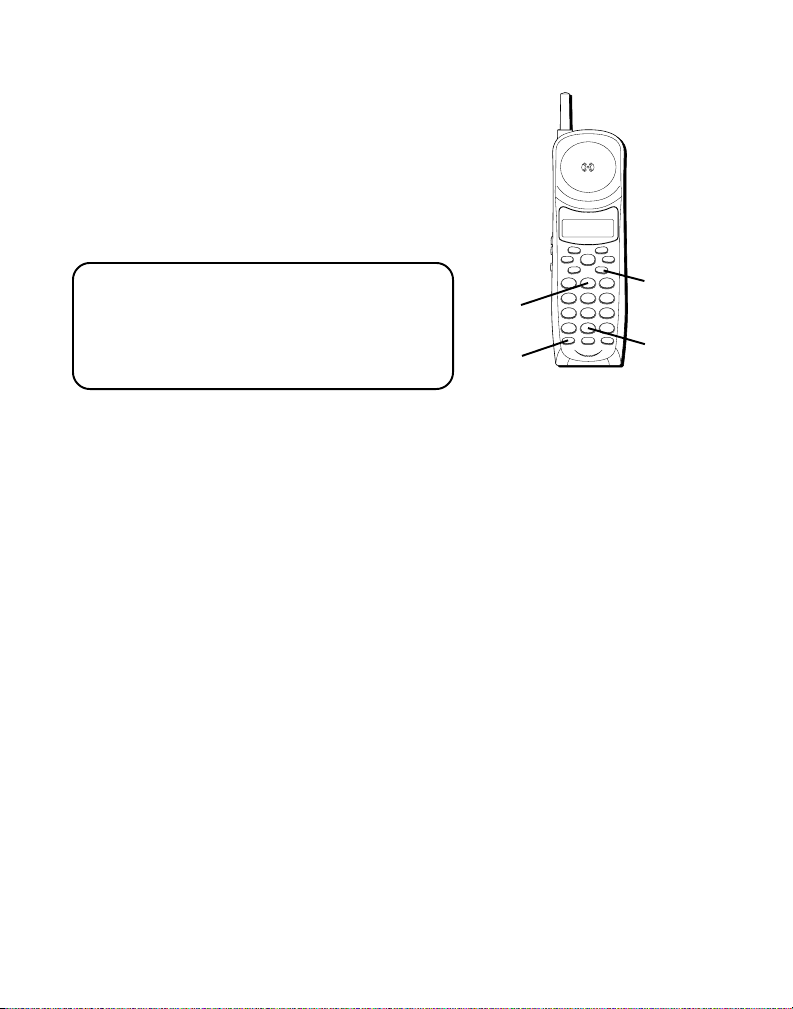
announcement, a default announcement
will play. To return to the default
announcement after you have recorded
ANNOUNCE
button
your own outgoing announcement, press
the ANNOUNCE button and release it when
you hear the beep.
Sample Outgoing Announcement
Hi, this is (use your name here), I can't answer the
phone right now, so please leave your name, number
and a brief message after the tone, and I'll get back to
you. Thanks.
REVIEWING ANNOUNCEMENT
• Press and release ANNOUNCE button to
review your outgoing announcement
.
16
Page 17

ANSWERING SYSTEM OPERATION
This section discusses the buttons and
features on the answering system.
MESSAGES INDICATOR
The base LCD indicator shows you how
many messages you have. The messages
indicator will be on to indicate you have
new messages.
SCREENING CALLS FROM
BASE
THE
You can screen incoming calls by waiting
for the caller to begin leaving a message
(to hear who it is), then pick up the
handset, and press TALK to talk to the
caller. The answering system automatically
stops recording when you activate the
handset or pick up an extension phone.
TIP: Make sure the volume on the base is
set loud enough to hear your incoming
calls.
LCD indicator
TALK
button
IN USE
PAGE/INTERCOM
FORMAT MUTE
PAUSE
REDIAL MEM
I
E
V
W
E
R
4
PQRS
7
*
ANSW
CHANNEL FLASHINT
FORMAT ANNOUNCE
MEMO ANSWER
HANDSET
VOLUME
PROG
4
PQRS
7
*
MUTE HOLD
PROG
DELETEDIAL
TALK
S
/
I
K
P
T
Y
S
O
A
L
P
P
DEF3ABC
21
MNO6JKL5GHI
WXYZ9TUV
8
A
S
R
E
E
OPER0TONE
#
A
S
G
S
E
E
S
M
PLAY/STOP
R
E
V
W
I
E
M
E
S
D
I
S
A
R
G
E
L
E
L
S
/
A
C
REDIAL/
PAUSE MEMORY FLASH
DEF3ABC
21
MNO6JKL5GHI
WXYZ9TUV
8
OPER0TONE
#
SPEAKER
DELETEDIAL
ON/OFF
17
Page 18
MESSAGE PLAYBACK
WXYZ9TUV
8
PQRS
7
MNO6JKL5GHI
4
DEF3ABC
21
#
OPER0TONE
*
M
E
S
S
A
G
E
S
FORMAT ANNOUNCE
DELETEDIAL
PLAY/STOP
HANDSET
VOLUME
REDIAL/
PAUSE MEMORY FLASH
PAGE/INTERCOM
MUTE HOLD
SPEAKER
IN USE
PROG
MEMO ANSWER
ON/OFF
R
E
V
I
E
W
M
E
S
S
A
G
E
S
/
C
A
L
L
E
R
I
D
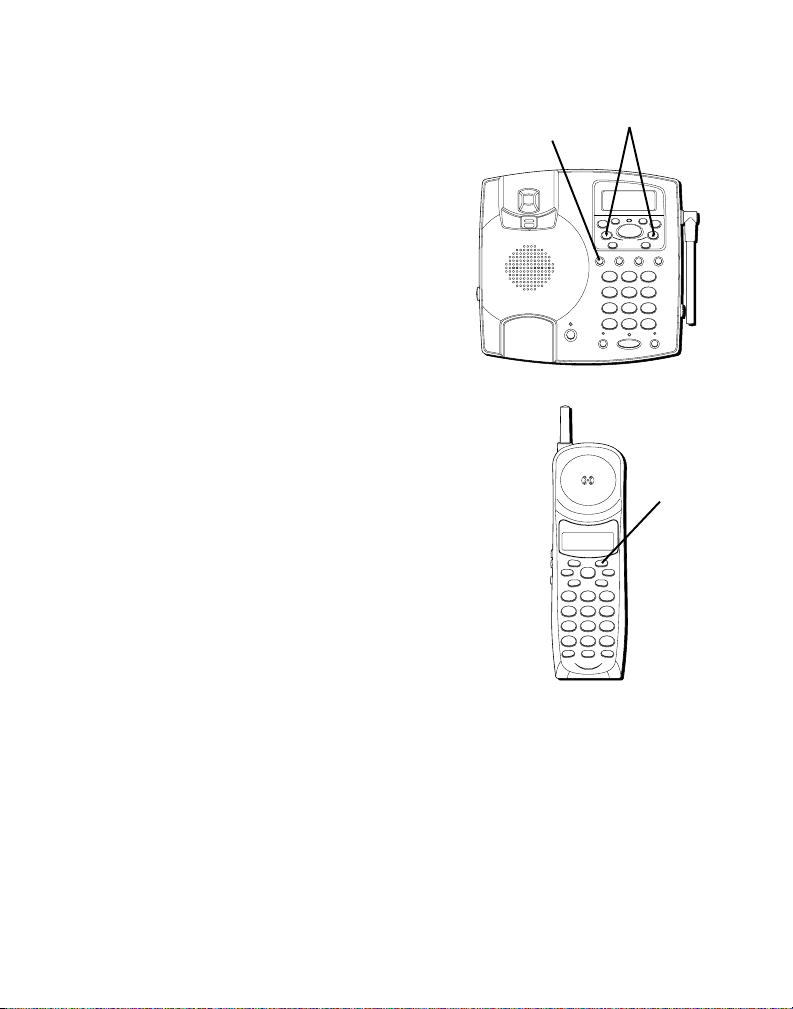
The base LCD lets you know when you
have messages. To play messages, press
PLAY/STOP.
While a message is playing, you can do the
following:
• Press PLAY/ STOP to stop the message
playback.
• Press and release REVIEW down arrow
button to restart the current message;
continue to press and release REVIEW
down arrow button to go to previous
messages.
• Press and release REVIEW up arrow
button to go to the next message.
• Press PLAY/ STOP to stop message
playback.
LCD indicator PLAY/STOP
button
REVIEW buttons
18
Page 19
MEMORY FULL
WXYZ9TUV
8
PQRS
7
MNO6JKL5GHI
4
DEF3ABC
21
#
OPER0TONE
*
M
E
S
S
A
G
E
S
FORMAT ANNOUNCE
DELETEDIAL
PLAY/STOP
HANDSET
VOLUME
REDIAL/
PAUSE MEMORY FLASH
PAGE/INTERCOM
MUTE HOLD
SPEAKER
IN USE
PROG
MEMO ANSWER
ON/OFF
R
E
V
I
E
W
M
E
S
S
A
G
E
S
/
C
A
L
L
E
R
I
D
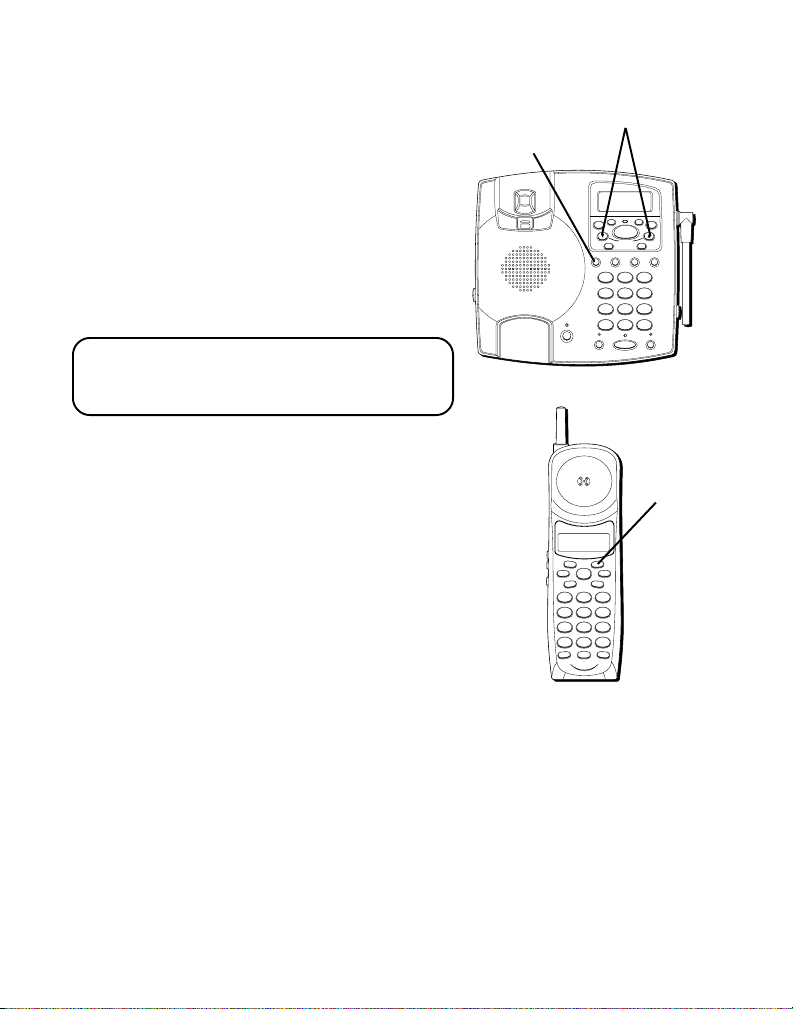
When the memory is full, the system
answers after 10 rings. You need to erase
some messages so the answerer can
record new messages.
ERASING MESSAGES
You can erase messages three ways: one
message at a time using the DELETE button
on the base; all previously played messages
using the DELETE button on the base; or
one message at a time using the ERASE
button (0) on the handset or a phone in
another location.
• To erase a message, press PLAY/STOP on
the base and press and release DELETE
button on the base to erase the message
that is playing.
• To erase all previously played messages,
press and hold the DELETE button on the
base until the unit beeps.
PLAY/STOP
button
ERASE
button
DELETE button
PROG
FORMAT MUTE
DELETEDIAL
TALK
PAUSE
REDIAL MEM
S
I
/
I
K
E
P
V
T
Y
W
S
E
O
A
R
L
P
P
DEF3ABC
21
MNO6JKL5GHI
4
WXYZ9TUV
PQRS
8
7
A
S
R
E
E
OPER0TONE
#
*
ANSW
CHANNEL FLASHINT
19
Page 20
• To erase a message from the handset:
1. Press ANSW button on the handset.
2. Press PLAY/STOP on the handset
(the 2 button).
3. Press ERASE on the handset (the 0
button) to erase the message that is
playing.
NOTE: Erased messages cannot be restored.
Also, be careful you don't press ERASE
button as the next unheard message is
playing because that message will also be
erased.
LEAVING A MEMO
Use the Memo feature to leave a message.
1. Press and hold the MEMO button. You
need to hold the button until you finish
the message.
2. Begin talking after you hear the beep.
3. Release the MEMO button when you
finish.
PLAY/
STOP
button
ANSW
button
FORMAT MUTE
PAUSE
REDIAL MEM
I
E
V
W
E
R
4
PQRS
7
*
ANSW
CHANNEL FLASHINT
PROG
DELETEDIAL
TALK
S
/
T
Y
A
L
P
21
8
A
S
R
E
OPER0TONE
MEMO
I
K
P
S
O
P
DEF3ABC
button
MNO6JKL5GHI
WXYZ9TUV
E
#
ERASE
button
20
Page 21

REMOTE ACCESS
This section explains two types of remote
access: using the handset to access the
answering system and accessing the
answering system from another phone.
The handset contains integrated buttons
that enable you access the answering
system with the handset.
You can also access your answering system
from any phone that is tone-dial
compatible by entering a 3-digit security
code after you hear the outgoing
announcement. A voice menu system
guides you through all of the procedures.
21
Page 22

USING THE CORDLESS
HANDSET
Press the ANSW button to access the
answering system from the handset.
After you access the answering system, use
the marked handset keys just as if you were
pressing the corresponding buttons on the
base (see "Answering System Operation"
for details on functions). To make it easy for
you, the functions are listed on the handset
above each number. For example, to play
messages:
1. Press the ANSW button.
2. Press 2 (PLAY/STOP).
3. When you are finished listening to your
messages, press ANSW again to quit, or
you may listen to the voice menu at any
time by pressing 7.
ANSWERING SYSTEM INDICATOR
You know the answering system is active
when you see the answering system
indicator on the handset come on.
PLAY/
STOP
button
ANSW
button
FORMAT MUTE
PAUSE
REDIAL MEM
I
E
V
W
E
R
4
PQRS
7
*
ANSW
CHANNEL FLASHINT
PROG
DELETEDIAL
TALK
S
/
I
K
P
T
Y
S
O
A
L
P
P
DEF3ABC
21
MNO6JKL5GHI
WXYZ9TUV
8
A
S
R
E
E
OPER0TONE
#
22
Page 23
SCREENING CALLS
FROM
THE CORDLESS
HANDSET
Use the handset to screen calls even when
you can't hear the answering system.
When the answering system picks up:
1. Press the ANSW button to gain access to
the answering system.
2. Listen to the caller leaving a message.
3. Press the TALK button to talk to the
person or press ANSW to stop
screening the call.
TALK
button
ANSW
button
FORMAT MUTE
PAUSE
REDIAL MEM
I
E
V
W
E
R
4
PQRS
7
*
ANSW
CHANNEL FLASHINT
PROG
DELETEDIAL
TALK
S
/
I
K
P
T
Y
S
O
A
L
P
P
DEF3ABC
21
MNO6JKL5GHI
WXYZ9TUV
8
A
S
R
E
E
OPER0TONE
#
23
Page 24

MEMORY FULL
When the memory is full, the system
answers after 10 rings, beeps and waits for
the caller to enter the 3-digit security code. If
you don't enter the security code within 10
seconds after the unit beeps, the phone
hangs up.
You need to erase some of the messages in
order for the system to record new
incoming messages.
NOTE: The unit also answers after the 10th
ring if it is turned off. To access the
answering system, enter your 3-digit security
code after you hear the beep.
24
Page 25

ACCESSING THE ANSWERING SYSTEM FROM ANOTHER
LOCATION
You can access your answering system from a touch-tone phone by
entering your 3-digit security code after you hear the outgoing
announcement.
1. Dial the phone number for the answering system.
2. Enter the security code after you hear the tone.
3. Follow the voice menu to use the answering system's remote functions.
The remote feature enables you to perform the following functions:
To Press this Button
Review message 1
Play back messages 2
Stop message playback 2
Erase message 0 (during message playback)
Skip message 3
Turn off/on answerer 4
Review voice menu options 7
TIP: You can bypass the outgoing announcement by pressing any numbered
key on the keypad while the announcement is playing. Then, you can enter
your security code to access the answering system.
25
Page 26
CHANGING THE SECURITY CODE
The default security code for accessing the
answering system from another location is
1 2 3. You must use the handset to change
the security code. With the phone off,
follow these steps:
1. Press ANSW (the ANSWER indicator
comes on).
2. Press TONE (*).
3. Enter 3 numbers to be used as the new
security code.
4. Press TONE (*) again. You will hear a new
security code.
5. Press "ANSW" again to confirm the new
security code.
TONE
button
ANSW
button
FORMAT MUTE
PAUSE
REDIAL MEM
I
E
V
W
E
R
4
PQRS
7
*
ANSW
CHANNEL FLASHINT
PROG
DELETEDIAL
TALK
S
/
I
K
P
T
Y
S
O
A
L
P
P
DEF3ABC
21
MNO6JKL5GHI
WXYZ9TUV
8
A
S
R
E
E
OPER0TONE
#
26
Page 27
CALLER ID SETTINGS
Four basic user-programmable menus are
set and stored in the phone. To view the
display press the PROG button on the
handset and REVIEW buttons on the base.
Of these settings, language and local area
code can also be set on the cordless
handset.
Set Language. Choices: English, Spanish,
French. (Default = English)
Set Contrast. Choices: 1[Low], 2 [Med], 3
[High]. (Default = Med)
Set Local Area Code. (you set)
Set Day (Current Day and Time will be
announced)
Set Day/Set Time. (it is automatically set
during the first Caller ID call)
PROG button
REVIEW buttons
FORMAT ANNOUNCE
A
S
G
S
E
E
S
DELETEDIAL
M
PLAY/STOP
R
E
V
W
I
E
M
E
S
D
I
S
A
R
G
E
L
E
L
S
/
A
C
MEMO ANSWER
ON/OFF
HANDSET
REDIAL/
VOLUME
PAUSE MEMORY FLASH
PROG
DEF3ABC
21
MNO6JKL5GHI
4
WXYZ9TUV
PQRS
8
7
IN USE
OPER0TONE
#
*
MUTE HOLD
PAGE/INTERCOM
SPEAKER
PROG
button
PROG
FORMAT MUTE
DELETEDIAL
TALK
PAUSE
REDIAL MEM
S
I
/
I
K
E
P
V
T
Y
W
S
E
O
A
R
L
P
P
DEF3ABC
21
MNO6JKL5GHI
4
WXYZ9TUV
PQRS
8
7
A
S
R
E
E
OPER0TONE
#
*
ANSW
CHANNEL FLASHINT
27
Page 28

SETTING THE DISPLAY LANGUAGE
1. Press and release PROG until
LANGUAGE
shows on the display.
2. Press the REVIEW up or down arrow
buttons to scroll to the desired language.
3. Press and release PROG again to store
the language setting.
SET
PROG button
PAGE/INTERCOM
PQRS
CHANNEL FLASHINT
REVIEW buttons
FORMAT ANNOUNCE
A
S
G
S
E
E
S
DELETEDIAL
M
PLAY/STOP
R
E
V
W
I
E
M
E
S
D
I
S
A
R
G
E
L
E
L
S
/
A
C
MEMO ANSWER
ON/OFF
HANDSET
REDIAL/
VOLUME
PAUSE MEMORY FLASH
PROG
DEF3ABC
21
MNO6JKL5GHI
4
WXYZ9TUV
PQRS
8
7
IN USE
OPER0TONE
#
*
MUTE HOLD
SPEAKER
PROG
button
PROG
FORMAT MUTE
DELETEDIAL
TALK
PAUSE
REDIAL MEM
S
I
/
I
K
E
P
V
T
Y
W
S
E
O
A
R
L
P
P
DEF3ABC
21
MNO6JKL5GHI
4
WXYZ9TUV
8
7
A
S
R
E
E
OPER0TONE
#
*
ANSW
28
Page 29
SETTING THE DISPLAY CONTRAST
WXYZ9TUV
8
PQRS
7
MNO6JKL5GHI
4
DEF3ABC
21
#
OPER0TONE
*
M
E
S
S
A
G
E
S
FORMAT ANNOUNCE
DELETEDIAL
PLAY/STOP
HANDSET
VOLUME
REDIAL/
PAUSE MEMORY FLASH
PAGE/INTERCOM
MUTE HOLD
SPEAKER
IN USE
PROG
MEMO ANSWER
ON/OFF
R
E
V
I
E
W
M
E
S
S
A
G
E
S
/
C
A
L
L
E
R
I
D
NOTE: This setting is for the base only.
1. Press and release PROG until
CONTRAST
shows on the display.
2. Press the REVIEW up or down arrow
buttons to scroll to the desired contrast
level.
3. Press and release PROG again to store
the new contrast level.
NOTE: You can press PROG to go on to the
next feature at any time. To exit the menu,
press PROG repeatedly.
SET
PROG button
PQRS
ANSW
CHANNEL FLASHINT
REVIEW buttons
PROG
button
PROG
FORMAT MUTE
DELETEDIAL
TALK
PAUSE
REDIAL MEM
S
I
/
I
K
E
P
V
T
Y
W
S
E
O
A
R
L
P
P
DEF3ABC
21
MNO6JKL5GHI
4
WXYZ9TUV
8
7
A
S
R
E
E
OPER0TONE
#
*
29
Page 30
SETTING THE LOCAL AREA CODE
1. Press and release PROG until
CODE
shows on the display.
2. Press a numeric key to enter the first
digit of your local area code.
3. Press a numeric key to enter the second
digit of your local area code.
4. Press a numeric key to enter the third
digit of your local area code.
5. Press and release PROG again to store
your local area code in memory.
NOTE: You can press PROG to go on to the
next feature at any time. To exit the menu,
press PROG repeatedly.
SET AREA
PROG button
PAGE/INTERCOM
REVIEW buttons
FORMAT ANNOUNCE
A
S
G
S
E
E
S
DELETEDIAL
M
PLAY/STOP
R
E
V
W
I
E
M
E
S
D
I
S
A
R
G
E
L
E
L
S
/
A
C
MEMO ANSWER
ON/OFF
HANDSET
REDIAL/
VOLUME
PAUSE MEMORY FLASH
PROG
DEF3ABC
21
MNO6JKL5GHI
4
WXYZ9TUV
PQRS
8
7
IN USE
OPER0TONE
#
*
MUTE HOLD
SPEAKER
NOTE: To clear the local area code, press
and release PROG, until SET AREA CODE is
displayed. Then enter "000". Press PROG
again to confirm.
30
FORMAT MUTE
PAUSE
REDIAL MEM
I
E
V
W
E
R
4
PQRS
7
*
ANSW
CHANNEL FLASHINT
PROG
button
PROG
DELETEDIAL
TALK
S
/
I
K
P
T
Y
S
O
A
L
P
P
DEF3ABC
21
MNO6JKL5GHI
WXYZ9TUV
8
A
S
R
E
E
OPER0TONE
#
Page 31

SETTING THE CURRENT DAY/TIME
WXYZ9TUV
8
PQRS
7
MNO6JKL5GHI
4
DEF3ABC
21
#
OPER0TONE
*
M
E
S
S
A
G
E
S
FORMAT ANNOUNCE
DELETEDIAL
PLAY/STOP
HANDSET
VOLUME
REDIAL/
PAUSE MEMORY FLASH
PAGE/INTERCOM
MUTE HOLD
SPEAKER
IN USE
PROG
MEMO ANSWER
ON/OFF
R
E
V
I
E
W
M
E
S
S
A
G
E
S
/
C
A
L
L
E
R
I
D
NOTES: This setting is for the base only.
Time is transmitted automatically by your
local phone company as part of Caller ID
service. If you have subscribed to Caller ID,
the current time will be set automatically
when your first CID call is received.
Otherwise, you can set the time manually.
REVIEW buttons
PROG button
1. Press and release PROG button until
DAY
shows on the display.
SET
2. Use REVIEW down arrow button on the
base to select current day.
3. Press the PROG button again and
TIME
shows on the display.
SET
4. Press a numeric key to enter the first
digit of the hour.
5. Press a numeric key to enter the second
digit of the hour.
PROG button
31
Page 32

6. Press a numeric key to enter the first
digit of the minute.
7. Press a numeric key to enter the second
digit of the minute.
8. Use REVIEW up or down arrow buttons
on the base to select AM or PM.
9. Press and release PROG again to store
the new day/time. A new day/time will be
announced.
NOTE: You can press and release PROG to
review the settings. To exit, press PROG
until you have exited the menu.
PROG button
PAGE/INTERCOM
REVIEW buttons
FORMAT ANNOUNCE
A
S
G
S
E
E
S
DELETEDIAL
M
PLAY/STOP
R
E
V
W
I
E
M
E
S
D
I
S
A
R
G
E
L
E
L
S
/
A
C
MEMO ANSWER
ON/OFF
HANDSET
REDIAL/
VOLUME
PAUSE MEMORY FLASH
PROG
DEF3ABC
21
MNO6JKL5GHI
4
WXYZ9TUV
PQRS
8
7
IN USE
OPER0TONE
#
*
MUTE HOLD
SPEAKER
32
Page 33

VOLUME CONTROL
WXYZ9TUV
8
PQRS
7
MNO6JKL5GHI
4
DEF3ABC
21
#
OPER0TONE
*
M
E
S
S
A
G
E
S
FORMAT ANNOUNCE
DELETEDIAL
PLAY/STOP
HANDSET
VOLUME
REDIAL/
PAUSE MEMORY FLASH
PAGE/INTERCOM
MUTE HOLD
SPEAKER
IN USE
PROG
MEMO ANSWER
ON/OFF
R
E
V
I
E
W
M
E
S
S
A
G
E
S
/
C
A
L
L
E
R
I
D
CORDED HANDSET
Adjust the handset receiver volume by
pressing the HANDSET VOLUME button on
the base unit. There are four volume
settings.
SPEAKERPHONE AND ANSWERING SYSTEM
Speakerphone and answering system
volume is adjusted with the slide control
located on the right side of the base unit.
CORDLESS HANDSET
Cordless handset receiver volume is
adjusted for four volume levels by pressing
the VOLUME/CID REVIEW buttons on the
cordless handset. Each press of the
VOLUME/CID REVIEW button adjusts the
receiver volume by one level. When the
maximum or minimum volume level is
reached, the phone beeps twice.
HANDSET VOLUME button
Speakerphone/answering
system volume control
VOLUME
/CID
REVIEW
buttons
FORMAT MUTE
PAUSE
REDIAL MEM
I
E
V
W
E
R
4
PQRS
7
*
ANSW
CHANNEL FLASHINT
PROG
DELETEDIAL
TALK
S
/
I
K
P
T
Y
S
O
A
L
P
P
DEF3ABC
21
MNO6JKL5GHI
WXYZ9TUV
8
A
S
R
E
E
OPER0TONE
#
33
Page 34

TELEPHONE OPERATION
WXYZ9TUV
8
PQRS
7
MNO6JKL5GHI
4
DEF3ABC
21
#
OPER0TONE
*
M
E
S
S
A
G
E
S
FORMAT ANNOUNCE
DELETEDIAL
PLAY/STOP
HANDSET
VOLUME
REDIAL/
PAUSE MEMORY FLASH
PAGE/INTERCOM
MUTE HOLD
SPEAKER
IN USE
PROG
MEMO ANSWER
ON/OFF
R
E
V
I
E
W
M
E
S
S
A
G
E
S
/
C
A
L
L
E
R
I
D
IN USE INDICATOR
You know the phone is on when the IN USE
indicator on the base comes on.
RECEIVING A CALL
Check the display on the base or cordless
handset to see who is calling.
Using the Cordless Handset — To answer a
call you must press the TALK button on the
handset. The IN USE indicator on the base
comes on whenever the cordless handset is
on. When finished, press TALK to hang up.
Using the Base — Lift the handset, or press
the SPEAKER button.
TALK
button
FORMAT MUTE
PAUSE
REDIAL MEM
I
E
V
W
E
R
4
PQRS
7
*
ANSW
CHANNEL FLASHINT
PROG
DELETEDIAL
TALK
S
/
I
K
P
T
Y
S
O
A
L
P
P
DEF3ABC
21
MNO6JKL5GHI
WXYZ9TUV
8
A
S
R
E
E
OPER0TONE
#
34
In use indicator
SPEAKER button
Page 35

MAKING A CALL
WXYZ9TUV
8
PQRS
7
MNO6JKL5GHI
4
DEF3ABC
21
#
OPER0TONE
*
M
E
S
S
A
G
E
S
FORMAT ANNOUNCE
DELETEDIAL
PLAY/STOP
HANDSET
VOLUME
REDIAL/
PAUSE MEMORY FLASH
PAGE/INTERCOM
MUTE HOLD
SPEAKER
IN USE
PROG
MEMO ANSWER
ON/OFF
R
E
V
I
E
W
M
E
S
S
A
G
E
S
/
C
A
L
L
E
R
I
D
From the Corded Handset — Lift the corded
handset. Wait for a dial tone. Dial the
desired number.
From the Cordless Handset — Press the
TALK button. Wait for a dial tone. Dial
desired number.
Using the Base — Press the SPEAKER
button. Wait for a dial tone. Dial desired
number.
TALK
button
PROG
FORMAT MUTE
DELETEDIAL
TALK
PAUSE
REDIAL MEM
S
I
/
I
K
E
P
V
T
Y
W
S
E
O
A
R
L
P
P
DEF3ABC
21
MNO6JKL5GHI
4
WXYZ9TUV
PQRS
8
7
A
S
R
E
E
OPER0TONE
#
*
ANSW
CHANNEL FLASHINT
SPEAKER button
35
Page 36

MANUAL CHANNEL SELECTION
While talking, you might need to manually
change the channel in order to reduce static
caused by baby monitors, garage door
openers, or other cordless phones. Press
and release the CHANNEL button to
advance to the next clear channel.
DURATION COUNTER
After you press TALK on the cordless
handset, or lift the corded handset, or press
the SPEAKER button on the base the builtin call duration counter shows on the
display and begins counting the length of
time of the call.
AUTO STANDBY
Placing the cordless handset in the
recharge cradle while the handset is off the
hook automatically hangs up the phone.
FORMAT MUTE
TALK
PAUSE
REDIAL MEM
I
/
E
V
Y
W
E
A
R
L
P
4
PQRS
7
A
R
E
OPER0TONE
*
ANSW
CHANNEL FLASHINT
CHANNEL button
PROG
DELETEDIAL
S
I
K
P
T
S
O
P
DEF3ABC
21
MNO6JKL5GHI
WXYZ9TUV
8
S
E
#
36
Page 37

RINGER SWITCH
WXYZ9TUV
8
PQRS
7
MNO6JKL5GHI
4
DEF3ABC
21
#
OPER0TONE
*
M
E
S
S
A
G
E
S
FORMAT ANNOUNCE
DELETEDIAL
PLAY/STOP
HANDSET
VOLUME
REDIAL/
PAUSE MEMORY FLASH
PAGE/INTERCOM
MUTE HOLD
SPEAKER
IN USE
PROG
MEMO ANSWER
ON/OFF
R
E
V
I
E
W
M
E
S
S
A
G
E
S
/
C
A
L
L
E
R
I
D
Cordless Handset — A two-position switch
permits the cordless handset ringer to be
turned off or on.
Base Unit — A three-position switch
permits the base unit ringer volume to be
set to HI, LO, or OFF.
The appropriate ringer switch must be on
for the cordless handset or base unit to ring
during incoming calls.
Ringer ON/
OFF switch
FORMAT MUTE
PAUSE
REDIAL MEM
I
E
V
W
E
R
4
PQRS
7
*
ANSW
CHANNEL FLASHINT
PROG
DELETEDIAL
TALK
S
/
I
K
P
T
Y
S
O
A
L
P
P
DEF3ABC
21
MNO6JKL5GHI
WXYZ9TUV
8
A
S
R
E
E
OPER0TONE
#
FLASH
Use the FLASH button to activate custom
calling services such as call waiting or call
transfer, which are available through your
local phone company.
TIP: If you use the TALK button on the cordless
handset to activate custom calling service such as
call waiting, you’ll hang up the phone.
Ringer ON/
OFF switch
FLASH button
FLASH button
37
Page 38

LAST NUMBER REDIAL
To redial the last number you dialed:
BASE UNIT
1. Pickup corded handset, or press
SPEAKER button.
2. Press the REDIAL/PAUSE button.
If you get a busy signal, and want to keep
dialing the number, hang up the base unit.
Then, repeat steps 1 and 2.
CORDLESS HANDSET
1. Press TALK button. Wait for dial tone.
2. Press the REDIAL/PAUSE button.
If you get a busy signal, and want to keep
dialing the number, press TALK to turn off the
cordless handset. Then, repeat steps 1 and 2.
PAGE/INTERCOM
REDIAL/PAUSE
button
FORMAT ANNOUNCE
A
S
G
S
E
E
S
M
PLAY/STOP
R
E
V
W
I
E
M
E
S
D
I
S
A
R
G
E
L
E
L
S
/
A
C
MEMO ANSWER
HANDSET
REDIAL/
VOLUME
PAUSE MEMORY FLASH
PROG
DEF3ABC
21
MNO6JKL5GHI
4
WXYZ9TUV
PQRS
8
7
IN USE
OPER0TONE
*
MUTE HOLD
SPEAKER
SPEAKER button
DELETEDIAL
ON/OFF
#
38
TALK
button
REDIAL/
PAUSE
button
FORMAT MUTE
PAUSE
REDIAL MEM
I
E
V
W
E
R
4
PQRS
7
*
ANSW
CHANNEL FLASHINT
PROG
DELETEDIAL
TALK
S
/
I
K
P
T
Y
S
O
A
L
P
P
DEF3ABC
21
MNO6JKL5GHI
WXYZ9TUV
8
A
S
R
E
E
OPER0TONE
#
Page 39

HOLD
WXYZ9TUV
8
PQRS
7
MNO6JKL5GHI
4
DEF3ABC
21
#
OPER0TONE
*
M
E
S
S
A
G
E
S
FORMAT ANNOUNCE
DELETEDIAL
PLAY/STOP
HANDSET
VOLUME
REDIAL/
PAUSE MEMORY FLASH
PAGE/INTERCOM
MUTE HOLD
SPEAKER
IN USE
PROG
MEMO ANSWER
ON/OFF
R
E
V
I
E
W
M
E
S
S
A
G
E
S
/
C
A
L
L
E
R
I
D
Press the HOLD button to put a call on hold.
The HOLD indicator will blink at halfsecond intervals.
To take a call off hold, press the HOLD
button again and the HOLD indicator will
turn off.
• To switch a call on hold from the base to
the cordless handset, press TALK on the
handset.
If the call is resumed from a non-system
phone at a separate extension, the system
will release the line to the non-system
phone, and the HOLD indicator will turn off.
TALK
button
FORMAT MUTE
PAUSE
REDIAL MEM
I
E
V
W
E
R
4
PQRS
7
*
ANSW
CHANNEL FLASHINT
PROG
DELETEDIAL
TALK
S
/
I
K
P
T
Y
S
O
A
L
P
P
DEF3ABC
21
MNO6JKL5GHI
WXYZ9TUV
8
A
S
R
E
E
OPER0TONE
#
HOLD indicator
HOLD
button
39
Page 40

PAGING THE CORDLESS
HANDSET
This feature helps to locate a misplaced
cordless handset.
Press and release the PAGE button on the
base. The display shows
PAGING
. The
handset beeps continuously and displays
PAGE YOU
for about 2 minutes or until you
press INT or TALK on the handset or PAGE
on the base.
NOTE: You can still page the handset with
the ringer off.
MUTE
To prevent the person you are speaking to
from hearing you while on a call, press the
MUTE button on the handset or (MUTE on
the base).
MUTE indicator on the base comes on
when using the base. Press MUTE again to
cancel.
MUTE
shows in the display. The
PAGE button
TALK
button
IN USE
PAGE/INTERCOM
FORMAT MUTE
PAUSE
REDIAL MEM
I
E
V
W
E
R
4
PQRS
7
*
ANSW
CHANNEL FLASHINT
TALK
S
/
Y
A
L
P
21
8
A
S
R
E
OPER0TONE
FORMAT ANNOUNCE
A
S
G
S
E
E
S
M
PLAY/STOP
R
E
V
W
I
E
M
E
S
D
I
S
A
R
G
E
L
E
L
S
/
A
C
MEMO ANSWER
HANDSET
REDIAL/
VOLUME
PAUSE MEMORY FLASH
PROG
DEF3ABC
21
MNO6JKL5GHI
4
WXYZ9TUV
PQRS
8
7
OPER0TONE
*
MUTE HOLD
SPEAKER
MUTE button
PROG
DELETEDIAL
I
K
P
T
S
O
P
DEF3ABC
MNO6JKL5GHI
WXYZ9TUV
E
#
DELETEDIAL
ON/OFF
#
MUTE
button
40
INT button
Page 41

PRIVACY MODE
WXYZ9TUV
8
PQRS
7
MNO6JKL5GHI
4
DEF3ABC
21
#
OPER0TONE
*
M
E
S
S
A
G
E
S
FORMAT ANNOUNCE
DELETEDIAL
PLAY/STOP
HANDSET
VOLUME
REDIAL/
PAUSE MEMORY FLASH
PAGE/INTERCOM
MUTE HOLD
SPEAKER
IN USE
PROG
MEMO ANSWER
ON/OFF
R
E
V
I
E
W
M
E
S
S
A
G
E
S
/
C
A
L
L
E
R
I
D
Privacy mode allows an initial user (at
handset or base) to prevent anyone from
interrupting the conversation by picking up
the line. During Privacy mode, if a second
user attempts to pick up the line, a warning
tone will sound, signifying that the line is
already in use and prevents the second
user from connecting to the conversation.
This feature does not prevent another user
from connecting by a parallel or extension
phone.
ENABLING PRIVACY MODE
While in talk mode, press and hold the
FORMAT button for more than 2 seconds
until you hear a tone. Then press “#”. A
confirmation tone sounds from the
handset, and
the display.
PRIVACY ENABLE
shows on
FORMAT button
FORMAT
button
FORMAT MUTE
PAUSE
REDIAL MEM
I
E
V
W
E
R
4
PQRS
7
*
ANSW
CHANNEL FLASHINT
PROG
DELETEDIAL
TALK
S
/
I
K
P
T
Y
S
O
A
L
P
P
DEF3ABC
21
MNO6JKL5GHI
WXYZ9TUV
8
A
S
R
E
E
OPER0TONE
#
41
Page 42

DISABLING PRIVACY MODE
WXYZ9TUV
8
PQRS
7
MNO6JKL5GHI
4
DEF3ABC
21
#
OPER0TONE
*
M
E
S
S
A
G
E
S
FORMAT ANNOUNCE
DELETEDIAL
PLAY/STOP
HANDSET
VOLUME
REDIAL/
PAUSE MEMORY FLASH
PAGE/INTERCOM
MUTE HOLD
SPEAKER
IN USE
PROG
MEMO ANSWER
ON/OFF
R
E
V
I
E
W
M
E
S
S
A
G
E
S
/
C
A
L
L
E
R
I
D
• Hang up the phone. Privacy Mode is
automatically canceled.
• During a call, press and hold the
FORMAT button for more than 2 seconds
until you hear a tone. Then press “*”. A
confirmation tone comes from the
handset, and
on the display.
PRIVACY DISABLE
appears
FORMAT button
FORMAT
button
FORMAT MUTE
PAUSE
REDIAL MEM
I
E
V
W
E
R
4
PQRS
7
*
ANSW
CHANNEL FLASHINT
PROG
DELETEDIAL
TALK
S
/
I
K
P
T
Y
S
O
A
L
P
P
DEF3ABC
21
MNO6JKL5GHI
WXYZ9TUV
8
A
S
R
E
E
OPER0TONE
#
42
Page 43

TEMPORARY TONE DIALING
This feature is useful only if you do not
have touch-tone service. Temporary Tone
Dialing enables pulse (rotary) service
phone users to access touch-tone services
offered by banks, credit card companies,
etc. If the TONE/PULSE switch is set to
PULSE, you can press the TONE button to
temporarily make the phone touch-tone
compatible. To get information about your
bank account, for example, you would:
1. Call the bank’s information line.
2. Press the TONE key, denoted with (*) on
the keypad, when your call is answered.
3. Follow the voice menu instructions to
get the information. When you hang up,
the phone goes back to pulse (rotary)
service.
TONE
button
TONE/PULSE switch
FORMAT ANNOUNCE
A
S
G
S
E
E
S
DELETEDIAL
M
PLAY/STOP
R
E
V
W
I
E
M
E
S
D
I
S
A
R
G
E
L
E
L
S
/
A
C
MEMO ANSWER
ON/OFF
HANDSET
REDIAL/
VOLUME
PAUSE MEMORY FLASH
PROG
DEF3ABC
21
MNO6JKL5GHI
4
WXYZ9TUV
PQRS
8
7
IN USE
OPER0TONE
#
*
MUTE HOLD
PAGE/INTERCOM
SPEAKER
TONE button
PROG
FORMAT MUTE
DELETEDIAL
TALK
PAUSE
REDIAL MEM
S
I
/
I
K
E
P
V
T
Y
W
S
E
O
A
R
L
P
P
DEF3ABC
21
MNO6JKL5GHI
4
WXYZ9TUV
PQRS
8
7
A
S
R
E
E
OPER0TONE
#
*
ANSW
CHANNEL FLASHINT
43
Page 44

FULL DUPLEX SPEAKERPHONE OPERATION
USING THE BASE UNIT
SPEAKERPHONE
For best speakerphone performance, avoid
the following:
• Areas with high background noise. (The
microphone might pick up these sounds.)
• Surfaces affected by vibration.
• Recessed areas such as in a corner,
under a cupboard, or next to a cabinet,
which can generate an echo effect.
NOTE: To maximize speakerphone volume,
remove the handset from the cradle.
NOTE: The speakerphone will reach full
duplex performance shortly after the line is
established.
44
Page 45

Because this is a full-duplex speakerphone,
WXYZ9TUV
8
PQRS
7
MNO6JKL5GHI
4
DEF3ABC
21
#
OPER0TONE
*
M
E
S
S
A
G
E
S
FORMAT ANNOUNCE
DELETEDIAL
PLAY/STOP
HANDSET
VOLUME
REDIAL/
PAUSE MEMORY FLASH
PAGE/INTERCOM
MUTE HOLD
SPEAKER
IN USE
PROG
MEMO ANSWER
ON/OFF
R
E
V
I
E
W
M
E
S
S
A
G
E
S
/
C
A
L
L
E
R
I
D
you can hear and talk at the same time just
as you can when using the handset.
Note the following guidelines when you use
the speakerphone.
• Stay reasonably close to the phone so
that you can be clearly heard by the
person to whom you are speaking.
• The SPEAKER indicator is on when the
speakerphone is in use.
RECEIVING A CALL WITH
SPEAKERPHONE
1. When the phone rings, press and release
the SPEAKER button on the base unit and
talk normally into the built-in microphone
at a minimum distance of 8-9 inches.
SPEAKER indicator
SPEAKER button
45
Page 46

2. Adjust speakerphone volume by sliding
WXYZ9TUV
8
PQRS
7
MNO6JKL5GHI
4
DEF3ABC
21
#
OPER0TONE
*
M
E
S
S
A
G
E
S
FORMAT ANNOUNCE
DELETEDIAL
PLAY/STOP
HANDSET
VOLUME
REDIAL/
PAUSE MEMORY FLASH
PAGE/INTERCOM
MUTE HOLD
SPEAKER
IN USE
PROG
MEMO ANSWER
ON/OFF
R
E
V
I
E
W
M
E
S
S
A
G
E
S
/
C
A
L
L
E
R
I
D
the VOLUME control on the right side of
the base unit.
3. To end the call, press the SPEAKER
button again.
MAKING A CALL WITH
SPEAKERPHONE
1. Press and release the SPEAKER button
on the base unit and wait for a dial tone.
2. Dial the number (using a memory dial
number, if desired.) The number you
dialed shows on the display.
3. When the party answers, adjust
speakerphone volume by sliding the
speakerphone VOLUME control on the
right side of the base unit.
4. To end the call, press the SPEAKER
button again.
SPEAKER button
Speakerphone
VOLUME control
46
Page 47

SWITCHING BETWEEN SPEAKER
HANDSET
AND
You can switch between speakerphone and
either handset after dialing a number, or
any time during a conversation.
Speaker to Handset — Press TALK on the
cordless handset or lift the corded handset,
then press the SPEAKER button.
Handset to Speaker — Press the SPEAKER
button, then hang up the handset.
FORMAT ANNOUNCE
M
MEMO ANSWER
HANDSET
REDIAL/
VOLUME
PAUSE MEMORY FLASH
PROG
4
PQRS
7
IN USE
*
MUTE HOLD
PAGE/INTERCOM
SPEAKER button
A
S
G
S
E
E
S
DELETEDIAL
M
PLAY/STOP
R
E
V
W
I
E
E
S
D
I
S
A
R
G
E
L
E
L
S
/
A
C
ON/OFF
DEF3ABC
21
MNO6JKL5GHI
WXYZ9TUV
8
OPER0TONE
#
SPEAKER
47
Page 48

INTERCOM OPERATION
WXYZ9TUV
8
PQRS
7
MNO6JKL5GHI
4
DEF3ABC
21
#
OPER0TONE
*
M
E
S
S
A
G
E
S
FORMAT ANNOUNCE
DELETEDIAL
PLAY/STOP
HANDSET
VOLUME
REDIAL/
PAUSE MEMORY FLASH
PAGE/INTERCOM
MUTE HOLD
SPEAKER
IN USE
PROG
MEMO ANSWER
ON/OFF
R
E
V
I
E
W
M
E
S
S
A
G
E
S
/
C
A
L
L
E
R
I
D
INTERCOM CALLING
The intercom feature of your phone system
allows you to have an unlimited-duration,
two-way conversation between the
cordless handset and the base unit without
tying up the telephone line. Since the
telephone line is not being used, you can
still receive incoming calls.
USING INTERCOM
FROM THE BASE
1. Make sure the phone is OFF.
2. Press PAGE/INTERCOM. A paging tone
sounds at the handset and base. (To
cancel intercom, press PAGE/INTERCOM
again.)
3. Wait for the person with the handset to
press the INT button.
4. When finished, press PAGE/INTERCOM
on the base to deactivate the intercom.
PAGE/INTERCOM button
PROG
FORMAT MUTE
DELETEDIAL
TALK
PAUSE
REDIAL MEM
S
I
/
I
K
E
P
V
T
Y
W
S
E
O
A
R
L
P
P
DEF3ABC
21
MNO6JKL5GHI
4
WXYZ9TUV
PQRS
8
7
A
S
R
E
E
OPER0TONE
#
*
ANSW
CHANNEL FLASHINT
48
INT button
Page 49

FROM THE CORDLESS HANDSET
1. Make sure the phone is OFF.
2. Press the INT button. A paging tone
sounds at the base and handset. (To
cancel intercom, press INT again.)
3. Wait for the person near the base to
press the PAGE/INTERCOM button.
4. When finished, press INT on the cordless
handset to deactivate the intercom.
FORMAT ANNOUNCE
A
S
G
S
E
E
S
M
PLAY/STOP
R
E
V
W
I
E
M
E
S
D
I
S
A
R
G
E
L
E
L
S
/
A
C
MEMO ANSWER
HANDSET
REDIAL/
VOLUME
PAUSE MEMORY FLASH
PROG
21
4
PQRS
8
7
IN USE
OPER0TONE
*
MUTE HOLD
PAGE/INTERCOM
SPEAKER
PAGE/INTERCOM button
PROG
FORMAT MUTE
DELETEDIAL
TALK
PAUSE
REDIAL MEM
S
I
/
I
K
E
P
V
T
Y
W
S
E
O
A
R
L
P
P
DEF3ABC
21
MNO6JKL5GHI
4
WXYZ9TUV
PQRS
8
7
A
S
R
E
E
OPER0TONE
#
*
ANSW
CHANNEL FLASHINT
DELETEDIAL
ON/OFF
DEF3ABC
MNO6JKL5GHI
WXYZ9TUV
#
INT button
49
Page 50

ADVANCED INTERCOM
WXYZ9TUV
8
PQRS
7
MNO6JKL5GHI
4
DEF3ABC
21
#
OPER0TONE
*
M
E
S
S
A
G
E
S
FORMAT ANNOUNCE
DELETEDIAL
PLAY/STOP
HANDSET
VOLUME
REDIAL/
PAUSE MEMORY FLASH
PAGE/INTERCOM
MUTE HOLD
SPEAKER
IN USE
PROG
MEMO ANSWER
ON/OFF
R
E
V
I
E
W
M
E
S
S
A
G
E
S
/
C
A
L
L
E
R
I
D
FEATURES
HANDLING AN INCOMING TELEPHONE
CALL DURING AN INTERCOM CALL
During an intercom call, if a telephone call
comes in, both users are alerted as follows:
Cordless Handset: Receives a ringing tone.
To take the call, press TALK. (The intercom
connection is discontinued.)
Base Unit: Speaker rings and the IN USE
indicator blinks. If the base unit speaker is
being used for the intercom call, press the
SPEAKER button. If the base unit corded
handset is being used, press and release
the hook switch on the base.
TALK
button
FORMAT MUTE
PAUSE
REDIAL MEM
I
E
V
W
E
R
4
PQRS
7
*
ANSW
CHANNEL FLASHINT
PROG
DELETEDIAL
TALK
S
/
I
K
P
T
Y
S
O
A
L
P
P
DEF3ABC
21
MNO6JKL5GHI
WXYZ9TUV
8
A
S
R
E
E
OPER0TONE
#
SPEAKER buttonIN USE indicator
50
Page 51

USING INTERCOM WHILE YOU
HAVE A TELEPHONE CALL
During a telephone call, you can use the
Intercom Paging function to page the other
unit and set up a private (2-way) intercom
conversation with another user, meanwhile
placing the telephone call on hold. Or, you
can create a 3-way conversation between
the telephone caller, the base unit, and the
cordless handset. You can also transfer the
telephone call to the opposite unit.
NOTE: Before intercom paging the other
unit, you must decide whether you want to
create a 2-way conversation or a 3-way
conversation. To set up a 2-way conversation,
your unit must be in Privacy mode when you
intercom page the other unit in order for
the external caller to remain on hold and be
unable to hear the resulting intercom
conversation.
51
Page 52

SETTING UP A TWO-WAY INTERCOM
WXYZ9TUV
8
PQRS
7
MNO6JKL5GHI
4
DEF3ABC
21
#
OPER0TONE
*
M
E
S
S
A
G
E
S
FORMAT ANNOUNCE
DELETEDIAL
PLAY/STOP
HANDSET
VOLUME
REDIAL/
PAUSE MEMORY FLASH
PAGE/INTERCOM
MUTE HOLD
SPEAKER
IN USE
PROG
MEMO ANSWER
ON/OFF
R
E
V
I
E
W
M
E
S
S
A
G
E
S
/
C
A
L
L
E
R
I
D
CONVERSATION WHILE YOU HAVE A
TELEPHONE CALL
1. Press the PAGE/INTERCOM on the base
or INT button on the handset where the
outside call is in progress.
The external caller is placed on hold. At
the base, the PAGE/INTERCOM indicator
blinks and a paging tone sounds for 2
minutes at both units.
displayed on the originating unit and
PAGE YOU
on the other unit.
2. To answer the intercom page:
PAGING
is
FORMAT MUTE
TALK
PAUSE
REDIAL MEM
I
E
V
W
E
A
R
L
P
4
PQRS
7
E
OPER0TONE
*
ANSW
CHANNEL FLASHINT
INT button
PAGE/INTERCOM
button
PROG
DELETEDIAL
S
/
I
K
P
T
Y
S
O
P
DEF3ABC
21
MNO6JKL5GHI
WXYZ9TUV
8
A
S
R
E
#
52
Page 53

AT THE BASE UNIT
WXYZ9TUV
8
PQRS
7
MNO6JKL5GHI
4
DEF3ABC
21
#
OPER0TONE
*
M
E
S
S
A
G
E
S
FORMAT ANNOUNCE
DELETEDIAL
PLAY/STOP
HANDSET
VOLUME
REDIAL/
PAUSE MEMORY FLASH
PAGE/INTERCOM
MUTE HOLD
SPEAKER
IN USE
PROG
MEMO ANSWER
ON/OFF
R
E
V
I
E
W
M
E
S
S
A
G
E
S
/
C
A
L
L
E
R
I
D
• Press the PAGE/INTERCOM button.
AT THE HANDSET
• Press the INT button. Both users can
now talk privately in Intercom mode.
SETTING UP A THREE-WAY
CONVERSATION USING INTERCOM
1. Press the PAGE/INTERCOM on the base
or INT button on the handset while the
outside call is in progress.
The external caller is placed on hold. On
the base the PAGE/INTERCOM indicator
blinks, and a paging tone sounds for 2
minutes on the base and handset.
PAGING
unit and
is displayed on the originating
PAGE YOU
on the other unit.
FORMAT MUTE
TALK
PAUSE
REDIAL MEM
I
/
E
V
Y
W
E
A
R
L
P
4
PQRS
7
A
R
E
OPER0TONE
*
ANSW
CHANNEL FLASHINT
INT button
PAGE/INTERCOM
button
PROG
DELETEDIAL
S
I
K
P
T
S
O
P
DEF3ABC
21
MNO6JKL5GHI
WXYZ9TUV
8
S
E
#
53
Page 54

2. If the originating unit is the handset:
press the SPEAKER button or lift the
corded handset. Three-way conversation
begins.
3. If the originating unit is the base unit:
Three-way conversation automatically
begins when TALK is pressed on the
cordless handset.
TALK
button
FORMAT MUTE
PAUSE
REDIAL MEM
I
E
V
W
E
R
4
PQRS
7
*
ANSW
CHANNEL FLASHINT
IN USE
PAGE/INTERCOM
PROG
DELETEDIAL
TALK
S
/
T
Y
S
O
A
L
P
P
DEF3ABC
21
MNO6JKL5GHI
WXYZ9TUV
8
A
S
R
E
E
OPER0TONE
#
MEMO ANSWER
HANDSET
VOLUME
PROG
MUTE HOLD
I
K
P
FORMAT ANNOUNCE
A
S
G
S
E
M
PLAY/STOP
R
E
V
I
E
M
E
S
S
A
G
E
S
/
A
C
REDIAL/
PAUSE MEMORY FLASH
21
4
PQRS
8
7
OPER0TONE
*
SPEAKER
SPEAKER
button
E
S
DELETEDIAL
W
D
I
R
E
L
L
ON/OFF
DEF3ABC
MNO6JKL5GHI
WXYZ9TUV
#
54
Page 55

MEMORY
The handset and base each have their own
separate memory dialing storage areas. Ten
15-character names and 24-digit telephone
numbers can be stored in the cordless
handset memory. Ten 15-character names
and 24-digit telephone numbers can be
stored in the base memory.
55
Page 56

STORING A NAME/NUMBER IN
WXYZ9TUV
8
PQRS
7
MNO6JKL5GHI
4
DEF3ABC
21
#
OPER0TONE
*
M
E
S
S
A
G
E
S
FORMAT ANNOUNCE
DELETEDIAL
PLAY/STOP
HANDSET
VOLUME
REDIAL/
PAUSE MEMORY FLASH
PAGE/INTERCOM
MUTE HOLD
SPEAKER
IN USE
PROG
MEMO ANSWER
ON/OFF
R
E
V
I
E
W
M
E
S
S
A
G
E
S
/
C
A
L
L
E
R
I
D
MEMORY
1. Press the MEM or MEMORY button.
2. Press the desired memory location (0
through 9 keys). If the memory location
is occupied, the memory location and
stored name and number appear on the
screen. If the memory location is empty,
EMPTY
3. Press the MEM or MEMORY button
again. The display shows
4. Use the keypad to store a name (up to 15
characters.) More than one letter is
stored in each of the number keys. For
example, to enter Bill Smith, press the 2
key twice for the letter B. Press the 4 key
3 times for the letter I. Press the 5 key 3
times for the letter L, and then press the
FORMAT button. Press the 5 key 3 times
again for the second letter L. Press the 1
key to enter a space. Press the 7 key 4
times for the letter S. Press the 6 key 1
appears in the display.
ENTER NAME
.
FORMAT
button
PROG
FORMAT MUTE
DELETEDIAL
TALK
PAUSE
REDIAL MEM
S
I
/
I
K
E
P
V
T
Y
W
S
E
O
A
R
L
P
P
DEF3ABC
21
MNO6JKL5GHI
4
WXYZ9TUV
PQRS
8
7
A
S
R
E
E
OPER0TONE
#
*
ANSW
CHANNEL FLASHINT
FORMAT button
MEMORY button
MEM
button
56
Page 57

time for the letter M. Press the 4 key 3
WXYZ9TUV
8
PQRS
7
MNO6JKL5GHI
4
DEF3ABC
21
#
OPER0TONE
*
M
E
S
S
A
G
E
S
FORMAT ANNOUNCE
DELETEDIAL
PLAY/STOP
HANDSET
VOLUME
REDIAL/
PAUSE MEMORY FLASH
PAGE/INTERCOM
MUTE HOLD
SPEAKER
IN USE
PROG
MEMO ANSWER
ON/OFF
R
E
V
I
E
W
M
E
S
S
A
G
E
S
/
C
A
L
L
E
R
I
D
times for the letter I. Press the 8 key 1
time for the letter T. Press the 4 key twice
for the letter H.
NOTE: If you don’t want to enter the name,
skip step 4.
NOTE: If you’re using two letters
consecutively that are stored in the same
number key, you must press FORMAT
between the letters.
5. Press MEM or MEMORY again. The
display shows
ENTER TEL NUMBER
.
6. Use the keypad to enter the number you
want to store (up to 24 digits.)
7. Press MEM or MEMORY again to store
the number.
FORMAT
button
PROG
FORMAT MUTE
DELETEDIAL
TALK
PAUSE
REDIAL MEM
S
I
/
I
K
E
P
V
T
Y
W
S
E
O
A
R
L
P
P
DEF3ABC
21
MNO6JKL5GHI
4
WXYZ9TUV
PQRS
8
7
A
S
R
E
E
OPER0TONE
#
*
ANSW
CHANNEL FLASHINT
FORMAT button
MEMORY button
MEM
button
57
Page 58

INSERTING A PAUSE IN THE
WXYZ9TUV
8
PQRS
7
MNO6JKL5GHI
4
DEF3ABC
21
#
OPER0TONE
*
M
E
S
S
A
G
E
S
FORMAT ANNOUNCE
DELETEDIAL
PLAY/STOP
HANDSET
VOLUME
REDIAL/
PAUSE MEMORY FLASH
PAGE/INTERCOM
MUTE HOLD
SPEAKER
IN USE
PROG
MEMO ANSWER
ON/OFF
R
E
V
I
E
W
M
E
S
S
A
G
E
S
/
C
A
L
L
E
R
I
D
DIALING SEQUENCE
Press the PAUSE button to insert a delay in
the dialing sequence of a stored telephone
number when a pause is needed to wait for
a dial tone (for example, after you dial 9 for
an outside line, or wait for a computer
access tone.) Each pause counts as 1 digit
in the dialing sequence.
REVIEWING, CHANGING OR
CID
REVIEW
buttons
PAUSE
button
FORMAT MUTE
PAUSE
REDIAL MEM
I
E
V
W
E
R
4
PQRS
7
*
ANSW
CHANNEL FLASHINT
MEM
button
PROG
DELETEDIAL
TALK
S
/
I
K
P
T
Y
S
O
A
L
P
P
DEF3ABC
21
MNO6JKL5GHI
WXYZ9TUV
8
A
S
R
E
E
OPER0TONE
#
DELETING STORED NUMBERS
To Review: press MEM or MEMORY, then
press the CID REVIEW buttons on the
cordless handset (or memory location
number) or REVIEW up or down arrow
buttons on the base to scroll through the
stored numbers.
58
REVIEW buttons
MEMORY button
Page 59

To Change: Use the same procedure to
WXYZ9TUV
8
PQRS
7
MNO6JKL5GHI
4
DEF3ABC
21
#
OPER0TONE
*
M
E
S
S
A
G
E
S
FORMAT ANNOUNCE
DELETEDIAL
PLAY/STOP
HANDSET
VOLUME
REDIAL/
PAUSE MEMORY FLASH
PAGE/INTERCOM
MUTE HOLD
SPEAKER
IN USE
PROG
MEMO ANSWER
ON/OFF
R
E
V
I
E
W
M
E
S
S
A
G
E
S
/
C
A
L
L
E
R
I
D
change a stored number as you do to store
a number—you’re just replacing one stored
phone number with a different one.
To Delete: Press MEM or MEMORY, then
press the CID REVIEW buttons on the
cordless handset or REVIEW up or down
arrow buttons on the base to scroll to a
desired entry.
1. While the entry is displayed, press
DELETE to mark the entry for deletion.
The display shows
ERASE MEMO?
2. Press DELETE a second time to delete
the entry.
NOTE: If you don’t want to change or
delete a number, simply wait a few seconds
for the unit to exit Review mode.
DELETED
is displayed.
CID
REVIEW
buttons
PROG
FORMAT MUTE
DELETEDIAL
TALK
PAUSE
REDIAL MEM
S
I
/
I
K
E
P
V
T
Y
W
S
E
O
A
R
L
P
P
DEF3ABC
21
MNO6JKL5GHI
4
WXYZ9TUV
PQRS
8
7
A
S
R
E
E
OPER0TONE
#
*
ANSW
CHANNEL FLASHINT
REVIEW buttons
MEMORY button
DELETE
button
MEM
button
59
Page 60

DIALING A STORED NUMBER
DURING REVIEW
While reviewing stored numbers, you can
dial any stored number by pressing DIAL.
NOTE: If you don’t want to dial a number,
simply wait a few seconds for the unit to exit
the review mode.
DIALING A STORED NUMBER
Cordless Handset:
Make sure the phone is ON.
1. Press MEM.
2. Press the number (0-9) for the desired
memory location. The number dials
automatically.
DIAL
button
FORMAT MUTE
PAUSE
REDIAL MEM
I
E
V
W
E
R
4
PQRS
7
*
ANSW
CHANNEL FLASHINT
PROG
DELETEDIAL
TALK
S
/
I
K
P
T
Y
S
O
A
L
P
P
DEF3ABC
21
8
A
S
R
E
E
OPER0TONE
MEM
MNO6JKL5GHI
WXYZ9TUV
button
#
60
Page 61

Base Unit:
Press the SPEAKER button.
1. Press MEMORY.
2. Press the number (0-9) for the desired
memory location. The number dials
automatically.
PAGE/INTERCOM
IN USE
FORMAT ANNOUNCE
A
S
G
S
E
E
S
M
PLAY/STOP
R
E
V
W
I
E
M
E
S
D
I
S
A
R
G
E
L
E
L
S
/
A
C
MEMO ANSWER
HANDSET
REDIAL/
VOLUME
PAUSE MEMORY FLASH
PROG
21
4
PQRS
8
7
OPER0TONE
*
MUTE HOLD
SPEAKER
MEMORY buttonSPEAKER button
DELETEDIAL
ON/OFF
DEF3ABC
MNO6JKL5GHI
WXYZ9TUV
#
61
Page 62

CHAIN DIALING FROM MEMORY
Use this feature to make calls that require a sequence of numbers, such as
a calling card number used for a frequently called long distance number.
The following example shows how you can store each part of the long
dialing sequence and use chain dialing to make a call through a long
distance service:
The Number For Memory Location
Long Distance Access Number 7
Authorization Code 8
Frequently called long distance number 9
Cordless Handset:
Make sure the phone is ON.
1. Press MEM and then press 7.
2. When you hear the access tone, press
MEM and then press 8.
3. At the next access tone, press MEM and
then 9.
FORMAT MUTE
PAUSE
REDIAL MEM
I
E
V
W
E
R
4
PQRS
7
*
ANSW
CHANNEL FLASHINT
PROG
DELETEDIAL
TALK
S
/
I
K
P
T
Y
S
O
A
L
P
P
DEF3ABC
21
8
A
S
R
E
E
OPER0TONE
MEM
MNO6JKL5GHI
WXYZ9TUV
button
#
62
Page 63

Base Unit:
WXYZ9TUV
8
PQRS
7
MNO6JKL5GHI
4
DEF3ABC
21
#
OPER0TONE
*
M
E
S
S
A
G
E
S
FORMAT ANNOUNCE
DELETEDIAL
PLAY/STOP
HANDSET
VOLUME
REDIAL/
PAUSE MEMORY FLASH
PAGE/INTERCOM
MUTE HOLD
SPEAKER
IN USE
PROG
MEMO ANSWER
ON/OFF
R
E
V
I
E
W
M
E
S
S
A
G
E
S
/
C
A
L
L
E
R
I
D
Lift the corded handset, or press the
SPEAKER button.
1. Press MEMORY and then press 7.
2. When you hear the access tone, press
MEMORY and then press 8.
3. At the next access tone, press MEMORY
and then 9.
TIP: Wait for the access tones before
pressing the next memory button or your
call might not go through.
MEMORY buttonSPEAKER button
63
Page 64

CALLER ID OPERATION
This Caller ID telephone system receives and displays information
transmitted by your local telephone company. This information can include
the phone number, date and time; or the name, phone number, and date
and time.
RECEIVING AND STORING CALL RECORDS
When you receive a call, the information is transmitted by the phone
company to your Caller ID telephone between the first and second ring.
The Caller ID information appears on the display for ten seconds while the
phone rings, giving you a chance to monitor the information and decide
whether or not to answer the ringing call.
If you are not at home or cannot answer, the telephone stores the
information so that you can see who called while you were unavailable.
Caller ID memory automatically stores the call number, date, time, phone
number and name, for the last 40 calls. If Caller ID memory is full, a new
call automatically replaces the oldest call in memory.
At any time, you can review the stored information for the last 40 calls.
Any calls received since your last review are marked as
display, to remind you to review them.
NEW
in the
64
Time Date
AM NEW CALL #
PM
Caller ID name
New/Repeat Call/Memory
REPT MEMO
Caller ID phone number
Call sequence number
Page 65

REVIEWING CALL RECORDS
WXYZ9TUV
8
PQRS
7
MNO6JKL5GHI
4
DEF3ABC
21
#
OPER0TONE
*
M
E
S
S
A
G
E
S
FORMAT ANNOUNCE
DELETEDIAL
PLAY/STOP
HANDSET
VOLUME
REDIAL/
PAUSE MEMORY FLASH
PAGE/INTERCOM
MUTE HOLD
SPEAKER
IN USE
PROG
MEMO ANSWER
ON/OFF
R
E
V
I
E
W
M
E
S
S
A
G
E
S
/
C
A
L
L
E
R
I
D
As calls are received and stored, the display
is updated to let you know how many calls
have been received.
• Press the CID REVIEW on the cordless
handset or REVIEW up arrow button on
the base to begin with the oldest call and
scroll toward more recent calls (higher
numbers.) When you reach the newest
call, the display shows
START/END
• Press the CID REVIEW on the cordless
handset or REVIEW down arrow button
on the base to begin with the newest call
and scroll toward older calls (lower
numbers.) When you reach the oldest
call, the display shows
.
START/END
.
CID
REVIEW
buttons
PROG
FORMAT MUTE
DELETEDIAL
TALK
PAUSE
REDIAL MEM
S
I
/
I
K
E
P
V
T
Y
W
S
E
O
A
R
L
P
P
DEF3ABC
21
MNO6JKL5GHI
4
WXYZ9TUV
PQRS
8
7
A
S
R
E
E
OPER0TONE
#
*
ANSW
CHANNEL FLASHINT
REVIEW buttons
65
Page 66

As you review calls, the display shows you
the following information for each call:
• The telephone number of the caller.
• The number of the call, with regard to
the order received.
• The name of the caller, if this service is
available in your area.
NOTE: If a name is received which exceeds
15 characters, the extra characters are
displayed for 3 seconds.
• Time and date the call was received.
•
NEW
appears for all calls that have not
been previously reviewed.
NOTE: Check with your local phone
company regarding name service availability.
66
Page 67

DIALING A CALLER ID
NUMBER
When reviewing any call record in the
Caller ID memory, you can dial back the
caller’s number.
1. Press CID REVIEW on the cordless
handset or REVIEW up or down arrow
buttons on the base until the desired call
record is displayed.
Depending on (a) how the incoming
caller’s phone number was formatted
when it was received, and (b) whether or
not you previously pre-programmed
your local area code into memory, you
may need to adjust the format of the
incoming caller’s stored phone number
before dialing it back.
The FORMAT button lets you change the
format of the displayed number.
CID
REVIEW
buttons
E
R
PQRS
ANSW
CHANNEL FLASHINT
FORMAT button
PAGE/INTERCOM
PROG
FORMAT MUTE
DELETEDIAL
TALK
PAUSE
REDIAL MEM
S
I
/
I
K
E
P
V
T
Y
W
S
O
A
L
P
P
DEF3ABC
21
MNO6JKL5GHI
4
WXYZ9TUV
8
7
A
S
R
E
E
OPER0TONE
#
*
REVIEW buttons
FORMAT ANNOUNCE
S
E
M
PLAY/STOP
R
E
V
M
E
S
S
A
G
E
MEMO ANSWER
HANDSET
REDIAL/
VOLUME
PAUSE MEMORY FLASH
PROG
4
PQRS
7
IN USE
OPER0TONE
*
MUTE HOLD
SPEAKER
FORMAT
button
A
S
G
E
S
DELETEDIAL
W
I
E
D
I
R
E
L
L
S
/
A
C
ON/OFF
DEF3ABC
21
MNO6JKL5GHI
WXYZ9TUV
8
#
67
Page 68

Available formats include:
Number of digits Explanation Example
Eleven digits long distance code “1”
+ 3-digit area code
+ 7-digit telephone number. 1-317-888-8888
Ten digits 3-digit area code +
7-digit telephone number. 317-888-8888
Seven digits 7-digit telephone number. 888-8888
NOTE: If the phone company does not supply all ten digits of an incoming
caller’s number, you will not be allowed to adjust the format of that number.
68
Page 69

Scroll to the number you want to call back:
2. If using base: press the REVIEW up or
down arrow buttons.
3. If using cordless handset: use the CID
REVIEW buttons.
4. If the number will not dial as shown,
press the FORMAT button. Repeat if
necessary, until the correct number of
digits are shown.
5. Press DIAL. The number dials
automatically.
FORMAT
button
CID
REVIEW
buttons
DIAL
button
FORMAT MUTE
PAUSE
REDIAL MEM
I
E
V
W
E
R
4
PQRS
7
*
ANSW
CHANNEL FLASHINT
TALK
button
PROG
PROG
DELETEDIAL
TALK
S
/
T
Y
A
L
P
21
8
A
S
R
E
E
OPER0TONE
button
I
K
P
S
O
P
DEF3ABC
MNO6JKL5GHI
WXYZ9TUV
#
NOTE: If you find it necessary to dial all
local calls with the area codes included
press and hold PROG until SET AREA CODE
appears, then enter “000”.
NOTE: To abort Caller ID Number
Dialback, press TALK on the handset or
SPEAKER on the base.
NOTE: If the number is corrupted, such as
a number in a name or an alphabetical
character in a number, an error tone comes
from the cordless handset and the number
won't dial.
FORMAT button
PAGE/INTERCOM
PROG
button
REVIEW buttons
FORMAT ANNOUNCE
A
S
G
S
E
E
S
DELETEDIAL
M
PLAY/STOP
R
E
V
W
I
E
M
E
S
D
I
S
A
R
G
E
L
E
L
S
/
A
C
MEMO ANSWER
ON/OFF
HANDSET
REDIAL/
VOLUME
PAUSE MEMORY FLASH
PROG
DEF3ABC
21
MNO6JKL5GHI
4
WXYZ9TUV
PQRS
8
7
IN USE
OPER0TONE
#
*
MUTE HOLD
SPEAKER
SPEAKER button
69
Page 70

DELETING THE CURRENT
WXYZ9TUV
8
PQRS
7
MNO6JKL5GHI
4
DEF3ABC
21
#
OPER0TONE
*
M
E
S
S
A
G
E
S
FORMAT ANNOUNCE
DELETEDIAL
PLAY/STOP
HANDSET
VOLUME
REDIAL/
PAUSE MEMORY FLASH
PAGE/INTERCOM
MUTE HOLD
SPEAKER
IN USE
PROG
MEMO ANSWER
ON/OFF
R
E
V
I
E
W
M
E
S
S
A
G
E
S
/
C
A
L
L
E
R
I
D
CALLER ID RECORD
To delete only the record in the display:
1. Use the CID REVIEW on the cordless
handset or REVIEW up or down arrow
buttons on the base to display the
desired Caller ID record.
2. Press DELETE. The display shows
DELETE CALL ID?
3. Press DELETE again, within ten seconds,
to erase the record.
The display shows
the deletion.
for several seconds.
DELETED
, confirming
CID
REVIEW
buttons
FORMAT MUTE
PAUSE
REDIAL MEM
I
E
V
W
E
R
4
PQRS
7
*
ANSW
CHANNEL FLASHINT
TALK
S
/
Y
A
L
P
21
8
A
R
E
OPER0TONE
DELETE
button
PROG
DELETEDIAL
I
K
P
T
S
O
P
DEF3ABC
MNO6JKL5GHI
WXYZ9TUV
S
E
#
REVIEW buttons DELETE button
70
Page 71

DELETING ALL CALLER ID
WXYZ9TUV
8
PQRS
7
MNO6JKL5GHI
4
DEF3ABC
21
#
OPER0TONE
*
M
E
S
S
A
G
E
S
FORMAT ANNOUNCE
DELETEDIAL
PLAY/STOP
HANDSET
VOLUME
REDIAL/
PAUSE MEMORY FLASH
PAGE/INTERCOM
MUTE HOLD
SPEAKER
IN USE
PROG
MEMO ANSWER
ON/OFF
R
E
V
I
E
W
M
E
S
S
A
G
E
S
/
C
A
L
L
E
R
I
D
RECORDS
To delete all the Caller ID records in
memory:
1. Use the CID REVIEW on the cordless
handset or REVIEW up or down arrow
buttons on the base to display any Caller
ID record.
2. Press and hold DELETE. The display
shows
DELETE ALL?
for several seconds.
3. Press DELETE again, within ten seconds,
to erase all records.
CALLER ID ERRORS
If there is an error in the transmission of
information to your Caller ID phone,
ERROR
If you have not subscribed to Caller ID
service or it is not working,
shows in the display.
shows in the display.
NO DATA
CID
REVIEW
buttons
FORMAT MUTE
PAUSE
REDIAL MEM
I
E
V
W
E
R
4
PQRS
7
*
ANSW
CHANNEL FLASHINT
TALK
/
Y
A
L
P
A
R
E
OPER0TONE
DELETE
button
PROG
DELETEDIAL
S
I
K
P
T
S
O
P
DEF3ABC
21
MNO6JKL5GHI
WXYZ9TUV
8
S
E
#
REVIEW buttons DELETE button
71
Page 72

CALL WAITING CALLER ID
WXYZ9TUV
8
PQRS
7
MNO6JKL5GHI
4
DEF3ABC
21
#
OPER0TONE
*
M
E
S
S
A
G
E
S
FORMAT ANNOUNCE
DELETEDIAL
PLAY/STOP
HANDSET
VOLUME
REDIAL/
PAUSE MEMORY FLASH
PAGE/INTERCOM
MUTE HOLD
SPEAKER
IN USE
PROG
MEMO ANSWER
ON/OFF
R
E
V
I
E
W
M
E
S
S
A
G
E
S
/
C
A
L
L
E
R
I
D
This feature allows the caller identification
information to appear in the display after
you hear the tone.
Press FLASH to put the person you’re
talking to on hold and answer the incoming
call. Press FLASH again when you want to
return to the first call.
IMPORTANT: In order to use this unit, you
must subscribe to either the standard
Name/Number Caller ID Service or Caller
ID with Call Waiting Service. To know who is
calling while you are on the phone, you
must subscribe to Caller ID with Call
Waiting Service.
FORMAT MUTE
PAUSE
REDIAL MEM
I
E
V
W
E
R
4
PQRS
7
*
ANSW
CHANNEL FLASHINT
TALK
S
/
Y
A
L
P
21
8
A
R
E
OPER0TONE
PROG
DELETEDIAL
I
K
P
T
S
O
P
DEF3ABC
MNO6JKL5GHI
WXYZ9TUV
S
E
#
FLASH button
FLASH
button
72
Page 73

SETTING A NEW SECURITY CODE FROM THE BASE
WXYZ9TUV
8
PQRS
7
MNO6JKL5GHI
4
DEF3ABC
21
#
OPER0TONE
*
M
E
S
S
A
G
E
S
FORMAT ANNOUNCE
DELETEDIAL
PLAY/STOP
HANDSET
VOLUME
REDIAL/
PAUSE MEMORY FLASH
PAGE/INTERCOM
MUTE HOLD
SPEAKER
IN USE
PROG
MEMO ANSWER
ON/OFF
R
E
V
I
E
W
M
E
S
S
A
G
E
S
/
C
A
L
L
E
R
I
D
1. Place the cordless handset close to the
base unit.
2. On the base unit, press and hold the
MUTE and HOLD buttons simultaneously
for at least two seconds. The MUTE and
HOLD indicators blink and
SECURITY
is displayed.
3. On the cordless handset, press and hold
the 2 and 8 keys simultaneously for at
least 2 seconds.
SET SECURITY
displayed again.
• If the transmission is successful, the
base unit beeps to confirm.
• If the transmission is not successful, the
unit will time out after 30 seconds and a
3-beep error tone sounds. If this
happens, move the cordless handset
closer to the base unit and try again.
SET
is
MUTE
indicator
MUTE button
HOLD
indicator
HOLD button
73
Page 74

S
ETTING
A NEW S
ECURITY CODE FROM THE HANDSET
1. Place the cordless handset close to the
base unit.
2. On the cordless handset, press and hold
the 2 and 8 keys simultaneously for at
least 2 seconds.
SET SECURITY
is
displayed.
3. On the handset, press and hold the
MUTE and HOLD buttons simultaneously
for at least two seconds. The MUTE and
HOLD indicators blink and
SECURITY
is displayed.
SET
• If the transmission is successful, the
cordless handset beeps to confirm.
• If the transmission is not successful, the
unit will time out after 30 seconds and a
3-beep error tone sounds. If this
happens, move the cordless handset
closer to the base unit and try again.
FORMAT MUTE
PAUSE
REDIAL MEM
I
E
V
W
E
R
4
PQRS
7
*
ANSW
CHANNEL FLASHINT
MUTE
button
PROG
DELETEDIAL
TALK
S
/
I
K
P
T
Y
S
O
A
L
P
P
DEF3ABC
21
MNO6JKL5GHI
WXYZ9TUV
8
A
S
R
E
E
OPER0TONE
#
74
Page 75

CHANGING THE BATTERY
Make sure the telephone is OFF before you
replace battery.
1. Remove the battery compartment door.
2. Disconnect the battery plug and remove
the battery pack from the handset.
3. Insert the new battery pack and
reconnect the battery plug.
4. Put the battery compartment door back
on.
5. Place handset in the base to charge. If
you don’t charge the handset battery
properly (for 12 hours) when you first set
up the phone and/or when you install a
new battery pack, the battery’s longterm performance will be compromised.
CAUTION: To reduce the risk of fire
or personal injury, use only the
battery listed in this use and care
guide.
75
Page 76

BATTERY SAFETY PRECAUTIONS
• Do not burn, disassemble, mutilate, or puncture. Like other batteries of
this type, toxic materials could be released which can cause injury.
• To reduce the risk of fire or personal injury, use only the battery listed in
the User’s Guide.
• Keep batteries out of the reach of children.
• Remove batteries if storing over 30 days.
RBRC
NOTE: The RBRC seal on the battery used in your product
indicates that we are participating in a program to collect and
RBRC
Ni-Cd
recycle Nickel Cadmium batteries throughout the United States
of America. Please call 1-800-8-BATTERY for information or
contact your local recycling center.
76
Page 77

MESSAGE INDICATORS
The following indicators show the status of a message or of the unit.
ERROR Caller information has been interrupted during transmission
ENTER NAME Prompt telling you to enter the name in one of the 10
DELETE ALL? Prompt asking if you want to erase all Caller ID records.
DELETE CALL ID? Prompt asking if you want to erase the
ERASE MEMO? Prompt asking if you want to erase one of the 10 numbers
START/END Indicates that there is no additional information in Caller ID
NEW Indicates call or calls have not been reviewed.
UNKNOWN CALL The incoming call is from an area not serviced by Caller ID or
PAGING Someone has pressed the PAGE button on the base or
BLOCKED NUMBER The person is calling from a number that has been blocked
REPT Repeat call message. Indicates that a new call from the same
NO DATA No Caller ID information was received.
or the phone is excessively noisy.
memory locations.
current Caller ID record that is shown on the display.
stored in the phone's outgoing memory.
memory.
the information was not sent
handset.
from transmission.
number was received more than once.
77
Page 78

HANDSET SOUND SIGNALS
Signal Meaning
A long warbling tone (with ringer on) Signals an incoming call
Three short beeps for 2 minutes Page signal
One long beep Out of range
One short beep (several times) Low battery warning
78
Page 79

TROUBLESHOOTING GUIDE
TELEPHONE
Problem Solution
No dial tone • Check installation:
Dial tone is OK, • Make sure the TONE/PULSE switch on the base is
but can’t dial out correctly set .
Handset/Base does • Make sure the handset RINGER switch is turned to ON and
not ring the base RINGER switch is turned to HI.
— Is the base power cord connected to a working outlet?
— Is the telephone line cord connected to the base unit
and the wall jack?
• Connect another phone to the same jack; the problem
might be your wiring or local service.
• Is the cordless handset out of range of the base?
• Make sure the battery is properly charged (12 hours).
• Is the battery pack installed correctly?
• Did the handset beep when you pressed the TALK button?
Did the CHARGE indicator on the cordless handset charger
come on? The battery may need to be charged. Did the IN
USE indicator on the base unit come on? Be sure the AC
power supply is plugged in.
• Charge the handset for at least 20 seconds.
• Move closer to the base. The handset may be out of range.
• You may have too many extension phones on your line. Try
unplugging some phones.
• Check for dial tone.
79
Page 80

Problem Solution
You experience static, • Change channels.
noise, or fading in and out • Move closer to base (cordless handset might be out of
Unit beeps • Place the handset in the cradle and charge the handset for
Memory Dialing • Did you program the memory location keys
doesn't work correctly?
Unit locks up and no • See "Changing the Security Code".
communication between
the base and cordless
handset
range).
• Does the base need to be relocated? Make sure base is not
plugged into an outlet with another household appliance.
• Charge battery.
20 seconds. If it still beeps, charge battery for 12 hours.
• Clean charging contacts on cordless handset and charger
with a soft cloth, or an eraser.
• See solutions for “No dial tone.”
• Replace battery.
• Did you follow proper dialing sequence?
80
Page 81

CALLER ID
Problem Solution
No Display • Is battery fully charged? Try replacing the battery.
• Make sure that the unit is connected to a non-switched
electrical outlet. Disconnect the AC power supply from the
base and reconnect it.
Caller ID Error Message • The unit displays this message if it detects anything other
than valid Caller ID information during the silent period
after the first ring. This message indicates the presence of
noise on the line.
No Caller ID • Did you order Caller ID service from your phone
company?
BATTERY
If you experience any of the following problems, even after fully recharging the battery, you may
need to replace the battery pack:
• Short talk time
• Poor sound quality
• Limited range
• IN USE indicator fails to light
81
Page 82

GENERAL PRODUCT CARE
To keep your telephone working and looking good, follow these
guidelines:
• Avoid putting the phone near heating appliances and devices that
generate electrical noise (for example, motors or fluorescent lamps).
• DO NOT expose to direct sunlight or moisture.
• Avoid dropping the handset, as well as other rough treatment to the
phone.
• Clean the phone with a soft cloth.
• Never use a strong cleaning agent or abrasive powder because this will
damage the finish.
• Retain the original packaging in case you need to ship the phone at a
later date.
• Periodically clean the charge contacts on the handset and base with a
clean pencil eraser.
82
Page 83

CAUSES OF POOR RECEPTION
• Aluminum siding.
• Foil backing on insulation.
• Heating ducts and other metal construction that can shield radio
signals.
• You’re too close to appliances such as microwaves, stoves,
computers, etc.
• Atmospheric conditions, such as strong storms.
• Base is installed in the basement or lower floor of the house.
• Base is plugged into AC outlet with other electronic devices.
• Baby monitor is using the same frequency.
• Handset battery is low.
• You’re out of range of the base.
SERVICE
FCC requires this product to be serviced only by the manufacturer or its
authorized service agents. In accordance with FCC requirements, changes
or modifications not expressly approved by ATLINKS USA could void the
user’s authority to operate this product. For instructions on how to obtain
service, call Consumer Information, 1-800-448- 0329.
Or refer inquiries to:
ATLINKS USA Inc.
Manager, Consumer Relations
P O Box 1976
Indianapolis, IN 46206
Attach your sales receipt to the booklet for future reference or jot down the
date this product was purchased or received as a gift. This information will
be valuable if service should be required during the warranty period.
Purchase date _____________ Name of store _____________________
83
Page 84

INDEX
A
Accessing the Answering System from
Another Location 25
Accessory Order Form 87
Advanced Intercom Features 50
Answering System Indicator 22
Answering System Operation 17
Answering System Setup 13
Auto Standby 36
B
Base Unit 38
Battery Safety Precautions 76
Before You Begin 5
C
Call Waiting 7
Call Waiting Caller ID 7, 72
Caller ID 7
Caller ID Errors 71
Caller ID Operation 64
Caller ID Settings 27
Causes of Poor Reception 83
Chain Dialing from Memory 62
Changing the Battery 75
Changing the Security Code 26
Corded Handset 33
Cordless Handset 33, 38
D
Deleting All Caller ID Records 71
Deleting the Current Caller ID Record 70
Desktop Installation 8
Dialing a Caller ID Number 67
Dialing a Stored Number 60
Dialing a Stored Number During Review 60
Digital Security System 6
Disabling Privacy Mode 42
Duration Counter 36
E
Enabling Privacy Mode 41
Erasing Messages 19
F
FCC Registration Information 2
Flash 37
From the Base 48
From the Cordless Handset 49
Full Duplex Speakerphone Operation 44
G
General Product Care 82
H
Handling an Incoming Telephone Call
During an Intercom Call 50
Handset Sound Signals 78
Hearing Aid Compatibility 2
Hold 39
I
Inserting a Pause in the Dialing
Sequence 58
Installation 8
Intercom Calling 48
Intercom Operation 48
Interference Information 2
Introduction 7
In Use Indicator 34
L
Last Number Redial 38
Leaving a Memo 20
Limited Warranty 86
84
Page 85

M
Making a Call 35
Making a Call with Speakerphone 46
Manual Channel Selection 36
Memory 55
Memory Full 19, 24
Message Indicators 77
Message Playback 18
Messages Indicator 17
Modular Jack Requirements 5
Mute 40
P
Paging the Cordless Handset 40
Parts Checklist 5
Privacy Mode 41
R
Receiving a Call 34
Receiving a Call with Speakerphone 45
Receiving and Storing Call Records 64
Recording the Outgoing Announcement 15
Remote Access 21
Reviewing Announcement 16
Reviewing Call Records 65
Reviewing, Changing or Deleting Stored
Numbers 58
Ringer Switch 37
S
Screening Calls from the Base 17
Screening Calls from the Cordless
Handset 23
Service 83
Setting A New Security Code from
the Base 73
Setting A New Security Code from the
Handset 74
Setting the Current Day/Time 31
Setting the Display Contrast 29
Setting the Display Language 28
Setting the Local Area Code 30
Setting the Ring Select 14
Setting the Speaker Volume 13
Setting Up a Three-Way Conversation
Using Intercom 53
Setting Up a Two-Way Intercom
Conversation While You Have a
Telephone Call 52
Speakerphone and Answering System 33
Storing a Name/Number in Memory 56
Switching between Speaker and
Handset 47
T
Telephone Operation 34
Temporary Tone Dialing 43
Troubleshooting Guide 79
U
Using Intercom 48
Using Intercom While You Have a Telephone
Call 51
Using the Base Unit Speakerphone 44
Using the Cordless Handset 22
Using Toll Saver 14
V
Voice Instructions 13
Volume Control 33
W
Wall Mount Installation 10
85
Page 86

LIMITED WARRANTY
What your warranty covers:
• Any defect in materials or workmanship.
For how long after your purchase:
• One year.
(The warranty period for rental units begins with the first rental or 45 days from date of
shipment to the rental firm, whichever comes first.)
What we will do:
• Provide you with a new or, at our option, a refurbished unit.
• The exchange unit is under warranty for the remainder of the original product’s warranty
period.
How to make a warranty claim:
• Properly pack your unit. Include any cables, etc., which were originally provided with the
product. We recommend using the original carton and packing materials.
• Include evidence of purchase date such as the bill of sale. Also print your name and
address and a description of the defect. Send via standard UPS or its equivalent to:
Thomson multimedia Inc.
11721 B Alameda Ave.
Socorro, Texas 79927
• Pay any charges billed to you by the Exchange Center for service not covered by the
warranty.
• Insure your shipment for loss or damage. Thomson multimedia Inc. accepts no liability in
case of damage or loss en route to Thomson multimedia Inc..
• A new or refurbished unit will be shipped to you freight prepaid.
What your warranty
• Customer instruction. (Your Owner’s Manual provides information regarding operating
instructions and user controls. For additional information, ask your dealer.)
• Installation and set-up service adjustments.
• Batteries.
• Damage from misuse or neglect.
• Products which have been modified or incorporated into other products.
• Products purchased or serviced outside the USA.
• Acts of nature, such as but not limited to lightning damage.
How state law relates to this warranty:
• This warranty gives you specific legal rights, and you may have other rights which vary
from state to state.
If you purchased your product outside the USA:
• This warranty does not apply. Contact your dealer for warranty information.
does not
cover:
86
Page 87

✂
TOTAL
QUANTITY
$5.00
CUSTOMER: CUT ALONG DOTTED LINE.
PRICE*
CATALOG NUMBER
ORM
F
RDER
O
DESCRIPTION
ACCESSORY
$8.75
$36.35
$18.35
5-2425
5-2510
5-2451
White Black
5-2444
5-2511
5-2452
Headset
Belt Clip
AC power adapter
$11.90
*Prices are subject to change without notice.
Total Merchandise.........................................$_______________
Sales Tax........................................................$_______________
We are required by law to collect the appropriate sales tax for each individual state,
county, and locality to which the merchandise is being sent. Duties will apply for
shipments to Canada.
Use VISA or Master Card or Discover preferably. Money order or check must be in U.S.
currency only. No COD or Cash. All accessories are subject to availability. Where
applicable, we will ship a superseding model.
Shipping/Handling....................................... $_______________
Total Amount Enclosed.................................$_______________
Mail order form and money order or check (in U.S. currency)
made payable to Thomson multimedia Inc. to:
5-2459
To order, call 1-800-338-0376 ( for accessories only) or complete this form.
Replacement Handset Battery
For credit card purchases
Your complete charge card number, its expiration date and your
signature are necessary to process all charge card orders.
Copy your complete account number from your VISA card.
My card expires:
Copy your complete account number from your
Master Card or Discover.
Thomson multimedia Inc.
Mail Order Department
P.O. Box 8419
Ronks, PA 17573-8419
Name_______________________________________________________
Copy the number above your
name on the Master Card
My card expires:
Address_____________________________________ Apt.____________
City ________________________State________ ZIP_________________
Daytime Phone Number ( )_______________________________
Please make sure that this form has been filled out completely.
Authorized Signature
____________________________________________________________________
87
Page 88

Model 26958
15696230 (Rev. 2 E/S)
01-03
Printed in China
ATLINKS USA, Inc.
10330 North Meridian Street
Indianapolis, IN 46290
© 2001 ATLINKS USA, Inc.
Trademark(s) ® Registered
Marca(s) Registrada(s)
Page 89

26958
Altavoz de Cable (Alámbrico) con 40
Canales de 900 MHz con Combinación
de Identificador de Llamada en Espera,
con Contestador y Teléfono Inalámbrico
Guía del Usuario
1
Creamos cosas buenas para la vida.
Page 90

INFORMACIÓN DEL REGISTRO A LA FCC
Su equipo telefónico de la ha sido registrado con la Comisión Federal de Comunicaciones (FCC) y está en acuerdo con las
Partes 15 y 68 de las Regulaciones y Reglas de la FCC.
1 Notificación a la Compañía Telefónica Local
Al fondo de este equipo Ud. hallará un rótulo indicando, entre otra información, el número de la Registración con la
FCC y el Número del Equivalente Timbre (REN) para este equipo. Ud. deberá, a petición, proveer esta información a
su compañía telefónica.
El REN es útil para determinar el número total de artefactos que Ud. puede conectar a su línea telefónica, todavía
asegurando que todos estos artefactos sonarán cuando se llame su número telefónico. En la mayoría de las áreas
(pero no en todas), el total de los números REN de todos los artefactos conectados a una línea no debe exceder 5.
Para estar seguro del número total de artefactos que Ud. pueda conectar a su línea (determinado por el REN), Ud.
deberá ponerse en contacto con su compañía telefónica local.
NOTAS:
• No se puede usar este equipo con un teléfono de previo pago proveído por la compañía telefónica.
• Las líneas compartidas son sujetas a las tarifas del estado, y por eso, es posible que Ud. no pueda usar su propio
equipo telefónico si Ud. estuviera compartiendo la misma línea telefónica con otros abonados.
• Se debe notificar la compañía telefónica cuando se desconecte permanentemente su teléfono de la línea.
2 Derechos de la Compañía Telefónica
Si su equipo causase algún problema en su línea que pudiera dañar la red telefónica, la compañía telefónica siempre
que sea posible le avisará de la posible interrupción temporal de su servicio. En caso que la compañía no pudiera
avisarle de antemano y hubiera necesidad de tomar tal acción, la compañía telefónica podrá interrumpir su servicio
inmediatemente. En caso de tal interrupción telefónica temporal la compañía debe : (1) darle aviso al momento de tal
interrupción temporal de servico, (2) concederle a Ud. la oportunidad de corregir la situación, (3) informarle a Ud. de
sus derechos de presentar una questa a la Comisión de acuerdo con los procedimientos dictados en la Subparte E de
la Parte 68 de las Regulaciones y Reglas de la FCC.
La compañía telefónica puede hacer los cambios en sus instalaciones de comunicación, en equipos, en sus
funcionamientos o procedimientos que digne necesarios para el manejo de sus negocios y que no sean incompatibles
con las Reglas y Regulaciones de l a FCC. Si estos cambios pudieran alterar el uso o el funcionamiento de su equipo
telefónico, la compañía telefónica deberá darle aviso adecuado en escrito para que Ud. goce de un servico
ininterrumpido.
INFORMACIÓN DE INTERFERENCIAS
Este artefacto cumple con la Parte 15 de las Reglas de la FCC. Su funcionamiento es sujeto a las dos condiciones
siguientes: (l) Este artefacto no puede causar interferencia dañosa, y (2) Este artefacto debe aceptar cualquier interferencia
recibida, incluyendo interferencia que puede causar un funcionamiento no deseado.
Este equipo ha sido probado y cumple con los límites para un artefacto digital de la Clase B, de conformidad con la Parte
15 de las Reglas de la FCC. Estos límites han sido diseñados para proporcionar una protección razonable contra una
interferencia dañosa que pueda existir en una instalación doméstica.
Este equipo genera, usa y puede radiar la energía de frecuencia de una radio y, si no fuera instalado y usado de acuerdo
con las instrucciones, puede causar interferencia dañosa a las transmisiones radiales. Sin embargo, no hay garantía que la
interferencia no ocurrirá en una instalación en particular.
Si este equipo causa en efecto una interferencia dañosa a la recepción de la radio o de la televisión, lo cual puede ser
determinado apagando y prendiendo el equipo, le animamos a Ud. de tratar de corregir la interferencia por medio de una
(o más) de las sugerencias siguientes:
• Cambie la posición o la ubicación de la antena (quiere decir la antena de la radio o de la televisión que está
recibiendo la interferencia).
• Cambie la posición o cambie la ubicación y aumente la distancia entre el equipo de telecomunicaciones y la
antena receptora de la radio o de la televisión que está recibiendo la interferencia.
• Conecte el equipo de telecomunicaciones a una toma en un circuito diferente del circuito al cual la antena
receptora esté conectada.
Si estas medidas no eliminan la interferencia, favor de consultar a su distribuidor o a un técnico de radio/televi
sión experto por otras sugerencias. También, la Comisión Federal de Comunicaciones (FCC) ha preparado un folleto muy
útil, “How To Identify and Resolve Radio/TV Interference Problems” (“Como Identificar y Resolver Problemas de
Interferencia de Radio/Televisión”). Este folleto se puede obtener del U.S. Goverment Printing Office, Washington, D.C.
20402. Favor de especificar el número 0 04-000-00345-4 cuando haga su pedido.
COMPATIBILIDAD CON AUDÍFONOS
Se juzga que este teléfono es compatible con audífonos, en base a las normas de la FCC.
El número de la FCC está ubicado en el fondo de la base
2
El numero REN esta ubicado en el fondo de la base
Page 91

TABLA DE CONTENIDO
INFORMACIÓN DEL REGISTRO A LA FCC ... 2
INFORMACIÓN DE INTERFERENCIAS............ 2
COMPATIBILIDAD CON AUDÍFONOS ............ 2
REQUISITOS DE CONEXIÓN .......................... 5
ANTES DE COMENZAR ................................... 5
LISTA DE PARTES ...................................... 5
SISTEMA DE SEGURIDAD DIGITAL ................. 6
INTRODUCCIÓN ............................................. 7
IDENTIFICADOR DE LLAMADAS (CALLER ID) 7
LLAMADA EN ESPERA (CALL WAITING) ..... 7
IDENTIFICADOR DE LLAMADA EN ESPERA
(CALL W AITING CALLER ID)............... 7
INSTALACIÓN ................................................ 8
INSTALACIÓN SOBRE ESCRITORIO O SUPERFICIE
PLANA ................................................ 8
INSTALACIÓN SOBRE PARED ...................... 10
PROGRAMACIÓN DEL SISTEMA DE
CONTESTADOR ................................... 13
INSTRUCCIONES ORALES ...................... 13
CÓMO PROGRAMAR EL VOLUMEN DEL
ALTAVO Z ....................................... 13
CÓMO PROGRAMAR EL SELECTOR DEL
TIMBRE ......................................... 14
CÓMO USAR EL AHORRADOR DE CARGOS
(“TOLL SAVER”)............................ 14
CÓMO GRABAR EL ANUNCIO SALIENTE ...... 15
CÓMO REVISAR EL ANUNCIO ................ 16
OPERACIÓN DEL SISTEMA DE CONTESTADOR .... 17
INDICADOR DE MENSAJES ........................ 17
CÓMO FILTRAR LLAMADAS DESDE LA BASE .17
REPRODUCCIÓN DE MENSAJES .................. 18
MEMORIA LLENA .................................... 19
CÓMO BORRAR MENSAJES ...................... 19
CÓMO DEJAR UN RECADO (MEMO)........... 20
ACCESO REMOTO ....................................... 21
UTILIZANDO EL AURICULAR INALÁMBRICO ... 22
INDICADOR DEL CONTESTADOR .............. 22
PARA FILTRAR LAS LLAMADAS DESDE EL
AURICULAR INALÁMBRICO .................... 23
MEMORIA LLENA .................................... 24
ADVERTENCIA: PARA PREVENIR
EL RIESGO DE UNFUEGO O DE UNA
SACUDIDA ELECTRICA, NO EXPONGA
ESTE APARATO A LA LLUVIA O A LA
HUMEDAD.
CÓMO T ENER ACCESO AL CONTESTADOR
DESDE
OTRA LOCALIZACIÓN ................. 25
CÓMO CAMBIAR EL CÓDIGO DE SEGURIDAD 26
PROGRAMACIONES DEL IDENTIFICADOR DE
LLAMADAS ........................................ 27
CÓMO PROGRAMAR EL IDIOMA DE LA
PANTALLA ..................................... 28
CÓMO PROGRAMAR EL CONTRASTE DE
LA
PANTALLA ................................. 29
CÓMO PROGRAMAR SU CLAVE DE AREA
LOCAL .......................................... 30
CÓMO PROGRAMAR EL DÍA/HORA ......... 31
CONTROL DE VOLUMEN ............................ 33
AURICULAR CON CABLE (ALÁMBRICO) ..... 33
ALTAV OZ Y SISTEMA DE CONTESTADOR ... 33
AURICULAR INALÁMBRICO .................... 33
OPERACIÓN DEL T ELÉFONO ........................... 34
INDICADOR DE EN USO ............................ 34
PARA RECIBIR UNA LLAMADA ............... 34
PARA HACER UNA LLAMADA ................ 35
SELECCIÓN MANUAL DE CANALES ............. 36
CONTADOR DE LA DURACIÓN .................... 36
ALERTA AUTOMÁTICO .............................. 36
SELECTOR DE VOLUMEN DEL T IMBRE .......... 37
BOTÓN DE SERVICIOS (“FLASH”)............ 37
PARA V OLVER A MARCAR EL ÚLTIMO
NÚMERO MARCADO ........................... 38
BASE DEL APARATO:............................ 38
AURICULAR INALÁMBRICO: ................... 38
EN ESPERA ........................................... 39
(La Tabla de Contenido continua en
la siguiente página)
ATTENTION:
RIESGO DE SACUDIDA
ELÉCTRICA NO ABRA
EL RELÁMPAGO Y LA
PUNTA DE FLECHA
DENTRO DEL TRIÁNGULO
ES UNA SEÑAL DE
ADVERTENCIA,
ALERTÁNDOLE A UD. DE
QUE HAY "VOLTAJE
PELIGROSO" DENTRO DEL
PRODUCTO.
VEA ADVERTENCIA EN LA PARTE POSTERIOR/BASE DEL PRODUCTO.
CUIDADO: PARA REDUCIR
EL RIESGO DE UNA SACUDIDA
ELÉCTRICA, NO QUITE LA
CUBIERTA (O PARTE
POSTERIOR) NO USE PARTES
DE REPUESTO DENTRO.
CONSULTE A ALGUNA
PERSONA CALIFICADA DEL
SERVICIO DE REPARACIONES.
EL SIGNO DE
EXCLAMACIÓN DENTRO
DEL TRIÁNGULO ES UNA
SEÑAL DE
ADVERTENCIA,
ALTERTÁNDOLE A UD. DE
QUE EL PRODUCTO, TRAE
INCLUCIDO,
INSTRUCTIONES MUY
IMPORTANTES.
3
Page 92

PARA ENCONTRAR EL AURICULAR
INALÁMBRICO ..................................... 40
ENMUDECEDOR ...................................... 40
MODALIDAD PARA PRIVACÍA ...................... 41
PARA HABILITAR LA FUNCIÓN DE
PRIVACÍA ....................................... 41
PARA INHABILITAR LA FUNCIÓN DE
PRIVACÍA ....................................... 42
MODALIDAD T EMPORAL PARA MARCAR POR
TONO ............................................... 43
OPERACIÓN DEL ALT AVOZ DÚPLEX ................. 44
PARA UTILIZAR EL ALTAVO Z EN LA BASE
DEL
APARATO ..................................... 44
PARA RECIBIR UNA LLAMADA CON EL
ALTAV OZ ........................................... 45
PARA HACER UNA LLAMADA CON EL
ALTAV OZ ........................................... 46
PARA CAMBIAR ENTRE A LTAVO Z Y
AURICULAR ........................................... 47
OPERACIÓN DEL INTERFONO .......................... 48
CÓMO LLAMAR POR EL INTERFONO ............ 48
CÓMO USAR EL INTERFONO ..................... 48
DESDE LA BASE .................................. 48
DESDE EL AURICULAR INALÁMBRICO........ 49
FUNCIONES AVANZADAS DEL INTERFONO..... 50
CÓMO MANEJAR UNA LLAMADA
ENTRANTE DURANTE UNA LLAMADA
POR
INTERFONO .............................. 50
CÓMO USAR EL INTERFONO MIENTRAS
USTED TIENE UNA LLAMADA ................. 51
CÓMO ESTABLECER UNA CONVERSACIÓN
BI-DIRECCIONAL EN EL INTERFONO
MIENTRAS
USTED TIENE UNA LLAMADA
TELEFÓNICA ................................... 52
EN LA BASE DEL APARATO ................... 53
EN EL AURICULAR ............................... 53
CÓMO ESTABLECER UNA CONVERSACIÓN
DE
T RES PERSONAS UTILIZANDO EL
INTERFONO .................................... 53
MEMORIA .................................................. 55
PARA ALMACENAR UN NOMBRE/ NÚMERO
EN
LA MEMORIA ................................. 56
CÓMO INTRODUCIR UNA PAUSA EN LA
SECUENCIA DE MARCAR ...................... 58
CÓMO REVISAR, CAMBIAR O BORRAR
NÚMEROS ALMACENADOS ................... 58
CÓMO MARCAR UN NÚMERO ALMACENADO
DURANTE
LA REVISIÓN ......................... 60
CÓMO MARCAR UN NÚMERO
ALMACENADO .................................... 60
MARCADO EN CADENA DESDE LA
MEMORIA ......................................... 62
OPERACIÓN DEL IDENTIFICADOR DE LLAMADAS
(CALLER ID) ........................................... 64
CÓMO RECIBIR Y ALMACENAR ARCHIVOS DE
LLAMADAS ........................................ 64
CÓMO REVISAR ARCHIVOS DE LLAMADAS ... 65
CÓMO MARCAR UN NÚMERO DEL
CALLER ID ........................................ 67
CÓMO BORRAR EL ARCHIVO ACTUAL DEL
CALLER ID ........................................ 70
CÓMO BORRAR T ODOS LOS ARCHIVOS DEL
CALLER ID ........................................ 71
ERRORES DEL IDENTIFICADOR DE LLAMADAS
(CALLER ID) ...................................... 71
IDENTIFICADOR DE LLAMADA EN ESPERA
(CALL W AITING CALLER ID)................. 72
CÓMO PROGRAMAR UN NUEVO CÓDIGO DE
SEGURIDAD DESDE LA BASE ....................... 73
CÓMO PROGRAMAR UN NUEVO CÓDIGO DE
SEGURIDAD DESDE EL AURICULAR ............... 74
CÓMO CAMBIAR LA BATERÍA ........................ 75
PRECAUCIONES DE SEGURIDAD PARA LA
BATERÍA........................................ 76
INDICADORES DE MENSAJES ......................... 77
SEÑALES SONORAS DEL AURICULAR .............. 78
SOLUCIÓN DE PROBLEMAS ........................... 79
CUIDADO GENERAL DEL PRODUCTO................ 82
CAUSAS DE UNA MALA RECEPCIÓN ................. 83
CÓMO OBTENER SERVICIOS DE
MANTENIMIENTO
....................................... 83
ÍNDICE ...................................................... 84
GARANTÍA LIMITADA .................................... 86
FORMULARIO PARA HACER PEDIDOS DE
ACCESORIOS
............................................ 87
4
Page 93

ANTES DE COMENZAR
LISTA DE PARTES
Asegúrese de que su paquete incluye los siguientes artículos:
FORMAT ANNOUNCE
A
S
G
S
E
E
S
DELETEDIAL
M
PLAY/STOP
R
E
V
W
I
E
M
E
S
D
I
S
A
R
G
E
L
E
L
S
/
A
C
MEMO ANSWER
ON/OFF
HANDSET
REDIAL/
VOLUME
PAUSE MEMORY FLASH
PROG
DEF3ABC
21
MNO6JKL5GHI
4
WXYZ9TUV
PQRS
8
7
IN USE
OPER0TONE
#
*
MUTE HOLD
PAGE/INTERCOM
SPEAKER
Base Auricular con
CHARGE
PROG
FORMAT MUTE
DELETEDIAL
TALK
PAUSE
REDIAL MEM
S
I
/
I
K
E
P
V
T
Y
W
S
E
O
A
R
L
P
P
DEF3ABC
21
MNO6JKL5GHI
4
WXYZ9TUV
PQRS
8
7
A
S
R
E
E
OPER0TONE
#
*
ANSW
CHANNEL FLASHINT
Auricular
inalámbrico
cable
Cable del auricular
(alámbrico)
Cable de línea telefónica
Placa para
montaje
Cargador para auricular
Cable de corriente AC
Cable largo de línea telefónica
inalámbrico
REQUISITOS DE CONEXIÓN
Para conectar el teléfono se necesita un enchufe modular RJ11,
que es el tipo de enchufe más común y se parece al ilustrado.
Si usted no tiene este tipo de enchufe, llame a su compañía
telefónica local para preguntar cómo conseguirlo.
5
Page 94

SISTEMA DE SEGURIDAD DIGITAL
Su teléfono inalámbrico utiliza un sistema de seguridad digital para
proteger al aparato contra timbrado falso, acceso no autorizado, y cargos
a su línea telefónica.
IMPORTANTE: Para poder utilizar este aparato, usted debe suscribirse ya sea
al servicio estándar de Identificación de Nombre/Número o al servicio de
Identificador de Llamadas con Llamada en Espera. Para saber quién llama
mientras usted está en el teléfono, usted debe suscribirse al servicio de
Identificador de Llamadas con Llamada en Espera.
CUIDADO: Cuando utilice equipo telefónico, hay instrucciones básicas
de seguridad que siempre deben seguirse. Refiérase a la guía de
INSTRUCCIONES DE SEGURIDAD IMPORTANTES provista con este
producto y guárdela para referencia futura.
6
Page 95

INTRODUCCIÓN
Su teléfono con Caller ID almacena y muestra información específica,
provista por su compañía telefónica local, a suscriptores al servicio de
Caller ID o servicios similares de identificación.
IDENTIFICADOR DE LLAMADAS (CALLER ID)
Esta función le permite ver el número o nombre y número de la persona
que llama antes de que usted conteste el teléfono.
LLAMADA EN ESPERA (CALL WAITING)
Esta función le permite contestar llamadas entrantes mientras usted está
hablando por teléfono.
IDENTIFICADOR DE LLAMADA EN ESPERA (CALL WAITING CALLER ID)
También conocido como Identificador de Llamadas Tipo II (Type II Caller
ID), esta función le permite ver nombre y número de la persona que llama
en una llamada que timbra mientras usted está hablando por teléfono con
otra persona.
7
Page 96

INSTALACIÓN
INSTALACIÓN
6
SOBRE
5
8
4
ESCRITORIO O
SUPERFICIE
PLANA
1. Asegúrese que la
placa para montaje esté sujeta
firmemente a la parte de abajo de la base.
2. Coloque el selector de tono/pulso (“TONE/PULSE”) en la posición de
tono (“TONE”) para servicio por tono, o en la posición de pulso
(“PULSE”) para servicio rotatorio. Si usted no sabe qué servicio tiene,
verifique con su compañía telefónica.
3. Coloque el selector del timbre (“RINGER”) (en el auricular) en la
posición “HI.”
4. Conecte el cable espiral dentro del auricular alámbrico y el otro extremo
en el enchufe localizado a un costado de la base.
5. Coloque el auricular alámbrico sobre la base.
6. Conecte el cable de corriente en el enchufe marcado “12V DC” en la
base y después a un enchufe de corriente AC.
7. Coloque el cable telefónico largo dentro del enchufe marcado “PHONE
LINE” en la parte posterior de la base, y conecte el otro extremo en un
enchufe modular.
8. Levante la antena.
Instalación continúa en la siguiente página.
CUIDADO: Use únicamente el cable de corriente ATLINKS USA 5-2510
(negro)/ 5-2511 (blanco) que viene incluido con esta unidad. El uso de
otros cables de corriente puede resultar en daño al aparato.
7
3
2
1
8
Page 97

9. Coloque el selector del timbre
(“RINGER”) en el auricular inalámbrico
en la posición de encendido (“ON”).
10. Conecte el cable de corriente del
cargador del auricular inalámbrico a un
enchufe de corriente eléctrica AC.
11. Coloque el auricular en el cargador y
cargue durante 12 horas. El indicador de
carga -”CHARGE”- (en el cargador) se
iluminará para indicar que la batería se
está cargando. Si usted no carga el
teléfono adecuadamente (durante 12
horas) cuando usted instala
inicialmente su teléfono, la calidad del
funcionamiento de la batería podría
deteriorarse.
10
9
PROG
FORMAT MUTE
DELETEDIAL
TALK
PAUSE
REDIAL MEM
11
I
S
E
I
/
K
P
V
T
Y
W
S
E
O
A
R
L
P
P
DEF3ABC
21
MNO6JKL5GHI
4
WXYZ9TUV
PQRS
8
7
A
S
E
R
E
OPER0TONE
#
*
ANSW
CHANNEL FLASHINT
CHARGE
MUY IMPORTANTE: Usted debe completar las conexiones de la base del
aparato alámbrico antes de que el auricular inalámbrico pueda ser utilizado.
De otra manera NO FUNCIONARÁ. Vea los pasos 1-8 de esta sección.
OBSERVACION SOBRE LA INSTALACION : Algunos teléfonos
inalámbricos funcionan en frecuencias que pueden interferir con los
televisores o videcaseteras. Para reducir al mínimo o impedir dichas
interferencias, la base del teléfono inalámbrico no debería colocarse cerca ni
encima de uno de estos aparatos. Si la inteferencia continua, por lo general,
con alejar el teléfono del televisor o el videograbador es suficiente para
reducirla o eliminarla.
9
Page 98

INSTALACIÓN SOBRE PARED
Debido a que es necesario cargar el
auricular inalámbrico durante 12 horas
antes de conectar la línea telefónica para
ser usada por primera vez, es mejor
conectar el cable de corriente de la base
para re-cargar el auricular inalámbrico en
un enchufe de corriente AC. Después
5
PAGE/INTERCOM
IN USE
2
FORMAT ANNOUNCE
A
S
G
S
E
E
M
PLAY/STOP
R
E
V
I
E
W
M
E
S
S
A
G
E
L
/
C
S
A
MEMO ANSWER
HANDSET
REDIAL/
VOLUME
PAUSE MEMORY FLASH
PROG
21
4
PQRS
8
7
OPER0TONE
*
MUTE HOLD
SPEAKER
S
DELETEDIAL
D
I
R
E
L
ON/OFF
DEF3ABC
MNO6JKL5GHI
WXYZ9TUV
#
3
coloque el auricular inalámbrico en la base
para re-cargar y cargue durante 12 horas
4
antes de instalar la base del aparato.
1. Después de la carga inicial del auricular
inalámbrico, quite la placa para montaje
de la base del aparato; gírela a que
quede de cabeza y vuelva a colocarla en
el aparato.
1
2. Coloque el selector de TONO/PULSO
(“TONE/PULSE”) en la posición de tono
(“TONE”) para servicio de tono (touchtone), o en la posición de pulso
(“PULSE”) para servicio rotatorio. Si
usted no sabe qué tipo de servicio tiene,
verifique con su compañía telefónica.
3. Coloque el selector del timbre (“RINGER”) de la base en la posición“HI.”
4. Conecte el cable espiral dentro del auricular alámbrico y el otro extremo
en el enchufe localizado a un costado de la base.
5. Quite el gancho para colgar de la base, gírelo y vuelva a ponerlo dentro
de la ranura. Usted necesita hacer esto para que el auricular alámbrico
no se caiga de la base.
Instalación continúa en la siguiente página.
CUIDADO: Use únicamente el cable de corriente ATLINKS USA
5-2510 (negro)/ 5-2511 (blanco) que viene incluido con esta unidad. El
uso de otros cables de corriente puede resultar en daño al aparato.
10
Page 99

6. Coloque el auricular alámbrico sobre la
base.
7. Conecte el cable de corriente en el
enchufe marcado “12V DC” en la base
y después a un enchufe de corriente
AC.
8. Coloque el cable telefónico corto
dentro del enchufe marcado “PHONE
LINE” en la parte posterior de la base.
9. Alimente el cable corto a través de las
ranuras para que la base quede plana y
lista para ser montada, y conecte el
otro extremo del cable de línea en un
enchufe modular telefónico.
10. Deslice los agujeros para montaje
sobre los postes de la placa y empuje
el aparato hacia abajo a que entre en
su sitio (Placa de pared no incluida).
11. Levante la antena de la base.
Instalación continúa en la siguiente página.
MUY IMPORTANTE: Usted debe
completar las conexiones de la base del
aparato alámbrico antes de que el auricular
inalámbrico pueda ser utilizado. De otra
manera NO FUNCIONARÁ. Vea los pasos
1-8 de esta sección.
11
8
6
7
10
9
11
Page 100

12. Coloque el selector del timbre
(“RINGER”) (en el auricular
inalámbrico) en la posición “ON.”
13. Conecte el cable de corriente del
cargador del auricular inalámbrico a un
enchufe de corriente eléctrica AC.
14. Coloque el auricular inalámbrico en el
cargador para la unidad inalámbrica y
cargue durante 12 horas. El indicador
de carga -”CHARGE”- (en el cargador)
se iluminará para indicar que la batería
se está cargando.
Si usted no carga el teléfono
adecuadamente (durante 12 horas)
cuando usted instala inicialmente su
teléfono, la calidad del funcionamiento
de la batería podría deteriorarse.
13
12
FORMAT MUTE
REDIAL MEM
I
V
E
R
4
PQRS
7
*
ANSW
CHANNEL FLASHINT
PROG
DELETEDIAL
TALK
PAUSE
14
S
E
I
/
K
P
T
Y
W
S
O
A
L
P
P
DEF3ABC
21
MNO6JKL5GHI
WXYZ9TUV
8
A
S
E
R
E
OPER0TONE
#
CHARGE
12
 Loading...