

Page 1
TM
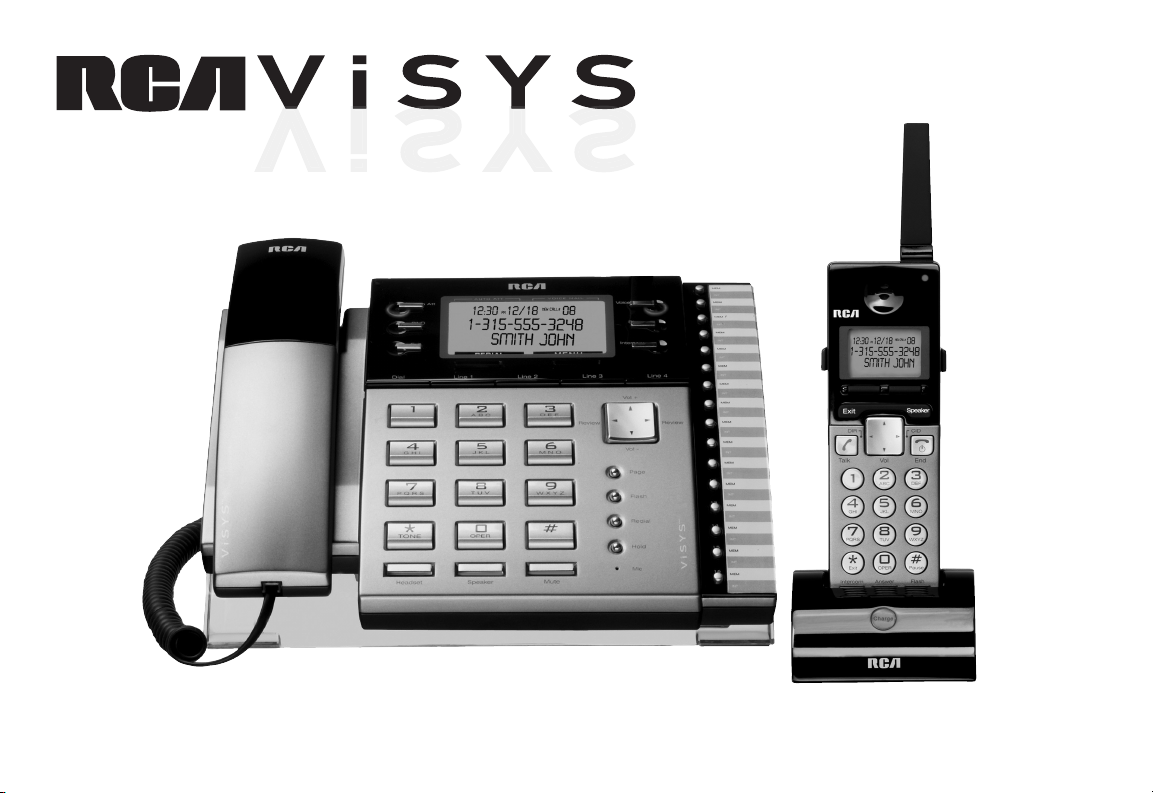
4 Line
Multi-Handset Office System
User’s Guide
Please read this manual before
operating this product for the first time.
Model 25450
Page 2

Important Information
Important Information
Equipment Approval Information
Your telephone equipment is approved for connection to the Public Switched Telephone Network and is in compliance with parts 15 and 68, FCC Rules and Regulations and the Technical Requirements for Telephone Terminal Equipment published by ACTA.
1 Notification to the Local Telephone Company
On the bottom of this equipment is a label indicating, among other information, the US number and Ringer Equivalence Number (REN) for the equipment. You
must, upon request, provide this information to your telephone company.
The REN is useful in determining the number of devices you may connect to your telephone line and still have all of these devices ring when your telephone
number is called. In most (but not all) areas, the sum of the RENs of all devices connected to one line should not exceed 5. To be certain of the number of
devices you may connect to your line as determined by the REN, you should contact your local telephone company.
A plug and jack used to connect this equipment to the premises wiring and telephone network must comply with the applicable FCC Part 68 rules and requirements adopted by the ACTA. A compliant telephone cord and modular plug is provided with this product. It is designed to be connected to a compatible
modular jack that is also compliant. See installation instructions for details.
Notes
• This equipment may not be used on coin service provided by the telephone company.
• Party lines are subject to state tariffs, and therefore, you may not be able to use your own telephone equipment if you are on a party line. Check with your
local telephone company.
• Notice must be given to the telephone company upon permanent disconnection of your telephone from your line.
• If your home has specially wired alarm equipment connected to the telephone line, ensure the installation of this product does not disable your alarm
equipment. If you have questions about what will disable alarm equipment, consult your telephone company or a qualified installer.
2 Rights of the Telephone Company
Should your equipment cause trouble on your line which may harm the telephone network, the telephone company shall, where practicable, notify you that
temporary discontinuance of service may be required. Where prior notice is not practicable and the circumstances warrant such action, the telephone company
may temporarily discontinue service immediately. In case of such temporary discontinuance, the telephone company must: (1) promptly notify you of such
temporary discontinuance; (2) afford you the opportunity to correct the situation; and (3) inform you of your right to bring a complaint to the Commission
pursuant to procedures set forth in Subpart E of Part 68, FCC Rules and Regulations.
The telephone company may make changes in its communications facilities, equipment, operations or procedures where such action is required in the operation of its business and not inconsistent with FCC Rules and Regulations. If these changes are expected to affect the use or performance of your telephone
equipment, the telephone company must give you adequate notice, in writing, to allow you to maintain uninterrupted service.
2
Page 3

Important Information
Interference Information
This device complies with Part 15 of the FCC Rules. Operation is subject to the following two conditions: (1) This device may not cause harmful interference;
and (2) This device must accept any interference received, including interference that may cause undesired operation.
This equipment has been tested and found to comply with the limits for a Class B digital device, pursuant to Part 15 of the FCC Rules. These limits are designed to provide reasonable protection against harmful interference in a residential installation.
This equipment generates, uses, and can radiate radio frequency energy and, if not installed and used in accordance with the instructions, may cause harmful
interference to radio communications. However, there is no guarantee that interference will not occur in a particular installation.
If this equipment does cause harmful interference to radio or television reception, which can be determined by turning the equipment off and on, the user is
encouraged to try to correct the interference by one or more of the following measures:
• Reorient or relocate the receiving antenna (that is, the antenna for radio or television that is “receiving” the interference).
• Reorient or relocate and increase the separation between the telecommunications equipment and receiving antenna.
• Connect the telecommunications equipment into an outlet on a circuit different from that to which the receiving antenna is connected.
If these measures do not eliminate the interference, please consult your dealer or an experienced radio/television technician for additional suggestions. Also,
the Federal Communications Commission has prepared a helpful booklet, “How To Identify and Resolve Radio/TV Interference Problems.” This booklet is available from the U.S. Government Printing Office, Washington, D.C. 20402. Please specify stock number 004-000-00345-4 when ordering copies.
Hearing Aid Compatibility
This telephone system meets FCC standards for Hearing Aid Compatibility.
US NUMBER IS LOCATED ON THE CABINET BOTTOM
REN NUMBER IS LOCATED ON THE CABINET BOTTOM
Licensing
Licensed under US Patent 6,427,009.
3
Page 4
SE E M ARK ING ON BO TTO M / BA CK OF PRO DUC T
RISK OF ELECTRIC SHOCK
DO NOT OPEN
WARNING: TO
PREVENT FIRE OR
ELECTRICAL SHOCK
HAZARD, DO NOT
EXPOSE THIS
PRODUCT TO RAIN
OR MOISTURE.
THE LIGHTNING
FLASH AND ARROW
HEAD WITHIN THE
TRIANGLE IS A
WARNING SIGN
ALERTING YOU OF
“DANGEROUS
VOLTAGE” INSIDE
THE PRODUCT.
CAUTION: TO REDUCE THE
RISK OF ELECTRIC SHOCK, DO
NOT REMOVE COVER (OR
BACK). NO USER
SERVICEABLE PARTS INSIDE.
REFER SERVICING TO
QUALIFIED SERVICE
PERSONNEL.
THE EXC LAMATION
POINT WITHIN THE
TRIANG LE IS A
WARNING SIGN
ALERTI NG YOU OF
IMPORTANT
INSTRU CTIONS
ACCOMPANY ING
THE PR ODUCT.
CAUTION:
Important Information
FCC RF Radiation Exposure Statement
This equipment complies with FCC RF radiation exposure limits set forth for an uncontrolled environment. This equipment should be
installed and operated with a minimum distance of 20 centimeters between the radiator and your body. This transmitter must not be
co-located or operated in conjunction with any other antenna or transmitter.”
For body worn operation, this phone has been tested and meets the FCC RF exposure guidelines when used with the belt clip supplied
with this product. Use of other accessories may not ensure compliance with FCC RF exposure guidelines.
4
Page 5

Introduction
Introduction
CAUTION: When using telephone equipment, there are basic safety instructions that
should always be followed. Refer to the IMPORTANT SAFETY INSTRUCTIONS provided
with this product and save them for future reference.
Congratulations on your purchase of the RCA 25450 Telephone System. The RCA
25450 Telephone System was built to satisfy a variety of business and residential
needs. A prominent feature of the RCA 25450 is the two-way radio which gives you
the flexibility to add remote handset phones anywhere there is an A/C electrical
outlet.
The RCA 25450 Telephone System functions like a PBX office system. Calls are
handled in a way that offer similar privacy.
The RCA 25450 is ready to go out of the box. This user guide will cover the basics to
get you started, explain the advanced features of the telephone, and show you how
to tailor the RCA 25450 to your specific needs.
To get the most from your new phone, we suggest that you take a few minutes right
now to read through this user’s guide.
NOTE: The ringer timing in this system may ring in a different sequence than other types of
phone systems connected to the same line(s).
IMPORTANT: In order to use all of the features of this unit, you must subscribe to either the
standard Name/Number Caller ID Service or Call Waiting Caller ID Service. To know who is
calling while you are on the phone, you must subscribe to Call Waiting Caller ID Service.
IMPORTANT: Because cordless phones operate on electricity, you should have at least one
phone in your business or home that isn’t cordless, in case the power goes out.
5
Page 6

Table of Contents
Important InformatIon .............................................................................2
EquIpmEnt approval InformatIon ..............................................................2
IntErfErEncE InformatIon ..........................................................................3
HEarIng aId compatIbIlIty ........................................................................3
lIcEnsIng .................................................................................................3
fcc rf radIatIon ExposurE statEmEnt .....................................................4
IntroductIon ............................................................................................5
Important InstallatIon InformatIon...........................................................9
Safety PrecautionS ..............................................................................................9
inStallation GuidelineS ........................................................................................9
tElEpHonE Jack rEquIrEmEnts ..................................................................10
parts cHEcklIst (basE unIt) ................................................................... 11
parts cHEcklIst (cordlEss HandsEt) .......................................................12
pHonE InstallatIon (basE unIt) ..............................................................13
BaSe unit location ............................................................................................13
inStallinG BackuP Battery .................................................................................13
inStallinG HandSet ............................................................................................13
inStallinG tHe ac adaPtor ................................................................................14
connectinG tHe telePHone line cordS ..............................................................14
two 2-line JackS ..............................................................................................15
four 1-line JackS ..............................................................................................15
cordlEss HandsEt InstallatIon ...............................................................16
inStallinG tHe cHarGinG cradle and ac adaPtor ...........................................16
inStallinG tHe cordleSS HandSet Battery ........................................................16
inStallinG tHe cHarGinG cradle wall Mount .................................................17
reGiSterinG tHe cordleSS HandSet ....................................................................17
basE unIt layout ...................................................................................18
basE unIt fEaturEs ................................................................................19
lcd diSPlay .......................................................................................................19
naviGation Button .............................................................................................19
Soft ButtonS ......................................................................................................19
Menu SySteM ...................................................................................................19
redial Button ....................................................................................................20
line ButtonS ......................................................................................................20
line dedicate ......................................................................................................20
Pre-dialinG ........................................................................................................20
SPeaker Button ..................................................................................................21
HeadSet Button ..................................................................................................21
Mute Button .....................................................................................................21
PaGe Button .......................................................................................................21
flaSH Button ....................................................................................................21
Hold Button .....................................................................................................21
dnd (do not diSturB) Button ........................................................................21
exit Button ........................................................................................................22
MeMory ButtonS ...............................................................................................22
Store Button ......................................................................................................22
directory ............................................................................................................22
intercoM Button ................................................................................................22
reSet Button .....................................................................................................22
auto attendant Button .....................................................................................22
voice Mail Button ............................................................................................23
call tranSferrinG ..............................................................................................23
Hold MeSSaGe ....................................................................................................23
conference callinG ...........................................................................................23
Second incoMinG call .......................................................................................23
caller id ...........................................................................................................23
call waitinG ......................................................................................................24
cordlEss HandsEt fEaturEs ....................................................................24
lcd diSPlay (cordleSS HandSet) .....................................................................24
cordleSS HandSet layout ..................................................................................25
6
Page 7

Table of Contents
cordleSS HandSet cHarGinG cradle layout ....................................................26
end/Power Button ............................................................................................27
talk Button ........................................................................................................27
Soft ButtonS ......................................................................................................27
Menu SySteM (adJuSt SettinGS and reGiStration) ........................................27
redial Soft Button ............................................................................................27
Pre-dialinG ........................................................................................................27
naviGation Button .............................................................................................27
SPeaker Button ..................................................................................................28
HeadSet Jack ......................................................................................................28
Mute ...................................................................................................................28
Hold ..................................................................................................................28
exit Button ........................................................................................................28
voice Mail Button ...........................................................................................29
voice Mail indicator liGHt ...............................................................................29
intercoM Button ................................................................................................29
call forwardinG ...............................................................................................29
conference callinG ...........................................................................................29
Second incoMinG call .......................................................................................29
caller id ...........................................................................................................30
call waitinG ......................................................................................................30
extenSion GrouPS ..............................................................................................30
usIng your rca 25450 pHonE systEm .................................................31
MakinG a call ...................................................................................................31
MakinG a call (BaSe unit) ...............................................................................31
redial (BaSe unit) .............................................................................................33
MakinG a call (cordleSS HandSet) .................................................................34
receivinG a call (BaSe unit) ............................................................................37
call waitinG ......................................................................................................38
endinG a call (BaSe unit) ................................................................................38
SwitcHinG Between audio ModeS .....................................................................39
PuttinG call(S) on Hold ...................................................................................39
Mute ...................................................................................................................40
call forwardinG (cordleSS HandSet) ..............................................................41
tranSferrinG a call to anotHer extenSion......................................................42
intercoM callS ..................................................................................................45
MakinG an intercoM call .................................................................................45
receivinG an intercoM call ..............................................................................46
end an intercoM call .......................................................................................47
iGnore and override an incoMinG line or intercoM call ..............................47
PaGinG (BaSe unit) ............................................................................................49
voIcE maIl (vm) ..................................................................................50
confiGure voice Mail (BaSe unit) ...................................................................50
reSet extenSion PaSSword (BaSe unit) ............................................................51
clear all vM Box MeSSaGeS (BaSe unit) .........................................................52
voice Mail Box ManaGeMent oPtionS (BaSe unit) .........................................52
voice Mail Box ManaGeMent oPtionS (cordleSS HandSet) ...........................57
voice Mail Box ManaGeMent oPtionS (offSite) ..............................................59
acceSS voice Mail (BaSe unit) ........................................................................60
acceSS voice Mail (cordleSS HandSet) ...........................................................64
acceSS vM (offSite location) ..........................................................................67
dIrEctory ...............................................................................................69
naviGate directory ............................................................................................69
advancEd functIons of your rca 25450 pHonE systEm .......................72
auto attendant (BaSe unit) .............................................................................72
confiGure auto attendant (BaSe unit) ...........................................................73
Hold MeSSaGe (BaSe unit) ...............................................................................76
SPeed dial (BaSe unit) ......................................................................................78
tHree-way conference callS ..........................................................................79
Second incoMinG call .....................................................................................82
extenSion GrouP SettinG (cordleSS HandSet) .................................................83
call loG .............................................................................................................84
7
Page 8

Table of Contents
sEttIngs and adJustmEnt ........................................................................87
Menu SySteM .....................................................................................................87
BaSe unit SetuP .................................................................................................88
line dedicate (BaSe unit) .................................................................................89
Sound (BaSe unit) .............................................................................................90
cordleSS HandSet SetuP ....................................................................................94
reGiSter cordleSS HandSet (BaSe unit and cordleSS HandSet) ....................94
dereGiSter cordleSS HandSet (BaSe unit and cordleSS HandSet) .................95
clear cordleSS HandSet id (BaSe unit)..........................................................96
next cordleSS HandSet id (BaSe unit) ........................................................97
Sound (cordleSS HandSet) ...............................................................................98
PHone SettinGS .................................................................................................101
dialinG Prefix ..................................................................................................101
area codeS ..................................................................................................... 102
contraSt (BaSe unit) ..................................................................................... 104
Set tiMe (BaSe unit) ...................................................................................... 104
do not diSturB (dnd) (BaSe unit) ........................................................... 105
auto or Manual line Selection SettinGS (cordleSS HandSet) ................... 106
reSet SySteM (BaSe unit) ............................................................................... 108
HeadSet and Belt cliP oPeration................................................................... 109
rePlacinG tHe BatterieS ................................................................................... 110
Cordless Handset Battery ..................................................................................110
Handset Memory Retention ............................................................................ 110
Base Unit Battery ................................................................................................. 111
Battery Safety Precautions ............................................................................... 111
otHEr InformatIon ...............................................................................112
diSPlay MeSSaGeS ............................................................................................112
Sound SiGnalS .................................................................................................113
troublEsHootIng tIps ............................................................................113
caller id .........................................................................................................114
telePHone .........................................................................................................114
General Product care ....................................................................................116
cauSeS of Poor recePtion ...............................................................................116
interference inforMation ................................................................................117
sErvIcE InformatIon .............................................................................118
lImItEd Warranty ................................................................................119
Wall mountIng brackEt tEmplatE for cordlEss HandsEt ..................... 121
accEssory InformatIon (rEplacEmEnt parts) ........................................ 123
8
Page 9

Connections and Setup
Important Installation Information
Safety Precautions
• Never install telephone wiring during a lightning storm.
• Never install telephone jacks in wet locations unless the jack is specifically designed for wet locations.
• Never touch non-insulated telephone wires or terminals, unless the telephone line is disconnected from the network.
• Use caution when installing or modifying telephone lines.
• Temporarily disconnect any equipment connected to the phone such as faxes, other phones, or modems.
Installation Guidelines
• Install the base unit near a telephone (modular) jack and an electrical outlet.
• Avoid sources of noise, such as a window by a busy street, and electrical noise, such as motors, microwave ovens, and fluorescent lighting.
• Avoid heat sources, such as heating air ducts, heating appliances, radiators, and direct sunlight.
• Avoid areas of excessive moisture or extremely low temperature.
• Avoid dusty locations.
• Avoid other cordless telephones or personal computers.
CAUTION: Always disconnect all phone cords from the Base Unit before battery installation or replacement.
INSTALLATION NOTE: Some cordless telephones operate at frequencies that may cause or receive interference with TVs, microwave ovens, and VCRs. To minimize
or prevent such interference, the base of the cordless telephone should not be placed near or on top of a TV, microwave ovens, or VCR. If such interference
continues, move the cordless telephone farther away from appliances. Certain other communications devices may also use the 900 MHz frequency for
communication, and, if not properly set, these devices may interfere with each other and/or your new telephone. If you are concerned with interference, please
refer to the owner’s manual for these devices on how to properly set channels to avoid interference. Typical devices that may use the 900 MHz frequency for
communication include wireless audio/video senders, wireless computer networks, multi-handset cordless telephone systems, and some long-range cordless
telephone systems.
INSTALLATION NOTE: If the 25450 Phone System shares a phone line with another type of phone system, the Auto Attendant and Voice Mail features may be
interrupted. You may want to turn off Auto Attendant and Voice Mail for that line.
9
Page 10

Connections and Setup
Telephone Jack Requirements
To use this phone, the user will need either two RJ14 (two line) or four RJ11 (one
line) modular jacks in order to supply this unit with 4 phone lines. The modular jacks
which may look like the one shown here. If you don’t have a modular jack, call your
local phone company to find out how to get one installed.
Modular telephone
line jack
10
Page 11
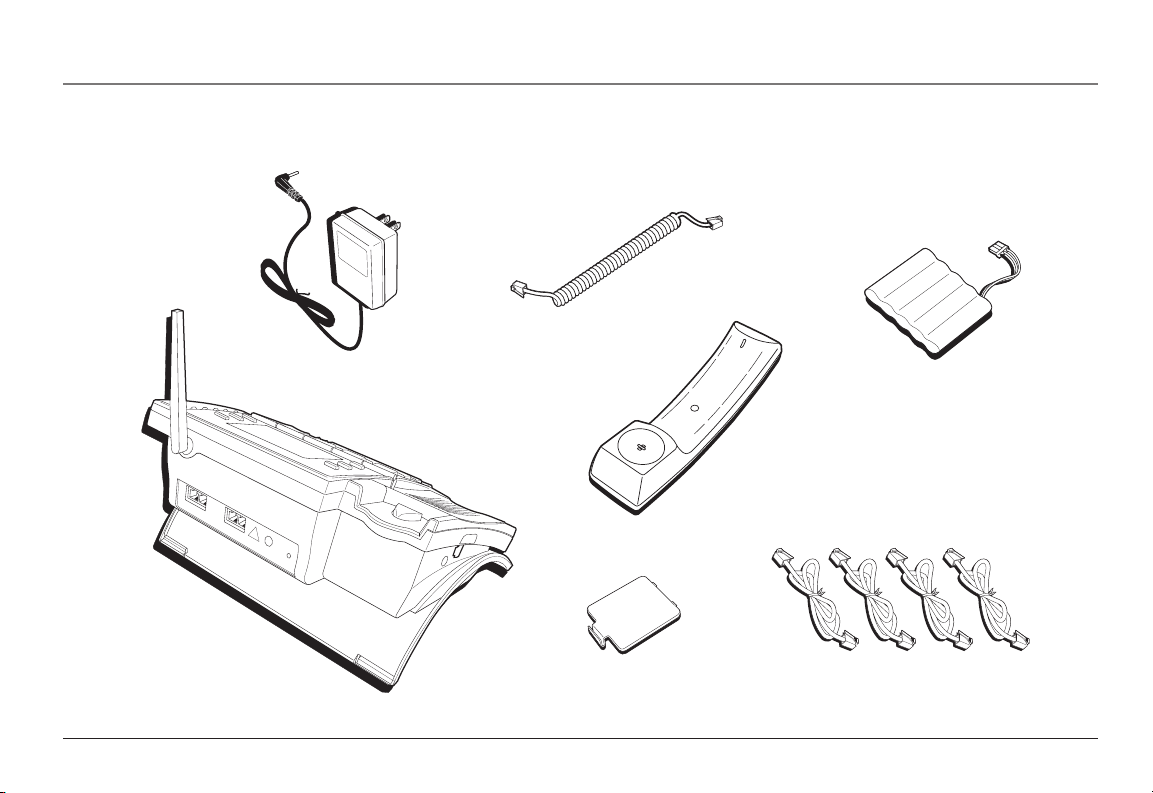
Base
Battery Compartment Cover
Handset Cord
Handset
Battery Pack
Line Cords (4)
Charger/AC Adapter
Connections and Setup
Parts Checklist (Base Unit)
Make sure your package includes the following items:
11
Page 12
Connections and Setup
REDIAL MENU
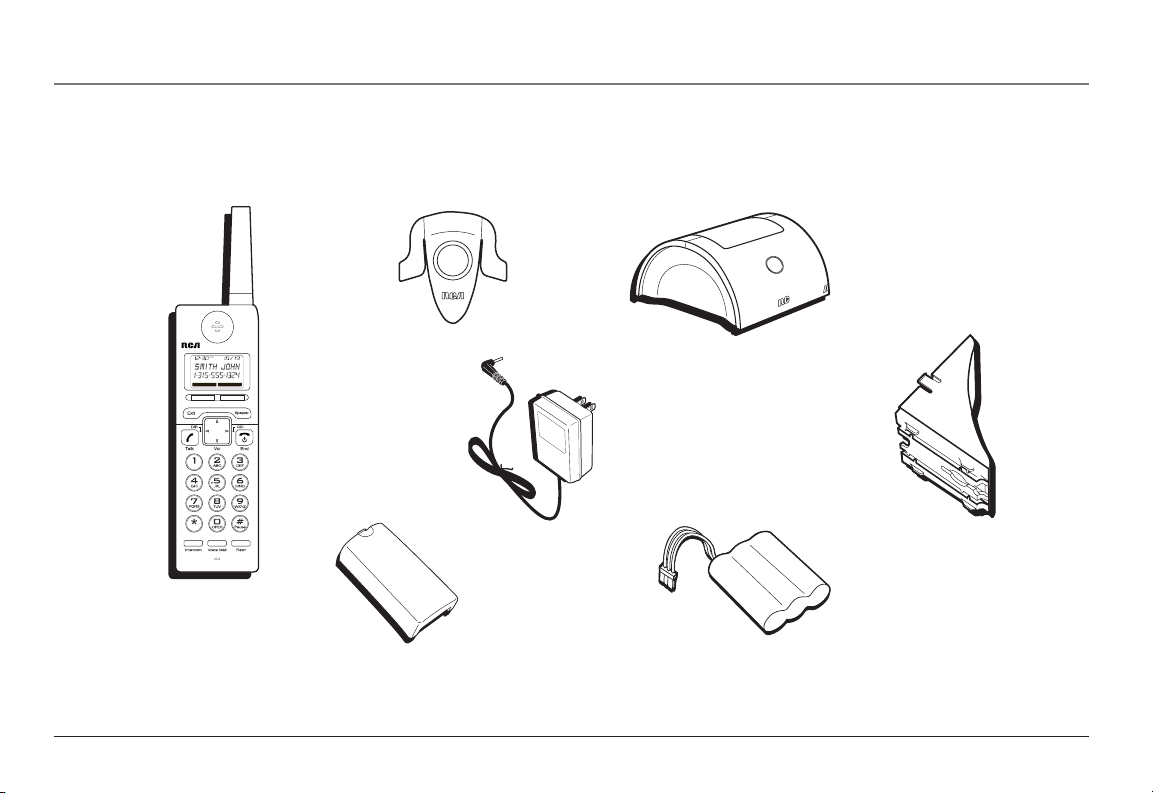
Cordless
Handset
Belt Clip
Base
Charging
Cradle
Charging
Cradle Bracke
t
Battery Pack
Battery Compartment Cover
Charger/AC Adapter
Parts Checklist (Cordless Handset)
Make sure your package includes the following items:
12
Page 13
Battery
Battery Compartment Cover
Black Wire
Connections and Setup
Phone Installation (Base Unit)
Base Unit Location
Place your phone on a level surface, such as a tabletop or desk, near an electrical
outlet and telephone wall jack. For the best performance, place the base unit at least
3 feet away from other electronic devices such as a computer or a fax machine. Raise
the antenna after the installation is complete.
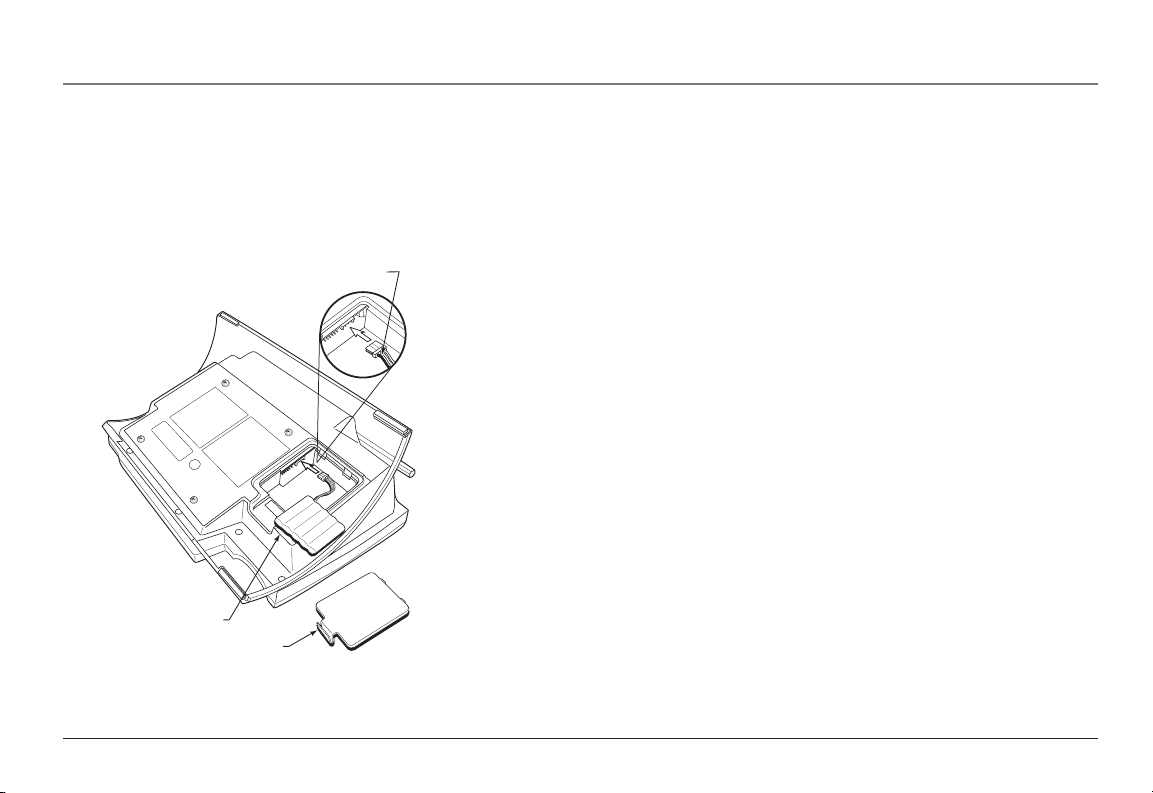
Installing Backup Battery
The backup battery can provide 30 minutes of normal operation in the event of a
power failure. Use only the supplied RCA Nickel Metal Hydride (Ni-MH) Base Unit
backup battery.
1. Locate the battery compartment cover and battery pack packaged separately.
2. Plug in the battery pack as shown.
3. Snap the battery compartment cover in place.
4. Charge the backup battery for 10 hours before the first use.
NOTE: If the low battery icon appears in the display when electrical power is on, replace the
rechargeable batteries. It is important to replace them as soon as possible to maintain unit
operation when electrical power is off. As a precaution, you may want to write down any
stored information you do not want erased.
IMPORTANT: If you are not going to use the telephone for more than 30 days, remove the
batteries because they can leak and damage the unit.
Installing Handset
Connect one end of the Handset cord to the Handset and the other end to the
Handset jack located on the left side of the Base Unit. Use only supplied RCA 25450
Handset.
13
Page 14

Connections and Setup
Power Outlet AC 120V
Base Unit
Adapter 7.5V
Handset
Cord
Handset
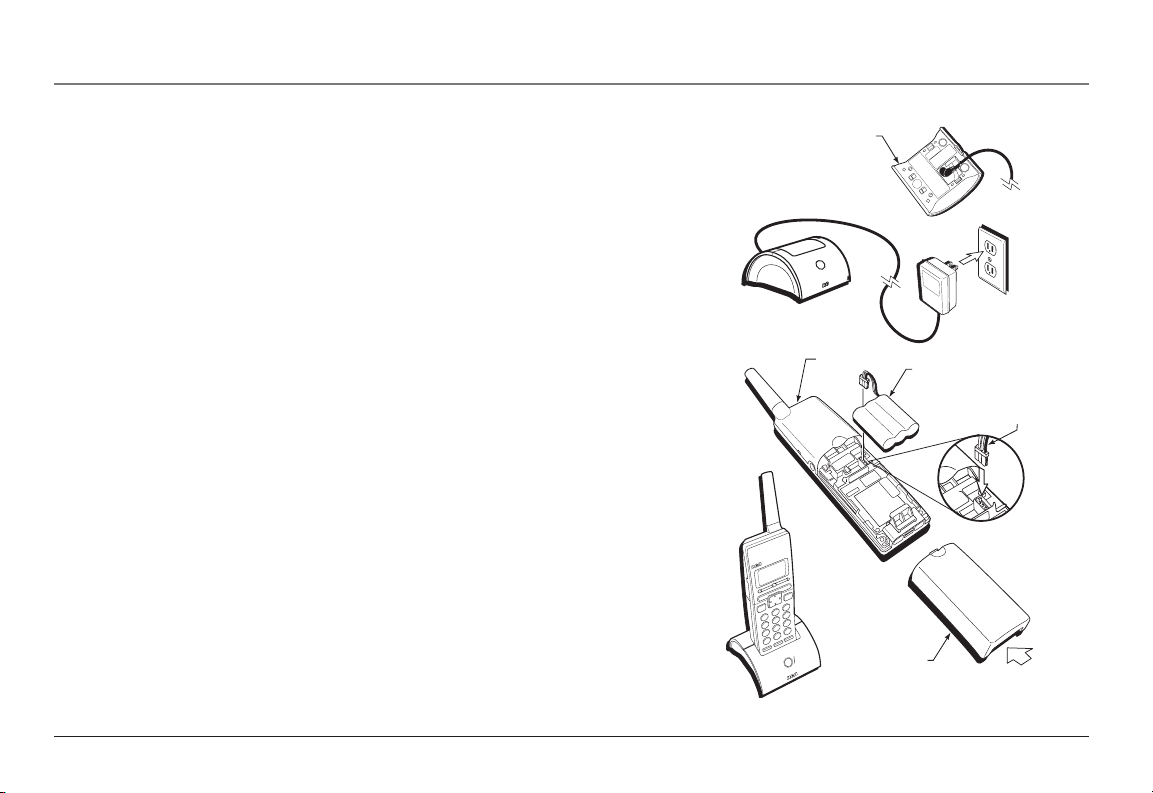
Installing the AC Adaptor
Plug the transformer end of the Base Unit AC adaptor (7.5VDC) into a standard AC
electrical power outlet, plug the other end into the “Power 7.5VDC ” jack on the back
of the Base Unit.
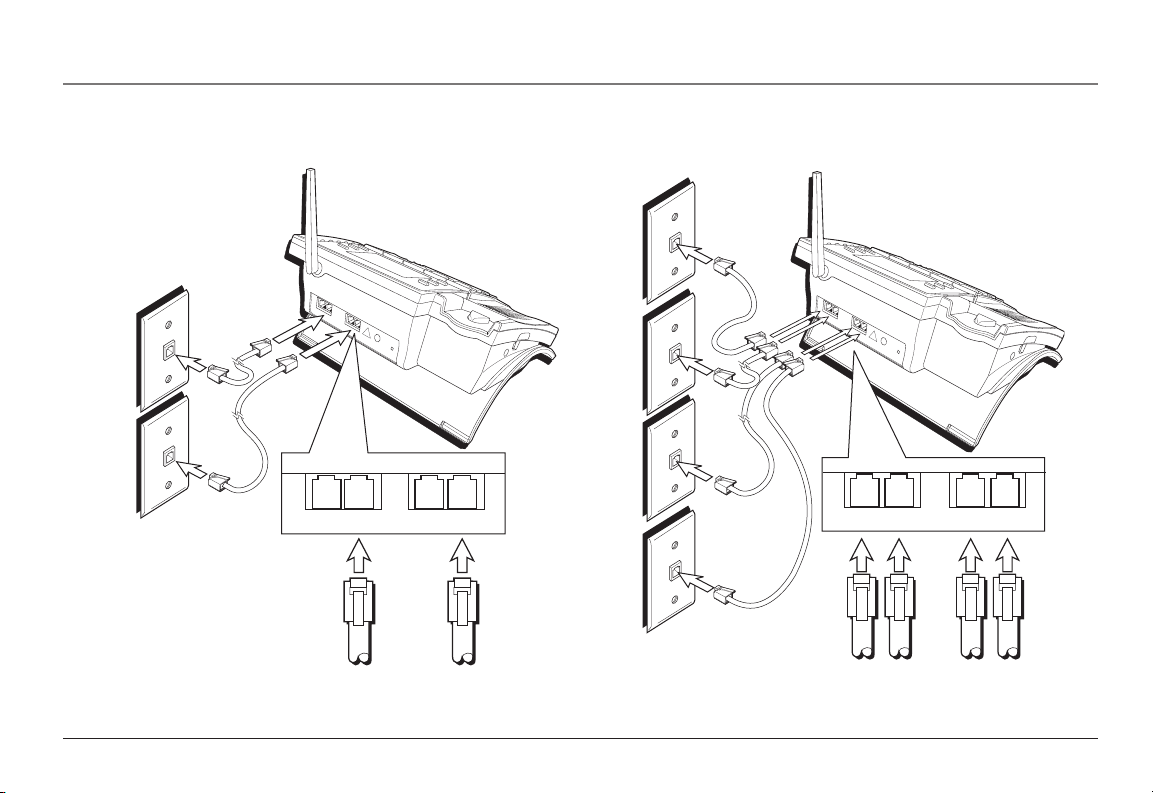
Connecting the Telephone Line Cords
Two 2-line Wall Jacks (Type RJ-14)
1. Plug one end of a straight telephone line cord into the jack on the base labeled
as “L2/L1” and the other end into the two-line wall jack you are using for lines 1
and 2.
2. Plug one end of a straight telephone line cord into the jack on the base labeled
as “L4/L3” and the other end into the two-line wall jack you are using for lines 3
and 4.
Four 1-line Wall Jacks (Type RJ-11)
1. Plug one end of a telephone line cord into the jack on the base labeled as “L2/L1”
and the other end into the wall jack you are using for line 1.
2. Plug one end of a telephone line cord into the jack on the base labeled as “L2”
and the other end into the wall jack you are using for line 2.
3. Plug one end of a telephone line cord into the jack on the base labeled as “L4/L3”
and the other end into the wall jack you are using for line 3.
4. Plug one end of a telephone line cord into the jack on the base labeled as
“L4/Data” and the other end into the wall jack you are using for line 4.
IMPORTANT: If you want to connect another device (such as a modem or fax machine), use
the jack on the phone labeled “L4/Data”. A call picked up on Line 4 at another extension may
interrupt fax, modem, or message transmissions. You must also disable the Auto Attendant
and Voice Mail features for Line 4 as these will also interrupt fax, modem or message
transmissions. If your wall jack is RJ-14 where two lines are integrated into one jack, you will
need a splitter for the L4/Data port.
14
Page 15
Connections and Setup
L4/Data L4/L3 L2 L2/L1
Line 1
Line 2
Line 3
Line 4
L4/Data
Line
4
L4/L3
Line
3
L2
Line
2
L2/L1
Line
1
Two 2-line Jacks
(Using 4-Wire Line Cords Supplied)
Four 1-line Jacks
15
Page 16
Connections and Setup
Battery
Back Cover
Handset
Cradle
Black
Wire
Cordless Handset Installation
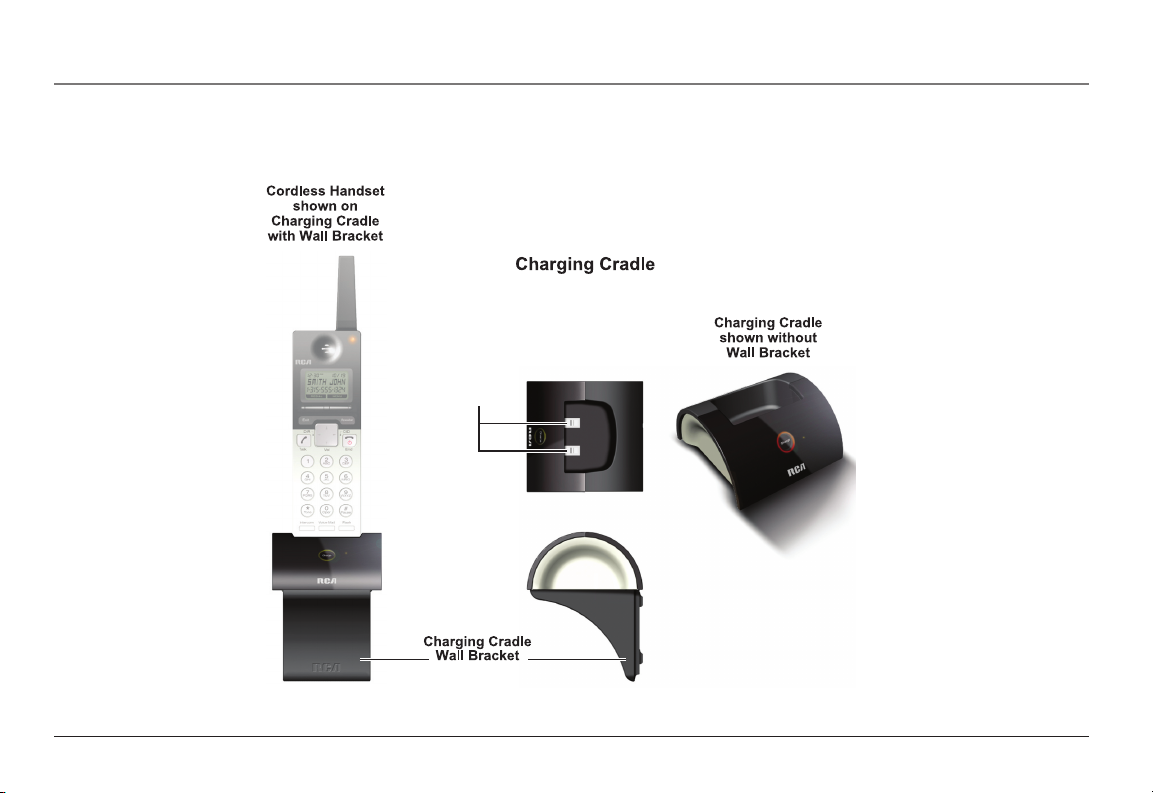
Installing the Charging Cradle and AC Adaptor
Plug the transformer end of the AC Adaptor into a standard AC electric power outlet, plug the other end into the “Power 5.5VDC In” jack on the back of the Charging
Cradle.
Installing the Cordless Handset Battery
1. Locate the back cover and battery pack packaged separately from the Handset.
2. Insert the battery pack and connect the plug on the battery pack to the jack
inside the compartment. Use only the supplied RCA Nickel Metal Hydride
(Ni-MH) battery.
NOTE: It is important to maintain the polarity (black and red wires) to the jack inside the
compartment. To ensure proper battery installation, the connector is keyed and can be
inserted only one way.
3. Close the battery compartment by pushing the back cover up until it snaps into
place.
4. Place the handset in the charging cradle. Charge the battery for 12 hours before
the first use.
NOTE: Allow the handset battery to properly charge (for 12 hours) prior to first use or when
you install a new battery pack. If you do not properly charge the phone, battery performance
will be compromised.
NOTE: The Cordless Handset may feel warm to the touch after charging.
16
Page 17
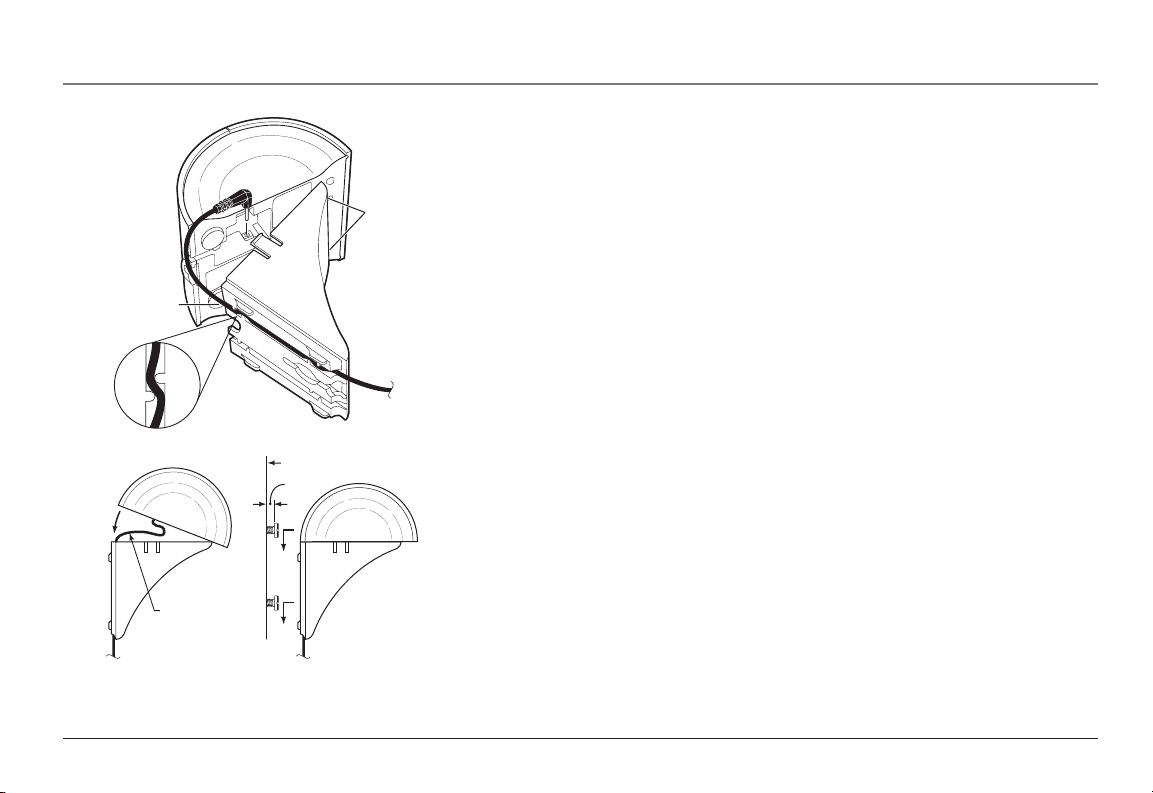
Mounting Surface
Cord Channel
Insert
tabs here
Leave 3"
from here
to plug
Loop inside
to prevent
pinching
3/16"
Connections and Setup
Installing the Charging Cradle Wall Mount
Choose a mounting location at least 10-1/2” clearance above the top screw hole.
1. Cut out the Charging Cradle Wall Mount Template. See page 121.
2. Hold the template against the wall and mark the mounting screw positions.
3. Drill holes in wall using appropriate size drill bit.
4. Insert anchor screws into the wall. We recommend #8 pan head screws. Allow
3/16” space between screw heads and wall.
5. Press the AC adapter cord in the cord channel of the wall bracket. Allow approximately 3” of cord past the end of the channel.
6. Insert the round connector on the AC adapter cord into the connection on the
bottom of the charging cradle.
7. Insert the front tabs of the bracket in the square holes of the charging cradle.
Swing the cradle down to snap it in place. Make sure the AC adapter cord is not
pinched between the cradle and the mount.
8. Mount the assembly to the wall.
9. Plug the AC Adapter into a power outlet.
10. Insert the cordless handset into the cradle. Charge the battery for 12 hours
before the first use.
Registering the Cordless Handset
Cordless Handsets purchased separately must be registered with the Base Unit before
using. If the Cordless Handset was purchased with the Base Unit as a system, it has
already been registered. Refer to the Settings and Adjustments section in this User’s
Guide for instructions on registration.
17
Page 18
Features
Headset
Handset
Speaker
Line Buttons
Dial Buttons
Mute
Voice Mail Lines
Voice Mail
Store
Intercom
Memory
Buttons
Auto Attendant
DND
Exit
Auto Att Lines
Soft
Button
Soft
Button
Page
Flash
Redial
Hold
Microphone
Keypad
Navigation Button
Volume + - / Directory-DIR / Caller-ID
LCD Display
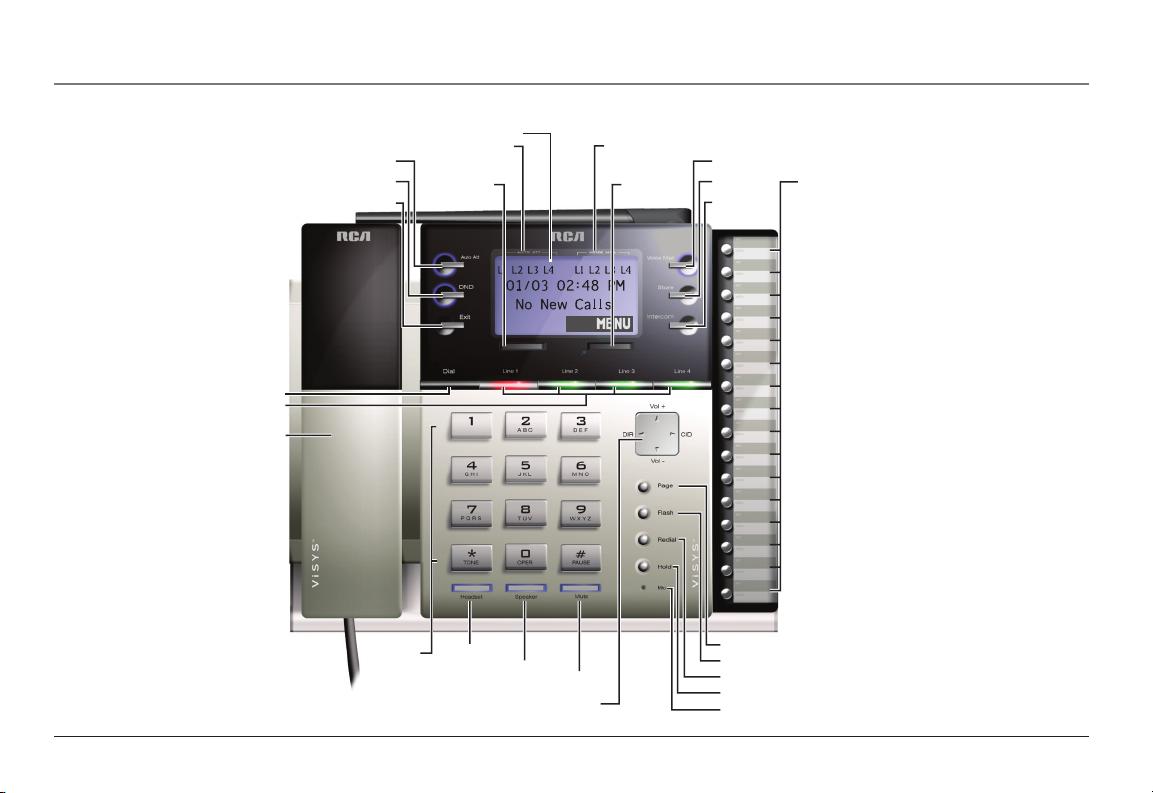
Base Unit Layout
18
Page 19
Features
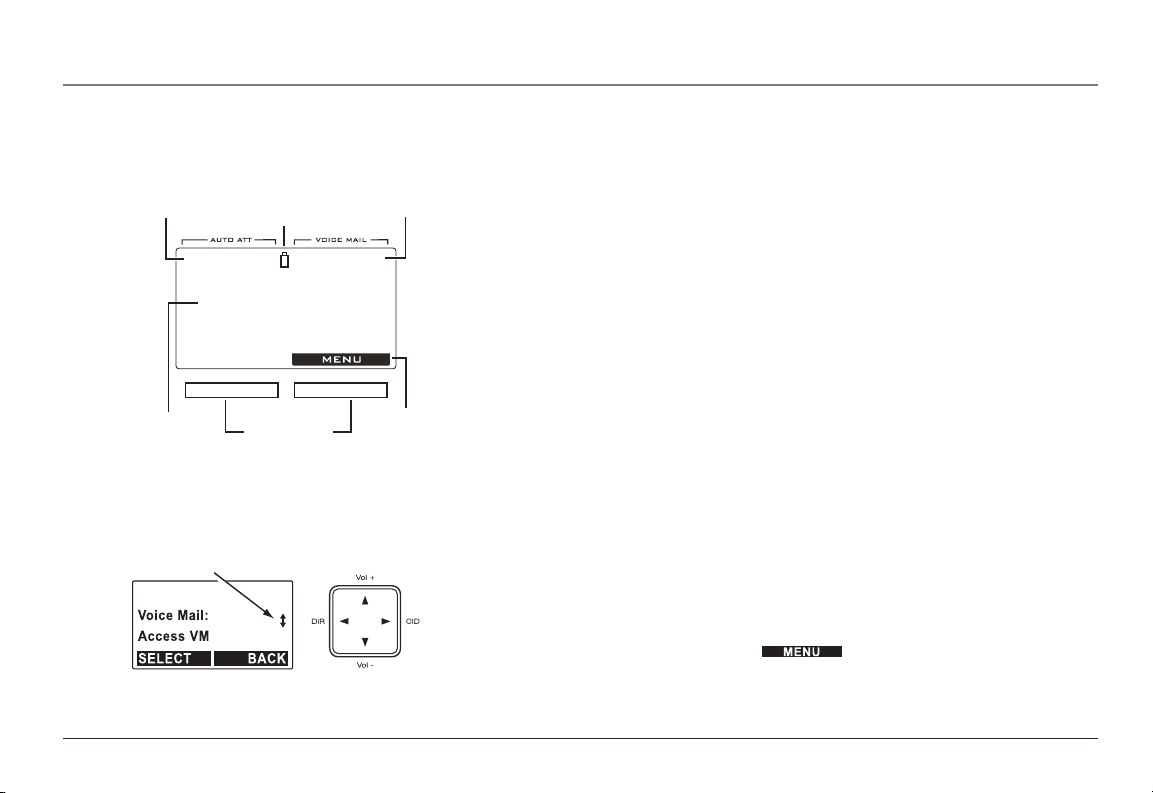
Auto Attendant
Indicators
L1 L2 L3 L4 L1 L2 L3 L4
Voice Mail
Indicators
12/09 05:24 PM
3 New Calls
Soft Buttons
Backup
Battery
Status
Soft Button
Functions
Date, Time
& Number of Calls, or
Caller ID Information
Arrows on Display Indicate
Scrolling Available by Using
Navigation Button
(The phone is not handling calls or being programmed)
Display shown in Standby Mode
Base Unit Features
LCD Display
The Display shows several functions and menu items of the phone system.
The first line of the display can show the Auto Attendant and Voice mail ON/OFF
indicators and backup battery status, or Caller ID, date and time, or messages.
The second and third lines can show Caller ID information, messages, menu selections, or editable characters.
The last line can show the various left and right soft button functions.
NOTE: When the system is not handling calls or being programmed, the LCD Display is in
Standby Mode.
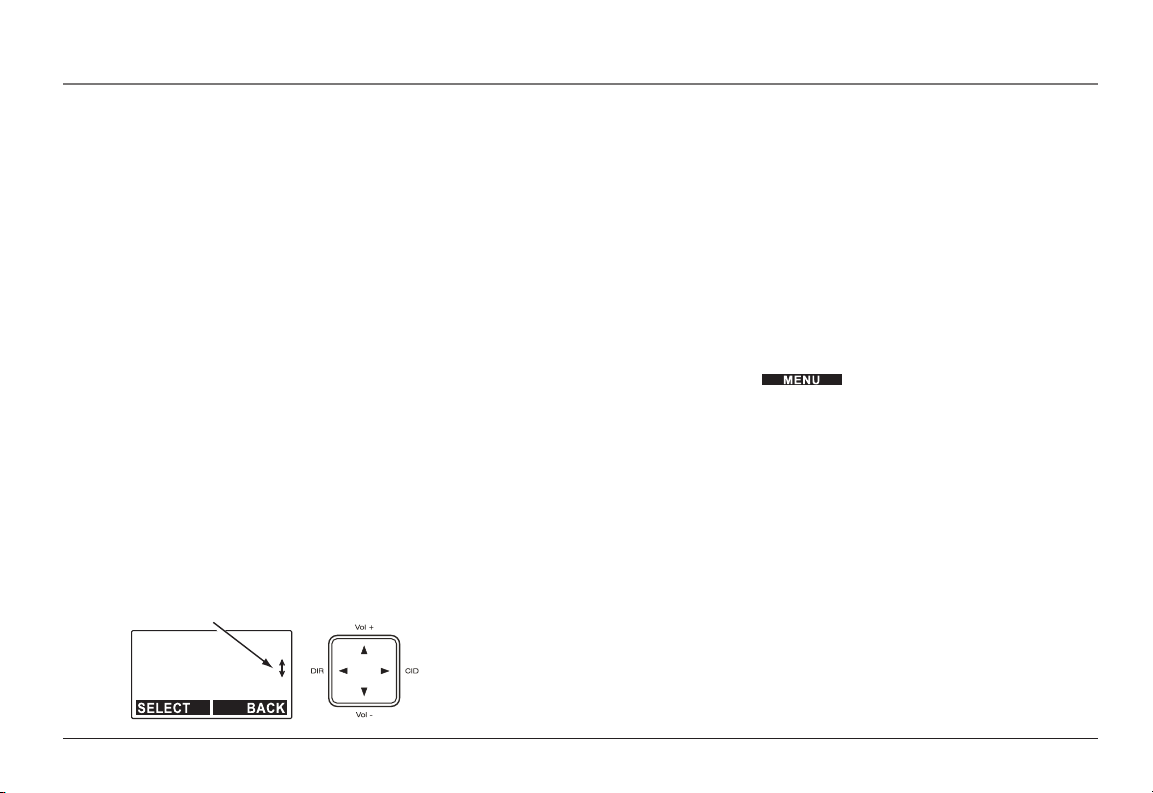
Navigation Button
Press 5 and 6 to scroll through records and menu selections on the display, adjust
ringer volume during standby mode (phone idle), and adjust the Handset/Receiver,
Speakerphone or Headset voice volume during a call. Press 3 and 4 to move the
cursor on the Display during number and name editing, and to access Caller ID or
Directory functions during Standby Mode.
Soft Buttons
The function of each Soft Button changes according to what is shown in the Display
above it. Press to perform the function shown above the soft button.
MENU System (Adjust Settings and Registration)
Use the Menu system by pressing the soft button to access adjustments for sound settings, display settings, system settings, and to register Cordless
Handsets.
NOTE: You must exit the Menu System before you can make a call.
19
Page 20

Features
Redial Button
Allows you to dial the last ten (10) numbers called. You can use the Navigation Button up/down arrows to scroll through the last 10 numbers dialed.
Line Buttons (4)
Four line buttons are available. Dual-colored lights in each Line button indicate:
• Line is idle (light off)
• Base Unit is ringing (flashing green quickly)
• Cordless Handset is ringing (flashing red quickly)
• Base Unit is on hold (flashing green slowly)
• Cordless Handset is holding a call (flashing red slowly)
• Base Unit in use (constant green)
• Cordless Handset in use (constant red)
Line Dedicate
The line dedicate function allows an extension (Base Unit or Cordless Handset) to be
dedicated to a line.
Dial Button
Pressing the Dial button accesses an available telephone line and dials the number
on the display. This allows users to pre-dial a number or review Caller ID records or
Directory entries before dialing the number.
Pre-Dialing
Allows you to enter a phone number before lifting the handset, pressing the
Speaker, Headset, Dial, or Line (1-4) buttons to make a call.
20
Page 21

Speaker Button
Allows you to talk to a caller hands free using the Speakerphone. The Speakerphone
remains in use unless you pick up the Handset or press the Headset button.
Headset Button
Allows you to talk to a caller using a headset. The headset jack supports a standard
2.5 mm plug. The Headset operation remains for the duration of the call until you
press the Speaker button or you pick up the Handset.
NOTE: If the headset is diconnected during a call, the call remains active unless the person on
the line hangs up, or you press the Headset button again.
Mute Button
Allows you to temporarily turn off the microphone on the Handset/Receiver, Headset, or Speakerphone during a call so the person on the line cannot hear you.
Page Button
Pages all Cordless Handsets. Each Cordless Handset can be paged individually using a
Memory Button.
Flash Button
Sends a signal to a phone line to retrieve a dial tone after you end a call, or to perform the call waiting feature provided by your local phone company during a call.
Hold Button
Allows you to temporarily suspend a call up to 30 minutes.
Features
DND (Do Not Disturb) Button
Press to activate a silent ring on all incoming calls, The DND button flashes if Do Not
Disturb is turned on.
21
Page 22

Features
Exit Button
Returns to the Standby Mode on the Display. Any unsaved changes will be discarded.
Memory Buttons
There are 16 buttons on the right panel that can have dual functions. They can
be used for one-touch paging to a Cordless Handset, or as Speed Dial buttons for
external phone numbers.
Store Button
Press to store speed dial numbers into the Memory buttons.
Directory
The Directory allows you to store up to 100 names and numbers.
Intercom Button
Places an intercom call to an extension (Cordless Handset) or Group ID.
Reset Button
Located on the back of the Base Unit, this button is indented to prevent accidental
reset. Press to reset the Base Unit to factory settings. All Voice Mail, Auto Attendant,
Caller ID, and Directory records will be erased. All Cordless Handsets will need to be
re-registered if the Base Unit is reset.
Auto Attendant Button
Auto Attendant is an automated call answering feature that uses recorded messages
to direct calls to extensions or voice mails. This allows you to leave the Base Unit
unattended. Auto Attendant can be turned on and off on each line. You can record a
separate message for each line or use the default recordings.
22
Page 23

Features
Voice Mail Button
Call Transferring
Allows you to move a call from one extension to another.
Hold Message
Accessed through the Menu soft button, the Hold Message function allows the user
to record, play, or delete a message for callers placed on hold.
Conference Calling
The conference call function allows a caller from the Base Unit or a Cordless Handset
to add a third person to a call. The call must include at least one outside line.
Second Incoming Call
Alerts you of a new call from a different line by a tone when you are on the phone.
Allows you to toggle between calls.
Caller ID
Contact your local phone company to subscribe to this feature. The phone system
receives and displays Caller ID information transmitted by your local phone company.
This information may include the phone number, date and time. The unit can store
up to 50 calls.
23
Page 24

Features
Smith John
1-315-555-1234
Caller ID
Information
Soft Buttons
Battery
Status
01
Handset ID
Number
RSSI
L1
Line
Indicator
Call Waiting
Contact your local phone company to subscribe to this feature. This feature allows
you to see on the Display who is calling when you hear a call waiting confirmation
tone.
NOTE: The call waiting tone is audible only to the extension that is on the line. No other
extension will hear the tone or can answer the call.
Cordless Handset Features
LCD Display (Cordless Handset)
The LCD display has a LED (Light Emitting Diode) for backlighting. The LED dims after
10 seconds of inactivity.
The first line of the Display can show the Caller ID, time and date, or can show the
following status icons from left to right:
RSSI (Receive Signal Strength Indicator) - During a call, the number of bars is
proportional to the radio signal strength received
Line Indicators - Indicate the line number(s) being accessed or held.
Handset ID - Displays a 2-digit Handset ID
Battery Strength Indicator - Number of bars is proportional to the amount of
battery time remaining. Indicates charging when in charger cradle
The second and third lines can show status, Caller ID information, message, menu
selections, or editable characters.
The last line shows various left and right Soft Button functions.
24
Page 25
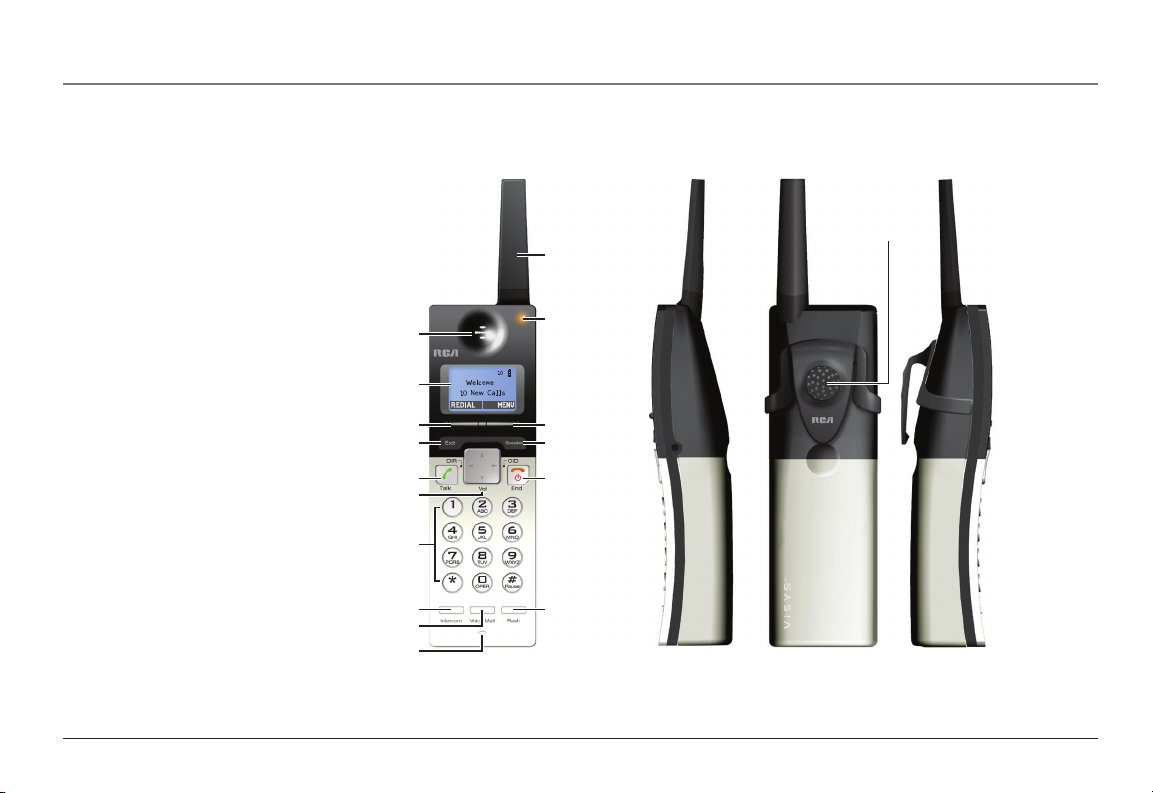
Speaker
Voice Mail
Microphone
Speakerphone
Intercom
Keypad
Exit
Soft Button
LCD display
Cordless Handset Receiver
Soft Button
Voice Mail
Indicator
Antenna
Flash
Navigation Button
(Volume + -/Directory/Caller ID)
Talk
End/Power
Cordless Handset Layout
Features
25
Page 26
Contacts
Features
Cordless Handset Charging Cradle
26
Page 27
Arrows on Display Indicate
Scrolling Available by Using
Navigation Button
VM box # 01
00 new 00 old
Play new
Features
End/Power Button
Press to end a call. Press for 3 seconds to turn the handset power ON or OFF.
Talk Button
Press to place a phone call, answer an incoming phone call, or make an intercom call
through the receiver or headset. The receiver or headset remains in use unless the
Speaker button is pressed.
Soft Buttons
The function of each Soft Button changes according to what is shown in the Display
above it. Press to perform the function above the Soft Button.
MENU System (Adjust Settings and Registration)
Use the Menu system by pressing the soft button to adjust sound
settings, phone settings, and to register Cordless Handsets.
Redial Soft Button
Allows you to dial the last ten (10) numbers called. You can use the Navigation
Button 5 or 6 arrows to scroll through the last 10 numbers.
Pre-Dialing
Allows you to enter a phone number before accessing a telephone line by pressing
the Talk or Speaker button.
Navigation Button
Press 5 or 6 to scroll through records and menu selections on the Display, adjust
ringer volume during Standby Mode, and adjust the Cordless Handset receiver,
Speakerphone or Headset voice volume during a call. Press 3 or 4 to move the
cursor on the Display during number and name editing, and to access Caller ID or
Directory functions during Standby Mode.
27
Page 28

Features
Speaker Button
Press the Speaker button to activate the Speakerphone and make a call, answer an
incoming call, or make an intercom call. You can toggle between the speakerphone
mode and the receiver by pressing the Talk or Speaker buttons. To end a call, press
the End button.
Headset Jack
Allows you to plug in a headset. The headset jack supports a standard 2.5 mm headset plug.
Mute
Available through the soft button. During a call, allows you to temporarily turn off the microphone on the Cordless Handset, headset, or speakerphone so
the person on the line cannot hear you.
Flash Button
Press to send a signal to a phone line to retrieve a dial tone after you end a call, or
to perform the call waiting feature provided by local phone companies during a call.
Hold
Available through the soft button during a call. Allows you to temporarily suspend a call up to 30 minutes.
Exit Button
Returns to the Standby Mode display. Any unsaved changes will be discarded.
28
Page 29

Features
Voice Mail Button
Allows you to access the Voice Mail system to play new or old messages or to change
your voice mail options.
Voice Mail Indicator Light
Flashes when there are unheard voice mail messages.
Intercom Button
Press to place an intercom call to an extension (Cordless Handset ID or Base Unit ID)
or a Group ID.
Call Forwarding
Allows you to forward future incoming calls from your extension to an external
phone number.
Call Transferring
Allows you to move a call from one extension to another.
Conference Calling
The conference call function allows a caller from the Base Unit or a Cordless Handset
to add a third person to a call. The call must include at least one outside line.
Second Incoming Call
Alerts you of a new call from a different line by a tone when you are on the phone.
Allows you to toggle between calls.
29
Page 30

Features
Caller ID
Contact your local phone company to subscribe to this feature. The phone system
receives and displays Caller ID information transmitted by your local phone company.
This information may include the phone number, date and time. The unit can store
up to 50 calls.
Call Waiting
Contact your local phone company to subscribe to this feature. This feature allows
you to see on the Display who is calling when you hear a call waiting tone.
NOTE: The call waiting tone is audible only to the extension that is on the line. No other
extension will hear the tone or can answer the call.
Extension Groups
This feature allows several Cordless Handset users to be called or paged at the same
time as one group. The first Handset user to answer receives the call. There are four
group ID numbers (91-94) available for Cordless Handset users.
NOTE: The Base Unit always belongs to all groups
For example, if several Cordless Handset users in a sales department decide to be
called as a group, each Cordless Handset subscribes to the same group ID number.
Outside and Intercom calls can be directed to that “sales” group ID number.
Auto Attendant recordings can also direct calls to Extension Groups. For example,
you could record an Auto Attendant message to say; “To speak with someone in
sales, press 91”.
30
Page 31

Using Your RCA 25450 Phone System
Using Your RCA 25450 Phone System
Your RCA 25450 Phone System comes ready to use. This section details the basic
operation of the Base Unit and Cordless Handset, including instructions on making,
receiving and ending a call, call waiting, switching between audio modes, putting a
call on hold, muting, call forwarding, transferring a call, and using the intercom.
Making a Call
Calls can be made using Base Unit handset, Cordless Handset, Headset, or Speakerphone. A call duration timer will display the length of the call after the connection
is established.
Making a Call (Base Unit)
Auto Line-Selection Dial (Base Unit)
The Auto Line-Selection dial function allows the user to make a call without choosing a phone line. An available line is automatically selected.
1. Press the Dial, Speaker or Headset button (when a Headset is plugged in), or pick
up the Handset (off-hook).
NOTE: To cancel dialing at any time, press the Speaker, or Headset button again, or return the
handset to the cradle.
2. If all usable phone lines are not available, the display will show
“No line available.”
3. If a phone line is available, the phone will enter talk mode and the display will
show “Press REDIAL or dial number”, or the display will show the dialing prefix if
it is enabled by the phone setting menu. The Speakerphone, Headset, or Handset
will be turned on.
4. Press the Redial button to redial the last number called, or enter the phone number using the keypad (0-9, *, #).
31
Page 32

Using Your RCA 25450 Phone System
Manual Line Selection Dial (Base Unit)
The manual line-selection function allows you to choose a phone line to make a call.
1. Press a Line button (1-4).
NOTE: To cancel at any time, press the Speaker button or return the Handset to the Cradle.
2. If the phone line selected is not connected or is in use, it will show “Line (1-4)
is not available”. If the phone line selected is dedicated to a Cordless Handset, it
will show “Line (1-4) is dedicated to ext # (01 – 16)”. If the phone line selected
is available but system resources such as voice channel are not available, it will
show “System busy”.
3. Otherwise, the phone will enter talk mode and the display will show “Press
REDIAL or dial number” or the dialing prefix if it is enabled via phone setting
menu. To use the Handset, lift it from the cradle. If the Handset is in the cradle,
the speakerphone will be turned on.
4. Press the Redial button to redial the last number called, or enter the phone number using the keypad (0–9, *, #).
Pre-Dialing (Base Unit)
The pre-dial function allows you to enter the number before accessing a phone line.
1. To pre-dial a number, enter the phone number using the keypad (0–9, *, #) while
in Standby Mode.
2. Use the and soft buttons to edit the number entered. The
soft button erases the last digit entered. The soft button
erases the whole number but remains in the dialing mode.
3. Press the Dial, Speaker, or Headset button (when a Headset is plugged in), or
pick up the handset (off-hook) to make an auto-line selection dial; or press Line
(1-4) to make a manual line selection dial.
32
Page 33

Delete?Delete?
Using Your RCA 25450 Phone System
NOTE: You can toggle between the Headset, Speakerphone and Handset/Receiver by pressing
the corresponding buttons or lifting the Handset/Receiver.
4. If the dialing prefix function is enabled via phone setting menu, the dialing
prefix will be inserted before the phone number entered.
5. Before the auto or manual line-selection dial is made, an incoming call takes
priority and will cancel the pre-dialing.
Redial (Base Unit)
The redial function allows the user to dial a number from the last 10 numbers dialed.
1. To redial a number, press the Redial button. The last phone number will be
displayed.
NOTE: If the Redial log is empty, the Redial display will show “Redial log empty” and return to
Standby Mode in 5 seconds.
2. Press 5 or 6 on the Navigation button to scroll through the last 10 numbers
dialed.
3. Press the Dial, Speaker or Headset (when a headset is plugged in) button, or pick
up the handset (off-hook) to make an auto line-selection dial; or press Line (1-4)
to make a manual line-selection dial. The phone number shown will be sent.
4. Before the auto or manual line-selection dial is made, an incoming call takes
priority and will cancel the redial.
To Delete a Number from the Redial Log (Base Unit)
1. Press the Redial Button. The last phone number will be displayed.
2. Press 5 or 6 on the Navigation button to scroll to the number to be deleted.
3. To delete a number from the Redial log, press the soft button. Press
the soft button to delete (a confirmation tone will sound) or the
soft button to keep it in the Redial log.
33
Page 34

Using Your RCA 25450 Phone System
To Save a Number from the Redial Log to Directory (Base Unit)
1. Press the Redial button.
2. Press 5 or 6 on the Navigation button to scroll to the number to be saved.
3. Press soft button.
4. Enter a name, and then save the number. Please refer to Directory section for
detailed operation.
Making a Call (Cordless Handset)
Press and hold the End button to turn on the Cordless Handset. You will hear a
confirmation tone and see the display when the Handset is on. Calls can be made by
pressing the Talk or Speaker buttons or plugging in a headset.
Auto Line-Selection Dial (Cordless Handset)
The Auto Line-Selection Dial function allows the user to dial a phone number without first choosing a line. An available line is automatically selected.
1. Press the Talk or Speaker button.
NOTE: To cancel dialing at any time, press the End button.
2. The display will show “Press REDIAL or dial number” or the dialing prefix if it is
enabled via the phone setting menu.
3. Press the soft button to redial the last number called, or enter the
phone number using the keypad (0–9, *, #).
4. If the Cordless Handset can not establish a connection to the Base Unit after 15
seconds, it will show “No connection”. If all usable phone lines are not available,
it will show “No line is available”. If there are usable phone lines available but all
system resources are in use, the display will show “System busy”.
5. Otherwise, it will enter talk mode. The corresponding receiver, headset, or speakerphone will be turned on.
34
Page 35

Using Your RCA 25450 Phone System
6. If the Cordless Handset loses the connection with the Base Unit due to interference, it will try to re-establish the connection for 10 seconds and the display will
show “Re-establishing connection …”
7. If the connection is re-established, it will enter talk mode. Otherwise, the display
will show “Connection lost” for 5 seconds and return to the standby screen.
Manual Line-Selection Dial (Cordless Handset)
The manual line-selection dial function allows the user to choose a phone line to
make a call.
1. Press the Talk or Speaker button. It will show “Connecting …”
NOTE: To cancel dialing at any time, press the End button.
2. If the Cordless Handset can not establish a connection to the Base Unit after 15
seconds, the display will show “No connection”. If all usable phone lines are not
available, it will show “No line is available”. If there are usable phone lines avail-
able but system resources are busy, the display will show “System busy”.
3. Otherwise, the display will show phone lines that are available at the time. Use
the keypad (1–4) to select a line.
4. If the phone line selected is unavailable, it will show “Line (1-4) is in use”.
5. Otherwise, it will enter talk mode and the display will show “Press REDIAL or dial
number” or the dialing prefix if it is enabled via phone setting menu and the corresponding receiver, headset or speakerphone will be turned on.
6. Press the Redial button to redial the last number called, or enter the phone
number using the keypad (0–9, *, #).
7. If the Cordless Handset loses the connection with the Base Unit due to interference, it will try to re-establish the connection for 10 seconds and show
“Re-establishing connection …”
35
Page 36

Using Your RCA 25450 Phone System
8. If the connection is re-established, it will enter talk mode. Otherwise, the display
will show “Connection lost” for 5 seconds and go back to standby screen.
Pre-Dialing (Cordless Handset)
The Pre-Dialing function allows you to enter the number before accessing a phone
line.
1. To pre-dial a number, enter the phone number using the keypad (0–9, *, #) while
in Standby Mode.
2. Use the and soft buttons to edit the number entered. The
soft button erases the last digit entered. The soft button
erases the entire line but remains in the pre-dialing mode.
3. Press the Talk or Speaker button to make auto or manual line-selection dial.
4. If the dialing prefix function is enabled via phone setting menu, the dialing
prefix will be inserted before the phone number entered.
5. Before the auto or manual line-selection dial is made, an incoming call takes
priority and will cancel the pre-dialing.
Redial (Cordless Handset)
The redial function allows the user to dial a number from the last 10 numbers dialed.
1. To redial a phone number, press the soft button. The last phone number dialed will be displayed.
NOTE: if the redial log is empty, it will return to standby display in 5 seconds after displaying
“Redial log empty”.
2. Press 5 or 6 on the Navigation button to scroll through the last 10 numbers
dialed.
3. Press the Talk, or Speaker button to make an auto or manual line-selection dial.
The phone number shown will be sent.
36
Page 37

Using Your RCA 25450 Phone System
4. Before the auto or manual line-selection dial is made, an incoming call takes
priority and will cancel the redial.
To Delete a Number from the Redial Log (Cordless Handset)
1. Press the soft button.
2. Press 5 or 6 on the Navigation button to scroll to the number to be deleted.
3. Press soft button. Then press the soft button to delete it
or press the soft button to keep it in the redial log.
To Save a Number from the Redial Log to Directory (Cordless Handset)
1. Press the soft button.
2. Press 5 or 6 on the Navigation button to scroll to the number to be saved.
3. Press soft button.
4. Enter a name, and then save the number. Please refer to Directory section for
detailed operation.
Receiving a Call (Base Unit)
1. The Base Unit will ring when there is an incoming call for it. The corresponding
Line (1-4) button will flash (fast) green.
2. The display will show “Incoming call from line (1-4)”, then Caller ID information
when available. “Private” or “Unknown” may show on the display if the caller’s
information has been blocked by the caller or the originating phone company.
NOTE: If there is more than one incoming call and intercom call for the Base Unit, only the
first one’s information will be shown.
3. Press the Line Button corresponding to the flashing Line Status LED, press the
Speaker or Headset button or lift the Handset/Receiver to start the conversation.
If desired, press the soft button to ignore and silence the ringer.
NOTE: The soft button applies only to the current call.
37
Page 38

Using Your RCA 25450 Phone System
Receiving a Call (Cordless Handset)
1. The Cordless Handset will ring and/or vibrate when a call is received. The display
will show “Incoming call from line (1-4)”, then Caller ID information if available.
“Private” or “Unknown” may show on the display if the caller’s information has
been blocked by the caller or the originating phone company.
NOTE: If there is more than one incoming call and intercom call for the Cordless Handset, only
the first one’s information will be shown.
2. Lift the Cordless Handset from the charging cradle and press the Talk button to answer. Press the Speaker button for speakerphone operation. Press the
soft button to ignore the call.
NOTE: The soft button applies only to the current call.
3. To switch between handset and speakerphone: press the Speaker button to switch
to speakerphone; press the Talk button to switch to handset.
4. To end the call, press the End button.
Call Waiting
To use this feature, you must subscribe to a Caller ID with a Call Waiting Service.
When you are on the phone and you are receiving another call, you will hear a tone
and the display will show who is calling. Press the Flash button to put the person
whom you are talking to on Hold and answer the incoming call. Press the Flash button again to switch between calls.
Ending a Call (Base Unit)
To end a handset call, put the handset in the cradle. To end a speakerphone call,
press the Speaker button. To end a headset call, press the Headset button.
38
Page 39

Using Your RCA 25450 Phone System
Ending a Call (Cordless Handset)
To end a receiver call, a headset call or a speakerphone call, press the End button or
place the Cordless Handset in charging cradle.
Switching Between Audio Modes
During a call, you can switch among the following audio modes: handset call (Base
Unit only), receiver call (Cordless Handset only), speakerphone call and headset call.
Base Unit
1. To switch to handset call, pick up the handset.
2. To switch to speakerphone call, press the Speaker button, then put the handset
back on the cradle if it was handset call.
3. To switch to headset call, press the Headset button, then put the handset back
on the cradle if it was handset call.
NOTE: A headset must be plugged in; otherwise error tone will be heard.
Cordless Handset
1. To switch to receiver call from headset call, unplug the headset.
2. To switch to headset call from receiver call, plug in the headset.
3. To switch to receiver or headset call from speakerphone call, press Talk button.
4. To switch to speakerphone call, press Speaker button.
Putting Call(s) on Hold
The hold function allows the user to temporarily suspend a call up to 30 minutes.
This function is also used when setting up a conference call (Please refer to ThreeWay Conference Calls for details).
39
Page 40

Using Your RCA 25450 Phone System
When a call is on hold, the extension that put the call on hold will remind the user
with 3 short beeps every 30 seconds. The caller will hear a pre-recorded hold message every 15 seconds (Please refer to “Hold Message” for details).
A call on hold can only be taken off hold by the extension that originally put it on
hold. The system will automatically end the call if the caller hangs up or it has been
put on hold for more than 30 minutes.
Base Unit
1. To put a call on hold, press the Hold button. The display will show “Call(s) on
hold” and the corresponding Line (1-4) button will flash (slow) green.
2. To resume the call, press the corresponding Line (1-4) button.
Cordless Handset
1. To put a call on hold, press the soft button.
2. Press 5 or 6 on the Navigation button to scroll to the “Hold” option.
3. Press the soft button. The display will show the call on hold and the
corresponding Line (1-4) button on Base Unit will flash (slow) red.
4. To take a call off hold, press the corresponding soft button.
5. Press 5 or 6 on the Navigation button to scroll to the desired line to unhold.
6. Press soft button.
NOTE: The Cordless Handset must be within the Base Unit’s coverage area to resume a call.
Otherwise, it will fail and the display will show “No connection” .
Mute
The Mute function allows a user to temporarily silence the outgoing voice (turn off
the microphone) during a call.
40
Page 41

Using Your RCA 25450 Phone System
Base Unit
1. To mute the call, press the Mute button. Mute is effective only for the current
call.
2. To unmute the call, press the Mute button again.
Cordless Handset
1. To mute the call, press the soft button. Mute is effective only for the
current call.
2. To unmute the call, press the soft button.
Call Forwarding (Cordless Handset Only)
The Auto Attendant feature on the Base Unit must be on for Call Forwarding to
function. The call forwarding function allows calls directed to a specific extension to
be transferred to another phone number. The Cordless Handset must be able to connect with the Base Unit to change the setting. Intercom calls are not forwarded. A
warning message will appear on the Cordless Handset display that all calls are being
forwarded. Setting a new call forwarding phone number will automatically replace
the previous number.
NOTE: Each Cordless Handset that has Call Forwarding enabled will use 2 phone lines; one for
the incoming call and one for when the call is forwarded.
NOTE: The Cordless Handset must be within the Base Unit’s coverage area to set up call
forwarding. Otherwise, it will fail with a “No connection” message.
Enable Call Forwarding
1. To enable call forwarding, press the soft button.
2. Press 5 or 6 on the Navigation button to locate the “Phone setting” option.
3. Press the soft button.
4. Press 5 or 6 on the Navigation button to locate the “Call forward” option.
41
Page 42

Using Your RCA 25450 Phone System
5. Press the soft button.
6. Press 5 or 6 on the Navigation button to locate the “Enable” option.
7. Press the soft button.
8. Enter or edit a phone number using the keypad (0–9, *, #). Use the
soft button to erase the last digit entered.
9. Press the soft button. A confirmation tone will sound. The display will
show “Calls forwarded” after 15 seconds.
Disable Call Forwarding
1. To disable call forwarding, press the soft button.
2. Press 5 or 6 on the Navigation button to locate the “Phone setting” option.
3. Press the soft button.
4. Press 5 or 6 on the Navigation button to locate the “Call forward” option.
5. Press the soft button.
6. Press 5 or 6 on the Navigation button to locate the “Disable (default)” option.
7. Press the soft button.
Transferring a Call to Another Extension
The Call Transfer function allows the user to move a call from one extension to
another. There are two types of call transfer: Announced and Unannounced.
Announced Call Transfer
Announced call transfer allows the user to talk to the person that will receive the
transfer before actually transferring the call.
42
Page 43

Using Your RCA 25450 Phone System
Base Unit
1. To make an announced call transfer, press the soft button.
NOTE: To cancel call transfer at any time, press the soft button.
2. Enter a valid two-digit extension, or extension group using the keypad
(0–9, *, #), or press a Memory (1 – 16) button for one-touch paging. It will page
the selected extension(s).
3. If the paging is not answered for 30 seconds, the call transfer will be cancelled,
and it will show “Paging out” for a few seconds.
4. After the paged extension (or one of the paged extensions) picks up and talks,
end the call to complete the announced call transfer.
Cordless Handset
1. To make an announced call transfer from the Cordless Handset, press the
2. Press 5 or 6 on the Navigation button to locate the “Xfer” option.
3. Press the soft button.
NOTE: To cancel call transfer at any time, press the soft button.
4. Enter a valid two-digit extension, or extension group using the keypad
(0–9, *, #). The Cordless Handset will page the selected extension(s).
5. If the paging is not answered for 30 seconds, the call transfer will be cancelled,
and the display will show “Paging out” for a few seconds.
6. After the paged extension (or one of the paged extensions) picks up and talks,
end the call to complete the announced call transfer.
soft button.
43
Page 44

Using Your RCA 25450 Phone System
Unannounced Call Transfer
Unannounced call transfer allows the user to transfer the call without talking to the
person who will receive the transfer. If an unannounced call transfer is not answered,
the call will be handled by Auto Attendant if it is turned on. The call will go to Voice
Mail if Voice Mail is turned on and Auto Attendant is turned off. The call will keep
ringing if both Auto Attendant and Voice Mail are turned off.
Base Unit
1. To make an unannounced call transfer, press the soft button.
NOTE: To cancel call transfer at any time, press the soft button.
2. Enter a valid two-digit extension, or extension group using the keypad (0–9, *, #),
or press a Memory (1 – 16) button for one-touch paging. The Base Unit will page
the selected extension(s).
3. End the call to complete the unannounced call transfer.
Cordless Handset
1. To make an unannounced call transfer, press the soft button.
2. Press 5 or 6 on the Navigation button to locate the “Xfer” option.
3. Press the soft button.
NOTE: To cancel call transfer at any time, press the soft button.
4. Enter a valid two-digit extension, or extension group using the keypad (0–9, *, #).
The Cordless Handset will page the selected extension(s).
5. End the call to complete the unannounced call transfer.
6. If the paged extension is busy, the incoming call will be connected to voice mail.
44
Page 45

Using Your RCA 25450 Phone System
Intercom Calls
Intercom calls allow extensions to communicate with each other internally. They can
be made to a single extension, group, or the Base Unit can page all extensions.
There are two types of intercom calls between Cordless Handsets: one is normal
intercom which can be made without the presence of the Base Unit if there are no
calls held by the Cordless Handset; the other is a Base Unit assisted intercom which is
made when there are calls held by the Base Unit. Base Unit assisted intercom is used
to set up a conference call (Please refer to Three-Way Conference Calls for details).
Making an Intercom Call
An intercom call can be made to a specific extension, or an Extension Group, or all
extensions (Base Unit only). If an intercom call is made to an Extension Group or
all extensions, the first extension to answer will be connected. Intercom paging will
time out after 30 seconds if there is no answer and the display will show “Paging
timeout” for a few seconds.
Base Unit
1. Press one of the sixteen one-touch Memory (1 – 16) buttons for Cordless Handset (01–16); or
2. Press the Intercom button followed by a two-digit Cordless Handset ID (01-16) or
an Extension Group ID (91–94); or
3. Press the Page button for all Cordless Handsets.
4. If system resources are busy, the display will show “System busy”. If the handset
is not in the cradle, it will be turned on. Otherwise, the speakerphone will be
turned on.
NOTE: If the Cordless Handset ID entered is not registered, the user will hear an error tone.
NOTE: To cancel an intercom call before a valid extension or extension group is entered, press
the Exit button; otherwise press the Speaker button, or return the handset to the cradle.
45
Page 46

Using Your RCA 25450 Phone System
Cordless Handset
1. Press the Intercom button followed by a two-digit Cordless Handset ID (01-16)
or an Extension Group ID (91–94);
2. If it is a Base Unit assisted intercom call and system resources are busy, the display will show “System busy”. Otherwise, the handset receiver or headset will be
turned on.
NOTE: To cancel an intercom call at any time, press the End button.
Receiving an Intercom Call
Base Unit
1. The Base Unit will ring when receiving an intercom call. The display will also
show “Incoming page from Ext # (01-16)”.
NOTE: If there is more than one incoming call and intercom calls for the Base Unit, only the
first call’s information will be shown.
2. Press the soft button or the DND button to turn the ringer off.
NOTE: The soft button only turns off the ringer for the current call. The DND
button turns off the ringer for the current and all following calls. Press the DND button again
to turn on the ringer.
3. Press the Speaker or Headset (when a headset is plugged in) button, or pick up
the handset to answer the intercom call shown in the display.
Cordless Handset
1. When an intercom call arrives, the Cordless Handset will ring and/or vibrate. The
display will show the caller’s Extension ID (00–16).
NOTE: If there is more than one incoming call and intercom calls for the Cordless Handset,
only the first call’s information will be shown.
46
Page 47

Using Your RCA 25450 Phone System
2. Press the soft button to turn off the ringer or vibrator if you wish to
ignore the call.
NOTE: The function is valid only for the current call.
3. Press the Talk or Speaker button to answer the intercom call shown in
the display.
End an Intercom Call
Base Unit
To end a handset call, put the handset in the cradle. To end a speakerphone call,
press the Speaker button. To end a headset call, press the Headset button.
Cordless Handset
To end a receiver call, a headset call or a speakerphone call, press the End button or
place the Cordless Handset in charging cradle.
Ignore and Override an Incoming Line or Intercom Call
Base Unit (Making an Outbound Line Call)
During an incoming or intercom call ring, the user can ignore the call and make an
outbound telephone call.
1. Press the soft button.
2. Press 5 or 6 on the Navigation button to scroll through the options until
“Line call” appears on the display.
3. Press the soft button. The speakerphone will turn on and you will
hear the dial tone.
4. Enter the telephone number and the number dialed will begin to ring.
5. If desired, the handset receiver may be lifted and used or the Headset button can
be pressed to use the headset mode.
47
Page 48

Using Your RCA 25450 Phone System
Base Unit (Making an Outbound Intercom Call)
During an incoming or intercom call ring, the user can ignore the call and make an
outbound intercom call.
1. Press the soft button.
2. Press 5 or 6 on the Navigation button until “Intercom” appears on the display.
3. Press the soft button. The display will prompt you for the extension
number.
4. Enter an extension number (01-16) or press one of the one-touch buttons to
page a specific extension or press the Page button to page all extensions.
5. If the page is answered, this becomes an intercom call.
Cordless Handset (Making an Outbound Line Call)
During an incoming or intercom call ring, the user can ignore the call and make an
outbound telephone call.
1. Press the soft button.
2. Press 5 or 6 on the Navigation button to scroll through the options until
“Line call” appears on the display.
3. Press the soft button. The speakerphone will turn on and you will
hear the dial tone.
4. Enter the telephone number and the number dialed will begin to ring.
48
Page 49

Using Your RCA 25450 Phone System
Cordless Handset (Making an Outbound Intercom Call)
During an incoming or intercom call ring, the user can ignore the call and make an
outbound intercom call.
1. Press the soft button.
2. Press 5 or 6 on the Navigation button until “Intercom” appears on the display.
3. Press the soft button. The display will prompt you for the extension
number.
4. Enter an extension number (01-16) to page the extension.
5. If the page is answered, this becomes an intercom call.
Paging (Base Unit)
The Page button on the Base Unit is a one-touch button to intercom (page) all cordless handsets.
1. Press the Page button. The display shows “Paging All…” if the Base Unit is not
busy. Otherwise, the display shows “System busy”.
2. The Cordless Handsets will display “Incoming page from Ext #00”.
3. The Base Unit will connect to the first Cordless Handset to answer. Press the Talk
or Speaker button on the Cordless Handset to answer the page.
4. To end the page, hang up or press the Speaker button if the speakerphone is on.
The Cordless handset can also end the page by pressing the End button.
49
Page 50

Voice Mail
Voice Mail (VM)
The Base Unit and every Cordless Handset connected to the system has its own voice
mailbox. Each Cordless Handset has a mailbox number that is the same as it’s ID/extension number. The Base Unit has the mailbox number “00”. The system can hold up
to 100 minutes of messages with each message having a limit of 64 seconds.
NOTE: The default password is “0000”. Use this password when setting up voice mail for the
first time, or after the password has been reset by the administrator.
Configure Voice Mail (Base Unit)
1. Press the Voice Mail button.
2. Press 5 or 6 on the Navigation button to scroll through the options until
“Configure VM” appears on the display.
3. Press the soft button.
4. Press 5 or 6 on the Navigation button to scroll through the options to select
which line to configure for voice mail. Auto attendant must be turned off to
change the configuration. The display will show “VM can only be configured
when AA is off” if auto attendant is on.
5. Press the soft button.
6. The display will show whether voice mail is on and the number of rings before
caller is directed to voice mail.
7. To change configuration, press the soft button.
8. First select “On (Default)” to enable or “Off” to disable.
9. Press the soft button.
10. If voice mail is on, the display will prompt the user to select number of rings before the caller is directed to voice mail. Press 5 or 6 on the Navigation button,
make selection (2–6).
50
Page 51

Voice Mail
11. Press the soft button.
12. The system will return to the Configure VM option screen.
Reset Extension Password (Base Unit)
This feature allows the user to reset any extension password to it’s default “0000”
password using the Base Unit. This feature is useful if an extension password has
become unknown.
NOTE: The user must know the administrator password to use this feature.
1. Press the Voice Mail button.
2. To reset an extension password to the default “0000” setting, press 5 or 6 on
the Navigation button to scroll through the options until “Reset password”
appears on the display.
3. Press the soft button.
4. Enter the four-digit administrator password.
NOTE: The default administrator password is “7221”. Use this password when resetting the
extension passwords or erasing all voice mail. If the administrator password was changed and
the new number is not known, there is no way to recover it without resetting the system. The
administrator password will default to “7221” after a reset.
See “Settings and Adjustments, Base Unit Setup, Administrator Password” for instructions on
changing the administrator password.
5. Enter two-digit VM box number.
6. Press the soft button. A confirmation tone will sound.
7. The extension password is reset to the default setting and the system will return
to the voice mail option screen.
51
Page 52

Voice Mail
Clear all VM box messages (Base Unit)
1. Press the Voice Mail button.
2. To clear all messages from voice mailbox, press 5 or 6 on the Navigation button to scroll through the options until “Clear VM box” appears on the display.
3. Press the soft button.
4. Enter admin password using keypad.
5. The display will prompt the user to confirm, “Clear all VM for all extensions?”
6. To confirm, press the soft button.
7. To cancel, press the soft button.
8. The system will return to the voice mail option screen.
Voice Mail Box Management Options (Base Unit)
VM box management allows users to change their extension password and customize
their mailbox greeting.
Change Extension Password (Base Unit)
1. Press the Voice Mail button.
2. Press 5 or 6 on the Navigation button to scroll through the options until
“Access VM” appears on the display.
3. Press the soft button.
4. Voice mail can only be accessed by 2 users at a time. If voice mail is not available,
the display will show “System busy”.
5. Enter the two-digit VM box number followed by your four-digit extension password when prompted. If voice mail is in use, the display will show “System busy”
and return to the voice mail menu after 5 seconds.
52
Page 53

Voice Mail
6. If the password is correct, the display shows the voice mailbox number, number
of new messages, number of old messages and “Play new”.
NOTE: If the password is incorrect, the display shows “Invalid password” and will return to the
voice mail menu after 5 seconds.
7. Press 5 or 6 on the Navigation button to scroll through the options until
“VM box option” appears on the display.
8. Press the soft button.
9. The display will show “Change password”.
10. Press the soft button.
11. Enter new password using keypad (1–9, *, #).
12. Re-enter password to verify.
13. If the passwords match, a confirmation tone will sound. The password is now
changed and the system will return to the VM box option screen.
14. If the passwords do not match, the display will show “Invalid password Please
re-enter.” Re-enter password or press the soft button to exit.
Play Greeting (Base Unit)
1. Press the Voice Mail button.
2. “Access VM” appears on the display.
3. Press the soft button.
4. Voice mail can only be accessed by 2 users at a time. Only 1 user can access a
mailbox at a time. If voice mail is not available, the display will show “System
busy”.
53
Page 54

Voice Mail
5. Enter the two-digit VM box number followed by your four-digit extension password when prompted. If voice mail is in use, the display will show “System busy”
and return to the voice mail menu after 5 seconds.
6. If the password is correct, the display will show the voice mailbox number, number of new messages, and number of old messages and “Play new”.
NOTE: If the password is incorrect, the display shows “Invalid password” and will return to the
voice mail menu after 5 seconds.
7. Press 5 or 6 on the Navigation button to scroll through the options until
“VM box option” appears on the display.
8. Press the soft button.
9. To play recorded mailbox greeting, press 5 or 6 on the Navigation button to
scroll through the options until “Play greeting” appears on the display.
10. Press the soft button.
11. The system will play the greeting. To stop playing the greeting, press the
12. The system will return to the VM box option screen.
Record Greeting (Base Unit)
1. Press the Voice Mail button.
2. Press 5 or 6 on the Navigation button to scroll through the options until
“Access VM” appears on the display.
3. Press the soft button.
4. Voice mail can only be accessed by 2 users at a time. Only 1 user can access a
mailbox at a time. If voice mail is not available, the display will show “System
busy”.
soft button.
54
Page 55

Voice Mail
5. Enter the two-digit VM box number followed by your four-digit extension password when prompted. If voice mail is in use, the display will show “System busy”
and return to the voice mail menu after 5 seconds.
6. If the password is correct, the display will show the voice mailbox number, number of new messages, and number of old messages.
NOTE: If the password is incorrect, the display shows “Invalid password” and will return to the
voice mail menu after 5 seconds.
7. Press 5 or 6 on the Navigation button to scroll through the options until
“VM box option” appears on the display.
8. Press the soft button.
9. To record mailbox greeting, press 5 or 6 on the Navigation button to scroll
through the options until “Record greeting” appears on the display.
10. Press the soft button.
11. After a long beep, the system will begin recording. Start recording your greeting.
When you are finished, press the soft button.
12. The system will playback the recorded greeting and then return to the VM box
option screen.
Delete Greeting (Base Unit)
1. Press the Voice Mail button.
2. Press 5 or 6 on the Navigation button to scroll through the options until
“Access VM” appears on the display.
3. Press the soft button.
4. Voice mail can only be accessed by 2 users at a time. Only 1 user can access a
mailbox at a time. If voice mail is not available, the display will show “System
busy”.
55
Page 56

Delete greetingDelete greeting
Voice Mail
5. Enter the two-digit VM box number followed by your four-digit extension password when prompted. If voice mail is in use, the display will show “System busy”
and return to the voice mail menu after 5 seconds.
6. If the password is correct, the display will show the voice mailbox number, number of new messages, and number of old messages.
NOTE: If the password is incorrect, the display shows “Invalid password” and will return to the
voice mail menu after 5 seconds.
7. Press 5 or 6 on the Navigation button to scroll through the options until
“VM box option” appears on the display.
8. Press the soft button.
9. To delete mailbox greeting, press 5 or 6 on the Navigation button to scroll
through the options until “Delete greeting” appears on the display.
10. Press the soft button.
11. The display will prompt the user to confirm, “Delete greeting?”
12. To confirm, press the soft button. If the system is using the default
greeting, it cannot be deleted. The display will show “Default greeting can not be
deleted.” Only recorded greetings can be deleted.
13. To cancel, press the soft button.
14. The system will return to the VM box option screen.
56
Page 57

Voice Mail
Voice Mail Box Management Options (Cordless Handset)
VM box management allows the user to manage their extension password and customize their mailbox greeting.
Change Extension Password (Cordless Handset)
1. Press the Voice Mail button.
2. Enter your two-digit handset ID followed by your four-digit password when
prompted.
3. Press 5 or 6 on the Navigation button to scroll through the options until
“VM box option” appears on the display.
4. Press the soft button.
5. “Change password” appears on the display.
6. Press the soft button.
7. Enter new four-digit password.
8. Re-enter password to verify.
9. If the passwords match, a confirmation tone will sound. The password is now
changed and the system will return to the VM box option screen.
10. If the passwords do not match, the display will show “Invalid password Please
re-enter.” Re-enter password or press the soft button to exit.
Play Greeting (Cordless Handset)
1. Press the Voice Mail button.
2. Enter your two-digit handset ID and four-digit password when prompted.
3. Press 5 or 6 on the Navigation button to scroll through the options until
“VM box option” appears on the display.
57
Page 58

Play greetingPlay greeting
Record greetingRecord greeting
Voice Mail
4. Press the soft button.
5. To play recorded mailbox greeting, press 5 or 6 on the Navigation button to
scroll through the options until “Play greeting” appears on the display.
6. Press the soft button.
7. The handset will play the greeting. To stop playing the greeting, press the
soft button.
8. The handset will return to the VM box option screen.
Record Greeting (Cordless Handset)
1. Press the Voice Mail button.
2. Enter your two-digit Cordless Handset ID and four-digit extension password
when prompted.
3. Press 5 or 6 on the Navigation button to scroll through the options until
“VM box option” appears on the display.
4. Press the soft button.
5. To record mailbox greeting, press 5 or 6 on the Navigation button to scroll
through the options until “Record greeting” appears on the display.
6. Press the soft button.
7. After a long beep, the system begins recording. Start recording your greeting.
When you are finished, press the soft button.
8. The system plays the message recorded and returns to the VM box option screen.
Delete Greeting (Cordless Handset)
1. Press the Voice Mail button.
2. Enter your two-digit Cordless Handset ID followed by your four-digit extension
password when prompted.
58
Page 59

Voice Mail
3. Press 5 or 6 on the Navigation button to scroll through the options until
“VM box option” appears on the display.
4. Press the soft button.
5. To delete mailbox greeting, press 5 or 6 on the Navigation button to scroll
through the options until “Delete greeting” appears on the display.
6. Press the soft button.
7. The display will prompt the user to confirm, “Delete greeting?”
8. To confirm, press the soft button. If the system is using the default
greeting, it cannot be deleted. The display will show “Default greeting cannot be
deleted.” Only recorded greetings can be deleted.
9. To cancel, press the soft button.
10. The system will return to the VM box option screen.
Voice Mail Box Management Options (Offsite)
Your voice mail personal greeting can be changed from an offsite location.
1. When calling from an offsite location, wait until the phone answers then press
the “i” (star) key to access voice mail through the auto attendant.
2. A voice prompt will ask “Please enter the extension followed by the password.”
3. Enter the two-digit extension and four-digit extension password.
4. If the extension and password were entered correctly, the voice prompt will instruct, “Press one to listen to new messages, press two to listen to old messages,
or press three to change your mailbox options.” If the extension and password
were entered incorrectly, the voice prompt will say “The password you’ve entered
is invalid,” The system will allow 2 more attempts to enter a correct password
and will hang up after the third incorrect attempt..
59
Page 60

Voice Mail
5. After choosing to change the mailbox options (option three) the voice prompt
will say, “Press two to listen to your personal greeting, press three to record a
new personal greeting, press four to delete your personal greeting, or press the
pound key to return to the previous menu.”
Press “2” to play the personal greeting. The personal greeting will be played or
the default “Please leave a message after the tone” will be played.
Press “3” to record a new personal greeting. The voice prompt will say, “To record
new greetings, speak clearly after the tone. When you finish recording, press the
pound key.” A long beep will sound. Record the message and press the # key.
Press “4” to delete the personal greeting.
6. Press “#” to return to the previous menu.
Access Voice Mail (Base Unit)
Several options are available when accessing voice mail through the Base Unit
including play new, play old, and VM box option.
Play New Messages (Base Unit)
1. Press the Voice Mail button.
2. “Access VM” appears on the display.
3. Press the soft button.
4. Voice mail can only be accessed by 2 users at a time. Only 1 user can access a
mailbox at a time. If voice mail is not available, the display shows “System busy”.
5. Enter the two-digit VM box number followed by the four-digit extension password when prompted.
6. If the password is correct, the display will show the voice mailbox number, number of new messages, and number of old messages. If the password is incorrect,
Play New MessagesPlay New Messages
60
Page 61

View CIDView CID
TransferTransfer
View Caller IDView Caller ID
Delete New MessageDelete New Message
Transfer MessageTransfer Message
Voice Mail
the display will show “Invalid password” and return to the voice mail menu after
5 seconds.
7. “Play new” appears near the bottom on the display. If there are new messages,
press the soft button.
8. The first new message will play. To replay the message once from the beginning,
press 3 on the Navigation button.
9. Press 4 on the Navigation button to move to the next new message. If there
are no more new messages, the display will stay on the last new message.
10. To play the previous message, press 3 3 (twice) on the Navigation button.
NOTE: A confirmation tone should sound each time you press 3.
11. At the end of the message, 2 beeps will sound and a voice will say “This message
was recorded on (date and time)”.
12. To delete a new message, press the soft button.
13. “Delete” appears on the display.
14. Press the soft button.
15. To view the Caller ID information, press the soft button.
16. Press 5 or 6 on the Navigation button to scroll through the options until
“View CID” appears on the display.
17. Press the soft button.
18. The display will show the date, time, name, and number of the caller, if available.
19. Press the soft button to return to the new message option screen.
20. To transfer the message to another extension, press the soft button.
61
Page 62

Play oldPlay old
Voice Mail
21. Press 5 or 6 on the Navigation button to scroll through the options until
“Transfer” appears on the display.
22. Press the soft button.
23. Enter the two-digit extension at the display prompt or press the soft
button to return to the new message option screen.
24. If the extension number is valid, the message will be transferred and the display
will return to the new message option screen.
25. After moving through all messages, the display will show “00 new”. Played, de-
leted, or transferred messages will not display. Press the soft button
to return to the new message option screen.
Play Old Messages (Base Unit)
1. Press the Voice Mail button.
2. “Access VM” appears on the display.
3. Press the soft button.
4. Voice mail can only be accessed by 2 users at a time. Only 1 user can access a
mailbox at a time. If voice mail is not available, the display shows “System busy”.
5. Enter the two-digit VM box number followed by the four-digit extension password when prompted. If voice mail is in use, the display will show “System busy”
and return to the voice mail menu after 5 seconds.
6. If the password is correct, the display will show the voice mailbox number, number of new messages, and number of old messages. If the password is incorrect,
the display will show “Invalid password” and return to the voice mail menu after
5 seconds.
7. To listen to old messages, press 5 or 6 on the Navigation button to scroll
through the options until “Play old” appears on the display.
Play Old MessagesPlay Old Messages
62
Page 63

View CIDView CID
TransferTransfer
View Caller IDView Caller ID
Delete Old MessageDelete Old Message
Transfer MessageTransfer Message
Voice Mail
8. Press the soft button.
9. The first old message will play. To replay the message from the beginning, press
3on the Navigation button.
10. Press 4on the Navigation button to move to the next old message. If there are
no more old messages, the display will stay on the last old message until it times
out and returns to Standby Mode.
11. To play the previous message, press 3 3 (twice) on the Navigation button.
NOTE: A confirmation tone should sound each time you press 3.
12. To delete an old message, press the soft button. To return to the
previous menu, press the soft button.
13. “Delete” appears on the display.
14. Press the soft button.
15. To view the Caller ID information, press the soft button.
16. Press 5 or 6 on the Navigation button to scroll through the options until
“View CID” appears on the display.
17. Press the soft button.
18. The display will show the date, time, name, and number of the caller, if available.
19. Press the soft button to return to the old message option screen.
20. To transfer the message to another extension, press the soft button.
21. Press 5 or 6 on the Navigation button to scroll through the options until
“Transfer” appears on the display.
22. Press the soft button.
63
Page 64

Voice Mail
23. Enter the two-digit extension at the display prompt or press the soft
button to return to the old message option screen.
24. If the extension number is valid, the message will be transferred and the display
will return to the old message option screen.
25. After moving through all the messages, the display will stay on the last old
message until it times out and returns to Standby Mode. Deleted, or transferred
messages will not display. Press the soft button to return to the new
message option screen.
Access Voice Mail (Cordless Handset)
Several options are available when accessing voice mail including play new, play old,
and VM box option.
Play New Messages (Cordless Handset)
1. Press the Voice Mail button. The display will show “Connecting...” while the
Cordless Handset contacts the voice mail system. If the connection fails, the
display will show “No connection”.
2. Voice mail can only be accessed by 2 users at a time. Only 1 user can access a
mailbox at a time. If voice mail is in use, the display will show “System busy”.
3. Enter the two-digit VM box number followed by the four-digit extension password when prompted.
4. If the password is incorrect, the display will show “Invalid password” and exit the
menu.
5. If the password is correct, the display will show the voice mailbox number, number of new messages, and the number of old messages.
6. “Play new” appears on the display.
7. Press the soft button.
Play New MessagesPlay New Messages
64
Page 65

View CIDView CID
TransferTransfer
Delete New MessageDelete New Message
Transfer MessageTransfer Message
View Caller IDView Caller ID
Voice Mail
8. The first new message will play. Press4on the Navigation button to move to the
next new message. If there are no more new messages, the display will remain on
the last new message until it times out and returns to Standby Mode.
9. To replay the message from the beginning, press 3on the Navigation button.
10. To play the previous message, press 3 3 (twice) on the Navigation button.
NOTE: A confirmation tone should sound each time you press 3.
11. To delete a new message, press the soft button.
12. “Delete” appears on the display.
13. Press the soft button to delete the message.
14. To view the caller ID information, press the soft button.
15. Press 5 or 6 on the Navigation button to scroll through the options until
“View CID” appears on the display.
16. Press the soft button.
17. The display will show the date, time, name, and number of the caller, if available.
18. Press the soft button to return to the new message option screen.
20. To transfer the message to another extension, press the soft button.
21. Press 5 or 6 on the Navigation button to scroll through the options until
“Transfer” appears on the display.
22. Press the soft button.
23. Enter the two-digit extension at the display prompt or press the soft
button to return to the new message option screen.
24. If the extension number is valid, the message will be transferred and the display
will return to the new message option screen.
65
Page 66

Play oldPlay old
Voice Mail
25. After moving through all messages, the display will show “00 new” (messages).
Played, deleted, or transferred messages will not display. Press the soft
button to return to the “Play new” display.
Play Old Messages (Cordless Handset)
1. Press the Voice Mail button. The display will show “Connecting...” while the Cordless
Handset contacts the voice mail system. If the connection fails, the display will show
“No connection”.
2. Voice mail can only be accessed by 2 users at a time. If voice mail is in use, the
display will show “System busy”.
3. Enter the two-digit VM box number followed by the four-digit extension password
when prompted.
4. If the password is incorrect, the display will show “Invalid password”.
5. If the password is correct, the display will show the voice mailbox number, number
of new messages, and the number of old messages.
6. To listen to old messages, press 5 or 6 on the Navigation button to scroll through
the options until “Play old” appears on the display.
7. Press the soft button.
8. Press 4on the Navigation button to move to the next old message. If there are no
more old messages, the display will stay on the last old message until it times out
and returns to Standby Mode.
9. To play the previous message, press 3 3 (twice) on the Navigation button.
NOTE: A confirmation tone should sound each time you press 3.
10. To delete an old message, press the soft button.
11. “Delete” appears on the display.
Play Old MessagesPlay Old Messages
Delete Old MessageDelete Old Message
66
Page 67

View CID
View CID
Transfer
Transfer
View Caller ID
View Caller ID
Transfer Message
Transfer Message
Voice Mail
12. Press the soft button to delete the message.
NOTE: Messages will be stored until deleted.
13. To view the caller ID information, press the soft button
14. Press 5 or 6 on the Navigation button to scroll through the options until
“View CID” appears on the display.
15. Press the soft button.
16. The display will show the date, time, name, and number of the caller, if available.
17. Press the soft button to return to the old message option screen.
18. To transfer the message, press the soft button.
19. Press 5 or 6 on the Navigation button to scroll through the options until
“Transfer” appears on the display.
20. Press the soft button.
21. Enter the two-digit extension at the display prompt or press the soft
button to return to the old message option screen.
22. If the extension number is valid, the message will be transferred and the display
will return to the old message option screen.
23. After moving through all messages, the display will stay on the last old message
until it times out and returns to Standby Mode. Deleted, or transferred messages
will not display. Press the soft button to return to the “Play old”
display.
Access VM (Offsite Location)
Voice mail can be accessed from an offsite location using a touch tone phone. To
access voice mail remotely the auto attendant must be on. The voice prompts may
differ if the system is not using the default messages.
67
Page 68

Voice Mail
1. The auto attendant will answer the call. The voice prompt will ask “Please enter
extension number or press zero for the operator.” To access voice mail, press the
“ * ” (star) button.
2. The voice prompt will ask “Please enter the extension followed by the password.”
3. Enter the two-digit extension followed by the four-digit extension password.
4. If the extension and password were entered correctly, the voice prompt will
instruct, “Press one to listen to new messages, press two to listen to old mes-
sages, or press three to change your mailbox options.” If the extension and
password were entered incorrectly, the voice prompt will continue to ask for the
extension and password.
5. If there are messages stored in voice mail, the first message will play. If there are
no messages, the voice prompt will say “You have no messages.”
6. When the message has finished, the voice prompt will say, “Press one to replay
this message.” Pressing “1” will replay the message and then return to the message menu.
7. If there are additional messages, the voice prompt will say, “Press two for next
message.” Pressing “2” will play the next message and then return to the message menu.
8. If you have not deleted the previous message, the voice prompt will say, “Press
three for previous message.” Pressing “3” will play the previous message and
then return to the message menu.
9. After playing a message, the voice prompt will say, “Press four to delete this
message.” Pressing “4” will delete the last played message. The voice prompt will
say “Message deleted”, and then return to the message menu.
NOTE: Messages will remain in voice mail until deleted.
10. Messages can be transferred to another extension. The voice prompt will say,
“Press five to transfer this message.” After pressing “5”, the voice prompt will
ask “Please enter the extension number, or press pound to cancel.”
68
Page 69

��
Directory
Directory Keypad Character Selection
Directory Keypad Character Selection
Button Character Order
Button Character Order
1 ‘ + , . * ( ) & 1
1 ‘ + , . * ( ) & 1
2 A B C 2
2 A B C 2
3 D E F 3
3 D E F 3
4 G H I 4
4 G H I 4
5 J K L 5
5 J K L 5
6 M N O 6
6 M N O 6
7 P Q R S 7
7 P Q R S 7
8 T U V 8
8 T U V 8
9 W X Y Z 9
9 W X Y Z 9
0 0
0 0
* Toggle case when in character editing
* Toggle case when in character editing
# # Space when in character editing
# # Space when in character editing
“P” (Pause) when in number editing
“P” (Pause) when in number editing
If the extension is valid, the voice prompt will say “Message transferred” The
message will be transferred to the extension and then return to the message
menu. If the extension is invalid, the prompt will say “The extension you’ve
entered is invalid,” and then will repeat the choices again.
11. After playing a message, the voice prompt will say, “Or press pound to return to
previous menu.” To go back to the previous menu, press the “#” key.
Directory
The directory stores up to one 100 names and numbers. Names can have up to 16
characters. Phone number entries can have up to 25 digits and spaces.
Navigate Directory
1. To enter the directory, press 3on the Navigation button.
2. The directory will display the first entry, or will show “Directory empty” if there
are no entries. Press 5 or 6 on the Navigation button to scroll through the
directory, or enter a letter from the keypad to jump to the first record in that alphabet group, then Press 5 or 6 on the Navigation button to reach the exact
record.
Add Entry
1. Press 3on the Navigation button.
2. The directory will display the first entry, or will show “Directory empty” if there
are no entries.
3. To add an entry, press the soft button.
4. Enter the name when prompted by the display using the keypad.
NOTE: To enter a letter or number using the keypad, press the corresponding keypad number
one or more times according to the order of the character on the button.
69
Page 70

Directory
NOTE: To erase a letter on the display, press 3 or 4 on the Navigation button to move the
cursor to the immediate right of the letter then press the soft button.
5. To save the name, press the soft button.
6. Enter the number when prompted by the display using the keypad.
7. To save the number, press the soft button.
Delete Entry
1. To enter the directory, press 3on the Navigation button.
2. The directory will display the first entry. Press 5 or 6 on the Navigation button to scroll through the directory, or enter a letter from the keypad to jump to
the first record in that alphabet group, then press 5 or 6on the Navigation
button to reach the exact record.
NOTE: To enter a letter using the keypad, press the corresponding keypad number one or more
times according to the order of the character on the button.
3. Press the soft button.
4. “Delete” appears on the display. Press the soft button.
5. The display will prompt for confirmation.
6. Press the soft button to delete entry.
7. Press the soft button to return to the directory menu.
Edit Entry
1. Press 3on the Navigation button.
2. The directory will display the first entry. Press 5 or 6 on the Navigation button
to scroll through the directory, or enter a letter from the keypad to jump to the
first record in that alphabet group, then press 5 or 6 on the Navigation button to reach the exact record.
70
Page 71

��
Directory
NOTE: To enter a letter using the keypad, press the corresponding keypad number one or more
times according to the order of the character on the button.
3. To edit an entry, press the soft button.
4. Press 5 or 6 on the Navigation button to scroll through the options until
“Edit” appears on the display.
6. Press the soft button.
7. Edit the name when prompted by the display using the keypad.
NOTE: To enter a letter or number using the keypad, press the corresponding keypad number
one or more times according to the order of the character on the button.
NOTE: To erase a letter or number on the display, press 3 or 4 on the Navigation button to
move the cursor to the immediate right of the letter then press the soft button.
8. Press the soft button.
9. Edit the number when prompted by the display.
10. Press the soft button.
View Number
1. Press 3on the Navigation button.
2. The directory will display the first entry. Press 5 or 6 on the Navigation button
to scroll through the directory, or enter a letter from the keypad to jump to the
first record in that alphabet group, then press 5 or 6 on the Navigation button
to reach the exact record.
3. To view the number for an entry, press the soft button.
4. Press 5 or 6 on the Navigation button to scroll through the options until
“View number” appears on the display.
5. Press the soft button.
6. The display will show the phone number.
71
Page 72

Clear allClear all
Advanced Functions of Your RCA 25450 Phone System
7. Press the soft button to return to the directory option screen.
Clear All
1. To enter the directory, press 3on the Navigation button.
2. To clear the entire directory, press the soft button while viewing the
directory.
3. Press 5 or 6 on the Navigation button to locate the “Clear all” option, and
then press .
4. The display will prompt for confirmation.
5. Select the soft button to clear the entire directory. Select the
soft button to return to the directory menu.
Advanced Functions of Your RCA 25450 Phone
System
The advanced functions are the tools that make the RCA 25450 a complete phone
system. These functions include auto attendant, speed dial, conference calls, second
incoming call, group setting (Cordless Handset), and call log.
Auto Attendant (Base Unit)
Auto Attendant is an automated call answering feature that uses default messages
or messages you record to direct a call to extensions or their voice mails. Auto
Attendant can be turned on or off on each line. You can record a separate message
for each line.
1. If the auto attendant function is on, the auto attendant function will greet callers, “Please enter the extension number or press zero for the operator” after the
second ring. This function can be turned on for 1 or more phone lines.
72
Page 73

TURN AA on/offTURN AA on/off
Advanced Functions of Your RCA 25450 Phone System
2. If the caller enters a valid extension, the call will ring the extension. If the call
is not answered after 30 seconds, the auto attendant prompts the caller with
a custom out-going message, or “The extension you’ve entered is busy or not
available, please try another extension, or to leave a message, press the pound
key.”
The caller can then enter another extension. If, after the third attempt, there is
no answer, the caller will be prompted, “Sorry, nobody can answer your call right
now. Please try again later. Goodbye.”
3. If the caller enters an invalid extension, the auto attendant prompts the caller,
“The extension you’ve entered is invalid, please try another extension.”
4. If the caller chooses to speak with the operator by pressing “0,” the phone will
prompt the caller, “Please hold, your call is being transferred to the operator.”
The call will then ring the Base Unit.
If the Auto Attendant function is turned off, all extensions will ring and the first one
to answer receives the call.
Configure Auto Attendant (Base Unit)
Auto Attendant can be turned on or off for each line (1-4). A recorded outgoing
message (OGM) can be assigned to each line.
Turning Auto Attendant On or Off
1. Press the Auto Att button.
2. “Turn AA on/off” appears on the display.
3. Press the soft button.
4. Press 5 or 6 on the Navigation button to scroll to the line number “Line (1-4)”
on the display that you want to turn on or off.
5. Press the soft button.
73
Page 74

Advanced Functions of Your RCA 25450 Phone System
6. Press the soft button.
7. The display will show “Line (1–4) AA is off” if auto attendant has been turned off
on the phone line. If auto attendant is on, the display will show
“Line (1–4) AA is on”.
Record Outgoing Message (OGM)
The Record Outgoing Message (OGM) allows you record up to 5 greeting messages
up to 60 seconds each from the Base Unit. The default automated outgoing message
(OGM) for all lines is “Please enter the extension number or press zero for the
operator.”
1. On the Base Unit, press the Auto Att button.
2. Press 5 or 6 on the Navigation button until “Configure AA” appears on the
display.
3. Press the soft button.
4. Press 5 or 6 on the Navigation button until “Record OGM” appears on the
display.
5. Press the soft button.
6. Up to 5 different greetings can be saved. Select a greeting (1–5) by pressing
5 or 6 on the Navigation button.
NOTE: The greeting locations (1-5) are the same as the default greeting until a new OGM is
recorded and overwrites them. The “Default“ OGM cannot be changed or deleted.
7. Press the soft button.
8. A long beep will sound. The user will record their message when the beep ends.
9. Press the soft button to stop recording.
10. To add or re-record a greeting, repeat the steps for the “Record OGM” function.
74
Page 75

Advanced Functions of Your RCA 25450 Phone System
Play Outgoing Message (OGM)
The saved outgoing messages can be reviewed using the play OGM function.
1. On the Base Unit, press the Auto Att button.
2. Press 5 or 6 on the Navigation button until “Configure AA” appears on the
display.
3. Press the soft button.
4. “Play OGM” appears on the display.
5. Press the soft button.
6. The display will show “Play OGM #:” Select a greeting (1–5) by pressing
5 or 6 on the Navigation button.
7. Press the soft button.
8. The greeting will play.
9. Press the soft button when finished listening to the greeting. The
display will return to step 6. When the message ends the display will return to
“Play OGM #:” .
10. To review another greeting, repeat the steps for the “Play OGM” function.
Select Outgoing Message (OGM)
1. Press the Auto Att button.
2. Press 5 or 6 on the Navigation button until “Configure AA” appears on the
display.
3. Press the soft button.
4. The display will show “Configure AA:” .
5. Press 5 or 6 on the Navigation button until “Select OGM” appears on the
display.
75
Page 76

Advanced Functions of Your RCA 25450 Phone System
6. Press the soft button.
7. Select a phone line (1-4) by pressing 5 or 6 on the Navigation button
8. Press the soft button.
9. Press 5 or 6 on the Navigation button and select “OGM 1-5” or the default
OGM.
10. Press the soft button. The selected OGM will play.
11. The display will show “Save selection?”.
12. Press soft button to accept or soft button to return to
Select OGM screen.
13. If the soft button is selected you will hear a confirmation tone and
display returns to “Configure AA:” screen.
14. To configure another line, repeat the steps for the “Configure AA” function.
Hold Message (Base Unit)
The hold message function allows the user to record, play, or delete a message for
callers placed on hold to remind them they are on hold. The message can be as long
as 30 seconds. The default message is a double beep tone. To record your own hold
message, refer to the following steps.
Record a Hold Message
Record a Hold message allows the user to create a message from the Base Unit to be
played while a caller is on hold.
1. Press the soft button.
2. Press 5 or 6 on the Navigation button to scroll through the options until
“System setting” appears on the display.
3. Press the soft button.
76
Page 77

Play messagePlay message
Advanced Functions of Your RCA 25450 Phone System
4. Press 5 or 6 on the Navigation button to scroll through the options until
“Hold message” appears on the display.
5. Press the soft button.
6. Press 5 or 6 on the Navigation button to scroll through the options until
“Record message” appears on the display.
7. Press the soft button.
8. After a long beep, the display will show “Recording hold message...” Record the
hold message.
9. Press the soft button to stop recording.
10. The display will show “Updating hold message...” and return to the hold message
option screen.
11. The message will play. After the message plays, press the Exit button or wait for
the menu to time out to return to the Standby Mode.
Play a Hold Message
The hold message can be reviewed using the play message function.
1. On the Base Unit, press the soft button.
2. Press 5 or 6 on the Navigation button to scroll through the options until
“System setting” appears on the display.
3. Press the soft button.
4. Press 5 or 6 on the Navigation button to scroll through the options until
“Hold message” appears on the display.
5. Press the soft button.
6. Press 5 or 6 on the Navigation button to scroll through the options until
“Play message” appears on the display.
77
Page 78

Delete messageDelete message
Advanced Functions of Your RCA 25450 Phone System
7. Press the soft button.
8. While the message is playing, the display will show “Playing hold message...”
9. Press the soft button when finished listening to the message.
Delete a Hold Message
The hold message can be deleted using the delete message function.
1. Press the soft button.
2. Press 5 or 6 on the Navigation button to scroll through the options until
“System setting” appears on the display.
3. Press the soft button.
4. Press 5 or 6 on the Navigation button to scroll through the options until
“Hold message” appears on the display.
5. Press the soft button.
6. Press 5 or 6 on the Navigation button to scroll through the options until
“Delete message” appears on the display.
7. Press the soft button.
8. The display will prompt “Delete hold message?”
9. Press the soft button to delete the message or to return
to hold message option menu.
Speed Dial (Base Unit)
The Base Unit can save displayed telephone numbers as Speed Dial numbers to one
of its 16 Memory button locations.
Calling Speed Dial Numbers
1. Lift the Handset or press the Speaker button.
78
Page 79

Advanced Functions of Your RCA 25450 Phone System
2. Press a Speed Dial (Memory) button.
Saving Phone Numbers to Speed Dial (Memory) buttons
1. On the Navigation button, press 3 (DIR) to access the Directory, or 4 (CID) to
access the Caller ID log to locate a displayed telephone phone number to save.
2. Press 5 or 6 on the Navigation button to scroll to a displayed telephone
number.
3. Press the Store button.
4. The display will prompt “Select Location”.
5. Press the Memory button location desired to store the number.
6. If the selected location already has a number stored, the display will show the
name and number with “Overwrite?” at the top of the screen.
7. Press the soft button to update the record.
8. Press the soft button to cancel changes to the current record.
Three-Way Conference Calls
The conference call function allows a caller from the Base Unit or a Cordless Handset
to add a third person to a call. The call must include at least one outside line.
Conference calls between three extensions (handsets or Base Unit) are not supported.
Three-way conference calls between an extension/Base Unit and two outside phone
lines require access to a free second line.
Add Extension From Base Unit
1. Press the Hold button to place the outside call on hold.
2. To bring in a Cordless Handset for a three-way conference, press the Intercom
button.
79
Page 80

Advanced Functions of Your RCA 25450 Phone System
3. Enter the two-digit Cordless Handset ID or press one of the 16 one-touch
Memory buttons to page a Cordless Handset.
4. After the Cordless Handset answers, press the soft button.
5. The display will show “Select line to conference” and list all lines on hold. Press
5 or 6 on the Navigation button to locate the line to add to the conference.
6. Press the soft button to start three-way conference.
NOTE: Any one of the two non-initiating parties can drop out of the three-way conference,
leaving the remaining two parties still in conversation.
Add Extension From Cordless Handset
1. Press the soft button.
2. “Hold” appears on the Display.
3. Press the soft button.
4. To add handset or the Base Unit for a three-way conference, press the Intercom
button.
5. Enter a handset ID or ID = 00 for the Base Unit.
6. After the second handset or the Base Unit answers, press the soft
button.
7. The display will show “Select line to conference” and list all lines which have
been placed on hold.
8. Press 5 or 6 on the Navigation button to locate the line to join the
conference.
9. Press the to start a three-way conference.
NOTE: Any one of the two non-initiating parties can drop out of the three-way conferencing,
leaving the remaining two parties still in conversation.
80
Page 81

Advanced Functions of Your RCA 25450 Phone System
Add Phone Line From Base Unit
1. Press the Hold button to place the current call on hold.
2. To add a phone line, lift the handset, press the Speaker button, or select an
available Line (1-4) button and enter a phone number, or press 3 or 4 on the
Navigation button to dial from Directory or Call Log.
3. After the second phone line answers, press the soft button.
4. The display will show “Select line to conference” and list all lines which have
been placed on hold. Press 5 or 6 on the Navigation button to locate the line
to join the conference.
5. Press the soft button to start three-way conference. Any one of the
2 non-initiating parties can drop out of the three-way conference, leaving the
remaining two parties still in conversation.
Add Phone Line From Cordless Handset
1. Press the soft button.
2. “Hold” appears on the Display.
3. Press the soft button.
4. To add a phone line, press the Talk or Speaker button and enter a phone number;
press the soft button; or press 3 or 4 on the Navigation button to
dial from Directory or Call Log.
5. After the second phone line answers, press the soft button.
6. The display will show “Select line to conference” and list all lines which have
been placed on hold. Press 5 or 6 on the Navigation button to locate the line
to join the conference.
81
Page 82

Advanced Functions of Your RCA 25450 Phone System
7. Press the soft button to start three-way conference.
NOTE: Any one of the two non-initiating parties can drop out of the three-way conference,
leaving the remaining two parties still in conversation.
Second Incoming Call
If a second call is received while a call is in progress, a long beep will sound if the
feature is on and the display will show “Incoming call from Line (1–4)”. The Caller ID
information will display if available.
Configure Second Incoming Call (2nd Call Alert)
1. On the Base Unit, press the soft button.
2. Press 5 or 6 on the Navigation button to locate “Phone settings”.
3. Press the soft button.
4. Press 5 or 6 on the Navigation button to locate “ 2nd call alert”.
5. Press the soft button.
6. Press 5 or 6 on the Navigation button to choose “ on (default)” or “off”.
7. Press the soft button.
Using Base Unit for Second Incoming Call
1. To accept the second call, place the first call on hold by pressing the Hold button
or end the current call.
2. Press the Speaker button to use speakerphone, press the Headset button to use
the headset, or press a Line (1-4) button shown on the display.
3. The handset receiver may be lifted and used once one of the options is selected
in step 2.
82
Page 83

Group settingGroup setting
Advanced Functions of Your RCA 25450 Phone System
Using Cordless handset for Second Incoming Call
1. Press the soft button.
2. “Hold” appears on the Display.
3. Press the soft button.
4. Or, to end the current call, press the End button.
5. To accept the second call, press the Talk button.
Extension Group Setting (Cordless Handset)
The Extension Group Setting feature allows a group of Cordless Handsets to be called
at the same time. The first handset to answer receives the call. For the Group setting
to function, cordless handsets subscribe to the same Group ID number. There are 4
numbers available (91–94). A Group ID number acts similarly to an individual handset ID number; it can be called, paged, or have calls transferred to it.
A Cordless Handset’s group setting(s) is individually selected and is not known to
other cordless handsets or the Base Unit. A Cordless Handset can change group
settings at any time. The Base Unit is a member of all groups. However, the Base
Unit cannot assign groups to the cordless handsets nor can it unsubscribe a Cordless
Handset from a group.
Selecting and Deleting an Extension Group ID number
1. Press the soft button on the Cordless Handset.
2. Press 5 or 6 on the Navigation button to locate the “Phone setting” option.
3. Press the soft button.
4. Press 5 or 6 on the Navigation button to locate the “Group setting” option.
5. Press the soft button.
83
Page 84

Advanced Functions of Your RCA 25450 Phone System
6. The display will show a list of group(s) to which the Cordless Handset subscribes.
The default list is empty.
7. Press the soft button to enter the submenu with “Subscribe” and
“Unsubscribe” options.
8. To add a group, press 5 or 6 on the Navigation button and select “Subscribe”.
9. Press the soft button.
10. The display will ask for a two-digit Group ID (91–94). Upon entering a valid
Group ID, display will show the updated subscription list.
11. To delete a group, press 5 or 6 on the Navigation button to select
“Unsubscribe”.
12. Press the soft button.
13. The display will ask for a two-digit Group ID (91–94). Upon entering a valid
Group ID, display will show the updated subscription list.
14. Press the soft button to return to the “Phone setting” menu, or press
the Exit button to return to standby, or press the soft button to make
more changes.
Call Log
Call Log is a list of Caller ID (CID) information for the last 50 incoming calls, starting
with the most recent. Each record includes the telephone number, name (if available), and time stamp (date and time). To use this feature, you must subscribe to a
Caller ID with a Call Waiting Service.
The display will show the date and time of call on the first line, followed by the
name on the second line, and the phone number on the third line. An unread record
will have a “NEW” at the end of the first line of display.
84
Page 85

Advanced Functions of Your RCA 25450 Phone System
When viewing a call record, the number can be dialed, stored to the directory, added
to speed dial (Base Unit), or deleted.
View Call Log
To view the call log, press 4 on the Navigation button to enter the Call Log.
Press 5 or 6 on the Navigation button to scroll through the numbers and names
when available.
Call a displayed Number
NOTE: A number can only be dialed when the phone is in standby or on hold.
1. From a Cordless Handset, press the Talk or Speaker button.
2. From the Base Unit, press the Dial, Speaker, Headset, an idle Line button, or pick
up the handset.
Modify Logged Numbers
The displayed Caller ID telephone number (in most cases) will be a ten-digit number
with the three-digit area code followed by the seven-digit telephone number.
Logged numbers can be modified to comply with the local dialing rules.
1. To enter the Call Log, press 4 on the Navigation button.
2. The display will show the date, time, name, and number with area code.
3. To display the telephone number without the “1” or area code, press the
soft button.
4. To return to displaying the telephone number with area code or prefix, press the
soft button once again.
For example, the number stored in the Call Log is “1-555-471-0704”, pressing the
Pressing the soft button a third time will display the original number
“1-555-471-0704”.
soft button once will change the displayed number to “471-0704”. Pressing the
soft button a second time will change the displayed number to “555-471-0704”.
85
Page 86

Clear allClear all
Advanced Functions of Your RCA 25450 Phone System
Save displayed Caller ID Information into the Directory
1. To save displayed Caller ID information into the directory, press the
soft button.
2. Press 5 or 6 on the Navigation button to move to the “Save” option.
3. Press the soft button.
4. The display switches to directory editing screen, where the Caller ID name and
number can be changed before it is saved.
5. Press the soft button when the name is displayed correctly.
6. Press the soft button when the number is displayed correctly.
Delete displayed Caller ID Information From the Call Log
1. To delete displayed Caller ID information from the Call Log, press the
soft button.
2. Press 5 or 6 on the Navigation button to move to the “Delete” option.
3. Press the soft button.
4. Press the soft button to erase the displayed CID record. Press the
soft button to return to the Call Log menu.
Clear All Caller ID Information from the Call Log
1. To clear all Caller ID information from the Call Log, press the soft
button.
2. Press 5 or 6 on the Navigation button to move to the “Clear all” option.
3. Press the soft button.
4. Press the soft button to erase all CID records. Press the
soft button to return to the call log menu.
86
Page 87

Settings and Adjustment
Settings and Adjustment
Menu System
NOTE: You must exit the Menu System before you can make a call.
Many of the RCA 25450 Phone System functions (including sound, phone settings,
registration, system settings and line dedicate) can be customized to meet individual
user requirements. To allow for a quick startup, these functions may have default
settings that are factory set when a Base Unit and Cordless Handset(s) are purchased
as a system. Most of these functions are accessed by pressing the soft
button on the Base Unit or Cordless Handset.
NOTE: Some settings listed below are described in other sections of this User’s Guide.
Base Unit Soft Button: Cordless Handset Soft Button:
Sound Sound
Ring volume Ring volume
Ring tone Ring tone
Key volume Key volume
Key tone Key tone
Phone setting Phone setting
Dialing prefix Dialing prefix
Area codes Area codes
Contrast Call forward
Set time Group setting
2nd call alert Line Selection
Registration 2nd call alert
Register HS Registration
Deregister HS Register HS
Clear HS ID Deregister HS
Next HS ID
System setting
Flash time
Admin password
Hold message
System settings and procedures for Do Not Disturb (DND) (Base Unit), Line Selection
(Cordless Handset), and System Reset (Base Unit) are at the end of this section.
87
Page 88

System settingSystem setting
Settings and Adjustment
Base Unit Setup
Flash Time
Flash time is the amount of time the phone needs to switch between lines. The flash
time function allows the user to adjust the length of time (100 ms–1000 ms selectable, with 600 ms as the default). The flash time requirements may vary by country
and service provider.
1. Press the soft button.
2. Press 5 or 6 on the Navigation button to scroll through the options until
“System setting” appears on the display.
3. Press the soft button.
4. “Flash time” appears on the display.
5. Press the soft button.
6. The display will show a range of values from 100 to 1000.
7. Press 5 or 6 on the Navigation button to scroll through the options and
choose the desired flash time.
8. Press the soft button.
Administrator Password
The administrator password can be changed using this function.
1. Press the soft button.
2. Press 5 or 6 on the Navigation button to scroll through the options until
“System setting” appears on the display.
3. Press the soft button.
4. Press 5 or 6 on the Navigation button to scroll through the options until
“Admin password” appears on the display.
88
Page 89

########
########
########
Settings and Adjustment
5. Press the soft button.
6. Enter the old four-digit password when prompted. To return to the system setting menu, press the soft button.
NOTE: The default password is “7221” . Use this password when resetting the voice mail
passwords or erasing all voice mail. If the administrator password has been changed, there is
no way to recover it without resetting the system. The administrator password will default to
“7221” after a reset.
7. If the password is incorrect, the display will show “Invalid password” and return
to the system setting menu.
8. If the password is correct, enter the new four-digit password when prompted. To
return to the system setting menu, press the soft button.
9. Re-enter the new password when prompted.
10. If the new password is retyped incorrectly, the system will to return to the “Enter
new password” display. Enter the new password and re-enter the password to
verify.
11. If both passwords match, the new password will be saved and the system will
return to the system setting menu.
Line Dedicate (Base Unit)
The line dedicate function allows a phone line to be dedicated to a single extension.
Auto attendant must be turned off to change line dedication.
NOTE: The system will exit the line dedicate function if the Exit button is pressed or a 15
second timeout is exceeded.
1. On the Base Unit, press the soft button.
2. Press 5 or 6 on the Navigation button to scroll through the options until
“Line dedicate” appears on the display.
3. Press the soft button.
89
Page 90

Settings and Adjustment
4. Press 5 or 6 on the Navigation button to scroll through the options
“Line (1–4)” to choose a line to dedicate.
5. Press the soft button. Press the soft button to return to
the previous menu. If auto attendant has not been disabled the display will show
“Line can only be dedicated to an extension when AA is off”.
6. The display will show the status of the selected phone line. If the line has not
been previously dedicated, the display will show “Line (1–4) dedication is dis-
abled”.
7. If the phone line is already dedicated, the display will show “Line (1–4) dedicated
to Ext # (1–16)”. To dedicate the phone line or to dedicate the line to a different
extension, press the soft button. Press the soft button to
return to the previous menu.
8. The display will ask whether to dedicate the line. Press the soft
button to dedicate line. Press the soft button to return to the line
dedicate menu.
9. The display will ask for the two-digit extension number to where you will dedicate the line. Enter that extension number.
10. Press the soft button. Press the soft button to return to
the previous menu.
Sound (Base Unit)
The phone’s volumes and tones can be adjusted to the user’s preferences including:
Speakerphone, Corded Handset, and Headset volumes.
90
Page 91

Settings and Adjustment
Receiver, Speakerphone, or Headset Voice Volume (Base Unit)
Adjust the voice volume of the person you are listening to on the line by pressing
5 or 6 on the Navigation button. There are 6 levels of volume. The selected volume will remain in effect for future phone calls until changed.
1. To increase voice volume, press 5 on the Navigation button.
2. To decrease voice volume, press 6 on the Navigation button.
Ring Volume (Base Unit)
Ring volume controls the ringer volume for incoming calls and pages. Adjust the
volume by pressing 5 or 6 on the Navigation button, or using the menu system.
Adjust by pressing 5 or 6 on the Navigation button
1. The Base Unit should be on hook (not in use)
2. To increase ring volume, press 5 on the Navigation button.
3. To decrease ring volume, press 6 on the Navigation button.
4. The display will show the volume level (“High, Medium (Default), Low, Off”) and
the phone will play the ring volume at each volume level as you scroll through
the options. The displayed volume level will be selected if no action is taken in 5
seconds.
Using the Menu System
1. Press the soft button.
2. “Sound” appears on the display.
3. Press the soft button.
4. “Ring volume” appears on the display.
5. Press the soft button.
91
Page 92

Settings and Adjustment
6. To increase the ring volume, press 5 on the Navigation button.
7. To decrease the ring volume, press 6 on the Navigation button.
8. The display will show the volume level (“High, Medium (Default), Low, Off”) and
the phone will play the ring tone at each volume level as the options are scrolled
through.
9. To accept the volume setting, press the soft button.
Ring Tone (Base Unit)
The ring tone can be changed using the menu system. There are four different
ring tones. The selected ring tone will remain in effect for future phone calls until
changed.
1. Press the soft button.
2. “Sound” appears on the display.
3. Press the soft button.
4. Press 5 or 6 on the Navigation button to scroll through the options until
“Ring tone” appears on the display.
5. Press the soft button.
6. To change the ring tone, press 5 or 6 on the Navigation button.
7. The display will show the ring tone (1–4) and the phone will play the ring tone as
the options are scrolled through.
8. To accept the ring tone setting shown on the display, press the soft
button.
Key Volume (Base Unit)
The key volume controls the volume of the keypad, and can be adjusted through the
menu system.
92
Page 93

Medium (Default)Medium (Default)
Settings and Adjustment
1. Press the soft button.
2. “Sound” appears on the display.
3. Press the soft button.
4. Press 5 or 6 on the Navigation button to scroll through the options until
“Key volume” appears on the display.
5. Press the soft button.
6. To increase the button volume, press 5 on the Navigation button.
7. To decrease the button volume, press the 6 on the Navigation button.
8. The display will show the volume level (“High, Medium (Default), Low, Off”).
9. To accept the volume setting shown on the display, press the soft
button.
Key Tone (Base Unit)
The key tone can be changed using the menu system. There are four different key
tones with key tone 1 the default. The selected key tone will remain in effect for
future phone calls until changed.
1. Press the soft button.
2. “Sound” appears on the display.
3. Press the soft button.
4. Press 5 or 6 on the Navigation button to scroll through the options until
“Key tone” appears on the display.
5. Press the soft button.
6. Press 5 or 6 on the Navigation button to change the key tone.
93
Page 94

Settings and Adjustment
7. The display will show the key tone (1–4) and the phone will play the key tone as
the options are scrolled through.
8. To accept the key tone setting shown on the display, press the soft
button.
Cordless Handset Setup
Register Cordless Handset (Base Unit and Cordless Handset)
Cordless handsets must be registered with the Base Unit before use. If the Cordless
Handset was purchased with the Base Unit as a system, the Cordless Handset has
already been registered. The ID will be displayed when the Cordless Handset is powered on. If the Cordless Handset has not been registered or the registration has been
deleted, the display shows “Please register”.
NOTE: You must program both the Base Unit and the Cordless Handset to register the
handset. Have both units ready to program as you must complete registration of the handset
within 30 seconds after programming the Base Unit.
1. On the Base Unit, press the soft button.
2. Press 5 or 6 on the Navigation button to scroll through the options until
“Registration” appears on the display.
3. Press the soft button.
4. “Register HS” appears on the display. Have the Cordless Handset ready to
program.
5. Press the soft button.
6. The display will show “Press REGISTER in HS menu options.” A 30 second timer
will begin at this point. If the registration process is not completed in this time,
the process will be canceled.
94
Page 95

Settings and Adjustment
7. On the Cordless Handset, press the soft button.
8. Press 5 or 6 on the Navigation button to scroll through the options until
“Registration” appears on the display.
9. Press the soft button.
10. “Register HS” appears on the display.
11. Press the soft button.
12. The Cordless Handset will link to the Base Unit at this time.
13. When finished, the Cordless Handset display will show “Registration completed”.
The new ID number is shown on the first line of the Cordless Handset display.
14. Repeat the steps for each Cordless Handset to be registered.
Deregister Cordless Handset (Base Unit and Cordless Handset)
You will program the Base Unit and the Cordless Handset to complete the procedure.
NOTE: Cordless Handsets must be deregistered from the Base Unit before the assigned ID can
be reused.
1. On the Base Unit, press the soft button.
2. Press 5 or 6 on the Navigation button to scroll through the options until
“Registration” appears on the display.
3. Press the soft button.
4. Press 5 or 6 on the Navigation button to scroll through the options until
“Deregister HS” appears on the display.
5. Press the soft button. Have the Cordless Handset ready to program.
6. The display on the Base Unit will show “Press DEREGISTER in HS menu options.”
A 30 second timer will begin at this point. If the deregistration process is not
completed in this time, the process will be canceled.
95
Page 96

Deregister HSDeregister HS
Settings and Adjustment
7. On the Cordless Handset, press the soft button.
8. Press 5 or 6 on the Navigation button to scroll through the options until
“Registration” appears on the display.
9. Press the soft button.
10. Press 5 or 6 on the Navigation button to scroll through the options until
“Deregister HS” appears on the display.
11. Press the soft button.
12. The Cordless Handset will link to the Base Unit at this time. The Cordless Handset
display will show “Deregistration completed,” and return to standby.
13. Repeat the steps for each Cordless Handset to be deregistered.
Clear Cordless Handset ID (Base Unit)
The Clear HS ID function clears an assigned Cordless Handset ID from the Base Unit.
This is useful if a Cordless Handset has been lost or replaced. Even if an ID is deregistered by the Cordless Handset, the ID will still be assigned on the Base Unit. The Clear
HS ID allows the ID to be reused.
1. On the Base Unit, press the soft button.
2. Press 5 or 6 on the Navigation button to scroll through the options until
“Registration” appears on the display.
3. Press the soft button.
4. Press 5 or 6 on the Navigation button to scroll through the options until
“Clear HS ID” appears on the display.
5. Press the soft button.
6. The display will ask for the cordless Handset ID.
7. Enter the two-digit cordless Handset ID.
96
Page 97

Settings and Adjustment
8. Press the soft button.
9. If a valid ID was entered, a confirmation tone will sound and the ID will be available for reuse.
10. If an invalid ID was entered, the display will show “Invalid ID” and return to the
“Registration” submenu.
Next Cordless Handset ID (Base Unit)
The Next HS ID function allows you to use the Base Unit to assign a specific ID to the
next Cordless Handset requesting registration.
NOTE: If the Next Cordless Handset ID function is not used, then the system automatically
assigns the lowest available ID number to the next Cordless Handset requesting registration.
1. On the Base Unit, press the soft button.
2. Press 5 or 6 on the Navigation button to scroll through the options until
“Registration” appears on the display.
3. Press the soft button.
4. Press 5 or 6 on the Navigation button to scroll through the options until
“Next HS ID” appears on the display.
5. Press the soft button.
6. The display will ask for a two-digit Cordless Handset ID. Enter a valid two-digit
Handset ID (01–16) that has not been already assigned.
7. Press the soft button.
8. If a valid ID was entered, a confirmation tone will sound and the ID will be available for the Cordless Handset requesting registration.
9. If an invalid ID was entered, the display will show “Invalid ID” and return to the
“Registration” submenu.
97
Page 98

Settings and Adjustment
10. The ID entered in step 6 will be assigned to the next Cordless Handset requesting
registration.
Sound (Cordless Handset)
The phone’s volumes and tones can be adjusted to the user’s preferences including:
Cordless Handset Receiver, Speakerphone, and Headset volumes.
Receiver, Speakerphone, or Headset Voice Volume (Cordless Handset)
Adjust the voice volume of the person you are listening to on the line by pressing
5 or 6 on the Navigation button. There are 6 levels of volume. The selected vol-
ume will remain in effect for future phone calls until changed.
1. To increase voice volume, press the 5 on the Navigation button.
2. To decrease voice volume, press the 6 on the Navigation button.
Ring Volume and Vibrate Settings (Cordless Handset)
Ring volume controls the ringer volume for incoming calls and pages. The volume
can be adjusted by pressing 5 or 6 on the Navigation button.
1. Press 5 or 6 on the Navigation button to increase/decrease ringer volume.
2. The display will show the ring volume level and vibrate settings (“Vibrate & High,
Vibrate, High, Medium (Default), Low and Off”) and the phone will play the ring
volume and/or vibrate at each volume level as the options are scrolled through.
The displayed volume level will be selected if no action is taken in 5 seconds.
NOTE: If you select a Vibrate setting, the Cordless Handset will ring instead of vibrating when
it ‘s in the Charging Cradle, and will vibrate when removed from the cradle.
3. To accept the volume setting, press the Exit button.
Using the Menu System
1. Press the soft button.
98
Page 99

Ring toneRing tone
Settings and Adjustment
2. “Sound” appears on the display.
3. Press the soft button.
4. “Ring volume” appears on the display.
5. Press the soft button.
6. Press 5 or 6 on the Navigation button to increase/decrease ringer volume and
vibration settings..
7. The display will show the volume level (“Vibrate & High, Vibrate, High, Medium
(Default), Low and Off” ) and the phone will play the ring volume and/or vibrate
at each volume level as the options are scrolled through.
8. To accept the volume setting, press the soft button.
Ring Tone (Cordless Handset)
The ring tone can be changed using the menu system. There are 4 different ring
tones. The selected ring tone will remain in effect for future phone calls until
changed.
1. Press the soft button.
2. “Sound” appears on the display.
3. Press the soft button.
4. Press 5 or 6 on the Navigation button to scroll through the options until
“Ring tone” appears on the display.
5. Press the soft button.
6. To change the ring tone, press 5 or 6 on the Navigation button.
7. The display will show the ring tone (1–4) and the phone will play the ring tone as
the options are scrolled through.
99
Page 100

Medium (Default)Medium (Default)
Settings and Adjustment
8. To accept the ring tone setting, press the soft button.
Key Volume (Cordless Handset)
The key volume controls the volume of the keypad, and can be adjusted through the
menu system.
1. Press the soft button.
2. “Sound” appears on the display.
3. Press the soft button.
4. Press 5 or 6 on the Navigation button to scroll through the options until
“Key volume” appears on the display.
5. Press the soft button.
6. To change the key volume, press 5 or 6 on the Navigation button.
7. The display will show the volume level (“Off, Low, Medium (Default), High”).
8. To accept the volume setting, press the soft button.
Key Tone (Cordless Handset)
The key tone can be changed using the menu system. There are four different key
tones with key tone 1 the default. The selected key tone will remain in effect for
future phone calls until changed.
1. Press the soft button.
2. “Sound” appears on the display.
3. Press the soft button.
4. Press 5 or 6 on the Navigation button to scroll through the options until
“Key tone” appears on the display.
100
 Loading...