

24991
Universal Remote
Instruction Manual

Table of Contents
Setup ..................................................................... 3
Battery Installation ............................................ 3
Battery Saver ....................................................3
Code Saver ...................................................... 3
Code Setup ...................................................... 3
Button Functions.................................................... 4
DVD Functions ................................................. 6
SAT Functions ..................................................6
Code Entry............................................................. 7
Direct Code Entry ............................................. 7
Code Search .................................................... 8
Using Your Remote................................................ 9
CodeIdentication ............................................9
Shifted Functions ............................................10
Controlling Devices with Power On and Off ... 10
Controlling Combo Devices ............................ 10
VCR/DVD/DVR Punch-Through ..................... 10
Volume/Mute Control and Punch-Through ..... 11
All Volume/Mute Control to any one Mode ..... 11
Setting any Mode for its own Volume/Mute .... 12
Troubleshooting ................................................... 13
Congratulations on your purchase of the 24991
Universal Remote Control. The 24991 is one of the
most easy to use remote controls available today.
With the 24991, juggling multiple remote controls is
a thing of the past! Your 24991 controls up to three
devices, including the most popular brands of TV,
VCR, DVD, SAT, CBL, and audio equipment.
Note: Some functions from your original remote
may not be controlled by this remote. Use the
original remote, if available, to control such
functions. Sometimes buttons other than described
in these instructions may actually perform the
function. For example, the CHAN and VOL
buttons might be used to navigate through menu
choices. We recommend you experiment with the
remote to identify if such situations pertain to your
equipment.
The 24991 is easy to use, easy to program, and
it gives you total control—at the touch of your
ngertips!
2

Setup
Battery Installation
1. On the back of the remote, push down on the
tab and lift the cover off.
2. Match the batteries to the + and - marks inside
the battery case, then insert 2 AAA Alkaline
batteries.
3. Press the battery cover back into place.
Battery Saver
Your remote automatically turns off if the buttons
are depressed more than 30 seconds. This will
save your batteries should your remote get stuck in
a place where the buttons remain depressed (e.g.,
between the sofa cushions).
Code Saver
You will have up to 10 minutes to change the
batteries in your remote without losing codes you
have programmed. However, do not press any
buttons until batteries are installed in the remote.
If buttons are pressed without batteries in the
remote, all codes will be lost.
Code Setup
The SETUP button is used to setup the remote.
You can either setup the remote using the code
for your brand of product, from the code tables (on
separate sheet), or you can search through the
libraryofcodesuntilyoundacodethatworks
for your product. Please refer to “Programming
with Code Search” page 9 for more information
on using the code search feature to learn how
to search through the library of codes for your
products. NOTE: You can store any kind of code
under any mode (except TV). I.E. you can store
a VCR code under the CABLE button, or a DVD
code under the SAT button, etc. However, you can
only store TV codes under the TV button.
3
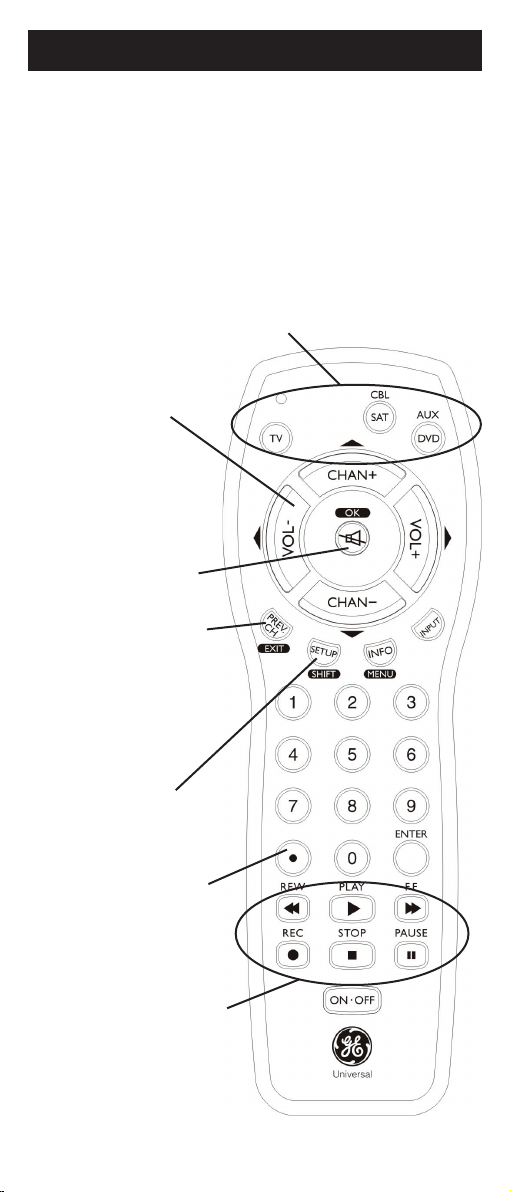
Button Functions
Some buttons on the remote might have functions that
are referred to by different names on the device you
are controlling. E.G. PREV CH may be called RECALL,
or ENTER may be called DISPLAY. These differences
depend on the brand and model of your product. Also,
this remote can only operate features that exist on your
product. E.G., your product must have PREV CH ability
for the PREV CH button to operate this feature.
TV, CBL/SAT, DVD/AUX Selects
product to be operated.
VOLUME UP/DOWN
Changes the volume
level of the product,
normally the TV.
MUTE Turns off the
TV sound while the
picture remains.
OK Selects menu
items for the device
you are controlling.
PREV. CH Returns to
the previously selected
channel. EXIT Exit OnScreen Menus and/or
Return to previous OnScreen selection.
SETUP For setup.
SHIFT Accesses
shifted functions.
DOT
Used to select digital
channels, e.g., 5.3.
RECORD, PLAY, STOP,
REW, FF, PAUSE VCR
control buttons operate your
VCR even when the remote
is set to operate the TV.
Also operates DVD Scan
-/+. Note the VCR keys also
control DVD when in DVD
Mode.
4
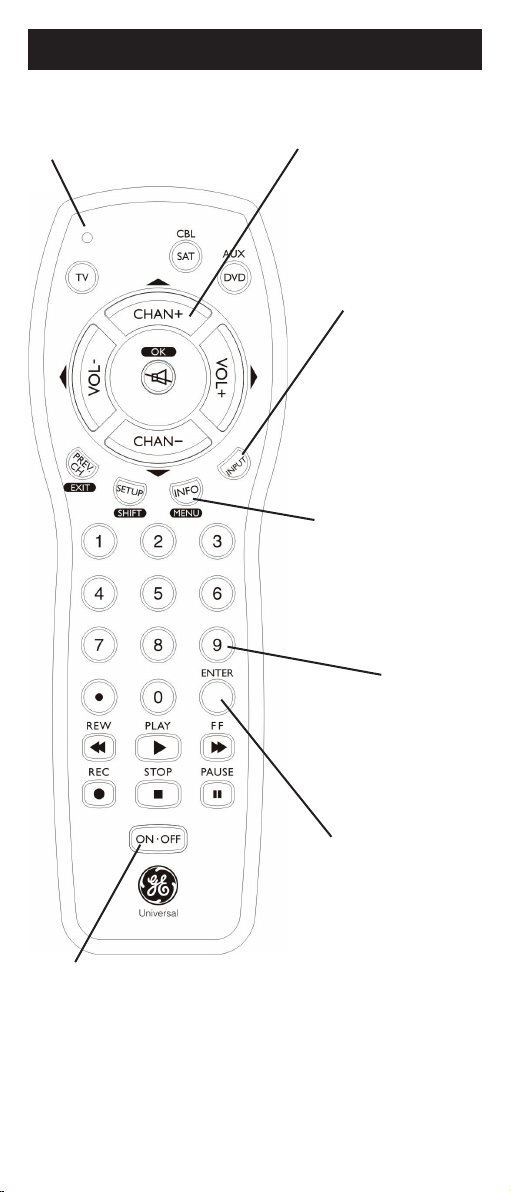
Button Functions, cont.
Red Indicator
Lights when any button is pressed.
CHANNEL Up/Down
Changes the channels.
INPUT
For some TVs, press
repeatedly to select
from available viewing
sources (antenna, cable
box, VCR, etc.).
INFO button brings up
DVD Display or Control
Menu for Chapter/Track/
Title number, Time re-
maining/elapsed indica-
tion, system information,
etc.
MENU
Selects the on-screen
menu.
NUMBERS
Enter numbers for direct
channel selection. Some
products require ENTER
to be pressed after chan-
nel selection.
ENTER
For some TV models,
used after direct chan-
nel number
entry to immediately
change to the
ON-OFF Turns
device On or Off.
Note: The REC button must be pressed TWICE to record
from your VCR. For some brands of VCRs, you might
need to press the REC button once, then press it again
for three seconds.
selected channel.
5
 Loading...