

Page 1
24959
Universal Remote
Instruction Manual
Page 2

Table of Contents
Introduction ...............................................3
Button Functions.......................................4
Initial Setup ...............................................6
Battery Installation ................................6
Battery Saver .......................................6
Code Saver ..........................................6
Code Setup ..........................................6
Direct Code Entry .....................................7
Code Search.............................................8
Code Identifi cation Feature ......................9
Setup ......................................................10
Programming Combo Device Codes ..10
DVD/DVR Punch-Through Feature ....10
Volume/Mute Control Feature ............10
Setting All Volume/Mute Controls .......11
Setting Any Mode to Use Own
Volume/Mute ......................................11
Code Learning ........................................12
Tips on Learning .................................12
IR Transmitter Finder .............................14
Learning Commands ..............................15
Clearing Commands ...............................16
Clearing All Learned Commands .......16
Master Clear .......................................16
Troubleshooting ......................................17
2
Page 3

Introduction
Congratulations on your purchase of this
GE Universal Remote Control. Your new
remote is one of the most easy to use
remote controls available today. Juggling
multiple remote controls is a thing of the
past! Your GE Remote controls up to
8 devices, including the most popular
brands of TV, DVD, DVR, Cable, etc.
In addition, this remote is equipped with a
command learning feature, which lets the
remote learn commands from your original
equipment remote control!
Note: Some functions from your original
remote may not be controlled by this
remote. Use the original remote, if
available, to control such functions.
Sometimes buttons other than described
in these instructions may actually perform
the function. For example, the CHAN and
VOL buttons might be used to navigate
through menu choices. We recommend
you experiment with the remote to
identify if such situations pertain to your
equipment.
The GE Universal Remote is easy to use,
easy to program, and it gives you total
control—at the touch of your fi ngertips!
3
Page 4

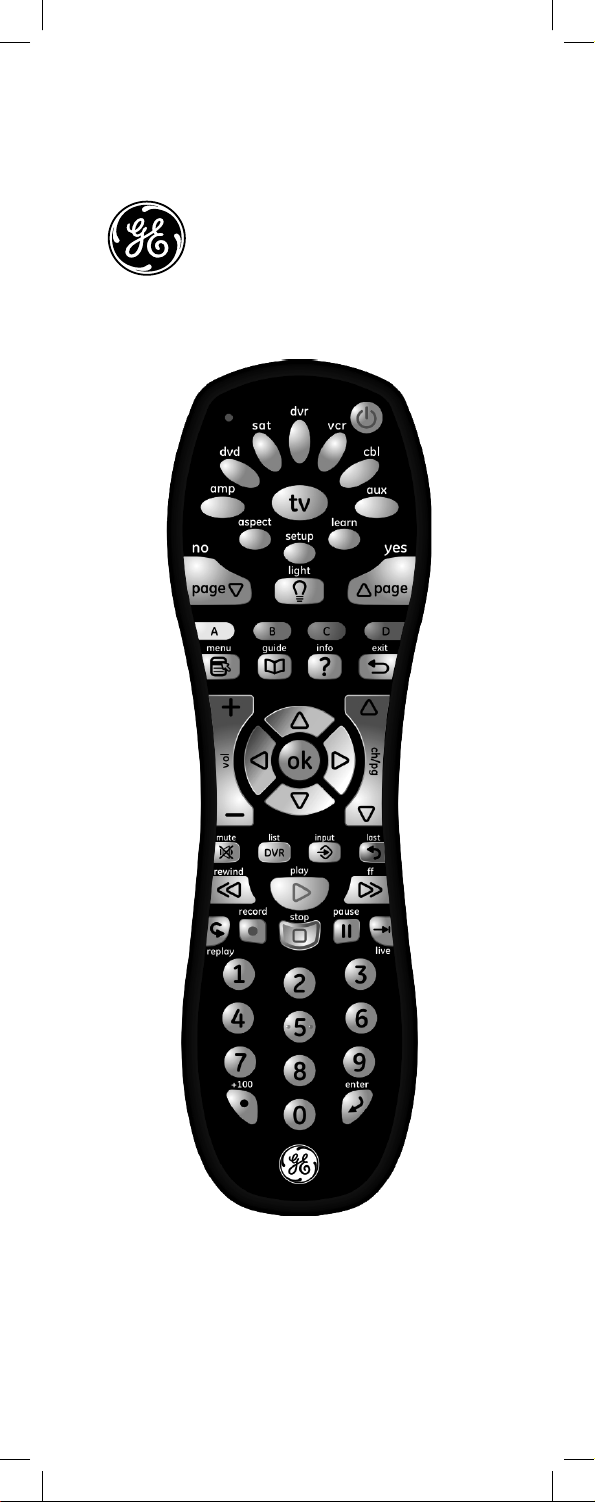
Button Functions
1.
2.
3.
4.
5.
6.
7.
8.
9.
10.
11.
12.
13.
dvr
sat vcr
dvd
amp
no yes
page
A
menu
mute
rewind
replay
vol
1
4
7
+100
aspect
record
B
guide
list
DVR
tv
setup
light
ok
play
stop
2
5
8
cbl
aux
learn
C
info exit
input
last
ff
pause
3
6
9
enter
page
D
ch/pg
live
0
28.
27.
26.
25.
24.
23.
22.
21.
20.
19.
18.
17.
16.
14.
15.
Note: The REC button must be pressed twice to
record from your DVD/DVR. For some DVD/DVR
brands, you might need to press REC button once,
then press it again for 3 seconds.
Some buttons on the remote might have functions
that are referred to by different names on the device you are controlling. These differences depend
upon the brand and model of your product. Also,
this remote can only operate features that exist on
your product.
4
Page 5

Button Functions (cont.)
1. Red Indicator: Lights when any button is pressed.
2. TV, DVD, DVR, etc.: Selects the product to be
operated.
3. ASPECT: Selects viewing format for the displayed
picture (See 14 below).
4. SETUP: Used for setting up your remote.
5. PAGE DOWN: Sets your Favorites ratings.
6. ABCD: Used to store learned commands. (Some
DVRs or Set Top boxes use colors and some use the
letter keys. You may have to try both to ensure correct
functionality.
7. MENU: Brings up the device Menu screen (if
available) - use with UP, DOWN, LEFT, and RIGHT
navigation buttons.
8. GUIDE: Displays satellite or cable on-screen program
guide.
9. VOLUME UP/DOWN: Changes the volume level of
the product, normally the TV.
10. MUTE: Turns off the TV sound while the picture
remains.
11. DVR: Press to display list of recorded shows on
your DVR.
12. REPLAY: On some DVRs, this button replays the last
8 seconds of a program.
13. NUMBERS: Enter numbers for direct channel
selection. Some products require Enter to be pressed
after channel selection.
14. Dot: used for digital channels, e.g., 2.3. (Controls
ASPECT for some DVRs)
+100: Used for channels greater than 100. On some
devices.
15. ENTER: Used after direct channel number entry to
immediately change to the selected channel.
16. RECORD, PLAY, STOP, REW, FF, PAUSE: Control
buttons that operate your DVD/DVR even when the
remote is set to operate the TV. Also operates DVD
Scan -/+.
17. LIVE: Returns to live TV.
18. INPUT: For some TVs, press repeatedly to select from
available viewing sources (antenna, cable box, etc.).
19. LAST: Returns to the previously selected channel or
DVD repeat toggle.
20. OK: Selects menu items for the device you are
controlling.
21. UP, DOWN, LEFT, RIGHT: Navigation buttons.
22. CHANNEL UP/DOWN: Changes the channels. Also
controls DVD/CD CHAPTER +/- track selection, i.e.,
DVD/CD Track Skip Up/Down. Note the DVR buttons
also control the DVD when in DVD Mode.
23. INFO: Displays/selects on-screen channel
information, etc.
24. EXIT: Exits on-screen menus, returns to previous onscreen selection.
25. PAGE UP: Sets your Favorites ratings.
26. BACKLIGHT: Turns backlighting On/Off.
27. LEARN: Used to setup learning functions.
28. POWER: Turns device on or off.
5
Page 6

Initial Setup
Battery Installation
1. On the back of the remote, push down on the
tab and lift the cover off.
2. Match the batteries to the + and - marks inside
the battery case, then insert 2 AAA Alkaline
batteries.
3. Press the battery cover back into place.
Battery Saver
Your remote automatically turns off if the buttons
are depressed more than 30 seconds. This will
save your batteries should your remote get stuck in
a place where the buttons remain depressed (e.g.,
or for instance, between the sofa cushions).
Code Saver
Codes are stored in permanent memory while you
are changing batteries so that you will not lose any
codes stored in the remote while you are changing
batteries.
Code Setup
The SETUP button is used to setup the remote.
You can either setup the remote using the code
for your brand of product, from the code tables (on
separate sheet), or you can search through the
library of codes until you fi nd a code that works for
your product.
Please refer to “Code Search” on page 8 for more
information on using the code search feature to
learn how to search through the library of codes for
your products.
6
Page 7

Direct Code Entry
Direct Code Entry
NOTE: You can store any kind of code under any
mode (except TV). I.E. you can store a VCR code
under the CBL button, or a DVD code under the
AUX button, etc. However, you can only store TV
codes under the TV button.
1. Press and hold the SETUP button until the red
indicator stays on, then release the SETUP
button.
2. Press and release the desired mode button
(TV, DVD, etc.). The red indicator blinks, then
stays lit.
3. Enter the 4 digit code from the code tables (on
separate sheet). Note: after a valid code entry,
the red indicator turns off. For an invalid code,
the red indicator fl ashes.
4. With your device on, press CHANNEL UP (or
POWER). If the device responds, no further
programming is required. Note: If some buttons
do not operate your equipment, try one of the
other codes for your brand.
Write your codes down here for easy reference
later.
Type Type stored Code
TV TV
AMP
DVD
SAT
DVR
VCR
CBL
AUX
7
Page 8

Code Search
Code Search
If your product does not respond after you have
tried all the codes for your brand, or if your brand is
not listed, try searching for your code by following
these steps.
1. Manually turn on the device (TV, DVD, etc.) to
be controlled.
2. Press and hold the SETUP button until the red
indicator stays on, then release the SETUP
button.
3. Press and quickly release the desired mode
button (TV, DVD, etc.). The red indicator blinks
off once.
4. Press the CHANNEL UP button repeatedly (up
to 300 times) until the device to be controlled
changes channel. The red indicator blinks off
with each button press. If you accidentally
overshoot the code required, press the
CHANNEL DOWN button to backtrack through
the library until the device changes channel.
Pressing CHANNEL UP changes direction to
forward again.
5. Press and release ENTER to install the code.
Most users store DVD codes under DVD. Cable
codes appear under CBL, etc. If you want to store
a Satellite code under CBL, for example, fi rst fol-
low the procedure for Direct Code Entry and select
CBL in Step 2 of Direct Code Entry. Then enter
any Satellite code in Step 3 of Direct Code Entry.
Then follow the steps above for Code Search.
Note: Code Search starts from the currently
stored 4 digit number under that mode. Sometimes
the fi rst code that “works” with your device may
only allow limited functionality (e.g. the MENU
button might not work). There may be a code
that performs more functions. Continue the code
search process until the best code is found.
8
Page 9

Code Identifi cation Feature
Code Identifi cation Feature
The Code Identifi cation Feature allows you to
identify the 4 digit library code stored under your
device key. For example, if you want to fi nd out
what 4 digit code is stored under your TV device
key, follow the six steps below:
1. Press and hold the SETUP button until the red
indicator stays on. Release the SETUP button.
2. Press and release the desired mode button
(TV, DVD, etc.). The red indicator blinks, then
stays lit.
3. Press and release the SETUP button. The red
indicator blinks off.
4. To fi nd the fi rst digit for the code stored under
the mode key pressed in step 2, press each
numeric key from 0-9 in turn. When the red
indicator blinks off the number you pressed is
the fi rst digit for the code you are searching for.
5. To fi nd the second digit, repeat step 4, this
time when the red indicator blinks off this is the
second digit.
6. Repeat step 4 to fi nd the third and fourth digits.
9
Page 10

Setup
Programming Combo Device Codes
Some combo (combination) devices (TV/DVR, TV/
DVD, DVD/DVR, etc.) require you to set up 2 different modes to control both parts of the combo.
For example, if you have a TV/DVD combo, you
might need to set up one code under the TV mode
to control the TV and a separate code (under other
modes) to control the DVD.
DVD/DVR Punch-Through Feature
This remote allows the 6 DVD/DVR transport
buttons (i.e. PLAY, PAUSE, STOP, FF, REWIND,
and REC) to operate the programmed TV, DVD,
SAT, DVR, Cable device if the code has these
button functions e.g. if you hvae programmed
a SAT/DVR or Cable/DVR, etc. Otherwise the
transport keys will punch-through to the last DVD
or VCR programmed mode you used, i.e., the
transport buttons control your DVD or VCR player
even when you are in TV, SAT or Cable mode. If
you want to enable this Punch-through feature to
allow the transport keys to always control your last
used DVD or VCR, please use the following steps:
1. Press and hold SETUP until the red indicator
stays on, then release the SETUP button.
2. Press and hold PAUSE until the red indicator
turns off, then release the PAUSE button. The
PAUSE button needs to be held held for about
3 seconds before the red indicator turns off.
The punch-through feature can be disabled again
by repeating the above steps.
Volume/Mute Control and PunchThrough Feature
Your remote allows you to select which device
mode controls VOLUME and MUTE. This remote
is initially set for all device modes to use their own
Volume/Mute control if present.
If the programmed code does not have Volume/
Mute operation, then VOLUME and MUTE will
“punch-through” (hand-over) control to the TVmode device without you needing to change to TV
mode. Note: Any mode chosen for Volume/Mute
control must have its own Volume/Mute function or
else VOLUME and MUTE will not function.
10
Page 11

Setup (cont.)
Setting ALL Volume/Mute Controls to
Any Mode
You can set all modes to “punch-through” to any
mode for Volume/Mute control without needing to
change to that mode by doing the following.
1. Press and hold SETUP until the indicator
remains on, then release SETUP.
2. Press and hold MUTE until the indicator blinks
off, then release the button.
3. Press and release SELECT to select the
desired mode (TV, DVD, etc.) for Volume/Mute
control; the indicator blinks, then stays on.
4. Press and release MUTE; the indicator turns
off. Note: The indicator will blink rapidly for 3
seconds if the mode you have selected does
not have Volume/Mute control.
5. All other modes will now “punch-through” to
your chosen mode for Volume/Mute control.
Setting Any Mode to Use its Own
Volume/Mute Control
You can set any mode to use only its own Volume/
Mute control.
Note: If your chosen mode does not have Volume/
Mute functions, then this remote’s VOLUME and
MUTE will not operate.
1. Press and hold SETUP until the indicator
remains on, then release SETUP.
2. Press and hold MUTE until the indicator blinks
off, then release the button.
3. Press and release SELECT to select the
desired mode (TV, DVD, etc.); the indicator
blinks, then stays on.
4. Press and release VOLUME- (down); the
indicator blinks, then stays on.
5. Press and release MUTE; the indicator turns
off.
6. All modes will now “punch-through” to the
respective modes you have chosen for Volume/
Mute control.
11
Page 12

Tips On Learning (cont.)
The learning feature lets you “learn” functions
from your original remote control. For example
- you may want to use your remote to operate
the RANDOM PLAY feature from your original
CD remote control. This remote is equipped with
an “easy learning” feature that lets you “learn”
features (such as RANDOM PLAY from your
original CD remote).
Tips on Learning
You can only learn one device type under any one
Mode button e.g. only learn TV codes under the
TV Mode, DVD codes under the DVD Mode, etc. If
you are trying to learn from a “Universal” remote, it
might have more than one code type stored under
a Mode. Try learning from another remote to see if
there’s a problem with the type or brand of remote
you are trying to learn from.
a. Some functions from some types of remotes
might not be able to be learned.
b. No functions may be stored under LEARN,
SETUP, or BACKLIGHT buttons.
c. Only one original device type can be learned
per individual Mode.
d. Use fresh batteries for both the Learning
Remote and the Original Remote.
e. Keep at least three feet away from
incandescent or low-energy lights when
learning.
f. Perform a Master Clear (see page 16) before
learning and try learning 2 or 3 commands
initially. Then carry out a Master Clear before
completely learning your original remote’s
commands.
12
Page 13

Code Learning
g. Place the original remote end-to-end with the
Learning Remote so the IR transmitters on both
remotes are directly in line with each other. You
may need to adjust the height of either remote
to achieve this. Use the IR Transmitter Finder
feature to assist you.
h. Keep the distance between the two remotes
to approximately 1 inch and do not move or
change the distance between the two remotes
until you have learned all the required buttons
for that Mode.
i. When Learning, do not release the button being
Learned until the red indicator has blinked off
for half a second.
j. Avoid learning your original remote Volume/
Mute buttons unless you are sure these operate
the same device e.g. some original DVD
remotes include TV Volume/Mute button control
and can be two different types of code.
k. Avoid learning your original remote DVD
transport buttons unless you are sure these
operate the same device e.g. some original TV
remotes include DVD button control and can be
two different types of code.
l. If learning the fi rst or second buttons for a
Mode results in continuous errors then try the
following:
i. End the Learn session by pressing the SETUP
button.
ii. Clear out the learned commands for that Mode.
iii. Check the IR transmitters are correctly
aligned between the two remotes (use the IR
Transmitter Finder facility).
iv. Adjust the distance between the two remotes
to be closer (e.g. half an inch) or a further away
(e.g. 2 inches) from each other.
v. Try learning the original remote for that Mode
again.
If problems reoccur with the same button check
the original remote button being learned – does it
transmit? Does it operate the target device? Try
learning that button under a different clear Mode.
If it learns okay then it is likely to be a different
code type from the others and cannot be learned
under the same Mode.
13
Page 14

IR Transmitter Finder
This feature assists you in identifying where your
original remote’s IR transmitter is located and
is particularly useful if your original remote’s IR
transmitter is hidden behind a lens.
1. Point both remotes facing each other by
approximately 1 inch apart (see Tips on
Learning on previous pages).
2. Press and hold the SETUP button until the red
indicator turns on, then release the button.
3. Press and release the desired Mode button (TV,
DVD, etc.), the red indicator blinks then stays
on.
4. Press and release the LEARN button, the red
indicator blinks then stays on.
5. Press and hold any Original Remote button
and move the Original Remote to the left
and right, and/or, up and down in front of
the Learning remote IR transmitter. The
red indicator will remain on if no IR from the
Original remote is found and the red indicator
will blink on and off more rapidly when the IR
transmitters are lining up. The point where the
red indicator blinks most rapidly is where the
two IR transmitters are aligned. Note some
original remotes will only transmit IR on the
initial button press then stop. In these cases,
quickly press and release the original remote
button repeatedly during this procedure.
6. You can now learn a button from your original
remote by continuing from “Step 4” in the
“Learning Commands” section on the next
page, or, to exit at this point, press and release
the SETUP button
14
Page 15

tv
learn
setup
aspect
amp
aux
cbl
dvr
dvd
sat vcr
light
page
page
no yes
Learning Commands
0
8
7
9
+100
enter
1. Press and hold the SETUP button until the red
indicator turns on, then release the button.
2. Press and release the desired mode button
(TV, DVD, etc.), the red indicator blinks then
stays on.
3. Press and release the LEARN button, the red
indicator blinks then stays on.
4. Press and release the Learning Remote button
that you want to teach (e.g. POWER).
5. Point both remotes facing each other by ap-
proximately 1 inch apart (see tips on page 12).
6. Press and hold the Original Remote button
(e.g. Power) until the red indicator blinks once
and stays on. If there is a learning problem, the
indicator blinks for three seconds and stays on.
If this happens, repeat Steps 4 to 6.
7. Repeat Steps 4-6 for other buttons you want to
learn.
8. Press and release the SETUP button when all
desired remote commands are learned. Code
Learning is now complete.
2.
1.
Line up your remotes (that you’re learning from)
in front of the learning remote on a hard surface
approx. 1-inch apart.
15
4.
3.
6.
Page 16

Clearing Commands
To Clear all Learned Commands under
a mode
1. Press and hold the SETUP button until the red
indicator turns on. Release the SETUP button.
2. Press and release the button for the mode you
want to clear (TV, DVD, etc.). The red indicator
blinks off.
3. Press and release the LEARN button TWICE.
The red indicator blinks off.
4. Press and release the SETUP button. The red
indicator turns off. All learned Commands under
that mode are now cleared.
Master Clear - To Clear all Learned
Commands under all modes
1. Press and hold the SETUP button until the red
indicator turns on. Release the SETUP button.
2. Press and release the LEARN button TWICE.
The red indicator blinks off.
3. Press and release the SETUP button. The red
indicator turns off. All Learned commands in the
remote are now cleared.
16
Page 17

Troubleshooting
Remote does not operate your product
1. Select the mode for the product you want to
control.
2. Program the remote with a new code.
3. Install new batteries in the remote. (You might
have to reprogram your remote after installing
new batteries.)
4. If these steps do not work, the remote might not
be compatible with your product.
Remote does not operate some
features of your product
1. Program remote with a new code.
2. If this does not work, your remote might not be
able to operate all features of your product or
the button names might be different than your
product.
Indicator blinks after you program a
product code
1. This means the remote did not accept the code.
2. Try to program the code again or try a different
code.
Lost Your Codes?
Enclosed with this remote is a sticker on which
you should write the codes for each device you
programmed. Apply the sticker to the back of
the remote or somewhere convenient for future
reference.
Also on the sticker is our website address which,
should you lose your codes or programming
instructions, you can fi nd available on our website:
www.jascoproducts.com
17
Page 18

90 Day Limited Warranty
Jasco Products Company warrants this product
to be free from manufacturing defects for a period
of ninety days from the original date of consumer
purchase. This warranty is limited to the repair
or replacement of this product only and does not
extend to consequential or incidental damage to
other products that may be used with this unit.
This warranty is in lieu of all other warranties
express or implied. Some states do not allow
limitations on how long an implied warranty lasts
or permit the exclusion or limitation of incidental or
consequential damages, so the above limitations
may not apply to you. This warranty gives you
specifi c rights, and you may also have other rights
that vary from state to state. If unit should prove
defective within the warranty period, return prepaid
with dated proof of purchase to:
Jasco Products Company
10 E. Memorial Road
Oklahoma City, OK 73114-2205
18
Page 19

19
Page 20

24959
Universal Remote
Instruction Manual
Jasco Products Company
10 E. Memorial Road
Oklahoma City, OK 73114-2205
Manual Version 4
Made in China 24959-05/11
 Loading...