

Page 1
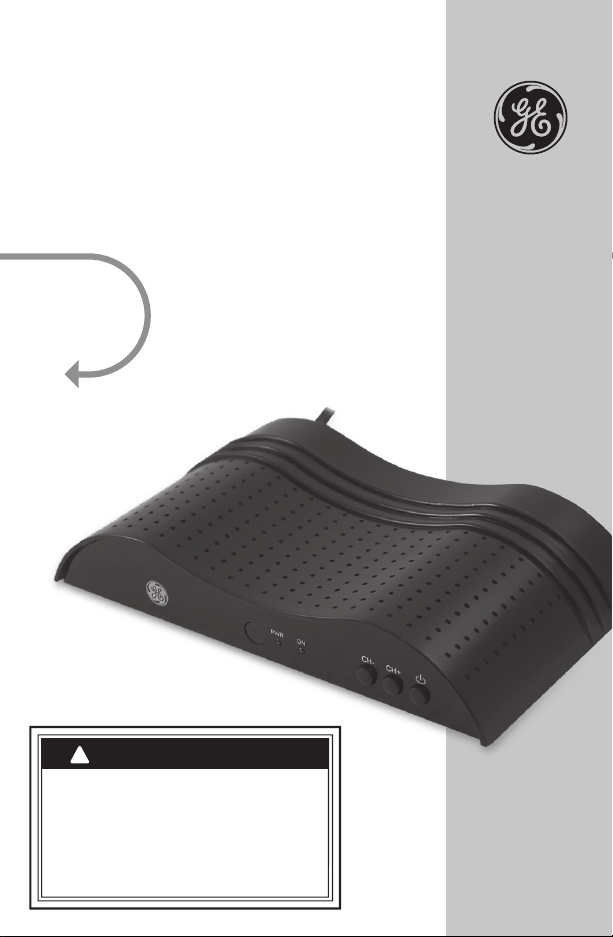
Digital Converter Box
Digital Converter Box will
automatically shut off
- For energy savings the unit is shipped with
sleep mode enabled at four hours as
required by the governing agency. To adjust
the setting or turn sleep mode off. See pg 14
IMPORTANT NOTICE
!
See Back
Cover for
SPECIAL
OFFER!
User’s Manual
Page 2

Table of
Contents Introduction 3
Warnings/Safety 5-7
Getting Started 8
Battery Installation 8
Converter Box 9
Remote 10
Connection 11
Converter Box Installation 11
Setup 12
Navigating the Menu 13
Apps 13
Channels 14
Screen Format 15
Parental Control 15-16
Closed Caption 17
Time Zone 18
Factory Default 18
Features 19
Troubleshooting 20-21
FCC 22
Specifications 23
2
Warranty 23
Page 3

The Digital Transition
Congratulations you are now prepared for the
digital transition. When analog signals end,
you will not be left with a blank screen on the
TV. Instead, the GE Digital Converter Box will
receive the new digital signals and convert
them so you can continue to watch free
“over-the-air” broadcasts on your analog TV.
It is truly an exciting time in television
history. In the same way, the black & white
transformation to color dramatically improved
the TV. Digital Television will heighten your
TV experience.
Advantages digital television has to offer
include superior picture quality, improved
sound quality, electronic programming guide
and more channels. That’s right! Depending
on the broadcast area; you may receive two,
three, or even four more times the channels.
Thank you for choosing GE!
3
Page 4
Risk of electric shock
• Keep children away
• Do not use in wet locations
Risk of fire
• Do not exceed electrical
ratings
WARNING
To reduce the risk of
electric shock
• Do not take the cover off
• No part of the receiver can
be repaired by the user
• Please consult a qualified
technichian for any repairs
WARNING
Safety
CAUTION
RISK OF ELECTRIC SHOCK
DO NOT OPEN
CAUTION: TO REDUCE THE RISK OF ELECTRIC
SHOCK, DO NOT REMOVE SCREWS.
NO USER-SERVICEABLE PARTS INSIDE.
REFER SERVICING TO QUALIFIED
SERVICE PERSONNEL.
Precautions
The lightning flash with arrowhead symbol within an
equilateral triangle, is intended to alert the user to the
presence of uninsulated “dangerous voltage“ within the
product’s enclosure that may be of sufficient magnitude to
constitute a risk of electric shock to persons.
The exclamation point within an equilateral triangle is
intended to alert the user to the presence of important
operating and maintenance (servicing) instructions in the
literature accompanying the product.
WARNING:
To prevent fire or shock hazard, do not expose this device
to rain or moisture. Dangerous voltage is present inside the
product. Do not remove the product enclosure.
4
CAUTION:
Insert the power plug into the wall outlet with AC power of
120V/50-60HZ. The AC plug is polarized and will only go in
the socket one way. Contact a licensed electrician, if you
can not get the plug to fit securely in the socket.
Page 5

Important
Safety Notes
1. INSTRUCTIONS:
Read and follow all safety and operating
instructions before operating this product.
Heed all warnings on the product and all
warnings contained in the user’s manual.
Be sure to keep these instructions for
future reference.
2.
CLEANING:
Use a dry cloth only.
3. VENTILATION OPENINGS:
Never block the ventilation openings on the
enclosure of the product. Do not place anything
on top of the product. Avoid operating the Digital
Converter Box in enclosed areas like cabinets and
bookcases. Do not place the product on soft
surfaces such as a bed, sofa, carpet, rug, near
drapes, curtains, or walls.
4. OBJECT AND LIQUID ENTRY:
Never push objects of any kind into the ventilation
openings of this product. Doing so may result in
personal or property damage or injury, including
fire or electrical shock. Never spill liquid of any kind
on the product.
5. HEAT:
6. POLARIZED PLUG:
For safety reasons, this product is equipped with
a polarized alternating current line plug with one
blade wider than the other. It will only fit into the
AC wall socket one way. Do not attempt to defeat
the safety feature of the polarized plug. If you
have difficulty fully inserting the plug, contact a
licensed electrician for help.
7. POWER CORD PROTECTION:
The power cord of this product should be routed
to avoid being walked on or pinched at plugs,
receptacles and the point where exiting from
the Digital Converter Box.
8. ATTACHMENTS:
Install product away from any heat sources such
as radiators, heat registers, stoves, or other devices
that generates heat. Avoid placing the Digital
Converter Box on top of all potential heat sources
like amplifiers.
Only use attachments and accessories
recommended by the manufacturer.
5
Page 6

Important
Safety Notes
9. LIGHTNING:
Power surges that may occur due to lightning can
damage sensitive electronics. Unplug the product
from wall power and disconnect the antenna
from the Digital Converter Box during lightning
storms and when unused for long period of times.
10. SERVICING:
There are no user serviceable parts within
this product. This product should be serviced
by qualified personnel only. Do not attempt
to service this product yourself. Servicing is
required when the product has been damaged
in any way, such as power supply cord or plug
is damaged, liquid has been spilled or objects
have fallen into the Digital Converter Box, the
Digital Converter Box has been exposed to rain
or moisture, does not operate normally, or has
been dropped.
11. OVERLOADING:
Do not overload wall outlets, extension cords
or convenience receptacles as this can result
in a risk of personal or property damage or
injury, including fire or electric shock. Always
operate any electrical device in accordance with
applicable electrical codes.
12. WATER AND LIQUIDS:
Do not use this product near any sources of
water such as a bath tub, kitchen sink,
swimming pool, basement, washing machine.
Never expose the apparatus to dripping or
splashing or place items such as vases,
aquariums, any other item filled with liquid, or
candles on top of the Digital Converter Box.
6
Page 7

Important
Antenna Lead-In Wire
Ground Clamp
Electric Service
Equipment
Antenna Discharge Unit
(NEC Section 810-20)
Grounding Conductors
(NEC Section 810-21)
Grounding Clamps
Power Service Grounding
Electrode System
(NEC Art 250, Part H)
Safety Notes
13. ELECTRIC SHOCK:
Do not remove the enclosure of the product.
There are no user-serviceable components.
All service/repair should be carried out by
qualified personnel.
14. POWER SOURCE:
Use only the type of power source indicated in
the product specifications. If you are uncertain
about the power supplied to your home, consult
a certified electrician.
15. SMOKE:
If the device should emit smoke or unusual odor,
immediately disconnect the power cord from
the wall outlet. Have the Digital Converter Box
serviced by a licensed technician.
16. BATTERIES:
Spent or discharged batteries must be recycled
or disposed of properly in compliance with
all applicable laws. For detailed information,
contact your local county solid waste authority.
17. Keep a 4 inch minimum distance around the
Digital Converter Box for sufficient ventilation
18. Outdoor Antenna Grounding:
If the outside antenna is connected to the digital
Converter Box, make sure the antennas system
is grounded. This will provide some protection
against built-up static charges and voltage
surges. Article 810 of the National Electrical
Code, ANS/NFPA 70 provides information
with regard to proper grounding of the
mast and supporting structure, grounding of
the lead-in wire to an antenna-dicharge unit,
size of grounding conductors, location of
antenna-dicharge unit, connection to grounding
electrode, and requirements for the electrode.
7
Page 8
OK
1
2
9
8
7
65
4
3
0
-
100
ON/OFF
VOL+
CH+
VOL-
RECALL SIGNAL ZOOM MUTE
AUDIO INFO
EXIT MENU SUBTITLE EPG
CH-
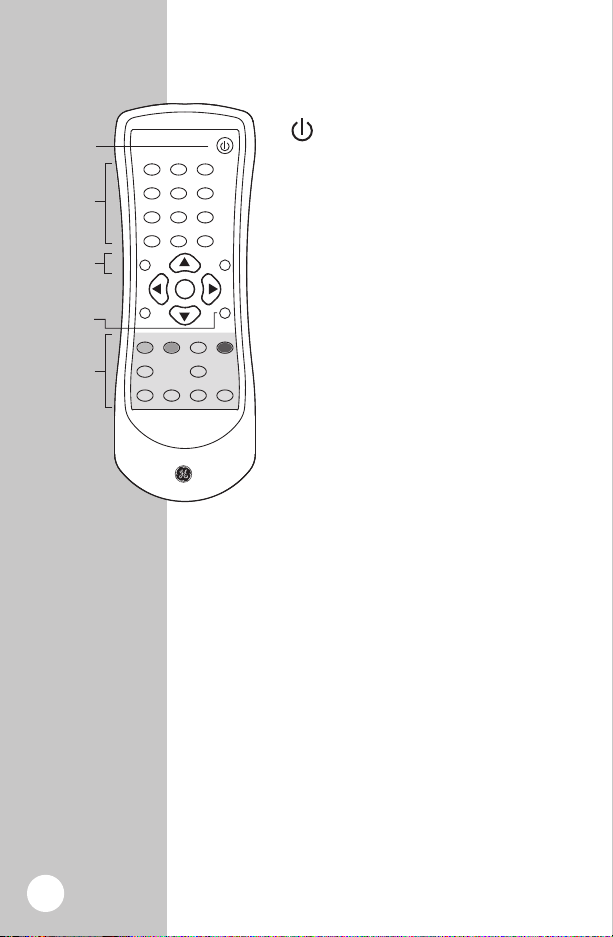
Remote
Getting Started
PWR
ON
CH- CH+
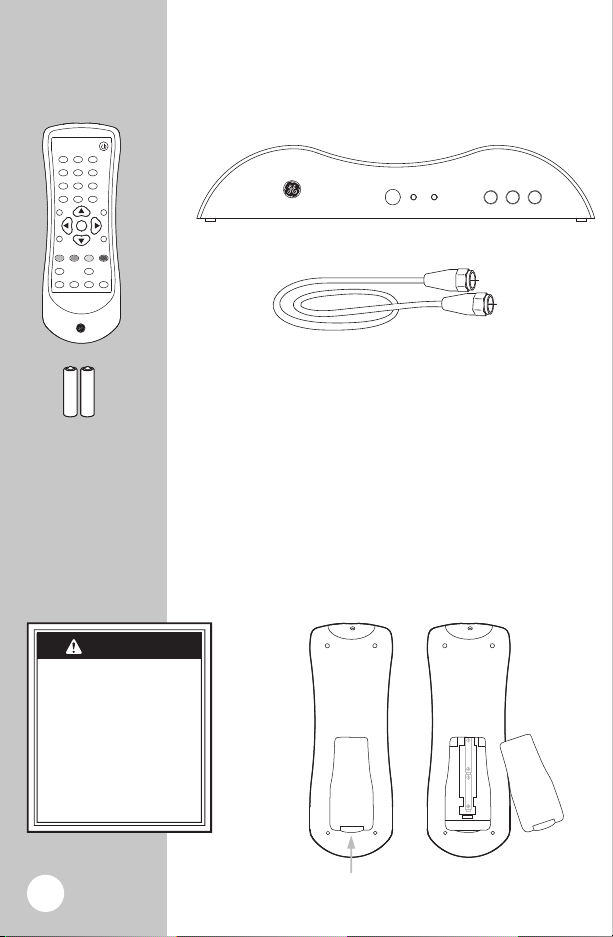
Smart Digital Converter Box - 22729 or
Digital Converter Box - 22730
+-+
-
“AAA” batteries
RF Cable
Batteries may leak harmful
liquids or ignitable materials
or explode causing injury
and product damage.
• Do not mix old and new
or other battery types.
• Replace all batteries at
the same time.
• Replace fully discharged
batteries immediately.
CAUTION
AAAAAA
Push
Below are all the items that are included with
your Digital Converter Box
You can use a composite audio/video cable instead of the RF cable if
your TV is compatible. (Not Included)
Installing the Remote batteries
1. On the back of the remote, push up on the tab
and lift the cover off.
2. Match the batteries to the + and -
the battery case, then insert 2 “AAA”
Alkaline batteries.
3. Press the battery cover back
marks inside
into place.
8
Page 9
PWR ON
CH-
ANT IN ANT OUT CH3 CH4 R L VIDEO
AUDIO
CH+
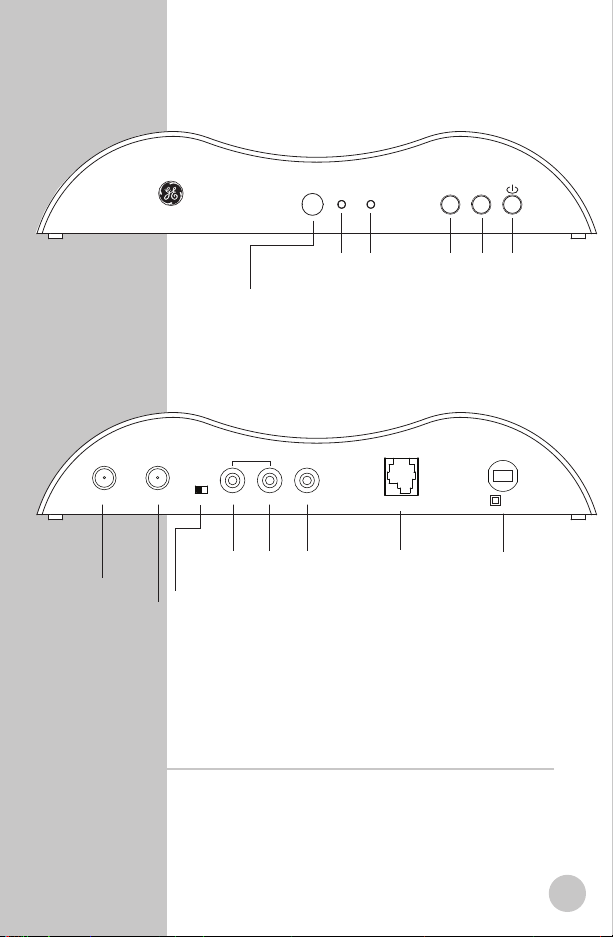
Front
Back
Smart Antenna
100~120VAC
60Hz
Consumption : 10W MAX
Connection for a
Smart Antenna
(Not included in
some models)
Power light,
always on when
plugged in
Green light
on when
box is “ON”
Infared
sensor
Turns power
ON/OFF
Channel
Down
Channel
up
Plugs in to wallVideo Output
(Yellow)
Audio Lft
(White)
Audio Rt
(Stereo/Red)
Channel selection
(only needed if
ANT OUT is used)
Antenna Port
TV Port
Converter Box
Digital Converter Box will shut off automatically
For energy savings the Digital Converter Box is shipped
with sleep mode enabled at four hours as required by the
governing agency. To adjust the setting or turn sleep mode
off go to pg 14.
9
Page 10
OK
1
2
9
8
7
65
4
3
0
-
100
ON/OFF
VOL+
CH+
VOL-
RECALL SIGNAL ZOOM MUTE
AUDIO INFO
EXIT MENU SUBTITLE EPG
CH-
Channel numbers
Channel up
or down
Volume up
or down
Power ON/OFF
Menu Setup
Remote
Power ON/OFF
Control
AUDIO - Function not available on these models.
INFO - Program information of the selected channel.
EXIT - Returns to the previous Menu within the
larger menus.
MENU - Displays the main Menu on screen.
SUBTITLE - Displays closed caption text.
EPG - Use to display the Simple Guide.
- Turns the Smart Digital Converter
Box ON or OFF.
OK - Executes the selected option in
menu or enters the value in any input
mode or it displays the channel list while
watching a program.
VOL+/VOL - Increases or decreases the
volume out of the Digital Converter Box.
CH-/CH+ - Goes up or down through
the channel numbers.
Menu Setup
RECALL - Return to previous channel
SIGNAL - Check signal reception
strength of the channel you are
watching. Use to optimize placement of
the antenna.
ZOOM - Choose between three screens
settings letter box, full and center.
MUTE - Turns sound off.
10
Page 11

Connecting
ANT IN ANT OUT CH3 CH4 R L VIDEO
AUDIO
Back
Smart Antenna
100~120VAC
60Hz
Consumption : 10W MAX
Select Channel 3 or 4
ANT IN ANT OUT CH3 CH4 R L VIDEO
AUDIO
Back
Smart Antenna
100~120VAC
60Hz
Consumption : 10W MAX
Red
White
Yellow
Converter Box
1. Connect either a
standard antenna
into the ANT IN port
or a Smart Antenna
into both the Smart
Antenna port and
ANT IN port.
2.
Connect the TV
from the ANT OUT
port to TV’s.
3. Select channel 3 or
4 on the converter box
(choose the channel
not used in your area).
Turn your TV to the
same channel
4. Plug-in to AC
Connecting TV with RF Cable (included)
Smart Antenna
is a feature in
Model 22729
1. Connect either a
standard antenna
into the ANT IN port
or a Smart Antenna
into both the Smart
Antenna port and
ANT IN port.
2.
Connect from the
converter box to the
TV’s A\V inputs using
Composite Cables
(make sure that
the color matches
the port).
3. Set TV to
proper input
4. Plug-in to AC
Connecting TV with Composite Audio/Video Cables
(not included)
11
Page 12
Setting up
OK
1
2
9
8
7
65
4
3
0
-
100
ON/OFF
CH+
CH-
OK
1
2
9
8
7
65
4
3
0
-
100
ON/OFF
VOL+
CH+
VOL-
RECALL SIGNAL ZOOM MUTE
AUDIO INFO
EXIT MENU SUBTITLE EPG
CH-
the Converter
Box on Screen
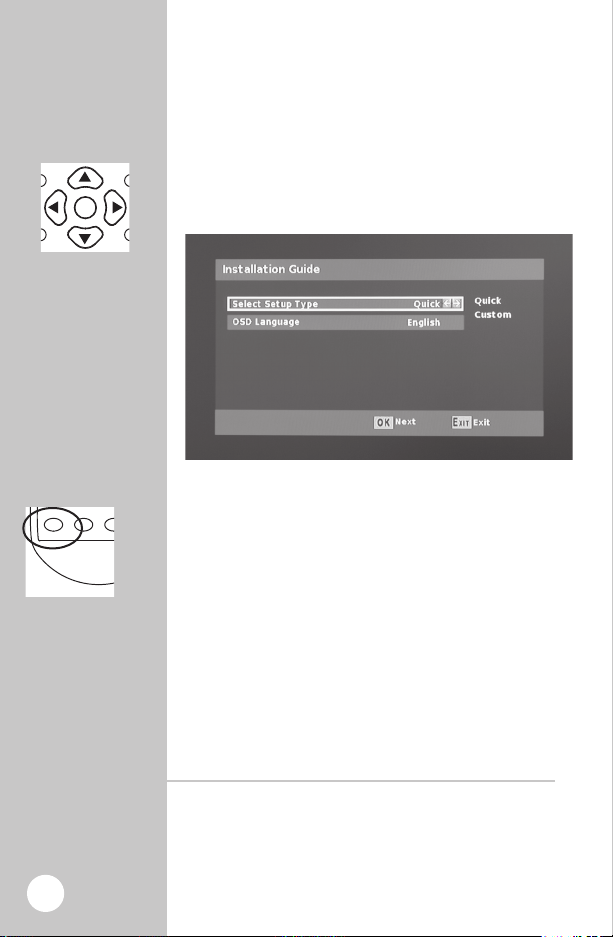
Arrows let you
navigate through
the menu screens.
Setup
When first plugged-in the menu guide will
show up on the screen. First, you will need to
choose a “Quick” or “Custom” install. “Quick” is
recommended for most users .
1. Choose either “Quick” or “Custom” Install.
2. If you choose the Quick install hit the OK button.
Now that you are in the Scan screen
1. The initial scanning will take about three to four
minutes. While the Converter Box is scanning, it is
programming your new HD channels. When the
scanning is complete, press “EXIT” to start viewing
your TV.
12
Digital Converter Box will shut off automatically
For energy savings the Digital Converter Box is shipped
with sleep mode enabled at four hours as required by the
governing agency. To adjust the setting or turn sleep mode
off go to pg 14.
Page 13

Navigating
the Menus
1. Press the “MENU” button on the remote. The screen
below will appear.
2. Use the “Up/Down” arrow buttons to select either
Channel, Setup, or Info. Press “OK” on the remote.
Use the “Up/Down” arrow buttons to navigate to
3.
the desired option. Press “OK” on the remote.
Once the desired setting has been selected using
4.
the arrow button, press the “EXIT” key to return to
the settings menu or press menu key to return to
normal operation. Settings will automatically be
stored in memory.
Menu Options
Menu : Apps : Simple Guide
1. This feature displays programming information for
current channel.
Menu : Apps : Full Guide
2. This feature displays programming information
for current and different channels. When
broadcasted, up to 8 days of programming
information may be viewed.
13
Page 14
OK
1
2
9
8
7
65
4
3
0
-
100
ON/OFF
CH+
CH-
Menu Options
Channel
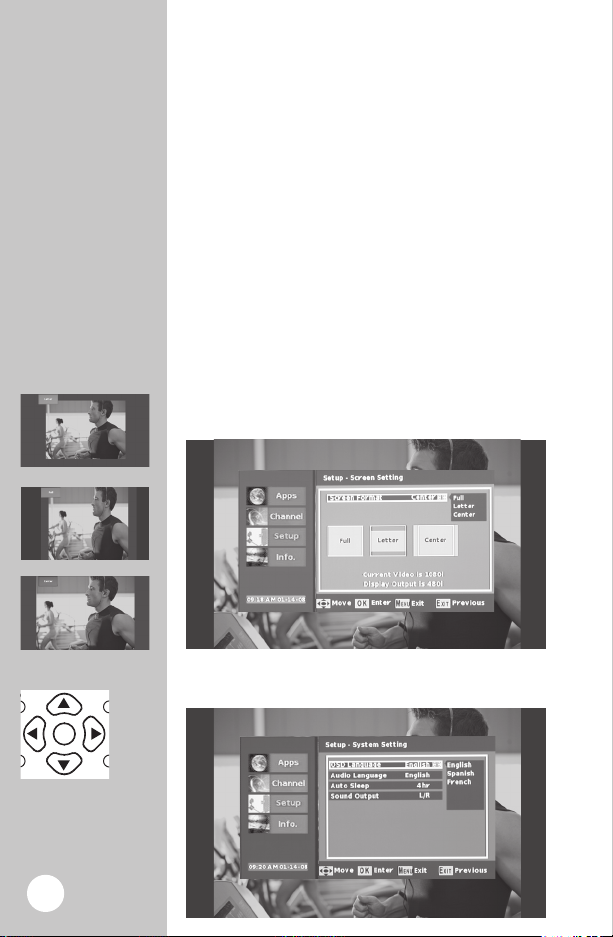
3 Screen Formats
Menu : Channel : Auto
1. Use this feature to scan for all available channels.
This feature is used during the setup process and
typically does not need to be repeated.
Menu : Channel : Manual
2. Use this feature to scan for a specific channel.
Digital channels maybe broadcasted at a different
frequency then the old analog channel. This means,
for example, channel 5 maybe broadcasted where
channel 32 used to be. The automatic scan feature
is recommended for most users.
Menu Options
Menu : Setup : Screen Setting : Screen Format
1. Choose the format you prefer for your TV. There
are three sizes, Letter box, Full, or Center.
Note: Use “EXIT” on your remote to return to
previous menu screen.
14
Page 15
Menu Options
OK
1
2
9
8
7
65
4
3
0
-
100
ON/OFF
CH+
CH-
Screen Format
Each of the rating
setting pages are
easy to maneuver
thru, use the
arrow key to
your selection.
Press “OK” when
you would like
to choose your
selection.
Menu : Setup : System Setting : OSD Language
Language: English, Spanish, or French
Select the language of the Converter Box text.
Menu : Setup : System Setting : Audio Languages
Audio Languages:
Displays the audio language chosen in either English,
Spanish, or French.
Menu : Setup : System Setting : Auto Sleep
Auto Sleep:
Default setting is 4 hours, you can adjust it to your
needs or turn it off.
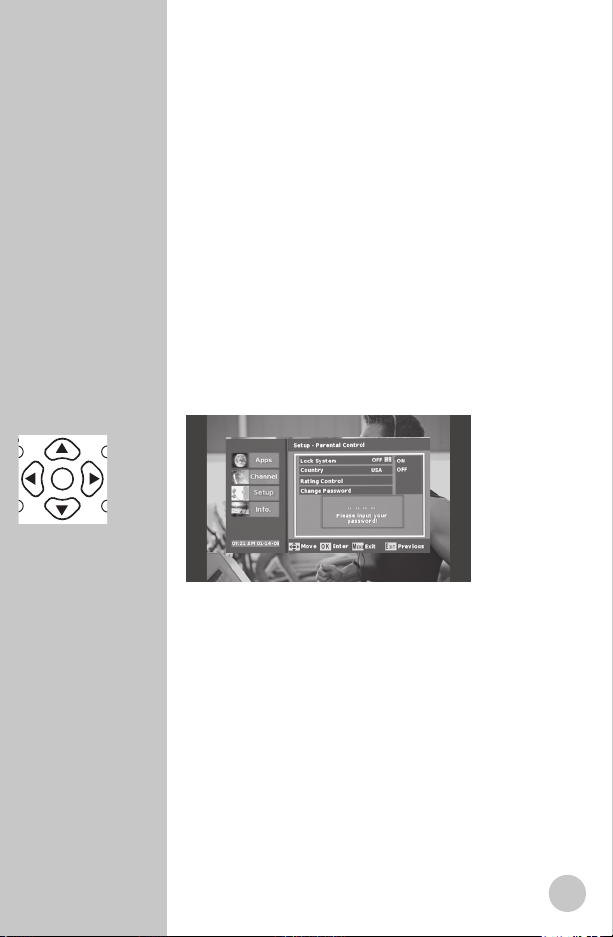
Menu Option
Menu : Setup : Parental Control
1. This is a great feature for parents that want to
control what their children view. You will need to put
in a password to access this function. The factory
setting is “1234”.
The rating control allows you to pick what parental
advisories that will be off limits to the kids. You will
get up to 3 different rating scales to choose from:
TV Rating: (FV, V, S, L, D)
- (FV) - Fantasy Violence
- (V) – Violence
- (S) – Sexual Situations
- (L) – Coarse Language
- (D) – Suggestive Dialogue
MPAA Rating: (G, PG, PG-13, R, NC-17, X, NR)
Digital Rating: (7+, 10+, 13+, 16+)
The Parental controls allows you to lock certain
channels, block specific movies or programs based
on different ratings that are available.
15
Page 16

Menu Option
OK
1
2
9
8
7
65
4
3
0
-
100
ON/OFF
VOL+
CH+
VOL-
RECALL SIGNAL ZOOM MUTE
AUDIO INFO
EXIT MENU SUBTITLE EPG
CH-
Parental Control
16
Setting up Parental Control:
A. Enter your pass code and turn on “Lock System”
B. Select either “TV Rating or MPAA Rating”, and
press “OK” on the remote.
C. Using the arrow left and right, you can arrow
over until “Allow All” is highlighted and arrow
down to select “Block All”.
D. Icons of locks will appear in all the blue squares
to indicate those channels and ratings have
been blocked.
E. Or use the up and down arrows to select the level
of rating. Use the left and right arrow to highlight
the blue box that you want to lock out; press
“OK”
and an icon of a lock will appear in the box.
Repeat this step to continue to block out
other ratings.
F. Press the “EXIT” button on the remote to return
to the settings menu or press menu key to return
to normal operation. Settings will automatically
be stored in memory.
Menu : Setup : Parental Control : Change Password
1. To change your password from the default
“1234”. Use the arrow keys up/down to select.
The change password box will pop up, use your
number keys to change the password. Re-enter
your new password to confirm.
Menu : Setup : Closed Caption
Closed caption formats types:
1. Analog mode (NTSC-CC)
Types of analog closed captions are TT1, TT2, TT3, TT4,
CC1, CC2, CC3, and CC4
2. Digital Mode (ATSC-CC)
Types of digital closed caption are Service 1-5
Page 17

Menu Option
Closed Caption
One of the benefits to Digital Closed Caption is
the display of captioning can be customized to the
viewers needs.
Caption Size
Captions can be displayed in different
Font sizes, options are:
Small, Standard or Large.
Foreground Color
Captions can be displayed in different Font color:
Red, Green, Blue, Yellow, Magenta,
Cyan, Black and White.
Foreground Opacity
Opacity will allow different shades of opaqueness
of the text. Options for Text opacity are;
Full、High、Half、Low、Zero.
Background Color
Caption can be displayed in different Font colors:
Red, Green, Blue, Yellow, Magenta,
Cyan, Black and White.
17
Page 18

Menu Option
Time Zone
Menu : Setup : Time Zone
Time Zone:
This function lets you choose which time zone that you are
located in. Hawaii, Alaska, Pacific, Mountain, Central,
or Eastern. Press the “EXIT” key to return to the settings
menu or press menu key to return to normal operation.
Settings will automatically be stored in memory.
Daylight Savings Time:
Auto daylight savings time function provides daylight
savings time in summer, and automatically switches back
to the normal timings in Winter. This option only works for
areas that support daylight savings.
18
Menu : Setup : Factory Default
1. Resets all settings back to factory default.
Page 19

Features
OK
1
2
9
8
7
65
4
3
0
-
100
ON/OFF
VOL+
CH+
VOL-
RECALL SIGNAL ZOOM MUTE
AUDIO INFO
CH-
Features
Antenna strength Indicator
Press the “SIGNAL” button on the remote. A screen
will appear and give you the details of the signal
quality and signal strength of the current channel.
Use this feature to optimize the antenna placement.
19
Page 20

Trouble
Shooting
Picture breaks up and freezes frequently.
- This indicates poor antenna reception.
- Use the signal indicator feature to determine
optimum position of receiving antenna.
- A better antenna may be required.
- Some channels may not have sufficient
signal in your area.
Message box : No signal
- Signal is not strong enough to view.
- Adjust the antenna
Poor sound quality or no sound
- Make sure TV volume is turned up to a
reasonable level.
- Make sure volume on converter box is at
medium level.
- Adjust the levels of TV volume and Digital
Converter Box volume to find optimum
combination of volumes to eliminate any noise.
- If using composite outputs, verify connections of
left and right composite inputs are hooked
up correctly.
- Make sure mute button is not enabled on TV or
Digital Converter Box.
Remote control does not work
- Install new batteries in the remote.
- Ensure batteries are aligned correctly, refer
to instructions (pg 8).
20
The Digital Converter Box box does not go to
the channel entered on the remote.
- With digital broadcasting each channel can
now have sub-channels. This requires the use
of the “DASH” button when selecting a channel.
For example, to watch channel 5, enter 5-1
on the remote.
Digital Converter Box box will not turn on
- Push the power button and wait 5 seconds.
Page 21

Trouble
Shooting
Digital Converter Box requires a short amount of
time to turn-on.
- Verify the Digital Converter Box is plugged
into AC power.
- Make sure remote has fresh batteries.
Does not receive specific channel anymore
- Use the signal indicator to optimize placement
of the antenna
- A better antenna may be required.
- Some channels may not have sufficient
signal in your area.
Digital Converter Box shuts off automatically
- For energy savings the Digital Converter Box is
shipped with sleep mode enabled at four hours
as required by the governing agency. To adjust the
setting or turn sleep mode off go to pg 14.
Error message reads no TV channels
- Make sure you have an antenna connected
to the Digital Converter Box.
- Adjust your antenna and re-scan for channels.
- Try a different/better antenna and re-scan
for channels.
It takes several seconds for a picture to
appear when I change channels
- This is normal.
- Digital signals have to be decoded unlike the old
analog signals.
If you press a command on the remote and
the converter performs a previous command
- The Digital Converter Box didn’t see the full
command. Release the button, make sure the
remote is pointed at the Digital Converter Box.
Re-press the command again. You may need to
reposition the Converter Box to be facing you.
Additional assistance can
be found at www.jascoproducts.com
21
Page 22

FCC WARNING
Any unauthorized changes or modifications to the
equipment would void the user’s warranty and may conflict
with both state and federal laws. The GE Digital Converter
Box complies with part 15 of the FCC rules. Operation is
subject to the following conditions:
1) The GE Digital Converter Box may not cause
harmful interference.
2) The GE Digital Converter Box may accept any interference
received including interference that may cause
undesired operation.
NOTE: This equipment has been tested and found to
comply with the limits for a Class B digital device, pursuant
to Part 15 of the FCC Rules. These limits are designed to
provide reasonable protection against harmful interference
in a residential installation. This equipment generates, uses
and can radiate radio frequency energy and, if not installed
and used in accordance with the instructions, may cause
harmful interference to radio communications. However,
there is no guarantee that interference will not occur in a
particular installation. If this equipment does cause harmful
interference to radio or television reception, which can be
determined by turning the equipment off and on, the user
is encouraged to try to correct the interference by one or
more of the following measures:
– Reorient or relocate the receiving antenna.
– Increase the separation between the equipment
and receiver.
– Connect the equipment into an outlet on a circuit
different from that to which the receiver
is connected.
– Consult the dealer or an
experienced radio/TV technician for help
22
Page 23

Specifications
Specifications
BROADCAST SIGNAL CONVERSION ATSC input/
NTSC output
DEMODULATION METHOD 8-VSB
VIDEO OUTPUT RF Output
(Coax)
Composite
Video
ANTENNA INPUT 75 ohm
F-connector
POWER REQUIREMENT AC 120V,
50/60Hz
POWER CONSUMPTION 10 watts, max/
Standby Mode:
2 watts max
DIGITAL CONVERTER 8.27 X 5.12 x
BOX DIMENSIONS 1.77 inches
21 x 13 x 4.5 cm
WEIGHT 2.2 lbs/1Kg
is a trademark of the General Electric Company and
is used under license to Jasco Products Company LLC,
10 E. Memorial Road, Oklahoma City, OK 73114.
This Jasco product comes with a 1 year limited warranty.
Visit www.jascoproducts.com for details.
22729-3
22730-3
23
Page 24

Decodificador Digital
El rectángulo del convertidor
de Digital apagará automáticamente
- para los ahorros de la energía la unidad se envía
con el modo del sueño permitido en cuatro horas
según los requisitos de la agencia que gobierna.
Para ajustar la configuración o dar vuelta a modo
del sueño apagado. Vea la paginación 14
AVISO IMPORTANTE
!
¡Vea detrás la
cubierta para la
OFERTA ESPECIAL!
Manual del Usuario
Page 25

Tabla de
Contenido Introducción 26
Advertencias/Seguridad 27-30
Para comenzar 31
Instalación de las baterías 31
Decodificador 32
Control remoto 33
Conexión 34
Instalación del decodificador 34
Configuración 35
Navigating the Menu 36
Canales 37
Formato de pantalla 37-38
Filtro para menores de edad 39
Subtitulado 40
Zona horaria 41
Defecto de fábrica 41
Características 42
Solución de problemas 43-44
FCC 45
Especificaciones 46
Garantía 46
25
Page 26

La transición digital
Felicitaciones: ahora usted está preparado
para la transición digital. Cuando las señales
analógicas lleguen a su fin, no quedará
pantalla en blanco en el televisor. Más bien, el
Decodificador Digital GE recibirá las nuevas
señales digitales y las convertirá para que
usted pueda seguir viendo emisiones “por
aire”, sin cargos, en su televisión analógica.
Es verdaderamente una época emocionante
en la historia de televisión. De la misma
manera que el paso del blanco y negro al color
mejoró de manera radical la televisión. La
televisión digital intensificará su experiencia
televisiva.
Entre las ventajas que la televisión digital
puede ofrecer están imagen de calidad
superior, sonido de calidad mejorada, guía
de programación electrónica y más canales.
¡Eso está muy bien! Según la zona de emisión,
usted puede recibir dos, tres o incluso cuatro
veces más los canales.
26
¡Gracias por escoger a GE!
Page 27

Riesgo de descarga eléctrica
• Mantenga alejados a los niños.
• No utilice en lugares húmedos.
Riesgo de incendio
• No exceda las
especificaciones eléctricas.
ADVERTENCIA
Para reducir el riesgo de
descarga eléctrica
• No quite la tapa.
• Ninguna parte del receptor
puede ser reparada por el
usuario.
• Por favor, consulte acerca
de las reparaciones con un
técnico calificado.
ADVERTENCIA
Precauciones
PRECAUCIÓN
RIESGO DE DESCARGA
ELÉCTRICA NO ABRIR
PRECAUCIÓN: PARA REDUCIR EL RIESGO DE
DESCARGA ELÉCTRICA, NO RETIRE
LOS TORNILLOS. NO INTENTE
REPARAR LOS COMPONENTES
INTERNOS. CONSULTE PERSONAL
DE SERVICIO CALIFICADO.
de seguridad
El símbolo de un rayo con punta de flecha dentro de un
triángulo equilátero alerta al usuario sobre la presencia de
“tensión peligrosa” sin aislamiento dentro de la cubierta
del producto que puede tener la magnitud suficiente para
constituir un riesgo de descarga eléctrica para las personas.
El signo de exclamación dentro de un triángulo equilátero
alerta al usuario sobre la presencia de importantes
instrucciones de funcionamiento y mantenimiento en la
literatura que acompaña el producto.
ADVERTENCIA:
Para evitar riesgo de incendio o descarga, no exponga
este dispositivo a la lluvia o a la humedad. Hay presencia
de voltaje peligroso dentro del producto. No retire la
carcasa del producto.
PRECAUCIÓN:
Inserte la clavija en la toma de pared con CA de 120 V/5060 HZ. La clavija de CA está polarizada y solamente podrá
insertarse de una manera. Comuníquese con un técnico
eléctrico licenciado, si la clavija no se adapta de manera
segura a la toma.
27
Page 28

Importantes
notas de
seguridad
28
1. INSTRUCCIONES:
Lea y siga todas las instrucciones de seguridad
y operación antes de poner en funcionamiento
este producto. Observe todas las advertencias del
producto y todas las advertencias contenidas en
el manual del usuario. Asegúrese de guardar estas
instrucciones para consultas futuras.
2.
LIMPIEZA:
Use un paño seco solamente.
3. ABERTURAS DE VENTILACIÓN:
No bloquee nunca las aberturas de ventilación en la
carcasa del producto. No coloque nada en la parte
superior del producto. Evite poner en funcionamiento
el Decodificador Digital en áreas cerradas como
gabinetes y bibliotecas. No coloque el producto
sobre superficies blandas tales como camas, sofás,
alfombras, tapetes, cortinas cercanas o paredes.
4. OBJETOS Y LÍQUIDOS:
No meta nunca objetos de ninguna clase en las
aberturas de ventilación de este producto. De
hacerlo, pueden presentarse lesiones a las personas
o daños a las propiedades, como incendios o
descargas eléctricas. No derrame nunca líquidos de
ningún tipo sobre el producto.
5. CALOR:
IInstale el producto lejos de fuentes caloríferas tales
como radiadores, rejillas de calefacción, estufas u
otros dispositivos que generen calor. Evite colocar el
Decodificador Digital en la parte superior de todas las
potenciales fuentes de calor como amplificadores.
6. CLAVIJA POLARIZADA:
Por motivos de seguridad, este producto viene con
una clavija de línea de corriente alterna polarizada
con una patilla más ancha que la otra. Solamente
se acomodará a la toma de CA de una manera. No
intente anular la característica de seguridad de la
clavija polarizada. Si tiene dificultades para insertar
completamente la clavija, busque ayuda con un
técnico eléctrico licenciado.
7. PROTECCIÓN DEL CABLE DE ALIMENTACIÓN:
El cable de alimentación de este producto debe
enrutarse para evitar que sea pisado o perforado
en las clavijas, tomas y el punto de salida del
Decodificador Digital.
8. ACCESORIOS:
Use solamente accesorios y aditamentos
recomendados por el fabricante.
Page 29

Importantes
notas de
seguridad
9. RAYOS:
Las sobretensiones que puedan presentarse debido
a rayos pueden dañar los componentes electrónicos
sensibles. Desconecte el producto del tomacorriente
y desconecte la antena del Decodificador Digital,
durante las tempestades con rayos y cuando no se
utilice durante largos periodos de tiempo.
10. MANTENIMIENTO Y REPARACIÓN:
No intente reparar los componentes de este
producto. El mantenimiento y las reparaciones
a este producto sólo deben hacerlos personal
calificado. No intente reparar usted mismo este
producto. Se requiere reparación cuando el
producto se ha dañado de alguna manera, por
ejemplo cuando se daña el cable de alimentación
o la clavija, se ha derramado líquido o han caído
objetos en el Decodificador Digital, se ha expuesto
el Decodificador Digital a la lluvia o a la humedad,
no funciona de manera normal o se ha caído.
11. SOBRECARGAS:
No sobrecargue los tomacorrientes o los cables
de extensión porque puede presentarse riesgo de
lesiones a las personas o daños a las propiedades,
como incendio o descarga eléctrica. Opere siempre
cualquier dispositivo eléctrico de acuerdo con los
códigos eléctricos aplicables.
12. AGUA Y LÍQUIDOS:
No use este producto cerca de fuentes de agua,
como una bañera, fregadero de cocina, piscina,
sótano, lavadora. No exponga nunca el aparato
a goteos o salpicaduras ni coloque objetos
como floreros, acuarios, o cualquier otro objeto
con líquido, ni velas en la parte superior del
Decodificador Digital.
29
Page 30

Importantes
Antena Conducir-En El Alambre
Descarga Eléctrica De la Antena Del
Equipo Del Servicio De la
Abrazadera De tierra
(NEC Section 810-20)
Poner a tierra Los Conductores
(NEC Section 810-21)
Servicio De Potencia De las Abrazaderas
Que ponen a tierra Que pone a
tierra El Sistema Del Electrodo
(NEC Art 250, Part H)
notas de
seguridad
13. DESCARGA ELÉCTRICA:
No retire la carcasa del producto. No intente reparar
los componentes internos. Las reparaciones y el
mantenimiento deben hacerlos solamente personal
calificado.
14. FUENTE DE ALIMENTACIÓN:
Use solamente la fuente de alimentación indicada
en las especificaciones del producto. Si usted no
está seguro acerca de la energía que tiene su casa,
consulte con un técnico eléctrico certificado.
15. HUMO:
Si el dispositivo emite humo u olores extraños,
desconecte inmediatamente el cable de
alimentación del tomacorriente. Haga que un
técnico eléctrico licenciado realice las reparaciones
y mantenimiento del Decodificador Digital.
16. BATERÍAS:
Las baterías desgastadas o descargadas deben
reciclarse o desecharse de manera adecuada
en cumplimiento de todas las leyes aplicables.
Para información detallada, comuníquese con las
autoridades locales para desechos sólidos.
17. Guarde una distancia mínima de 4 pulgadas
alrededor del rectángulo del convertidor de Digital
para la suficiente ventilación
18. El PONER A TIERRA AL AIRE LIBRE
DE LA ANTENA:
Si la antena exterior está conectada con el
rectángulo digital del convertidor, cerciórese de
que el sistema de las antenas esté puesto a tierra.
Esto proporcionará a una cierta protección contra
cargas y voltaje estáticos
30
Page 31

OK
1
2
9
8
7
65
4
3
0
-
100
ON/OFF
VOL+
CH+
VOL-
RECALL SIGNAL ZOOM MUTE
AUDIO INFO
EXIT MENU SUBTITLE EPG
CH-
Control remoto
Para comenzar
PWR
ON
CH- CH+
Decodificador Digital Inteligente - 22729 o
Decodificador Digital – 22730
+-+
-
Baterías “AAA”
Cable de RF
Las baterías pueden tener fugas de
líquidos perjudiciales o sustancias
inflamables o pueden explotar y
causar lesiones a las personas o
daños al producto
• No combine baterías nuevas con
usadas ni utilice diferentes tipos de
baterías.
• Reemplace todas las baterías al
mismo tiempo.
• Reemplace de inmediato las
baterías completamente descargadas.
PRECAUCIÓN
AAAAAA
Presione
Éstos son todos los ítems que vienen con su
Decodificador Digital
Se puede utilizar un cable compuesto de audio/video en lugar de cable
de RF si su televisor es compatible. (No se incluye).
Instalación de las baterías del
control remoto:
1. Presione hacia arriba la lengüeta en la parte
posterior del control remoto y levante la tapa.
2. Inserte dos baterías alcalinas tamaño “AAA”
de manera que correspondan con las marcas + y
– dentro del compartimiento.
3. Coloque nuevamente la tapa haciendo presión.
31
Page 32

PWR ON
CH-
ANT IN ANT OUT CH3 CH4 R L VIDEO
AUDIO
CH+
Parte frontal
Parte posterior
Smart Antenna
100~120VAC
60Hz
Consumption : 10W MAX
Conexión para una
Antena Inteligente
(No se incluye en
algunos modelos)
Luz siempre
encendida cuando
está conectado
Luz verde
encendida
cuando el
decodificador
está encendido
Sensor
infrarrojo
Apaga/Enciende
Canales
hacia
abajo
Canales
hacia
arriba
Se conecta a la paredSalida de video
(Amarillo)
Audio
izquierdo
(Blanco)
Audio derecho
(Estéreo/Rojo)
Selección de canales
(se necesita solamente
si se usa ANT OUT)
Puerto de la antena
Puerto
del
televisor
Decodificador
32
El Decodificador Digital se apagará
automáticamente
Para ahorrar energía, el Decodificador Digital está equipado
con modo sleep habilitado para cuatro horas según lo exige
la institución responsable. Para ajustar la configuración o
apagar el modo sleep, consulte la pág. 14.
Page 33

OK
1
2
9
8
7
65
4
3
0
-
100
ON/OFF
VOL+
CH+
VOL-
RECALL SIGNAL ZOOM MUTE
AUDIO INFO
EXIT MENU SUBTITLE EPG
CH-
Números
de canales
Navegar por
los canales
Subir/bajar
volumen
Encendido/
Apagado
Configuración
de menús
Power ON/OFF
Control
remoto
- Enciende o apaga el Decodificador
Digital Inteligente.
OK – Ejecuta la opción seleccionada
en el menú o ingresa el valor cualquier
modo de entrada o visualiza la lista de
canales mientras ve un programa.
VOL+/VOL – Aumenta o reduce el
volumen del Decodificador Digital.
CH-/CH+ – Navega por los números de
canales.
Configuración de menús
RECALL – Regresa al canal anterior.
SIGNAL – Comprueba la intensidad de
recepción de la señal del canal que está
viendo. Use para optimizar la colocación
de la antena.
ZOOM – Escoja entre las tres
configuraciones de pantalla: buzón,
completo y central.
MUTE – Apaga el sonido.
AUDIO – Función no disponible en estos modelos.
INFO – Información del programa del canal
seleccionado.
EXIT – Regresa al menú anterior dentro de los menús
más grandes.
MENU – Visualiza en pantalla el menú principal.
SUBTITLE – Visualiza el texto de subtitulado.
EPG – Use para visualizar la Guía Simple.
33
Page 34

ANT IN ANT OUT CH3 CH4 R L VIDEO
AUDIO
Parte posterior
Smart Antenna
100~120VAC
60Hz
Consumption : 10W MAX
Seleccione el canal 3 ó 4
Conexión del
ANT IN ANT OUT CH3 CH4 R L VIDEO
AUDIO
Parte posterior
Smart Antenna
100~120VAC
60Hz
Consumption : 10W MAX
Rojo
Blanco
Amarillo
Decodificador
1. Conecte una
antena estándar
en un puerto ANT
IN o una Antena
Inteligente tanto en
el puerto Antena
Inteligente como en el
puerto ANT IN.
Conecte el televisor
2.
del puerto ANT OUT a
del televisor.
Seleccione el
3.
canal 3 ó 4 en el
decodificador (escoja
el canal no usado en
su zona). Coloque su
televisor en el mismo
canal.
4. Conecte a la CA.
Conexión del televisor al cable de RF (incluido)
El modelo 22729
presenta la
característica de
Antena Inteligente
1. Conecte una antena
estándar en un puerto
ANT IN o una Antena
Inteligente tanto
en el puerto Antena
Inteligente como en el
puerto ANT IN.
Conecte el
2.
decodificador a las
entradas A/V del
televisor usando los
cables compuestos
(asegúrese de que el
color corresponda con
el puerto).
Coloque el televisor
3.
en la entrada
apropiada.
Conecte a la CA.
4.
34
Conexión del televisión a los cables compuestos de
audio/video (no incluidos)
Page 35

Configuración
OK
1
2
9
8
7
65
4
3
0
-
100
ON/OFF
CH+
CH-
OK
1
2
9
8
7
65
4
3
0
-
100
ON/OFF
VOL+
CH+
VOL-
RECALL SIGNAL ZOOM MUTE
AUDIO INFO
EXIT MENU SUBTITLE EPG
CH-
del
Decodificador
en pantalla
Las flechas le
permiten navegar
por las pantallas
de los menús.
Configuración
Cuando se conecte por primera vez, aparecerá en
la pantalla la guía de menús. Primero, necesitará
escoger una instalación “Quick” (rápida) o
“Custom” (personalizada). Se recomienda la
instalación “Quick” en la mayoría de los casos.
1. Escoja entre instalación “Quick” o “Custom”.
2. Si usted escoge la instalación Quick, pulse el
botón Aceptar (OK).
Ahora que usted está en la pantalla de escaneado
1. El escaneado inicial durará aproximadamente
tres o cuatro minutos. Mientras el Decodificador
está escaneando, está programando sus nuevos
canales de HD (alta definición). Cuando haya
terminado el escaneado, presione “EXIT” para
comenzar a ver su televisión.
El Decodificador Digital se apagará
automáticamente
Para ahorrar energía, el Decodificador Digital está
equipado con modo sleep habilitado para cuatro horas
según lo exige la institución responsable. Para ajustar la
configuración o apagar el modo sleep, consulte la pág. 14.
35
Page 36

Navegación
por los Ajuste
1. Presione el botón “Ajuste” en el control remoto. Abajo
aparecerá la pantalla.
2. Use los botones de dirección “Arriba/Abajo” para
seleccionar Channel (Canal), Setup (Configuración) o Info
(Información). Presione “OK” en el control remoto.
3. Use los botones de dirección “Arriba/Abajo” para
navegar hasta la opción deseada. Presione “OK” en el
control remoto.
4. Una vez se haya seleccionado la configuración deseada
usando el botón de dirección, presione la tecla “EXIT”
para regresar al menú de configuraciones o presione la
tecla de menú para regresar a la operación normal. Las
configuraciones se guardarán automáticamente en la
memoria.
36
Opciones de Menú
Ajuste : Usos : Guia simple
1. Use esta característica para escanear todos los canales
disponibles. Esta característica se usa durante el proceso de
instalación y típicamente no necesita repetirse.
Ajuste : Usos : Guia completa
2. Use esta característica para escanear un canal
específico. Los canales digitales pueden emitirse en una
frecuencia diferente a la del antiguo canal analógico. Esto
quiere decir, por ejemplo, que el canal 5 puede emitirse
donde estaba el canal 32. Se recomienda la
característica de escaneo automático en la mayoría
de los casos.
Page 37

OK
1
2
9
8
7
65
4
3
0
-
100
ON/OFF
CH+
CH-
Opciones
de Menú
Formato de
pantalla
Ajuste : Canal : Auto
1. Escoja el formato que prefiera para su televisor. Hay
tres tamaños: buzón, completo o central.
Ajuste : Canal : Manual
2. Use esta característica para escanear un canal
específico. Los canales digitales pueden emitirse
en una frecuencia diferente a la del antiguo canal
analógico. Esto quiere decir, por ejemplo, que el
canal 5 puede emitirse donde estaba el canal
32. Se recomienda la característica de escaneo
automático en la mayoría de los casos.
3 formatos de
pantalla
Opciones de Menú
Ajuste : Ajuste de pantalla : Formato de Pantalla
1. Escoja el formato que prefiera para su televisor.
Hay tres tamaños: buzón, completo o central.
Nota: Use “EXIT” en su control remoto para regresar
a la pantalla de menú anterior.
37
Page 38

Opciones
OK
1
2
9
8
7
65
4
3
0
-
100
ON/OFF
CH+
CH-
de Ajuste
Filtro para
menores de edad
Cada una de
las páginas de
configuración de
clasificación es
fácil de manejar:
use la tecla de
dirección hasta
su selección.
Presione “OK”
cuando desee
escoger su
selección.
Ajuste : Setup : System Setting : OSD Language
Language: Idioma: Inglés, español o francés
Seleccione el idioma del texto del Decodificador.
Ajuste : Setup : System Setting : Audio Languages
Audio Languages:
Visualiza el idioma de audio escogido en inglés, español o
francés.
Ajuste : Setup : System Setting : Auto Sleep
Auto Sleep:
La configuración por defecto es de 4 horas; usted puede
ajustarlo a sus necesidades o apagarlo.
Opciones de Menú
Ajuste : Setup : Parental Control
1. Ésta es una excelente característica para los padres
que desean controlar lo que sus hijos ven. Para tener
acceso a esta función, será necesario que ingrese una
contraseña. La configuración de fábrica es “1234”.
El control de clasificación le permite escoger los
notificadores para padres que estarán por fuera
de los límites para los niños. Usted tendrá hasta 3
diferentes escalas de clasificación entre las cuales
escoger:
Clasificación de televisión: (FV, V, S, L, D)
- (FV) – Violencia fantástica
- (V) – Violencia moderada
- (S) – Situaciones sexuales
- (L) – Lenguaje crudo poco frecuente
- (D) – Diálogos sugestivos
Clasificación MPAA: (G, PG, PG-13, R, NC-17, X, NR)
Clasificación digital: (7+, 10+, 13+, 16+)
Los controles para padres le permiten bloquear
ciertos canales, bloquear películas o programas
específicos con base en diferentes clasificaciones
disponibles.
38
Page 39

Opciones de
OK
1
2
9
8
7
65
4
3
0
-
100
ON/OFF
VOL+
CH+
VOL-
RECALL SIGNAL ZOOM MUTE
AUDIO INFO
EXIT MENU SUBTITLE EPG
CH-
Menú
Filtro para
menores de edad
Configuración del filtro para menores de edad:
A. Ingrese su contraseña y encienda “Lock System”
B. Seleccione “TV Rating” (Clasificación de televisión)
o “MPAA Rating” (Clasificación MPAA) y presione “OK”
en el control remoto.
C. Usando la flecha izquierda y derecha, usted
puede desplazarse hacia arriba hasta seleccionar
“Allow All” (permitir todo) y desplazarse hacia abajo
para seleccionar “Block All” (bloquear todo).
D. Aparecerán íconos de bloqueo en todos
los recuadros azules para indicar que se han
bloqueado esos canales y clasificaciones.
E. O use las flechas arriba y abajo para seleccionar
el nivel de clasificación. Use la flecha izquierda y
derecha para seleccionar el recuadro azul que
usted desea bloquear; presione “OK” y aparecerá un
ícono de bloqueo en el recuadro. Repita este paso
para seguir bloqueando otras clasificaciones.
F. Presione el botón “EXIT” en el control remoto para
regresar al menú de configuraciones o presione
la tecla de menú para regresar a operación
normal. Las configuraciones se guardarán
automáticamente en la memoria.
Menu : Setup : Parental Control : Change Password
1. Para cambiar su contraseña por defecto
“1234 ”. Use las teclas de dirección arriba/abajo
para seleccionar. Aparecerá el cuadro de cambio de
contraseña; use las teclas numéricas para cambiar
la contraseña. Ingrese otra vez su contraseña nueva
para confirmar.
Menu : Setup : Closed Caption
Tipos de formatos de subtitulado:
1. Modo analógico (NTSC-CC))
Los tipos de subtitulados analógicos son: TT1, TT2, TT3,
TT4, CC1, CC2, CC3 y CC4
2. Modo digital (ATSC-CC)
Los tipos de subtitulados digitales son: Service 1-5
39
Page 40

Opciones de
Menú
Subtitulado
Uno de los beneficios del Subtitulado Digital
es que la visualización del subtitulado puede
personalizarse según las necesidades de los
televidentes.
Tamaño del subtitulado
El subtitulado puede visualizarse en diferentes
tamaños de fuente; las opciones son:
Pequeño, Estándar o Grande.
Color de primer plano
El subtitulado puede visualizarse en diferentes colores
de fuente: Rojo, Verde, Azul, Amarillo, Magenta, Cian,
Negro y Blanco.
Opacidad de primer plano
La opacidad permitirá diferentes sombras del texto.
Las opciones para la opacidad del texto son:
Completo Alto Medio Bajo Cero.
Color de fondo
El subtitulado puede visualizarse en diferentes colores
de fuente: Rojo, Verde, Azul, Amarillo, Magenta, Cian,
Negro y Blanco.
40
Page 41

Opciones
de Ajuste
Zona horaria
Ajuste : Formato del tiempo
Zona horaria:
Esta función le permite escoger en cuál zona horaria
usted está ubicado. Hawai, Alaska, Zona Pacífico,
Zona Montañosa, Zona Central o Zona Oriental.
Presione la tecla “EXIT” para regresar al menú de
configuraciones o presione la tecla de menú para regresar
a operación normal. Las configuraciones se guardarán
automáticamente en la memoria.
Horario de verano:
La función automática de horario de verano permite
ahorro energético en verano y cambia automáticamente
Ajuste : Disposición : Cambiar Contrasena
1. 1. Reinicializa todas las configuraciones a defecto
de fábrica.
41
Page 42

Características
OK
1
2
9
8
7
65
4
3
0
-
100
ON/OFF
VOL+
CH+
VOL-
RECALL SIGNAL ZOOM MUTE
AUDIO INFO
CH-
Características
Indicador de potencia de la antena
Presione el botón “SIGNAL” en el control remoto.
Aparecerá una pantalla que le dará los detalles
de la calidad y potencia de la señal para el canal
actual. Use esta característica para optimizar la
colocación de la antena.
42
Page 43

Solución de
problemas
La imagen se desintegra y se congela con
frecuencia.
- Esto indica recepción deficiente de la antena.
- Use la característica del indicador de señal
para determinar la posición óptima de la antena
receptora.
- Puede que se requiera una mejor antena.
- Puede que algunos canales no tengan suficiente
señal en su área.
Cuadro de mensaje : Sin señal
- La señal no es lo suficientemente fuerte para
poder verla.
- Ajuste la antena.
Calidad deficiente de sonido o ausencia de sonido
- Asegúrese de que el volumen del televisor está en
un nivel moderado.
- Asegúrese de que el volumen del decodificador
está en nivel medio.
- Ajuste los niveles del volumen del televisor
y del Decodificador Digital hasta encontrar la
combinación óptima de volumen para eliminar el
ruido.
- Si usa salidas compuestas, verifique que las
conexiones de las salidas compuestas izquierda y
derecha estén acopladas correctamente.
- Asegúrese de que el botón “Mute” no esté
habilitado en el televisor o Decodificador Digital.
El control remoto no funciona
- Instale baterías nuevas en el control remoto.
- Asegúrese de que las baterías estén alineadas
correctamente, consulte las instrucciones (pág. 8).
El Decodificador Digital no va al canal ingresado
en el control remoto.
- Con emisión digital cada canal puede tener ahora
subcanales. Esto requiere el uso del botón “DASH” al
seleccionar un canal. Por ejemplo, para ver el canal
5, ingrese 5-1 en el control remoto.
El Decodificador Digital no se enciende
43
Page 44

Solución de
problemas
44
- Oprima el botón de encendido y espere 5 segundos.
El Decodificador Digital requiere una corta cantidad
de tiempo para encenderse.
- Verifique que el Decodificador Digital esté
conectado a la CA.
- Asegúrese de que el control remoto tena baterías
nuevas.
Ya no recibe un canal específico
- Use el indicador de señal para optimizar la
colocación de la antena
- Puede que se requiera una mejor antena.
- Puede que algunos canales no tengan suficiente
señal en su área.
El Decodificador Digital se apaga automáticamente
- Para ahorrar energía, el Decodificador Digital está
equipado con modo sleep habilitado para cuatro
horas según lo exige la institución responsable. Para
ajustar la configuración o apagar el modo sleep,
consulte la pág. 14.
Mensaje de error dice que no hay canales de
televisión
- Asegúrese de que tiene una antena conectada al
Decodificador Digital.
- Ajuste su antena y escanee nuevamente los
canales.
- Intente con una antena diferente/mejor y escanee
nuevamente los canales.
La imagen necesita varios segundos para aparecer
cuando cambio de canal
- Esto es normal.
- Las señales digitales tienen que decodificarse a
diferencia de las antiguas señales analógicas.
Si usted presiona un comando en el telecontrol y el
convertidor realiza un anterior ordena
- el rectángulo del convertidor de Digital no vio
el comando completo. Release/versión el botón,
cerciórese de que el telecontrol es acentuado en
elconvertidor Box. Re-press de Digital el comandootra
vez. Usted puede
Additional assistance can
be found at www.jascoproducts.com
Page 45

ADVERTENCIA
DE FCC
Los cambios o modificaciones no autorizados que se
hagan al equipo anularán la garantía del usuario y
pueden entrar en conflicto con las leyes estatales y
federales. El Decodificador Digital GE cumple con la
Parte 15 de las normas de FCC (Comisión Federal de
Comunicaciones de Estados Unidos). La operación
está sujeta a las siguientes condiciones:
1) Puede que el Decodificador Digital no cause
interferencia perjudicial.
2) El Decodificador Digital puede aceptar la
interferencia recibida, incluida la interferencia que
pueda causar una operación no deseada.
NOTA: Este equipo ha sido puesto a prueba y
cumple con las limitaciones para dispositivos
digitales de Clase B, de acuerdo con la Parte 15 de
las normas de FCC. Dichos límites se diseñaron para
ofrecer suficiente protección contra interferencias
perjudiciales en instalaciones residenciales. Este
equipo genera, utiliza y puede irradiar energía de
radiofrecuencia y, si no se instala y utiliza de acuerdo
a las instrucciones, puede causar interferencia
perjudicial a las radiocomunicaciones. Sin embargo,
no se garantiza que no se presente interferencia en
una instalación en particular. Si este equipo genera
interferencia perjudicial en la recepción de radio o
televisión, lo cual puede determinarse apagando
y encendiendo el equipo, se aconseja al usuario
que intente una o más de las siguientes medidas
correctivas:
- Reoriente o reubique la antena receptora.
- Aumente la distancia entre el equipo y el receptor.
- Conecte el equipo a una toma de un circuito distinto
al que está conectado el receptor.
- Consulte con el distribuidor o busque ayuda con un
técnico experto en radio y televisión.
45
Page 46

Specifications
CONVERSIÓN DE SEÑAL DE EMISIÓN Entrada ATSC/
Salida NTSC
MÉTODO DE DEMODULACIÓN 8-VSB
SALIDA DE VIDEO Salida de RF
(Coaxial) Video
Compuesto
ENTRADA DE ANTENA F-Conector
DE 75 ohmios
REQUERIMIENTO DE ENERGÍA CA 120 V,
50/60 Hz
CONSUMO DE ENERGÍA 10 vatios, máx./
Modo en Espera:
2 vatios máx.
DIMENSIONES DEL
DECODIFICADOR DIGITAL 8,27 X 5,12 X 1,77
pulgadas 21 x 13
x 4,5 cm
PESO 2,2 libras/1 Kg.
46
es una marca comercial de General Electric
Company, utilizada bajo licencia por Jasco
Products Company, LLC, 10 E. Memorial Road,
Oklahoma City, OK 73114.
Este producto de Jasco tiene una garantía limitada
de 1 año. Para conocer los detalles, visite
www.jascoproducts.com.
Page 47

47
Page 48

24950
Learning
Apply it to items such as our
Universal Remote
Receive a FREE* 6 ft.
Composite Audio/Video Cable
go to www.jascoproducts.com/special/freeavcable.asp
*Requires $4.95 shipping and handling charge | Offer Valid in the Continental U.S. Only.
(Amarillo)
YELLOW
RED
(Rojo)
Get
(Blanco)
WHITE
Offer!
Additional
shown above
& control your new
For coupon code type web address
Converter Box and 5 other devices
any single purchase
shown above
10% OFF
For coupon code type web address
moto universal que aprende y controle su caja nueva del convertidor y 5 otros dispositivos. n Para el tipo direccion del código de la cupón de la tela demostrada arriba
Reciba cables audio/video 6ft compuestos libre n Visitanos a www.jascoproducts.com/special/freeavecable.asp n Requiere $4.95 que envían y la oferta de las cargas n
oferta valida solamenete en los continente de E.U.U. n Oferta adicional n Más consiga el 10% de cualquier sola compra n Apliqúelo a los artículos tales como nuestro telere-
 Loading...