

Page 1

22437
2.4GHz Digital Cordless Telephone
with Dual Mode Call ID
User manual
[photo]
Thomson Teleco
m
46, Quai Alphonse le Gallo,
92648 Boulogne Cedex, France
is a trademark of General Electric company used under license to Thomson Inc.
Indianapolis, IN 46290
Model: 22437
(Rev. 0 E)
06-35
Printed in China
– 1 –
Page 2

IMPORTANT SAFETY
INSTRUCTIONS
BEFORE USING YOUR TELEPHONE EQUIPMENT, BASIC
SAFETY PRECAUTIONS SHOULD ALWAYS BE FOLLOWED
TO REDUCE THE RISK OF FIRE, ELECTRIC SHOCK AND
INJURY TO PERSONS, INCLUDING THE FOLLOWING
1. Read and understand all instructions.
2. Follow all warnings and instructions marked on the product.
3. Unplug this product from the wall outlet before cleaning. Do not
use liquid cleaners or aerosol cleaners. Use a damp cloth for
cleaning.
4. Do not use this product near water, for example, near a bath tub,
wash bowl, kitchen sink, laundry tub, in a wet basement, or near
a swimming pool.
5. Do not place this product on an unstable cart, stand or table. The
product may fall, causing serious damage to the product.
6. Slots and openings in the cabinet and the back or bottom are
provided for ventilation. To protect it from overheating, these
openings must not be blocked or covered. The openings should
never be blocked by placing the product on the bed, sofa, rug, or
other similar surface. This product should never be placed near
or over a radiator or heat register. This product should not be
placed in a built-in installation unless proper ventilation is
provided.
7. This product should be operated only from the type of power
source indicated on the marking label. If you are not sure of the
type of power supply to your home, consult your dealer or local
power company.
8. Do not allow anything to rest on the power cord. Do not locate
this product where the cord will be damaged by person walking
on it.
9. Do not overload wall outlet extension cords, as this can result in
the risk of fire or electric shock.
10. Never push objects of any kind into this product through cabinet
slots as they may touch dangerous voltage points or short out
parts that could result in a risk of fire or electric shock. Never
spill liquid of any kind on this product.
11. To reduce the risk of electric shock, do not disassemble this
product. Instead, when some repair work is required, take the
unit to a qualified technician. Opening or removing covers may
expose you to dangerous voltages or other risks. Incorrect
reassembly can cause electric shock when the appliance is
subsequently used.
12. Unplug this product from the wall outlet and refer servicing to
qualified service personnel under the following conditions:
When the power supply cord or plug is damaged or frayed.
If liquid has been spilled into the product.
If the product has been exposed to rain or water.
If the product does not operate normally by following the
operating instructions. Adjust only those controls that are
covered by the operating instructions because improper
adjustment of other controls may result in damage and will often
require extensive work by a qualified technician to restore the
product to normal operation.
If the product has been dropped or cabinet has be damaged.
If the product exhibits a distinct change in performance.
13. Avoid using a telephone (other than a cordless type) during an
electrical storm. There may be a remote risk of electrical shock
from lightning.
Do not use the telephone to report a gas leak in the vicinity of
the leak.
IMPORTANT: Because cordless phones operate on electricity, you
should have one phone in your home that isn’t cordless, in case the
power in your home goes out.
WARNING:
TO PREVENT FIRE OR ELECTRICAL SHOCK HAZARD, DO
NOT EXPOSE THIS PROCUCT TO RAIN OR MOISTURE.
– 2 –
Page 3

THE LIGHTING
FLASH AND
ARROW HEAD
WITHIN THE
TRIANGLE IS A
WARNING SIGN
ALERTING YOU
OF
“DANGEROUS
VOLTAGE”
INSINDE THE
PRODUCT.
CAUTION: TO
REDUCE THE RISK
OF ELECTRICAL
SHOCK, DO NOT
REMOVE COVER
(OR BACK). NO
USER
SERVICEABLE
PARTS INSIDE.
REFER SERVICING
TO QUALIFIED
SERVICE
PERSONNEL.
THE
EXCLAMATION
WITHIN THE
TRIANGLE IS
WARNING SIGN
ALERTING YOU
OF IMPORTANT
INSTRUCTIONS
ACCOMPANYING
THE PRODUCT.
SEE MARKING ON BOTTOM / BACK OF PRODUCT
Battery Safety Precautions
Do not burn, disassemble, mutilate, or puncture. Like other
batteries of this type, toxic materials could be released which
can cause injury.
To reduce the risk of fire or personal injury, use only the battery
listed in User’s Guide.
Keep batteries out of children.
Remove batteries if storing over 30 days.
Do Not Use Alkaline or Non Rechargeable Batteries
CAUTION:
Danger of explosion if battery is incorrectly replaced. Replace only
with GP60AAAHC - Ni-MH 1.2V 600mAh rechargeable battery or
equivalent. Do not dispose of the battery in a fire. The cell may
explode. Check with local code for possible special disposal
instructions.
Installation
IMPORTANT:
Please make sure you completed the Handset battery installation
first, before you plug in the Base Adaptor.
Connecting the Base Station and Power Plug
Connecting the plugs to the corresponding sockets in the base station
(they can not be connected incorrectly because the sockets and plugs
are designed prevent reverse poling). Lay the cable under the
telephone to the rear. Plug the telephone line in the telephone
connection socket. Insert the power plug at the other end in the power
outlet. The base station is now ready to operate.
The base station and charging station have no power
switch. Ensure that a Mains power outlet is close by and
that the power plug is easy to access. Check that the
voltage specified on the power plug corresponds with that
supplied by local power network.
– 3 –
Page 4

Connecting the Charging Station #
Insert the power plug in the socket on the rear side of the charging
station. Insert the power plug at the other end in the power outlet. The
charging station is now ready to operate.
CAUTION:
Use only the Thomson power supply that came with this unit. Using
other power supplies may damage the unit.
#
This feature is onl
y app
licable with more than one handset
Getting Started
Install and Charge the Batteries
Insert two pieces AAA batteries in the compartment, ensuring correct
polarity and close the compartment.
Place the handset in the base station to charge for 16 hours prior
for first use. If you don’t properly charge the phone, battery
performance will be compromised.
Warning: The handset does not work and damaged if the wrong
batteries are inserted.
Features
We are very pleased that you have purchased this highly sophisticated,
cordless telephone which is equipped with the following features:
Digital cordless telephone complying to DECT* standards
Operation instruction in 3 languages
Teleconference
Call forwarding
Internal, free communication between handsets
Automatic call answering on/off
Call log function with caller list for 30 numbers or names
(network dependent)
DOT MATRIX LCD display
Phone book for 50 entries with name and call number
Extended redialing for 10 call numbers
Microphone muting function
Acoustic battery and range warning signals
Key lock
Key input tone on/off
8 incoming call ringing melodies
Ringing volume control (5 levels and silent)
Tone/Pulse dialing
Operation of up to 4 handsets
Paging function from base station to handset
Up to 100 hours standby
Up to 10 hours continuous call time
Operation with 2 standard AAA batteries (Ni-MH)
Adjustable flash time
*DECT = Digital Enhanced Cordless Telecommunication=Standard
for Cordless Telephone.
Menu Structure (Handset)
– 4 –
Page 5

1- CALL LOG
2- PHONE BOOK
ADD NEW ENTER NUMBER ENTER NAME
SELECT
EDIT
DELETE? CONFIRM?
3- SETUP HS
RING MELODY MELODY 1-8
RING VOLUME [-----]
TONES LOW BATTERY ON
OFF
NO COVERAGE ON
OFF
KEY TONE ON
OFF
AUTO TALK ON
OFF
ALARM ON TIME HH:MM
OFF
HANDSET NAME
LANGUAGE ENGLISH
FRANÇAIS
ESPAÑOL
CONTRAST [-----]
RESET RESET?
4- SETUP BS
RING MELODY MELODY 1-5
RING VOLUME [------]
CHANGE PIN ENTER PIN NEW PIN REPEAT PIN
DIAL MODE TONE
PULSE
FLASH TIME 100ms/120ms/250ms/270ms/300ms/370ms/600ms/800ms
VMWI VMWI OFF?
AREA CODE
ENTER LAC
RESET ENTER PIN RESET?
5- DATE/TIME
YEAR 20xx DATE DD/MM TIME HH:MM
6- REGISTRATION
REGISTER ENTER PIN
REMOVE HANDSET ENTER PIN
HANDSET 1..4
Handset and Base Layouts
– 5 –
Page 6
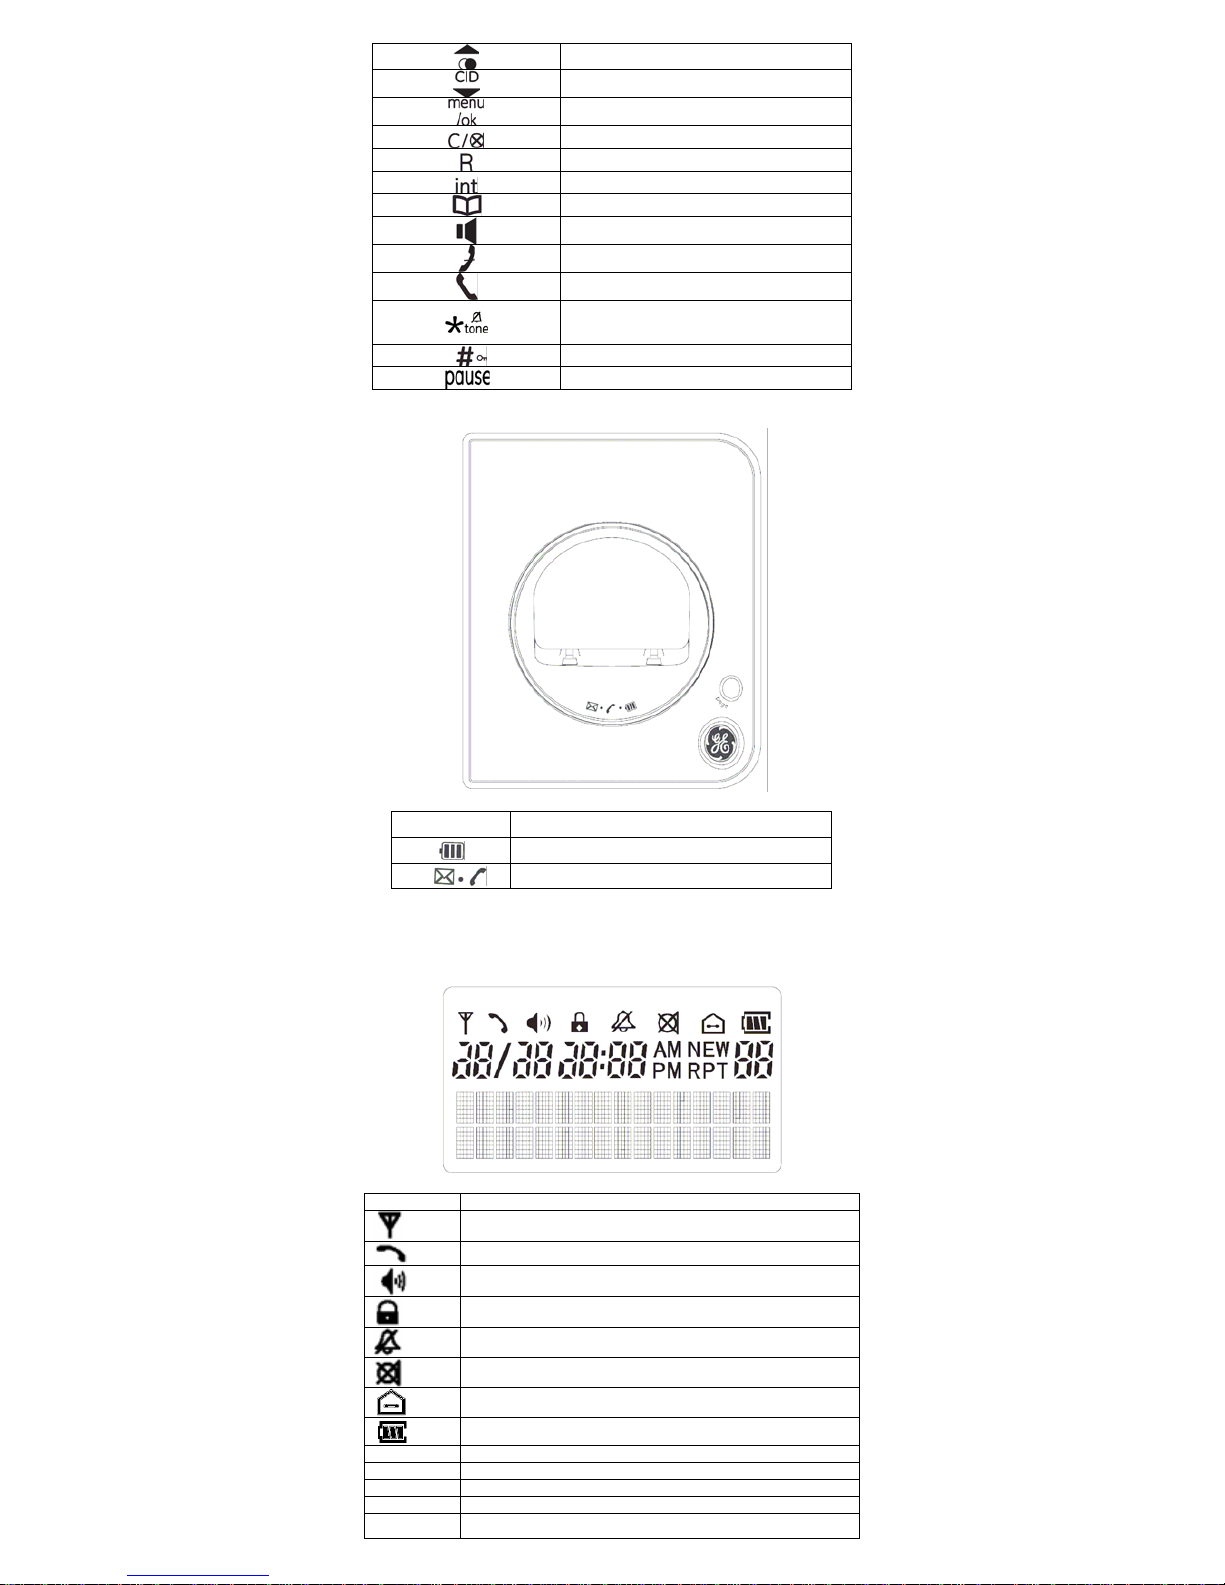
Redial / up key
Caller ID / down key
Menu / OK key
Cancel / mute key
Flash key
Intercom key
Phone book key
Speakerphone key
Off key
Talk key
Asterisk / ring off / temporary tone
dialing key
Hash key/Keypad lock key
Pause key
page
Paging
Charging (amber)
VMWI
*
/ In use (blue)
*
Depending on the country and service availability and subscription to the
operator.
LCD Display
Icon Description
Aerial icon
Phone icon
Speaker phone in use icon
Key lock icon
No ring icon
Microphone mute icon
Intercom call indicator
Battery level indicator
NEW
New call indicator in call log browsing
RPT
Repeated call indicator in call log browsing
AM
Am
PM
Pm
00
Call log counter (display the incoming call log numbers)
– 6 –
Page 7

Using the Handset Telephone
Using the telephone
When the handset is inserted in the station charging unit, it starts
to charge automatically. To optimize the battery performance,
charge the handset battery for 14 hours prefer to first use.
Note: This phone defaults to Tone Dialing. To change Pulse Dialing,
see chapter “Base Station Settings – Changing the Dialing Mode”. If
you don’t know which type of service you have, please check with
the local telephone company.
Selecting the Language
Three different languages are available for selection for each handset.
key. Press
Press or key to select SETUP HS and press
key.
Press or key to select LANGUAGE and press
key.
Press
or key to select Language.
Press
key to confirm the setting.
Note: The following languages are available: ENGLISH, FRANÇAIS,
and ESPAÑOL.
Making Internal Calls
IMPORTANT: Internal calls can be made only if more than one
handset is registered on the base station.
Press key during standby mode.
Press a digit to specify which handset (1..4) to call to.
The other handset will ring with the icon flashing.
When other handset answered, the internal call is established.
Press key to end the call.
Note: 1.If an external call is received during an internal call, short
acoustic signals are issued, a third handset, if existed, may answer the
call.
2. When a handset is in call mode, the other handsets (if existed)
are able call each other using the intercom.
Making External Calls
Normal dialling
Press key and wait for a dialling tone.
Dial the telephone number.
Press key to end the call.
On hook dialling
Dial the telephone number (delete incorrect entries by pressing
key).
Press key to carry out the conversation.
Press key to end the call.
VMWI LED
The VMWI LED in the base unit will flash when there are new voice
message calls received. “Message waiting” turns on LCD.
This service need subscription to local operator and it supports the
FSK CLI system only.
Taking Calls
When an external call is received, all registered handsets and the base
station ring.
flashes in the handset display and, if subscribed,
the telephone number of the caller appears (network depended). If the
caller has been stored in your phone book, the name appears. The
in-use LED on the base station flashes. In the case of an internal call
flashes in the handset display or pressing the paging key on the
base station “PAGING” flashes in the handset display.
– 7 –
Page 8

Handset is in the base station
Take the handset from the base station; a connection is
automatically established (when the AUTO TALK function is
active). Otherwise, press
key.
Press key to end the call.
Handset is not in the base station
Press key to make a call.
Press key to end the call.
Redialling
The phone stores the last ten numbers dialled in the redial memory.
Press key; the last call number dialled is displayed.
Press or key to search the required number in the
redial memory list.
Press key to carry out the conversation.
Press key to end the call.
Note: 1. If the number is longer than 16 digits, only the last 14 digits
shown. will be
b
2. Name is displayed instead if number is matched with phone
ook memory.
Dialling from the Phone Book
Press key; the first entry in the phone book appears. (Or
PHONEBOOK EMPTY if no entry)
Press or key to select the required subscriber from
the phone book. Alternatively, enter the first letter of the name
required.
Press key to carry out the conversation.
Press key to end the call.
Note: How to store entries in the phone book is explained in the
Chapter “Phone Book”.
Call Log Operations
IMPORTANT: To use the “Call Log” function, you must subscribe
to your network operator’s Caller Line Identification (CLI) service.
Browse, Call Back, Delete, Store
If calls have been received in your absence, these are stored in the
CALL LOG memory when your telephone service has enabled this
function. The number of calls appears in the display. Incoming calls
are also indicated in the display for 10 seconds during a call.
Press to enter CALL LOG memory.
Browse: Press or key to browse through the CALL
LOG memory.
Or
Call Back: press or key to call back.
Or
Delete: Press to enter CALL LOG menu.
Press
to select DELETE? by using or key.
Press key to delete the entry.
Or
Delete all: Press
to enter CALL LOG menu.
Press to select DELETE ALL? by using or key.
Press
key to delete all entries.
Or
Store: Press to enter CALL LOG menu.
Press to select SAVE NUMBER by using or key.
Enter the name using keypad
Press key to save the entry in phone book memory.
– 8 –
Page 9

Note: The CALL LOG icon and display indicator disappear only after
browsing through all the entries.
Edit Call Log memory
When browsing Call Log memory, Caller Line Identification (CLI)
number can be edited before dial back. Amended CLI number will
not overwrite the stored Call Log memory.
Press 0-9 to add digits in front of CLI number.
Press to remove entry or leftmost digit.
Press or key can recover the original CLI number.
Example:
CLI number is 12345678
Press digit 1, display is 1 12345678
Press digit 2, display is 12 12345678
Press
, display is 12345678
Press digit 3, display is 3 12345678
Press , display is 12345678
Press
, display is 2345678
Press
, display is 345678
(
key is no function if number is 6 or less digit )
Holding Calls /Forwarding Calls
If the telephone is connected to a PABX system, it is possible to put
calls on hold and call other extension lines or to forward calls.
Press key to put the call on hold and dial the extension
number (e.g. 23).
Press key once more can re-take the call again or press
key to forward the call.
Note: The above information can vary according to the PABX system
used. Therefore, refer to the relevant information of the PABX
network.
Intercom Call Transfer
It is possible to put an external call on hold and call another handset
registered to the base or to forward calls.
Press key to hold the external call and initiate an internal
call.
Input the desired handset number (e.g. 2).
The target handset will ring. After the internal connection is
made, press
key to transfer the external call.
If key is pressed before another handset is answered, the
call transfer procedure will be cancelled and the external call
connection is regained.
Teleconference
After have received an external call, it is possible to include a second
handset in the conversation (three way conference).
Press and enter the number of the corresponding handset
(e.g.2) which will join the teleconference.
The external caller is kept on hold. As soon as handset 2 takes
the call, the internal connection is established.
Press the key any time, and then press or key
scroll to “CONFERENCE”.
Press will start the 3 way conference.
Press again, “SINGLE CALL” will show and then press will
end the 3 way conference and return to intercom call.
Note: The handset which initiates the intercom call can switch
een the phone call and the intercom handset by pressing betw
key and th ess en pr or key to s ct “S CH”.
y pressing the
ele WIT
B key, any of the handsets can quit from the
teleconference and the other handset continues with the external
call.
Handset Speaker Phone
Press key to activate or deactivate the handset speaker. The
icon turns on or off.
– 9 –
Page 10

Changing the Receiver Volume
Press or key to change the receiver volume during a
call.
Muting the Ringer volume
Press and hold key for 1.5 seconds in idle mode to
activate or deactivate the handset Ringer. The
icon turns on
or off.
Muting the Microphone
Press key can switch the microphone on or off during a
call. The
icon turns on or off.
Paging the Handset
If a handset has been misplaced, it is possible to call all the handsets.
Short press page key on the base station.
To stop the page call:
Simply press any key on the handset or page on the base
station.
Entering a Dialling Pause (P)
If the telephone is connected to a PABX system, it may be necessary
to insert a dialing pause. To do this, press and hold
key about 2
seconds after entering the relevant digit in the pre-dial buffer, e.g. 0,
for an external line (0P….). A “P” appears in the display indicating a
pause.
Switching the Key Lock On/Off
Incoming calls can still be received when key locked.
Press and hold key for 2 seconds to activate or deactivate
the key lock. The
icon turns ON.
Phone Book
The telephone can store up to 50 entries in the phone book with name
and call number. When the function is supported by the telephone
provider service and the caller, the handset displays the name of the
caller (when stored in the phone book).
Store Entries
Press key to access phone book memory.
Press key to access phone book menu.
Press or key to select ADD NEW and press
key.
Enter number (max. 24 digits) and press key when
finished.
Enter name (max. 15 characters) and press key when
finished.
Note: 1. When the capacity is full, Memory full will display.
2. Any incorrect input can be deleted by pressing
.
Key assignment Overview
1
1 SPACE € £ $ % & < >
7
PQRS7 ß Şþ Ř Ś Š
2
ABC2ДАБВГЕЖЗĄ ć č
8
TUV8ÜÙÚÛŤŢŮ Ű
3
DEF3ИЙЛКР Ď Ę Ě
9
WXYZ9ÝŸŹŽŻ
4
GHI4ĞÌÍÎÏ İ
0
. , ?!0 + - :'"Δ¿
5
JKL5 Ł
# * @ \/ _ ( )= §
6
MNO6ЦТУФХшС Ň Ń Ő
List Entries / Edit Entries / Delete Entries
Press key to access phone book memory.
List Entry: Press
or key to scroll. (You can press to
switch the entry display between user name and phone
number).
Or
Edit Entry: Press or key to scroll.
Press key to select a desired entry, and then press or
to select the submenu EDIT.
– 10 –
Page 11

Press to start Number edition and press key again to
start Name edition.
Press key to confirm.
Note: Press key to delete any incorrect input.
Or
Delete: Press or key to scroll.
Press key to select a desired entry, and then press or
to select the submenu DELETE?.
Press key to delete the entry.
Press key again to confirm.
Handset Settings
Changing the Handset Ringer Melody
You may select one of the 8 available handset ringer tones for your
incoming calls alert tone.
Press key.
Press
or key to select SETUP HS and press
key.
Press
or key to select RING MELODY and press
key.
Press or key to select the desired ring melody, the
selected melody will be sounded.
Press key to confirm the setting.
Changing the Ringing Volume
You may select one of the 5 available volumes for your incoming
calls alert tone. The default setting is volume 5. Ringer can be
disabled by pressing
key for 1.5 seconds in idle mode.
key. Press
Press or key to select SETUP HS and press
key.
Press
or key to select RING VOLUME and press
key.
Press
or key to select the desired ring volume, the
selected volume will be sounded.
Press key to confirm the setting.
TONES
Low Battery
You may set the warning beep to ON when your cordless handset
battery is low, so as to alert you to charge the battery.
key. Press
Press
or key to select SETUP HS and press
key.
Press
or key to select TONES and press key.
Press
or key to select LOW BATTERY and press
key.
Press or key to select ON or OFF.
Press
key to confirm the setting.
No Coverage
You may set the warning beep to ON or OFF when the cordless
handset is out of range.
key. Press
Press
or key to select SETUP HS and press
key.
Press
or key to select TONES and press key.
Press
or key to select NO COVERAGE and press
key.
– 11 –
Page 12

Press or key to select ON or OFF.
Press
key to confirm the setting.
Note: Out of range warning beep only can be activated in talk mode.
Key Tone
You may set the key tone to ON or OFF when you press the keypad.
Press key.
Press
or key to select SETUP HS and press
key.
Press or key to select TONES and press key.
Press or key to select KEY TONE and press
key.
Press or key to select ON or OFF.
Press
key to confirm the setting.
Activating/Deactivating Automatic Call
Answering
The automatic call answering function enables the incoming call to
be taken immediately when the handset is removed from the base
station.
Press key.
Press
or key to select SETUP HS and press
key.
Press
or key to select AUTO TALK and press
key.
Press
or key to select ON or OFF.
Press
key to confirm the setting.
Setting the Alarm
Press key.
Press
or key to select SETUP HS and press
key.
Press
or key to select ALARM and press key.
Press
or key to select ON or OFF.
TO set alarm:
Press when scroll to ON.
Enter the time (HH:MM) and press or key to select
“am” or “pm”.
Press
to confirm the setting.
Note: When the alarm is set, "A" will be shown on the lower right
corner of LCD.
To disable alarm:
Press when scroll to OFF.
Entering/Changing Handset Name
It is possible to assign a name to each handset. This name is then
displayed when the phone is in standby mode.
Press key.
Press
or key to select SETUP HS and press
key.
Press
or key to select HANDSET NAME and press
key.
Edit the desired name (up to 13 characters) using number key
(any incorrect input can be deleted by
key).
Press
key to confirm the setting.
Changing the contrast setting
key. Press
Press
or key to select SETUP HS and press
key.
Press
or key to select CONTRAST and press
key.
Press
or key to adjust contrast level (5 levels).
– 12 –
Page 13

Press key to confirm the setting.
Default Settings
This option allows user to restore the cordless handset to the default
setting.
1. Press key.
2. Press
or key to select SETUP HS and press
key.
3. Press
or key to select RESET and press key,
the LCD will display RESET?.
4. Press key to confirm the setting.
Base Station Settings (using the
Handset)
Changing the Base Ringer Melody (external /
internal)
You may select one of the 5 available base ringer tones for your
incoming calls alert tone.
Press key.
Press
or key to select SETUP BS and press
key.
Press
or key to select RING MELODY and press
key.
Press or key to select the desired ring melody, the
selected melody will be sounded.
Press key to confirm the setting.
Changing the Ringing Volume
You may select one of the 5 available volumes for your incoming
calls alert tone.
Press key.
Press
or key to select SETUP BS and press
key.
Press
or key to select RING VOLUME and press
key.
Press
or key to select the desired ring volume (0-5),
the selected volume will be sounded.
Press key to confirm the setting.
Changing Base PIN Code
PIN is your base’s identification number, the function is to avoid the
setting changed by others. The default setting is “0000”. You may
change the PIN. Please take down the change so as to operate the
unit normally.
Press key.
Press or key to select SETUP BS and press
key.
Press
or key to select CHANGE PIN and press
key, the LCD will show ENTER PIN.
Press number key to input the old PIN code and press
key,
the LCD will show NEW PIN, prompt you to input a new PIN
code.
Note: WRONG PIN will be shown if the old PIN code you input is
wrong, and then return to step 4.
Input the desired new PIN code and press
key, the LCD
will show REPEAT PIN, prompt you to input the new PIN code
again.
Input the new PIN code again and press
key to confirm
the setting.
Note: 1. The PIN code must be 4 digits.
2. If the new PIN code that you input two times is different, the
change will fail, the display will return to step 5.
Changing the Dialling Mode
You may set the dial mode to TONE or PULSE according to your
– 13 –
Page 14

needs.
Press key.
Press
or key to select SETUP BS and press
key.
Press
or key to select DIAL MODE and press
key.
Press
or key to select TONE or PULSE.
Press
key to confirm the setting.
Changing the Flash Time
You may select flash time form 100ms to 800ms according to your
needs. The default setting is 600ms.
Press key.
Press
or key to select SETUP BS and press
key.
Press
or key to select FLASH TIME and press
key.
Press
or key to select the desired flash time
(100ms/120ms/250ms/270ms/300ms/370ms/600ms/800ms).
Press key to confirm the setting.
VMWI
If you have subscribed to a voice messaging service, the VMWI LED
on the base will flash to alert you if you have a messages waiting.
To turn Visual Message Waiting Indication (VMWI) off
Press the key
Press
or key to select SETUP BS and press
key.
Use the
or keys to scroll to VMWI and press the
key again
You will be prompted VMWI OFF?.
Press the to confirm the setting.
Setting the Area Code
If the area code is set, even you enter the area code before the
telephone number, the area code will be cut and will not be dialed.
Press the key
Press or key to select SETUP BS and press
key.
Use the or keys to scroll to AREA CODE and press
the key again
Input the area code number and then press the to confirm
the setting.
Reset Base
This option allows user to restore the base and Date/Time to the
default setting.
Press the key
Press
or key to select SETUP BS and press
key.
Use the
or keys to scroll to RESET and press the
key again
Enter the PIN (factory setting =0000) and press
key to
confirm, the LCD will display RESET?.
Press
key to confirm the setting.
Date / Time
You can set the Date/Time displayed in idle mode.
key. Press
Press
or key to select DATE/TIME and press
key, the LCD will display YEAR 2007.
Input the correct last two digits of year (range: 00-99) using
– 14 –
Page 15

number key, press key to confirm the setting and enter
month and date setting.
Input the correct month and date, the format is: date/month
(date range: 01-30/31, month range: 01-12) using number key,
press key to confirm the setting and enter time setting.
Input the correct time, the format is: hour/minute (hour range:
00-23 for 24 hours format or 01-12 for 12 hours format; minute
range: 00-59) using number key, and set the “am” , “pm” or 24
hours format using
or key.
Press
key to confirm the setting.
Note: If the value you input is over the range during setting, you can’t
enter next setting by pressing key.
Registration
Registering Additional Handsets
Further handset of the same model can be registered on one base
station.
Press key until the REGISTRATION menu appears and
press key.
Press or key to select the submenu REGISTER and
press
key.
Enter the PIN (factory setting =0000) and press key
Handset display shows SEARCHING.
Press and hold page key on the base station for 10 seconds until
acknowledgement signal is heard.
Note: 1.Once the registration procedure is completed, the new
handset will automatically be allocated the next available handset
number.
2. The base will be ready for registration for 2 minutes when
the page key is pressed and hold for more than 10 seconds. During
the handset searching for a base station which is available for
registration. “searching” will be shown on the LCD display .
Remove a Handset from the Base
If several handsets are registered on one base station, they can
deregister each other mutually. The last handset can not be
deregistered.
Press key until the REGISTRATION menu appears and
press
key.
Press or key to select the submenu REMOVE
HANDSET and press
key.
Enter the PIN (factory setting =0000) and press key
If necessary, use or key to select the handset and
press
key. REMOVE HANDSET? will show on the
display.
Press key to confirm.
Technical Specifications
Handset Operating Time:
(average values*)
Approx. 10 hours talk time
Approx. 100 hours standby
AC / DC Adaptor
(for Base)
VD060035D
Input: 230V AC / 50 Hz
Output: 6V DC, 350mA
Single-phase AC excluding IT
installations defined by the EN 60950
standard.
Caution: the network voltage is classified
as a hazard by the criteria of this
standard.
Telephone connection Appliance designed for connection to an
analogue telephone line class TNV3
(telecommunications network voltage) as
defined by the EN 60950 standard.
Rechargeable Battery per
Handset
GP60AAAHC, 2 x 1.2V / 600mAh /
Ni-MH, AAA or equivalent
– 15 –
Page 16

For guidance only, depends on initial battery charge.
General Product Care
Simply wipe the base station with a damp cloth or an antistatic wipe.
Never use a dry cloth as this can cause static discharge.
Periodically clean the charge contacts on the handset and base
and charger with a soft cloth.
Troubleshooting Guide
PROBLEMS CAUSES SOLUTIONS
Registration not
work.
The battery is not
sufficiently charged.
Handset and base
station were not
prepared for
registration.
Charge the battery for
14 hours (see Battery
Charging).
Unplug and then plug
in the power adaptor.
No display. The battery has not
been charged.
Charge the battery or
replace them (see
Battery Charging)
No reactions to
keystroke.
No radio
connection to the
base station:
blinking!
The keypad is locked.
The handset is
outside the base
station range.
The handset is not
registered.
The base station does
not work.
Press
key longer
than 2 seconds.
Move closer to the
base station.
Register the handset
(see Registering
Handset).
Unplug and then plug
the power adaptor to
the power outlet
(220-230V AC / 50
Hz) and the other end
into the power jack on
base bottom.
Consumer Information
1. An applicable certification jacks Universal Service
Order Codes (USOC) for the equipment is provided
(i.e., RJ11C) in the packaging with each piece of
approved terminal equipment.
2. If this equipment causes harm to the telephone network,
the telephone company will notify you in advance that
temporary discontinuance of service may be required.
But if advance notice isn’t practical, the telephone
company will notify the customer as soon as possible.
Also, you will be advised of your right to file a
complaint with the FCC if you believe it is necessary.
3. The telephone company may make changes in its
facilities, equipment, operations or procedures that
could affect the operation of the equipment. If this
happens the telephone company will provide advance
notice in order for you to make necessary
modifications to maintain uninterrupted service.
4. Please follow instructions for repairing if any (e.g.
battery replacement section); otherwise do not alternate
or repair any parts of device except specified.
5. Connection to party line service is subject to state tariffs.
Contact the state public utility commission, public
– 16 –
Page 17

service commission or corporation commission for
information.
6. This equipment is hearing aid compatible.
NOTICE:
1) If your home has specially wired alarm equipment
connected to the telephone line, ensure that the installation of
this phone does not disable your alarm equipment. If you
have questions about what will disable alarm equipment,
consult your telephone company or a qualified installer.
2) According to telephone company reports, AC electrical
surges, typically resulting from lightning strikes, are very
destructive to telephone equipment connected to AC power
sources. To minimize damage from these types of surges, a
surge protector is recommended.
3) This device complies with part 15 of the FCC Rules.
Operation is subject to the following two conditions: (1) This
device may not cause harmful interference; and (2) This
device must accept any interference received, including
interference that may cause undesired operation.
4) For body worn operation, this handset has been tested and
meets the FCC RF exposure guidelines. Use of accessories
may not ensure compliance with FCC RF exposure guidelines.
5)The FCC ID for this product is:RAQ22437EX
Should you experience trouble with this equipment, please
contact American Telecom Services Customer Support for
service information. If the equipment is causing harm to the
telephone network, the telephone company may request that
you disconnect the equipment until the problem is resolved.
6) Privacy of communications may not be ensured when using
this phone
WARNING: Changes or modifications to this unit not
expressly approved by the party responsible for compliance could
void the user's authority to operate the equipment.
CAUTION: To maintain compliance with the FCC's RF
exposure guidelines place the base unit at least 20 cm from
nearby persons.
CAUTION:
For service or replacement, please contact
American Telecom Services Support.
NOTE: This equipment has been tested and found to comply
with the limits for a Class B digital device, pursuant to Part 15
of the FCC Rules. These limits are designed to provide
reasonable protection against harmful interference in a
residential installation. This equipment generates uses and can
radiate radio frequency energy and, if not installed and used in
accordance with the instructions, may cause harmful
interference to radio communications. However, there is no
guarantee that interference will not occur in a particular
installation. If this equipment does cause harmful interference
to radio or television reception, which can be determined by
turning the equipment off and on, the user is encouraged to try
to correct the interference by one or more of the following
measures:
• Reorient or relocate the receiving antenna.
• Increase the separation between the equipment and
receiver.
• Connect the equipment into an outlet on a circuit different
from that to which the receiver is needed.
• Consult the dealer or an experienced radio TV technician
for help.
– 17 –
Page 18

Environment
“WEEE” weight: 0.447Kg
Used equipment and used handset batteries must be disposed of in
compliance with current environmental protection regulations. You
should return them to your reseller or dispose of them at an approved
recycling centre.
Do not attempt to open the batteries, as they contain chemical
substance. In the event of leakage, avoid contact with the skin, eyes
and mouth. In the event of contact, rinse the affected part for several
minutes in running water. Clean the product with absorbent paper or
a dry cloth and contact your reseller for replacement batteries.
– 18 –
 Loading...