

Page 1
GEAppliances.com
Refrigerators
Bottom Freezer
197D3358P002 49-60204-1 12642714SP 05-02 JR
Safety Instructions . . . . . . . . . . .2–4
Operating Instructions
Features . . . . . . . . . . . . . . . . . . . .6, 7
Ice Service . . . . . . . . . . . . . . . . . . . .8
Temperature Controls . . . . . . . . . . .5
Care and Cleaning
Cleaning . . . . . . . . . . . . . . . . . .9, 10
Light Bulbs . . . . . . . . . . . . . . . . . .10
Installation Instructions
Preparing to Install
the Refrigerator . . . . . . . . . . . .11, 12
Removal of Freezer Drawer . . .16, 17
Reversing the Door Swing . . . .12–15
Troubleshooting Tips . . . . . .18, 19
Normal Operating Sounds . . . . . .18
Consumer Support
Consumer Support . . . . .Back Cover
Warranty for Canadian
Customers . . . . . . . . . . . . . . . . . . .20
Warranty for U.S. Customers . . . . .21
Réfrigérateurs
Congélateur inférieur
Refrigeradores
Congelador inferior
Write the model and serial
numbers here:
Model #______________________
Serial # ______________________
Find these numbers on a label
on the right side, near the top of
the refrigerator compartment.
Model 22
Manuel d’utilisation
et d’installation
Owner’s Manual and
Installation Instructions
Manual del propietario
y instalación
La section française commence à la page 22
La sección en español empieza en la página 42
Page 2
IMPORTANT SAFETY INFORMATION.
READ ALL INSTRUCTIONS BEFORE USING.
WARNING!
Use this appliance only for its intended purpose as described in this Owner’s Manual.
SAFETY PRECAUTIONS
When using electrical appliances, basic safety precautions should be followed, including the following:
■
■ This refrigerator must be properly installed
and located in accordance with the Installation
Instructions before it is used.
■
■ Do not allow children to climb, stand or hang
on the shelves in the refrigerator. They could
damage the refrigerator and seriously injure
themselves.
■
■ Do not touch the cold surfaces in the freezer
compartment when hands are damp or wet.
Skin may stick to these extremely cold surfaces.
■
■ Do not store or use gasoline or other flammable
vapors and liquids in the vicinity of this or any
other appliance.
■
■ Keep fingers out of the “pinch point” areas;
clearances between the doors and between
the doors and cabinet are necessarily small.
Be careful closing doors when children are
in the area.
■
■ In refrigerators with automatic icemakers,
avoid contact with the moving parts of the
ejector mechanism, or with the heating element
that releases the cubes. Do not place fingers or
hands on the automatic icemaking mechanism
while the refrigerator is plugged in.
■
■ Unplug the refrigerator before cleaning and
making repairs.
NOTE: We strongly recommend that any servicing be
performed by a qualified individual.
■
■ Turning the control to the 0 (off) position does
not remove power to the light circuit.
■
■ Do not refreeze frozen foods which have
thawed completely.
Consumer Support Troubleshooting Tips
Operating Instructions Safety InstructionsInstallation Instructions
2
Page 3
3
Consumer SupportTroubleshooting TipsOperating InstructionsSafety Instructions Installation Instructions
PROPER DISPOSAL OF THE REFRIGERATOR
Child entrapment and suffocation are not problems
of the past. Junked or abandoned refrigerators are
still dangerous…even if they will sit for “just a few
days.” If you are getting rid of your old refrigerator,
please follow the instructions below to help prevent
accidents.
Before You Throw Away Your Old Refrigerator
or Freezer:
■ Take off the doors.
■ Leave the shelves in place so that children may
not easily climb inside.
Refrigerants
All refrigeration products contain refrigerants,
which under federal law must be removed prior
to product disposal. If you are getting rid of an
old refrigeration product, check with the
company handling the disposal about what
to do.
USE OF EXTENSION CORDS
Because of potential safety hazards under certain conditions, we strongly recommend against
the use of an extension cord.
However, if you must use an extension cord, it is absolutely necessary that it be a UL-listed (in the United
States) or a CSA certified (in Canada), 3-wire grounding type appliance extension cord having a grounding
type plug and outlet and that the electrical rating of the cord be 15 amperes (minimum) and 120 volts.
DANGER! RISK OF CHILD ENTRAPMENT
GEAppliances.com
Page 4
4
Consumer Support Troubleshooting Tips
Operating Instructions Safety InstructionsInstallation Instructions
IMPORTANT SAFETY INFORMATION.
READ ALL INSTRUCTIONS BEFORE USING.
WARNING!
HOW TO CONNECT ELECTRICITY
Do not, under any circumstances, cut or remove the third (ground) prong from the power cord.
For personal safety, this appliance must be properly grounded.
The power cord of this appliance is equipped
with a 3-prong (grounding) plug which mates
with a standard 3-prong (grounding) wall outlet to
minimize the possibility of electric shock hazard
from this appliance.
Have the wall outlet and circuit checked by a
qualified electrician to make sure the outlet is
properly grounded.
Where a standard 2-prong wall outlet is
encountered, it is your personal responsibility and
obligation to have it replaced with a properly
grounded 3-prong wall outlet.
The refrigerator should always be plugged into its
own individual electrical outlet which has a voltage
rating that matches the rating plate.
This provides the best performance and also
prevents overloading house wiring circuits which
could cause a fire hazard from overheated wires.
Never unplug your refrigerator by pulling on the
power cord. Always grip plug firmly and pull
straight out from the outlet.
Repair or replace immediately all power cords that
have become frayed or otherwise damaged. Do not
use a cord that shows cracks or abrasion damage
along its length or at either end.
When moving the refrigerator away from the
wall, be careful not to roll over or damage the
power cord.
USE OF ADAPTER PLUGS (Adapter plugs not permitted in Canada)
Because of potential safety hazards under certain conditions, we strongly recommend against
the use of an adapter plug.
However, if you must use an adapter, where local
codes permit, a temporary connection may be made
to a properly grounded 2-prong wall outlet by use
of a UL-listed adapter available at most local
hardware stores.
The larger slot in the adapter must be aligned with
the larger slot in the wall outlet to provide proper
polarity in the connection of the power cord.
When disconnecting the power cord from the
adapter, always hold the adapter in place with one
hand while pulling the power cord plug with the
other hand. If this is not done, the adapter ground
terminal is very likely to break with repeated use.
If the adapter ground terminal breaks, DO NOT USE
the refrigerator until a proper ground has been
established.
Attaching the adapter ground terminal to a wall outlet
cover screw does not ground the appliance unless the
cover screw is metal, and not insulated, and the wall
outlet is grounded through the house wiring. You should
have the circuit checked by a qualified electrician to make
sure the outlet is properly grounded.
READ AND FOLLOW THIS SAFETY INFORMATION CAREFULLY.
SAVE THESE INSTRUCTIONS
Page 5
Consumer SupportTroubleshooting TipsOperating Instructions
Safety Instructions
Installation Instructions
About the controls on the refrigerator. GEAppliances.com
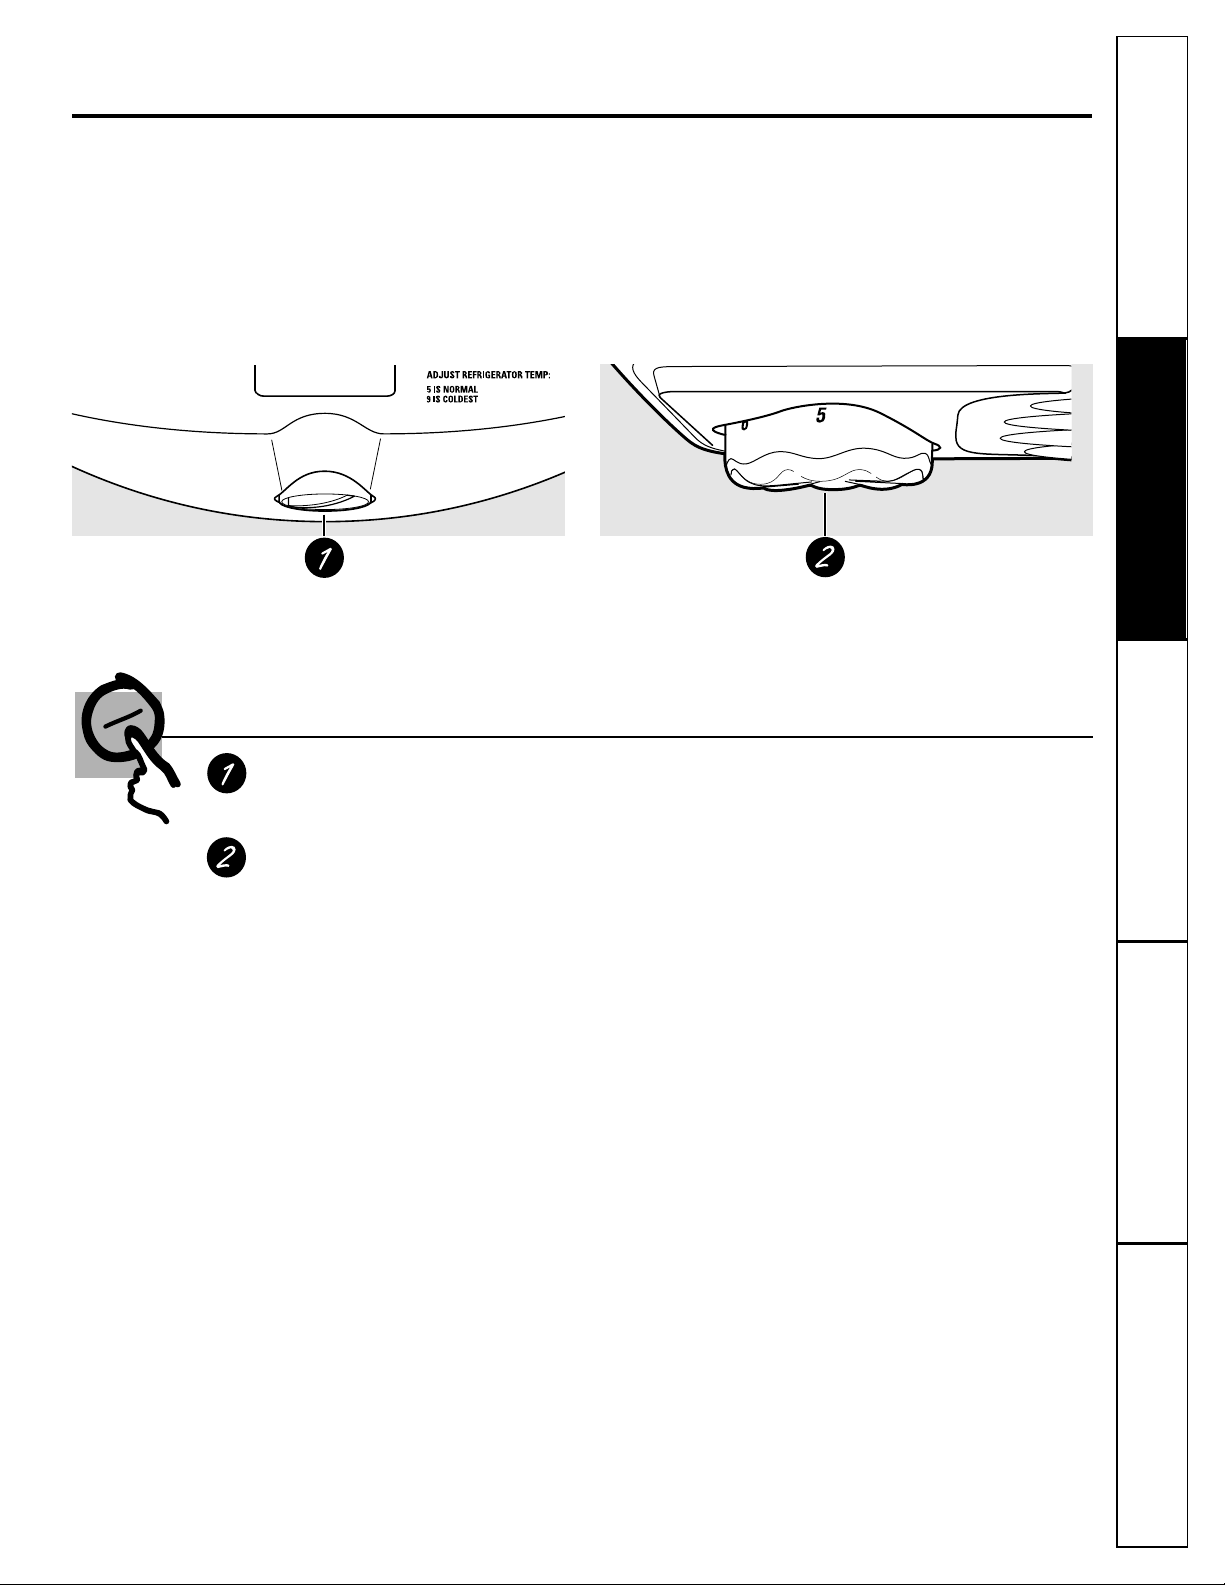
Control Settings
Refrigerator Control
The refrigerator control maintains the temperatures throughout the refrigerator.
Freezer Control
The freezer control maintains the temperatures throughout the freezer compartment.
Moving the freezer control to 0 (off) stops cooling in both areas—refrigerator and freezer—but does
not shut off power to the refrigerator.
Initially set the refrigerator control at 5 and the freezer control at 5.
If you want colder or warmer temperatures, adjust the refrigerator temperature first. When satisfied with that
setting, adjust the freezer temperature.
Control settings will vary based on personal preferences, usage and operating conditions, and may require more
than one adjustment.
After changing the controls, allow 24 hours for the refrigerator to reach the temperature you have set.
5
4
6
5
Page 6
About the refrigerator shelves and bins.
Not all features are on all models.
6
Consumer Support Troubleshooting Tips
Operating Instructions Safety InstructionsInstallation Instructions
Refrigerator Door Shelf
The bottom door shelf in the refrigerator
compartment is removable for easy
cleaning.
To remove, hold both ends and pull
straight up.
Adjustable Bins on the Refrigerator Door
Adjustable bins can easily be carried from
refrigerator to work area.
To remove: Lift bin straight up, then
pull out.
To replace or relocate: Engage the bin in the
molded supports on the door, and push
down. Bin will lock in place.
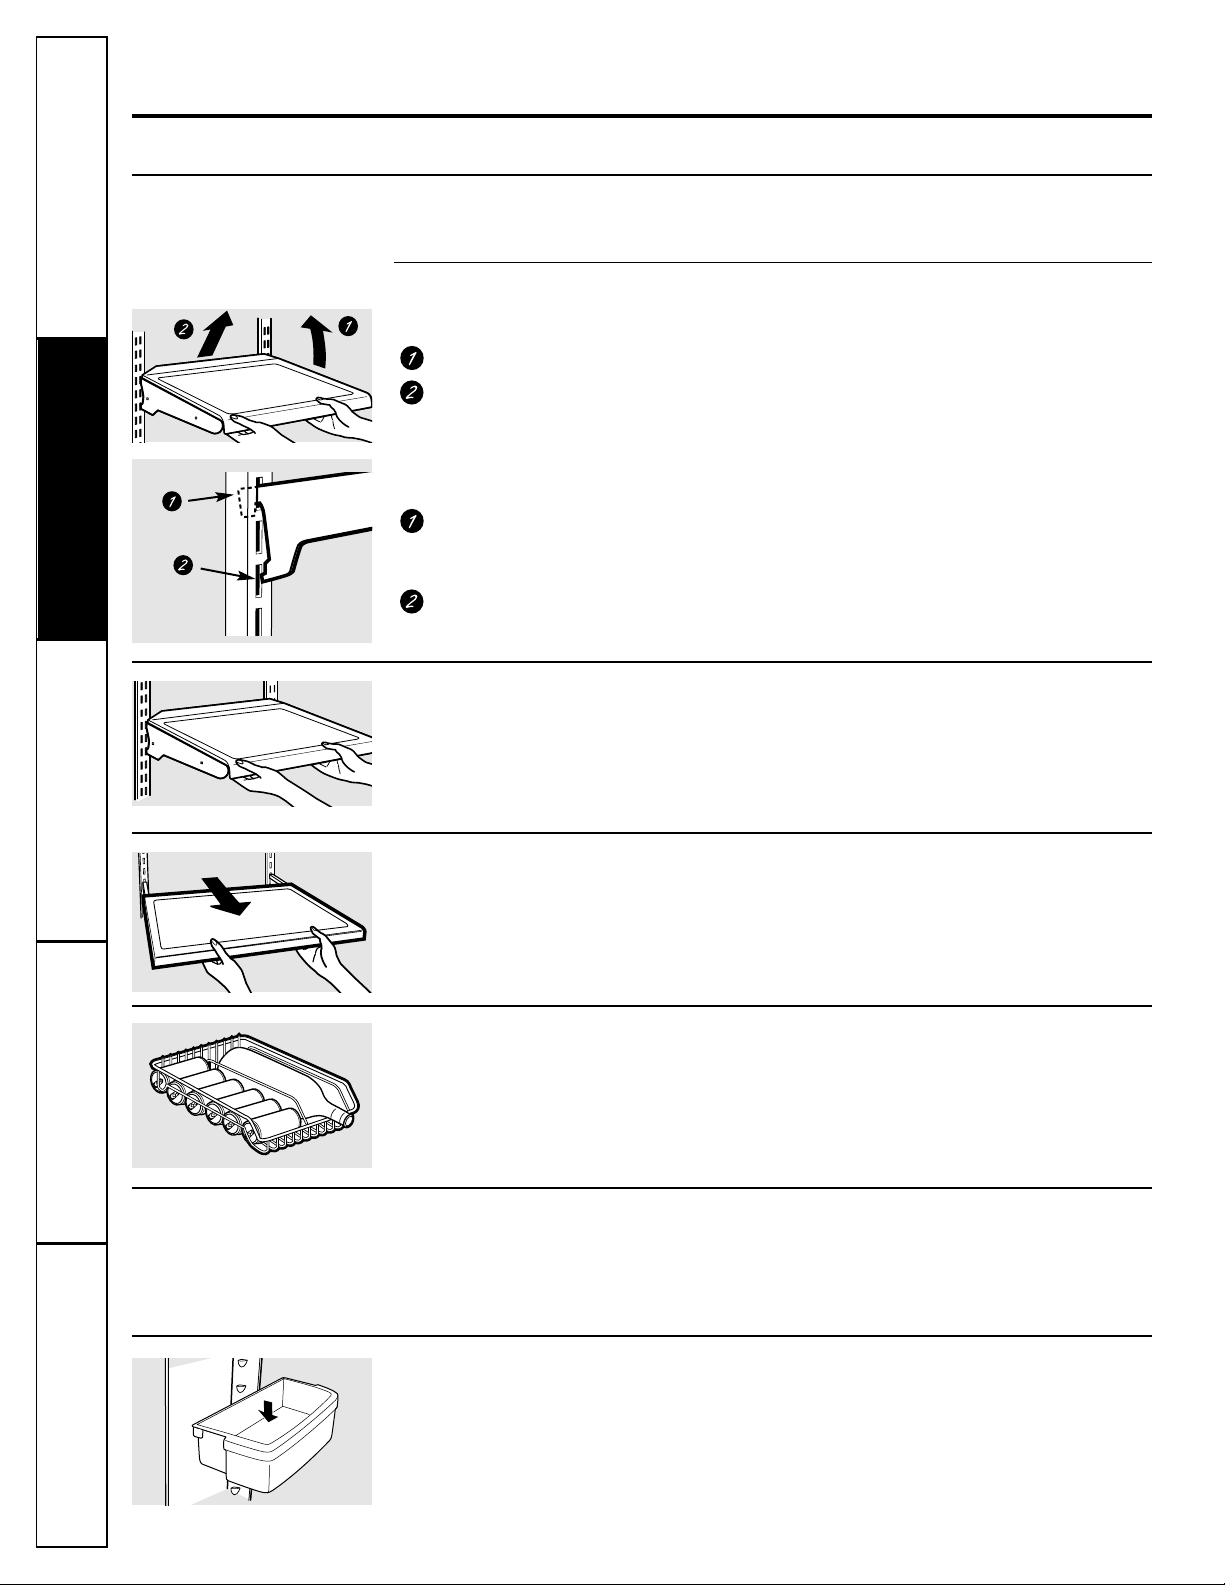
Rearranging the Shelves
To remove:
Tilt the shelf up at the front.
Lift the shelf up at the back and
bring the shelf out.
To replace:
While tilting the shelf up, insert the top
hook at the back of the shelf in a slot
on the track.
Lower the front of the shelf until the
bottom of the shelf locks into place.
Shelves in the refrigerator compartment are adjustable.
Refrigerator Compartment
Spillproof Shelves (on some models)
Spillproof shelves have special edges to
help prevent spills from dripping to lower
shelves. To remove or replace the shelves,
see Rearranging the Shelves.
Slide-Out Spillproof Shelf (on some models)
The slide-out spillproof shelf allows you
to reach items stored behind others. The
special edges are designed to help prevent
spills from dripping to lower shelves.
Make sure you push the shelves all the way in
before you close the door.
Shelf Saver Rack (on some models)
Slide-out beverage rack holds twelve cans of
soda or two wine/water bottles (lengthwise).
It can be removed for cleaning.
To remove, slide the rack out to the stop
position, lift the rack up and past the stop
position and lift it out.
Page 7
About the storage drawers. GEAppliances.com
Not all features are on all models.
7
Consumer SupportTroubleshooting TipsOperating Instructions
Safety Instructions
Installation Instructions
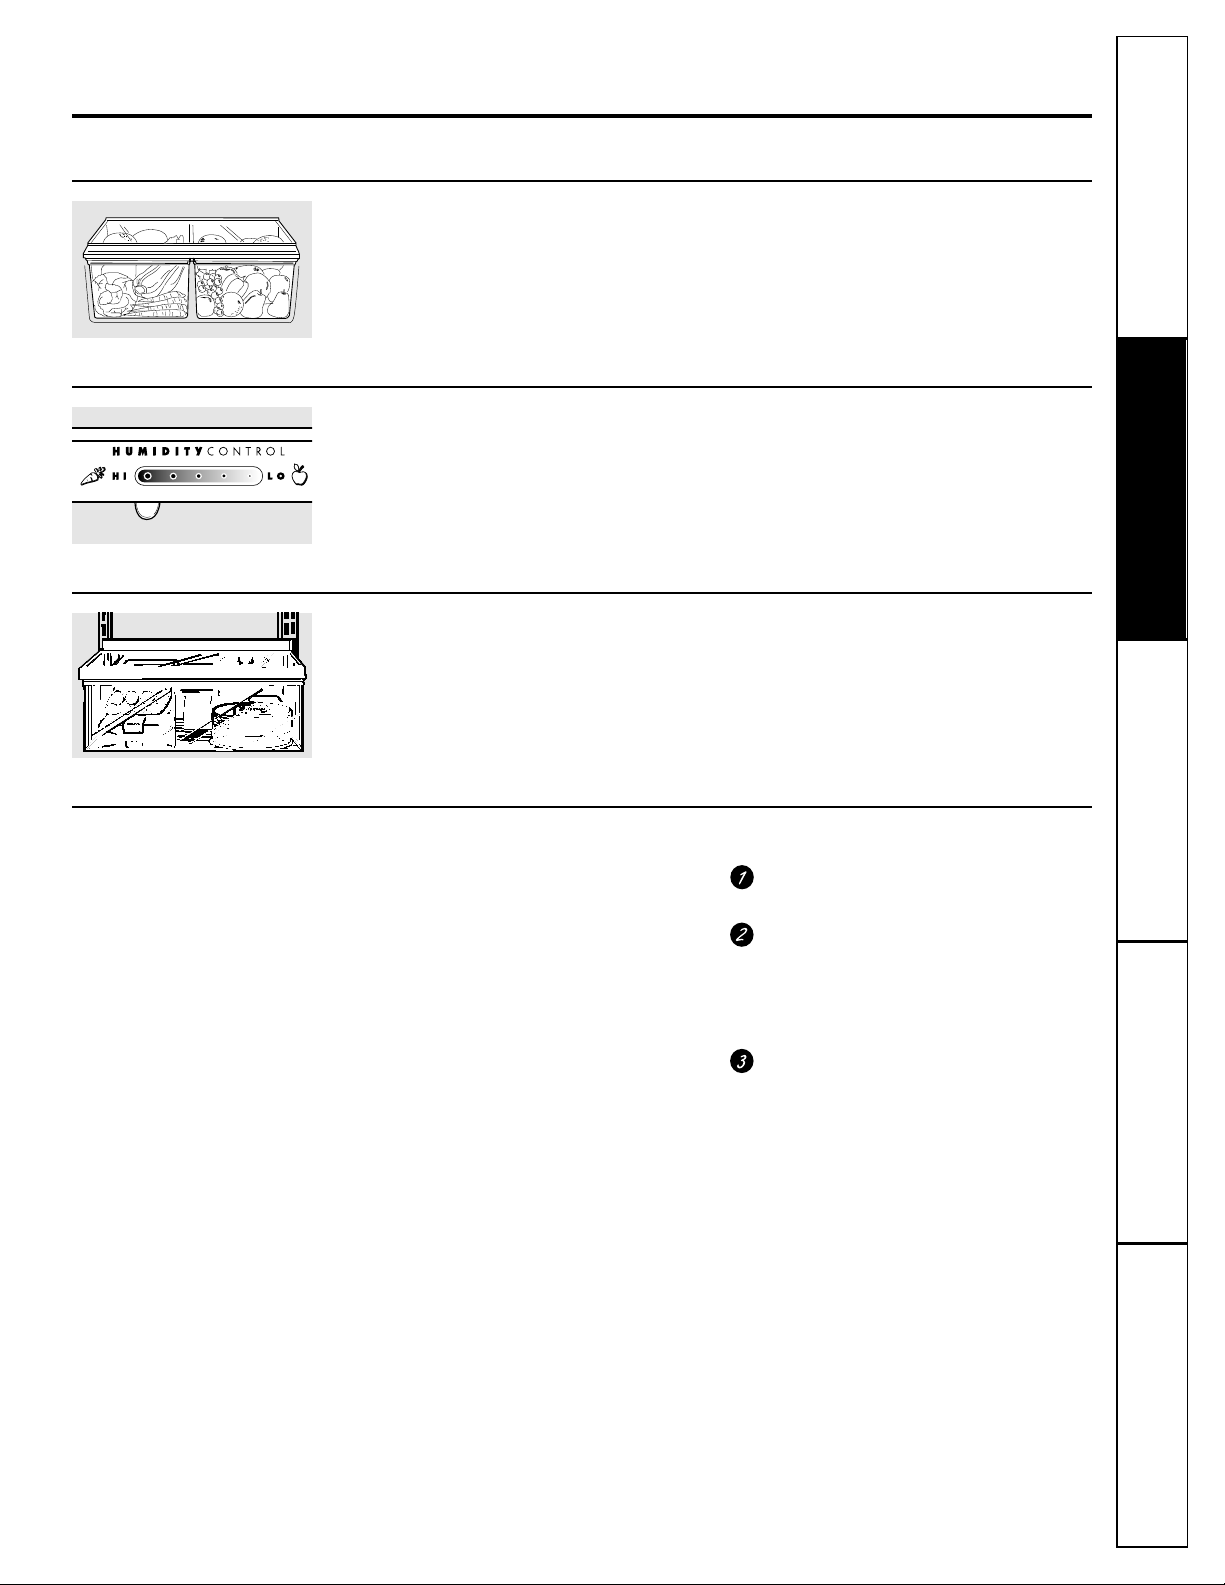
Fruit and Vegetable Drawers
Excess water that may accumulate in the
bottom of the drawers should be emptied
and the drawers wiped dry.
Adjustable Humidity Drawers
Slide the control all the way to the
HI setting to provide high humidity
recommended for most vegetables.
Slide the control all the way to the LO
setting to provide lower humidity levels
recommended for most fruits.
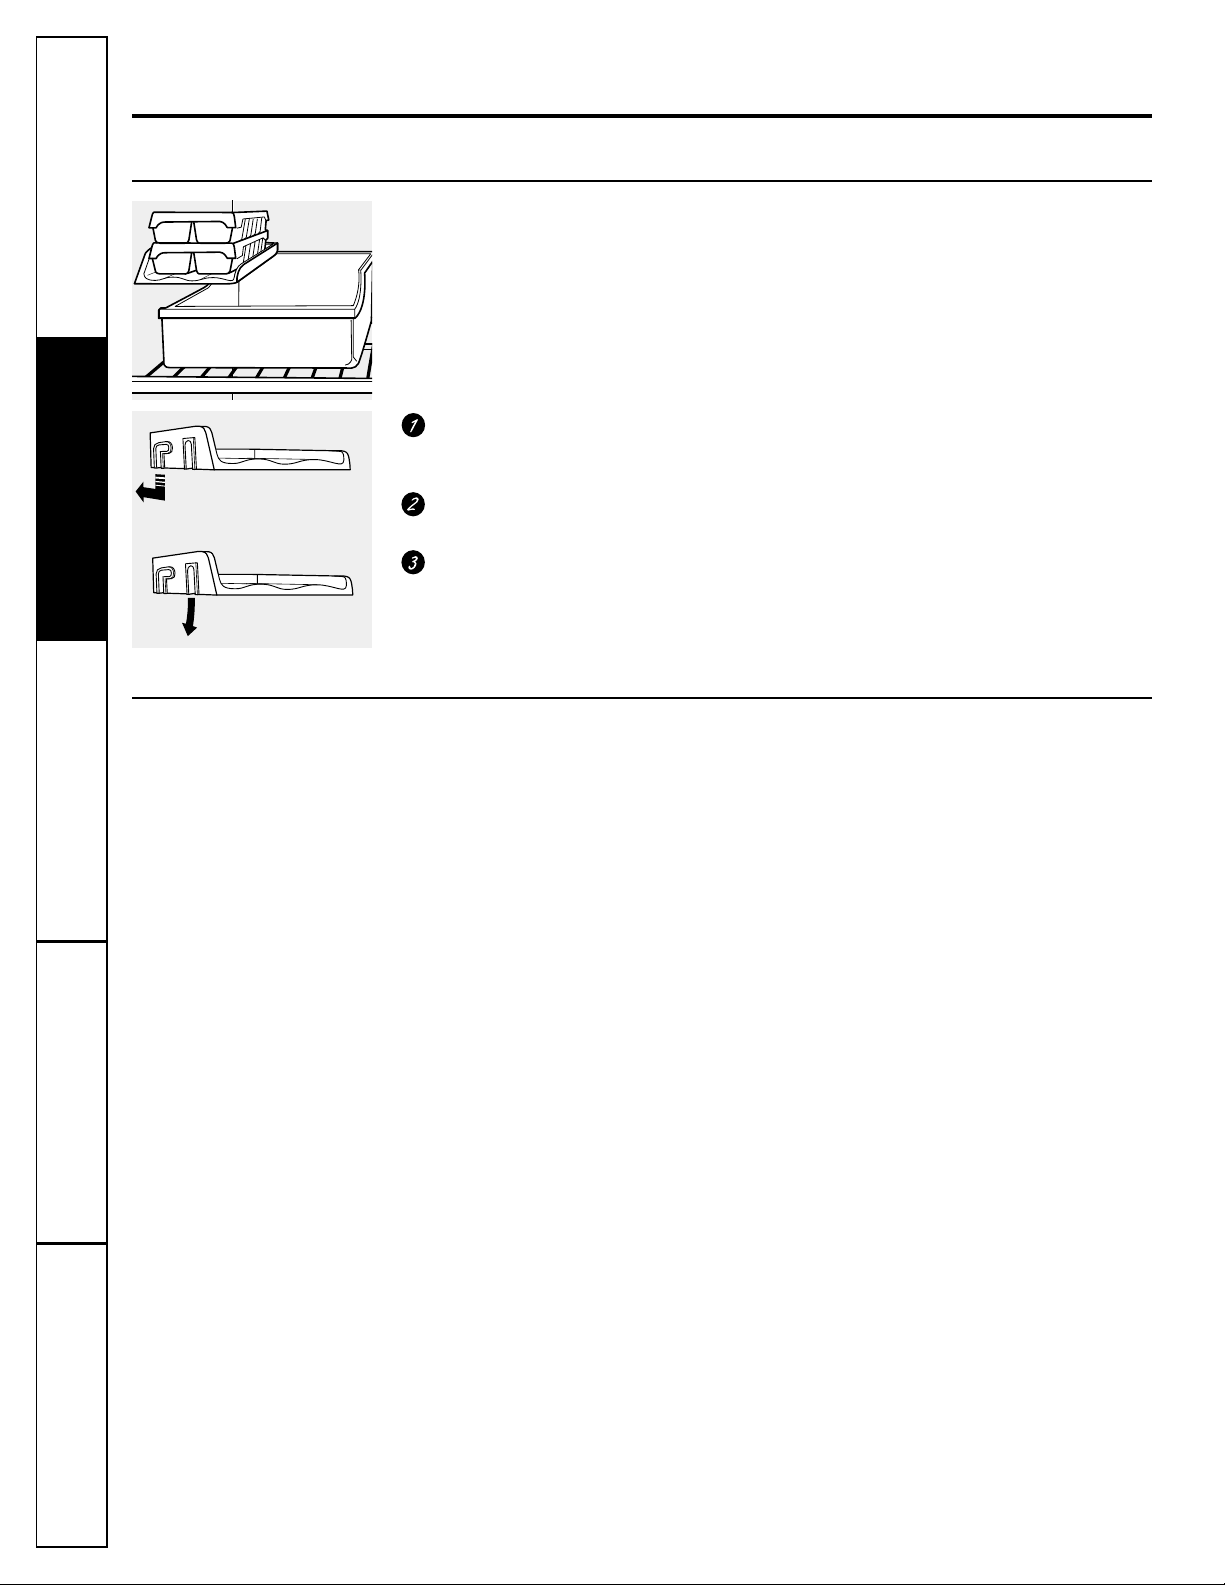
Snacks Drawer
The snacks drawer can be moved to the
most useful location for your family’s needs.
Drawer Removal
Drawers at the bottom of the refrigerator
compartment stop before coming all the
way out, to help prevent contents from
spilling onto the floor. Drawers can be
removed easily by tilting up slightly and
pulling past “stop” location.
To remove drawers when the refrigerator
compartment door cannot be opened all
the way, first remove food.
Remove the drawer farthest from
the door.
Remove the glass top by pushing up
from underneath and tilting it to clear
the door. Be careful when handling
the glass. We recommend wearing
protective gloves.
Remove the center rail and remove
the drawer. After cleaning, replace the
drawers in reverse order.
Page 8
8
Consumer Support Troubleshooting Tips
Operating Instructions Safety InstructionsInstallation Instructions
About the ice service.
Not all features are on all models.
Icemaker Accessory Kit
An icemaker accessory kit is available at
extra cost.
Check the label on the right side, near
the top of the refrigerator compartment,
for the specific icemaker kit needed for
your model.
Ice Service Compartment
The freezer has an ice service compartment
with an ice tray shelf and a pull-out ice
storage bin.
CAUTION: Make sure shelf is secure before placing
items on shelf to avoid property damage.
To install the ice tray shelf:
Slide the L-shaped opening, on the side
of the shelf, over the back screw located
on the side wall of the refrigerator.
Push the rack back until the screw is
locked into the L-shaped opening.
Lower the front of the shelf until the
front screw, located on the side wall of
the refrigerator, goes into the opening
at the front of the ice tray shelf.
Page 9
Consumer SupportTroubleshooting TipsOperating Instructions
Safety Instructions
Installation Instructions
Care and cleaning of the refrigerator. GEAppliances.com
9
Cleaning the Outside
The door handles and trim. Clean with a cloth
dampened with soapy water. Dry with a soft
cloth. Do not use wax on the door handles
and trim.
Keep the outside clean. Wipe with a clean
cloth lightly dampened with kitchen
appliance wax or mild liquid dish
detergent. Dry and polish with a clean,
soft cloth.
Do not wipe the refrigerator with a soiled dish
cloth or wet towel. These may leave a residue
that can erode the paint. Do not use scouring
pads, powdered cleaners, bleach or cleaners
containing bleach because these products can
scratch and weaken the paint finish.
The stainless steel panels and door handles
(on some models) can be cleaned with
a commercially available stainless steel
cleaner such as Stainless Steel Magic.
™
Stainless Steel Magic is available at Ace,
True Value, Servistar, HWI and other
leading stores. It is also available through
GE Parts and Accessories, 800.626.2002,
or visit our Website, GEAppliances.com.
In Canada, call 1.888.261.3055 or visit
our Website, geappliances.ca. Order part
number WX10X15.
Do not use appliance wax or polish on the
stainless steel.
Cleaning the Inside
To help prevent odors, leave an open box of
baking soda in the refrigerator and freezer
compartments.
Unplug the refrigerator before cleaning. If this
is not practical, wring excess moisture out
of sponge or cloth when cleaning around
switches, lights or controls.
Use an appliance wax polish on the inside
surface between the doors.
Use warm water and baking soda solution—
about a tablespoon (15 ml) of baking soda
to a quart (1 liter) of water. This both cleans
and neutralizes odors. Rinse and wipe dry.
After cleaning the door gaskets, apply a
thin layer of petroleum jelly to the door
gaskets at the hinge side. This helps keep
the gaskets from sticking and bending out
of shape.
Avoid cleaning cold glass shelves with hot water
because the extreme temperature difference may
cause them to break. Handle glass shelves
carefully. Bumping tempered glass can cause
it to shatter.
Do not wash any plastic refrigerator parts in
the dishwasher.
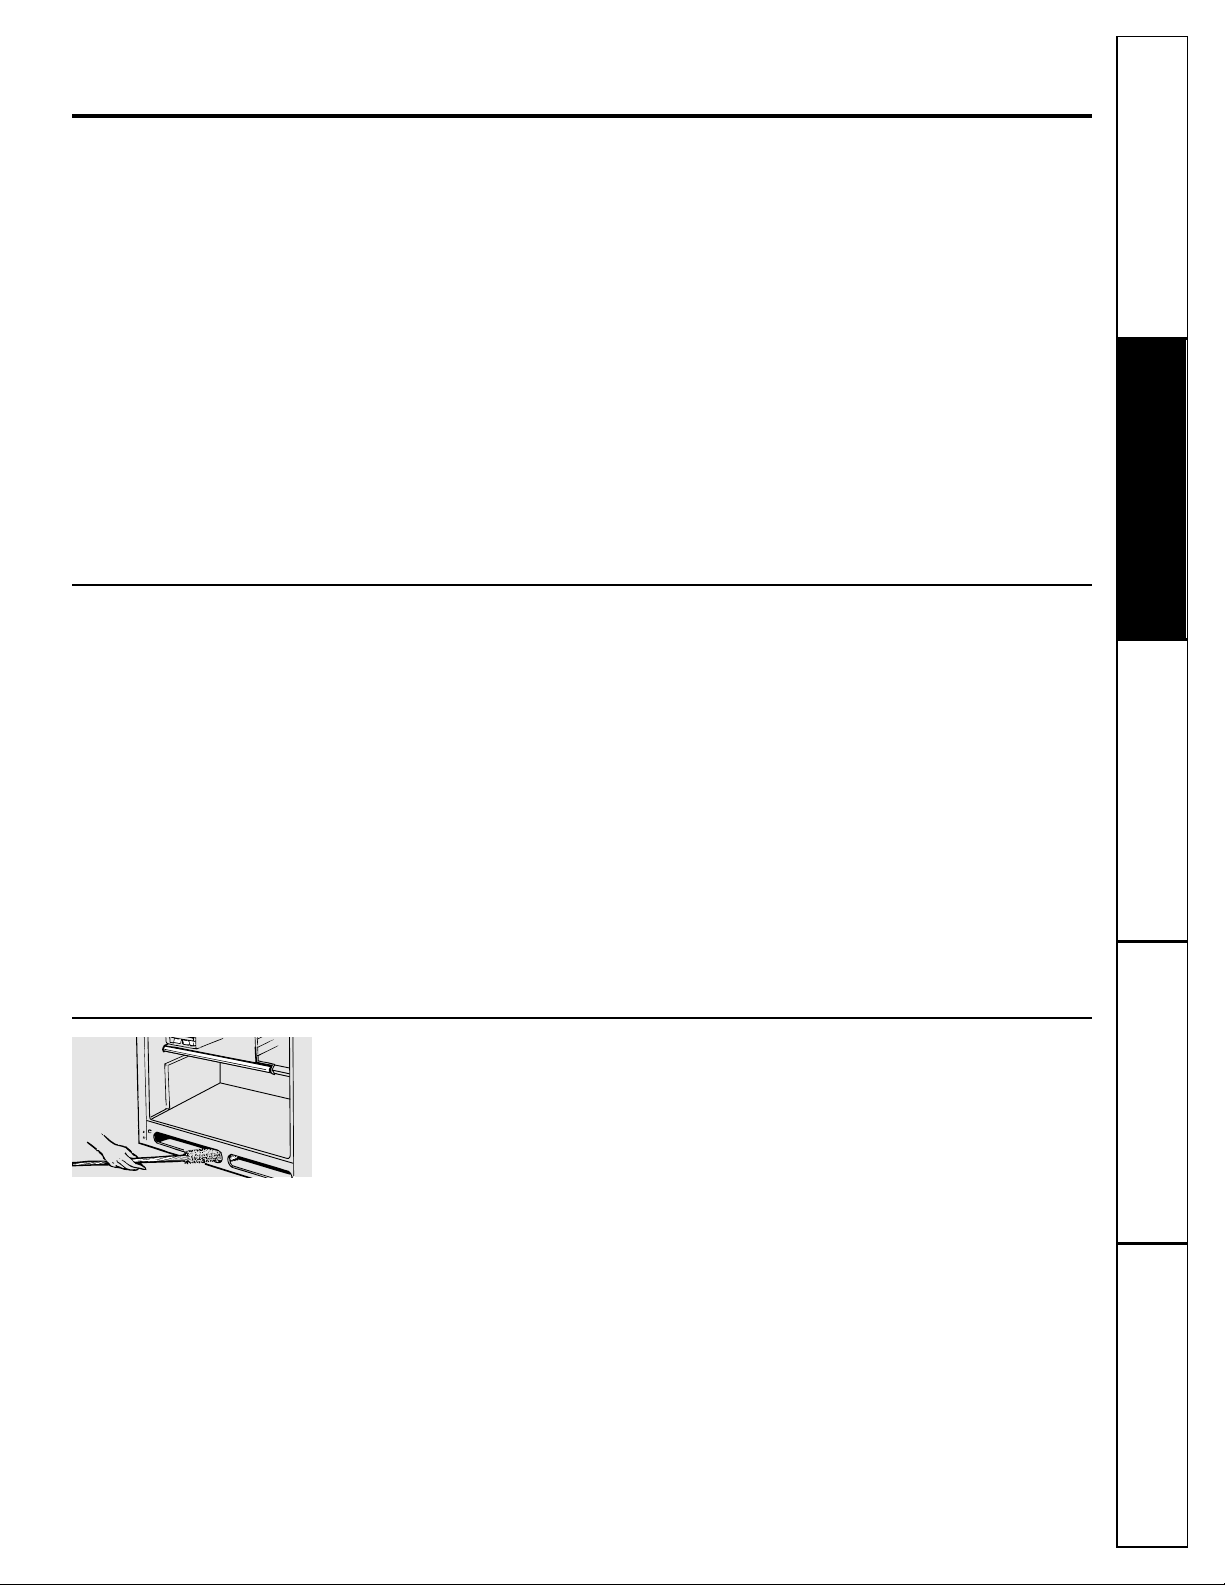
Under the Refrigerator
For most efficient operation, keep the
area under the refrigerator clean. Remove
the base grille and sweep away or vacuum
up dust.
For best results, use a brush specially
designed for this purpose. It is available at
most appliance parts stores.
Clean the condenser coils at least
once a year.
Page 10
10
Consumer Support Troubleshooting Tips
Operating Instructions Safety InstructionsInstallation Instructions
Care and cleaning of the refrigerator.
Preparing for Vacation
For long vacations or absences, remove
food and unplug the refrigerator. Move
the freezer control to the 0 (off) position,
and clean the interior with a baking soda
solution of one tablespoon (15 ml) of
baking soda to one quart (1 liter) of
water. Leave the doors open.
Move the icemaker feeler arm (for
icemaker equipped models) to the STOP
(up) position and shut off the water supply
to the refrigerator.
If the temperature can drop below
freezing, have a qualified servicer drain
the water supply system (for icemaker
equipped models) to prevent serious
property damage due to flooding.
Preparing to Move
Secure all loose items such as grille, shelves
and drawers by taping them securely
in place to prevent damage.
Be sure the refrigerator stays in an upright
position during moving.
Light Bulb Replacement
Turning the freezer control to the 0 (off) position does not remove power to the light circuit.
Behind the Refrigerator
Be careful when moving the refrigerator
away from the wall. All types of floor
coverings can be damaged, particularly
cushioned coverings and those with
embossed surfaces.
Pull the refrigerator straight out and return
it to position by pushing it straight in.
Moving the refrigerator in a side direction
may result in damage to the floor covering
or refrigerator.
When pushing the refrigerator back, make sure
you don’t roll over the power cord or icemaker
supply line.
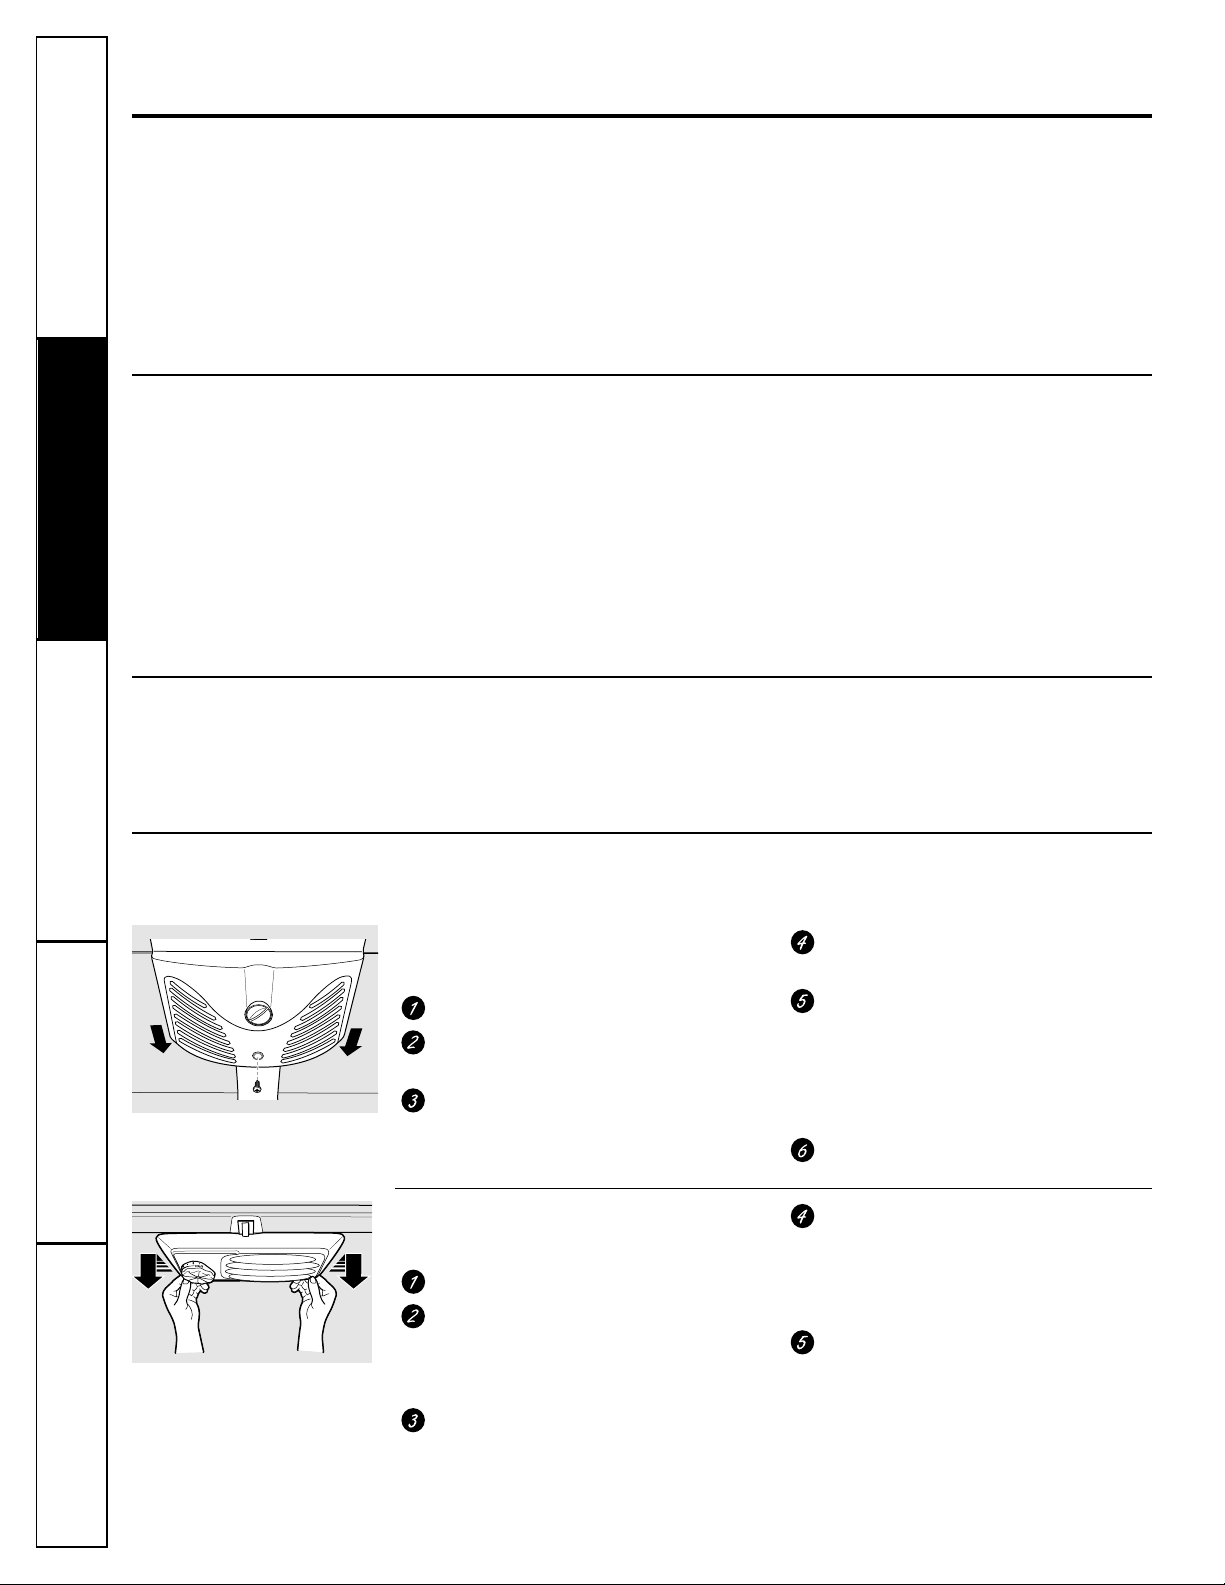
Refrigerator Compartment
CAUTION: Light bulbs may be hot.
Unplug the refrigerator.
The bulbs are located at the top of
the refrigerator compartment.
To remove the light shield, remove the
screw at the back. Slide the shield back
and remove it.
Replace the bulb with an appliance
bulb of the same or lower wattage.
To replace the shield, line up the tabs
on the shield with the slots in the side
of the light assembly. Slide the shield
forward until it locks in place. DO NOT
force it past the locking point, since this
could damage the shield.
Plug the refrigerator back in.
Freezer Compartment
CAUTION: Light bulbs may be hot.
Unplug the refrigerator.
The bulb is located at the top of the
freezer compartment. To remove the
shield, push in on the tabs at the back
of the shield and pull straight out.
Replace with an appliance bulb of
the same or lower wattage.
To replace the shield, insert the tabs at
the front of the shield into the slots at
the front of the light assembly. Push the
back of the shield up until the back tabs
pop into place.
Plug the refrigerator back in.
Page 11

Consumer SupportTroubleshooting TipsOperating Instructions
Safety Instructions
Installation Instructions
Preparing to install the refrigerator.
Read these instructions completely and carefully.
Water Supply to the Icemaker
If the refrigerator has an icemaker, it will have to be
connected to a cold water line.
A water supply kit (containing copper tubing,
shutoff valve, fittings and instructions) is available
at extra cost from your dealer or from Parts and
Accessories, 800.626.2002.
Refrigerator Location
Do not install the refrigerator where the
temperature will go below 60°F (16°C)
because it will not run often enough to
maintain proper temperatures.
Install it on a floor strong enough to support it
fully loaded.
Clearances
Allow the following clearances for ease
of installation, proper air circulation and
plumbing and electrical connections:
Sides . . . . . . . . . . . . . . . . . . . . . . . .0″ (0 mm)
Top . . . . . . . . . . . . . . . . . . . . . . . . .1/2″ (13 mm)
Back . . . . . . . . . . . . . . . . . . . . . . . . .1/2″ (13 mm)
Door Swing at 90° angle . . . . . . . .1/4″ (6 mm)
with handle, add
1
1
⁄2″ (38 mm)
Drawer Front Clearance . . . . . . . .12″ (30 cm)
If the unit is to be installed into a recess where
the top of the unit is completely covered, use
dimensions from the floor to the top of the hinge
cover to verify proper clearance.
Rollers
The rollers have 3 purposes:
Rollers adjust so the door closes easily when
opened about halfway. [Front of refrigerator
should be 1/4″ (6 mm) higher than the rear
of refrigerator.]
Rollers adjust so the refrigerator is firmly
positioned on the floor and does not wobble.
Rollers allow you to move the refrigerator away
from the wall for cleaning.
To adjust the rollers:
Remove the base grille.
Turn the roller adjusting
screws clockwise to
raise the refrigerator,
counterclockwise to
lower it. Use a 3/8″
socket wrench or
adjustable wrench. Set
the stabilizing brake.
See Stabilizing Brake.
Base Grille
Remove end
cap(s), then
remove the base
grille by grasping
it at the bottom
and pulling it
straight out.
To replace the base
grille, align prongs on
back of grille with slots
in cabinet and push
forward until the
grille snaps into place.
Snap the top of the
end caps on first,
then the bottom.
Roller Adjustment Screw
(3/8″ hex with slot)
Roller
Stabilizing
Brake
11
Base
Grille
End Cap
Page 12
12
Consumer Support Troubleshooting Tips
Operating Instructions Safety InstructionsInstallation Instructions
Preparing to install the refrigerator.
Read these instructions completely and carefully.
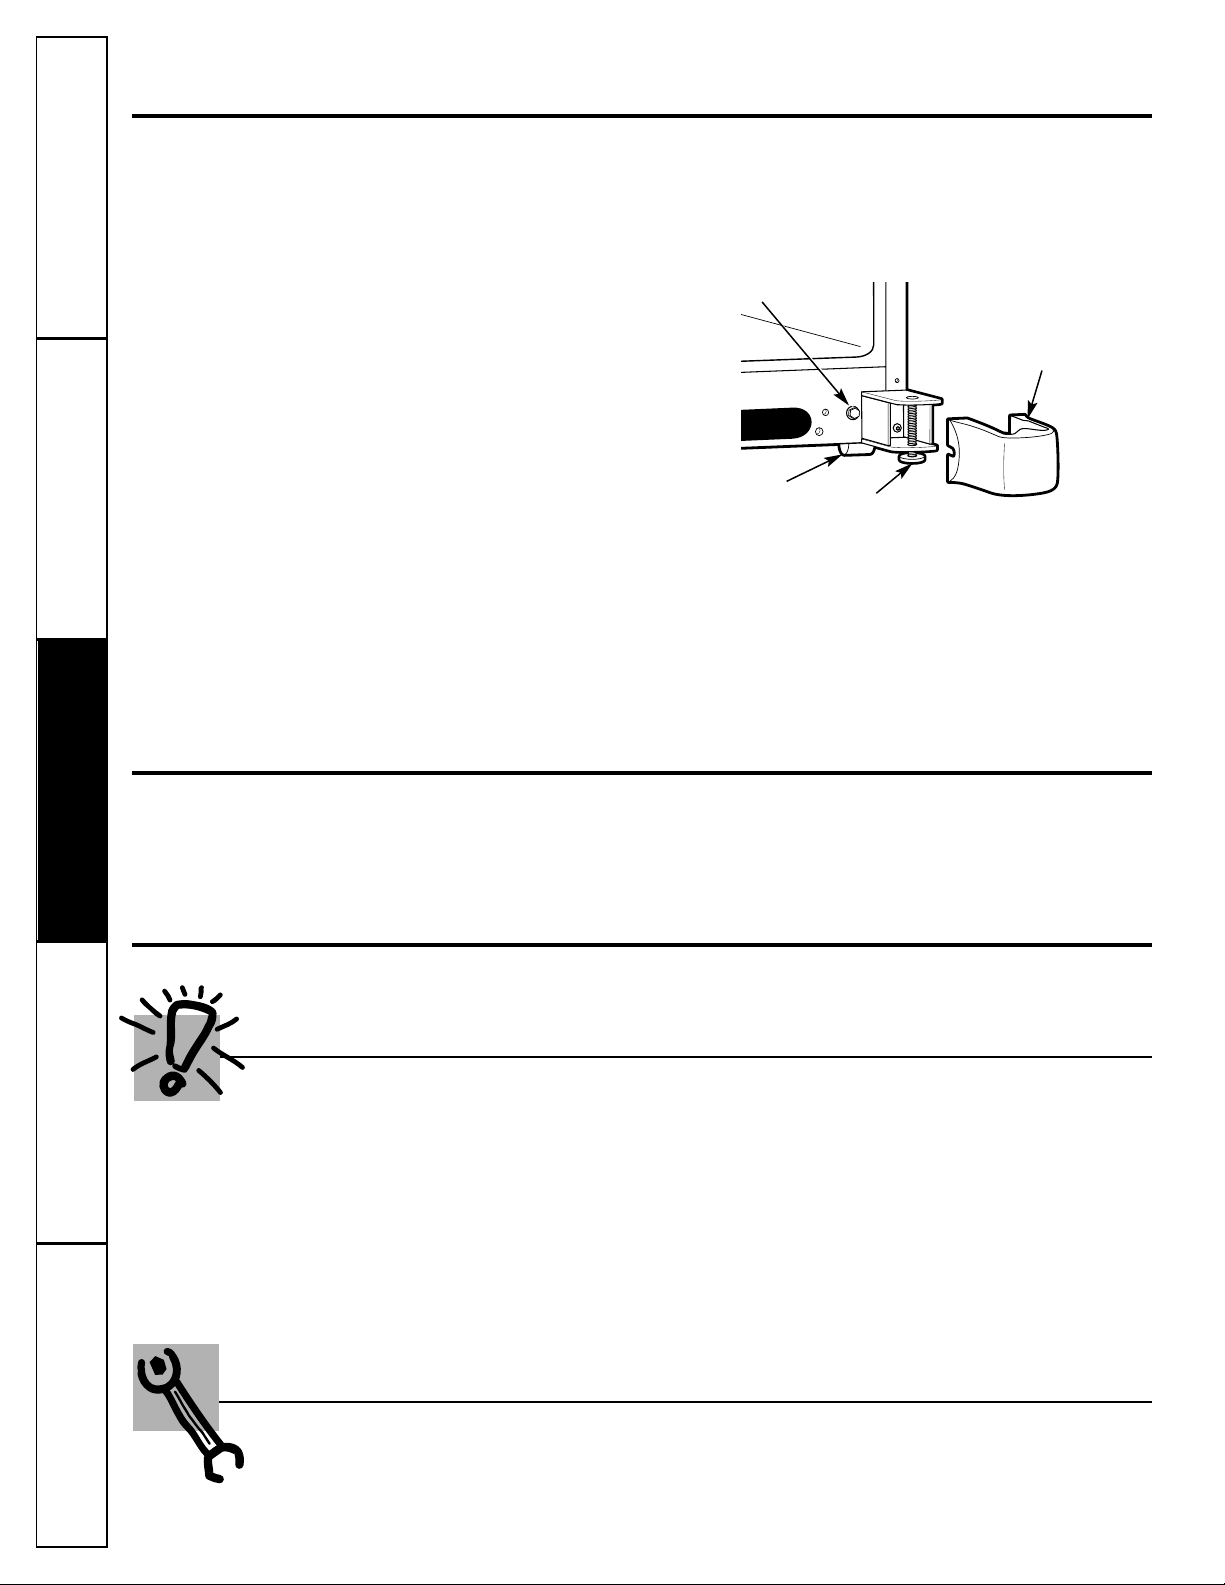
Stabilizing Brake
This refrigerator is equipped with leveling feet
which serve as a stabilizing brake. These additional
leveling feet will hold the refrigerator securely in
position during operation and cleaning.
To set the brake, first remove the end caps and
base grille. Second, adjust the rollers to the desired
position. See Rollers. Then turn both leveling feet
on each side until the feet are firmly in place
against the floor.
On models with a freezer drawer: After the brake is
securely in place, unscrew the roller adjustment
bolt counterclockwise until the weight of the
refrigerator is supported by the stabilizing brake.
This allows the weight to be positioned on the
stabilizing brake.
Replace the base grille and reinstall the end caps.
Reverse the procedure to roll the refrigerator out.
CAUTION: To avoid possible personal injury or property
damage, the leveling feet must be firmly touching
the floor.
Roller Adjustment Screw
(3/8″ hex with slot)
Roller
Leveling Foot
End Cap
Reversing the door swing.
Read these instructions completely and carefully.
Before You Begin
When reversing the door swing:
■ Read the instructions all the way through before starting.
■ Handle parts carefully to avoid scratching paint.
■ Set screws down by their related parts to avoid using them in the wrong places.
■ Provide a non-scratching work surface for the doors.
IMPORTANT: Once you begin, do not move the cabinet until door-swing reversal is completed.
These instructions are for changing the hinges from the right side to the left side—if you ever want to change the hinges
back to the right side, follow these same instructions and reverse all references to left and right.
Tools Required
■ Phillips screwdriver
■ Blade-type screwdriver or putty knife
■ Masking tape
■ 5/16″ hex head driver
■ 3/8″ hex head driver
Removing the doors.
The doors may need to be removed to move the unit through tight spaces.
You may also want to reverse the door swing for easier access to the refrigerator.
Page 13
On models with a freezer door: Tape the door
shut with masking tape at the upper corners.
Remove the center hinge pin with a 5/16″ hex
head driver. Then remove the center hinge by
removing the three Phillips head screws.
On models with a freezer drawer: Open the
drawer and remove the hinge bracket by
removing the three Phillips head screws.
Remove the center hinge pin with a 5/16″
hex head driver.
Invert the hinge bracket and reinstall the hinge
pin in the bracket. Set the hinge bracket and
the three screws aside for reinstallation later.
Remove Freezer Door and Transfer Bottom Hinge Bracket (Freezer Door Model only)
Remove the tape from the freezer door. Tilt the
door away from the cabinet and lift it to free its
bottom socket from the hinge pin on the center
hinge bracket.
Set the door on a non-scratching surface.
Remove the bottom hinge bracket by removing
the four 3/8″ hex head screws.
Remove the plug buttons on the bottom left
side of the cabinet and install them in the
vacant screw holes on the right side.
Install the bottom hinge bracket on the left
side.
Remove the hinge pin from the bottom hinge
bracket and install it in the outer hole.
Consumer SupportTroubleshooting TipsOperating Instructions
Safety Instructions
Installation Instructions
13
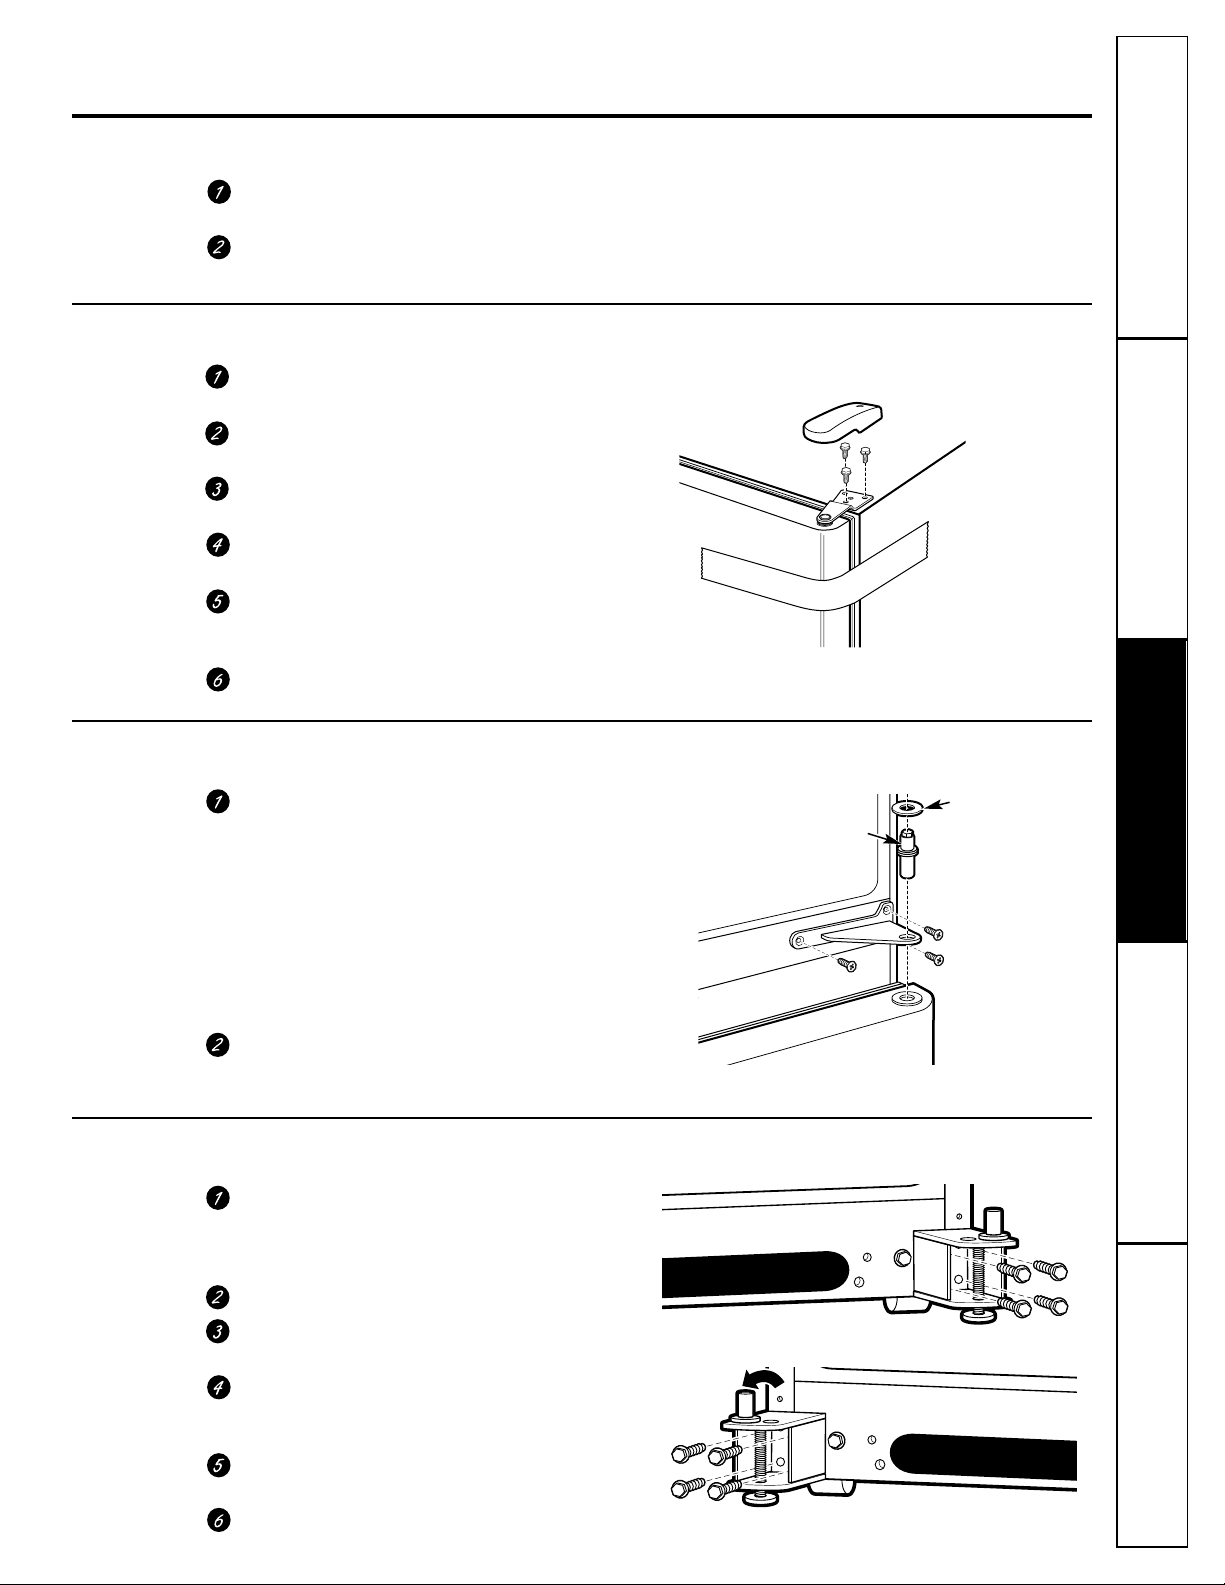
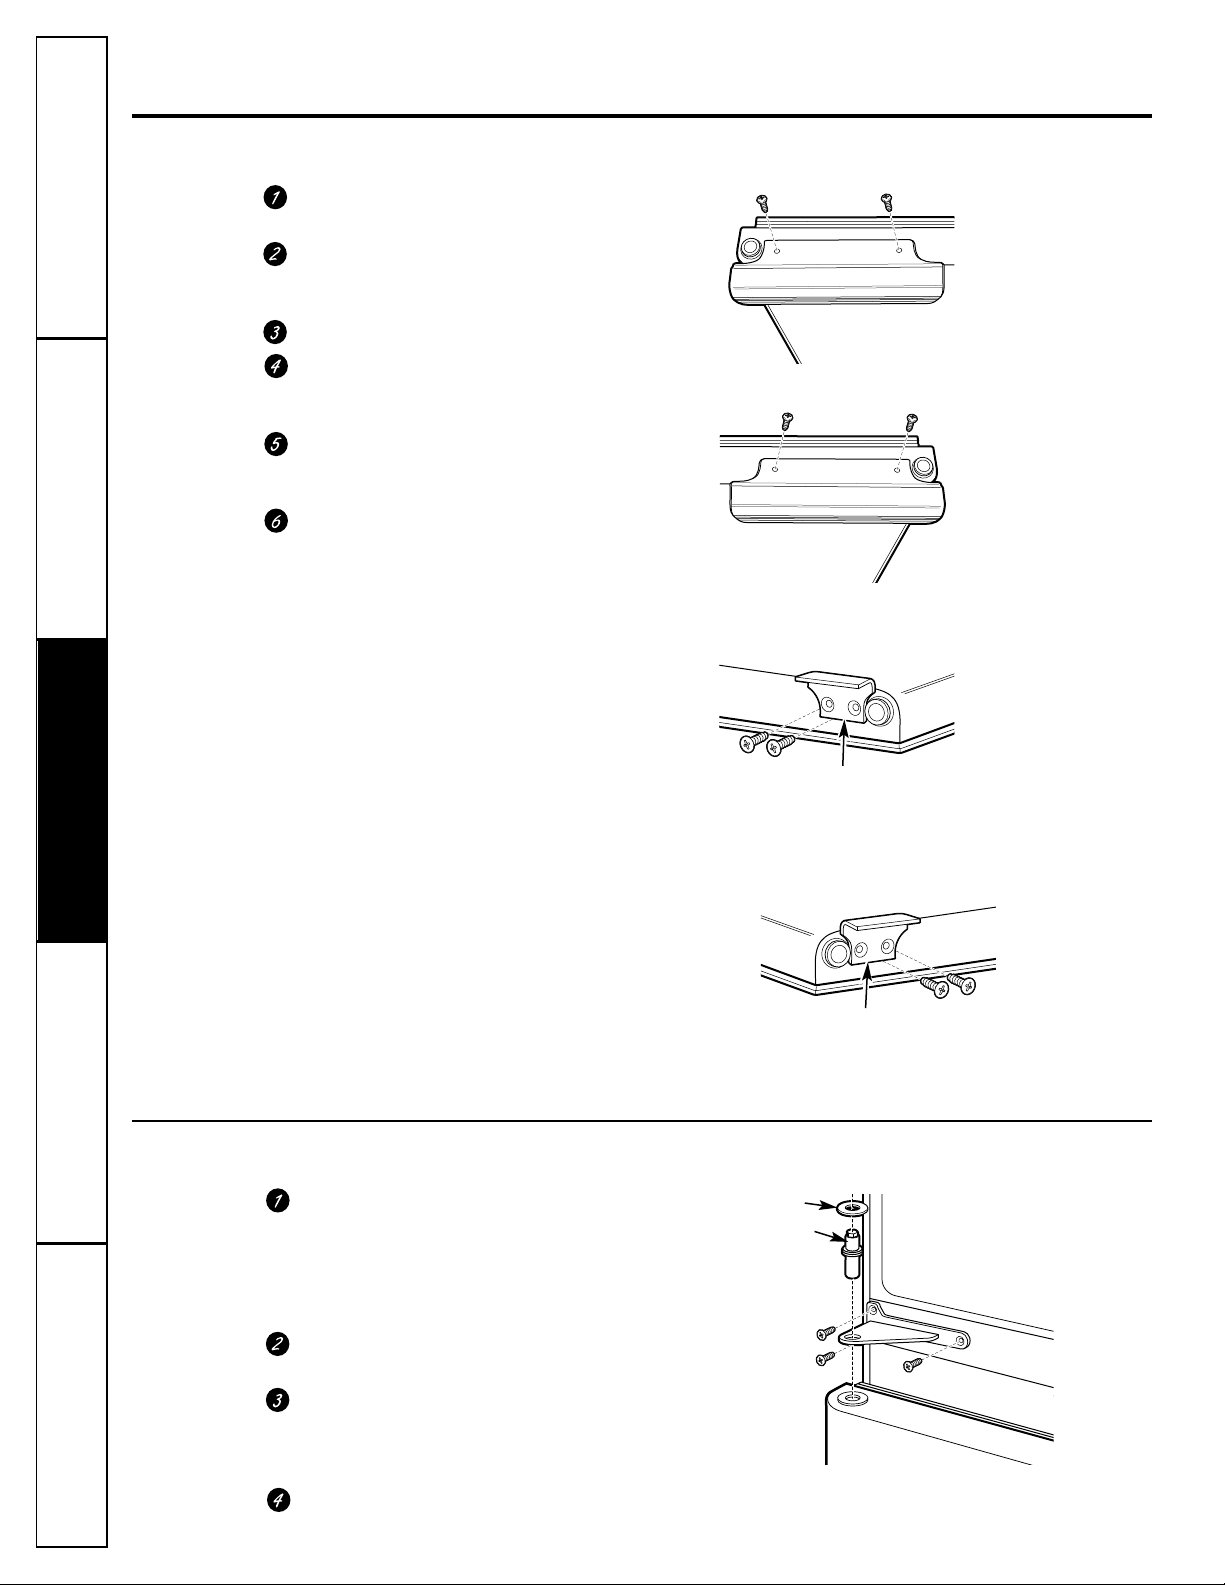
Remove the Refrigerator Door and Top Hinge
Remove the top hinge cover by removing the
screw.
Tape the door shut with masking tape at
both upper corners.
Remove the three 5/16″ hex head screws that
hold the top hinge to the cabinet.
Lift the hinge straight up to free the hinge pin
from the socket in the top of the door.
Remove the tape, tilt the door away from the
cabinet and lift it to free its bottom socket from
the hinge pin on the center hinge bracket.
Set the door on a non-scratching surface.
Before Removing the Doors
Unplug the refrigerator from its electrical
outlet.
Empty all door shelves, including the dairy
compartment.
CAUTION: Do not let either door drop to the floor. To do so
could damage the door stop.
Remove the Center Hinge Bracket
Center Right
Center Hinge Pin
Plastic Washer
Bottom Right
Bottom Left
Page 14
Remove the screws attaching the freezer door
handle to the left side and remove handle.
Remove the plug buttons on the right side and
install them in the vacant screw holes on the left
side.
Install the handle on the right side.
Remove the screws attaching the freezer door
stop to the bottom right side of the freezer
door.
Remove the plug buttons on the left side and
install them in the vacant screw holes on the
right side.
Install the door stop on the left side.
Rehang Freezer Door (on some models) and Install Center Hinge Bracket
On models with a freezer door: Lower the bottom
socket of the freezer door onto the bottom
hinge bracket. Shut the door and secure door
to cabinet with masking tape if needed. Insert
the center hinge pin into the hinge hole on top
of the freezer door.
Attach the center hinge bracket to the left side
loosely with the three Phillips head screws.
On models with a freezer door: Remove any
masking tape. Supporting the freezer door by
the handle, align the freezer door with the
cabinet.
Tighten the three screws.
14
Consumer Support Troubleshooting Tips
Operating Instructions Safety InstructionsInstallation Instructions
Reversing the door swing.
Reverse Freezer Door Handle and Transfer Door Stop (Freezer Door Model only)
Left Side
Right Side
Door Stop
Center Left
Center Hinge Pin
Plastic Washer
Door Stop
Left Side
Right Side
Page 15
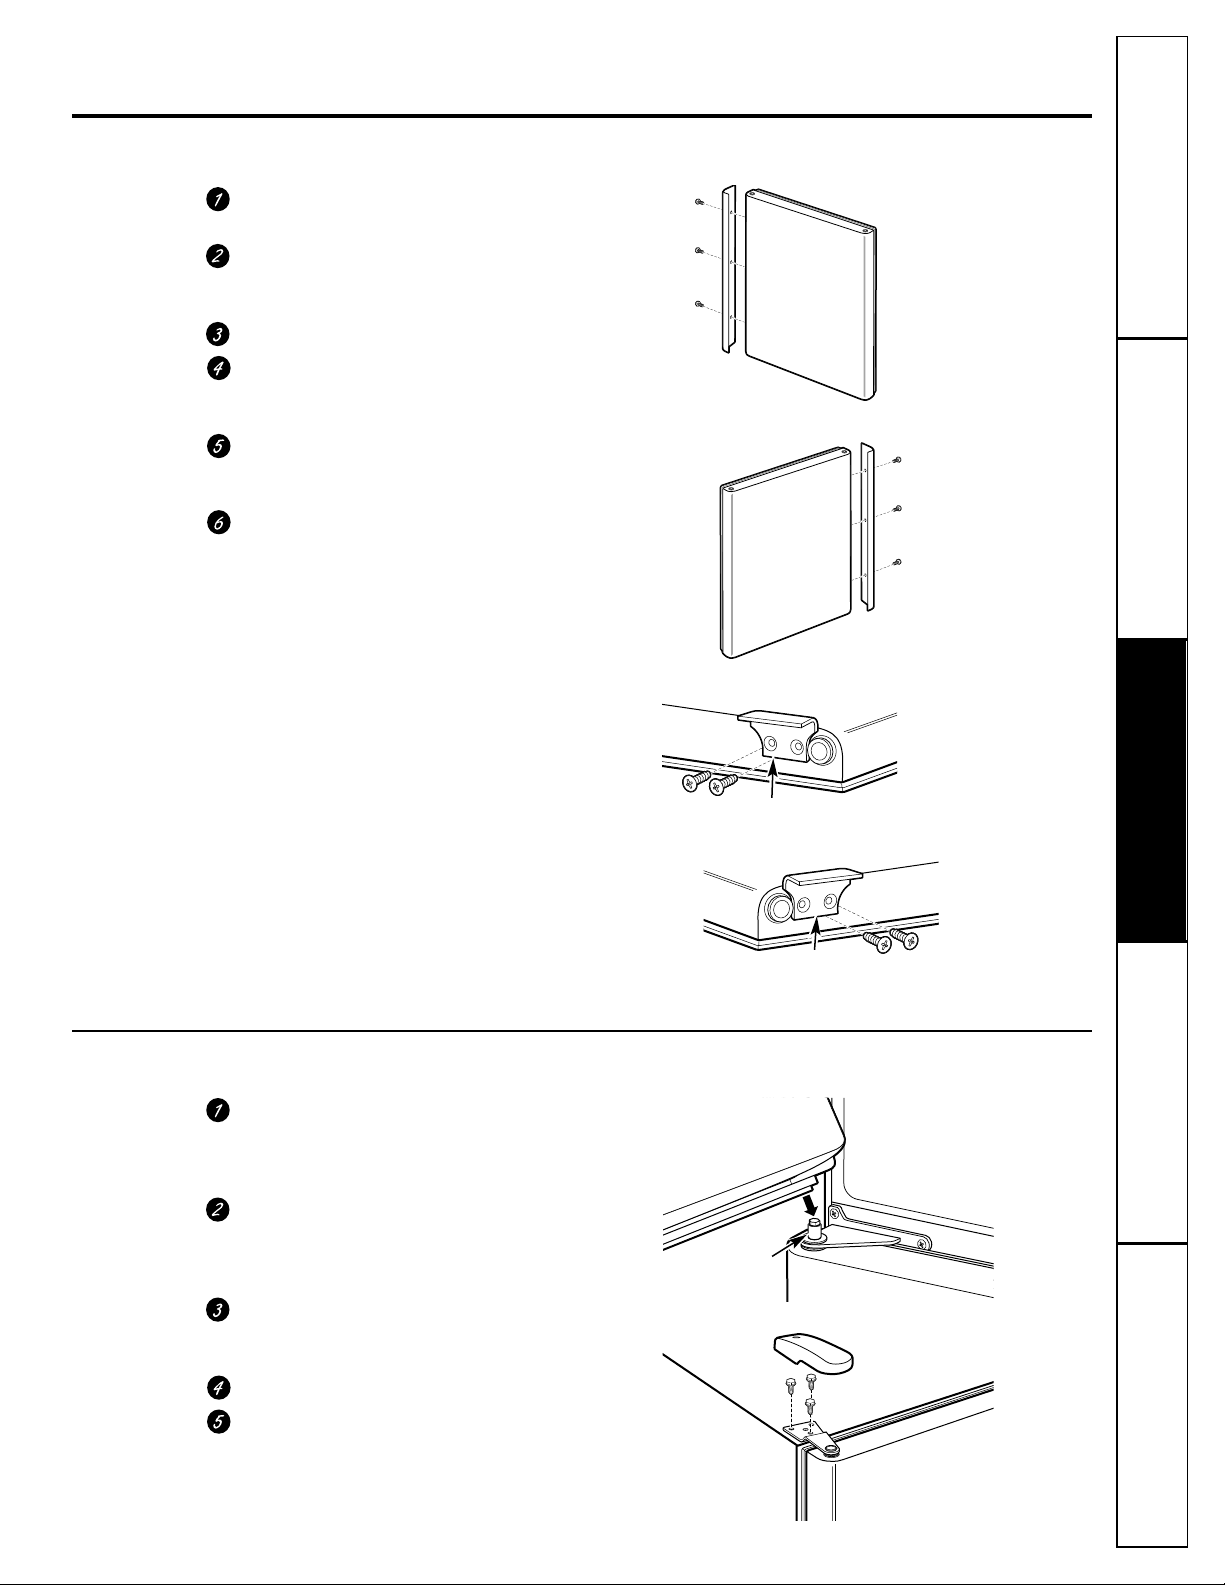
Rehang Refrigerator Door and Install Top Hinge
Lower the bottom socket of the refrigerator
door onto the center hinge bracket. Shut the
door and secure door to cabinet with masking
tape if needed.
Insert the top hinge pin into the hinge hole on
top of the refrigerator door and attach the top
hinge to the cabinet loosely with the three
5/16″ hex head screws.
Remove any masking tape. Supporting the
refrigerator door by the handle, align the door
with the cabinet.
Tighten the three screws.
Install the hinge cover.
Consumer SupportTroubleshooting TipsOperating Instructions
Safety Instructions
Installation Instructions
15
Reverse Refrigerator Door Handle and Transfer Door Stop
Remove the screws attaching the refrigerator
door handle to the left side and remove handle.
Remove the plug buttons on the right side
and install them in the vacant screw holes on
the left side.
Install the handle on the right side.
Remove the screws attaching the refrigerator
door stop to the bottom right side of the
refrigerator door.
Remove the plug buttons on the left side and
install them in the vacant screw holes on the
right side.
Install the door stop on the left side.
Center Hinge Pin
Left Side
Door Stop
Right Side
Door Stop
Left Side
Right Side
Left Side
Page 16

To remove the drawer front from the slides:
Remove the Phillips head screw on each side
of the railing. DO NOT remove the hex head
screws from the rail assemblies.
Lift up on the freezer drawer handle to separate
the drawer railings from the rail assemblies.
Set the drawer on a non-scratching surface.
16
Consumer Support Troubleshooting Tips
Operating Instructions Safety InstructionsInstallation Instructions
Removal of freezer drawer.
The freezer drawer can be removed, if needed, to fit through tight areas.
Read these instructions completely and carefully.
To Remove the Freezer Drawer
To remove the baskets:
Open the freezer drawer all the way.
Slide the top basket back into the freezer.
Remove the lower basket by lifting it up at the
back, then lifting the entire basket up and out
of the railings.
To Remove the Stabilizing Brakes (if needed to fit through tight spaces)
Remove the base grille. Then remove both end
caps. Remove both stabilizing brakes with 3/8″
hex head driver.
Base Grille
End Cap
Phillips
Screw
Bracket
Page 17
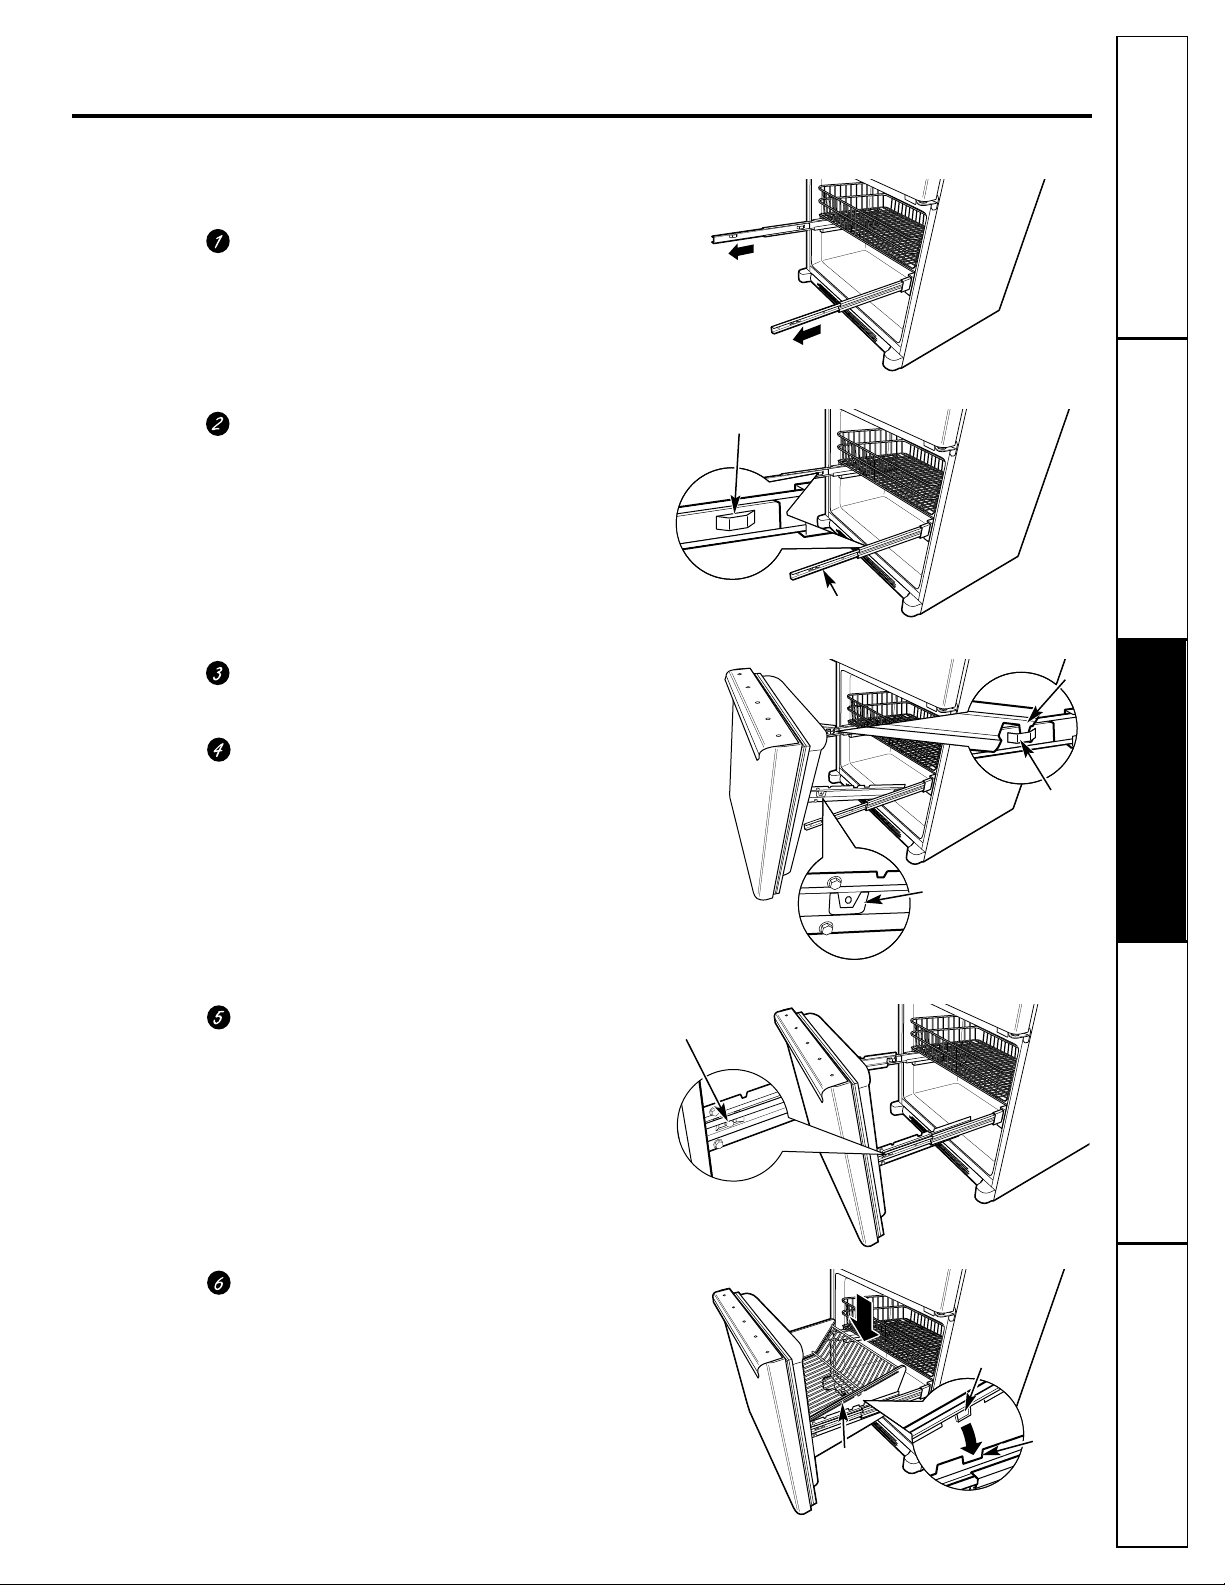
Replace the Phillips head screw on both rail
assemblies.
Locate the slots on the inside of the rail
assemblies near the back.
Insert the hooks at the back of the railings
attached to the drawer, into the slots on the rail
assemblies.
Lower the front of the drawer, making sure the
tabs on the sides of the railing fit into the front
slots in the rail assemblies.
Replace the lower freezer basket. Make sure
the tabs on the sides of the basket fit into the
back notches in the rail assemblies and that
the lip on each side fits over the inside
section of the railings.
Consumer SupportTroubleshooting TipsOperating Instructions
Safety Instructions
Installation Instructions
To Replace the Freezer Drawer
IMPORTANT: Two people may be required to complete
this procedure.
Pull out the rail assemblies to the full length on
each side of the cabinet.
Slot
Rail assembly
Slot
Tab
Hook
Phillips
Screw
Tab
Notch
Lip
17
Page 18
Consumer Support Troubleshooting Tips
Operating Instructions Safety InstructionsInstallation Instructions
18
Normal operating sounds.
Before you call for service…
Troubleshooting Tips
Save time and money! Review the charts on the following
pages first and you may not need to call for service.
Problem Possible Causes What To Do
Refrigerator does not Refrigerator in defrost cycle. • Wait about 30 minutes for defrost cycle to end. If lights
operate work but the unit does not restart, remove the base grille.
Locate the defrost timer mounted on the center rail and
turn the timer knob clockwise until you hear a click. The
refrigerator should begin operating.
Control in 0 (off) position. • Move the control to a temperature setting.
Refrigerator is unplugged. • Push the plug completely into the outlet.
The fuse is blown/circuit • Replace fuse or reset the breaker.
breaker is tripped.
Vibration or rattling Rollers need adjusting. • See Rollers.
(slight vibration
is normal)
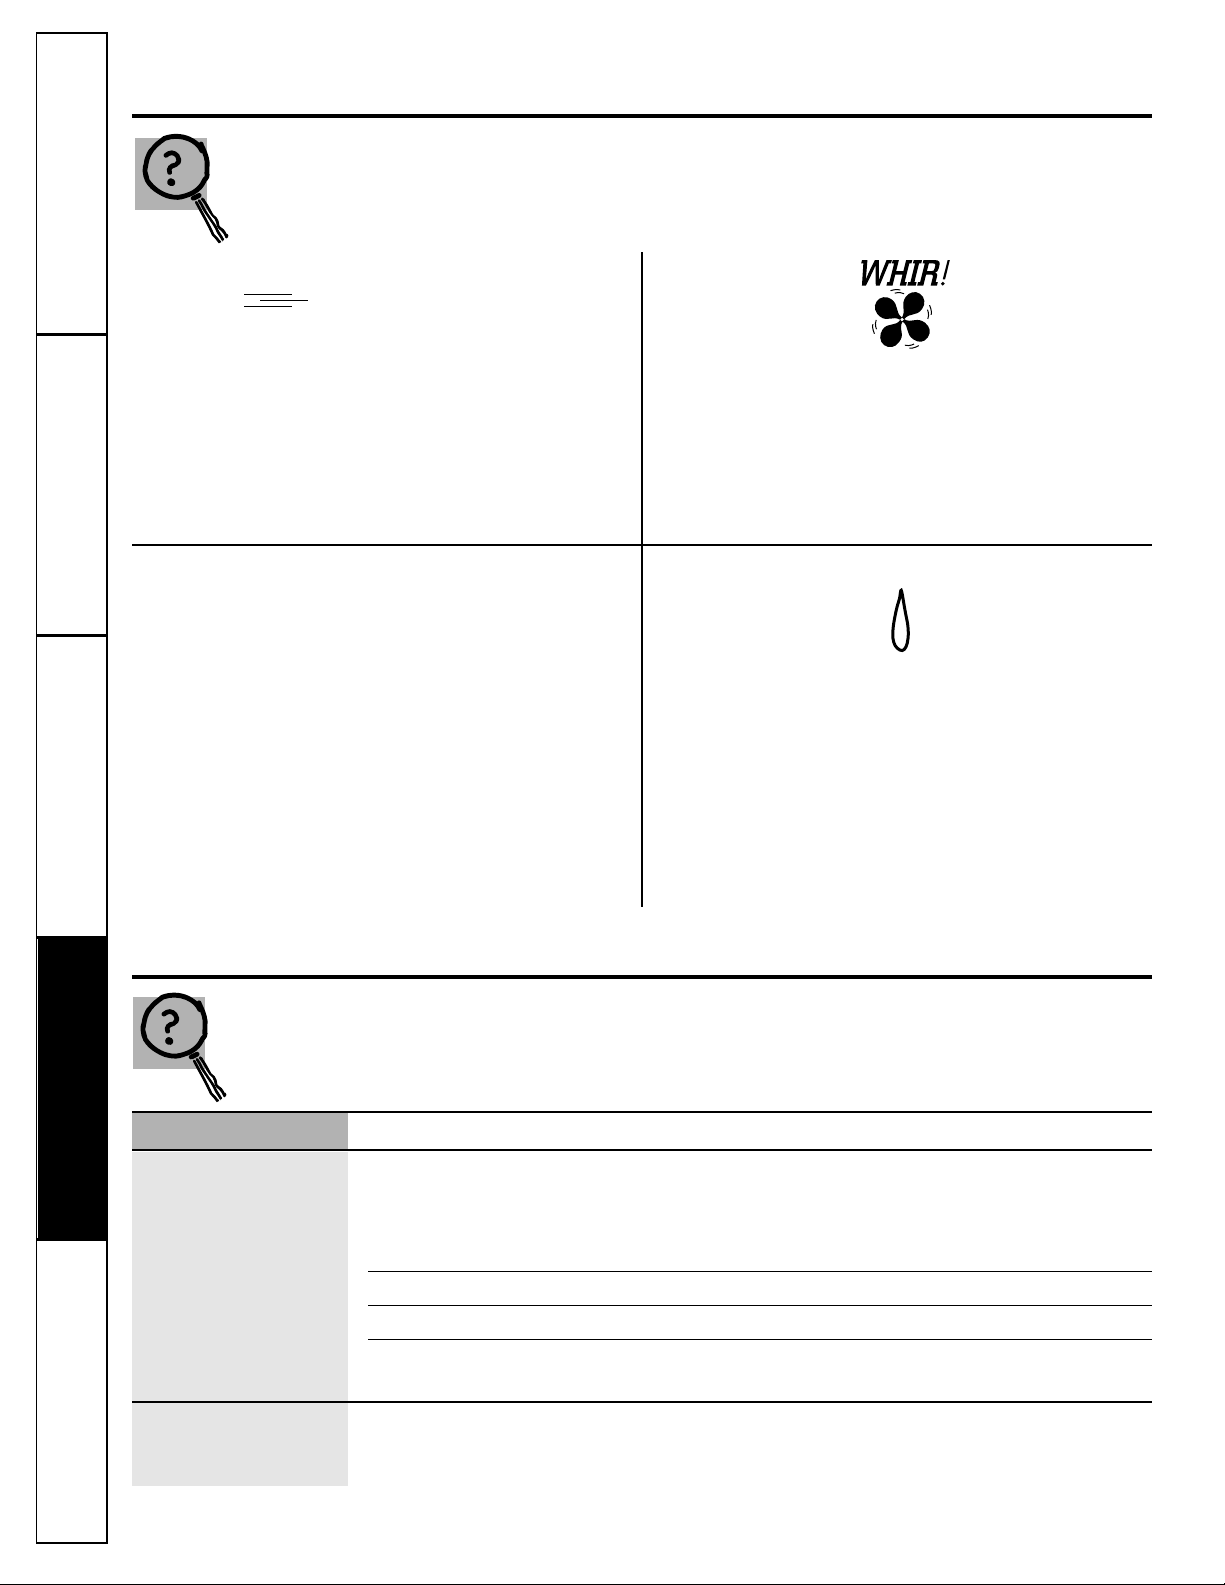
Newer refrigerators sound different from older refrigerators.
Modern refrigerators have more features and use newer technology.
HUMMM...
WHOOSH...
■
The new high efficiency compressor may run faster and longer
than your old refrigerator and you may hear a high-pitched
hum or pulsating sound while it is operating.
■
You may hear a whooshing sound when the doors close. This is
due to pressure equalizing within the refrigerator.
■
You may hear the fans spinning at high speeds. This happens
when the refrigerator is first plugged in, when the doors are
opened frequently or when a large amount of food is added to
the refrigerator or freezer compartments. The fans are helping
to maintain the correct temperatures.
■
The fans change speeds in order to provide optimal cooling
and energy savings.
CLICKS, POPS,
CRACKS and SNAPS
■
You may hear cracking or popping sounds when the
refrigerator is first plugged in. This happens as the refrigerator
cools to the correct temperature.
■
The freezer control will click when starting or stopping the
compressor.
■
Defrost timer snapping in and out of the defrost cycle.
■
Expansion and contraction of cooling coils during and after
defrost can cause a cracking or popping sound.
■
On models with an icemaker, after an icemaking cycle, you
may hear the ice cubes dropping into the ice bucket.
WATER SOUNDS
■
The flow of refrigerant through the freezer cooling coils may
make a gurgling noise like boiling water.
■
Water dropping on the defrost heater can cause a sizzling,
popping or buzzing sound during the defrost cycle.
■
A water dripping noise may occur during the defrost cycle as
ice melts from the evaporator and flows into the drain pan.
■
Closing the door may cause a gurgling sound due to pressure
equalization.
Do you hear what I hear? These sounds are normal.
Page 19
19
Consumer SupportTroubleshooting TipsOperating Instructions
Safety Instructions
Installation Instructions
GEAppliances.com
Problem Possible Causes What To Do
Motor operates for Normal when refrigerator • Wait 24 hours for the refrigerator to completely
long periods or cycles is first plugged in. cool down.
on and off frequently.
Often occurs when large • This is normal.
(Modern refrigerators
amounts of food are
with more storage
placed in refrigerator.
space and a larger
Door left open. • Check to see if package is holding door open.
freezer require more
Hot weather or frequent • This is normal.
operating time. They
door openings.
start and stop often
Temperature control • See About the controls.
to maintain even
set at the coldest setting.
Grille and condenser need •See Care and cleaning.
cleaning.
Refrigerator or freezer Temperature controls not set • See About the controls.
compartment too warm cold enough.
Warm weather or frequent •Set the temperature control one step colder.
door openings. See About the controls.
Door left open. • Check to see if package is holding door open.
Frost or ice crystals Door left open. • Check to see if package is holding door open.
on frozen food
Too frequent or too long
(frost within package
door openings.
is normal)
Ice cubes have Food transmitting odor/taste • Wrap foods well.
odor/taste to ice cubes.
Interior of refrigerator •See Care and cleaning.
needs cleaning.
Slow ice cube freezing Door left open. • Check to see if package is holding door open.
Freezer control not set • See About the controls.
cold enough.
Refrigerator has odor Foods transmitting • Foods with strong odors should be tightly wrapped.
odor to refrigerator.
• Keep an open box of baking soda in the refrigerator;
replace every three months.
Interior needs cleaning. • See Care and cleaning.
Moisture forms on Not unusual during • Wipe surface dry and reset the refrigerator control
outside of refrigerator periods of high humidity. one setting colder.
Moisture collects inside Too frequent or too
(in humid weather, air long door openings.
carries moisture into
refrigerator when doors
are opened)
Door/drawer does not Rollers need adjusting. •See Preparing to Install the Refrigerator.
close by itself
Freezer door/drawer This is normal if, after popping • This indicates that there is a good seal on the freezer
pops open when open, the freezer door/drawer door/drawer. If the freezer door/drawer does not
refrigerator door closed on its own. automatically close after popping open, then see the
is closed Problem: Door/drawer does not close by itself, above.
temperatures.)
Page 20
CUSTOMER WARRANTY
(for customers in Canada)
Your refrigerator is warranted to be free of defects in material and workmanship.
What is covered How Long Warranted Parts Labour
(From Date of Sale) Repair or Replace
at Camco’s Option
Compressor Ten (10) Years Ten (10) Years Five (5) Years
Sealed System (including Five (5) Years Five (5) Years Five (5) Years
evaporator, condenser
tubing and refrigerant)
All Other Parts One (1) Year One (1) Year One (1) Year
TERMS AND CONDITIONS:
1. This warranty applies only for single
family domestic use in Canada when the
Refrigerator has been properly installed
according to the instructions supplied by
Camco and is connected to an adequate
and proper utility service.
Damage due to abuse, accident,
commercial use, and alteration or
defacing of the serial plate cancels all
obligations of this warranty.
Service during this warranty period must
be performed by an Authorized Camco
Service Agent.
2. Neither Camco nor the Dealer is liable for
any claims or damages resulting from
failure of the Refrigerator or from service
delays beyond their reasonable control.
3.
To obtain warranty service, purchaser
must present the original Bill of Sale.
Components repaired or replaced are
warranted through the remainder of the
original warranty period only.
4. This warranty is in addition to any
statutory warranty.
WHAT IS NOT COVERED:
• Service trips to your home to teach you
how to use the product.
• Damage to finish after delivery.
• Improper installation—proper installation
includes adequate air circulation to the
refrigeration system, adequate electrical,
plumbing and other connecting facilities.
• Replacement of house fuses or resetting
of circuit breakers.
• Replacement of light bulbs.
• Damage to product caused by accident,
fire, floods or acts of God.
• Loss of food due to spoilage.
• Proper use and care of product as listed
in the owner’s manual, proper setting of
controls.
• WARRANTOR IS NOT RESPONSIBLE
FOR CONSEQUENTIAL DAMAGES.
IMPORTANT
Keep this warranty and your bill of sale as proof of original purchase and purchase date.
Camco Service is available coast to coast.
If further help is needed concerning this
warranty, contact:
Manager, Consumer Relations
Camco Inc., Consumer Service
1 Factory Lane
Suite 310
Moncton, New Brunswick E1C 9M3
20
Staple your receipt here.
Proof of the original purchase
date is needed to obtain service
under the warranty.
Page 21

21
Consumer SupportTroubleshooting TipsOperating Instructions
Safety Instructions
Installation Instructions
Refrigerator Warranty. (For customers in the United States)
For The Period Of: GE Will Replace:
One Year Any part of the refrigerator which fails due to a defect in materials or workmanship.
From the date of the During this full one-year warranty, GE will also provide, free of charge, all labor
original purchase and in-home service to replace the defective part.
Five Years Any part of the sealed refrigerating system (the compressor, condenser, evaporator
From the date of the and all connecting tubing) which fails due to a defect in materials or workmanship.
original purchase During this five-year warranty, GE will also provide, free of charge, all labor and
in-home service to replace the defective part.
■ Service trips to your home to teach you how to use the
product.
■ Improper installation.
■ Failure of the product if it is abused, misused, or used for
other than the intended purpose or used commercially.
■ Loss of food due to spoilage.
■ Replacement of house fuses or resetting of circuit
breakers.
■ Damage to the product caused by accident, fire, floods or
acts of God.
■ Incidental or consequential damage caused by possible
defects with this appliance.
What GE Will Not Cover:
This warranty is extended to the original purchaser and any succeeding owner for products purchased for home
use within the USA. In Alaska, the warranty excludes the cost of shipping or service calls to your home.
Some states do not allow the exclusion or limitation of incidental or consequential damages. This warranty gives
you specific legal rights, and you may also have other rights which vary from state to state. To know what your
legal rights are, consult your local or state consumer affairs office or your state’s Attorney General.
Warrantor: General Electric Company. Louisville, KY 40225
All warranty service provided by our Factory Service Centers,
or an authorized Customer Care
®
technician. To schedule service,
on-line, 24 hours a day, visit us at GEAppliances.com, or call
800.GE.CARES (800.432.2737).
Staple your receipt here.
Proof of the original purchase
date is needed to obtain service
under the warranty.
Page 22

Soutien au
consommateur
Conseils de dépannage
Fonctionnement Mesures de sécuritéInstallation
Mesures de sécurité . . . . . . .23, 24
Fonctionnement
Caractéristiques . . . . . . . . . . .26, 27
Commandes . . . . . . . . . . . . . . . . .25
Service de glaçons . . . . . . . . . . . .28
Entretien et nettoyage
Nettoyage . . . . . . . . . . . . . . . .29, 30
Remplacement des ampoules . . .30
Installation
Changement du sens
d’ouverture de la porte . . . . .32–35
Enlèvement du tiroir
du congélateur . . . . . . . . . . . .36, 37
Préparation . . . . . . . . . . . . . .31, 32
Conseils de dépannage . . . .38, 39
Bruits de fonctionnement
normaux . . . . . . . . . . . . . . . . . . . .38
Soutien au consommateur
Garantie pour la clientèle
au Canada . . . . . . . . . . . . . . . . . .40
Soutien au consommateur . . . . .41
22
Écrivez ici le numéro de modèle et le
numéro de série :
Modèle #__________________________
Série # __________________________
Vous trouverez ces numéros sur
l’étiquette grise située à droite, près du
haut du compartiment réfrigérateur.
Page 23

Soutien au
consommateur
Conseils de dépannageFonctionnementMesures de sécurité Installation
MESURES DE SÉCURITÉ IMPORTANTES.
LISEZ D’ABORD TOUTES LES DIRECTIVES.
electromenagersge.ca
AVERTISSEMENT!
N’utilisez cet électroménager que pour l’usage auquel il est destiné, comme expliqué dans le présent manuel.
MESURES DE SÉCURITÉ
Lorsque vous utilisez un appareil électrique, observez toujours les mesures de sécurité de base,
y compris les suivantes.
■ Installez le réfrigérateur conformément aux
directives d’installation avant de l’utiliser.
■ Ne laissez pas les enfants grimper, s’asseoir,
se tenir debout ni se pendre aux clayettes du
réfrigérateur. Ils pourraient endommager le
réfrigérateur et se blesser gravement.
■ Ne recongelez pas les aliments surgelés qui ont
complètement dégelé.
■ N’entreposez et n’utilisez pas d’essence ou autres
vapeurs et liquides inflammables à proximité de
cet appareil ou de tout autre appareil
électroménager.
■ Éloignez les doigts des parties du réfrigérateur où
l’on peut facilement se pincer : les espaces entre
les portes et entre les portes et les placards sont
toujours étroits. Soyez prudent lorsque vous fermez
les portes de l’appareil en présence des enfants.
■ Si votre réfrigérateur est doté d’une machine à
glaçons automatique évitez le contact avec les
pièces mobiles du mécanisme éjecteur, ou avec
l’élément chauffant qui libère les glaçons.
Ne posez pas les doigts ou les mains sur le
mécanisme de la machine à glaçons pendant
que le réfrigérateur est branché.
■ Ne touchez pas les surfaces froides du congélateur
si vous avez les mains humides ou mouillées : la
peau risque d’adhérer à ces surfaces très froides.
■ Débranchez votre réfrigérateur avant de le
nettoyer ou de le réparer.
REMARQUE : Nous vous recommandons vivement de
confier toute réparation à un technicien qualifié.
■ Lorsque vous réglez la commande sur 0 (arrêt),
l’alimentation électrique de l’ampoule n’est pas
coupée.
COMMENT VOUS DÉBARRASSER CONVENABLEMENT
DE VOTRE ANCIEN RÉFRIGÉRATEUR
Les enfants pris au piège ou morts d’asphyxie sont
toujours d’actualité. Les réfrigérateurs abandonnés
sont toujours aussi dangereux, même si on n’attend
que «quelques jours» pour s’en débarrasser. Si vous
ne gardez pas votre ancien réfrigérateur, veuillez
suivre les directives ci-dessous afin de prévenir les
accidents.
Avant de vous débarrasser de votre ancien
réfrigérateur ou congélateur :
■ Démontez les portes.
■ Laissez les clayettes en place afin d’empêcher
les enfants de grimper à l’intérieur.
Réfrigérants
Tous les appareils de réfrigération contiennent
des réfrigérants qui, conformément aux lois
fédérales, doivent être enlevés avant toute
élimination de l’appareil. Si vous vous
débarrassez de vieux appareils de réfrigération,
vérifiez, auprès de la société qui s’occupe de
leur élimination, ce que vous devez faire.
CORDONS PROLONGATEURS
Nous vous recommandons fortement de ne pas utiliser de cordons prolongateurs à cause des risques
potentiels qu’ils présentent dans certaines conditions.
Toutefois si vous décidez d’utiliser tout de même un cordon prolongateur, il est absolument nécessaire
qu’il s’agisse d’un cordon à 3 fils avec mise à la terre pour appareils électroménagers homologué
UL (aux États-Unis) ou certifié CSA (au Canada), pourvu d’une fiche et d’une prise mises à la terre
de 15 ampères (minimum) et de 120 volts.
DANGER! RISQUES POUR LES ENFANTS
23
Page 24

24
MESURES DE SÉCURITÉ IMPORTANTES.
LISEZ D’ABORD TOUTES LES DIRECTIVES.
AVERTISSEMENT!
RACCORDEMENT ÉLECTRIQUE
Ne coupez ni retirez en aucun cas la troisième broche (mise à la terre) de la fiche du cordon
d’alimentation. Pour votre sécurité, cet appareil doit être correctement mis à la terre.
Le cordon d’alimentation de cet appareil est muni
d’une fiche à 3 broches (mise à la terre) qui se
branche dans une prise murale ordinaire à
3 alvéoles (mise à la terre) pour réduire au
minimum les risques de chocs électriques.
Faites examiner la prise de courant et le circuit
par un électricien qualifié pour vous assurer que
la prise est correctement mise à la terre.
Si la prise murale est du type standard à 2 alvéoles,
il vous incombe de la faire remplacer par une prise
à 3 alvéoles correctement mise à la terre.
Le réfrigérateur doit toujours être branché dans sa
propre prise de courant, dont la tension nominale
est identique à celle indiquée sur la plaque
signalétique.
Cette précaution est recommandée pour garantir
un rendement optimum et éviter une surcharge des
circuits électriques de la résidence, ce qui pourrait
créer un risque d’incendie par surchauffe des fils.
Ne débranchez jamais le réfrigérateur en tirant
sur le cordon d’alimentation. Saisissez fermement
la fiche du cordon et tirez droit pour la retirer
de la prise.
Réparez ou remplacez immédiatement tout cordon
effiloché ou endommagé. N’utilisez pas un cordon
fendillé ou présentant des signes d’usure.
Lorsque vous déplacez votre réfrigérateur du mur,
faites attention de ne pas le faire rouler sur le
cordon d’alimentation afin de ne pas
l’endommager.
FICHE D’ADAPTATION (Fiches d’adaptation non permises au Canada)
Nous vous recommandons fortement de ne pas utiliser une fiche d’adaptation à cause des risques
potentiels qu’elle présente dans certaines circonstances.
Toutefois, si vous décidez d’utiliser tout de même
une fiche d’adaptation, vous pouvez effectuer un
raccordement temporaire, si les codes locaux le
permettent, dans une prise de courant à 2 alvéoles
adéquatement mise à la terre en utilisant une fiche
d’adaptation homologuée UL, en vente dans la
plupart des quincailleries.
La fente la plus longue de la fiche doit être alignée
avec la fente la plus longue de la prise murale afin
d’assurer la polarité appropriée pour le
branchement du cordon d’alimentation.
Lorsque vous débranchez le cordon d’alimentation
de la fiche d’adaptation, saisissez toujours la fiche
d’une main pendant que vous tirez sur la fiche du
cordon d’alimentation de l’autre. Sinon,
la borne de mise à la terre de la fiche d’adaptation
risque de casser avec le temps.
Si la borne de mise à la terre de la fiche casse,
N’UTILISEZ PAS l’appareil tant qu’une mise à la terre
adéquate n’aura pas été rétablie.
Le fait de fixer la borne de mise à la terre de la fiche
d’adaptation à la plaque de la prise de courant n’assure
pas automatiquement la mise à la terre de l’appareil. Il
faut que la vis soit en métal, non isolée, et que la prise de
courant soit mise à la terre par l’entremise du câblage de
la résidence. Faites vérifier le circuit par un électricien
qualifié pour vous assurer que la prise est adéquatement
mise à la terre.
VEUILLEZ LIRE ET SUIVRE ATTENTIVEMENT
CES MESURES DE SÉCURITÉ.
CONSERVEZ CES DIRECTIVES
Soutien au
consommateur
Conseils de dépannage
Fonctionnement Mesures de sécuritéInstallation
Page 25

Les commandes du réfrigérateur. electromenagersge.ca
Réglage des commandes
Commande de température du réfrigérateur
La commande de température du réfrigérateur maintient les températures dans tout le
compartiment réfrigérateur.
Commande de température du congélateur
La commande de température du congélateur maintient les températures dans tout le compartiment
congélateur.
Si vous réglez la commande du congélateur sur 0 (arrêt), la réfrigération cesse dans les deux
compartiments, mais le courant alimentant le réfrigérateur n’est pas coupé.
Réglez initialement la commande du réfrigérateur sur 5 et celle du congélateur sur 5.
Si vous désirez augmenter ou abaisser la température, réglez d’abord celle du compartiment réfrigérateur. Lorsque vous
êtes satisfait du réglage du réfrigérateur, ajustez la température du congélateur.
Les réglages de commandes varieront en fonction des préférences personnelles, de l'utilisation et des conditions de
fonctionnement. Ces réglages peuvent nécessiter plus d'un ajustement.
Après avoir réglé les commandes, attendez 24 heures pour laisser le réfrigérateur atteindre la température que vous
avez réglée.
25
Soutien au
consommateur
Conseils de dépannageFonctionnementMesures de sécurité Installation
5
4
6
Page 26

26
Les clayettes et les balconnets.
Toutes les caractéristiques ne sont pas disponibles sur tous les modèles.
Balconnet de porte du réfrigérateur
Le balconnet inférieur de la porte du
réfrigérateur est amovible pour faciliter
le nettoyage.
Pour l’enlever, tenez-le par ses extrémités
et tirez-le vers le haut.
Bacs réglables dans la porte du réfrigérateur
Les bacs réglables s’enlèvent facilement
pour que vous puissiez les apporter à votre
surface de travail.
Enlèvement : Soulevez l’avant du bac droit
vers le haut, puis enlevez en soulevant.
Remise en place ou changement
d’emplacement : Engagez le bac dans les
soutiens moulés de la porte, et poussez
vers le bas. Le bac se fixe en place.
Soutien au
consommateur
Conseils de dépannage
Installation Mesures de sécuritéFonctionnement
Mise en place des clayettes
Les clayettes du réfrigérateur sont réglables.
Compartiment réfrigération
Enlèvement :
Soulevez la clayette à l’avant.
Soulevez la clayette à l’arrière et
faites-la sortir.
Remise en place :
En faisant basculer la clayette vers le
haut, insérez le crochet supérieur à
l’arrière de la clayette dans une fente
du rail.
Abaissez le devant de la clayette
jusqu’à ce que le bas de la clayette
se fixe en place.
Clayettes anti-déversement (sur certains modèles)
Les clayettes anti-déversement ont des bords
spéciaux pour empêcher tout déversement
aux clayettes inférieures. Pour enlever ou
remettre en place ces clayettes, consultez
Disposition des clayettes.
Clayette coulissante anti-déversement (sur certains modèles)
Grâce à la clayette glissante antidéversement, vous pouvez atteindre des
articles placés derrière d’autres. Ses bords
spéciaux sont conçus pour empêcher tout
déversement aux clayettes inférieures.
Assurez-vous de bien pousser les clayettes jusqu’au
fond pour refermer la porte.
Panier sauve clayette (sur certains modèles)
Le panier amovible à breuvages contient
douze boîtes de boisson gazeuse ou deux
bouteilles de vin (longitudinalement).
On peut l’enlever pour nettoyer.
Pour enlever, faites glisser le panier vers le
haut jusqu’à sa position d’arrêt, soulevez le
panier pour lui faire dépasser sa position
d’arrêt, puis enlevez-le.
Page 27

Les bacs de rangement. electromenagersge.ca
Toutes les caractéristiques ne sont pas disponibles sur tous les modèles.
27
Bacs à fruits et à légumes
Si une quantité d’eau excessive s’accumule
dans le fond des bacs, videz-les et essuyez-les.
Bacs à humidité réglable
Réglez la commande sur HI (haut) pour
que le bac conserve un degré d’humidité
élevé pour la conservation des légumes.
Réglez la commande sur LO (bas) pour
abaisser le degré d’humidité dans le bac
pour la conservation des fruits.
Bacs à collations
Le bac à collations peut être transporté à
l’endroit qui convient le mieux aux besoins
de votre famille.
Enlèvement des bacs
Les bacs à la partie inférieure du
compartiment réfrigérateur se bloquent
avant de sortir complètement de l’appareil
afin d’empêcher que leur contenu ne se
renverse sur le plancher. Ces bacs peuvent
être enlevés facilement en les relevant
légèrement tout en les tirant au-delà de
leurs «butées».
Pour enlever les bacs lorsque la porte
du compartiment réfrigérateur ne s’ouvre
pas complètement, retirez d’abord les
aliments.
Enlevez le bac le plus éloigné de la
porte.
Enlevez le couvercle de verre en
le soulevant par le dessous et en
l’inclinant pour le dégager de la porte.
Faites attention lorsque vous manipulez
le couvercle de verre. Nous vous
recommandons de porter des gants
protecteurs.
Enlevez le rail du centre et enlevez le
bac. Après avoir nettoyé, remettez en
place les bacs en suivant l’ordre inverse.
Soutien au
consommateur
Conseils de dépannageFonctionnement
Mesures de sécurité
Installation
Page 28

28
Service de glaçons.
Toutes les caractéristiques ne sont pas disponibles sur tous les modèles.
Nécessaire de machine à glaçons automatique
Un nécessaire de machine à glaçons
automatique est disponible, moyennant
supplément.
Pour connaître le nécessaire qui convient à
votre modèle de machine à glaçons, vérifiez
l’étiquette dans le côté droit à proximité de
dessus du compartiment réfrigérateur.
Compartiment du service de glaçons
Le congélateur possède un compartiment
pour le service de glaçons comprenant une
clayette pour les moules à glaçons et un bac
à glaçons amovible.
ATTENTION : Assurez-vous que la clayette est bien
installée avant d’y placer des articles afin d’éviter
tout dommage matériel.
Installation du clayette pour les moules à
glaçons :
Faites glisser l’ouverture en L, située
du côté du compartiment, sur la vis
arrière située sur la paroi de côté du
réfrigérateur.
Poussez le compartiment en place
jusqu’à ce que la vis soit fixée à
l’ouverture en L.
Abaissez l’avant du compartiment
jusqu’à ce que la vis avant, située sur la
paroi de côté du réfrigérateur, entre
dans l’ouverture située à l’avant du
compartiment à glaçons.
Soutien au
consommateur
Conseils de dépannage
Installation Mesures de sécuritéFonctionnement
Page 29

Entretien et nettoyage du réfrigérateur. electromenagersge.ca
29
Nettoyage de l’extérieur
Les poignées de porte et leur garniture.
Nettoyez-les au moyen d’un linge humecté
d’eau savonneuse. Séchez avec un linge
doux. N’appliquez pas de cire sur les
poignées et les garnitures de porte.
Gardez l’extérieur du réfrigérateur propre.
Essuyez-le avec un linge propre légèrement
humecté de cire pour appareils
électroménagers ou d’un détergent liquide
doux pour la vaisselle. Séchez et polissez
avec un linge doux et propre.
N’essuyez pas le réfrigérateur avec un linge
à vaisselle sale ou une serviette humide :
ils pourraient laisser un résidu qui pourra
endommager la peinture. N’utilisez pas de
tampons à récurer, de produits nettoyants en
poudre, de javellisants ou de produits nettoyants
contenant un javellisant, car ces produits peuvent
égratigner la peinture et la rendre
moins résistante.
Vous pouvez nettoyer les panneaux et les
poignées de porte en acier inoxydable avec un
nettoyant d’acier inoxydable vendu sur le
marché, comme le Stainless Steel Magic.
™
Vous trouverez le Stainless Steel Magic
chez Ace, True Value, Servistar, HWI et dans
d’autres magasins connus. Vous pouvez
également le commander en vous adressant
au Service de pièces et accessoires GE par
téléphone au numéro 800.626.2002 ou à
notre site Web GEAppliances.com. Au
Canada, appelez le 1.888.261.3055 ou
visitez notre site Web, electromenagersge.ca.
Commandez la pièce numéro WX10X15.
N’utilisez pas de cire pour appareils ménagers sur
l’acier inoxydable.
Nettoyage de l’intérieur
Pour éviter les mauvaises odeurs, laissez
une boîte ouverte de bicarbonate de soude
dans les compartiments réfrigérateur et
congélateur.
Débranchez le réfrigérateur avant de le
nettoyer. S’il est trop difficile de le faire,
essorez bien votre linge ou votre éponge
pour enlever l’excès d’eau lorsque vous
nettoyez autour des interrupteurs, des
lampes ou des commandes.
Appliquez une cire pour appareils
électroménagers à l’intérieur des
contre-portes.
Utilisez une solution d’eau tiède et de
bicarbonate de soude–environ une cuillère
à soupe (15 ml) de bicarbonate de soude
par pinte (1 litre) d’eau—afin de nettoyer
tout en neutralisant les odeurs. Rincez et
essuyez bien.
Après avoir nettoyé les joints de porte,
appliquez une fine couche de vaseline sur
les joints du côté des charnières pour
empêcher les joints de coller et de se
déformer.
Évitez de nettoyer les tablettes en verre encore
froides avec de l’eau chaude car elles risquent
de se casser à cause de l’écart excessif de
température. Manipulez les tablettes en verre
avec prudence. Si vous cognez le verre trempé,
il pourra se briser.
Ne lavez aucune pièce de plastique du
réfrigérateur au lave-vaisselle.
Sous le réfrigérateur
Pour un fonctionnement plus efficace,
vous devez garder la zone sous le
réfrigérateur propre. Retirez la grille
inférieure et balayez ou aspirez la poussière.
Pour de meilleurs résultats, utilisez une
brosse conçue spécialement à cet effet que
vous pouvez obtenir dans la plupart des
centres de pièces.
Nettoyez les bobines du condenseur
au moins une fois par an.
Soutien au
consommateur
Conseils de dépannageFonctionnementMesures de sécurité Installation
Page 30

Entretien et nettoyage du réfrigérateur.
Derrière le réfrigérateur
Prenez un soin particulier lorsque vous
éloignez le réfrigérateur du mur. Tous les
types de revêtements de sol peuvent être
endommagés, particulièrement ceux qui
sont coussinés ou dont la surface est gaufrée.
Tirez le réfrigérateur en ligne droite et,
lorsque vous le remettez en place,
poussez-le vers le mur en ligne droite.
Les déplacements latéraux du réfrigérateur
pourraient endommager le revêtement
de sol ou le réfrigérateur.
Lorsque vous remettez le réfrigérateur en place
en le poussant, veuillez à ne pas le faire rouler
sur le cordon d’alimentation ou sur la conduite
d’eau de la machine à glaçons.
Départ en vacances
Lorsque vous vous absentez pendant une
période prolongée, videz et débranchez
le réfrigérateur. Réglez la commande
de température du compartiment
réfrigérateur sur 0 (arrêt) et nettoyez
l’intérieur avec une solution d’eau et de
bicarbonate de soude, à raison d’une
cuillère à soupe (15 ml) de bicarbonate
par pinte (1 litre) d’eau. Laissez les portes
ouvertes.
Réglez le bras régulateur de la machine à
glaçons (sur les modèles sans machine à
glaçons) à la position STOP (ARRÊT—
relevé) et fermez le robinet d’arrêt de la
conduite d’eau du réfrigérateur.
Si la température risque de descendre sous
le point de congélation, demandez à un
réparateur de vidanger la conduite d’eau
(sur les modèles sans machine à glaçons)
afin d’éviter les dégâts sérieux causés par
les inondations.
Déménagement
Immobilisez tous les éléments amovibles,
tels que la grille, les clayettes et les bacs, à
l’aide de ruban gommé pour éviter de les
endommager.
Assurez-vous que le réfrigérateur demeure
debout pendant son déménagement.
Soutien au
consommateur
Conseils de dépannage
Installation Mesures de sécuritéFonctionnement
Remplacement de l’ampoule électrique
Vous ne coupez pas le courant du circuit des lumières en tournant le bouton de contrôle du
congélateur en position 0 (arrêt).
30
Compartiment réfrigération
MISE EN GARDE : Les ampoules électriques
peuvent être brûlantes.
Débranchez le réfrigérateur.
Les ampoules sont situées en haut du
compartiment réfrigération.
Pour enlever l’écran à lumière, enlevez
la vis à l’arrière. Faites glisser l’écran à
lumière et enlevez-le.
Remplacez l’ampoule par une ampoule
d’appareil électroménager de même
voltage ou d’un voltage plus bas.
Pour remettre en place l’écran, alignez
les taquets situés sur l’écran aux fentes
situées de côté de l’ensemble de
lumière. Faites glisser vers l’avant
l’écran jusqu’à ce qu’il se verrouille en
place. NE FORCEZ JAMAIS au-delà du
point de verrouillage, car vous pouvez
endommager l’écran.
Rebranchez le réfrigérateur.
Compartiment congélation
MISE EN GARDE : Les ampoules électriques
peuvent être brûlantes.
Débranchez le réfrigérateur.
L’ampoule est située en haut du
compartiment congélation. Pour
enlever l’écran, poussez les taquets
situés à l’arrière de l’écran vers
l’intérieur et tirez l’écran droit vers
vous.
Remplacez par une ampoule d’appareil
électroménager de même voltage ou
d’un voltage plus bas.
Pour remettre l’écran en place, insérez
les taquets situés à l’avant de l’écran
dans les fentes situées à l’avant de
l’ensemble de lumière. Poussez l’écran
vers l’arrière et vers le haut jusqu’à ce
que les taquets arrière se fixent en
place.
Rebranchez le réfrigérateur.
Page 31

Soutien au
consommateur
Conseils de dépannageFonctionnement
Mesures de sécurité
Installation
Préparation.
Veuillez lire toutes les directives attentivement.
Alimentation en eau de la machine à glaçons
Si votre réfrigérateur est doté d’une machine à
glaçons, la machine à glaçons doit être raccordée
à une conduite d’eau froide.
Un nécessaire d’alimentation en eau (comprenant
un tuyau de cuivre, un robinet d’arrêt, des raccords
et des directives) est disponible moyennant
supplément chez votre marchand ou auprès du
Service des pièces et accessoires, 800.626.2002.
Au Canada, appelez le 1.888.261.3055.
Emplacement du réfrigérateur
N’installez pas le réfrigérateur dans une pièce où
la température ambiante risque d’être inférieure
à 16 °C (60 °F) parce qu’il ne se mettra pas en
marche suffisamment souvent pour maintenir
les températures convenables.
Installez le réfrigérateur sur un plancher
suffisamment solide pour le supporter lorsqu’il
est plein.
Dégagements
Prévoyez les dégagements suivants pour faciliter
l’installation, assurer une circulation d’air adéquate,
et permettre les raccordements de plomberie et
d’électricité :
Côtés . . . . . . . . . . . . . . . . . . . . . . . . . . . 0 mm (0 po)
Dessus . . . . . . . . . . . . . . . . . . . . . . . 13 mm (1/2 po)
Arrière . . . . . . . . . . . . . . . . . . . . . . 13 mm (1/2 po)
La porte s’ouvre à un angle de 90°
. . 6 mm (1/4 po)
avec la poignée, ajoutez
38 mm (1
1
⁄2 po)
Espace libre pour le bac avant . . . . .30 cm (12 po)
Si vous devez installer votre réfrigérateur dans
une encoignure où le haut du réfrigérateur est
complètement couvert, utilisez la dimension allant
du plancher au sommet du couvercle de la
charnière pour trouver la bonne dimension
d’ouverture libre.
Roulettes
Les roulettes de nivellement jouent trois rôles :
Elles peuvent être réglées pour que les portes
se referment automatiquement lorsqu’elles
sont à moitié ouvertes. (L’avant du
réfrigérateur doit être plus haut de 6 mm
[1/4 po] par rapport à l’arrière de l’appareil.)
Elles peuvent être réglées de manière à
permettre à l’appareil de reposer solidement
sur le sol et l’empêcher ainsi de branler.
Elles vous permettent d’éloigner le
réfrigérateur du mur pour le nettoyage.
Pour régler les roulettes de nivellement :
Enlevez la grille
inférieure. Tournez
les vis de réglage des
roulettes dans le sens
horaire pour relever le
réfrigérateur, ou dans
le sens antihoraire pour
l’abaisser. Pour ce faire,
utilisez une clé à
douille de 3/8 po ou
une clé à molette.
Réglez le frein de
stabilisation. Consultez
Frein de stabilisation.
Grille inférieure
Enlevez les
capot(s), puis
enlevez la grille
inférieure en la
saisissant par le
bas et en la tirant
vers vous.
Pour remettre la grille
inférieure en place,
placez les tiges à
l’arrière de la grille
vis-à-vis des fentes de
l’appareil et poussez
sur la grille jusqu’à ce
qu’elle bloque en place.
Fixez le haut des capots aux extrémités, plus le bas.
Vis de réglage des roulettes
(tête hex. fendue de 3/8 po)
Roulette
Frein de
stabilisation
31
Grille
inférieure
Capot d’extrémité
Page 32

32
Préparation.
Veuillez lire toutes les directives attentivement.
Frein de stabilisation
Ce réfrigérateur est doté des pieds de nivellement
qui jouent le rôle de frein de stabilisation. Ces pieds
de nivellement supplémentaires permettent au
réfrigérateur de demeurer en place pendant le
fonctionnement et le nettoyage.
Pour engager le frein, enlevez d’abord les capots
aux extrémités et la grille inférieure. Réglez
ensuite les roulettes à la hauteur désirée.
Consultez Roulettes. Par la suite, tournez les pieds
de nivellement de chaque côté jusqu’à ce qu’ils
reposent solidement sur le plancher.
Sur les modèles à tiroir du congélateur : Lorsque
le frein est bien engagé, dévissez le boulon de
réglage des roulettes en le tournant dans le sens
antihoraire, jusqu’à ce que le poids du réfrigérateur
repose sur le frein de stabilisation. De cette façon,
le poids de l’appareil est transféré au pied de
stabilisation.
Remettez en place la grille inférieure et les capots
aux extrémités.
Suivez la procédure dans l’ordre inverse pour
remettre le réfrigérateur sur ses roulettes.
ATTENTION : Pour éviter tout risque de blessures ou de
dommages matériels, il faut que les pieds de nivellement
soient solidement appuyés sur le sol.
Vis de réglage des roulettes
(tête hex. fendue de 3/8 po)
Roulette
Pied de nivellement
Changement du sens d’ouverture de la porte.
Veuillez lire toutes les directives attentivement.
Remarques importantes
Lorsque vous inversez le sens d’ouverture des portes :
■ Veuillez lire toutes les directives avant de commencer.
■ Manipulez les pièces avec soin pour éviter d’égratigner la peinture.
■ Placez les vis à côté de leur pièce afin d’éviter de les visser aux mauvais endroits.
■ Prévoyez une surface de travail douce afin de ne pas égratigner les portes.
IMPORTANT : Une fois que vous avez commencé l’opération, ne déplacez pas la carrosserie jusqu’à ce que l’inversion
de l’ouverture des portes est terminée.
Les directives qui suivent vous indiquent de quelle façon transférer les charnières du côté droit vers le côté gauche.
Si jamais vous désirez retransférer les charnières du côté droit, suivez les mêmes directives—en remplaçant seulement
le mot «gauche» par le mot «droit».
Outils nécessaires
■ Tournevis Phillips
■ Tournevis à embout plat ou couteau à mastic
■ Ruban-cache
■ Clé hexagonale de 5/16 po
■ Clé hexagonale de 3/8 po
Soutien au
consommateur
Conseils de dépannage
Installation Mesures de sécuritéFonctionnement
Capot d’extrémité
Enlèvement des portes.
Vous devrez peut-être enlever les portes pour faire passer votre réfrigérateur par des espaces étroits.
Vous pouvez aussi changer le sens d’ouverture des portes pour faciliter l’accès à l’intérieur de votre
réfrigérateur.
Page 33

Débranchez le réfrigérateur de sa prise de
courant.
Videz tous les balconnets de porte, y compris
le casier à produits laitiers.
ATTENTION : Évitez de laisser tomber les portes sur le
sol. Vous pourriez endommager les butées de porte.
Enlevez la porte du réfrigérateur et la charnière supérieure
Enlevez le couvercle de la charnière supérieure en
ôtant la vis.
Maintenez la porte fermée en apposant du ruban-
cache dans les deux coins supérieurs.
Enlevez les trois vis à tête hexagonale de 5/16 po
qui fixent la charnière supérieure à l’armoire.
Soulevez la charnière pour dégager l’axe de
charnière de la douille située sur le dessus de
la porte.
Enlevez le ruban-cache, éloignez la porte de
l’appareil en l’inclinant, puis soulevez-la pour la
dégager de l’axe de la charnière intermédiaire.
Posez la porte sur une surface qui ne raye pas.
Soutien au
consommateur
Conseils de dépannageFonctionnement
Mesures de sécurité
Installation
Avant l’enlèvement des portes
Enlevez le support de la charnière centrale
Modèles avec porte de congélateur : Fermez bien la
porte et tenez-la fermée en collant du ruban masque
aux coins supérieurs. Enlevez la goupille de la
charnière centrale à l’aide d’une clé hexagonale de
5/16 po. Enlevez ensuite la charnière centrale en
ôtant les trois vis à tête Phillips de 5/16 po.
Modèles avec bac de congélateur : Ouvrez le bac et
enlevez le support de la charnière en ôtant les trois vis
à tête Phillips de 5/16 po. Enlevez la goupille de la
charnière centrale à l’aide de la clé hexagonale de
5/16 po.
Changez de place le support de la charnière et
remettez en place la goupille de la charnière dans le
support. Mettez de côté le support de la charnière et
les trois vis pour la remise en place plus tard.
Centre droite
Goupille
de la charnière
centrale
Rondelle en
matière
plastique
Enlevez la porte du congélateur et changez de côté le support de la charnière inférieure
(modèle à porte de congélateur uniquement).
Enlevez le ruban masque de la porte du congélateur.
Faites basculer la porte afin de la séparer de
l’armoire et soulevez-la pour libérer sa douille
inférieure de la goupille située au centre du
support de charnière centrale.
Posez la porte sur une surface qui ne raye pas.
Enlevez le support de la charnière inférieure
en enlevant les quatre vis à tête hexagonale de
3/8 po.
Enlevez les bouchons du côté inférieur gauche de
l’armoire et mettez-les dans les trous de vis vacants
du côté droit.
Montez le support de la charnière inférieure du côté
gauche.
Enlevez la goupille de la charnière du support de
la charnière inférieure et mettez-la dans le trou
extérieur.
33
Côte inférieure droit
Côte inférieure gauche
Page 34

34
Changement du sens d’ouverture de la porte.
Soutien au
consommateur
Conseils de dépannage
Installation Mesures de sécuritéFonctionnement
Enlevez les vis qui fixent la poignée de la
porte du congélateur au côté gauche et ôtez la
poignée.
Enlevez les bouchons du côté droit et mettez-les
dans les trous de vis vacants du côté gauche.
Mettez la poignée du côté droit.
Enlevez les vis qui fixent l’arrêt de la porte du
congélateur au côté inférieur droit de la porte
du congélateur.
Enlevez les bouchons du côté gauche et mettezles dans les trous de vis vacants du côté droit.
Placez l’arrêt de porte du côté gauche.
Changez de côté la poignée de la porte du congélateur et changez de côté l’arrêt de porte
(modèle à porte de congélateur uniquement)
Côté gauche
Côté droit
Arrêt de la porte
Arrêt de la porte
Côté gauche
Côté droit
Accrochez à nouveau la porte du congélateur (sur certains modèles) et mettez le support
de la charnière centrale
Modèles avec une porte de congélateur : Abaissez
la douille inférieure de la porte du congélateur
dans le support de la charnière inférieure.
Fermez la porte et conservez-la fermée en
collant du ruban masque si nécessaire. Insérez
la goupille de la charnière centrale dans le trou
de charnière situé en haut de la porte du
congélateur.
Fixez la support de la charnière centrale au
côté gauche sans serrer, à l’aide des vis à tête
Phillips de 5/16 po.
Modèles avec une porte de congélateur :
Enlevez le ruban masque. En portant la porte
du congélateur par sa poignée, alignez la porte
du congélateur à l’armoire.
Resserrez les trois vis.
Centre gauche
Goupille
de la charnière
centrale
Rondelle en
matière
plastique
Page 35

Accrochez à nouveau la porte du réfrigérateur et mettez la charnière supérieure
Abaissez la douille inférieure de la porte du
réfrigérateur dans le support de la charnière
centrale. Fermez la porte et tenez-la fermée
en collant du ruban masque si nécessaire.
Insérez la goupille de la charnière supérieure
dans le trou de charnière situé en haut de la
porte du réfrigérateur et fixez la charnière
supérieure à l’armoire sans serrer, à l’aide
des trois vis à tête hexagonale de 5/16 po.
Enlevez le ruban masque. En portant la porte
du réfrigérateur par sa poignée, alignez la porte
à l’armoire.
Resserrez les trois vis.
Mettez le couvercle de la charnière.
Soutien au
consommateur
Conseils de dépannageFonctionnementMesures de sécurité Installation
35
Changez de côté la poignée de la porte du réfrigérateur et changez de côté l’arrêt de porte
Enlevez les vis qui fixent la poignée de la porte
du réfrigérateur au côté gauche et ôtez la
poignée.
Enlevez les bouchons du côté droit et mettez-les
dans les trous de vis vacants du côté gauche.
Mettez la poignée du côté droit.
Enlevez les vis qui fixent l’arrêt de la porte du
réfrigérateur au côté inférieur droit de la porte
du réfrigérateur.
Enlevez les bouchons du côté gauche et mettez-
les dans les trous de vis vacants du côté droit.
Placez l’arrêt de porte du côté gauche.
Goupille de la
charnière centrale
Côté gauche
Arrêt de la porte
Côté droit
Arrêt de la porte
Côté gauche
Côté droit
Côté gauche
Page 36

Enlèvement de l’avant du panier des rails :
Enlevez la vis à tête Phillips de chaque côté des
rails. N’ENLEVEZ PAS les vis à tête hexagonale
des ensembles de rails.
Soulevez la poignée du tiroir du congélateur
pour séparer les rails du tiroir des ensembles
de rails.
Posez le tiroir sur une surface qui ne raye pas.
36
Enlèvement du tiroir du congélateur.
Vous pouvez enlever le tiroir du congélateur, si vous le désirez, pour passer par des espaces étroits.
Veuillez lire toutes les directives attentivement.
Soutien au
consommateur
Conseils de dépannage
Installation Mesures de sécuritéFonctionnement
Enlèvement du tiroir du congélateur
Enlèvement des paniers :
Ouvrez complètement le tiroir du congélateur.
Remettez en place le panier supérieur en le
faisant glisser dans le congélateur.
Enlevez le panier inférieur en le soulevant à
l’arrière, puis en soulevant tout le panier et en
l’enlevant de ses rails.
Enlèvement des freins de stabilisation (si nécessaire pour passer par des espaces étroits)
Enlevez la grille inférieure. Puis enlevez les deux
capots d’extrémité. Enlevez les freins de stabilisation
en utilisant une clé hexagonale de 3/8 po.
Vis à tête
Phillips
Console
Grille inférieure
Capot d’extrémité
Page 37

Soutien au
consommateur
Conseils de dépannageFonctionnementMesures de sécurité Installation
Remise en place du tiroir du congélateur
IMPORTANT : Il faut probablement deux personnes
pour remettre en place ce tiroir.
Tirez complètement les ensembles de rails de
chaque côté de l’armoire.
Trouvez les fentes à l’intérieur des ensembles
de rails près de l’arrière.
Insérez les crochets à l’arrière des rails fixés
au tiroir, en les faisant entrer dans les fentes
à l’intérieur des ensembles de rails.
Abaissez l’avant du tiroir, en vous assurant que
les taquets situés de côté des rails entrent dans
les fentes avant des ensembles de rails.
Remettez en place les vis à tête Phillips sur les
deux ensembles de rails.
Remettez en place le panier inférieur du
congélateur. Assurez-vous que les taquets
situés de chaque côté du panier entrent dans
les fentes arrières des ensembles de rail et
que la languette située de chaque côté
recouvre bien la section intérieure des rails.
Fente
Ensemble de rail
Fente
Taquet
Crochet
Vis à tête
Phillips
Taquet
Fente
Languette
37
Page 38

Soutien au
consommateur
Conseils de dépannage
Fonctionnement Mesures de sécuritéInstallation
Bruits de fonctionnement normaux.
Avant d’appeler un réparateur…
Conseils de dépannage—Économisez du temps et de l’argent!
Consultez d’abord les tableaux qui suivent et vous pourrez peut-être
éviter de faire appel à un réparateur.
Problème Causes possibles Correctifs
Le réfrigérateur ne Le cycle de dégivrage est en cours. • Attendez environ 30 minutes permettre au cycle de dégivrage
fonctionne pas de se terminer. Si les lampes s’allument mais que le
réfrigérateur ne se remet pas en marche, enlevez la grille
inférieure. Repérez la minuterie de dégivrage installée sur le
rail au centre, puis tournez le bouton de la minuterie dans
le sens horaire jusqu’à ce que vous entendiez un «déclic».
Le réfrigérateur devrait se remettre en marche.
La commande est réglée • Réglez la commande de température sur un réglage
sur 0 (arrêt). de température.
Le réfrigérateur est débranché. • Enfoncez la fiche de l’appareil dans la prise murale.
Le disjoncteur ou le fusible • Remplacez le fusible ou réenclenchez le disjoncteur.
peut avoir sauté.
Vibration ou bruit Les roulettes ont besoin • Consultez Roulettes.
métallique (une légère d’être réglés.
vibration est normale)
38
Les réfrigérateurs plus récents font des bruits différents de ceux des anciens. Les réfrigérateurs
modernes présentent plus de fonctions et sont plus avancés sur le plan technologique.
HUMMM...
OUUCH....
■
Le nouveau compresseur à rendement élevé peut fonctionner plus
longtemps et plus vite que votre ancien réfrigérateur et vous pouvez
entendre un son modulé ou un ronflement aigu pendant son
fonctionnement.
■
Vous pouvez entendre un sifflement lorsque les portes se ferment.
Cela vient de l’équilibrage de pression dans le réfrigérateur.
■
Vous pouvez entendre les ventilateurs tourner à hautes vitesses. Cela se
produit lorsque le réfrigérateur vient d’être branché, lorsque les portes
sont ouvertes fréquemment ou lors de l’ajout d’une grande quantité
d’aliments dans les compartiments congélateur ou réfrigérateur. Les
ventilateurs permettent de maintenir les bonnes températures.
■
Les ventilateurs changent de vitesses pour assurer des économies
d’énergie et un refroidissement optimaux.
CLICS et CLAQUEMENTS
■
Vous pouvez entendre des craquements ou des claquements lorsque
le réfrigérateur est branché pour la première fois. Cela se produit
lorsque le réfrigérateur se refroidit à la bonne température.
■
Le règlage du congélateur clique quand le compresseur se met en
marche ou s’ârrete.
■
La minuterie de dégivrage se mettant en marche ou s’ârretant
pendant le cycle de dégivrage.
■
L’expansion et la contraction des serpentins de refroidissement
pendant et après le dégivrage peuvent causer un craquement ou un
claquement.
■
Sur les modèles équipés d’une machine à glaçons, après un cycle de
fabrication de glaçons, vous pouvez entendre les glaçons tomber dans
le bac.
BRUITS D’EAU
■
Le passage de l’agent frigorifique dans les serpentins de
refroidissement du congélateur peut être accompagné d’un
gargouillement semblable à celui de l’eau en ébullition.
■
L’eau tombant sur l’élément chauffant de dégivrage peut faire un
bruit de grésillement, de claquement ou de bourdonnement pendant
le cycle de dégivrage.
■
Un bruit de suintement d’eau peut être entendu pendant le cycle de
dégivrage lorsque la glace de l’évaporateur fond et tombe dans le bac
de récupération.
■
Fermer la porte peut causer un gargouillement en raison de
l’équilibrage de pression.
Entendez-vous ce que j’entends ? Ces bruits sont normaux.
OUIR !
Page 39

Soutien au
consommateur
Conseils de dépannageFonctionnement
Mesures de sécurité
Installation
electromenagersge.ca
Problème Causes possibles Correctifs
Le moteur fonctionne Ceci est normal lorsque le • Attendez 24 heures pour que le réfrigérateur refroidisse
pendant de longues réfrigérateur vient d’être branché. complètement.
périodes ou démarre
Ceci arrive souvent lorsque • C’est normal.
et s’arrête fréquemment.
une grande quantité d’aliments
a été mise au réfrigérateur.
(Les réfrigérateurs
Porte laissée ouverte. • Vérifiez qu’il n’y a pas un paquet qui empêche la porte de fermer.
congélateurs étant plus
Temps chaud ou ouverture • C’est normal.
grands, leur moteur doit
fréquente des portes.
fonctionner plus
Les commandes de température • Consultez Les commandes.
longtemps. Ils démarrent
ont été réglées aux températures
et s’arrêtent afin de
les plus basses.
Il faut nettoyer la grille • Consultez Entretien et nettoyage.
températures uniformes.)
et le condenseur.
Température trop élevée La commande de température • Consultez Les commandes.
dans le congélateur ou du réfrigérateur ou du
le réfrigérateur congélateur n’est pas réglée
à une température assez basse.
Temps chaud ou ouverture • Abaissez la commande de température d’une position.
fréquente des portes. Consultez Les commandes.
Porte laissée ouverte. • Vérifiez qu’il n’y a pas un paquet qui empêche la porte de fermer.
Givre sur les aliments Porte laissée ouverte. • Vérifiez qu’il n’y a pas un paquet qui empêche la porte de fermer.
surgelés (il est normal
Les portes ont été ouvertes
que du givre se forme à
trop souvent ou pendant trop
l’intérieur du paquet)
longtemps.
Odeur/saveur Des aliments ont transmis leur • Emballez bien les aliments.
anormale des glaçons odeur/goût aux glaçons.
Il faut nettoyer l’intérieur du • Consultez Entretien et nettoyage.
réfrigérateur.
Formation lente des Porte laissée ouverte. • Vérifiez qu’il n’y a pas un paquet qui empêche la porte de fermer.
glaçons
La commande de température • Consultez Les commandes.
du congélateur n’est pas réglée à
une température assez basse.
Odeur dans Des aliments ont transmis • Les aliments à odeur forte doivent être emballés
le réfrigérateur leur odeur au réfrigérateur. hermétiquement.
• Gardez une boîte ouverte de bicarbonate de soude
dans le réfrigérateur.
Il faut nettoyer l’intérieur. • Consultez Entretien et nettoyage.
De la condensation Cela n’est pas inhabituel pendant • Essuyez bien la surface extérieure et abaissez la
s’accumule à l’extérieur les périodes de forte humidité. commande du réfrigérateur d’une position.
De la condensation Les portes sont ouvertes trop
s’accumule à l’intérieur fréquemment ou pendant trop
(par temps humide, longtemps.
l’ouverture des portes
laisse entrer de l’humidité)
La porte/le tiroir Vous devez ajuster les roulettes. • Consultez Préparation à l’installation du réfrigérateur.
ne ferme pas seul
La porte/le tiroir du C’est normal si, après s’être • Cela indique que la porte/le tiroir du compartiment congélation a
compartiment congélation ouvert, la porte/le tiroir du un bon joint. Si la porte/le tiroir du compartiment congélation
s’ouvre quand la porte du compartiment congélation se ne se referme pas automatiquement après s’être ouvert, consultez
réfrigérateur est fermée referme tout seul. la section Problème : La porte/le tiroir ne ferme pas seul, ci-dessus.
Le moteur fonctionne
pendant de longues
périodes ou démarre et
s’arrête fréquemment.
(Les réfrigérateurs
modernes et leurs
congélateurs étant plus
grands, leur moteur doit
fonctionner plus
longtemps. Ils démarrent
et s’arrêtent afin de
maintenir des
températures uniformes.)
39
Page 40

GARANTIE DU CLIENT
Votre réfrigérateur est garanti contre tout défaut de matériau et de fabrication.
Ce que cette Durée de garantie Pièces Main-d’oeuvre
garantie couvre (à partir de la Réparation ou
date d’achat) remplacement au
choix de Camco
Compresseur Dix (10) ans Dix (10) ans Cinq (5) ans
Système scellé (y Cinq (5) ans Cinq (5) ans Cinq (5) ans
compris l’évaporateur, la
tuyauterie du condenseur
et le frigorigène)
Toutes les autres pièces Un (1) an Un (1) an Un (1) an
TERMES ET CONDITIONS :
1. La présente garantie ne s’applique qu’à
l’utilisation domestique par une seule famille
au Canada, lorsque le réfrigérateur a été
installé conformément aux instructions
fournies par Camco et est alimenté
correctement en eau et en électricité.
Les dommages dûs à une utilisation
abusive, un accident, une exploitation
commerciale, ainsi que la modification,
l’enlèvement ou l’altération de la plaque
signalétique annulent la présente
garantie.
L’entretien effectué dans le cadre de la
présente garantie doit l’être par un
réparateur agréé Camco.
2. Camco et le marchand ne peuvent être
tenus pour responsables en cas de
réclamations ou dommages résultant
de toute panne du réfrigérateur ou d’un
entretien retardé pour des raisons qui
raisonnablement échappent à leur contrôle.
3. L’acheteur doit, pour obtenir un service
dans le cadre de la garantie, présenter
la facture originale. Les éléments
réparés ou remplacés ne sont garantis
que pendant le restant de la période de
garantie initiale.
4. Cette garantie est en sus de toute
garantie statutaire.
EXCLUSIONS DE LA GARANTIE :
• Visites à domicile pour vous apprendre à
vous servir de l’appareil.
• Dommages causés à la peinture ou à
l’émail après livraison.
• Installation incorrecte—l’installation
correcte inclut la bonne circulation d’air
pour le système de réfrigération, des
possibilités de branchement aux circuits
électriques, d’alimentation en eau et autres.
• Remplacement des fusibles ou
réarmement des disjoncteurs.
• Remplacement des ampoules
électriques.
• Dommages subis par l’appareil à la suite
d’un accident, d’un incendie, d’inondations
ou en cas de force majeure.
• Perte des aliments dûe à la déterioration.
• Utilisation correcte et entretien adéquat
de l’appareil selon les manuel
d’utilisation, réglage correct des
commandes.
• LE GARANT N’EST PAS RESPONSABLE
DES DOMMAGES INDIRECTS.
IMPORTANT
Gardez cette garantie et votre facture originale comme preuve d’achat et preuve
de la date d’achat.
Camco vous offre ses services dans tout
le pays. Pour de plus amples renseignements
sur la présente garantie, veuillez prendre
contact avec :
Directeur, Relations avec les consommateurs
Camco Inc., 1 Factory Lane, Bureau 310
Moncton, New Brunswick E1C 9M3
40
Agraphez votre reçu ici.
Vous devez fournir la preuve de
l’achat original pour obtenir des
services en vertu de la garantie.
Page 41

41
Soutien au consommateur.
Site Web appareils électroménagers GE
electromenagersge.ca
Vous avez une question ou vous avez besoin d’aide pour votre appareil électroménager? Contactez-nous
par Internet au site electromenagersge.ca 24 heures par jour, tous les jours de l’année.
Service de réparations 1.800.361.3400
Service de réparations GE est tout près de vous.
Pour faire réparer votre électroménager GE, il suffit de nous téléphoner.
Studio de conception réaliste
Sur demande, GE peut fournir une brochure sur l’aménagement d’une cuisine pour les personnes
à mobilité réduite.
Écrivez: Directeur, Relations avec les consommateurs, Camco, Inc.
Bureau 310, 1 Factory Lane
Moncton, N.B. E1C 9M3
Prolongation de garantie electromenagersge.ca
Achetez un contrat d’entretien GE avant que votre garantie n’expire et bénéficiez d’un rabais substantiel.
Ainsi le service après-vente GE sera toujours là après expiration de la garantie.
Visitez notre site Web ou appelez-nous au 1.800.461.3636.
Pièces et accessoires
Ceux qui désirent réparer eux-mêmes leurs électroménagers peuvent recevoir pièces et accessoires
directement à la maison (cartes VISA, MasterCard et Discover acceptées).
Les directives stipulées dans le présent manuel peuvent être effectuées par n’importe quel utilisateur. Les autres
réparations doivent généralement être effectuées par un technicien qualifié. Soyez prudent, car une réparation
inadéquate peut affecter le fonctionnement sécuritaire de l’appareil.
Vous trouverez dans les pages jaunes de votre annuaire le numéro du Centre de service Camco le plus
proche. Autrement, appelez-nous au 1.888.261.3055.
Contactez-nous
Si vous n’êtes pas satisfait du service après-vente dont vous avez bénéficié :
Premièrement, communiquez avec les gens qui ont réparé votre appareil.
Ensuite, si vous n’êtes toujours pas satisfait envoyez tous les détails–numéro de téléphone compris–au
Directeur, Relations avec les consommateurs, Camco, Inc.
Bureau 310, 1 Factory Lane
Moncton, N.B. E1C 9M3
Inscrivez votre appareil électroménager electromenagersge.ca
Inscrivez votre appareil électroménager en direct, aussitôt que possible. Cela améliorera nos
communications et notre service après-vente. Vous pouvez également nous envoyer par la poste
le formulaire d’inscription joint à votre documentation.
Page 42

Información de
seguridad . . . . . . . . . . . . . .43, 44
Instrucciones de operación
Características . . . . . . . . . . .46, 47
Controles . . . . . . . . . . . . . . . . . .45
Servicio de hielo . . . . . . . . . . . .48
Cuidado y limpieza
Cambio de bombilla . . . . . . . . .50
Limpieza . . . . . . . . . . . . . . .49, 50
Instrucciones de instalación
Cómo invertir el vaivén
de la puerta . . . . . . . . . . . . .52–55
Para quitar la gaveta
del congelador . . . . . . . . . . .56, 57
Preparación para
instalar el refrigerador . . . . .51, 52
Solucionar problemas . . . .58–60
Sonidos normales
de la operación . . . . . . . . . . . . .58
Servicio al consumidor
Garantía para consumidores
en los Estados Unidos . . . . . . . .62
Servicio al consumidor . . . . . . .63
42
Servicio al consumidor Solucionar problemas Operación
Seguridad
Instalación
Escriba aquí el modelo y el número
de serie:
Modelo # ________________________
Serie # __________________________
Encuentre estos números en la etiqueta
gris en el lado derecho, cerca de la
parte superior del compartimiento del
refrigerador.
Page 43

INFORMACIONES IMPORTANTES DE SEGURIDAD.
LEA PRIMERO TODAS LAS INSTRUCCIONES.
GEAppliances.com
¡ADVERTENCIA!
Use este aparato sólo para los fines que se describen en este Manual del propietario.
PRECAUCIONES DE SEGURIDAD
Cuando use electrodomésticos, siga las precauciones básicas de seguridad, incluyendo las siguientes:
■ Antes de usarse, este refrigerador deberá estar
instalado y ubicado de acuerdo con las
instrucciones de instalación.
■ No permita que los niños se suban, se paren o se
cuelguen de las charolas del refrigerador. Podría
dañarse el refrigerador y causarles serias lesiones.
■ No toque las superficies frías del congelador
cuando tenga las manos húmedas o mojadas.
La piel se podría adherir a las superficies
extremadamente frías.
■ No guarde ni use gasolina u otros vapores o líquidos
inflamables cerca de este o cualquier otro aparato.
■ Aleje los dedos fuera de las áreas donde se puede
pinchar los dedos; los espacios entre las puertas y
entre las puertas y los gabinetes son
necesariamente estrechos. Cierre las puertas con
cuidado en la presencia de los niños.
■ Si su refrigerador tiene un dispositivo automático
para hacer hielo, evite el contacto con las partes
móviles del mecanismo de expulsión, o con el
elemento calefactor que desprende los cubos.
No ponga los dedos ni las manos en el
mecanismo automático para hacer hielo mientras
el refrigerador esté conectado.
■ Desconecte el refrigerador antes de limpiarlo o
efectuar reparaciones.
NOTA: Recomendamos enfáticamente encargar cualquier
servicio a un personal calificado.
■ El colocar el control en posición 0 (apagado)
no quita la corriente del circuito de la luz.
■ No vuelva a congelar los alimentos congelados
una vez que se hayan descongelado.
Servicio al consumidorSolucionar problemasOperación
Seguridad
Instalación
DESHACERSE DEBIDAMENTE DE SU REFRIGERADOR
El atrapamiento y la sofocación de los niños no son
un problema del pasado. Los refrigeradores
abandonados son un peligro…aunque sea sólo por
“pocos días.” Si se deshace de su viejo refrigerador,
por favor siga las instrucciones abajo para
ayudarnos a prevenir algún accidente.
Antes de deshacerse de su viejo refrigerador
o congelador:
■ Quite las puertas.
■ Deje los entrepaños en su sitio para que los niños
no se suban.
Refrigerantes
Todos los aparatos de refrigeración contienen
refrigerantes, los cuales se deben retirar antes
de la eliminación del producto de acuerdo con
la ley federal. Si va a desechar algún aparato
antiguo de refrigeración, consulte con la
compañía a cargo de desechar el aparato
para saber qué hacer.
USO DE CABLES DE EXTENSION
Debido a los accidentes potenciales que pudieran ocurrir bajo determinadas condiciones, se recomienda
estrictamente no usar cables de extensión.
Sin embargo, si decidiera usarlos, es absolutamente necesario que sea del tipo UL trifilar para aparatos
y cuente con una clavija con conexión a tierra y que el cable eléctrico sea de 15 amperios (mínimo) y
120 voltios.
¡PELIGRO! RIESGO DE QUE
UN NIÑO PUEDA QUEDAR ATRAPADO
43
Page 44

44
INFORMACIONES IMPORTANTES DE SEGURIDAD.
LEA PRIMERO TODA LAS INSTRUCCIONES.
¡ADVERTENCIA!
COMO CONECTAR LA ELECTRICIDAD
Bajo ninguna circunstancia debe cortar o quitar la tercera punta (tierra) de la clavija. Para su seguridad
personal, este aparato deberá conectarse debidamente a tierra.
El cable eléctrico de este aparato está equipado con
una clavija de tres puntas (tierra) que enchufa en
un contacto estándar de pared de tres salidas
(tierra) para reducir al mínimo la posibilidad de
daños por un choque eléctrico con este aparato.
Haga que un electricista calificado verifique el
enchufe de la pared y el circuito para asegurarse
que la salida esté conectada debidamente a tierra.
Donde se disponga sólo de un contacto de pared con
salida para dos puntas, es su responsabilidad personal
y su obligación reemplazarlo por un contacto
adecuado para tres puntas con conexión a tierra.
El refrigerador deberá conectarse siempre en su
propio contacto eléctrico individual que tenga
un voltaje que vaya de acuerdo con la tabla de
clasificación.
Esto garantiza la mejor ejecución y evita la
sobrecarga del circuito eléctrico de la casa y los
daños a causa del sobrecalentamiento de los cables.
Nunca desconecte el refrigerador jalando el cable.
Tome siempre firmemente la clavija y sáquela del
contacto sin doblarla.
Repare o reemplace inmediatamente todos los
cables eléctricos de servicio que se hayan desgastado
o dañado en alguna otra forma. No utilice cables
que muestren roturas o daños por abrasión a lo
largo de éste ni en la clavija o en alguno de sus
extremos.
Al alejar su refrigerador de la pared, cuide que no
pase sobre el cable o lo dañe.
USO DE LOS ADAPTADORES (No se permite usar enchufes adaptadores en Canadá)
Debido a los accidentes potenciales relacionados con la seguridad bajo determinadas circunstancias,
recomendamos estrictamente no utilizar un adaptador para clavija.
Sin embargo, si se decidiera usar un adaptador
donde los códigos locales lo permitan, es necesario
hacer una conexión temporal a un contacto de pared
para dos puntas debidamente conectado a tierra
utilizando un adaptador UL, mismo que puede
adquirirse en comercios locales especializados.
La punta más larga del adaptador se deberá alinear
con la entrada larga del contacto con el fin de tener
la polaridad adecuada en la conexión de la clavija.
Al desconectar el cable del adaptador, deténgalo
siempre con una mano tirando a la vez el cable
eléctrico con la otra mano. De no hacerlo puede
causar que el adaptador se rompiera después de
mucho uso.
Si se rompiera la terminal a tierra del adaptador,
NO USE el aparato hasta que se haya reestablecido
la conexión a tierra de manera adecuada.
La conexión de la terminal de tierra del adaptador a la
salida del contacto de pared no conecta el aparato a tierra,
a no ser que el tornillo de la tapa sea de metal y no esté
aislado y que el contacto de la pared esté conectado a
tierra a través del cableado de la casa. Un electricista
calificado deberá revisar el circuito para asegurarse de
que el contacto esté debidamente conectado a tierra.
FAVOR DE LEER Y SEGUIR CUIDADOSAMENTE
LAS PRECAUCIONES DE SEGURIDAD.
GUARDE ESTAS INSTRUCCIONES
Servicio al consumidor Solucionar problemas
Operación SeguridadInstalación
Page 45

Los controles del refrigerador. GEAppliances.com
El ajuste de los controles
Control del refrigerador
El control del refrigerador mantiene las temperaturas en todas partes del refrigerador.
Control del congelador
El control para el congelador mantiene las temperaturas en todas partes del congelador.
La colocación del control para el congelador en 0 (apagado) interrumpe el enfriamiento
en ambos compartimientos—el refrigerador y el congelador—pero no apaga el refrigerador.
Coloque primero el control del compartimiento del refrigerador en 5 y el control del congelador en 5.
Si quiere temperaturas más frías o más cálidas, ajuste primero la temperatura del compartimiento del refrigerador.
Cuando esté satisfecho con ésta, ajuste la temperatura del congelador.
Los ajustes de control variarán basado en las preferencias personales, uso y condiciones de operación,
y podría ser necesario hacer más de un ajuste.
Después de cambiar los controles, permita que transcurran 24 horas para que el refrigerador alcance
la temperatura deseada.
45
Servicio al consumidorSolucionar problemasOperación
Seguridad
Instalación
5
4
6
Page 46

46
Estantes y compartimientos del refrigerador.
No todos los modelos tienen todas las características.
Estante de la puerta del refrigerador
El estante de la puerta inferior en el
compartimiento del refrigerador puede
sacarse para facilitar su limpieza.
Para quitarlo, sujete ambos extremos y tire
hacia arriba.
Compartimientos ajustables en la puerta del refrigerador
Los compartimientos ajustables se pueden
llevar fácilmente del refrigerador al área de
trabajo.
Para retirarlos: Levante el compartimiento
recto y luego hálelo.
Para reemplazarlos o reubicarlos: Inserte el
compartimiento en los soportes moldeados
en la puerta y empuje hacia abajo. Éste se
ajustará en su lugar.
Servicio al consumidor Solucionar problemas
Operación SeguridadInstalación
Reorganización de los estantes
Los estantes del refrigerador son ajustables.
Compartimiento del refrigerador
Para retirarlo:
Incline el estante en la parte del frente.
Levante el estante hacia arriba en la
parte de atrás y saque el estante.
Para reemplazarlo:
Mientras inclina el estante hacia arriba,
inserte el gancho superior en la parte
posterior del estante en la ranura del
carril.
Baje el frente del estante hasta que la
parte inferior del estante se ajuste en
su lugar.
Estantes a prueba de salpicaduras (en algunos modelos)
Los estantes a prueba de salpicaduras
tienen bordes especiales para evitar que las
salpicaduras se rieguen a los estantes
inferiores. Para retirar o reemplazar los
estantes, vea Reorganización de los estantes.
Estante deslizante a prueba de salpicaduras (en algunos modelos)
El estante deslizante a prueba de
salpicaduras le permite alcanzar alimentos
almacenados detrás de otros. Los bordes
especiales están diseñados para ayudar a
evitar que las salpicaduras se rieguen a los
estantes inferiores.
Asegúrese de que empuje los estantes
completamente antes de cerrar la puerta.
Bandeja metálica minimizadora (en algunos modelos)
La bandeja deslizante para bebidas sostiene
12 latas de soda o dos botellas de vino /
agua (a lo largo). Puede retirarse para su
limpieza.
Para retirarla: Deslice la bandeja hacia la
posición de freno, levante la bandeja y pase
la posición de freno y levántela.
Page 47

Gavetas para guardar. GEAppliances.com
No todos los modelos tienen todas las características.
47
Gavetas para frutas y vegetales
El exceso de agua que pueda acumularse
en el fondo de las gavetas deben ser vaciado
y las gavetas deben ser secadas.
Gavetas con humedad ajustable
Deslice el control hasta llegar a la posición
HI (alto)para proporcionar el alto nivel de
humedad recomendado para la mayoría
de los vegetales.
Deslice el control hasta llegar a la posición
LO (bajo) para proporcionar el nivel de baja
humedad recomendado para la mayoría de
las frutas.
Gaveta para bocadillos sellada
La gaveta se puede cambiar de lugar para
el lugar más práctico para su familia.
Para quitar las gavetas
Las gavetas de la parte inferior del
compartimiento del refrigerador se
detienen antes de salir en su totalidad para
tratar de evitar que el contenido caiga al
suelo. Las gavetas pueden sacarse de
manera fácil si se inclinan ligeramente y
se deslizan hacia fuera para pasar el “tope”.
Para quitar las gavetas cuando no
puede abrirse totalmente la puerta del
compartimiento del refrigerador, saque
primero la comida.
Saque la gaveta más alejada de la
puerta.
Quite la cubierta de vidrio empujando
desde abajo e inclinándola para librar
la puerta. Tenga cuidado al mover el
vidrio. Recomendamos el uso de
guantes de protección.
Retire el carril central y retire la gaveta.
Después de limpiar, reemplace las
gavetas en el orden inverso.
Servicio al consumidorSolucionar problemasOperaciónSeguridad Instalación
Page 48

48
Servicio de hielo.
No todos los modelos tienen todas las características.
Juego de accesorios para el dispositivo automático para hacer hielo
Puede obtener, a costo adicional, un
juego de accesorios para el dispositivo
para hacer hielo.
Revise la etiqueta en el lado derecho, cerca
de la parte superior del compartimiento del
refrigerador, para el kit de la máquina de
hielos específico necesario para su modelo.
Compartimiento para hielos
El congelador cuenta con un
compartimiento para hielos con un
estante para charolas de hielo y una
bandeja de almacenamiento deslizable,
también para hielos.
PRECAUCIÓN: Asegúrese de que el estante esté
bien firme antes de colocar objetos sobre ella para
evitar daños.
Para instalar el estante para charolas de
hielo:
Deslice la abertura en forma de L, en
el costado del
estante
, por encima del
tornillo posterior ubicado en la pared
lateral del refrigerador.
Empuje el estante hacia atrás hasta que
el tornillo encaje en la abertura en
forma de L.
Baje el frente del estante hasta que el
tornillo delantero, ubicado en la pared
lateral del refrigerador, entre en la
abertura al frente del estante para
charolas de hielo.
Servicio al consumidor Solucionar problemas
Operación SeguridadInstalación
Page 49

Cuidado y limpieza del refrigerador. GEAppliances.com
49
Limpiar el exterior
Las manijas de la puerta y los ornamentos. Se
limpian con un paño humedecido con una
solución de detergente suave y agua. Seque
con un paño suave. No use cera en las
manijas de la puerta ni en los ornamentos.
Mantenga limpio el terminado. Limpie con
un paño limpio ligeramente humedecido
con cera para aparatos de cocina o un
detergente suave y agua. Seque y pula con
un paño limpio y suave.
No limpie el refrigerador con un paño sucio para
trastes ni con un paño húmedo. Estos podrían dejar
residuos que afecten a la pintura. No use
estropajos, limpiadores en polvo, blanqueadores
ni limpiadores que contengan blanqueador, ya que
estos productos podrían rayar y desprender el
terminado de pintura.
Los paneles y las empuñaduras de las puertas
de acero inoxidable (en algunos modelos)
pueden ser limpiados con un limpiador
para acero inoxidable para usos
comerciales como Stainless Steel Magic.
™
Stainless Steel Magic™está disponible
en Ace, True Value, Servistar, HWI y otros
establecimientos como estos. Éste también
puede ser ordenado visitando nuestro sitio
a Web, GEAppliances.com o llamando al
Departamento de Accesorios de GE al
800.626.2002. Solicite la pieza
No. WX10X15.
No utilice cera para electrodomésticos sobre el
acero inoxidable.
Limpiar el interior
Para evitar olores, deje una caja abierta
de bicarbonato de sodio en los
compartimientos del refrigerador
y del congelador.
Desconecte el refrigerador antes de limpiarlo.
Si no fuera posible, exprima el exceso de
humedad de la esponja o del paño cuando
se limpie alrededor de botones, bombillas
o controles.
Use cera para electrodomésticos en el
interior entre las puertas.
Use agua caliente y una solución de
bicarbonato de sodio—aproximadamente
una cucharada (15 ml) de bicarbonato de
sodio por cada cuarto (1 litro) de agua.
Esta solución limpia y neutraliza olores.
Enjuague y seque.
Después de limpiar las juntas de las puertas,
aplique una capa delgada de vaselina del
lado de la bisagra. Esto ayuda a evitar que
las juntas se doblen o se peguen.
Evite limpiar los estantes de vidrio fríos con
agua caliente, ya que la extrema diferencia de
temperatura puede hacer que se quiebren. Maneje
los estantes de vidrio con cuidado. Chocar vidrio
templado puede hacer que se rompe en pedazos.
No lave partes plásticas del refrigerador en el
lavaplatos.
Debajo del refrigerador
Para la operación más eficiente, usted
necesita mantener limpia la región debajo
del refrigerador. Quite la rejilla de la base y
barra o pase el aspirador.
Para obtener los mejores resultados, use un
cepillo para este propósito. Puede adquirir
uno en la mayoría de las tiendas de
refacciones para electrodomésticos.
Limpie las bobinas del condensador
al menos una vez al año.
Servicio al consumidorSolucionar problemasOperaciónSeguridad Instalación
Page 50

Cuidado y limpieza del refrigerador.
Atrás del refrigerador
Se deberá tener cuidado al retirar el
refrigerador de la pared. Todos los tipos de
recubrimiento de pisos se pueden dañar,
sobre todo los recubrimientos acojinados y
los que tienen superficies repujadas.
Jale el refrigerador en forma recta y
empuje nuevamente para devolverlo a su
posición. Mover el refrigerador en
dirección lateral puede causar daños al
recubrimiento del piso o al refrigerador.
Al empujar el refrigerador a su lugar, asegúrese de
no pasar sobre el cable eléctrico ni sobre la línea de
alimentación del dispositivo para hacer hielos.
Preparación para vacaciones
En el caso de vacaciones o ausencias
prolongadas, quite los alimentos y
desenchufe el refrigerador. Mueva el
control del compartimiento del
refrigerador a la posición 0 (apagado)
y limpie el interior con solución de
bicarbonato de una cucharada (15 ml)
de bicarbonato por un cuarto (1 litro)
de agua. Deje abiertas las puertas.
Mueva el brazo detector del dispositivo para
hacer hielo (en modelos equipados con la
máquina para hacer hielo) a la posición
STOP (PARADA—hacia arriba) y desconecte
el suministro de agua al refrigerador.
Si la temperatura pueda llegar al punto de
congelación, haya una persona calificada
para desaguar el sistema del suministro de
agua (en modelos equipados con la
máquina para hacer hielo) para evitar daños
a la propiedad causados por inundación.
En caso de mudanza
Asegure todos los elementos sueltos como
parrillas, entrepaños y recipientes
pegándolos con cinta adhesiva en su
lugar para evitar daños.
Asegúrese de que el refrigerador se coloque en
posición vertical durante la mudanza.
Servicio al consumidor Solucionar problemas
Operación SeguridadInstalación
Cambio de bombilla
Girar el control del congelador a la posición 0 (apagado) no elimina la corriente del circuito
de iluminación.
50
Compartimiento del refrigerador
PRECAUCIÓN: Las bombillas podrían estar
calientes.
Desconecte el refrigerador.
Las bombillas están ubicadas en la parte
superior del compartimiento del
refrigerador.
Para retirar el protector de la luz, retire
el tornillo en la parte posterior. Deslice
el protector hacia atrás y retírelo.
Reemplace la bombilla con una
bombilla de electrodomésticos del
mismo o de inferior voltaje.
Para reemplazar el protector, alinee las
pestañas del protector con las ranuras
en el costado de la unidad de luz.
Deslice el protector hacia adelante
hasta que encaje en su lugar. NO lo
fuerce más allá del punto de encaje, ya
que esto podría estropear el protector.
Conecte de nuevo el refrigerador.
Compartimiento del congelador
PRECAUCIÓN: Las bombillas podrían estar
calientes.
Desconecte el refrigerador.
La bombilla está ubicada en la parte
superior del compartimiento del
congelador. Para retirar el protector,
empuje las pestañas en la parte
posterior del protector y hale hacia
afuera.
Reemplace con una bombilla eléctrica
de voltaje similar o inferior.
Para reemplazar el protector, inserte las
pestañas al frente del protector en las
ranuras al frente de la unidad de luz.
Empuje la parte posterior del protector
hacia arriba hasta que las pestañas
posteriores encajen en su lugar.
Conecte de nuevo el refrigerador.
Page 51

Servicio al consumidorSolucionar problemasOperación
Seguridad
Instalación
Preparación para instalar el refrigerador.
Lea las instrucciones completamente y debidamente.
Suministro de agua al dispositivo para hacer hielo
Si su refrigerador tiene un dispositivo para hacer
hielo, éste tendrá que ser conectado a una línea de
agua fría.
Por un costo adicional, es posible adquirir de su
distribuidor o llamando a partes y accesorios al
800.626.2002, un paquete para el suministro de
agua (contiene los tubos de cobre, la válvula de
cierre, los dispositivos de ajuste y las instrucciones).
Ubicación del refrigerador
No instale el refrigerador donde las temperaturas
van debajo los 60 °F (16 °C), ya que no podrá
funcionar bastante para mantener las temperaturas
adecuadas.
Instale sobre un piso suficientemente firme para
soportar un refrigerador completamente lleno.
Espacios libres
Deje suficiente espacio para facilitar la instalación,
la circulación adecuada de aire y las conexiones de
plomería y eléctricas.
Lados . . . . . . . . . . . . . . . . . . . . . . . .0″ (0 mm)
Parte superior . . . . . . . . . . . . . . . . .1/2″ (13 mm)
Parte posterior . . . . . . . . . . . . . . . .1/2″ (13 mm)
Vaivén de la puerta a un ángulo
de 90° . . . . . . . . . . . . . . . . . . . . . . .1/4″ (6 mm)
con manija,
adicionar
11⁄2″ (38 mm)
Espacio delantero para la gaveta . .12″ (30 cm)
Si la unidad se debe instalar en una muesca
en la cual la parte superior de la unidad está
completamente cubierta, use las dimensiones desde
el piso hasta la parte superior de la cubierta de la
bisagra para verificar el espacio correcto.
Rodillos
Los rodillos tienen 3 propósitos:
Los rodillos se ajustan para hacer que la puerta
se cierre con facilidad cuando está abierta
aproximadamente en la mitad. [Delantero
del refrigerador deberá 1/4″ (6 mm) superior
que el trasero del refrigerador.]
Los rodillos se ajustan para que el refrigerador
sea firmemente posicionado en el piso y para
no tambalearse.
Los rodillos permiten mover el refrigerador
para retirarlo de la pared para su limpieza.
Para ajustar los rodillos:
Quite la rejilla de la
base. Gire los tornillos
de ajuste del rodillo
en el sentido de las
manecillas del reloj para
elevar el refrigerador,
en el sentido contrario
de las manecillas del
reloj para bajarlo.
Utilice una llave de
cubo ajustable o de
3/8.″ Fije la barra
estabilizadora. Consulte
la sección Freno
estabilizador.
Rejilla de la base
Remueva tapa(s)
extrema(s),
entonces quite la
rejilla de la base
sujetándola de la
parte baja y tirando
de ella hacia el
frente.
Para volver a colocar
la rejilla de la base,
debe alinear los dientes
en la parte posterior
de la rejilla con las
ranuras del gabinete
y empujar al frente
hasta que la rejilla encaje en su lugar. Tire de la
parte superior de las tapas extremas primero,
entonces tire de la parte inferior.
Tornillo de ajuste del rodillo
(hexagonal de 3/8″ con
ranura)
Rodillo
Freno
estabilizador
Rejilla de
la base
Tapa extrema
51
Page 52

52
Preparación para instalar el refrigerador.
Lea las instrucciones completamente y debidamente.
Freno estabilizador
Este refrigerador está equipado con unas patas
de nivelación que hacen las veces de freno
estabilizador. Estas patas de nivelación adicionales
harán que el refrigerador quede firme en su sitio
durante su operación y limpieza.
Para ajustar el freno, quite primero las tapas
extremas y la rejilla de la base. Luego ajuste los
rodillos en la posición deseada (consulte la sección
Rodillos) y gire ambas patas de nivelación en cada
lado hasta que las patas estén firmes contra el piso.
En los modelos con gaveta de congelador: Después de
que el freno esté en su sitio, desatornille el perno de
ajuste de los rodillos en el sentido contrario de las
manecillas del reloj hasta que el refrigerador se
apoye sobre el freno estabilizador. Esto permite que
el peso descanse sobre este freno.
Vuelva a colocar la rejilla de la base y las tapas
extremas.
Use el procedimiento inverso para mover
el refrigerador.
ADVERTENCIA: Para evitar posibles daños personales
o materiales, las patas de nivelación deben asentarse
firmemente sobre el piso.
Cómo invertir el vaivén de la puerta.
Lea las instrucciones completamente y debidamente.
Notas importantes
Cuando cambie el modo de apertura de la puerta:
■ Lea las instrucciones por completo antes de empezar.
■ Maneje las partes con cuidado para evitar rascar la pintura.
■ Sitúe los tornillos cerca de las partes que correspondan para evitar utilizarlos en un lugar incorrecto.
■ Provea un lugar de trabajo apropiado para que las puertas no se rasquen.
IMPORTANTE: Una vez haya empezado, no mueva el gabinete hasta que haya finalizado el proceso de cambiar el modo de
apertura de la puerta.
Estas instrucciones son para cambiar las bisagras del lado derecho al lado izquierdo—si usted quiere volver a poner las bisagras
de nuevo en el lado derecho, siga las mismas instrucciones (simplemente cambie todas las referencias a izquierda y derecha).
Herramientas necesarias
■ Destornillador Phillips
■ Destornillador plano o cuchillo de enmasillar
■ Cinta para cubrir (aislante)
■ Destornillador de cabeza hexagonal de 5/16″
■ Destornillador de cabeza hexagonal de 3/8″
Servicio al consumidor Solucionar problemas
Operación SeguridadInstalación
Cómo remover las puertas.
Puede que sea necesario remover las puertas para mover la unidad a través de espacios estrechos.
Quizás usted también deba cambiar la orientación en que la puerta abre para tener un más fácil acceso
al refrigerador.
Tornillo de ajuste del
rodillo (hexagonal de 3/8″
con ranura)
Rodillo
Base de nivelación
Tapa extrema
Page 53

Desenchufe el refrigerador.
Vacíe los estantes de las puertas, incluyendo el
compartimiento de productos lácteos.
PRECAUCION: No deje que ninguna de las puertas se caiga al
suelo. Si esto ocurriera el freno de la puerta podría dañarse.
Retire la puerta del refrigerador y la bisagra superior
Retire la cubierta de la bisagra superior retirando
el tornillo.
Coloque cinta para cubrir en ambas esquinas
superiores del marco de la puerta.
Retire los tres tornillos de cabeza hexagonal de 5/16″
que unen la bisagra superior al gabinete.
Levante la bisagra directamente hacia arriba para
liberar el pasador del cubo en la parte superior de
la puerta.
Quite la cinta, incline y retire la puerta del gabinete
y levántela para liberar su receptáculo inferior del
pasador de la bisagra en el soporte de la bisagra
central.
Coloque la puerta en una superficie que no
la raye.
Servicio al consumidorSolucionar problemasOperación
Seguridad
Instalación
Antes de sacar las puertas
Retire el soporte de la bisagra central
En los modelos con puerta de congelador: Pegue las
puertas cerradas con cinta de enmascarar en las
esquinas superiores. Retire el pasador de la bisagra
central con un destornillador de cabeza hexagonal
de 5/16″. Luego, retire la bisagra central retirando
los tres tornillos de cabeza Phillips.
En los modelos con gaveta del congelador: Abra la
gaveta y retire los soportes de la bisagra retirando los
tres tornillos de cabeza Phillips. Retire el pasador de
la bisagra central con un destornillador de cabeza
hexagonal de 5/16″.
Inserte el soporte de la bisagra y reinstale el pasador
de la bisagra en el soporte. Ponga el soporte de la
bisagra y los tres tornillos a un lado para la
reinstalación posterior.
Retire la puerta del congelador y traslade el soporte de la bisagra inferior
(modelo con puerta de congelador únicamente)
Retire la cinta de la puerta del congelador. Incline
la puerta hacia fuera del gabinete y levántela para
liberar el orificio inferior del pasador de la bisagra
en el soporte de la bisagra central.
Coloque la puerta en una superficie que no
la raye.
Retire el soporte de la bisagra inferior retirando los
cuatro tornillos de cabeza hexagonal de 3/8″.
Retire los botones de los tapones en el costado
izquierdo inferior del gabinete e instálelos en los
orificios vacantes de los tornillos en el costado
derecho.
Instale el soporte de la bisagra inferior en el costado
izquierdo.
Retire el pasador de la bisagra del soporte de la
bisagra inferior e instálelo en el orificio exterior.
53
Centro derecho
Pasador
de la bisagra
central
Arandela
plástica
Costado derecho inferior
Costado izquierdo inferior
Page 54

54
Cómo invertir el vaivén de la puerta.
Servicio al consumidor Solucionar problemas
Operación SeguridadInstalación
Retire los tornillos que unen la manija de la
puerta del congelador al costado izquierdo y
retire la manija.
Retire los botones de los tapones en el costado
derecho e instálelos en los orificios vacíos de los
tornillos en el costado izquierdo.
Instale la manija en el costado derecho.
Retire los tornillos uniendo el freno de la
puerta del congelador al costado derecho
inferior de la puerta del congelador.
Retire los botones de los tapones en el costado
izquierdo e instálelos en los orificios vacíos de
los tornillos en el costado derecho.
Instale el freno de la puerta en el costado
izquierdo.
Vuelva a colgar la puerta del congelador (en algunos modelos) e instale el soporte de la
bisagra central
En los modelos con puerta de congelador: Baje
el orificio inferior de la puerta del congelador
hacia el soporte de la bisagra inferior. Cierre
la puerta y asegúrela la puerta al gabinete con
cinta de enmascarar de ser necesario. Invierta el
pasador de la bisagra central en el orificio de la
bisagra en la parte superior de la puerta del
congelador.
Una el soporte de la bisagra central al costado
izquierdo sin presionar con los tres tornillos de
cabeza Phillips.
En modelos con puerta de congelador: Retire la
cinta de enmascarar. Apoyando la puerta del
congelador en la manija, alinee la puerta del
congelador con el gabinete.
Apriete los tres tornillos.
Invierta la manija de la puerta del congelador y traslade los frenos de la puerta
(modelo con puerta de congelador únicamente)
Costado izquierdo
Costado derecho
Freno de la puerta
Centro izquierdo
Pasador
de la bisagra
central
Arandela
plástica
Freno de la puerta
Costado izquierdo
Costado derecho
Page 55

Vuelva a colgar la puerta del refrigerador e instale la bisagra superior
Baje el orificio inferior de la puerta del
refrigerador hacia el soporte de la bisagra
central. Cierre la puerta y asegúrela al gabinete
con cinta de enmascarar de ser necesario.
Inserte el pasador de la bisagra superior en el
orificio de la bisagra en la parte superior de la
puerta del refrigerador y una la bisagra superior
al gabinete sin presión con los tres tornillos de
cabeza hexagonal de 5/16″.
Retire la cinta de enmascarar. Apoyando la
puerta del refrigerador en la manija, alinee la
puerta con el gabinete.
Apriete los tres tornillos.
Instale la cubierta de la bisagra.
Servicio al consumidorSolucionar problemasOperación
Seguridad
Instalación
55
Invierta la manija de la puerta del refrigerador y traslade el freno de la puerta
Retire los tornillos que unen la manija de la
puerta del refrigerador al costado izquierdo y
retire la manija.
Retire los botones de los tapones en el costado
derecho e instálelos en los orificios vacíos de los
tornillos en el costado izquierdo.
Instale la manija en el costado derecho.
Retire los tornillos que unen el freno de la
puerta del refrigerador al costado derecho
inferior de la puerta del refrigerador.
Retire los botones de los tapones en el costado
izquierdo e instálelos en los orificios vacíos de
los tornillos en el costado derecho.
Instale el freno de la puerta en el costado
izquierdo.
Pasador de la
bisagra central
Costado izquierdo
Freno de la puerta
Costado derecho
Freno de la puerta
Costado izquierdo
Costado derecho
Costado izquierdo
Page 56

56
Para quitar la gaveta del congelador.
La gaveta del congelador puede ser removida, si es necesario, para que quepa por áreas estrechas.
Lea las instrucciones completamente y debidamente.
Servicio al consumidor Solucionar problemas
Operación SeguridadInstalación
Para remover la gaveta del congelador
Para remover el frente de la gaveta de los deslizadores:
Retire el tornillo de estrella en cada lado del
riel. NO retire los tornillos de cabeza hexagonal
de la ensambladura del riel.
Levante la empuñadora de la gaveta del
congelador para separar los rieles de la
gaveta de la ensambladura del riel.
Coloque la gaveta en una superficie que no
raye.
Para remover las canastas:
Abra la gaveta del congelador hasta el máximo.
Deslice la canasta superior de nuevo en el
congelador.
Retire la canasta inferior levantándola en
la parte de atrás luego levantando toda la
canasta hacia arriba y hacia afuera de los
rieles.
Para remover los frenos estabilizadores (si fuera necesario ajustar para lugares estrechos)
Remueva la rehilla de la base. Remueva ambas tapas
extremas. Remueva ambos frenos estabilizadores
con un destornillador de cabeza hexagonal de 3/8.″
Rejilla de la
base
Tapa extrema
Tornillo de
estrella
Soporte
Page 57

Servicio al consumidorSolucionar problemasOperación
Seguridad
Instalación
Para reponer la gaveta del congelador
Reemplace el tornillo de estrella en ambas
ensambladuras del riel.
Localice las ranuras al interior de la
ensambladura del riel cerca de la parte
posterior.
Inserte los ganchos en la parte posterior de los
rieles unidos a la gaveta, en las ranuras de la
ensambladura del riel.
Baje el frente de la gaveta cerciorándose de que
las orejillas en los lados del riel encajen en las
ranuras frontales en la ensambladura del riel.
Reemplace la canasta inferior del
congelador. Cerciórese de que las orejillas
en los lados de la canasta se ajusten en las
muescas posteriores en las ensambladuras
del riel y que el reborde en cada lado se
ajuste en la sección interna de los rieles.
IMPORTANTE: Es posible que dos personas sean
necesarias para completar este procedimiento.
Tire hacia afuera la ensambladura del riel
a la máxima extensión en cada costado del
gabinete.
Ranura
Ensambladura del riel
Ranura
Orejilla
Gancho
Tornillo de
estrella
Orejilla
Muesca
Reborde
57
Page 58

58
Servicio al consumidor Solucionar problemas
Operación SeguridadInstalación
Sonidos normales de la operación.
Antes de solicitar un servicio…
Solucionar problemas
¡Ahorre tiempo y dinero! Revise las tablas en las siguientes
páginas y tal vez no necesitará de solicitar un servicio.
Problema Causas Posibles Qué hacer
El refrigerador no Refrigerador en ciclo de • Espere 30 minutos para que la descongelación se termine.
funciona descongelar. Si las luces funcionan pero la unidad no se enciende, quite
la rejilla de la base. Localice el control de tiempo de
descongelación que está montado en el riel central y gire la
perilla en el sentido de las manecillas del reloj hasta que
escuche un click. El refrigerador debe empezar a funcionar.
Control en posición 0 (apagado). • Mueva el control hasta un ajuste de temperatura.
El refrigerador esté desconectado. • Empuje la clavija completamente en el enchufe.
Fusible fundido/interruptor • Reemplace el fusible o reajuste el interruptor.
de circuito roto.
Los refrigeradores más nuevos producen sonidos diferentes a los modelos más antiguos. Los
refrigeradores modernos tienen más funciones y usan tecnología más reciente.
HMMMM...
WHOOSH....
■
El nuevo compresor de alta eficiencia puede funcionar más
rápido y durar más que el de su refrigerador anterior y
puede escuchar un zumbido de tono alto o un sonido
pulsante mientras opera.
■
Puede escuchar un sonido de soplido cuando las puertas se
cierran. Esto se debe a que la presión se está estabilizando
dentro del refrigerador.
■
Puede escuchar los ventiladores moviéndose a gran
velocidad. Esto pasa cuando el refrigerador se conecta por
primera vez, cuando las puertas se abren frecuentemente o
cuando se guarda gran cantidad de alimentos en el
refrigerador o en los compartimientos del congelador. Los
ventiladores están ayudando a mantener las temperaturas
correctas.
■
Los ventiladores cambian la velocidad para suministrar
enfriamiento óptimo y ahorrar energía.
CHASQUIDOS,
ESTALLIDOS, CRUJIDO
■
Puede escuchar sonidos como de crujido o estallidos
cuando el refrigerador se conecta por primera vez. Esto
pasa a medida que el refrigerador se enfría hasta la
temperatura correcta.
■
El control del congelador produce un chasquido cuando
el compresor inicia o para.
■
El reloj del descongelador produce un chasquido al iniciar y
terminar el ciclo de descongelación.
■
Expansión y contracción de las bobinas durante o después
del ciclo de descongelación puede causar sonidos como de
crujido o estallidos.
■
En modelos con máquina de hielos, después de completar
un ciclo de hacer hielo, se pueden escuchar los cubos de
hielo cuando caen a la bandeja de hielos.
SONIDOS DE AGUA
■
El fluido del refrigerante a través de las bobinas puede
producir un sonido de borboteo como de agua hirviendo.
■
El agua que cae en el calentador de descongelación puede
causar un chisporroteo, estallido o zumbido durante el
ciclo de descongelación.
■
Un ruido de agua cayendo se puede escuchar durante el
ciclo de descongelación a medida que el hielo se derrite
del evaporador y fluye hacia la bandeja de drenaje.
■
El cierre de las puertas puede producir un sonido de
gorgoteo debido a la estabilización de la presión.
¿Usted escucha lo que yo escucho? Estos sonidos son normales.
¡WHIR!
Page 59

59
Servicio al consumidorSolucionar problemasOperación
Seguridad
Instalación
GEAppliances.com
Problema Causas Posibles Qué hacer
Vibraciones o sacudidas Los rodillos requieren • Vea Rodillos.
(una vibración ligera un ajuste.
es normal)
El motor opera durante Es normal cuando • Espere 24 horas para que el refrigerador se enfríe
períodos prolongados o el refrigerador es recién completamente.
se arranca y se para con instalado en su casa.
frecuencia. (Refrigeradores
Ocurre cuando hay largas • Eso es normal.
modernos con más espacio
cantidades de alimentos
de almacenamiento y un
en el refrigerador.
congelador más grande
Se dejó abierta la puerta. • Revise si un paquete mantiene la puerta abierta.
requieren más tiempo de
Clima caluroso o aperturas • Eso es normal.
operación. Se arrancan y
frecuentes de la puerta.
se paran a menudo para
Controles de temperatura • Vea Los controles.
mantener temperaturas
ajustados al punto más frío.
uniformes.)
Rejilla y condensador • Vea Cuidado y limpieza.
requieren de limpieza.
Compartimiento del El control de temperatura • Vea Los controles.
refrigerador o congelador no se fijó bastante frío.
demasiado cálido
Clima caluroso o aperturas • Fije el control de temperatura un paso más frío.
frecuentes de la puerta. Vea Los controles.
Se dejó abierta la puerta. • Revise si hay un paquete que mantiene la puerta abierta.
Escarcha o cristales Se dejó abierta la puerta. • Revise si hay un paquete que mantiene la puerta abierta.
de hielo en alimentos
La puerta se abre con frecuencia
congelados (escarcha
o por mucho tiempo.
en paquete es normal)
Formación lenta del hielo Se dejó abierta la puerta. • Revise si hay un paquete que mantiene la puerta abierta.
El control de temperatura • Vea Los controles.
no es bastante frío.
Los cubos tienen mal Alimentos transmitiendo • Envuelva bien los alimentos.
olor/sabor olor/sabor a los cubos.
El interior del refrigerador • Vea Cuidado y limpieza.
requiere limpieza.
El refrigerador huele Alimentos transmitiendo • Alimentos con olores fuertes deben estar tapados.
olores al refrigerador.
• Guarde una caja de bicarbonato de sodio en el
refrigerador; cámbiela cada tres meses.
El interior requiere limpieza. • Vea Cuidado y limpieza.
Se forma humedad No es extraño durante • Seque la superficie con un paño suave y ajuste el
en la superficie de los periodos de alta humedad. control del refrigerador una marca más hacia lo frío.
compartimientos entre
las puertas
Humedad en el interior Se abre la puerta con
(en clima húmedo el aire frecuencia o por mucho
lleva la humedad al interior tiempo.
del refrigerador cuando se
abren las puertas)
Page 60

60
Antes de solicitar un servicio…
Solucionar problemas
Servicio al consumidor Solucionar problemas
Operación SeguridadInstalación
Problema Causas Posibles Qué hacer
La puerta/gaveta no se Los rodillos necesitan ajuste. • Consulte la sección Cómo preparar la instalación del
cierra sola refrigerador.
La puerta/gaveta del Esto es normal si después de • Esto indica que hay un buen sellante en la puerta/gaveta
congelador se abre cuando abrirse, la puerta/gaveta del del congelador. Si la puerta/gaveta del congelador no se
la puerta del refrigerador congelador se cierra sola. cierra automáticamente después de abrirse, entonces
está cerrada consulte la sección anterior, Problema: La puerta/gaveta
del refrigerador no se cierra sola.
Page 61

61
Notas.
Servicio al consumidorSolucionar problemasOperación
Seguridad
Instalación
Page 62

Servicio al consumidor Solucionar problemas
Operación SeguridadInstalación
Garantía del Refrigerador.
Durante: GE reemplazará:
Un año Cualquier parte del refrigerador que falle debido a un defecto en materiales o mano de obra.
A partir de la fecha Durante este año de garantía completa, GE también proporcionará sin costo, mano de obra y
de compra original servicio en su hogar para reemplazar las partes defectuosas.
Cinco años Cualquier parte del sistema sellado de refrigeración, (compresor, condensador, evaporador y todas
A partir de la fecha tuberías de conexión) que falle debido a un defecto en materiales o mano de obra. Durante este
de compra original cinco años de garantía, GE también proporcionará sin costo, mano de obra y servicio en su hogar
para reemplazar las partes defectuosas.
■ Viajes de servicio a su hogar para enseñarle cómo usar
el producto.
■ Una instalación incorrecta.
■ Fallas del producto si hay abuso, mal uso, o uso para
otros propósitos que los propuestos, o uso para fines
comerciales.
■ Pérdida de alimentos por averías.
■ Reemplazo de fusibles de su hogar o reajuste de
interruptores de circuito.
■ Daño al producto causado por accidente, fuego,
inundaciones, o actos de Dios.
■ Daño incidental o consecuencial causado por posibles
defectos con el aparato.
Lo que GE no cubrirá:
Esta garantía se extiende al comprador original y a cualquier propietario que lo suceda para el caso de productos
comprados para uso doméstico normal en los Estados Unidos. En Alaska, usted tendrá que pagar el flete del
producto o los costos de viaje del técnico de servicio hasta su hogar.
Algunos estados no permiten la exclusión o limitación de daños incidentales o consecuenciales. Esta garantía le
proporciona derechos legales específicos, y puede tener otros derechos que pueden variar de un estado a otro.
Para conocer los derechos legales de su estado, consulte con su oficina local de asuntos del consumidor o al
procurador general de su estado.
Garantidor: General Electric Company. Louisville, KY 40225
62
Todos los servicios de garantía los proporcionan nuestros Centros
de Reparación de Fábrica o nuestros técnicos Customer Care
®
autorizados. Para concertar una cita de reparación, en línea,
24 horas al día, visítenos al GEAppliances.com, o llame al
800.GE.CARES (800.432.2737).
Grape aquí su recibo.
Se requiere facilitar prueba
de la fecha de compra original
para obtener un servicio
bajo la garantía.
Page 63

63
Servicio al consumidor.
Página Web de GE Appliances
GEAppliances.com
¿Tiene alguna pregunta sobre su electrodoméstico? ¡Pruebe la página Web de GE Appliances 24 horas al
día, cualquier día del año! Para mayor conveniencia y servicio más rápido, ya puede descargar los Manuales
de los Propietarios, pedir piezas o incluso hacer una cita en línea para que vengan a realizar una
reparación. También puede “Ask Our Team of Experts™” (Preguntar a nuestro equipo de expertos)
sobre cualquier cuestión y mucho más...
Solicite una reparación GEAppliances.com
El servicio de expertos GE está a tan sólo un paso de su puerta. ¡Entre en línea y solicite su reparación
cuando le venga bien 24 horas al día cualquier día del año! O llame al 800.GE.CARES (800.432.2737)
durante horas normales de oficina.
Real Life Design Studio (Estudio de diseño para la vida real)
GEAppliances.com
GE apoya el concepto de Diseño Universal—productos, servicios y ambientes que pueden usar gente de
todas las edades, tamaños y capacidades. Reconocemos la necesidad de diseñar para una gran gama de
habilidades y dificultades físicas y mentales. Para más detalles cobre las aplicaciones de GE Diseño Universal,
incluyendo ideas de diseño para la cocina para personas con discapacidades, mire nuestra página Web hoy
mismo. Para personas con dificultades auditivas, favor de llamar al 800.TDD.GEAC (800.833.4322).
Garantías ampliadas GEAppliances.com
Compre una garantía ampliada y obtenga detalles sobre descuentos especiales disponibles mientras su garantía
está aún activa. Puede comprarla en línea en cualquier momento, o llamar al (800.626.2224) durante horas
normales de oficina. GE Consumer Home Services estará aún ahí cuando su garantía termine.
Piezas y accesorios GEAppliances.com
Aquellos individuos con la calificación necesaria para reparar sus propios electrodomésticos pueden
pedir que se les manden las piezas o accesorios directamente a sus hogares (aceptamos las tarjetas VISA,
MasterCard y Discover). Haga su pedido en línea hoy, 24 horas cada día o llamar por teléfono
al 800.626.2002 durante horas normales de oficina.
Las instrucciones descritas en este manual cubren los procedimientos a seguir por cualquier usuario. Cualquier
otra reparación debería, por regla general, referirse a personal calificado autorizado. Debe ejercerse precaución
ya que las reparaciones incorrectas pueden causar condiciones de funcionamiento inseguras.
Póngase en contacto con nosotros GEAppliances.com
Si no está satisfecho con el servicio que recibe de GE, póngase en contacto con nosotros en nuestra página
Web indicando todos los detalles así como su número de teléfono o escríbanos a:
General Manager, Customer Relations
GE Appliances, Appliance Park
Louisville, KY 40225
Registre su electrodoméstico GEAppliances.com
¡Registre su nuevo electrodoméstico en línea—cuando usted prefiera! El registrar su producto a tiempo le
proporcionará, si surgiera la necesidad, una mejor comunicación y un servicio más rápido bajo los términos
de su garantía. También puede enviar su tarjeta de registro pre-impresa que se incluye en el material de
embalaje.
Page 64

Consumer Support.
GE Appliances Website
In the U.S.: GEAppliances.com
Have a question or need assistance with your appliance? Try the GE Appliances Website 24 hours a day,
any day of the year! For greater convenience and faster service, you can now download Owner’s Manuals,
order parts, catalogs, or even schedule service on-line. You can also “Ask Our Team of Experts™” your questions,
and so much more... In Canada: geappliances.ca
Schedule Service In the U.S.: GEAppliances.com
Expert GE repair service is only one step away from your door. Get on-line and schedule your service at your
convenience 24 hours any day of the year! Or call 800.GE.CARES (800.432.2737) during normal business hours.
In Canada, call 1.800.361.3400
Real Life Design Studio In the U.S.: GEAppliances.com
GE supports the Universal Design concept—products, services and environments that can be used by people of all
ages, sizes and capabilities. We recognize the need to design for a wide range of physical and mental abilities and
impairments. For details of GE’s Universal Design applications, including kitchen design ideas for people with
disabilities, check out our Website today. For the hearing impaired, please call 800.TDD.GEAC (800.833.4322).
In Canada, contact: Manager, Consumer Relations, Camco, Inc.
Suite 310, 1 Factory Lane
Moncton, N.B. E1C 9M3
Extended Warranties In the U.S.: GEAppliances.com
Purchase a GE extended warranty and learn about special discounts that are available while your warranty is still
in effect. You can purchase it on-line anytime, or call 800.626.2224 during normal business hours. GE Consumer
Home Services will still be there after your warranty expires. In Canada, call 1.888.261.2133
Parts and Accessories In the U.S.: GEAppliances.com
Individuals qualified to service their own appliances can have parts or accessories sent directly to their homes
(VISA, MasterCard and Discover cards are accepted). Order on-line today, 24 hours every day or by phone at
800.626.2002 during normal business hours.
Instructions contained in this manual cover procedures to be performed by any user. Other servicing generally should be
referred to qualified service personnel. Caution must be exercised, since improper servicing may cause unsafe operation.
Customers in Canada should consult the yellow pages for the nearest Camco service center, or call 1.888.261.3055.
Contact Us In the U.S.: GEAppliances.com
If you are not satisfied with the service you receive from GE, contact us on our Website with all the details including
your phone number, or write to: General Manager, Customer Relations
GE Appliances, Appliance Park
Louisville, KY 40225
In Canada: geappliances.ca, or write to: Director, Consumer Relations, Camco, Inc.
Suite 310, 1 Factory Lane
Moncton, N.B. E1C 9M3
Register Your Appliance In the U.S.: GEAppliances.com
Register your new appliance on-line—at your convenience! Timely product registration will allow for enhanced
communication and prompt service under the terms of your warranty, should the need arise. You may also
mail in the pre-printed registration card included in the packing material. In Canada: geappliances.ca
Printed in the United States
 Loading...