

Page 1
21887
Digital Cordless
Telephone and Corded
Speakerphone with Dual
Mode Caller ID User’s Guide
– 0 –
Page 2

Precautions of Use
The quality of communication depends on the location and
environment of the base and the handset. The 21887 must be kept
away from sources of excessive heat (radiators, direct sunlight, etc.)
and protected against vibrations and dust. Never allow your telephone
to come into contact with water or other liquids or with aerosols. To
reduce the risk of interference and optimize reception, take particular
care to keep it away from the immediate vicinity of windows, large
metal objects, reinforced concrete, televisions, music centre, halogen
lamps or heating devices, fluorescent lighting, burglar alarms,
microwave ovens, computers, etc.
To clean the 21887, use a lightly moistened antistatic cloth
Safety
In the event of danger, the mains adapter acts as 220V power
isolating device. It should therefore, as a precaution, be installed
close to the appliance and be easily accessible.
If the mains adapter fails, it must be replaced by an identical model.
If not connected to the mains power or if there is a mains power
failure, installations with cordless handsets will no longer work. You
will then be unable to make or receive calls through the cordless
handset in event of emergency. Fortunately, our Combo phone 21887
consists of one base station and cordless handset. Therefore, you are
still able to make or receive calls through the base station during
p
ower failure (but no digits or icons will be appeared on the display)
The appliance is designed for connection to an analogue telephone
line class TNV3 (telecommunications network voltage).
! Do not use your telephone to notify a gas leak when you are in
the vicinity of the leak.
– 1 –
Page 3

It is recommended that you avoid using this device during electrical
storms.
Thomson Telecom hereby declares that the 21887 conforms to the
essential requirements and other applicable provisions of European
directive 1999/5/CE.
WARNING:
TO PREVENT FIRE OR ELECTRICAL SHOCK HAZARD, DO NOT
EXPOSE THIS PROCUCT TO RAIN OR MOISTURE
.
THE LIGHTING
FLASH AND
ARROW HEAD
WITHIN THE
TRIANGLE IS A
WARNING SIGN
ALERTING YOU OF
“DANGEROUS
VO LTAGE”
INSINDE THE
PRODUCT
.
CAUTION: TO
REDUCE THE RISK OF
ELECTRICAL SHOCK,
DO NOT REMOVE
COVER (OR BACK).
NO USER
SERVICEABLE PARTS
INSIDE. REFER
SERVICING TO
QUALIFIED SERVICE
PERSONNEL
.
THE
EXCLAMATION
WITHIN THE
TRIANGLE IS
WARNING SIGN
ALERTING YOU OF
IMPORTANT
INSTRUCTIONS
ACCOMPANYING
THE PRODUCT.
SEE MARKING ON BOTTOM / BACK OF PRODUCT
– 2 –
Page 4
Battery Safety Precautions
z Do not burn, disassemble, mutilate, or puncture. Like other
batteries of this type, toxic materials could be released which
can cause injury.
z To reduce the risk of fire or personal injury, use only the battery
listed in User’s Guide.
z Keep batteries out of children.
z Remove batteries if storing over 30 days.
z Do Not Use Alkaline or Non Rechargeable Batteries.
CAUTION:
Danger of explosion if battery is incorrectly replaced.
Replace only with GP60AAAHC – Ni-MH 1.2V 600mAh
rechargeable battery or equivalent.
Only use rechargeable batteries with exactly the same specifications
as those supplied with the product. Using non-rechargeable or
non-conforming batteries can damage the product. The batteries
could split or leak if incorrectly inserted, opened or exposed to heat.
Never dispose of batteries in a fire: the cell could explode.
Check with local code for possible special disposal instruction.
Note: To ensure the battery charging properly, clean the charging
contacts on the handset and charger with a soft, dry cloth once a
month. Clean more often if the unit is subject to grease, dust or high
humidity.
– 3 –
Page 5

Installation
Packaging Contents
Single
pack
Twin
pack
Triple
pack
Packaging
contents
Handset Base
Stations
1 1 1
Cordless
Handset
1
2 3
Mains
Adaptor
2
3 4
Telephone
Line Cord
1
1 1
Batteries,
type AAA,
“1.2V
600mAh”
2
4 6
Charging
station
1
2 3
Operating
instructions
1 1
1
Please check the contents of the package carefully. If anything is
missing or shows signs of transport damage, do NOT put the
telephone into service! In such a case, contact either your sales outlet
with the purchase receipt.
Connecting the Base Station and Power Plug
Connecting the plugs to the corresponding sockets in the base station
(they can not be connected incorrectly because the sockets and plugs
– 4 –
Page 6
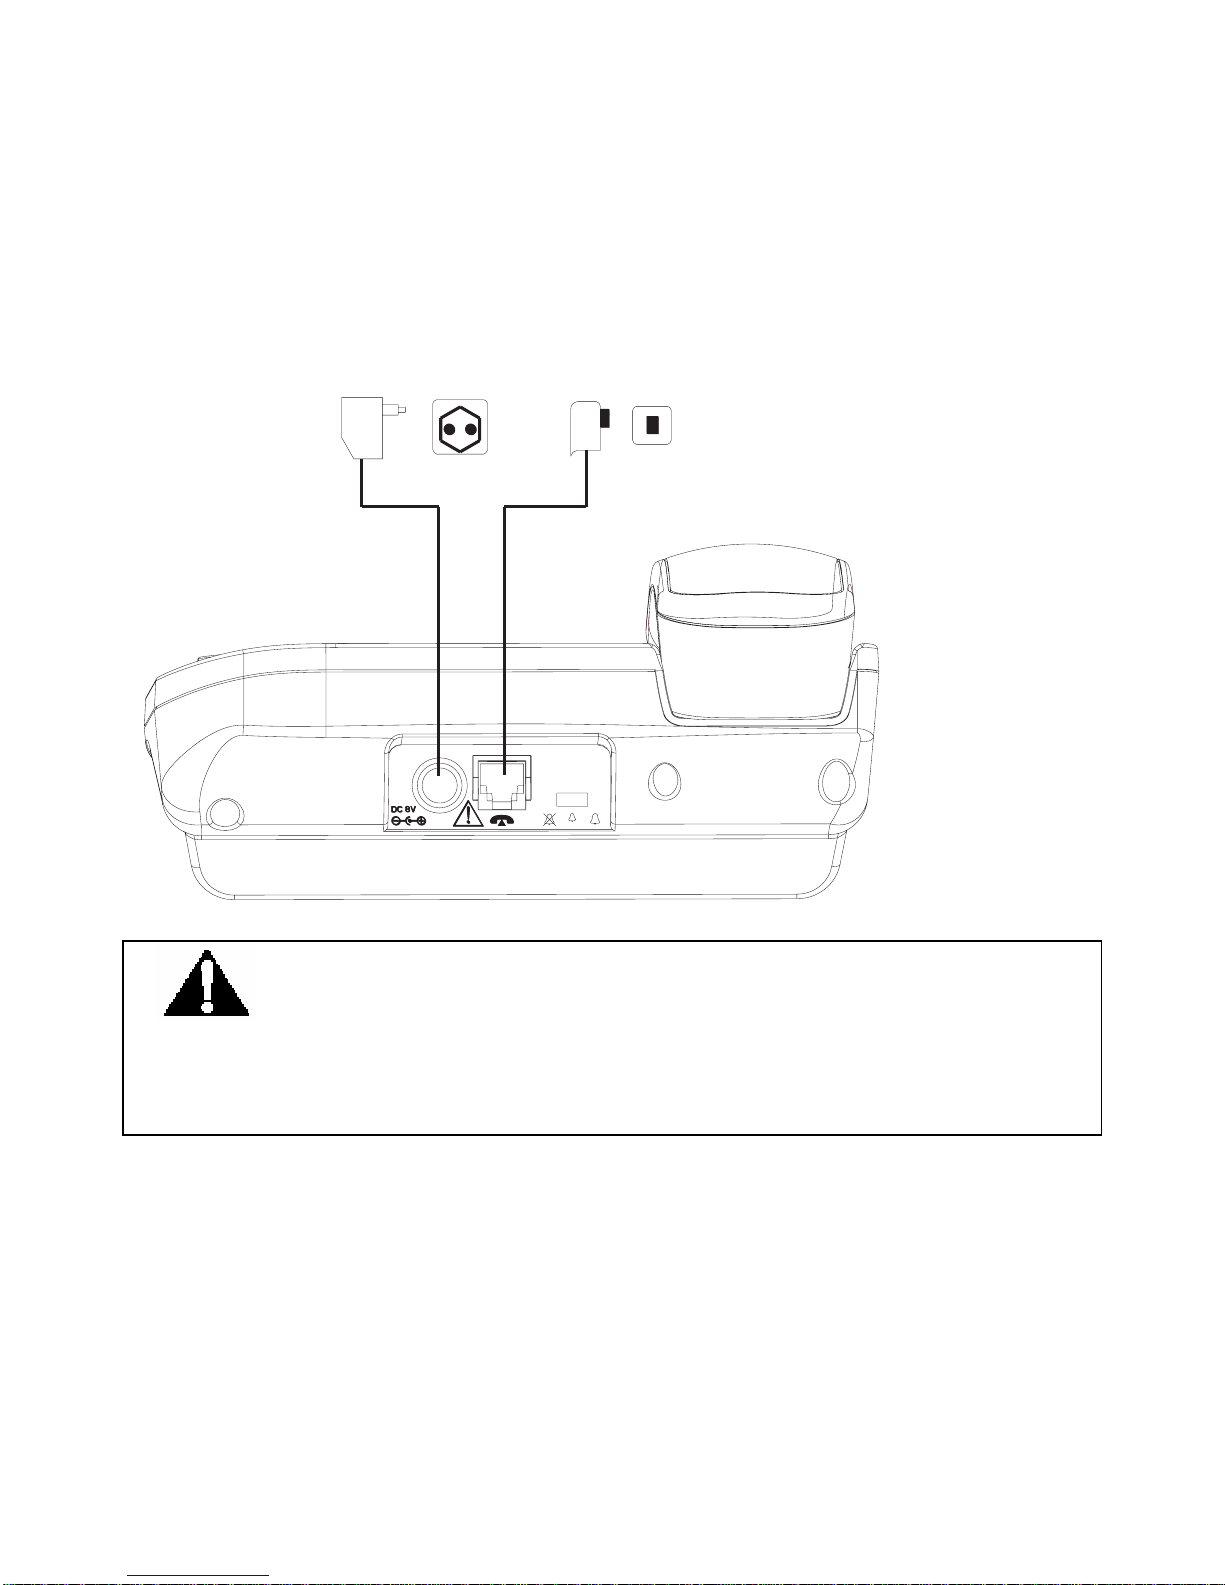
are designed prevent reverse poling). Plug the telephone line in the
telephone connection socket. Insert the power plug at the other end in
the power outlet. The base station in now ready to operate.
Only use the connection cable supplied.
AC power outlet
Phone jack
CAUTION:
Plug the adapter to the socket outlet that near the equipment
and shall be easily accessible. Use only the Thomson Telecom power
supply that came with this unit. Using other power supplies may
damage the unit.
– 5 –
Page 7
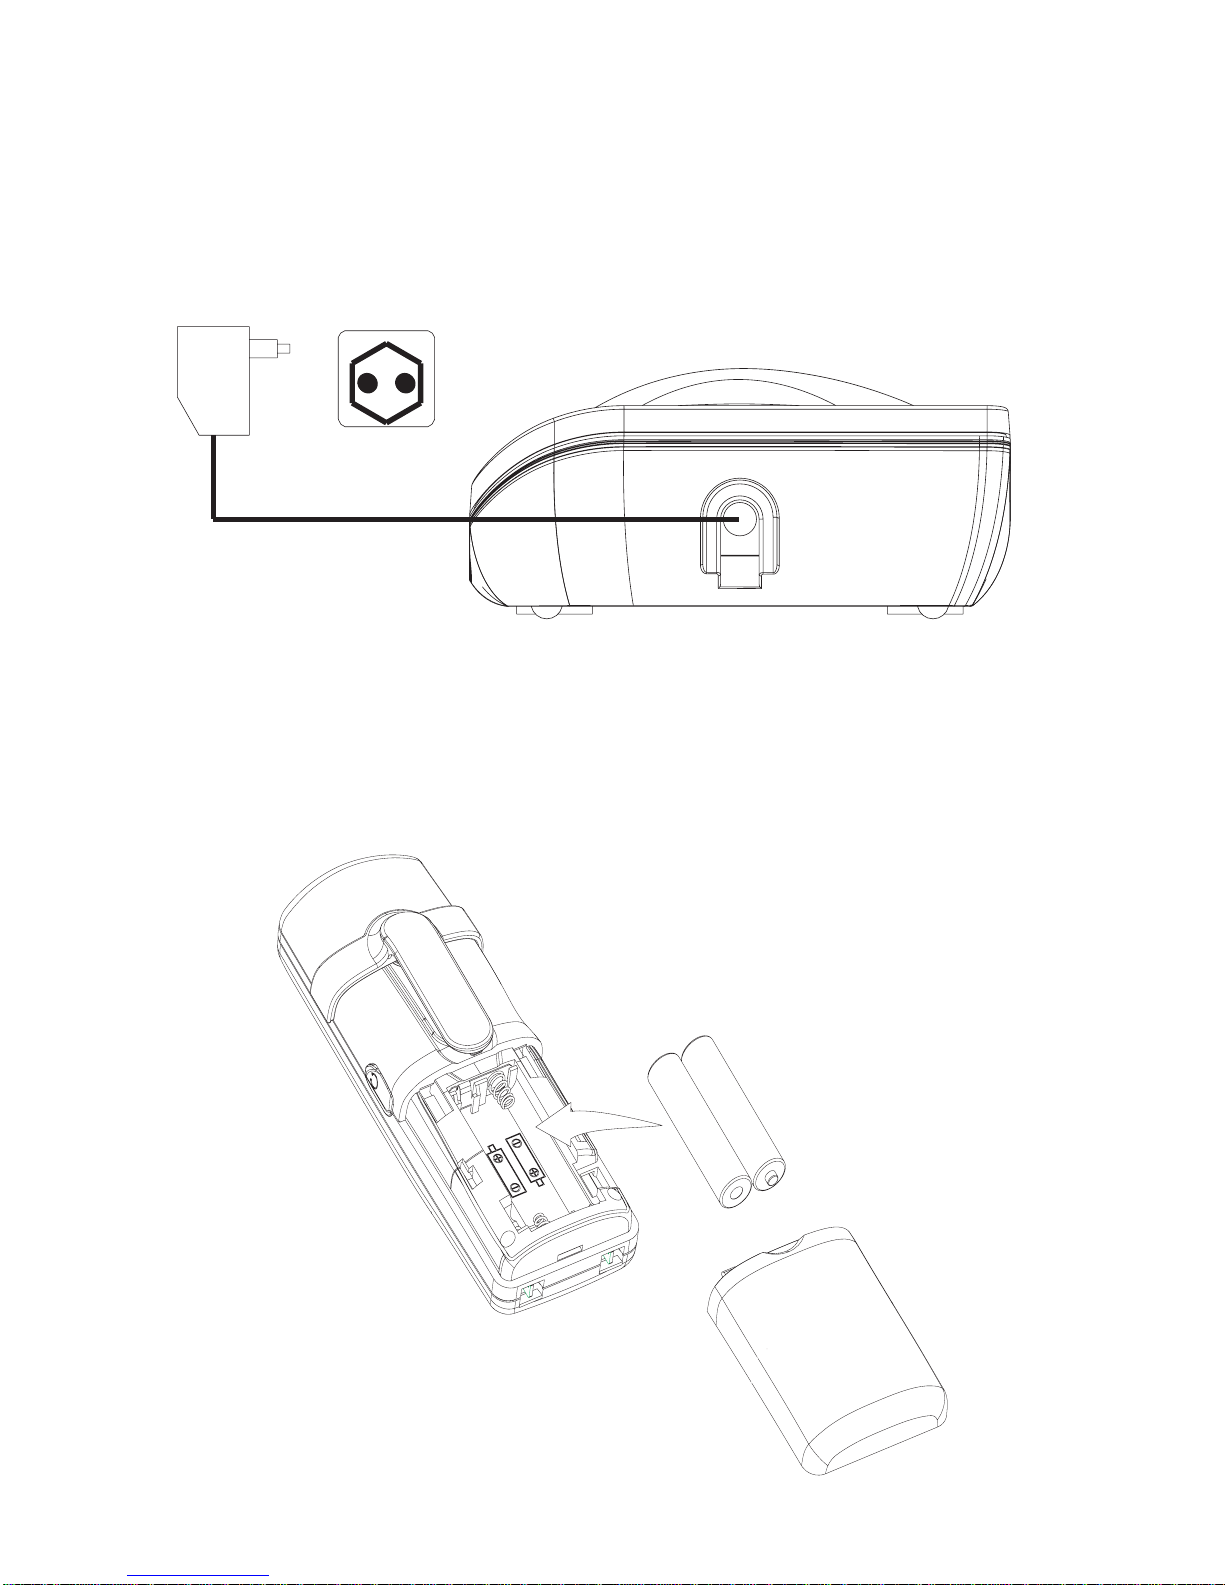
Connecting the charging station
Insert the power plug in the socket on the rear side of the charging
station. Insert the power plug at the other end in the power outlet. The
charging station is now ready to operate.
AC power outlet
Getting Started
Install and Charge the Batteries
– 6 –
Page 8
Insert two pieces AAA batteries in the compartment, ensuring correct
polarity and close the compartment.
Place the handset in the remote charge unit to charge for 14 hours
prior for first use. If you don’t properly charge the phone, battery
performance will be compromised.
Warning: The handset does not work and damaged if the
wrong batteries are inserted.
Use Only Rechargeable batteries supplied (charge at least 14
hours before use).
Do Not use Alkaline or Non Rechargeable batteries.
If batteries are empty, handset LCD will not has any display and the
handset will not response to any key. Handset is then required to put
back on Base Station / Charger cradle to charge. Handset cannot be
used until handset name and aerial icon appear. If handset does not
charged full before use, handset may emit battery low alert tone and
battery level indicator shows empty
Corded Base Station Set Up
Ringer Switch Setting
Ringer volume level (HIGH/LOW/OFF) can be selected by
a switch at the rear side of base station. Default is HI.
Note:
Base intercom ring tone level can’ t be turn OFF.
Handset ringer volume setting is refer to section of Headset Settings
– Ring Volume.
– 7 –
Page 9

Features
This cordless telephone is equipped with the following
features:
Handset Base Station
z Digital sound quality (DECT)
z Large mono display with backlight
z 50 Name and number phone book
z Handsfree
z Caller ID* and Caller ID* with Call Waiting
z Incoming 30 name/number call log
z Multi-language menu.
z 8 level LCD contrast, user changeable
z 10 Last number redial
z Microphone mute
z Conference call+ (1 external with 2 internal)
z Call forwarding/transfer+
z Message waiting indicator*
z Separate base and handset ringers
z 4 Level earpiece volume
z Real time clock display
z Call timer
z Key tone on/off
z Page Handset from base station
z Flash/Pause/Hold function
z Tone and Pulse dialing
DECT Cordless Handset
z Large mono display with backlight
z 50 Name and number phone book
z Hands free
– 8 –
Page 10

z Caller ID * and Caller ID* with Call Waiting
z Incoming 30 name/number call log
z Multi-language menu.
z 8 Ring tone melodies
z Ringer on/off
z 5 level LCD contrast
z 5 level ring volume
z Real time clock display
z Handset naming
z Automatic call answering
z Key input tone on/off
z Battery status inc low battery warning
z Tone and pulse dialing
z Up to 100 hours standby
z Up to 10 hours continuous talk time
z Out of range warning
z Recall/Pause/Hold
z Line in use indication
+ More than one handset required
* Subscription may be required. Please contact your network
provider.
DECT: Digitally Enhanced Cordless Telecommunication Standard for Cordless telephones
– 9 –
Page 11

Handset Layouts
– 10 –
Page 12
Redial / up key
/▲
CID/▼ Caller ID / down key
menu / OK Menu / OK key
Cancel / mute key
R Flash key
Intercom key
Phone book key
Speakerphone key
Off key
Talk key
Asterisk / ring off / temporary tone
dialing key
* / / tone
Hash key/Keypad lock key
Pause key
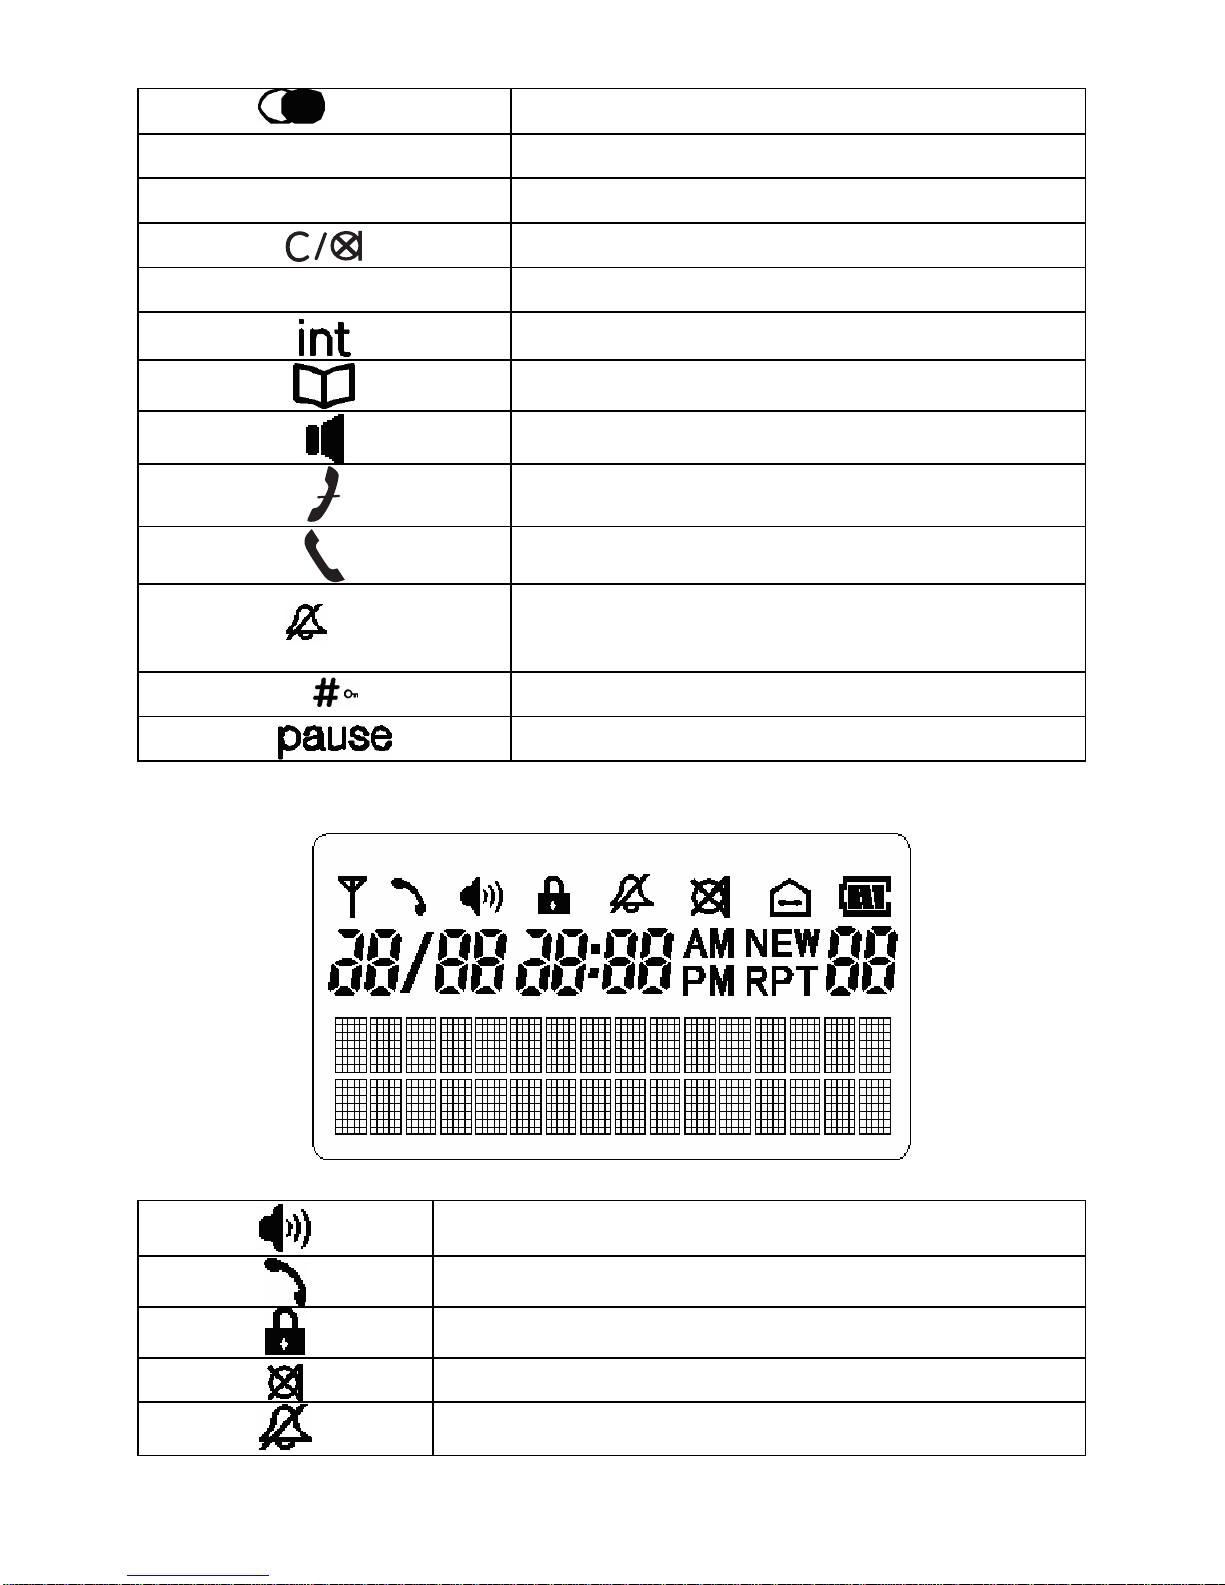
Handset LCD Display
Speakerphone icon
Phone icon
Key lock icon
Mute icon
Ring off icon
– 11 –
Page 13

Battery icon
Aerial icon
Internal call
NEW Missed call icon
RPT Repeated call icon
AM AM icon
PM PM icon
Corded Base Layouts
– 12 –
Page 14

menu / OK Menu / OK key
▲ / ▼ Up / down key
C Cancel key
exit Exit key
CID Caller ID key
redial Redial key
Intercom/ page Intercom/ page key
Phone book key
hold Hold key
flash Flash key
Register handset/Mute key
Register/ mute
Speaker key
Vol+/ vol- Volume up / down key
Pause key
*/tone
Asterisk / temporary tone dialing key
– 13 –
Page 15

Base LCD
Phone icon
Speakerphone icon
Mute icon
Internal call icon
Missed call icon
(Voice) Message Waiting icon
RPT Repeated call icon
AM AM icon
PM PM icon
Menu Operation
Base menu
Selecting the Language
Different languages display are available for selection.
z Press MENU/OK key.
z “Language” is displayed and press MENU/OK key.
z Press ▲ or ▼ key to select the desired language.
z Press MENU/OK key to confirm the setting.
z Press the exit key to return to idle mode.
LCD Contrast
There are 8 levels selection. The default setting is level 4.
– 14 –
Page 16

z Press MENU/OK key.
z Press ▲ or ▼ key to select “CONTRAST” and press
MENU/OK key.
z Press ▲ or ▼ key to select the desired contrast level.
z Press MENU/OK key to confirm the setting.
z Press the exit key to return to idle mode.
Key Tone
You can set the Base key tone to “On” or “Off” when you press the
base keypad. The default setting is “On”.
z Press MENU/OK key.
z Press ▲ or ▼ key to select “KEY TONE” and press
MENU/OK key.
z Press ▲ or ▼ key to select “ON” or “OFF”.
z Press MENU/OK key to confirm the setting.
z Press the exit key to return to idle mode.
Dial Mode
You can set the dial mode to “Tone” or “Pulse”. The default setting is
“Tone”.
z Press MENU/OK key.
z Press ▲ or ▼ key to select “DIAL MODE” and press
MENU/OK key.
z Press ▲ or ▼ key to select “TONE” or “PULSE”.
z Press MENU/OK key to confirm the setting.
z Press the
exit key to return to idle mode.
Flash Time
You can select flash time from 100ms to 800ms. The default setting is
600ms.
z Press MENU/OK key.
z Press ▲ or ▼ key to select “FLASH TIME” and press
MENU/OK key.
z Press ▲ or ▼ key to select the desired flash time.
z Press MENU/OK key to confirm the setting.
z Press the
exit key to return to idle mode.
– 15 –
Page 17

Date / Time
You can set the Date/Time displayed in idle mode. The default setting
is “2007, 01/01 12:01 pm”.
z Press MENU/OK key.
z Press ▲ or ▼ key to select “DATE/TIME” and press
MENU/OK key, the LCD will display “Year 2007”.
z Input the correct last two digits of year (range: 00-99) using
number key, press MENU/OK key to confirm the setting and
enter month and date setting.
z Input the correct date and month by numeric key, the format is:
date/month (date range: 01-30/31, month range: 01-12) using
number key, press MENU/OK key to confirm the setting and
enter time setting.
z Input the correct time, the format is: hour/minute (hour range:
01-12 and 00-23, minute range: 00-59) using number key, and
set the “am” or “pm” using ▲ or ▼ key.
z Press MENU/OK key to confirm the setting.
z Press the
exit key to return to idle mode.
Note: If the value you input is over the range, you can’t enter next
setting by pressing MENU/OK key, please enter the correct setting
again.
Message Waiting
If you have subscribed to a voice messaging service, the icon
will be displayed to alert you if you have a new messages waiting.
You can turn Visual Message Waiting Indication (VMWI) off
z Press the MENU/OK key
z Use the ▲ or ▼ keys to scroll to ’VMWI’ and press the
‘Menu/OK’ key again
z You will be prompted ‘VMWI OFF?’
z Press the MENU/OK to confirm the setting.
z Press the
exit key to return to idle mode.
Note: This service need subscription to local operator and it supports
the FSK CLI system only.
– 16 –
Page 18

Reset
You can reset your Telephone Base to its original (default) settings.
Note: After reset the base, all the caller ID records stored in base and
cordless handset, and all the phonebook and redial records stored in
base will be cleared. Please write down the useful information before
reset.
z Press MENU/OK key.
z Press ▲ or ▼ key to select “RESET” and press MENU/OK
key, the LCD will display “ENTER PIN”. (The default setting
is “0000”)
z Input the correct PIN code using number key, press MENU/OK
key to confirm, and the LCD will display “RESET?”.
z Press MENU/OK key to confirm the setting.
z Press the
exit key to return to idle mode.
Handset Menu
Handset Setting
Ring Melody
8 ringer tones are available for selection. The default setting is
“Melody 1”.
z Press MENU/OK key.
z Press ▲ or ▼ key to select SETUP HS and press MENU/OK
key.
z Press ▲ or ▼ key to select RING MELODY and press
MENU/OK key.
z Press ▲ or ▼ key to select the desired ring melody, the
selected melody is sounded.
z Press MENU/OK key to confirm.
z Press the
key to return to idle mode.
Ring Volume
5 ring volumes are available for selection. The default setting is
volume 5. Ringer can be disabled by pressing * key for 1.5 seconds in
– 17 –
Page 19

idle mode, and then icon will then shown on the display. Press
and hold * key again can Enable ringer again.
z Press MENU/OK key.
z Press ▲ or ▼ key to select SETUP HS and press MENU/OK
key.
z Press ▲ or ▼ key to select RING VOLUME and press
MENU/OK key.
z Press ▲ or ▼ key to select the desired ring volume, the
selected volume is sounded.
z Press MENU/OK key to confirm.
z Press the
key to return to idle mode.
Note: For the cordless handset, the intercom ring volume can’t be
adjusted, but it can be turned off.
Low Battery
You can set the warning beep to ON when cordless handset battery is
low. It alert you to charge the battery. The default setting is ON.
z Press MENU/OK key.
z Press ▲ or ▼ key to select “SETUP HS” and press
MENU/OK key.
z Press ▲ or ▼ key to select TONES and press MENU/OK key.
z Press ▲ or ▼ key to select LOW BATTERY and press
MENU/OK key.
z Press ▲ or ▼ key to select ON or OFF.
z Press MENU/OK key to confirm.
z Press the key to return to idle mode.
No Coverage
You can set the warning beep to ON or OFF when the cordless
handset is out of range. The default setting is ON.
z Press MENU/OK key.
z Press ▲ or ▼ key to select SETUP HS and press MENU/OK
key.
z Press ▲ or ▼ key to select TONES and press MENU/OK key.
z Press ▲ or ▼ key to select NO COVERAGE and press
– 18 –
Page 20

MENU/OK key.
z Press ▲ or ▼ key to select ON or OFF.
z Press MENU/OK key to confirm.
z Press the key to return to idle mode.
Key Tone
You can set the key tone to ON or OFF.. The default setting is ON.
z Press MENU/OK key.
z Press ▲ or ▼ key to select SETUP HS and press MENU/OK
key.
z Press ▲ or ▼ key to select TONES and press MENU/OK key.
z Press ▲ or ▼ key to select KEY TONE and press MENU/OK
key.
z Press ▲ or ▼ key to select ON or OFF.
z Press MENU/OK key to confirm.
z Press the
key to return to idle mode.
Auto Talk
This option allows user to pick up the cordless handset from charger
to answer the call directly during ringing, and no need to press
or
key. The default setting is ON.
z Press MENU/OK key.
z Press ▲ or ▼ key to select SETUP HS and press MENU/OK
key.
z Press ▲ or ▼ key to select AUTO TALK and press
MENU/OK key.
z Press ▲ or ▼ key to select ON or OFF.
z Press MENU/OK key to confirm.
z Press the
key to return to idle mode.
(Daily) Alarm
z Press MENU/OK key.
z Press ▲ or ▼ key to select SETUP HS and press MENU/OK
key.
z Press ▲ or ▼ key to select ALARM and press MENU/OK key.
– 19 –
Page 21

z Press ▲ or ▼ key to select ON or OFF.
z Enter HH:MM (if 12 hour format is set, set the “am” or “pm” by
pressing ▲ or ▼ key).
z Press MENU/OK key to confirm.
Note:
1. If Alarm is set to ON, “A” will be appeared on right side of display
When Alarm time is reached, “ALARM ON” will blinking and alarm
sound will stop after around 1 minute.
Handset Name
You can set the cordless handset name that you like. The default
name is HANDSET.
z Press MENU/OK key.
z Press ▲ or ▼ key to select SETUP HS and press MENU/OK
key.
z Press ▲ or ▼ key to select HANDSET NAME and press
MENU/OK key.
z Edit the desired name by pressing number key. (delete incorrect
entries by pressing C key).
z Press MENU/OK key to confirm.
z Press the
key to return to idle mode.
Note: Press ▲ or ▼ key can move the cursor.
Language
Your cordless handset has different display language, the name of
each language setting is always spelt in its own language.
z Press MENU/OK key.
z Press ▲ or ▼ key to select SETUP HS and press MENU/OK
key.
z Press ▲ or ▼ key to select LANGUAGE and press
MENU/OK key.
z Press ▲ or ▼ key to select the desired language.
z Press MENU/OK key to confirm the setting.
z Press the key to return to idle mode.
– 20 –
Page 22

LCD Contrast
There are 5 levels selection. The default setting is level 4
z Press MENU/OK key.
z Press ▲ or ▼ key to select SETUP HS and press MENU/OK
key.
z Press ▲ or ▼ key to select CONTRAST and press MENU/OK
key.
z Press ▲ or ▼ key to select the desired contrast level.
z Press MENU/OK key to confirm.
z Press the
key to return to idle mode.
Reset Handset
You can reset your cordless handset to its original (default) settings.
z Press MENU/OK key.
z Press ▲ or ▼ key to select SETUP HS and press MENU/OK
key.
z Press ▲ or ▼ key to select RESET and press MENU/OK key,
the LCD will display “RESET?”
z Press MENU/OK key to confirm the setting.
z Press the
key to return to idle mode.
Base Setting
Change PIN
PIN is your base’s identification number, this function is to avoid the
stored setting is changed by others. The default setting is “0000”.
Please take down the new PIN code for your record.
z Press MENU/OK key.
z Press ▲ or ▼ key to select SETUP BS and press MENU/OK
key.
z Press ▲ or ▼ key to select CHANGE PIN and press
MENU/OK key, the LCD will show ENTER PIN (default
setting = 0000).
z Press number key to input the current PIN code and press
MENU/OK key, the LCD will show NEW PIN, prompt you to
input a new PIN code.
– 21 –
Page 23

Note: WRONG PIN will be shown if the current PIN code you input
is wrong, and then return to step 4.
z Input the desired new PIN code and press MENU/OK key, the
LCD will show REPEAT PIN, prompt you to input the new PIN
code again.
z Input the new PIN code again and press MENU/OK key to
confirm the setting.
z Press the key to return to idle mode.
Note: 1. The PIN code must be 4 digits.
2. If the new PIN code that you input two times is different, the
change will fail, the display will return to step 5. (prompt
you to input new PIN code)
Dial Mode
You can set the dial mode to TONE or PULSE. The default setting is
TONE.
z Press MENU/OK key.
z Press ▲ or ▼ key to select SETUP BS and press MENU/OK
key.
z Press ▲ or ▼ key to select DIAL MODE and press
MENU/OK key.
z Press ▲ or ▼ key to select TONE or PULSE.
z Press MENU/OK key to confirm the setting.
z Press the
key to return to idle mode.
Flash Time
Flash duration is depended on your office PABX or local telephone
company. You can select flash time form 100ms to 800ms. The
default setting is 600ms.
z Press MENU/OK key.
z Press ▲ or ▼ key to select SETUP BS and press MENU/OK
key.
z Press ▲ or ▼ key to select FLASH TIME and press
MENU/OK key.
z Press ▲ or ▼ key to select the desired flash time.
z Press MENU/OK key to confirm.
– 22 –
Page 24

z Press the key to return to idle mode.
Message Waiting (VMWI)
If you have subscribed to a voice message waiting service,
MESSAGE WAITING will be displayed on handset and
icon in
Base will turn ON if you have a messages waiting call.
You can reset Visual Message Waiting Indication (VMWI) to Off by
the Cordless Handset
z Press the MENU/OK key.
z Press ▲ or ▼ key to select SETUP BS and press MENU/OK
key.
z Press ▲ or ▼ key to select VMWI and press MENU/OK key.
z You will be prompted ‘VMWI OFF?’
z Press the MENU/OK to confirm.
z Press the key to return to idle mode.
Note: This service need subscription to local operator and it supports
the FSK CLI system only.
Reset Base
This option allows user to restore the base and Date/Time to the
default setting.
Note: After reset the base, all the caller ID records stored in base and
cordless handset, and all the phonebook and redial records stored in
base will be cleared. Please write down the useful information before
reset.
z Press MENU/OK key.
z Press ▲ or ▼ key to select SETUP BS and press MENU/OK
key.
z Press ▲ or ▼ key to select RESET and press MENU/OK key,
the LCD will display ENTER PIN (default setting = 0000).
z Input the correct PIN code by pressing numeric key, press
MENU/OK key to confirm, and the LCD will display
“RESET?”
z Press MENU/OK key to confirm.
z Press the
key to return to idle mode.
– 23 –
Page 25

Date / Time
You can set the Date/Time displayed in idle mode. The default setting
is “2007, 01/01 12:01 pm”.
z Press MENU/OK key.
z Press ▲ or ▼ key to select DATE/TIME and press MENU/OK
key, the LCD will display “YEAR 2007”.
z Input the correct last two digits of year (range: 00-99) using
number key, press MENU/OK key to confirm and then enter
month and date setting.
z Input the correct date and month by numeric key, the format is:
date/month (date range: 01-30/31, month range: 01-12) using
number key, press MENU/OK key to confirm the setting and
enter time setting.
z Input the correct time by numeric key,, the format is:
hour/minute (hour range: 01-12 and 00-23, minute range:
00-59), and set the “am” or “pm” by pressing ▲ or ▼ key.
z Press MENU/OK key to confirm.
z Press the
key to return to idle mode.
Note: If the figure you input is over the range, you can’t enter next
setting menu even pressing MENU/OK key, you are required to
enter the correct setting again.
Registration
Register
Up to 4 cordless handsets can be registered to one base.
z Press MENU/OK key.
z Press ▲ or ▼ key to select REGISTRATION and press
MENU/OK key.
z Press ▲ or ▼ key to select REGISTER and press MENU/OK
key, the LCD will display ENTER PIN (default setting = 0000).
z Input the correct PIN code and press MENU/OK key to begin
to register the cordless handset, the LCD will display
SEARCHING.
z Press and hold the mute key on base around 6 seconds until the
base LCD show REGISTRATION.
– 24 –
Page 26

z After Registered, press the key to quit
(during “SEARCHING” is displayed, handset can’t quit until
time out) .
Note: 1. SUCCESSFUL will be shown on cordless handset if it is
registered to the base. Cordless handset number eg.2 will be
shown after it returns to idle mode.
2. NO BASE will be shown on cordless handset if it can’t
register to the base within 1 minute, you have to register the
handset again.
3. If the PIN code you input is wrong, registration will not
succeed. Handset will display “WRONG PIN” after time out.
Handset will display “SEARCHING” again. User has to press
[MENU/OK] key to select REGISTRATION and repeat the
same procedures to enter the correct PIN code again.
Remove Handset
This function allows user to remove the registered cordless handset
from the base.
z Press MENU/OK key.
z Press ▲ or ▼ key to select REGISTRATION and press
MENU/OK key.
z Press ▲ or ▼ key to select REMOVE HANDSET and press
MENU/OK key, the LCD will display ENTER PIN.(default
setting = 0000).
z Input the correct PIN code and press MENU/OK key.
z Press ▲ or ▼ key to select the cordless handset (1,2,3,4) you
want to remove and press MENU/OK key, the LCD will
display “REMOVE HANDSET?”
z Press MENU/OK key to confirm the setting.
z Press the
key to return to idle mode.
Note: 1. The removed cordless handset LCD will show “NOT REG”.
You must register it again before using it.
2. If the PIN code you input is wrong, “WRONG PIN” will be
shown on cordless handset LCD.
– 25 –
Page 27

Basic Operation
Making External Calls
Pre-dialing
Post-dialling Using the Base
z Pick up the corded handset from the base or press key, wait
for a dial tone,
z Dial the desired telephone number.
z Hang up the corded handset or press key to end the call.
The call timer will be shown and last for about 2 seconds before
return to idle mode.
Post-dialling Using the Cordless Handset
z Press the or key, wait for a dial tone, and then dial the
desired telephone number.
z Press key or place the cordless handset into the charger to
end the call.
The call timer will be shown and last for about 2 seconds before
return to idle mode.
Pre-dialing
Pre-dialing Using the Base
z Input the desired telephone number.
z Delete any incorrect digit by pressing C key.
z Pick up the corded handset from the base or press
key, the
number will be automatically dialled out.
z Hang up the corded handset or press
key to end the call.
The call timer will be shown and last for about 2 seconds before
return to idle mode.
Pre-dialling Using the Cordless Handset
z Input the desired telephone number.
z Delete any incorrect digit by pressing C key.
– 26 –
Page 28

z Press the or key, the number will be automatically
dialled out.
z Press
key or place the cordless handset into the charger to
end the call.
The call timer will be shown and last for about 2 seconds before
return to idle mode.
Adjust the Receiver or Speaker Volume
You can adjust the receiver or speaker volume during a call (external
or internal). There are 5 different volume levels
During a call:
z Press the Volume VOL + or VOL - key to adjust the volume on
corded base.
z Press the Volume ▲ or ▼ key to adjust the volume on cordless
handset.
Taking Calls
When the phone rings, the icon will flash and the LCD on the
base and cordless handset will show “Call”.
Take a Call Using the Base
z Pick up the corded handset from the base or press key to
answer a call.
z Hang up the corded handset or press
key to end the call.
Take a Call Using the Cordless Handset
z Take the cordless handset from the charging station, the
connection is automatically established (when the AUTO
TALK function is active). Otherwise press
or .
z Press key or place the cordless handset into the charger to
end the call.
– 27 –
Page 29

Hands-free
Switch between Speakerphone & Receiver Using the
Base
To switch to speakerphone mode, press key and hang up the
corded handset.
To switch to receiver mode, pick up the corded handset from the base.
Switch between Speakerphone & Receiver Using the
Cordless Handset
To switch to speakerphone mode, press key.
To switch to receiver mode, press
key again or press key.
Making Internal Calls
You can make internal calls between base and cordless handset, or
any two cordless handsets (if you have more than one cordless
handset).
Base to Cordless Handset
z When base is in idle mode, press INT/PAGE key,
“INT-NUMBER?” will be shown, input the cordless handset
number. (1,2,3,4) you want to call.
z The called cordless handset will ring and the LCD will show
“Base”.
z Press
or key of the called cordless handset to answer.
Cordless Handset to Base
z When the cordless handset is in idle mode, press INT key,
“INT-NUMBER?” will be shown, input the number “0”.
z The base will ring and the LCD will show the calling cordless
handset’s name and number.
z Pick up the corded handset or press key from the base to
answer.
Cordless Handset to Cordless Handset
z When the cordless handset is in idle mode, press INT key,
– 28 –
Page 30

“INT-NUMBER?” will be shown, input the cordless handset
number (1,2,3,4) you want to call..
z The called cordless handset will ring and the LCD will show
the calling cordless handset’s name and number.
z Press
or key of the called cordless handset to answer.
Call Transfer
The function allows you to transfer an external call from base to a
cordless handset, or from a cordless handset to base or another
cordless handset.
z During an external call, press Intercom key on base or INT key
on handset to put the external call on hold.
z Enter the number of the handset that you would like to transfer
the call to (0 for base, 1-4 for cordless handset).
z When the paged handset or base answers the call, intercom is
established.
z After calling base user or calling handset user hangs up (press
), external line is then transferred..
Note: 1. There must be more than two handsets registered to the base,
otherwise the call transfer function from one cordless
handset to another cordless handset will be invalid;
2. If the internal call is not answered in 100 seconds after the
paging, it will call back external line.
Three Party Conference
After receiving an external call, it is possible to include a second
handset in the conversation.
z During an external call, press the handset INT key to put the
external call on hold. (If Base, press the intercom key).
z Enter the number of the handset that you would like to
conference with (0 for base, 1-4 for cordless handset).
z When the handset or base is answered, press the MENU/OK
key.
z You will see two Options CONFERENCE and SWITCHING.
SWITCHING means switch back external call.
z Press the MENU/OK’ key again to select CONFERENCE.
– 29 –
Page 31

3 way conference is established.
z You can press the MENU/OK key again during the call, use the
▲ or ▼ key to select SINGLE CALL and press the
MENU/OK key again to put the External Call on hold and
speak to the Internal Caller. To return to the Conference, press
the MENU/OK Key, select CONFERENCE and press the
MENU/OK key to make 3 party conference again.
z After calling base user or calling handset user hangs up (press
), The remaining party can continuously connect to the
external call.
Redial Function
The last 10 phone numbers you dial out are separately stored in base
and cordless handset redial memory. The redial function of the base
and cordless handset is the same.
Dial a number from the Redial memory
z Press REDIAL key on base or key on cordless handset. If
the redial memory is empty, EMPTY will be shown.
z Press ▲ or ▼ key to select the desired Redial number.
z Take telephone line with the base or cordless handset, the
telephone number is automatically dialed out.
Note: If you want to edit the number before dialing out, press
MENU/OK key to enter menu and select SELECT to edit the
Redial number.
Save Redial Memory
z Press REDIAL key on base or key on cordless handset.
z Press ▲ or ▼ key to select the desired redial number.
z Press MENU/OK key on the base or handset to enter menu,
press ▲ or ▼ key to select SAVE NUMBER, press
MENU/OK key, ENTER NAME will be shown and you can
input the desired name. You must input the name; otherwise the
record can’t be saved.
– 30 –
Page 32

z Press MENU/OK key on the base or handset to save.
Delete a Single Redial Memory
z Press REDIAL key on base or key on cordless handset.
z Press ▲ or ▼ key to select the desired redial number.
z Press MENU/OK key on the base or handset to enter menu,
press ▲ or ▼ key to select DELETE, press MENU/OK key
again, CONFIRM? will be shown.
z Press MENU/OK key on the base or handset to confirm.
Delete All Redial Memory
z Press REDIAL key on base or key on cordless handset.
z Press MENU/OK key on the base or handset to enter menu,
press ▲ or ▼ key to select DELETE ALL, press MENU/OK
key again, CONFIRM? will be shown.
z Press MENU/OK key on the base or handset to confirm.
Caller ID Service
The caller’s information will be displayed and recorded if you have
subscribed to Caller ID service from your local telephone company.
When the telephone rings, the caller’s information will be displayed
on the base and cordless handset LCD display. This information
includes the phone number and name (if supported). The base or
cordless handset can store up 30 calls (up to 20 digits and 15
characters for each record). When the memory is full, a new call will
automatically replaces the oldest call in the memory.
Note: 1.If the caller’s information includes Date/Time, the Date/Time
will be stored into the record. The Date/Time display is also
updated after receiving a call.
2. If the caller number is matched with one of phonebook
memory, the matched name stored in the phonebook memory
will be displayed.
3. If the incoming call is registered as “Private Number” and its
caller ID information is withheld, LCD will show
PRIVATE..
4. If the incoming call does not have Caller ID service or its
service area is not linked to yours, the LCD will show
– 31 –
Page 33

UNAVAILABLE.
5. Display “MISSED CALLS” – call is missed or some
Caller-ID memories not yet reviewed. Base will also shows
the
icon .
6. If the same call are received more than one time, the “RPT”
icon will be shown when you review the record to prompt you
this is a repeat call.
7. Display “LONG DISTANCE” – Long distance call is
received.
Review Caller ID Record
z Press CID key and use ▲ or ▼ key to review all call records.
Dial from Call Log
z Press CID key and use ▲ or ▼ key to select the desired record.
z Lift the corded handset or press
on the handset base or
press the key or key on the cordless handset.
Note: If you want to edit the number before dialing out, press
MENU/OK key to enter menu and select SELECT to edit the
number.
Store Call Log into Phonebook
z Press CID key and use ▲ or ▼ key to select the desired record.
z Press MENU/OK key.
z Press ▲ or ▼ key to select SAVE NUMBER.
z Press MENU/OK key and use the numeric keypad to enter a
name for the phone book entry. press the
on the cordless
handset or C key on the corded base to delete any incorrect
entries.
To enter the characters for a name, press the numeric key
consecutively eg: letter H, press the number 4 key twice. If 2
consecutive characters are on the same key, enter the first character,
then wait for the cursor to move to the right before entering the next
character.
z Press the MENU/OK key to save the entry.
– 32 –
Page 34

Key Assignment Overview
Key Capital letter
1
1 space € £ $ % & <>
2 АBCБГ2
3
DEFÐДЕЖЗ3ΔΖ
4
GHIИЙКЛ4Ğ ΘΙ
5 JKLМНОП5ΚΛ
6
MNOРСТУ6 ÑΞΟ
7 PQRSФХЦЧ7ΠΣ
8 TUVШЩЪЫ8ΥΦ
9 WXYZЬЭЮЯ9ΨΩ
0
. , ? ! 0 + - : ' "Δ ¿
# * @ \ / _ ()=§
#
Delete a Single Call Log
z Press CID key and use ▲ or ▼ key to select the desired record.
z Press MENU/OK key.
z Press ▲ or ▼ key to select DELETE.
z Press MENU/OK key, the LCD will show CONFIRM?, press
MENU/OK key again to confirm.
Delete All Call Records
z Press CID key.
z Press MENU/OK key.
z Press ▲ or ▼ key to select DELETE ALL.
z Press MENU/OK key, the LCD will show CONFIRM?, press
MENU/OK key again to confirm.
Caller ID Dial Back
When browsing Call Log memory, Caller Line Identification (CLI)
number can be edited before dial back. Amended CLI number will
not overwrite the stored Call Log memory.
z Press “0 – 9” to add digits in front of CLI number.
– 33 –
Page 35

z Press to remove entry or leftmost digit.
z Press ▲ or ▼key can recover the original CLI number.
Example:
CID number is 12345678
Press digit 1, display is 1 12345678
Press digit 2, display is 12 12345678
Press , display is 12345678
Press digit 3, display is 3 12345678
Press , display is 12345678
Press
, display is 2345678
Press
, display is 345678 ( key is no function if number is 6 or
less digits),
If press ▲ or ▼key, display is 12345678.
Note: If original CLI number exceeds 16 digits, new digits can not be
inserted.
Advanced Operation
Phonebook
Your corded base and cordless handset can each store up to 50 names
and numbers, Each Phonebook memory can be up to 15 characters
and 24 digits long.
Note: You can also view the Phonebook during a call
Review Phonebook
z Press key.
Note: If the phonebook is empty PHONEBOOK EMPTY will be
shown.
z Press ▲ or ▼ key to review phonebook memories.
z You can search a name by inputting the first character.
z Review the phone number in accordance with the name by
pressing * key.
z When you scroll to the end, “-----------” will be shown.
– 34 –
Page 36

Store Name and Number into Phonebook
z Press key.
z Press MENU/OK key to enter menu, select ADD NEW.
z Press MENU/OK key
z ENTER NUMBER will be shown, enter number using the
keypad. Press and hold 0 key if a PAUSE is needed, character
“P” will be shown.
z Press MENU/OK key.
z ENTER NAME will be shown, enter the name by pressing
the keypad. If you need to delete any incorrect characters,
press the
on the cordless handset or C key on the corded
base.
To enter the characters for a name, press the numeric key
consecutively eg: letter H you would press the number 4 key twice. If
2 consecutive characters are on the same key, enter the first character,
then wait for the cursor to move to the right before entering the next
character.
z Press MENU/OK key to save the record.
Note: When MEMORY FULL is shown, you must delete one or more
unnecessary records before saving a new record.
Edit Phonebook Memory
z Press key and use ▲ or ▼ key to select the desired record.
z Press MENU/OK key.
z Press ▲ or ▼ key to select EDIT and press MENU/OK key.
z Use the keypad to edit the number entry
(press ▲ or ▼ key to move the cursor).
z Press MENU/OK key.
z Use the keypad to edit the name entry
( press ▲ or ▼ key to move cursor).
z Press MENU/OK key to save the entry.
Note: Delete a digit at left side of cursor, press
on cordless
handset or C key on corded base.
– 35 –
Page 37

Delete Phonebook Memory
z Press key and use ▲ or ▼ key to select the desired record.
z Press MENU/OK key.
z Press ▲ or ▼ key to select DELETE.
z Press MENU/OK key, the LCD will show CONFIRM? , Press
MENU/OK key again to confirm.
Dial Record from Phonebook
z Press key and use ▲ or ▼ key to select the desired record
z Take telephone line with the base or cordless handset, the
telephone number is automatically dialed out.
Note: If you want to edit the number before dialing out, press
MENU/OK key to enter menu and select SELECT to edit the
number first.
Special Feature
Page All Cordless Handsets from Base
z Press and hold PAGE key on the base for 3 seconds, the base
LCD will show PAGING HANDSETS, all the cordless handset
will beep and LCD show PAGING.
z Press EXIT or C key on the base or press any key on the
cordless handset to stop. Paging sound will be stopped after 30
seconds.
Temporary Tone (for pulse or rotary service
user)
In pulse dialing mode, you can switch to Tone dialing to access bank
facilities etc. by pressing * key.
It will reset automatically to pulse dialing after you end the call.
Mute
z Press MUTE key on handset base or on cordless
handset to active the mute feature during talking.
– 36 –
Page 38

z The mute icon will be shown.
z Press MUTE key on handset base or
on cordless
handset again to turn it off.
Pause
You can insert a 3 seconds PAUSE into the dialing or storing of a
number into phonebook.
E.g. to dial number: 9 + PAUSE (press and hold 0 key) + telephone
number.
Press and hold 0 key for 1.5 seconds, the LCD will show “P”.
Flash
Use FLASH key on corded base or R key on cordless handset to
activate custom calling services such as call waiting or call
forwarding, which are available through your local telephone
company. “R” will be shown on the LCD.
The FLASH key or R key can also be used to access a new dial tone
without hanging up.
Note: Refer section of Base Setting – Flash Time to select Flash
duration. If the function dial did not work normally, please contact
with the vendor of the PBX or your local telephone company.
Keypad Lock (only for cordless handset)
The default setting is “Off”.
z To lock the keypad, press and hold
key until a beep is
heard during standby, icon will be shown.
z To unlock the keypad, press and hold # key again until a beep is
heard and
icon is disappear.
Note:.When the key lock is activated, you can still be able to accept
incoming calls.
Hold Call (only for base)
The line will be hold by pressing HOLD key, a music will be heard
as a reminder.
– 37 –
Page 39

Lift the corded handset or press key or press HOLD key again to
release the Hold function. The hold can also be released when the
branch phone answer the call..
Technical Specifications
Handset Operating Time:
(average values*)
Approx. 10 hours talk time
Approx. 100 hours standby
AC / DC Adapter: (for
Base)
VD080040D
Input: 230V AC / 50 Hz
Output: 8V DC, 400mA
Single-phase AC excluding IT
installations defined by the EN 60950
standard.
Caution: the network voltage is classified
as a hazard by the criteria of this
standard.
AC / AC Adapter (for
Handset charging)
VA070020D
Input: 230V AC / 50 Hz
Output: 7V AC, 200mA
Single-phase AC excluding IT
installations defined by the EN 60950
standard.
Caution: the network voltage is classified
as a hazard by the criteria of this
standard.
Telephone connection Appliance designed for connection to an
analogue telephone line class TNV3
(telecommunications network voltage) as
defined by the EN 60950 standard.
Rechargeable Battery per
handset :
GP60AAAHC, 1.2V / 600mAh / Ni-MH,
AAA x 2 or equivalent
* For guidance only, depends on initial battery charge.
– 38 –
Page 40

General Product Care
Simply wipe the base station with a damp cloth or an antistatic wipe.
Never use a dry cloth as this can cause static discharge.
Troubleshooting Guide
When you forgot the base PIN code, follow the following procedures
can RESET the PIN code to “0000”.
1. with the base is in standby mode, press MENU/OK key and key in
“442737”
2. Press ▲ or ▼key, “FACTORY RESET” is shown.
3. Press MEN/OK key, “RESET” is shown
4. Press MENU/OK to confirm.
5. Press the exit key on base to quit.
6. Following “Registration” section to register all handsets again.
PROBLEMS CAUSES SOLUTIONS
Registration not work. The battery is not
sufficiently charged.
Handset and base
station were not
prepared for
registration.
Wrong PIN code is
entered
Charge the battery for
14 hours (see Battery
Charging).
Unplug and then plug
in the power adaptor.
Enter correct PIN
code again.
(default is 0000)
No display. The battery has not
been charged.
Charge the battery or
replace them (see
Battery Charging)
– 39 –
Page 41

No reactions to
keystroke.
No radio connection
to the base station:
blinking!
The keypad is locked.
The handset is outside
the base station range.
The handset is not
registered.
The base station does
not work.
Press # key longer
than 2 seconds.
Move closer to the
base station.
Register the handset
(see Registering
Handset).
Unplug and then plug
the power adaptor to
the power outlet
(220-230V AC / 50
Hz) and the other end
into the power jack on
base bottom.
Base or cordless
handset displays
“NOT AVAILABLE”
The handset is outside
the base station range
The base station does
not work.
Either cordless
handset or base is in
use.
Move closer to the
base station.
Unplug and then plug
the power adaptor to
the power outlet
(220-230V AC / 50
Hz) and the other end
into the power jack on
base bottom.
Wait for cordless
handset or base return
idle state.
– 40 –
Page 42

Environment
Used equipment and used handset batteries must be disposed of in
compliance with current environmental protection regulations. You
should return them to your reseller or dispose of them at an approved
recycling centre.
“WEEE” weight:1.011Kg
Do not attempt to open the batteries, as they contain chemical
substance. In the event of leakage, avoid contact with the skin, eyes
and mouth. In the event of contact, rinse the affected part for several
minutes in running water. Clean the product with absorbent paper or
a dry cloth and contact your reseller for replacement batteries.
– 41 –
Page 43

Thomson Telecom
46, Quai Alphonse le Gallo,
92648 Boulogne Cedex, France
is a trademark of General Electric company and is under license by
Thomson Telecom, France.
Model: CE21887GEX-A
00019339 (Rev.1 E)
07-32
Printed in China
– 42 –
 Loading...