

Page 1
Use and Care & Installation Guide
Refrigerator
GE Appliances
Models: Side by Side 20–27
English Version.................................. 2
Version française.......................... 23
Versión en español...................... 45
Safety Instructions ........................ 3
Operating Instructions, Tips
Automatic Icemaker &Dispenser ........ 5–7
CFC Disposal................................................... 2
Food Storage Suggestions.......................... 8
Ice Service ....................................................... 7
Shelves...................................................... 9, 10
Storage Drawers............................................ 9
Temperature Controls .................................. 4
Care and Cleaning
Behind the Refrigerator............................. 11
Cleaning—Inside and Outside .............. 11
Drawer Removal...................................... 12
Light Bulb Replacement............................ 12
Under Refrigerator...................................... 11
Water Filter Accessory................................. 7
Problem Solver...................... 17–19
Normal Operating Sounds .................... 17
More questions ?…In the United States call
GE Answer Center® 800.626.2000
In Canada consult your local telephone
directory for the Camco Service Center
Preparation
Clearances.................................................... 13
Leveling..........................................................13
Location......................................................... 13
Moving &Vacation ..................................... 13
Rollers ............................................................ 13
Water Supply to Icemaker........................ 13
Installation ................................. 14–16
Adapter Plug ................................................ 14
Electrical Requirements ............................ 14
Extension Cord ............................................ 14
Grounding..................................................... 14
Water Line Installation ....................... 15, 16
Consumer Services.................. 20
Appliance Registration................................. 2
Model and Serial Numbers ......................... 2
Warranty for Canadian Customers......... 21
Warranty for U. S. Customers
...... Back Cover
Page 2

HELP US HELP YOU…
Write down the model
and serial numbers.
You’ll see them on a label on the wall beside
the top drawer or at the bottom, just inside the
fresh food compartment door.
These numbers are also on the Consumer
Product Ownership Registration Card that
came with your refrigerator.
Before sending in this card, please write these
numbers here:
Model Number
Serial Number
Use these numbers in any correspondence or
service calls concerning your refrigerator.
Read this guide carefully.
It is intended to help you operate and
maintain your new refrigerator properly.
Keep it handy for answers to your questions.
If you don’t understand something or need
more help:
In the United States, call:
GE Answer Center
®
800.626.2000
24 hours a day, 7 days a week
In Canada, write:
Manager, Consumer Relations
2645 Skymark Ave.
Mississauga, Ontario
Canada L4W 4H2
If you received a damaged
refrigerator…
Immediately contact the dealer (or builder)
that sold you the refrigerator.
Save time and money.
Before you request service…
Check the Problem Solver section in this
guide. It lists minor operating problems that
you can correct yourself.
2
CFC DISPOSAL
Y our old refrigerator has a cooling system that used CFCs
(chlorofluorocarbons). CFCs are believed to harm stratospheric ozone.
If you are throwing away your old refrigerator, make sure the CFC
refrigerant is removed for proper disposal by a qualified servicer. If
you intentionally release this CFC refrigerant you can be subject to
fines and imprisonment under provisions of the federal Clean Air Act.
IF YOU NEED SERVICE
To obtain service, see the Consumer Services
page in the back of this guide.
We’re proud of our service and want you to
be pleased. If for some reason you are not
happy with the service you receive, here are
3 steps to follow for further help.
For Customers in the United States:
FIRST,contact the people who serviced your
appliance. Explain why you are not pleased.
In most cases this will solve the problem.
NEXT, if you are still not pleased, write
all the details—including your phone
number—to:
Manager, Consumer Relations
GE Appliances
Appliance Park
Louisville, KY 40225
FINALLY, if your problem is still not
resolved, write:
Major Appliance Consumer
Action Program
20 North Wacker Drive
Chicago, IL 60606
For Customers in Canada:
FIRST, contact the people who serviced your
appliance. Explain why you are not pleased.
In most cases this will solve the problem.
NEXT , if you are still not pleased, write all the
details—including your phone number—to:
Manager, Consumer Relations
2645 Skymark Ave.
Mississauga, Ontario
Canada L4W 4H2
Page 3
3
IMPOR TANT SAFETY INSTRUCTIONS
Read all instructions before using this appliance.
WARNING—When using this appliance,
always exercise basic safety precautions,
including the following:
• Use this appliance only for its intended purpose
as described in this Use and Care Guide.
• This refrigerator must be properly
installed and located in accordance
with the Installation Instructions
before it is used.
• Never unplug your refrigerator by
pulling on the power cord. Always grip
plug firmly and pull straight out from
the outlet.
• Repair or replace immediately all electric
service cords that have become frayed or
otherwise damaged. Do not use a cord that
shows cracks or abrasion damage along its length
or at either the plug or connector end.
• When moving your refrigerator away from the
wall, be careful not to roll over or damage the
power cord.
• Do not allow children to climb, stand or
hang on the shelves in the refrigerator. They
could damage the refrigerator and seriously
injure themselves.
• If your old refrigerator is still around
the house but not in use, be sure to
remove the doors. This will reduce the
possibility of danger to children.
• After your refrigerator is in operation, do
not touch the cold surfaces in the freezer
compartment, particularly when hands are
damp or wet. Skin may adhere to these extremely
cold surfaces.
• If your refrigerator has an automatic icemaker,
avoid contact with the moving parts of the ejector
mechanism, or with the heating element that
releases the cubes. Do not place fingers or hands
on the automatic icemaking mechanism while the
refrigerator is plugged in.
• Don’t refreeze frozen foods which have thawed
completely. The United States Department of
Agriculture in Home and Garden Bulletin
No. 69 says:
‘‘…You may safely refreeze frozen foods that
have thawed if they still contain ice crystals or if
they are still cold—below 40°F. (4°C.).
‘‘…Thawed ground meats, poultry or fish that
have any off-odor or off-color should not be
refrozen and should not be eaten. Thawed ice
cream should be discarded. If the odor or color of
any food is poor or questionable, get rid of it. The
food may be dangerous to eat.
‘‘…Even partial thawing and refreezing reduces
the eating quality of foods, particularly fruits,
vegetables and prepared foods. The eating quality
of red meats is affected less than that of many
other foods. Use refrozen foods as soon as
possible to save as much of their eating quality as
you can.’’
• Unplug your refrigerator before
cleaning and making repairs.
NOTE: We strongly recommend that
any servicing be performed by a
qualified individual.
• Before replacing a burned-out light bulb, the
refrigerator should be unplugged in order to avoid
contact with a live wire filament. (A burned-out
light bulb may break when being replaced.)
NOTE: Turning control to OFF position does
not remove power to the light circuit.
• Do not store or use gasoline or other flammable
vapors and liquids in the vicinity of this or any
other appliance.
SAVE THESE
INSTRUCTIONS
,,,,,,,,,,,,,,
,,,,,,,,,,,,,,
,,,,,,,,,,,,,,
,,,,,,,,,,,,,,
,,,,,,,,,,,,,,
,,,,,,,,,,,,,,
,,,,,,,,,,,,,,
Important Safety Instructions
Page 4
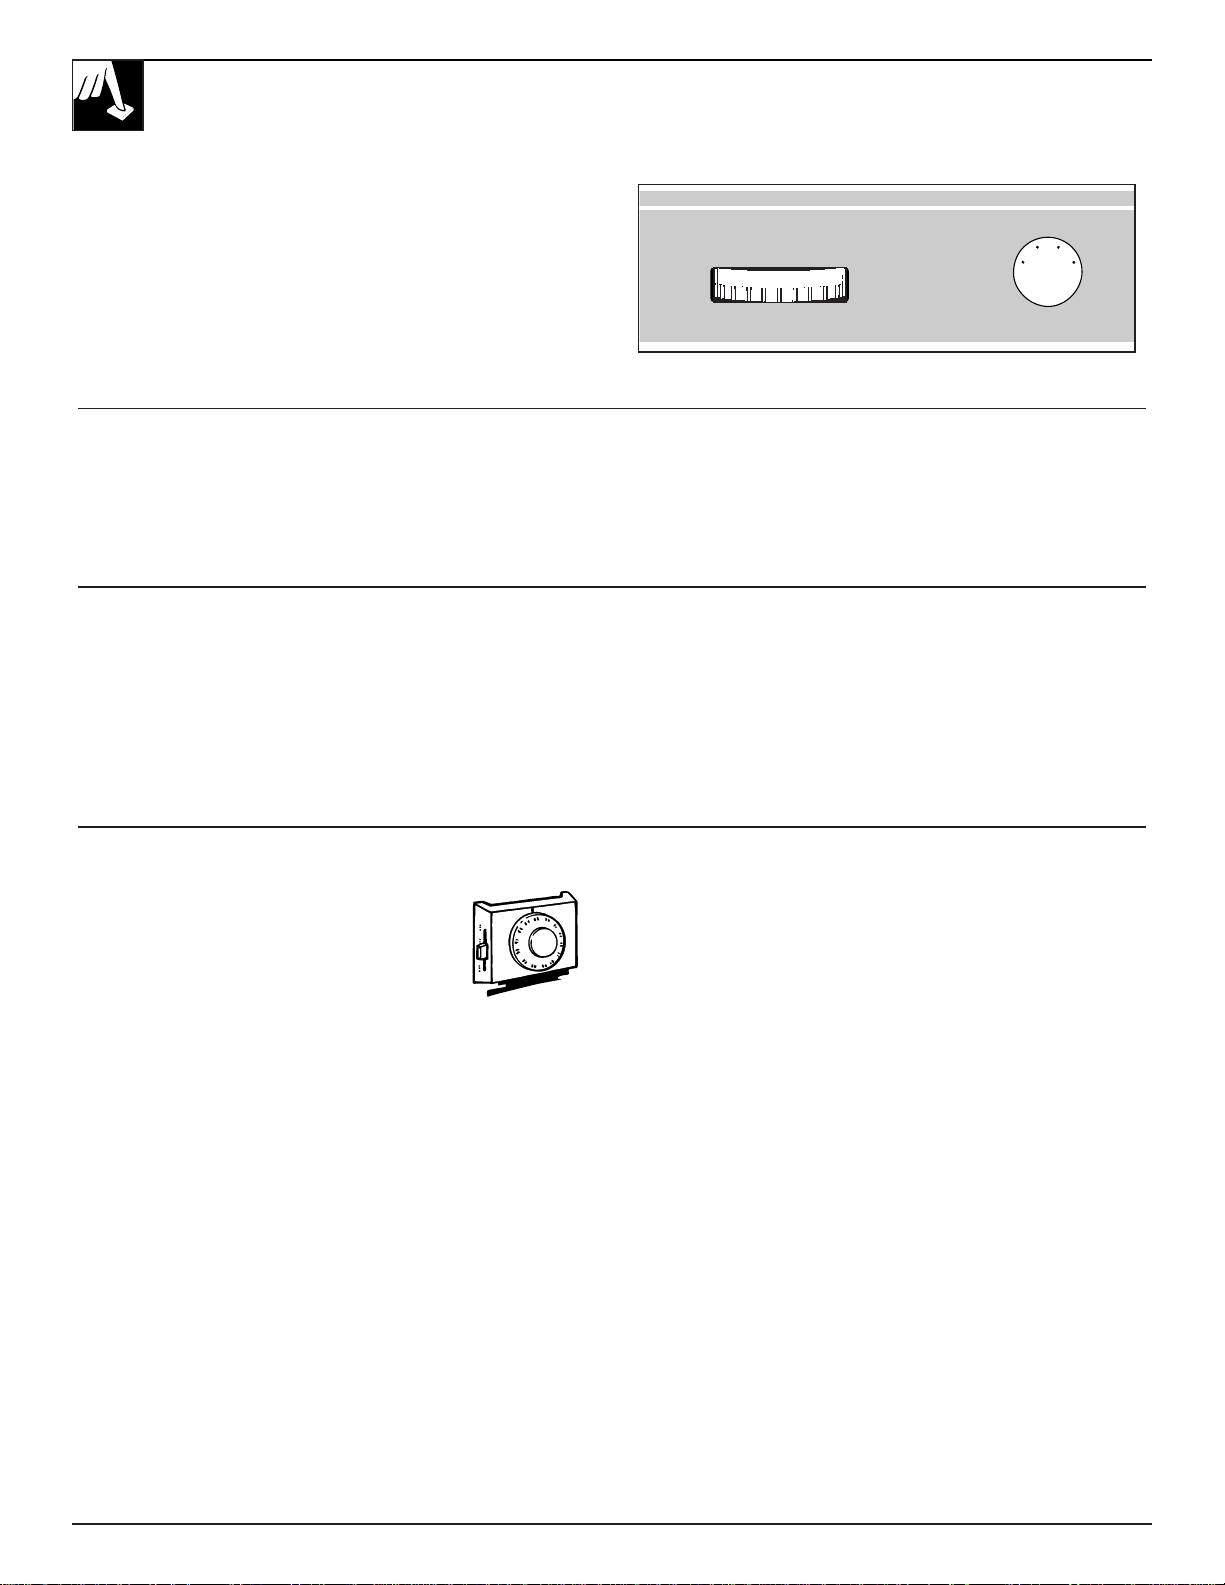
OPERATING YOUR REFRIGERATOR
Set the Temperature Controls
4
The temperature controls let you regulate the temperature in the fresh
food and freezer compartments.
At first, set the Fresh Food control at “5” and the Freezer control at “C”.
Allow 24 hours for the temperature to stabilize, whether you are
setting the controls for the first time or adjusting them later. Then, if
you want colder or warmer temperatures in either compartment, adjust
the controls one step at a time.
NOTE: Moving the Fresh Food control to OFF turns off cooling in
both compartments—fresh food and freezer—but does not shut off
power to the refrigerator.
TEMPERATURE CONTROLS
Initial Setting C
Coldest E
Initial Setting 5
Coldest 9
Freezer
Fresh Food
●
●
A
B
C
D
E
1
3
5
7
9
F
F
O
How to Test Temperatures
Use the milk test for the fresh food compartment. Place a container
of milk on the top shelf in the fresh food compartment. Check it a day
later. If the milk is too warm or too cold, adjust the temperature controls.
Use the ice cream test for the freezer compartment. Place a
container of ice cream in the center of the freezer compartment. Check
it after a day. If it’s too hard or too soft, adjust the temperature controls.
Always allow 24 hours for the refrigerator to reach the
temperature you set.
Automatic Energy Saver System No Defrosting
You won’t find an “energy saver” switch on this refrigerator.
Warm liquid from the refrigerator’s condenser is automatically
circulated around the front edge of the freezer compartment to help
keep moisture from forming on the outside of the refrigerator during
humid weather.
Many refrigerators use special electric heaters. This refrigerator needs
none. That’s why there is no “energy saver” switch…there’s no need
for it.
It is not necessary to defrost the freezer or fresh food compartments.
Your refrigerator is designed and equipped to defrost itself automatically.
If you turn your household thermostat below 60°F. (16°C.) at night…
…you may want to move the freezer control one
step colder. Cooler temperatures in the house may
cause the compressor to operate less frequently,
thus allowing the freezer compartment to warm
somewhat. To protect your frozen food supply,
leave the freezer setting at this colder setting for
the entire winter or for as long as you keep your
thermostat turned down.
Moving the freezer control to colder setting should have no effect on
your fresh food compartment. However, if freezing occurs, move the
fresh food control one step warmer.
When you stop turning the thermostat down, turn the refrigerator’s
controls back to their regular settings.
Page 5
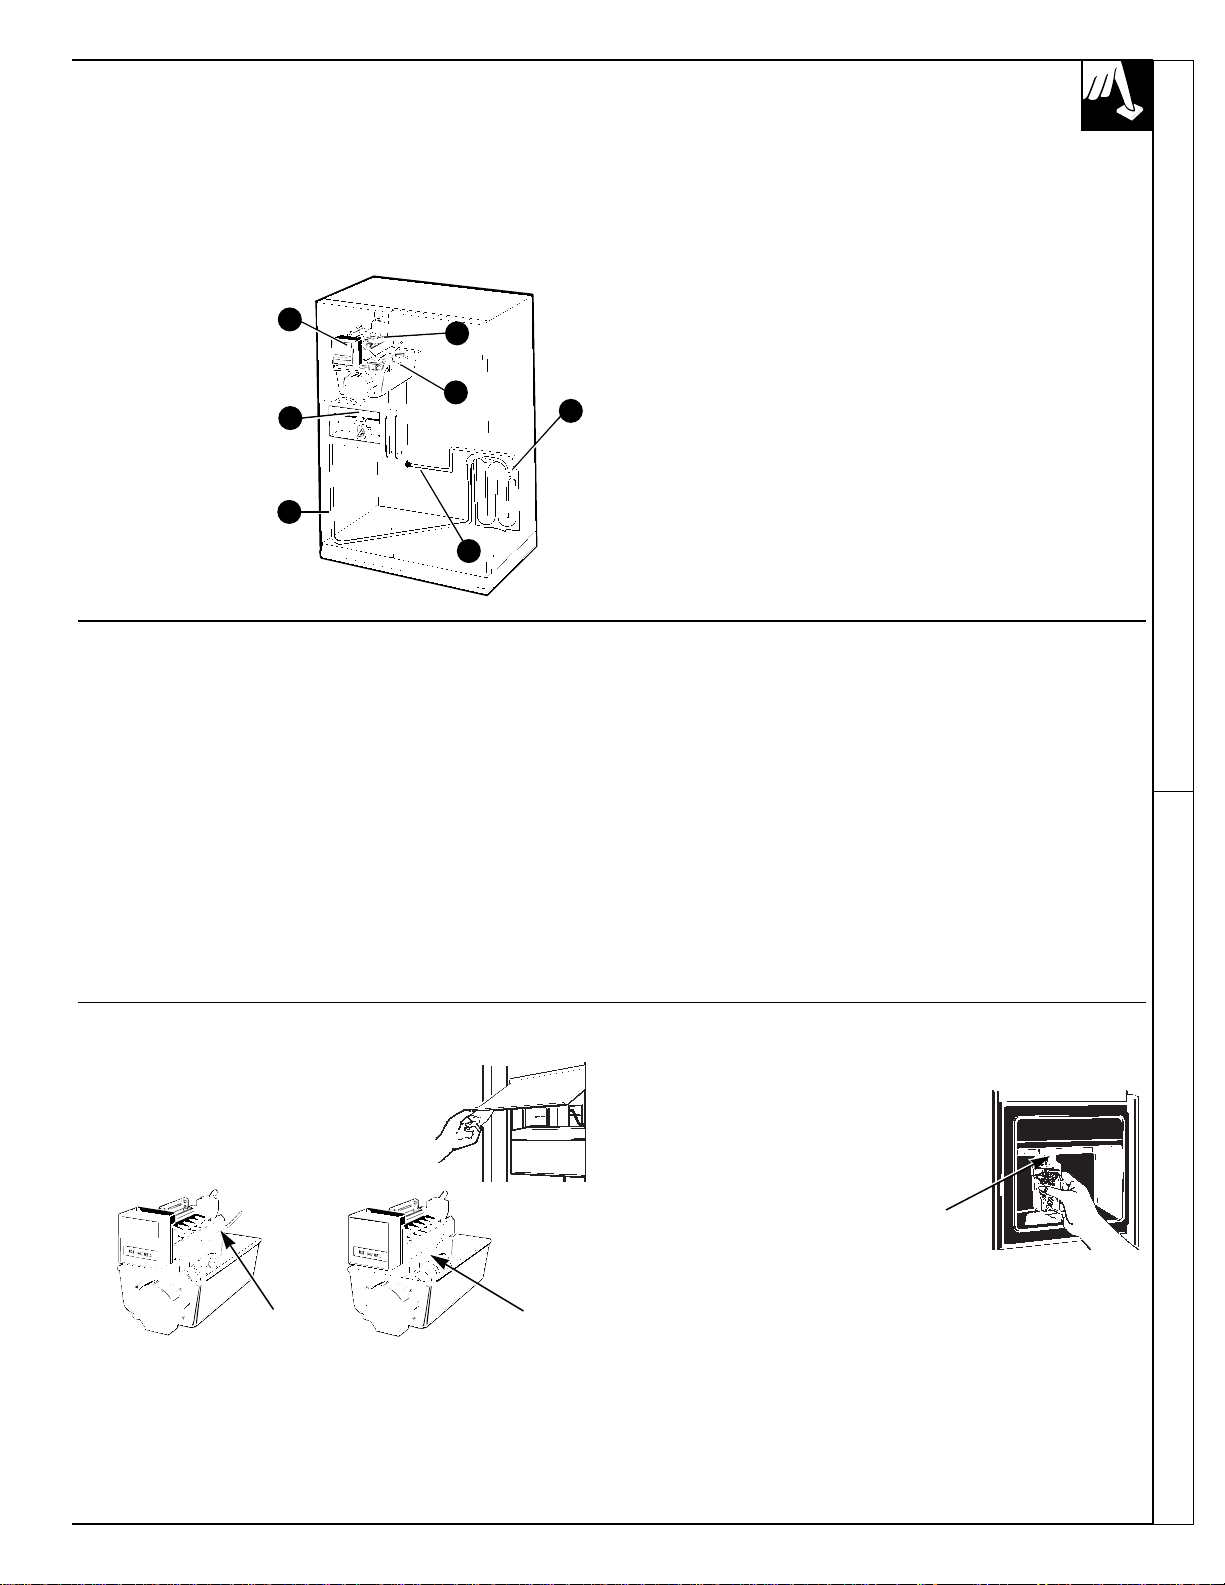
AUTOMATIC ICEMAKER & DISPENSER
(on some models)
5
Operating Your Refrigerator Automatic Icemaker & Dispenser
How They Work
The automatic icemaker makes ice continually. The dispenser
dispenses water, ice cubes or crushed ice through the freezer
compartment door. Here’s how they work.
Water flows from the household supply through a
(1) dual solenoid valve
to the
(2) water tubing and
to the
(3) automatic icemaker
as needed.
Water is frozen in the
(4) cube mold and
ejected into the
(5) storage bin where
a motor-powered
auger moves
cubes forward.
Cubes fall through the chute in the door when the dispenser
pad is pressed.
When CRUSHED is selected (on some models), a baffle channels
cubes through the crusher and crushed ice falls through a chute into
the glass.
When WATER is selected, (on some models) water flows through the
(6) tubing in the door and is dispensed when the dispenser
pad is pressed.
(7) A light switch (on some models) turns the night light in the
dispenser on or off.
The light also comes on when the dispenser pad is pressed.
The light in the dispenser should be replaced with a 7 watt maximum
bulb when it burns out.
3
7
6
4
5
1
2
Important Facts about Your Ice & Water Dispenser
• If this is your first icemaker you’ll hear occasional sounds that
may be unfamiliar. These are normal icemaking sounds and are not
cause for concern.
• Your icemaker will produce 8 cubes per cycle—approximately
120 cubes in a 24-hour period—depending on freezer compartment
temperature, room temperature, number of door openings and other
use conditions.
• Intermittent dispensing of ice is normal. If ice flow interruption is
more than brief, ice clump(s) may be the cause and should be
removed following instructions in this section.
• Avoid overfilling glasses with ice and using narrow or extra-tall
glasses. This can jam the chute or cause the door in the chute to
freeze shut. Periodically open the freezer compartment door and look
down into the chute. If ice is blocking the chute, poke it through with
a wooden spoon.
• To help keep bits of ice from being sprayed beyond the glass,
place the glass close to the ice chute—but not so close that it blocks
outcoming ice.
• Fill glasses with ice before adding soda or other beverage mixes.
• Beverages and foods should not be quick-chilled in the ice
storage bin. Cans, bottles or food packages in the storage bin may
cause the icemaker or auger to jam.
• Do not add ice from trays or bags to the storage bin. It may not
crush or dispense well.
Before Using Your Icemaker and Dispenser
If you use your refrigerator before the water
connection is made, raise the ice access door and
make sure the icemaker feeler arm is in the
STOP (up) position. When the water supply has
been connected to the icemaker, move the feeler
arm to ON (down) position.
At first there will be a delay before water is dispensed and ice is made.
On models with a water dispenser,
if no water is dispensed when the refrigerator is
first installed, there may be air in the water line
system. Press the dispenser pad for at least two
minutes to remove trapped air from the water
line and to fill the water system.
The ice cube mold will automatically fill with water AFTER cooling
to freezer temperatures. The first cubes normally freeze after
several hours.
NOTE: With a newly-installed refrigerator, allow about 24 hours
for the freezer compartment to get cold enough to make ice.
(continued next page)
WATERCRUSHEDCUBEDICE
LIGHT
OFF ON
Feele Feele
Page 6
AUTOMATIC ICEMAKER & DISPENSER
(continued)
Once Your Icemaker and Dispenser are in Operation
Throw away the first few batches of ice cubes (16 or 24 cubes). This
will flush away any impurities in the water line. Do the same thing
after vacations or extended periods when ice isn’t used.
On models with a water dispenser, pour the first 6 glassfuls of water in
the kitchen sink. The first water through the system picks up a slight
‘‘plastic’’ taste from the water tubing.
To make sure the bin fills with ice, level the cubes occasionally.
When cubes fall into the bin they may pile up close to the icemaker
and push the feeler arm to the STOP (up) position before the bin gets
full. Keeping the cubes level allows the icemaker to fill the bin.
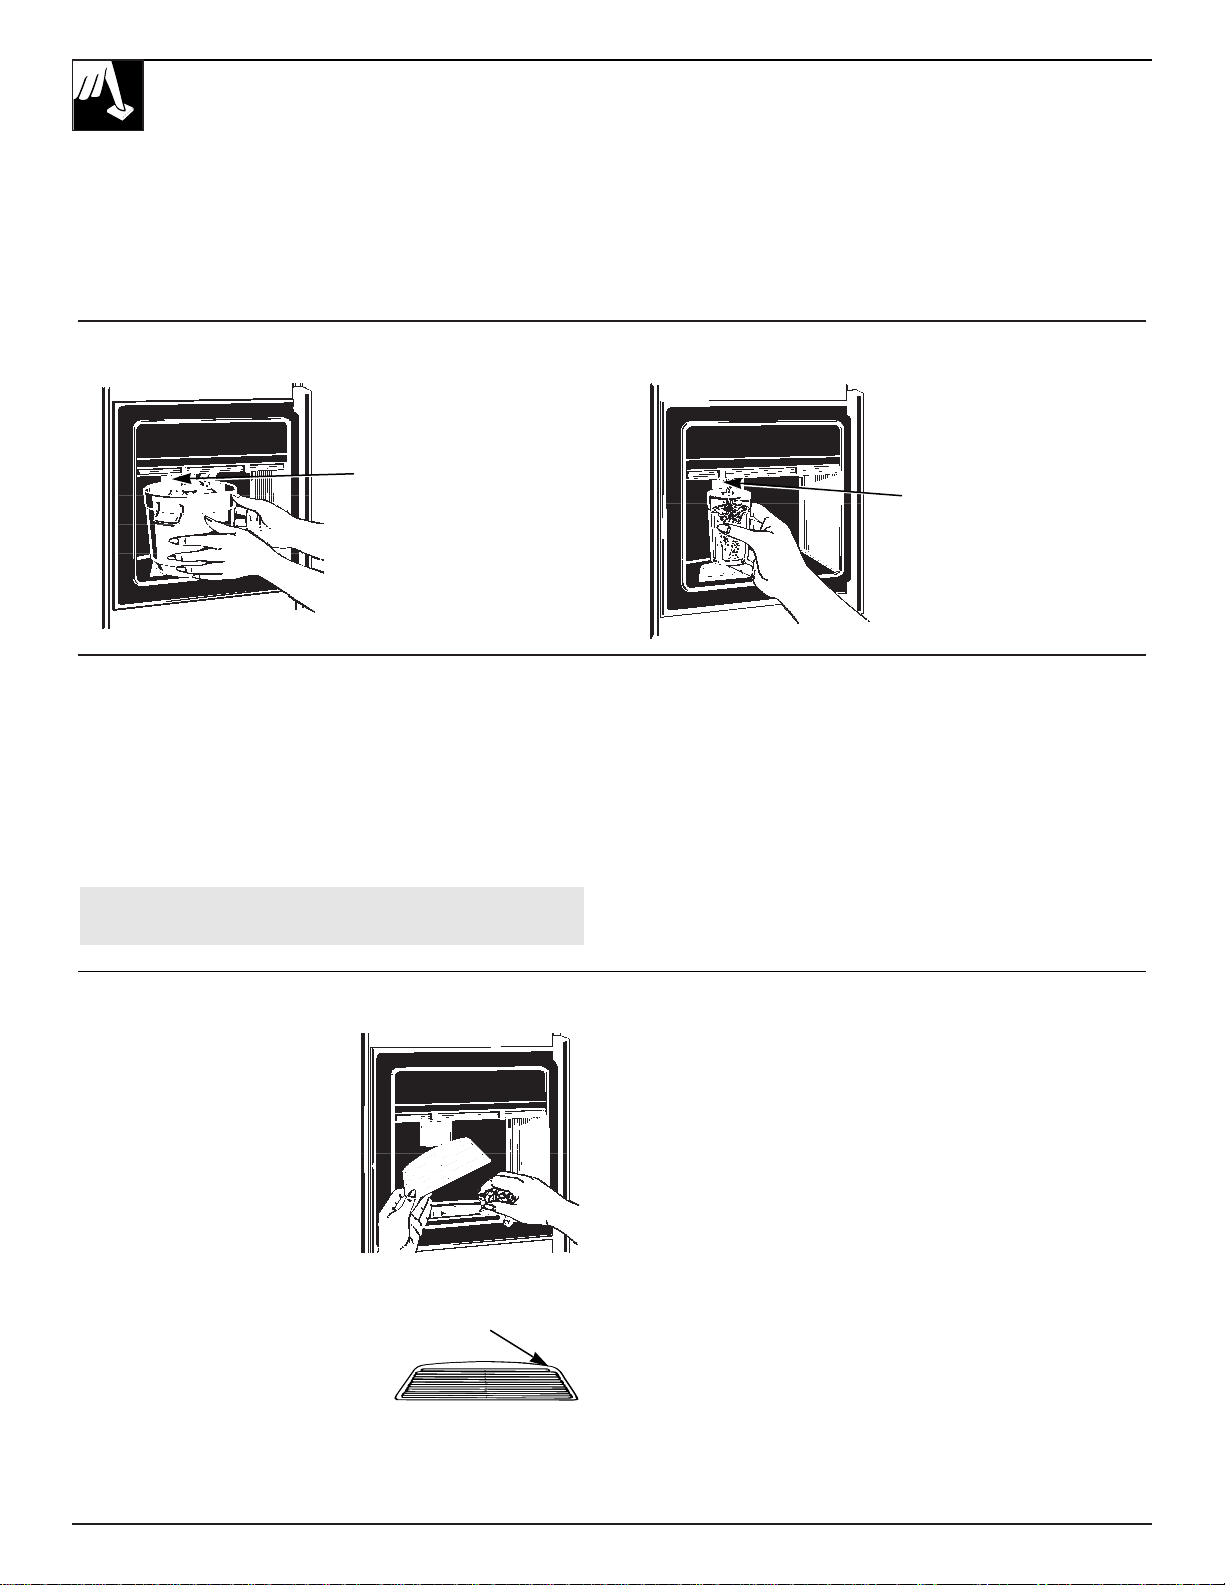
To Dispense Ice and Water
• Select CUBES, CRUSHED ICE
(on some models) or WATER.
• Grip the glass or other container
near the rim and press the rim
against the center of the dispenser
pad.
WATER CRUSHEDCUBEDICE
LIGHT
OFF ON
WATER CRUSHED CUBEDICE
LIGHT OFF ON
When Dispensing Ice… When Dispensing Water…
Some crushed ice may be dispensed even though you selected
CUBES. This happens occasionally when a few cubes get channeled
to the crusher.
Sometimes a mound of snow will form on the door in the ice chute.
This condition is normal, and usually occurs when you have dispensed
crushed ice repeatedly. The snow will eventually evaporate.
Sometimes crushed ice will spray beyond the glass. To avoid this,
hold the glass up close to the chute.
The first glass of water dispensed may be warmer than the
following ones. This is normal.
Dispensed water is cool, not iced. For colder water, simply add
crushed ice or cubes before dispensing water.
CAUTION: Never put fingers or other objects into the
dispenser opening.
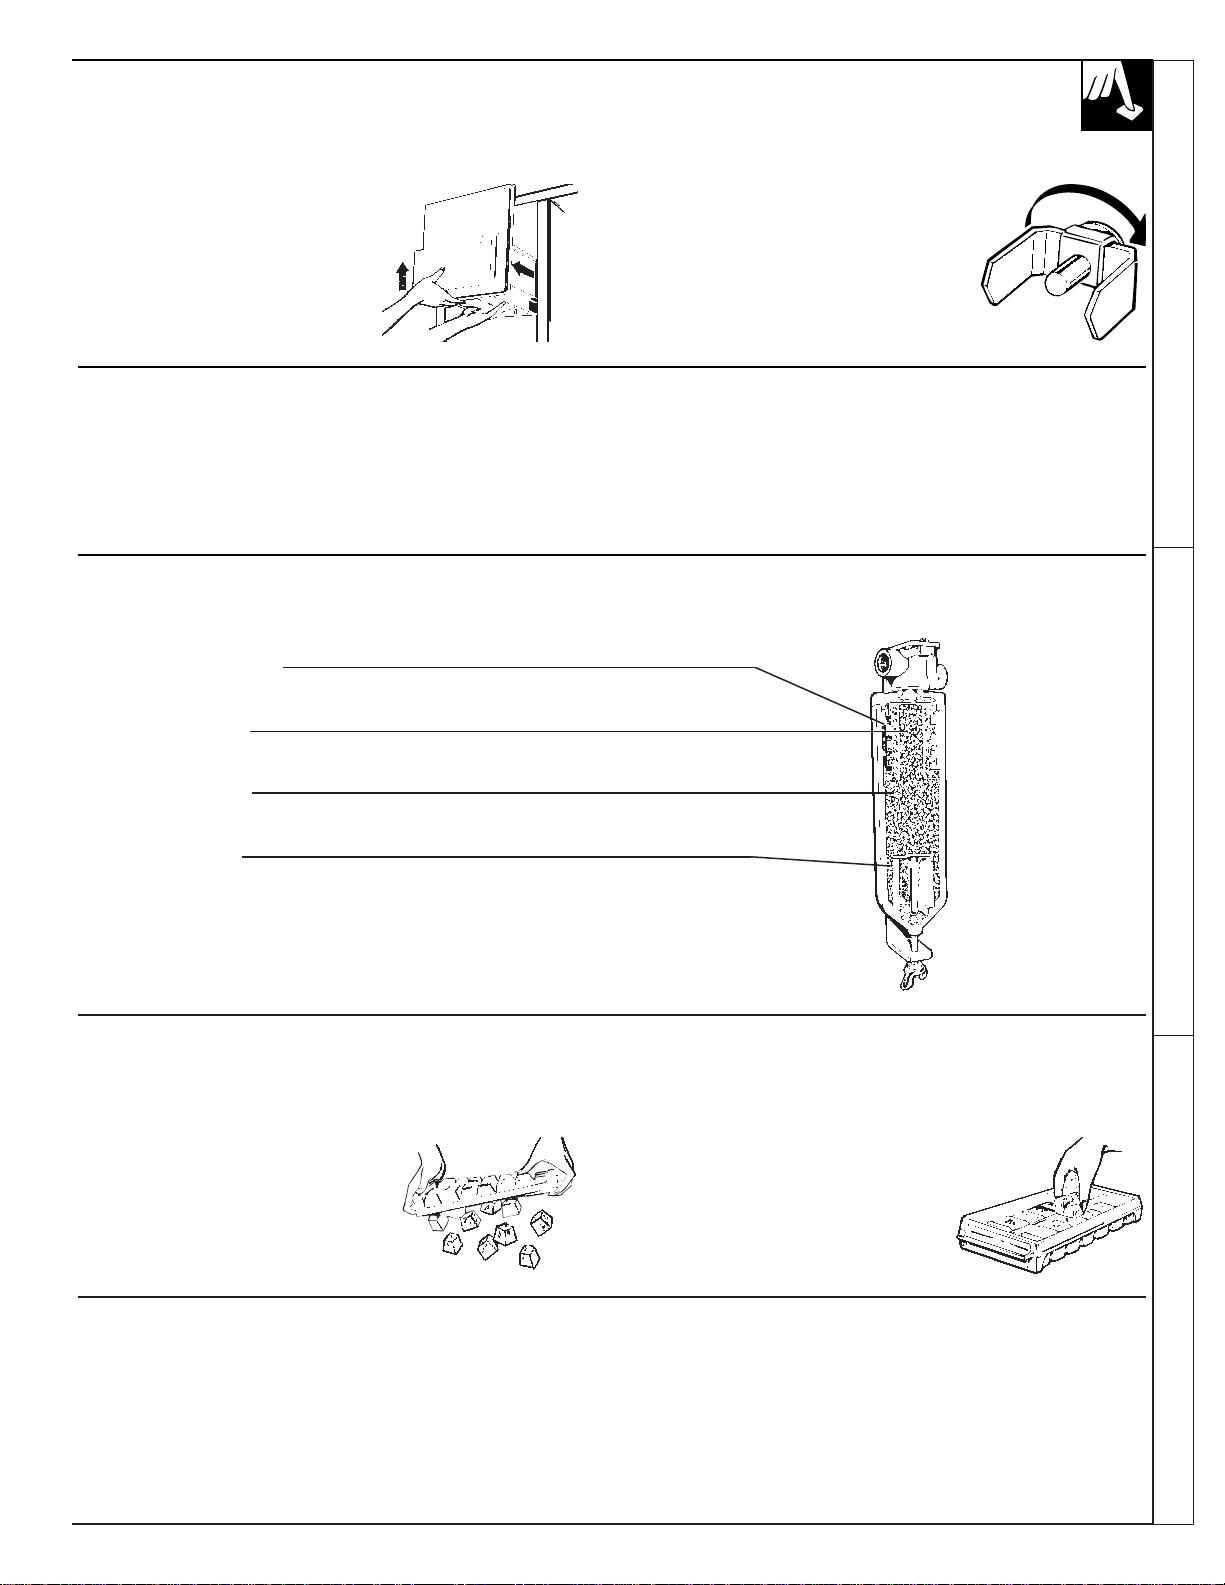
To Stop Dispensing If Ice Clumps Form in the Storage Bin…
Release pressure from the
dispenser pad and wait a few
seconds to catch the last bits of ice
or drops of water.
There may be some dripping after
dispensing crushed ice or water. If
there is a lot of dripping, the spill
should be wiped dry right away.
Do not pour water in the spill shelf because it is not self draining—
pour it in the kitchen sink. The shelf and its grille should be cleaned
regularly according to Care and Cleaning
instructions. The grille is easily removed
by pressing on the back right corner.
The icemaker ejects cubes in groups of 8, and it is normal for several
cubes to be joined together. However, if you don’t use the
ice very often, ice clumps may form in the storage bin and can clog
the dispenser.
If this happens:
• Remove the storage bin from the freezer.
• Break up ice clumps with your hands. Throw away any clumps that
you can’t break up.
• Replace the bin before the remaining cubes melt and fuse together.
WATER CRUSHEDCUBEDICE LIGHT
OFF ON
Press here to remove grille
Dispenser
pad
Dispenser
pad
6
Page 7
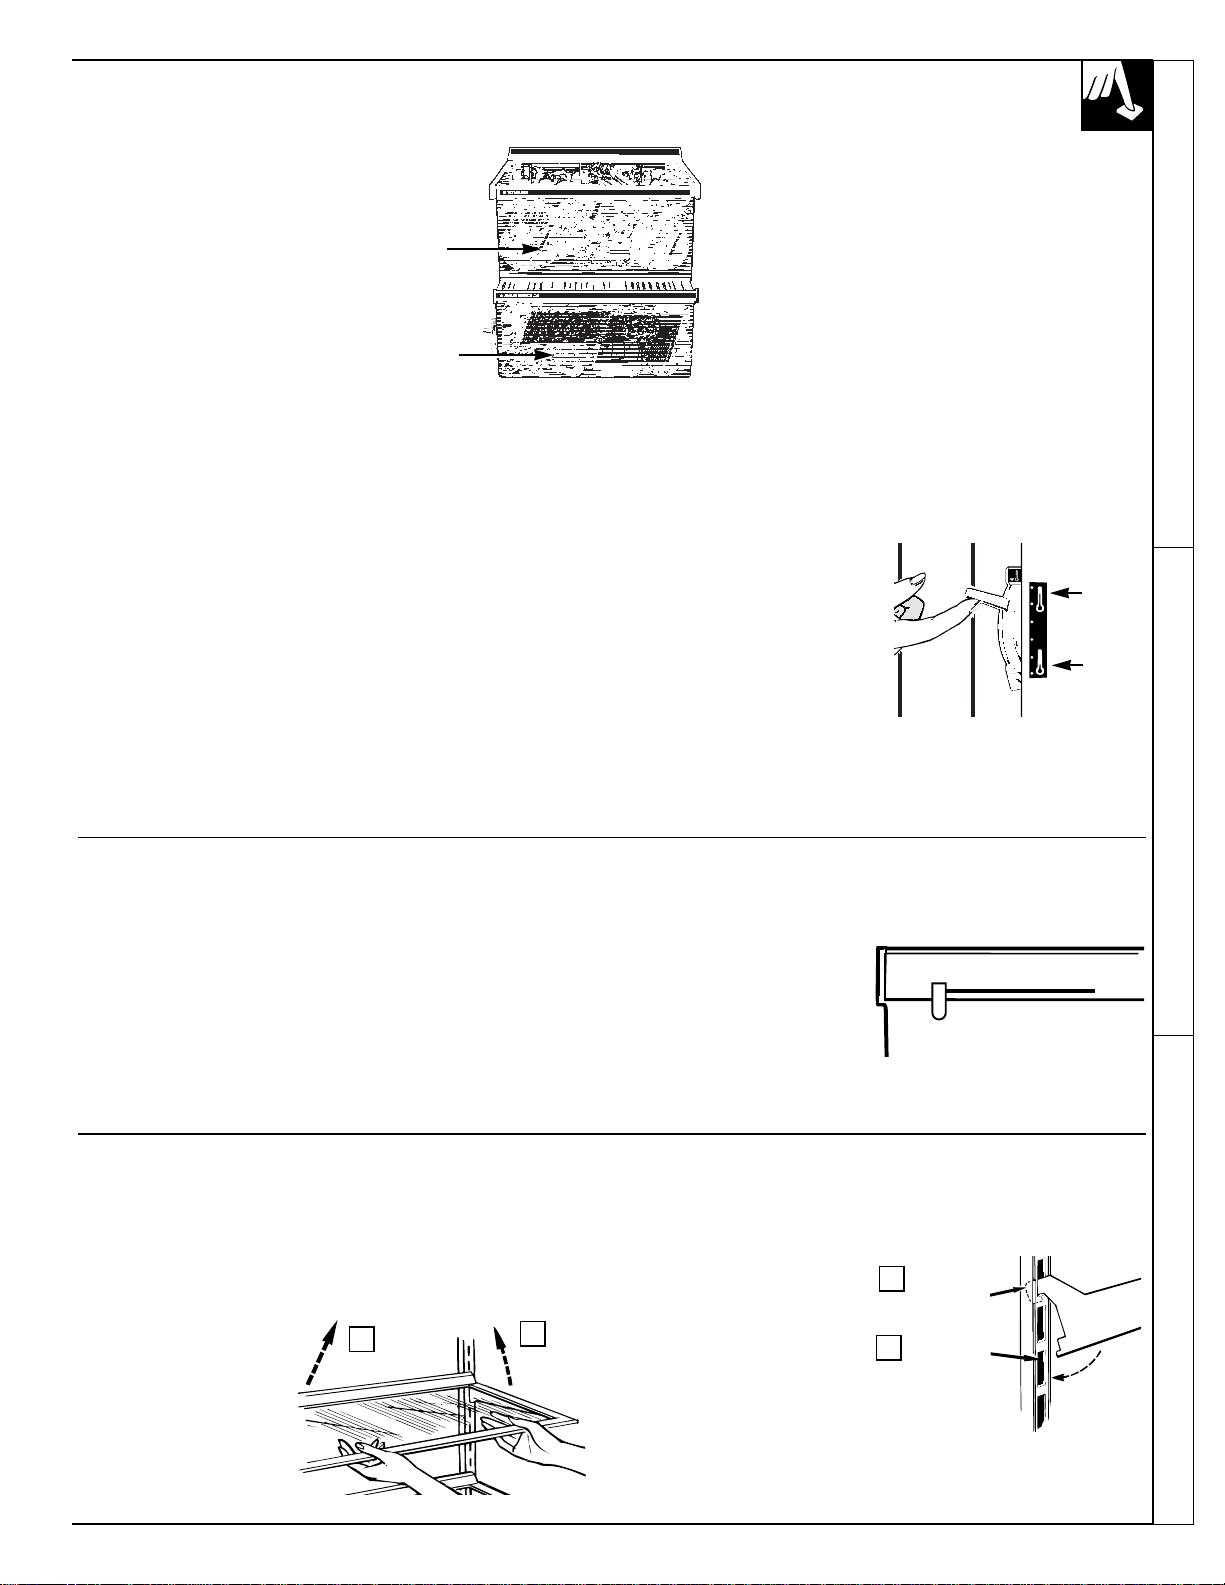
To Remove Ice Storage Bin To Replace Ice Storage Bin
Lift the left corner to free the bin from
the shelf. Pull the bin straight out while
supporting it at front and back.
Slide the bin back until the tab on the bin locks
into the slot in the shelf.
If the bin does not go all the way back, remove
it and turn the drive mechanism 1/4 turn. Then
push the bin back again until the tab on the
bin locks into the slot in the shelf.
Rotate
Drive
Mechanism
If Ice Is Not Used Often…
‘‘Old’’ ice cubes will become cloudy and taste stale. Empty ice
storage bin periodically and wash it in lukewarm water. Be sure to
allow storage bin to cool before replacing it—otherwise ice cubes will
stick to the metal auger.
Move Feeler Arm to STOP (up) Position when…
• Home water supply is to be turned off for several hours.
• Ice storage bin is to be removed for a period of time.
• Going away on vacation, at which time you should also turn off the
valve in the water supply line to your refrigerator.
• Turning the fresh food control to the OFF position.
Water Filter Accessory
Your ice cubes can only be as fresh-tasting as the water that produces them.
That’s why it’s a good idea to purify your water with a water filter.
REMOVES SEDIMENT
Rigid, porous graded density depth cellulose
fiber cartridge catches dirt, rust particles, sand and silt.
REMOVES ODORS
Activated charcoal granules remove
musty, stale odors.
IMPROVES TASTE
Activated charcoal granules remove oily,
medicinal, plastic and metallic tastes.
REDUCES SCALE
Special crystals reduce hard scale deposit formation.
The water filter is an option at extra cost and is available from your dealer.
Specify WR97X0214. It has complete installation instructions and installs
in minutes on 1/4
″ O.D. copper water line.
Ice Trays (on some models)
Ice trays are designed to release ice
cubes easily. Hold tray upside-down
over a container and twist both ends to
release cubes.
For only one or two ice cubes, leave
tray right-side up, twist both ends slightly
and remove number of cubes you want.
Wash ice trays and storage bin in a
solution of lukewarm water and vinegar to
remove mineral deposits. Do not put them
in an automatic dishwasher.
ICE SERVICE
Water Supply Kit Automatic Icemaker Accessory Kit
A kit containing copper tubing, shut-off valve fittings and instructions
needed to connect the icemaker to your cold water line is available at
extra cost. See Preparation section.
If your refrigerator did not come already equipped with an automatic
icemaker, an Icemaker Accessory Kit is available at extra cost. Check
the back of the refrigerator for the specific icemaker kit needed for
your model.
ACCESSORIES
7
Automatic Icemaker & Dispenser Ice Service Accessories
Page 8

FOOD STORAGE SUGGESTIONS
8
Suggested storage times for meat and poultry*
Eating quality DAYS IN MONTHS IN
drops after REFRIGERATOR FREEZER
time shown AT 35°to 40°F. AT 0°F.
(2° to 4°C.) (-18°C.)
Eating quality DAYS IN MONTHS IN
drops after REFRIGERATOR FREEZER
time shown AT 35°to 40°F. AT 0°F.
(2° to 4°C.) (-18°C.)
Fresh Meats
Roasts (Beef & Lamb)......................3 to 5 ...........................6 to 12
Roasts (Pork & Veal)........................ 3 to 5 ...........................4 to 8
Steaks (Beef).................................... 3 to 5 ...........................6 to 12
Chops (Lamb)................................... 3 to 5 ...........................6 to 9
Chops (Pork).................................... 3 to 5 ...........................3 to 4
Ground & Stew Meats ...................... 1 to 2 ...........................3 to 4
Variety Meats.................................... 1 to 2 ...........................3 to 4
Sausage (Pork)................................. 1 to 2 ...........................1 to 2
Processed Meats
Bacon...................................................7...................................1
Frankfurters.......................................... 7.................................1/2
Ham (Whole)........................................ 7...............................1 to 2
Ham (Half)........................................ 3 to 5 ...........................1 to 2
Ham (Slices)......................................... 3...............................1 to 2
Luncheon Meats............................... 3 to 5..........Freezing not recommended.
Sausage (Smoked)............................... 7..............Freezing not recommended.
Sausage (Dry & Semi-Dry) .............14 to 21 ........Freezing not recommended.
Cooked Meats
Cooked Meats and Meat Dishes........ 3 to 4 ...........................2 to 3
Gravy & Meat Broth.......................... 1 to 2 ...........................2 to 3
Fresh Poultry
Chicken & Turkey (Whole)................ 1 to 2 ..............................12
Chicken (Pieces)............................... 1 to 2...............................9
Turkey (Pieces)................................. 1 to 2...............................6
Duck & Goose (Whole)..................... 1 to 2...............................6
Giblets............................................... 1 to 2...............................3
Cooked Poultry
Pieces (Covered with Broth) ..............1 to 2................................6
Pieces (Not Covered)........................ 3 to 4...............................1
Cooked Poultry Dishes ..................... 3 to 4 ...........................4 to 6
Fried Chicken.................................... 3 to 4...............................4
(Other than for meats & poultry) FREEZER
Most fruits and vegetables................................................8-12 months
Lean fish.............................................................................6-8 months
Fatty fish, rolls and breads, soups, stew, casseroles.........2-3 months
Cakes, pies, sandwiches, leftovers (cooked),
ice cream (original carton)............................................1 month max.
Meats, fish and poultry purchased from the store vary in quality and
age; consequently, safe storage time in your refrigerator will vary. For
meat and poultry information, call the U.S. Dept. of Agriculture
at 800-535-4555.
*U.S. Department of Agriculture
Fresh Food Storage Tips
To store vegetables:
• Use the vegetable drawers — they have
been designed to preserve the natural
moisture and freshness of produce.
• Covering vegetables with a moist towel
helps maintain crispness.
• As a further aid to freshness,
prepackaged vegetables can be
stored in their original wrapping.
Unfrozen meats, fish, and poultry:
• Always remove store wrappings.
• Rewrap in foil, plastic wrap or wax paper
and refrigerate immediately.
Cheese:
• Wrap well with wax paper or aluminum
foil, or put in a plastic bag.
• Carefully wrap to expel air and help
prevent mold.
• Store prepackaged cheese in its own
wrapping if you wish.
Tips on Freezing Foods
There are 3 essential requirements for efficient home freezing.
1. Initial quality. Freeze only top-quality foods. Freezing retains
quality and flavor; it cannot improve quality.
2. Speed. The quicker fruits and vegetables are frozen after picking,
the better the frozen product will be. You’ll save time, too, with less
culling and sorting to do.
3. Proper packaging. Use food wraps designed especially
for freezing.
To freeze meat, fish and poultry, wrap well in freezer-weight foil (or
other heavy-duty wrapping material), forming it carefully to the shape
of the contents. This expels air. Fold and crimp ends of the package to
provide a good, lasting seal. Don’t refreeze meat that has been
completely thawed; meat, whether raw or cooked, can be frozen
successfully only once.
Fine-quality ice cream, with high cream content, will normally
require slightly lower temperatures than more “airy” already-packaged
brands with low cream content.
• It will be necessary to experiment to determine the freezer
compartment location and temperature control setting to keep your
ice cream at the right serving temperature.
• The rear of the freezer compartment is slightly colder than the front.
New techniques are constantly being developed. Consult the County
Extension Service or your local Utility Company for the latest
information on freezing and storing foods.
Page 9
STORAGE DRAWERS
Fruit & Vegetable Drawer (on some models) Convertible Meat Drawer (on some models)
This refrigerated drawer keeps unwrapped foods fresh by retaining the
natural moisture content of foods such as:
• Artichokes • Cherries • Plums • Asparagus
• Corn • Radishes • Beets, topped • Currants
• Rhubarb • Blueberries • Greens, leafy • Spinach
• Carrots • Lettuce • Tomatoes, ripe • Celery
• Parsley • Peas, green
As in any refrigerated storage area, it is recommended that foods with
strong odors be stored wrapped—foods such as:
• Broccoli • Cabbage • Parsnips • Brussels sprouts
• Cauliflower • Turnips • Green onions
Storage time will depend upon the type of food and its condition when
placed in the drawers.
Excess water that may accumulate in the bottom of the drawer should
be emptied and the drawer wiped dry. The drawer is partially sealed
by gaskets attached to the cover. Always replace the drawer in this
cover and push the drawer all the way in.
The Convertible Meat Drawer has its own cold air duct to allow
a stream of cold air from the freezer compartment to flow around
the drawer.
The variable temperature control regulates the air flow from the
freezer compartment.
Set control lever down to the
coldest setting to store fresh meats.
If lever is left in meat position for
a long period of time, some
frost may form on the inside
of the drawer.
Set control lever up to convert
the drawer to normal refrigerator
temperature and provide extra
vegetable storage space. Cold air
duct is turned off. Variable settings
between these extremes can be selected.
Sealed Snack Pack (on some models) Adjustable Humidity Drawers (on some models)
The sealed Snack Pack—and shelf to which it is attached—can be
relocated within the Fresh Food compartment. The sealed drawer
retains sufficient humidity for convenient storage of lunch meats,
cheese, hors d’oeuvres, spreads and snacks.
These drawers have individual, adjustable humidity controls that let
you regulate the amount of moisture retained in foods.
Slide the control all the way
to the “veg high” setting and
the drawer provides high
humidity recommended for
most vegetables.
Slide the control all the way
to the “fruit low” setting to
provide lower humidity levels
recommended for most fruits.
Adjustable Humidity Pan
veg high fruit low
TEMP
Fru
it
Convertible
Meat Keeper
Normal
setting
Coldest
setting
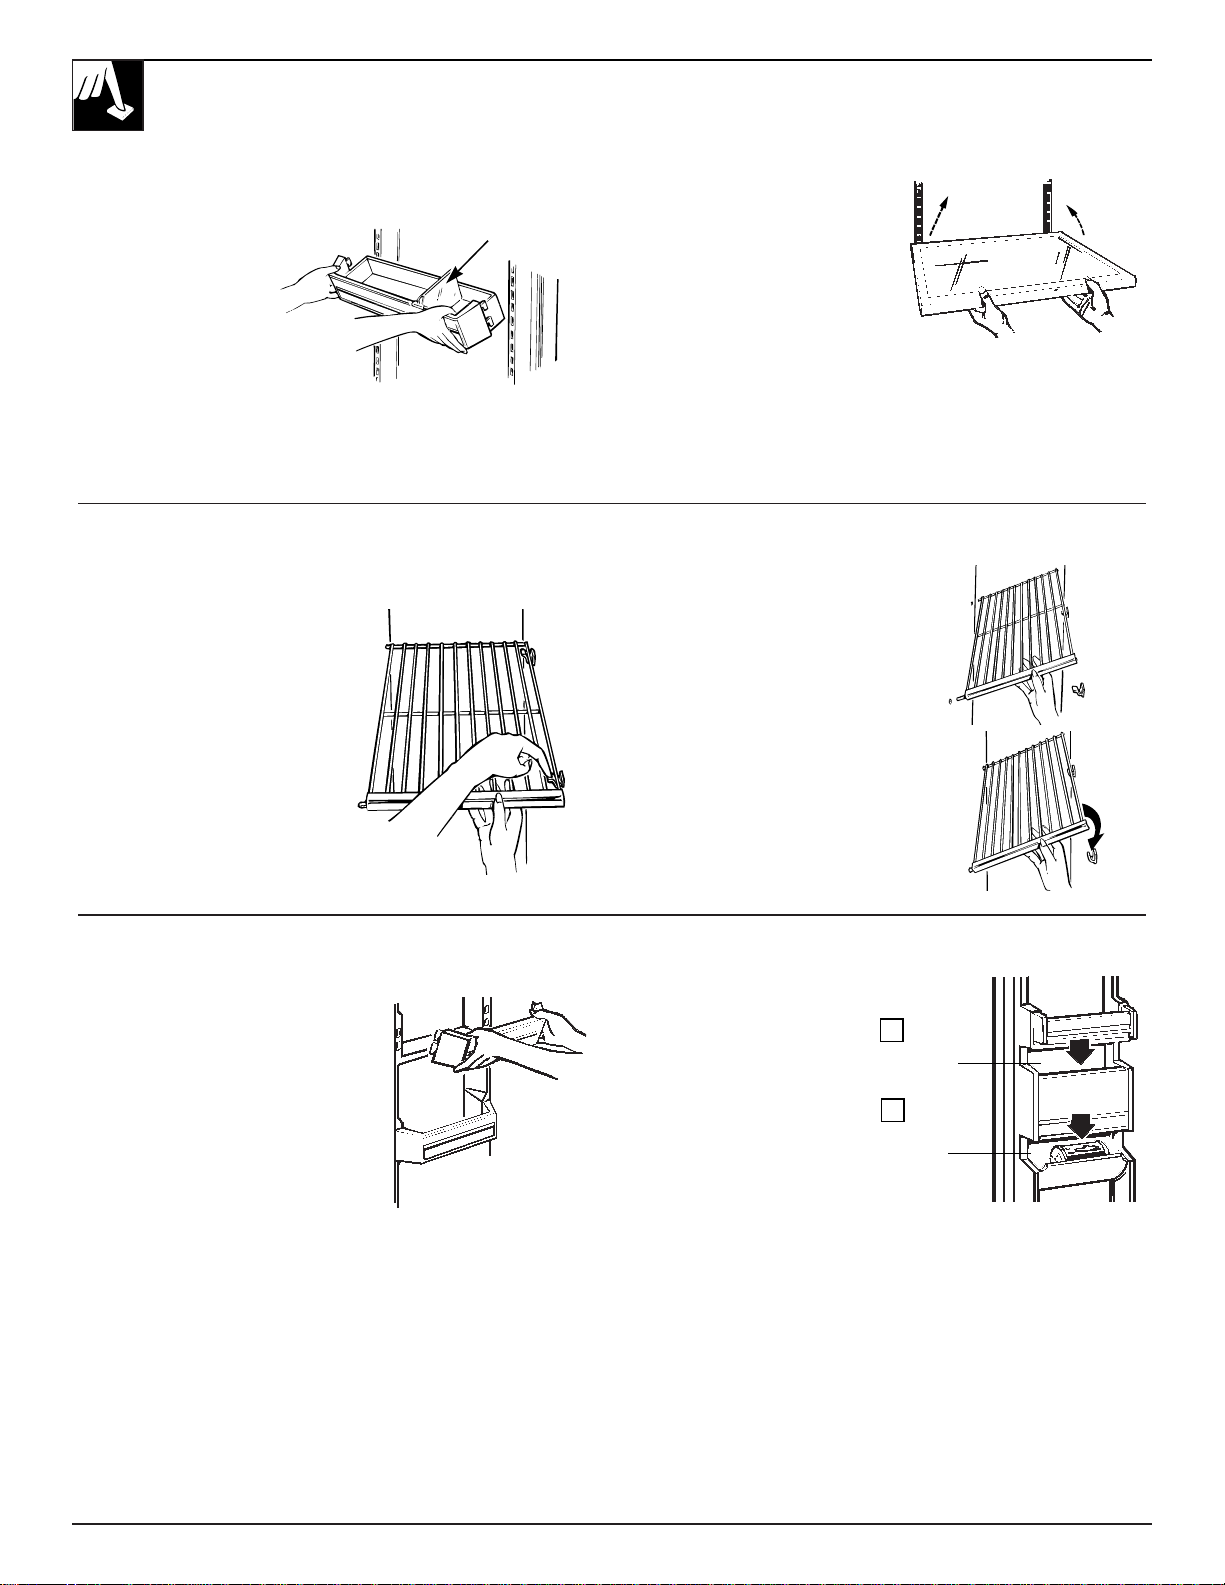
How to Rearrange Your Shelves
Shelves in the fresh food compartment are adjustable, enabling
you to make efficient shelf arrangements to fit your family’s food
storage needs.
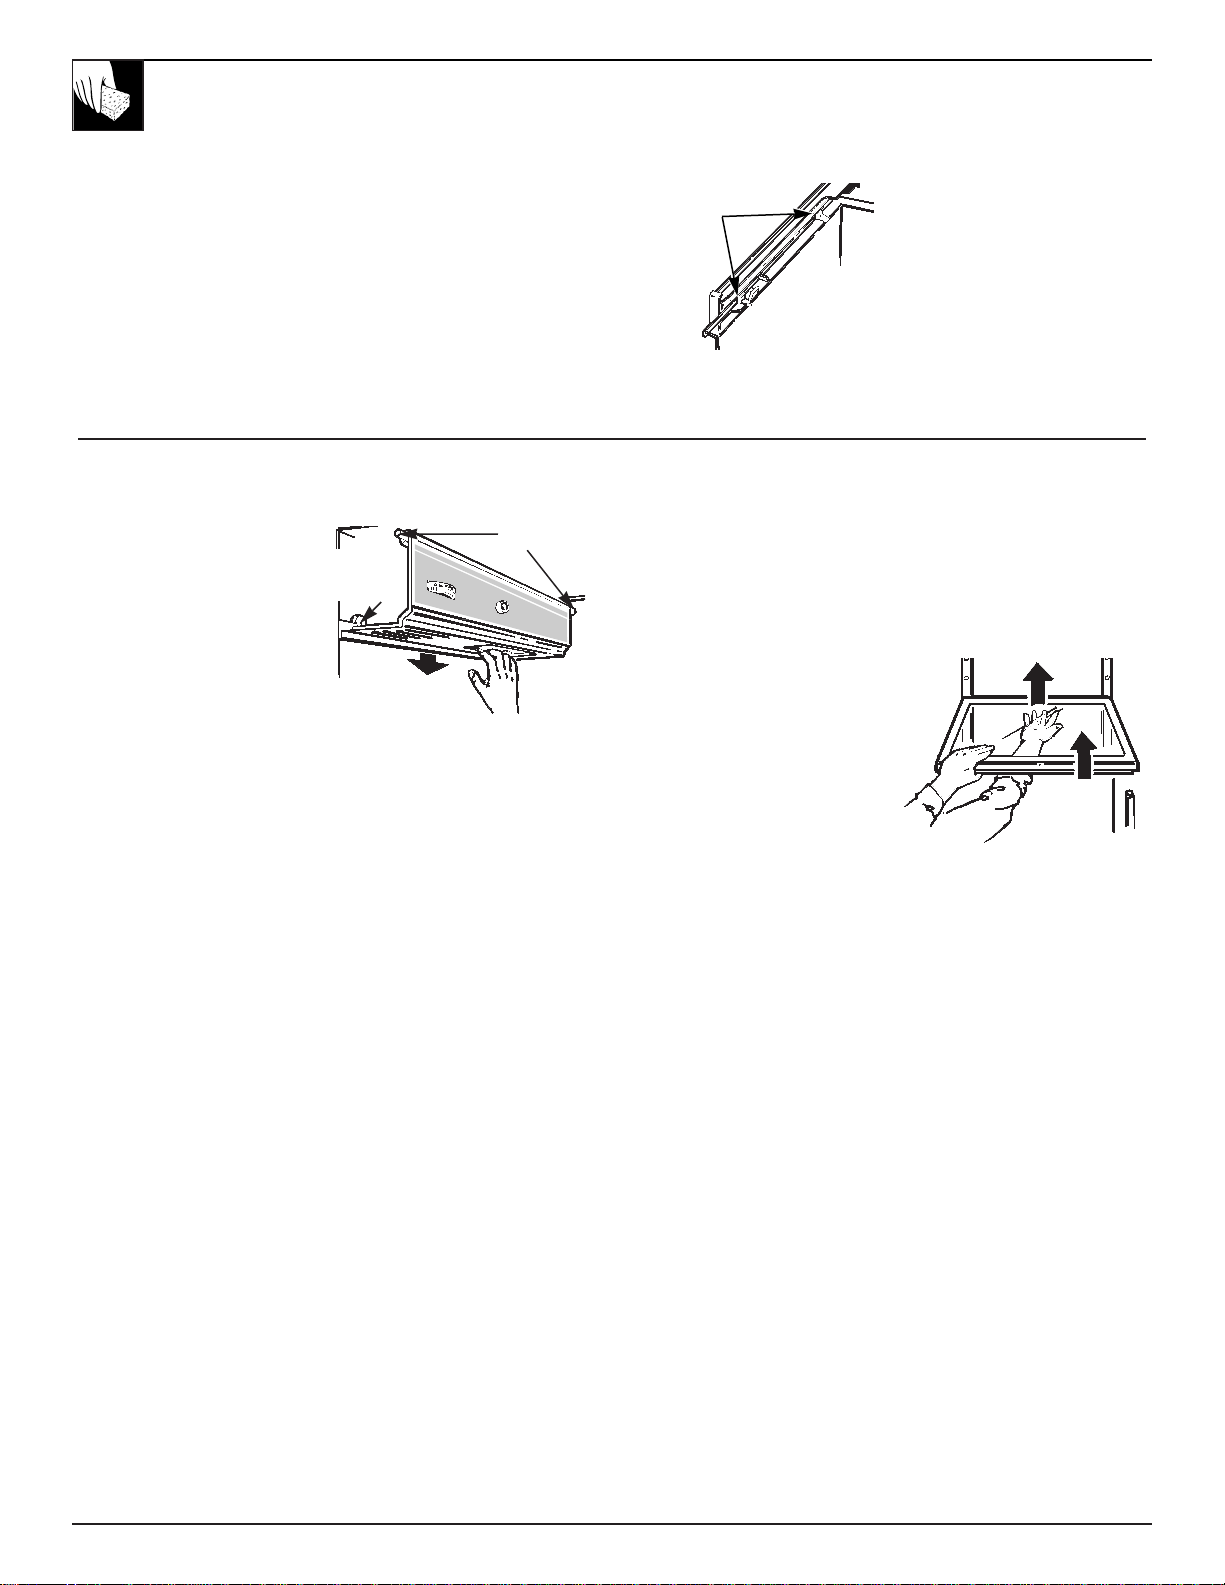
To remove shelves:
Tilt the shelf up at front,
then lift it up and out of the
tracks on the rear wall of
the refrigerator.
To relocate shelves:
Select desired shelf height.
With shelf front raised
slightly, engage the top
hooks in the tracks at the
rear of the cabinet. Then
lower the front of the shelf
until it locks into position.
Wire shelves (on some
models) are adjustable in the same manner.
(continued next page)
SHELVES
9
Lift up
and out
2
Tilt up
1
Lower to
lock into place
2
Engage
top hook
1
Food Storage Suggestions Storage Drawers Shelves
Page 10
SHELVES
Bins on Fresh Food Compartment Door
(on some models)
Adjustable bins can easily be carried from refrigerator to work area.
To remove:
Lift bin straight up until
mounting hooks disengage.
To replace or relocate:
Select desired shelf height,
engage bin’s hook in slots
on the tracks of the door,
and push in. Bin will lock
in place.
The divider (on some models) helps prevent tipping, spilling or
sliding of small items stored on the door shelf. Place index finger and
middle finger on either side of the divider near the front and simply
move it back and forth to fit your needs.
Spillproof Shelves (on some models)
Spillproof shelves have special
edges to help prevent spills from
dripping to lower shelves.
Shelves in Freezer Compartment
Shelves in the freezer are easily removed and replaced
(on some models).
To remove:
1. While pressing tabs on the shelf
supports on right wall, lift the
shelf out of grooves in the supports.
2. Pull shelf sideways until the
shelf rods come out of holes
on left wall.
To replace shelves:
Insert the rods into the holes. Then,
while pressing the tabs, lower the
shelf into the grooves in the supports.
Be sure the shelf wire is fully inserted
into grooves.
If shelf supports at desired level on
right wall do not have tabs, merely
lower shelf into place on supports.
Deep Door Shelves in the Freezer Compartment
(on some models)
Detachable shelf extenders
deepen and enclose fixed door shelves,
providing more storage room and greater
storage flexibility.
To remove: Lift the shelf extender
straight up until the mounting hooks come
out of the slots in the door.
To replace: Line up the hooks with the
slots in the door and push in and down.
Juice Can Rack (on some models)
Cans of frozen juice are
easily accessible when stored
in the rack on the freezer
compartment door.
To load it, place the first
can in the bottom of the
rack. Then load additional
cans into the rack from
the top.
10
Divider
Additional
cans go here
2
Place first
can here
1
Page 11
CARE AND CLEANING
Cleaning—Outside
11
The water and ice dispenser spill shelf should be wiped dry
immediately to prevent spotting. Water left on the shelf may leave
deposits that you can remove by soaking with undiluted vinegar. You
can also use a paste of non-precipitating water softener (such as
Calgon brand) and water, or 1 teaspoon (5 ml) of citric acid powder
per pint (500 ml) of hot tap water. Soak until the deposit disappears or
becomes loose enough to rinse away. Usually 30 minutes soaking time
is adequate. Avoid using wax on the spill shelf and trim.
The door handles and trim can be cleaned with a cloth dampened
with a solution of mild liquid dishwashing detergent and water. Dry
with a soft cloth. Don’t use wax on the door handles and trim.
Keep the finish clean. Wipe with a clean cloth lightly dampened with
kitchen appliance wax or mild liquid dishwashing detergent. Dry and
polish with a clean, soft cloth. Do not wipe the refrigerator with a
soiled dishwashing cloth or wet towel. These may leave a residue that
can erode the paint. Do not use scouring pads, powdered cleaners,
bleach or cleaners containing bleach because these products can
scratch and weaken the paint finish.
Protect the paint finish. The finish on the outside of the refrigerator
is a high quality, baked-on paint finish. With proper care, it will stay
new-looking and rust-free for years. Apply a coat of kitchen/appliance
wax when the refrigerator is new and then at least twice a year.
Appliance Polish Wax & Cleaner is available from Service and Parts
Centers.
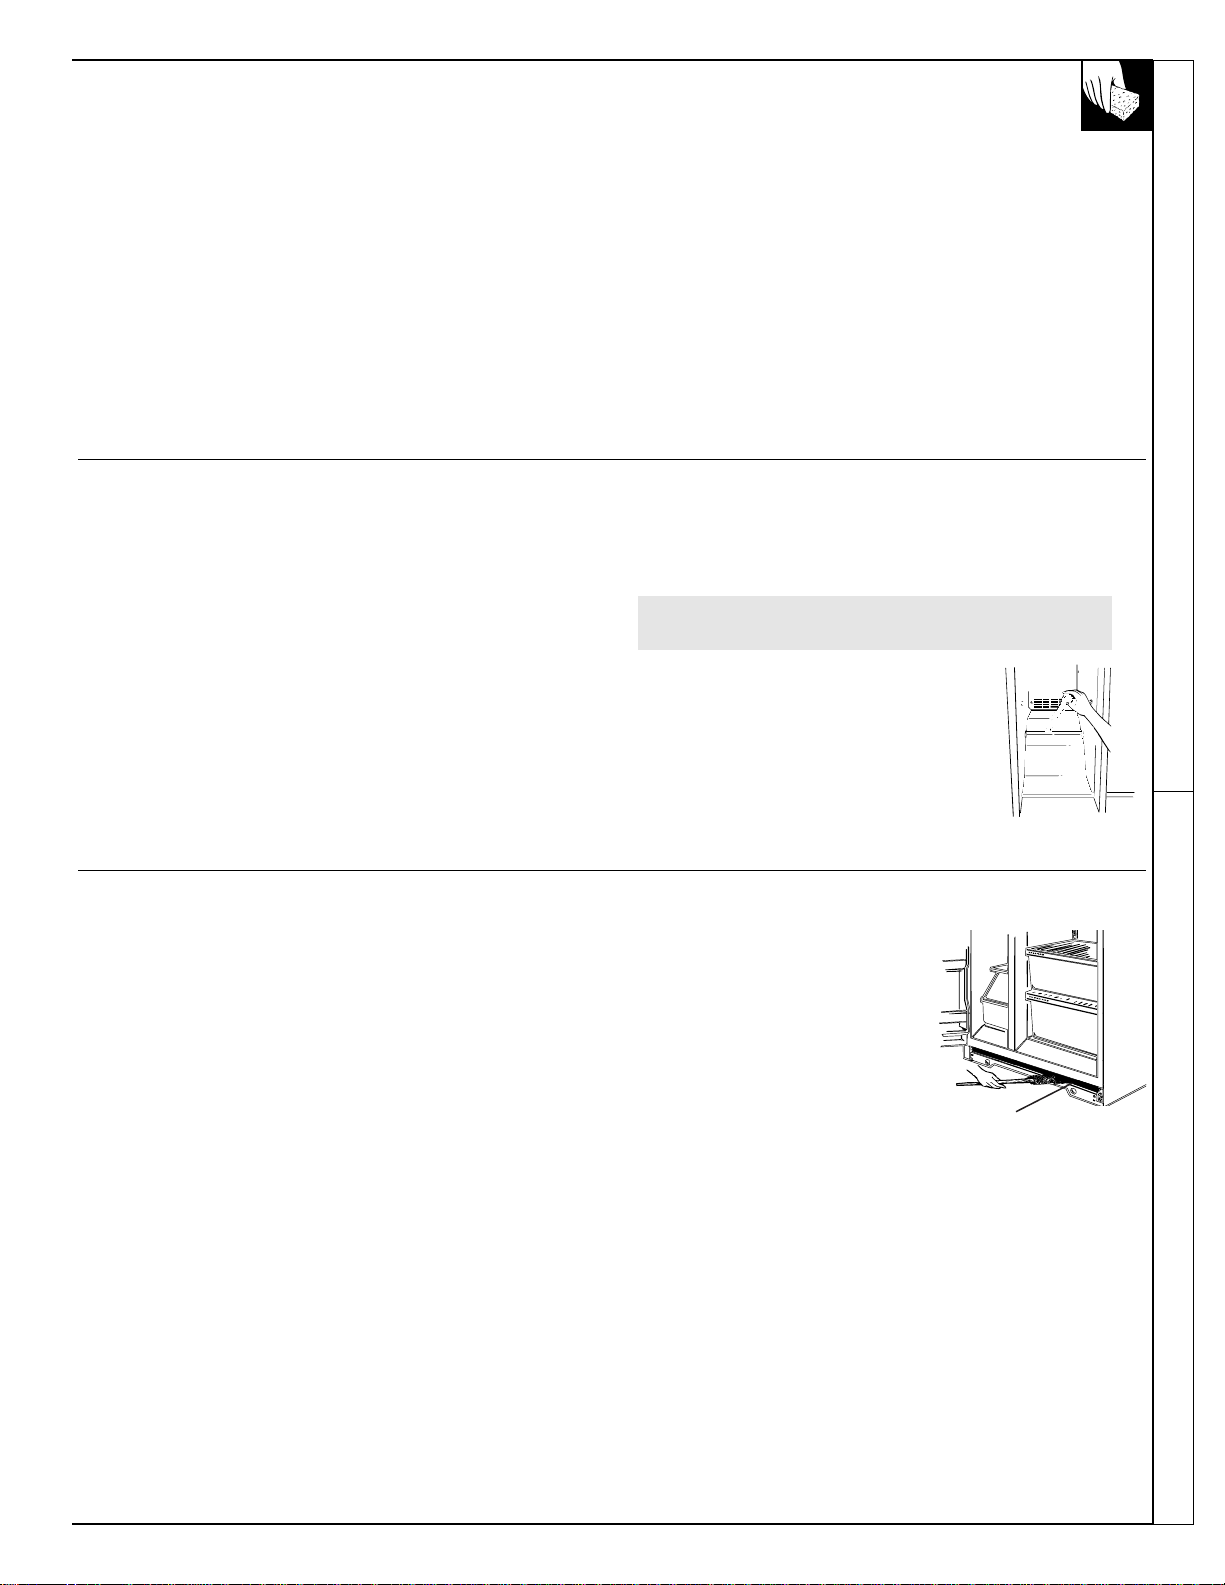
Shelves Care and Cleaning
Cleaning—Inside
Inside the fresh food and freezer compartments should be cleaned
at least once a year. Unplug the refrigerator before cleaning. If this is
not practical, wring excess moisture out of sponge or cloth when
cleaning around switches, lights or controls.
Use warm water and baking soda solution—about a tablespoon
(15 ml) of baking soda to a quart (1 L) of water. This both cleans and
neutralizes odors. Rinse thoroughly with water and wipe dry.
Other parts of the refrigerator—including door gaskets, meat and
vegetable drawers, ice storage bin and all plastic parts—can be
cleaned the same way. After cleaning door gaskets, apply a thin layer
of petroleum jelly to the door gaskets at the hinge side. This helps
keep the gaskets from sticking and bending out of shape. Do not use
cleansing powders or other abrasive cleaners.
Avoid cleaning cold glass shelves with hot water because the extreme
temperature difference may cause them to break.
To help prevent odors, leave an open box of baking soda in the
rear of the refrigerator, on the top shelf. Change the box every 3
months. An open box of baking soda in the freezer will absorb stale
freezer odors.
Drain opening in freezer compartment.
During yearly cleaning, remove bottom freezer
basket and flush a solution of baking soda —
1 teaspoon (5 ml) and 2 cups (500 ml) of hot
(not boiling) water— through the drain line with
the help of a meat baster. This will help eliminate
odor and reduce the likelihood of a clogged drain
line. If drain becomes clogged, use a meat baster
and baking-soda-and-water solution to force the
clog through the drain line.
Do not wash any plastic parts from your refrigerator in
your automatic dishwasher.
Behind Refrigerator Under Refrigerator
Care should be taken in moving your refrigerator away from the wall.
All types of floor coverings can be damaged, particularly cushioned
coverings and those with embossed surfaces. Pull the refrigerator
straight out and return it to position by pushing it straight in. Moving
your refrigerator in a side direction may result in damage to your floor
covering or refrigerator.
When pushing the refrigerator back, make sure you don’t roll over the
power cord or icemaker supply line (on some models).
For most efficient operation,
you need to keep the area under the
refrigerator clean. Remove the base
grille and either sweep away or
vacuum up dust that is readily
accessible. For best results, use a
brush specially designed for this
purpose. It is available at most
appliance parts stores. This easy
cleaning operation should be done
at least once a year.
(continued next page)
Clean the condenser coils
at least once a year.
Page 12
CARE AND CLEANING
(continued)
Drawer Removal
Light Bulb Replacement
Fresh Food Compartment—Upper Light
1. Unplug refrigerator.
2. To align the control knob
properly, note position of
numbered control for proper
reassembly, turn control to
OFF and pull off knob.
3. Pull bottom of light panel
down about 1/4 inch (6 mm)
just enough to disengage lip at
rear from grooves in retainers
on rear wall.
4. Lift panel to disengage top from pins on side walls and
remove panel.
After replacing with same size bulb, reinstall panel (hang top on pins;
pull bottom down, push it back and release it to let lip engage grooves
in retainers). Replace temperature control knob in OFF position, turn
it to previous setting and plug refrigerator back in.
Fresh Food Compartment—Lower Light (on some models)
This light is located either behind the top drawer or right above the top
drawer (depending on your model).
1. Unplug the refrigerator.
2. If the light is behind the top drawer you will need to remove the
drawer and the shelf above it. To remove the drawer see the Drawer
Removal section in Care and Cleaning.
• To remove the shelf first
remove any food on the shelf.
Then tilt the shelf up at the front
and lift it up and out of the
tracks.
3. Grasp the bottom of the light
shield and pull it forward and up.
4. After replacing with the same size
bulb, replace the shield. If you
cannot locate the correct bulb, see
your dealer.
5. If the light was behind the top drawer, you will need to replace the
drawer and the shelf above it.
• To replace the shelf, raise the shelf front slightly and place the top
hooks in the lowest large track slots. Then lower the front of the
shelf until it is level.
6. Plug the refrigerator back in.
Freezer Compartment
1. Unplug the refrigerator.
2. Remove the shelf just below light shield. (The shelf
will be easier to remove if it is emptied first.)
3. Pull the light shield toward you to reach the bulb.
After replacing with same size bulb, reinstall shelf and plug the
refrigerator back in.
TEMPERATURE CONTROLS
Initial Setting C
Coldest E
Initial Setting 5
Coldest 9
Freezer
Fresh Food
●
●
12
Grooved
retainer, one
on each side
Pin
Drawers will stop before coming all the way out of refrigerator to help
prevent contents from spilling onto floor. Drawers can easily be
removed by tilting up slightly and pulling past “stop” location.
On some models you may need to remove the door bins from the fresh
food door before removing the drawers.
If the door prevents you from taking out the drawers, the refrigerator
will need to be rolled forward until the door opens enough to slide the
drawers out. In some cases when you roll the refrigerator out you will
need to move the refrigerator to the left as you roll it out.
Drawer guides
Left side
When replacing the drawers, make sure you slide them through the
drawer guides on the left side.
Page 13
PREPARATION
Preparing for Vacation Preparing to Move
13
For shorter vacations, remove perishable foods and leave controls
at regular settings. However, if room temperature is expected to
drop below 60°F. (16°C.), follow same instructions in Temperature
Control section.
For long vacations or absences, remove food and shut off power to
refrigerator. Move the Fresh Food control to OFF position and clean
interior with baking soda solution of 1 tablespoon (15 ml) of soda to
1 quart (1 L) of water. Wipe dry. To prevent odors, leave open box of
soda in refrigerator. Leave doors open.
Move the icemaker (on some models) feeler arm to STOP (up)
position and be sure to shut off water supply to the refrigerator.
Disconnect power cord from wall outlet, remove all food, and clean
and dry the interior.
Secure all loose items such as grille, shelves and storage pans by
taping them securely in place to prevent damage.
Be sure refrigerator stays in
upright position during actual moving and
in van. Refrigerator must be secured in van to prevent movement.
Protect outside of refrigerator with blanket.
Care and Cleaning Preparation
Refrigerator Location Clearances
Do not install refrigerator where temperature will be below
60°F. (16°C.) because it will not run often enough to maintain
proper temperatures.
Do install it on a floor strong enough to support a fully loaded
refrigerator.
Allow the following clearances for ease of installation, proper air
circulation, plumbing and electrical connections.
Sides ..................................................................5/8
″ (15 mm)
Top ....................................................................1″ (25 mm)
(If built-in, allow 7⁄8
″
[22 mm] for hinge covers.)
Back ..................................................................1″ (25 mm)
If the refrigerator is against a wall on either side, allow the
following door clearances:
for 20, 22 and 24 models ...................................3/4″ (19 mm)
for 27 models.....................................................1
1
/2″ (38 mm)
Rollers Leveling
Adjustable rollers behind the base
grille enable you to move the
refrigerator away from the wall for
cleaning. These rollers should be set
so the refrigerator rests firmly on the
floor. To assure that the doors will
close automatically from a half-wayopen position, there is a built-in tilt
from the front to the back of the
cabinet. Side-by-side refrigerators also
have specially designed door hinges that lift both doors slightly when
opened, allowing the force of gravity to help close them securely.
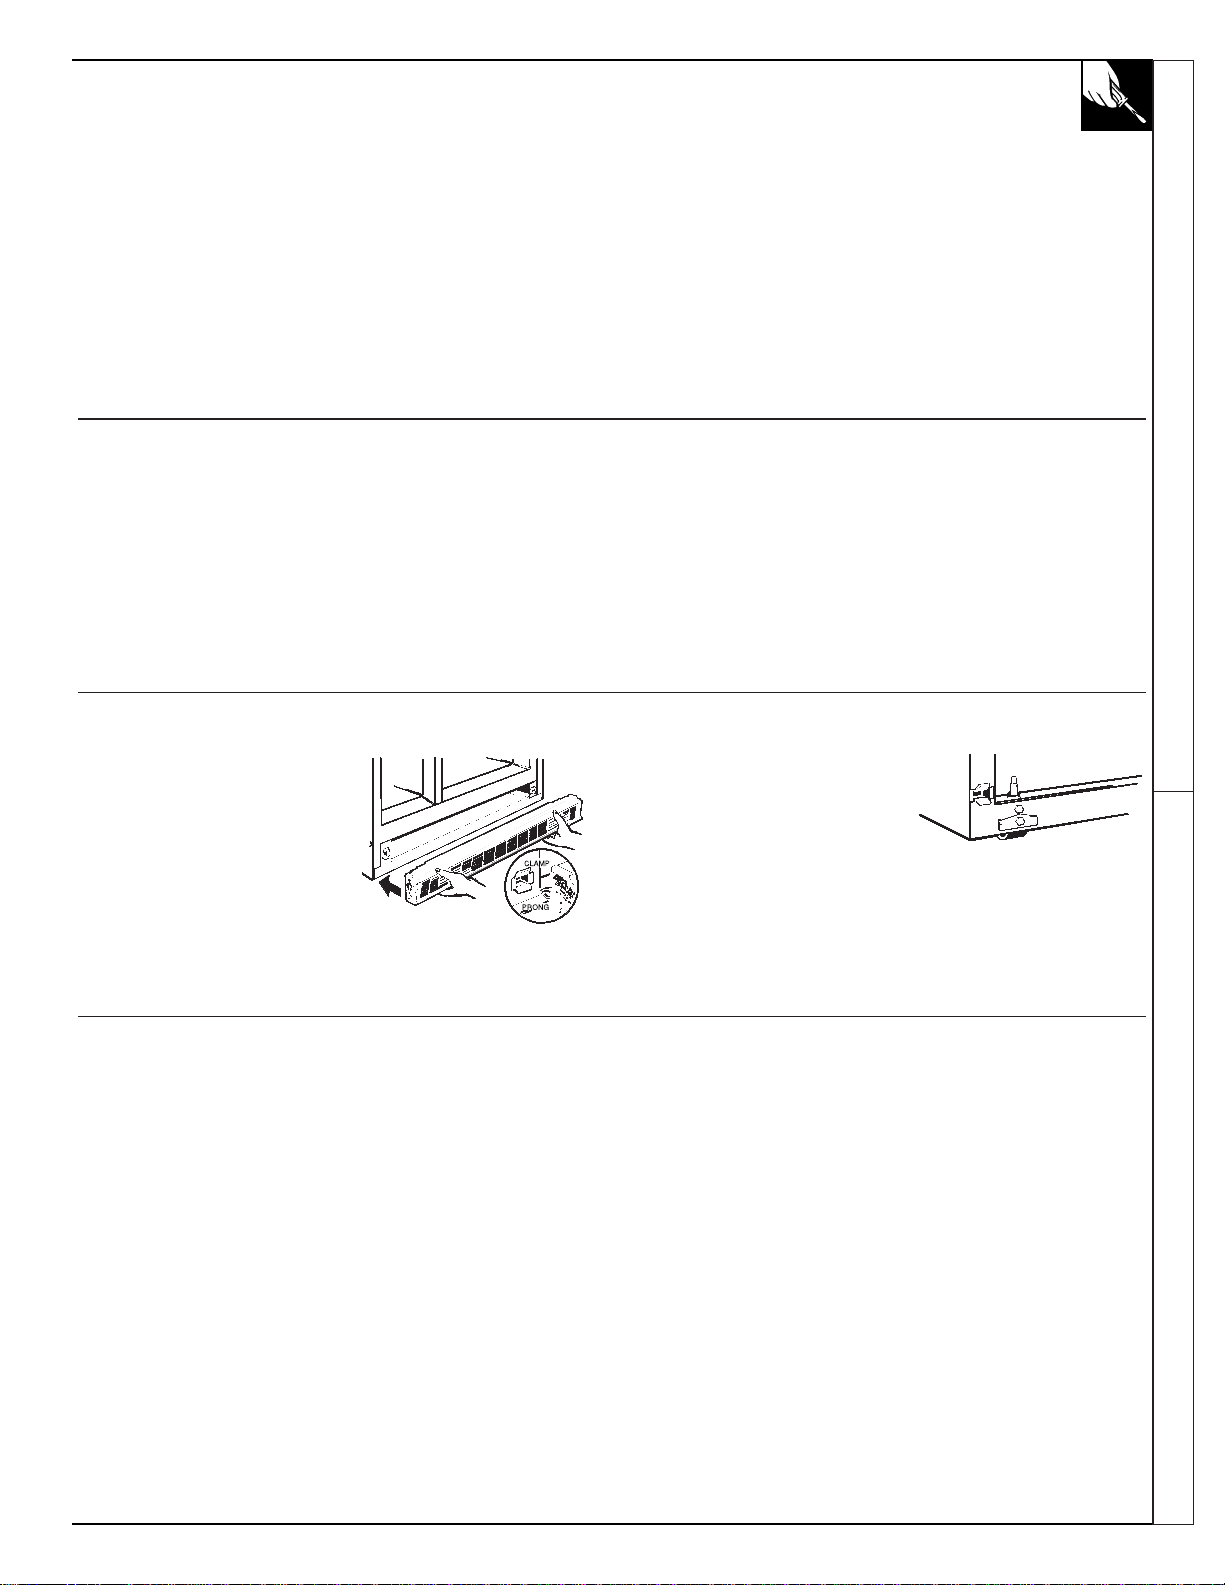
To adjust rollers, remove the base
grille by grasping it at the bottom and
pulling it out.
Turn the roller adjusting screws
clockwise to raise the refrigerator,
counterclockwise to lower it. Use an
adjustable wrench (3/8″ hex head bolt)
or pliers.
When leveling, you can improve door closure by raising the front
approximately 5/8″ (15 mm) from the floor.
To replace base grille, align prongs on back of grille with clamps in
cabinet and push forward until grille snaps into place.
Water Supply to Icemaker (on some models)
If your refrigerator has an icemaker, or if you plan to add an icemaker later, the icemaker will
have to be connected to a cold water line. A water supply kit containing copper tubing, shut-off
valve, fittings and instructions is available at extra cost from your dealer. There should be sufficient
tubing for the icemaker from the cold water supply to allow you to move the refrigerator out from
the wall several feet (approximately 8 feet [244 cm] of 1/4″ copper tubing in three 10-inch [25 cm]
diameter coils).
Page 14

INSTALLATION REQUIREMENTS
IMPORT ANT…PLEASE READ CAREFULLY
How to Connect Electricity
14
For personal safety, this
appliance must be
properly grounded.
The power cord of this
appliance is equipped with a
3-prong (grounding) plug
which mates with a standard
3-prong (grounding) wall
outlet to minimize the
possibility of electric shock
hazard from this appliance.
Have the wall outlet and circuit checked by a qualified electrician to
make sure the outlet is properly grounded.
Where a standard 2-prong wall outlet is encountered, it is your
personal responsibility and obligation to have it replaced with a
properly grounded 3-prong wall outlet.
DO NOT , UNDER ANY CIRCUMSTANCES, CUT OR REMOVE
THE THIRD (GROUND) PRONG FROM THE POWER CORD.
Preferred method
Insure proper
grounding exists
before using.
Use of Adapter Plug
Because of potential
hazards under certain
conditions, we strongly
recommend against use
of an adapter plug.
However, if you still elect
to use an adapter, where
local codes permit, a
TEMPORARY
CONNECTION may be
made to a properly
grounded 2-prong
wall outlet by use of
a UL listed adapter
available at most local
hardware stores.
The larger slot in the adapter must be aligned with the larger slot in
the wall outlet to provide proper polarity in the connection of the
power cord.
Use of an adapter plug will increase the clearance needed for the back
of the refrigerator.
CAUTION: Attaching the adapter ground terminal to a wall outlet
cover screw does not ground the appliance unless the cover screw is
metal, and not insulated, and the wall outlet is grounded through the
house wiring. You should have the circuit checked by a qualified
electrician to make sure the outlet is properly grounded.
When disconnecting the power cord from the adapter, always hold
the adapter in place with one hand while pulling the power cord plug
with the other hand. If this is not done, the adapter ground terminal is
very likely to break with repeated use.
Should the adapter ground terminal break, DO NOT USE the
appliance until a proper ground has again been established.
Temporary Method
(Adapter plugs not
permitted in Canada.)
Align large prongs/slots.
Insure proper grounding and firm
connection exists before use.
Electrical Requirements Use of Extension Cords
The refrigerator should always be plugged into its own individual
electrical outlet which has a voltage rating that matches the rating plate.
This provides the best performance and also prevents overloading house
wiring circuits which could cause a fire hazard from overheated wires.
Because of potential safety hazards under certain conditions, we
strongly recommend against the use of an extension cord. However, if
you still elect to use an extension cord, it is absolutely necessary that it
be a UL-listed 3-wire grounding type appliance extension cord having
a grounding type plug and outlet and that the electrical rating of the
cord be 15 amperes (minimum) and 120 volts.
Page 15
WATER LINE INSTALLATION INSTRUCTIONS
15
INSTALL THE SHUTOFF VALVE ON THE
NEAREST FREQUENTLY USED DRINKING
WATER LINE.
a. Choose a location for the valve that is easily
accessible. It is best to connect into the side of
a vertical water pipe. When it is necessary to
connect into a horizontal water pipe, make the
connection to the top or side, rather than at the
bottom, to avoid drawing off any sediment from
the water pipe.
b. Drill a 1/4
″ hole in the water pipe, using a
sharp bit. Remove any burrs resulting from
drilling the hole in the pipe. (Do not drill a hole
if the valve is a self-piercing type.)
c. Fasten the
shutoff valve to
the cold water pipe
with the pipe clamp.
d. Tighten the
clamp screws until the
sealing washer begins to
swell. Do not overtighten
or you may crush the
copper tubing.
2
CAUTION:
• If you use your refrigerator before connecting
the water line, make sure the icemaker feeler arm
is kept in the STOP (up) position.
• Do not install the icemaker tubing in areas
where temperatures fall below freezing.
•When using any electrical device (such as a
power drill) during installation, be sure the device
is insulated or wired in a manner to prevent the
hazard of electric shock.
• All installations must be in accordance with
local plumbing code requirements.
WARRANTY INFORMATION
This water line installation is not warranted by
the refrigerator or icemaker manufacturer.
Follow these instructions carefully to minimize
the risk of expensive water damage.
WHAT YOU WILL NEED
• A cold water supply is required for automatic
icemaker operation. The water pressure must be
between 20 and 120 p.s.i.
•
Power drill, unless you have a self-piercing valve.
• Copper tubing, 1/4″ outer diameter to connect
the refrigerator to the water supply. Be sure both
ends of the tubing are cut square.
To determine how much copper tubing you need:
measure the distance from the water valve on the
back of the refrigerator to the water supply pipe.
Then add 8 feet (244 cm). Be sure there is
sufficient extra tubing (about 8 feet [244 cm]
coiled into 3 turns of about 10 inches [25 cm]
diameter) to allow the refrigerator to move out
from the wall after installation. Do not use plastic
tubing or plastic fittings because the water supply
line is under pressure at all times. Also, certain
types of plastic tubing may become brittle with
age and crack, resulting in water leakage.
• Shutoff valve to connect to the cold water line.
The shut-off valve should have a water inlet with a
minimum inside diameter of 5/32″ at the point of
connection to the COLD WATER LINE. Saddletype shut-off valves are included in many water
supply kits. Before purchasing, make sure a
saddle-type valve complies with your local
plumbing codes.
• Two 1/4″ outer diameter compression nuts
and 2 ferrules (sleeves)—to connect the copper
tubing to the shutoff valve and the refrigerator
water valve.
• If your existing water line has a flared fitting at
the end, you will need an adapter (available at
plumbing supply stores) to connect the water line
to the refrigerator OR—you can cut off the flared
fitting with a tube cutter and then use a
compression fitting.
SHUT OFF THE MAIN WATER SUPPLY.
Turn on the nearest faucet long enough to clear
the line of water.
1
Typical ways to connect to water supply
Under sink
to cold
water pipe
Through wall to
utility room cold
water pipe
In crawl
space under
house
Through floor
to basement
cold water pipe
Pipe
clamp
Saddle type
shutoff
valve
Washer
Inlet
end
Vertical
cold water
pipe
(continued next page)
Page 16

16
WATER LINE INSTALLATION INSTRUCTIONS
(continued)
CONNECT THE COPPER TUBING TO
THE REFRIGERATOR.
Before making the connection to the
refrigerator, be sure the refrigerator power
cord is not plugged into the wall outlet.
We recommend installing a water filter
(available at Service and Parts Centers) if your
water supply has sand or particles that could clog
the screen of the refrigerator’s water valve. Install
it in the water line near the refrigerator.
6
ROUTE THE COPPER TUBING BETWEEN THE
COLD WATER LINE AND THE REFRIGERATOR.
Route the tubing through a hole drilled in the
floor or wall (behind the refrigerator or adjacent
base cabinet) as close to the wall as possible. Be
sure there is sufficient extra tubing (about 8 feet
[244 cm] coiled into 3 turns of about 10″ [25 cm]
diameter) to allow the refrigerator to move out
from the wall after installation.
3
a. Remove the plastic flexible cap from the
water valve.
b. Place the
compression nut
and ferrule
(sleeve) onto the
end of the tubing
as shown.
c. Insert the end
of the copper
tubing into the
water valve
connection as far
as possible. While holding
the tubing, tighten the fitting.
d. Fasten the copper tubing into the clamp
provided to hold it in a vertical position. You may
need to pry open the clamp.
TURN THE WATER ON AT THE
SHUTOFF VALVE.
Tighten any connections that leak.
7
MOVE THE REFRIGERATOR BACK TO
THE WALL.
Arrange the coil of copper tubing so that it does
not vibrate against the back of the refrigerator or
against the wall.
10
SET THE ICEMAKER FEELER ARM TO THE ON
(DOWN) POSITION.
The icemaker will not begin to operate until it
reaches its operating temperature of 15°F. (-9°C.)
or below . It will then begin operation automatically
if the icemaker is in the ON (down) position.
NOTE: The icemaker may double-cycle when it
first starts, causing some water spillage from the
icemaker into the ice bucket. This is normal and
should not happen again. The first few batches of
cubes should be thrown away, so that remaining
impurities in the water line will be flushed out.
9
PLUG THE REFRIGERATOR POWER CORD
INTO A GROUNDED ELECTRICAL OUTLET.
8
CONNECT THE COPPER TUBING TO THE
SHUTOFF VALVE.
Place the compression
nut and ferrule (sleeve)
onto the end of the
tubing and connect it to
the shutoff valve. Make
sure the tubing is fully
inserted into the valve.
Tighten the compression
nut securely.
4
TURN ON THE WATER AND FLUSH OUT
THE TUBING.
a. Turn the main water supply on and flush out
the tubing until the water is clear.
b. Shut the water off at the water valve after
about one quart of water has been flushed
through the tubing.
5
Saddle type
shutoff valve
Packing nut
Outlet valve
Compression nut
Ferrule
(sleeve)
Ferrule
(sleeve)
1/4″ Copper
tubing
1/4″
Compression nut
Tubing
clamp
Refrigerator connection
Page 17
QUESTIONS?
USE THIS PROBLEM SOLVER
NORMAL OPERATING SOUNDS
These sounds are normal and do not indicate a need for service.
The new high efficiency compressor runs faster and will have a higher
pitch hum or pulsating sound while operating.
Defrost timer and refrigerator control clicks on and off.
The fan circulating air inside the freezer which keeps the
temperatures throughout.
W ater dropping on the defrost heater causing a
sizzling, hissing or popping sound during the defrost cycle.
The flow of refrigerant through the freezer cooling
coil sounds like boiling water or a gurgling noise.
Cracking or popping of cooling coils caused by expansion
and contraction during defrost and refrigeration following defrost.
W ater dripping as it melts from the evaporator
and flows to the drain pan during the defrost cycle.
Icemaker (on some models):
The icemaker water valve will buzz when the icemaker fills
with water . If the feeler arm is in the ON (down) position it will buzz even if it has
not yet been hooked up to water . Keeping the feeler arm in the ON (down) position
before it is hooked up to water can damage the icemaker. To prevent this, raise the
feeler arm to the STOP (up) position. This will stop the buzzing.
The sound of cubes dropping into the bin and water running in pipes as icemaker refills.
(continued next page)
PROBLEM POSSIBLE CAUSE
REFRIGERATOR • May be in defrost cycle when motor does not operate for about 30 minutes.
DOES NOT OPERATE
• Temperature control in OFF position.
• If interior light is not on, refrigerator may not be plugged in at wall outlet.
• If plug is secure and the refrigerator still fails to operate, plug a lamp or a small
appliance into the same outlet to determine if there is a tripped circuit breaker or
burned out fuse.
MOTOR OPERATES • Modern refrigerators with more storage space and a larger freezer
FOR LONG PERIODS compartment require more operating time.
• Normal when refrigerator is first delivered to your home—usually requires 24
hours to completely cool down.
• Large amounts of food placed in refrigerator to be cooled or frozen.
• Hot weather—frequent door openings.
• Door left open.
• Temperature controls are set too cold. Refer to instructions for use
of Temperature Controls.
• Grille and condenser need cleaning. Refer to Care and Cleaning page.
MOTOR STARTS & • Temperature control starts and stops motor to maintain even temperatures.
STOPS FREQUENTLY
VIBRATION OR • If refrigerator vibrates, more than likely it is not resting solidly on the floor and
RATTLING fron
t roller screws or front leveling legs need adjusting, or floor is weak or uneven.
Refer to Rollers in the Preparation section.
• If dishes vibrate on shelves, try moving them. Slight vibration is normal.
Water Line Installation Problem Solver
17
Page 18
PROBLEM POSSIBLE CAUSE
HOT AIR FROM • Normal air flow cooling motor. In the refrigeration process, it is normal that heat
BOTTOM OF be expelled in the area under the refrigerator. Some floor coverings will discolor
REFRIGERATOR at these normal and safe operating temperatures. Your floor covering supplier
should be consulted if you object to this discoloration.
DOOR NOT CLOSING • Door gasket on hinge side sticking or folding over. To correct, put a small
PROPERLY amount of petroleum jelly on face of gasket.
FRESH FOOD OR • Temperature control not set cold enough. Refer to Temperature Control section.
FREEZER COMPARTMENT
• Warm weather—frequent door openings.
TEMPERATURE
• Door left open for long time.
TOO WARM
• Package may be holding door open.
FOODS DRY OUT • Foods not covered, wrapped or sealed properly.
FROST OR ICE • Door may have been left ajar or package holding door open.
CRYSTALS ON
• Too frequent or too long door openings.
FROZEN FOOD
• Frost within package is normal.
SLOW ICE CUBE • Door may have been left open.
FREEZING
• Turn temperature of freezer compartment colder.
ICE CUBES HAVE • Old cubes need to be discarded.
ODOR/TASTE
• Ice storage bin needs to be emptied and washed.
• Unsealed packages in refrigerator and/or freezer compartments may be
transmitting odor/taste to ice cubes.
• Interior of refrigerator needs cleaning—refer to Care and Cleaning section.
• Poor-tasting incoming water. Install a water filter—see Water Filter
Accessory section.
AUTOMATIC • ON-STOP control in STOP (up) position.
ICEMAKER
• Water supply turned off or not connected.
DOES NOT WORK
• Freezer compartment too warm.
• Cubes too small—water shutoff valve connecting refrigerator to home
water line may be clogged.
• Sometimes cubes fuse to the side of the ice mold and hold the feeler arm in the
STOP (up) position. Remove this ice to restart the icemaker.
• When reaching for cubes by hand, you may have pushed the feeler arm into the
STOP (up) position by mistake.
• Piled up cubes in storage bin may cause icemaker to shut off too soon. With
icemaker feeler arm in STOP (up) position, level cubes in bin.
CUBE DISPENSER • No ice cubes. Remove storage container. If cubes are frozen to wire arm,
DOES NOT WORK remove cubes.
(on some models)
• No ice cubes. Icemaker turned off or water supply turned off.
• Irregular ice clumps in storage container. Break up as many as you can with
fingertip pressure and discard the remaining clumps.
PROBLEM SOLVER
(continued)
18
Page 19
PROBLEM POSSIBLE CAUSE
WATER HAS POOR • If the water dispenser has not been used for a long time, dispense water
TASTE/ODOR in regular manner until all water in the system is replenished with fresh water.
(on some models)
• Poor-tasting incoming water. Install a water filter—see Water Filter section.
WATER IN FIRST • Allow about 24 hours for water to cool to proper temperature after
GLASS IS WARM refrigerator is first installed.
(on some models)
• If water dispenser has not been used for a long time, water in first
glass will not be as cool as in succeeding glasses.
• If the water system has been drained, allow several hours for replenished
supply to chill.
WATER DISPENSER • Water supply line turned off or not connected.
DOES NOT WORK
• Supply line may be clogged with sediment.
(on some models)
• If no water is dispensed when the refrigerator is first installed, there may be air in
the water system. Press the dispenser pad for at least two minutes to remove trapped
air from the water line and to fill the water system.
DIVIDER BETWEEN • Normal warmth is created by automatic energy saver system circulating warm
FRESH FOOD AND liquid around front edge of freezer compartment to help prevent condensation
FREEZER COMPART- on outside of refrigerator in hot, humid weather.
MENTS FEELS WARM
MOISTURE FORMS • Not unusual during periods of high humidity.
ON OUTSIDE OF
REFRIGERATOR
MOISTURE • Too frequent or too long door openings.
COLLECTS INSIDE
• In humid weather, air carries moisture into refrigerator when doors are opened.
WATER ON KITCHEN • The drain in the bottom of the refrigerator may be clogged. Remove any ice on
FLOOR OR ON the freezer bottom and clean the drain. Refer to Care and Cleaning section.
BOTTOM OF FREEZER
• When using the dispenser use a glass no taller than 6
″ (15 cm) tall. A taller
glass may be jamming cubes in the funnel chute. They can fuse inside the chute
and drop out later, leaving water or ice on the floor.
REFRIGERATOR • Foods with strong odors should be tightly covered.
HAS ODOR
• Check for spoiled food.
• Interior needs cleaning. Refer to Care and Cleaning section.
• Defrost water system needs cleaning.
• Keep open box of baking soda in refrigerator; replace every 3 months.
INTERIOR LIGHT • No power at outlet.
DOES NOT WORK
• Light bulb needs replacing. See Care and Cleaning section.
ORANGE GLOW IN THE • An orange glow is sometimes seen in the freezer compartment when the defrost
FREEZER COMPARTMENT heater is on. This is normal.
If you need more help… In the United States call, toll free:
GE Answer Center
®
800.626.2000 consumer information service
In Canada: Manager, Consumer Relations
2645 Skymark Ave., Mississauga, Ontario, Canada L4W 4H2
19
Problem Solver
Page 20

20
We’ll Be There
With the purchase of your new GE appliance, receive the assurance that if you ever need information
or assistance from GE, we’ll be there. All you have to do is call—or write!
In-Home Repair Service
In the United States: 800-GE-CARES (800-432-2737)
A GE consumer service professional will provide expert repair service, scheduled at a time that’s convenient for you. Many GE
Consumer Service company-operated locations offer you service today or tomorrow, or at your convenience (7:00 a.m. to 7:00 p.m.
weekdays, 9:00 a.m. to 2:00 p.m. Saturdays). Our factory-trained technicians know your appliance inside and out—so most repairs
can be handled in just one visit.
In Canada consult your local telephone directory for the Camco Service or Authorized Service Center
nearest you.
GE Answer Center®
In the United States: 800.626.2000
Whatever your question about any GE major appliance, GE Answer Center® information service is available to help. Your call—and your
question— will be answered promptly and courteously. And you can call any time. GE Answer Center® service is open 24 hours a day, 7
days a week.
In Canada contact Manager, Consumer Relations, Camco Inc., 2645 Skymark Avenue, Mississauga,
Ontario, Canada L4W 4H2
Service Contracts
In the United States: 800-626-2224
You can have the secure feeling that GE Consumer Service will still be there after your warranty expires. Purchase a GE contract
while your warranty is still in effect and you’ll receive a substantial discount. With a multiple-year contract, you’re assured of future
service at today’s prices.
800-461-3636 In Canada
Parts and Accessories
In the United States: 800-626-2002
Individuals qualified to service their own appliances can have parts or accessories sent directly to their home. The GE parts system provides
access to over 47,000 parts…and all GE Genuine Renewal Parts are fully warranted. VISA, MasterCard and Discover cards are accepted.
User maintenance instructions contained in this guide cover procedures intended to be performed by any user. Other servicing generally
should be referred to qualified service personnel. Caution must be exercised, since improper servicing may cause unsafe operation.
In Canada consult your local telephone directory for the Camco Service or Authorized Service Center
nearest you.
For Customers With Special Needs…
In the United States: 800.626.2000
Upon request, GE will provide Braille controls for a variety of GE appliances, and a brochure to assist in planning a barrier-free kitchen for
persons with limited mobility. To obtain these items, free of charge, call 800.626.2000.
Consumers with impaired hearing or speech who have access to a TDD or a conventional teletypewriter may call 800-TDD-GEAC
(800-833-4322) to request information or service.
In Canada contact Manager, Consumer Relations, Camco Inc., 2645 Skymark Avenue, Mississauga,
Ontario, Canada L4W 4H2
Page 21

21
FIRST YEAR
CAMCO warrants the replacement or repair of all parts of this Refrigerator which prove to be
defective in material or workmanship, for one year from the date of purchase. Such parts will be
repaired or replaced at the option of Camco without charge, subject to the terms and conditions
set out below .
The DEALER warrants to provide the service labor for the repair or replacement of all parts of
this Refrigerator which prove to be defective in mater ial or workmanship for one year from the
date of purchase.
NEXT FOUR YEARS
CAMCO warrants the hermetically sealed refrigerator system (namely: Evaporator, Condenser,
Motor Compressor, Interconnecting Tubing, Drier and Refrigerant Charge) against defects in
material or workmanship for an additional four years. These parts will be repaired or replaced
at the option of Camco without charge, subject to the terms and conditions set out below.
The DEALER warrants for the next four years to provide the service labor necessary to repair
or replace the hermetically sealed refrigeration system, subject to the ter ms and conditions set
out below .
TERMS AND CONDITIONS
1. This warranty applies only to single family domestic use in Canada when the Refrigerator has
been properly installed according to the instr uctions supplied by Camco and is connected to
an adequate and proper utility service. Damage due to abuse, accident, commercial use, and
alteration or the removal or defacing of the serial plate, cancels all obligations of this warranty.
Service during this warranty must be performed by an Authorized Camco Service Agent.
2. Neither Camco nor the Dealer is liable for any claims or damages resulting from any failure of
the Refrigerator or from service delays beyond their reasonable control.
3. To obtain warranty service, purchaser must present the original bill of sale. Components
repaired or replaced are warranted through the remainder of the original warranty period only.
4. This warranty does not cover expense involved in making this appliance readily accessible
for servicing.
5. This warranty gives you specific legal rights. Additional warranty rights may be provided by
law in some areas.
Camco Service is available coast-to-coast. See preceding page for service information.
If further help is needed concerning this Warranty, contact:
Manager, Consumer Relations
Camco Inc., Consumer Service
2645 Skymark Avenue ,
Mississauga, Ontario
L4W 4H2
CONSUMER WARRANTY
(for customers in Canada)
Part No. 162D7744P002
Pub. No. 49-6854
Side by Side 20–27 Models
Page 22

22
Page 23

23
Guide d’utilisation et d’entretien
Réfrigérateur
Électroménagers GE
Consignes de sécurité ..............25
Mode d’emploi et conseils
Bacs.................................................................31
Clayettes.................................................31, 32
Conservation des aliments........................30
Machine à glaçons et distributeur ...27–29
Réglage des commandes
de température..........................................26
Se débarrasser du CFC...............................24
Service glaçons ............................................29
Entretien et nettoyage
Derrière le réfrigérateur..............................33
Enlèvement des bacs..................................34
Filtre à eau .....................................................29
Nettoyage—intérieur et extérieur.............33
Remplacement de l’ampoule....................34
Sous le réfrigérateur....................................33
Guide de dépannage.........39–41
Bruits de fonctionnement normaux........39
Autres questions?…Aux États-Unis
communiquez avec
GE Answer Center®800.626.2000.
Au Canada vérifiez le numéro du
Centre de service Camco dans
l’annuaire téléphonique.
Préparation
Alimentation en eau....................................35
Dégagement .................................................35
Déménagement...........................................35
Emplacement................................................35
Nivelage .........................................................35
Roulettes........................................................35
Vacances .......................................................35
Installation ..................................36–38
Adaptateur.....................................................36
Cordons prolongateurs ..............................36
Installation de la conduite d’eau.......37, 38
Mise à la terre ...............................................36
Spécifications électriques .........................36
Service à la clientèle................42
Enregistrement de l’appareil.....................24
Garantie..........................................................43
Numéros de modèle et de série ...............24
Page 24

AIDEZ-NOUS À VOUS AIDER…
Inscrivez les numéros de modèle
et de série.
Ils figurent sur l'étiquette qui se trouve soit
sur la paroi du réfrigérateur à côté du bac
supérieur, soit à la partie inférieure de la
contre-porte du compartiment réfrigérateur.
Ces numéros sont également indiqués sur la
carte d’enregistrement de l’appareil qui
accompagne votre réfrigérateur.
Avant de nous retourner cette carte, veuillez
inscrire ces numéros ici :
Numéro de modèle
Numéro de série
Mentionnez les numéros de modèle et de
série dans toute correspondance concernant
votre réfrigérateur ou lorsque vous appelez le
service de réparation.
Lisez attentivement ce guide.
Il est conçu pour vous aider à faire
fonctionner et entretenir correctement votre
nouveau réfrigérateur.
Gardez-le à portée de la main pour le
consulter en cas de doute.
Si vous avez des questions ou désirez
de l’aide:
Aux États-Unis, communiquez avec :
GE Answer Center
®
800.626.2000
24 heures par jour, 7 jours par semaine
Au Canada, écrivez au :
Directeur, Relations avec les
consommateurs
2645 Skymark Avenue
Mississauga (Ontario) Canada
L4W 4H2
Si le réfrigérateur qui vous a été
livré est endommagé…
Communiquez immédiatement avec le
marchand (ou l’entrepreneur) qui vous a
vendu le réfrigérateur.
Économisez du temps et de
l’argent. Avant d’appeler le
service de réparation…
Consultez le Guide de dépannage. Il contient
une liste des problèmes mineurs de
fonctionnement auxquels vous pouvez vousmême remédier.
24
SE DÉBARRASSER DU CFC
Votre ancien réfrigérateur a un système de refroidissement qui a utilisé
les CFC (chlorofluorocarbones). Les CFC sont jugés nocifs pour
l’ozone stratosphérique.
Si vous vous débarrassez de votre ancien réfrigérateur, assurezvous que le frigorigène avec CFC soit enlevé correctement par un
technicien qualifié. Si vous libérez intentionnellement ce frigorigène
avec CFC vous pouvez être soumis aux contraventions et à
l’emprisonnement sous provisions du Clean Air Act fédéral.
SI VOUS AVEZ BESOIN DE RÉPARATION
Si vous avez besoin de réparation, consultez
la section Service à la clientèle à la fin du
présent guide.
Nous sommes fiers de notre service de
réparation et désirons vous donner
satisfaction. Si pour quelque raison que ce
soit vous n’êtes pas satisfait du service aprèsvente dont vous avez bénéficié, voici la
marche à suivre.
Aux États-Unis :
PREMIÈREMENT, communiquez avec les
gens qui ont réparé votre appareil. Expliquezleur pourquoi vous n’êtes pas satisfait. Dans
la plupart des cas, cela devrait résoudre votre
problème.
ENSUITE, si vous n’êtes toujours pas
satisfait, écrivez, en donnant tous les détails y
compris votre numéro de téléphone, au :
Manager, Consumer Relations
GE Appliances
Appliance Park
Louisville, KY 40225
ENFIN, si votre problème n’est pas encore
résolu, écrivez au :
Major Appliance Consumer
Action Program
20 North Wacker Drive
Chicago, IL 60606
Pour les clients du Canada :
PREMIÈREMENT, communiquez avec les
gens qui ont réparé votre appareil et
expliquez-leur pourquoi vous n’êtes pas
satisfait. Habituellement, cela devrait régler
votre problème.
ENSUITE, si vous n’êtes toujours pas
satisfait, écrivez à l’adresse ci-dessous, en
indiquant tous les détails, y compris votre
numéro de téléphone :
Directeur, Relations avec
les consommateurs
2645 Skymark Avenue
Mississauga (Ontario) Canada
L4W 4H2
Page 25

25
CONSEILS DE SÉCURITÉ IMPORTANTS
Veuillez lire toutes les instructions avant d’utiliser cet appar eil.
AVERTISSEMENT—Lorsque vous
utilisez le réfrigérateur, observez toujours
certaines précautions de base, notamment:
• N’utilisez le réfrigérateur que pour son usage
prévu, comme décrit dans le présent guide.
• Installez le réfrigérateur conformément
aux instructions d’installation avant
de l’utiliser.
• Ne débranchez jamais le réfrigérateur
en tirant sur le cordon d’alimentation.
Saisissez fermement la fiche du cordon et
tirez droit pour la retirer de la prise.
• Réparez ou remplacez immédiatement tout
cordon effiloché ou endommagé. N’utilisez pas
un cordon fendillé ou présentant des signes
d’usure.
• Lorsque vous éloignez le réfrigérateur du
mur, prenez garde de ne pas le faire rouler
sur le cordon d’alimentation: vous pourriez
l’endommager.
• Ne laissez pas les enfants grimper, s’asseoir, se
tenir debout ou se pendre aux clayettes du
réfrigérateur. Ils pourraient endommager le
réfrigérateur et se blesser gravement.
• Si vous avez gardé votre ancien
réfrigérateur mais que vous ne vous en
servez pas, ayez soin de démonter les
portes pour éviter que les enfants ne s’y
enferment.
• Une fois le réfrigérateur en marche, ne touchez
pas les surfaces froides du congélateur, surtout
si vous avez les mains humides: la peau risque
d’adhérer à ces surfaces très froides.
• Si votre réfrigérateur a une machine
automatique à glaçons, évitez le contact
avec les pièces mobiles du mécanisme
éjecteur, ou avec l’élément chauffant qui
libère les glaçons. Ne mettez pas vos doigts
ou vos mains sur le mécanisme automatique
de la machine à glaçons pendant que le
réfrigérateur est branché.
• Ne recongelez pas les aliments surgelés qui ont
complètement dégelé. Selon les experts en
alimentation:
“…Il n’y a pas de danger à recongeler les aliments
partiellement décongelés s’ils renferment encore
des cristaux de glace ou si leur température n’a pas
encore dépassé 4 °C (40 °F).
Les viandes hachées, la volaille ou le poisson
dégelés dont l’odeur ou la couleur sont suspectes ne
doivent être ni recongelés ni consommés. Les crèmes
glacées décongelées doivent être jetées. Si l’odeur
ou l’aspect d’un aliment vous semble anormal,
jetez-le: sa consommation pourrait être dangereuse.
Même une décongélation partielle suivie d’une
recongélation peut altérer la qualité des aliments,
surtout celle des fruits, légumes et plats cuisinés.
Les viandes rouges sont moins susceptibles d’être
altérées que la plupart des autres aliments.
Consommez les aliments recongelés dans les plus
brefs délais pour préserver au maximum leur
qualité alimentaire.”
• Débranchez votre réfrigérateur avant
de le nettoyer et de le réparer.
REMARQUE: nous vous
recommandons vivement de confier toute
réparation à un technicien qualifié.
• Avant de remplacer une ampoule grillée, le
réfrigérateur doit être débranché pour éviter
tout contact avec un fil sous tension. (Une
ampoule grillée peut se briser pendant l’opération.)
REMARQUE: quand vous placez la commande
sur “OFF” (éteint), l’alimentation électrique de
l’ampoule n’est pas coupée.
• N’entreposez et n’utilisez pas d’essence ou
autres vapeurs et liquides inflammables à
proximité de cet appareil ou de tout autre
appareil électroménager.
CONSERVEZ CES
INSTRUCTIONS
,,,,,,,,,,,,,,
,,,,,,,,,,,,,,
,,,,,,,,,,,,,,
,,,,,,,,,,,,,,
,,,,,,,,,,,,,,
,,,,,,,,,,,,,,
,,,,,,,,,,,,,,
Conseils de sécurité importants
Page 26

FONCTIONNEMENT DE VOTRE RÉFRIGÉRATEUR
Réglage des commandes de température
26
Les commandes de température vous permettent de régler la
température dans le réfrigérateur et le congélateur. Tout d’abord,
mettez la commande du réfrigérateur sur “5” et celle du
congélateur sur “C.”
Attendez 24 heures que la température se stabilise, que vous régliez
les commandes pour la première fois ou que vous les régliez plus tard.
Puis, si vous voulez des températures plus froides ou plus chaudes
dans l’un des compartiments, réglez les commandes une étape à la fois.
REMARQUE: Mettre la commande du réfrigérateur sur “OFF”
(éteint) coupe le refroidissement dans les deux compartiments—
réfrigérateur et congélateur—mais ne coupe pas le courant au
réfrigérateur.
TEMPERATURE CONTROLS
Initial Setting C
Coldest E
Initial Setting 5
Coldest 9
Freezer
Fresh Food
●
●
A
B
C
D
E
1
3
5
7
9
F
F
O
Vérification de la température
Pour le réfrigérateur, placez un récipient de lait sur la clayette
supérieure. Vérifiez-le le lendemain. Si le lait est trop chaud ou trop
froid, réglez la température en conséquence.
Pour le congélateur, placez un récipient de crème glacée au centre
du congélateur. Vérifiez-la le lendemain. Si la crème glacée est trop
dure ou trop molle, réglez la température en conséquence.
Attendez toujours 24 heures pour laisser le réfrigérateur atteindre
la température que vous avez réglée.
Système automatique d’économie d’énergie Pas de dégivrage
Ce réfrigérateur n’est pas muni d’un commutateur “d’économie
d’énergie.”
Le liquide chaud du condenseur circule automatiquement à l’avant du
congélateur pour empêcher la formation de condensation à l’extérieur
du réfrigérateur par temps humide.
De nombreux réfrigérateurs comportent des éléments électriques
spéciaux. Celui-ci n’en a pas besoin. C’est pourquoi il n’a pas de
commutateur “d’économie d’énergie.”
Il n’est pas nécessaire de dégivrer le congélateur ou le réfrigérateur.
Bien que votre réfrigérateur soit conçu et équipé d’une commande de
dégivrage automatique, la présence d’un peu de givre sur les
emballages est normale.
Si vous abaissez le thermostat de votre résidence à 16 °C (60 °F) la nuit
Il vous faudra abaisser d’une position le réglage de
la commande du compartiment congélateur. En
effet, en raison de la température plus basse dans la
maison, le compresseur fonctionnera moins
souvent, entraînant du même coup un
“réchauffement” du compartiment congélateur.
Pour protéger vos aliments surgelés, laissez la
commande de votre compartiment congélateur à ce nouveau réglage
pendant tout l’hiver ou tant que vous abaisserez la température dans
la maison.
La température du compartiment réfrigérateur n’est nullement affectée
par le nouveau réglage de la commande du compartiment congélateur.
Toutefois, si les aliments gèlent, augmentez d’un cran la commande
du compartiment réfrigérateur.
Lorsque vous cesserez d’abaisser le thermostat de la maison, ramenez
les commandes de température du réfrigérateur à leur réglage habituel.
Page 27

27
Fonctionnement du réfrigérateur Machine à glaçons et distributeur
MACHINE À GLAÇONS ET DISTRIBUTEUR
(sur certains modèles)
Fonctionnement
La machine automatique à glaçons fait de la glace en continu. Le
distributeur distribue de l’eau, des glaçons ou de la glace concassée
par la porte du congélateur. Ils fonctionnent de la manière suivante.
L’eau provenant de la canalisation domestique s’écoule dans:
(1) une électrovanne,
puis dans
(2)des tuyaux jusqu’à
(3)la machine à glaçons
automatique, selon les
besoins.
L’eau est gelée dans le
(4)moule à glaçons; ces
derniers sont éjectés
dans
(5)le bac, où une vis sans
fin motorisée les
pousse vers l’avant.
Quand on appuie sur la plaque de distribution, les glaçons sont
distribués par le conduit de la porte.
Quand la manette est en position “CRUSHED” (concassée)
(sur certains modèles), un déflecteur achemine les glaçons vers le
broyeur. La glace concassée tombe par le conduit directement dans
le verre.
Lorsque “WATER” (eau) est sélectionné, (sur certains modèles),
l’eau s’écoule par:
(6)les tuyaux à l’intérieur de la porte; elle sort quand on appuie sur le
bouton de distribution.
(7)Un commutateur électrique (sur certains modèles) allume ou
éteint la veilleuse dans le distributeur.
La lumière s’allume également quand on appuie sur le bouton de
distribution.
Quand l’ampoule de la veilleuse est grillée, remplacez-la par une
ampoule de 7 watts maximum.
3
7
6
4
5
1
2
Informations importantes concernant votre distributeur
• Si c’est votre première machine à glaçons, vous entendrez
parfois des bruits qui vous sembleront inhabituels. Ces bruits,
normaux, sont causés par la fabrication de la glace et il n’y a pas lieu
de s’inquiéter.
• Votre machine à glaçons produira environ 8 glaçons par cycle—
soit environ 120 glaçons toutes les 24 heures—selon la température
du congélateur, la température ambiante, la fréquence d’ouverture
des portes et d’autres conditions d’utilisation.
• L’intermittence de distribution des glaçons est normale. Si cette
interruption persiste, des blocs de glace peuvent en être la cause.
Retirez-les en suivant les directives données dans cette section.
• Évitez de trop remplir les verres de glaçons et d’utiliser des
verres étroits ou très hauts. Le conduit peut se bloquer et le volet
geler et coincer. Ouvrez périodiquement la porte du congélateur pour
vérifier si le conduit n’est pas bloqué. Le cas échéant, faites passer
les glaçons au moyen d’une cuillère en bois.
• Pour éviter que des morceaux de glace ne tombent à l’extérieur
du verre, placez celui-ci près du conduit—sans toutefois bloquer la
sortie des glaçons.
• Remplissez les verres de glaçons avant d’ajouter des boissons
gazeuses ou autres liquides.
• Ne placez pas de boissons ou d’aliments dans le bac à glaçons
pour les rafraîchir. Les boîtes, bouteilles et paquets alimentaires
peuvent coincer la machine à glaçons ou la vis sans fin.
• N’ajoutez pas dans le bac à glaçons des glaçons non fabriqués
par votre machine à glaçons. Ils risquent d’être difficiles à
concasser ou distribuer.
Avant d’utiliser votre machine à glaçons et votre distributeur
Si vous utilisez votre réfrigérateur avant qu’il ne
soit relié à la canalisation de la maison, soulevez
la porte d’accès et vérifiez que le bras régulateur
de la machine à glaçons est en position STOP
(ARRÊT—relevée). Quand la machine à glaçons
est reliée à la canalisation de la maison, abaissez
le bras palpeur en position ON (MARCHE—
abaissée).
Au commencement il y aura un délai avant de la distribution de l’eau
et la production de glaçons.
Pour les modèles munis d’un distributeur d’eau,
s’il n’y a pas d’eau distribuée quand le
réfrigérateur est premièrement installé, il y a
peut-être de l’air dans la conduite d’eau.
Appuyez sur le bouton de distribution pendant
deux minutes au minimum pour expulser l’air
du tuyau d’eau et remplir le réservoir d’eau.
Le moule à glaçons se remplira automatiquement APRÈS le
refroidissement aux températures de congélation. Les premiers
glaçons se produisent normalement après quelques heures.
REMARQUE: si vous venez d’installer votre réfrigérateur, attendez
environ 24 heures pour que le congélateur atteigne la température
assez froide pour la production de glaçons.
(suite à la page suivante)
WATERCRUSHEDCUBEDICE
LIGHT
OFF ON
Bras régulateur en
position STOP
(ARRÊT—relevée)
Bras régulateur en
position ON
(MARCHE—abaissée)
Appuyez sur le bouton de distribution jusqu’à
ce que le réservoir d’eau se remplisse.
Page 28

MACHINE À GLAÇONS ET DISTRIBUTEUR
(suite)
Une fois la machine à glaçons et le distributeur installés
Jetez les premiers lots de glaçons (16 ou 24 glaçons). Vous éliminerez
ainsi les éventuelles impuretés provenant du tuyau d’eau. Procédez de
même en revenant de vacances ou quand vous refaites des glaçons
après un arrêt prolongé.
Pour les modèles munis d’un distributeur d’eau, jetez les 6 premiers
verres d’eau dans l’évier pour nettoyer le tuyau. Au début, l’eau qui
coule dans le système peut avoir un léger goût de “plastique”
provenant du tuyau d’eau.
Pour vous assurer que le bac se remplit de glaçons, nivelez ces
derniers de temps à autre. Quand les glaçons tombent dans le bac, ils
risquent de s’empiler près de la machine à glaçons et de pousser le bras
régulateur en position STOP (ARRÊT—relevée) avant que le bac ne
soit plein. Si le niveau est uniforme, la machine à glaçons peut remplir
le bac.
Pour distribuer eau et glaçons
• Réglez la manette de sélection sur
CUBES (glaçons), CRUSHED
ICE (glace concassée, sur certains
modèles) ou WATER (eau).
• Tenez le verre ou autre récipient
près du bord et appuyez le bord du
verre contre le centre du bouton de
distribution.
WATER CRUSHEDCUBEDICE
LIGHT
OFF ON
WATER CRUSHED CUBEDICE
LIGHT OFF ON
Distribution de glaçons… Distribution d’eau…
Même si vous avez sélectionné CUBES, il est possible que de la glace
concassée tombe dans votre verre. Cela se produit de temps à autre
quand plusieurs glaçons sont acheminés vers le broyeur. Un amas de
givre se forme parfois sur le volet du conduit à glaçons. Ceci est
normal, et se produit généralement après des distributions répétées de
glace concassée. Le givre s’évaporera après quelque temps.
Pour éviter de la glace concassée ne tombe à l’extérieur du verre,
placez celui-ci près du conduit.
Il est normal que le premier verre d’eau soit moins froid que les
suivants. L’eau venant du distributeur est froide, mais non glacée.
Si vous désirez de l’eau plus froide, ajoutez simplement de la glace
concassée ou des glaçons dans votre verre avant de vous servir.
ATTENTION: N’insérez jamais vos doigts ou des objets dans
l’ouverture des distributeurs.
Pour arrêter la distribution
Arrêtez d’appuyer sur le bouton de
distribution et attendez quelques
secondes pour recueillir les derniers
morceaux de glace ou gouttes d’eau
avant de retirer votre récipient. Un
léger écoulement se produit parfois
après la distribution de glace
concassée ou d’eau. Si l’écoulement
est important, essuyez-le
immédiatement.
Ne versez pas d’eau dans le bac de trop-plein, car il n’est pas muni de
système d’écoulement—jetez l’excès d’eau dans l’évier. Nettoyez
régulièrement le bac de trop-plein et sa grille conformément aux
instructions d’entretien. La grille se retire facilement lorsqu’on appuie
sur le coin arrière droit.
Formation de blocs de glace
dans le bac à glaçons…
La machine à glaçons éjectant les glaçons par groupes de 8, il est
normal que plusieurs d’entre eux soient collés. Toutefois, si vous
n’utilisez pas souvent de glaçons, des blocs peuvent se former dans le
bac et boucher le distributeur.
Dans ce cas:
• Retirez le bac à glaçons du congélateur.
• Brisez les blocs de glace avec vos mains. Jetez ceux que vous ne
pouvez pas séparer.
• Remettez le bac à sa place avant que les glaçons restants ne fondent
et collent ensemble.
WATER CRUSHEDCUBEDICE LIGHT
OFF ON
Appuyez ici pour
enlever la grille
Bouton de
distribution
Bouton de
distribution
28
Page 29

Retrait du bac à glaçons Remise en place du bac à glaçons
Soulevez le coin gauche pour dégager le
bac de la clayette. Tirez droit vers vous en
soutenant le bac à l’avant et à l’arrière.
Glissez le bac jusqu’à ce que la languette du
bac s’engage dans la fente de la clayette. Si le
bac ne va pas jusqu’au fond, retirez-le et
donnez un quart de tour au mécanisme
d’entraînement. Glissez-le de nouveau en
place jusqu’à ce que la languette s’engage
dans la fente de la clayette.
Tournez
Mécanisme
d’entraînement
Si vous n’utilisez pas souvent de glaçons…
Les “vieux” glaçons perdent leur transparence et prennent un goût
fade. Videz régulièrement le bac à glaçons et lavez-le à l’eau tiède.
Laissez-le refroidir avant de le remettre en place, pour éviter que des
glaçons ne collent à la vis sans fin métallique.
Placez le bras régulateur en position STOP
(ARRÊT—relevée) quand…
• L’alimentation en eau domestique doit être coupée pendant
plusieurs heures.
• Le bac à glaçons sera retiré pendant un certain temps.
• Vous partez en vacances. Dans ce cas, fermez également le robinet
du tuyau d’arrivée d’eau de votre réfrigérateur.
• Quand vous positionnez la commande de température du
réfrigérateur sur OFF (éteint).
Filtre à eau
Vos glaçons ne peuvent qu’avoir le goût de l’eau qui les produit. C’est pourquoi nous vous
conseillons de purifier votre eau avec un filtre à eau.
RETIRE LES SÉDIMENTS
La cartouche rigide de fibres de cellulose, de densité de grade poreux, retient la saleté, les
particules de rouille, le sable et la vase.
RETIRE LES ODEURS
Les granulés de charbon activés retirent les odeurs de moisi et de renfermé.
AMÉLIORE LE GOÛT
Les granulés de charbon activés retirent les goûts métalliques, plastiques, médicaux et huileux.
RÉDUIT LE CALCAIRE
Des cristaux spéciaux retirent la formation de dépôt calcaire.
Le filtre à eau est en option, moyennant un supplément, et est disponible chez votre
concessionnaire. Spécifiez WR97X0214. Il a des instructions d’installation complètes et
s’installe en quelques minutes sur une conduite d’eau en cuivre de 1/4
″ de diamètre extérieur.
Moules à glaçons (sur certains modèles)
Pour libérer les glaçons, retournez le
moule, tenez-le au-dessus d’un bac ou d’un
bol et tournez-le aux deux extrémités.
Pour deux ou trois glaçons, laissez
le moule à l’endroit, tournez les deux
extrémités légèrement et enlevez le
nombre désiré de glaçons.
Lavez les moules et le bac de stockage
dans une solution d’eau tiède et de
vinaigre pour quitter les dépôts calcaires.
Ne les passez pas au lave-vaisselle.
SERVICE GLAÇONS
Kit d’alimentation en eau Kit de machine automatique à glaçons
Un kit contenant des conduites en cuivre, des raccords de vanne
d’arrêt et les instructions nécessaires pour brancher la machine à
glaçons à votre conduite d’eau froide est disponible moyennant des
frais supplémentaires. Voir la section Préparation.
Si votre réfrigérateur n’a pas été fourni équipé d’une machine
automatique à glaçons, un kit de machine à glaçons est disponible,
moyennant des frais supplémentaires. Voyez derrière votre réfrigérateur
pour le kit de machine à glaçons spécifique nécessaire pour votre modèle.
ACCESSOIRES
29
Machine à glaçons et distributeur Service glaçons Accessoires
Page 30

LA CONSERVATION DES ALIMENTS
30
Périodes de conservation suggérées pour la viande et la volaille*
La qualité des NOMBRE DE JOURS NOMBRE DE MOIS
aliments diminue DE RÉFRIGÉRATION DE CONGÉLATION À
après le délai ENTRE 2 ET 4 °C -18 °C
indiqué (35 à 40 °F) (0 °F)
La qualité des NOMBRE DE JOURS NOMBRE DE MOIS
aliments diminue DE RÉFRIGÉRATION DE CONGÉLATION À
après le délai ENTRE 2 ET 4 °C -18 °C
indiqué (35 à 40 °F) (0 °F)
Viande fraîche
Rôtis (boeuf et agneau)....................... 3 à 5 ...................................6 à 12
Rôtis (porc et veau)............................. 3 à 5 ...................................4 à 8
Biftecks................................................ 3 à 5...................................6 à 12
Côtelettes (agneau).............................. 3 à 5 ...................................6 à 9
Côtelettes (porc).................................. 3 à 5...................................3 à 4
Viande hachée et à ragoût................... 1 à 2...................................3 à 4
Abats................................................... 1 à 2...................................3 à 4
Saucisses (porc).................................. 1 à 2 ...................................1 à 2
Viande préparée
Bacon..................................................... 7.........................................1
Saucisses fumées................................... 7........................................1/2
Jambon (entier)...................................... 7......................................1 à 2
Jambon (demi).................................... 3 à 5 ...................................1 à 2
Jambon (tranches)................................. 3 ......................................1 à 2
Tranches de viande préparée............... 3 à 5 ...................Congélation déconseillée.
Saucisson (fumé)................................... 7......................Congélation déconseillée.
Saucisson (sec et demi-sec)..............14 à 21..................Congélation déconseillée.
Viande cuite
Viande cuite et plats de viande............ 3 à 4...................................2 à 3
Sauces et bouillons ............................. 1 à 2 ...................................2 à 3
Volaille fraîche
Poulet et dinde (entiers)...................... 1 à 2.....................................12
Poulet (morceaux)............................... 1 à 2......................................9
Dinde (morceaux)................................ 1 à 2 ......................................6
Canard et oie (entiers)......................... 1 à 2 ......................................6
Abattis................................................. 1 à 2......................................3
Volaille cuite
Morceaux (dans du bouillon)...............1 à 2.......................................6
Morceaux (sans bouillon).................... 3 à 4......................................1
Plats cuits à base de volaille................ 3 à 4 ...................................4 à 6
Poulet frit............................................. 3 à 4......................................4
Aliments (autres que viande et volaille) CONGÉLATEUR
La plupart des fruits et légumes.................................................8 à 12 mois
Poisson maigre............................................................................6 à 8 mois
Poisson gras, pain et petits pains, soupes, ragoûts
et casseroles ............................................................................2 à 3 max.
Gâteaux, tartes, sandwiches, restes (cuits), crème
glacée (emballage d’origine)...................................................1 mois max.
La qualité et la fraîcheur de la viande, du poisson et de la volaille achetés
à l’épicerie varient; en conséquence, le délai de conservation dans votre
réfrigérateur varie également. Pour d’autres renseignements sur la
conservation de la viande et de la volaille, veuillez appeler le Ministère
de l’Agriculture des États-Unis au 800-535-4555.
* Ministère de l’Agriculture des É.-U.
Conseils pour la réfrigération
Légumes
• Utilisez les bacs à légumes—ils sont conçus
pour conserver l’humidité et la fraîcheur
naturelles des légumes.
• Couvrez les légumes avec un essuie-tout
humide pour qu’ils demeurent croquants.
• Les légumes préemballés se conservent
mieux dans leur emballage d’origine.
Fromages
• Enveloppez dans du papier ciré ou du papier
d’aluminium, ou mettez-le dans un sac de
plastique.
• Enveloppez de façon à chasser le plus d’air
possible afin de prévenir la moisissure.
• Vous pouvez conserver le fromage dans son
emballage d’origine, si vous le désirez.
Viande, poisson et volaille non congelés
• Retirez toujours l’emballage d’origine.
• Enveloppez l’aliment dans du papier
d’aluminium, du papier ciré ou une pellicule
de plastique, puis mettez-le immédiatement
au réfrigérateur.
Conseils pour la congélation des aliments
Il existe 3 conditions pour une congélation efficace.
1. Qualité des produits. Ne congelez que des aliments d’excellente
qualité. La congélation conserve la qualité et la saveur, mais ne les
améliore pas.
2. Vitesse de congélation. Plus les fruits et légumes sont congelés
rapidement après la cueillette, plus la congélation est efficace. Et
vous gagnerez du temps, car vous n’aurez pas besoin de faire un
deuxième tri.
3. Emballage. Utilisez des produits d’emballage spécialement conçus
pour la congélation.
Pour congeler la viande, le poisson ou la volaille, emballez-les
soigneusement dans du papier d’aluminium (ou autre type
d’emballage résistant), ayez soin d’appuyer l’emballage sur l’aliment
pour chasser l’air. Repliez les bouts pour obtenir un emballage
hermétique et durable. Ne recongelez pas la viande qui a
complètement décongelée; qu’elle soit crue ou cuite, la viande ne peut
être congelée qu’une seule fois.
La crème glacée de qualité, à forte teneur en crème, exige
habituellement une température légèrement plus basse que la crème
glacée légère à faible teneur en crème.
• Seule l’expérience vous permettra de déterminer l’emplacement dans
le congélateur et le réglage de la température appropriés pour
conserver la crème glacée à la température de service.
• La température est légèrement plus froide à l’arrière du congélateur
qu’à l’avant.
De nouvelles techniques sont constamment mises au point.
Communiquez avec le ministère de l’Agriculture de votre région ou
votre entreprise locale de services publics pour obtenir les
renseignements les plus récents sur la conservation et la congélation
des aliments.
Page 31

BACS
Bac à fruits et à légumes (sur certains modèles) Bac à viande adaptable (sur certains modèles)
Ce bac réfrigéré garde frais les aliments non emballés en retenant
l’humidité naturelle de tels aliments:
• Artichauts • Céleri • Légumes verts • Prunes
• Asperges • Cerises • Maïs • Radis
• Betteraves • Épinards • Myrtilles • Rhubarbe
équeutées • Groseilles • Persil • Tomates mûres
• Carottes • Laitue • Petits pois
Comme dans tout réfrigérateur, nous recommandons d’emballer les
aliments à odeur forte—tels que:
• Brocoli • Choux • Oignons verts • Panais
• Choux de Bruxelles • Choux-fleurs • Navets
La durée de stockage dépend du type d’aliment et de sa condition
lorsqu’il est placé dans le bac.
L’eau en excès qui risque de s’accumuler au fond des bacs doit être
vidée et les bacs doivent être bien essuyés. Le bac est partiellement
fermé par des joints fixés au couvercle. Remettez toujours le bac en
place dans ce couvercle et poussez le bac à fond.
Le bac à viande adaptable est muni d’une voie d’air séparée qui
permet à un courant d’air froid en provenance du congélateur de
circuler autour du bac. La commande de température règle le
courant d’air froid en provenance du congélateur.
Pour conserver la viande fraîche,
abaissez le levier pour ramener
le bac à la température de
réfrigération la plus froide. Si
vous le laissez sur cette position
pendant longtemps, du givre peut
se former à l’intérieur du bac.
Soulevez le levier pour ramener
le bac à la température de
réfrigération normale; vous aurez ainsi un bac à légumes
supplémentaire. L’accès de l’air froid est fermé. Vous pouvez
sélectionner différentes positions entre ces deux extrêmes.
Plateau à collation hermétique (sur certains modèles) Bacs réglables (sur certains modèles)
Vous pouvez choisir l’emplacement du plateau à collation hermétique
et de la clayette qui le soutient à l’intérieur du compartiment
réfrigérateur. Le plateau hermétique maintient suffisamment
d’humidité pour conserver viandes et fromages, hors d’œuvres,
tartinades et collations.
Ces bacs sont dotés d’une commande réglable vous permettant de
régler le degré d’humidité à l’intérieur de ceux-ci.
Placez la commande à “veg
high” pour que le bac conserve
un degré d’humidité élevé
pour la conservation des
légumes.
Réglez la commande à “fruit
low” pour abaisser le degré
d’humidité dans le bac pour
la conservation des fruits.
Adjustable Humidity Pan
veg high fruit low
TEMP
Bac à fruits
et à légumes
Bac à viande
adaptable
Température
normale
Température
la plus froide
La disposition de vos clayettes
Les clayettes du réfrigérateur sont réglables, ce qui vous permet de les
disposer de façon à profiter au maximum de l’espace de rangement
qu’elles vous offrent.
Pour retirer
une clayette:
Faites-la basculer par
l’avant, puis soulevez-la en
la tirant pour la libérer des
crémaillères de la paroi
arrière du réfrigérateur.
Pour remettre une
clayette en place:
Choisissez la hauteur
désirée, puis soulevez
légèrement l’avant de la
clayette, introduisez les
ergots supérieurs dans les
crémaillères au fond de
l'appareil. Abaissez ensuite
l’avant de la clayette jusqu’à ce qu’elle soit bien en place.
Les clayettes métalliques (sur certains modèles)
peuvent être réglées de la même manière.
(suite à la page suivante)
CLAYETTES
31
Soulevez et
dégagez
2
Poussez
vers le
haut
1
Abaissez
pour verrouiller
2
Engagez
l’ergot
supérieur
1
La conservation des aliments Bacs Clayettes
Page 32

CLAYETTES
(suite)
Balconnets (sur certains modèles)
Vous pouvez facilement transporter les balconnets réglables du
réfrigérateur à votre plan de travail.
Pour les retirer:
soulevez le balconnet tout droit
jusqu’à ce que les crochets de
fixation se libèrent.
Pour les remettre en place ou
les déplacer: choisissez la
hauteur désirée, engagez l’ergot
du balconnet dans les fentes
des crémaillères de la porte et poussez
pour assurer la mise en place.
Les séparateurs (sur certains modèles) retiennent fermement les
produits de petite taille, les empêchant de basculer, de se renverser et
de glisser. Saisissez l’avant du séparateur entre l’index et le majeur,
puis déplacez le séparateur selon vos besoins.
Clayettes anti-débordements (sur certains modèles)
Les clayettes anti-débordements
ont des rebords spéciaux qui sont
conçus pour empêcher les aliments
renversés de couler sur les clayettes
inférieures.
Clayettes dans le congélateur
Les clayettes dans le congélateur sont facilement retirées et remises
en place (sur certains modèles).
Pour les retirer:
1. Tout en appuyant sur les
languettes sur les supports de la
clayette sur la paroi droite,
soulevez l’étagère des rainures
dans les supports.
2. Sortez la clayette de côté jusqu’à
ce que les tiges sortent des trous
sur la paroi gauche.
Pour les remettre en place:
Insérez les tiges dans les trous. Puis,
tout en appuyant sur les languettes,
abaissez la clayette dans les rainures
dans les supports. Assurez-vous que
la clayette est bien insérée dans les
rainures.
Si les supports des clayettes au
niveau désiré sur la paroi à droite
n’ont pas de languettes, simplement
abaissez la clayette en position sur
les supports.
Balconnets de contre-porte très profonds
(sur certains modèles)
Des rallonges amovibles entourent
les clayettes fixes des portes et leur
donnent plus de profondeur, procurant
ainsi plus d’espace et de souplesse
de rangement.
Pour les retirer: soulevez la rallonge
tout droit jusqu’à ce que les crochets de
fixation sortent des fentes de la porte.
Pour les remettre en place: alignez les
crochets sur les fentes de la porte et
poussez pour assurer la mise en place.
Balconnet de stockage pour boîtes de jus de fruits
(sur certains modèles)
Les boîtes de jus de fruits
congelées sont facilement
accessibles lorsqu’elles
sont rangées dans le
balconnet de contre-porte
du congélateur.
Pour remplir le balconnet,
déposez la première boîte
au fond de celui-ci, puis
introduisez les autres
boîtes à partir du haut.
Séparateur
32
Placez les
autres
boîtes ici
2
Placez la
première
boîte ici
1
Page 33

ENTRETIEN ET NETTOYAGE
Nettoyage—extérieur
33
Essuyez soigneusement le bac de trop-plein du distributeur d’eau
et de glaçons pour éviter les taches d’eau. Vous pouvez éliminer les
dépôts calcaires laissés par l’eau en trempant le bac dans du vinaigre
non dilué. Il est également possible d’utiliser un adoucisseur d’eau en
pâte non précipitant (de type Calgon) dilué dans de l’eau ou une
cuillerée à thé d’acide citrique en poudre par demi-litre d’eau très
chaude. Laissez tremper jusqu’à ce que les dépôts disparaissent ou
soient suffisamment ramollis pour être éliminés par rinçage.
Trois minutes de trempage suffisent en général. Évitez de cirer le
bac et sa garniture.
Les poignées de porte et leur garniture peuvent être nettoyées au
moyen d’un linge humide et d'une solution d’eau et de détergent
liquide pour la vaisselle. Essuyez avec un linge doux. N’appliquez pas
de cire sur les poignées et les garnitures de porte.
Pour maintenir le fini propre, frottez avec un chiffon propre
légèrement humecté de cire pour appareils électroménagers ou d’un
détergent liquide doux pour la vaisselle. Séchez et polissez avec un
chiffon doux propre. N’essuyez pas le réfrigérateur avec un chiffon à
vaisselle ou une serviette mouillée: ils pourraient laisser un résidu qui
attaquera la peinture. N’utilisez pas de tampons à récurer, de produits
en poudre, d’eau de Javel ou autres produits similaires, car vous
risqueriez de rayer la peinture et de la rendre moins résistante.
Protégez les surfaces peintes. La surface extérieure du réfrigérateur
est recouverte d’une peinture émaillée de haute qualité. Moyennant
certaines précautions, cette peinture gardera son éclat et résistera à la
rouille pendant de longues années. Appliquez une cire pour appareils
électroménagers quand le réfrigérateur est neuf, puis au moins deux
fois par an par la suite.
La lotion de cire et de crème de nettoyage pour votre appareil
électroménager peut s’acquérir chez votre distributeur local.
Clayettes Entretien et nettoyage
Nettoyage—intérieur
Nettoyez au moins une fois par an le réfrigérateur et le
congélateur. Débranchez le réfrigérateur avant de le nettoyer. Si cela
n’est pas pratique, essorez bien votre éponge ou chiffon pour nettoyer
autour des interrupteurs, voyants ou boutons. Utilisez une solution
d’eau (15 ml) environ de bicarbonate de soude par litre (1 L) d’eau—
pour nettoyer et éliminer les odeurs. Rincez bien et essuyez.
Les autres éléments du réfrigérateur—y compris les joints de porte,
les bacs à viande et à légumes, le bac à glaçons et toutes les pièces en
plastique—peuvent être nettoyés de la même manière. Après avoir
nettoyé les joints de porte, appliquez une fine couche de gelée de
pétrole du côté des charnières. Ceci empêche les charnières de
“coller” et de se déformer. N’utilisez pas de produits nettoyants en
poudre ou autres produits abrasifs.
Évitez de nettoyer les clayettes en verre encore froides dans de
l’eau chaude car elles risquent de se casser à cause de l’écart excessif
de température.
Pour éviter les mauvaises odeurs, laissez une boîte de bicarbonate
de soude ouverte au fond du réfrigérateur, sur la clayette du haut.
Remplacez-la tous les trois mois. Une boîte ouverte de bicarbonate de
soude dans le congélateur absorbera les odeurs de renfermé.
Orifice d’écoulement dans le congélateur.
Au cours du nettoyage annuel, retirez le panier
du congélateur et, à l’aide d’une poire à jus,
versez une solution de bicarbonate de soude—
une cuillerée à thé (5 ml)—et un demi-litre d’eau
chaude (non bouillante) dans le tuyau
d’écoulement. Ceci contribue à neutraliser les
odeurs et à éviter que le tuyau ne se bouche.
Si ce dernier se bouche, versez, à l’aide d’une poire à jus, une solution
de bicarbonate de soude et d’eau pour dégager le bouchon.
Ne lavez aucun élément en plastique du réfrigérateur dans
votre lave-vaisselle.
Derrière le réfrigérateur Sous le réfrigérateur
Prenez un soin particulier lorsque vous déplacez le réfrigérateur.
Tous les types de revêtements de sol peuvent être endommagés,
particulièrement ceux qui sont coussinés ou dont les surfaces sont
gaufrées. Tirez le réfrigérateur droit vers l’avant et remettez-le en
place en le poussant droit. Si vous le déplacez latéralement, vous
risquez de l’endommager, ou d’abîmer le revêtement de sol. Quand
vous remettez le réfrigérateur en place en le poussant, veillez à ne pas
le faire rouler sur le cordon d’alimentation ou sur la conduite d’eau de
la machine à glaçons (sur certains modèles).
Pour un fonctionnement plus
efficace, vous devez garder la zone
sous le réfrigérateur propre. Retirez la
grille inférieure et balayez ou aspirez
la poussière immédiatement
accessible.
Pour de meilleurs résultats, utilisez
une brosse conçue spécialement à
cet effet, que vous pouvez obtenir
chez votre concessionnaire local.
Ce nettoyage simple doit être fait
au moins une fois par an.
(suite à la page suivante)
Nettoyez les bobines du
condenseur au moins une
fois par an.
Page 34

ENTRETIEN ET NETTOYAGE
(suite)
Remplacement de l’ampoule
Compartiment du réfrigérateur—Lumière supérieure
1. Débranchez le réfrigérateur.
2. Pour aligner correctement
le bouton de commande,
notez la position de la
commande numérotée pour
un bon remontage, tournez
la commande sur OFF (éteint)
et tirez le bouton.
3. Tirez le bas du panneau
lumineux d’environ
1/4
″ (6 mm) juste assez pour désengager la lèvre à l’arrière des
rainures dans les retenues sur la paroi arrière.
4. Soulevez le panneau pour désengager le haut des goupilles sur les
parois latérales et déposez le panneau.
Après avoir remplacé par une ampoule de la même taille, réinstallez
le panneau (accrochez le haut sur les goupilles; tirez le bas; renfoncezle et relâchez-le pour laisser la lèvre s’engager dans les rainures dans
les retenues). Remettez le bouton de commande de température en
position OFF (éteint), tournez-le au réglage précédent et rebranchez
le réfrigérateur.
Réfrigérateur—éclairage inférieur (sur certains modèles)
Cet éclairage est situé derrière le bac supérieur ou directement au-
dessus du bac supérieur (dépendant du modèle).
1. Débranchez le réfrigérateur.
2. Si l’éclairage est derrière le bac supérieur vous aurez besoin de
retirer le bac et la clayette qui est au-dessus. Pour retirer le bac
voyez la section Retrait des bacs dans l’Entretien et nettoyage.
• Pour retirer la clayette, quittez
d’abord tous les aliments audessus de la clayette. Ensuite
inclinez la clayette à l’avant et
soulevez-la et sortez-la des
crémaillères.
3. Saisissez le bord inférieur de
l’écran et soulevez-le vers l’avant.
4. Après avoir remplacé l’ampoule
par une autre de la même taille,
raccrochez l’écran pour le remettre en place. Si vous ne pouvez pas
trouver l’ampoule correcte, consultez votre revendeur local.
5. Si l’éclairage était situé derrière le bac supérieur, vous aurez besoin
de remplacer le bac et la clayette qui est au-dessus.
• Pour remplacer la clayette, soulevez légèrement l’avant de la
clayette et placez les crochets supérieurs dans les grandes fentes
des crémaillères les plus inférieures. Ensuite abaissez l’avant de la
clayette jusqu’à ce qu’il soit nivelé.
6. Rebranchez le réfrigérateur.
Compartiment congélateur
1. Débranchez le réfrigérateur.
2. Retirez la clayette située juste au dessus de l’écran d’éclairage.
(La clayette sera plus facile à enlever si elle est d’abord vidée.)
3. Tirez l’écran vers vous pour avoir accès a l’ampoule.
Après avoir remplacé par une ampoule de la même taille,
réinstallez le panneau et la clayette et rebranchez le réfrigérateur.
TEMPERATURE CONTROLS
Initial Setting C
Coldest E
Initial Setting 5
Coldest 9
Freezer
Fresh Food
●
●
34
Dispositif
de retenu
rainu
su
extrémité
G
Dépose du bac
Les bacs se bloquent avant de sortir complètement du réfrigérateur
pour empêcher leur contenu de se renverser sur le sol. On peut
facilement les retirer en les soulevant légèrement et en tirant au-delà
de leur “butée.”
Sur certains modèles vous aurez peut être besoin de retirer les
balconnets de la porte du réfrigérateur avant de quitter les bacs.
Si la porte vous empêche de quitter les bacs, vous aurez besoin de rouler
le réfrigérateur en avant jusqu’à ce que la porte s’ouvre assez pour faire
glisser les bacs pour les retirer. En certains cas quand vous rouler le
réfrigérateur vous aurez besoin de le déplacer à gauche en le roulant.
C
du
Côté gau
Quand vou
les crémaillères au
Page 35

PRÉPARATION
Départ en vacances Déménagement
35
Si vous partez pour peu de temps, retirez les aliments périssables du
réfrigérateur et laissez-le réglé au réglage habituel. Si la température
ambiante descend sous 16 °C (60 °F), suivez les instructions dans la
section Réglage des commandes de température.
Si vous vous absentez pour une longue période, débranchez le
réfrigérateur, réglez la commande de température du compartiment
réfrigérateur sur “OFF” (éteint) et nettoyez l’intérieur du réfrigérateur
avec une solution de bicarbonate de soude (1 cuillerée à soupe [15 ml]
pour 1 litre d’eau). Essuyez. Pour éviter les odeurs, posez une boîte de
bicarbonate de soude ouverte dans le réfrigérateur et laissez les
portes ouvertes.
Mettez le bras régulateur de la machine à glaçons (sur certains
modèles) en position STOP (ARRÊT—relevée) et prenez soin de
couper l’alimentation en eau du réfrigérateur.
Débranchez le cordon d’alimentation, retirez tous les aliments du
réfrigérateur, nettoyez et séchez l’intérieur.
Immobilisez tous les éléments mobiles, tels que grille, clayettes et
bacs, avec du ruban adhésif pour éviter de les endommager.
Assurez-vous que le réfrigérateur restera en position verticale pendant
son transport et dans le camion. Il doit être attaché à l’intérieur du
véhicule pour ne pas bouger. Protégez l’extérieur du réfrigérateur avec
une couverture.
Entretien et nettoyage Préparation
Emplacement de réfrigérateur Dégagements
N’installez pas le réfrigérateur à un endroit où la température
ambiante descendra au-dessous de 16 °C (60 °F) parce qu’il ne se
mettra pas en marche suffisamment souvent pour maintenir les
températures convenables.
Installez le réfrigérateur sur un sol suffisamment solide pour le
soutenir lorsqu’il est plein.
Laissez les jeux suivants pour faciliter l’installation, la bonne
circulation d’air, les branchements de plomberie et électriques.
Côtés ........................................................................5/8″ (15 mm)
Dessus.......................................................................1″ (25 mm)
(Si l’appareil est encastré, prévoyez 23 mm [7/8″] pour les capots
de charnière.)
Arrière.......................................................................1″ (25 mm)
Si le réfrigérateur est contre un mur d’un côté, laissez les jeux
suivants pour la porte:
pour les modèles de 20, 22, et 24 .............................3/4″ (19 mm)
pour les modèles de 27 .............................................1
1
/2″ (38 mm)
Roulettes Nivelage
Les roulettes réglables, situées
derrière la grille, vous permettent de
déplacer le réfrigérateur pour le
nettoyer. Réglez-les de façon à ce que
le réfrigérateur repose fermement sur
le sol. Pour assurer que les portes se
ferment automatiquement d’une
position à demi-ouverte, il y a une
inclinaison intégrée de l’avant à
l’arrière du meuble. Les réfrigérateurs
à compartiments côte à côte sont également munis de charnières de
portes spécialement conçues pour que les portes se relèvent
légèrement lorsqu’elles sont ouvertes, afin de se refermer d’ellesmêmes sous l’effet de la force de gravité.
Pour régler les roulettes, retirez la
grille en la saisissant par dessous et en
la tirant.
Pour soulever le réfrigérateur, tournez
les vis de réglage des roulettes dans le
sens des aiguilles d’une montre; pour
l’abaisser, tournez les vis dans le sens
contraire. Utilisez une clé à molette (boulon à tête hex. de 3/8″) ou
une pince.
Quand vous nivelez le réfrigérateur, vous pouvez faciliter la fermeture
des portes en soulevant l’avant autant que 5/8″ (15 mm) plus que
l’arrière du réfrigérateur du sol.
Pour remettre la grille en place, alignez les agrafes à l’arrière de la
grille avec les dispositifs de fixation du réfrigérateur et poussez sur la
grille jusqu’à ce qu’elle soit bien en place.
Ouverture
Agrafe
Alimentation en eau de la machine à glaçons (sur certains modèles)
Si votre réfrigérateur a une machine à glaçons, ou si vous voulez en ajouter une plus tard,
la machine à glaçons doit être branchée à une conduite d’eau froide. Il faudra relier
le réfrigérateur à un tuyau d’eau froide potable. Moyennant un supplément, vous pouvez
vous procurer un nécessaire d’alimentation en eau contenant un tuyau en cuivre, un robinet
d’arrêt, des raccords et des instructions chez votre marchand. La longueur du tuyau reliant
la machine à glaçons à la canalisation d’eau froide doit être suffisante pour qu’il soit possible
d’avancer légèrement le réfrigérateur (8′ [244 cm] environ de tube en cuivre de 1/4″ en 3
boucles de 10″ [25 cm] de diamètre).
Page 36

INSTALLATION
IMPORTANT…Veuillez lir e attentivement
Branchement électrique
36
Pour votre propre
sécurité, cet appareil
doit être correctement
mis à la terre.
Le cordon d’alimentation
de cet appareil est équipé
d’une fiche à 3 broches
(mise à la terre) qui se
branche dans une prise
murale ordinaire à 3 trous
pour limiter les risques de
décharges électriques.
Faites examiner la prise murale et le circuit par un électricien qualifié
pour vérifier que la prise est correctement mise à la terre.
Si la prise murale est du type bipolaire standard, vous êtes
personnellement responsable de son remplacement par une prise à 3
trous correctement mise à la terre.
NE COUPEZ NI RETIREZ EN AUCUN CAS LA TROISIÈME
B
ROCHE (MISE À LA TERRE) DE LA FICHE DU
CORDON D’ALIMENTATION.
Méthode
recommandée
Vérifier la mise à la
terre avant le
branchement.
Utilisation d’un adaptateur
En raison des risques
qu’elle présente dans
certains conditions, nous
déconseillons fortement
l’utilisation d’un
adaptateur. Toutefois, si
vous décidez d’utiliser un
adaptateur, et que les
codes locaux le
permettent, vous pouvez
effectuer un
RACCORDEMENT
TEMPORAIRE à l’aide
d’un adaptateur
homologué UL, branché
dans une prise murale à
deux trous mise à la
terre. Vous pouvez vous procurer cet adaptateur chez votre quincaillier.
La fente la plus longue de l’adaptateur doit être placée vis-à-vis de la
fente la plus longue de la prise afin d’assurer la polarité adéquate pour
le branchement du cordon d’alimentation.
Lorsque vous utilisez un adaptateur, il faut prévoir un dégagement
plus important à l’arrière du réfrigérateur.
ATTENTION: Le fait de fixer la cosse de terre de l’adaptateur à la
vis de la prise n’assure pas la mise à la terre de l’électroménager, à
moins que cette vis soit en métal, qu’elle ne soit pas isolée, et que la
prise de courant soit adéquatement mise à la terre. Faites vérifier la
prise par un électricien qualifié pour vous assurer que la prise est
adéquatement mise à la terre.
Lorsque vous débranchez le cordon d’alimentation de
l’adaptateur, tenez toujours l’adaptateur en place d’une main
en tirant le cordon d’alimentation avec l’autre, sinon, la cosse
de terre de l’adaptateur risque de se casser à la longue.
Si la cosse de terre de l’adaptateur casse, N’UTILISEZ PAS
l’appareil tant qu’il n’aura pas été adéquatement mis à la terre.
Méthode temporaire
(Adaptateurs interdits
au Canada.)
Placer la broche la plus
large vis-à-vis de la fente la
plus longue.
Vérifier la mise à la terre
et le branchement avant
d’utiliser l’appareil.
Spécifications électriques Utilisation de cordons prolongateurs
Le réfrigérateur doit toujours être branché dans sa propre
prise de courant, dont la tension nominale correspond à celle
indiquée sur la plaque signalétique.
Cette précaution est recommandée pour garantir un rendement
optimum et éviter de surcharger les circuits électriques de l’habitation,
ce qui pourrait créer un risque d’incendie par surchauffe des fils.
Nous recommandons instamment de ne pas utiliser de cordons
prolongateurs à cause des risques potentiels qu’ils présentent dans
certaines conditions. Si toutefois vous décidez d’utiliser un cordon
prolongateur, il est absolument nécessaire qu’il soit à 3 fils avec mise
à la terre pour appareils électroménagers certifié par l’ACNOR,
équipé d’une fiche et d’une prise mise à la terre de 15 ampères (au
minimum) et 120 volts.
Page 37

DIRECTIVES D’INSTALLATION DE LA CONDUITE D’EAU
(suite à la page suivante)
INSTALLEZ LE ROBINET D’ARRÊT SUR LA
CONDUITE D’EAU POTABLE FRÉQUEMMENT
UTILISÉE LA PLUS PROCHE.
Raccordements usuels à la conduite d’eau
principale
a.
Choisissez pour le robinet un emplacement
facilement accessible. Il est préférable de
l’installer sur le côté d’une conduite d’eau froide
verticale. Si vous devez le raccorder à une
conduite d’eau horizontale, effectuez le
raccordement sur le dessus ou le côté de la
conduite pour éviter la chute de sédiments
provenant de la conduite d’eau.
b. Percez un trou de 1/4 po dans la conduite d’eau,
à l’aide d’un foret affûté. Enlevez les bavures
produites lors du perçage de la conduite. (Ne
percez pas de trou si le robinet est autotaraudeur.)
c. Fixez le robinet d’arrêt
à la conduite d’eau froide
à l’aide d’une bride.
2
ATTENTION :
• Si vous utilisez votre réfrigérateur avant que la
conduite d’eau soit raccordée, assurez-vous que le
bras régulateur de la machine à glaçons est à la
position ARRÊT (relevé).
• N’installez pas le tuyau de la machine à glaçons
dans un endroit où la température descendra sous
le point de congélation.
• Lorsque vous utilisez un appareil électrique
(comme une perceuse) lors de l’installation,
assurez-vous qu’il est isolé ou câblé de façon à
éviter tout risque de chocs électriques.
• Toutes les installations doivent être conformes
aux exigences du code de plomberie local en vigueur .
RENSEIGNEMENTS SUR LA GARANTIE
L’installation de cette conduite d’eau n’est
pas garantie par le fabricant de la machine à
glaçons ou du réfrigérateur. Veuillez suivre
ces directives attentivement afin de réduire
au minimum les risques de dommages
coûteux causés par l’eau.
• Si votre conduite d’eau est dotée d’un raccord
évasé à une extrémité, vous aurez besoin d’un
adaptateur (vendu dans toutes les bonnes
quincailleries) pour raccorder la conduite d’eau
au réfrigérateur OU vous pouvez couper le
raccord évasé à l’aide d’un coupe-tubes et ensuite
utiliser un raccord à compression.
MATÉRIEL NÉCESSAIRE
• La machine à glaçons automatique nécessite
une conduite d’eau froide. La pression de l’eau
doit varier entre 20 et 120 lb/po2.
• Perceuse électrique, à moins que vous ayez un
robinet autotaraudeur.
• Tuyau de cuivre de 1/4 po de diamètre extérieur
pour raccorder le réfrigérateur à la conduite
d’eau. Assurez-vous que les extrémités du tuyau
et de la conduite sont coupées à angle droit.
Pour calculer la longueur de tuyau de cuivre
nécessaire, mesurez la distance entre l’électrovanne
à l’arrière du réfrigérateur et la conduite d’eau.
Ajoutez ensuite 8 pieds (244 cm). Assurez-vous que
la longueur de tuyau supplémentaire est suffisante
(environ 8 pieds [244 cm] de tuyau enroulé pour
former trois boucles d’environ 10 pouces [25 cm]
de diamètre) pour que vous puissiez éloigner le
réfrigérateur du mur après l’installation. N’utilisez
pas de tuyau ou de raccord en plastique car la
conduite d’eau est constamment sous pression.
De plus, certains types de tuyau de plastique
peuvent casser et fendiller avec le temps,
provoquant des fuites d’eau.
• Robinet d’arrêt pour installation sur la conduite
d’eau froide. Le robinet d’arrêt doit être doté d’un
orifice d’entrée d’au moins 5/32 po de diamètre
intérieur au point de raccordement avec la
CONDUITE D’EAU FROIDE. Bon nombre
d’ensembles de raccordement comprennent des
robinets d’arrêt à brides. Avant d’en faire l’achat,
assurez-vous que l’installation d’un robinet à
brides est conforme avec le code de plomberie en
vigueur dans votre région.
• Deux écrous à compression de 1/4 po de diamètre
extérieur et deux douilles de raccordement—pour
raccorder le tuyau de cuivre au robinet d’arrêt et à
l’électrovanne du réfrigérateur.
FERMEZ LE ROBINET DE LA CONDUITE
D’EAU PRINCIPALE.
Ouvrez le robinet le plus près pour permettre à la
conduite d’eau de se vider.
1
À la conduite
d’eau froide
sous l’évier
À travers le mur, à
la conduite d’eau
froide de la salle
de lavage
Dans le vide
sanitaire sous
la maison
À travers le
plancher, à la
conduite d’eau
du sous-sol
37
Page 38

DIRECTIVES D’INSTALLATION DE LA CONDUITE D’EAU
(suite)
38
d. Serrez les vis de
la bride jusqu’à ce que
la rondelle d’étanchéité
commence à «gonfler».
Ne serrez pas de façon
excessive afin de ne
pas écraser le tuyau de
cuivre.
Nous recommandons d’installer un filtre à eau
(vendu dans les Centres de pièces et au Service
après-vente) si votre eau contient du sable ou des
particules qui pourraient obstruer la rondelle-filtre
de l’électrovanne du réfrigérateur.
Installez ce filtre
sur la conduite
d’eau, à proximité
du réfrigérateur .
a. Retirez le
capuchon en
plastique souple
du raccord du
réfrigérateur.
b. Installez l’écrou
à compression et la
douille de raccordement à
l’extrémité du tuyau, comme illustré.
c. Insérez l’extrémité du tuyau de cuivre le plus
loin possible dans le raccord du réfrigérateur.
Serrez le raccord tout en tenant le tuyau.
d. Insérez le tuyau de cuivre dans la fixation
fournie pour le maintenir en place. Il peut être
nécessaire d’ouvrir légèrement la fixation.
PLACEZ LE TUYAU DE CUIVRE ENTRE LA
CONDUITE D’EAU FROIDE ET LE RÉFRIGÉRATEUR.
Faites passer le tuyau par un trou percé dans le
plancher ou le mur (derrière le réfrigérateur ou à
proximité de l’armoire) le plus près possible du
mur. Assurez-vous que la longueur de tuyau
supplémentaire est suffisante (environ 8 pieds
[244 cm] formant 3 boucles d’environ 10 po
[25 cm] de diamètre) pour que vous puissiez
éloigner le réfrigérateur du mur après l’installation.
3
OUVREZ LE ROBINET D’ARRÊT DE LA
CONDUITE D’EAU PRINCIPALE.
Serrez tous les raccords qui fuient.
7
REPLACEZ LE RÉFRIGÉRATEUR PRÈS DU MUR.
Disposez les boucles de tuyau de cuivre de façon
qu’elles ne vibrent pas contre l’arrière du
réfrigérateur ou le mur.
10
PLACEZ LE BRAS RÉGULATEUR DE LA MACHINE
À GLAÇONS À LA POSITION ON (MARCHE—ABAISSÉ).
La machine à glaçons ne se met en marche que
lorsqu’elle atteint une température de
fonctionnement de 15 °F (-9 °C) ou moins.
Lorsque le bras régulateur est à la position ON
(MARCHE—abaissé), la machine à glaçons se
met automatiquement en marche. REMARQUE :
Lorsqu’elle se met en marche pour la première
fois, la machine à glaçons peut effectuer un
double cycle, ce qui provoquera l’écoulement d’un
peu d’eau dans le bac à glaçons. Cette situation
est normale et ne devrait pas se reproduire. Jetez
les premiers lots de glaçons afin d’éliminer les
impuretés résiduelles de la conduite d’eau.
9
BRANCHEZ LE CORDON D’ALIMENTATION DU
RÉFRIGÉRATEUR DANS UNE PRISE DE COURANT
MISE À LA TERRE.
8
RACCORDEZ LE TUYAU DE CUIVRE AU
ROBINET D’ARRÊT.
Installez l’écrou à
compression et la douille
de raccordement à
l’extrémité du tuyau et
raccordez-le au robinet
d’arrêt. Assurez-vous
que le tuyau est bien
inséré à l’intérieur du
robinet. Serrez
solidement l’écrou à
compression.
4
OUVREZ LE ROBINET ET RINCEZ LE TUYAU.
a. Ouvrez le robinet de la conduite d’eau
principale et rincez le tuyau jusqu’à ce que l’eau
soit propre.
b. Coupez l’eau au niveau de l’électrovanne après
avoir fait couler par le tuyau environ une pinte d’eau.
5
RACCORDEZ LE TUYAU DE CUIVRE AU
RÉFRIGÉRATEUR.
Avant d’effectuer le raccordement au
réfrigérateur, assurez-vous que le cordon
d’alimentation de l’appareil n’est pas
branché dans la prise de courant.
6
Robinet
d’arrêt à
brides
Écrou
de serrage
Orifice de
sortie
Écrou à
compression
Douille de
raccordement
Bride
Robinet
d’arrêt à
brides
Rondelle
Orifice
d’entrée
Conduite
d’eau froide
verticale
Douille de
raccordement
Tuyau de cuivre de 1/4 po
Écrou à
compression
de 1/4 po
Fixation
du tuyau
Raccord du réfrigérateur
Page 39

PROBLÈME CAUSE POSSIBLE
LE RÉFRIGÉRATEUR • Le cycle de dégivrage est peut-être en marche: le moteur cesse alors de
NE FONCTIONNE PAS fonctionner pendant une trentaine de minutes.
• La commande de température est sur “OFF” (éteint).
• Si l’éclairage intérieur ne s’allume pas, le réfrigérateur n’est peut-être pas
branché dans la prise de courant.
• Si la fiche est bien branchée mais que le réfrigérateur ne fonctionne toujours
pas, branchez une lampe ou un petit appareil électroménager dans la prise de courant
pour vérifier s’il y a du courant (le disjoncteur ou le fusible peut avoir sauté).
LE MOTEUR FONCTIONNE • Les réfrigérateurs modernes étant plus grands, ainsi que leur congélateur,
PENDANT DE LONGUES leur moteur doit fonctionner plus longtemps.
PÉRIODES
• Si le réfrigérateur vient d’être installé, 24 heures sont habituellement nécessaires
pour qu’il refroidisse complètement.
• Il y a beaucoup d’aliments placés dans le réfrigérateur ou le congélateur.
• Les portes sont souvent ouvertes par temps chaud.
• Une porte est restée ouverte.
• Les commandes de température sont sur un réglage trop froid. Reportez-vous
à la section sur les Commandes de température.
• La grille et le condenseur doivent être nettoyés. Reportez-vous aux instructions
de la page sur l’Entretien et nettoyage.
LE MOTEUR DÉMARRE ET • La commande de température fait démarrer et arrêter le moteur pour maintenir
S'ARRÊTE FRÉQUEMMENT une température uniforme.
VIBRATION OU • Le réfrigérateur n’est probablement pas posé fermement sur le sol et les vis des
BRUIT MÉTALLIQUE roulettes avant ou les pieds de nivellement doivent être réglés, ou le sol n’est pas
solide ou égal. Reportez-vous à la section Roulettes, à la page sur Préparation.
• Si les plats vibrent sur les clayettes, déplacez-les. Une légère vibration est normale.
BRUITS DE FONCTIONNEMENT NORMAUX
Les nouveaux compresseurs à haut rendement fonctionnent plus rapidement
et produisent un bourdonnement ou un bruit de pulsation plus audible pendant
le fonctionnement.
La minuterie de dégivrage et la commande du réfrigérateur
font entendre des déclics pendant le fonctionnement.
Le ventilateur fait circuler de l’air dans le congélateur
afin de maintenir la température réglée.
Des gouttes d’eau tombent sur l’élément de dégivrage, ce qui
produit un crépitement ou un sifflement pendant le cycle de dégivrage.
Le frigorigène qui circule dans les bobines de refroidissement de
congélateur font un bruit qui ressemble à de l’eau qui bout ou à gargouillis.
L’expansion et la contraction des bobines de refroidissement pendant le
dégivrage et la réfrigération qui suit dégivrage produisent des craquements.
De l’eau s’égoutte lorsqu’elle fond dans l’évaporateur et s’écoule
dans le plateau de dégivrage pendant le cycle de dégivrage.
Machine à glaçons (sur certains modèles): L’électrovanne de la machine à glaçons
fait du bruit lorsque la machine à glaçons se remplit. Si le bras régulateur est en
position ON (MARCHE—abaissée), il fera du bruit même s’il n’a pas encore été raccordé
à l’eau. Gardant le bras régulateur en position ON (MARCHE—abaissée) avant qu’il soit
raccordé à l’eau peut endommager la machine à glaçons. Pour l’éviter, relevez le bras
régulateur en position STOP (ARRÊT—relevée). Ceci arrêtera le bruit. Les glaçons font
du bruit lorsqu’ils tombent dans le bac et lorsque l’eau circule dans les tuyaux pour remplir
la machine à glaçons.
(suite à la page suivante)
VOUS AVEZ DES QUESTIONS?
UTILISEZ CE GUIDE DE DÉPANNAGE
Instructions de pose de la canalisation d’eau Guide de dépannage
39
Page 40

GUIDE DE DÉPANNAGE
(suite)
40
PROBLÈME CAUSE POSSIBLE
AIR CHAUD AU BASE • Courant d’air normal provenant du moteur. Pendant le processus de réfrigération, il
DU RÉFRIGÉRATEUR est normal que de la chaleur soit expulsée à la base du réfrigérateur. Certains
revêtements de sol peuvent se décolorer sous l’effet de cette température de
fonctionnement normale qui ne présente aucun danger. Si vous voulez éviter cette
décoloration, consultez votre fournisseur de revêtements de sol.
LA PORTE NE SE REFERME • Le joint de la porte du côté des charnières “colle” ou se replie. Pour y remédier,
PAS ENTIÈREMENT appliquez une petite quantité de gelée de pétrole sur la surface du joint.
TEMPÉRATURE TROP • La commande de température n’a pas été réglée à un niveau assez bas. Reportez-vous
ÉLEVÉE DANS LE à la section Commandes de température.
CONGÉLATEUR OU
• Temps chaud—ouverture fréquente des portes ou la porte ouverte trop longtemps.
LE RÉFRIGÉRATEUR
• Porte maintenue ouverte par un paquet.
ALIMENTS DESSÉCHÉS • Les aliments ne sont pas couverts ou emballés de façon appropriée, ou leur
emballage n’est pas hermétique.
GIVRE SUR LES • La porte peut avoir été laissée entrouverte, ou un paquet l’empêche de fermer.
ALIMENTS SURGELÉS
• Les portes sont ouvertes trop souvent ou trop longtemps.
• Il est normal que du givre se forme à l’intérieur du paquet.
FORMATION LENTE • La porte peut avoir été laissée ouverte.
DES GLAÇONS
• Réglez la commande du congélateur à une température plus froide.
ODEUR/SAVEUR • Jetez les vieux glaçons.
ANORMALE DES GLAÇONS
• Videz et lavez le bac à glaçons.
• Des aliments non emballés hermétiquement dans le réfrigérateur et/ou le
congélateur peuvent avoir transmis leur odeur aux glaçons.
• Nettoyez l’intérieur du réfrigérateur—reportez-vous à la section Entretien et
nettoyage.
• L’eau du robinet n’a pas bon goût. Installez un filtre à eau—reportez-vous à la
section Filtre à eau.
LA MACHINE À GLAÇONS • Le bras régulateur est en position STOP (ARRÊT––relevée).
AUTOMATIQUE NE
• L’alimentation en eau est coupée ou non raccordée.
FONCTIONNE PAS
• Le congélateur est trop chaud.
• Les glaçons sont trop petits—le robinet d’arrêt qui relie le réfrigérateur à
la conduite d’eau est peut-être bouché.
• Les glaçons collent parfois sur le côté du moule à glaçons et maintiennent le
bras régulateur en position STOP (ARRÊT––relevée). Retirez cette glace pour
redémarrer la machine à glaçons.
• En voulant prendre des glaçons, vous avez peut-être poussé par erreur le bras
régulateur sur la position STOP (ARRÊT––relevée).
• Un amas de glaçons dans le bac peut provoquer l’arrêt prématuré de la machine
à glaçons. Avec le bras régulateur en position STOP (ARRÊT––relevée), nivelez
les glaçons dans le bac.
LA SÉPARATION ENTRE LE • Le système automatique d’économie d’énergie produit une chaleur normale en
RÉFRIGÉRATEUR ET LE faisant circuler du liquide chaud autour du rebord avant du congélateur pour
CONGÉLATEUR empêcher la condensation sur l’extérieur du réfrigérateur par temps chaud et
EST CHAUDE humide.
Page 41

PROBLÈME CAUSE POSSIBLE
LE DISTRIBUTEUR DE • Pas de glaçons. Retirez le bac. Si des glaçons sont collés au bras régulateur,
GLAÇONS NE retirez-les.
FONCTIONNE PAS
• Pas de glaçons. La machine à glaçons est éteinte ou l’alimentation en eau est coupée.
(sur certains modèles)
• Blocs irréguliers dans le bac à glaçons. Brisez-en autant que possible avec vos
doigts et jetez ceux qui restent.
MAUVAIS GOÛT/ODEUR • Si le distributeur d’eau n’a pas été utilisé pendant longtemps, faites couler l’eau
DE L’EAU normalement jusqu’à ce que l’eau du système soit remplacée par de l’eau fraîche.
(sur certains modèles)
• L’eau de la maison a mauvais goût. Installez un filtre à eau—reportez-vous à la
section Filtre à eau.
L’EAU VERSÉE DANS LE • Attendez au moins 24 heures après l’installation du réfrigérateur pour que l’eau
PREMIER VERRE EST refroidisse à la température idéale.
CHAUDE
• Si le distributeur d’eau n’a pas été utilisé pendant longtemps, l’eau versée dans
(sur certains modèles)
le premier verre ne sera pas aussi froide que celle des verres suivants.
• Après la vidange du réservoir d’eau, attendez plusieurs heures pour que l’eau
refroidisse.
LE DISTRIBUTEUR D’EAU • L’alimentation en eau est coupée ou n’est pas raccordée.
NE FONCTIONNE PAS
• Le tuyau d’alimentation peut être bouché par des dépôts.
(sur certains modèles)
• S’il n’y a pas d’eau distribuée quand le réfrigérateur est premièrement installé,
il y a peut-être de l’air dans la conduite d’eau. Appuyez sur le bouton de distribution
pendant deux minutes au minimum pour expulser l’air du tuyau d’eau et remplir
le réservoir d’eau.
DE LA CONDENSATION SE • Cela n’est pas inhabituel pendant les périodes de forte humidité.
FORME À L’EXTÉRIEUR
DU RÉFRIGÉRATEUR
DE LA CONDENSATION • Les portes sont ouvertes trop fréquemment ou pendant trop longtemps.
S’ACCUMULE À L’INTÉRIEUR
• Par temps humide, l’ouverture des portes provoque l’entrée d’humidité dans le réfrigérateur.
EAU SUR LE SOL OU AU • L’orifice d'écoulement de l’eau au fond du réfrigérateur peut être bouché. Retirez toute
FOND DU CONGÉLATEUR la
glace qui pourrait se trouver au fond du congélateur et nettoyez l’orifice d’écoulement.
Reportez-vous à la section consacrée à l’Entretien et nettoyage.
• N’utilisez pas de verre dont la hauteur est supérieur à 6
″ (15 cm), vous pouvez
coincer des glaçons dans le conduit. Ils peuvent se coller à l’intérieur du conduit et
tomber plus tard, laissant de l’eau ou des glaçons sur le sol.
ODEUR DANS LE • Les aliments à odeur forte doivent être hermétiquement emballés.
RÉFRIGÉRATEUR
• Vérifiez si des aliments ne sont pas avariés.
• L’intérieur doit être nettoyé. Reportez-vous à la section consacrée à l’Entretien.
• Le système d’évacuation de l’eau de dégivrage doit être nettoyé.
• Gardez une boîte de bicarbonate de soude ouverte dans le réfrigérateur.
Remplacez-la tous les trois mois.
L’ÉCLAIRAGE INTÉRIEUR • Il n’y a pas de courant à la prise.
NE FONCTIONNE PAS
• L’ampoule doit être remplacée. Reportez-vous à la section consacrée à l’Entretien.
LUEUR ORANGE DANS • Une lueur orange brille parfois dans le congélateur lorsque le dégivrage fonctionne.
LE CONGÉLATEUR C’est normal.
Pour de plus amples renseignements…Aux États-Unis appelez sans frais au:
Centre de réponse GE
®
, 800.626.2000 Service d’information à la clientèle
Au Canada: Communiquez avec: Directeur, Relations avec les consommateurs,
2645 Skymark Avenue, Mississauga (Ontario) Canada L4W 4H2
Guide de dépannage
41
Page 42

42
Nous serons là
Lorsque vous achetez un nouvel électroménager GE, soyez assuré que vous pouvez toujours
compter sur GE pour obtenir de l’aide ou de l’information. Il suffit de nous appeler—ou écrire!
Si vous avez des besoins particuliers…
Aux États-Unis : 800.626.2000
Sur demande, GE peut vous fournir des commandes avec inscription en braille pour une variété d’électroménagers GE, de même qu’une
brochure qui facilite l’aménagement d’une cuisine pour les personnes dont la mobilité est limitée. Vous pouvez obtenir ces articles sans
frais en appelant au 800.626.2000.
Les clients qui présentent des problèmes d’élocution, de même que les malentendants, qui possèdent un dispositif spécial de
télécommunication ou un téléscripteur traditionnel, peuvent composer le 800-TDD-GEAC (800-833-4322) pour toute demande de
renseignement ou de service après-vente.
Au Canada : Communiquez avec le Directeur, Relations avec les consommateurs,
2645 Skymark Avenue, Mississauga (Ontario) Canada L4W 4H2
Service de réparation à domicile
Aux États-Unis : 800-GE-CARES (800-432-2737)
Un professionnel du Service après-vente GE effectuera la réparation nécessaire au moment qui vous convient vraiment. De nombreuses
succursales du Service après-vente GE vous offrent un service le jour même ou le lendemain, ou à la date qui vous convient (entre 7 h 00 et
19 h 00 en semaine, et entre 9 h 00 et 14 h 00 le samedi). Nos techniciens formés à l’usine connaissent à fond votre électroménager—la
plupart des réparations peuvent être ainsi effectuées en une seule visite.
Au Canada : Consultez votre annuaire téléphonique local pour connaître la succursale de Service aprèsvente Camco ou le centre de réparation autorisé le plus près de chez vous.
GE Answer Center®
Aux États-Unis : 800.626.2000
Lorsque vous avez des questions au sujet d’un électroménager GE, le Centre de réponse GE est en mesure de vous aider. On répondra
rapidement et avec courtoisie à votre appel et à vos questions. Vous pouvez téléphoner en tout temps. Le Centre de réponse GE est ouvert
24 heures par jour, 7 jours par semaine.
Au Canada : Communiquez avec le Directeur, Relations avec les consommateurs,
2645 Skymark Avenue, Mississauga (Ontario) Canada L4W 4H2
Contrats d’entretien
Aux États-Unis : 800-626-2224
Ayez l’esprit tranquille en sachant que vous pourrez toujours compter sur le Service après-vente GE lorsque votre garantie sera expirée.
Achetez un contrat d’entretien GE avant que votre garantie n’expire et bénéficiez ainsi d’un rabais substantiel. En achetant un contrat de
plusieurs années, vous pouvez ainsi faire effectuer des réparations dans le futur et ce, aux prix d’aujourd’hui.
Au Canada : 800-461-3636
Pièces et accessoires Aux États-Unis :
800-626-2002
Les bricoleurs qui désirent réparer eux-mêmes leurs électroménagers peuvent recevoir directement à la maison les pièces et accessoires.
Le système de pièces GE vous donne accès à plus de 47 000 pièces…Et toutes les pièces de rechange d’origine GE sont entièrement
garanties. Nous acceptons les cartes VISA, MasterCard et Discover.
Les directives d’entretien stipulées dans le présent guide comportent des procédures que n’importe quel utilisateur peut effectuer. Les
autres types de réparations doivent généralement être effectués par un technicien qualifié. Il faut faire preuve de prudence, puisqu’une
réparation inadéquate peut affecter le fonctionnement sécuritaire de l’appareil.
Au Canada : Consultez votre annuaire téléphonique local pour connaître l’adresse du Magasin de pièces
Camco ou du marchand autorisé le plus près de chez vous.
Page 43

43
PREMIÈRE ANNÉE
CAMCO garantit le remplacement ou la réparation de toutes les pièces de ce réfrigérateur qui se
révèlent défectueuses en raison d’un vice de matières ou de fabrication pendant un an à compter
de la date de l’achat. Ces pièces seront réparées ou remplacées gratuitement, au choix de
Camco, sous réserve des conditions stipulées ci-dessous.
Le MARCHAND garantit qu’il four nira la main-d’œuvre nécessaire à la réparation ou au
remplacement de toutes les pièces de ce réfrigérateur qui se révèlent défectueuses en raison
d’un vice de matières ou de fabrication pendant un an à compter de la date de l’achat.
QUATRE ANNÉES SUIVANTES
CAMCO garantit le système frigorifique (c’est-à-dire l’évaporateur, le condenseur, le moteur du
compresseur, les tuyaux de raccordement, le déshydrateur et la charge de frigorigène)
contre tout
vice de matières ou de fabrication pendant quatre années supplémentaires.
Ces pièces seront
réparées ou remplacées gratuitement, au choix de Camco, sous réserve des conditions stipulées
ci-dessous.
Le MARCHAND garantit qu’il fournira la main-d’œuvre nécessaire à la réparation ou au remplacement
du système frigorifique sous réserve des conditions stipulées ci-dessous.
CONDITIONS
1. La présente garantie ne s’applique qu’à l’utilisation domestique par une seule famille au
Canada, lorsque le réfrigérateur a été installé conformément aux directives fournies par Camco
et est alimenté correctement en eau et en électricité. Les dommages dûs à une utilisation
abusive, un accident, une exploitation commerciale, ainsi que la modification, l’enlèvement ou
l’altération de la plaque signalétique annulent la présente garantie. L’entretien dans le cadre de
la présente garantie doit être effectué par un réparateur autorisé de Camco.
2. Camco et le marchand ne peuvent être tenus responsables en cas de réclamations ou
dommages résultant de toute panne du réfrigérateur ou d’un entretien retardé pour des raisons
indépendantes de leur volonté.
3. L’acheteur doit, pour obtenir un service dans le cadre de la garantie, présenter la facture
originale. Les pièces réparées ou remplacées ne sont garanties que pendant le restant de la
période de garantie initiale.
4. La présente garantie ne couvre pas les frais engagés pour rendre cet appareil accessible pour
la réparation.
5. La présente garantie vous confère des droits précis. Il est possible que la législation en vigueur
dans certaines régions vous en confère d’autres.
Camco vous offre ses services dans tout le pays. Voir la page précédente pour des renseignements
sur le service après-vente.
Pour de plus amples renseignements sur la présente garantie, veuillez prendre contact avec :
Directeur, Relations avec les consommateurs, Camco Inc., Service après-vente, 2645 Skymark
Avenue, Mississauga (Ontario) L4W 4H2
GARANTIE DU CLIENT
(pour la clientèle au Canada)
Numéro de pièce 162D7744P002
Pub. N
o
. 49-6854
Modèles côte à côte 20–27
Page 44

44
Page 45

45
Guía de uso y de cuidado
Refrigerador
Electrodomésticos GE
Instrucciones de seguridad
...47
Instrucciones de operación,
consejos
Controles de temperatura .........................48
Deshacerse del CFC....................................46
Dispositivo automático para hacer
hielo y dispensador...........................49–51
Entrepaños.............................................53, 54
Gavetas para guardar .................................53
Servicio de hielo...........................................51
Sugerencias para
guardar alimentos....................................52
Cuidado y limpieza
Accesorio del filtro de agua.......................51
Atrás del refrigerador..................................55
Cambio de foco ............................................56
Debajo del refrigerador ..............................55
Limpieza interior y exterior........................55
Retiro de las gavetas...................................56
Solucionar los problemas
61–64
Sonidos normales de operación ..............61
¿Más preguntas?…llame a
GE Answer Center® 800.626.2000.
Preparación
Desplazamiento ...........................................57
Espacio libre..................................................57
Nivelación ......................................................57
Ruedas............................................................57
Suministro de agua para el
dispositivo para hacer hielo....................57
Ubicación.......................................................57
Vacaciones ...................................................57
Instalación...................................58–60
Cable de extensión......................................58
Clavija de adaptación..................................58
Conexión a tierra..........................................58
Instrucciones para la instalación
de la tubería de agua .......................59, 60
Requerimientos eléctricos.........................58
Servicios al consumidor......65
Garantía..........................................................66
Números de serie y de modelo.................46
Registro del aparato....................................46
Page 46

AYUDENOS A AYUDARLE…
Anote los números de modelo y
de serie.
Usted los verá en una etiqueta en la pared
junto al cajón superior o en el fondo,
precisamente en el interior de la puerta del
compartimiento de alimentos frescos.
Estos números se encuentran también en la
Tarjeta de registro de propiedad del producto
del consumidor que se proporciona junto con
su refrigerador.
Antes de enviar esta tarjeta, por favor anote
aquí los siguientes números:
Número de modelo
Número de serie
Use estos números en toda correspondencia o
llamada de servicio referentes a su refrigerador.
Lea cuidadosamente este folleto
Es nuestra intención ayudarle a
operar y mantener adecuadamente su
nuevo refrigerador.
Mantenga este folleto a la mano para
responder a sus preguntas.
Si no entiende algo o necesita asesoría,
llame a:
GE Answer Center
®
800.626.2000
24 horas del día, 7 días a la semana
Si usted recibe un refrigerador
dañado…
Contacte inmediatamente al distribuidor (o al
fabricante) que le vendió el refrigerador.
Ahorre tiempo y dinero.
Antes de solicitar el servicio…
Revise la sección de Solucionar los
problemas de este folleto. Allí se describen
problemas de operación menores que usted
mismo puede corregir.
46
DESHACERSE DEL CFC
Su antiguo refrigerador tiene un sistema de refrigeración que usó CFC
(clorofluorocarbonos). Se cree que los CFC son nocivos para el ozono
estratosférico.
Si se desperdicia del antiguo refrigerador, asegúrese de que se deshaga
del refrigerante con CFC correctamente por un técnico calificado. Si
se libera a propósito el refrigerante con CFC puede estar sujeto a las
multas y al encarcelamiento bajo las estipulaciones del Clean Air Act
federal.
SI SE NECESITA SERVICIO
Para solicitar servicio, vea la página de
Servicios al consumidor al final de este folleto.
Estamos orgullosos de nuestro servicio y
queremos complacerlo. Si por alguna razón
usted no quedara satisfecho con el servicio
recibido, por favor siga los tres
pasos siguientes:
PRIMERO contacte a las personas que le
dieron servicio a su aparato. Explíqueles por
qué no quedó satisfecho. En la mayoría de los
casos, ellos le resolverán su problema.
DESPUES, si usted siguiera insatisfecho con
el servicio, escriba todos los detalles
(incluyendo su número telefónico) a:
Manager, Consumer Relations
GE Appliances
Appliance Park
Louisville, KY 40225
FINALMENTE, si aún siguiera sin resolver
el problema, escribir a:
Major Appliance Consumer
Action Program
20 North Wacker Drive
Chicago, IL 60606
Page 47

47
INSTRUCCIONES IMPOR TANTES DE SEGURIDAD
Lea todas las instrucciones antes de usar el aparato.
ATENCION: Al usar este aparato tome
siempre las precauciones básicas de
seguridad incluyendo las siguientes:
• Use este aparato sólo para los fines que se
describen en esta Guía de Uso y de Cuidado.
• Antes de usarse, este refrigerador
deberá estar instalado y ubicado
de acuerdo con las instrucciones
de instalación.
• Nunca desconecte el refrigerador
jalando el cable. Tome siempre
firmemente la clavija y sáquela del
contacto sin doblarla.
• Repare o reemplace inmediatamente todos los
cables eléctricos de servicio que se hayan
desgastado o dañado en alguna otra forma. No
utilice cables que muestren roturas o daños por
abrasión a lo largo de éste ni en la clavija o en
alguno de sus extremos.
• Al alejar su refrigerador de la pared, cuide que
no pase sobre el cable o lo dañe.
• No permita que los niños se suban, se paren o
se cuelguen de las charolas en el refrigerador.
Podría dañarse el refrigerador y causarles
serias lesiones.
• Si aún tuviera en casa su antiguo
refrigerador, pero no se estuviera
usando, quite las puertas. Esto reducirá
la posibilidad de accidentes de los niños.
• Después de que su refrigerador esté en
operación, no toque las superficies frías del
congelador, sobre todo cuando tenga las manos
húmedas o mojadas. La piel se podría adherir a
las superficies extremadamente frías.
• Si su refrigerador tiene un dispositivo
automático para hacer hielo, evite el contacto
con las partes móviles del mecanismo de
expulsión, o con el elemento calefactor que
desprende los cubos. No ponga los dedos ni las
manos en el mecanismo automático para hacer
hielo mientras el refrigerador esté conectado.
• No vuelva a congelar los alimentos congelados
una vez que se hayan descongelados. El
Departamento de Agricultura, en su Boletín Casa
y Jardín No. 69, dice:
“...Ud. puede volver a congelar alimentos
congelados que se han descongelado sin correr
peligro si éstos todavía tienen cristales de hielo o
si todavía son fríos - debajo de 40°F (4°C).
Las carnes molidas descongeladas, las aves y el
pescado que tenga un color o un olor raro no debe
de volver a congelarse ni comerse. El helado
derretido debe tirarse. Si el olor o el color de
cualquier alimento es malo o dudoso, deséchelo.
Podría ser peligroso comerlo.
Inclusive el descongelamiento parcial y el volver
a congelar los alimentos reduce la calidad del
alimento, especialmente de las frutas, verduras y
comidas preparadas. La calidad del alimento de
las carnes rojas se ve menos afectada que la de
muchos otros alimentos. Use los alimentos que
volvió a congelar tan pronto como sea posible
para conversar al máximo la calidad del alimento.”
• Desconecte el refrigerador antes
de limpiarlo o efectuar reparaciones.
NOTA: Recomendamos enfáticamente
encargar cualquier servicio a personal
calificado.
• Antes de reponer un foco fundido se deberá
desconectar el refrigerador para evitar el contacto
con algún filamento vivo. (El foco fundido puede
quebrarse al reemplazarlo). NOTA: El colocar el
control en posición OFF (apagado) no quita la
corriente del circuito de la luz.
• No guarde ni use gasolina u otros vapores o
líquidos inflamables cerca de este o cualquier
otro aparato.
SIGA ESTAS
INSTRUCCIONES
,,,,,,,,,,,,,,
,,,,,,,,,,,,,,
,,,,,,,,,,,,,,
,,,,,,,,,,,,,,
,,,,,,,,,,,,,,
,,,,,,,,,,,,,,
,,,,,,,,,,,,,,
Instrucciones importantes de seguridad
Page 48

COMO OPERAR SU REFRIGERADOR
Ajuste los controles de la temperatura
48
Dos controles le permiten controlar la temperatura en el
compartimiento para alimentos frescos y el congelador.
Coloque primero el control del compartimiento de alimentos frescos
en “5” y el control del congelador en “C”.
Si se están ajustando los controles por primera vez o se está haciendo
un ajuste posterior, deje transcurrir 24 horas para que se estabilice
la temperatura. Después, si desea temperaturas más frías o más altas
en cualquiera de los dos compartimientos, ajuste los controles paso
por paso.
NOTA: La colocación del control del compartimiento de
alimentos frescos en OFF (apagado) interrumpe el enfriamiento en
ambos compartimientos — el del alimentos frescos y el congelador —
pero no apaga el refrigerador.
TEMPERATURE CONTROLS
Initial Setting C
Coldest E
Initial Setting 5
Coldest 9
Freezer
Fresh Food
●
●
A
B
C
D
E
1
3
5
7
9
F
F
O
Cómo verificar las temperaturas
Haga la prueba de la leche para el compartimiento de alimentos
frescos. Para ello, coloque un recipiente con leche en el entrepaño
superior del compartimiento para alimentos frescos. Verifique al día
siguiente. Si la leche está demasiado tibia o demasiado fría, ajuste los
controles de la temperatura.
Haga la prueba del helado para el congelador. Coloque un
recipiente con helado en el centro del congelador. Verifique al día
siguiente. Si está demasiado duro o demasiado suave, ajuste los
controles de la temperatura.
Permita siempre que transcurran 24 horas para que el refrigerador
alcance la temperatura deseada.
Sistema automático de ahorro de energía No es necesario descongelar
En este refrigerador no encontrará ningún botón para ahorro de energía.
El líquido tibio del condensador del refrigerador circula
automáticamente por el borde delantero del congelador para evitar que
se forme humedad fuera del refrigerador cuando el clima esté húmedo.
Muchos refrigeradores usan calentadores eléctricos especiales. Este
refrigerador no lo necesita. Por eso, aquí no hay botón para ahorro de
energía…no se requiere.
No es necesario descongelar el congelador ni el compartimiento de
alimentos frescos. Su refrigerador está diseñado y equipado de manera
que se descongele automáticamente.
Si se desea bajar en la noche el termostato por debajo de 60°F (16°C)…
…usted puede ajustar el control del congelador un
grado más frío. Las temperaturas más frías en la
casa pueden hacer que el compresor trabaje con
menor frecuencia y el congelador enfríe
ligeramente menos. Para proteger sus alimentos
congelados, deje el congelador en este grado más
frío durante todo el invierno o durante el tiempo
que mantenga el termostato ajustado en este grado más bajo.
El mover el control del congelador hacia 1 grado más frío no
debería influir en el compartimiento de alimentos frescos. Sin
embargo, si se congelara, ajuste el control de este compartimiento
a un grado menos frío.
Al dejar de bajar el termostato, vuelva a ajustar los controles del
refrigerador a sus posiciones habituales.
Page 49

DISPOSITIVO AUT OMATICO PARA
HACER HIELO Y DISPENSADOR
49
Cómo operar su refrigerador Dispositivo automático para hacer hielo y dispensador
Cómo trabaja
El dispositivo automático para hacer hielo funciona continuamente. El
dispensador surte agua, cubos de hielo o hielo triturado a través de la
puerta del compartimiento del congelador. Estos mecanismos trabajan
de la siguiente manera.
El agua fluye de la tubería
de la casa a través de
(1) una válvula solenoide
doble a
(2) la tubería de agua y al
(3) dispositivo automático
para hacer hielo, según
se requiera.
El agua se congela en:
(4) el molde para cubos y
se expulsa al
(5) recipiente de
almacenamiento, donde
una sonda impulsada por
un motor empuja los cubos
hacia adelante.
Los cubos se surten a través del conducto de la puerta cuando se
oprime el botón del dispensador.
Cuando se selecciona “CRUSHED” (triturado) (en algunos
modelos), un canal guía los cubos a través del triturador y el hielo
triturado cae a través del orificio al vaso.
Cuando se selecciona “WATER” (agua), (en algunos modelos) el
agua corre a través de
(6) la tubería de la puerta y se surte cuando se aprieta el botón
correspondiente.
(7) Un interruptor de luz (en algunos modelos) enciende o apaga en
la noche la luz en el dispensador.
La luz se enciende también cuando se presiona el botón del
dispensador.
Cuando se funda el foco del dispensador, deberá reemplazarse con un
foco de máximo 7 watt.
3
7
6
4
5
1
2
Algunos datos importantes de su dispensador de agua y de hielo
• Si éste es su primer dispositivo para hacer hielo, usted escuchará
sonidos que podrán serle desconocidos. Se trata de sonidos normales
de la producción de hielo y no son causa de preocupación.
• El dispositivo para hacer hielo producirá 8 cubos por ciclo—
aproximadamente 120 cubos en un ciclo de 24 horas, dependiendo
de la temperatura del congelador, de la temperatura ambiente, del
número de veces que se abra la puerta y de otras condiciones del uso.
• El surtimiento intermitente de hielo es normal. Si la interrupción del
flujo de hielo fuera más que breve, podrían ser la causa los
conglomerados de hielo que se deberán retirar siguiendo las
instrucciones de esta sección.
• Evite los vasos demasiado llenos de hielo y el uso de vasos estrechos
o demasiado altos. Esto podría obstruir el orificio o hacer que se
congele la puerta del orifico de manera que no se pueda abrir. Abra
periódicamente el congelador y mire el orificio. Si hubiera hielo
bloqueándolo, desprenda con una cuchara de madera.
• Para evitar que los pedazos de hielo caigan fuera del vaso, coloque
éste cerca de la boca del orificio, pero no tan cerca que evite la caída
del hielo.
• Llene los vasos con hielo antes de poner refresco u otras bebidas.
• Las bebidas y los alimentos no se deberán enfriar rápidamente en el
recipiente del hielo. Las latas, botellas o paquetes de comida en el
recipiente de hielos podrían causar la obstrucción del dispositivo
para hacer hielo o del recipiente.
• No agregue hielo de charolas o de bolsas en el recipiente. Podría
provocar que no se surtiera o se triturara adecuadamente.
Antes de usar su dispositivo para hacer hielo y su dispensador
Si usted usa su refrigerador antes de que se haga
la conexión de agua, levante la puerta de acceso
al hielo y asegúrese de que el brazo de llenado
esté en la posición STOP (PARADA—hacia
arriba). Cuando se haya conectado la tubería de
agua al dispositivo para hacer hielo, mueva el
brazo detector hasta la posición ON
(ACTIVADA—hacia abajo).
Al principio habrá una demora antes de la distribución del agua y la
producción de hielo.
En modelos con un dispensador de agua, si no
hay distribución de agua cuando el refrigerador
está primeramente instalado, hay posibilidad de
aire en el sistema de la línea de agua. Oprima el
botón del dispensador durante al mínimo dos
minutos para eliminar el aire atrapado de la
línea de agua y llenar el sistema.
El molde para cubos se llenará automáticamente con agua después de
la refrigeración a las temperaturas de congelación. Los primeros cubos
se producirán normalmente después de algunas horas.
NOTA: En un refrigerador recién instalado, deje unas 24 horas que se
enfríe el congelador a la temperatura bastante fría para hacer hielo.
(pase a la página siguiente)
WATERCRUSHEDCUBEDICE
LIGHT
OFF ON
Brazo detector
en posición STOP
(PARADA—hacia arriba).
Brazo detector
en posición ON
(ACTIVADA—
hacia abajo).
Oprima el botón del dispensador
hasta que la línea de agua se llene.
Page 50

DISPOSITIVO AUT OMATICO PARA
HACER HIELO Y DISPENSADOR
(pase)
Una vez que estén en operación el dispositivo para hacer hielo y el dispensador
Deseche las primeras cargas de cubos de hielo (16 o 24 cubos). Esto
eliminará las impurezas que pudiera haber en la tubería de agua. Haga
lo mismo después de vacaciones o después de períodos largos en los
que no haya usado hielo.
En modelos con dispensador, deseche los primeros 6 vasos de agua en
el fregadero. Las primeras aguas que salen del sistema adquieren un
ligero sabor a "plástico" de la tubería.
Para asegurar que se llene el recipiente de hielo, nivele los cubos de
vez en cuando. Cuando los cubos caen en el recipiente, podrán
apilarse hasta cerca del dispositivo para hacer hielo y empujar el brazo
detector a la posición STOP (PARADA—hacia arriba) antes de que se
llene el recipiente. Mantener el nivel de cubos permite al dispositivo
llenar el recipiente.
Para surtir hielo y agua
• Seleccione CUBES (cubos de
hielo), CRUSHED ICE (hielo
triturado) (en algunos modelos) o
WATER (agua).
• Sostenga el vaso u otro recipiente
cerca de la llave y presione contra
el centro del botón del
dispensador.
WATER CRUSHEDCUBEDICE
LIGHT
OFF ON
WATER CRUSHED CUBEDICE
LIGHT OFF ON
Al surtir hielo… Al surtir agua…
A pesar de seleccionar la modalidad de cubos de hielo, es posible que
salga algo de hielo triturado. Esto sucede en ocasiones cuando algunos
cubos se canalizan al triturador.
En ocasiones es posible que se forme escarcha sobre la puerta del
orificio del hielo. Esto es normal y sucede generalmente cuando se ha
surtido repetidamente hielo triturado. La escarcha se evapora después
de poco tiempo.
Para evitar que el hielo triturado caiga fuera del vaso, coloque éste
cerca de la boca del orificio.
El primer vaso de agua que sale puede estar ligeramente menos fría
que la que sale a continuación. Esto es normal.
El agua surtida está fría, no helada. Para agua más fría agregue
simplemente hielo triturado o cubos antes de extraer agua.
PRECAUCION: No introduzca nunca los dedos ni otros objetos
en la apertura del dispensador.
Para dejar de surtir
Suelte el botón del dispensador y
espere algunos segundos para
permitir que caigan las últimas gotas
de agua.
Podrá haber un ligero goteo después
de surtir hielo triturado o agua. Si
goteara demasiado, se deberá secar
la llave inmediatamente.
No ponga agua en la charola de la llave, ya que no se desagua
sola—vacíe en el lavadero. La charola y su parrilla se deberán
limpiar regularmente de acuerdo con las Instrucciones de cuidado
y de limpieza. La parrilla se puede retirar fácilmente presionando la
esquina posterior derecha.
Si se forman bloques de hielo en el
recipiente de almacenamiento…
El dispositivo para hacer hielo expulsa cubos de hielo en grupos de 8
hielos y es normal que algunos cubos salgan pegados. Sin embargo, si
no usa hielo con mucha frecuencia, se pueden formar conglomerados
de hielo en el recipiente y obstruir el dispensador.
Si esto sucediera:
• Retire el recipiente de almacenamiento del congelador.
• Rompa los conglomerados de hielo con las manos. Deseche los
conglomerados que no pueda romper.
• Vuelva a colocar el recipiente antes de que se derritan los cubos
restantes y formen un bloque al volver a congelarse.
WATER CRUSHEDCUBEDICE LIGHT
OFF ON
Presione aquí para retirar la parrilla
Botón del dispensador
Botón del dispensador
50
Page 51

Para retirar el recipiente de
almacenamiento de hielo
Levante la esquina izquierda para
desprender el recipiente del entrepaño.
Jálelo hacia afuera deteniendo
atrás y adelante.
Para volver a colocar el recipiente de
almacenamiento de hielo
Deslice la parte de atrás del recipiente hasta que
la lengüeta entre en la perforación del entrepaño.
Si el recipiente no entrara hasta adentro, vuelva
a sacar y gire el mecanismo de manejo 1/4 de
vuelta. Empuje de nuevo hasta que la
lengüeta se
atore en la perforación del entrepaño.
Gire
Mecanismo
de manejo
Si no se usa hielo con frecuencia…
Los cubos de hielo “viejos” se opacan y adquieren un sabor rancio.
Vacíe periódicamente el recipiente de almacenamiento de hielos y
lávelo en agua tibia. Asegúrese de que el recipiente esté frío antes de
volverlo a colocar, ya que en caso de no hacerlo, los cubos de hielo se
adherirán a la sonda metálica.
Mover el brazo detector hacia la posición STOP
(PARADA—hacia arriba) cuando…
• Se vaya a suspender el suministro de agua durante varias horas.
• Cuando se retire el recipiente de almacenamiento de hielos durante
cierto tiempo.
• Cuando vaya a salir de vacaciones, momento en el que también debería
cerrar la válvula de la tubería de suministro de agua al refrigerador.
• Cuando se sitúa el control de temperatura del compartimiento de los
alimentos frescos en la posición OFF (apagado).
Accesorio para el filtro de agua
Sus cubos de hielo sólo pueden tener un sabor tan fresco como el agua que los produce.
Esa es la razón por la que es una buena idea purificar su agua con un filtro.
ELIMINA EL SEDIMENTO
El cartucho profundo de fibra de celulosa rígida, de densidad porosa graduada,
atrapa polvo, partículas de herrumbre, arena y sedimento.
ELIMINA LOS OLORES
Los granulos de carbón activado eliminan los olores a humedad y los olores rancios.
MEJORA EL SABOR
Los granulos de carbón activado eliminan los sabores a aceite, medicinas, plástico y metal.
REDUCE LA FORMACIÓN DE INCRUSTACIONES
Cristales especiales reducen la formación de depósitos de incrustaciones duras.
El filtro de agua es una opción a costo adicional y puede obtenerse de su distribuidor. Especifique el Accesorio
WR97X0214. Viene con instrucciones completas de instalación y se instala en minutos en una línea de agua de cobre
de 1/4
″ de diámetro externo.
Charolas de hielo (en algunos modelos)
Para soltar los cubos de hielo, invierta la
charola, sosténgala sobre un cajón de
almacenamiento recipiente, y tuérzala en
ambos extremos.
Para sacar solamente uno o dos cubos
de hielo, deje la charola hacia arriba, tuerza
ligeramente ambos extremos y saque el
número deseado de cubos.
Lave las charolas del hielo
y el compartimiento
de almacenamiento
en una solución de agua
tibia y vinagre para quitar depósitos de
incrustaciones duras. No los coloque en un lavaplatos automático.
SERVICIO DE HIELO
Equipo de suministro de agua
A un costo adicional, puede obtenerse un equipo que contiene tubería
de cobre, las conexiones para la válvula de cierre y las instrucciones
necesarias para conectar el dispositivo de hacer hielo con su línea de
agua fría. Véase la sección de Preparación.
Juego de accesorios para el dispositivo
automático para hacer hielo
Si su refrigerador no venía ya equipado con un dispositivo automático
para hacer hielo, puede obtener, a costo adicional, un Juego de
Accesorios para el Dispositivo para Hacer Hielo. Véase la parte de
atrás de su refrigerador para el juego de dispositivo para hacer hielo
específico necesario para su modelo.
ACCESORIOS
51
Dispositivo para hielo y dispensador Servicio de hielo Accesorios
Page 52

ENTREPAÑOS
Recipientes en la puerta del compartimiento de
alimentos frescos (en algunos modelos)
Los recipientes ajustables se pueden llevar fácilmente del refrigerador
al área de trabajo.
Para retirar:
Levante el recipiente hasta
desenganchar.
Para volver a meter o
colocar los recipientes,
primero, seleccione la
altura deseada, engrane el
recipiente en las guías de
la puerta y empuje hasta
adentro. El recipiente se quedará en la posición correcta.
El divisor (en algunos modelos) ayuda a prevenir que se caigan, se
derramen o se deslicen artículos pequeños guardados en el entrepaño
de la puerta. Coloque los dedos índice y medio en ambos lados del
divisor cerca del frente y mueva simplemente hacia adelante y hacia
atrás según se requiera.
Entrepaños a prueba de derramamientos
(en algunos modelos)
Los entrepaños a prueba de
derramamientos tienen bordes
especiales que están diseñados para
ayudar a prevenir derramamientos
o goteo a los entrepaños que se
encuentran más abajo.
Entrepaños en el Congelador
Los entrepaños en el congelador pueden ser desmontados y colocados
otra vez fácilmente en su lugar (en algunos modelos).
Para quitarlos:
1. Mientras oprime las lengüetas de
los soportes del entrepaño en la
pared derecha, levante el
entrepaño para sacarlos de las
ranuras de los soportes.
2. Jale el entrepaño a un lado hasta
que las varillas salgan de los
agujeros de la pared izquierda.
Para volver a colocar los entrepaños:
Inserte las varillas en los agujeros.
Luego, mientras oprime las lengüetas,
baje el entrepaño dentro de las ranuras
de los soportes. Asegúrese que el
alambre del entrepaño esté totalmente
insertado en las ranuras.
Si los soportes de entrepaños al
nivel preferido sobre la pared a la
derecha no tienen lengüetas,
simplemente baje el entrepaño en su
sitio sobre los soportes.
Compartimientos de la puerta del congelador
(en algunos modelos)
Las barreras de este compartimiento
desmontable aumentan la profundidad y
protegen los entrepaños fijos
de la puerta, proporcionando así mayor
espacio y flexibilidad de almacenamiento.
Para sacarlas: Levante la barrera hacia
arriba, hasta que los ganchos salgan de las
ranuras de la puerta.
Para volver a colocarlas: Sitúe los
ganchos a la altura de las ranuras de la
puerta, encájelos y mueva la barrera en sentido descendente.
Soporte para latas de zumo (en algunos modelos)
Las latas de zumo
congelado pueden meterse
y sacarse con gran facilidad
cuando se colocan en el
soporte de la puerta
del congelador.
Para meterlas, coloque
la primera lata en el fondo
del soporte. Seguidamente,
meta más latas en el soporte
desde arriba.
El divisor
54
Las
demás se
meten por aquí
2
Coloque
la primera
lata aquí
1
Page 53

CUIDADO Y LIMPIEZA
Limpieza exterior
55
El entrepaño con protección contra derramamiento del
dispensador de agua y hielo se deberá secar inmediatamente para
evitar que se perfore. El agua que queda en la charola puede dejar
depósitos que pueden quitarse remojando con vinagre sin diluir. Es
posible usar también una pasta de suavizante de agua que no cause
precipitaciones (por ejemplo, Calgon) y agua, o una cucharadita
(5 ml) de polvo de ácido cítrico por pinta de agua caliente de la llave.
Remoje hasta que desaparezca el depósito o se desprenda lo suficiente
para enjuagarlo. Generalmente es suficiente remojar durante 30
minutos. Evite el uso de cera en el entrepaño y colóquela en su lugar.
Las manijas de la puerta y los ornamentos se pueden limpiar
con un paño empapado con una solución de detergente suave y agua.
Seque con un
trapo limpio. No use cera en las manijas de la puerta ni en
los ornamentos.
Mantenga limpio el terminado. Limpie con un paño limpio
ligeramente humedecido con cera para aparatos de cocina o un
detergente suave y agua. Seque y pula con un paño limpio y suave. No
limpie el refrigerador con un trapo sucio para trastes ni con una toalla
húmeda. Estos podrían dejar residuos que afecten a la pintura. No use
fibra, limpiadores en polvo, blanqueadores ni limpiadores que
contengan blanqueador, ya que estos productos podrían rayar y
desprender el terminado de pintura.
Proteja el terminado de pintura. El terminado del exterior del
refrigerador es un terminado de pintura horneada de alta calidad. Con
el cuidado adecuado conservará su apariencia nueva y libre de óxido
durante muchos años. Aplique una capa de cera de cocina/aparatos
mientras el aparato sea nuevo y posteriormente por lo menos 2 veces
al año.
La loción de cera y de crema limpiadora para su aparato
electrodoméstico se puede adquirir del Service y en los centros de
refacciones.
Entrepaños Cuidado y limpieza
Limpieza interior
El interior del compartimiento de alimentos frescos y del
congelador se deberá de limpiar por lo menos una vez al año.
Desconecte el refrigerador antes de limpiarlo. Si no fuera posible,
exprima el exceso de humedad de la esponja o del trapo cuando se
limpie alrededor de interruptores, focos o controles.
Use agua caliente y una solución de bicarbonato de
sodio—aproximadamente una cucharada (15 ml) de bicarbonato de
sodio por cada cuarto (1 litro) de agua. Esta solución limpia y
neutraliza olores. Enjuague completamente con agua y seque.
Otras partes del refrigerador, incluyendo los empaques de la
puerta, los cajones para vegetales y carne, el recipiente para el
almacenamiento de hielo y todas las partes de plástico, se pueden
limpiar de la misma manera. Después de limpiar los empaques de la
puerta, aplique una capa delgada de petrolato del lado de la bisagra.
Esto ayuda a evitar que los empaques se doblen o se peguen. No usar
polvos para limpiar ni otros limpiadores abrasivos. Evite limpiar los
entrepaños de vidrio fríos con agua caliente, ya que la extrema
diferencia de temperatura puede hacer que se quiebren.
Para evitar olores, deje una caja abierta de bicarbonato en la parte
posterior del refrigerador en el entrepaño superior. Cambie la caja
cada 3 meses. Una caja abierta de bicarbonato de sodio en el
congelador absorbe los olores rancios del congelador.
Apertura del desagüe en el congelador.
En la limpieza anual, retire la canasta superior
del congelador e introduzca con ayuda de una
jeringa para carne una solución de bicarbonato
de sodio—una cucharadita (5 ml) y 2 tazas (500
ml) de agua caliente (no hirviendo)—en la
tubería de desagüe. Esto ayudará a eliminar los
olores y a reducir la probabilidad de que se tape.
Si se tapara el desagüe, use una jeringa para
carne y una solución de bicarbonato de sodio y
agua para destapar la tubería.
No lave partes plásticas del refrigerador en el lavaplatos.
Atrás del refrigerador Debajo del refrigerador
Se deberá tener cuidado al retirar el refrigerador de la pared. Todos los
tipos de recubrimiento de pisos se pueden dañar, sobre todo los
recubrimientos acojinados y los que tienen superficies repujadas. Jale
el refrigerador en forma recta y empuje nuevamente para devolverlo a
su posición. El mover el refrigerador en dirección lateral puede causar
daños al recubrimiento del piso o al refrigerador.
Al empujar el refrigerador a su lugar, asegúrese de no pasar sobre el
cable eléctrico ni sobre la línea de alimentación del dispositivo para
hacer hielos (en algunos modelos).
Para la operación más eficiente,
usted necesita mantener limpia la
región debajo del refrigerador. Quite
la rejilla de la base y barra o pase
el aspirador sobre el polvo
inmediatamente accesible. Para
obtener los mejores resultados, use
un cepillo para este propósito. Puede
adquirir uno en la mayoría de las
tiendas de refacciones para aparatos
para el hogar. Esta manera fácil de
limpiar deberá hacerse una vez al año.
(pase a la página siguiente)
Limpie las bobinas del
condensador al menos
una vez al año.
Page 54

CUIDADO Y LIMPIEZA
(pase)
Cambio de foco
Luz superior del compartimiento de alimentos frescos
1. Desconecte el refrigerador.
2. Para alinear correctamente la
perilla de control, advierta la
posición del control numerado
para reensamblarla
correctamente; gire el control a
OFF (apagado) y quite la perilla.
3. Jale hacia abajo la parte
inferior del panel de plástico
aproximadamente 1/4
″ (6 mm) apenas lo suficiente para
desenganchar el reborde en la parte posterior de las ranuras en los
reténes que se encuentran en la pared posterior.
4. Levante el panel para desenganchar la parte superior de los
pasadores en las paredes laterales y sáquelo.
Después de colocar un foco nuevo del mismo tamaño, vuelva a
instalar el panel (suspenda la parte superior en los pasadores; jale la
parte inferior hacia abajo, empújelo hacia atrás y suéltelo para dejar
que el reborde enganche en las ranuras de los reténes). Vuelva a
colocar la perilla de control de temperatura en la posición OFF
(apagado), gírela al ajuste anterior y vuelva a conectar el refrigerador.
Compartimiento de alimentos frescos—Luz inferior
(en algunos modelos)
Esta luz está situada detrás de la gaveta superior o justo arriba de la
gaveta superior (dependiendo del modelo).
1. Desenchufe el refrigerador.
2. Si la luz está situada detrás de la gaveta superior será necesario
quitar la gaveta y el entrepaño sobre ella. Para quitar la gaveta, vea
la sección Extracción de gavetas en Cuidado y limpieza.
• Para quitar el entrepaño, primero
quite todos los alimentos sobre
él. Entonces incline el entrepaño
hacia adelante al frente y
levántelo hacia arriba y sáquelo
de las ranuras.
3. Agarre el fondo del panel del
foco y tírelo hacia adelante
y hacia arriba.
4. Después de cambiar el foco por
uno del mismo tamaño, vuelva a colocar el panel. Si no encontrara
el tipo correcto de foco, consulte a su concesionario.
5. Si la luz estuvo situada detrás de la gaveta superior, será necesario
reemplazar la gaveta y el entrepaño sobre ella.
• Para volver a colocar el entrepaño, levante ligeramente el frente
del entrepaño y coloque los ganchos superiores en las ranuras
inferiores más grandes. Entonces baje el frente del entrepaño hasta
que esté nivelado.
6. Enchufe otra vez el refrigerador.
Congelador
1. Desconecte el refrigerador.
2. Saque el entrepaño inmediatamente debajo del panel de plástico.
(Será más fácil quitar el entrepaño si se le quita antes todo lo que
tenga encima.)
3. Jale el panel de plástico hacia afuera para tener acceso al foco.
Después de colocar un foco nuevo del mismo tamaño, reinstale el
panel y el entrepaño y vuelva a conectar el refrigerador.
TEMPERATURE CONTROLS
Initial Setting C
Coldest E
Initial Setting 5
Coldest 9
Freezer
Fresh Food
●
●
56
Retén
ranurado,
uno en
cada lado
Pasador
Como sacar las gavetas
Las gavetas se detienen antes de salirse del refrigerador con el fin de
evitar que caiga al suelo su contenido. Pueden extraerse fácilmente
levantándolas ligeramente y tirando de ellas hasta pasar el punto
donde se atrancan.
En algunos modelos puede ser necesario quitar los recipientes de
la puerta del compartimiento de alimentos frescos antes de quitar
las gavetas.
Si no se puede quitar las gavetas a causa de la puerta, se necesitará
hacer rodar el refrigerador hacia adelante hasta que la puerta se abra
bastante para deslizar las gavetas hasta quitarlas. En algunos casos
cuando se hace rodar el refrigerador hacia adelante se necesitará
mover el refrigerador a la izquierda mientras lo roda hacia adelante.
Guías de la gaveta
Lado izquierdo
Al volver a colocar las gavetas, asegúrese de que las deslice a
través de las guías de la gaveta del lado izquierdo.
Page 55

PREPARACION
Preparación para vacaciones En caso de mudanza
57
Para las vacaciones más cortas, saque los alimentos perecederos y
deje los controles en los ajustes habituales. Sin embargo, si se espera
que la temperatura ambiente baje a menos de 60 °F (16 °C), siga las
mismas instrucciones en la sección de Control de temperatura.
En el caso de vacaciones o ausencias prolongadas, desconecte el
refrigerador, mueva el control del compartimiento de alimentos
frescos a la posición OFF (apagado) y limpie el interior con solución
de bicarbonato de una cucharada (15 ml) de bicarbonato por un cuarto
(1 litro) de agua. Séquelo. Para evitar olores, deje abierta la caja de
bicarbonato dentro del refrigerador. Deje abiertas las puertas.
Mueva el brazo detector del dispositivo para hacer hielo (en algunos
modelos) a la posición STOP (PARADA—hacia arriba). Asegúrese de
desconectar el suministro de agua al refrigerador.
Desconecte el cable de la corriente del contacto en la pared. Saque
todos los alimentos y limpie y seque el interior.
Asegure todos los elementos sueltos como parrillas, entrepaños,
y recipientes pegándolos con cinta adhesiva en su lugar para
evitar daños.
Asegúrese de que el refrigerador se coloque en posición vertical
durante la mudanza y en el camión. En el camión es necesario
asegurarlo para evitar movimiento. Proteja su exterior con una sábana.
Cuidado y limpieza Preparación
Ubicación del refrigerador Espacios libres
No instale el refrigerador donde las temperaturas rebasen los
60 °F (16 °C), ya que no podrá mantener las temperaturas adecuadas.
Instale sobre un piso suficientemente firme para soportar un
refrigerador completamente lleno.
Deje suficiente espacio para facilitar la instalación, la circulación
adecuada de aire y las conexiones de plomería y eléctricas.
Lados .................................................................5/8″ (15 mm)
Parte superior ....................................................1″ (25 mm)
(En caso de empotrarase, deje 7⁄8″[22 mm] para las cubiertas
de las bisagras.)
Parte posterior ...................................................1″ (25 mm)
Si el refrigerador está contra una pared en cualquiera de los dos
lados, deje los siguientes espacios libres para las puertas:
para modelos de 20, 22 y 24..............................3/4″ (19 mm)
para modelos de 27............................................1
1
/2″ (38 mm)
Ruedas Nivelación
Las ruedas ajustables detrás de la
parrilla de la base permiten mover el
refrigerador para retirarlo de la pared
para su limpieza. Estas ruedas deberán
colocarse de manera que el
refrigerador descanse firmemente
sobre ellas. Para asegurar que las
puertas cierren automáticamente desde
una posición medio abierta, las
bisagras están construidas de manera
que la fuerza de gravedad contribuya a que cierren solas.
Los refrigeradores de dos puertas verticales cuentan con bisagras
diseñadas especialmente que levantan ligeramente las puertas al abrir,
de manera que la misma fuerza de gravedad contribuye a que se
cierren de manera segura.
Para ajustar las ruedas, quite la
parrilla de la base inclinando en la
parte superior y tirando hacia afuera.
Mueva las ruedas delanteras
ajustando los tornillos en sentido de
las manecillas del reloj para elevar el
refrigerador y contra las manecillas del
reloj para bajarlo. Use una llave (hexagonal de 3/8″) o pinzas.
Gire el engrane de la rueda ajustando los tornillos en sentido de las
manecillas del reloj para elevar el refrigerador y contra las manecillas
del reloj para bajarlo. Use un desarmador de hoja plana.
Al nivelar, puede mejorar el cierre de la puerta elevando el frente a
una distancia aproximada de 5/8″ (15 mm) del piso.
Para volver a colocar la parrilla de la base hay que alinear las
puntas de la parte trasera de la parrilla con pinzas en el gabinete y
empujar hasta que la parrilla atore en su lugar.
Pinza
Punta
Suministro de agua al dispositivo para hacer hielo (en algunos modelos)
Si su refrigerador tiene un dispositivo para hacer hielo, o si planea agregarlo después, éste tendrá
que ser conectado a una línea de agua fría. Será necesario conectar el dispositivo para hacer hielo
a la tubería de agua fría. Por un pequeño costo adicional, es posible adquirir de su distribuidor un
paquete para el suministro de agua que contiene los tubos de cobre, la válvula de cierre, los
dispositivos de ajuste y las instrucciones. Debería haber la tubería suficiente para el dispositivo
para hacer hielo desde la llave de suministro de agua fría para permitir alejar el refrigerador algunos
pies de la pared (aproximadamente 8 pies [244 cm] de tubo de cobre de 1/4″ en 3 roscas de 10
pulgadas [25 cm] de diámetro).
Page 56

REQUERIMIENTOS DE LA INSTALACION
IMPORTANTE…POR FAVOR LEA CUIDADOSAMENTE
Cómo conectar la electricidad
58
Para su seguridad
personal, este aparato
deberá conectarse
debidamente a tierra.
El cable eléctrico de este
aparato está equipado con
una clavija de tres puntas
(tierra) que enchufa en un
contacto estándar de pared
de tres salidas (tierra) para
reducir al mínimo la
posibilidad de daños
por un choque eléctrico con
este aparato.
Haga que un electricista calificado verifique el enchufe de la
pared y el circuito para asegurarse que la salida esté conectada
debidamente a tierra.
Donde se disponga sólo de un contacto de pared con salida para dos
puntas, es su responsabilidad personal y su obligación reemplazarlo
por un contacto adecuado para tres puntas con conexión a tierra.
BAJO NINGUNA CIRCUNSTANCIA DEBE CORTAR O
QUITAR LA TERCERA PUNTA (TIERRA) DE LA CLAVIJA.
Método recomendado
Antes de conectar,
asegúrese de que exista
conexión a tierra.
Uso de un adaptador
Debido a los accidentes
potenciales relacionados
con la seguridad que se
pueden dar bajo
determinadas
circunstancias,
recomendamos
estrictamente no utilizar
una clavija de adaptación.
Sin embargo, si se
decidiera usar un
adaptador donde los
códigos locales lo
permitan, es necesario
hacer una CONEXION
TEMPORAL a un
contacto de pared para dos puntas debidamente conectado a tierra
utilizando un adaptador UL, mismo que puede adquirirse en
comercios locales especializados.
La punta más larga del adaptador se deberá alinear con la entrada
larga del contacto con el fin de tener la polaridad adecuada en la
conexión de la clavija.
El uso de un adaptador requiere de un espacio mayor entre la pared y
la parte posterior del refrigerador.
PRECAUCION: La conexión de la terminal de tierra del adaptador a
la salida del contacto de pared no conecta el aparato a tierra, a no ser
que el tornillo de la tapa sea de metal y no esté aislado y que el
contacto de la pared esté conectado a tierra a través del cableado de la
casa. Un electricista calificado deberá revisar el circuito para
asegurarse de que el contacto esté debidamente conectado a tierra.
Al desconectar el cable del adaptador, deténgalo siempre con una
mano tirando a la vez el cable eléctrico con la otra mano.
Si se rompiera la terminal a tierra del adaptador, NO USE el
aparato hasta que se haya reestablecido la conexión a tierra de
manera adecuada.
Método temporal
(Las clavijas de adaptación
no están permitidas en
Canadá.)
Alinear las puntas/orificios
largos.
Asegurar la conexión a tierra
adecuada y verificar la firmeza
de la conexión antes de usarse.
Requerimientos eléctricos Uso de cables de extensión
El refrigerador deberá conectarse siempre en su propio contacto
eléctrico individual que tenga un voltaje que vaya de acuerdo con
tabla de clasificación.
Esto garantiza la mejor ejecución y evita la sobrecarga del circuito
eléctrico de la casa y los daños a causa del sobrecalentamiento de
los cables.
Debido a los accidentes potenciales que pudieran ocurrir bajo
determinadas condiciones, se recomienda estrictamente no usar cables
de extensión. Sin embargo, si decidiera usarlos, es absolutamente
necesario que sea del tipo UL trifilar para aparatos y cuente con una
clavija con conexión a tierra y que el cable eléctrico de 15 amperios
(mínimo) y 120 voltios.
Page 57

59
INSTALACION DE LA TUBERIA DEL AGUA
PRECAUCION:
• Si utiliza el refrigerador antes de conectar la
tubería del agua, asegúrese de que la varilla de
contacto de la máquina de hacer hielo permanezca
en la posición “STOP” (PARADA—hacia arriba).
• No instale el tubo de la máquina de hacer hielo
en sitios en donde la temperatura pudiera
descender por debajo del punto de congelación.
• Cuando utilice un aparato eléctrico (como, por
ejemplo, un taladro mecánico) durante la instalación,
asegúrese de que dicho aparato esté eléctricamente
aislado o que sus componentes estén dispuestos
de tal manera que no exista peligro de que se
produzcan descargas eléctricas.
• Todas las instalaciones deben apegarse a las
normas vigentes en materia de obras de plomería.
INFORMACION SOBRE LA GARANTIA
Esta instalación de la tubería del agua no está
garantizada ni por el fabricante del refrigerador
ni por el de la máquina de hacer hielo. Siga
estas instrucciones detenidamente para
minimizar el riesgo de producir daños
causados por acción del agua, los cuales
podrían resultar muy costosos.
CORTE EL PASO DE AGUA DEL
ABASTECIMIENTO PRINCIPAL.
Abra el grifo más cercano durante el tiempo
suficiente para despejar la tubería del agua.
1
INSTALE LA LLAVE DE PASO EN LA
TUBERIA DE AGUA POTABLE DE USO FRECUENTE
MAS CERCANA.
a. Coloque la llave en un lugar que tenga fácil
acceso. Lo mejor es colocarla en el lateral de un
tubo vertical. Si fuera necesario colocarla en un tubo
horizontal, haga la conexión en la parte superior o
lateral, en vez de en la inferior, para evitar la
extracción de sedimentos presentes en el tubo.
b. Haga un agujero de 1/4
″ en el tubo con un
taladro, usando una broca bien afilada. Elimine las
asperezas que pudieran haberse producido al
hacer el agujero con el taladro. (No haga un
agujero si usted cuente con una válvula de autoperforación.)
2
• Si la tubería del agua existente tiene en el
extremo un empalme apestañado, para conectar la
tubería del agua al refrigerador se necesitará de
un adaptador (que se compra en las tiendas de
artículos de plomería) o, puede cortar el empalme
apestañado con un cortatubos y entonces usar
un empalme de compresión.
QUE SE NECESITA
• Para el funcionamiento automático de la
máquina de hacer hielo es necesario un
abastecimiento de agua fría. La presión del
agua debe oscilar entre 1.4 y 8.3 barias.
• Taladro eléctrico, a menos que usted cuente
con una válvula de auto-perforación.
• Para la conexión entre el refrigerador y el
abastecimiento de agua es necesario un tubo
de cobre de un diámetro exterior de 1/4″.
Asegúrese de que ambos extremos del tubo estén
cortados a precisión.
Para determinar la cantidad de tubo de cobre que
necesita, mida la distancia desde la válvula del
agua detrás del refrigerador. Después añada
8 pies (244 cm). Asegúrese de que haya suficiente
tubo adicional 8 pies (244 cm) doblado en forma
de una gran espiral en 3 vueltas de eso de 10″ (24
cm) de diámetro para permitir distanciar el
refrigerador de la pared después de la instalación.
No utilice tubos ni empalmes de plástico ya que la
tubería de abastecimiento de agua se halla
siempre bajo presión. Además, ciertos tipos de
tubos de plástico podrían debilitarse con el tiempo
y agrietarse, ocasionando fugas de agua.
• Una llave de paso para conectarse a la tubería
del agua fría. La entrada de agua de dicha llave
habrá de tener un diámetro interior mínimo de
5/32″ en el punto de conexión a la TUBERIA DE
AGUA FRIA. En muchos de los juegos de
accesorios para el abastecimiento de agua se
incluyen llaves de paso tipo campana. Antes de
comprarla, asegúrese de que la llave de paso de
tipo campana se ajuste a las normas vigentes en
materia de plomería.
• Dos tuercas de compresión con diámetro
exterior de 1/4″ y dos férulas (mangas)—para
conectar el tubo de cobre a la llave de paso y la
válvula del agua del refrigerador.
Debaj
ver
de agu
P
t
fr
de ser
E
de peq
alt
de la
P
t
fr
Formas típicas de conexión al abastecimiento del agua
(pase a la página siguiente)
Page 58

INSTALACION DE LA TUBERIA DEL AGUA
(pase)
60
c. Una la llave de paso al
tubo de agua fría con la
abrazadera de tubo.
d. Apriete los tornillos
de la abrazadera hasta
que la arandela
obturadora empiece a
dilatarse. No apriete
demasiado pues podría quebrar el tubo de cobre.
HAGA PASAR EL TUBO DE COBRE ENTRE LA
TUBERIA DE AGUA FRIA Y EL REFRIGERADOR.
Haga pasar el tubo por un agujero hecho en el
suelo (detrás del refrigerador o del armario base
adyacente) lo más próximo posible a la pared.
Asegúrese de que haya suficiente tubo adicional 8
pies (244 cm) doblado en forma de una gran
espiral en 3 vueltas de eso de 10″ (25 cm) de
diámetro para permitir distanciar el refrigerador
de la pared después de la instalación.
3
Abrazadera
del tubo
Llave de
paso
Arandela
Extremo
de entrada
Tubo de
agua fría
vertical
CONECTE EL TUBO DE COBRE A LA
LLAVE DE PASO.
Coloque la tuerca de
compresión y la férula
(manga) en el extremo
del tubo y
conéctelo a la
llave de paso.
Asegúrese
de que el tubo esté
totalmente
metido en la
llave. Apriete
bien la tuerca
de compresión.
4
ABRA EL ABASTECIMIENTO DE AGUA Y DEJE
CORRER EL AGUA POR LA TUBERIA.
a. Abra el abastecimiento principal del agua y deje
que ésta corra por el interior del tubo hasta que
salga completamente transparente.
b. Cierre el agua después de que haya pasado por
el tubo un litro, aproximadamente.
5
CONECTE EL TUBO DE COBRE AL REFRIGERADOR.
Antes de efectuar la conexión al refrigerador,
asegúrese de que el cable eléctrico del
refrigerador no esté enchufado a la toma de
corriente de la pared.
Si su abastecimiento de agua contiene arena o
partículas que pudieran obstruir la criba de la
6
Llave
de paso
Tuerca de
presión
Válvula de
salida
Tuerca de compresión
Férulas
(mangas)
válvula del agua del refrigerador, recomendamos
que instale un filtro para agua (disponible a los
centros de servicio y en los centros de refacciones).
Instálelo en el tubo de agua cerca al refrigerador.
a. Retire el tapón
de plástico de la
válvula de agua.
b. Coloque la
tuerca de
compresión y la
férula (manga) al
extremo del tubo,
tal como se
indica
en la ilustración.
c. Introduzca el
extremo del tubo de cobre en la entrada de la
válvula del agua (lo
más posible). Al mismo
tiempo
que sujeta el tubo, apriete el dispositivo de ajuste.
d. Sujete el tubo de cobre con la abrazadera que se
proporciona, de modo que quede en posición
vertical. Es posible que tenga que abrir la
abrazadera a palanca.
ABRA EL AGUA EN LA LLAVE DE PASO.
Apriete todas las conexiones que tengan fugas de agua.
7
DESPLACE EL REFRIGERADOR NUEVAMENTE
CONTRA LA PARED.
Coloque el tubo de cobre en espiral contra la
parte trasera del refrigerador o contra la pared
para, de esta manera, evitar la vibración.
10
COLOQUE LA VARILLA DE CONTACTO DE LA
MAQUINA DE HACER HIELO EN LA POSICION
“ON” (ACTIVADA—HACIA ABAJO).
La máquina de hacer hielo no entrará en funcionamiento
hasta que haya alcanzado su temperatura de operación
de 15 °F (-9 °C), o inferior. En dicho
momento
entrará en funcionamiento, siempre que se encuentre
en la posición “ON” (ACTIVADA—hacia
abajo).
OBSERVACION: La máquina de hacer hielo
podría
hacer un ciclo doble al arrancar por primera vez,
ocasionando que se vierta agua de la máquina de
hacer hielo sobre la cubitera. Esto es normal y no deberá
ocurrir una segunda vez. El primer hielo hecho
debe
tirarse a fin de eliminar las impurezas que
permanezcan en la tubería del agua.
9
ENCHUFE EL CABLE ELECTRICO DEL
REFRIGERADOR A UNA TOMA DE CORRIENTE
CONECTADA A TIERRA.
8
Férulas
(mangas)
Tubería de
cobre de 1/4″
Tuerca de
compresión
de 1/4″
Abrazadera
del tubo
Conexión al refrigerador
Page 59

¿PREGUNTAS?
USE ESTA HOJA PARA SOLUCIONAR LOS PROBLEMAS
PROBLEMA CAUSA POSIBLE
EL REFRIGERADOR • Puede estar en el ciclo de descongelar cuando el motor no opera durante 30 minutos.
NO FUNCIONA
• El control de la temperatura está en posición OFF (apagado).
• Si no se enciende la luz interior, posiblemente el refrigerador no esté conectado al
contacto de la pared.
• Si la clavija está conectada y el refrigerador sigue sin operar, conecte una lámpara
o algún otro aparato pequeño en el mismo contacto para determinar si hay
un falso contacto o algún fusible fundido.
EL MOTOR OPERA • Los refrigeradores modernos con gran espacio de almacenamiento y un
DURANTE PERIODOS congelador más grande requieren de más tiempo de operación.
PROLONGADOS
• Es normal si el refrigerador es recién instalado—normalmente requiere de
24 horas para enfriarse.
• Hay grandes cantidades de alimentos en el refrigerador que requieren ser
enfriados o congelados.
• Clima caluroso—aperturas frecuente de la puerta del refrigerador.
• Se dejó la puerta abierta.
• Los controles de temperatura están ajustados a demasiado frío. Consulte las
instrucciones para ver el uso de los Controles de temperatura.
• La parrilla y el condensador requieren de limpieza. Consulte la página
correspondiente a Cuidado y limpieza.
EL MOTOR ARRANCA Y • El control de temperatura arranca y para el motor para mantener
PARA CON FRECUENCIA temperaturas uniformes.
SONIDOS NORMALES DE LA OPERACION
Estos sonidos son normales y no son señal de que se necesite servicio.
El nuevo compresor de alta eficiencia funciona más rápido y tendrá
un zumbido o ruido pulsante más alto durante la operación.
El control de tiempo de descongelamiento y el control del
refrigerador producen un ligero sonido al encenderse o apagarse.
El aire de ventilación que circula dentro del congelador
mantiene una temperatura uniforme.
El goteo de agua que cae en el calentador para descongelar
causa un ruido silbante durante el ciclo de descongelamiento.
El flujo de refrigerante a través de la espiral de refrigeración del congelador
causa sonidos similares al agua hirviendo o un ruido de burbujeo.
Las espirales de refrigeración crujen o truenan a causa de la expansión o la contracción
durante el descongelamiento y la refrigeración después del descongelamiento.
El goteo de agua se derrite del vaporizador y fluye a la
bandeja de desagüe en el ciclo de descongelamiento.
Dispositivo para hacer hielo (en algunos modelos):
La válvula de agua del dispositivo para hacer hielo zumba cuando se llena de agua. Si la
varilla de contacto está en posición ON (ACTIVADA—hacia abajo) zumbará aun si no
haya estado conectada al agua. Guardando la varilla de contacto en la posición ON
(ACTIVADA—hacia abajo) antes de que esté conectada al agua puede dañar el
dispositivo para hacer hielo. Para evitar eso, levante la varilla de contacto a la posición
STOP (PARADA—hacia arriba). Esto parará el ruido.
El sonido de los cubos de hielo cayendo al recipiente y el flujo del agua en las tuberías
para llenar el dispositivo.
(pase a la página siguiente)
Instalación de la tubería del agua Solucionar los problemas
61
Page 60

SOLUCIONAR LOS PROBLEMAS
(pase)
62
PROBLEMA CAUSA POSIBLE
VIBRACIONES Y • Si el refrigerador vibra, lo más probable es que no esté colocado firmemente sobre
SACUDIDAS el piso y que necesiten ajuste los tornillos de las ruedas frontales o las patas
frontales, o el piso es irregular o débil. Consulte la sección de Ruedas de la
página de Preparación.
• Si los recipientes vibran sobre los entrepaños, cámbielos de lugar. Es normal una
vibración ligera.
AIRE CALIENTE DEL • El aire normal fluye para enfriar el motor. En el proceso de refrigeración es normal
FONDO DEL que salga calor en el área abajo del refrigerador. Algunos recubrimientos de piso se
REFRIGERADOR decoloran a estas temperaturas normales de una operación segura. Puede consultar a
su vendedor de recubrimientos de pisos si tiene alguna objeción a esta decoloración.
LA PUERTA NO CIERRA • Los recipientes de la puerta del lado de las bisagras están atoradas o rebasan los bordes.
ADECUADAMENTE Para corregir, coloque una pequeña cantidad de petrolato en la pared del recipiente.
LA TEMPERATURA DEL • El control de temperatura está demasiado bajo. Consulte la sección de Control
COMPARTIMIENTO DE de temperaturas.
ALIMENTOS FRESCOS O
• Clima caluroso—apertura frecuente de las puertas.
DEL CONGELADOR ES
• La puerta permaneció abierta mucho tiempo.
DEMASIADO ALTA
• Algún paquete mantiene la puerta abierta.
LOS ALIMENTOS SE SECAN • Los alimentos no han sido tapados, envueltos o sellados adecuadamente.
ESCARCHA O FORMACION • La puerta puede haber quedado entreabierta o algún paquete está obstruyendo y la
DE CRISTALES EN LOS puerta no cierra adecuadamente.
ALIMENTOS CONGELADOS
• La puerta se abre con frecuencia o durante tiempos prolongados.
• La escarcha dentro de los paquetes es normal.
FORMACION LENTA DE • La puerta puede haberse quedado abierta.
CUBOS DE HIELO
• Ajuste la temperatura del congelador a una temperatura más fría.
LOS CUBOS DE HIELO • Es necesario desechar los cubos viejos.
TIENEN OLOR/SABOR
• El recipiente de almacenamiento de hielo se tiene que vaciar y lavar.
• Los empaques no sellados en el refrigerador y/o congelador pueden estar
transmitiendo olor/sabor a los cubos de hielo.
• Es necesario limpiar el interior del refrigerador—consulte la sección de
Cuidado y limpieza.
• Sabor desagradable en el agua suministrada. Instale un filtro para agua—consulte
la sección de Accesorios para el filtrado del agua.
NO FUNCIONA EL • El control de ON-STOP está en posición STOP (PARADA—hacia arriba).
DISPOSITIVO AUTOMATICO
• El suministro de agua está cerrado o desconectado.
PARA HACER HIELO
• El congelador tiene una temperatura demasiado alta.
• Los cubos son demasiado pequeños—puede estar tapada la válvula de la tubería
de suministro de agua de la casa a la que está conectado el refrigerador.
• En ocasiones, los cubos se pegan al lado del molde y mantienen el brazo detector
del dispositivo en la posición STOP (PARADA—hacia arriba). Quite este hielo para
que vuelva a operar el dispositivo para hacer hielo.
• Cuando se toman los cubos con la mano, puede suceder que mueva el brazo
detector del dispositivo hacia la posición STOP (PARADA—hacia arriba).
• Los cubos apilados en el recipiente pueden hacer que el dispositivo se apague
demasiado pronto. Con el brazo detector del dispositivo en posición STOP
(PARADA—hacia arriba), nivele los cubos en el recipiente.
Page 61

Solucionar los problemas
63
PROBLEMA CAUSA POSIBLE
EL DISPENSADOR DE • No hay cubos de hielo. Quite el recipiente de almacenamiento. Si hay cubos
CUBOS DE HIELO NO congelados en el brazo, quítelos.
FUNCIONA
• No hay cubos de hielo. Está desconectado el dispositivo para hacerlos o está
(en algunos modelos)
desconectada el agua.
• Bloques irregulares de hielo en el recipiente de almacenamiento. Rómpalos lo más
que se pueda con la presión de los dedos y deseche los cubos restantes.
AGUA CON OLOR/SABOR • Si el dispensador de agua no se ha usado durante mucho tiempo, extraiga agua de la
DESAGRADABLE manera normal hasta que el agua del sistema haya salido y se haya reemplazado con
(en algunos modelos) agua fresca.
• Sabor desagradable en el agua que entra. Instale un filtro de agua—consulte la
sección de Filtro de agua.
EL AGUA DEL PRIMER • Si el refrigerador está recién instalado, espere unas 24 horas hasta que el agua se
VASO ESTA TIBIA enfríe a temperaturas adecuadas.
(en algunos modelos)
• Si no se ha usado durante mucho tiempo el dispensador de agua, el agua del primer
vaso no estará tan fría como la de los vasos subsecuentes.
• Si se ha desaguado el sistema, espere algunas horas para permitir que se enfríe el
agua fresca.
NO FUNCIONA EL • La tubería de suministro de agua está cerrada o desconectada.
DISPENSADOR DE AGUA
• La tubería de suministro puede estar tapada con sedimentos.
(en algunos modelos)
• Si no hay distribución de agua cuando el refrigerador está primeramente
instalado, hay posibilidad de aire en el sistema de la línea de agua. Oprima el
botón del dispensador durante al mínimo dos minutos para eliminar el aire
atrapado de la línea de agua y llenar el sistema.
EL DIVISOR ENTRE EL • El calor normal se crea por un sistema automático de ahorro de energía en el que
COMPARTIMIENTO DE circula líquido a temperaturas más altas frente al congelador para evitar la
ALIMENTOS FRESCOS Y EL
condensación en el exterior del refrigerador en climas calientes y húmedos.
CONGELADOR SE SIENTE
TIBIO
SE FORMA HUMEDAD EN • Puede suceder durante los períodos con alto grado de humedad.
EL EXTERIOR DEL
REFRIGERADOR
SE OBSERVA HUMEDAD • El refrigerador se abre con mucha frecuencia o durante mucho tiempo.
EN EL INTERIOR
• En climas húmedos, el aire lleva la humedad dentro del refrigerador cuando se
abren las puertas.
AGUA EN EL PISO DE LA • El desagüe en el fondo del refrigerador puede estar tapado. Quite el hielo del piso
COCINA O EN EL FONDO del congelador y limpie el desagüe. Consulte la sección de Cuidado y limpieza.
DEL CONGELADOR
• No use un vaso más alto que 6 pulgadas (15 cm), pueden estar quedando cubos
en el orificio. Estos pueden aglomerarse dentro del orificio y ser expulsados más
tarde dejando agua o hielo en el piso.
(pase a la página siguiente)
Page 62

PROBLEMA CAUSA POSIBLE
EL REFRIGERADOR HUELE
• Los alimentos con olores fuertes deben estar tapados.
• Verifique si no hay alimentos descompuestos.
• Se tiene que limpiar el interior. Consulte la sección de Cuidado y limpieza.
• Hay que limpiar el sistema de agua de deshielo.
• Deje una caja abierta de bicarbonato de sodio en el refrigerador. Cámbiela cada 3 meses.
NO FUNCIONA LA • No hay corriente en el contacto.
LUZ INTERIOR
• Hay que cambiar el foco. Consulte la sección de Cuidado y limpieza.
UN BRILLO ANARANJADO • A veces aparece un brillo anaranjado en el conjelador cuando el calefactor de
APARECE EN descongelación está encendido. Eso es normal.
EL CONGELADOR
Si necesita más ayuda…llame sin costo a:
GE Answer Center
®
, 800.626.2000
consumer information service
SOLUCIONAR LOS PROBLEMAS
(pase)
64
Page 63

65
Estaremos Con Usted
Con la compra de su nuevo aparato GE recibirá la seguridad de que si alguna vez necesita
información o asesoría GE, estaremos a su disposición. Todo lo que tiene que hacer es llamar—¡sin
costo! En GE Answer Center se habla español.
Servicio de reparación en su hogar
800-GE-CARES (800-432-2737)
Un especialista del servicio al consumidor GE le proporcionará el servicio especializado de reparación, programado a la hora más
conveniente para usted. Muchos centros de servicio al consumidor GE operados por la compañía le ofrecen servicio hoy o mañana o
cuando a usted le convenga (7:00 a.m. a 7:00 p.m. en días laborables y 9:00 a.m. a 2:00 p.m. los sábados). Nuestros técnicos capacitados
por la fábrica conocen su aparato por fuera y por dentro—así, la mayoría de las reparaciones se hacen en sólo una visita.
GE Answer Center®
800.626.2000
Cualquiera que sea su pregunta sobre alguno de los grandes aparatos GE, el servicio de información GE Answer Center® será dispuesto
a ayudar. Usted llama y su pregunta será contestada inmediatamente y con cortesía. Y usted puede llamar a cualquier hora. El servicio
GE Answer Center® está abierto 7 días a la semana las 24 horas del día.
Contratos de servicio
800-626-2224
Usted puede estar seguro de que GE Consumer Service estará allí aún después de que expire su garantía. Compre usted un contrato de
servicio mientras que esté vigente su garantía y recibirá un descuento considerable. Con un contrato para varios años, usted asegura el
servicio futuro a los precios de hoy.
Partes y accesorios
800-626-2002
Las personas calificadas para dar servicio a sus propios aparatos pueden solicitar las partes y accesorios que se les enviarán directamente a
sus hogares. El sistema de refacciones de GE tiene acceso a más de 47000 partes, y todas las refacciones originales GE cuentan con plena
garantía. Se aceptan tarjetas VISA, Mastercard y Discover.
Las instrucciones de mantenimiento para el usuario que contiene este folleto cubren procedimientos que puede realizar cualquier usuario.
Otro tipo de servicios los deberá ejecutar exclusivamente personal calificado. Es necesario tener precaución, ya que el servicio inadecuado
puede ser causa de peligros en la operación.
Para clientes con necesidades especiales…
800.626.2000
Si se solicita, GE puede proporcionar controles Braille para numerosos aparatos, así como un folleto de ayuda en la planeación de una
cocina sin barreras para personas limitadas en su movilidad. Para adquirir estos artículos, llamar sin costo al teléfono 800.626.2000.
Los consumidores con impedimentos de oído o de habla que tienen acceso a TDD o a algún teletipo convencional, llamar al 800-TDD-GEAC
(800-833-4322) para solicitar información o servicio.
Solucionar los problemas Estaremos con usted
Page 64

66
LO QUE ESTA CUBIERT O
GARANTIA COMPLETA POR
UN AÑO
Durante un año a partir de la fecha de
la compra original proporcionaremos
sin cargo alguno, partes y servicio de
mano de obra en su mismo hogar
para reparar o reponer
cualquier
parte del refrigerador
que falle a
causa de algún defecto de fabricación.
GARANTIA COMPLETA POR
CINCO AÑOS
Durante cinco años a partir de la
fecha de la compra original,
proporcionaremos sin cargo alguno,
partes y servicio de mano de obra en
su hogar para reparar o reponer
cualquier parte del sistema sellado
de refrigeración (el compresor, el
condensador, el evaporador y todas
las tuberías de conexión) que falle a
causa de algún defecto de fabricación.
GARANTIA LIMITADA DE POR VIDA
Durante la vida del ref
rigerador,
reemplazaremos sin cargo alguno,
cualquier deposito o gaveta
transparente
proporcionada con
el refrigerador si éste se rompiera
durante el uso normal. No se
incluyen las cubiertas de las gavetas.
Las gavetas se podrán cambiar en
GE Service y en los centros de
refacciones o escribiendo a la
dirección que aparece abajo.
******************************
Esta garantía se extiende al
comprador original y a cualquier
propietario subsecuente por
productos comprados para uso
normal en el hogar en los 48
estados continentales, Hawai y
Washington D.C. En Alaska valdrá
la misma garantía pero con la
LIMITACION de que el propietario
pagará el costo del embarque al
taller de servicio o los viáticos del
técnico de servicio hasta su hogar.
Todos los servicios de garantía serán
proporcionados por nuestros centros
de servicio de fábrica o por los
técnicos autorizados del Customer
Care®(Atención al cliente) durante
las horas laborables normales.
Si su aparato necesitara servicio
durante el período de garantía o
posteriormente, llamar al
800-GE-CARES (800-432-2737).
LO QUE NO ESTA
CUBIERTO
• Viajes de servicio a su hogar para
mostrar cómo se usa el producto.
Lea el material para el Uso y el
cuidado. Si aún tuviera alguna
pregunta sobre cómo operar el
producto, f avor de contactar a nuestro
representante o a nuestra oficina de
Asuntos del consumidor en la
siguiente dirección o llame sin cargo a:
GE Answer Center
®
800.626.2000
consumer information service
• Instalación inadecuada.
Si usted tiene algún problema
de instalación, contacte a nuestro
representante o instalador.
Usted es responsable de
proporcionar las instalaciones
adecuadas de electricidad,
plomería y otras conexiones.
• Reemplazo de fusibles del hogar o
eliminación de cortocircuitos.
• Fallas del aparato si éste se usara
para otros propósitos que los
propuestos o se usara para fines
comerciales.
• Daños al producto causados por
accidentes, fuego, inundaciones o
cualquier causa de fuerza mayor.
• Pérdida de alimentos a causa
de averías.
LA EMPRESA QUE OTORGA LA
GARANTIA NO ES
RESPONSABLE DE DAÑOS
CONSECUENTES.
Algunos estados no permiten la exclusión o la limitación de daños incidentales o consecuentes, de manera que la limitación o exclusión mencionada
no sería válida para usted. Esta garantía le proporciona derechos legales específicos y usted podrá tener otros derechos más que varían de estado.
Para saber qué derechos legales tiene en su estado, consulte a la oficina local de derechos del consumidor o a la procuraduría de su estado.
Empresa que otorga la garantía: General Electric Company
Si necesitara asesoría con respecto a esta garantía, escriba a:
Manager—Consumer Affairs, GE Appliances, Louisville, KY 40225
Part No. 162D7744P002
Pub. No. 49-6854
Modelos lado por lado 20–27
Impreso en los Estados Unidos
Este folleto está impreso en papel reciclado.
SU REFRIGERADOR GENERAL ELECTRIC
GARANTIA
(para los clientes en los Estados Unidos)
Engrape aquí la nota de caja o el cheque
cancelado. Es necesario mostrar la
fecha original de la compra para obtener
servicio bajo garantía.
Page 65

NOTAS
67
Page 66

WHAT IS COVERED
FULL ONE-YEAR WARRANTY
For one year from date of original
purchase, we will provide, free of
charge, parts and service labor in
your home to repair or replace
any
part of the refrigerator
that fails
because of a manufacturing defect.
FULL FIVE-YEAR WARRANTY
For five years from date of original
purchase, we will provide, free of
charge, parts and service labor in
your home to repair or replace any
part of the sealed refrigerating
system (the compressor, condenser ,
evaporator and all connecting
tubing) that fails because of a
manufacturing defect.
LIMITED LIFETIME WARRANTY
For the life of the refrigerator, we
will replace, free of charge,
any
see-through pan or drawer
furnished with the refrigerator if the
pan or drawer breaks during normal
household use. Drawer covers are
not included. The drawers can be
exchanged at a GE Service and
Parts Center, or by writing to the
address below.
*******************************
This warranty is extended to the
original purchaser and any succeeding
owner for products purchased for
ordinary home use in the 48 mainland
states, Hawaii and Washington, D.C. In
Alaska the warranty is the same
except that it is LIMITED because you
must pay to ship the product to the
service shop or for the service
technician’s tra v el costs to y our home .
All warranty service will be provided
by our Factory Service Centers or by
our Authorized Customer Care
®
servicers during normal working hours.
Should your appliance need service,
during warranty period or beyond, call
800-GE-CARES (800-432-2737).
WHAT IS NO T COVERED
• Service trips to your home to
teach you how to use the product.
Read your Use and Care
material.
If you then have any
questions about operating the
product, please contact your
dealer or our Consumer Affairs
office at the address below, or
call, toll free:
GE Answer Center
®
800.626.2000
consumer information service
• Improper installation.
If you have an installation problem,
contact your dealer or installer.
You are responsible for providing
adequate electrical, plumbing and
other connecting facilities.
• Replacement of house fuses or
resetting of circuit breakers.
• Failure of the product if it is used
for other than its intended purpose
or used commercially.
• Damage to product caused
by accident, fire, floods or acts
of God.
• Loss of food due to spoilage.
WARRANTOR IS
NOT
RESPONSIBLE FOR
CONSEQUENTIAL DAMAGES.
Some states do not allow the exclusion or limitation of incidental or consequential damages, so the above limitation or exclusion
may not apply to you. This warranty gives you specific legal rights, and you may also have other rights which vary from state to state.
To know what your legal rights are in your state, consult your local or state consumer affairs office or your state’s Attorney General.
Warrantor: General Electric Company
If further help is needed concerning this warranty, write:
Manager—Consumer Affairs, Appliance Park, Louisville, KY 40225
Part No. 162D7744P002
Pub. No. 49-6854
Side by Side 20–27 Models
Printed in the United States
12-95 CG
This book is printed on recycled paper.
YOUR GENERAL ELECTRIC REFRIGERATOR
WARRANTY
(for customers in the United States)
Staple sales slip or cancelled check
here. Proof of original purchase date
is needed to obtain service
under warranty.
 Loading...