

Page 1

13TVR60/19TVR60
TV/VCRUser'sGuide
We bring good things to life.
Page 2
Important Information
lie
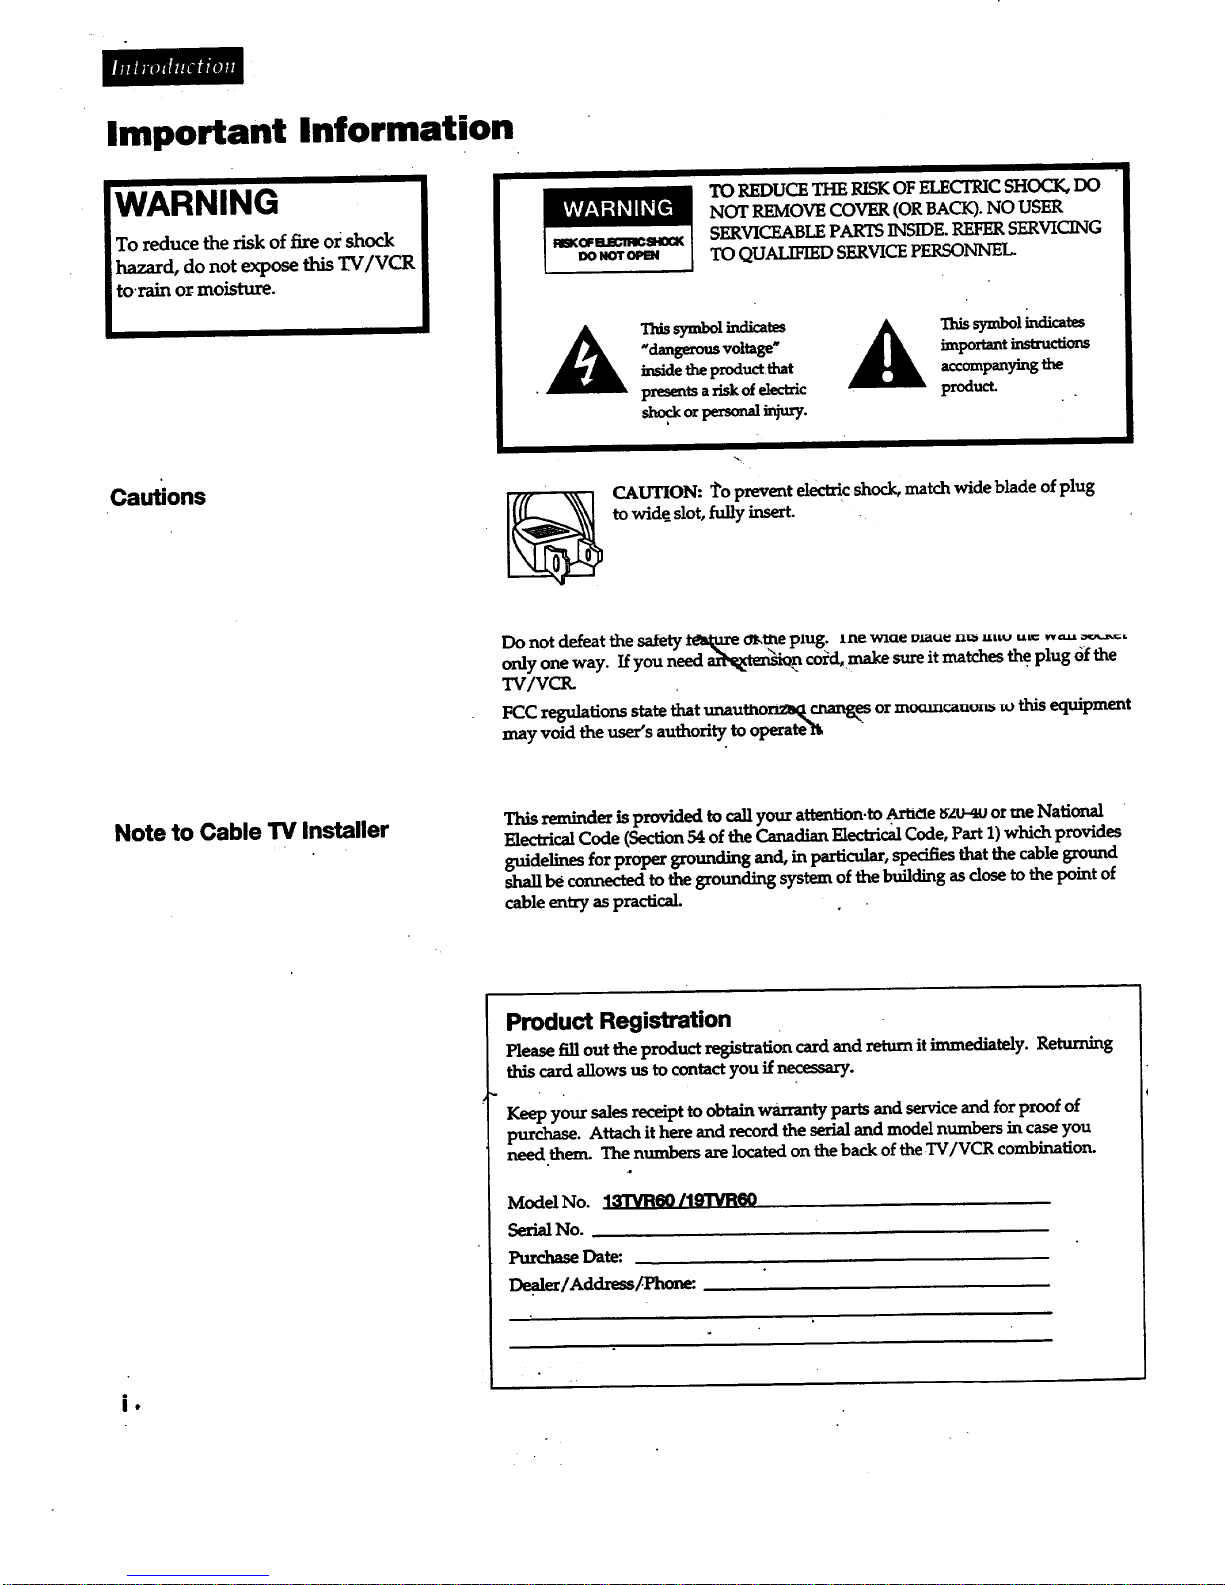
WARNING
To reduce the risk of fire oi shock
hazard, do not expose this TV/VCR
to.rain or moisture.
I
Cautions
II
TO REDUCETHE RISKOF ELECTRICSHOCK,DO
NOT REMOVECOVER (ORBACK).NO USER
SERVICEABLEPARTSINSIDE.REFERSERVICING
TO QUALIFIED SERVICEPERSONNEL
A
Thissymbol_UcaWs
"dangerousvoltage"
insidethe product,that
presents a risk of electr_
importantinstruc_ons
accompanyingthe
producL
CAUTION: to prevent electric shock, match wide blade of plug
to wide slot, fully insert.
Do not defeat the safety tesk-meo_me plug. lne wlue vmu_ .= a,v -.=. ....
only one way. Ifyou need _n co/d, make sure it matches the plug 6f the
TV/VCK
FCC regulations state that unaumonz_kcnang _ or moomcauo_ _o this equipment
may void the user's authority to operate't_
Note to Cable TV Installer
This reminder is provided to call your attention-to .Ar_oe _-4u orme National
Electrical Code (Section 54 of the Canadian Electrical Code, Part 1) which provides
guidelines for proper grounding and, in particular, specifies thatthe cable ground
shaUbe connected to tb_ grounding system of thebuilding as dose to thepoint of
cable entry as practical.
Product Registration
Please fill out theproduct registration card and return itimmediately. Returning
this card allows us to contact you ifnecessary.
Keep your sales receipt to obtain warranty parts and service and forproof of
purchase. Attach ithere and record the serialand model numbers in case you
need them. The numbers are located on the back of theTV/VCR combination.
ModelNo. 13TVR60/19"rVR60
Serial No.
Purchase Date:
Degfler/Address/Phone:
i •
Page 3
mUB]fl_l/_l]_# mm
Table of Contents
Important "information
w_
Cautions
Note to Cable TVInstaller
Product-Registration
i
i
i
i
Setting Up the TV/VCR
S_l_up
Che_ Accessories With TV/VCR __ 2
InsertBatteriesin Remote 3
ConnectAntennaorCable-TV
System 3
Turn On the TV/VCR 3
Put Channels into Memory.
(Auto Channel Search) 3
Add or Remove Channels from
TV/VCR's Memory 4
Set the Time and Date (Clock) __ 4
Select the Language. (Escoge
una Lengua.) 5
Select a Channel and Adjust
the Volume 5
6-7
Using the Remote Control
Buttons
Using the TV/VCR FeatUres
_-_ _hys 8
Adjust theV_deo 8 "
Closed Captioni_ 9
Commercial Skip 9
WakJe-UpTuner . 10
SleepTimer " 10
Playing a Tape
Using the Playback Features
Pause 12
Frame Advance 12
Picture Seai_ 12
Automatic Tracking 13
Manual Tracking 13
Tnne Counter. 13
Auto Play Feature 14
Auto Repeat Feature 14
Commercial Scan 14
Index Search
Zero Search
Blank Search
Recording a Program
Recording Features
Zecord_ Speeds
Recording Pause
Child Lock
Types of Recordings
Basic Recording
• One TouchRecording
TimerRecording
Checking or Clearing Time_
Recordings
Stopping a Timer Recording
Copying and Edi_g Tapes
15
16
16
17
17
17
18
19
2O
21
22
22
Location of Controls
FrontPanel 23
BackPanel 24
Hooking Up the TV/VCR
Choosing a Hookup 24
Connect Cable SystemWithCable Box to
Unscramble All Channels 26
Connect Cable System With Cable Box to
Unscramble Only Premium
Channels 26
ConnectVCR orCamcordeT
forCopying Tapes 27
References
Trouble Checks 28-29
Cleaningthe"IV/VCR 30
Specifications 30
Index 32-33
1
Page 4
m.-y_B mlIMW |mmRml_ ssHI_ L'_B
Startup
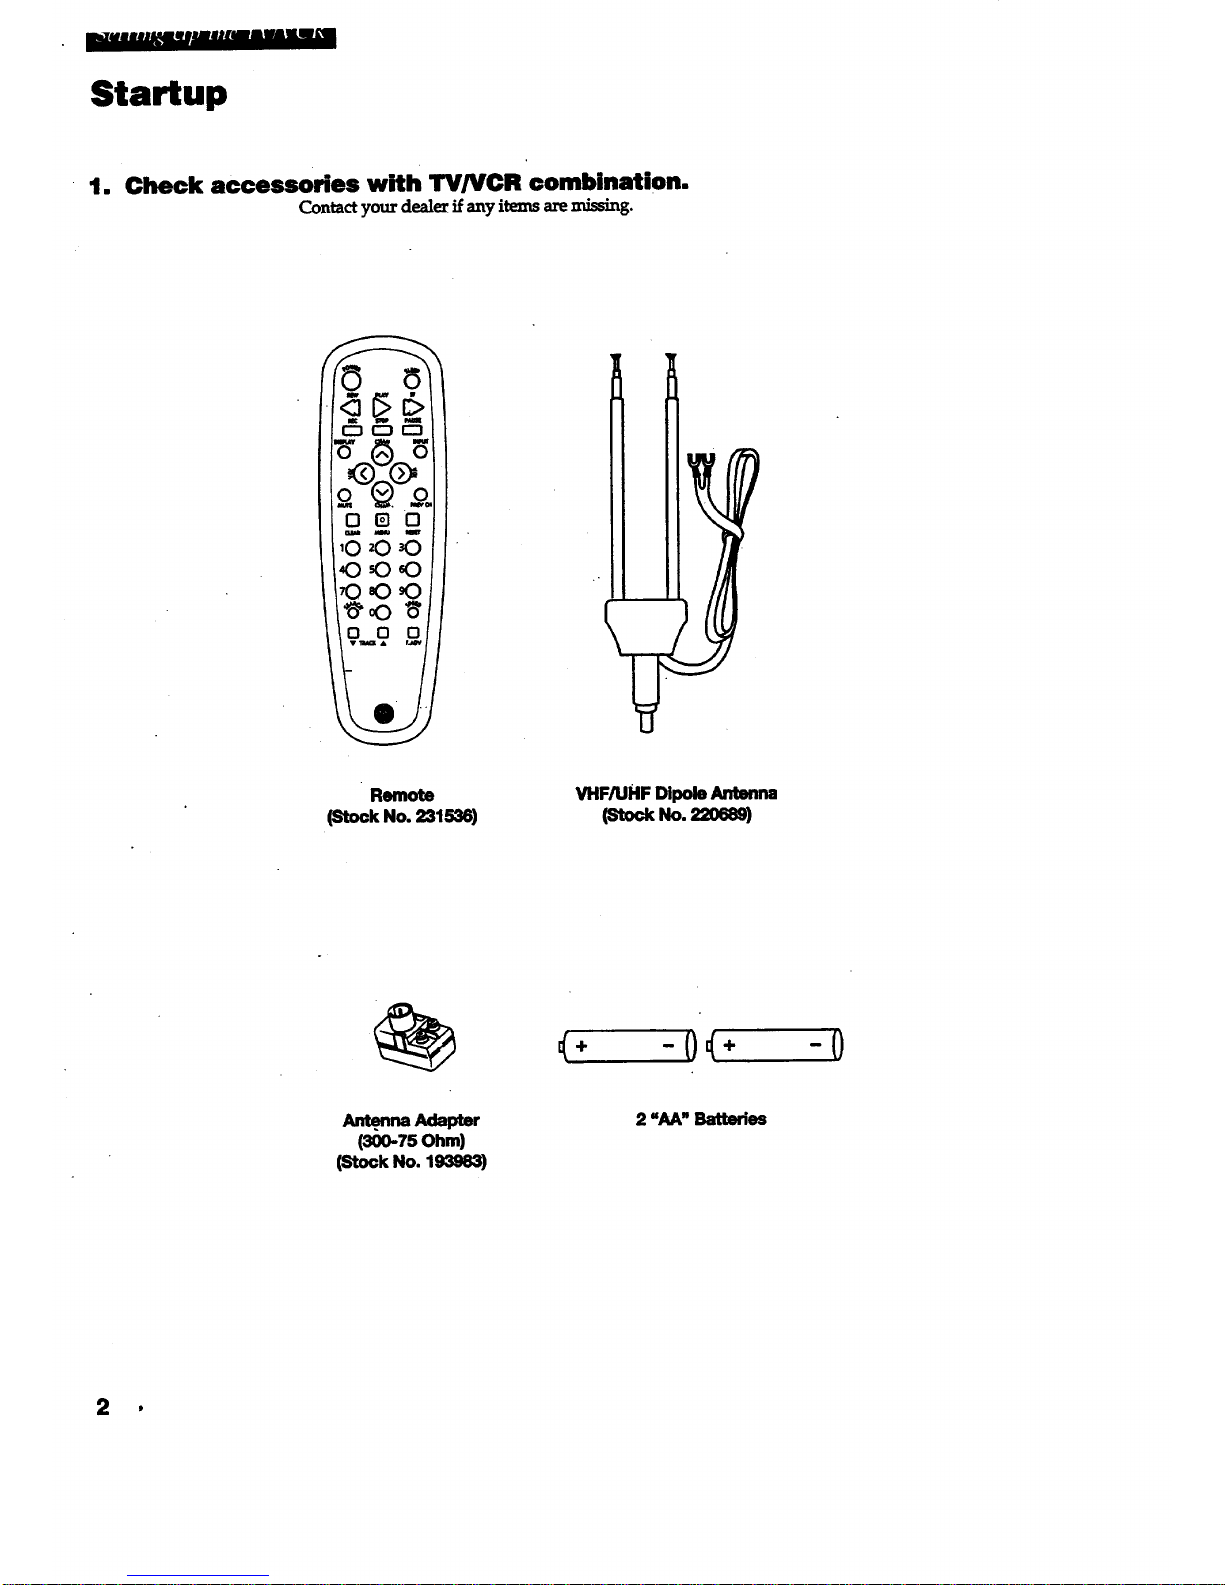
1. Check accessories with TVNCR combination.
Contactyour dealezif anyitemsaremissing.
0c30
Remote
(Stock No. 231536)
VHF/UHF DipoleAntenna
_'tock No. _0_8)
_÷ -()_÷ -()
Antenna Adapter
(300-75 Ohm)
(Stock No. 193_3)
2 "AA" Battsdes
p
Page 5
L_i_|Im#ff_AWAWlINI
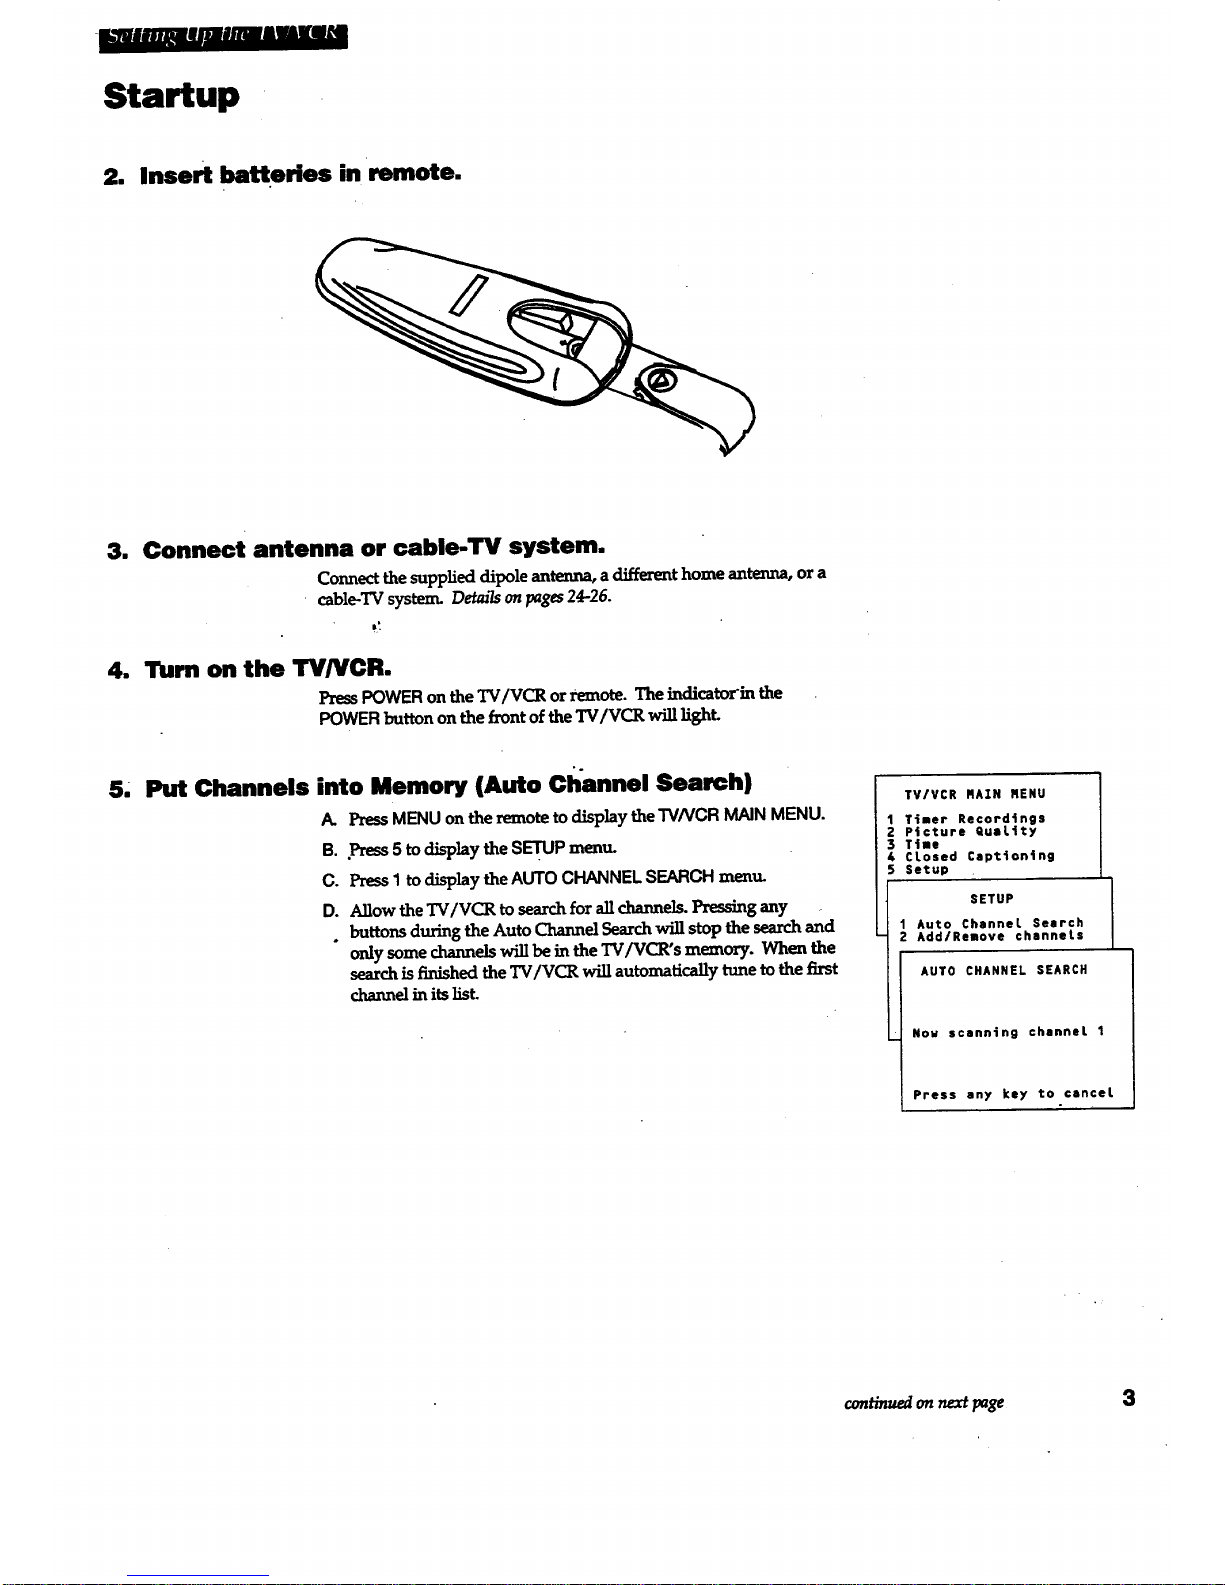
Startup
2. Insert batteries in remote.
m
m
Connect antenna or cable-TV system.
Connect thesupplied dipole antenna, a different home antenna, ora
• cable-TV system. Details onpages24-26.
TUrn on the I_fNCR.
PressPOWERon the "IV/VCR orremote. The indicatorin
POWERbuttononthefront oftheTV/VCR will Light.
5, Put Channels into Memory (Auto Channel Search)
A. PressMENUonthe remoteto display theTV/VCR MAINMENU.
B. Pr_ 5 to displaytheSETUPmenu.
C. Press1 tod_play the AUTOCHANNELSEARCHmenu.
D. Anow theTV/VCR to search for all channels. Pressing any
. buttonsduringtheAutoChannelSearchwillstopthesearchand
only some channels will be in the'I"4/VCR's memory. When the
search is finished the TV/VCR wiU automatically tune to the first
channel in its list.
TV/VCR RA:N NENU
1 Timer Recordings
2 Pfcture RuaL_ty
3 Ttme
4 CLosed Cspt4on4ng
Setup
SETUP
1 Auto Channel Search
2 Add/Remove channels
AUTO CHANNEL SEARCH
Now scanning channel 1
Press any key to cancel
continuedonnextpage 3
Page 6
i_,ii/ll_ Imllllllllli_#_
•Startup
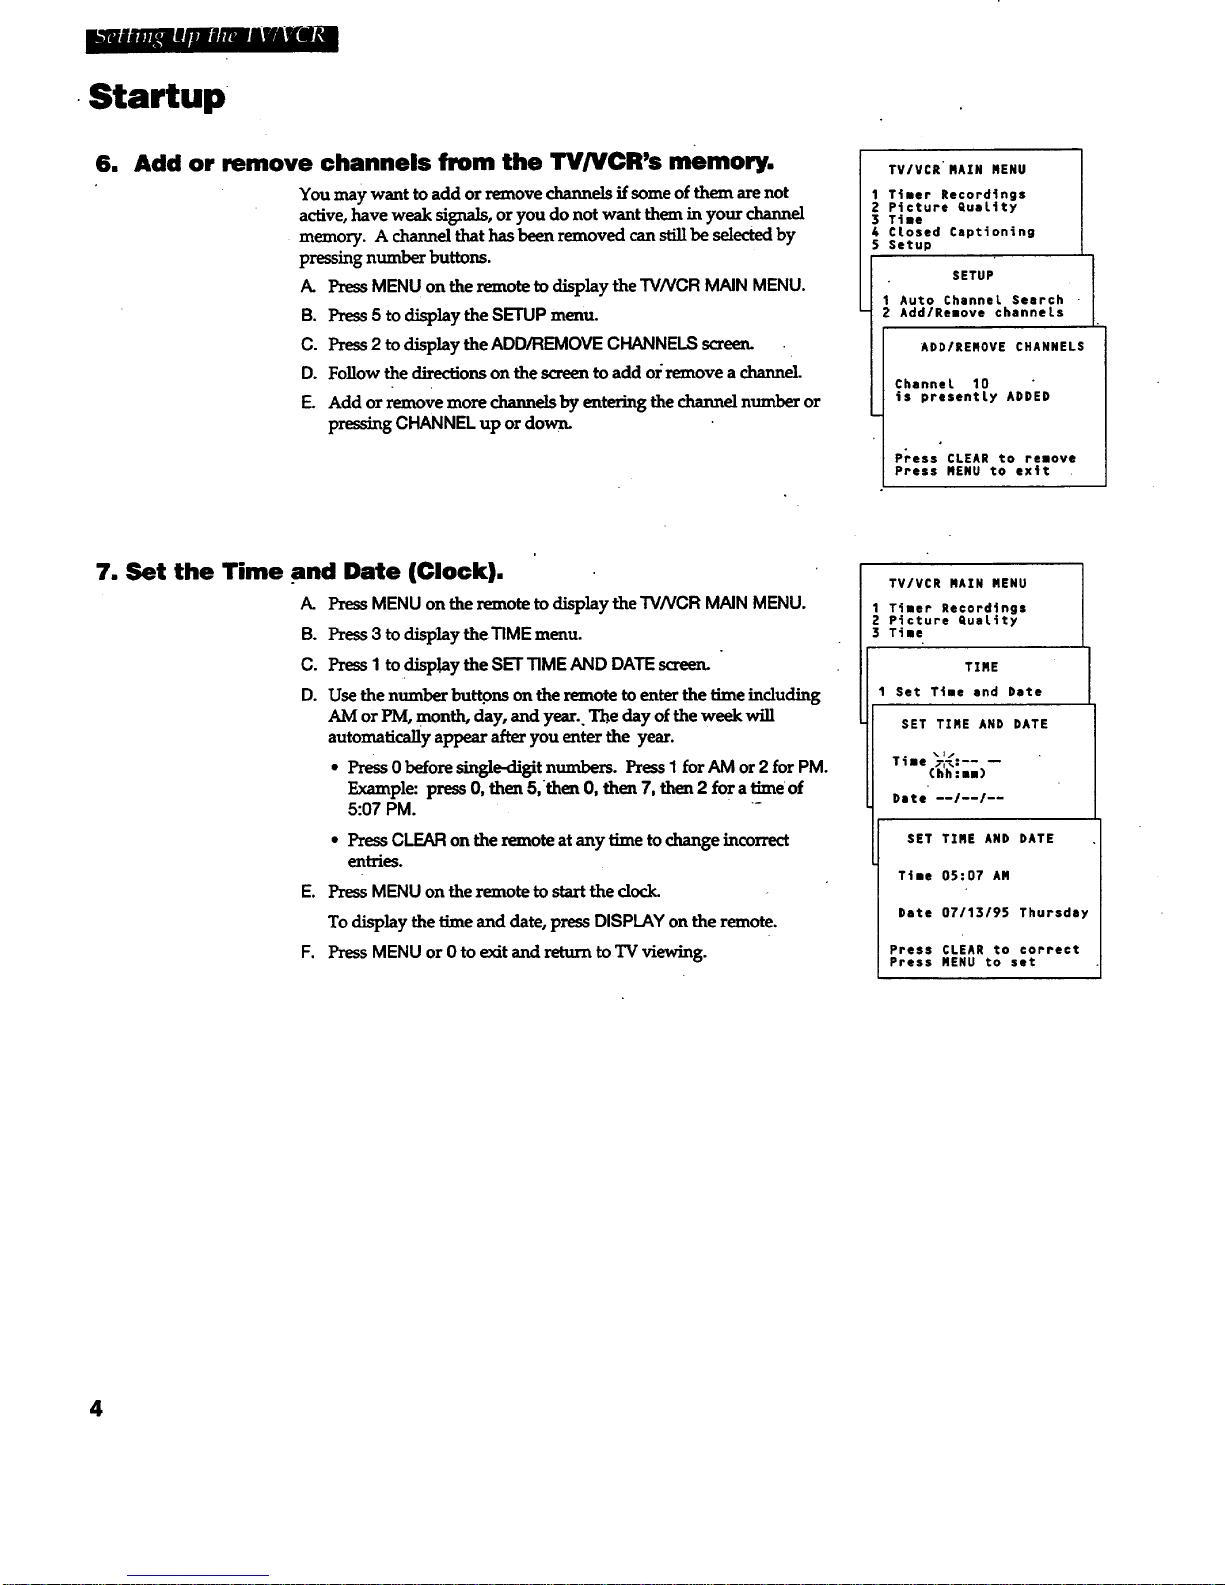
6. Add or remove channels from the TV/VCR's memory.
You maywant to addor move chazmelsif someof them arenot
active, have weak signals, oryou do not want them in your channel
memory. A channel that has been removed can still be selected by
pressing number buttons.
A. PressMENUon theremoteto display the TV/VCR MAIN MENU.
B. Press5 todisplay the SETUPmenu.
C. Press2 to displaythe ADD/REMOVECHANNELSscreerL
D. Follow the directions on the screen to add ox:remove a channel.
E. Add or remove more channels by entering the channel number or
pressing CHANNEL up or down.
TV/VCR HAIR MENU
1 Timer Recordings
2 Picture GueLtty
3 Tiae
4 Ctosed Captioning
5 Setup
SETUP
1 Auto Channel Search
2 Add/Reuove channels
ADD/REROVE CHARNELS
Channel 10
is presently ADDED
P_ess CLEAN to remove
Press RENU to exit
7. Set the Time and Date (Clock).
PressMENU onthe _ot_ to displaythe TV/VCR MAIN MENU.
B. Press3 to displaythe TIMEmenu.
C. PressI todisplaythe SET33MEAND DATEscreen. "
D. Use the number buttons on the remote to enter the time including
AM or PM, month, day, and year.. Th.eday of the week will
automatically appear after you enter the year.
* Press 0 before single-digit numbers. Press I for AM or 2 for PM.
Example: press 0, then 5,'then 0, then 7, then 2 for a time of
5:07 PM.
* Press CLEARon the remote at any time tochange incorrect
entries.
E. Press MENU on the remote to start the dock.
To aise_ythe "rimeand date,pressDISPLAYonthe remote.
F. PressMENUor 0 to exitand return to TV viewing.
TV/VCR RAIN RENU
1Ttaer Record4ngs
Z Ptcture quality
3 Time
TIRE
1 Set T4me and Date
SET TIRE AND DATE
Txae _%:__ m
(hh:muJ
Date --/--/--
SET TIRE AND DATE
T4ae 05:07 AN
Date 07/13/95 Thursday
Press CLEAR to correct
Press NENU to set
4
Page 7
Uau,,#jMirmRmdlVAll_
Startup
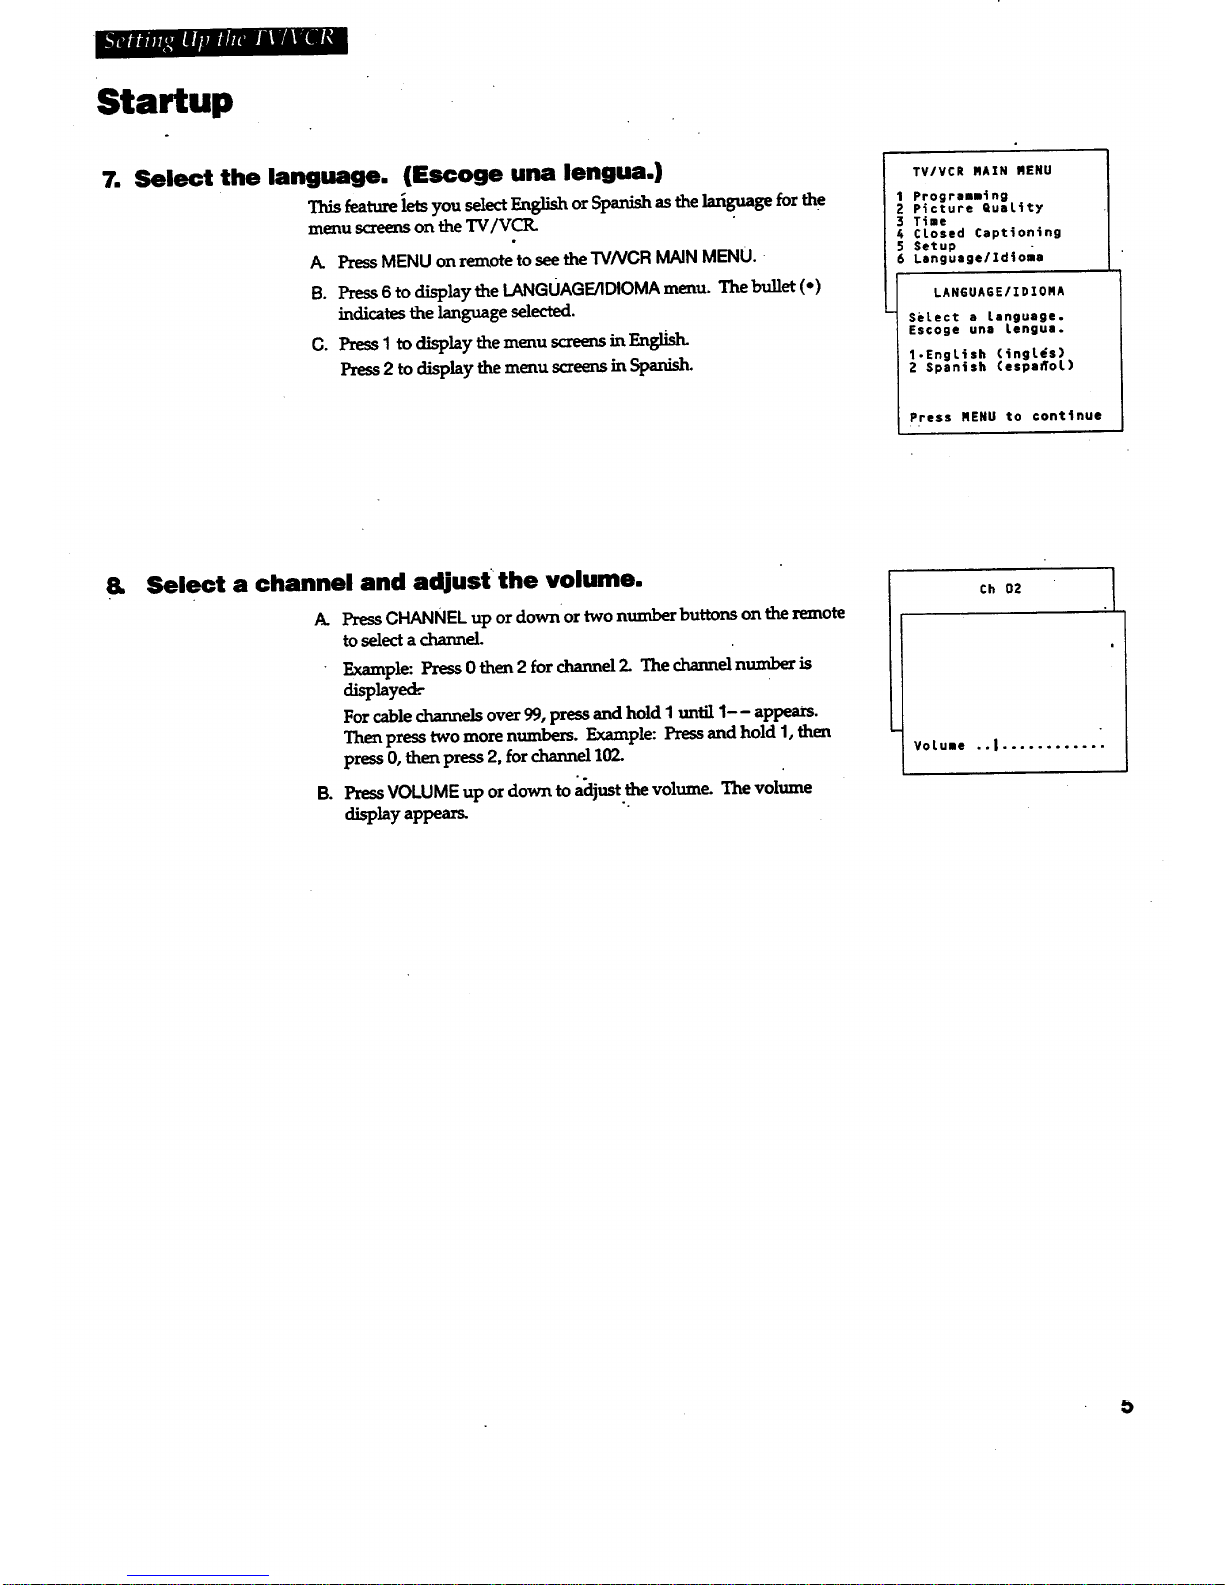
7. Select the language. (Escoge una lengua.)
Thisfeatureletsyou selectEnglishorSpanish asthelanguageforthe
menuscreenson the TV/VCIL
A. Press MENU on remote to see the TVNCR MAIN MENU. -
B. Press6 to display the LANGUAGE/IDIOMA menu. The bullet (.)
indicates the language selected.
O. Press 1 to display the menu screens in EnglL_h.
Press2 to displaythemenu screensinSpanish.
TV/VCR MAIN MENU
Programming
P_cture QuaLity
3 Time
4 CLosed Captioning
5 Setup
6 Lsnguage/Idtoma
LANGUAGE/IDIOMA
SeLect a Language.
Escoge una Lengua.
1-EngL4sh CingL_s)
2 Spanish Cespa_oL)
Press MENU to continue
&
Select a channel and adjust the volume.
A. PressCHANNEL up ordownor two number buttonson theremote
to select a channel.
B°
Example: Press 0 then 2 forchannelI The channel number is
d played
Potcablechannelsover99,pressandholdqunRlq-- appears.
Thenpresstwomore numbers.Example:PressandholdI,
press0,thenpress2,forchannel10P-
upordown toa_ijust.the volume. The volume
PressVOLUME
displayappeam
Ch 02
VoLume ..| ............
b
Page 8
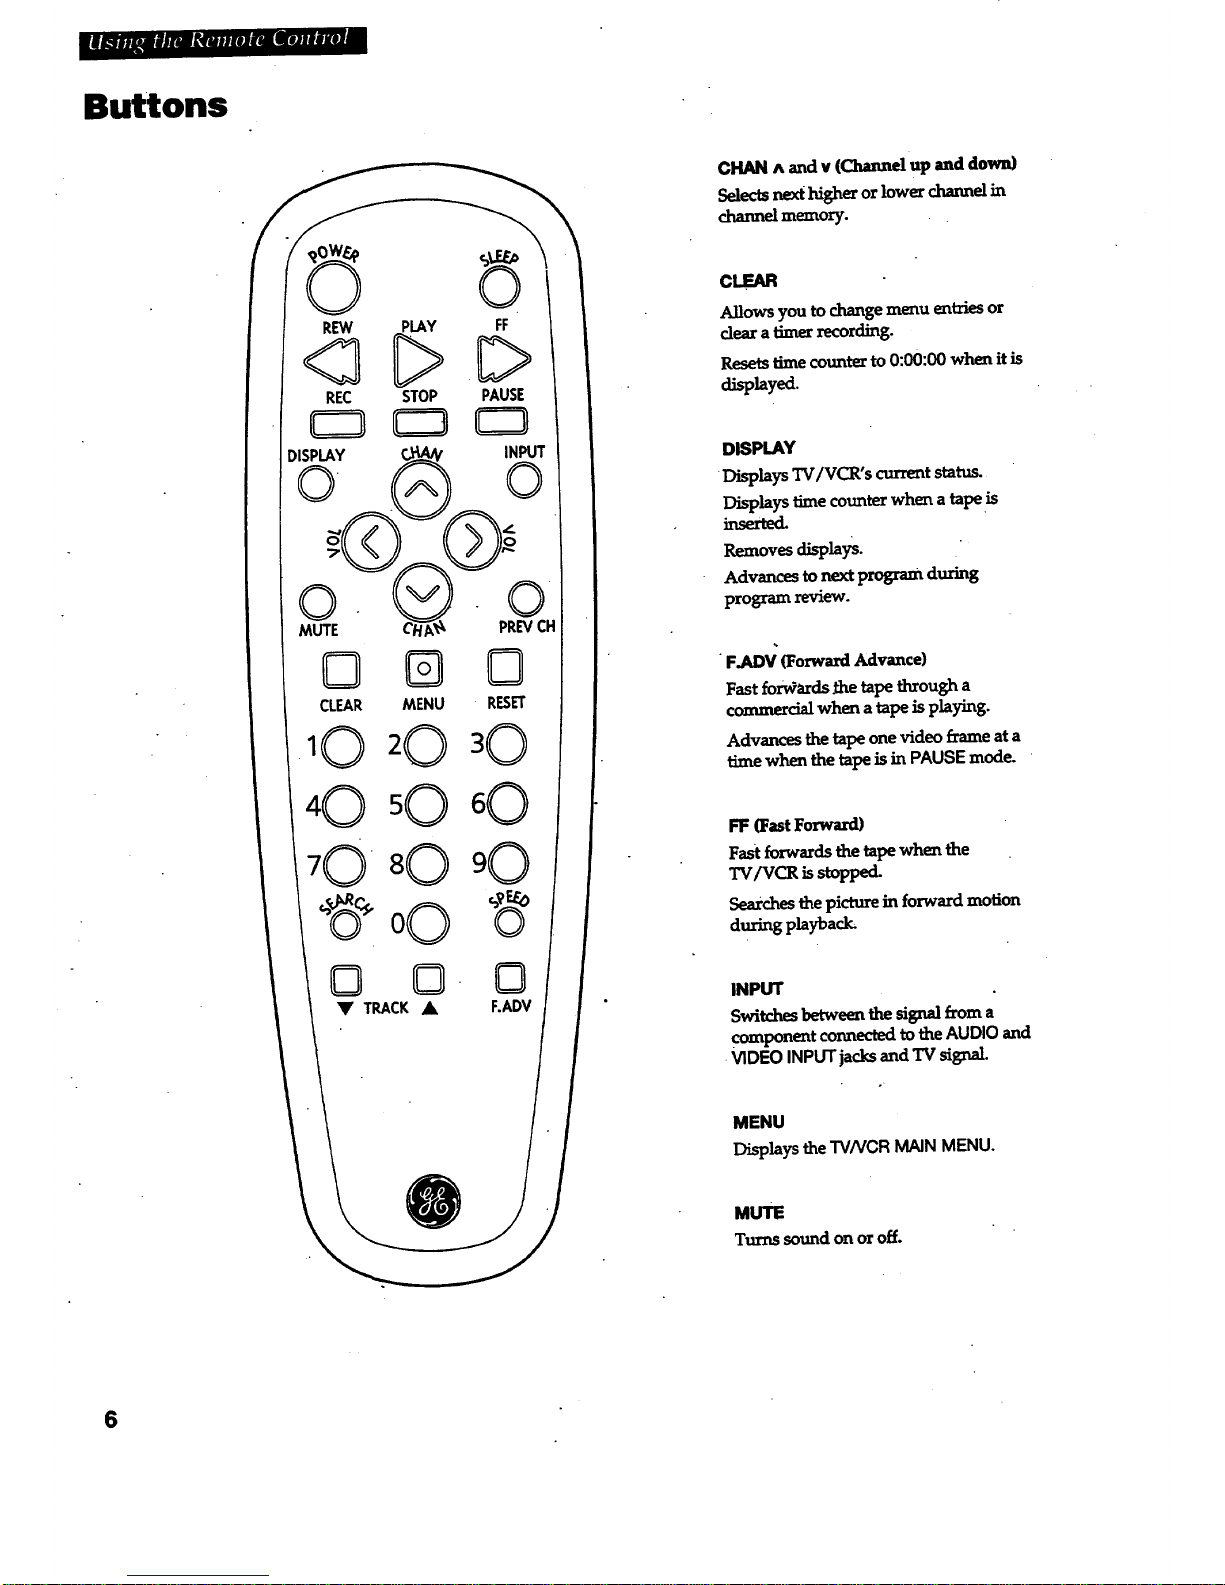
Buttons
0
REW PLAY
<?C>
REC STOP
DISPLAY
© _
MUTE C/_N
CLEAR MENU
10 20
FF
D
PAUSE
f INPUT
).©
PREVCH
C?
RESET
W
0 0 0
F.ADV
CHAN ^ and v (Channel up aad down)
_tecls ne_ ]_gherorlowercharme]in
chazmelmemoz7.
CLEAR
Allows you to change menu entries or
clear a timer recording.
Resets time counter to 0:00:00 when it is
a_sp_yed.
DISPLAY
DL_tays TV/V(_,'s _t status.
Displays time counter when a tape is
_serted.
Removesdisplays.
Advances to next program during
program review.
"F.ADV _orwaLrd Advance)
Fast fi_r_ards _e tape through a
commercial when a tape is playing.
Advances the tape one video frame at a
time when the tape is in PAUSE mode. •
FF (Fast Foxward)
Fast forwards the tape when the
TV/VCR isstopped.
Searches the picture in forward motion
during playback;
INPUT
Switches between the signal fzom a
component connected to the AUDIO and
.VIDEO INPUT jacks and TV signal.
MENU
Displays the TVNCR MAIN MENU.
MUTE
Turns sound on or off.
6
Page 9
i '" L
ButtonS +
Numbers (Oi_zough9)
n_'s.
Selectacat,le_ overO0_ pressing
and holdingI untilI-- appearson the
screen.Thenpresstheoth_two
numbe_.
PAUSE
Pausestheta_ dm_a_ playbad_
Pauses recording'toprevent recordingof
unwanted scenes.
PLAY
Plays atape.
POWER
TurnsTV/VCR on or off.
PREV CH (l_vious channel)
Switchesbetweenthelasttwo channels.
Selectonechannelandthenselectthe
otherusix_thenumber buttons.Press
PREV CH toswitchbetweenthetwo
channels.
REW (Rewind)
Rewinds the tape when the TV/VCR is
stoppe_
Searchesthepictureinreversemotion
during playback. '
Sr_tRCH
OperatesCommercialSkip during TV
viewing.
Displays INDEX,ZERO,andBLANK
search screem when tape is inserted
in theTV/VCR.
Operates Commercial Scan by advancing
tape 60 seconds during playback.
SLEEP • "
Sets TV/VCR to automatically turn off in
30;60, 90, or 120 minutes.
• SPEED (TapeSpeed)
_c_ amco_g speed
(SP,SLP, or LP).
SlOP
Stops_mctions suchasrecord, play,
rewind, fastforward, and pause.
REC (Record)
StartsTV/VCR recording.
U.s_i for one-touch recording.
RESET
Resetsvideo functionstofactorysettin_
Usedtoresettime forwake-uptime_
(alarm).
TRACK • and _'
(Track_ up and down)
Letsyou manually reduce the streaks
thatmay appear in the picture during
p_ayba_.
VOL < and > (Volume up and down)
Raises and lowers sound.
7
Page 10
Using the TV/VCR Features
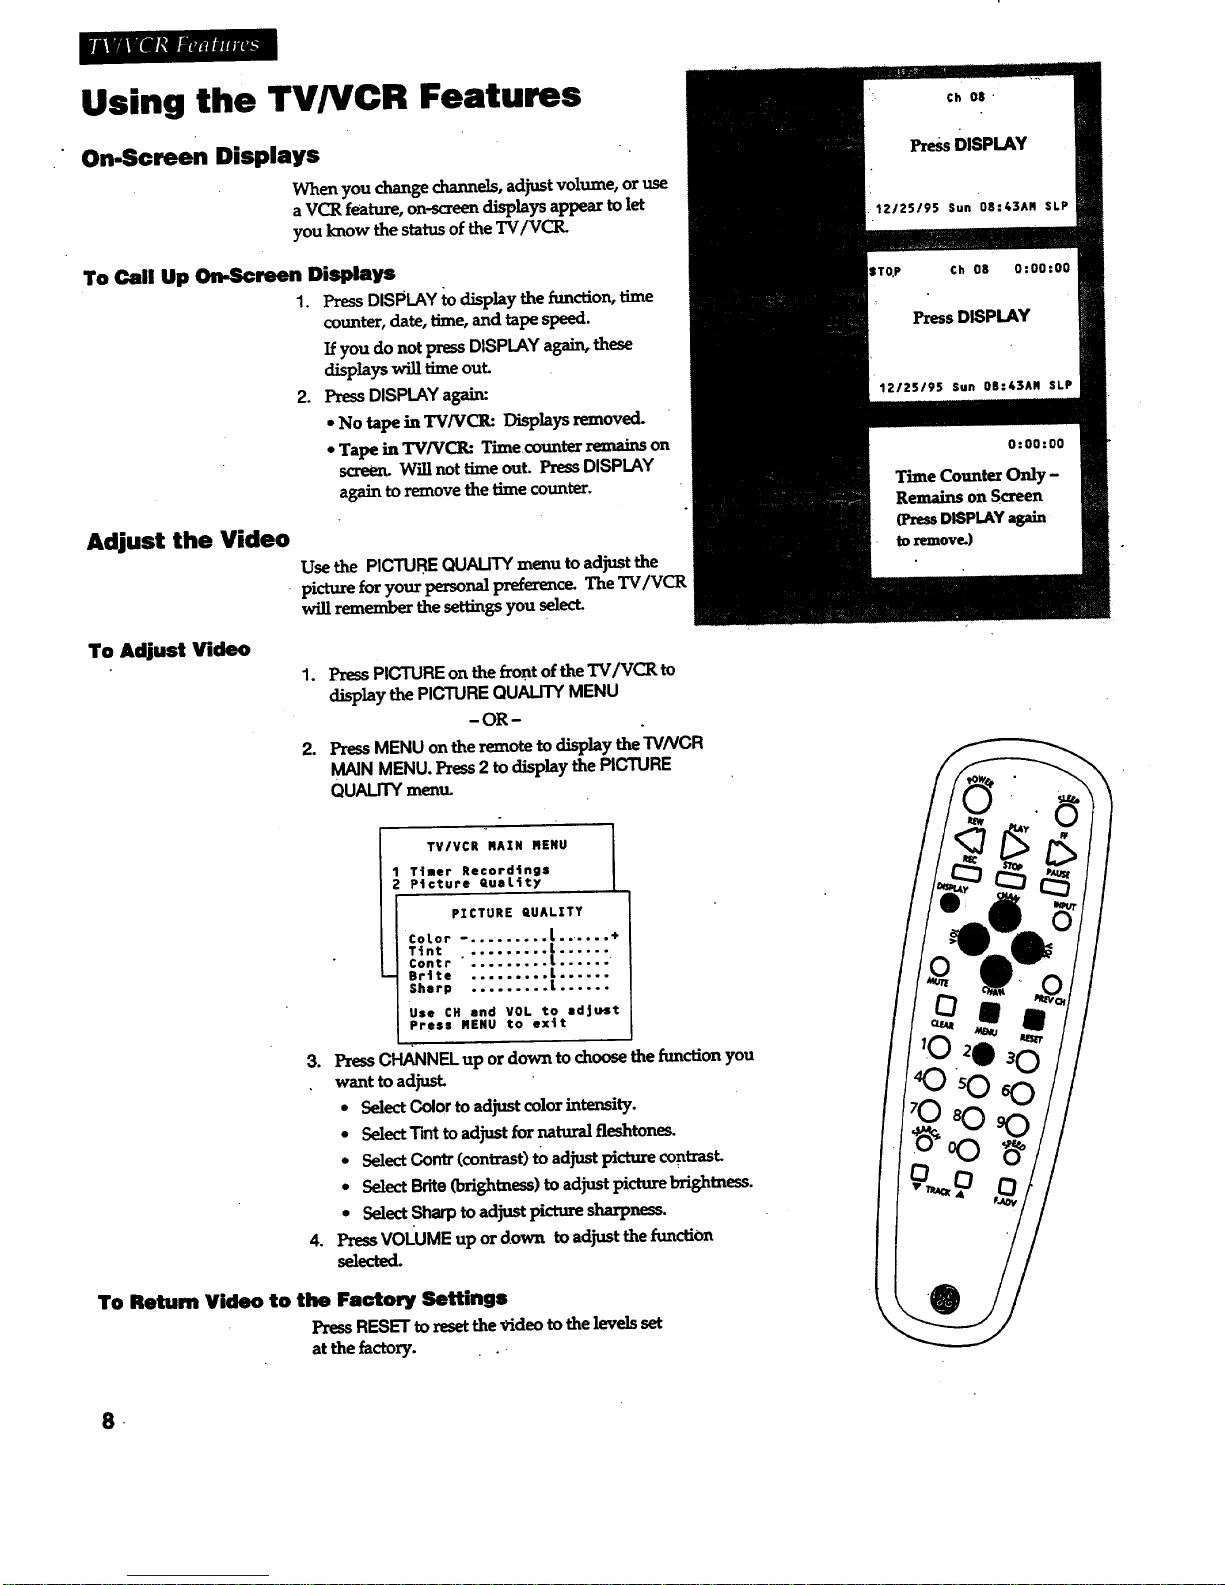
On-Screen Displays
When you change channels, adjust volume, or use
a VCR feature, on-_ree_ displays appe.ar to let
you know the status of the TV/VCR.
To Call Up On-Screen Displays
1. Press DISPLAY _ display the _nction, time
counter, date, time, and tape speed.
you do not press DISPLAY _ these
displays will time out.
2. Press DISPLAY a&zLLm
* No tape in TV/VCIh Displays removed.
• Tape in TV/VCR: Time.counter remains on
screen. Will not time out. Press DISPLAY
again to remove the time counter.
Adjust the Video
Usethe PICTUREQUALITYmenu to adjustthe
• picture for your personal preference. The TV/VCR
will remember the settings you select.
To Adjust Video
1.
,
PressPICTUREonthef_ontof theI"4/VC_ to
ctisplaythe PICTUREQUALITYMENU
-OR-
PressMENUon the remotetodisplay the TV/VCR
MAIN MENU.Press2 to dLsplaythe PICTURE
QUALITYmem_
TV/VCR RAIN RENU
1 Ttuer Recordings
2 Picture GuaLity
.
o
PICTURE QUALITY
CoLor -. ........ {.. .... +
Ttntcontr ":::::::::[:'"::
Brtte ......... L ......
Sharp ......... L ......
Use CH and VOL to adjust
Press RENU to extt
Press CH/_NNELup or down to choose the function you
want to adjust.
• Select Colorto adjust color intensity.
* Select Tintto adjust for natural fleshtones.
* Select Contr (contrast) tOadjust picture contrast.
• SelectBrite(bfi_tness) to adF_t pictm'e brightness.
. SelectSharptoadjust pictumsharpness.
Press VOLUMEup or down to a(i_Jst the function
selected.
To Return Video to the Factory Settings
PressRESETtoresetthe Videoto thelevelsset
at the factory.
.
Page 11

Using the TV/VCR Features
Closed Captioning
_sed cap_oning,disphysthesoand ofaprogramaswordsontheTVscree_
It is use/u] for the deaf, hearing impaired, oranyone who wants to watch a
program without sound. If you have turned dosed captioning o_ and it does
not appear on the screen, it is not available on the channel you are watching.
Checkyour TVprogram listii_gsforCC (dosed caption)broadcasts.
To View Closed Captioning
1. PressMENU todisplay TV/VCR MAIN MENU.
2..Press 4 to display the CLOSED CAPTIONING menu.
3. PressI to changethe CC Display.
• There are three choices:
OFF, ON, andON WHEN MUTED.
• _chtime y0upress 1 tbeOC Displaywitl _o_
the Closed Captioning menu screen.
TVIVCR RAIN MENU
Progremaing
P4cture QuaLity
Tt=e
CLosed Cept4on4n9
CLOSED CAPTIONING
1 CC D_spLey: OFF
2 CC Mode: CAPTION 1
CLOSED CAPTIONING I
1 £C P_spLay: ON
2 CC Mode: CAPTION 1
CLOSED CAPTIONING
1 CC D4spLey: ON WHEN MUTED
2 CC Mode: CAPTION 1
0 Exit
4. Press2toselectfheCC Mode.
• Thereare_o"zd_oices:
Caption1, Caption2, Text1,.andText 2.
• F_r_timeyoupz_ss2theOC Mode will changeontt_e
Closed Captioning menu scree_
CLOSED CAPTIONING
CC D4spLay: ON
.CO Mode: CAPTION I
CLOSED CAPTIONING
1 CC D4spLey: ON
2 CC Node: CAPTION 2
CLOSED CAPTIONING
1 CC D|spLay: ON
2 CC Mode: TEXT 1
CLOSED CAPTIONING
1 CC DispLay: ON
2 CC Mode: TEXT 2
0 Ex4t
Commercial Skip
Commercial Skip allows you to scan other r..hann_ during'
commezx_z_s.F_chtime you pressSEARCH wl_e watching
TVthe Commercial Skip Kmerincreases 30 seconds up to four
minute_The TV/VCR will automatically switch back to the
o"ngizmlc.h&melwhen timerunsout To cancel Commercial
Skip,_ pressing SEARCHum_[SkipTime_disappean
fzomthescreen.
9
Page 12

Using the TVNCR Features
Wake-Up Timer
The wake-up timer turns the TV/VCR on at a desired lime. You can
set it to wake you up in the morning or remind you that a favorite
program is about tostart..
To Set the Wake-Up Timer
1. Press MENU to dL_playtheTV/VCR MAIN MENU.
2. l_ess 3 to d_play the TIME menu.
3. Press 3 to display t.heWAKE-UP TIMER meal
4. Use the number buttons on th_ xemote to e_ter the channel
number and time:
• After you enter the time, press I forAM or2 for PM.
Example: press 0, then 5, then 0, then 7, then 2, for a time of
5:07 PM.
• l_ess CLEAR to correct'_e last _nt_. Press RESET tocancel or
change the time.
5. PRssMENU tosetthe tmum
• The wake-up timer will turn on the TV/VCR every day
andtheTIMERWAKE UPmdicatoronthe _ont ofthe
TV/VCR will lir:,hL
6. When th'eTV/VCR turns on atthe set time you can turn it off by
pressing any button on the remote. Ifyou don't turn off the
TV/VCR, it will automatically turn itself off after _rm hour.
To Cancel the Wake-Up Timer
Follow steps i -3 above,pressRESETto cancelthe'cim.er,and then
pn_ssMENU to exit.
ThetimerLsalsocax_Jed ff MENUJspnss_ bdoxesteps4 ax_ 5are
completed.
Sleep Timer
The sleep timer automatically turns the TV[VCR off afte_ 30, 60, 90,
or 120minutes.
1. Repeatedly press SLEEP. Eachtmteyou_ SLEEP,the
amountof timechangesasshownbelow.
STOP Ch 08 0:00mm
12/25/95 Sun 08:43AR SLP
--]_ ]_msSLEEP AmLof'r'mle
Two T,_ 30 Minutes
T'm_es 1 Houx
roar Times 90 Minut_
Five "l"mt_ 2 Horns
Six T'mum T,,,,_ Off
,
• If the sleep timer has already been set, the rema_ng time
be/oR tt_ "IV/VCR turns offisdisplayed on the screen.
Tocancelthesleep"dmeLrepeatedly press SLEEPtmU]themenu.
disappears f:romthe screen.
You can a!so set the` sleep _ from the TV/VCRMAIN MENU.
1. DLs-playtheTIME me_.as shownaboveandpx_ss2. Fol)owthe
diRctiov.son thescreen.PressSLEEPor CHANNELup ordown
to c_ the amotmtoftinge.PRssMENU to e)dt.
TV/VCR RAZN RENU
1T_mer Recordfngs
2 Picture =uatfty
3 T_me
TIRE
1 Set T4me end Date
Steep Timer
Wake-up T_aer
MAKE-UP TZRER
Channet_
T_me --:--
(hh:mm)
MAKE-UP TINER
Channel 12
Time 05:07 .AR
Press CLEAR to correct
Press RESET for --:--
Press RENU to set
@
10
Page 13

_i_R|i, mlJrMI RIIRRJWII
Operating Instructions
To Play a Tape
_LA¥
o:oo:o0
,
.
3.
°
.
.
,_dety Tab
a tapem theTV/VCR.
TV/VCR automatica]ly turns on. The tape automatically begins
toplayifthesafetytabonthecassettehasbeenremovedand the
AutoRay featurehasbeenturnedon.
PressPLAY;if necessary.
PLAYandthetimecounterappearonthescreen.
Ifnecessary,pressTRACKING up ordown on theremoteor
CHANNEL up ordown on theTV/VCR toremoveanystreaks
fromthepicture.D_ilsareon_age13.
Press STOP on the remote or STOP/EJECTon the TV/VCR to
stopplayback.
PressREW. The TVIVCR wiU au_maticallyrewindthetapelfR
reachestheendofthetapeduringplayback.Whilerewinding,
you canpressPOWER andtheTV/VCR willst_11rewind
the tape.
PressSTOP/EJECT on theTV/VCR toejectthetapeonceitis
completelyrewound:
A cassettemay beejectedwiththepowerturnedoff.
11
Page 14

mM_A
Using the Playback Features
Pause
This feature pauses the tape and allows you to examine
the details ofthe scene. Pause works best for tapes
recorded in SLP speed.
1. Press PAUSE on the remote during playback to pause
the action.
The TV/VCR will automatically switch from pause to
stop after a few minutes to prevent tape wear.
2. PressPAUSEor PLAYto return toplayback.
Frame Advance
Frame advance lets you view the video tape one frame at
a time. Frame advance works best for tapes recorded in
SLPspeed.
1. PressPAUSEduring playback to pause the action.
2. Press F-ADVeach time you want to view a frame of
the scene.
Press and hold F.ADVtoview the tape in slow motion,
f_ame-by-frame.
3. Press PAUSE or PLAYto return to playback.
Picture Search
You'can visually search a picture during playback.
Sound is turned off during picture search. Picture
search works best fortapes recorded in SI Pspeed.
1. Duzing playback, pressFFtosearchforwardor
REWto seaxch in reverse.
If you start searching within five seconds of a
previoussearch,thesearchspeedwillbesloweT
forapproximatelyeightseconds.-
2. PressFF orREW again,orpressPLAY toreturnto
playback.
12
Page 15

EHmm.mJ.bm
Using the Playback Features
Automatic Tracking
The TV/VCR has automatic'tracking which adjusts the
picture when playing a tape that was recorded on
another VCR. Automatic tracking _ _u'ned on
whenever a tape is inserted or the TV/VCR's power is
turned on.
Manual Tracking
Occasionally, you may need to manually adjust
tracking on a _pe recorded on a different VCR ol
camcorder. Tracking is used when playing atape. It
has no effect during recording.
* When streaks or snow appear in the picture during
normal playback or slow motion, press TRACKING
up or down on the remote or CHANNELup or down
on the TV/VCR for the best possible picture.
* To turn automatic trackingback on, press and hold
bothof theCHANNELbuttons on the front of the
TV/VCP,.
Time Counter
The time counter helps locate the beginning or end of
programs you taped. The time counter automatically
xesets to 0:00:00 whenever atape is inserted, or you
can press CLEARwhen the time counter isdisplayed.
Forexample, if a 30-minute program was recorded at
the beginning of the tape and you wanted to record
another program afterit, you wo_
1. Insert theprerecorded ta_.
0:00:00
2. PressDISPLAYtwiceto.displaythetimecounter.
1,3
Page 16

IIM_/
Using the Playback Features
Auto Play Feature
This feature enables the TV/VCR to automatically
startplaying a tape when it is imerted. (The safety
tabon the tape must be removed.)
1. Press MENU to display the TVNCR MAIN MENU.
2. Press5todisplay theSETUPmenu.
3. Press4to changethe AutoPlaysetting.
4. TheAuto Playfeatureis setto ON at the factory.
SelectON if you want a tapewith itssafetytab
removedto start playingautomatically.
5. Press 4 to change the Auto Play setting to OFF if
you do not want a tape with its safety tab
removed to start playing automatically.
TV/VCR RAZN RENU
Ttmer Recordings
Picture QuaLity
Time
CLosed Captioning
Setup
SETUP
1 Auto Channel Search
2 Add/Remove channels
3 Set Auto .Repeat
4 Auto PLay: ON
5 Signal Type: CABLE
0 Exit
Auto Repeat Feature
This feature tells the TV/VCR to play atape (orpart
of a tape) continuously. TheTV/VCR will
automatically rewind the tape, or a selected portion
of the tape, and play it repeatedly.
.
Using REW, FF,or PLAY,gotothe place on the
tape that you want to be the beginning of'the
section thatautomatically repeats. Reset the
timecounter to 0:00:00by pressing DISPLAY,
then CLEAR.
.
.
4.
5.
6;
Using FFor PLAY,go.tothe place on the tape
that you want to be the end of the section that
plays continuously. Remember the numbers on
the time counter. (2:55isthe end time for AUTO
REPEATin the exampletothe figt_r.)
Press MENU to display the TV/VCR MAIN MENU.
Press5 to displaytheSETUP menu.
Press3to displaythe AUTO REPEATmenu.
Using the number buttons, enter the amountof
time you want the tape to repeat (thenumber
from Step2). In the exampleat right, the section
that the TV/VCR will automatically repeat is
2:55- twohours, 55 minutes long.
7. The REPEATindicator on the front of the
TV/VCR will fight whe_. you activate the Auto
Repeat feature.
8. To stopAUTOREPEAT,pressMENU, 5, 3, and
CLEAR.
AUTO REPEAT
et the Length of time
you want the tape to
pLay. in • repeating Loop
Loop from 0:00 to -:--
(h:mm)
AUTO REPEAT
Set the Length of ti'me
fou vent the taps to
)Lay in a repeating Loop
Loop from 0:00 to 2:55
(h:mm)
Press CLEAR to turn off
Press RENU to exit
Commercial Scan
This is useful for skipping commercials orshort
program segments.
1. Press SEARCHduring playbacktoadvancethe
tape approximately 60 .seconds.
14'
Page 17

IIRmmigmlgm
Using the Playback Features
Index Search
The TV/VCR aut_m_aticallyrecords index marks on _ tape each time you begin
recording. DurLngplayback you can locate the program you want to play by the
number of index marks. YourTV/VCR has _'o index playback features. Youcan
select a specific index number or search by scan and play.
To Select Scan and Play Index Playback
1. Insertthepre-recor(iedtapeandpressSTOP.
2. PressSEARCHto displaytheINDEX SEARCHscree_
3. l_essFFto scanforwa_ or REWtoscanm _ezse.
When the TV/VCR locates an index mark, it will stop
and play a few seconds d the program following
the mark. _
4. At any time during the search, press PLAYto stop
searching and begin playback, or press STOPto stop
the search.
Iftb_beginningor endof the tapeis reachedduringthe
search,Endof ta_ appeam
To Select a Specific Index Number for Index Playback
I. Insert the prerecorded tape and press STOP.
2. Press SEARCH to display the INDEXSEARCHscreerL
%NDEX SEARCH
Press REU or FF
to beg_n scsnn4ng
or
Enter • speclfic
Index nqlRber
P[\
INDEX SEARCH
Scenn4hg.,.
Index number
01
Press STOP to cancel
INDEX SEARCH
Press REU or FF
to beg4n search"
or
Enter a spscif4c
Index ntQeber
Press SEARCH to ex4t
.
.
Use the number buttons to e_t_ the number of
the index mark you want the TV/VCR to
search fort
FFto searchforward or REw to search
revezse.
When the TV/VCR locates the index mark, itwill
be_ playbac_
When using index playback, the following index
marksmaybe s_F1_ bythe TWVCX.
• The mark dosesttothecurrent location on
the tape.
* The mark at tb_beginning of a recorded
segment that is flve minutes or Jess.
• The mark at the beginning of the tape.
15
Page 18

Using the Playback Features
Zero Search
This feature allows you to quickly return to a tin'recounter reac_rtg
of 0:00:00. This is especially convemient when you want to watch a
segment of the tape several times.
1. Insert the prerecorded tape. Press STOP.
2. PressDISPLAYtwicetodisplay only the time counter.
3. Use PLAY,FF,or REWtolocatethe startofthesegmentyou
want torepeat.
4. PressCLEARtoresetthetime(minterto 0:00:00.
5. Continue playing the tape and press STOP when you reach the
end of the segmentyou want to rel_f.•
6. Press SEARCH twice to display the ZEROSEARCH scree_ The
cm-renttime counter is displayed.
ZERO SEARCH
Current tape counter is
0:12=34
Press REM to go to
0:00:00
Press SEARCH to ex4t
ZERO SEARCH •
Current tape counter 4s
-0:1Z:34
Press FF to go to
0=00=00
Press SEARCH to extt
7. Press REWto return to O:O0:O0.The time counter is displayed in
the upper right comer of the screen during the search. If the
current time counter has a minus in frontof it, press FF.
Blank Search
The TV/VCR will search forblank portions of the tape that aremore
than s_xseconds in length.
1. Lnsertthe prerecorded tape and _ STOP.
2. Press SEARCH three times to display the BLANKSEARCHscreerL
BLANK SEARCH
Press FF to begin
searching for btenk
sect|on of tape.
Press SEARCH to exit
.
4.
Press FF to begin seaty.hmg for a segment tl_atis at least six
seconds ofblank tape.
PressSTOP tostop BLANKSEARCH.
@
16
Page 19

mE_rwu_h.mmtauRmm
Recording Features
Recording Speeds
PressSPEEDtoselectarecordingspeed.
.
n_.,mmq 'rim.
Cam_to _
T-120 2Hrs 6Hrs
• 2I-Irs40Min 8I'-Irs
T-160
LP
4Hrs
5Hrs _Min
• SP (StandardPlay)givesthebestq_talityrecording.
Thatis why most prerecorded, rental tapes are
recorded in SP. Fewer programs can be recorded on
the tape.
• SLP(SuperLong Play) gives three times the
recording_me oftapesrecordedinSP.Special
effectssuchaspause,slowmotion,picturemarch,
andframeadvanceworkinthisspeed.
• LP (LongPlay)givestwicetherecordingtimeof
tapesrecordedinSP.Specialeffectsarenot
recommendedinthisspeed.
SLP
t
Tape.SpeedJ.d_tor
Recording Pause
Thisfeature_dlowsyoutopreventrecordingshort
passagesofunwantedmaterial.
PressPAUSE duringrecordingtostopand start
recording.
The TV/VCR willautomaticallyswitchfrom pause
tostopaftera few minutestopreventtapewear.
Child Lock
This f_ature locks the TV/VCR in the OFF p_'tion
only. Turnthe TV/VCR off to activate Child Lock.
• Turnthe TV/VCRoff.
• Press andhold the POWERl)utton for six seconds
to turn on the"ChildLock if it hasn't been activated.
• Press and hold bhe POWERbutton for sixseconds
toturnofftheChildLockfeature.
The POWERbuttonblinks six t_meswhen Child
• Lock has _en activated.
17
Page 20

Types of Recordings
Your TV/VCR provides different ways to record which areexplained in the
following sections: -
Basic Recording
One-Touch Recording
Timer Recording
Copying and FJiiling Tapes
Basic Recording
How to Make a Recording
I. Insert a tape with safety tab in place.
2. PressSPEED to se!ectarecordings_.
The tape speed indicator appears.
3. Select the channel to be recorded. Ifrecording from the
AUDIO/VIDEOINPUTjacks,pressINPUT or00 to select
theline input (VIDEO).
The channel number or VIDEO INflashes on the screen.
4. _ressRECtobeginrecording.
The indicatorin theRECbuttononthe frontofthe
"IV/VCR brims on during recording and RECORD
appears on the screen.
5. Press STOP/EJECTon the TV/VCR or STOP on the
remote to stop recording.
18
Page 21

_llif Illlillilliill _lliil_
One.Touch Recording
One-touch recording lets you record up to four hours or to the end of the tape without
programming the timer. You can begin recording immediately. The TV/VCR will stop
automatically at the end of the recording.
How to Use One-Touch Recording
1. Insert a tape with safety tab in place. The TV/VCR.
will turn on.
2. Selectthe channel to be recorded.
If recording from the AUDIO/VIDEO INPUT jacks, press
INPUT or 00 to select the line input (VIDEO).
3. PressSpEED to select a recording speed. Youcanalso
change the speed of a one-touch recording inprogre_.
4. Press REC to activate recording.
°
Press REGre_tediy unt_ the desired amount of
recording time is displayed. Each time you press .REC
the recording time increases by 30 minutes -- up to
tape end.
RECORD LENGTH 0:3.0
Ch 04
Press RE¢ to set Length
Display
r
Press
REC
O:30
1..00
130
2:OO
3.-00
4..00
Tape end
0:00
Recording
Time
(3OM_
(1Hr)
(1.I-It,30 Min)
(2I-Its)
(3 I-ks)
(4 I-Its)
(Tape end)
(Tums CYd)
The TIMERRECindicator on the TV/VCR's front
panel will fight during one-touch recording.
During one-touch recording, press REC to display the
time remaining on the scree_ Press REC again to
increase the recording time.
Stopping a One-Touch Recording in Progress
PressSTOP/EJECT on the TV/VCR or STOP on the
remote to stop the one-touch recording.
--OR--
_eatedly press REC until RECORD LENGTH 0:00
a_.ars..
19
Page 22

Timer Recording
Timer _cording lets you program the TV/VCR to record up to eight different
programs within a one-year period. Beforesetting the timer, make sure that
the dock is set con_-tly.
Setting a Timer Recording
1. t:'ZessMENUtO.clL_]a,y the TV/VCR MAIN MENU.
2. Press1 tod_l_y the TIMER RECORDINGSmenu.
3. l_essI toCreatea New Program.
,
l_ess 1,2,3, or4toselectthetypeofpn_ran_
1 Onetime -- singleprogramrecorded once.
2 Daihj-- programrecordedatsametime everyday.
3 Weekdays-- programrecordedatsame
time Monday through Friday.
4Weeldy _ programrecordedatsame time
once aweek.
. Pressnumber buttons to enter the channel number,
starttime including AMor PM, end time, and startdate
of the recording. Just follow the on-screen prompts.
• If recording _rom the AUDIO/_qDEO INPUT jacks,
press INPUT or 00 to select the line input (VIDEO)
instead of a channel
PressCLEARto correctanentry.
6. PressSPEEDto selecta recording speed.
7. Press MENUto save your program.
o
9.
10.
Repeatsteps3 - 6 for additioxBlpro_'a_ns.
Insert atapewith safetytabintactbeforethe recording
istobeg_
The TIMERRECindicator lights in the TV/VCR's front
paneL
If youtu_mthe TV/VCR off,the"nMERir.ticator
flashif the_ isn'ta cassetteJntheTV/VCR.
Ifusing a cable box, turn it on an_i tune it Io the
channel you want to record before it is llme for the
recording to begin.
I
TV/VCR RAIN MENU - I
I
Trier Record4ngs
TIRER RECORDINGS i
1 Create a Neu Prograa
Now often should this I
prograa record?
I
1 One ttae
DaiLy (every day)
Neekdays (R-F)
WeekLy (once per week)
Progrsa 1 (One Ttse)
Channel /_
Program 1 (One Tiae)
Channel _q8
Start T_me /_:--
Program 1 (One Time)
Channel 08
Start Ttme _,5:10 _PR
End T_le _:--
Prograa 1 (One T_le)
Channel "08
Start q_me 02:10 PR
End T_ae 03:35 PR
-- Start Date 11115/94 Fr_
Tape Speed _ '
Press CLEAR to correct
Press MENU to save
'W'
1" '"i .....
TIMER RECORD Indicator
|
20
Page 23

Timer Recording
Checking or Clearing Timer Recordings
1. "PressMENUontheremoteto displaythe
TV/VCR MAIN MENU.
• 2. PressI todisplaytheTIMER RECORDINGS
II"teZtlL1.
3. ]_ress2toReviewExistingProgs.
4. PressCLEARto eraseaprogram.
5. PressMENUto reviewthe nextprogram.
Stopping A Timer Recording
1. PressSTOP/EJECTonthe TV/VCR or
STOPonthe remotewhite thetimer
recording is in progress.
Onlytoday's tm_errecording_sc_mcegedby
pressing stop while theprogramisin
progress. The daily, weekday, orweekly
program remaifis in the timer.
TV/VCR RAIN RENU
1 Tiaer Recordings
TI_ER RECORDINGS
1 Create a New Prograa
2 Rev4e_ Exist4ng Progs.
Prograu .1 (One T_a@)
Channel 08
Star_ T4ae 02:10 PR
End T_me 03:35 PR
Start Date 11/18/94 Fri
Tape Speed SLP
Press CLEAR to erase
PFess RENU _ extt
21
Page 24

Copying and Editing Tapes
Operating Instructions t_fer to_ on_,_ 2"/.)
programsandother
mam-i,_Ism_y infringethe
rightsofot._e_.
Use anotherVCR orcamcorderastheplaybackVCR and
theTV/VCR astherecordingVCIL
I. Turnon theVCR orcamcorderandtheTV/VCIL
.
3.
°
°
6.
°
°
PressINPUTor00onTV/VCR's remotetoselectthe
lineinput(VIDEO).
InsertthetapeyouwanttocopyintotheplaybackVCR
orcamcorder.Insertablanktapewithsafetytabintact
intotheTV/VCP,.
StarttheplaybackVCR orcamcorderplaying.Ifthe
tapewas notrecordedontheplaybackVCR,
may appearandyoumay needtoadjustthetracking.
When you reachtheplaceyou want tobegincopying,
placetheplaybackVCR orcamcorderinplaypause.
PressREC,then PAUSE,ontheTV/VCR's remote.
Press PAUSEon both the VCR or camcorder and the
TV/VCR's remote atthesame time to begin copying
the tape.
Editoutsegmentsthatyou donotwanttocopyby
pressingPAUSE ontheTVIVCR's remotetostop
copying the tape. Then, locate the next segment you
want to copy on the playback VCR or cmncorderby
usingFF,REW,orPLAY. PressPAUSEon the playback.
VCR or camcorder.PressPAUSEat the samelime on
boththe VCR or camcorderandthe "IV/VCR's remote
toresumecopying.
PressSTOP on boththeVCR orcamcorderand the
TV/VCR's remotewhen youaret_mished.
Remember topressINPUT on theTV/VCR's remote for
normal TV viewingon theTV/VCR.
VIDEO IN
22'
Page 25

LocatiOn of controls .- Front Panel
,/
TapeCompartment
f"
TIMER REC Indicator
,]._:b.tsw1_matimer programhasbeenset
and a cassette with safety tab in place is in
the TV/VCR.
Flashes when a timer rec0rding has been'setand.
the TV/VCR is turned off with no cassette
i_erted, a cassette with no safety tab has been
inserted, or there has been a power interruption.
TIMER WAKEUP Indicator
LiF:_itswhen thewake-up timer turns on the
TV/VCK
REPEAT Indicator
Lights during auto r_peaL
Remote Sensor
Receives signals from the remote. Aim remote at
this sensor with no objects between them.
REW (Rewind)
Rewin.ds the tape when the TV/VCR is stopped.
Searches the picture in reverse during playback.
PLAY
Flays a tape.
F.FWD (F_t Forward)
Fastforwardsthe tapewhen theVCR isstopped.
Searches the picture forward during playback.
REC (Record)
Press to startTV/VC Rrecording. The indicator
in the button lights during recording.
STOP/EJECT
Stop normal hLnCtions--'such as record, play,
rewind, fast-forward, or pavme.
Press when a tape is stoppedto ejectthe cassette.
POWER
Turns the TV/VCR on or off. The indicator in
the button is lit when the power ison.
PICTURE
Displays the PICTURE QUALITY menu.
CHAN A and v (Channel up and down)
Selects next higher or lower channel in the
TV/VCR's channelmemory.
Used for tracki_ when a tapeisplaying.
VOL+ and - (Volume up and down)
Raises and lowers the sound.
23
Page 26

Location of Controls -- Back Panel
IN FROM ANTENNA Jack
Receives the si_l _m an antenna or cable systen_
VIDEO and AUDIO INPUT Jacks
Receive signals from another component, such as a VCR or
camcorder_ when it is connected to these jacks.
To select these jacks, press INPUT or O0 to display VIDEO.
Choosing a Hookup
Answer the questions to choose the hookup for your TV/VCR.
lm
How do you receive your TV signals?
Choose one answer from below.
A. Sul:_lled di]:)ole antettna - See page 25,'Section A.
[3. Rabbitears (set-top) and/or bowtie antenna- See page 25, Section B.
C. Outside antenna- See page 25, Section B.
D. Cable System- Go to question 2.
2. What type of Cable-TV system* do you have?
Choose one answer from below.
A. Cablewithout abox - See page 25, Section B.
B. Cablebox to unscramble all channels'- See page 26, Section A.
C. Cable box to .u_scramble only premium channels,such asHI_,
Showtime, Cinemax, et_ - See page 26, Section B.
*Youmay need to contact your local cable company for assistance.
Optional Hookup
To hook up a VCR or camcorder for copying
tapes -- Turn to page 27.
24
Page 27

co.nect Anten Jmtenn or
W' a Cable Box
A. Supplied Antenna
Follow these steps to connect the supplied
antenna to your TV/VCIL Do not connect
this antenna if you plan to connect a
different type of indoor or outdoor antenna
or cable system.
1. Insert the antenna base into the slot on
the back of your TVNCR.
2. Connect the twin-lead ends of the
antenna to the screw temflnals of the
supplied antenna adapter.
3.. Connect the antenna adapter to the IN
FROMANTENNA jack on the back of the
TV/VCIL
4. Plug in the TV/VCR's power cord.
1
Turn to page 2 for "Setting Up the
TV/VCR."
Adjust the length and position of the antenn_
rods for the best receptioru
• For viewing VHF channels, extend the
r0ds fully.
• For UHF viewing, shorten the rods.
a
\
@'PUT@
Twin-Lead Ends
Back of TV/VCR
B. Antenna or Cable System
Without a Cable Box
1. Connect as show_
Thisconnectionmayrequireadditional
accessoriesnotprovided.
2. Plug in TV/VCR's power cord.
3. Turn to page 2 for "Setting Up the
TV/VCR."
El Match Your Type of Antenna or Cable
OR
OR
l /
; /
; //
I ;
Backof I'WVCR
25
Page 28

k
Connect a Cable System Vtmha Cable Box
A' Cable Box Required to
Unscramble all Channels
1.
2.
Connect as shown.
This connection may require additional
accessories not provided.
Plug in powe_ cords of TV/VCR and
cable box.
Turn topage 2 for "_tSng Up the
TYNCIL"
.
B. Cable Box Require.d to
Unscramble Premium
Channels Only
1. Connect as shown.
This connection requires additional accessories
not provided.
2. Plug in power cords of TV/VCR and
cable box.
O_'_on
Place theA-B switch in tl_ Bposit,ontowatch
premium channeLs. Place the A-B switch in the
AIX_tion to watchotherchamm_when cable
box is not needed.
.
4. Turn to page 2 for."Setting Up the
TV/VCR."
t
Cal:_ Box
Coax_
Cable
Back of TV/VCR
Cable_rn
CableSystem
A
I
_ok _'rV_R
I ell
e'_o il
, , , ,, |
26
Page 29

r#mr._n_Arl_ mm wllmk-mh_
ComwDcta VCtl;I_ _ for €_atwi_l _
A. VCR for Copying Tapes
1. Connect as shown.
This connection requires additional accessories
not provided.
2. Plug in power cords of VCR and
TV/VCR.
3. Turn to page 22 for "Copying and
PressINPUTontheremotetoselecttheline
(audio!video) input on the TV/VCR to receive
the signal f_m the VCR.
Ifyour VCR has stereo AUDIO OUT jacks,
connect the audio cable to the jacklabeled
MONO. If neitherjack islabeledMONO,you
may need aY-adapter to hear both channels.
VCR (Playback Only)
TVNCR (Recording Only)
FromAntm_ C_le
orCableBox
B. Camcorder for Copying
Tapes
lo Connect as shown.
This connection x_tu_es additional accessozies
not Frovide&
2. Plug in TV/VCR's pow_cord.
3.
Turn to page 22 for "Copying and,
Editing Tapes."
PressINPUTon the remote to select the line
(audio/video) inpueontheTV/VCR to receive
thesisal fi-omthecamcorder.
If your camcorder has stereo AUDIOOUTjacks,
you may needa Y- adaptertohearboth
channels.
tel_btonFrosra__l orbs-m=t_b
•_y iafra_ a_ r_h_ ofoam_
i
. Onty)
ii_mOOi ,k_ I . or _a_Okl _OX
-'-_- i - "
"rvNct__ o,0y)
Page 30

Trouble Checks
Sometimesproblemscanbeeasilysolvedby checkingafewbasicthings.
Checkbelowbeforeyou callforhelportakeyourTV/VCR toanAuthorized
GE VCR Servicenter.
Problem
No power
TV/VCR does not respond to remote
Poor or no picture during TV viewing
No sound
Snow or streaks in picture or no picture
duringplayback
Willnot record or play
Cannot insert or eject tape
Time counter not working
Rewind does not operate
Timer recordi_ not made
or wrong program recorded
Solution
• Plug TV/VCR into an operating outlet.
• Check connections.
• _ remote at TV/VCR's remote s_sor with no objects between them.
•* Change batteries.
• Switchtoanactive.channeL
• Check antenna connection_ If using supplied dipole, try adjusting rods.
• Check video adjustments. See page 8.
• Make surethelineinputisnotselected.PressINPUT on theremotetoswitch
between line and tuner.
• PressVOLUME up toinareasesound.
• Soundhasbeenmuted. PressMUTEon remote or VOLUMEup.
• Check tape-- itmay be worn outor ofpoor quality.Try anothertape.
* Some snow/streaksarenormal duringsearch,pause,frameadvance,and
slow-motionplayback..
• Press one oftheTRACKING buttons on theremoieor CHANNEL up ordown
on theTV/VCR tomove thestre_,sup ordown and out ofthepicture.
• No cassette in TV/VCR.
• Ejectand re-'m,sertcassette.
• Broken tape-- try anothercassette.
* Safetytabremoved from cassette-- TVIVCR willnot record.
• TV/VCR isinpause mode. PressPAUSE on theremote.
• Insert cassette with window facing up and safety tab facing out. "
• To remove cassette, TV/VCR must be connected to working outlet.
• Turn POWER off and then on before trying to insert or remove cassette.
• PressDISPLAY on remote todisplaytimecounteron screen.Seepage13.
• The timecounterdoes¢totadvance duringunrecorded portionsoftape.
When an unrecorded segment of tape is encountered, the time counter will
holditscountuntilrecordedmaterialisdetectedagain.
• A minus (-) will appear in front of the time counter if you rewind the tape
farther back than a counter reading of 0:00:00.
• Tape already rewound.
i
• Program entered incorrectly (wrong channel or times). Seepage 20.
• Cable box was not turned on at lime recording was to begiru
• Power interruption. TIMERindicator flashes on front of TV/VCR.
• Checkto seeff ".t_neand date are correct D including AM/PM.
•Programexceededtape'slengthortapewas notrewoundbeforehand.
• No tape in TV/VCR, or cassette e_ted if safety tab broken off.
28'
Page 31

Trouble, Checks
Problem
Clock shows incorrect llme or date
TVNCR makes noise when stopped
Will not auto channel search active
channels correctly
Tape plays back in slow motion
Cannot see closed captions on screen
Box appears on screen
TIMER indicator on front of TV/VCR is flashing
Tape plays over and over
Tape starts playing automatically
TV/VCR turns off automatically
TVNCR turns on automatically
Cannot record one program while watching
a diHerent program
Power button on front of TVNCR flashes briefly
VCR functions won't work
Receive same signal on more than one channel
when using an antenna
Solution
• Power interruption. TIMERindicator flashes on _ont of TV/VCR.
• Clock was not set accurately (check AM/PM and date). Seepage 4.
• Need to reset clock for daylight saving time or standard time. S_epage4.
•"IVIVCR isremoving tape from heads.Thisisnormal.Thehead cylinder
insidetheTV/VCR willcontinuetorotatefora few minutesafteryou put the
VCR inthestopmode.
Check antenna orcableconnections.
• Press PLAYto return to normal playback.
• Closod captionfurtctionmust be set to on. Seepage 9.
• Station may not be broadcasting closed captions.
• Atextfeaturehasbeenseiected. Seepage§
• Power intem_ption. Check time and date setting (dock). Seepage 4.
• Timer program set and TV/VCR turned off with no cassette or cassette with
no sadety tabinserted. Seepage20.
• Auto repeat play tumed on. Seepage 14.
• Auto play feature turned on. Seel_ge14.
• Sleep timer turned o_ Press POWERto turn"IV/VCR back on.
• Wakeuptimer(alann)tumedon. SeepagelO.
• TV!VCR only has one tuner. Only one program can be watched and
recorded at the same time.
• Child Lockfeature has been activated. Seepage17.
• Child Lockfeature has been activated. Seepage 17.
• ChangeSignalType toAntennaonSetupMenu.PressMENU on remote,5 for
SetupMenu,and5 againtochangetheSignalType.
29
Page 32

U_
Cleaning the TV/VCR
Use a soft cloth or dusting attachment of your vacuum cleaner to dust your
TV/VCIL Remove dust from the ventilation holes of the cabinet.
Plastic surfaces are easily scratched and canbe marred by alcohol and various
solvents. Avoid excessive use of off-basedfurniture polishes since the materials
used in the cabinet will accumulate more dust. We recommend using anon-
abrasive, anti-static cleaner and polisher.
Specifications
Picture Tube
Format:
Record/Playback
System:
Video Signal System:
Antenna:
Tuner:.
Type:
Power Requiremenl:
Power Consumptiom
Dimensions:
13TVR60:.13-inchmeasured diagonal 90"deflection
19TVR60: 19-inch measured diagonal 9(P deflection
VHS
Video: 2-Head
Audio Track: One
EIA standard: NTSC color
75-ohm external VHF/UHF combined
antenna terminal
USA: 181 channel tuning capability*
(125cable channels)
Canada: 178 channel tuning capability*
(122cable _annels)_
Autoprogramming frequency synthesis
120V AC, 60 Hz
13TVR6(k.80 watts
19IYR60:100 watts
13TVR60:15.44 inches high (386mm)
19TVR60:.1936 inches high (484mm)
13TVR60:14.64 inches wide (366mm)
19TVR60:
13TVR60:
19TVR60:
Weighe 13TYRO.
19TVR6_.
Operating
Tempera_u_e Range:.
20 inches wide (500 mm)
14.84 inches deep (371 mm)
18.84 inches deep (471 ram)
29.7pounds(_33ks)
48.62pounds(22.1kg)
+41"Fto +104"F
Operating "
Humidity Range: 10%to 75%
*Check your cable company's compat_ility requirements.
30'
Page 33

Limited Warranty
What your warranty covers:
• Any defect in materials or workmanship.
For how long after your purchase:
• 90 days forlabor charges.
• Two years for picture tube.
• One year for parts.
(Thewarranty period for rentalunits begins with the first ren_)
What we will do:
• Pay any Authorized GE VCR Servicenter the labor charges .to repair yourTV/VCK
• Pay any AuthOrized GE VCR Servicenter for the new or, at our option, rebuilt
replacement parts required to repair your TV/VCI_
How you get service:
• Take your "IV/VCR to any Authorized GE VCRServicenter. Toidentify your nearest
Authorized GE VCRServicenter, ask your dealer, look in the Yellow Pages, or call
1..800-447-1700.
• Show the service technician your evidence of purchase date.
• Pick up your TV/VCR when repairs are completed.
What your warranty does not cover:
• Customer instruction. (Your Owner's Manual dearly describes how to install, adjust,
and operate your TVIVCR. Any additional information should be obtained from
your dealer.)
• Lnst_lation and related adjustments.
• Signal reception problems not caused by your TV/VCR.
• Damage from misuse or neglect.
• Cleaning of video/audio heads.
• Remote controlbatteries.
• A TV/VCR that has been modified or incorporated into other products oris used for
institutional or other comm_clal purposes.
• A TV/VCR purchased. or serviced outside the USA.
• Acts of God, such as but not limited to lightning damage.
Product Registration:
• Please complete and mail the Product Registration Card packed with your TV/VCI_
Itwill make it easier to contact you should it ever be necessary. The return of the
cardis not required for warranty coverage.
How state law relates to this warranty:
• This warranty gives you specific legal rights, and you may have other rightsthat
vary from state to state.
If you purchased your TV/VCR outside the USA=
• Thiswan_ty doesnot apply. Conta_your dealerfor warranty mfozmatio_
31
Page 34

B_
Index
32'
Accessories, Included .................... ".... .2
ADD/REMOVE CHANNELS Menu .............. 4
Adding Channels to Memory .................. 4
Adjusting the Video .......................... 8
Adjusting Volume ... : ....................... 5
Antenna System, Connecting ................ 25
AUDEONIDEO IN Jacks ............... 18,20,24,27
AUTO CHANNEL SEARCH Menu .............. 3
Auto Play Feature ........................... 14
AUTO PLAY Screen .......................... 14
Auto Repeat Feature •.14
AUTO REPEAT Menu ........................ 14
Automatic Tracking ......................... 13
Back Panel Controls ........................ "24
Basic Recording ............................. 18
Batteries, Installing in Remote ..... :.......... .3
Blank Search Feature ........................ 16
BLANK S.EARCH Screen ..................... 16
Brito (Brightness) Function .................... 8
Buttons, Remote Control .................... 6-7
Cable System (No Cable Box), Connecting ..... "25
Cable System with Cable Box, Connecting ..... .26
Camcorder, Connecting to TV/VCR .......... "27
Cap tions,l Closed .. ............................ 9
Cautions .................................... i
CO DISPLAY Menu .......................... 9
CC MODE Menu ............................. 9
CHAN Buttons ....................... .5,6,8,10,23
ChannelMemory, Programming............... 3
Channel, Selecting ........................... 5
Chart, One Touch Recording Tune ........ .... 19
Chart, Recording S.i_eds ..................... 17
Checking a Timer Recording .... ........... : .21
Checking for Trouble .................... .28-29
Child Lock ................................. 17
Choosing a Hookup ........................ .24
Cleaning the TV/VCR " .30
CLEAR Button..' ....... _....... 4,6,10,13,16,20,21
Clearing a Timer Recording ................. .21
Clock Setting (Setting Time and Date) ........... 4
CLOSED CAPTIONING Menu ................. 9
Closed Captions ............................. 9
Color Function ............................... 8
Commercial Scan .14
Connections
Antmma .............................. .25
Cable system With Cable Box for
All Channels ......................... :26
Cable System With Cable BOx for
Premium Channels .................... .26
Cable System With No Cable BOx ........
Camcorder to Copy Tapes .............. .27
Supplied Antenna ..................... _.5
VCR to Copy Tape s .................... _,_
Contents .................................... 1
Contr (Contrast) Function ..................... .8
Controls, Back Panel...0 ................ •..... .24
Controls, Front Panel ' . .23
Controls, Remote ........................... 6-7
Copying Tapes "... ......................... .22
Daily Programs, Recording ..................
Date,Setting................................. 4
DesignSpecifications....................... .30
DipoleAntenna, Connecting ................. "25
DISPLAYButton ....................... 6,8,13,16
Displays, On-Screen .......................... 8
Editing Tapes ..... ... ...................... .22
Electronic Program Indexing ................. 15
Escoge una Lengua ........................... 5
Factory Settings, Reset ........................ 8
Features, Playback ........................ 11-16
Features, Recording ....................... 17-22
Features, TV/VCR ......................... 8-10
FF (Fast Forward) Button ......... 6,12,13,15,16,23
First-Time Operation ............... . ....... 2-5
Frame Advance ............................. 12
Front Panel Controls ......................... .23
Home Antenna System, Connecting .......... .25
Hookups
Antenna ............................... 25
CableSystem with CableBOx for
•AllChannels ..........................26
• Cable System With Cable Box for
Premium Channels ............ . ...... "26
Cable System With No Cable Box ........ .25
C_mncorder to Copy Tapes .............. .27
Supplie d Antenna ..................... "25
VCR to Copy Tapes .................... .27
IDIOMA/LANGUAGE Menu ................... _5
Important Information ....................... .i
IncludedAccessories ........................ 2.
Index Feature ............................... 15
Index Number Feature ....................... 15
INDEX SEARCH Menu.. ..................... 15
Information, Important ........................ i
INPUT Button ................... 6,18,20,22,24,27
Language for Displays ......... -.............. .5
LANGUAGE/IDIOMA Menu ................... .5
Limited Warranty .......................... .31
Location of Controls ................... 6-7,23-24
LPSpeed .... ............ ..... ................ 17
Manual Tracking ............................. 13
MENU Button . .3,4,5,6,8,9,14,20,21
MUTE Button ................................ 6
Note to Cable TV Installer ..................... i
Number Buttons ............. 4,6-7,8,9,10,14,20,21
On-ScreenDisplays .......................... 8
One-Touch Recording ....................... 19
One-Time Program, Recording ............. 18, 20
Operation
One-Touch Record ...................... 19
Play a Tape ............................ 11
Program Omnnel Memory ............... .3
Record a Program ...................... 18
Set the Sleep T'u_er ...10
.....°._..........
Set the Time and Date (Clock) .............. 4
Set the Wake-up Tuner .................. 10
T'maer Record ......................... .20
Video, Adjust ........................... 8
PAUSE Button ...................... 6-7,12,17,22
continuedon next page
Page 35

!l[#l/l[Wi#[#l_ll
Index
Pau_se During Playback . : ..... ; .............. 12
Pause During Recording . .17
PICTURE QUALITY Menu ..................... 8
Picture Search .............................. 12
PLAY Button .................. 6-7,11,12,15,16,23
Playback
Auto Play .............................14
BlankTape ............................16
Commercial Scan .......................14
Features............................11-16
Index ................................. 15
Pause .................................. 12
Play aTape ............................ 11
Repeat ................................ 14
Zero .................................. 16
POWER Buttonand Indicator.........3,6-7,11,23
PREV GH (PreviousChannel)Button..........6-7
Problem Solving .........................28-29
ProductRegistrationCard .....................i
Programming Channel Memory .............. .3
PROGRAMMING Menu ................... 20,21
REC (Record) Button and Indicator .6-7,18,19,22,23
Recording
Basic .18
Features ............................... 17
One Touch ............................. 19
Pause ............. .................... 17
Speeds and Chart.. ..................... 17
Timer ................................ .20
RegistrationCard " " .i
Remote Batteries, Installing ..... .: ............ .3
Remote Control Buttons ..................... 6-7
Remote Sensor 23
Removing Channels from Me_nory ............. 5
REPEAT Indicator ........................ 14,23
RESET Button ......................... 6-7,8,10
Resetting Video to Factory Settings ............. 8
REW (Rewind) Button ............ 6-7,11,12,16,23
Safety Tab ....................... 11,18-20,22,23
Scan and Play Index Feature .................. 15
Scan, Commercial ........................... 14
SEARCH Button .................... 6-7,14,15,16
Search, Index ............................... 15
search, Time Counter ........................ 16
Searching .................................. 12
Selecting a Channel .......................... 5
Selecting a Language for Displays .............. 5
Sensor, Remote " .:-23
Setting a One-Touch Recording ............... 19
Setting a Timer .Recording ................... .20
Setting the Clock ................ ............. 4
Setting the Date .............................. 4
Setting the Time ............................ .4
settingUp theTV/VCR .................... .2-5
SETUP Menu .............................4,14
Sharp Function ..............................8
SLEEP Button ...........................6-7,10
SleepTimer ........................_....... 10
sta, Speed ................................. 17
Solving Problems ........................ -28-29
SPSpeed ................................... ,,
Specifications...............................30.
SPEED (TapeSpeed)Button .......6-7,17,18,19,20
Speeds, Recording .......................... 17
Start Up ................................. .2-5
STOP Button ............... 6-7,11,15,16,18,19,22
STOP/EJEGT Button .............. I1,18,19,21,23
Stoppinga Tmner Recording ................. 21
Stopping One-Touch Recording ............... 19
Tab, Safety ....................... 11,18-20,22,23
Table of Contents • . .1
Tape, Howto Play .......................... 11
Tapes, Copying ............................. 22
Tapes, Editing ............................. -22
Text Mode, Closed Captioning ................. 9
Time Counter ... _..................... ...13,16
TIME Menu ............................... 4,10
Time, Setting ............. _.................. 4
TIMER Indicator ..................... . .19,20,23
Timer Recording
Checking " -21
Clearing .............................. .21
Setting ............................... -20
Stopping ............................. .21
"tint Function ................... . ............. 8
TRACKING Buttons .................... 6-7,11,13
Tracking, Automatic ......................... 13
Tracking, Manual ........................... 13
Trouble Checks ......................... .28-29
Turn on TV/VCR ............................ 3
TV/VCR MAIN MENU .......... 4,5,8,9,10,14_0,21
TV/VCR Setup .................... ......... .2-5
•Types of Recordings.. ....................... 18
VCIL Connecting to TV/VCR ................ -27
VHF/UHF Antenna Connector ............ -24-26
Video, Adjusting ............................. 8
VIDEO/AUDIO IN Jacks ' .18,20,24,27
Video, Reset to Factory Settings ................ 8
Video Settings ............................... 8
VOL (Volume) Buttons ................ .5,6-7,8,23
Volume, Adjusting ......................... ..5
WAKE-UPIndicator ....................... 10,23
wami .i
Warranty, Limited .......................... 31
Weekdays (M-F),Recording ................. .20
Weekly Program, Recording ................. .20
ZERO SEARCH Screen ....................... 16
33
Page 36

Foryour nearest AUthorized Servicenter
call toll-free in the USA.
I-8(D-447-1700
If your TV/VCR ne_is service, please contact your dealer or
the nearest servicenter from the Yetlow Pages. Please do not
send any products to the Indianapolis address listed in this
manual or on the carton. This will only add delays in service
for .your product.
_ THOMSON I_ISUMEH ELECTRONICS
10330 N Meridian Street
Indianapolis, IN 46290
©1995 Thomson Consumer Elecu_nics,Inc.
T_.k_)® _
Printedin USA
20511080
 Loading...