

Page 1
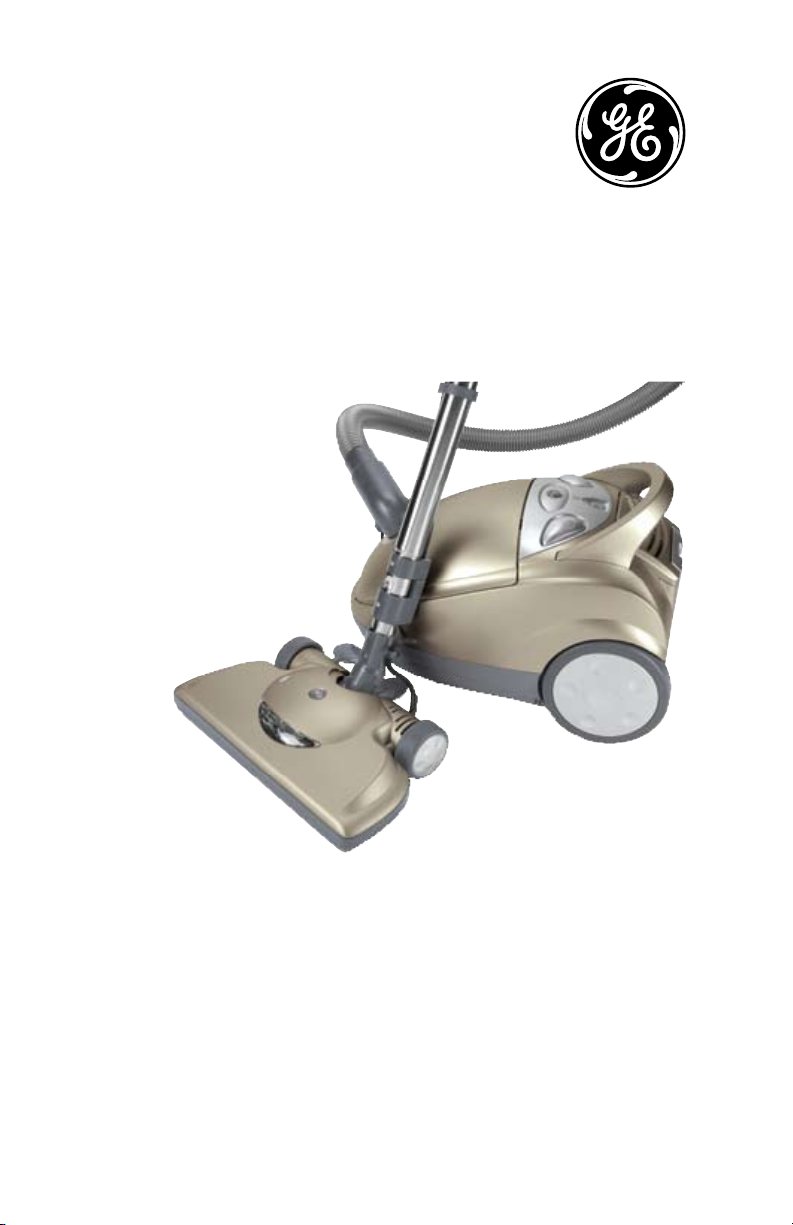
CANISTER VACUUM
Model Number: 169072
UPC: 68113169072
Customer Assistance
1-877-207-0923 (US)
1-877-556-0973 (Canada)
Thank you for purchasing a GE small appliance.
In keeping with the GE ecomagination initiative, please consider the option to
recycle the packaging material and donate the appliance you are no longer using.
Page 2

IMPORTANT SAFETY INSTRUCTIONS
When using an electrical appliance, basic precautions should always be
followed, including the following:
READ ALL INSTRUCTIONS BEFORE USING THIS VACUUM CLEANER
WARNING – To reduce the risk of fire, electric shock, or injury:
• Do not leave appliance when plugged
in. Unplug from outlet when not in use
and before servicing.
• Do not use outdoors or on wet surfaces.
• Always turn off this appliance when
removing dust container and filters
• Do not allow to be used as a toy. Close
attention is necessary when used by or
near children.
• Use only as described in this manual.
Use only manufacturer’s recommended
attachments.
• Do not use with damaged cord or plug.
If appliance is not working as it should,
has been dropped, damaged, left
outdoors, or dropped into water, Call
our toll-free customer service number
for information on examination, repair,
or adjustment.
• Do not pull or carry by cord, use cord as
a handle, close a door on cord, or pull
cord around sharp edges or corners. Do
not run appliance over cord. Keep cord
away from heated surfaces.
• Do not unplug by pulling on cord. To
unplug, grasp the plug, not the cord.
• Do not handle plug or appliance with
wet hands.
• Do not put any object into openings. Do
not use with any opening blocked; keep
free of dust, lint, hair, and anything that
may reduce airflow.
• Keep hair, loose clothing, fingers, and all
parts of body away from openings and
moving parts.
• Turn off all controls before unplugging.
• Use extra care when cleaning on stairs.
• Do not use to pick up flammable or
combustible liquids, such as gasoline, or
use in areas where they may be present.
• The hose contains electrical wires. Do
not use when damaged, cut, or
punctured.
• Avoid picking up sharp objects
• Always turn off this appliance before
connecting or disconnecting either
hose or motorized nozzle.
• Hold plug when rewinding onto cord
reel. Do not allow plug to whip when
rewinding.
• Do not pick up anything that is burning
or smoking, such as cigarettes,
matches, or hot ashes.
• Do not use without dust bag and/or
filters in place.
• Do not use the vacuum cleaner to pick
up large objects or objects that are
likely to damage the vacuum cleaner.
• Ensure the power cord is kept well away
from the revolving brushes of this
product, when is on and running.
• Do not immerse cord, plug, or appliance
in any liquid
• Do not use appliance for other than
intended use.
• Do not carry the appliance while it is
running.
• Don’t use an extension cord with this
appliance
• S tore the appliance in a dry place.
• Keep end of hose, wands, and other
open-ings away from your face and body.
• To avoid damaging the carpet, keep the
vac-uum cleaner head moving at all times.
SAVE THESE INSTRUCTIONS!
2
Page 3
CONSUMER SAFETY INFORMATION
This appliance is intended for household use only.
To reduce the risk of electric shock, this appliance has a polarized plug (one blade
is wider than the other). This plug will fit in a polarized outlet only one way. If the
plug does not fit fully in the outlet, reverse the plug. If it still does not fit, contact a
qualified electrician to install the proper outlet. Do not change the plug in any way.
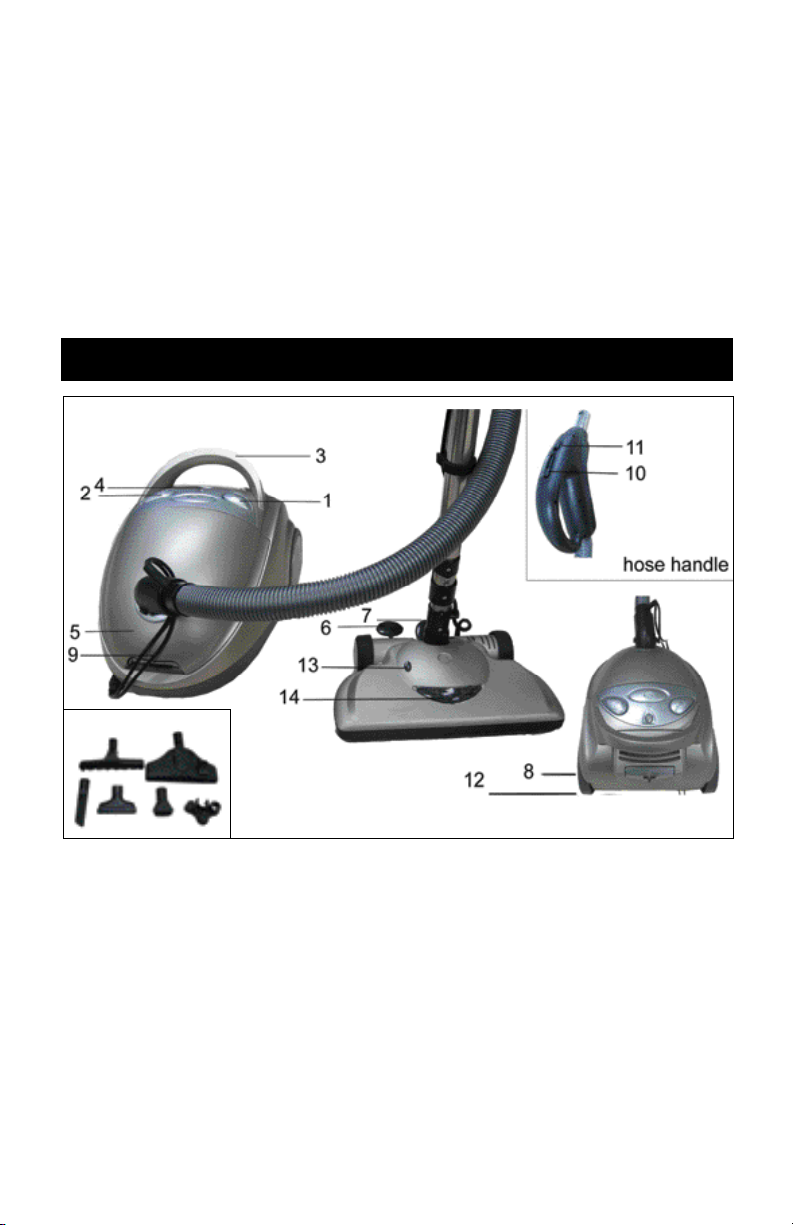
PARTS
Accessory Kit
1. Main On/off Switch
2. Cord Rewind Button
3. Handle
4. Dust Full Indicator
5. Front Cover Release
6. Brush Height Adjustment
7. Handle Release
8. Exhaust Filter Release
9. Power Brush Cord
10. Power Control Button
11. Power Brush On/off switch
12. Power Cord
13. Height Level Window
14. Front Light
15. Accessory Kit
15A. Large Bristle Brush
15B. Floor Brush
15C. Crevice Tool
15D. Small Brush
15E. Round Brush
15F. Accessory Holder
16. Wand Release Button
3
Page 4

ASSEMBLY INSTRUCTIONS
Assembling Flexible Hose
1. Insert the flexible tube (the end without
the handle) into the air intake duct on the
canister until you hear a click to indicate
that the hose is locked into the unit
2. Plug the cord into the socket on the front
of the canister.
Assemble handle into telescopic tube
1. Handle only fits on one end.
2. Insert the other end of the telescopic tube into
the metal tube attached to the powerhead.
Note:
Be sure connectors are aligned.
3. Insert completed telescopic tube into
powerhead.
Extending/Collapsing the telescopic tube
To extend the telescopic tube, push the black release button and then pull the
tube to the desired length.
Note: Shorten length of telescopic tube for storage.
4
Page 5

Install Onboard Accessories
Some of the canister vacuum’s
accessories can be stored onboard
the unit using the included holder
(part F)
Clip the accessory holder to the
telescopic tube and insert the Crevice
Tool, Small Brush, and Round Brush.
A. Large Bristle Brush: Ideal for sofa,
curved edges around furniture
B. Floor Brush: floor/carpet cleaning
(All Carpets) Bristles Extended Out
(Hard Floor Surface) Bristles In
C: Crevice Tool: For cleaning radiators, crevices, corners and between sofa pillows
D: Small Brush: This brush is specially intended for cleaning cloth surfaces
E: Round Brush:
remove dust from plants
F: Accessory Holder:
For cleaning furniture, curtains, books, floor lamps, shelves, and to
to store accessories (crevice brush, small brush and round brush).
OPERATION INSTRUCTIONS
1. Using the power cord: Pull the cord to the
desired length. The yellow mark indicates the
maximum length of extension.
2. Adjust the air-flow regulator on the handle to
the lowest speed
3. Plug in canister vacuum
4. Press the Main On/Off button (part 1)
5. Set the power switch on the handle to 1 for
rotating brush or 0 to turn rotating brush off
6. To adjust the power, slide the power control
on the handle
7. Step on the Handle release button to adjuster the telescopic tube to a comfortable
operating angle.
8. Step on the Brush Height button to adjust powerhead to appropriate flooring type
Note:
the power brush will automatically turn off if the telescopic tube is in an
upright position to protect your carpet from potential damage caused by the
rotation of the power brush.
Note:
the power brush will automatically turn off if the rotator bar is blocked by
clogs (hair, cloth, etc.) for your protection. In that case, turn off the power head,
unplug the vacuum, clean the clogs, and re-start the power brush.
IMPORTANT- Do not pull out
the cord any further than
the red indicator mark.
5
Page 6

Maximum
Minimum
When vacuuming is complete, press the main
ON/OFF switch (Part 1) to shut unit Off, unplug
the unit. Press the Cord Rewind button to
automatically rewind the power cord.
CAUTION: BE CAREFUL TO AVOID INJURY
AS CORD RETRACTS VERY QUICKLY
Warning: If the power cord is damaged,
do not use the unit and contact the
customer service number located on the
front cover of the manual.
CARE AND MAINTENANCE
Power Brush Maintenance
The Brush Roll may need to be cleaned to remove fibers and hair that have
become entangled around the Brush Roll or to replace the rotator or belt of the
power brush.
1. Unplug the vacuum. Press the wand
release button to take out the wand
from the powerhead.
wand release
2. Turn the power head over and remove the 2 screws to lift off the brush cover and
take out the rotator and belt. (See the drawing below for the location of the screws)
3. Remove any clogs and replace the rotator and/or belt.
4. Reinsert the rotator back into the brush roll tray (make sure the belt is attached
properly) with the rounded edge of the end cap facing down. Place the brush cover
back onto the brush and replace the 2 screws.
6
Page 7

Replacement of dust bag
This unit has a dust full indicator (part 4). When it is blue, turn off the unit, clean
the dust bag.
Note:
When the dust full indicator is blue while the dust bag is not full,
somewhere in the unit has a clog (clogs). Unplug the unit, check the unit
and clean the clog (clogs).
1. Remove the flexible hose
from the canister. Open the
front cover.
3. Release the dust bag holder lock to
take out dust bag for replacement
2. Taking out the dust bag holder
7
Page 8

Cleaning of filters
Pre-motor filter
1. Remove the flexible hose from the canister, open the front cover and take out
the dust bag holder.
2. Take out the pre-motor filter.
3. Clean the filter by
rinsing with tap
water. Thoroughly
dry and install it
again.
Note: make sure filter is completely dry before re-installation.
Exhaust filter
1. Lift off the grill located on the back of
the vacuum
2. Take out the HEPA filter and clean with
Round Brush (part E in Accessory Kit).
Re-install it.
Warning:
beginning any cleaning or maintenance
Note: make sure that all filters and/or dust bag are in position before operation
8
please unplug the unit before
Page 9

PROBLEMS AND CAUSES
Problem Cause
1. Unit and/or power brush will not start • Power cord not firmly plugged into
outlet
• Power head cord not connected to
canister securely
• Blown fuse or tripped breaker in
home
• On/off switch is not on
2. Won’t pick-up or low suction • Dust bag is full
• Clogged filters
• Nozzle/dirt passage hose clogged
3. Dust escaping from cleaner • Dust bag is full
• Dust bag not installed
• Hose not installed correctly
4. Cleaner tools won’t pick up • Hose clogged
• Dust bag is full
• Filter clogged
Note: The power brush will automatically turn off if the rotator bar is blocked
by clogs (hair, cloth, etc.) for your protection. In that case, turn off the power
head, unplug the vacuum, clean the clogs, and restart the power brush.
9
Page 10

CUSTOMER ASSISTANCE
For faster service, please have the model number and product name ready for the
operator to assist you. This number can be found on the bottom of your appliance and
on the front page of this manual.
Model Number: ____________________ Product Name: _________________________
Customer Assistance Number 1-877-207-0923 (U.S.) or 1-877-556-0973 (Canada)
Keep these numbers for future reference!
For more information, please visit us at www.gehousewares.com
TWO-YEAR LIMITED WARRANTY
What does your warranty cover?
• Any defect in material or workmanship.
For how long after the original purchase?
• Two years.
What will we do?
• Provide you with a new one.
• For those items still under warranty but
no longer available, WAL-MART reserves
the right to replace with a similar GE
branded product of equal or greater value.
How do you make a warranty claim?
• Save your receipt.
• Properly pack your unit. We recommend
using the original carton and packing
materials.
• Return the product to your nearest
WAL-MART store or call Customer
Assistance at 1-877-207-0923 (U.S.)
or 1-877-556-0973 (Canada).
What does your warranty not cover?
• Parts subject to wear, including, without
limitation, glass parts, glass containers,
cutter/strainer, blades, seals, gaskets,
clutches, motor brushes, and/or
agitators, etc.
• Commercial use or any other use not
found in printed directions.
• Damage from misuse, abuse, or neglect,
including failure to clean product
regularly in accordance with
manufacturer’s instructions.
How does state law relate to this
warranty?
• This warranty gives you specific legal
rights, and you may also have other
rights which vary from state to state
or province to province.
• This warranty is in lieu of any other
warranty or condition, whether express
or implied, written or oral, including,
without limitation, any statutory
warranty or condition of merchantability
or fitness for a particular purpose.
• WAL-MART, GE and the product
manufacturer expressly disclaim all
responsibility for special, incidental and
consequential damages or losses caused
by use of this appliance. Any liability is
expressly limited to an amount equal to
the purchase price paid whether a claim,
however instituted, is based on contract,
indemnity, warranty, tort (including
negligence), strict liability, or otherwise.
Some states or provinces do not allow
this exclusion or limitation of incidental
or consequential losses so the foregoing
disclaimer may not apply to you.
What if you encounter a problem with
this product while using it outside the
country of purchase?
• The warranty is valid only in the country
of purchase and you follow the warranty
claim procedure as noted.
is a trademark of General Electric
Company and is used under the
license by Wal-Mart Stores Inc.,
Bentonville, AR 72716
Marketed in Canada by:
Wal-Mart Canada Corp.
1940 Argentia Road, Mississauga, Ontario L5N1P9
 Loading...