

Page 1
ESPRESSO/CAPPUCCINO
MACHINE
Item Stock Number
169067
UPC: 681131690676
For Customer Asistance, call Customer Service at
1-877-207-0923 (US) or 1-877-556-0973 (Canada)
169067 • 681131690676
Page 2

IMPORTANT SAFEGUARDS
When using electrical appliances, basic safety precautions should always be
followed to reduce the risk of fire, electric shock, and/or injury to persons,
including the following:
• READ ALL INSTRUCTIONS BEFORE
USING THE MACHINE.
• Do not touch hot surfaces. Use handles
or knobs.
• To protect against electric shock, do not
immerse cord, plugs, or machine in water
or other liquid.
• Close supervision is necessary when any
appliance is used by or near children.
• Turn control switch to OFF and unplug
from outlet when not in use and before
cleaning. Allow to cool before putting on
or taking off parts, and before cleaning.
• Do not operate any appliance with a
damaged cord or plug or after the
appliance malfunctions, or has been
damaged in any manner. Call our tollfree customer service number for
information on examination, repair
or adjustment.
• Do not use outdoors.
• Do not let cord hang over edge of table
or counter, or touch hot surfaces.
• Do not place this appliance on or near
a hot gas or electric burner or in a
heated oven.
• To disconnect, turn control to “off”, then
remove plug from wall outlet.
• Do not use appliance for other than
intended use.
• Use on a hard, flat level surface only, to
avoid interruption of airflow underneath
the appliance.
• Always be sure water tank boiler cap is
tightened securely before turning
machine on.
• DO NOT remove boiler cap until pressure
is completely relieved. See section
“CAUTION PRESSURE”
• WARNING: To reduce the risk of fire or
electric shock, do not remove any service
covers. No user serviceable parts inside.
• The use of accessory attachments
not recommended by the appliance
manufacturer may result in fire, electric
shock or injury to persons.
• Do not immerse appliance in water.
.
SAVE THESE INSTRUCTIONS!
2
Page 3

CONSUMER SAFETY INFORMATION
This appliance is intended for household use only.
Special Cord Set Instructions
a) A short power-supply cord is provided to reduce risks resulting from becoming
entangled in or tripping over a longer cord.
b) Longer detachable power-supply cords or extension cords are available and may be
used if care is exercised in their use.
c) If a long detachable power-supply cord or extension cord is used
1. The marked electrical rating of the detachable power–supply cord or extension
cord should be at least as great as the electrical rating of the appliance.
2. If the appliance is of the grounded type, the extension cord should be a groundingtype 3-wire cord, and
3. The longer cord should be arranged so that it will not drape over the counter top or
table top where it can be pulled on by children or tripped over.
d) This appliance has a polarized plug (one blade is wider than the other). To reduce the
risk of electric shock, this plug is intended to fit into a polarized outlet only one way. If
the plug does not fit fully into the outlet, reverse the plug. If it still does not fit, contact
a qualified electrician. Do not attempt to modify the plug in any way.
CAUTION: PRESSURE
To avoid possible burns from hot steam and water, NEVER open the boiler cap
while there is pressure in the boiler. Remove all pressure first.
To remove all pressure, proceed as follows:
1. Turn the selector knob to the “O” position and unplug the appliance.
2. Remove the filter holder and dispose of coffee grounds.
3. Re-install the filter holder and the empty carafe.
4. Turn the steam selector control knob to the “cup” position and allow all pressure
and residual water to completely drain off into the carafe until all flow and
sound ceases. The pressure is now removed.
3
Page 4
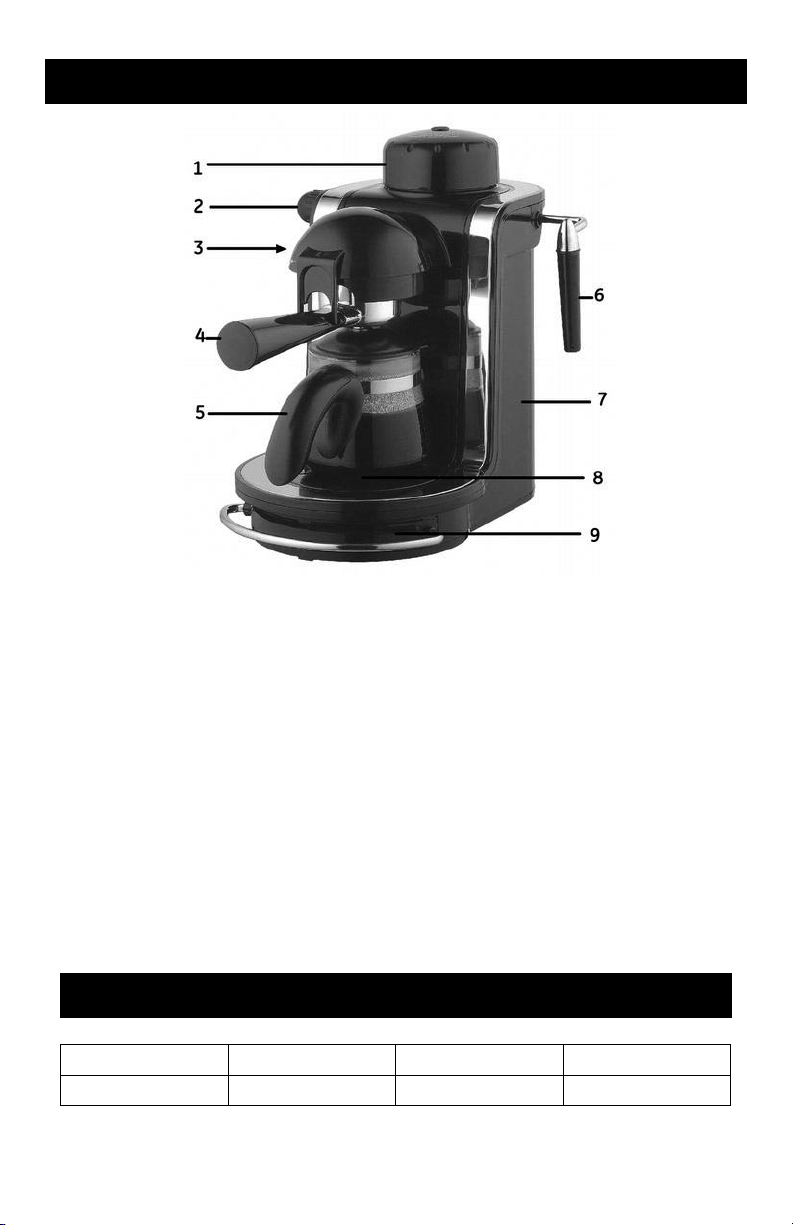
PRODUCT FEATURES AND DIAGRAM PARTS
Parts
1. Water tank boiler cap
2. Steam selector
control knob
3. Indicator light
4. Filter holder set
5. Carafe
6. Frothing tube
7. Boiler
8. Reservoir plate
9. Drip tray
Features
• Auto self-priming
operation to produce
constant pressure
• 3-way select switch knob
with brewing, frothing and
stop functions
• Fixed steam pipe for
frothing milk and heating
up beverages
• Removable drip tray for
easy clean up
COFFEE MAKER MODEL
Model No. Rated voltage Rated power Capacity
169067
4
120V, 60Hz
750W 240cc / 1.014 cups
Page 5

OPERATING INSTRUCTIONS
Congratulations! You are the owner of a GE espresso/cappuccino maker. This unique
appliance has been designed to provide you with delicious espresso/cappuccino
quickly and conveniently. Espresso is a flavorful coffee beverage utilizing a unique
method of brewing. Popular in Europe, it is a far richer and more full-bodied brew
than regular coffee. Because of its richness, espresso is usually served in 1-1/2 to
2 oz. portions, in demitasse cups.
Cappuccino is a drink made of about one third espresso, one third hot milk, and one
third foam.
Preparing espresso or cappuccino is very different from brewing regular drip
coffee in that this machine operates under steam pressure and requires special
attention. To ensure your safety and the long life of this appliance, please read all
instructions, cautions, notes, and attentions.
Before Using Your Espresso Maker
Please refer to page 3 for diagram of parts.
1. Wash the stainless cup and filter holder in a mixture of mild detergent and water.
Rinse each thoroughly.
2. To rinse the inside of the machine, follow steps for brewing espresso, using
water only.
The Coffee
The coffee should be a freshly ground, dark roasted variety. You may want to try a
French or Italian roast. Pre-ground coffee will only retain its flavor for 7-8 days,
provided it is stored in an airtight container, in a cool, dark area. Do not store in a
refrigerator or freezer.
Whole beans are recommended, to be ground just before use. Coffee beans stored in
an airtight container will keep up to 4 weeks before they being to lose their flavor.
5
Page 6

OPERATING INSTRUCTIONS
The Grind
This is a vital step in the espresso making process and takes practice. The coffee
must be ground fine, but not too fine
• The correct grind should look gritty, like salt or sand.
• If the grind is too fine, the water will not flow through the coffee even under
pressure. Grounds that are too fine look like powder and feel like flour when rubbed
between the fingers.
• If the grind is too coarse, the water flows through the coffee too fast, preventing a
full flavored extraction.
Be sure to use a quality grinder or mill for uniform consistency of your
espresso grind.
How To Brew Espresso
Please refer to page 3 for diagram of parts. First unwind the electrical cord from the
bottom of your machine.
Filling the water tank…
1. Turn the selector control knob to the center “O” or OFF position.
2. Fill the carafe with cold water to the desired number of servings. Never use warm
or hot water to fill the water container. Note: If you are making cappuccino, refer to
page 7 for the proper water measurements.
3. Remove the water tank boiler cap and pour the water into the water tank. Do not
fill to the top of the tank or there will not be enough area to generate steam.
CAUTION:
to make sure power switch is off. Do not pour more than 5 ounces of water into
the tank.
4. Screw the boiler cap back on top of the water tank. Make sure it is on tight.
Do not pour water into the tank while the machine is on or hot. Check
Preparing the Coffee…
1. Remove the filter holder by grabbing the filter handle and sliding 1/4 to the left.
The filter holder will now release.
2. Place the filter basket in the filter holder. See figure 1.
6
Page 7

OPERATING INSTRUCTIONS
(FIGURE 1)
3. Scoop fresh fine ground espresso into the filter basket to the appropriate number
of servings. Clean any excess coffee from the rim of the filter holder. This will
assure proper fit under the brew head.
ATTENTION:
a. Do not pack coffee.
b. Do not overfill the filter basket. This might cause clogging or over flow.
4. Place the filter retainer clip in the release position, by pulling the clip back
toward you hand. Place the filter holder underneath the brew head so that the
handle is positioned to the left of center. Lift the filter holder into place and slide
handle to center. See figure 2.
Handle position for inserting filter assembly
(FIGURE 2)
7
Page 8

OPERATING INSTRUCTIONS
Brewing Espresso…
1. Make sure the reservoir plate on the drip tray is in place. Place the cover
on the glass carafe so the lid opening faces the spout, and set it on the
reservoir plate.
2. Make sure the steam selector control knob is in the “O”, OFF position.
3. Plug the power cord into a 120v electrical outlet.
4. Rotate the selector control knob to the “cup” position. The light will illuminate
to let you know the machine is on. See figure 3.
(FIGURE 3)
5. Espresso will begin to flow into the espresso cup in about five minutes.
6. When the espresso has stopped flowing into the carafe, turn the power off by
moving the control knob back at the “O” position. Unplug the power cord and
allow the machine to cool. Do not remove boiler cap until the pressure in the
machine has been released. See section “CAUTION PRESSURE”.
7. After the machine has cooled down and all pressure has been relieved, remove
the filter holder. Using the filter retainer clip to secure the filter basket in the
filter holder, turn the filter holder upside down to empty. Rinse the filter basket
and holder with water.
CAUTION: The metal parts of the filter holder might still be very hot. Make sure
to use the filter retainer clip when discarding the grounds. Cool down these
parts by running under cold water.
8. See instructions for cleaning.
How to Make Cappuccino
Cappuccino is espresso topped with steamed and frothed milk. Frothing milk for
cappuccino takes practice. Do not discouraged if it is not perfect the first time.
It may take a few times before you perfect this process.
For best results, we recommend frothing the milk in a separate pitcher and
pouring the milk into your coffee. The milk and pitcher should be cold. Do not
use a pitcher which has just been washed in warm water.
8
Page 9

OPERATING INSTRUCTIONS
1. The first step in making cappuccino is to make espresso. Therefore, pour in
sufficient water for the required quantity of espresso, plus enough water for
the production of steam. Example: For 2 servings, fill water to the midpoint
between the 2 and 4 cup markings.
2. Follow steps 1-4 on “Brewing Espresso”.
3. Fill a small stainless steel or ceramic pitcher 1/3 full with cold milk or half and
half and set next to the machine. Skim milk or 2% will be the easiest to froth.
4. Rotate the selector control knob to the “cup” marking. The espresso will begin
to flow in about 5 minutes. As soon as the espresso reaches the steaming
position mark on the glass carafe, turn the steam selector control knob to the
OFF position. At that time the boiler has created enough pressure and steam to
start frothing the milk. Frothing the milk before finishing the espresso prevents
you from running out of the steam. This can happen if you froth towards the
end of the brewing process.
To Steam: Hold the pitcher below the frothing tube. Rotate the selector control
knob downward slowly to the “steam” position. Gently move the pitcher in a
circular motion around the steam nozzle.
(FIGURE 4)
To Froth: When the milk has doubled in volume, insert the steam nozzle down into
the milk to further heat the milk. To avoid splattering of hot milk, do not lift the
steam nozzle above the surface of the milk until the steam selector control knob is
closed. This is done by rotating the selector control knob back to the “O” OFF
position. After the milk is frothed, set the pitcher aside to allow the frothed milk to
settle. Turn the steam selector control knob back to the “cup” position to finish
making espresso. When the espresso has stopped flowing into the carafe, turn the
control knob to the “O” OFF position. Pour the espresso into a cup which has the
capacity of at least 5 ounces. Then add the steamed milk to the espresso and
spoon on the frothed milk.
The proportion between espresso and milk is to taste; normally 1 part espresso
and 2 parts milk plus the froth.
5. Unplug the power cord and allow the machine to cool. Do not remove the
boiler cap until the pressure in the machine has been released. See section
“CAUTION PRESSURE”.
6. Continue to follow steps 7-8 on “Brewing Espresso”.
9
Page 10

CLEANING
1. Unplug the appliance power cord.
2. Clean the steam nozzle
to produce steam for another 1-2 seconds, which will clear the nozzle. Remove
the plastic cover by pulling it free. The metal steam nozzle underneath can be
unscrewed in a counter-clockwise direction. Wipe nozzle with a damp cloth. Clean
the nozzle with a needle if it is still blocked. The nozzle must be screwed on again
in a clockwise direction. Tighten using reasonable force.
3. The carafe, carafe lid, filter basket, reservoir plate and drip tray can be washed
with soapy water or placed on the top rack only of your dishwasher.
immediately after foaming milk by allowing the appliance
CAUTION:
machine is under pressure. See section CAUTION PRESSURE.
4. After the pressure has been released, remove boiler cap. Discard the remaining
water through the top opening of the water tank. Screw the boiler cap back
in place.
5. Always empty the water tank of any water between uses.
6. Wipe housing with a soft wet cloth. Do not use abrasive cleaners or scouring pads
as they will scratch the finish.
7. Do not store the filter holder on the machine. This can adversely affect the fit
while brewing espresso.
Do not immerse machine in water. Do not remove boiler cap while
Deliming
Mineral deposit build-up in the espresso maker will affect the operation of the
machine. Your espresso maker must be delimed when you begin to notice an
increase in the time to brew espresso, or when there is additional steaming. Also,
you will notice a build up of while deposits on the surface of the brew head. The
frequency of cleaning depends upon the hardness of the water used.
The following table gives the suggested cleaning intervals.
SUGGESTED CLEANING INTERVAL
Type of water Cleaning Frequency
Soft Water every 80 brew cycles
Hard Water every 40 brew cycles
10
Page 11

CLEANING
Your espresso maker may be delimed using while household vinegar.
Clean the water tank first, following steps 1-5;
1. Make sure the steam selector control knob is in the center OFF position and that
the plug is disconnected from the electrical outlet.
2. If the machine is cool and the pressure has been released (see section CAUTION
PRESSURE
household vinegar into the water tank.
3. Screw on the boiler cap and allow machine to sit overnight with the vinegar
solution in the water tank.
4. SLOWLY remove the boiler cap and discard vinegar through the top opening of
the espresso maker.
5. Rinse the water tank thoroughly with tap water, repeating this step twice.
To wash internal parts:
1. Make sure you clean the inside of the water tank first.
2. Make sure control is in the off position, the plug is disconnected from the
electrical outlet, the machine is cool and all pressure in the machine has been
released (see section CAUTION PRESSURE). Remove the pressure cap and pour
8 ounces of fresh white household vinegar into the water tank.
3. Screw the boiler cap back on top of the water tank. Make sure the cap is
on tight.
4. Insert the filter holder into the brew head and place the glass carafe with lid
on the reservoir plate.
5. Plug the machine into the electrical outlet and turn the power switch on.
6. Place a cup with cold water under the steam nozzle. Turn the selector control
knob to the “cup” position. When vinegar begins to flow into the carafe, insert
the nozzle into the water and open the steam nozzle slowly by turning the
selector control knob to the “steam” position. After a few seconds close the
steam nozzle by turning the knob back up to the “cup” position. This will clean
any residue left in the nozzle from frothing milk.
7. When all the vinegar has been pumped into the carafe and the flow has
stopped, turn the control knob to “O” and allow the machine to cool.
8. Repeat steps 1-7 using only tap water to rinse any remaining traces of vinegar
out of the machine. Repeat this process twice, allowing the machine to cool and
pressure to be released before repeating.
), remove the boiler cap and pour 8 ounces of undiluted white
11
Page 12

PROBLEMS AND CAUSES
Problem Causes
Coffee does not come out • No water in tank.
• Coffee grind is too fine.
• Too much coffee in the filter.
• Boiler cap is not secure, steam is escaping.
• Machine was not turned on, or plugged in.
Coffee comes out too quickly • Coffee grind is too coarse.
• Not enough coffee in filter basket.
Coffee comes out around the
edge of the filter holder
No steam is generated
Coffee is splattering out of spout • The water tank is empty or low, not
Milk is not foamy after frothing
•
Filter holder is not inserted in the brew head
properly.
• There are coffee grounds around the filter
basket rim.
• There is too much coffee in the filter basket.
• Coffee has been packed too tightly.
• The water tank is empty.
• There is too much water in the tank,
no room for steam.
• Machine is not turned on.
enough pressure.
• Ran out of steam.
12
Page 13

CUSTOMER ASSISTANCE
If you have a claim under this warranty, please call our Customer Assistance Number.
For faster service, please have the model, type and series numbers ready for the
operator to assist you. These numbers can be found on the bottom of your appliance.
Model: _________
Customer Assistance Number 1-877-207-0923 (U.S.) or 1-877-556-0973 (Canada)
Keep these numbers for future reference!
For more information, please visit us at www.walmart.com
Type: _________________ Series: ___________________
TWO-YEAR LIMITED WARRANTY
What does your warranty cover?
• Any defect in material or workmanship.
For how long after the original purchase?
• Two years.
What will we do?
• Provide you with a new one.
• For those items still under warranty but
no longer available, WAL-MART reserves
the right to replace with a similar GE
branded product of equal or greater value.
How do you make a warranty claim?
• Save your receipt.
• Properly pack your unit. We recommend
using the original carton and packing
materials.
• Return the product to your nearest
WAL-MART store or call Customer
Assistance at 1-877-207-0923 (U.S.)
or 1-877-556-0973 (Canada).
What does your warranty not cover?
• Parts subject to wear, including, without
limitation, glass parts, glass containers,
cutter/strainer, blades, seals, gaskets,
clutches, motor brushes, and/or
agitators, etc.
• Commercial use or any other use not
found in printed directions.
• Damage from misuse, abuse, or neglect,
including failure to clean product
regularly in accordance with
manufacturer’s instructions.
How does state law relate to
this warranty?
• This warranty gives you specific legal
rights, and you may also have other
rights which vary from state to state
or province to province.
• This warranty is in lieu of any other
warranty or condition, whether express
or implied, written or oral, including,
without limitation, any statutory
warranty or condition of merchantability
or fitness for a particular purpose.
• WAL-MART, GE and the product
manufacturer expressly disclaim all
responsibility for special, incidental and
consequential damages or losses caused
by use of this appliance. Any liability is
expressly limited to an amount equal to
the purchase price paid whether a claim,
however instituted, is based on contract,
indemnity, warranty, tort (including
negligence), strict liability, or otherwise.
Some states or provinces do not allow
this exclusion or limitation of incidental
or consequential losses so the foregoing
disclaimer may not apply to you.
What if you encounter a problem with
this product while using it outside the
country of purchase?
• The warranty is valid only in the country
of purchase and you follow the warranty
claim procedure as noted.
is a trademark of General Electric
Company and is used under the
license by Wal-Mart Stores Inc.,
Bentonville, AR 72716
Marketed in Canada by:
Wal-Mart Canada Corp.
1940 Argentia Road, Mississauga, Ontario L5N1P9
 Loading...