

Page 1
9100190000080/169064
Printed in China
For Customer Assistance, call Customer Service at
1-877-207-0923 (US) or 1-877-556-0973 (Canada)
Item Stock Number
169064
UPC: 681131690645
Digital Full Size Iron
g
CUSTOMER ASSISTANCE
If you have a claim under this warranty, please call our Customer Assistance Number.
For faster service, please have the model, type and series numbers ready for the
operator to assist you. These numbers can be found on the bottom of your appliance.
MODEL :________________ TYPE :_______________ SERIES :________________
Customer Assistance Number 1-877-207-0923 (US) or 1-877-556-0973 (Canada)
Keep these numbers for future reference!
For more information, please visit us at www.walmart.com
TWO- YEAR LIMITED WARRANTY
What does your warranty cover?
• Any defect in material or
workmanship.
For how long after the original
purchase?
•Two years.
What will we do?
•Provide you with a new one!
• For those items still under warranty
but no longer available, WAL-MART
reserves the right to replace with a
similar GE branded product of equal
or greater value.
How do you make a warranty claim?
• Save your receipt.
•Properly pack your unit. We
recommend using the original carton
and packing materials.
•Return the product to your nearest
WAL-MART store or call Customer
Assistance at 1-877-207-0923 (US) or
1-877-556-0973 (Canada)
What does your warranty not cover?
•Parts subject to wear, including,
without limitation, glass parts, glass
containers, cutter/strainer, blades,
seals, gaskets, clutches, motor
brushes, and/or agitators, etc.
• Commercial use or any other use not
found in printed directions.
• Damage from misuse, abuse, or
neglect, including failure to clean
product regularly in accordance with
manufacturer’s instructions.
How does state law relate to this
warranty?
• This warranty gives you specific legal
rights, and you may also have other
rights which vary from state to state
or province to province.
• THIS WARRANTY IS IN LIEU OF ANY
OTHER WARRANTY OR CONDITION,
WHETHER EXPRESS OR IMPLIED,
WRITTEN OR ORAL, INCLUDING,
WITHOUT LIMITATION, ANY
STATUTORY WARRANTY OR
CONDITION OF MERCHANTABILITY OR
FITNESS FOR A PARTICULAR
PURPOSE.
•WAL-MART, GE AND THE PRODUCT
MANUFACTURER EXPRESSLY
DISCLAIM ALL RESPONSIBILITY FOR
SPECIAL, INCIDENTAL AND
CONSEQUENTIAL DAMAGES OR
LOSSES CAUSED BY USE OF THIS
APPLIANCE. ANY LIABILITY IS
EXPRESSLY LIMITED TO AN AMOUNT
EQUAL TO THE PURCHASE PRICE PAID
WHETHER A CLAIM, HOWEVER
INSTITUTED, IS BASED ON CONTRACT,
INDEMNITY, WARRANTY, TORT
(INCLUDING NEGLIGENCE), STRICT
LIABILITY OR OTHERWISE. SOME
STATES OR PROVINCES DO NOT
ALLOW THIS EXCLUSION OR
LIMITATION OF INCIDENTAL OR
CONSEQUENTIAL LOSSES SO THE
FOREGOING DISCLAIMER MAY NOT
APPLY TO YOU.
What if you encounter a problem with
this product while using it outside the
country of purchase?"
• The warranty is valid only in the
country of purchase and you follow the
warranty claim procedure as noted.
is a trademark of General Electric
Company and is used under the
license by WAL-Mart Stores, Inc.,
Bentonville, AR 72716
g
MARKETED IN CANADA BY:
Wal-Mart Canada Corp.
1940 Argentia Road,
Mississauga, Ontario L5N1P9
16906406EFM1.qxd 5/19/06 16:04 Page 1
Page 2
E3E2
IMPORTANT SAFEGUARDS
When using electrical appliances, basic safety precautions should always be
followed, including the following:
1. Read all instructions before using.
2. Use iron only for its intended use.
3. To protect against a risk of electrical shock, do not immerse the iron in water or
other liquids.
4. The iron should always be set to Standby/Off icon on the fabric setting button
before unplugging from outlet. Never yank cord to disconnect from outlet;
instead, grasp plug and pull to disconnect.
5. Before using for the first time, remove any sticker or protective foil from the
SOLEPLATE. Clean the SOLEPLATE with a soft cloth.
6. Do not allow cord to touch hot surfaces. Allow iron to cool completely before putting
away. Wrap cord loosely around iron when storing.
7. Always disconnect iron from electrical outlet when filling with water or emptying
iron and when not in use.
8. Do not operate iron with a damaged cord or if the iron has been dropped or damaged.
To avoid the risk of electrical shock, do not disassemble the iron. Incorrect reassembly
can cause a risk of electrical shock when the iron is used. Contact Customer Service
Department (see back cover), to return for examination and repair.
9. Close supervision is necessary for any appliance being used by or near children.
Do not leave iron unattended while connected or on an ironing board.
10. Burns can occur from touching hot metal parts, hot water, or steam. Use caution
when you turn a steam iron upside down as there may be hot water in the
reservoir.
11. When you have finished ironing or when leaving the iron even for short periods:
– Set the ADJUSTABLE STEAM CONTROL to the “No Steam” position, and press the
fabric setting button to Standby/Off icon.
– Stand the iron upright on its HEEL REST and unplug iron from electrical outlet.
NOTE: the soleplate may become damaged if the iron is stored with the soleplate
facing downward.
12. This product is intended for household use only.
SAVE THESE INSTRUCTIONS
Consumer Safety Information
THIS APPLIANCE IS INTENDED FOR HOUSEHOLD USE ONLY.
THIS APPLIANCE HAS NO USER-SERVICEABLE PARTS, THIS PRODUCT SHOULD ONLY
BE SERVICED BY AN AUTHORIZED SERVICE REPRESENTATIVE.
Special Instructions
This is a 1400 watt appliance. To avoid a circuit overload, do not operate another
high wattage appliance on the same circuit. If an extension cord is absolutely
necessary, a 15-ampere cord should be used. Cords rated for less amperage may
overheat. Care should be taken to arrange the cord so that it cannot be pulled or
tripped over.
Your iron is designed to rest on the HEEL REST. Do not leave the iron unattended
while it is ON. Do not set the iron on an unprotected surface, even if it is on its
HEEL REST.
Polarized Plug
This appliance has a polarized plug (one blade is wider than the other). To reduce
the risk of electric shock, this plug is intended to fit into a polarized outlet only one
way. If the plug does not fit fully into the outlet, reverse the plug. If it still does not
fit, contact a qualified electrician.
Do not attempt to modify the plug in any way. If the plug fits loosely into the AC
outlet or if the AC outlet feels warm do not use that outlet.
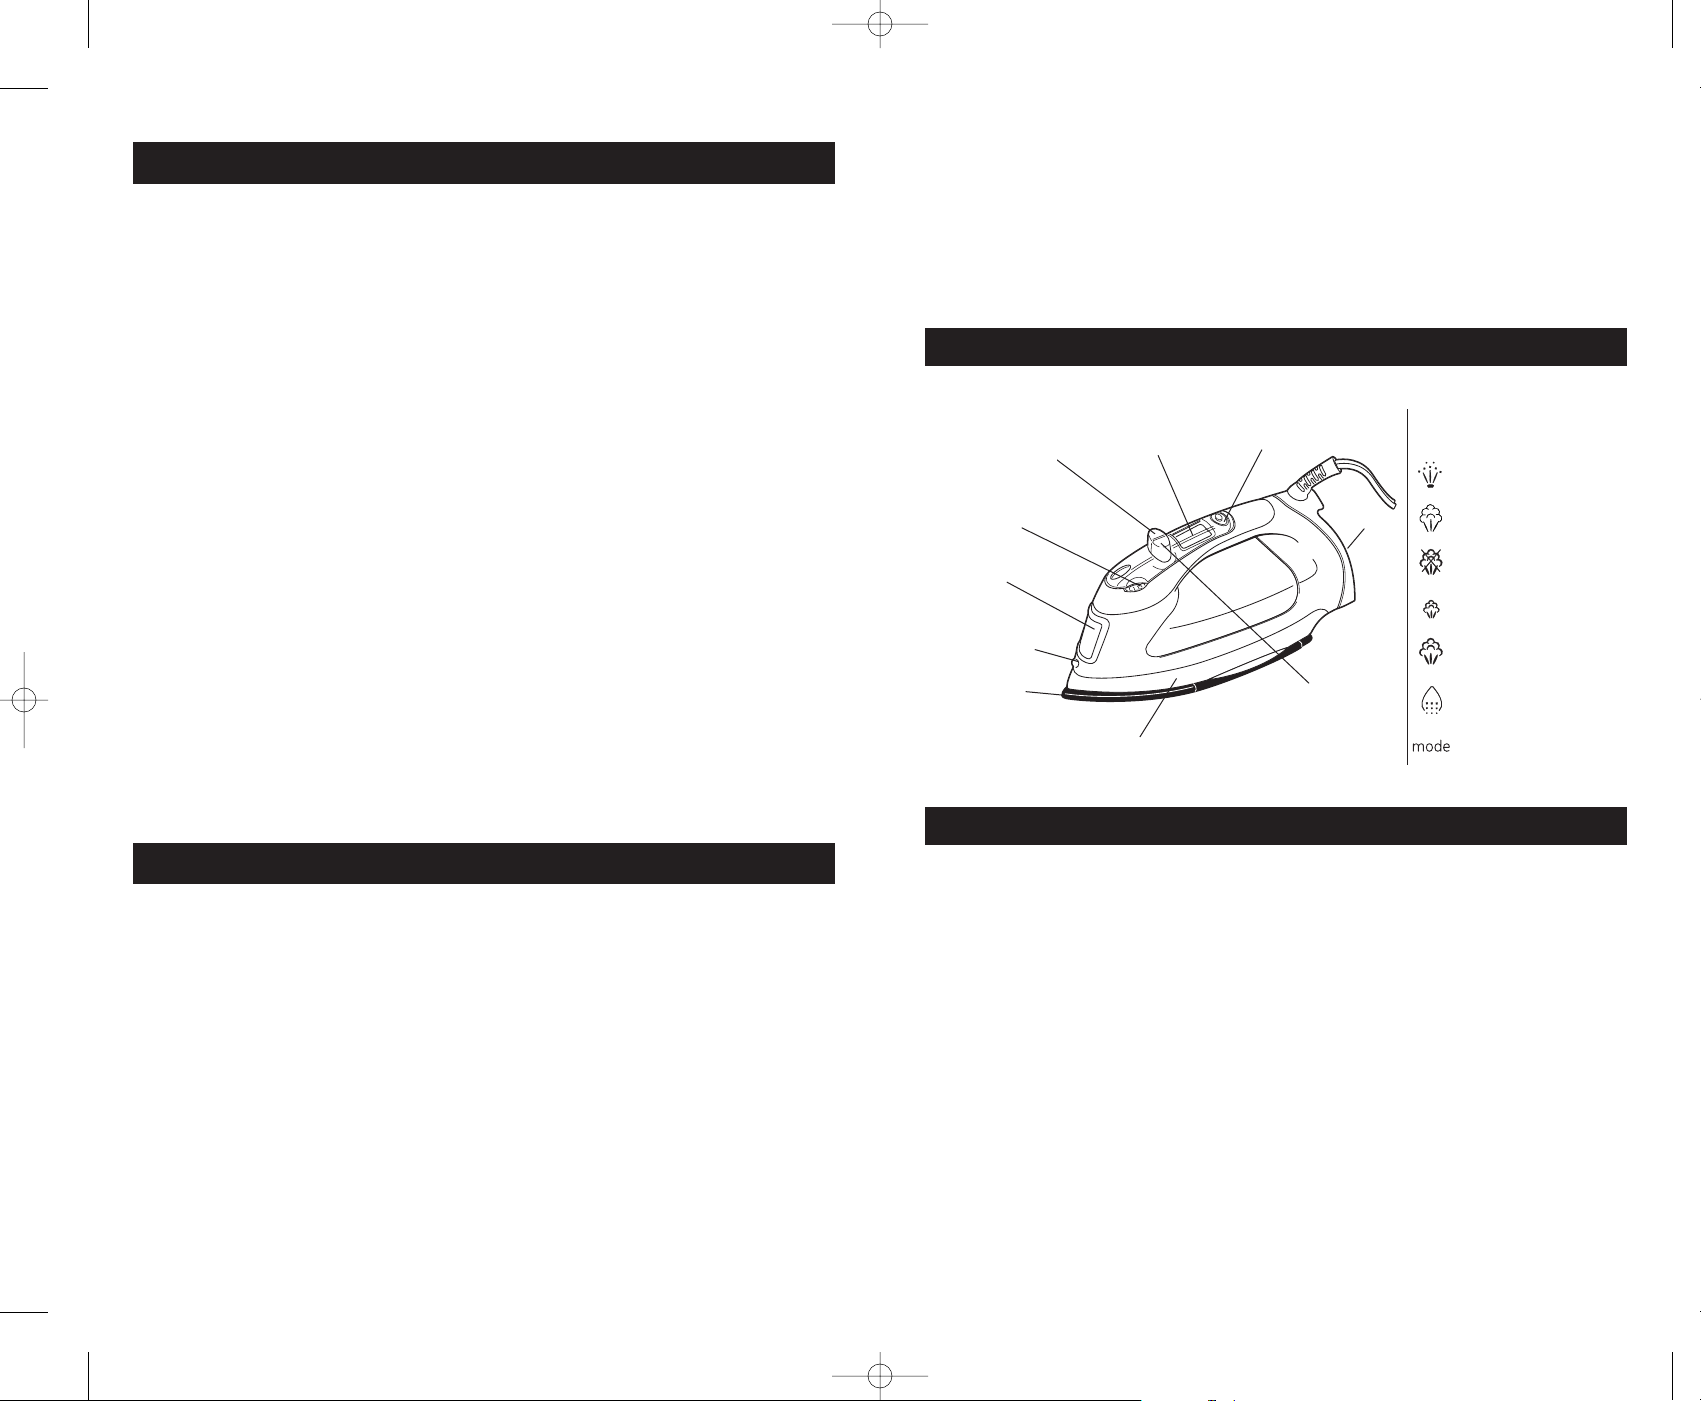
KNOW YOUR IRON
Symbols
Fabric Setting
Button
Heel
Rest
Adjustable
Steam Dial
Covered Water
Door
Spray Nozzle
Soleplate
Stainless Steel Skirt
spray button
burst of
steam button
no steam
light steam
heavy steam
self clean
BEFORE FIRST USE
During first use of the iron, the iron may appear to “smoke”. This will stop and does
not indicate a defect or hazard. Steam Vents should be cleared before first use to
remove any remaining residue from the manufacturing process and to ensure that
no stain is transferred to the fabric the first time the iron is used. To clear steam
vents:
1. Turn the Adjustable Steam Control to the “No Steam” position.
2. Fill with water to the “Max” fill line.
NOTE: Overfilling the iron may cause the iron to spill water during use. Do not
overfill Tank and never fill with anything but water.
3. Plug cord into a 120 volt AC electrical outlet. Pressing the Fabric Setting Button
select the highest setting “Linen”.
4. Let the iron preheat for 2 minutes while sitting on the Heel Rest.
5. Turn the Adjustable Steam Control to the Heavy Steam setting.
6. Pass the iron over an old cloth, letting the iron steam for a few minutes.
NOTE: Any iron may spit or sputter during the first uses with tap water. As the
steam chamber becomes conditioned, this occurrence will stop.
fabric setting
button
Digital LCD
Screen
Steam
Button
Spray
Button
16906406EFM1.qxd 5/19/06 16:04 Page 3
g
Page 3

Filling Water Tank
If you plan on using the Steam features, fill the Water Tank as follows:
1. Unplug iron from electrical outlet and set on a stable, heat resistant level
surface. Be sure that the Adjustable Steam Control is set to “No Steam”.
2. Fill with water to the "MAX" fill line.
NOTE: Except in areas with very hard water, tap water is recommended as it helps
condition the Soleplate. In areas with very hard water, distilled water may be
alternated with tap water to prolong the life of the iron.
Steam Ironing
1. Fill the Water Tank.
2. Plug cord into 120 volt AC electrical outlet.
3. By pressing the Fabric Setting Button (this button is marked with the " "
symbol), select the appropriate fabric setting. You will see the temperature bar
climb as the selected temperature is reached. While the temperature is being
reached a box will appear around the selected Fabric Setting and blink until the
selected temperature is reached.
4. When the box around the selected fabric setting stops blinking and the
temperature bar stops climbing the selected temperature is reached.
5. Turn the Adjustable Steam Dial to the desired Steam setting. Steam dial should
be turned in clockwise direction.
NOTE: This is the Standby/Off icon. When first plugged in the Standby/Off icon
will flash and the Fabric Setting Button light will remain off.
Once the fabric setting is selected, the Fabric Setting Button will remain lit until the
unit is set to the Standby/Off setting or unplugged.
Dry Ironing
1. Make sure the iron is unplugged from the outlet and that no fabric setting has
been selected.
2. Turn the Adjustable Steam Control to the “No Steam” position.
3. Plug cord into 120 volt AC electrical outlet.
4. By pressing the Fabric Setting Button, select the appropriate fabric setting. You
will see the temperature bar climb as the selected temperature is reached.
While the temperature is being reached a box will appear around the selected
Fabric Setting and blink until the selected temperature is reached.
5. When the box around the selected fabric setting stops blinking and the
temperature bar stops climbing the selected temperature is reached.
E4 E5
HOW TO USE YOUR DIGITAL IRON
6. The iron is now ready for dry ironing.
7. Use the Spray Button if moisture is needed.
Spray Feature
If fabrics are too dry, or have stubborn creases or wrinkles, the spray feature can
be used to moisten the area for smoother ironing.
1. Be sure that the iron is filled with water.
2. Press the Spray Button while the iron is in the horizontal position, a fine spray
of water will emit from the Spray Nozzle.
NOTE: It may be necessary to push the Spray Button a few times before spray
starts.
Burst/Vertical Burst Feature
The Burst of Steam Button provides an extra blast of steam. This feature helps with
pleats and removing stubborn wrinkles.
1. Be sure that the iron is filled with water.
2. When the Cotton or Linen fabric setting is selected, the Steam Guide Icon will
appear when the Iron is ready for the Burst of Steam feature to be used.
3. Using the Fabric Setting Button select the Cotton or Linen setting. It may be
necessary to pump the Burst Button several times to start Burst for the first
time at each ironing session.
NOTE: This feature will operate as long as the Cotton or Linen setting is selected. If
the temperature setting is too low, water may drip from the Soleplate. Allow 5
seconds between uses of the Burst feature to prevent water spotting.
Automatic Shut-Off Feature
The Auto Shut-Off feature will turn your iron off after the iron has been plugged in
and on for 30 minutes. After 30 minutes, when the Auto Shut-Off feature has
activated, the Fabric Setting Button Light will start to flash. It will not stop flashing
until the Fabric Setting Button is pressed to restart the iron or if the iron is
unplugged.
To reset your iron, simply push the Fabric Setting Button on the Handle to turn the
unit back on.
Self Clean Feature
It is recommended to use the Self Clean feature after every 5 uses to prevent mineral
build up that can clog the iron and prevent it from heating and steaming properly.
1. Turn the variable steam dial to "No Steam" setting.
2. Fill the water tank to the MAX fill line.
3. Plug the iron in and set the temperature control to its highest setting (Linen).
Allow iron to heat for 2 minutes.
4. Turn the variable steam Dial to " " for the Self Clean setting.
5. Place a towel over the ironing surface.
6. Hold the iron horizontally 2 inches above the towel allowing the steam to flow
through the vents until the water tank is emptied; you may also press the Burst
button several times remembering to pause about 5 seconds between bursts
to allow the iron to reheat.
7. Unplug when finished. Allow iron to cool before cleaning the exterior of the iron
or storing. Use a damp cloth and wipe off exterior of iron before storing, handling
or cleaning.
Fig. 1
16906406EFM1.qxd 5/19/06 16:04 Page 5
Page 4

CARING FOR YOUR IRON
CAUTION: NEVER IMMERSE IRON IN WATER OR OTHER LIQUIDS.
Emptying and Storing your Iron
1. Deselect the fabric settings and turn the Steam Control Dial to the “No Steam”
position.
2. Unplug the iron and allow to cool.
3. To empty water from the iron, make sure the Water Door is opened and slowly
tilt the pointed end over the sink and turn upside down. The water will run out
of the Water Fill Opening.
4. Wrap cord loosely around cool iron and store in an upright position. Wrapping
the cord too tightly can damage the cord.
5. Do not store the iron laying flat. Any small amount of moisture or residue may
cause the Soleplate to discolor.
Caring and Cleaning the Soleplate
1. Never iron over zippers, pins, snaps, buttons, or metal rivets as these may
scratch the Soleplate.
2. To clean the Soleplate of occasional build-up, wipe cool iron with a sudsy cloth.
Do not use abrasive cleaners or metal scouring pads.
Helpful Hints
1. Sort items to be ironed according to their required temperature settings. Begin
ironing at the lower settings and increase temperature as needed. If you are in
doubt about what temperature to use, start at a low temperature setting and
iron an inside seam. Gradually increase the heat and steam settings until
wrinkles are removed with out damaging the fabric.
2. When changing from a high temperature setting to a lower temperature
setting allow approximately 3-10 minutes for the lower temperature to be
reached.
NOTE: When Dry Ironing; it will take longer for the iron to cool down to a lower
setting. For example, if the iron is first set at Linen and then changed to Silk, it may
take 10-15 minutes for the iron to drop to the selected temperature.
When Steam Ironing, the temperature will descend faster because the water helps
to cool down the iron.
The following chart is designed to help you select the best setting and method for
the fabric you intend to iron. Check garment labels and follow recommendations
provided by the fabric manufacturer.
TROUBLESHOOTING
Iron Does Not Heat
• Iron should be plugged into a working electrical outlet.
• Check to see that a fabric setting has been selected.
• Did the Auto Shut-Off activate?
Iron Does Not Steam
• Check to see that the iron contains water. Add water if necessary.
• Make sure the Adjustable Steam Dial is turned to the desired setting
• Gently tap the Soleplate on the ironing board once or twice to clear steam
valves of any blockages.
Iron Spits Water or Leaks
• Make sure iron as been allowed to reach selected temperature for ironing.
Preheat for 2 minutes.
• Make sure that the Adjustable Steam Dial is turned to the “No Steam” position.
• If steam ironing, use the Fabric Setting Button to select the Cotton or Linen
setting and wait until the desired temperature is reached. Check that the higher
setting is safe for the fabric.
• Iron may be overfilled. Turn iron off and unplug. Allow iron to cool and pour
water out of the Water Fill Opening. Plug iron in electrical outlet and reheat.
Synthetic
Silk
Wool
Cotton
Linen
Acetate • Nylon
Silk • Nylon
Wool • Polyester
Cotton
Linen
SETTING FABRIC
Use dry on wrong side of fabric.
Use dry on wrong side of fabric.
Use steam on wrong side of fabric.
While fabric is damp, use either steam or dry
iron until fabric is dry. Iron dark fabrics on
wrong side to avoid shine.
While fabric is damp, use either steam or dry
iron until fabric is dry. Iron dark fabrics on
wrong side to avoid shine.
RECOMMENDATIONS
E6 E7
16906406EFM1.qxd 5/19/06 16:04 Page 7
 Loading...