

Page 1
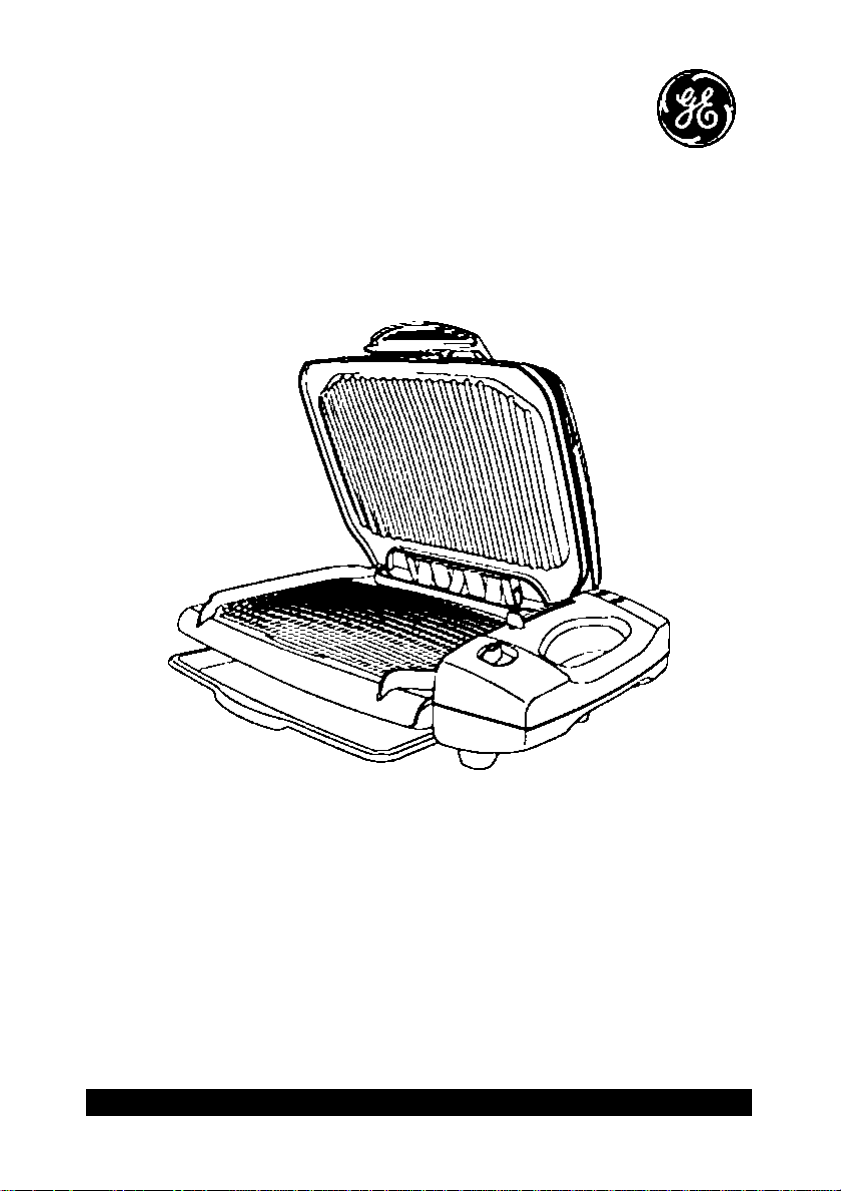
Contact Indoor Grill
Item Stock Number 169039
UPC: 681131690393
www.gehousavar«$.com
For Product Service. Call Customer Assistance at 1-877-207-0923
169039 ♦661131690393
Page 2

IMPORTANT SAFEGUARDS
Whan using aloctocal apptiancas. basic safety pracautons should always ba foilowad.
induding the folowing:
WARNING: A risk o( fire and eiactric shock odsts in all electrical appliances and may
cause personal injury or death. Please follow ad safety nstructions.
1. READ ALL INSTRUCTIONS BEFORE 9.
USING AP№ANCE.
Do not Id the ootd hang o«rer edge of
table or counter, or touch hot surfaces.
2. CAUTION: HOT SURFACE.
The apprenca Is hot dwlng operation
and retains heat lor some time after
being switched of. Do not touch hot
suiaco such as housing and pil
piatas. Use hancias or *pot holder'.
Nvrer moM the epfAanoe during use.
3. Close supervision is necessary when
the appliance is used by cr near
children and disabled persons.
4. Do not operate unattendeil, and never
leave the appliance unattended when
connected to power outlet.
5. Unplug the awhance ttom power
outtei when not In use and bcdore
deantng. To disconnect, pwitcn OFF
then rerrave plug from wall outlet.
Allow to cod before putting on or
taUng off 9III plates, and bctorc
deening the applianoe.
6. Do not operate any appliance with a
damaged cord or dug or after the
appliance tnalhindiors. or has boon
damaged In any mannec Return
appliance to the nearest authorind
service fedlity for esamination,
repBir or adjustment
7. The use of accessory attachments not
recommended by the mandactufer
may causa injuries and may damage
the applianoe.
8. Do not use outdoors.
10. Do not piece on or near a hot gas or
electric burner, or In a heated oven.
11. Do not use the applianca for other
than intended use.
12. lb protect aprst eiactric shock do
not immerse the appliance fodudr«
cord and plugs In water or other
bquid.
13. Ensure that there are no flammable
objects on or dose to the apdtance
while in use. If the appliance catches
f re. unplug A. Never use water to
edfoguish the Rre.
14. Do not cut food on the grill dstes to
avoid dam^mg the norvstick coabng,
Répare the food on carving board.
19. Never put metal toil or other utcnsis
on the grill plate dtilng oooking.
16. Beware of tot spitbng and hot steam
while grilling fat or fui^ meat
17.1b discotmecL dide the control Knob
to *OFP, then remov« dug from mi
outteL
IB. Do not operate ptii without the drip
paa
19. Extreme caution rmst be used w4«n
movirg an appTianco containing hot
dl and other hot liquids.
SAVE THESE INSTRUCTIONS!
Page 3

INSTRUCTIONS FOR USE
1. This appliance is designed for indoor
useonf^
2. If the appliance is used for the first
tkne. Mlcw the CLEANING
INSHtUCnONS to dean the appliance
first Both 0ili pMes must be properly
installed before use. Put the drip tray
under the front of the appiiance. Do
not use the grill without the drip tray or
without both grill plates.
3. Spread e thin coat)ng of vegctaoie cH
on №e 9iQ Plata before the appliance
is turned on.
A. Plug in the electrical outlet, Le. 120V
norrvnal branch dreut
5. Ckee the Hd and slide the control knob
tp desired temoerature setting. The
POWER light wU go on indicating
there is power to the gift. Wart
apprournatcly 5-8 minutes to allow the
unit to pre-heaL
6. The heater will stop automsbcaiv
when R reaches the temperature arxl
the READY light will go on. The heater
wil turn on again when its temoerature
has dropped to a certain lewd.
7. nit the food drecUy on the pit plata.
Neier put metal foil or utensRs on the
grin ptates. Always use either wooden
or hta resistance plastic utsnsis to
avoid damaging the non-stidc coating
of the gfll plates. Nft«r use metal
tongs and cutlery
8. GnII the food according to your own
taste. Griling Brno depends on the
fdnds of food, biHal temperature of
the food, triidafiess of food AND
whether the lid is dosed. Ganerely
speaiong, dosing the lid wil reduce
CDcMng duration by ooe-tnM.
9. It is not necessary to ban food during
Contact Grilling. During open gnilng,
turn the food from time to Bme.
Follow procedures of SETVP FOR
OPEN GRILUNG after preheating.
10. When oookiig is finished, slide the
oonbDl №ob to OFF so as to power
off. Unplug the appTance after use.
11. CAL/nON: To ptavert damage to
countertop or table top, use a
non-flammable, heat resistant trNet or
placsmat between the appliance and
the countertop or table top surface.
Never dace on carpet, fumitura, or
other combustible materials. Be
cautious cf hot splashing oil or hot
steam durii^ coddng
Page 4
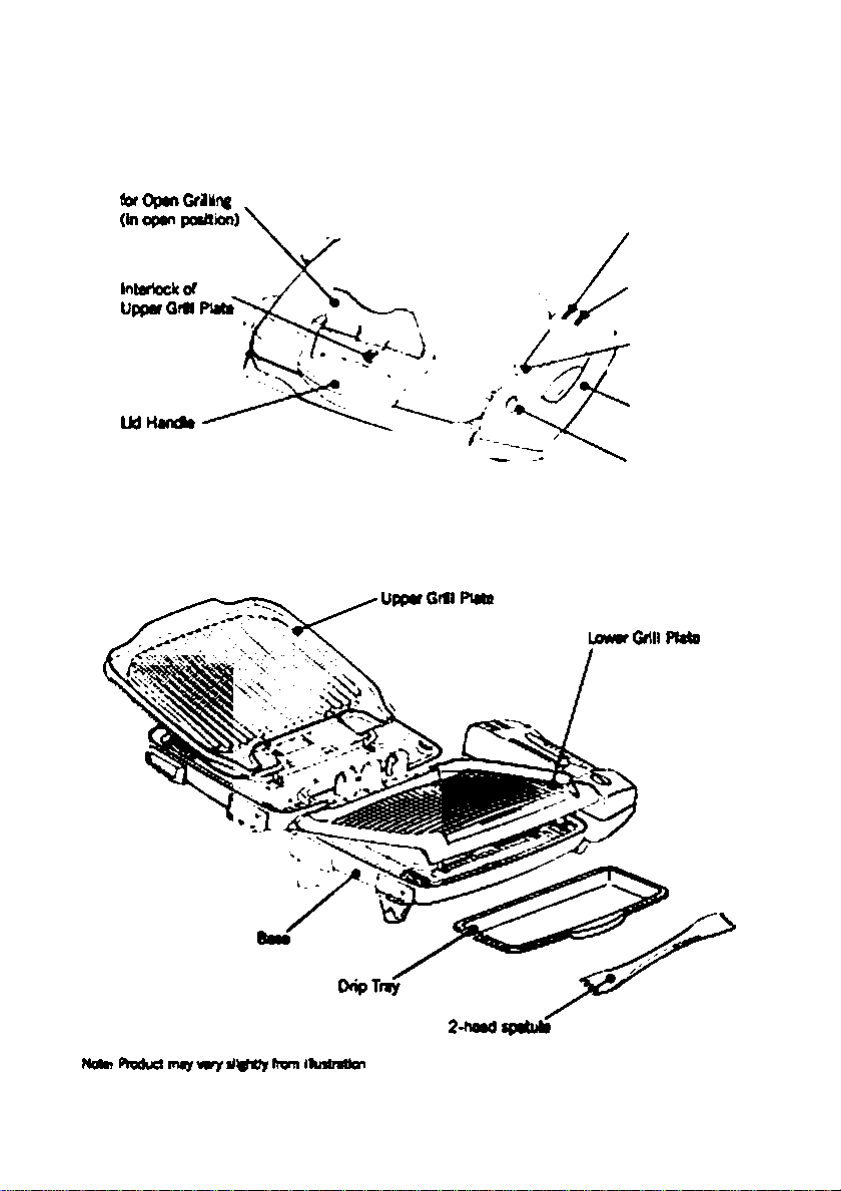
KNOW YOUR CONTACT INDOOR GRILL
Supped
Reedy Ught
F^werLVd
Cortid Knob
LelchdUtf
Page 5
CLEANING INSTRUCTIONS
1. Always unplug the apphance and let
the appliance cool do^ sufflcientty
before cleening to avoid accidental
bums.
2. Place the drip tray under the front of
the Icwer gril plate. Scrape off any
occcss tat and food pertides with the
presided 2-head spet^- Use the
corresponding head fo clean each gnii
plate. Upper plate fast and then lower
one. Ybu may need a paper towel to
wipe thooiiintothe drip tray Usea
wet warm sponge to dw stubborn
residues.
3. Remove gnlt pfofos before deaning
them In water, tolfow ihe REMOVE
GRILL PLATES INSTRUCTIONS below.
Do not immerse tne app'tance into
wMer or any liquid.
4. Viteh the 0lll plates and drip trey with
hot soapy watet Oo not use abresive
deaning pewder or sharp objects to
dean the grti ptates as it may damage
the costirig.
5. Clean the outer surface of the
appliance with a damp doth. Do not
use aixasive deanirig powder or shan>
objects to dean it cr the fintsMng wlH
be damaged.
6. Dry the grill plates, drip tray and al
surfaces of the appCance before
assmbTr«. Rrilow the INSTALL
GRILL PLATES instructiorts below.
Store the drip tray and spatula with the
appliance.
7. Than are no user serviceable parts.
Ary servicing other than indicated in
this Irstruction manual should be
performed by an authorized servica
represenlatli«. Do not attempt to open
theappiafKe.
Install Grill Plates
Rase lid. Install tower plate fWst and
toen the upper plate. (FUlow steps 1.2,
3, and 4) Alrgn the teeth on each grid
with the hinge.
0stuete
0 Pré» »‘ciieK’
M<D$W»ln
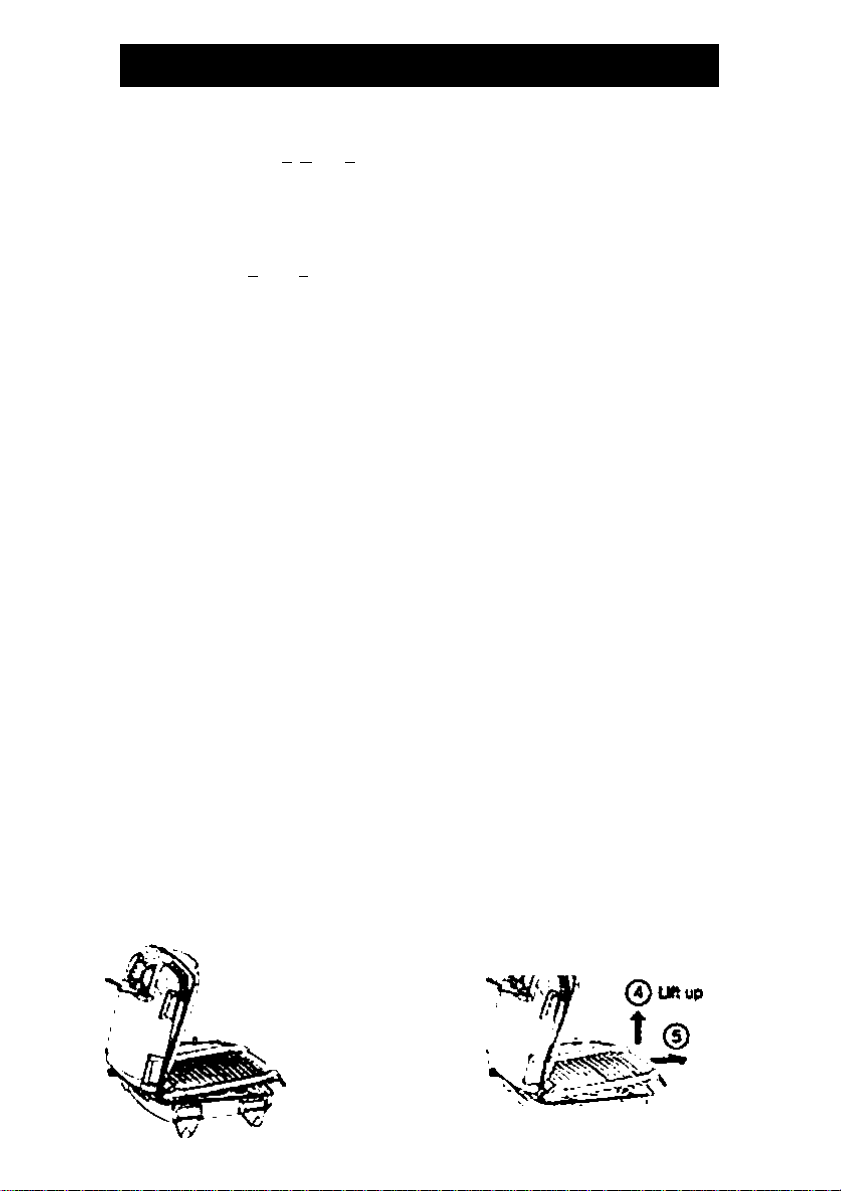
Remove Grill Plates
open the support on the lid handle and
raise Td to a vertical position. Pull and
hold the interiodi button while remcMng
upper gril plate. {Follow steps 1,2 and
3) Lift up and slide out to remove tower
grill piate. (Foltow steps 4 and 5)
0Pt««nehcM 0SHdt<krt
M»rlodi Dutton «
SiidooU
w
Page 6

FOR HOUSEHOLD USE ONLY
Extension Coni Use
a) A short power supply cord b pnMded
to reduce the risk o( becoming
entangled or tripping over a longer cord.
b) Eidenston cords may be used If care is
ecerctsed in their use.
c) N epdcnsicn ooej is used,
1) The marked elactrfc rating of the
cord or extension cord should beat
least 120V. ISA.
2} The longer cord shorid bo amngod
so that it will not drape over the
countertop or table top where it can
be pulled on by chiUien or tr^rped
over trintenbonaily
3) The csdcnsion cord should be a
pounding 3 Wire Cord.
Groundins Plug
This eppBance has a ^ourtoing plug
{3^n). As a saMy feature to reduce the
risk of electric shock, this ptog is intended
to fit into a grounded outlet only tfthe
plug does not fit fully In the oudat, contact
a quaMed electridaa Do not attempt to
defeat this safety feature. Oo not use a
3wnro to 2-wlrc 9Dundt)g adaptor to
defeat this safety feature.
Electric Power
N the oiectiic circuit is overtoadod with
other appliances, your applarce may not
operate. It should be operated on a
separate electfical cimal faom other
eppliancas. X you are not sure the reason
of mertoading or cannot find a separate
drcuK. cordact a quaBRed eiectrfdan.
Satup for Open Grilling Setup for Contact Grilling
for Concftd Griilifif of
«xtmtNckfooo
Page 7

Customer Assistance
H you h«ve » cialm under thb warranty^ pieasa call our Customer Assistance Number.
For faster service ptease hs>« modd, series, and type numbers ready for operator to
assist you. These numbers can be found on the bcittom of your Coritact Indoor Gril.
MODEb TYPE: SERIES:
Customer Assistance Number 1-S77*207'0923
Nmp this number tof tutmw nf9mK9l
TWO-YEAR LIMITED WARRANTY
What does your warranty caver?
• Any defect in materia) or workmanship.
For How long after the ortglnBl purchase?
• Two years.
What wlQ we do?
• Ptoride you with a new one.
How do you make a vramnty ctalm?
• Save your receipt.
• Pioperly pack your unit Wa
recommend usng the original
carton and packing mstariais.
• Return the product to your nearest
WALAMART store or call Customer
Assisance at 1-877-207-0923.
___________
What V you enceunler a probfem with
thb product whk using K outdde the
country of purchase?
* The warranty is vdid only in the
country of purchase and if you follow
the warranty cialm procedure as noted.
V • a UaOmwk ol
Ganani Dseede Company
and e vwd undar Ota icaraa
by WALAMAAT Stoma Inc.
totUttOla. Aft 72716
What does your wananty not OMer?
• Commercial use.
• Damage from misuse, abuse,
or neglect.
• Picducts which hat« been modrtied
or Incorporated into other products.
WAL-MART Stores. Inc.
Bentonvifle.AR 72716
aacconoiA
Page 8

Grill por contacto para interiores
Número de código del producto 169039
UPC: 681131690393
www.Behousewwes.com
ftra obtener servicio pan el producto, lame a Atención al diente al 1>877>207'0923
l&90¿9«6dn32 690393
Page 9

INSTRUCCIONES IMPORTANTES DE SEGURIDAD
Cuando use electrodomésticos, debe seeuir siemom las precauciones básicas da sep«)dad. incluyendo
tas que se meroonan 8 contnuacién.
AOVDlTENCiA: al nesgo de incendio y choque eiécthco está presente cuando usa cualquier
atectjodomésbco y puede provocer heridas personales o ta muerte. №r favor siga todas las
tfistrucciones de seguridad
1. L£A TODAS LAS INSTRUCCIONES ANTES
DE UTILIZAR EL ELECTRODOMÉSTIOOi
2. PRECAUCIÓN: SUPERFKIE CAUENTE. O
etecbodoméstico está caliente durante su
funcionamientD y rebene el calor durante
cierto tiempo Incluso después de apagado.
No (oque las superficies calientes como la
cubierta y las bendefas pera asac Utince las
asas o un agarrador. Ntmca mueva el
electndomésticD rrwnbas esté en usa
3. Deberá viglene atantamerrte cuando el
electrodoméstico sea usado por retos o
personas incapacitedas, o cerca de ellos.
4. Nunca pones en furdonamícnto ni dqe el
electredomesoco sin supervisión cuando esté
conectado al lomacorriente.
5. Oesanchule el eiecttodoméstico del
tomecorriente cuando no esté en uso y entes
de limpiarlo. Rara desconectar, apég^
(interruptor en OFF) y lueoo desenchútelo del
tomaconicnte de pared. D^e onfriar el
doctrodomésbcD antes de colocar o quitar las
band^ para asar, y antes de limpierfa
6. No ponga en (untíonamiento ningún
electrodoméstico con un cable o enchute
dafiado o si el electiodomésbco no fundona
correctamente o ha sido dafiado de alguna
manera. Oevueta el etectredoméstico al
centro da servido auteriado más cercano
para su enmen, rsparadón o ajuste.
7. □ ifio de accesorios no recomendados por
el fabncante puede provocar lesiones y daAar
el ctectfodoméstica
8. No k) use en exteriores.
9. No d^ que el cable quede colgando dd
borde de te mesa o mostrador ni que esté
10
en contacto con superficies calientes.
10. No coloque d etectiodomésbco sobra o
cerca de un quemador e gas o déctnco
caliente, o en un homo caliente.
11. No ulibce d etecbodoméstico para otros
fines que no sean pera los que (ue cHsetodo.
12. Pan protección conba ñesgs de chor^
elécbico no sumerfa d etecbodoméstico,
incluyendo d cade y los enchufes, en agua
ni en otros líquidos.
13. Asegúrese de que no haya obietos
idiamables sobre ni carca dd
etecbodoméstico, mientras esté en usa
d etecbodomésboo se prende fuego,
desenchúfelo. Nunca uQce egra para
axtmgur d fuego
14 No corte alimentos en las panchas para
asar para evitar que se daóe d revestimientD
anbadherente. Prepare ios alimentos en una
tabla para cortee
15. Nunca coloque papd de aluminio ni otros
utensilos en la plancha para asar mientras
cocine.
16. Tenga cuidado con las salpicaduras de gasa
y con d vapor caliente d asar carne con
grasa o jugosa.
17. Ftera desoonecter. la perUa de control
hacia la posición nOEP (apagar), y luego
desench Je dd tomacorriente de pared.
18. No ponga en funcionamiento d pil sin la
bandajapara goteo.
19. Debe tenerse absoluto cuidado d mover un
etecbodoméstico que contera acdte
ediente u otros équidos ceiientes.
Si
¡GUARDE ESTAS INSTRUCCIONES!
Page 10

INSTRUCCIONES DE USO
1. Este elec&odoméstico está doeAedo para uso
extíustvo en Intertores.
2. Si ti electrecX)mésüco se usa por primera vez.
prvrato I» INSTRUCOONES DE
UMPIQA oara Umpiarla Ambas planchas
para asar deten instatarse correctamente
antas de usarse. ColoQue la bandeia de
gateo debaio de la parte delantera dti
etectrodomésbco. No utiíca el griU sin la
band^ de goteo o sin colocar ambas
planchas para asar.
3. Extienda una capa f na de aceite vegetal en
las planchas para asar antas de encender el
electrodoméstica
4. Enchufe en ti tomacorrierrte eiéc^, es
dedr en ti arcuto nominal de 120V.
5. Cierre la tapa y gn la penlla de control hasta
la configuración de temperatura deseeda. La
luz de POWER (encendido} se prenderá
Indicando que ti grifi está encendida Espere
apradmsdamante entre 5 y 8 minutos para
que la unidad se calente.
6. El calerrtador se detendrá autsmáticamente
cuando alcance la terTrporstura y se
encwderá la hiz de REAOY (Usto). 0
calentador se encerxlerá nuevamente cuando
la temperatura haya bajado hasta lai
determinado nivel.
6. Ase los eiimentoe a su propio gjsta 0
Oempo de asedo depende dti tipo de
tiimantcs, de la temperatun irriclal da ios
alimentos, dti grosor Y de s’ la tapa está
cerrada. №r r^ general, si tierra la tapa,
disminuirá tu tercio ti tiernpo de cocdón.
9. No es necesario dar vutila los aimentos
durante ti asado por contacta Cuando
uQies el gil! abieito, dé vuelta los ahmertos
de tarrto en tanto. Si^ los proctifmientos
de OISPOSICiÓN PARA ASAR CON a
GRILL ABIERTO después ds precaientar.
10. Cuando llrtaiice la cocción, gira la perilla de
control hacia la posición OFF (apagar) para
apapr ti gfil. Oesentinie ti
electrodoméstico después de usarlo.
11. PRECAUCtÓN; ptisevftwquasadeheti
mosbador o la mesa, utiFice un msr^ti
indMdual o sahamartoles inftamable y
resistente ai calor, entre ti tiectrodoméstico
y la superfitie dti mostrador o de la mesa.
Ntfftca coloque sobre una eliombra, mueble
ni obTS materiales combustibles. Ten^
cuidado con les salpicaduras de aceite o
vapor callente ti codner.
7. Coloque ks almentos diredamerto en las
planchas para asar. Nunca coloque pepti de
akiminio ni utensilios en las plerrchas pe^
asat Siempre ubiice utensilios de madera o
de plástico resistente al caler pen evitar
dañar ti revesbmientD antiadherente de las
planchas pera asar. Nunca use pinzas ri
cubiertos de metal.
Page 11

CONOZCA SU GRia POR CONTACTO PARA INTERIORES
Soporte ptri «ado
cort d gitt «biirto
Ote)
luráttfwdb»
MnOeorODi
M»
Page 12
INSTRUCCIONES DE LIMPIEZA
1. Siempre desenchufe d etecbodoméstico y
dde que se enfrie fe sufideme entes de
llmpiatio. pan éviter Quemaduras
2. Ociloque la bandeja de goteo debajo de la
parte detenten de la plancha para asar
inferiot Raspe para quitar cualquier exceso
de pasa y partícutas de aümentos con la
espátula doble que se propordona. Usad
cKtremo correspondierte de la espábia para
limpiar cada una do las planchas pera asac
Primen) la plancha superior y lue^) la inferia
Puede que necesite una tedia de papd para
adsorba d aceite y volcarlo en la band^ da
gotea Uttice una esponfita mojada en agua
bbte pan Kmpia los res^juos lebddos.
3. Rebre las ptenchas pera asa antes de
limpiaiias con a^; siga las
INSrRUCCiONES MRA RETIRAR LAS
PLANCHAS PARA ASAR, que se encuentran
8 conbnuacidnL No sumerja d
dectnxtomésbco en a^ w en nlngiín abo
liquida
4. Lave las planchas pera asar y la bandda de
goteo con agua callente y jabón. No udlce
pdvo Implada abrasNo rrl objetos flioaoe
para limpiar las planchas pan asa, ye que
pueden daAa d tMsbmiento.
5. Limpie la superítele edertor dd
dectrodoméstico con un peho húmeda No
utiTa poho Implada abrasivo ni objetes
tUosos pera limpiarlo, ya que puede daóar la
terminacióa
6. Seque las planchas para asa. la bandeja
de goteo y todas las superfícies dd
electrodoiTiéstioo antes de voha a colocarlas.
S^ las instrucciones sobre CÓMO INSTALAR
LAS PLANCHAS RILRA ASAR, que se
encuentran a oonbrajatíán. Guárdela
bandeja de goteo y la esoótUa con d
eiectrodomásooa
7. No hay pezas que d usuario pueda arte^ac
Cuafeufer servicio que no sea d indicado en
este ntenual de instrucciones deberá sa
rwhzado pa un representante de senioos
autorizado. No interte abrir d
aeCüPOOiHBSqCp.
Cómo Instalar las planchas para asar
Lestente la tapa. Primero y después instale una
placa más beja la placa supeñoc (Siga los
pasos 1.2.3 y 4). Alinee los dientes de cada
plancha para asa con la bisagra.
0000»
pMaHfjv
© PiMiooe gtn
(T)oak»
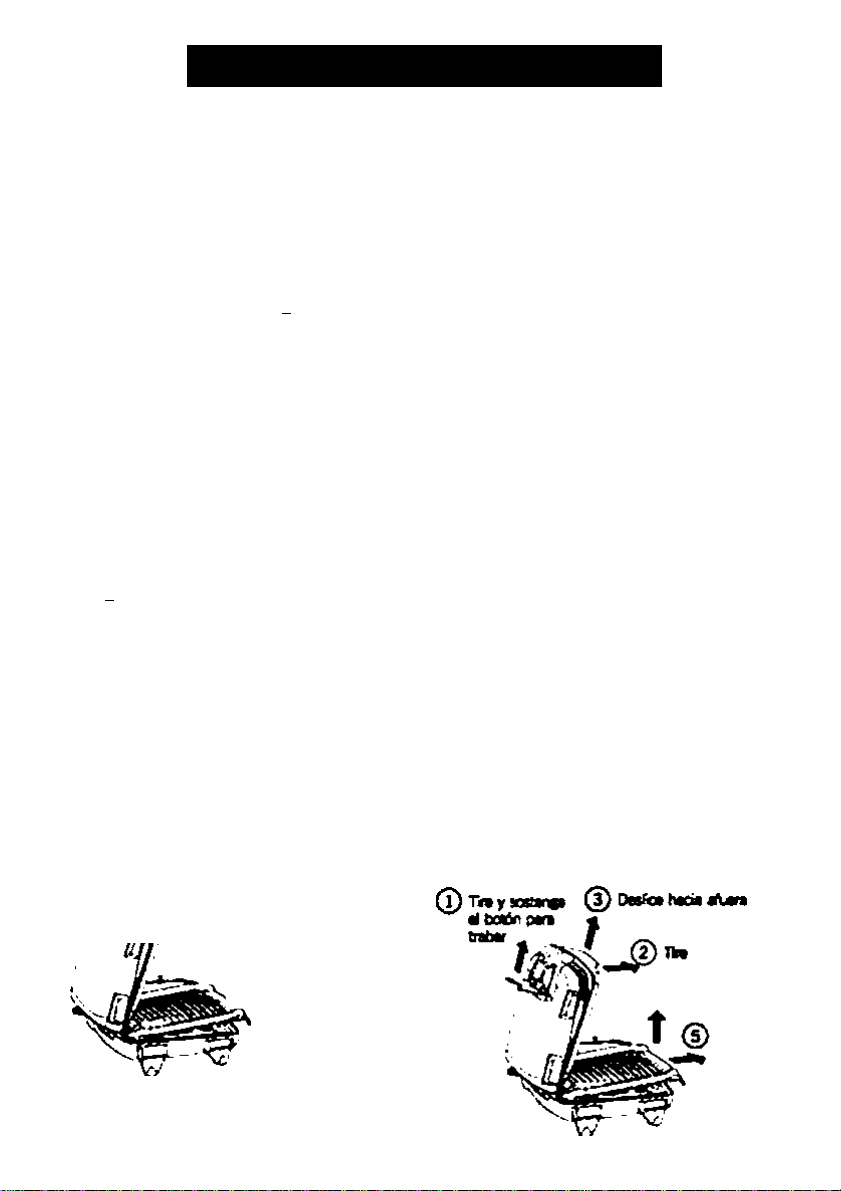
Cómo retirar las planchas para asar
Abra d soporte dd asa de la tapa y levante la
tapa hasta que quede en posídón vertical. Tire
y sostenga d boten para trabar mientras rebra
ta plancha para asar supertec (Sga los pesos
1.2y3). Loarte y deslice hada feera pan
robra ia plar^dia pera asa inferia. (Siga los
pasos 4, y 5)
0 Tin hacio wiíbo
Oae'earaü*
itum
Page 13

PARA USO DOMESTICO UNiCAMEKTE
Uso del cable de extensión
a) Se induye un cable de alimentación da
corriente corto para reducir el Пеаяо de
enredarse o trc^ezatse cort utt саЫо targa.
b) Los cables de extersiún pueden usarse si es
con extremo cuidada
c) Si se usa un cable de extensión:
1) В valor eléctrico ncmiftal marcado del
cable o del саЫв de extensión (M» ser al
mexe 120V, ISA.
2) В cable més largo debe anegarse de
modo que rto quede plegado sobre tt
mostrador o la mesa, donde tos nióos
puedan tirar de él o tropezarse con él sin
querer.
3) В cable de cMensión debe ser un cabio
del tipo da conexión a barra con 3
alantxBS.
Enchufe de conexión a tierra
Esta electrodoméstico ber« un enchufe da
conexión a tierra (de 3 petas) Como me^
do seguridad para rodudr el riesgo de choque
elécIricD. este enctaria está Ideado pan calzar
en urt tomacomente con conexión a berra
Cnlcamenta. Si el enchufe no entra por
completo en ei tomacorriente. oonaxilquese oon
un electricista calificada No intento elíninar
esta caracterfsücs de seguridad. No ubioe un
adaptada a berra de 3 para 2 pera eliminar
esta caractarlsbca de seguridad.
Corriente eléctrica
$1 el dicuito dóctrtco esté sobrecargado con
otras efectrodomésbeos. pueda que su
electrodoméstico no funcione. Deberia
funcionar en un tírcuito eléctrico disbrrio del de
los demás electrodomésboos. Si no está seguro
sobra la razón de la SDbrocam o no encuentra
otra cárcubo eléctrico, comuniqúese con un
electricista calificada
Disposición para asar con el grill abierto Disposición para asar por contacto
(y Aaripor oomohiD el soports
hela iaeuehv un *efc'
L» ttntm Гкомп a» p«i aaar
por corteto Ito «‘^nntoo iriy vajees
Page 14

Atención al cliente
Si tiene un reclamo en virtud de esta gsrantta, sírvase llamar a nuestm número de
atención al diente. Rn agilizar el servicio, sírvase tener a mano el número do
modelo, de serie y de tipo para que la operadora k> pueda ayudar. Podrá encontrar
esos números en la parte posterior de su gnil de contacto para Interiores.
MODELO: ЛРО: SERIb.
Número de atención al diento 1-877-207-0923
{Guarde esto nátneco pera tetorwda futura!
GARANTÍA LIMPTADA POR DOS AÑOS
«Qué oAwa su (arantfaT
• Cualquier defecto de materui o mano
de obra.
¿Durante cuánto tfen^ después de la
compra origlnd?
• Oosarios.
¿Qué haramos?
• Le pfoporcwafemos uno nuevo.
¿Cómo se roaüza un redamo de prantla? desune nares t^ttiaede
• Guarde su recibo.
• Empaquete su unidad oorrectamente.
Recomendamos utilizar la caja y los
materiales de embalaje originales.
• Devuelva el producto a su tienda
WAL*MART más cercana o llame a
AtMidón al Oíentt al 1-877-207-0923.
¿Qué no está cubierto por su garantía?
• Uso comercial.
• Darios debido a uso indebido, abuso o
negligencia.
• Productos que han sido modificados o
incorporados a otros productos.
¿Qué pasa si bene un problema con esta
producto al dfllzarto fuera del país en
que lo compró?
• La garantía es válida únicamente en d
país de compra y $1 usted sigue d
procodímientD do reclamo
correspondiente.
de Genesi OtcMe Compeny
y te usan oen ileaneie di
WA1.*WART Stares ine.
8епмп«1е. AR 72716
WAL-MART Stores, Irte.
Bentenvále.AR 72716
•ICC030C6A
 Loading...