

Page 1
GEAppliances.com
™
GE and GE Profile
Safety Instructions . . . . . . . 2–5
Operating Instructions
Care and Cleaning . . . . . . . . . . . . . 18
Control Panel and Settings . . 6–11
Loading Place Settings . . . . . . . . 17
Loading the Racks . . . . . . . . . . . . . 16
Using the Dishwasher . . . . . .12–15
Troubleshooting Tips . . . 19–21
Consumer Support
Consumer Support . . . . . . . . . . . . . .23
Warranty . . . . . . . . . . . . . . . . . . . . . 22
Owner’s Manual
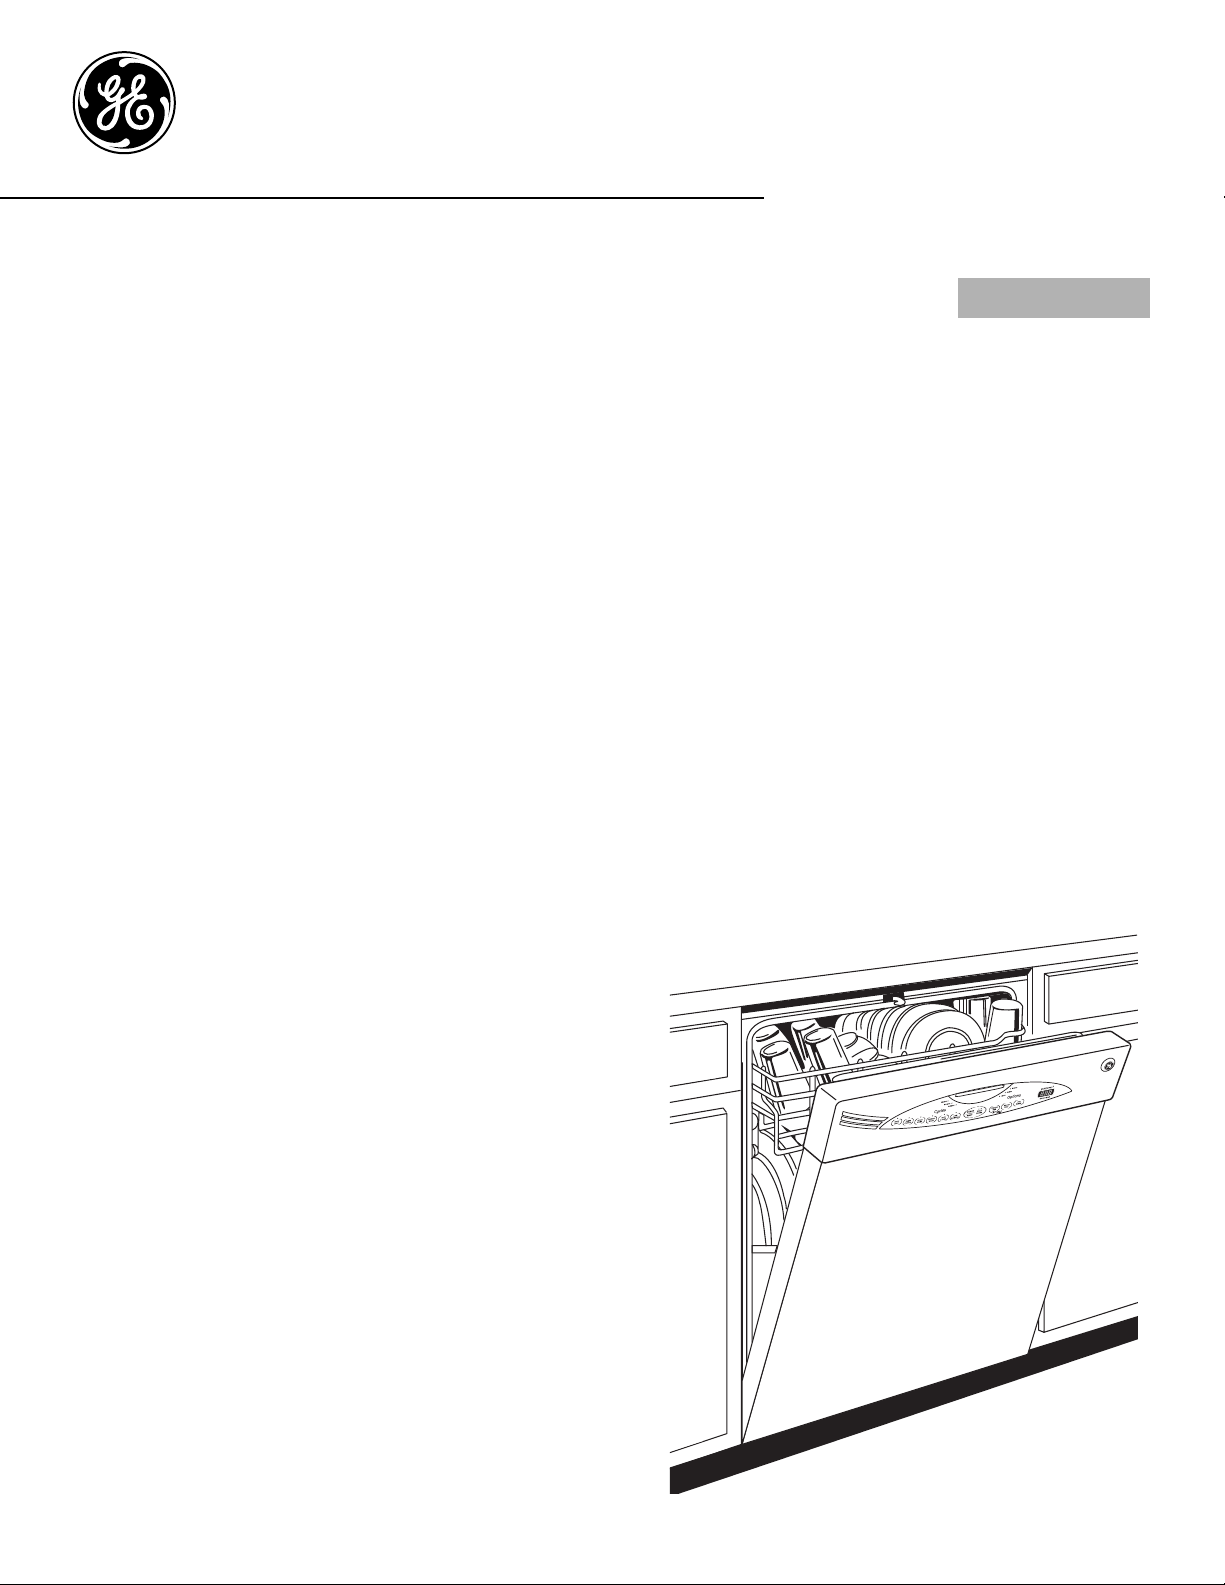
Tall Tub
Dishwashers
Write the model and serial
numbers here:
Model # __________________
Serial # __________________
You can find them on the tub wall
just inside the door.
Dishwashers
165D4700P388 49-55064 07-09 JR
Page 2

IMPORTANT SAFETY INFORMATION
READ ALL INSTRUCTIONS BEFORE USING —
SAVE THESE INSTRUCTIONS
WARNING!
For your safety, the information in this manual must be followed to minimize the risk of fire,
explosion, electric shock, and to prevent property damage, personal injury, or death.
WARNING!
Under certain conditions, hydrogen gas may be produced in a water heater that has not been used for two
or more weeks. HYDROGEN GAS IS EXPLOSIVE.
If the hot water has not been used for two or more weeks, prevent the possibility of damage or injury
by turning on all hot water faucets and allow them to run for several minutes. Do this before using any
electrical appliance connected to the hot water system. This simple procedure will allow any built-up
hydrogen gas to escape. Since the gas is flammable, do not smoke, use an open flame, or use the appliance
during this process.
WATER HEATER SAFETY
PROPER INSTALLATION AND MAINTENANCE
This dishwasher must be properly installed and located in accordance with the Installation Instructions
before it is used. If you did not receive an Installation Instructions sheet with your dishwasher, you can
receive one by visiting our Website at GEAppliances.com. In Canada, visit www.GEAppliances.ca.
■ Connect the dishwasher/appliance to a grounded
Operating Instructions Safety InstructionsConsumer Support Troubleshooting Tips
metal, permanent wiring system; or runan
equipment-grounding conductor with the circuit
conductors and connect to the equipmentgrounding terminal or lead of the appliance.
■ Improper connection of the equipment-grounding
conductor can result in a risk of electric shock.
Check with a qualified electrician or service
representative if you are in doubt whether the
appliance is properly grounded.
■ Dispose of discarded appliances and shipping
or packing material properly.
■ Do not attempt to repair or replace any part
of your dishwasher unless it is specifically
recommended in thismanual. All other servicing
should be referred to a qualified technician.
■ To minimize the possibility of electric shock,
disconnect this appliance from the power supply
before attempting any maintenance.
NOTE: Turning the dishwasheroff does not
disconnect the appliance fromthepower supply.
We recommend having a qualified technician
service yourappliance.
CAUTION: To prevent minor injury and property damage
■ Contents washed in Anti-bacterial mode, if
available, may be hot to the touch. Use care
before handling.
■ Using a detergent that is not
specifically designed for
dishwashers will cause the
dishwasher to fill with suds.
■ If your dishwasher is connected to a wall
switch, ensure that the switch is on prior
to use.
■ On dishwashers with electronic controls,
if you choose to turn the wall switch
off between wash cycles, allow 5-10 seconds after
turning the switch on before touching START/RESET
to allow the control to initialize.
2
■ Non-Dishware Items: Do not wash items such
as electronic air cleaner filters, furnace filters
and paint brushes in your dishwasher. Damage
to the dishwasher and discoloration or staining
of the dishwasher may result.
■ Close supervision is necessary if this appliance
is used by or near children.
■ Load light, plastic items so they do not become
dislodged and drop to the bottom of the
dishwasher—they might come into contact with
the heating element and be damaged.
Page 3
INFORMACIÓN IMPORTANTE DE SEGURIDAD
LEA TODAS LAS INSTRUCCIONES ANTES DE USAR—
GUARDE ESTAS INSTRUCCIONES GEAppliances.com
¡ADVERTENCIA!
Para su seguridad, debe cumplirse con la información de este manual a fin de minimizar
el riesgo de incendio o explosión, descarga eléctrica o para prevenir daños a la propiedad,
lesiones personales o la muerte.
¡ADVERTENCIA!
Bajo ciertas condiciones, puede producirsegas de hidrógeno en un calentador de agua que no se ha usado
durante dos semanas o más. EL GAS DE HIDRÓGENO ES EXPLOSIVO.
Si el agua caliente no se ha utilizado por dos semanas o más, evite la posibilidad de daños o lesiones
abriendo todos los grifos de agua caliente y dejándolas correr durante varios minutos. Haga esto antes
de utilizar cualquier aparato eléctrico que se encuentre conectado al sistema de agua caliente. Este simple
procedimiento permitirá que se libere cualquier clase de acumulación de gas de hidrógeno. Ya que el gas
es inflamable, no fume o utilice una llama abierta o un aparato durante este proceso.
SEGURIDAD DEL CALENTADOR DE AGUA
INSTALACIÓN Y MANTENIMIENTO ADECUADOS
Este lavaplatos debe instalarse de manera adecuada y ubicarse de acuerdo con las Instrucciones de
Instalación antes de comenzar el uso. Si usted no ha recibido una página de Instrucciones de instalación
con su lavaplatos, puedeobtener una visitando nuestro sitio Web en GEAppliances.com.
■ Conecte el lavaplatos/aparato a un sistema
de cableado permanente con conexión a tierra
o debe utilizarse un conductor de conexión a tierra
del equipamiento con los conductores de circuito,
y debe conectarse a la terminal de conexión
a tierra o conductor del aparato.
■ Una conexión inadecuada del conductor de
conexión a tierra de equipo puede provocar
un riesgo de descarga eléctrica. Consulte a un
electricista calificado o representante de servicio
técnico si tiene dudas sobre la correcta conexión
a tierra del aparato.
■ Elimine los aparatos que no va a utilizar más y el
material de empaque o envío como corresponde.
■ No intente reparar o cambiar ninguna pieza de
su lavaplatos a menos que esté específicamente
recomendado en este manual. Cualquier otro
servicio debe realizarlo un técnico calificado.
■ Para minimizar la posibilidad de una descarga
eléctrica, desconecte esteaparato de la fuente
de energía antes de realizar cualquier clase de
mantenimiento.
NOTA:Apagar el lavaplatos no desconecta el
aparato del suministro de energía. Recomendamos
queun técnico calificado realice el servicio técnico
de su aparato.
PRECAUCIÓN: Para evitar lesiones menores y daños a la propiedad
■ Los elementos lavados en el modo anti-bacterial,
si se encuentra disponible, pueden quedar
calientes al tacto. Tenga cuidado antes de
tocarlos.
■ Utilizar un detergente no
diseñado específicamente
para lavaplatos provocará
que el aparato se llene
de espuma.
■ Si su lavaplatos se encuentra conectado
a un interruptor de pared, verifique que
el interruptor se encuentre encendido
antes del uso.
■ En lavaplatos con controles electrónicos, si usted
elije apagar el interruptor de pared entre ciclos
de lavado, deje pasar 5-10 segundos después de
encender el interruptor antes de presionar
START/RESET para permitir que el control se inicie.
■ Elementos no aptos para lavaplatos: No lave
elementos como filtros de limpiadores de aire
electrónicos, filtros de hornos y pinceles de pintura
en su lavaplatos. Pueden producirse daños en el
lavaplatos y decoloración o manchas en el
aparato.
■ Se requiere una supervisión estricta cuando
cualquier aparato es utilizado por niños o en
su cercanía.
■ Cargue elementos livianos y plásticos de modo
que no se desplacen y caigan al fondo del
lavaplatos, ya que pueden entrar en contacto con
el elemento calentador y dañarse.
Consumer SupportTroubleshooting TipsOperating InstructionsSafety Instructions
3
Page 4
IMPORTANT SAFETY INFORMATION
READ ALL INSTRUCTIONS BEFORE USING —
SAVE THESE INSTRUCTIONS
WARNING! RISK OF CHILD ENTRAPMENT
PROPER DISPOSAL OF THE DISHWASHER
unked or abandoned dishwashers are
J
dangerous…even if they will sit for “just a few
days.” If you are getting rid of your old
dishwasher, please follow the instructions below
to help prevent accidents.
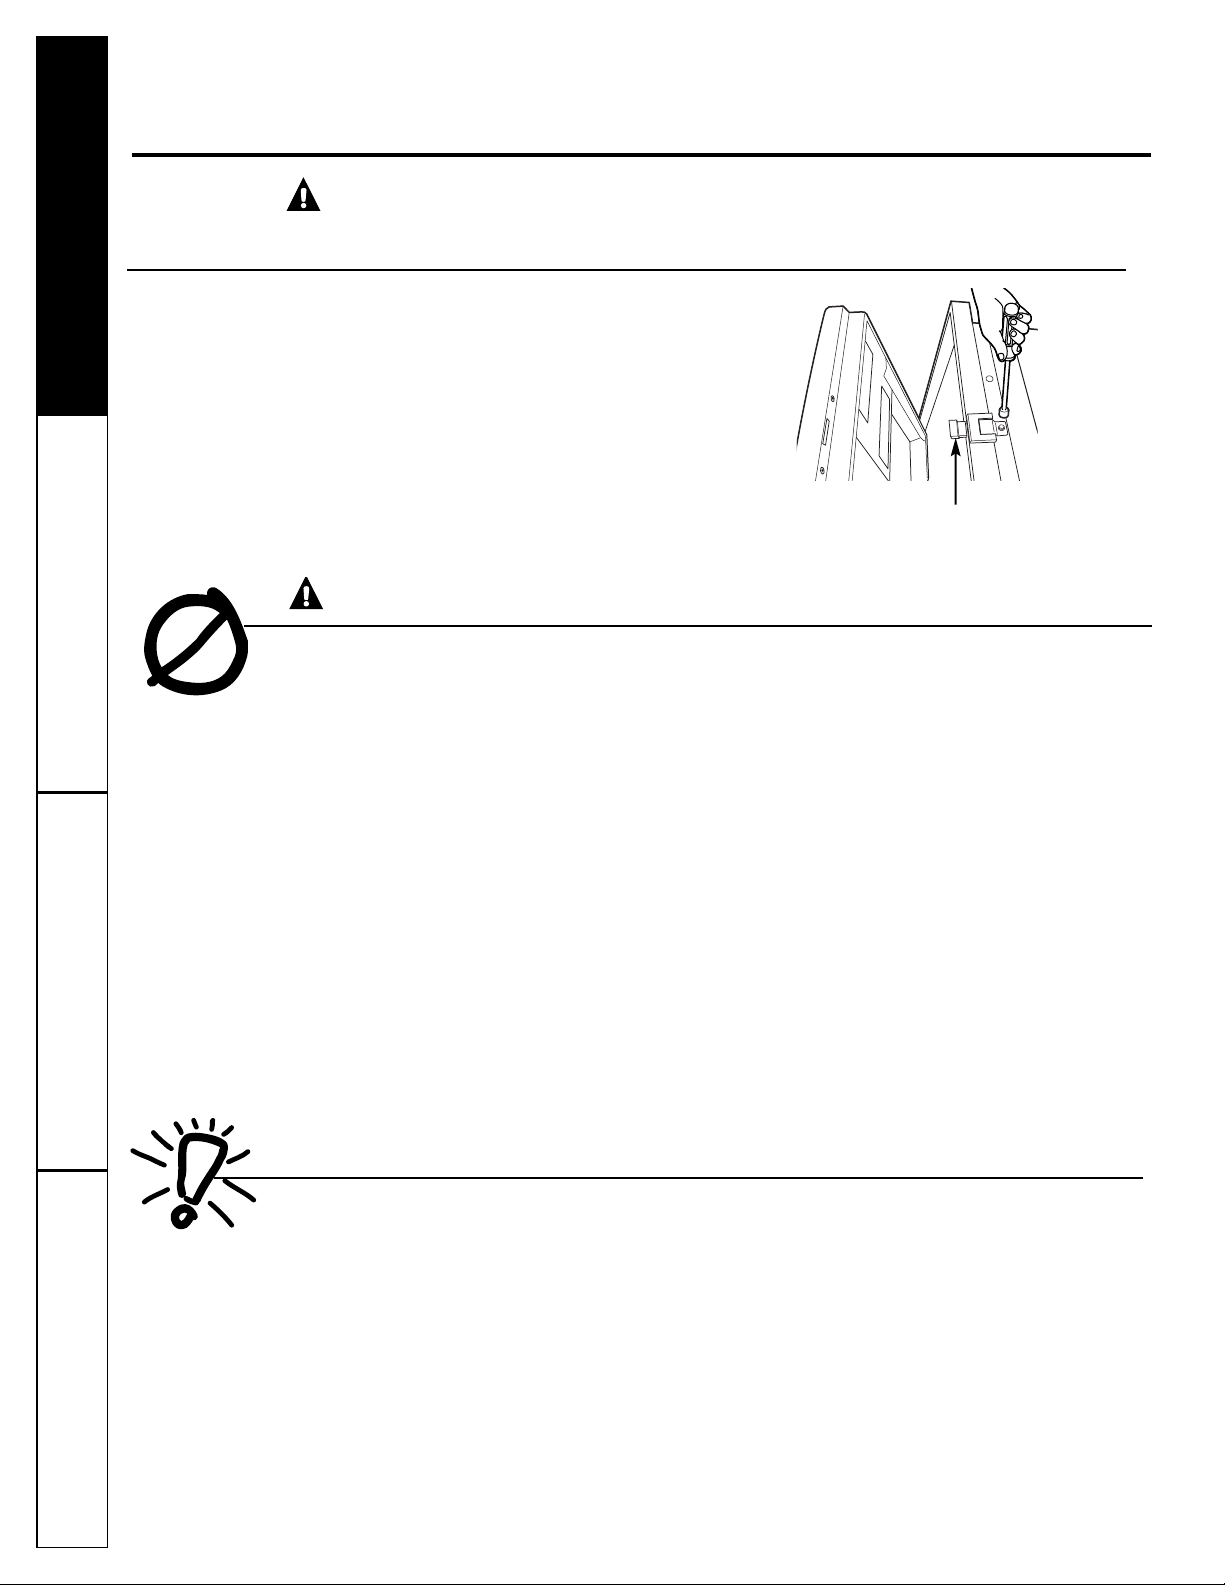
Before You Throw Away Your Old
Dishwasher:
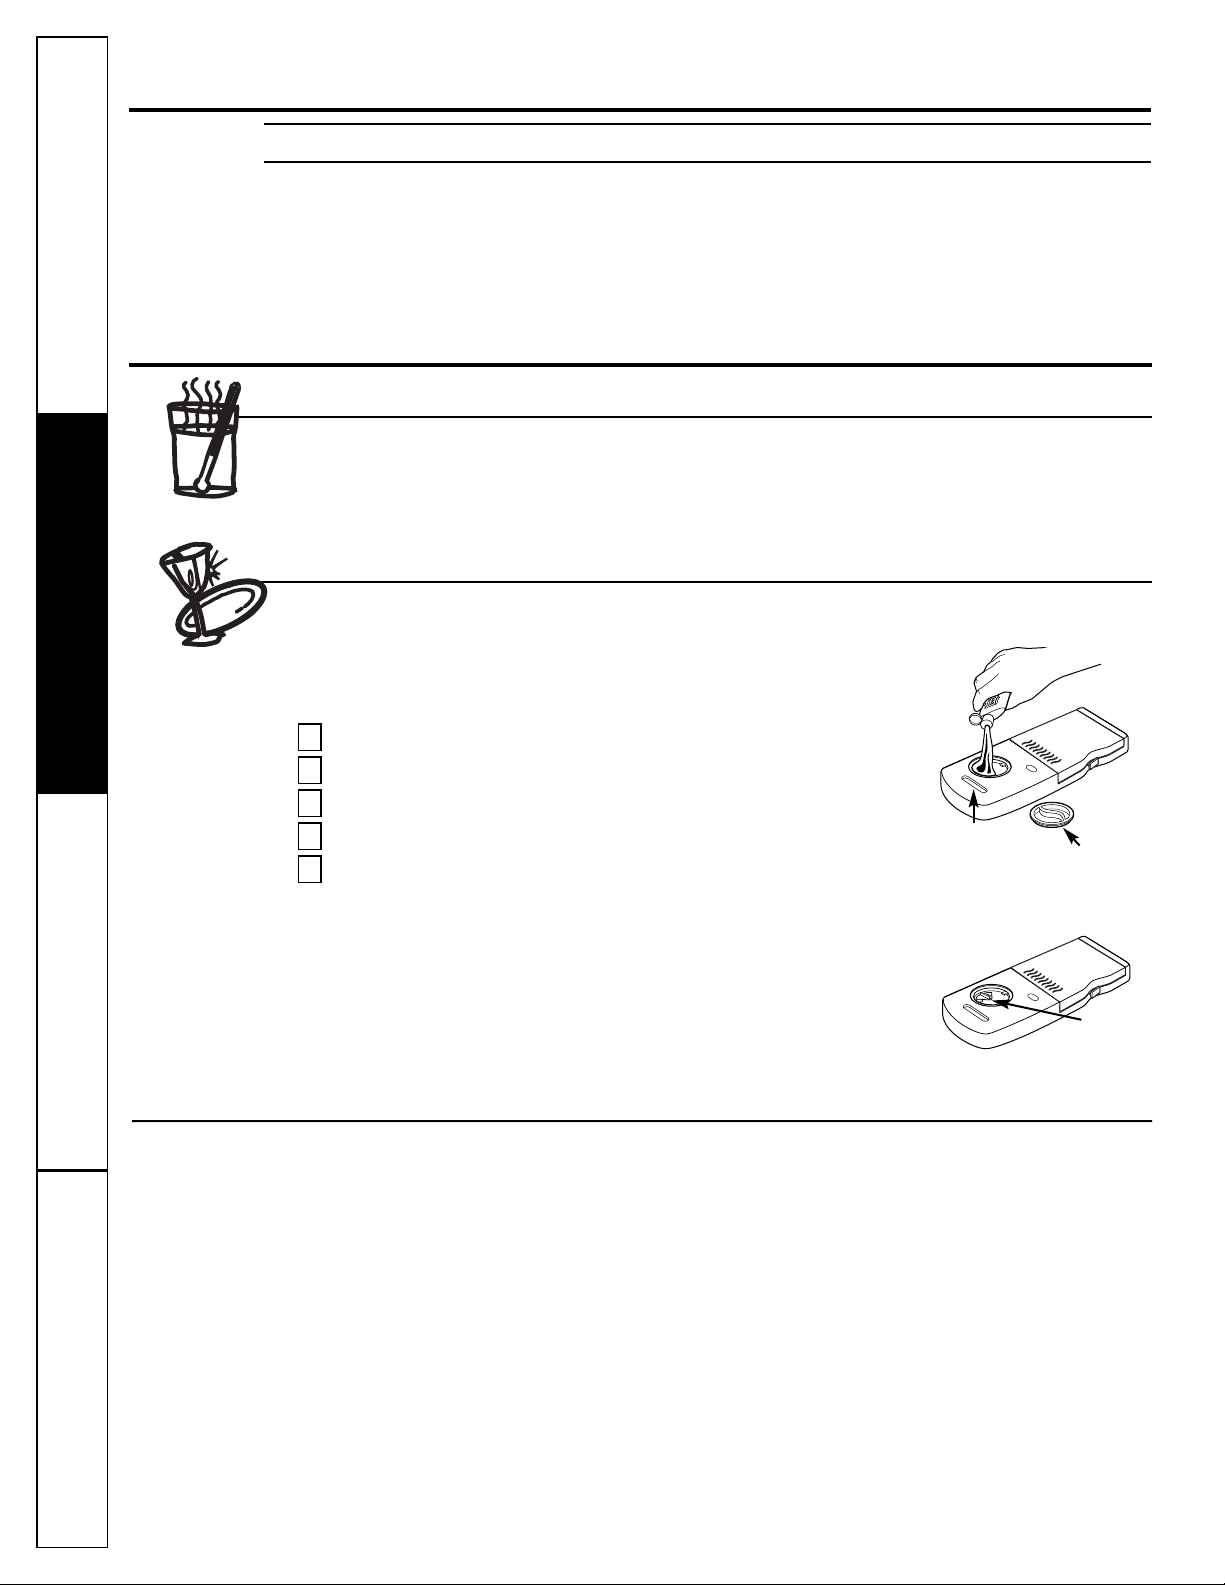
■ Take off the door of the washing compartment
or remove the door latch keeper (as shown).
Door latch keeper
WARNING!
■ Use this appliance only for its intended purpose
as described in this Owner’s Manual.
■ Use only powder, tabs, liquid detergents or rinse
Operating Instructions Safety InstructionsConsumer Support Troubleshooting Tips
agents recommended for use in a dishwasher
and keep them out of the reach of children.
Cascade
Dishwashing Detergents, and Cascade Crystal
Clear
in all GE dishwashers.
■ Locate sharp items so that they are not likely
to damage the door seal.
■ Load sharp knives with the handles up to reduce
the risk of cut-type injuries.
■ Do not wash plastic items unless marked
dishwasher safe or the equivalent. For plastic items
not so marked, check the manufacturer’s
recommendations.
■ Do not touch the heating element during or
immediately after use.
®
and Cascade®Complete Automatic
®
rinse agents have been approved for use
When using your dishwasher, follow basic precautions,
including the following:
■ Do not operate your dishwasher unless all enclosure
panels are properly in place.
■ Do not tamper with controls.
■ Do not abuse, sit on or stand on the door or dish
rack of the dishwasher.
■ Do not allow children to play around the dishwasher
when opening or closing the door due to the
possibility of small fingers being pinched in the door.
■ Do not discard a dishwasher without first removing
the door of the washing compartment or the latch
keeper.
■ Do not store or use combustible materials, gasoline
or other flammable vapors and liquids in the vicinity
of this or any other appliance.
■ Do not allow children to play with, on or inside this
or any discarded appliance.
READ AND FOLLOW THIS SAFETY INFORMATION CAREFULLY.
SAVE THESE INSTRUCTIONS
4
Page 5
INFORMACIÓN IMPORTANTE DE SEGURIDAD
LEA TODAS LAS INSTRUCCIONES ANTES DE USAR—
GUARDE ESTAS INSTRUCCIONES GEAppliances.com
¡ADVERTENCIA! RIESGO DE ENCIERRO PARA NIÑOS
ELIMINACIÓN CORRECTA DEL LAVAPLATOS
Un lavaplatos desechado o abandonado resulta
peligroso…aún si quedará en un lugar por “sólo
unos días”. Si va a desechar su viejo lavaplatos,
siga las siguientes instrucciones para prevenir
accidentes.
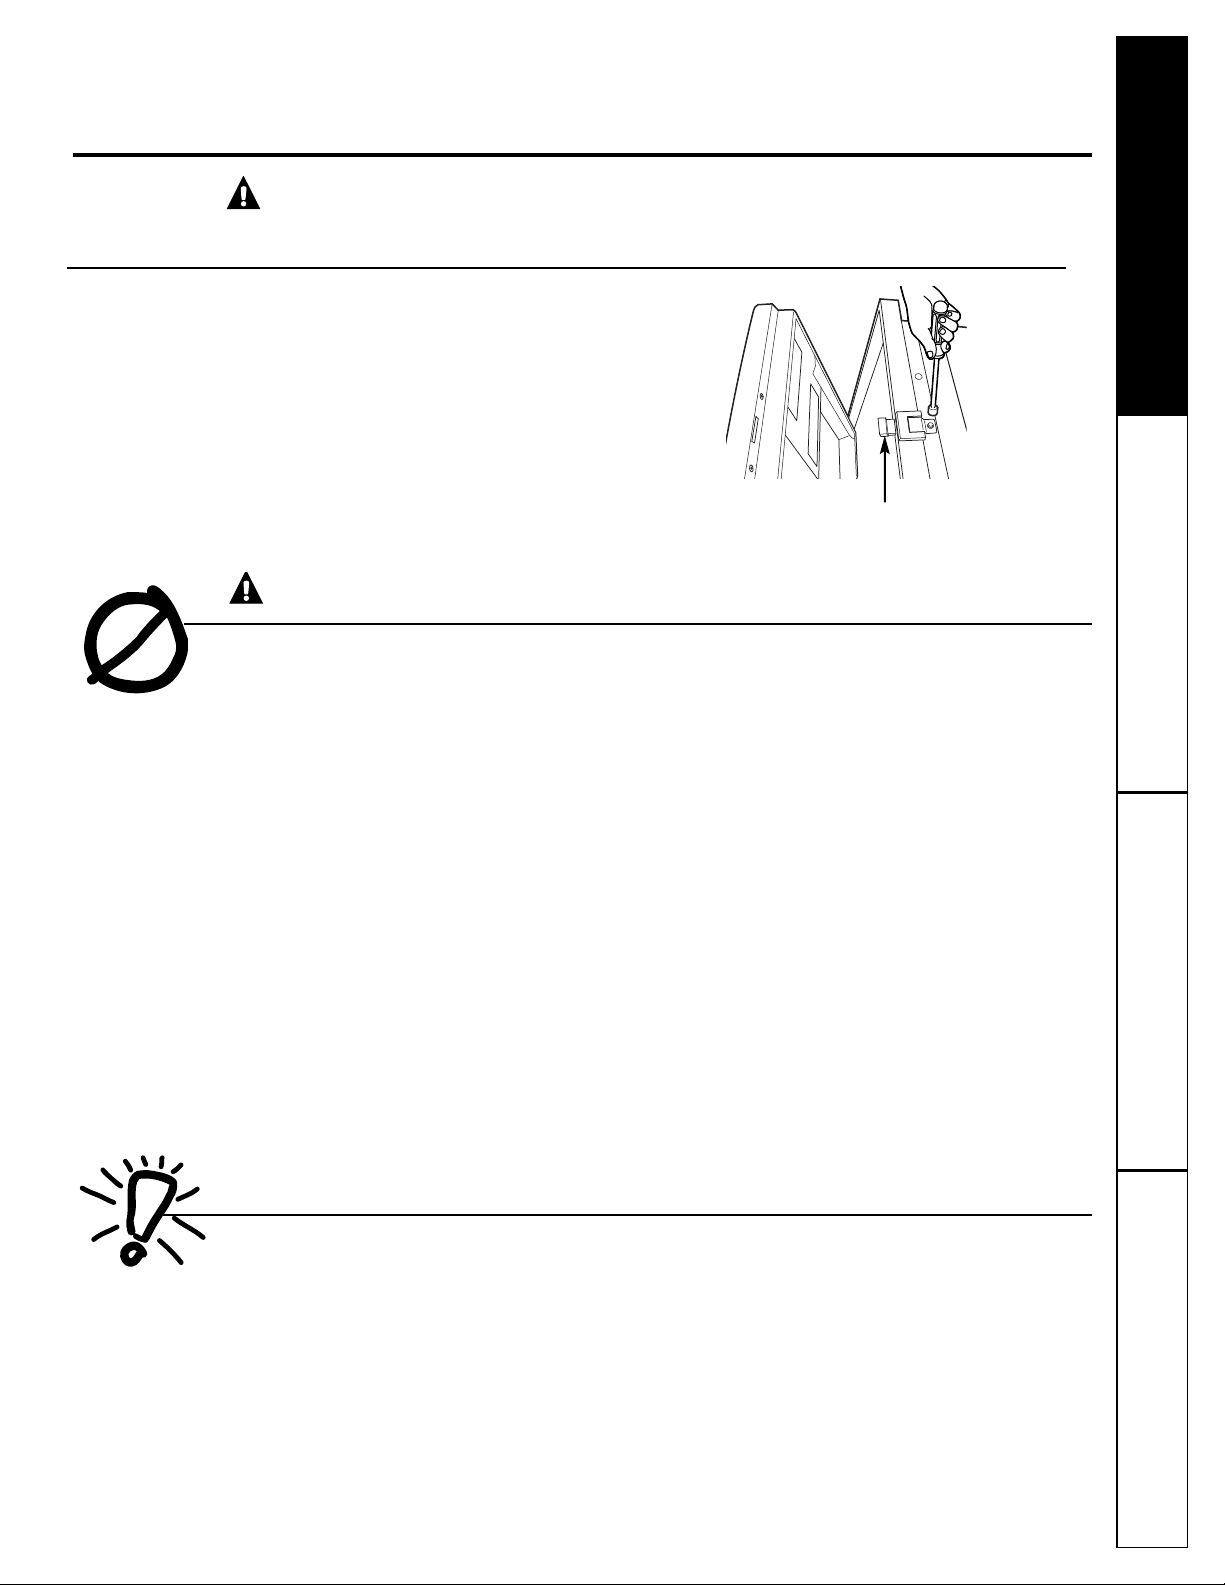
Antes de desechar su viejo lavaplatos:
■ Quite la puerta del compartimento de lavado
o saque la traba de la puerta (como puede
verse).
Traba de la puerta
¡ADVERTENCIA!
■ Use este aparato sólo con el objetivo para el que
fue creado, como se describe en este Manual del
Propietario.
■ Utilice sólo detergentes en polvo, líquido o tabletas
o agentes de enjuague recomendados para uso
en lavaplatos y manténgalos alejados del alcance
de los niños. Los detergentes para lavaplatos
automáticos Cascade
y los agentes de enjuague Cascade CrystalClear
han sido aprobados para el uso en todos los
lavaplatos GE.
■ Ubique los elementos filosos de modo que no dañen
el sellado de la puerta.
■ Cargue cuchillos filosos con los mangos hacia arriba
para reducir el riesgo de una lesión personal.
■ No lave elementos plásticos a menos que estén
marcados como aptos para lavaplatos o
equivalente. En el caso de elementos plásticos
que no estén marcados así, verifique las
recomendaciones del fabricante.
®
y Cascade®Complete,
Cuando use su lavaplatos, siga precauciones básicas
de seguridad, incluyendo las siguientes:
®
■ No toque el elemento calentador durante el uso
o inmediatamente después de finalizar el uso.
■ No haga funcionar el lavaplatos a menos que todos
los paneles del recinto se encuentren en su lugar.
■ No altere o modifique los controles.
■ No maltrate, ni se siente o se pare sobre la puerta
o bandejas de los platos del lavaplatos.
■ No permita que los niños jueguen alrededor del
lavaplatos cuando abra o cierre la puerta debido
a la posibilidad de pellizcar sus dedidos con
la puerta.
■ No deseche el lavaplatos sin antes quitar la puerta
del compartimento de lavado o la traba de la
puerta.
■ No almacene o use materiales combustibles,
gasolina u otros vapores o líquidos inflamables
cerca de este o cualquier otro aparato.
■ No permita que los niños jueguen sobre, con
o dentro de este o cualquier otro aparato
descartado.
LEA Y SIGA ESTAINFORMACIÓN DE SEGURIDAD CUIDADOSAMENTE.
GUARDE ESTAS INSTRUCCIONES
Consumer SupportTroubleshooting TipsOperating InstructionsSafety Instructions
5
Page 6
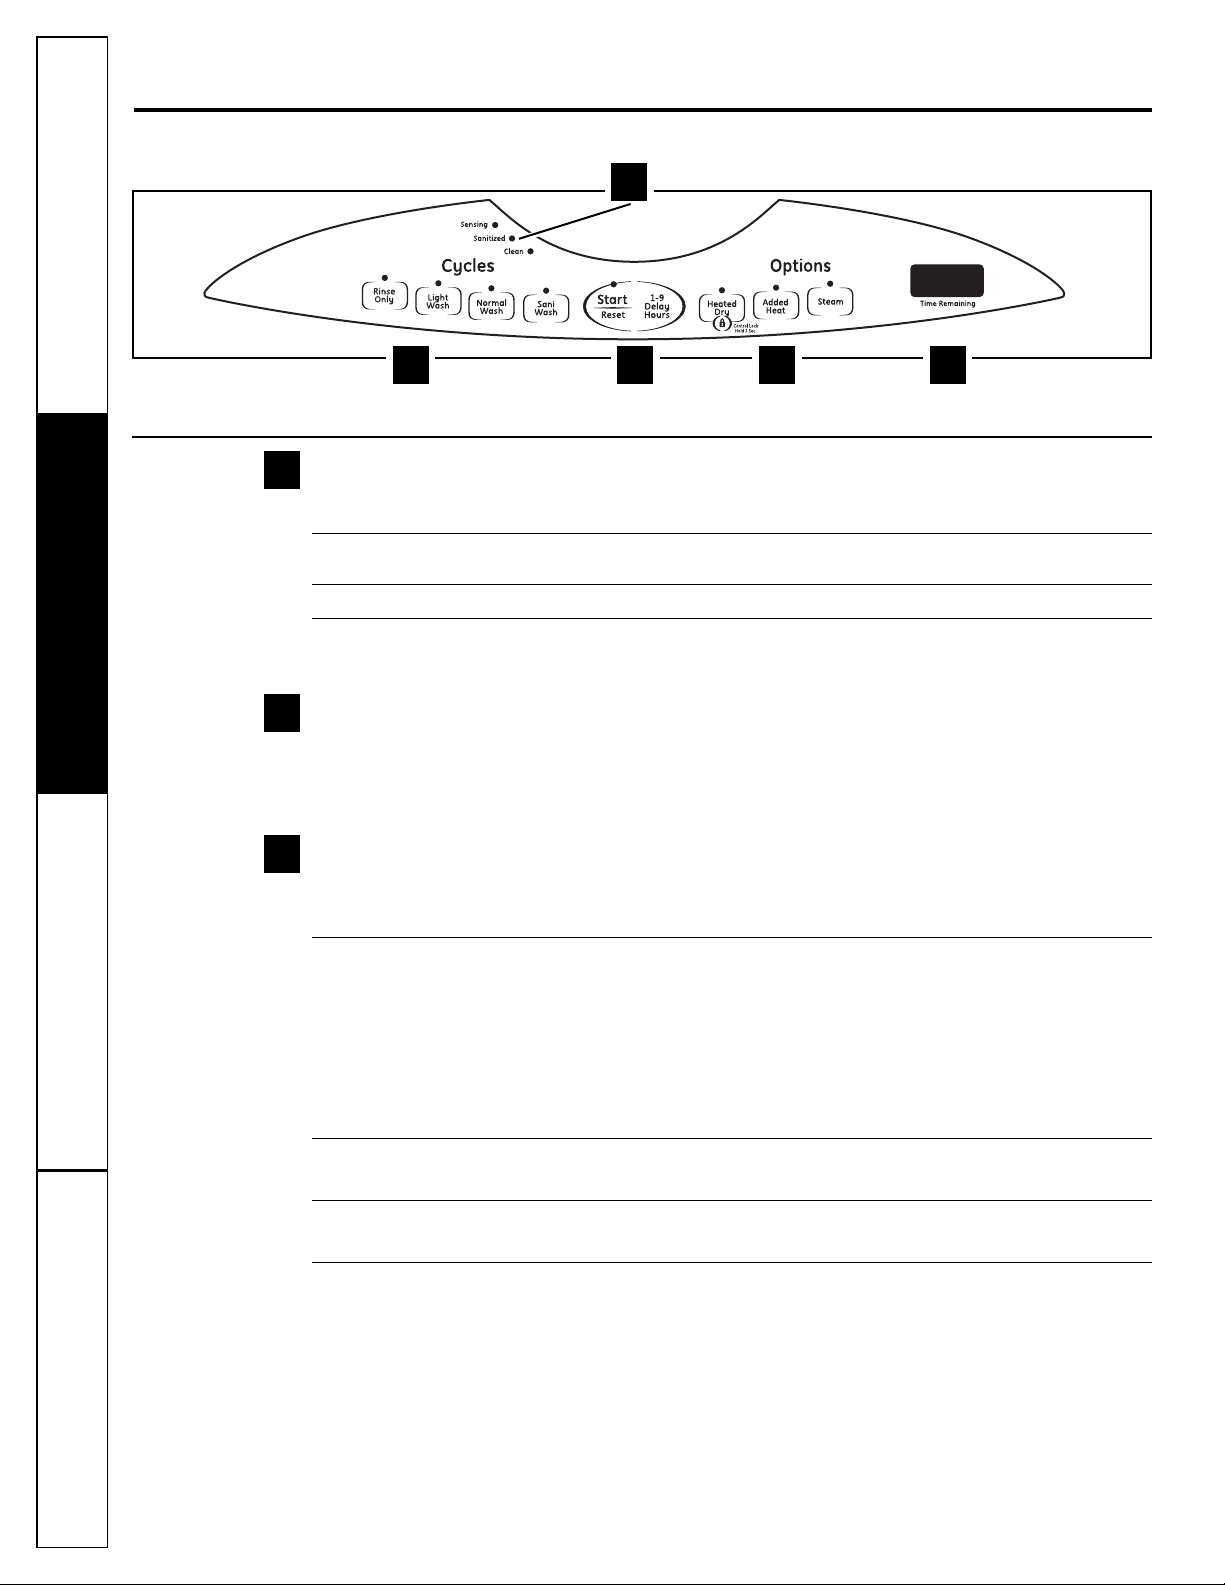
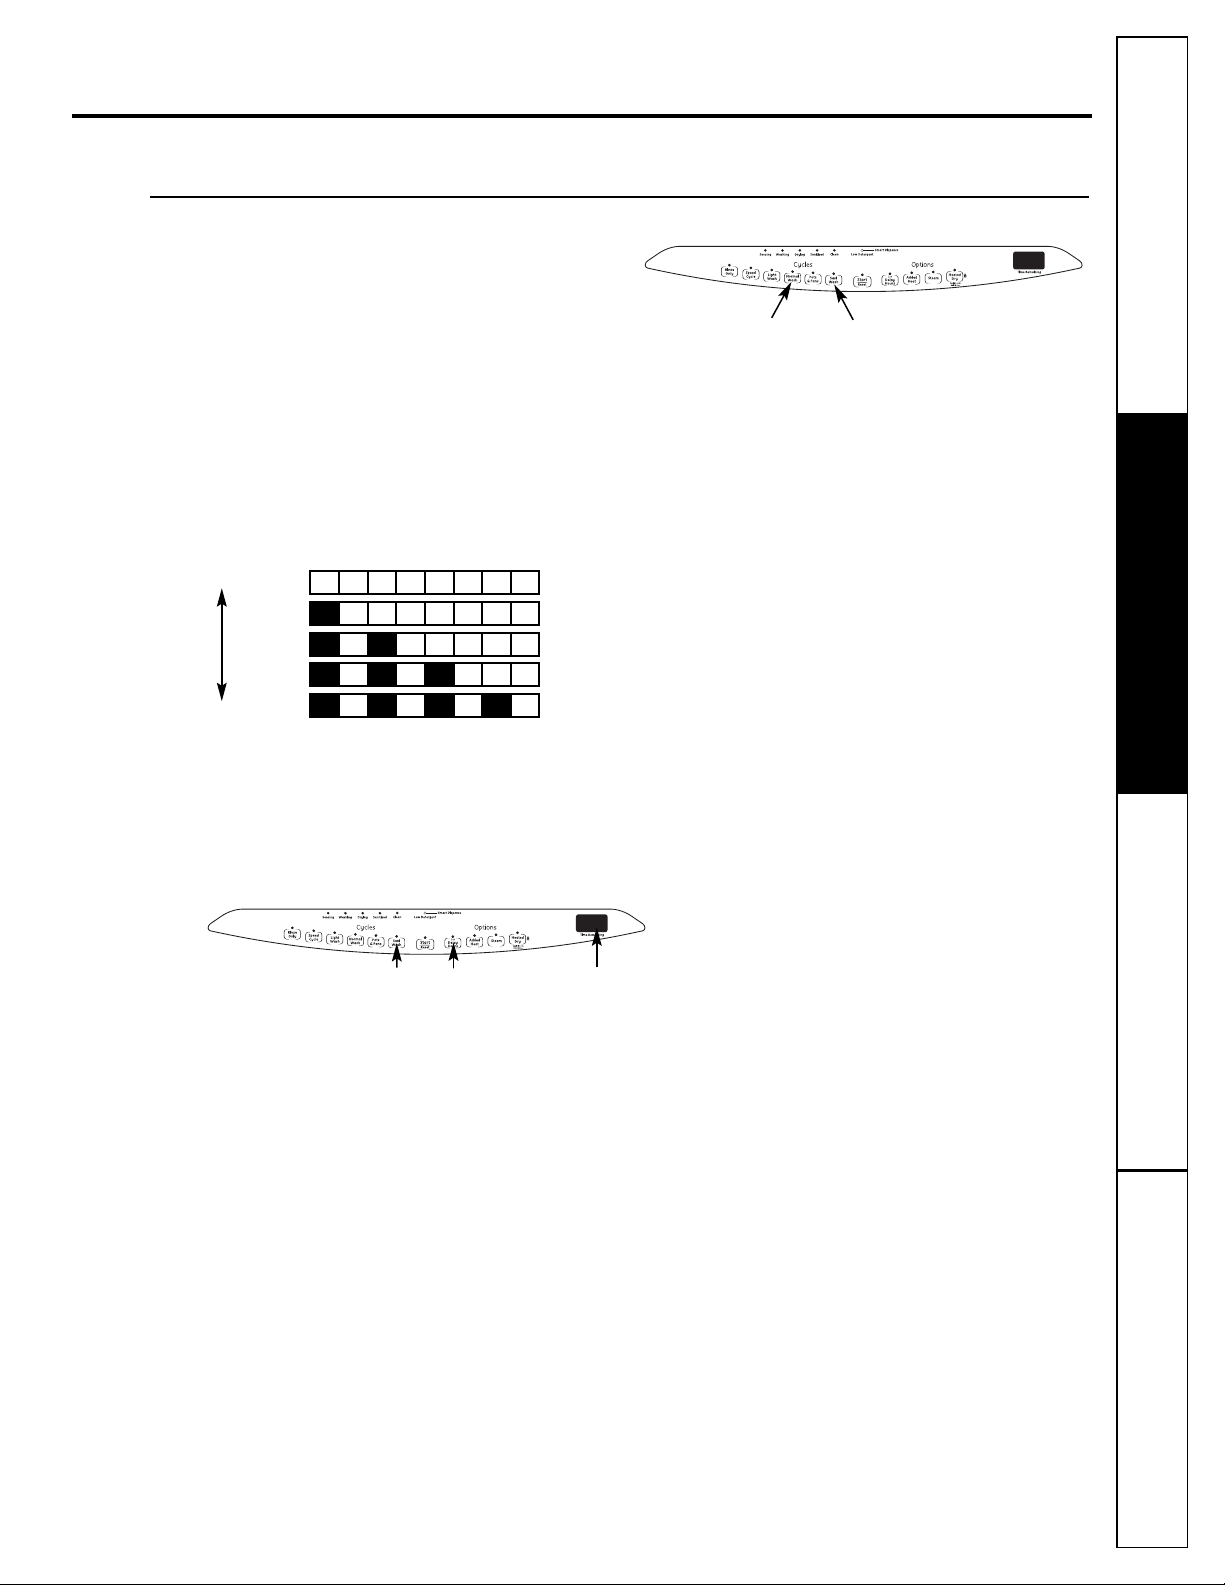
About the dishwasher control panel.
Choose the dishwasher control panel that corresponds to the features on your dishwasher.
1
53
4
2
Control Settings
Status Indicator Lights
1
The Status display tells you what’s happening while the dishwasher is in operation and may flash, indicating a
malfunction (see page 8). The lights will come ON indicating the sequence of operation the dishwasher is in.
SENSING Displayed while the sensor is measuring the amount of soil and temperature of water.
(on some models) The dishwasher will adjust the selected cycle to achieve optimal performance.
SANITIZED Displayed when cycle has met sanitization conditions. Light remains ON until door is opened.
CLEAN Displayed when a wash cycle is complete. The light stays ON as a reminder that the dishes are
clean until the door is relatched or until another cycle is selected.
Time Remaining Display (on some models)
2
Operating Instructions Safety InstructionsConsumer Support Troubleshooting Tips
During operation, the display shows the minutes remaining until the cycle is complete. The display may adjust the
remaining time while the Sensing light is on. The time displayed at the start of each cycle may change from the
factory setting as the unit customizes itself to home use. During a delay start, the display will show hours of time
remaining until the cycle starts.
Cycles
3
The light above the selected pad will be ON to indicate which cycle has been selected.
This dishwasher is equipped with a dirt and temperature sensor. Cycle length and time will vary depending on the
soil level and temperature.
SANI WASH 7.5–8.75 gal., 50–135 min.
This cycle raises the water temperature in the final rinse to sanitize your dishware. The cycle
length will vary depending on the temperature of your inlet water.
NOTE: The SANIWASH cycle is monitored for sanitization requirements. If the cycle is interrupted
during or after the main wash portion or if the incoming water temperature is so low that
adequate water heating cannot be achieved, the sanitizing conditions may not be met. In these
cases, the Sanitized light will not illuminate at the end of the cycle.
NOTE: NSF certified residential dishwashers are not intended for licensed food establishments.
NORMAL WASH 5.2 gal., 60–90 min.
This cycle is for medium/heavily soiled dishes and glassware
LIGHT WASH 7.5 gal., 40–60 min.
(on some models)
RINSE ONLY 2.5 gal., 11 min.
NOTE: Only the SANI WASH cycle has been designed to meet the requirements of Section 6, NSF 184 for
soil removal and sanitization efficacy.
This cycle is for everyday dishes and glassware.
For rinsing partial loads that will be washed later. Do not use detergent with this cycle.
.
6
Page 7

GEAppliances.com
Options
4
The light above the selected pad will be ON to indicate which option has been selected.
STEAM For use with heavily soiled and/or dried-on, baked-on soils. This option MUST be selected PRIOR
to starting the cycle. The STEAM option adds 24 minutes to the cycle time.
HEATED DRY Shuts off the drying heat option. Dishes air dry naturally and energy is saved. For faster air dry,
Light OFF you can prop the door open after the CLEAN light illuminates.
HEATED DRY Turns the heater on for faster drying. This will extend the total cycle time between
Light ON 8 and 38 minutes depending on the cycle selected. NOTE: HEATED DRY cannot be
selected with RINSE ONLY cycle.
LOCK You can lock the controls to prevent any selections from being made. Or you can lock the controls
after you have started a cycle.
Children cannot accidentally start dishwasher by touching pads with this option selected.
To LOCK the dishwasher control, touch and hold the HEATED DRY pad for 3 seconds. The light
below the HEATED DRY pad will turn on. To UNLOCK the dishwasher control, touch and hold the
HEATED DRY pad for 3 seconds. The LOCK light will turn off.
ADDED When selected, the cycle will run longer with the heating element on to improve both wash and
HEAT dry performance. NOTE: Cannot be selected with RINSE ONLY cycle.
DELAY HOURS You can delay the start of a wash cycle for up to 9 hours. Touch the DELAY HOURS pad to choose
the number of hours you want to delay the start of the cycle; then touch START/RESET one time.
The dishwasher will count down and start automatically at the correct time. Touching
START/RESET a second time will cancel the DELAY START selection.
RESET To change a cycle after washing starts, touch the START/RESET pad to cancel the cycle. The
START/RESET light will flash while the water is pumped out if needed. This takes approximately
90 seconds. When the light stops flashing, the dishwasher can be reprogrammed and restarted.
Start
5
Close and latch the dishwasher door and select the cycle and desired enhancements. Touch the START/RESET pad
once to begin the cycle. Water begins to fill the dishwasher, and approximately 60 seconds later the wash action
begins. Touching the START/RESET pad a second time will cancel the cycle and cause the water to drain out. This will
take approximately 2 minutes.
NOTE: The dishwasher remembers your last cycle so you don’t have to reprogram each time. When the dishwasher
door is fully closed, the control panel lights will display the last settings you selected.
If you don’t want to change any of the settings, simply touch the START/RESET pad once to begin the cycle.
If the door is closed, the indicator lights will turn off if the START/RESET pad is not pressed within two minutes.
To activate the display, open and close the door or touch any pad.
Also, if a power failure occurs, NORMAL WASH and HEATED DRY will automatically be programmed.
Consumer SupportTroubleshooting TipsOperating InstructionsSafety Instructions
7
Page 8
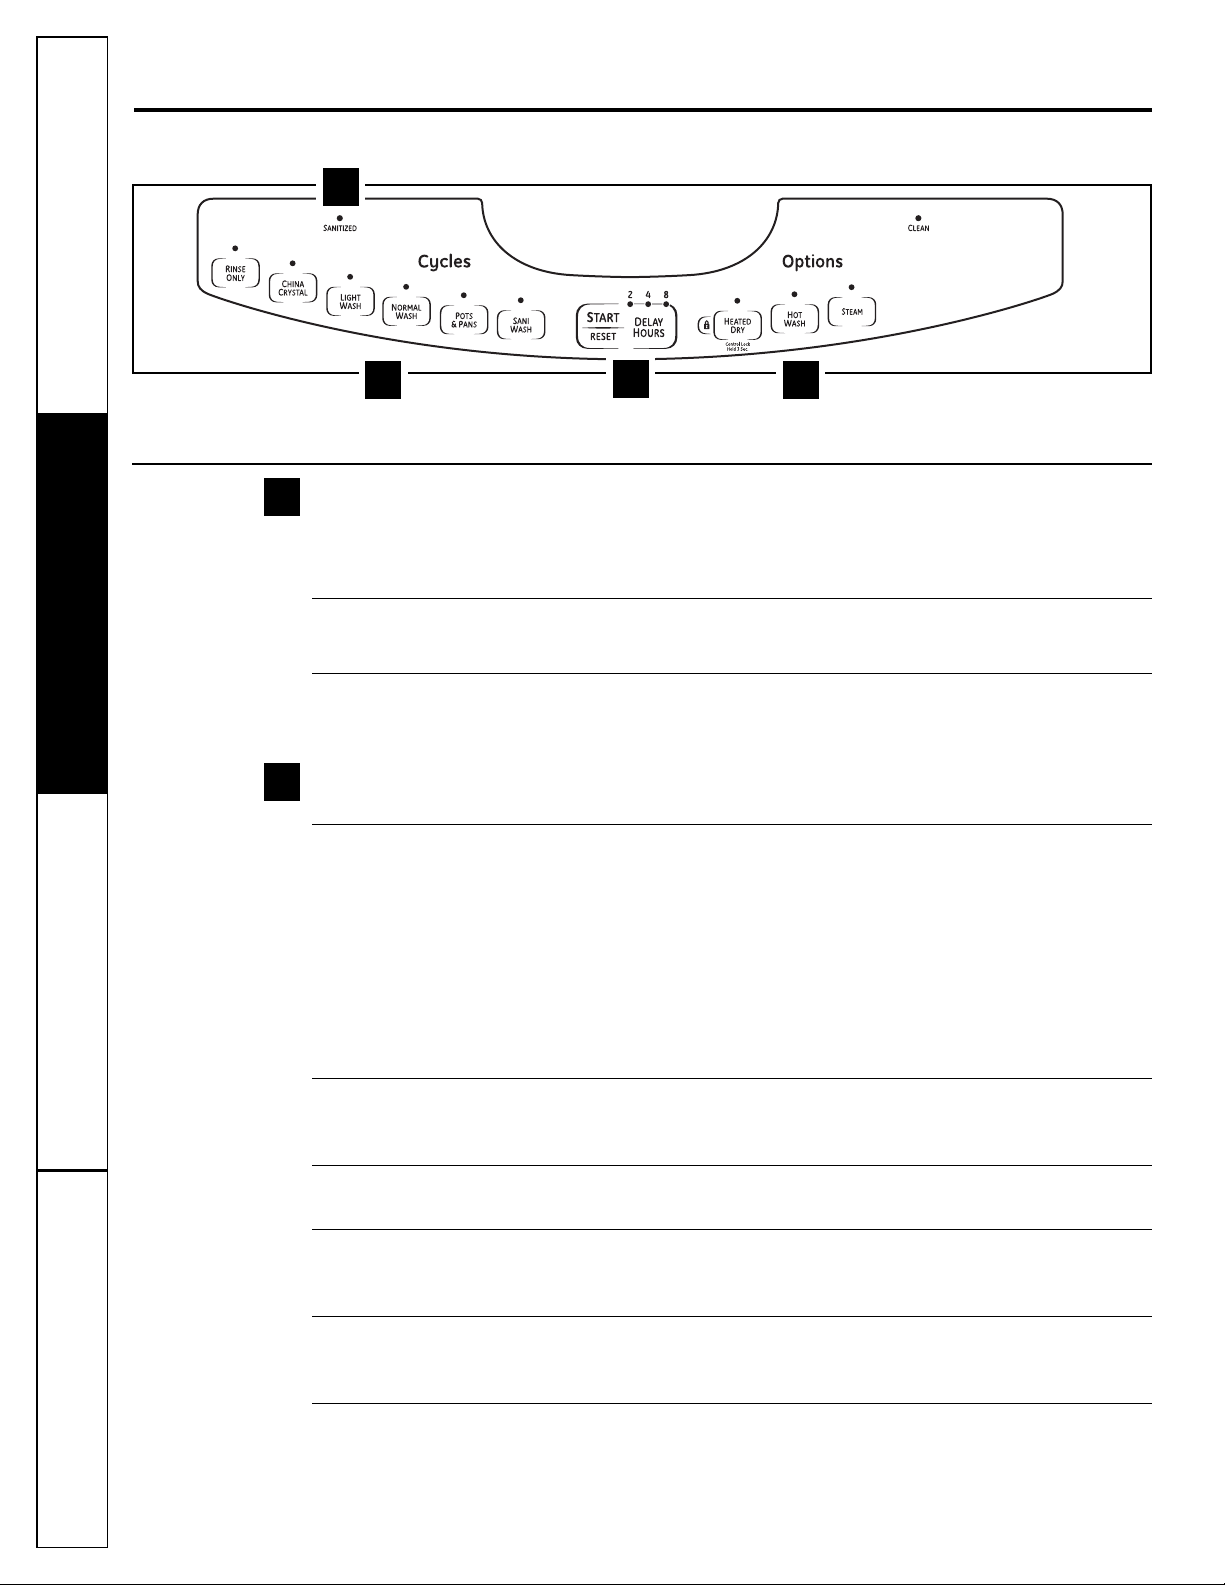
About the dishwasher control panel.
Choose the dishwasher control panel that corresponds to the features on your dishwasher.
1
2
4
3
Control Settings
Status Indicator Lights
1
The Status display tells you what’s happening while the dishwasher is in operation and may flash,
indicating a malfunction (see page 8). The lights will come ON indicating the sequence
of operation the dishwasher is in.
SANITIZED Displayed when cycle has met sanitization conditions. Light remains ON until
(on some door is opened.
models)
CLEAN Displayed when a wash cycle is complete. The light stays ON as a reminder that
(on some the dishes are clean until the door is opened or until another cycle is selected.
Operating Instructions Safety InstructionsConsumer Support Troubleshooting Tips
models)
Cycles
2
The light above the selected pad will be ON to indicate which cycle has been selected.
SANI WASH 7.3 gal., 97 min.
(on some
models)
This cycle raises the water temperature in the final rinse to sanitize your dishware.
The cycle length will vary depending on the temperature of your inlet water.
NOTE: The SANI WASH cycle is monitored for sanitization requirements. If the
cycle is interrupted during or after the main wash portion or if the incoming water
temperature is so low that adequate water heating cannot be achieved, the
sanitizing conditions may not be met. In these cases, the Sanitized light will not
illuminate at the end of the cycle.
NOTE: NSF certified residential dishwashers are not intended for licensed food
establishments.
POTS & PANS 8.5 gal., 89 min.
or HEAVY This cycle is meant for heavily soiled dishes or cookware with dried-on or baked-
WASH on soils. Everyday dishes are safe to be used in this cycle.
NORMAL WASH 5.6 gal., 56 min.
This cycle is for medium/heavily soiled dishes and glassware.
LIGHT WASH 6.1 gal., 36 min.
(on some This cycle is for everyday dishes and glassware.
models)
CHINA CRYSTAL 6.1 gal., 39 min.
(on some This cycle is for lightly soiled china and crystal.
models)
RINSE ONLY 1.2 gal., 6 min.
For rinsing partial loads that will be washed later. Do not use detergent with
this cycle.
NOTE: Only the SANI WASH cycle has been designed to meet the requirements of Section 6,
8
NSF 184 for soil removal and sanitization efficacy
.
Page 9
GEAppliances.com
Options
3
he light above the selected pad will be ON to indicate which OPTION has been selected.
T
OT START/ For use with heavily soiled and/or dried-on, baked-on soils. This option MUST be
H
STEAM selected PRIOR to starting the cycle. This option will improve both wash and dry
(on some performance. This option adds 20 minutes to the cycle time.
models) NOTE: Cannot be selected with RINSE ONLY cycle.
HEATED DRY Shuts off the drying heat option. Dishes air dry naturally and energy is saved.
Light OFF For faster air dry you can prop the door open after the CLEAN light illuminates.
HEATED DRY Turns the heater on for fast drying. This will extend the total run time by 38 minutes.
Light ON NOTE: Cannot be selected with RINSE ONLY cycle.
LOCK You can lock the controls to prevent any selections from being made. Or you can lock
the controls after you have started a cycle.
(on some Children cannot accidentally start dishwasher by touching pads with this option
models) selected.
To LOCK the dishwasher control, touch and hold the HEATED DRY pad for 3 seconds. The light below
the HEATED DRY pad will turn on. To UNLOCK the dishwasher control, touch and hold the HEATED
DRY pad for 3 seconds. The LOCK light will turn off.
HOT WASH/ When selected, the cycle will run longer with the heating element on to improve both
ADDED HEAT wash and dry performance. For use with heavily soiled and/or dried-on soils. This
option MUST be selected PRIOR to starting the cycle. NOTE: Cannot be selected with
RINSE ONLY cycle.
DELAY HOURS You can delay the start of a wash cycle for 2, 4 or 8 hours (delay time options may
vary by model). Touch the DELAY HOURS pad to choose the number of hours you want
to delay the start of the cycle; then touch START/RESET one time. The dishwasher will
count down and start automatically at the correct time. Touching START/RESET a
second time will cancel the DELAY START selection.
RESET To change a cycle after washing starts, touch the START/RESET pad to cancel the
cycle. The START/RESET light will flash while the water is pumped out if needed. This
takes approximately 90 seconds. When the light stops flashing, the dishwasher can be
reprogrammed and restarted.
Start
4
Close and latch the dishwasher door and select the cycle and desired enhancements. Touch the
START/RESET pad once to begin the cycle. Water begins to fill the dishwasher, and approximately
60 seconds later the wash action begins. Touching the START/RESET pad a second time will cancel
the cycle and cause the water to drain out. This will take approximately 2 minutes.
NOTE: The dishwasher remembers your last cycle so you don’t have to reprogram each time. When
the dishwasher door is fully closed, the control panel lights will display the last settings you selected.
If you don’t want to change any of the settings, simply touch the START/RESET pad once to begin
the cycle.
If the door is closed, the indicator lights will turn off if the START/RESET pad is not pressed within two
minutes. To activate the display, open and close the door or touch any pad.
Also, if a power failure occurs, NORMAL WASH and HEATED DRY will automatically be programmed.
Consumer SupportTroubleshooting TipsOperating InstructionsSafety Instructions
9
Page 10
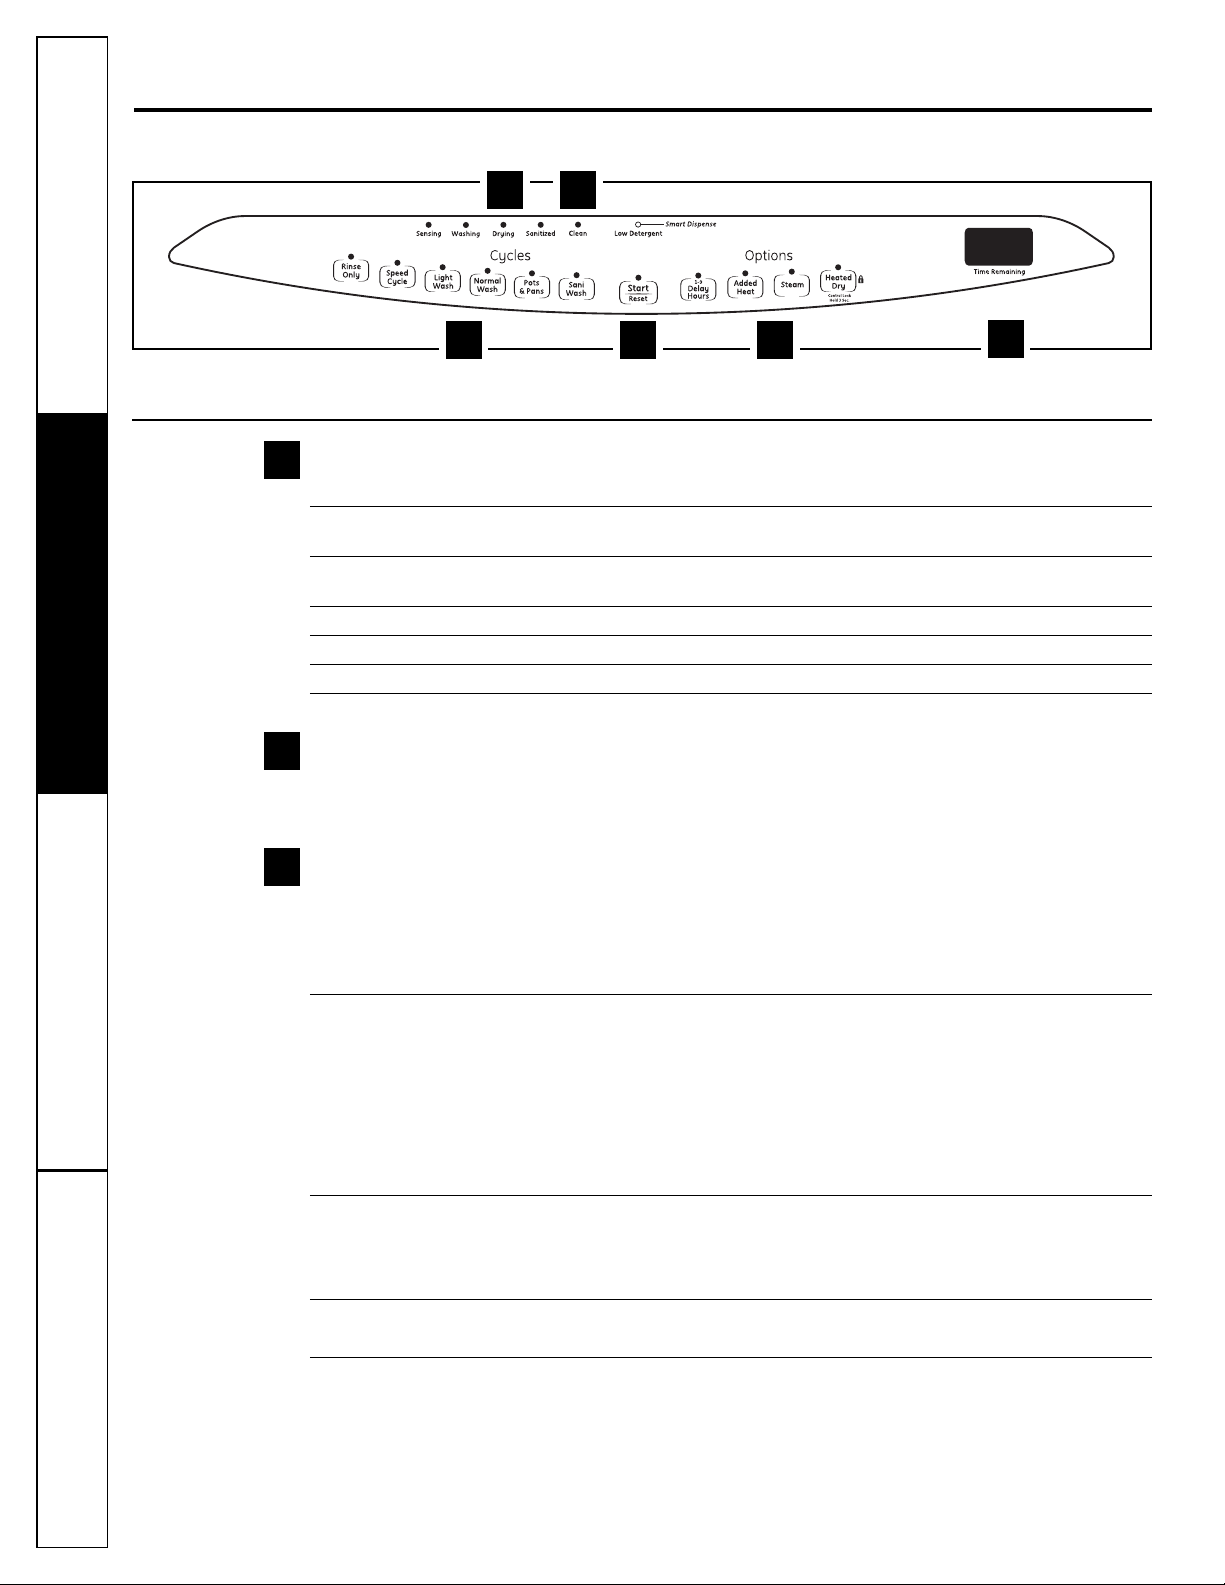
About the dishwasher control panel.
Choose the dishwasher control panel that corresponds to the features on your dishwasher.
1 6
453
2
Control Settings
Status Indicator Lights
1
The Status display tells you what’s happening while the dishwasher is in operation and may flash, indicating a
malfunction (see page 6). The lights will come ON indicating the sequence of operation the dishwasher is in.
M
LOW DETERGENT Displayed when the SmartDispense
(on some models) dishwasher detergent.
SENSING Displayed while the ExtraClean™ Sensor is measuring the amount of soil and temperature
of water. The dishwasher will adjust the selected cycle to achieve optimal performance.
WASHING Displayed during prewash and main wash periods.
DRYING Displayed during HEATED DRY.
SANITIZED Displayed when cycle has met sanitization conditions. Light remains ON until door is opened.
CLEAN Displayed when a wash cycle is complete.
Operating Instructions Safety InstructionsConsumer Support Troubleshooting Tips
Time Remaining Display (on some models)
2
During operation, the display shows the minutes remaining until the cycle is complete. The display may adjust
the remaining time while the Sensing light is on. The time displayed at the start of each cycle may change from
the factory setting as the unit customizes itself to home use. During a delay start, the display will show hours of time
remaining until the cycle starts.
Cycles
3
Press thepad for the desiredwashcycle.
NO
TE: All cycletimes andwater usage information contained in the following section are approximate
valuesonly. Actual results will dependon several factors, including but notlimited to, inlet temperature,
household waterpressure and turbidity of the wash water.
The light above or nextto the selected pad will be ON to indicate whichWASH CYCLEhas been selected.
SANI WASH 7.5–8.75 gal., 50–135 min.
This cycle raises the water temperature in the final rinse to sanitize your dishware. The cycle
length will vary depending on the temperature of your inlet water.
NOTE: The SANIWASH cycle is monitored for sanitization requirements. If the cycle is interrupted
during or after the main wash portion or if the incoming water temperature is so low that
adequate water heating cannot be achieved, the sanitizing conditions may not be met. In these
cases, the Sanitized light will not illuminate at the end of the cycle.
NOTE: NSF certified residential dishwashers are not intended for licensed food establishments.
POTS & PANS 8.75–10 gal., 75–140 min.
This cycle is meant for heavily soiled dishes or cookware with dried-on or baked-on soils.
This cycle may not remove burned-on foods. Everyday dishes are safe to be used in
this cycle.
NORMAL WASH 5.2 gal., 60–90 min.
This cycle is for medium/heavily soiled dishes and glassware
LIGHT WASH 7.5 gal., 40–60 min.
(on some models)
This cycle is for everyday dishes and glassware.
T
needs to be refilled with liquid or gel automatic
.
10
Page 11
GEAppliances.com
SPEED CYCLE 7.5 gal., 35–70 min.
on some models)
(
RINSE ONLY 2.5 gal., 10 min.
NOTE:This dishwasher is equipped with a CleanSensor
ength and time may vary depending on soil and temperature conditions.
l
NOTE:Only the SANI WASH cycle has been designed to meet the requirements of Section 6, NSF 184 for soil
removal and sanitization efficacy.
Options
4
The light above the selected pad will be ON to indicate which ENHANCEMENT/EXTRA has been selected.
STEAM For use with heavily soiled and/or dried-on, baked-on soils. This option MUST be selected PRIOR
(on some models)
HEATED DRY When HEATED DRY is off, dishes will air dry.
Light OFF
HEATED DRY Turns the heater on for faster drying. This will extend the total cycle time between
Light ON 8 and 38 minutes depending on the cycle selected. NOTE: HEATED DRY cannot be
LOCK You can lock the controls to prevent any selections from being made. Or you can lock
This cycle is for everyday dishes and glassware.
or rinsing partial loads that will be washed later. Do not use detergent with this cycle.
F
™
with automatic temperature control; therefore, cycle
to starting the cycle. The STEAM option adds 24 minutes to the cycle time.
selected with RINSE ONLY cycle.
the controls after you have started a cycle.
Children cannot accidentally start dishwasher by touching pads with this option
selected.
To unlock the dishwasher controls, touch and hold the HEATED DRY pad for 3
seconds. The light above the LOCK pad will turn off. To lock the dishwasher control,
touch and hold the HEATED DRY pad for 3 seconds. The light above the LOCK pad
will turn on.
ADDED HEAT When selected, the cycle will run with heating element on longer and may increase
cycle times to improve both wash and dry performance.
NOTE: Cannot be selected with RINSE ONLY cycle.
DELAY HOURS You can delay the start of a wash cycle for up to 9 hours. Touch the DELAY HOURS pad
to choose the number of hours you want to delay the start of the cycle; then touch
START/RESET. The machine will count down and start automatically at the correct time.
Touching START/RESET a second time will cancel the DELAY START selection.
NOTE: If you forget to fully close the door, a reminder signal will beep until you do so.
RESET To change a cycle after washing starts, touch the START/RESET pad to cancel the
cycle. The START/RESET light will flash while the water is pumped out if needed. This
takes approximately 90 seconds. When the light stops flashing, the dishwasher
can be reprogrammed and restarted.
START
5
Close the dishwasher door and select the cycle and desired enhancements. Touch the START/RESET pad to begin the cycle.
Water fill begins, and approximately 60 seconds later the wash action begins.
NOTE:The dishwasher remembers your last cycle so you don’t have to reprogram each time. When the dishwasher door
is fully closed, the control panel lights will display the last settings you selected.
If you don’t want to change any of the settings, simply touch the START/RESET pad to begin the cycle.
If the door is closed, the indicator lights will turn off if the START/RESET pad is not selected within two minutes. To activate
the display, open and close the door or press any pad.
Also, if a power failure occurs, NORMAL WASH and HEATED DRY will automatically be programmed. Make any new
selections and touch the START/RESET pad to begin the cycle.
CLEAN
6
The CLEAN light will illuminate and a double beep will sound when a wash cycle is complete. On some models, the CLEAN
light will turn off when the door is opened. On other models, the CLEAN light will remain on until the door is opened
and then relatched or until any keypad is pressed while the door is latched shut.
Consumer SupportTroubleshooting TipsOperating InstructionsSafety Instructions
11
Page 12
Flashing display lights.
Status Indicator Lights What It Means
START/RESET Cycle has been interrupted by pressing the START/RESET pad. Light will stop
Using the dishwasher.
Check the Water Temperature
lashing after the dishwasher automatically drains out the water.
f
NOTE:For models without the START/RESET pad, LEDs that are illuminated will flash
during reset.
The entering water should be at least 120°F (49°C) and
not more than 150°F (66°C) for effective cleaning and to
prevent dish damage. Check the water temperature with
a candy or meat thermometer. Turn on the hot water
faucet nearest the dishwasher, place the thermometer in
a glass and let the water run continuously into the glass
until the temperature stops rising.
®
Use a Rinse Agent such as Cascade Crystal Clear
Rinse agents such as Cascade Crystal Clear®remove spots and prevent new film buildup on your dishes, glasses,
flatware, cookware and plastic.
Filling the Dispenser
The rinse agent dispenser holds 3.5 oz. (103.5 ml) of rinse agent. Under normal
conditions, this will last approximately one month. Try to keep it full, but do not overfill.
Operating Instructions Safety InstructionsConsumer Support Troubleshooting Tips
Make sure the dishwasher door is fully open.
1
Turn the dispenser cap to the left and lift it out.
2
Add rinse agent until the indicator window looks full.
3
Clean up any spilled rinse agent with a damp cloth.
4
Replace the dispenser cap.
5
Rinse Aid Setting
The amount of rinse agent released into the final wash can be adjusted. The factory
setting is at the midpoint. If there are rings of calcium (hard water) spots on dishes, try a
higher setting. If you see foam in the dishwasher, move the indicator to a lower setting.
To adjust the setting
Remove the dispenser cap; then turn the adjuster counterclockwise to increase the
amount of rinse agent, clockwise to reduce the amount of rinse agent.
Indicator
window
Dispenser cap
Rinse agent
adjuster
12
Dish Preparation Prior to Loading
■ No prerinsing of normal food soil is required.
■ Scrape off hard soils, including bones, toothpicks, skins
and seeds.
■ Remove large quantities of any remaining food.
■ Remove leafy vegetables, meat trimmings and
excessive amounts of grease or oil.
■ Remove acidic food soils that can discolor stainless
steel.
Page 13
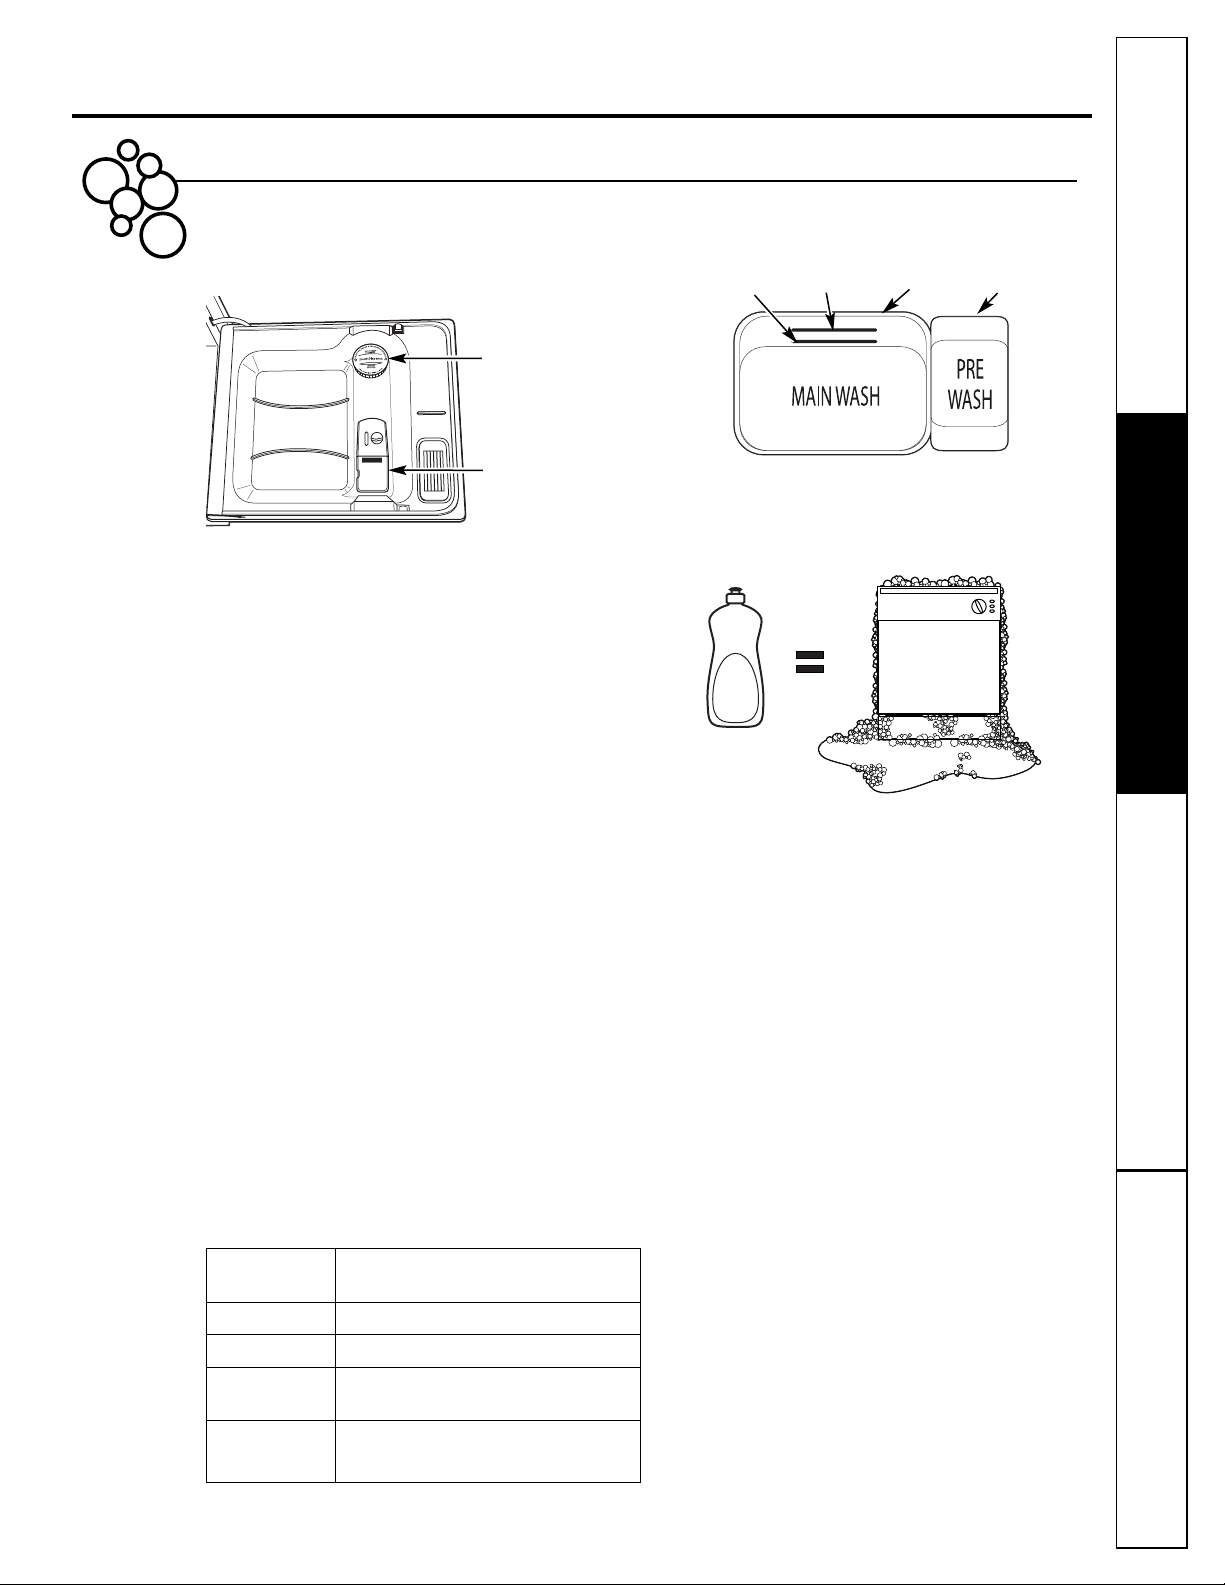
Manual Detergent Dispenser
GEAppliances.com
our dishwasher comes equipped with a manual dispenser
Y
and, on some models, an automatic liquid dishwasher
TM
detergent dispenser (SmartDispense
). You can use either
of these dispensers, but don’t use both at the same time.
SmartDispense
Manual Detergent
Dispenser
TM
The cover of the main wash section will open during the
M
wash cycle. If you are using SmartDispense
T
, leave the
cover of the main wash section dispenser open before
starting the cycle.
You may use powder, liquid, gel or tablets in the manual
dispenser. It is important to keep powdered detergents and
tablets fresh and dry so they don’t lose effectiveness.
Therefore, do not put detergent into the manual dispenser
until you are ready to wash dishes.
or heavily soiled loads, use a bit more detergent. For water
F
temperatures above 140°F (60°C), use a bit less detergent.
Medium
Soft
For heavily soiled loads, use the Pots and Pans or Heavy Wash cycle.
Soft
Medium
Hard
Extremely
Hard
DO NOTUSE HAND DISHDETERGENT
Filling Manual Detergent Dispenser
The amount of detergent to use depends on whether your
water is hard or soft. With hard water, you need extra
detergent. With soft water, you need less detergent.
Protect your dishes and dishwasher by contacting your
water department and asking how hard your water is.
Twelve or more grains is extremely hard water. A water
softener is recommended. Without it, lime can build up in
the water valve, which could stick while open and cause
flooding. Too much detergent with soft water can cause a
permanent cloudiness of glassware, called etching.
Use the information in the table below as a guide to
determine the amount of automatic dishwasher detergent
to place in the dispenser. You may use powder, liquid, gel
or tablets in this dispenser.
When using automatic dishwashing detergent tablets,
simply place one tablet in the main wash section and close
the cover.
Number
of Grains
Less than 4
4 to 8
8 to 12
Greater
than 12
Detergent Cups to Fill
Fill cup to soft line (1/3 full)
Fill cup to medium soft line (2/3 full)
Fill cup to medium hard line
(completely full)
Fill both main wash cup
and pre wash cup
NOTE:Using a detergent that is not specifically designed
for dishwashers will cause the dishwasher to fill with suds.
During operation, thesesuds will spill out of the dishwasher
vents, covering the kitchen floor and making the floor wet.
Because so many detergent containers look alike, store the
dishwasher detergent in a separate space from all other
cleaners. Show anyone who may use the dishwasher the
correct detergent and where it is stored.
While there will be no lasting damage to the dishwasher,
your dishes will not get clean using a dishwashing
detergent that is not formulated to work with dishwashers.
Consumer SupportTroubleshooting TipsOperating InstructionsSafety Instructions
13
Page 14
Using the dishwasher.
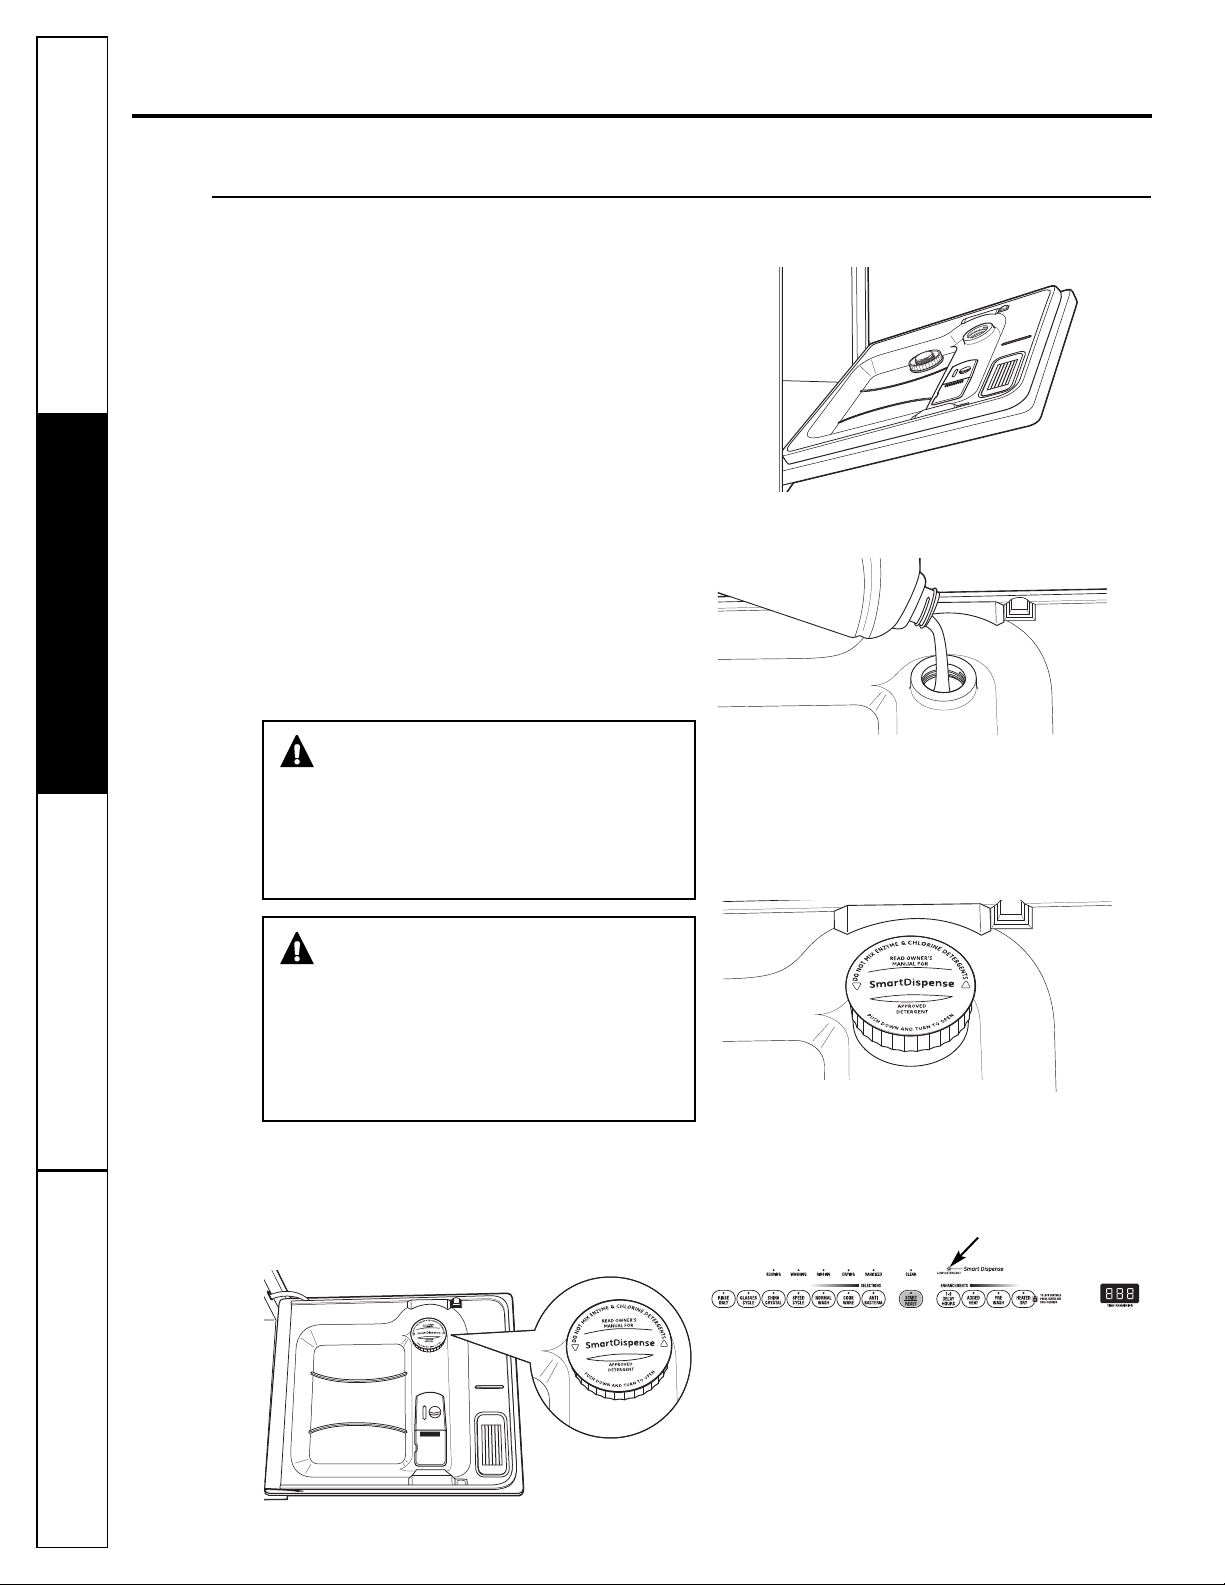
SmartDispense
his dishwasher may have a SmartDispense
T
which automatically dispenses liquid automatic
dishwasher detergent into each cycle based on soil
level and water hardness.
To utilize the SmartDispense
it must first be filled. Although any liquid or gel
automatic dishwashing detergent can be used in
the SmartDispense™system, all liquid or gel
automatic dishwashing detergents are not the same.
Most automatic dishwashing detergents are chlorine
bleach-based (such as Cascade®) while others contain
enzymes (such as Cascade Complete®).
Do not mix any chlorine bleach-based automatic
dishwashing detergent with any dishwashing
detergent containing enzymes as this could cause
the detergents to congeal and lead to blockage of
the SmartDispense™system. Check the detergent
label to determine if the detergent is chlorine
bleach-based or one that contains enzymes. It is
recommended that the same type of detergent be
used when refilling your SmartDispense™system.
TM
Detergent Dispenser (on some models)
™
™
Detergent Dispenser,
eature
f
et the door at a comfortable angle to fill the
S
dispenser.
Aim the detergent bottle at the opening in the door
and begin to fill.
Operating Instructions Safety InstructionsConsumer Support Troubleshooting Tips
CAUTION!Absolutely do not add
powder detergent, tablets or any liquid soap or
detergent normally used for washing hands or
dishes in a sink. Only use liquid or gel detergent
specifically designed for use in an automatic
dishwasher.
The dispenser will hold 40 oz of liquid dishwasher
detergent (standard size bottle).
When full, replace the cap and turn clockwise
until tight to ensure that no water enters the
SmartDispense
the door, it will be washed off in the next cycle.
™
dispenser. If residue is left on
¡PRECAUCIÓN! Bajo ninguna
circunstancia agregue detergente en polvo,
tabletas, o jabón o detergente líquido normalmente
utilizado para lavar manos o platos en un
fregadero. Sólo utilice detergente líquido o en gel
específicamente diseñados para utilizar en
lavaplatos automáticos.
Filling Dispenser
To open the dispenser for filling, push down and
turn the blue cap counterclockwise until the cap
is loose. Lift cap off.
An indicator light will turn on to notify you when the
dispenser needs to be filled again. After filling, the light
will not turn off until the door is closed. A full dispenser
will last approximately 1 month for the average user.
Turn clockwise until tight .
Light will turn on when it is time to refill.
14
NOTE:If you are not using SmartDispense™and you
want to turn the LOWDETERGENT LEDlight off, press
the ADDED HEATpad 5 times within 3 seconds. You
will hear 3 beeps, then the light will go off. You can
turn the light back on by pressing the ADDEDHEAT
pad 5 times within 3 seconds.
Page 15
SmartDispenseTMDetergent Dispenser
Water Hardness Calibration
rior to the first use, the dishwasher needs to
P
be calibrated for water hardness. Please follow
directions below to calibrate the dishwasher to
the hardness of your tap water.
Determine the Hardness of Your Tap Water
In the bag containing these instructions, you should
find a water hardness test strip package. Read the
instructions on the package, remove the test strip and
follow the instructions to determine the hardness level
of your tap water. You will use this information to
calibrate your dishwasher to dispense the optimal
amount of detergent.
Water hardness test strip indication
OFT
S
0 RED
RED
1
2 RED
RED
3
4 RED
HARD
alue to Enter
V
nto Dishwasher
i
1
2
3
4
5
Set Control to Calibration Mode
From the standby mode (dishwasher not running
a cycle and the panel lights on), enter the water
hardness selection mode.
Control Calibration
Control Panel
Press at the same time for 3 seconds.
1. Close and latch the door (lights on, dishwasher
not running).
2. Press the SANI WASH and DELAY HOURS pads at
the same time for 3 seconds. The display will show
a number 1 to 5. This is the water hardness value
currently set.
Display
Press NORMAL
WASH pad to lower
the value.
3. Press the SANI WASH pad to raise the value or
the NORMAL WASH pad to lower the value. Set
the water hardness value (1 to 5) to the number
determined with the test strip and table at left.
4. Once the water hardness is set, press the
START/RESETpad to save the setting and return
the dishwasher to normal operation.
You should recalibrate the dispenser if water
conditions change, for example, if a water softener
system is added or removed.
Calibration of Models Without 3-Digit
Display Front Controls
1. Close and latch the door (lights on, dishwasher not
running).
2. Press the SANI WASH and DELAY HOURS pads
together for 3 seconds.
3. To change the setting, press the DELAY HOURS pad
the number of times that corresponds to the water
hardness value. You will hear a confirmation with
beeps for the number of times you pressed the pad.
4. If the number of beeps is not what you desire, start
pressing the DELAY HOURS pad again to reenter
a new water hardness level.
5. Once the water hardness is set, press the
START/RESETpad to save the setting and return
the dishwasher to normal operation.
GEAppliances.com
Control Panel
Press SANI
WASH pad to
raise the value.
15
Consumer SupportTroubleshooting TipsOperating InstructionsSafety Instructions
Page 16

Loading the dishwasher racks.
For best dishwashing results, follow these loading guidelines. Features and appearance of racks and silverware
askets may vary from your model.
b
Upper Rack
old-down tines (on some models) provide
Although the upper rack is primarily for glasses,
cups and saucers, pots and pans can be placed
n this rack for effective cleaning. Cups and glasses
i
fit best along the sides. This is also a secure place
for dishwasher-safe plastics.
The upper rack is adjustable (on some models)
to add flexibility in loading your dishwasher.
To lower, push tabs in and lower rack. To raise,
just pull up on rack until it snaps.
The utility shelf (on some models) may be placed
in the up or down position to add flexibility. A wine
glass holder (on some models) secures wine
glasses for best washability. Because wine glasses
come in various sizes, after loading, slowly push
in the rack to make sure they will clear the top
of the dishwasher.
The upper rack is good for all kinds of odd-shaped
utensils. Saucepans, mixing bowls and other items
should be placed face down.
F
flexibility for extra-large and hard-to-fit items.
Secure larger dishwasher-safe plastics over 2 tines
when possible.
Make sure small plastic items are secure so they
can’t fall onto the heater.
Be sure that items do not protrude through the
bottom of the rack and block rotation of the
middle spray arm. This could result in poor wash
performance for items in the upper rack.
Check to make sure
that no items will block
rotation of the wash
arms.
Operating Instructions Safety InstructionsConsumer Support Troubleshooting Tips
One-piece basket (on some models)
Three-piece basket (on some models)
To remove end baskets, grasp the
basket at opposite corners and slide
apart.
Lower Rack
The lower rack is best used for plates, saucers and
cookware. Large items such as broiler pans and
baking racks should go along the left-hand side.
Load platters, pots and bowls along the sides, in
corners or in the back. The soiled side of items
should face the center of the rack. If necessary,
oversized glasses and mugs can be placed in the
lower rack to maximize loading flexibility.
Also, be careful not to let a portion of an item such
as a pot or dish handle extend through the bottom
rack. This could block the wash arm and cause
poor washing results.
Silverware Basket
To load flatware, simply push the adjustable
handle to either side (on some models). Put
flatware in the removable basket with fork and
knife handles up to protect your hands. Place
spoons in the basket with handles down. Mix
knives, forks and spoons so they don’t nest
together. Distribute evenly. Small plastic items,
such as measuring spoons and lids from small
containers should go in the bottom of the
silverware basket with the silverware on top.
The one-piece silverware basket (on some models)
can be placed in the front, right side or back of the
lower rack.
A variety of options is available regarding the
three-piece silverware basket (on some models)
in your dishwasher. The complete basket is
designed to fit on the right side of the lower rack.
Additionally, each end of the basket is removable
to add loading flexibility to accommodate flatware
and lower rack capacity needs.
Fold-down tines (on some models) provide
flexibility for extra-large and hard-to-fit items. The
tines may be left in the up position or folded down
to customize the lower rack.
Do not let any item
extend through the
bottom of the silverware
basket. Items that
extend through the rack
could prevent the spray
arm from turning and
cause poor wash
performance.
The lids of both end and middle baskets
(on some models) can be closed to contain small
items. Long items can be placed on the utility shelf
in the upper rack.
The accessory
basket (on some
models) can hold
small items such
as baby bottle
nipples, plastic lids,
or corn cob holders.
16
Page 17

Loading place settings… GEAppliances.com
Follow these guidelines for loading 10 place settings. Features and appearance of racks and silverware baskets
ay vary from your model.
m
Upper Rack—10 place settings Lower Rack—10 place settings
Follow these guidelines for loading 12 place settings. Features and appearance of racks and silverware baskets
may vary from your model.
OTE:Silverware should be individually loaded into the slots on the silverware basket lid.
N
NOTE:
Silverware should be individually loaded into the slots on the silverware basket lid.
Upper Rack—12 place settings Lower Rack—12 place settings
Optional accessories.
You can change the appearance of your
dishwasher by adding a custom panel trim kit.
Wood panel trim kit—This accessory contains
trim and instructions for you to supply and install a
1/4 thick decorative wood door:
■ GPF525B (Black)
■ GPF525W (White)
■ GPF525C (Bisque)
Trimless wood panel kit—This accessory contains
parts and instructions for you to supply and install
a 3/4 thick decorative wood door:
■ GPF575
Non-wood countertop bracket kit—This is for
installations which have non-wood countertops
and includes side-mounting brackets and
instructions for securing the dishwasher.
■ GPF65
These accessories are available at extra cost from
GE. Call 800.626.2002 to order. Visa, MasterCard
or Discover cards are accepted.
Specify accessory number when ordering.
Consumer SupportTroubleshooting TipsOperating InstructionsSafety Instructions
17
Page 18

Caring for the dishwasher.
Cleaning the Exterior Door Panel
Before cleaning the front panel, make
sure you know what type of panel you have. Refer
to the last two letters of your model number. You
an locate your model number on the left-hand tub
c
wall just inside the door. If your model number ends
with BB, CC, WW, SA or BG, then you have a painted
door panel. If your model number ends with SS, then
you have a Stainless Steel Door panel. If your model
number ends with CS, then you have a CleanSteel
panel.
Follow the instructions below for cleaning the door
panel for your specific model.
Painted Door Panel (model numbers ending in
BB–black, CC–bisque, WW–white, SA–silver metallic
or BG–graphite black)
Use a clean, soft, lightly dampened cloth, then dry
thoroughly. You may also use a good appliance wax
or polish.
Cleaning the Control Panel
To clean the control panel, use a lightly dampened
cloth. Then dry thoroughly.
tainless Steel Door Panel (model numbers ending
S
in SS)
The stainless steel panels can be cleaned with
tainless Steel Magic or a similar product using a
S
clean, soft cloth. Do not use appliance wax, polish,
bleach or products containing chlorine on Stainless
Steel doors.
You can order Stainless Steel Magic #WX10X15
through GE Parts by calling 800.626.2002.
CleanSteel Door Panel (model numbers
ending in CS)
Use a clean, soft, lightly dampened cloth, then
dry thoroughly. Do not use appliance wax, polish
or any chemical agent on CleanSteel doors.
Do not wipe the dishwasher with a soiled dish
cloth or wet towel. These may leave a residue.
Do not use scouring pads or powdered cleaners
because these products can scratch the finish.
Operating Instructions Safety InstructionsConsumer Support Troubleshooting Tips
Protect Against Freezing
If your dishwasher is left in an unheated place during
the winter, ask a service technician to:
Cut off electrical power to the dishwasher.
1
Remove fuses or trip circuit breaker.
Turn off the water supply and disconnect the
2
water inlet line from the water valve.
Does Your Dishwasher Have an Air Gap?
An air gap protects your dishwasher against water
backing up into it if a drain clogs. The air gap is not
a part of the dishwasher. It is not covered by your
warranty. Not all plumbing codes require air gaps,
so you may not have one.
Drain water from the water inlet line and water
3
valve. (Use a pan to catch the water.)
Reconnect the water inlet line to the water valve.
4
The air gap is easyto clean.
Turn off the dishwasher and lift off the cover.
1
Remove the plastic cap and clean with
2
a toothpick.
Air gap
Check the air gap any time your
dishwasher isn’t draining well.
18
Page 19

Before you call for service…
Troubleshooting Tips
Save time andmoney! Reviewthecharts on the following pages, or visit GEAppliances.com.
In Canada visit www.GEAppliances.ca. You may not need to call for service.
Error Messages Possible Causes What To Do
START/RESET status You have pressed the • Press the START/RESET pad once to start the dishwasher. Press the
indicatorlight flashing START/RESET pad while the START/RESET pad a second time when the dishwasher is running only if you
dishwasher is running. This will wish to cancel the cycle.
cancel the cycle. The light will
stop flashing after the dishwasher
drains (about 90 seconds).
Power to the dishwasher was • The light will stop flashing after the dishwasher drains. A new cycle will
turned off while a cycle was start automatically.
running and power has just been
restored to the dishwasher. The
blinking lights indicate that the
dishwasher is draining the potential
water inside.
Dishwasher BEEPS This is a reminder that your • Close and latch the door after opening it mid-cycle.
once every 30 seconds dishwasher door has been left
open during operation. It will
continue beeping until you close
the door.
Beeping at the end This is normal. The dishwasher • To turn off the double beep indicator (or re-activate it if it was previously
of the cycle will beep twice at the end of the turned off), press the HEATED DRY pad 5 times within 3 seconds.
cycle A triple beep will sound to indicate the end-of-cycle beep option
has been turned on or off.
Low Detergent light SmartDispense™has less than • Fill the SmartDispense™reservoir with liquid detergent. After filling the
is ON 10 cycles worth of detergent reservoir, the LOW DETERGENT light will turn OFF once the door is closed.
left in the dishwasher If you are not using the SmartDispense™feature, turn off the low detergent
light by pressing the ADDED HEAT pad 5 times within 3 seconds.
Problem Possible Causes What To Do
Dishesand flatware Low inlet water temperature • Make sure inlet water temperature is correct (see page 12). Turn on the hot
not clean water faucet nearest the dishwasher, let run until the water temperature
stops rising. Then start the dishwasher and turn off the faucet. This insures
the entering water is hot.
Water pressure is temporarily low • Turn on a faucet. Is water coming out more slowly than usual? If so, wait
until pressure is normal before using your dishwasher.
Air gap or disposer is clogged • Clean the air gap or flush the disposer.
Improper rack loading • Make sure large dishware does not block the detergent dispenser or the
wash arms. See the Loading the dishwasher racks section.
No air gap or high drain loop • Verify that you have an air gap or a high drain loop. Refer to the
Installation Instructions.
Spots and filming • Use rinse agents such as Cascade CrystalClear®to remove spots
on glasses and and prevent new film buildup.
flatware
Cloudiness on Combination of soft water and • This is called etching and is permanent. To prevent this from happening,
glassware too much detergent use less detergent if you have soft water. Wash glassware in the shortest
Extremely hard water
Low inlet water temperature
Overloading the dishwasher
Improper loading
Old or damp powder detergent
Rinse agent dispenser empty
Too little detergent
Water temperature entering the • This could be etching. Lower the water heater temperature.
dishwasher exceeds 150°F (66°C)
• Make sure water temperature is at least 120°F.
• Load dishwasher as shown in the Loading Place Settings section.
• Make sure detergent is fresh.
• If water is extremely hard, a softener may be required.
cycle that will get it clean. Recalibrate the SmartDispense™system if you
are using it (see page 15). Do not use the manual detergent dispenser and
the SmartDispense™at the same time.
Consumer SupportTroubleshooting TipsOperating InstructionsSafety Instructions
19
Page 20

Before you call for service…
roblem Possible Causes What To Do
P
Sudsin the tub Correct detergent • Use only automatic dishwasher detergents to avoid sudsing. Cascade
wasn’t used Automatic Dishwashing Detergents have been approved for use in all
GE dishwashers.
• To remove suds from the tub, open the dishwasher and let suds dissipate.
Close and latch the dishwasher. Pump out water by touching the
START/RESETpad once; then 30 seconds later, touch the
START/RESETpad again. Repeat if necessary.
Rinse agent was spilled • Always wipe up rinse agent spills immediately.
Detergent placed in manual • Use SmartDispense™or the manual detergent dispenser, but not both.
detergent dispenser and
SmartDispense™dispenser
Detergent left in Dishes are blocking the • Reposition the dishes, so the water from the lower spray arm can
dispenser cups detergent cup or flush the detergent cup or the outlet on the SmartDispense™system.
SmartDispense™outlet See the Loading the dishwasher section.
Water in the Cap not tightened after • Use a turkey baster to remove as much water as possible from the
SmartDispense
dispenser the cap fully to prevent water from entering the dispenser.
Black or gray Aluminum utensils have • Remove marks with a mild, abrasive cleaner.
marks on dishes rubbed against dishes
Dishesdon’t dry Low inlet water temperature • Make sure inlet water temperature is at least 120°F.
Operating Instructions Safety InstructionsConsumer Support Troubleshooting Tips
Controlpanelresponded Door latch may not be properly • Make sure the door is firmly closed.
toinputsbutdishwasher seated
never filled with water
Stained tub interior Some tomato-based foods can • Use of the RINSE ONLY cycle after adding the dish to the load
™
filling the dispenser SmartDispense™dispenser and refill it as normal. Be sure to tighten
• Select HEATED DRY.
• Use HOT START, HOT WASH or ADDED HEAT options.
• Select a higher cycle, such as ANTI-BACTERIA, SANI WASH or POTS & PANS.
Rinse agent dispenser is empty • Check the rinse agent dispenser and fill as required.
Water valve may be turned off • Make sure water valve (usually located under the sink) is turned on.
cause reddish stains can decrease the level of staining. GE recommends Cascade
Plastic Booster to help remove these types of stains.
Tea or coffee stains • Remove the stain by hand, using a solution of 1/2 cup bleach
and 3 cups warm water.
®
®
WARNING
Before cleaning interior, wait at least 20 minutes after a cycle for the
heating elements to cool down. Failure to do so can result in burns.
ADVERTENCIA
Antes de limpiar el interior, espere por lo menos 20 minutos después
de un ciclo para que los elementos calentadores se enfríen. No hacerlo
puede provocar quemaduras.
An overall yellow or brown film can
be caused by iron deposits in water
White film on inside surface— • GE recommends Cascade Crystal Clear®to help prevent hard water
hard water minerals mineral deposits from forming.
Dishwasher won’t run Fuse is blown or circuit breaker • Replace fuse or reset circuit breaker. Remove any other appliances from
is tripped the circuit.
Power is turned off • In some installations, the power to the dishwasher is provided through a
Control panel is locked • Unlock control panel. See page 7, 9 or 11.
Reboot your control • Turn off power to the dishwasher (circuit breaker or wall switch) for
20
• A special filter in the water supply line is the only way to correct
this problem. Contact a water softener company.
• Run dishwasher with citric acid to remove mineral deposits. Citric acid
(Part number: WD35X151) can be ordered through GE Parts. See back
cover for ordering information.
wall switch, often located next to the disposer switch. Make sure it is on.
30 seconds; then turn back on.
Page 21

GEAppliances.com
roblem Possible Causes What To Do
P
Control panel lights Time too long between • Each pad must be touched within 30 seconds of the others.
go off when you’re touching of selected pads To relight, touch any pad again, or unlock and relatch door.
setting controls
ater standing in This is normal • A small amount of clean water around the outlet on the tub
W
the bottom of the tub bottom at the back of the tub keeps the water seal lubricated.
Water won’t pump Drain is clogged • If you have an air gap, clean it. See page 18.
out of the tub
Steam This is normal • Warm, moist air comes through the vent by the door latch during drying
Sanitized light does The door was opened and the • Do not interrupt the cycle anytime during or after main wash.
not illuminate at the cycle was interrupted during
end of the cycle or after the main wash portion
(Anti-Bacteria
cycle only)
Noise Normal operating sounds • These are all normal. No action is required.
The incoming water • Raise the water heater temperature to between 120°F and 140°F.
temperature was too low
Detergent cup opening
Water entering dishwasher
The motor stops and starts at
various times during the cycle
Drain pump sounds during
pump out
Rattling dishes when the spray • Make sure dishes are properly loaded. See the Loading the
arm rotates dishwasher racks section.
• If the dishwasher drains into a disposer, run disposer clear.
• Check to see if your kitchen sink is draining well. If not, you
may need a plumber.
and when water is being pumped out. This is necessary for drying.
21
Consumer SupportTroubleshooting TipsOperating InstructionsSafety Instructions
Page 22

GE Dishwasher Warranty.
All warranty service provided by our Factory ServiceCenters, or an
®
authorized Customer Care
technician.To schedule service, visitus
on-line at GEAppliances.com, or call800.GE.CARES (800.432.2737)
in the United States. In Canada, call 1.800.561.3344. Please have
serial numberandmodel number available when calling for service.
Staple your receipt here.
Proof of the original purchase
date is needed to obtain service
nder the warranty.
u
For The Period Of: GE Will Replace:
One Year Any part of the dishwasher which fails due to a defect in materials or workmanship. During
From the date of the this limited one-year warranty, GE will also provide, free of charge, all labor and in-home service
original purchase to replace the defective part.
Five Years The dishwasher racks and the electronic control module if they should fail due to a defect
(for Profile Models in materials or workmanship. During this five-year limited warranty, you will be responsible
PDW7000 Series) for any labor or in-home service costs.
From the date of the
original purchase
Lifetime of Product ThePermaTuf®tub or door liner, if it fails to contain water due to a defect in materials or
(for Profile Models workmanship. During this limited warranty, GE will also provide, free of charge, all labor and
PDW7000 Series) in-home service to replace the defective part.
What GE Will Not Cover (for customers in the United States):
■ Service trips to your home to teach you how to use
the product.
■ Improper installation, delivery or maintenance.
■ Failure of the product if it is abused, misused, or used for
other than the intended purpose or used commercially.
■ Replacement of housefuses or resetting of circuit breakers.
Operating Instructions Safety InstructionsConsumer Support Troubleshooting Tips
■ Product not accessible to provide required service.
■ Damage to the product caused by accident, fire, floods
or acts of God.
■ Incidental or consequential damage caused by possible
defects with this appliance.
■ Cleaningor servicing of the airgapdevicein the drain line.
■ Damage caused after delivery, including damage from
items dropped on the door.
EXCLUSION OF IMPLIED WARRANTIES—Your sole and exclusive remedy is product repair as provided in this Limited
Warranty. Any implied warranties, including the implied warranties of merchantability or fitness for a particular
purpose, are limited to one year or the shortest period allowed by law.
This warrantyis extendedto the originalpurchaserandany succeeding owner for products purchased for home usewithin the
USA. If the productis located in an area where service by a GE AuthorizedServicer is not available,you may be responsible fora trip
charge or you may be required to bring the product to an Authorized GE Servicelocation for service. Proof of original purchase date
is neededto obtainservice under the warranty. In Alaska,thewarranty excludesthecost of shipping or servicecallsto yourhome.
Somestates do not allow the exclusion or limitation of incidental or consequential damages. This warranty gives you specific legal
rights, and you may also have other rights which vary from state to state. To know what your legal rights are, consult your local
or state consumer affairs office or your state’s Attorney General.
Warrantor: General Electric Company. Louisville, KY 40225
What Is Not Covered (for customers in Canada):
■ Service trips to your home to teach you how to use
the product.
■ Improper installation.
If you have an installation problem, contact your dealer
or installer. You
electrical, exhausting and other connecting facilities.
EXCLUSION OF IMPLIED WARRANTIES—Your sole and exclusive remedy is product repair as provided in this Limited
Warranty. Any implied warranties, including the implied warranties of merchantability or fitness for a particular
purpose, are limited to one year or the shortest period allowed by law.
are responsible for providing adequate
■ Failure of the product if it is abused, misused, or used for
other than the intended purpose or used commercially.
■ Replacement of housefuses or resetting of circuit breakers.
■ Damage to the product caused by accident, fire, floods
or acts of God.
■ Damage caused after delivery.
This warrantyis extendedto the originalpurchaserandany succeeding owner for products purchased in Canada for homeuse
within Canada. In home warranty service willbe provided in areaswhere it is available and deemedreasonable by Mabe to provide.
WARRANTOR IS NOT RESPONSIBLE FOR CONSEQUENTIAL DAMAGES.
22
Warrantor: MABE CANADA INC.
Page 23

Consumer Support.
GE Appliances Website
ave a question or need assistance with your appliance? Try the GE Appliances Website 24 hours a day,
H
any day of the year! For greater convenience and faster service, you can now download Owner’s Manuals,
order parts or even schedule service on-line. In Canada: www.GEAppliances.ca
n the U.S.:
I
GEAppliances.com
Schedule Service In the U.S.: GEAppliances.com
Expert GE repair service is only one step away from your door. Get on-line and schedule your service at your
convenience any day of the year! Or call 800.GE.CARES (800.432.2737) during normal business hours.
In Canada, call 1.800.561.3344
Real Life Design Studio In the U.S.: GEAppliances.com
GE supports the Universal Design concept—products, services and environments that can be used by people of all
ages, sizes and capabilities. We recognize the need to design for a wide range of physical and mental abilities and
impairments. For details of GE’s Universal Design applications, including kitchen design ideas for people with disabilities,
check out our Website today. For the hearing impaired, please call 800.TDD.GEAC (800.833.4322).
In Canada, contact: Manager, Consumer Relations, Mabe Canada Inc.
Suite 310, 1 Factory Lane
Moncton, N.B. E1C 9M3
Extended Warranties In the U.S.: GEAppliances.com
Purchase a GE extended warranty and learn about special discounts that are available while your warranty is still
in effect. You can purchase it on-line anytime, or call 800.626.2224 during normal business hours. GE Consumer Home
Services will still be there after your warranty expires. In Canada, call 1.888.261.2133
Parts and Accessories In the U.S.: GEAppliances.com
Individuals qualified to service their own appliances can have parts or accessories sent directly to their homes
(VISA, MasterCard and Discover cards are accepted). Order on-line today, 24 hours every day or by phone at
800.626.2002 during normal business hours.
Instructions contained in this manual cover procedures to be performed by any user.Other servicing generally
shouldbe referred to qualified service personnel. Caution must be exercised,since improper servicing may cause
unsafeoperation.
Customers in Canada can order parts and accessories on-line at www.GEAppliances.ca, 24 hours every day, or by
phone at 1.800.661.1616 during normal business hours.
Contact Us In the U.S.: GEAppliances.com
If you are not satisfied with the service you receive from GE, contact us on our Website with all the details including
your phone number, or write to: General Manager, Customer Relations
GE Appliances, Appliance Park
Louisville, KY 40225
In Canada: www.GEAppliances.ca, or write to: Director, Consumer Relations, Mabe Canada Inc.
Suite 310, 1 Factory Lane
Moncton, N.B. E1C 9M3
Register Your Appliance In the U.S.: GEAppliances.com
Register your new appliance on-line—at your convenience! Timely product registration will allow for enhanced
communication and prompt service under the terms of your warranty, should the need arise. You may also mail
in the pre-printed registration card included in the packing material. In Canada: www.GEAppliances.ca
23
Page 24

Notes.
Operating Instructions Safety InstructionsConsumer Support Troubleshooting Tips
24
Printed in the United States
Printed on Recycled Paper
Page 25

www.electromenagersge.ca
MC
Consignes de sécurité . . . . . . . 2, 3
Directives de fonctionnement
Chargement de la vaisselle . . . . . . . . 16
Chargement des paniers
du lave-vaisselle . . . . . . . . . . . . . . . . . . 15
Entretien et nettoyage . . . . . . . . . . . . 17
Tableau de commande
et réglages . . . . . . . . . . . . . . . . . . . . . 4–10
Utilisation du lave-vaisselle . . . . .10–14
Dépannage . . . . . . . . . . . . . . . . . 18–20
Manuel
d’utilisation
Grand baquet
lave-vaisselle
GE et GE Profile
Service à la clientèle
Garantie . . . . . . . . . . . . . . . . . . . . . . . . . . 21
Service à la clientèle . . . . . . . . . . . . . . . .22
Inscrivez ci-dessous les numéros
de modèle et de série :
N° de modèle ________________
N° de série __________________
Ils se trouvent sur la paroi de la cuve,
à l’intérieur de la porte.
Lave-vaisselle
165D4700P388 49-55064 07-09 JR
Page 26

CONSIGNES DE SÉCURITÉ IMPORTANTE
VEUILLEZ LIRE TOUTES LES CONSIGNES AVANT D’UTILISER
L’APPAREIL—CONSERVEZ CES DIRECTIVES
AVERTISSEMENT!
Pour votre sécurité, veuillez suivre les directives données dans le présent manuel afin de
réduire au minimum les risques d’incendie, d’explosion et de chocs électriques et prévenir
tout dommage et blessure grave ou mortelle.
AVERTISSEMENT!
Dans certaines conditions, il peut se former de l’hydrogène dans un chauffe-eau qui n’a pas été utilisé pendant
deux semaines ou plus. L’HYDROGÈNE EST UN GAZ EXPLOSIF.
Si vous n’avezpas utilisé votre chauffe-eau pendant deux semainesou plus,ouvrez tous les robinetsd’eau
chaude et laissez couler l’eau pendant plusieurs minutes afin de réduire les risques de dommages matériels
ou de blessures. Prenez cette précaution avant même d’utiliser un électroménager raccordé au chauffe-eau
pour éliminer l’hydrogène qui pourrait s’y être accumulé. Puisqu’il s’agitd’un gaz inflammable, ne fumez pas
ou n’utilisez pas une flamme nue ou un électroménager au cours de ce processus.
SÉCURITÉ DU CHAUFFE-EAU
INSTALLATION ET ENTRETIEN APPROPRIÉS
Ce lave-vaisselle doit être correctement installé, en conformité avec les directives d’installation fournies,
avant d’être utilisé. Si vous n’avez pas reçu les directives d’installation avec votre appareil, vous pouvez
Fonctionnement Consigne de sécuritéService à la clientèle Dépannage
vous les procurer en visitant notre site Web à l’adresse www.electromenagersge.ca.
■ Cetappareil doit êtrerelié à un système
de câblage électrique permanent en métal, mis
à la terre. Sinon, un fil de mise à la terre pour
appareillage doitêtre installéet raccordé à la
borneou au fil de mise à la terre de l’appareil.
■ Un raccordementincorrectdu fil de miseà la terre
peut présenter un risque d’électrocution. Consultez
un électricien ou un technicien qualifié si vous
n’êtes pas certain que l’appareil est correctement
misà la terre.
■ Veuillez vous débarrasserde la façon appropriée
de vos vieux électroménagers et des matériaux
d’emballage ou d’expédition.
■ Ne tentezpas de réparerou de remplacer une
piècequelconque de votre lave-vaisselle,à moins
quecela ne soit spécifiquementrecommandé
dans le présent manuel. Confiez toutes les autres
réparations à un technicienqualifié.
■ Pour réduire au minimum les risques
d’électrocution, débranchez l’appareil de sa source
d’alimentation avant d’eneffectuerl’entretien.
REMARQUE : Le fait d’arrêterle lave-vaisselle
ne coupe l’alimentationélectrique de l’appareil.
Nous vous recommandons de confier la réparation
de votre électroménager à un technicienqualifié.
ATTENTION : Pour éviter les blessures mineures ou les dommages matériels
■ Les articles lavés au mode antibactérien, le cas
échéant, peuventêtre chauds au toucher.
Manipulez-les avec prudence.
■ L’utilisation d’un détergent non
conçu pour les lave-vaisselles
peut provoquer la formation
de mousse.
■ Si votre lave-vaisselle est branché sur
un circuit relié à un interrupteur mural,
assurez-vous d’actionner celui-ci avant
d’utiliser votre appareil.
■ Sur les lave-vaissellesdotés de commandes
électroniques, si vous fermez l’interrupteur mural
entre les cycles de lavage, attendez de 5 à 10
secondes après avoir ramené l’interrupteur à ON
(Marche) avant d’appuyersur la touche
START/RESET (Marche/réinitialisation) pour
permettre aux commandes de se réinitialiser.
2
■ Articles autres que la vaisselle: ne lavez pas dans
le lave-vaisselle des articles comme des filtres
de purificateur d’air, des filtres de systèmes
de chauffage ou des pinceaux. Vous pourriez
endommager le lave-vaisselle et provoquer une
décoloration ou des taches dans l’appareil.
■ Une surveillance attentive est nécessaire lorsque
cet appareil est utilisé par ou près des enfants.
■ Placez les articles légers en plastique de manière
qu’ils ne se déplacent pas ou ne tombent pas au
fond de l’appareil—ils pourraient entrer en contact
avec l’élément chauffant, ce qui pourrait les
endommager.
Page 27

ww.electromenagersge.ca
w
AVERTISSEMENT! RISQUE DE SUFFOCATION POUR
UN ENFANT COINCÉ À L’INTÉRIEUR DE L’APPAREIL
ÉLIMINATION APPROPRIÉE DU LAVE-VAISSELLE
Les lave-vaisselle jetés ou abandonnés sont
dangereux… même si vous ne les laissez là «que
pour quelques jours». Si vous voulez jeter votre
vieux lave-vaisselle, veuillez suivre les directives
ci-dessous pour éviter les accidents.
Avant de jeter votre vieux lave-vaisselle :
■ Enlevez la porte de l’appareil ou enlevez
la gâche de la porte (comme indiqué dans
l’illustration).
Gâche de la porte
AVERTISSEMENT!
■ N’utilisez cet appareil que pour l’usage pour lequel
il a été conçu, comme expliqué dans le présent
manuel.
■ N’utilisez que des détergents en poudre, en liquide
ou en tablettes, ou des produits de rinçage
recommandéspour le lave-vaisselle et gardez-les
hors de portée des enfants. L’utilisation des
détergents pour lave-vaisselleautomatiques
Cascade
de rinçage Cascade Crystal Clear
dans tous les lave-vaisselle GE.
■ Placez les articlescoupants de manière à ce qu’ils
n’endommagent pas le joint d’étanchéité de la
porte.
■ Placez dans le panier à couverts les couteaux
tranchants le manche vers le haut afin de réduire
les risques de coupures.
■ Ne lavez-pas les articles en plastique, à moins qu’ils
portent la mention «Lavable au lave-vaisselle» ou
l’équivalent. Dans le cas des articles en plastique
qui ne portent pas cette mention, reportez-vous aux
recommandations du fabricant.
■ Ne touchez pas à l’élément chauffant pendant
ou immédiatement après le fonctionnement
de l’appareil.
MD
et CascadeMDComplete, et les produits
précautions de base, notamment les suivantes :
MD
est approuvée
Lors du fonctionnement de votre lave-vaisselle, prenez les
■ Ne faite pas fonctionner le lave-vaissellesi tous
les panneaux de la carrosserie n’ont pas été
correctement réinstallés.
■ Ne modifiez pas le fonctionnement des
commandes.
■ N’utilisez pas le lave-vaisselle de façon abusive,
et ne vous assoyez pas ou ne montez pas sur
la porte ou les paniers de l’appareil.
■ Ne laissez pas les enfants jouer à proximité du lavevaisselle lorsque vous ouvrez ou fermez la porte
afin d’éviter que leurs petits doigts se coincent dans
la porte.
■ Ne jetez pas un lave-vaisselle sans d’abord enlever
la porte ou la gâche de la porte de l’appareil.
■ N’entreposezpas ou n’utilisez pas de produits
combustibles, d’essence ou autres vapeurs
ou liquides inflammables à proximité de votre
lave-vaisselle ou de tout autre électroménager.
■ Ne laissez pas les enfants jouer avec le lavevaisselle, ou à l’intérieur de celui-ci ou de tout autre
électroménager mis aux rebuts.
Service à la clientèleDépannageFonctionnementConsigne de sécurité
VEUILLEZ LIREETSUIVREÀ LALETTRECES CONSIGNESDESÉCURITÉ.
CONSERVEZ CES DIRECTIVES
3
Page 28

Tableau de commande du lave-vaisselle.
Choisissez le tableau de commande qui correspond aux caractéristiques offertes sur votre lave-vaisselle.
1
53
4
2
Réglage des commandes
Voyants d’état
1
Les voyants d’état vous indiquent ce qui se passe pendant le fonctionnement du lave-vaisselle et peuvent clignoter
pour indiquer une défectuosité (reportez-vous à la page 8). Les voyantss’ALLUMENTpour indiquer à quelle étape
du programme de lavage se trouve le lave-vaisselle.
SENSING (Capteur) Ce voyant s’allume lorsque le capteur évaluela saleté et la température de l’eau.
(surcertains modèles) Lelave-vaisselle ajuste le programme choisi afin d’obtenir un rendement optimal.
SANITIZED Ce voyant s’allume lorsque le programme remplit les conditions de désinfection. Le voyant
(Hygiénique) demeure ALLUMÉjusqu’à ce que la porte soit ouverte.
CLEAN (Propre) Ce voyant s’allume lorsque le programme de lavage est terminé. Le voyant demeure ALLUMÉ
Fonctionnement Consigne de sécuritéService à la clientèle Dépannage
Affichage de la durée résiduelle (sur certains modèles)
2
Affiche le nombre de minutes qui restent avant la fin du programme. La durée résiduelle affichée peut être modifiée
lorsque le voyant Sensing (Capteur) s’allume. De plus, la durée affichée au début de chaque programme peut varier
par rapport à celle réglée à l’usine car l’appareil adapte les durées à vos habitudes d’utilisation. Lors d’une mise en
marche différée, l’écran affiche le nombre d’heures qui restent avant le début du programme.
Programmes
3
Le voyant au-dessus de la touche sélectionnée s’ALLUME pour indiquer le programme de lavage que vous avez choisi.
Le lave-vaisselle est doté d’un capteurde température et de saleté. La longueur et la durée du programme varient
en fonction du degré de saleté de la vaisselle et de la température de l’eau.
SANI WASH 28,4–33,1 litres (7,5–8,75 gal.), 50–135 min
(Lavage hygiénique)
NORMALWASH 19,7 litres (5,2 gal.), 60–90 min
(Lavage normal)
LIGHT WASH 28,4litres (7,5 gal.), 40–60 min
(Saleté légère)
(surcertains modèles)
pour vous rappeler que la vaisselle est propre jusqu’à ce que la porte soit reverrouillée ou qu’un
autre programme soit sélectionné.
Ce programme augmente la température de l’eau au rinçage final pour désinfecter votre
vaisselle. La longueur du programme varie selon la température de l’eau qui alimente
le lave-vaisselle.
REMARQUE : Le programme SANI WASH est surveillé pourrépondre aux exigences de
désinfection. Si le programme est interrompu pendant ou après le cycle de lavage principal,
ou si la température de l’eau qui alimente le lave-vaisselle est trop basse pour qu’un chauffage
adéquat de l’eau puisse être obtenu, il est possible que les conditions de désinfection ne soient
pas remplies. Dans un tel cas, le voyant Sanitized (Hygiénique) ne s’allume pas à la fin du
programme.
REMARQUE : Les lave-vaisselles résidentiels qui ont obtenu la certification NSF ne sontpas
conçus pour être utilisés dans des établissements alimentaires agréés.
Ce programme est conçu pour la vaisselle et les verres moyennement ou trèssales.
Ce programme est conçu pour laver la vaisselle et les verres de tous les jours.
RINSE ONLY 9,5 litres (2,5 gal.), 11 min
(Rinçage seulement)
REMARQUE : Seul le programme SANI WASH est conçu pour répondre aux exigences de la section6 de la norme
NSF 184 pour l’enlèvement de la saleté et l’efficacité de la désinfection.
Pour rincer des chargements partiels qui seront lavés plus tard. N’utilisez pas de détergent
avec ce programme.
4
Page 29

www.electromenagersge.ca
Options
4
Le voyant au-dessus de la touche choisie s’ALLUME pour indiquer l’option que vous avez choisie.
TEAM(Vapeur) Utilisez cette option lorsque la vaisselle est très sale ou que les aliments ont cuit ou séché sur
S
HEATED DRY Désactive l’option de séchage avec chaleur. La vaisselle sèche de façon naturelle et vous
(Séchageavecchaleur) économisez de l’énergie. Pouraccélérer le séchageà l’air, vous pouvez entrouvrir la porte
Voyant ÉTEINT lorsque le voyant CLEAN s’allume.
HEATED DRY Allume l’élément chauffant pour accélérer le séchage. Cette fonction allonge la durée
(Séchageavecchaleur) du programme de 8 à 38 minutes, selon le programme choisi. REMARQUE : Vous ne pouvez
Voyant ALLUMÉ pas sélectionner l’option HEATED DRY avec le programme RINSE ONLY.
VERROUILLÉ Vous pouvez verrouiller les commandes pour empêcher toute programmation. Vous pouvez
ADDED HEAT Lorsque cette option est choisie, le programme est allongé et l’élément chauffant s’allume
(Chaleur pour améliorer l’efficacité du lavage et du séchage. REMARQUE : Vous ne pouvez pas choisir
supplémentaire) cette option avec le programme RINSE ONLY.
a vaisselle. Il FAUTchoisir cette option AVANT de mettre en marche le lave-vaisselle. L’option
l
TEAMajoute 24 minutes à la durée du programme.
S
également verrouiller les commandes après avoir mis le lave-vaisselle en marche.
Lorsque cette option est sélectionnée, les enfants ne peuvent pas mettre accidentellement
le lave-vaisselle en marche en appuyant sur les touches.
Pour VERROUILLERles commandes du lave-vaisselle, appuyez pendant 3 secondes sur
la touche HEATED DRY. Le voyant sous la touche HEATED DRY s’allume. Pour DÉVERROUILLER
les commandesdu lave-vaisselle, appuyez pendant 3 secondes sur la touche HEATEDDRY.
Le voyant VERROUILLÉ s’éteint.
DELAY HOURS Vouspouvez retarder la mise en marche du lave-vaisselle pendant un maximum de 9 heures.
(Délai d’attente) Appuyez sur la touche DELAY HOURSpour choisir le nombre d’heures d’attente avant la mise
en marche du lave-vaisselle, puis appuyez une foissur la touche START/RESET. Le compte
à rebours s’amorce et le lave-vaisselle se met automatiquement en marche lorsque le délai
est écoulé. Appuyez une deuxièmefois sur la touche START/RESET pour annuler la
programmation de la mise en marche différée.
RESET (Réinitialisation) Pourmodifier un programme après que le lave-vaisselle se soit mis en marche, appuyez
sur la touche START/RESET pour annuler le programme. Le voyant START/RESET clignote
pendant la vidange de l’appareil, s’il y a lieu. Cela prend environ 90 secondes. Lorsque le voyant
cesse de clignoter, vouspouvezreprogrammer le lave-vaisselle et le remettreen marche.
Mise en marche
5
Fermez et verrouillez la porte du lave-vaisselle, puis choisissez le programme et les options désirés. Appuyez une fois
sur la touche START/RESET pour mettre le lave-vaisselle en marche. L’appareil se remplit d’eau et environ 60 secondes
plus tard, l’action de lavage débute. Si vous appuyez une deuxième fois sur la touche START/RESET, vous annulez
le programme et le lave-vaisselle se vidange. Cela prend environ 2 minutes.
REMARQUE : Le lave-vaisselle conserve en mémoire le dernier programme utilisé, de sorteque vous n’avez pas à le
programmer chaque fois. Lorsque la porte du lave-vaisselle est bien fermée, les voyants du tableau de commande
affichent les derniers réglages que vous avez sélectionnés.
Si vous ne voulez pas modifier les réglages, appuyez simplement sur la touche START/RESET pour mettre le lave-
vaisselle en marche.
Lorsque vous fermez la porte, les voyants s’éteignent si vous n’appuyez pas sur la touche START/RESET dans un délai
de 2 minutes. Pour allumer le tableau de commande, ouvrez et refermez la porte, ou appuyez sur une touche.
De plus, si une panne de courant se produit, le programme NORMAL WASH et l’option HEATED DRY sont
automatiquement programmés.
Service à la clientèleDépannageFonctionnementConsigne de sécurité
5
Page 30

Tableau de commande du lave-vaisselle.
Choisissez le tableau de commande qui correspond aux caractéristiques offertes sur votre lave-vaisselle.
1
2
4
3
Réglage des commandes
Voyants d’état
1
Les voyants d’état vous indiquent ce qui se passe pendant le fonctionnement du lave-vaisselle
et peuvent clignoter pour indiquer une défectuosité (reportez-vous à la page 8). Les voyants
s’ALLUMENT pour indiquer à quelle étape du programme de lavage se trouve le lave-vaisselle.
SANITIZED Ce voyant s’allume lorsque le programme remplit les conditions de désinfection.
(Hygiénique) Le voyant demeure ALLUMÉ jusqu’à ce que la porte soit ouverte.
(surcertains modèles)
CLEAN (Propre) Ce voyant s’allume lorsque le programme de lavage est terminé. Le voyant
(surcertains modèles)
Fonctionnement Consigne de sécuritéService à la clientèle Dépannage
Programmes
2
Le voyant au-dessus de la touche sélectionnée s’ALLUME pour indiquer le programme de lavage que vous
avez choisi.
SANI WASH 27,6 litres (7,3 gal.), 97 min.
(Lavage
hygiénique)
(surcertains modèles)
POTS & PANS 32,2 litres (8,5 gal.), 89 min
(Casseroles)
ou HEAVY
WASH (Saleté
importante)
NORMALWASH 21,2 litres (5,6 gal.), 56 min
(Lavage normal)
LIGHT WASH 23,0 litres (6,1 gal.), 36 min
(Saleté légère)
(surcertains modèles)
CHINA CRYSTAL 23,0 litres (6,1 gal.), 39 min
(Cristal et
porcelaine)
(surcertains modèles)
RINSE ONLY 4,5 litres (1,2 gal.), 6 min
(Rinçage seulement)
6
REMARQUE : Seul le Lavage hygiénique SANI WASH est conçu pour répondre aux exigences de la
section 6 de la norme NSF 184 pour l’enlèvement de la saleté et l’efficacité de la désinfection.
Le voyant demeure ALLUMÉ pour vous rappeler que la vaisselle est propre
jusqu’à ce que la porte soit ouverte ou qu’un autre programme soit sélectionné.
Ce programme augmente la température de l’eau au rinçage final pour
désinfecter votre vaisselle. La longueur du programme varie selon la
température de l’eau qui alimente le lave-vaisselle.
REMARQUE : Le programme SANI WASH est surveillé pour répondre aux
exigences de désinfection. Si le programme est interrompu pendant ou après le
cycle de lavage principal, ou si la température de l’eau qui alimente le lavevaisselle est trop basse pour qu’un chauffage adéquat de l’eau puisse être
obtenu, il est possible que les conditions de désinfection ne soient pas remplies.
Dans un tel cas, le voyant Sanitized ne s’allume pas à la fin du programme.
REMARQUE : Les lave-vaisselles résidentiels qui ont obtenu la certification NSF ne
sont pas conçus pour être utilisés dans des établissements alimentaires licenciés.
Ce programme est conçu pour la vaisselle ou les casseroles très sales,
sur lesquels des aliments sont séchés ou cuits. Vous pouvez laver en toute
sécurité la vaisselle de tous les jours à ce programme.
Ce programme est conçu pour la vaisselle et les verres moyennement
ou très sales.
Ce programme est conçu pour laver la vaisselle et les verres de tous les jours.
Ce programme est conçu pour les articles en cristal et en porcelaine légèrement
sales.
Pour rincer des chargements partiels qui seront lavés plus tard. N’utilisez
pas de détergent avec ce programme.
Page 31
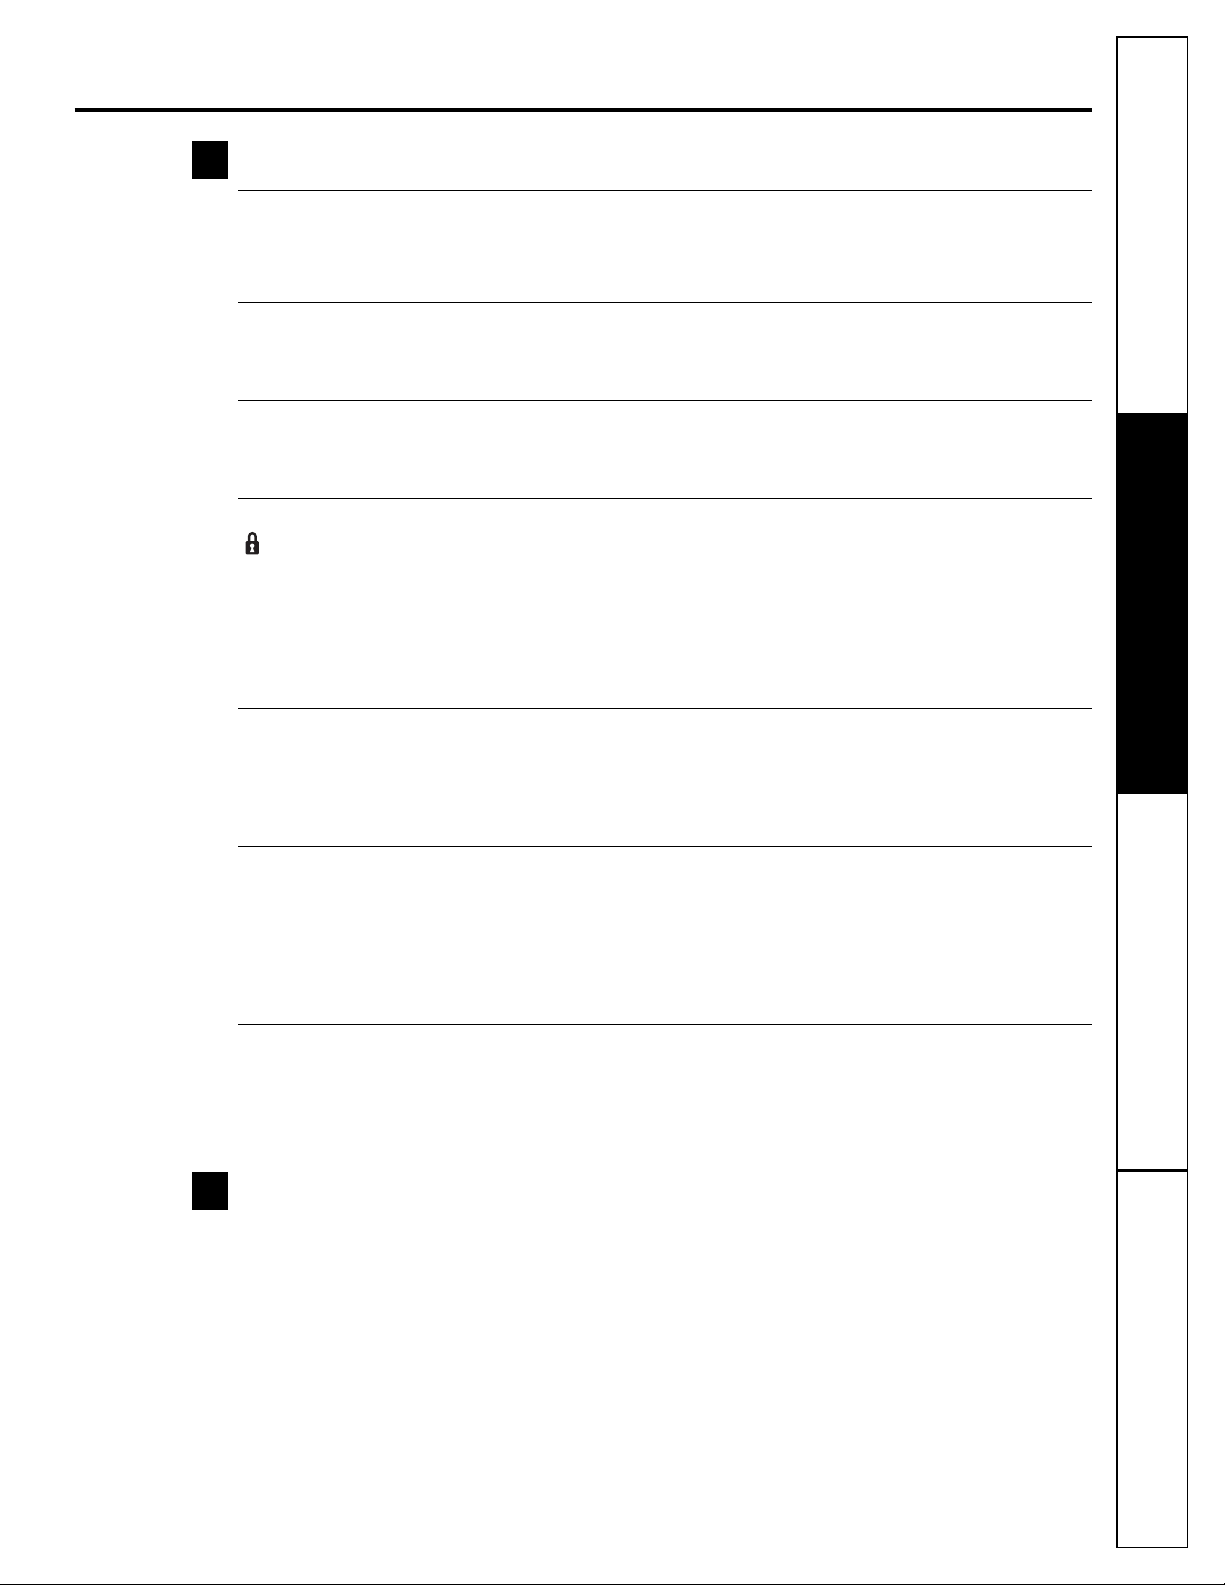
www.electromenagersge.ca
Options
3
Le voyant au-dessus de la touche choisie s’ALLUME pour indiquer l’OPTION que vous avez choisie.
HOT START/STEAM Utilisez ce programme lorsque la vaisselle est très sale ou que des aliments ont
(Lavage initial cuit ou séché sur la vaisselle. Il FAUT choisir cette option AVANT de mettre le lave-
à l’eau chaude/ vaisselle en marche. Cette option améliore l’efficacité du lavage et du séchage.
Vapeur) Elle ajoute 20 minutes à la durée du programme. REMARQUE : Vous ne pouvez
(sur certains modèles)
HEATED DRY Désactive l’option de séchage avec chaleur. La vaisselle sèche de façon naturelle
(Séchage avec et vous économisez de l’énergie. Pour accélérer le séchage à l’air, vous pouvez
chaleur) entrouvrir la porte lorsque le voyant CLEAN s’allume.
Voyant ÉTEINT
HEATED DRY Allume l’élément chauffant pour accélérer le séchage. Cette fonction allonge
(Séchage avec de 38 minutes la durée totale du programme.
chaleur) REMARQUE : Vous ne pouvez pas choisir cette option avec le programme
Voyant ALLUMÉ RINSE ONLY.
VERROUILLÉ Vous pouvez verrouiller les commandes pour empêcher toute programmation.
(sur certains modèles)
pas utiliser cette option avec le programme RINSE ONLY.
Vous pouvez également verrouiller les commandes après avoir mis le lave-vaisselle
en marche.
Lorsque cette option est sélectionnée, les enfants ne peuvent pas mettre
accidentellement le lave-vaisselle en marche en appuyant sur les touches.
Pour VERROUILLERles commandes du lave-vaisselle, appuyez pendant 3 secondes sur la
touche HEATED DRY. Le voyant sous la touche HEATED DRY s’allume. PourDÉVERROUILLER
les commandesdu lave-vaisselle, appuyez pendant 3 secondes sur la touche HEATEDDRY.
Le voyant VERROUILLÉ s’éteint.
HOT WASH/ Lorsque cette option est choisie, le programme est allongé et l’élément chauffant
ADDED HEAT s’allume pour améliorer l’efficacité du lavage et du séchage. Utilisez ce
(Lavage à l’eau programme lorsque la vaisselle est très sale ou que des aliments ont cuit
chaude/Chaleur ou séché sur la vaisselle. Il FAUT choisir cette option AVANT de mettre le lave-
supplémentaire) vaisselle en marche. REMARQUE : Vous ne pouvez pas utiliser cette option avec
le programme RINSE ONLY.
DELAY HOURS Vous pouvez retarder la mise en marche du lave-vaisselle pendant 2, 4 ou 8
(Délai d’attente) heures (les options du délai d’attente peuvent varier selon le modèle). Appuyez
sur la touche DELAY HOURS pour choisir le nombre d’heures d’attente avant
la mise en marche du lave-vaisselle, puis appuyez une fois sur la touche
START/RESET. Le compte à rebours s’amorce et le lave-vaisselle se met
automatiquement en marche lorsque le délai est écoulé. Appuyez une deuxième
fois sur la touche START/RESET pour annuler la programmation de la mise
en marche différée.
RESET Pour modifier un programme après que le lave-vaisselle se soit mis en marche,
(Réinitialisation) appuyez sur la touche START/RESET pour annuler le programme. Le voyant
START/RESET clignote pendant la vidange de l’appareil, s’il y a lieu. Cela prend
environ 90 secondes. Lorsque le voyant cesse de clignoter, vous pouvez
reprogrammer le lave-vaisselle et le remettre en marche.
Mise en marche
4
Fermez et verrouillez la porte du lave-vaisselle, puis choisissez le programme et les options désirés.
Appuyez une fois sur la touche START/RESET pour mettre le lave-vaisselle en marche. L’appareil
se remplit d’eau et environ 60 secondes plus tard, l’action de lavage débute. Si vous appuyez une
deuxième fois sur la touche START/RESET, vous annulez le programme et le lave-vaisselle se
vidange. Cela prend environ 2 minutes.
REMARQUE : Le lave-vaisselle conserve en mémoire le dernier programme utilisé, de sorte que
vous n’avez pas à le programmer chaque fois. Lorsque la porte du lave-vaisselle est bien fermée,
les voyants du tableau de commande affichent les derniers réglages que vous avez sélectionnés.
Si vous ne voulez pas modifier les réglages, appuyez simplement sur la touche START/RESET pour
mettre le lave-vaisselle en marche.
Lorsque vous fermez la porte, les voyants s’éteignent si vous n’appuyez pas sur la touche
START/RESET dans un délai de 2 minutes. Pour allumer le tableau de commande, ouvrez et refermez
la porte, ou appuyez sur une touche.
De plus, si une panne de courant se produit, le programme NORMAL WASH et l’option HEATED DRY
sont automatiquement programmés.
Service à la clientèleDépannageFonctionnementConsigne de sécurité
7
Page 32

Tableau de commande du lave-vaisselle.
Choisissez le tableau de commande qui correspond aux caractéristiques offertes sur votre lave-vaisselle.
1 6
453
2
Réglage des commandes
Voyants d’état
1
Les voyants d’état vous indiquent ce qui se passe pendantle fonctionnement du lave-vaisselleet peuvent clignoter
pour indiquer une défectuosité (reportez-vous à la page 6). Les voyants s’ALLUMENT pour indiquer à quelle étape
du programme de lavage se trouve le lave-vaisselle.
C
LOW DETERGENT Ce voyant s’allume lorsqu’il faut remplirle distributeur SmartDispense
(Bas niveau de lave-vaisselle automatique liquide ou en gel.
détergent)
(surcertains modèles)
C
SENSING (Capteur) Ce voyant s’allume lorsque le capteur ExtraClean
Le lave-vaisselle ajuste le programme choisi afin d’obtenir un rendement optimal.
Fonctionnement Consigne de sécuritéService à la clientèle Dépannage
8
WASHING(Lavage) Ce voyant s’allume au cours du lavage préliminaire et du lavage principal.
DRYING (Séchage) Ce voyant s’allume pendant le SÉCHAGE AVEC CHALEUR.
SANITIZED Ce voyant s’allume lorsque le programme remplit les conditions de désinfection. Le voyant
(Hygiénique) demeure ALLUMÉjusqu’à ce que la porte soit ouverte.
CLEAN (Propre) Ce voyant s’allume lorsque le programme de lavage est terminé.
Affichage de la durée résiduelle (sur certains modèles)
2
Affiche le nombre de minutes qui restent avant la fin du programme. La durée résiduelle affichée peut être modifiée
lorsque le voyant Sensing(Capteur) s’allume. De plus, la durée affichée au début de chaque programme peut varier
par rapport à celle réglée à l’usine car l’appareil adapte les durées à vos habitudes d’utilisation. Lors d’une mise en
marche différée, l’écran affiche le nombre d’heures qui restent avant le début du programme.
Programmes
3
Appuyez sur la touche correspondant au programmede lavagedésiré.
REMARQUE :
fournis dans la section quisuitsontapproximatifs. Lesrésultatsréels dépendent de plusieurs facteurs,
notamment de la températurede l’eau quialimentele lave-vaisselle, de la pression de l’eaude la résidence
et de la turbiditéde l’eau de lavage.
Le voyantau-dessus ou à côté de la touche sélectionnée s’ALLUMEpour indiquerle PROGRAMME
DE LAVAGEque vous avez choisi.
SANI WASH 28,4–33,1 litres (7,5–8,75 gal.), 50–135 min
(Lavage hygiénique)
POTS & PANS 33,1–37,9 litres (8,75–10 gal.), 75–140 min
(Casseroles)
NORMALWASH 19,7 litres (5,2 gal.), 60–90 min
(Lavage normal)
Tousles renseignementsconcernant les durées de programme et la consommation d’eau
Ce programme augmente la température de l’eau au rinçage final pour désinfecter votre
vaisselle. La longueur du programme varie selon la température de l’eau qui alimente
le lave-vaisselle.
REMARQUE : Le programme SANI WASH est surveillé pourrépondre aux exigences de
désinfection. Si le programme est interrompu pendant ou après le cycle de lavage principal,
ou si la température de l’eau qui alimente le lave-vaisselle est trop basse pour qu’un chauffage
adéquat de l’eau puisse être obtenu, il est possible que les conditions de désinfection ne soient
pas remplies. Dans un tel cas, le voyant Sanitized (Hygiénique) ne s’allume pas à la fin du
programme.
REMARQUE : Les lave-vaissellesrésidentiels qui ont obtenu la certification NSF ne sont pas
conçus pour être utilisés dans des établissements alimentaires agréés.
Ce programme est conçu pour la vaisselle ou les casseroles trèssales, sur lesquelles
desaliments sontséchés ou cuits. Il est possible quece programme ne puisse pas
déloger lesaliments brûlés. Vous pouvez laver en toute sécurité la vaisselle de tous
lesjoursà ce programme.
Ce programme est conçu pour la vaisselle et les verres moyennement ou trèssales.
M
évalue la saleté et la température de l’eau.
M
de détergent pour
Page 33

www.electromenagersge.ca
LIGHT WASH
(Saleté légère)
(surcertains modèles)
SPEED CYCLE 28,4 litres (7,5 gal.), 35–70 min
(Lavagerapide)
(sur certains modèles)
RINSE ONLY 9,5 litres (2,5 gal.), 10 min
(Rinçageseulement)
REMARQUE : Ce lave-vaisselle est doté d’un capteur CleanSensorMCqui contrôle automatiquement
la température; par conséquent, la longueur et la durée du programme peuvent varier selon la saleté
de la vaisselle et la température de l’eau.
REMARQUE : Seul le programme SANI WASH est conçu pour répondre aux exigences de la section 6
de la norme NSF 184 pour l’enlèvement de la saleté et l’efficacité de la désinfection.
Options
4
Le voyant au-dessus de la touche choisie s’ALLUME pour indiquer l’OPTION que vous avez choisie.
STEAM (Vapeur)
(sur certains modèles) la vaisselle. Il FAUT choisir cette option AVANT de mettre le lave-vaisselle en marche. L’option
HEATED DRY Lorsque l’option HEATED DRY n’est pas en fonction, la vaisselle sèche de façon
(Séchage avec naturelle à l’air.
chaleur) Voyant
ÉTEINT
28,4 litres (7,5 gal.), 40–60 min
Ce programme est conçu pour laver la vaisselle et les verres de tous les jours.
Ce programme est conçu pour laver la vaisselleet les verres de tous les jours.
Pour rincer les chargements partiels qui seront lavés plus tard. N’utilisez pas de
détergent avec ce programme.
Utilisez cette option lorsque la vaisselle est très sale ou que des aliments ont cuit ou séché sur
STEAM ajoute 24 minutes à la durée du programme.
HEATED DRY Allume l’élément chauffant pour accélérer le séchage. Cette fonction allonge
(Séchage avec la durée du programme de 8 à 38 minutes, selon le programme choisi.
chaleur) Voyant REMARQUE : Vous ne pouvez pas sélectionner l’option HEATED DRY avec le
ALLUMÉ programme RINSE ONLY.
VERROUILLÉ Vous pouvez verrouiller les commandes pour empêcher toute programmation.
Vous pouvez également verrouiller les commandes après avoir mis le lavevaisselle en marche.
Lorsque cette option est sélectionnée, les enfants ne peuvent pas mettre
accidentellement le lave-vaisselle en marche en appuyant sur les touches.
Pour DÉVERROUILLER les commandes du lave-vaisselle, appuyez pendant 3 secondes sur
la touche HEATED DRY. Le voyant au-dessus de la touche VERROUILLÉ s’éteint. Pour
VERROUILLER les commandes du lave-vaisselle, appuyez pendant 3 secondes sur la touche
HEATED DRY.Le voyant au-dessus de la touche VERROUILLÉ s’allume.
ADDED HEAT Lorsque cette option est choisie, le programme est allongé et l’élément chauffant
(Chaleur s’allume, ce qui peut allonger la durée des programmes pour améliorer
supplémentaire) l’efficacité du lavage et du séchage. REMARQUE : Vous ne pouvez pas utiliser
cette option avec le programme RINSE ONLY.
DELAY HOURS Vous pouvez retarder la mise en marche du lave-vaisselle pendant un maximum
(Délai d’attente) de 9 heures. Appuyez sur la touche DELAY HOURS pour choisir le nombre
d’heures d’attente avant la mise en marche du lave-vaisselle, puis appuyez
une fois sur la touche START/RESET. Le compte à rebours s’amorce et le lave-
vaisselle se met automatiquement en marche lorsque le délai est écoulé. Appuyez
une deuxième fois sur la touche START/RESET pour annuler la programmation
de la mise en marche différée. REMARQUE : Si vous oubliez de fermer la porte,
un signal sonore se fait entendre jusqu’à ce que vous fermiez correctement la porte.
Service à la clientèleDépannageFonctionnementConsigne de sécurité
RESET Pour modifier un programme après que le lave-vaisselle se soit mis en marche,
(Réinitialisation) appuyez sur la touche START/RESET pour annuler le programme. Le voyant
START/RESET clignote pendant la vidange de l’appareil, s’il y a lieu. Cela prend
environ 90 secondes. Lorsque le voyant cesse de clignoter, vous pouvez
reprogrammer le lave-vaisselle et le remettre en marche.
9
Page 34

Tableau de commande du lave-vaisselle.
Mise en marche
5
Fermez et verrouillez la porte du lave-vaisselle, puis choisissez le programme et les options désirés. Appuyez une fois sur la
touche START/RESETpour mettre le lave-vaisselle en marche. L’appareil se remplit d’eau et environ 60 secondes plus tard,
’action de lavage débute.
l
REMARQUE : Le lave-vaisselle conserve en mémoire le dernier programme utilisé, de sorteque vous n’avez pas à le
programmer chaque fois. Lorsque la porte du lave-vaisselle est bien fermée, les voyants du tableau de commande affichent
les derniers réglages que vous avez sélectionnés.
Si vous ne voulez pas modifier les réglages, appuyez simplement sur la touche START/RESET pour mettre le lave-vaisselle
en marche.
Lorsque vous fermez la porte, les voyants s’éteignent si vous n’appuyez pas sur la touche START/RESET dans un délai
de 2 minutes. Pour allumer le tableau de commande, ouvrez et refermez la porte, ou appuyez sur une touche.
De plus, si une panne de courant se produit, le programme NORMAL WASH et l’option HEATED DRY sont automatiquement
programmés. Effectuez de nouvelles sélections et appuyez ensuite sur la touche START/RESET pour mettre le lave-vaisselle
en marche.
Propre
6
Le voyant CLEAN s’allume et deux signaux sonores se font entendre lorsque le programme de lavage est terminé. Sur
certains modèles, le voyant CLEANs’éteint lorsque vous ouvrez la porte. Sur d’autres, le voyant CLEAN demeure allumé
jusqu’à ce que la porte soit ouverte et ensuite reverrouillée ou jusqu’à ce que vous appuyiez sur une touche pendant que
la porte est fermée et verrouillée.
Voyants clignotants.
Fonctionnement Consigne de sécuritéService à la clientèle Dépannage
Voyants d’état Signification
START/RESET Le programme a été interrompu parce que vous avez appuyé sur la touche START/RESET.
Le voyant cesse de clignoter lorsque le lave-vaisselle a automatiquement vidangé l’eau.
REMARQUE : Sur les modèles qui ne possèdent pas la touche START/RESET, les voyants qui sont
allumés clignoteront pendant la réinitialisation.
Utilisation du lave-vaisselle.
Vérification de la température de l’eau
L’eau qui alimente le lave-vaisselle doitêtre à une
température d’au moins 49 °C (120°F) et d’au plus 66 °C
(150 °F) pour que l’action de lavage soit efficace et pour
prévenirtout dommage à la vaisselle. Vérifiez la
température de l’eauavec un thermomètre à bonbons
ou à viande. Ouvrez le robinet d’eau chaude le plus près
du lave-vaisselle, placez le thermomètre dans un verre et
laissez l’eau couler continuellement dans le verre jusqu’à ce
que la température cesse d’augmenter.
10
Page 35

www.electromenagersge.ca
Utilisation d’un produit de rinçage comme Cascade
Crystal Clear
n produit de rinçage, comme celui de marque Cascade Crystal Clear
U
pellicule sur la vaisselle, les verres, les couverts, les ustensiles de cuisson et le plastique.
Remplissage du distributeur
Le distributeur de produit de rinçage contient 103,5 ml (3,5 oz) de produit de rinçage.
Dans des conditions normales de fonctionnement, cette quantité est suffisante pour
environ un mois. Essayez de maintenir le distributeur plein, sans le faire déborder.
Assurez-vous que la porte du lave-vaisselle est entièrement ouverte.
1
Tournez le bouchon du distributeur vers la gauche pour l’enlever.
2
Versez du produit de rinçage jusqu’à ce que l’indicateur de niveau soit plein.
3
Nettoyez le produit de rinçage renversé avec un linge humide.
4
Remettez en place le bouchon du distributeur.
5
Dosage du produit de rinçage
Vous pouvez régler la quantité de produit de rinçage versée au rinçage final. Le distributeur a été réglé à l’usine
au pointmilieu. Si vous constatez la présence de taches circulaires de calcium (eau dure) sur la vaisselle, placez le
distributeur à un réglage plus élevé. Si vous apercevez de la mousse dans le lave-vaisselle, placez le distributeur
à un réglage moins élevé.
Pour régler le dosage
Enlevez le bouchon du distributeur, puis tournez le dispositif de réglage dans le sens antihoraire pour augmenter
la quantité de produit de rinçage, et dans le sens horaire pourla diminuer.
MD
MD
nlève les taches et empêche la formation d’une
e
Indicateur
de niveau
du distributeur
Dispositif de réglage
du produit de rinçage
Bouchon
Préparation de la vaisselle avant le chargement
■ Il n’est pas nécessaire de rincer au préalable la vaisselle
normalement sale.
■ Enlevez les aliments durcis, y compris les os, les curedents,les pelures et les pépins.
■ Enlevez les grandes quantités d’aliments.
■ Enlevez les légumes en feuilles, les parures de viande
et les quantités excessives de graisse et d’huile.
■ Enlevez les aliments acides qui peuvent décolorer l’acier
inoxydable.
Service à la clientèleDépannageFonctionnementConsigne de sécurité
11
Page 36

Utilisation du lave-vaisselle.
Distributeur de détergent manuel
otre lave-vaisselle est doté d’un distributeur de détergent
V
manuel, et certains modèles possèdent en plus un
distributeur de détergent liquide automatique
(SmartDispense
de ces distributeurs, mais pas les deux en même temps.
Le couvercle de la section pour le lavage principal s’ouvre
pendant le cycle de lavage. Si vous utilisez le distributeur
SmartDispenseMC, laissez le couvercle du distributeur pour
le lavage principal ouvert avant de mettre le lave-vaisselle
en marche.
Vous pouvez utiliser dans le distributeur manuel du
Fonctionnement Consigne de sécuritéService à la clientèle Dépannage
détergent en poudre, en liquide, en gel ou en tablettes.
Il est important de conserver le détergent en poudre et
en tablettes dans un endroit frais et sec afin qu’il ne perde
pas de son efficacité. Par conséquent, ne versez pas de
détergent dans le distributeur manuel avant d’être prêt
à mettre l’appareil en marche.
Remplissagedudistributeurdedétergentmanuel
La quantité de détergent varie selon que votre eau est dure
ou douce. Si votre eau est dure, vous devez utiliser une
quantité supplémentaire de détergent. Si votre eau est
douce, vous avez besoin d’unequantité moins grande
de détergent.
Protégez votre vaisselle et votre lave-vaisselle en
communiquant avec votre service des eaux pour connaître
le degré de dureté de votreeau. Une eau présentant une
concentration de 12 grains ou plus est extrêmement dure.
Nous recommandons l’utilisation d’un adoucisseur d’eau,
sinon du calcaire peut s’accumuler à l’intérieur de
l’électrovanne, ce qui pourrait la bloquer en position ouverte
et provoquer une inondation. Une quantité excessive de
détergent dans une eau douce peut provoquer l’apparition
d’une pellicule blanchepermanente appelée attaque
chimique sur les verres.
Consultez le tableau ci-dessous pour déterminer la quantité
de détergent à verser dans le distributeur. Vous pouvez
utiliser du détergent en poudre, en liquide, en gel ou en
tablettes.
Lorsque vous utilisez des tablettes de détergent pour lavevaisselle automatique, déposez simplement une tablette
dans le distributeur et refermez le couvercle.
MC
). Vous pouvez utiliser l’un ou l’autre
Distributeur
SmartDispense
Distributeur de
détergent manuel
Nombre
de Grains
Moins de 4
Entre 4 et 8
MC
Entre 8 et 12
Plus de 12
Remplissez le godet du lavage principal
Godets à Remplir
Remplissez le godet jusqu’à la ligne
pour une eau douce (au 1/3)
Remplissez le godet jusqu’à la ligne
pour une eau moyennement douce
(aux 2/3)
Remplissez le godet jusqu’à la ligne
pour une eau moyennement dure
(complètement rempli)
et celui du lavage préliminaire
Lorsque la vaisselle est très sale, utilisez un peu plus de
détergent. Lorsque la température de l’eau est supérieure
à 60 °C (140 °F), utilisez un peu moins de détergent.
Eau moyennement
Eau douce
Lorsque la vaisselle est très sale, utilisez le programme Pots and Pansou
Heavy Wash.
douce
Eau moyennement
dure
Eau extrêmement
dure
N’UTILISEZ PAS DU DÉTERGENT LIQUIDE POUR
LE LAVAGE DE LA VAISSELLE À LA MAIN
REMARQUE : Si vous utilisez un détergent qui n’est pas conçu
pour les lave-vaisselle, il se formera de la mousse à l’intérieur
de l’appareil. Pendant le fonctionnement, cette mousse
sortira par les évents de l’appareil et s’écoulera sur le
plancher de cuisine.
Comme bon nombre de contenants de détergent se
ressemblent, rangez le détergent pour lave-vaisselle
à partde vos autres produits nettoyants. Montrez le bon
détergent à toute personne susceptible d’utiliser le
lave-vaisselle, ainsi que l’endroit où vous le gardez.
Même si l’utilisation d’un détergent non conçu pour les
lave-vaisselle ne risque pas de causer des dommages
permanents à votre appareil, votre vaisselle ne sera pas
aussi propre.
12
Page 37

www.electromenagersge.ca
Distributeur de détergent SmartDispense
otre lave-vaisselle est peut-être dotédu distributeur
V
de détergent SmartDispense
automatiquement du détergent liquide pour lavevaisselle automatique à chaque programme, en
fonction de la saleté de la vaisselle et de la dureté
de l’eau.
Pour pouvoir utiliser le distributeurde détergent
SmartDispenseMC, vous devez d’abord le remplir.
Même si vous pouvez utiliser n’importe quelle marque
de détergent pour lave-vaisselle automatique en
liquide ou en gel dans le distributeur SmartDispenseMC,
tous ces produits ne sont pas identiques. La plupart
des détergents pour lave-vaisselle automatique
contiennent du javellisant à base de chlore (comme
ceux de marque CascadeMD), tandis que d’autres sont
à base d’enzymes (comme ceux de marque Cascade
CompleteMD).
Ne mélangez pas du détergent pour lave-vaisselle
automatique à base de chlore avec du détergent
contenantdes enzymes car les détergents
pourraient figer et bloquer le distributeur
SmartDispenseMC. Vérifiezl’étiquette du contenant
pour déterminer si le détergent est à base de chlore
ou d’enzymes. Nous vous recommandons d’utiliser
le même type de détergent lorsque vous remplissez
à nouveau votre distributeur SmartDispenseMC.
MC
qui verse
ATTENTION! Il ne faut jamais
verserdans le distributeur du détergent en poudre,
en tablettes ou liquide ou tout autre détergent
normalement utilisé pour se laver les mains ou pour
laver la vaisselle à la main dans un évier. N’utilisez
que du détergent liquide ou en gel spécifiquement
conçu pour les lave-vaisselles automatiques.
uvrez la porte à un certain angle pour être à l’aise
O
pour remplir le distributeur.
Placez la bouteille de détergent vis-à-vis de l’ouverture
dans la porte et remplissez le distributeur.
Le distributeur peut contenir 1,18 litre (40 oz) de
détergent liquide pour lave-vaisselle(contenant
de format standard).
Lorsque le distributeur est plein, remettez en place le
capuchon et tournez-le dans le sens horaire jusqu’à
ce qu’ilsoit bien vissé pour empêcher l’eau d’entrer
dans le distributeur SmartDispense
détergent sur la porte, il disparaîtra lors du prochain
programme de lavage.
MC
(sur certains modèles)
MC
. S’il reste du
Remplissage du distributeur
Pour ouvrir le distributeur pour le remplir, appuyez
sur le capuchon bleu tout en le tournant dans le sens
antihoraire jusqu’à ce que le capuchon soit dévissé.
Enlevez-le.
Tournez dans le sens horaire jusqu’à ce qu’il soit bien vissé.
Un voyant s’allume pour vous indiquer que vous
devez remplir de nouveau le distributeur. Lorsque le
distributeur a été rempli, le voyant ne s’éteindra que
lorsque vous aurez fermé la porte.Lorsque le
distributeur est plein, cette quantité est suffisante
pour environ un mois dans des conditions d’utilisation
moyennes.
Ce voyant s’allume lorsqu’il faut remplir le distributeur.
REMARQUE : Si vous n’utilisez pas le distributeur
SmartDispenseMCet que vous désirez éteindre le
voyant LOWDETERGENT, appuyez 5 fois sur la
touche ADDED HEAT en moins de 3 secondes.
3 signaux sonores se font entendre, puis le voyant
s’éteint. Vous pouvez le rallumer en appuyant 5 fois
sur la touche ADDED HEAT en moins de 3 secondes.
13
Service à la clientèleDépannageFonctionnementConsigne de sécurité
Page 38

Utilisation du lave-vaisselle.
Étalonnage en fonction de la dureté de l’eau
du distributeur de détergent SmartDispense
vant de l’utiliser pour la première fois, il faut
A
étalonner le lave-vaisselle en fonction de la dureté
de l’eau. Veuillez suivre les directives ci-dessous pour
étalonner le lave-vaisselle en fonction de la dureté
de votre eau.
Évaluation de la dureté de votre eau
Dans le sac qui contenait les présentes directives,
vous trouverez une trousse de bande réactive pour
la dureté de l’eau. Veuillez lire les directives sur
l’emballage, retirez la bande réactive et suivez les
directives pour évaluer la dureté de votre eau du
robinet. Cette information vous permettra d’étalonner
votre lave-vaisselle afin qu’il distribue la quantité
optimale de détergent.
Indication de la bande réactive pour la dureté de l’eau
OUCE
D
Fonctionnement Consigne de sécuritéService à la clientèle Dépannage
DURE
Réglage des commandes au mode
d’étalonnage
Pendant que le lave-vaisselle est au mode d’attente
(le tableau de commande est allumé mais le lavevaisselle n’est pas en marche), accédez au mode
de réglage de la dureté de l’eau.
Étalonnage des commandes
Appuyez simultanément sur ces touchespendant 3 secondes.
1. Fermez et verrouillezla porte (le tableau de
2. Appuyez simultanément sur les touches SANI
ROUGE
0
1 ROUGE
2 ROUGES
3 ROUGES
4 ROUGES
Tableau de commande
commande s’allume, mais le lave-vaisselle n’est pas
en marche).
WASH et DELAY HOURSpendant 3 secondes.
L’écran affiche un chiffre entre 1 et 5. C’est la valeur
actuellement réglée pour la dureté de l’eau.
aleur à entrer sur
V
e lave-vaisselle
l
1
2
3
4
5
Écran d’affichage
MC
Tableau de commande
Appuyez sur la touche
NORMAL WASH pour
diminuer la valeur.
Appuyez sur la touche
SANI WASH pour
augmenter la valeur.
3. Appuyez sur la touche SANI WASHpour augmenter
la valeur, ou sur la touche NORMAL WASH pour la
diminuer. Entrez la valeur de la dureté de l’eau
(entre 1 et 5) correspondant au chiffre déterminé à
l’aide de la bande réactive et du tableau ci-contre.
4. Après avoir réglé la dureté de l’eau, appuyez sur
la touche START/RESET pour enregistrer le réglage
et ramener le lave-vaisselle au mode normal.
Vous devez réétalonner le distributeur si la dureté
de votre eau change, par exemple si vous installez
un adoucisseur d’eau sur votre conduite, ou si vous
l’enlevez.
Étalonnage des modèles sans écran
d’affichage à trois chiffres
1. Fermez et verrouillezla porte (le tableau de
commande s’allume, mais le lave-vaisselle n’est
pas en marche).
2. Appuyez simultanément sur les touches SANI
WASH et DELAY HOURSpendant 3 secondes.
3. Pour modifier le réglage, appuyez sur le touche
DELAY HOURSle nombre de fois correspondant
à la valeur de la dureté de l’eau. Pour confirmer
votre réglage, l’appareil fait entendre le même
nombre de signaux sonores que le nombre de fois
que vous avez appuyé sur la touche.
4. Si le nombre de signaux sonores ne correspond pas
à la valeur que vous désirez, appuyez de nouveau
sur la touche DELAY HOURSet entrez une nouvelle
valeur pour la dureté de l’eau.
5. Après avoir réglé la dureté de l’eau, appuyez sur
la touche START/RESET pour enregistrer le réglage
et ramener le lave-vaisselle au mode normal.
14
Page 39

Chargement des paniers du lave-vaisselle. w
ww.electromenagersge.ca
Pour un lavage optimal, veuillez suivre les lignes directrices ci-dessous pour le chargement des paniers. Les
caractéristiques et l’apparence des paniers et du panier à couverts peuvent être différentes de celles de votre modèle.
Panier supérieur
Même si le panier supérieur est avant tout conçu
pour les verres, les tasses et les soucoupes, vous
pouvez également y placer des casseroles pour
un lavage efficace. Idéalement, placez les tasses et
les verres sur les côtés. Vous pouvez également y
placer des articles en plastique lavables au lavevaisselle.
Le panier supérieur est réglable (sur certains
modèles) pour plus de souplesse lors du
chargement de votre lave-vaisselle. Pour l’abaisser,
appuyez sur les languettes et abaissez le panier.
Pour le relever, il suffit de relever le panier jusqu’à
ce qu’il revienne à sa positiond’origine.
Le support utilitaire (sur certains modèles) peut
être abaissé ou relevé pour plus de souplesse. Un
support à verres à vin (sur certains modèles) retient
en place les coupes pour une efficacité de lavage
optimale. Comme il existe une variété de formats
de verres à vin, après le chargement, poussez
lentement sur le support pour éviter que les verres
touchent à la voûte du lave-vaisselle.
Vous pouvez également placer dans le panier
supérieur toutes sortes d’ustensiles de formes
variées. Placez les casseroles, les bols à mélanger
et autres articles à l’envers.
Les tiges repliables (sur certains modèles)
procurent plus de souplesse pour les articles très
gros et encombrants.
Si possible, placez les gros articles en plastique
lavable au lave-vaisselle sur deuxtiges.
Assurez-vous de bien retenir en place les petits
articles en plastique afin d’éviter qu’ils tombent sur
l’élément chauffant.
Assurez-vous que les articles ne dépassent pas
sous le panier, empêchant ainsi le bras gicleur
intermédiaire de tourner. Cela pourrait affecter
l’efficacité du lavage des articlesqui se trouvent
dans le panier supérieur.
Assurez-vous qu’aucun
article n’empêche les bras
gicleurs de tourner.
Panier à couverts monopièce
(sur certains modèles)
Panier trois pièces
(sur certains modèles)
Pour enlever les paniers d’extrémité,
saisissez le panier par les coins
opposés et faites-le glisser pour
le dégager.
Panier inférieur
Le panier inférieur est conçu pour les assiettes, les
soucoupes et les casseroles. Placez les gros
articles, comme les lèchefrites et les grilles de
cuisson, le long du côté gauche. Placez les
assiettes, les casseroles et les bols sur les côtés,
dans les coins ou à l’arrière du panier. La surface
salie des articles doit toujours être orientée vers le
centre du panier. Au besoin, placez dans le panier
inférieur les tasses ou les verres surdimensionnés
pour maximiser la souplesse de chargement.
De plus, assurez-vous qu’aucune partie d’un
article, par exemple la poignée d’une casserole,
ne dépasse sous le panier inférieur. Cela pourrait
empêcher le bras gicleur de tourner et affecter
l’efficacité du lavage.
Panier à couverts
Lors du chargement des couverts, poussez
simplement sur la poignéeréglable d’un côté
ou de l’autre (sur certains modèles). Rangez les
couverts dans le panier en plaçant le manche des
couteaux et des fourchettes vers le haut pour
ne pas vous blesser les mains. Placez les cuillères
dans le panier le manche vers le bas. Mélangez
les couteaux, les fourchettes et les cuillères afin
qu’ils ne s’entassent pas les uns sur les autres.
Répartissez-les de façon uniforme. Placez les
petitsarticles en plastique, comme les cuillères
à mesurer et les couvercles de petits contenants,
dans le fond du panier à couverts et installez
le couvercle sur le dessus du panier.
Le panier à couverts monopièce (sur certains
modèles) peut être placé à l’avant, du côté
droit ou à l’arrière du panier inférieur.
Vous pouvez placer de différentes façons le panier
à couverts à trois sections (sur certains modèles)
dans votre lave-vaisselle. Le panier complet est
conçu pour s’installer du côté droit du panier
inférieur. De plus, chaque extrémité du panier est
amovible pour plus de souplesse lors du
Les tiges repliables (sur certains modèles)
procurent plus de souplesse pour les articles très
gros et encombrants. Ces tiges peuvent être
abaissées ou relevées afin de personnaliser le
panier inférieur.
Ne laissez aucun article
dépasser sous le panier
à couverts.Des articles
qui dépassent sous le
panierpeuvent
empêcher le bras gicleur
de tourner et atténuer
l’efficacité du lavage.
chargement des couverts et pour accroître la
capacité du panier inférieur.
Les couvercles des paniers d’extrémité et du
panier du milieu (sur certainsmodèles) peuvent
se fermer pour retenir en place de petits articles.
Les articles plus longs peuvent être placés sur le
support utilitaire dans
le panier supérieur.
Vous pouvez
placer dans le
panierutilitaire (sur
certains modèles) de
petits articles, comme des
biberons, des tétines, des
couvercles en plastique,
des fourchons à épis
de maïs, etc.
Service à la clientèleDépannageFonctionnementConsigne de sécurité
15
Page 40

Chargement de la vaisselle…
Suivez les lignes directrices ci-dessous pour charger les couverts de 10 personnes. Les caractéristiques
t l’apparence des paniers et du panier à couverts peuvent être différentes de celles de votre modèle.
e
:
Placez les couteaux, fourchettes et cuillères individuellement dans les fentes des couvercles du panier
à couverts.
Panier supérieur—10 couverts Panier inférieur—10 couverts
Suivez les lignes directrices ci-dessous pour charger les couverts de 12 personnes. Les caractéristiques
et l’apparence des paniers et du panier à couverts peuvent être différentes de celles de votre modèle.
REMARQUE : Placez les couteaux, fourchettes et cuillères individuellement dans les fentes des couvercles du panier
à couverts.
EMARQUE
R
Fonctionnement Consigne de sécuritéService à la clientèle Dépannage
Panier supérieur—12 couverts Panier inférieur—12 couverts
Accessoires facultatifs.
Vous pouvez modifier l’apparence de votre
lave-vaisselle en installant un panneau décoratif
personnalisé.
Ensemble de moulures pour panneau de bois—
Cet ensemble comprend les moulures et les
directives pour l’installation d’un panneau de porte
décoratif en bois (non fourni) de 6,3 mm (1/4 po)
d’épaisseur :
■ GPF525B (Noir)
■ GPF525W (Blanc)
■ GPF525C (Bisque)
Ensemble pour panneau de bois sans
moulures—Cet ensemble comprend les pièces
et les directives pour l’installation d’un panneau
de porte décoratif en bois (non fourni) de 19,0 mm
(3/4 po) d’épaisseur :
■ GPF575
Ensemble de supports pour comptoirs non
fabriqués en bois—Cet ensemble est conçu pour
l’installation d’un lave-vaisselle sous un comptoir
non fabriqué en bois. Il comprend des supports
latéraux et des directives pour l’installation du
lave-vaisselle.
■ GPF65
Vous pouvez vous procurer ces accessoires
moyennant des frais supplémentaires auprès
de GE. Appel 800.626.2002 à la commande.
Les cartes de crédit Visa, MasterCard ou Discover
sont acceptées.
Veuillez préciser le numéro de l’accessoire lors
de votre commande.
16
Page 41

Entretien du lave-vaisselle. w
Nettoyage du panneau de la porte
Avant de nettoyer le panneau avant de la porte,
vérifiez de quel type de panneau il s’agit. Vérifiez les
deux dernières lettresde votre numéro de modèle.
ous trouverez le numéro de votre modèle sur la
V
paroi gauche de la cuve, tout juste à l’intérieur de la
porte. Si votrenuméro de modèle se termine par les
lettres BB, CC, WW, SA ou BG, votreappareil est doté
d’un panneau de porte peint. Si votre numéro de
modèlese termine par les lettres SS, votre appareil
est doté d’un panneau de porte en acier inoxydable.
Si votre numéro de modèle se termine par les lettres
CS, votre appareil est alors doté d’un panneau de
porte CleanSteel.
Veuillezsuivre les directives ci-dessous pour nettoyer
le panneau de porte de votre modèle.
Panneau de porte peint (numéro de modèle
se terminant par BB-noir, CC-bisque, WW-blanc,
SA-argent métallique, ou BG-noir graphite).
Utilisez un chiffon doux et propre légèrement
humide, puis séchez. Vous pouvez également utiliser
une cire ou un poli pour électroménagers.
Panneau de porte en acier inoxydable (numéro
de modèle se terminant par SS)
Vous pouvez nettoyer les panneaux en acier
inoxydable avec un chiffon doux et propre et un
produit nettoyant comme Stainless Steel Magic
ou tout autre produit similaire. N’utilisezpas sur
les portes en acier inoxydable une cire pour
électroménagers, un poli, un javellisant ou un produit
contenant du chlore.
Vous pouvez commander le produit nettoyant
Stainless Steel Magic n° WX10X15 au service des
Piècesde GE au numéro 1.800.626.2002.
Panneau de porte CleanSteel (numéro de modèle
se terminant par CS)
Utilisez un chiffon doux et propre légèrement
humide, puis séchez. N’utilisez pas sur les
panneaux de porte CleanSteel une cire pour
électroménagers, un poli, ou un nettoyant à base
de produits chimiques.
N’essuyez pas la porte du lave-vaisselle avec un
chiffon ou un linge à vaisselle mouillé ou sale car
ils peuvent laisser des résidus. N’utilisez jamais de
tampons à récurer ou des nettoyants en poudre
car ils peuvent égratigner le fini.
ww.electromenagersge.ca
Nettoyage du tableau de commande
Pour nettoyer le tableau de commande, utilisez
un chiffon légèrement humide, puis asséchez-le.
Protection contre le gel
Si vous laissez votre lave-vaisselledans un endroit
non chauffé pendant l’hiver, demandez à un
technicien d’effectuer les tâches qui suivent :
Couperl’alimentation électrique du lave-
1
vaisselle. Enleverles fusibles ou déclencher les
disjoncteurs.
Couperl’alimentation en eau et débrancher
2
la conduite d’alimentation en eau de
l’électrovanne.
Vidanger l’eau de la conduite d’alimentation
3
et de l’électrovanne (utiliser un récipient pour
recueillir l’eau).
Rebrancher la conduite d’alimentation en eau
4
à l’électrovanne de l’appareil.
Votre lave-vaisselle est-il doté d’une coupure anti-refoulement?
Une coupure anti-refoulement protège votre lavevaisselle contre les refoulements d’eau lors d’un
blocage du renvoi. Ce dispositif ne fait pas partie du
lave-vaisselle. Il n’est pas couvert par votre garantie.
Puisque tous les codes de plomberie n’exigent pas
de coupures anti-refoulement, il est possible que
vous n’ayez pas un tel dispositif.
Ilest facilede nettoyerla coupure anti-refoulement.
Arrêtez le lave-vaisselle et enlevez le couvercle
1
chromé.
Enlevez le capuchon en plastique et nettoyez-le
2
à l’aide d’un cure-dents.
Coupure antirefoulement
Service à la clientèleDépannageFonctionnementConsigne de sécurité
Vérifiez la coupure anti-refoulement
dès que votre lave-vaisselle ne se
videpas bien.
17
Page 42

Avant d’appeler un réparateur…
Conseils de dépannage
Gagnez du temps et économisez de l’argent! Consultez les tableaux des
pages qui suivent ou visitez notre site Web www.electromenagersge.ca.
Vous pourriez vous éviter d’appeler un réparateur.
Messages d’erreur Causes possibles Correctifs
Le voyant d’état Vous avez appuyé sur la touche • Appuyez une seule fois sur la touche START/RESETpour mettre en marche lave-
START/RESET (mise en START/RESET pendant que le lave- vaisselle. Appuyez une deuxième fois sur la toucheSTART/RESET pendant que
marche/remise à zéro) vaisselle est en marche. Cela le lave-vaisselle est en marche pour annuler le programme.
clignote annule le programme.Le voyant
Le lave-vaisselle fait Ce signal vousrappelle que vous • Fermez et verrouillez la porte après l’avoir ouverte pendant le fonctionnement
entendre un signal avez ouvert la porte du lave-vaisselle de l’appareil.
sonore(BIP) toutes pendant le fonctionnement. Le signal
les 30 secondes se fera entendre jusqu’àce que vous
Fonctionnement Consigne de sécuritéService à la clientèle Dépannage
Un signal sonore se fait Ce phénomène est normal. Le • Pour annuler ce double signal sonore (ou pour le remettreen fonction si vous l’aviez
entendre à la fin du lave-vaisselle fait entendre deux précédemment annulé), appuyez 5 fois sur la touche HEATED DRY en moins
programme signauxsonores à la fin du de 3 secondes. Troissignaux sonoresse feront entendre pour indiquerque vous avez
Le voyant LOW Il reste dans le distributeur de • Remplissez le réservoir du distributeur SmartDispense
DETERGENT est ALLUMÉ détergent SmartDispense
cessera de clignoter après la
idange du lave-vaisselle (environ
v
90 secondes)
L’alimentationélectrique au lave- • Le voyant cesserade clignoter après la vidange du lave-vaisselle. Un nouveau
vaissellea été coupée pendant programme débutera automatiquement.
qu’il fonctionnait, et l’alimentation
électrique vientd’être rétablie. Le
voyantclignote pour indiquer que
le lave-vaisselle vidange l’eau qui
peut se trouver à l’intérieur
fermiez la porte
programme annulé ou remis en fonction l’option du signal sonore à la fin du programme.
MC
M
C
détergent pour moinsde fermerez la porte. Si vous n’utilisez pas le distributeurSmartDispense
10 programmesde lavage pouvez éteindre le voyantLOW DETERGENTen appuyant 5 fois sur la touche
du Lorsque le réservoir seraplein,le voyant LOWDETERGENT s’éteindra quandvous
ADDED HEAT en moins de 3 secondes.
avec du détergent liquide.
M
C
, vous
Problème Causes possibles Correctifs
La vaisselle et les Latempérature de l’eauesttropbasse • Assurez-vous que la température de l’eau qui alimente le lave-vaisselle est correcte
couverts ne sont pas (reportez-vous à la page 10). Ouvrez le robinet d’eau chaude situé le plus près du
propres lave-vaisselle, puis laissez couler l’eau jusqu’àce que la température cessede
Faiblepression d’eau temporaire • Ouvrez un robinet. Le débit d’eauest-il plus faible que d’habitude? Si tel est le cas,
Coupure anti-refoulementou broyeur • Nettoyez la coupure anti-refoulement ou rincezle broyeur à déchets.
à déchets obstrués
Chargement incorrect des paniers • Assurez-vous que les articles de grande dimension ne bloquent pas le distributeur de
Aucune coupure anti-refoulement • Vérifiez si vousavez une coupureanti-refoulement ou un boyau de vidange surélevé.
ou boyau de vidange surélevé Reportez-vous aux directives d’installation.
Taches et pellicule sur • Utilisez le produit de rinçage Cascade Crystal Clear
les verres et les couverts taches et prévenir la formationd’une pellicule.
Eau extrêmement dure
Basse température de l’eau
Surchargedu lave-vaisselle
Chargement incorrect
Détergent en poudre «trop vieux»
ou humide
Distributeur de produitde rinçage
vide
Quantité de détergent insuffisante
grimper. Mettez ensuite le lave-vaisselle en marche et fermez le robinet. Vous
aurez ainsi la certitude que l’eau qui alimente le lave-vaisselleest chaude.
attendez que la pression revienneà la normale avant d’utiliser votre lave-vaisselle.
détergentou les brasgicleurs. Reportez-vous à la section Chargement des paniers
du lave-vaisselle.
MD
pour fairedisparaîtreles
• Assurez-vous que la température de l’eau atteint au moins 49 °C (120 °F).
• Placez la vaisselle dans l’appareil de la façon indiquée à la section Chargement des
paniers du lave-vaisselle.
• Utilisez du détergent«frais».
• Si l’eau est extrêmement dure, il peut être nécessaire d’installerun adoucisseur d’eau.
18
Page 43

www.electromenagersge.ca
roblème Causes possibles Correctifs
P
Pellicule blanchâtre sur Utilisation d’une trop grande quantité • Ce phénomène permanent est appelé attaque chimique. Pour l’éviter, utilisez moins
les verres de détergentdans une eau douce de détergent si votre eau est douce. Choisissez le programme le plus court pour
aver vos verres. Ré-étalonnez le distributeur SmartDispense
l
MC
i vous l’utilisez
s
(reportez-vous à la page 14). N’utilisez pas le distributeur de détergent manuel en
même temps que le distributeur SmartDispenseMC.
La température de l’eau qui alimente • Cela pourraitêtre une attaquechimique.Abaissez la température du chauffe-eau.
le lave-vaisselle est supérieureà 66 °C
(150 °F)
Mousse dans la cuve Utilisation d’undétergent non • Pour éviter la formation de mousse, n’utilisez qu’un détergent conçu pour les lave-
approprié vaisselleautomatiques. L’utilisationdes détergents pourlave-vaisselleCascade
MD
est approuvée dans tous les lave-vaisselles GE.
• Pour faire disparaître la mousse dans la cuve, ouvrez la porte du lave-vaisselle
let laissez a mousse s’évaporer. Fermez et verrouillez la porte du lave-vaisselle.
Vidangez l’eau du lave-vaisselle en appuyant une fois sur la touche START/RESET,
puis 10 secondes plus tard, appuyez de nouveau sur la toucheSTART/RESET.
Répétez au besoin.
Renversementde produit de rinçage • Essuyezimmédiatement le produit de rinçage renversé.
Vous avez mis du détergent dans • Utilisez le distributeurSmartDispense
le distributeur de détergent manuel et mais pas les deuxen mêmetemps.
utilisez le distributeur SmartDispense
MC
MC
ou le distributeur de détergent manuel,
Il reste du détergentdans Des articles empêchent l’eau • Replacez les articles dans l’appareil afin que l’eau du bras gicleur inférieur puisse
les distributeurs d’atteindre le distributeurde détergent atteindre le distributeurde détergent ou l’orifice de sortie du distributeur
ou l’orifice de sortiedu distributeur SmartDispense
SmartDispense
MC
vaisselle.
Présence d’eau Vous n’avez pas vissé le capuchon • À l’aide d’une poire à jus,enlevez le plus d’eau possibledans le distributeur
dans le distributeur après avoirrempli le distributeur SmartDispense
SmartDispense
M
C
le capuchon pour empêcher l’eaud’entrer dans le distributeur.
MC
. Reportez-vous à la section Chargement des paniers du lave-
MC
, puis remplissez-le de détergent. Assurez-vous de bien serrer
Marques noires ou Frottement d’ustensilesen aluminium • Faites disparaître ces marques à l’aide d’un produit nettoyant abrasif doux.
grisâtressur la vaisselle sur la vaisselle
La vaisselle ne sèchepas Basse température de l’eau • Assurez-vous que la température de l’eau qui alimente le lave-vaisselle atteint au
moins 49 °C (120 °F).
• Sélectionnez l’option HEATEDDRY.
• Sélectionnez les options HOT START, HOTWASH ou ADDED HEAT.
• Sélectionnez un programme dont l’action de lavage est pluspuissante, comme
SANI WASHou POTS & PANS.
Le robinetd’eau chaude est peut-être • Assurez-vous que le robinet d’eau chaude (habituellementsitué sousl’évier) est
fermé ouvert.
Le panneaude Le verrou de la porte n’est pas • Assurez-vous que la porte soitbien fermée.
commande a réagi bien placé
aux entrées, mais le
lave-vaisselle ne s’est
jamais rempli d’eau
Taches à l’intérieurde la Certains aliments à base de • Pour atténuer la formation de taches, réglez le programmeRINSE ONLY après avoir
cuve tomate peuventcauserdes taches placéla vaisselle dans l’appareil. GE recommande l’utilisation du produit Cascade
Le robinetd’eau est peut-être • Assurez-vous que le robinet d’eau (normalement sous l’évier) soit
fermé ouvert.
MD
rougeâtres Plastic Booster pour faire disparaître ce type de taches.
Tachesde thé ou de café • Faites disparaître ces taches à la main à l’aide d’unesolution contenant une
1/2 tasse de javellisantet 3 tasses d’eau chaude.
AVERTISSEMENT
Avant de nettoyerl’intérieur de l’appareil, attendez au moins 20 minutes après
la fin d’un programme de lavage pour permettre à l’élémentchauffantde refroidir.
Sinon, vous risquez de vous brûler.
La présence d’unepellicule jaune • Le seulmoyen de corriger ce problème consiste à installer un filtre spécialsur la
ou brunâtre peut être causée par conduite d’eau. Veuillez communiquer avec un fournisseurd’adoucisseursd’eau.
des dépôtsde fer dansl’eau
Pelliculeblanchâtre sur les surfaces • GE recommande l’utilisation du produitde rinçage Cascade Crystal Clear
internes – dépôts de minéraux pour empêcher la formationde dépôts de minéraux causés par l’eau dure.
causés par l’eau dure
• Faites fonctionner le lave-vaisselle en y versant de l’acide citrique pour enlever les
dépôts de minéraux. Vous pouvez acheter ce produit au service des pièces de GE
(n° de pièce WD35X151). Pourobtenir les renseignements pour commander,
reportez-vous à la dernière page.
MD
Service à la clientèleDépannageFonctionnementConsigne de sécurité
19
Page 44

Avant d’appeler le service de réparations…
Problème Causes possibles Correctifs
Le lave-vaisselle Unfusible est grillé ou • Remplacez le fusible ou réenclenchez le disjoncteur. Débranchez tous les autres
ne fonctionne pas le disjoncteur est déclenché électroménagers du circuit.
L’alimentationélectrique est coupée • Dans certaines installations, l’alimentationélectrique du lave-vaisselleest
Les commandessont verrouillées • Déverrouillez les commandes. Reportez-vous à la page 5, 7 ou 9.
Réinitialisez le tableau de • Coupez l’alimentation électriquedu lave-vaisselle (en déclenchant le disjoncteur
commande ou en actionnant l’interrupteur mural, le cas échéant) pendant 30 secondes,
Les voyants du tableau Délai trop long entreles choix des • Vous avezun délai de 30 secondes pour appuyer sur chaque touche. Pourallumer
de commande s’éteignent touches à nouveau le tableau de commande, appuyez sur une touche ou déverrouillez,
lorsque vous réglez les puis verrouillez la porte.
commandes
Il reste de l’eau propreau Ce phénomène est normal • Une petite quantité d’eau propre reste au fond du lave-vaisselle, vers l’arrière
fond de la cuve de la cuve, afin de garder le joint lubrifié.
Il reste de l’eau au fond Lerenvoi est bloqué • Si vous avez une coupure anti-refoulement, nettoyez-la.Reportez-vous à la page 17.
de la cuve
Vapeur Ceci est normal • De la vapeur s’échappe de l’évent pendant le lavage, le séchage et la vidange
Le voyant SANITIZED ne Vous avez ouvertla porteet le • Il ne faut pas interrompre le programme pendantou après le cyclede lavage
Fonctionnement Consigne de sécuritéService à la clientèle Dépannage
s’allumepas à la fin du programme a été interrompu pendant principal.
programme(programme lou après le cycle de lavage principal
SANI WASHseulement)
Bruit Bruits de fonctionnement normaux • Tous ces bruits sontnormaux. Aucun correctif n’est requis.
La température de l’eau qui alimente • Augmentezle réglage du chauffe-eau pourque la température de l’eauvarie entre
le lave-vaisselle est tropbasse 49 °C (120 °F) et 60 °C (140 °F).
Ouverturedu distributeur de détergent
Entréede l’eau dans le lave-vaisselle
Arrêt et mise en marche du moteur
à différents moments pendant le
programme
Bruit de la pompe pendant la vidange
de l’eau
Bruit causé par la vaissellelorsque • Assurez-vous que les articles sont bien placés dansles paniers. Reportez-vous
le bras gicleur tourne à la section Chargement des paniersdu lave-vaisselle.
commandée par un interrupteur mural, souventplacé à côté de l’interrupteur
du broyeurà déchets.Assurez-vous que l’interrupteur est à ON (Marche).
puis rétablissezl’alimentation électrique.
• Si l’eau du lave-vaisselle se vide dans un broyeurà déchets, faites fonctionner
le broyeurpour le dégager.
• Vérifiez si l’évier de votre cuisine se vide correctement. S’il ne se vide pas, vous
aurez peut-êtrebesoin d’un plombier.
de l’eau. Elle est nécessaire pour le séchage.
20
Page 45

Garantie GE sur les lave-vaisselle.
Toutes les réparations sous garantie seront effectuées par
nos centres de réparation ou nos réparateurs autorisés.
Appelez le 1.800.561.3344. Veuillez fournir le numéro
de série et le numéro de modèle lorsque vous appelez
Agrafez le reçu d’achat ici.
Pour obtenir le service sous
garantie, vous devrez fournir
a preuve de l’achat original.
l
pour obtenir le service.
Pour une période de : GE remplacera :
Un an Toute pièce du lave-vaisselle qui se casse à cause d’un vice de matériau ou de main-d’oeuvre.
à partir de la date Au cours de cette année de garantie limitée, GE fournira, gratuitement, toute la main-d’oeuvre
d’achat initial et le service à la maison nécessaires pour remplacer la pièce défectueuse.
Cinq ans Les paniers et le module de contrôle électronique du lave-vaisselle s’ils ne fonctionnent plus
(seulement les numéros à cause d’un vice de matériau ou de main-d’oeuvre. Au cours de ces cinq ans de garantie
de modèle GE Profile de limitée,vous serezresponsable de tous frais de main-d’oeuvre ou de service à la maison.
la sériePDW7000) à partir
de la date d’achat initial.
Toute la vie du produit La cuve en acier inoxydable ou la doublure de porte, si elles ne peuvent plus arrêter l’eau
(seulement les numéros à cause d’un vice de matériau ou de main-d’oeuvre. Au cours de cette garantie limitée, GE
de modèle GE Profile de fournira également, gratuitement, toute la main-d’oeuvre et le service à la maison nécessaires
la sériePDW7000) pour remplacer la piècedéfectueuse.
Ce qui n’est pas couvert :
■ Tout déplacement de service chez vous pour vous
apprendre à utiliser votre lave-vaisselle.
■ Toute mauvaise installation.
Si vous avez un problème d’installation, appelez
votre revendeur ou un installateur. Vous êtes
responsable de fournir une bonne alimentation
électrique, un bon échappement et tout autre
branchement nécessaire.
■ Toute panne du produit s’il a été malmené, mal usé
ou utilisé à une autre fin que celle prévue ou utilisé
commercialement.
■ Tout remplacement des fusibles de la maison ou tout
rebranchement des disjoncteurs.
■ Tout dommage occasionné par un accident, un incendie,
une inondation ou un acte de Dieu.
■ Tout dommage subi après la livraison.
■ Le service s’il est impossible d’avoir accès au produit
pour ce faire.
EXCLUSION DE GARANTIES IMPLICITES – Votre seul et unique recours est la réparation du produit selon
les dispositions de cette Garantie limitée. Toutes les garanties implicites, incluant les garanties de
commercialité et d’adéquation à un usage spécifique, sont limitées à une année ou à la période la plus
courte autorisée par la législation.
Cette garantie est valable pourle premier propriétaire et tout autre propriétaire du produit s’ilacheté au Canada pour utilisation
domestique au Canada. Le serviceà domicile sousgarantie serafourni là où il est disponible et dansles régions que Mabeconsidère
quel’offrede service est raisonnable.
LE GARANT N’EST PAS RESPONSABLE DES DOMMAGES CONSÉCUTIFS.
Garant : MABE CANADA INC.
21
Service à la clientèleDépannageFonctionnementConsigne de sécurité
Page 46

Soutien au consommateur.
Site Web appareils électroménagers GE
Vous avez une question ou vous avez besoin d’aide pour votre appareil électroménager? Contactez-nous par
Internet au site www.electromenagersge.ca24 heures par jour, tous les jours de l’année.
www.electromenagersge.ca
Service de réparations 1.800.561.3344
Service de réparations GE est tout près de vous.
Pour faire réparer votre électroménager GE, il suffit de nous téléphoner.
Studio de conception réaliste
Sur demande, GE peut fournir une brochuresur l’aménagement d’une cuisine pour les personnes
à mobilité réduite.
Écrivez: Directeur, Relations avec les consommateurs, Mabe Canada Inc.
Bureau 310, 1 Factory Lane
Moncton, N.B. E1C 9M3
Prolongation de garantie www.electromenagersge.ca
Achetez un contrat d’entretien GEavant que votre garantie n’expire et bénéficiezd’un rabais substantiel. Ainsi
le service après-vente GE sera toujours là aprèsexpiration de la garantie.
Visitez notresiteWeb ou appelez-nous au 1.888.261.2133
Pièces et accessoires
Ceux qui désirent réparer eux-mêmes leurs électroménagers peuventrecevoirpièces et accessoires directement à
la maison (cartes VISA, MasterCard et Discover acceptées).
Les directives stipulées dansle présentmanuel peuvent être effectuées par n’importe quel utilisateur. Les autres
réparations doivent généralement être effectuées par un technicien qualifié. Soyez prudent, car une réparation
inadéquate peut affecter le fonctionnement sécuritaire de l’appareil.
Les consommateurs au Canada peuvent commander des pièces et des accessoires en ligne au site
www.electromenagersge.ca, 24 heures sur 24 et tous les jours, ou par téléphone au 1.800.661.1616 pendant
les heures de bureau.
Contactez-nous
Si vous n’êtes pas satisfait du service après-vente dont vous avez bénéficié :
Premièrement, communiquez avec les gens qui ont réparé votre appareil.
Ensuite, si vous n’êtes toujours pas satisfait envoyez tous les détails–numéro de téléphone compris–au
Directeur, Relations avec les consommateurs, Mabe Canada Inc.
Bureau 310, 1 Factory Lane
Moncton, N.B. E1C 9M3
Inscrivez votre appareil électroménager www.electromenagersge.ca
Inscrivez votreappareil électroménager en direct, aussitôt que possible. Cela améliorera nos communications
et notre service après-vente. Vous pouvez également nous envoyer par la poste le formulaire d’inscription joint à
votre documentation.
22
Page 47

Notes.
23
Service à la clientèleDépannageFonctionnementConsigne de sécurité
Page 48

Notes.
Fonctionnement Consigne de sécuritéService à la clientèle Dépannage
24
Imprimé aux États-Unis
Imprimé sur du papier recyclé
 Loading...