

Page 1
Built-inElectricOven
Safetyinstructions,.,..................3.4
OperatingInstructions,lips
Aluminum Foil....... ...........................4. 12417
Automatic OvenShut Off .. ...........................9
Features... .........................................O....•.....OO..5
Oven..... ....................................................6.l 8
BaKng..... .............................................l O.l3
Broiling,BroilingGuide.... ................l 7, 18
ClockandTimers.. ..................................6l 7
ControlPanel
.,.. ...........8.10. 12, 13, 15,17,20,21
Fan
Light BulbReplacement ...................8. 23
Lower Oven Controls. ..............................l O
Preheating...... ............................................l O
Roasting,RoastingGuide ...... .........15. 16
Shelves.... ...............................................9. 10
Timed Baking....... ..............................12, 13
Vent ... ............................................................9
Power Outage.....i ................<<...................@mo..<7
Self-CleaningInstructions.... ..............l 9-22
.... .........<..... .............................
6
Problem Soiver...............................26
Thermostat Adjustment-
DoIt Yourself.... .
More questions?...call ~
,. .....................................14
GEAnswarCenter”800.626,2000
CareandCleaning.,..................22-25
BroilerPanand Rack...
Lift-OffOven Door
PorcelainOven interior..,..... .......................25
Self-CleaningInstructions. .................19-22
Shelves ..............................................O..........23
... .............................
.... ....................................
23
24
Consumer Services...................27
Appliance Registration.. ................................2
Important PhoneNumbers.... ....................27
Model and Serial Number Location..... ......2
Removalof PackagingTape ... .....................2
Warranty
.,.. ....................................BackCover
GEAppliances
Models: JKP13 JKP27
JKP14 JRP14
JKP15 JRP15
JKP26 JRP24
164D2966P122
Page 2
HELPUSHELPYOU...
Beforeusingyouroven,read this
guidecarefully.
It is intendedto helpyouoper~teandmaintainyour
newovenproperly.
Keepit handyfor answersto yourquestions.
Ifyoudon’tunderstandsomethingorneedmorehelp,call:
GE Answer Center”
800.626.2000
24hours a day,7 daysa week
Howto RemovePackagingTape
Toassureno damageis donetothefinishof the
product,thesafestwayto removeadhesiveleftfrom
packagingtapeonnewappliancesis an applicationof
a householdliquid dishwashingdetergent,mineraloil
orcookingoil.ApplywithQ softclothandallowto
soak.Wipedryandthenapplyan appliancepolishto
thoroughlycleanandprotect
NOTE: Theplastictapemustberemovedfromthe
chrometrimon ovenparts,Itcannotbe removedif it
isbakedon.
thesurface.
Writedownthe modeland
serialnumbers.
You’llfindthemona labelon the frontof the
ovenbehindtheovendoor.
Thesenumbersarealsoon theConsumerProduct
OwnershipRegistrationCardthatcamewithyour
oven.Beforesendinginthiscard,pleasewritethese
numbershere:
ModelNumber
SerialNumber
Usethesenumbersin anycorrespondenceor service
callsconcerningyouroven.
Savetimeand money.
Beforeyourequestservice...
ChecktheProblemSolverin thebackofthisguide.It
listscausesof minoroperatingproblemsthatyoucan
correctyourself.
IFYOUNEEDSERVICE...
Toobtainservice,seetheConsumprServicespagein
thebackof this guide,
We’reproudofour serviceandwpntyoutobe
pleased.Iffor somereasonyouwe nothappywiththe
serviceyoureceive,herearethreestepsto followfor
furtherhelp.
FIRST,contactthepeoplewhqservicedyour
appliance.Explainwhyyouare not pleased.In most
cases,thiswillsolvetheprable~,
NEXT,ifyouare stillnotpleased,writeallthe
details-including your phonenumber—to:
Manager,ConsumerRelations
GEAppliances
AppliancePark
Louisville,KY40225
FINALLY,ifyourproblem,isstillnotresolved,write:
MajorApplianceConsumerActionPanel
20NorthWackerDrive
Chicago,IL 60606
Page 3
mORTAN’T SAFETYWSTRUCTIONS
Readallhtmctiombeforewingthisapp~mw.
APORTANTSAFETYNOTICE
*TheCaliforniaSafeDrinkingWaterandToxic
Enforcement
Act requirestheGovernorof
Californiatopublishalistofsubstancesknownto
thestatetocausebirthdefectsorotherreproductive
harm,andrequiresbusinessestowarncustomersof
potentialexposuretosuchsubstances.
● Thefiberglassinsulationin seE-cleaning
ovensgivesoffa verysmaiiamountof@rbon
monoxideduringthe cieaningcycle.Exposure
canbeminimizedbyventingwithanopen
windoworusinga ventilationfanorhood.
Whenusingelectricalappliances,basicsafety
precautionsshouldbefollowed,includingthe
following:
● Usethis applianceonlyfor ik intendeduse
asdescribedinthisguide.
● Have the instaiiershowyouthe locationofthe
circuit
● Besureyour appliance is properly installed and
breakerorfuse.Markitforeasyreference.
ground~ byaqualifiedtechnicianinaccordance
withtheprovidedInstallationInstructions.
● Do not attempt torepair or replaceanypart of
yourovenunlessit is specific~y recommended
in thisguide.Allotherservicingshouldbe
referredto aqualifiedtechnician.
● Beforeperformingany service,DISCONNECT
THEOVENPOWERSUPPLYATTHE
HOUSEHOLDDISTRIBUTIONPANELBY
REMOVINGTHEFUSEORSWITCHINGOFF
THECIRCUITBREAKER.
● Donot leavechildrenalone--Childrenshould
notbeleftaloneorunattendedinanareawhere
applianceisinuse.Theyshouldneverbeallowed
tositor standonanypartoftheappliance.
● Donot allow anyone to climb, stand orhang on
the door.Theycoulddamagetheovenorcause
severepersonalinjury.
● CAUTION:ITEMSOFINTERESTTO
CHILDRENSHOULDNOTBESTOREDIN
CABINETSABOVEANOVEN.CHILDREN
CL~BING ONTHEOVENTO REACH
ITEMSCOULDBESERIOUSLYINJUMD.
not store flammablematerialsin an oven.
4Do
*Teachchddrennot toplaywiththe
controls
oranyotherpartoftheoven.
Always keep combustible wall coverings?
c
curtains or drapes a safe distance from your
oven.
● Never wear loose-fitting or hanging garments
while using the appfiance.
Becarefulwhen
reachingforitemsstoredincabinetsoverthe
oven,Flammablematerialcouldbeignitedif
broughtincontactwithhotheatingelementsand
maycausesevereburns,
“DONOTSTOREOR USECOMBUSTIBLE
MATERIALS,GASOLINEOR OTHER
FLAMMABLEVAPORSANDLIQU~S IN
THEVICINITYOF THISOR ANYOTHER
APPLIANCE.
● Useonlydry potholders—-Moist
ordamppotholdersonhotsurfaces
mayresultinburnsfromsteam.Do
notletpotholderstouchhotheatingelements.
Donotuseatowelorotherbulkycloth.Such
clothscancatchfireonahotheatingelement.
● Alwayskeep dish towels, dish cloths, pot
holders and other linens a safe distance from
your oven.
● Always keep wooden and plastic utensils
and canned food a safe distance away from
your oven.
● For your safety, never use your appliance for
warming or heating the room.
● Do not let cooking grease or other
flammable materials accumulate in
or near the oven.
● Besure the oven is securely installed in a
mbinet that is firmly attached to the house
structure,
Neverallowanyonetoclimb,sit,
standorhangontheovendoor.
● Donot use water on grease ~lres.
Smotherfireorflameoruseamultipurposedrychemicalorfoam-type
fireextinguisher.
Flameintheovencanbesmotheredcompletely
byclosingtheovendoorandturningtheoven
offorbyusinga multi-purposedrychemicalor
foam-typefireextinguisher.
(continuednexrpage)
3
Page 4
IMPORTANTSAFETYINSTRUCTIONS
(continued)
● Donot touchthe heatingelementsor the
interiorsurfaceofthe oven.Thesesurfacesmay
behotenoughtoburneventhoughtheyaredark
incolor.Duringandafteruse,donottouch,orlet
clothingorotherflammablematerialscontactany
interiorareaoftheoven;allowsufficienttimefor
coolingfirst.
Potentiallyhotsurfacesincludetheovenvent
openingsandsurfacesneartheopenings,crevices
aroundtheovendoor,theedgesofthedoor
windowandmetaltrimpartsabovethedaor,
Remember: Theinsidesurfaceoftheovenmay
behotwhenthedooris opened,
● When cooking pork, followthedirections
exactlyandalwayscooktherntatto aninternal
temperatureofatleast170°F.Thisassuresthat,in
theremotepossibilitythattrichinamaybepresent
inthemeat,itwillbekilledandthemeatwillbe
safetoeat.
Oven
● Stand away from the oven when opening the
oven door.
causeburnstohands,faceand/oreyes.
Hotairorsteamwhichescapescan
● Do not use your oven to dry newspapers.
Ifoverheated,theycancatchfire.
● Donot leavepaper products,cooking
utensils,or foodin the ovenwhennot inuse.
*Donotuse oven for storage area. Items
storedin anovencanignite,
● After broiling, always take the broiler pan
out of the oven and clean it.
Leftovergrease
inthebroilerpancancatchfirenexttimeyouuse
thepan.
● Never leavejars or cans of fat drippings on or
near your oven.
Self-CleaningOven
*Donotcleanthe oven door gasket. Thedoor
gasketisessentialforagoodseal.Careshouldbe
takennottorub,damageormovethegasket,
● Do not use oven cleaners, No commercial
ovencleanerorovenlinerprotectivecoating
ofanykindshouldbe usedinoraroundanypart
oftheoven.Residuefromovencleanerswill
damagetheinsideoftheovenwhentheself-cle~
cycleisused.
● Donot heat unopened food containers.
Pressurecouldbuildupandthecontain~r
couldburst,causingariinjury,
● Keep the oven vent duct unobstructed,
● Keep the oven free from
grease buildup.
● Place the ovensheIf in the desired position
while the oven is cool,
Iftheshelvesmustbe
handledwhenhot,donotletthepotholder
contacttheheatingelementsintheoven.
● Never leave the ovendoor open whenyouare
notwatchingtheoven.
● Pullingout theshelfto the shelf stopisa
convenience in Iifting heavy foods. Itisalsoa
precautionagainstburnsfromtouchingthehot
surfacesofthedoorortheovenwalls.
● When using cooking or roasting bags in
the oven,
followthemanufacturer’sdirections,
● Clean only parts listed in this Use and
Care Guide.
● Before self-cleaning the oven,removethebroiler
panandothercookware.
● Donot use aluminum foil to line oven bottoms,
except as suggested in guide.
Improper
installationofaluminumfoilmayresultina
riskofelectricshockorfire.
● Besure to wipe up excess spillage before
starting the self-cleaning operation.
● If theself-cleaningmodemalfunctions,turnthe
ovenoffanddisconnectthepowersupply.Haveit
servicedbyaqualifiedtechnician.
SAVETHESE
~STRUCTIONS
4
Page 5
Q?
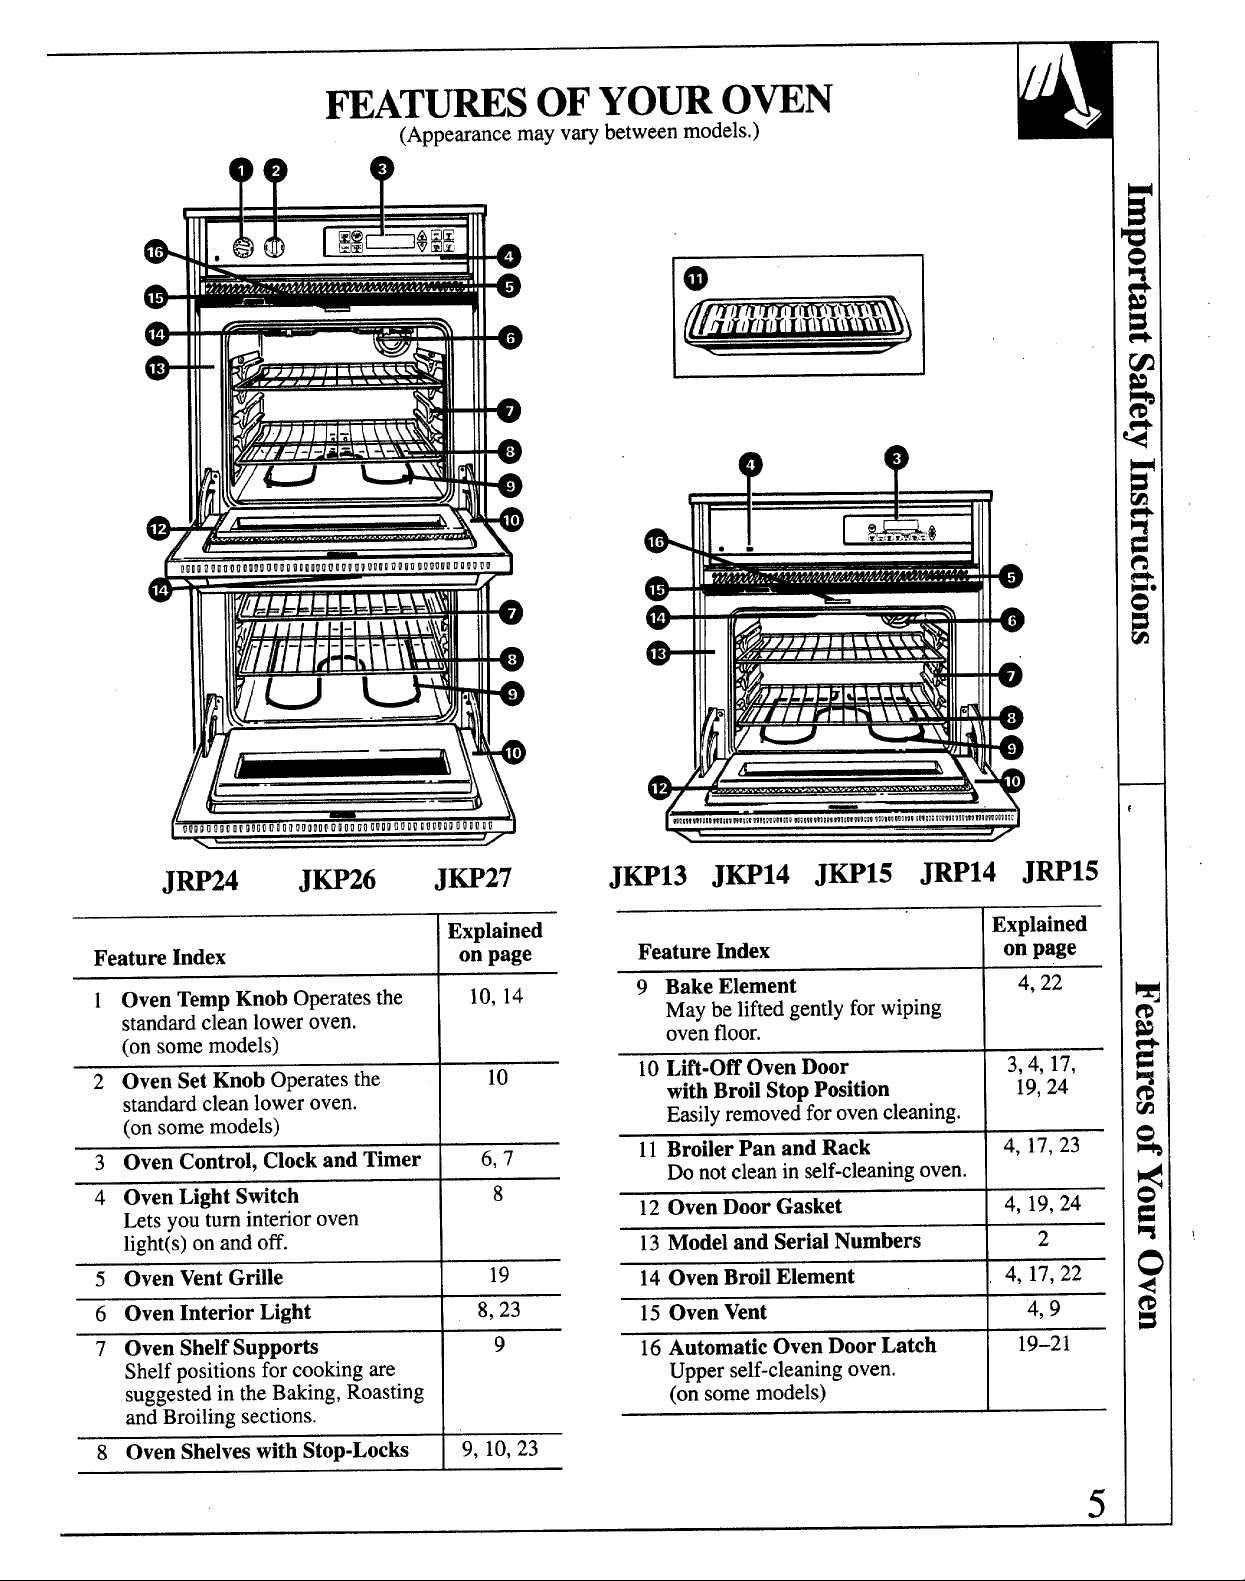
FEATURESOFYOUROVEN
(Appearancemayvarybetweenmodels.)
H
m
m
r’
—
IIf
JRP24
Feature Index
1 Oven Temp Knob
standardcleanloweroven.
(onsomemodels)
2 Oven SetKnob Operatesthe
standardcleanloweroven.
(onsomemodels)
3 Oven Control, Clockand Timer
4 Oven Light Switch
Letsyouturninterioroven
light(s)on and off.
5 Oven VentGrille
6 Oven Interior Light
7 Oven ShelfSuppo~
Shelfpositionsforcookingare
suggestedin theBaking,Roasting
andBroilingsections.
JKP26
Operatesthe
JKP27
Explained
on page
10,
10
6,7
8
19
8,23
9
14
I
JKP13 JKP14 JKP15 JRP14 JRP15
Explained
Feature Index
9 Bake Element
Maybe liftedgentlyfor wiping
ovenfloor.
10 Lift-Off OvenDoor
with BroilStop Position
Easilyremovedforovencleaning.
11Broiler Pan and Rack
Donotcleanin self-cleaningoven.
12 Oven Door Gasket
13Modeland SerialNumbers
14Oven BroilElement
15
Oven Vent
16Automatic OvenDoor Latch
Upperself-cleaningoven,
(onsomemodels)
on page
4,22
3,4, 17,
19,24
4, 17,23
4, 19,24
2
17,22
4,
4,9
19-21
8 Oven Shelveswith Stop-Locks
9,10,23
5
Page 6
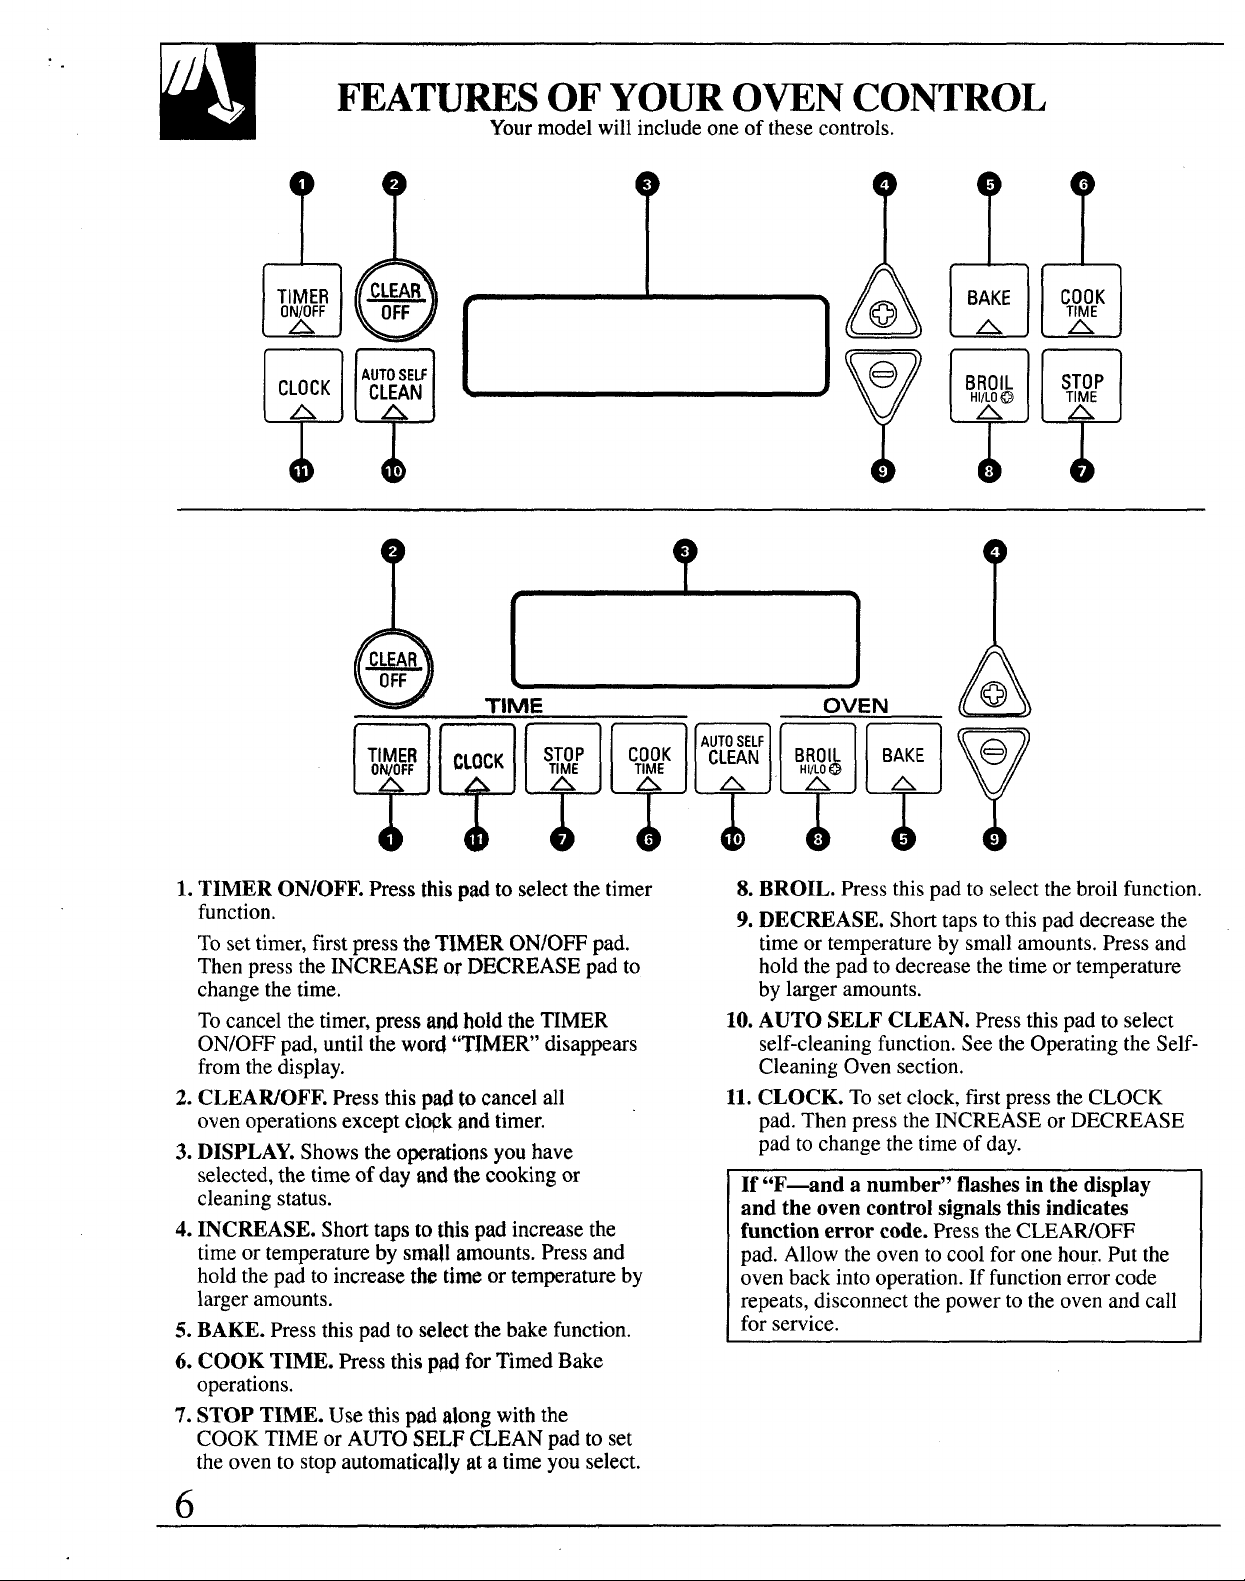
FEATURESOFYOUROVENCONTROL
Yourmodelwillincludeoneof thesecontrols,
Q
1.TIMER ON/OFF.Pressthispadto select the timer
function.
Tosettimer,firstpresstheTIMERON/OFFpad.
Thenpressthe INCREASEor DECREASEpadto
changethetime.
Tocancelthetimer,pressandholdtheTIMER
ON/OFFpad,untiltheword“TIMER’disappears
fromthedisplay.
2.CLEAR/OFF.Pressthispadto cancelall
ovenoperationsexcept cl~k pndtimer.
3. DISPLAY.Showstheo~rations youhave
selected,thetimeof dayandthecookingor
cleaningstatus.
4. INCREASE.Shorttapsto thispadincreasethe
timeor temperaturebysmallamounts.Pressand
holdthepadto increasethetimeor temperatureby
largeramounts.
5. BAKE. Pressthispadto selectthebakefunction.
6. COOK TIME. PressthispadforTimedBake
operations.
7. STOP TIME. Usethispad alongwiththe
COOKTIMEor AUTOSELFCLEANpad to set
theovento stopautomaticallyata timeyouselect.
8.BROIL. Pressthispadto selectthebroilfunction.
9. DECREASE. Shorttapsto this pad decreasethe
timeor temperatureby smallamounts.Pressand
holdthepadto decreasethetimeor temperature
by largeramounts.
10.AUTO SELF CLEAN.Pressthispadto select
self-cleaningfunction.SeetheOperatingtheSelfCleaningOvensection.
11. CLOCK. Tosetclock,firstpresstheCLOCK
pad.ThenpresstheINCREASEor DECREASE
padto changethe timeofday.
If “F-and a number”flashesinthedis~lay
-- .
andtheovencontrolsignalsthisindicat;s functionerrorcode.PresstheCLEAR/OFF
pad.Allowtheovento coolfor onehour.Putthe
ovenbackintooperation.If functionerrorcode
repeats,disconnectthepowertotheovenandcall
for service.
Page 7
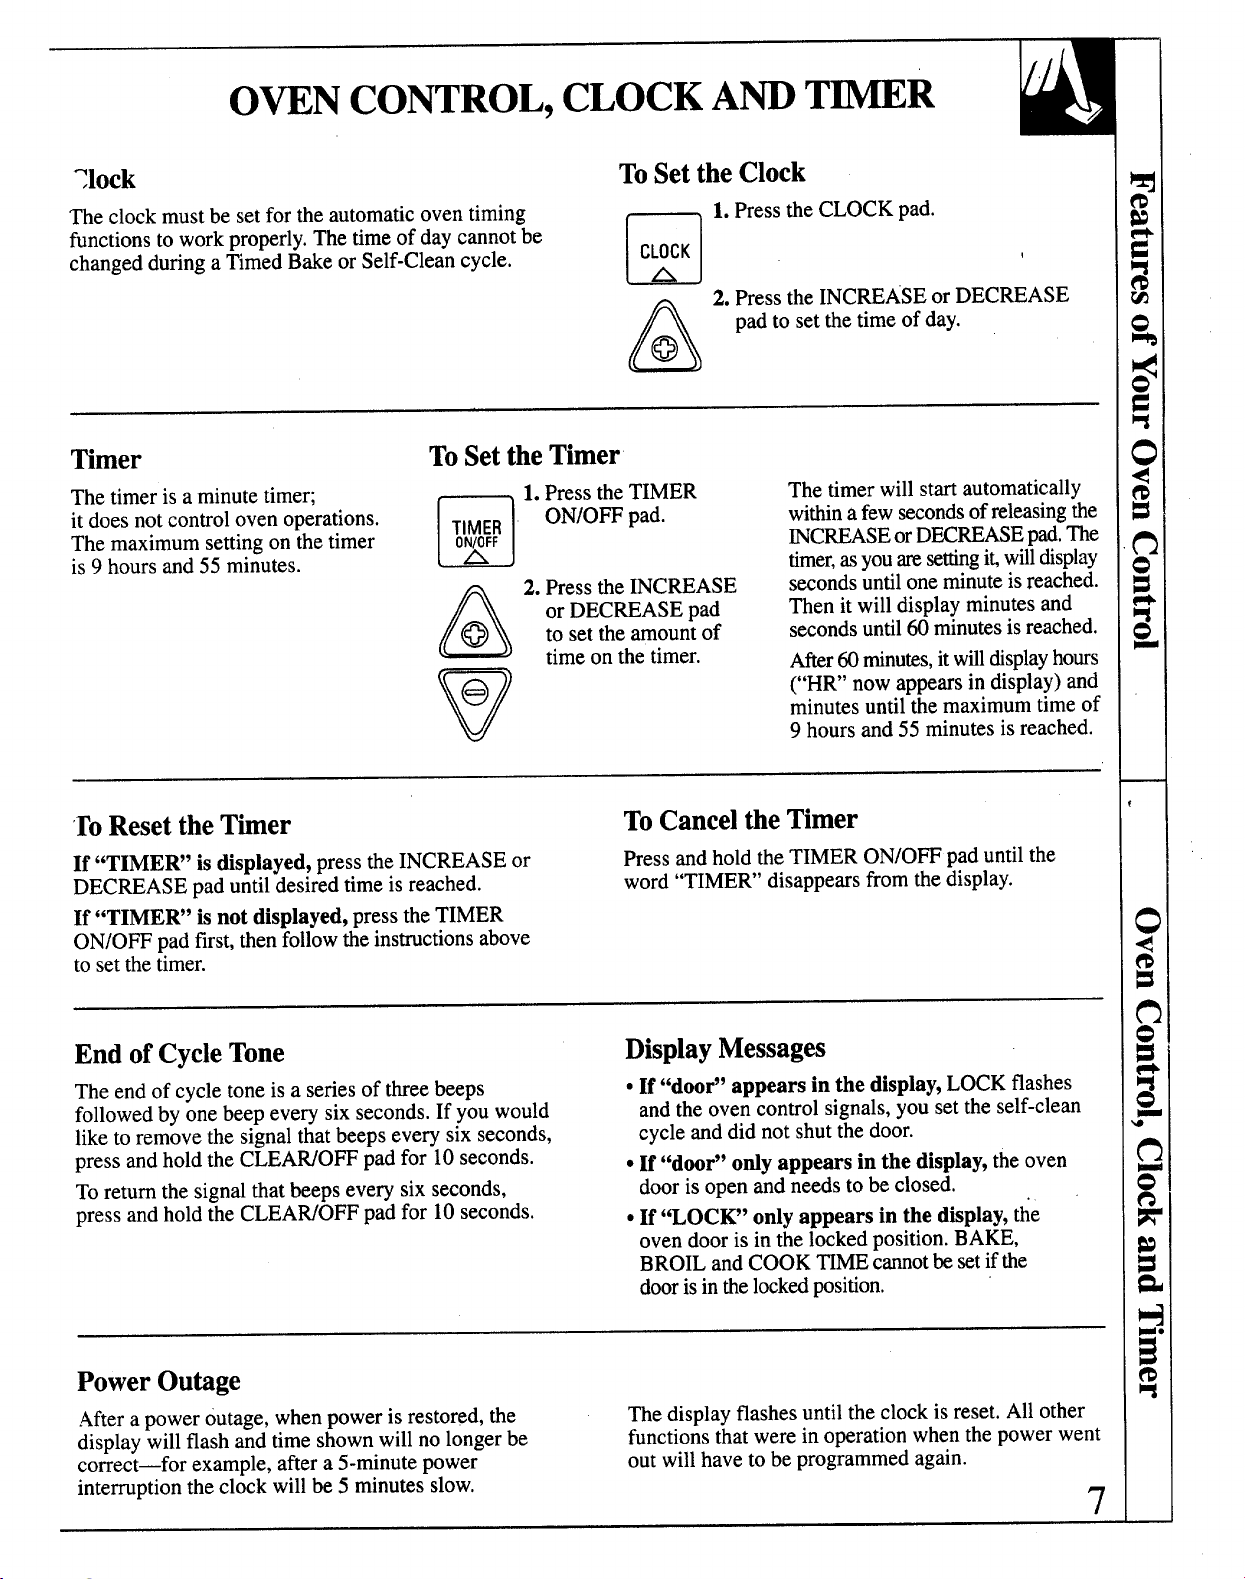
OVENCONTROL,CLOCKANDTIMER
:lock
Theclockmustbesetfortheautomaticoventiming
functionstoworkproperly,Thetimeof daycannotbe
changedduringa TimedBakeor Self-Cleancycle.
Timer
Thetimeris aminutetimer;
it doesnotcontrolovenoperations.
Themaximumsettingonthetimer
is 9 hoursand55minutes.
ToSettheTimer
1.PresstheTIMER
;~vlAE~
A
c1
2. PresstheINCREASE
@
A
@
v
ToSetthe Clock
CLOCK
A
c1
@
A
ON/OPFpad.
or DECREASEpad
to settheamountof
timeon the timer.
1.PresstheCLOCKpad.
!
2. PresstheINCREASEor DECREASE
padto setthetimeofday.
Thetimerwillstartautomatically
withinafewsecondsofreleasingthe
INCREASEorDECREASEpad,The
timer,asyoum settingi~willdisplay
secondsuntil oneminuteisreached.
Thenitwilldisplayminutesand
secondsuntil 60minutesisreached.
After60minutes,it willdisplayhours
(“HR’nowappearsindisplay)and
minutesuntilthe maximumtimeof
9 hoursand 55 minutesis reached.
‘1’oResetthe Timer
If “TIMER” isdisplayed,presstheINCREASEor
DECREASEpaduntildesiredtimeis reached.
If “TIMER” isnot displayed,presstheTIMER
ON/OFFpadfirst,thenfollowthe instructionsabove
to setthetimer.
End ofCycleTone
Theendof cycletoneisa seriesof three beeps
followedbyonebeepeverysixseconds.Ifyouwould
liketo removethesignalthatbeepseverysixseconds,
pressandholdthe CLEAWOFFpadfor 10seconds.
Toreturnthe signal thatbeepseverysix seconds,
pressandholdtheCLEAWOFFpadfor 10seconds.
PowerOutage
ToCancelthe Timer
PressandholdtheTIMERON/OFFpaduntil the
word“TIMER’disappearsfromthedisplay.
DisplayMessages
● If “door” appears in the display,LOCKflashes
andthe ovencontrolsignals,yousettheself-clean
cycle anddid notshutthedoor.
● If “door” ordyappears in the display,theoven
dooris open andneedsto be closed.
. If ‘6LOCK9’onlyappearsinthedisplay,the
ovendooris in thelocked position.BAKE,
BROILandCOOKTIMEcannotbesetifthe
doorisinthe lockedposition.
Aftera poweroutage,whenpoweris restored,the
displaywillflashand timeshownwillnolongerbe
correct-for example,aftera 5-minutepower
interruptiontheclockwillbe5 minutesslow,
Thedisplayflashesuntiltheclockis reset,Allother
functionsthatwerein operationwhenthepowerwent
outwillhavetobeprogrammedagain.
7
Page 8
BeforeUsing#h@~VP~
USINGYOUROVEN
1.Lookatthecqn~ols.~~ sumyouunderstandhow to
setthemproperly,
2.Checktheovenjflterior,@ok at(heshelves.
Takea practicerun at re~ovingandreplacingthem
properlyto givesure,sturdyspp~rt,
3.Readoverthei~formatjoqandtipsthatfollow.
4. Keepthisguide haqd~SDyPUcpnreferto it,
especiallyduringthefirstweeksof usingyour
newoven.
Bothlights comeon w~n theup~r ovendooris
openedorwhenthecofl~rolpmel lightswitchis
turnedon.
NOTE: Thebottomoven~ws nothavei~ ownlight
switch.ItoperatesbyOpening~e up~r ovendooror
byusingthecontrolptiel l~gh}switch.
NOTE:
● A fan may automaticallyturnonandoffto cool
internalparts.Thisisnormal,andthefan may
continuetorunevenaftertheovenis turnedoff.
● Youmaynoticea “burning”or “oily”smellthefirst
fewtimesyouturnyourovenon.Thisis normalin a
newovenandwilldisappearin a shorttime.Tospeed
theprocess,seta self-cleancyclefora minimumof
3 hours.SeetheOperatingtheSelf-CleaningOven
section.
Thelightcomeson whenthpovend~r is opened
or whenthecon~olpanelswi@~is turnedon,
Page 9
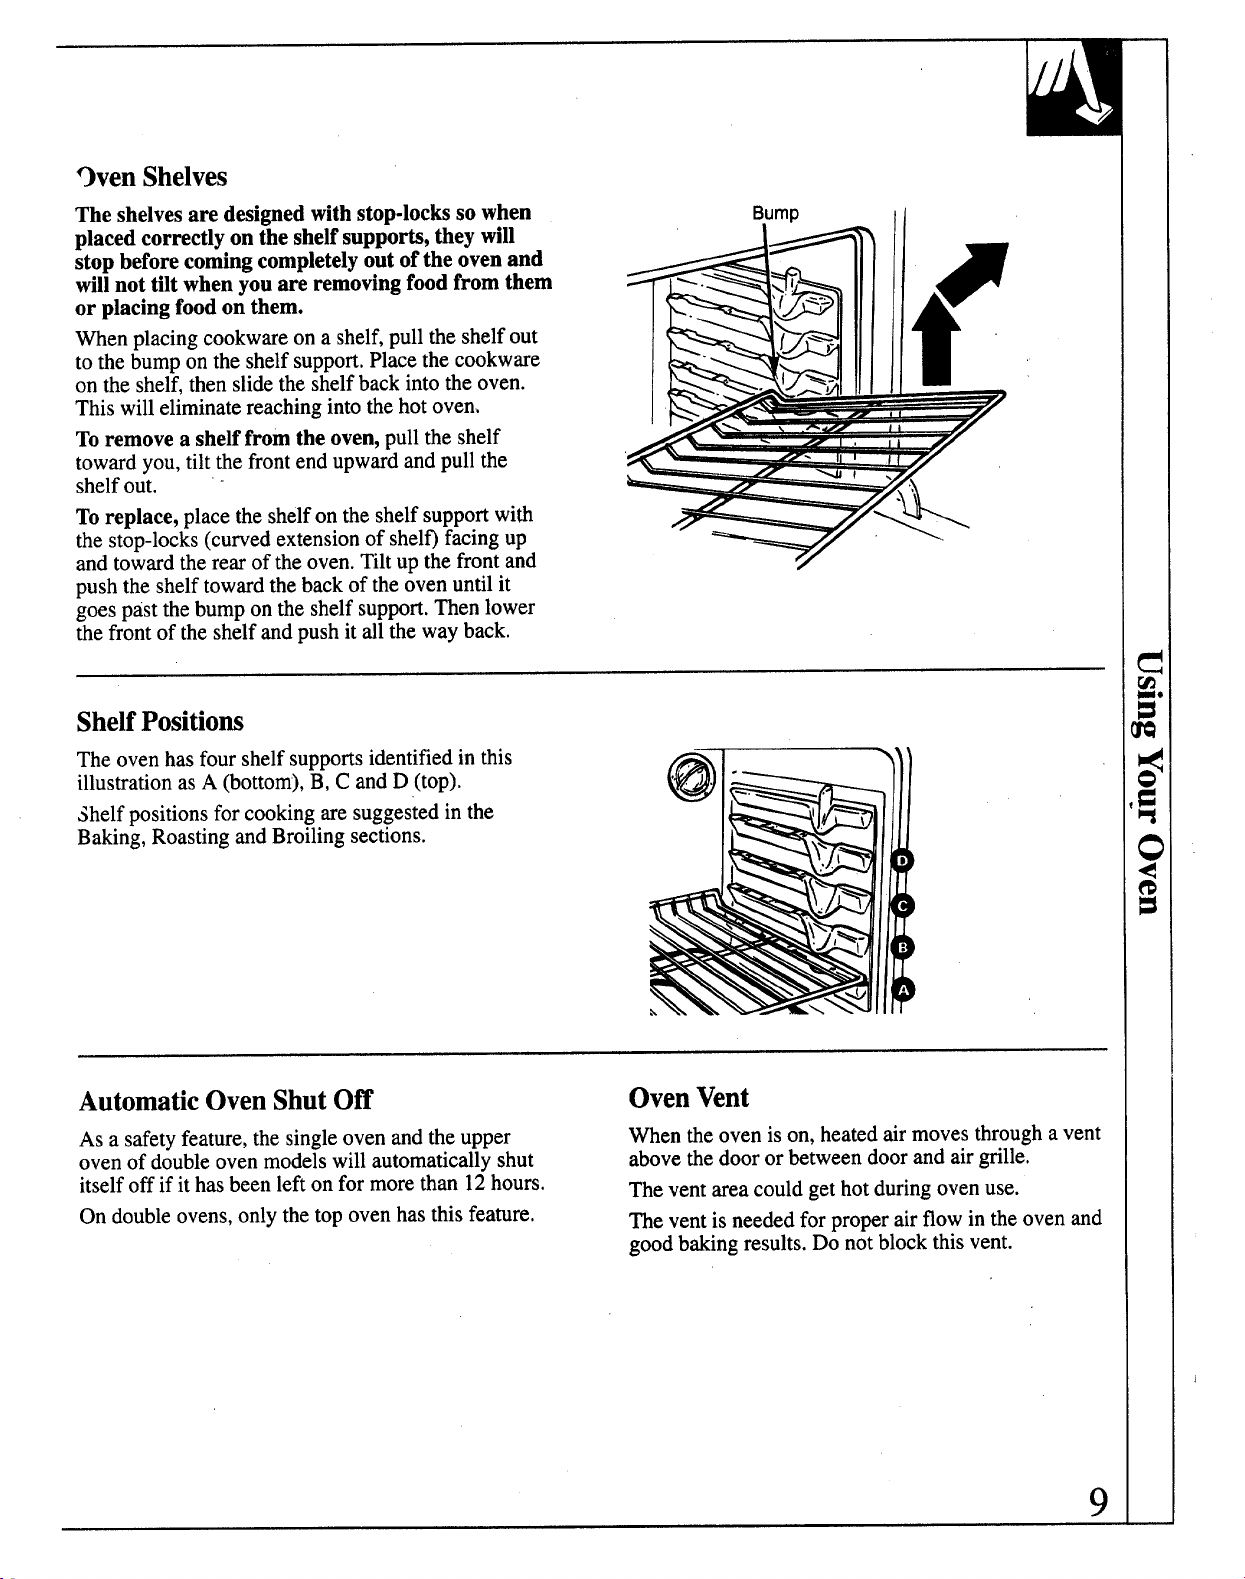
9ven Shelves
Theshelvesaredesignedwithstop-lockssowhen
placedcorrectlyontheshelfsupports,theywill
stopbeforecomingcompletelyoutoftheovenand
willnottilt whenyouareremovingfoodfromthem
orplacingfoodon them.
Whenplacingcookwareon a shelf,pulltheshelfout
to the bumpon theshelfsupport,Placethe cookware
on the shelf,thenslidetheshelfbackintotheoven.
Thiswilleliminatereachingintothehotoven.
Toremovea shelffrom theoven,pulltheshelf
towardyou, tilt thefrontendupwardandpullthe
shelfout. -
Toreplace,placethe shelfon the shelfsupportwith
thestop-locks(curvedextensionofshelf)facingup
andtowardtherearoftheoven.Tiltup thefrontand
pushthe shelftowardthebackoftheovenuntil it
goespastthebumpontheshelfsupport,Thenlower
thefrontof theshelfandpushit allthewayback.
ShelfPositions
Theovenhasfourshelfsupportsidentifiedin this
illustrationas A(bottom),B, C andD (top).
Shelfpositionsforcookingaresuggestedinthe
Baking,RoastingandBroilingsections.
Bump
II
I
1
,
1
.
AutomaticOvenShutOff
OvenVent
As a safetyfeature,the singleovenandthe upper Whentheovenison,heatedair movesthrougha vent
ovenof doubleovenmodelswillautomaticallyshut
itselfoffif it has beenleftonfor morethan 12hours.
Ondoubleovens,onlythetopovenhasthisfeature.
abovethedooror betweendoorandairgrille.
Theventareacouldgethotduring ovenuse.
Thevent is neededforproperairflowintheovenand
goodbakingresults.Do notblockthisvent.
9
Page 10

BAKING
Youroventemperatureiscontrolledveryaccurately
usingan ovencontrolsystem.Itis recommendedthat
youoperatetheovenfora numberof weeksto
becomefamiliarwithyournewoven’sperformance.
Howto SettheOvenfor Baking
OvensControlledwithTouchPads
Toavoidpossibleburns,placeshelvesinthecorrect
positionbeforeyouturntheovenon.
1.PresstheBAKEpad.
2. PresstheINCREASEor DECREASEpaduntilthe
desiredtemperatureis displayed.
Theword“ON’ and“100°”willbe displayed.As the
ovenheatsup,thedisplaywillshowthechanging
temperature.Whentheovenreachesthetemperature
youset,atonewillsound.
3.PresstheCLEAR/OFFpad whenbakingisfinished
andthenremovethe foodfromtheoven.
NOTE: Afanmayautomaticallyturnonandoffto
coolinternalparts.Thisisnormal,andthefanmay
continueto run aftertheovenis turnedoff.
Tochangethe oventemperature during BAKE
cycle,presstheBAKEpadandthentheINCREASE
orDECREASEpadto getthenewtemperature.
If youthinkan adjustmentis necessary,see the Adjus~
theOvenThermostatsection.It giveseasyDo It
Yourse~instructionsonhowtoadjustthe thermostat.
NOTE: Whentheovengetshot,thetopandoutside
surfacesoftheovengethottoo,
OvensControlledwithKnobs(onsomemodels)
OVENTEMP
Toavoidpossibleburns,placeshelvesin thecorrect
positionbeforeyouturntheovenon.
TheLOWEROVENCONTROLknobsarelocated
ontheleftsideof thecontrolpanel.
Thelowerovencanbe usedwhile theupperovenis
on.Thelowerovenhasa standardporcelainfinish.
SeetheCareandCleaningsectionofthisguide.
TO BAKEOR ROAST
1.TurntheOVENSETknobtoBAKE.
2.TurntheOVENTEMPknobto desiredtemperature.
3.Whenfinished,turntheOVENSETknobto OFF.
TOBROIL:
1.TurnboththeOVENSETandOVENTEMPknob
to BROIL.
2. Whenfinished,turntheOVENSETknobtoOFF,
OVENSET
OvenShelves
Arrangetheoven
shelfor shelvesin
thedesiredlocations
whiletheovenis
cool.Thecorrect
shelfposition
dependsonthekind
offoodandthe
browningdesired.
Asa generalrule,
placemostfoodsin themiddleof theoven,on either
shelfpositionsB or C.Seethechartfor suggested
shelfpositions.
w
—-
10
\>
I ~pe of Food
I Angelfoodcake
Biscuitsor muffins
Cookiesorcupcakes
Brownies
Layercakes
Bundtor poundcakes
Piesorpieshells
Frozenpies
Casseroles
Roasting
] ShelfPosition
1A
Bor C
Bor C
Bor C
Bor C
Aor B
Bor C
I
A (oncookiesheet)
Bor C
Aor B
1
I
Page 11

‘reheating
Preheattheovenif therecipecallsforit.Preheatmeans
bringingtheovenuptothespecifiedtemperature
beforeputtingthefoodin theoven.Topreheat,setthe
ovenatthecorrecttemperature—selectinga higher
temperaturedoesnotshortenpreheattime.
Preheatingisnecessaryforgoodresultswhenbaking
cakes,cookies,pastryandbreads.Formostcasseroles
androasts,preheatingisnotnecessary.Forovenswithout
a preheatindicatorlight or tone,preheat10minutes.
Aftertheovenis preheated,place the foodintheoven
asquicklyas possibleto preventheatfromescaping.
I
BakingPans
Usetheproperbakingpan.Thetypeof finishonthe
pandeterminestheamountofbrowningthatwilloccur,
cDark,roughordullpans absorbheatresultingin a
browner,crispercrust.Usethistypefor pies.
● Shiny,brightandsmoothpans reflectheat,resulting
in alighter,moredelicatebrowning.Cakesand
cookiesrequirethistypeofpan.
● Glassbakingdishes absorbheat.Whenbaking
in glassbakingdishes,thetemperaturemayneed
to be reducedby 25°F.
Pan Placement
Forevencookingandproperbrowning,theremustbe
enoughroomfor air circulationin the oven.Baking
resultswillbebetterif bakingpans arecenteredas
muchaspossibleratherthanbeingplacedto thefront
or to thebackoftheoven.
Pansshouldnottoucheachother or thewallsof the
oven.Allow 1-to 1 k-inchspacebetweenpansas well
asfromthebackof theoven,thedoorandthesides.
If youneedto usetwo shelves,staggerthepansso
oneisnotdirectlyabovetheother.
BakingGuides
Whenusingpreparedbakingmixes,followpackagerecipeor instructions
for thebestbakingresults.
Cookies
Whenbakingcookies,flatcookiesheets(without
sides)producebetter-lookingcookies.Cookiesbaked
in ajellyrollpan(shortsidesallaround)mayhave
darkeredges andpaleorlightbrowningmayoccur.
Do notusea cookiesheetso largethatittouchesthe
wallsor thedoorof theoven,Neverentirely cover
a shelfwitha largecookiesheet.
Forbestresults,use onlyonecookie sheetin theoven
ata time.
~
E
*g’
I
Pies
Forbestresults,bakepiesindark,roughor dull pans
to producea browner,crispercrust.Frozenpiesinfoil
pansshouldbeplacedon an aluminumcookiesheet
forbaking sincetheshinyfoilpanreflectsheataway
fromthe piecrust;thecookiesheethelpsretainit.
Cakes
Whenbakingcakes,warpedorbentpanswillcause
unevenbakingresultsandpoorlyshapedproducts.A
cakebakedin apanlargerthanthereciperecommends
willusuallybe crisper,thinneranddrierthanit should
be.Ifbakedina pansmallerthanrecommended,itmay
beundercookedandbattermayoverflow.Checkthe
recipeto makesurethepansizeusedistheone
recommended.
(continued next page)
11
I
Page 12

BA~G
(continued)
AluminumFoil
Neverentirelycover
ashelfwithaluminum
foil.Thiswilldisturb
theheatcirculation
andresultin poor
baking.A smaller
sheetof foilmaybe
usedto catcha
spilloverbyplacing
iton a lowershelf
severalinchesbelow
thefood.
TIMEDBAKING
(OvensControlledwithTouchPads)
to TimeBake ~~ .
HOW
Theovencontrolallowsyouto turntheovenonor
offautomaticallyatspecific
Examplesof ImmediateStart(oventurnson nowand
yousetittoturnoffautomafic~ly)andDelayStartand
Stop(settingtheoventoturnonWmwtically ata later
timeandturnoffatapresetStop~me) willbedescribed.
timesthatyou set.
Don’tPeek
Setthetimerfortheestimatedcookingtimeanddo
notopenthedoorto lookatyourfood.Mostrecipes
provideminimumandmaximumbakingtimessuch
as “bake30-40minutes.”
DONOTopenthedoorto checkuntiltheminimum
time.Openingtheovendoorfrequentlyduring
cookingallowsheattoescapeand makesbaking
timeslonger.Yourbakingresultsmayalsobe affected.
NOTE: Beforebeginningmakesuretheclockshows
thecorrecttimeof day.
Tosettheclock,firstpresstheCLOCKpad.Press
theINCREASEorDECREASEpaduntilthecorrect
timeof dayis displayed.
Howto SetImmediateS@rtand Automatic Stop
Toavoidpossible burns, plac$theshelvesin tie
correctpositionbeforeyoutu~ theovenon,
Theovenwillturnonimmedhiblyandcookfor a
selectedlengthof time,At the end ofCookTime,
theovenwillturnoffautomatically,
1.PresstheCOOKTIMEpad,
$y$~K
A
❑
2. PresstheINCREASEpad unti)th~desiredlength
of baking timeappearsintheWtsplay,
BAKE
A
4. PresstheINCREASEorDECREASEpaduntilthe
desiredtemperatureis displayed,Anattentiontone
willsoundif step
Thewords“TIMEBAm’ Wd “COOKTIME’
willbedisplayedalongwithm oventemperature
thatyou setandtheCookTtme~a[ youentered,
NOTE: If yourrecipereqpires
preheating,youmay~eedto add
additionaltimeto thelengthof
theCookTime.
3. PresstheBA@ p@,
3 is not done,
Theovenwillstartautomatically.Theword “ON”
and“100°”willbe displayed.TheCookTimewill
beginto countdown.Astheovenheatsup,the
displaywillshowthechangingtemperature.
Whentheovenreachesthetemperatureyou set,
a tonewillsound.Theovenwillcontinuetocook
fortheprogrammedamountof time,then shutoff
automatically.
5. PresstheCLEAR/OFFpadto clearthedisplay
if necessary.Removethefoodfromtheoven.
Remember,eventhoughtheovenshutsoff
automatically,foodscontinuecookingafterthe
controlsareoff.
NOTE:
● Foodsthatspoileasily,suchasmilk,eggs,fish,
stuffings,poultryandpork,shouldnotbeallowedto
sitformorethanonehourbeforeoraftercooking.
Roomtemperaturepromotesthe growthofharmful
bacteria.Besurethattheovenlightisoffbecauseheat
fromthebulbwillspeedharmfulbacteriagrowth.
● Afan mayautomaticallyturnonandoffto cool
internalparts.Thisis normal,andthefanmay
continuetorunaftertheovenis turnedoff.
12
Page 13

lowto SetDelayStart and AutomaticStop
QuickReminder:
1.PresstheCOOKTIMEpad.
2. PresstheINCREASE/DECREASEpad to set
thelengthofcookingtime.
3. Pressthe STOPTIMEpad.
4. PresstheINCREASE/DECREASEpaduntil
thedesiredStopTimeappearsin thedisplay.
5.PresstheBAKEpad.
6. PresstheINCREASE/DECREASEpadto
selectan oventemperature.
Toavoidpossibleburns,placetheshelvesinthe
correctpositionbeforeyouturntheovenon,
Youcan settheovencontrolto delay-starttheoven,
cookfor a specificlengthof timeandthenturnoff
automatically.
1.PresstheCOOKTIMEpad.
$?$:
A
c1
‘t.PresstheINCREASEpaduntilthedesiredlength
of cookingtimeappe~s in thedisplay.
y~:[
A
c1
ThecontrolautomaticallysetstheStopTimeby
addingtheCookTimeto thetimeofday. For
example,thetimeofdayis 2:00andthe Cook
Timeis 3 hours.Adding3 hoursto thetimeofday
equals 5:00.
4. ChangetheStopTimeby pressingthe
INCREASEpad untilthedesiredStopTime
appearsinthedisplay.
NOTE: If yourreciperequires
preheating,youmayneedto add
additionaltimeto theCookTime.
3. PresstheSTOPTIMEpad.“STOP
TIME’andtheearliestStopTimeyou
cansetappearin the display.
5.Pressthe BAKEpad,
BAKE
A
c1
6. PresstheINCREASEor
DECREASEpaduntil thedesired
@
A
e
,V
CLEAR
OFF
o
NOTE:
● Thelowtemperaturezoneof thisoven(between
150°F.and 200”F.)is availableto keephotcooked
foodswarm.Foodskeptintheovenlongerthantwo
hoursat theselowtemperaturesmayspoil.
● Foodsthatspoileasily,suchasmilk,eggs,fish,
stuffings,poultryandpork,shouldnotbeallowedto
sitformorethanonehourbeforeor aftercooking.
Roomtemperaturepromotesthegrowthof harmful
bacteria.Besurethe ovenlightis offbecauseheat
fromthebulbwillspeedharmfulbacteriagrowth.
● Afan mayautomaticallyturnonandoffto cool
internalparts.Thisis normal,andthefanmay
continueto runaftertheovenis turnedoff.
temperatureis displayed.
Theovenwillturnon automatically.The
word“ON’ and“100°”willbedisplayed.
TheCookTimewillbeginto countdown.
Astheovenheatsup,thedisplaywillshow
thechangingtemperature.Theovenwill
continueto cookfor theprogrammed
timeandshutoffautomatically.
Attheendof TimedBake,thedisplay
willshow“OHR:OOCOOKTIME’and
theovenwillturnoff.Theendof cycle
tonewillsound.
7. PresstheCLEAWOFFpadtoclear
thedisplayif necessary.Removethe
foodfromtheoven.Remember,even
thoughtheovenshutsoffautomatically,
foodscontinuecookingafterthecontrols
areoff.
13
Page 14

ADJUSTTHEOVENTHERMOSTAT—
DOIT YOURSELF!
Youmay find that your newovencooksdifferently
than the one it replaced. Werecommendthatyou thermometers, suchasthose foundingrocerystore.,,
useyour newovenfor a fewweeksto becomemore to checkthetemperaturesettingof yournewoven.
familiarwithit, followingthetimesgivenin your Thesethermometersmayvary20-40degrees.
recipesasa guide.
If youthink your new ovenis too hot or toocool,
you can adjust the thermostat yourself.Ifyouthink
it is toohot,adjustthethermostatto make it cooler.If
youthinkitis toocool,adjustthe thermostatto make
it hotter.
OvensControlled with Touch Pads
ToAdjust the Thermostat:
1.PresstheBAKEpad.
2. Selectanoventemperaturebetween500°F.
and550”F.
3, Immediately,beforeONisdisplayed,pressand
holdtheBAKEpadforabout fourseconds,The
displaywillchangetotheovenadjustmentdisplay.
Wedo notrecommend the useofinexpensive
The oventemperaturecanbeadjustedupto (+)35”F.
44
hotteror (-)35°F,cooler.UsetheINCREASEor
DECREASEpadto selectthedesiredchangein
thedisplay.
Whenyouhavemade theadjustment,pressthe
5.
CLEAWOFFpadto go backto thetimeofday
display.Useyourovenas youwouldnormally,
NOTE: Thisadjustmentwillnotaffectthe broiling
or self-cleaningtemperatures.It willberetainedin
memoryafterapowerfailure.
Ovens Controlled with Knobs
Pull the knob offthe shaft, lookat the back ofthe
knob and note the current setting beforemaking
any adjustment. Theknob is factorysetwiththetop
screwdirectlyunderthepointer.
Back of the OVENTEMPknob
Lower screw movestoward
ToAdjust the Thermostat:
1.Pullofftheknob.
2. Loosenbothscrewson backof theknob.
HO~ER or COOLER
3. HoldbothDartsot’the knobas showninthe
Thelowerscrew moves
towardHOTTER to
increasethetemperature.
Thelower screw moves
towardCOOLER to
decreasethetemperature.
4. Tightenthescrews,
5. Returntheknobto theoven.
Re-checkovenperformancebeforemakingany
additionaladjustments.
14
Page 15

ROASTING
Roasting is cooking by dry heat.Tendermeator
poultrycanberoasteduncoveredin youroven.
Roastingtemperatures,whichshouldbe lowand
steady,keepspatteringto aminimum.
Roastingisreallyabakingprocedureusedfor meats.
Therefore,ovencontrolsaresetforBakingorTimed
Baking.{Youmayheara slightclickingsound,
indicatingtheovenis workingproperly.)Timed
Bakingwillturntheovenon andoffautomatically,
OvensControlledwithTouchPads
1.Placethe shelfin Aor B position.Nopreheatingis
necessary.
2. Checktheweightof the
meat.Placeit fat side
up(orfor poultry
breast-side-up)on
roastingrackina
shallowpan.The
meltingfatwillbaste
themeat.Selecta pan
as closetothesize”of themeatas possible.
(Thebroilerpanwithrackisa good panforthis.)
3. Pressthe BAKEpad.
BAKE
A
n
4. Pressthe INCREASEor DECREASE
paduntilthedesiredtemperatureis
o
A
-
displayed.
Mostmeatscontinueto cookslightlywhilestanding,
I
afterbeingremovedfromtheoven, The standingtime
recommendedfor roastsis 10to 20 minutes.This
allowsroaststo firmupandmakesthem easierto
carve.The internaltemperaturewillrise about5°to
10°F.;tocompensatefor thetemperaturerise, if
desired,removetheroastfromovensooner(at5°to
10“F.lessthantemperaturein the RoastingGuide),
Rememberthatfoodwillcontinueto cookinthehot
ovenandthereforeshouldberemovedwhenthe
desiredinternaltemperaturehasbeenreached.
Theovenwillstartautomatically.Theword“ON”
and6’100°”willbe displayed.Astheovenheats
the displaywillshowthechangingtemperature.
Up,
Whentheovenreachesthetemperatureyouset,a
tonewillsound.
5. PresstheCLEAWOFFpadwhen
@
@
I
CLEAR
F
o
NOTE: A fanmayautomaticallyturnonandoff to
roasting is finished andthen remove
thefoodfromtheoven.
coolinternalparts.Thisisnormal,andthefan may
continuetorunaftertheovenisturnedoff.
Tochangetheoventemperatureduringthe
roastingcycle,pressthe BAKEpadandthen
theINCREASEor DECREASEpadtogetthe
newtemperature.
UseofAluminumFoil
Youcanusealuminumfoilto linethebroilerpan.
Thismakesclean-upeasierwhenusingthepanfor
marinating,cookingwithfruits,cookingheavily
curedmeatsor bastingfoodduringcooking.Press
thefoiltightly aroundtheinsideofthepan.
(cc>tltir714edrle.ytI>[lge)
15
Page 16

ROASTING
Questionsand Answers
Q.Isit necessaryto checkfordonenesswith
a meatthermometer?
A. Checkingthefinishedinternaltemperatureat
thecompletionof cookingtimeis recommended.
Temperaturesareshownin theRoastingGuide.For
roastsover8pounds,checkwiththermometerathalfhour intervalsafterhalfthecookingtimehaspassed.
Q.Whyismy
carveit?
A.Roastsareeasierto sliceif allowedtocool 10to
20minutesafterremovingthemfromtheoven.
Besuretocutacrossthegrainof themeat.
roastcrumblingwhenI tryto
ROASTINGGUIDE
FrozenRoss@
(continued)
Q.
A. Itis notnecessarytopreheatyouroven.
Q.Whenbuyinga roast,arethereanyspecialtips
A.Yes.Buyaroastasevenin thicknessaspossible,
Q. CanI sealthesidesof myfoil “tent”when
A. Sealingthefoilwillsteamthemeat.Leavingit
DoI needto preheatmyoven eachtimeI cook
a roastorpoultry?
thatwouldhelpmecookit moreevenly?
orbuyrolledroasts.
roastingaturkey?
unsealedallowstheairto circulateandbrown
themeat.
Frozenroastsofbeef,pork,lamb,etc.,canbe started Makesurepoultryisthawedbeforeroasting.
withoutthawing,butallow10to 25 minutesper
pound additionaltime(10minutesperpoundfor Somecommercialfrozenpoultrycanbe cooked
roastsunder 5 pounds,more timeforlargerroasts). successfullywithoutthawing.Followthedirections
Oven
Type Temperature
Meat
Tendercuts;rib,highquality 325°
sirlointip,rumportopround*
Lamblegorbone-inshoulder* 325”
Vealshoulder,legorloin*
Porkloin.riborshoulder* 325°
Ham,precooked
Poultry
ChickenorDuck 325°
Chickenpieces 350°
Turkey
*Forbonelessrolledroastsover6inchesthick,add5 to 10minutesperpoundtotimesgivenabove.
tThe U.S.DepartmentofAgriculturesays“Rarebeefispopular,butyoushouldknowthatcookingittoonly140”F.meanssome
foodpoisoningorganismsmaysurvive.”(Source:SafeF
325°
I
325°
,
325°
I
Doneness
Rare:
Medium:
WellDone:
Rare:
Medium:
WellDone:
WellDone:
WellDone:
ToWarm:
WellDone:
WellDone:
WellDone:
oodBook.YourKitchenGuide,USDARev.June1985.)
Unthawedpoultryoftendoesnotcookevenly.
givenonthepackagelabel.-
ApproximateRoastingTime
inMinutesperPound
3to5Ibs. 6to8Ibs.
24-33 18-22
35-39
40-45
21-25
25-30 24-28
30-35
35-45
35-45 3M0
17-20minutesperpound(anyweight)
3to5lbs.
35-40 30-35
35-40
10to 15Ibs.
18-25
22-29
30-35
20-23
28-33
30-40
Over5 Ibs.
Over15lbs.
15-20
Internal
Temperature“F.
140°–1500t
150°–1600
170°-1850
140°–1500+
150°–1600
170°-1850
170°-1800
170°–1800
115°-1200
185°–1900
185°–1900
Inthigh:
185°–1900
16
Page 17

BROILING
lroilingiscookingfoodbyintenseradiantheatfromthe
~pperbroilelementintheoven.Mostfishandtender
cutsofmeatcanbebroiled,Followthesedirectionsto
keepspatteringandsmokingto aminimum.
1.If the meathasfat or gristlearoundtheedge, cut
verticalslashesthroughbothabout2 inchesapart.
If desired,the fat maybetrimmed,leavinga layer
about1/8inchthick.
2. Placethemeatonthebroiler rackin thebroilerpan.
Alwaysusetherack sothefat dripsintothebroiler
pan;otherwisethejuicesmaybecomehotenough
to catchonfire.
3. Positionaflatshelfonrecommendedshelfpositionas
suggestedintheBroilingGuide.Mostbroilingis
doneonC position,but ifyour ovenisconnectedto
208volts,youmay wishto usea higherposition.
OvensControlledwithTouchPads
1.PresstheBROILpad.
BROIL
HIILOQ
A
❑
2. PresstheINCREASEpadonceforLOBroilortwice
forHIBroil,TochangefromHIBroiltoLOBroil,press
theBROILpadthenpresstheDECREASEpadonce,
3. Whenbroilingisfinished,pressthe CLEAR/OFF
pad.Servethefoodimmediately,andleavethe
panoutsidetheoventocoolduringthemealfor
easiestcleaning.
4.Leave the dooropento
thebroilstopposition. .’ -
Thedoorstaysopenbyitself, ‘“..,.,,
yetthepropertemperatureis ““”<.._ ..maintainedin theoven.
5.Turnthefoodonlyonceduringbroiling.
Timethefoodsforthefirstside accordingto
theBroilingGuide.Turnthefood,thenusethe
timesgivenforthe secondsideasa guideto the
preferreddoneness.
NOTE: A fanmayautomaticallyturnonandoffto
coolinternalparts.Thisisnormal,andthefan may
continueto runaftertheovenis turnedoff.
\ II
\m
UseofAluminumFoil
Youcanusealuminum
foilto lineyourbroiler
panandbroilerrack.
However,youmust
moldthefoiltightlyto
therack andcut slitsin
itjust liketherack.
Withouttheslits,thefoilwillpreventfat andmeat
juicesfromdrainingto thebroilerpan.Thejuices
couldbecomehotenoughto catchon fire.If youdo
notcutthe slits,you are f~ing, notbroiling.
Questionsand Answers
Q. Why are mymeats not turning out as brown as
they should?
In someareas,thepower(voltage)totheovenmay
A.
below,In thesecases,preheatthebroilelementfor
10minutesbeforeplacingbroilerpanwithfoodin
theoven.Checkto seeifyouareusingthe
recommendedshelfposition.Broilforthelongest
periodof timeindicatedintheBroilingGuide.Turn
thefoodonly onceduringbroiling.Youmayneed
tomovethefoodto ahighershelfposition.
When broiling,isit necessaryto alwaysusea
Q,
rack in the pan?
A.
Yes.Usingtheracksuspendsthemeatoverthe
pan.Asthemeatcooks;thejuicesfallintothepan,
thuskeepingthemeatdrier.Juicesareprotectedby
therackandstaycooler,thus preventingexcessive
spatterandsmoking.
Q. ShouldI salt the meat beforebroiling?
A.No. Saltdrawsoutthejuicesandallowsthem to
evaporate.Alwayssaltaftercooking.Turnthe
meatwithtongs;piercingthemeatwithaforkalso
allowsthe juices to escape.Whenbroilingpoultry
orfish,brusheachsideoftenwithbutter,
Q. DoI needto greasemybroilerrackto prevent
meatfromsticking?
A. No.Thebroilerrackisdesignedtoreflectbroiler
heat,thuskeepingthesurfacecool enoughto
preventmeatfromstickingtothesurface.
However,sprayingthebroilerracklightlywitha
vegetablecookingspraybeforecookingwillmake
cle~n-upeasier. - “ -
(continued next page)
17
Page 18

. .
BROILINGGUIDE
m
● Alwaysusethebroilerpanandrackthat comes
withyouroven.It isdesignedto minimizesmoking
andspatteringby trappingthejuicesin the shielded
lowerpartof thepan.
● Theovendoorshouldbeopento thebroil
stopposition.
● Forsteaksandchops,slashfat evenlyaroundthe
outsideedgesof themeat.Toslash,cutcrosswise
throughtheouterfat surfacejust totheedge of the
meat.Usetongsto turnthemeatoverto prevent
piercingthemeatandlosingthe juices.
● Ifdesired,marinatemeatsor chickenbefore
broiling,or brushwithbarbecuesaucelast5 to
10min~tesonly.
Shelf I
PositionTime,MinutesTime,Minutes
c
c
c
c
c
c
:
A 35
Cor D
Cor D
B 13-16 Donot
c
B
c
B
c
c
c
B
c
Food
Bacon
GroundBeef
WellDone
BeefSteaks
Rare
Medium
WellDone
Rare
Medium
WellDone
Chicken
BakeryProducts
Bread(Toast)or
ToasterPastries
EnglishMuffIns
LobsterTtdls
Fish
HamSlices
(precooked)
PorkChops
WellDone
LambChops
Medium
WellDone
Medium
WellDone
W]enersand
similarprecooked
sausages,bratwurst
Quantityand/or
Thickness
1/2lb.(about8
thinslices)
1lb. (4patties)
1/2to3/4inchthick
1inchthick
(1to 1Xlbs.)
1Xinchthick
(2to2%lbs.)
1whole
(2to2%Ibs.),
splitlengthwise
2to4 slices
1pkg.(2)
2(s~lit)
?6;08oz.each)
1-lb.fillets1/4to
1/2inchthick
1inchthick
2(1/2inchthick)
2(1 inchthick),
about1lb.
2(1 inchthick),
about10to 12oz.
2(1Xinchthick),
about1lb.
l-lb.pkg.(10)
● Whenarrartgingfoodonthepan,do notletfatty
edgeshangoverthesidesbecausethedrippingfat
willsoil theoven.
● Thebroiler doesnotneedtobepreheated,However,
for verythinfoods,or toincreasebrowning,preheat
if desired.
cUseLOBroil to cookfoodssuchaspoultryor thick
porkchopsthoroughlywithoutover-browningthem.
cFrozensteakscartbebroiledby positioningtheoven
shelfat nextlowestshelfpositionandincreasing
cookingtimegiveninthisguide1 Ztimesperside.
● Ifyourovenisconnectedto 208volts,rare steaks
mavbebroiledbvureheatin~thebroilerand
po~itioningtheo;;n shelfo~epositionhigher.
FirstSide
4%
10 7
6 5
8 6
12 11
10
;;
1Y*2
3-4
5
8 8
10
13
10
12
14
17 12-14
6
I
I
SecondSide ~
4X
7-8
14-16
20-25
10-15
1/2 Spaceevenly,PlaceEnglish
turnover.
5
10
13
9
10
12
1–2
Comments
Arrangeinsinglelayer.
Spaceevenly.Upto8patties
takeaboutsametime.
Steakslessthan1inchthickcook
throughbeforebrowning,Pan
fryingisrecommended.
Slashfat.
Reducetimeabout5to10minutesper
sideforcut-upchicken.Brusheach
sidewithmeltedbutter.
Broilskin-side-downfirst.
muff]nscut-side-u~andbrush
withbutter,ifdesi~ed.
Cutthroughbackofshell.Spread
open.Brushwithmeltedbutterbefore
broilingandafterhalfofbroilingtime.
Handleandturnverycarefully.
Brushwithlemonbutterbefore
andduringcooking,ifdesired.
Preheatbroilertoincreasebrowning.
Increasetime5to10minutesperside
for1%inchthickorhomecuredham.
Slashfat.
Slashfat.
Ifdesired,splitsausagesin
halflengthwise;cutinto5-to
6-inchpieces.
18
Page 19

OPERATINGTHESELF-CLEANINGOVEN
NormalCleaningTime:3 hours
~nmodelswithdoubleovens,onlytheupperovenis self-cleaning.
. he bottomovenis standardclean.SeethePorcelainOvenInteriorsection.
Singleovenmodelsare self-cleaning.
Beforea CleanCycle
Werecommendventingwithan openwindow
orusinga ventilationfanorhoodduringthefirst
self-cleaningcycle.
1.Removethebroilerpan,broilerrack,all cookware
andanyaluminumfoilfromtheoven—theycan’t
withstandthehighcleaningtemperatures.
NOTE: Theovenshelvesmaybecleanedin
theself-cleaningoven.However,theywilldarken,
losetheirlusterandbecomehardto slide.
A.Wipeupheavysoilontheovenbottom.If you
use-soap,rinsethoroughlybeforeself-cleaning
topreventstaining.
Oven vent
grille
_ Oven
Uven front
frame
\
0 00000010000 0000000000Doonna100UOOIIOUOOOOODUnnooooo
Y4*73
Area
outside inside in door
gasket
Area
gasket
Openings
Oven door
gasket
light
3.Cleanspattersor soilontheovenfrontframeand
theovendooroutsidethegasket witha dampened
cloth.Theovenfrontframeandtheovendoor
outsidethegasketdo notgetcleanedbytheselfcleancycle.On theseareas,usedetergentandhot
wateror asoap-filledsteelwoolpad.Rinsewell
witha vinegarandwatersolution.Thiswillhelp
preventa brownresiduefromformingwhenthe
ovenisheated.Bufftheseareaswitha drycloth.
Do notcleanthegasket.
Donotuseabrasivesorovencleaners.Clean
theoutsidefrontoftheovendoorwithsoapand
water.Alsousesoapandwaterto cleanunder the
ovenventgrille.
Makesurethe ovenlight bulbcoveris inplace.
Donotruborcleanthedoorgasket—
thefiberglassmaterialof thegaskethasan
extremelylowresistancetoabrasion.Anintact
andwell-fittingovendoorgasketis essentialfor
energy-efficientovenoperationandgoodbaking
results.If younotice the gasketbecomingworn,
frayedordamagedin anywayorif ithasbecome
displacedon thedoor,youshouldhaveit replaced.
Donotletwaterrundownthroughopeningsin
thetopofthe door.Tohelppreventwaterfrom
gettingin theseslotswhencleaning,openthedoor
asfar asitwillgo.
4. Closetheovendoorandmakesuretheoven
light is off.If theovenlightis notturnedoff,
thelifeofthebulbwillbe shortenedor it may
burnoutimmediately.Thedoor latches
automaticallyafterthecleancycleis set.
Donotusecommercialovencleanersoroven
protectorsin orneartheself-cleaningoven.
Acombinationof anyof theseproductsplusthe
highclean-cycletemperaturemaydamagethe
porcelainfinishof theoven.
(continued next page)
19
Page 20

OPERATINGTHESELF-CLEANINGOVEN
Howto SetOven for Cleaning
QuickReminder:
1.PresstheAUTOSELFCLEANpad.
2. PresstheINCREASEor DECREASEpad
untilthedesiredCleanTimeappears.
If theovenistoohotandyoustartto setaclean
cycle,theword“OFF’ will appearinthedisplay.
Allowadditiondtimeforcoolingbeforeyoutry to
setthecycle.
1.Followthedirectionsin theBeforea CleanCycle
section.
AUTOSELF
CLEAN
2. Afterclosingthedoor,pressthe AUTO
SELFCLEANpad.
Q
3.Pressthe INCREASEor
DECREASEpaduntilthe
@
A
e
v
desiredCleanTimeis displayed.
CleanTimeis normally3 hours.You
canchangetheCleanTimeto anytime
between2 and4 hours,dependingon
theamountofsoilinyouroven.
(continued)
Theself-cleancyclewillautomaticallybeginafter
“CLEAN’isdisplayedandthetimeforthecleancycle
isset.Thewords“ON’ and“LOCK”willappearinthe
displaywhenthedoorautomaticallylocks.Itwillnot
bepossibletoopentheovendooruntilthetemperature
dropsbelowthe locktemperatureandtheLOCKlight
goesoff. “
4.WhentheLOCKlightis off,openthedoor.
NOTE:
c1
QTheword“door”willbedisplayed,theword
● A fan may automaticallyturnon and off to cool
● Youcanfindout whenthecleancycle
{T:[
A
“LOCK”willflashandovencontrolwillsignalif you
setthecleancycleandforgettoclosetheovendoor.
internalparts.Thisis normal,andthefanmay
continueto runaftertheovenis turnedoff.
willbe finishedby pressingtheSTOP
TIMEpad.
ToStopa CleanCycle
1.PresstheCLEAWOFFpad.
CLEAR
F
o
2.WhentheLOCKlight goesoffandtheovenhas
cooledbelowthe lockingtemperature,openthedoor.
20
Page 21

ffter Self-Cleaning
Youmaynoticesomewhiteashin the oven.Justwipe
itup withadampclothaftertheoven cools.
If whitespotsremain,removethemwitha soap-filled
steelwoolpad.Be sureto rinsethoroughlywitha
vinegarandwatermixture.Thesedepositsareusually
asaltresiduethatcannotberemovedbythe cleancycle.
Howto SetDelayStart ofCleaning
QuickReminder:
1.PresstheAUTOSELFCLEANpad.
2. PresstheINCREASEor DECREASEpad
until the desiredCleanTimeappears.
3. PresstheSTOPTIMEpad.
4. PresstheINCREASEor DECREASEpaduntil
thedesiredStopTimeappearsin thedisplay.
DelayStartis settingtheoventimerto starttheclean
cycleautomaticallyat a later timethanthepresent
timeof day.
NOTE:Beforebeginning,makesuretheovenclock
LOWSthecorrecttimeof day.
1.FollowthedirectionsintheBeforea CleanCycle
section.
AUTO SELF
CLEAN
A
❑
Q
A
2. Afterclosingthedoor,presstheAUTO
SELFCLEANpad.
3. PresstheINCREASEor DECREASE
padtoentertheCleanTime.
If the ovenis notcleanafteronecleancycle,
repeatthecycle.
If theshelveshavebecomehardto slide,wipethe
shelfsupportswithcookingoil.
NOTE:No functionscanbeprogrammedbeforethe
doorautomaticallyunlocks.
5.PresstheINCREASEpadto changethe
StopTimeto alatertimeof day if
@
A
Theself-cleancyclewillautomaticallybeginafter
“CLEAN”is displayedandthetimefor cleancycle
is set.Thewords“ON”and“LOCK’willappearin
thedisplaywhenthedoorautomaticallylocks. It
willnotbepossibleto opentheovendoor untilthe
temperaturedropsbelowthelocktemperatureand
theLOCKlightgoesoff.
6.Whenthe LOCKlightis off,openthedoor.
NOTE:
● Duringa delayedself-cleanoperationyoucanfind
outwhentheovenis setto turnon bypressingand
holdingtheAUTOSELFCLEANpadfor3 seconds,
● Afan may automaticallyturnonandofftocool
internalparts.Thisis normal,andthe fan may
continueto runaftertheovenis turnedoff.
desired.Forexample:If you set Stop
Timeat 11:00,ovenwillstartcleancycle
at 8:00andendat 11:00.Thedoor
latchesautomatically.
(continued next page)
@
V
4. Pressthe STOPTIMEpad.“STOP
y~:[
A
TheearliestStopTimewillbe the CleanTime
selectedplusth~timeofday.For example:If the
CleanTimeisthreehoursandthetime of dayis6:00,
theStopTimethatappearsinthedisplaywillbe 9:00.
TIME”andtheearliestStopTimeyou
cansetwillappearin thedisplay.
21
Page 22

OPERATINGTHESELF-CLEANINGOVEN
Qu~tions and Answers
(continued)
Q.If myovenclockis notsetto thecorrecttime
ofday,canIstillself-cleanmyoven?
A.If theclockis notsetto thecorrecttimeofday
youwillnotbeableto seta delaycleantoend
ata specifictime.
Q. CanI usecommercialoven cleanersonany
partof myself-cleaningoven?
A.No cleanersor coatingsshouldbeusedaround
anypartof thisoven. If youdo usethemanddo
notthoroughlyrinsethe ovenwithwater,wipingit
absolutelycleanafterward,the residuecan scar
theovensurfaceanddamagemetalpartsthenext
timetheovenis automaticallycleaned.
Q. What should I doif excessivesmokingoccurs
duringcleaning?
A.Thisis causedbyexcessivesoil.Turntheovenoff.
Openthewindowstoridtheroomof smoke.Wait
untiltheovenhascooledandtheword“LOCK’is
offin the display.Wipeup theexcesssoilandreset
thecleancycle.
Q. 1sthe “crackling” or “popping” sound I hear
during cleaningnormal?
A. Yes.Thisis the soundofthemetalheating
andcoolingduringboththe cookingand
cleaningfunctions.
Q.Shouldtherebeanyodorduringthecleaning?
A.Yes,therewillbeanodorduringthefirst
fewcleanings.Failureto wipeoutexcessivesoil
might alsocausea strongodorwhencleaning.
Q. What causesthe hair-likelineson the enameled
surface of my oven?
A.Thisis a normalcondition,resultingfrom
heatingandcoolingduringcleaning.Theselines
do notaffecthowyourovenperforms.
Q. Whydo I haveash leftin my ovenafter cleaning?
A. Sometypes of soilwillleavea depositwhichis ash.
It can be removedwitha dampspongeorcloth.
Q. Myovenshelves do not slideeasily.What is
the matter?
A. Aftermanycleanings,the ovenshelveswilllose
theirlusterandbecomehardto slide.Tomakethe
shelvesslidemoreeasily,wipetheshelfsupports
withcookingoil.
Q. Myovenshelveshavebecomegrayafterthe
self-cleancycle.Isthisnormal?
A.Yes.Afterthe self-cleancycle,the shelveswill
losesomelusteranddiscolorto adeepgraycolor.
CAREANDCLEANING
Propercare andcleaningareimportantsoyourovenwillgiveyouefficient
andsatisfactoryservice,Followthesedirectionscarefullyin caringfor your
ovento assuresafeandproper maintenance.
BESUREELECTRICALPOWERISOFFBEFORECLEANING
ANYPARTOFTHEOVEN.
OvenHeatingElemen@
Donotcleanthebakeelementorthebroilelement.
Anysoilwillburnoff whentheelementsareheated.
Thebake elementcanbe liftedgentlytocleanthe
ovenfloor.If spillovers,residueor ashaccumulate
aroundthebakeelementgentlywipearoundthe
elementwithwarmwater.
Broil Element
Bake Element
Page 23

9venShelves
Cleantheshelveswithanabrasivecleanseror
steelwool.Aftercleaning,rinsetheshelveswith
cleanwateranddrywitha cleancloth.
NOTE:Theovenshelvesmayalsobecleaned
intheself-cleaningoven.However,theshelveswill
darkenin color,losetheirlusterandbecomehardto
slideif cleanedduringtheself-cleaningcycle.Wipe
theshelfsupportswithcookingoiltomakethe
shelvesslidemoreeasily.
BroilerPan and Rack
Afterbroiling,removethebroilerpanfromtheoven,
Removetherackfromthepan.Carefullypourout
greasefromthepanintoapropercontainer.Washand
rinsethebroilerpan andrackinhotwaterwitha
soap-filledor plasticscouringpad.
If foodhas burned on, sprinkletherackwith
detergentwhilehotandcoverwithwetpapertowels
L
.a dishcloth.Soakingthepan willremoveburned
onfoods.
Thebroilerpanmaybe cleanedwitha commercial
ovencleaner.Donotuse an ovencleaneron the rack.
Boththebroilerpan andrackcanalsobecleaned
in thedishwasher.
Do notcleanthebroilerpanorrackin the self-
cleaningoven.
Donot storea soiledbroilerpan andrack anywhere
intheoven.
OvenLightBulbReplacement
CAUTION:Beforereplacingyourovenlight,disconnect
electricalpowerforyourovenatthemainfuseor
circuitbreakerpanelorpulltheplug. Besureto letthe
lightcoverandbulbcool completelybeforeremoving
orreplacingthem.Whencleaning,avoidtouchingwarm
lightswithcleaningclothsifthelightcoveris removed.
Theovenlight(bulb)iscoveredwitha removableglass
coverwhichis heldinplacewitha wire.Removethe
ovendoor,if desired,toreachcovereasily.
Toremove:
● Holdyourhandunder
thecoversoit doesn’t
fallwhenreleased.With
fingersof thesamehand, X
firmlypushbackthe
wirecoverholder.Lift
offthecover.
● DONOTREMOVEANYSCREWS.
● Replacebulbwith40-watthomeappliancebulb.
Toreplacecover:
● Placeitintothegrooveofthelight receptacle.Pull
wireforwardto thecenterof co~er untiiit snapsinto
place.Whenin place,thewireholdsthecoverfirrrdy.
Becertainthewireis in thedepressioninthecenter
ofthecover.
● Connecttheelectricalpowerto the oven.
.;E
,~ “w
Q@
Wire cover holder
(continued next page)
23
Page 24

CAREANDCLEA~G
(continued)
Lift-OffOvenDoor(singleovenorupperovenonly)
The ovendoor is removable,
butitis heavy.Youmayneed
helpremovingandreplacing
thedoor.Donotliftthedoorby
thehandle.Thiscancausethe
glassto breakor cm cause
damagetothedoor.
Toremovethe door,openita
fewinchesto the specialstop
positionthatwillholdthedoor
open.Graspfirmlyon eachside
andliftthedoorstraightup and
offthehinges.
NOTE:
● Becarefulnottoplace handsbetweenthehinge
andtheovendoorframeasthehingecouldsnap
backandpinchfingers.
● Whileworkingintheovenarea,coverthehinges
withtowelsoremptypaper towelrollsto prevent
pinchedfingersandchippingtheporcelainenamel
ontheframe.
Toreplacethe door,makesurethe hinges are inthe
specialstopposition.Positiontheslotsin thebottom
ofthedoorsquarelyoverthehinges.Thenlowerthe
doorslowlyandevenlyoverbothhingesat the same
time,If hingessnapbackagainsttheovenframe,pull
thembackout.
TOCLEANTHEDOOR:
Insideof thedoor:
● Becausetheareainsidethegasketis cleanedduring
theselfcleancycle,youdonotneedto cleanthisby
hand. Any soaplefton thelinercausesadditional
stainswhentheovenis heated.
● Theareaoutsidethegasket canbe cleanedwitha
soap-filledscouringpad.
● Donotrub orclean thedoorgasket—thefiberglass
materialofthegaskethasanextremelylow
resistanceto abrasion.Anintactandwell-fitting
ovendoorgasketisessentialforenergy-efficient
ovenoperationandgoodbakingresults.If you
noticethegasketbecomingworn,frayedor damaged
in anywayorif ithasbecomedisplacedonthedoor,
youshouldhave it replaced.
NOTE: Thegasketisdesignedwitha gapatthe
bottomto allowforproperaircirculation.
Inside Gasket
Gasket
Outside Gasket
Outsideofthedoor:
● Usesoapandwatertothoroughlycleanthetop,
sidesandfrontof the ovendoor.Rinse well.You
mayalsousea glasscleaner to cleantheglasson
outsideofthedoor.
● Spillageofmarinades,fruitjuices,tomatosauces
andbastingmaterialscontainingacidsmay cause
discolorationand shouldbe wipedup immediately.
Whensurfaceiscool,cleanandrinse.
● Donot useovencleaners, cleansingpowders or
harsh abrasives onthe oufiideof the door.
Lift-OffOvenDoor(lowerovenonly-onsomemodels)
Followthesamedirectionsforremovingand
replacingthedoorasdescribedabove;
TOCLEANTHEDOOR:
Insideofdoor:
● Soapandwaterwillnormallydothejob. Heavy
spatteringor spilloversmayrequirecleaningwitha
mildabrasivecleaner.Soapy,wetmetalpadsmay
alsobeused.Do not allowfoodspillswitha high
sugaror acidcontent(suchas milk,tomatoes,
sauerkraut,fruitjuicesor pie filling)to remainon
thesurface.Theymaycausea dullspotevenafter
cleaning.
● Ifnecessary,youmayuseanovencleaner.
Followthepackagedirections.
24
cCleanthe inside of theovenwindowwitha mild
non-scratchingcleaneranda dampcloth.
Outsideofdoor:
● Usesoapandwaterto thoroughlycleanthetop,
sidesandfrontof the ovendoor.DONOTletwater
rundownthroughopeningsinthetopofthedoor.
Rinse well.Youmayalsousea glasscleanerto
cleantheglasson the outsideof thedoor.
● Spillageofmarinades,fruitjuices,tomatosauces
andbastingmaterialscontainingacidsmay cause
discolorationand shouldbe wipedup immediately.
Whensurfaceiscool,cleanandrinse.
● Donot useovencleaners,cleansingpowderso,
harshabrasiveson theoutsideofthedoor.
Page 25

‘orcelain OvenInterior (lowerovenonly-onsomemodels)
Withpropercare,theporcelain
enamelfinishontheinsideof
theoven—top,bottom,sides,
backandinsideof thedoor—
willstaynew-lookingforyears.
Let theovencoolbefore
cleaning.Werecommendthat
youwearrubbergloveswhencleaningtheoven.
Soapandwaterwillnormallydothejob.Heavy
spatteringor spilloversmayrequirecleaningwitha
mildabrasivecleaner.Soapy,wetmetalpadsmayalso
beused.Do not allowfoodspillswitha highsugaror
acidcontent(suchasmilk,tomatoes,sauerkraut,fruit
juicesorpiefilling)toremainonthesurface,They
maycauseadullspot evenaftercleaning.
Householdammoniamay make the cleaningjob
easier.Place1/2cupina shallowglassor pottery
containerin acoldovenovernight.Theammonia
fumeswillhelploosentheburned-ongreaseandfood.
Ifnecessary,youmayusean ovencleaner.
Followthepackagedirections.
Cautionsabout usingspray-onovencleaners:
● Donot sprayontheelectricalcontrolsandswitches
becauseitcouldcausea short circuitandresultin
sparkingor fire.
● Donotallow a filmfromthecleanerto buildup
onthetemperaturesensor—itcouldcausetheoven
to heatimproperly.(Thesensoris locatedat thetop
of theoven.)Carefullywipethe sensorcleanafter
eachovencleaning,beingcarefulnottomovethe
sensoras a changein its positioncouldaffecthow
theovenbakes.
● Donotsprayanyovencleaneron theoven
door,handlesor anyexteriorsurfaceof the
oven, cabinetsorpaintedsurfaces.The cleaner
candamagethesesurfaces.
I
GlassWindow
Tocleanthe outsideof the ovenwindow,usea glass
Leaner.Rinseandpolishwitha drycloth.
Donotallowthewaterorcleanerto rundown
insidetheopeningsintheglassortheopeningsin
thetopofthe ovendoorwhilecleaning.
.
ControlPaneland Knobs
It’s a goodidea to wipethe controlpanel after each
use. Cleanwithmildsoapandwateror vinegarand
water,rinsewithcleanwaterandpolishdry witha
softcloth.
Donotuseabrasivecleansers,strongliquid
cleansers,plasticscouringpadsorovencleansers
onthecontrolpanel—theywilldamagethefinish.
A 50/50solutionofvinegarandhotwatersolution
workswell,
The control knobs (lowerovenonly–onsome
models)may be removedfor easier cleaning.
Beforeremovingtheknobsforcleaning,please
note thattheknobson the leftsideand theknobson
therightsideareontheproperOFFposition.When
replacingtheknobs,checktheOFFpositiontoinsure
properplacement.
PaintedSurfaces
Paintedsurfacesincludetheoutsideoftheovendoor
andthecontrolpanel.Cleanthesewithsoapand
wateror a vinegarandwatersolution.Do not use
commercialovencleaners,cleansingpowder,steel
woolorharshabrasivesonanypaintedsurface.
I
Theknobstemhasa grooveineachside. Thegroove
ononesidehas a springclip.Theothergrooveis
clear(seeillustration).Whenremovingtheknob,
it maybe helpfulto slipa thincloth(suchas a
handkerchie~or apieceof stringunderandaround
theknobedge and pullup.Checktheinsideof the
knobandfindthemoldedrib.
Wash the knobs in soapandwateror avinegarand
hotwatersolutionbutdo notsoak.
Replacetheknobbyfittingthemoldedribinsidethe
knobintotie cleargrooveon thestem.
Clear Groove in Stem
25 I
Page 26

●
QUESTIONS?
USETHISPROBLEM SOLVER
PROBLEM
OVENLIGHT
DOESNOTWORK
FOODD~ES NOT
BROL PROPERLY
FOODDOESNOT’ROAST
ORBAKEPROPERLY
CLOCKAND
MINUWSECOND
TWRW
OWEN’WL NOT
SELF-CLEAN
~
DOORWIL~NOTOPEN
~R SELF-CM CYCLE
CONTROLSIGNALSAFTER
;~&~G&OK TIME
NOTWORK
POSSIBLECAUSE
*Thisisfunctionerrorcode.PresstheCLEAR/0~ pad.Allowtheovento cool
onehour.Placetheovenbackintoo~ratiort. Iffunctionerroroccursagain,
disconnectpowerto theovenandcall for service.
@Thecircuitbreakerin yourhousehasbeentripped,or afusehasbeenblown.
● Theovencontrolsarenotproperlyset.
*The lightbulbis iooseordefective.Tightenorreplace.
● Theswitchoperatingtheovenlightis broken.Call for service.
● Ovencontrolsnotsetproperly.SeetheBroilingsection.
*Doornotleftopentothebroils!oppositionasrecommended.
● Impropershelfpositionbeingused.SeetheBroilingGuide.
● Foodis beingcookedon ahotpan.
@Cookwareisnotsuitedforbroiling,
● Lowvoltage.SeetheBroilingsection.
● Aluminumfoilusedonthebroilerpanandrackhasnotbeenfittedproperly
andslitasrecommended.
● Ovencontrolsnotsetproperly.SeetheBakingor Roastingsection.
*Shelfpositionis incorrect.SeetheRoastingorBakingsection.
● Incorrectcookwareor cookwareof impropersizeis beingused.
*Oventhermostatneedsadjustment.SeetheAdjusttheOvenThermostat—
Dolt Yourse~section.
*Checkforapoweroutage.
*SeetheOvenControl,ClockandTimersection.
● Oventemperatureis toohighto set self-cleanoperation.
Allowthe oventocoolto roomtemperatureandresetthecontrols.
*Whenthetemperaturehasfallenbelowthelockingtemperature,
thedoorcanbeopened.
*Thisisremindingyouto enterabaketemperature.
OVENmMpE~~RE Too
HOTORTOOCOLD
“BuRNma” OR “OILY’
ODOREMITTINGFROM
OVEN~EN TURNEDON
STRONGODOR
● Oventhermostatneedsadjustment.SeetheAdjusttheOvenT’hermostat—
DiJIt Yourse§ion.
● Thisisnormal in anew ovenandwilldisappearintime.Tospeedtheprocess,
seta self-clemcvclefor a minimumof 3hours.SeetheOperatingthe SelfCleaningOvensbction.
*Anodorfromtheinsulationaroundthe inside of theovenis normalforthe
fwstfewtimestheovenisused.This is temporary.
OVENNOT’CLEANAFTER
SELF-=EAN CYCLE
“door”APPEARS
~ THEHISPLAY
FANNOISE
~Ovencontrolsnotsetproperly.SeetheOperatingtheSelf-CleaningOvensection.
● Heavilysoiledovensrequire3‘/1-to4-hourCleanTime.
● Heavyspilloversshouldbecleanedup beforestartingtheself-cleaningcycle.
*Ovendoornotclosedafterself-cleancycleis selected.
● Dooris stilllockedandYOUwe trying to enter anoven cooking oPeration”
● A fanmayautornatically turnonandofftocoolinternalparts.Thisis normal,
andthe fanmaycontinueto runaftertheoven is turnedoff.
If you needmore help..call, tollfree:
o
GE AnswerCenter
800.626.2000 consumer information service
26
Page 27

WdllBeThere
WiththepurchaseofyournewGEappliance,receivetheassurancethatifyou everneed
‘nforrnationor assistancefrom GE,we’llbe tiere. Allyou havetodo iscall—toll-free!
GEAnswerCentep
80~6262000
WhateveryourquestionaboutanyGEmajorappliance,GEAnswerCenter@
informationserviceisavailabletohelp. Yourcall—andyourquestion—willbe
answeredpromptlyandcourteously.Andyoucancallanytime.GEAnswer
Center@semiceisopen24hoursaday,7daysaweek.
lmHomeRepairSewice
80ME#ARES(80M2-273fl
AGEconsumerserviceprofessionalwillprovideexpertrepairservice,
scheduledata timethat’sconvenientforyou.ManyGEConsumerService
company-operatedlocationsofferyouservicetodayor tomorrow,oratyour
convenience(7:00a.m.to 7:00p.m.weekdays,9:00a.m.to2:00p.m.Saturdays).
Ourfactory-trainedtechniciansknowyourapplianceinsideandout–somost
repairscanbehandledinjustonevisit.
I
m7
ForCustome~W& SpecialNeeds...
80~62E2000
Uponrequest,GEwillprovide
BraillecontrolsforavarietyofGE
appliances,and abrochureto
assistinplanningabarrier-free informationorservice.
kitchenforpersonswithlimited
mobility.Toobtaintheseitems,
freeofcharge,call800.626.2000.
Consumerswithimpairedhearingorspeechwhohave
accesstoaTDDoraconventionalteletypewritermay
call800-TDD-GEAC(800-833-4322)torequest
SewiceContracts
80M2&2224
YoucanhavethesecurefeelingthatGEConsumerServicewillstillbethere
afteryourwarrantyexpires.Purchasea GEcontractwhileyourwarrantyisstill
ineffectandyou’llreceiveasubstantialdiscount.Withamultiple-yearcontract,
you’reassuredoffutureserviceat today’sprices.
PartsandAccessories
80@62&2002
Individualsqualifiedtoservicetheirownappliances
~nhaveneededpartsoraccessoriessentdirectlyto
eirhome.TheGEpartssystemprovidesaccesstoover
47,000parts..and all GEGenuineRenewalPartsare
fullywarranted.VISA,MasterCardandDiscovercards
areaccepted.
Usermaintenanceinstructionscontainedinthisguide
coverproceduresintendedto beperformedbyanyuser,
Otherservicinggenerallyshodd bereferred to qualified
servicepersonnel.Cautionmustbeexercised,since
improperservicingmaycauseunsafeoperation.
Page 28

~~
Staplesales slip or cancelledcheck
here. Proofof originalpurchase date
WHATISCOVERED
WHATISNOTCOVERED
FULLONE-YEARWARRANTY
Foroneyearfromdateoforiginal
purchase,wewillprovide,freeof
charge,padsandservicelaborin
yourhometo repairorreplace
anypart of theoventhatfails
becauseofa manufacturingdefect.
● Servicetripsto yourhometo
teachyouhowtousetheproduct.
ReadyourUseandCarematerial.
Ifyouthenhaveanyquestions
aboutoperatingthe productplease
contactyourdealeror our
ConsumerAffairsofficeatthe
addressbelow,orcall,tollfree:
GEAnswerCenteP
800.626.2000
consumerinformationservice
. Improperinstallation.
Ifyouhavean installation
problem,contactyourdealeror
installer.Youareresponsiblefor
providingadequateelectrical,gas,
exhaustingandotherconnecting
facilitiesasdescribedinthe
InstallationInstructionsprovided
withthe product.
***********************
Thiswarrantyisextendedtothe
originalpurchaserandanysucceeding
ownerfor productspurchasedfor
ordinatyhomeuseinthe
states,HawaiiandWashington,DC.
InAlaskathewarrantyisthesame
exceptthatit isLIMITEDbecause
youmustpayto shiptheproductto
theserviceshopor forthe service
technician’stravelcoststoyourhome.
Allwarrantyservicewillbeprovided
byourFactoryServiceCentersorby
ourauthorizedCustomerCar@
servicersduringnormalworkinghours.
Shouldyourapplianceneedservice,
duringwarrantyperiodorbeyond,
call800-GE-CARES
(800-432-2737).
. Replacementof housefusesor
resettingof circuitbreakers.
cFailureoftheproductifit isused
forotherthanits intended
purposeorusedcommercially.
● Damagetoproductcaused
byaccident,fire,floodsor acts
ofGod.
WARRANTORISNOT
RESPONSIBLEFOR
CONSEQUENTIALDAMAGES.
48mainland
Some statesdo notallowthe exclusionorlimitationof incidentalorconsequentialdamages,sotheabovelimitationorexclusion
maynotapplytoyou,Thiswarrantygivesyou specificlegalrights,andyoumay alsohaveotherrightswhichvaryfromstatetostate.
Toknowwhatyourlegalrightsareinyourstate,consultyourlocalorstateconsumeraffairsoffice
@
RecycledPaper
PartNo.164D2966P122
PubNo. 49-6601
1-95 CG
or your state’s Attorney General.
Warrantor:GeneralElectricCompany
Iffurtherhelpisneededconcerningthiswarranty,write:
Manager-Consumer Affairs,GEAppliances,Louisviiie,KY40225
JKP13 JKI
JKP14 JRP14
JKP15
JRP15
JKP26 JRP24
Printed in LaFayette, GA
 Loading...