

Page 1

e
20 Piece
Hair Cut Kit
INSTRUCTION MANUAL
Hair Cut Kit
20 Piezas
MANUAL DE INSTRUCCIONES
Page 2

IMPORTANT
SAFEGUARDS
When using electrical appliances,
especially when children are present,
basic safety precautions should always
be followed, including the following:
READ ALL INSTRUCTIONS
BEFORE USING
KEEP AWAY FROM WATER
DANGER-
cally live, even when the switch is off.
To reduce the risk of death or injur y
by electric shock:
1. Unplug this appliance before cleaning.
2. Do not place or store appliance
where it can fall or be pulled into a
tub or sink.
3. Do not use while bathing or in a
shower.
4. Do not place in, or drop into, water
or other liquid.
5. Do not reach for an appliance that
has fallen into water. Unplug immediately.
6. Always unplug this appliance from
electrical outlet immediately after
using.
Any appliance is electri-
DO NOT REACH
INTO THE WATER
WARNING-To reduce the risk of
burns, electrocution, fire, or injur y to
persons:
1. This appliance should never be left
unattended when plugged in.
2. Close supervision is necessary when
this appliance is used by, on, or near
children or invalids.
3. Use this appliance only for its intended use as described in this manual.
Do not use attachments not recommended by the manufacturer.
4. Never operate this appliance if it
has a damaged cord or plug, if it is not
working properly, if it has been
dropped or damaged, or dropped
into water. Return the appliance to
the place of purchase for exchange.
5. Keep the cord away from heated
surfaces.
6. Never drop or insert any object into
any opening on this appliance.
7. Do not use outdoors or operate
where aerosol (spray) products are
being used or where oxygen is being
administered.
8. Do not place appliance on any surface while it is operating.
9. Do not use this appliance with a
damaged or broken comb or with
teeth missing from the blades, as
injury may occur. Before use, make
certain blades are aligned properly.
(See “Care of your Clippers”)
Page 3

10. Do not pull, twist, or wrap line
cord around appliance.
11. Do not use an extension cord to
operate this appliance.
SAVE THESE
INSTRUCTIONS
OPERATING
INSTRUCTIONS
Your GE 20 Piece Hair Cut Kit contains:
• High performance clipper with diamond-sharpened blade for precision
cutting
• Blade guard
• 4 attachment combs: 1/8", 1/4",
3/8", 1/2" for varying hair lengths
• Left and right ear attachment combs
• Barber cape
• Barber scissors
• Barber comb
• Styling comb
• 3 Styling clips
• Neck brush
• Cleaning brush
• Lubricating oil
• Soft storage pouch
• Video (in English and Spanish): easy
to follow, this video demonstrates
basic hair cutting techniques and follows six popular hair styles step by
step. It will give you the confidence
and instruction you need to give
great-looking haircuts to every member of your family.
This appliance is intended for household use. Use on Alternating Current
(50/60 hertz) only. This appliance has
a polarized plug (one blade is wider
than the other). As a safety feature,
this plug will fit in the outlet only one
way. If the plug does not fit fully in the
outlet, reverse the plug. If it still does
not fit, contact a qualified electrician.
Do not attempt to defeat this safety
feature.
Your new GE Haircut Kit has everything you need to achieve professional
haircuts at home. Its powerful magnetic motor clipper, with High
Carbon steel blades for long-lasting
cutting precision, features a 5-position
adjustamatic taper control. Just set the
lever for desired hair length and clipper will automatically cut hair in that
section to that length. Also included
are 6 attachment combs for achieving
different hair lengths (including left
and right ear taper combs), barber
scissors, a styling comb with angled
teeth, a barber comb with straight
teeth, a full-length barber cape, a
pouch for easy storage, 3 styling clips
to assist you in cutting longer hair
styles, a neck brush and a step-by-step
How-to Video filled with styling tips
and techniques in both English and
Spanish. The kit also comes with lubricating oil, a cleaning brush and a
blade guard for easy maintenance and
protection of the clipper blades.
Page 4
TO CUTTING HAIR AT HOME
THE GE GUIDE
Before you start:
1. Inspect your clipper. Make sure it’s
free of hair and dirt, properly oiled,
and running smoothly.
2. Place cape around the neck of the
person getting the haircut.
3. Seat the person so that his or her
head is at your eye level. This gives you
greater visibility and control.
4. First, comb hair until it’s tanglefree. Then hold clipper in a comfortable grip. Now you’re ready to cut.
MEDIUM TO LONG CUT
To begin with, cut only a small
amount of hair until you become used
to the length each attachment leaves
the hair. Try the longest attachment
comb and put the taper control at the
highest setting. If you want a shorter
cut, you can then use shorter combs.
• Short attachment comb (number 1)
cuts hair to 1/8".
• Medium-Short attachment comb
(number 2) cuts hair to 1/4".
• Medium-Long attachment comb
(number 3) cuts hair to 3/8".
• Long attachment comb (number 4)
cuts hair to 1/2".
• Left ear attachment comb lightly
tapers over left ear.
• Right ear attachment comb lightly
tapers over right ear. These combs
make this part of the haircut easier.
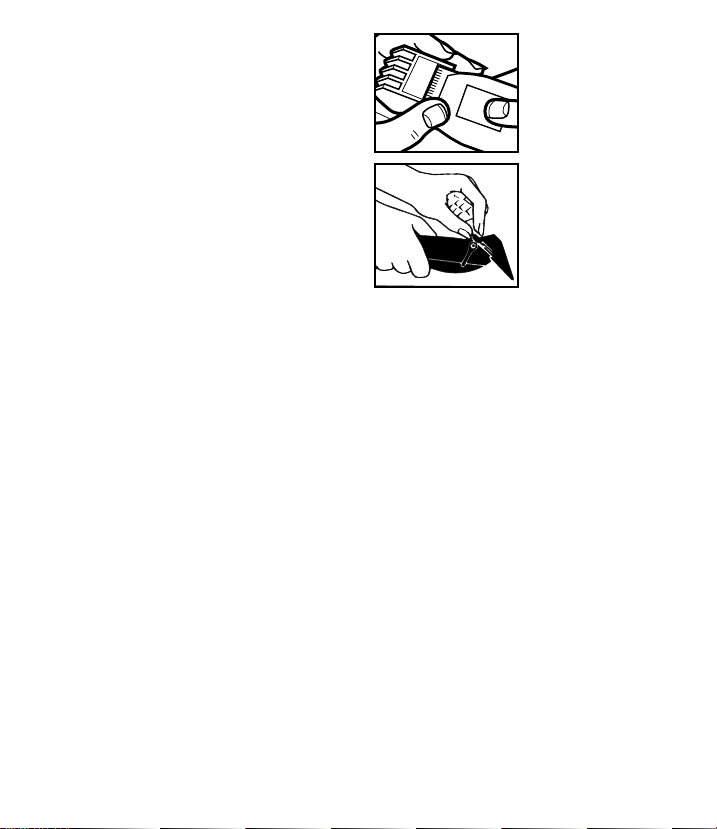
Attach combs by
holding them teeth
up, then snapping
onto the bottom of
the clipper blade.
To remove comb
attachments, place
index finger and
thumb as illustrated; then pull out
and up.
NOTE: Never push or shove the clipper through the hair to make it move
more quickly . Professional experience
shows that the clipper works most efficiently when it cuts through the hair at
its own speed.
TO BEGIN CUTTING HAIR:
1. The hair should be combed in its
natural direction.
Page 5
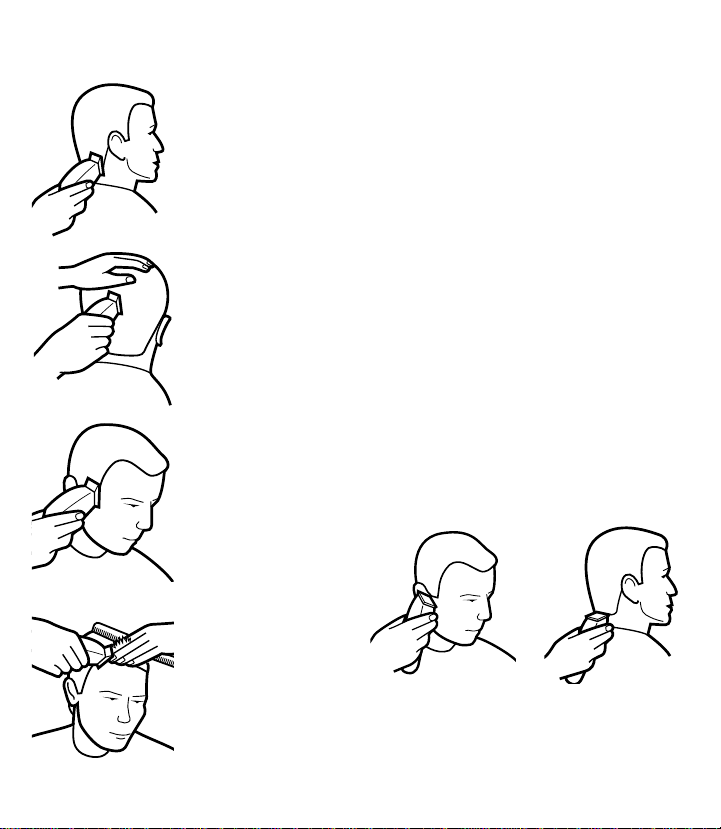
2. Using the largest attachment comb,
trim sides from the bottom upward.
Hold clipper lightly
against the hair with
teeth of the attachment comb pointing upward, yet flat
against the head.
Gradually lift the clip
per upward and out-
ward through the
hair , trimming justa
little at a time.
Repeat around sides
and back of head.
If you want hair to
be even shorter:
A) Apply more pressure to the head
with the attachment
comb that is in place.
This takes a little
practice, of course.
OR
B) Just switch to a
shorter attachment
comb.
Remember, it’s better to leave too
much hair than too
little. For longer hair
on top, use the barber comb and lift
hair on the top of
the head, cutting
over the comb, or hold the hair between the fingers and cut to desired
length. Always working from the front
to the back of the head, gradually cut
the hair shorter by reducing the space
between the comb or fingers and the
head. Comb often to check for uneven
strands, and to get rid of trimmed hair .
OUTLINING
Outlining requires no attachments.
Comb hair into the desired style.
Position the clipper between the sideburns and the ear (see below), making sure the corner edge of the blade
is against the hairline. With the outline of the hair as your guide,
slowly move the clipper over, around
and behind the ears. For the back of
the neck and the sideburns, hold the
clipper upside down (see above) and,
holding it against the skin at the
length desired, move the clipper
downward.
Page 6
STOP. COMB. CHECK.
For best results, do as the professionals do: comb hair often, and check
clipping results as you comb. This way
you avoid uneven sides, bangs, neckline, etc.
SHORT CUTS TO PERFECT
FLAT TOPS, CREW CUTS, ETC.
Always cut from the back of the neck
to the crown, using the longest comb
setting. Hold the comb attachment
flat against the head and slowly move
the clipper up through the hair. Use
the same technique for the sides, cutting from the bottom to the upper
side of the head.
For the front to the crown, cut the
hair against the direction in which it
grows, then even it up with the sides.
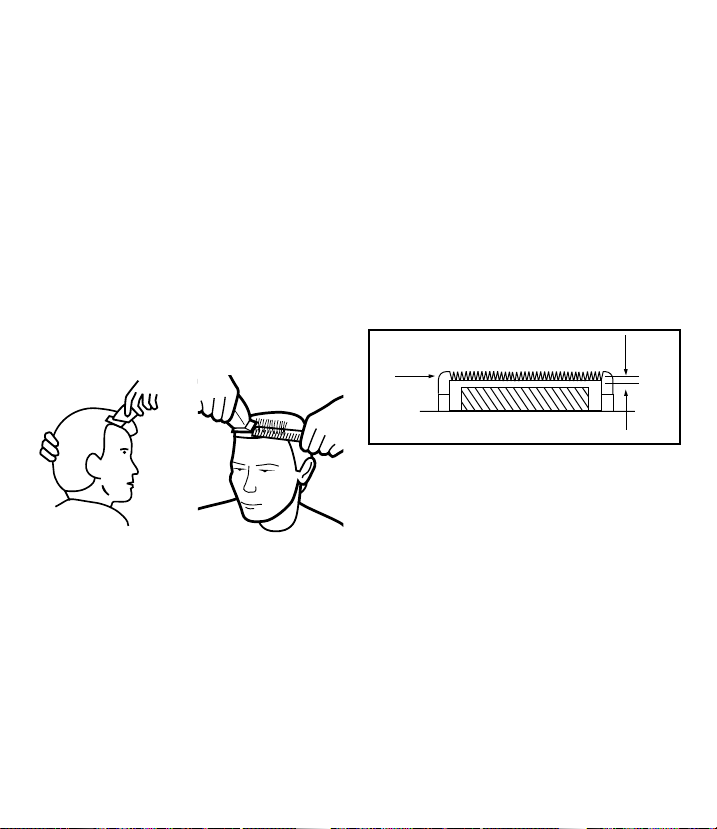
For a flat top, use the flat comb, not the
attachment comb. Just cut hair on top
of the head over flat comb (see above).
To taper hair down to the neckline,
use attachment comb #1. Comb hair
and check for uneven spots. Outline
sideburns and neck areas (see “Outlining”).
CARE OF YOUR CLIPPERS
IF YOU DETERMINE THAT BLADE
ALIGNMENT IS INCORRECT:
GE hair clippers are carefully exam-
ined to insure that the blades are in
perfect alignment. You will need to
realign the blades, of course, after
removal for cleaning or replacement,
or if they should be knocked out of
alignment. How can you tell if blades
need realigning? Simply match them
up, point for point, to conform with
FIG. 1 below:
FIG. 1
To prevent the clipper from contacting the skin or cutting too closely,
make certain that the end top blade
teeth are 1/32" to 1/16" back from
bottom blade.
TO ALIGN BLADES:
1. Add two or three drops of Lubricating Oil (included).
2. Turn clipper on for a minute to
disperse oil evenly over blades, then
turn off.
Page 7

3. Unplug clipper and slightly loosen
screws. (See FIG. 2)
FIG. 2
4. Position the extreme left-hand
tooth of the top blade so that it either
covers or appears to the left of the first
small tooth on the bottom blade.
5. Make sure that the big tooth on the
bottom blade touches the extreme
right hand tooth of the top blade.
SPECIAL OIL
To maintain the blades of your GE
clipper, oil them after ever y three or
four haircuts. Gently place a few drops
of oil on the teeth of the blades, using
the special lubricating oil included
with your set. Turn the clipper on for
a minute, then turn off. This light,
natural oil was formulated specifically
for the GE high speed clipper. Because it is the right oil to use, it will
not slow down the blades. Never use
any other product. There is no substitute for the lubricating oil included in
your kit.
POWER SCREW
The power screw permits you to adjust
the power of your clipper . You may find
it necessary to adjust it if the power in
your house is low. (The GE clipper was
designed for household use.)
1. Turn clipper on.
2. With screwdriver or dime, turn the
power screw clockwise until arm
strikes the coil, making a clacking
noise. FIG. 3
FIG. 3
3. Then turn the screw counterclockwise, just until noise stops. This is the
maximum power setting. FIG. 4
FIG. 4
ADJUSTABLE TAPER LEVER
Just like professional clippers, the GE
taper lever is positioned at your thumb.
You can hold the clipper in your hand
and adjust the lever at the same time.
This 5 detent taper lever eliminates
the need for an attachment comb,
because it lets you gradually adjust the
closeness of the cut. For the closest
Page 8

cut and the shortest hair, push taper
lever up as far as it will go to position
#1. To increase cutting length, slowly
push lever down to detent 2, 3, 4 or 5.
If you push to the lowest position, it
will leave hair about the same length
as the short attachment comb – 1/8".
Because a different cutting edge is
used with each setting, the taper lever
lengthens the life of your blades.
Using your cleaning brush, brush hair
out of the blades. This should be done
after each use. When the blades are
finally free of hair, put a small amount
of oil across the blades.
If you do this after every clipping,
especially with heavy hair cutting, the
blades should remain in good working
condition. If clipper stops cutting and
this action doesn’t help, check the
blades. If they’ve become dull, replace
them or return them to the place of
purchase.
Close Cut
Bottom
Blade
Adjustable
Taper
Lever
Power
Screw
Switch
Top
Blade
Longer Cut
NOTE: Never pull on the clipper
cord. Never twist or wrap the cord
around the clipper; lay it flat with the
cord coiled up when not in use.
Page 9

WARNING:
IF YOU THINK
THE POWER IS OFF
WHEN THE SWITCH
IS OFF,
YOU’RE WRONG.
KEEP AWAY FROM WATER
Everyone knows that electricity and
water are a dangerous combination.
But did you know that an electric
appliance is still electrically live even if
the switch is off? If the plug is in, the
power is on. So when you are not
using your appliances, keep them
unplugged.
ALWAYS UNPLUG
SMALL APPLIANCES
A Public Service Ad from the Association of Home Appliance
Manufacturers and Underwriters Laboratories, Inc.
TWO YEAR LIMITED WARRANTY
If you have any problems with this
product, please call 1-877-207-0923.
This GE branded product is warranted by Wal-Mart for a period of 24
months against defects in material or
workmanship. To obtain service under
this warranty, your first option is to
return the defective product, along
with the original sales slip, to the nearest Wal-Mart store to exchange it for a
replacement product (provided the
store has an in-stock replacement).
If this option is not possible for you,
you may return the defective product
to the Service Department nearest
you, provided that with the product
you include the original sales slip and
$3.00 for postage and handling. Be
sure to also include your name, full
address with zip code, telephone
number, and a detailed description of
the problem you are having with the
unit. We will repair or replace (at our
option) your appliance free of charge
for 24 months from the date of purchase if the appliance is defective in
workmanship or materials. California
residents need only provide proof of
purchase and should call 1-877-2070923 for shipping instructions.
ANY IMPLIED WARRANTIES, OBLIGATIONS, OR LIABILITIES, INCLUDING BUT NOT LIMITED TO
Page 10

THE IMPLIED WARRANTY OF MERCHANTABILITY AND FITNESS FOR
A PARTICULAR PURPOSE, SHALL
BE LIMITED IN DURATION TO
THE 24 MONTH DURATION OF
THIS WRITTEN, LIMITED WARRANTY. Some states do not allow
limitations on how long an implied
warranty lasts, so the above limitations
may not apply to you.
IN NO EVENT SHALL Wal-Mart BE
LIABLE FOR ANY SPECIAL, INCIDENTAL, OR CONSEQUENTIAL
DAMAGES FOR BREACH OF THIS
OR ANY OTHER WARRANTY,
EXPRESS OR IMPLIED, WHATSOEVER. Some states do not allow the
exclusion or limitation of special, incidental, or consequential damages, so
the above limitation may not apply to you.
This warranty gives you specific legal
rights, and you may also have other
rights which vary from state to state.
For product which was purchased in
the U.S. but is being used in another
country, the warranty is valid only if
you follow the return procedures
described above.
Page 11

SALVAGUARDIAS
IMPORTANTES
Al usar aparatos eléctricos, en especial
cuando hay niños presentes, se deben
tomar precauciones básicas de seguridad. Éstas incluyen las siguientes:
LEA TODAS LAS
INSTRUCCIONES ANTES
DE USAR EL APARATO
MANTÉNGALO
ALEJADO DEL AGUA
PELIGRO - Cualquier aparato puede
conducir electricidad aunque esté
apagado. Para reducir el riesgo de
muerte por choque eléctrico:
1. Desconecte este aparato antes de
limpiarlo.
2. No coloque o almacene el aparato
en un lugar de donde pueda caer o
alguien lo pueda jalar a una tina o fregadero.
3. No use el aparato mientras se está
bañando o duchando.
4. No coloque el aparato, ni permita
que caiga al agua u otro líquido.
5. Si el aparato cae al agua,
desconéctelo inmediatamente y antes
de sacarlo del agua.
6. Siempre se debe desconectar este
aparato de la toma de corriente
inmediatamente después de usarlo.
NO PONGA LAS MANOS EN EL
AGUA PARA RECOGERLO.
ADVERTENCIA
riesgo de quemaduras, electrocución,
incendio o lesiones:
1. Este aparato nunca se debe dejar
sólo mientras está enchufado.
2. Es necesaria una super visión cuidadosa cuando algún niño o inválido
use este aparato o cuando se use cerca
o al alcance de dichas personas.
3. Este aparato se debe usar sólo para
los fines descritos en este manual. No
use accesorios que no sean recomendados por el fabricante.
4. Nunca opere este aparato si tiene el
enchufe dañado, si no funciona de
manera apropiada, si se ha dejado caer
o está dañado o si se dejó caer al agua.
Devuelva el aparato al lugar donde lo
compró para intercambiarlo.
5. Mantenga el cordón lejos de superficies calientes.
6. No introduzca o inserte ningún
objeto en ninguna de las ranuras de
este aparato.
7. No se debe usar al aire libre ni en
lugares donde se esté usando laca (en
aerosol) o donde se esté administrando oxígeno.
8. No coloque el aparato sobre ninguna superficie mientras está en funcionamiento.
- Para disminuir el
Page 12

9. No use este aparato si el peine está
dañado o roto, o si le faltan dientes a
la navaja ya que esto puede causar
heridas. Antes de usar el aparato,
asegúrese de que las navajas estén
bien alineadas. (Refiérase al “Cuidado
de su Recortadora”).
10. No jale, ni tuerza el cordón, ni lo
enrolle alrededor del aparato.
11. No use un cordón de extensión
para operar este aparato.
GUARDE ESTAS
INSTRUCCIONES
INSTRUCCIONES DE
OPERACIÓN
Su nuevo juego de 20 piezas de GE
para cortar cabello incluye:
• Una recortadora de alto rendimiento con navajas afiladas con diamantes
para lograr cortes precisos
• Guarda navajas
• 4 peines de accesorio: 3.2 mm, 6.4
mm, 9.6 mm, 12.8 mm (1/8”, 1/4”,
3/8”, 1/2”) para diferentes largos de
cabello
• Peines de accesorio para la oreja
derecha e izquierda
• Capa de peluquero
• Tijeras de peluquero
• Peine de peluquero
• Peine de modelado
• 3 pinzas de modelado
• Cepillo para el cuello
• Cepillo limpiador
• Aceite lubricante
• Estuche suave de almacenamiento
• Video fácil de entender (en inglés y
español). Este video muestra las técnicas básicas de corte de cabello y muestra paso a paso el corte de seis estilos
populares. Le dará la confianza y la
capacidad para hacerle excelentes
cortes a todos los miembros de su
familia.
Este aparato es para uso doméstico. Se
debe usar solamente con corriente
alterna (50/60 hertz). Este aparato
tiene un enchufe polarizado (uno de
los dientes es más ancho que el otro).
Como medida de seguridad, este
enchufe sólo entrará al tomacorriente
en una posición. Si el enchufe no
entra completamente en el tomacorriente, voltéelo. Si, aún así, no entra,
comuníquese con un electricista calificado. No intente sobrellevar esta
medida de seguridad.
Su nuevo juego de corte de cabello de
GE tiene todo lo que necesita para
lograr cortes de profesionales en casa.
Su recortadora magnética motorizada
de gran potencia, tiene navajas de
acero con un alto contenido de carbón para mayor precisión, cortes
duraderos y un control automático de
graduación ajustable en 5 posiciones.
Simplemente seleccione el largo de
Page 13

corte deseado y la recortadora
automáticamente cortará todo el cabello en esa sección a la misma longitud.
También incluye 6 peines de accesorio
para diferentes largos de cabello
(incluyendo peines en ángulo para la
oreja derecha e izquierda), tijeras de
peluquero, un peine para modelado
con dientes en ángulo, un peine de
peluquero con dientes rectos, una
capa larga de peluquero, un estuche
para el fácil almacenamiento, 3 pinzas
de modelado para ayudarle en los
cortes de cabello más largo, un cepillo
para el cuello y un vídeo que le explica
paso a paso diversos consejos de modelado y técnicas, tanto en inglés como
en español. El juego incluye el aceite
lubricante, un cepillo limpiador y un
protector de navajas para el fácil mantenimiento y la protección de las navajas de la recortadora.
LA GUÍA DE GE PARA CORTAR
EL CABELLO EN CASA
Antes de empezar:
1. Revise la recortadora para asegurarse que no tenga cabello o polvo,
que esté propiamente aceitada y que
funcione sin problemas.
2. Póngale la capa alrededor del cuello de la persona que se va a cortar el
cabello.
3. Acomode a la persona con la cabeza
al nivel de los ojos de usted. Esto le
dará mayor visibilidad y control.
4. Pásele un peine al cabello para
desenredarlo. Sujeta la recortadora de
una manera cómoda para usted.
Ahora está listo para hacer el corte.
CORTE MEDIANO A LARGO
Para empezar , sólo corte una pequeña
cantidad de cabello, hasta que se acostumbre al largo de cada accesorio.
Pruebe con el peine de accesorio más
largo y seleccione el control de corte
más alto. Si desea un corte más corto
puede usar los peines más cortos.
• El peine de accesorio corto (número
1) corta el cabello a 3.2 mm (1/8”)
• El peine de accesorio mediano-corto
(número 2) corta el cabello a 6.4 mm
(1/4”)
• El peine de accesorio mediano-largo
(número 3) corta el cabello a 9.6 mm
(3/8”)
• El peine de accesorio largo (número
4) corta el cabello a 12.8 mm (1/2”)
• El peine para la oreja izquierda sirve
para recortar el cabello sobre dicha
oreja.
• El peine para la oreja derecha sir ve
para recortar el cabello sobre dicha
oreja. Esto peines facilitan esta parte
del corte.
Para colocar los
peines, sujételos con
los dientes hacia
arriba y luego fijándolos en la parte
inferior de la navaja de la recortadora.
Page 14

Para quitar los
peines de accesorio, coloque le dedo índice y el pulgar tal como lo
muestra la figura y
luego jale hacia
fuera y hacia arriba.
NOTA: Nunca empuje o fuerce la
recortadora para que pase por el
cabello con mayor rapidez. La experiencia profesional ha demostrado que
la recortadora funciona mejor si ésta
avanza a su propia velocidad.
PARA EMPEZAR A
CORTAR EL CABELLO:
1. El cabello se debe peinar en su
dirección normal de crecimiento.
2. Use el peine de accesorio más
largo, recorte los lados de abajo hacia
arriba. Coloque la
recortadora suavemente contra el
cabello, con los
dientes del peine
de accesorio apuntando hacia arriba,
pero que quede
plana contra la
cabeza. Levante la
recortadora gradualmente, hacia arriba y hacia fuera
pasándola por el
cabello y recortando poco a poco.
Repita el movimiento a los lados y en la
parte posterior de
la cabeza.
Si desea que el cabello quede aún
más corto:
A) Presione más
con el peine de
accesorio. Esto, por
supuesto, requiere
práctica.
O,
B) Simplemente
cambie el peine de
accesorio por uno
más corto.
Recuerde que es mejor dejar el cabello un poco largo y no demasiado
corto. Para cabello más largo, use el
peine de peluquero y levante el cabello en la parte superior de la cabeza.
Corte por encima del peine, o tome el
cabello entre dos dedos y córtelo al
largo deseado. Trabaje siempre de
adelante hacia atrás y corte de forma
gradual, al reducir el espacio entre e
peine o los dedos y la cabeza. Peine el
cabello con frecuencia para detectar
mechones disparejos y despejar el
cabello ya cortado.
DELINEACIÓN
No es necesario ningún accesorio
para la delineación. Peine el cabello
en el estilo deseado. Coloque la recor-
Page 15

tadora entre las patillas y la oreja (ver
más abajo), asegurándose que la
punta de la navaja esté contra la línea
del cabello. Use la línea de cabello
como guía y dirija la recortadora con
lentitud por encima, alrededor y
detrás de las orejas. Para la parte posterior del cuello y las patillas, sujete la
recortadora hacia abajo (ver más arriba) y contra la piel al largo deseado.
Mueva la recortadora hacia abajo.
DETÉNGASE, PEINE Y REVISE
Para obtener mejores resultados, haga
lo que los profesionales: peine el
cabello con frecuencia y revise los
resultados del corte a medida que
avanza. De esta manera se evita lados
desiguales, mechones, mala definición en el cuello, etc.
CONSEJOS PARA LOGRAR CORONILLAS PLANAS Y CORTES MILITARES PERFECTOS, ETC.
Siempre empiece el corte del cuello
hacia la coronilla y use el peine de
accesorio más largo. Sujete el peine
de accesorio para que quede plano
contra la cabeza y pase la recortadora
por el pelo con lentitud. Use la misma
técnica para los lados, cortando de
abajo hacia arriba.
Para la frente de la coronilla, corte el
cabello en sentido contrario al crecimiento normal del mismo, luego
emparéjela con los lados.
Para un estillo de coronilla plana, use
un peine recto en vez del peine de
accesorio. Simplemente corte el cabello en la parte alta de la cabeza por encima del peine recto (ver más arriba).
Para hacer el degradé hasta la línea del
cuello, use el peine de accesorio #1.
Peine el cabello y revise si hay partes
disparejas. Delinee el área de las patillas y el cuello (ver “Delineación”).
CUIDADO DE SU RECORTADORA
SI USTED DETERMINA QUE LA
ALINEACIÓN DE LAS NAVAJAS ES
INCORRECTA:
Las recortadoras de GE se examinan
con cuidado para asegurar que las
navajas tengan una alineación perfecta. Por supuesto, después de limpiar o
reemplazar las navajas tendrá que
volver a alinearlas. Asimismo, tendrá
Page 16

que volver a alinearlas si se desalinean. ¿Cómo puedo determinar cuando es necesario realinear las navajas?
Simplemente trate de emparejarlas,
de punta a punta, hasta que queden
en la posición que se muestra en la
FIG. 1 a continuación.
FIG. 1
Para evitar que la recortadora entre
en contacto con la piel o corte
demasiado cerca de la misma,
asegúrese que hay un espacio de
1/32” a 1/16” entre los dientes del
extremo de la navaja superior y la
navaja inferior.
ALINEACIÓN DE LAS NAVAJAS:
1. Coloque dos o tres gotas del aceite
lubricación (incluido).
2. Encienda la recortadora por un
minuto para esparcir el aceite de manera uniforme en las navajas, luego
apáguela.
3. Desconecte la recortadora y
desajuste los tornillos ligeramente.
(Ver la FIG. 2)
FIG. 2
4. Coloque el diente del extremo
izquierdo de la navaja superior en una
posición que cubra o esté a la izquierda del primer diente pequeño de la
navaja inferior.
5. Asegúrese que el diente grande la
navaja inferior toque el extremo derecho de la navaja superior.
ACEITE ESPECIAL
Para mantener las cuchillas de su
recortadora de GE en buen estado,
acéitelas cada tres o cuatro cortes.
Aplique una cuantas gotas de aceite
en los dientes de las navajas. Use el
aceite de lubricación especial que
viene incluido en su juego. Encienda
la recortadora por un minuto y luego
apáguela. Este aceite ligero y natural
se formuló específicamente para la
recortadora de gran velocidad de GE.
Como es el aceite correcto que se
debe usar, no disminuirá la velocidad
de las navajas. Nunca use otros productos. No hay sustitución para el
aceite de lubricación que viene incluido con su juego.
TORNILLO DE POTENCIA
El tornillo de potencia le permite ajustar la potencia de su recortadora. Es
posible que sea necesario ajustarlo si
Page 17

la potencia en su casa es baja. (La
recortadora de GE se diseñó para uso
casero).
1. Encienda la recortadora.
2. Use un destornillador o una moneda de diez centavos para darle vuelta
al tornillo en el sentido de las
manecillas del reloj, hasta que el
brazo tope con el resorte y se oiga un
ruido. FIG. 3
FIG. 3
3. Entonces dele vuelta en sentido
contrario a las manecillas del reloj
hasta que deje de sonar. Éste es el
nivel de potencia más alto. FIG. 4
FIG. 4
LA PALANCA DE RECORTE
AJUSTABLE
Al igual que las recortadoras profesionales, la palanca de recorte está a la
altura de su dedo pulgar . Usted puede
sujetar la recortadora en su mano y a
la vez ajustar el nivel de recorte.
Esta palanca de recorte de 5 niveles
elimina la necesidad de los peines de
accesorio porque le permite ajustar el
nivel del corte. Para lograr el corte
más al ras y quedar con el cabello más
corto, coloque la palanca de degradé
en la posición #1. Para aumentar el
largo del corte, coloque la palanca en
la posición 2, 3, 4 ó 5. Si la coloca en
la posición más alta, dejará el cabello
del mismo largo que con el peine de
accesorio corto de 3.2 mm (1/8”).
Como cada nivel usa un ángulo diferente del filo de la navaja, la palanca de
recorte extiende la vida de sus navajas.
Con su cepillo limpiador, quite el
cabello de las navajas. Esto se debe
hacer después de cada uso. Cuando
las navajas estén limpias, coloque una
pequeña cantidad de aceite sobre las
navajas.
Si hace esto después de cada corte,
sobre todo cuando se ha cortado una
gran cantidad de cabello, las navajas
se deberían mantener en buen estado. Si la recortadora deja de cortar y
esta operación no da resultados,
revise las navajas. Si se han desafilado,
reemplácelas o llévelas al lugar donde
las compró.
Corte al ras
Corte más largo
Page 18

NOTA: Nunca jale el cordón de la
recortadora. No lo retuerza ni enrolle
alrededor de la recortadora. Cuando
no esté en uso, colóquela plana con el
cordón enrollado de forma suelta.
Navaja superior
Navaja
inferior
ADVERTENCIA:
SI USTED PIENSA QUE
LA CORRIENTE ESTÁ
APAGADA CUANDO EL
APARATO ESTÁ APA-
GADO, SE EQUIVOCA.
MANTÉNGALO ALEJADO DEL AGUA
Palanca de
degradé
ajustabl
Tronillo de
potencia
Interruptor
Todos saben que la electricidad y el
agua son una combinación peligrosa.
¿Pero sabía usted que aunque el
aparato esté apagado puede conducir
electricidad? Si el aparato está enchufado, la electricidad está encendida.
Así que cundo no esté usando el
aparato, desenchúfelo.
SIEMPRE SE DEBE
DESENCHUFAR
LOS APARATOS
ELECTRODOMÉSTICOS
PEQUEÑOS
Un anuncio del servicio público de la Asociación de Fabricantes
de Aparatos Electrodomésticos y de “Underwriters
Laboratories, Inc.”.
Page 19

DOS AÑOS DE
GARANTÍA LIMITADA
Si tiene algún problema con este producto, por favor lame al 1-877-207-0923.
Este producto de marca GE, está
garantizado por Wal-Mart por un periodo de 24 meses contra los defectos
de material o de fábrica. Para obtener
servicios bajo esta garantía, su
primera opción es llevar el producto
defectuoso con los recibos de compra
originales, a la tienda Wal-Mart más
cercana para intercambiarlo por otro
(siempre y cuando la tienda tenga un
reemplazo para el producto).
Si esta opción no es posible para
usted, puede enviar el producto
defectuoso al Departamento de
Ser vicio más cercano a su área, adjuntando los recibos de compra originales y $3.00 por los cargos de envío.
No olvide incluir su nombre, dirección completa con código postal,
número de teléfono y una descripción
detallada del problema. Nosotros lo
repararemos o reemplazaremos su
producto (a nuestra discreción), sin
cargo alguno por 24 meses a partir de
la fecha de compra, si el producto
tiene defectos de fábrica o materiales.
Para los residentes de California solamente es necesario proporcionar una
prueba de compra y deben llamar al
1-877-207-0923 para que les den
instrucciones de envío.
CUALQUIER GARANTÍA IMPLÍCITA, OBLIGACIÓN O RESPONSABILIDAD, INCLUYENDO PERO NO
LIMITADO A LA GARANTÍA IMPLÍCITA DE COMERCIABILIDAD O
APTITUD PARA UN PROPÓSITO
PARTICULAR, ESTARÁ LIMITADA
AL PERIODO DE 24 MESES DE EST A
GARANTÍA LIMITADA. Algunos estados no permiten limitaciones en la
duración de garantías implícitas, de
manera que las limitaciones anteriores podrían no aplicarse a usted.
EN NINGÚN CASO SE PODRÁ
RESPONSABILIZAR A Wal-Mart POR
CUALQUIER DAÑO ESPECIAL,
INCIDENTAL O CONSECUENTE O
POR INCUMPLIMIENTO DE ESTA
U OTRA GARANTÍA LIMITADA,
EXPRESA O IMPLÍCITA. Algunos
estados no permiten exclusiones ni
limitaciones en los daños especiales,
incidentales o consecuentes, de manera que las limitaciones anteriores
podrían no aplicarse a usted.
Esta garantía le otorga derechos
legales específicos y es posible que
tenga otros derechos que varían de un
estado a otro.
Para los productos que se compraron
en Estados Unidos pero que se están
usando en el extranjero, la garantía
sólo tendrá validez si se sigue el procedimiento de devolución descrito
más arriba.
Page 20

USA
Service Centers:
Customer Service
Department
150 Milford Road
East Windsor, NJ 08520
Customer Service
Department
7475 N. Glen Harbor Blvd.
Glendale, AZ 85307
Centros de Servicio:
Departamento de
Servicio al Cliente
150 Milford Road
East Windsor, NJ 08520
Departamento de
Servicio al Cliente
7475 N. Glen Harbor Blvd.
Glendale, AZ 85307
CANADA
CONSUMER PRODUCTS INC.
156, rte Parkshore
Brampton, Ontario
L6T 5M1
IB-3678 00GE26038
 Loading...