

Page 1

FINAL APPROVAL:
DATE:
840074400 EvOS.qxd 11/15/00 9:50 AM
age 1
Food Processor
ir
JC Po-c^CS
SrioÁi^h
Spar\isk
Nc ^¡e.^
-£>
Food Processor Safety
Parts and Features
Using Your Food Processor
User Guide
...............................................
...........................
..................................
..................
.........
2 Cleaning................................................
.........
.........
.........
4
5
9
Recipes
..................................................
Customer Assistance...........................
..........
..........
..........
P) i^ Scsok
10
10
18
For Customer Assistance Please Call: 1-877-207-0923 I
840074400
Í^íECORD PR(S^7
';7'5ijed Oí'
mv
t ^
-Md
So
‘^>S>
Page 2

840074400 EvOS.qxd 11/15/00 9:50 AM
ge 2
Food Processor Safety
IMPORTANT SAFEGUARDS
W^en using electrical appliances, basic safety precautions should always be followed,
including the following:
1. Read and save all instructions.
2. To protect against risk of electrical
shock, do not immerse base, motor,
cord, or plug in water or other liquid.
3. Close supervision is necessary when using
this appliance near children.
4. This appliance should not be used by
children.
5. Unplug cord from outlet when not in
use, before putting on or taking off parts,
and before cleaning.
6. Avoid contacting moving parts. Keep
fingers out of discharge opening.
7. Do not operate any appliance with a
damaged cord or plug or after the
appliance malfunctions or is dropped
or damaged in any manner. Call our
toll-free customer assistance number for
information on examination, repair or
electrical or mechanical adjustment.
8. The use of attachments not
recommended or sold by the
appliance manufacturer may cause
fire, electric shock, or injury.
9. Do not use your food processor if any
part is chipped, cracked or broken.
10. Do not use appliance outdoors.
11. Do not let cord hang over edge of table
or counter, or touch hot surfaces.
12. Never feed food into food chute by hand
when slicing or shredding food. Always
use food pusher.
13. The blade and disc are sharp. Handle
carefully. Store out of reach of children.
14. Make sure the blade or disc has come to
a full stop before removing cover.
15. Be certain cover is securely locked in
place before operating appliance.
16. To reduce the risk of injury, never place
cutting blade or disc on base without first
putting bowl properly in place.
17. Keep hands and utensils away from
moving blade and disc while processing
food to reduce the risk of severe
personal injury and/or damage to the
food processor. A rubber scraper may be
used but ONLY when the food processor
is not running.
18. Do not attempt to defeat the cover
interlock mechanism.
19. To reduce the risk of injury, be sure to
insert or remove blade and disc using
hubs provided for this purpose. Use
caution when removing blade and disc
from the bowl, when emptying the bowl,
and when cleaning.
20,
Be sure to turn switch to OFF position
after each use. Always use the pusher to
clear the food chute. When this method
is not possible, turn the motor off and
disassemble unit to remove the
remaining food.
21. The appliance is not intended for
commercial, professional or industrial
use. It is designed and built exclusively
for domestic use only.
Never use appliance for a longer period
22,
or with a larger amount of ingredients
other than that recommended by the
appliance manufacturer.
23. The maximum rating of this unit is
based on using the S-blade. Using the
Slicing/Shredding Disc may draw
significantly less power.
24. Do not place on or near a hot gas or
electric burner or in a heated oven.
25. Do not use appliance for other than
intended use.
SAVE THESE INSTRUCTIONS!
Page 3

840074400 EvOS.qxd 11/15/00 9:50 AM
Consumer Safety Information
This appliance is intended for household
use only.
This appliance is equipped with a polarized
plug. This type of plug has one blade wider
than the other. The plug will fit into an
electrical outlet only one way. This is a safety
feature intended to help reduce the risk
of electrical shock. If you are unable to
insert the plug into the outlet, try reversing
the plug. If the plug should still fail to fit,
contact a qualified electrician to replace the
obsolete outlet. Do not attempt to defeat the
safety purpose of the polarized plug by
modifying the plug in any way.
Before First Use
Unpack processor. Handle the S-Blade
and Slicing/Shredding Disc carefully;
they are very sharp. Wash all parts
ge 3
&
To avoid an electrical circuit overload, do
not use another high wattage appliance on
the same circuit with your food processor.
The length of the cord used on this appli
ance was selected to reduce the hazards of
becoming tangled in, or tripping over a
longer cord. If a longer cord is necessary, an
approved extension cord may be used. The
electrical rating of the extension cord must
be equal to or greater than the rating of the
food processor. Care must be taken to
arrange the extension cord so that it will
not drape over the countertop or tabletop
where it can be pulled on by children or
accidentally tripped over.
except the base in hot, soapy water.
Rinse then dry. These parts can also be
placed in the dishwasher.
Processing Tips and Techniques
• For a uniform consistency when
chopping, leave room in the bowl for
the food to be tossed around.
• Also for a more uniform consistency,
start with pieces of food that are
similar in size. Carrots, for example,
should all be cut in 1-inch chunks.
Do not process 4-inch pieces with
i^-inch pieces.
• This food processor is excellent to
chop, mix, slice, or shred most
foods. However, to maintain peak
performance, we do not recommend
the following: grinding grain, coffee
beans or spices; slicing frozen meat;
or crushing ice.
• Do not puree or mash starchy
vegetables like potatoes. They will
be overprocessed in a second and
turn gummy.
• Operating time will depend on quantity
of food being processed. Most foods
can be sliced, chopped, or shredded in
seconds. Do not operate processor for
more than one minute at a time.
If processing large quantities, let the
processor rest about one minute
before continuing.
• To slice or shred cheese, select a
firm cheese like cheddar, Monterey
Jack, or Swiss. Place cheese in freezer
for 30 minutes before processing.
Always use highest speed of food
processor.
Page 4
840074400 EvOS.qxd 11/15/00 9:50 AM
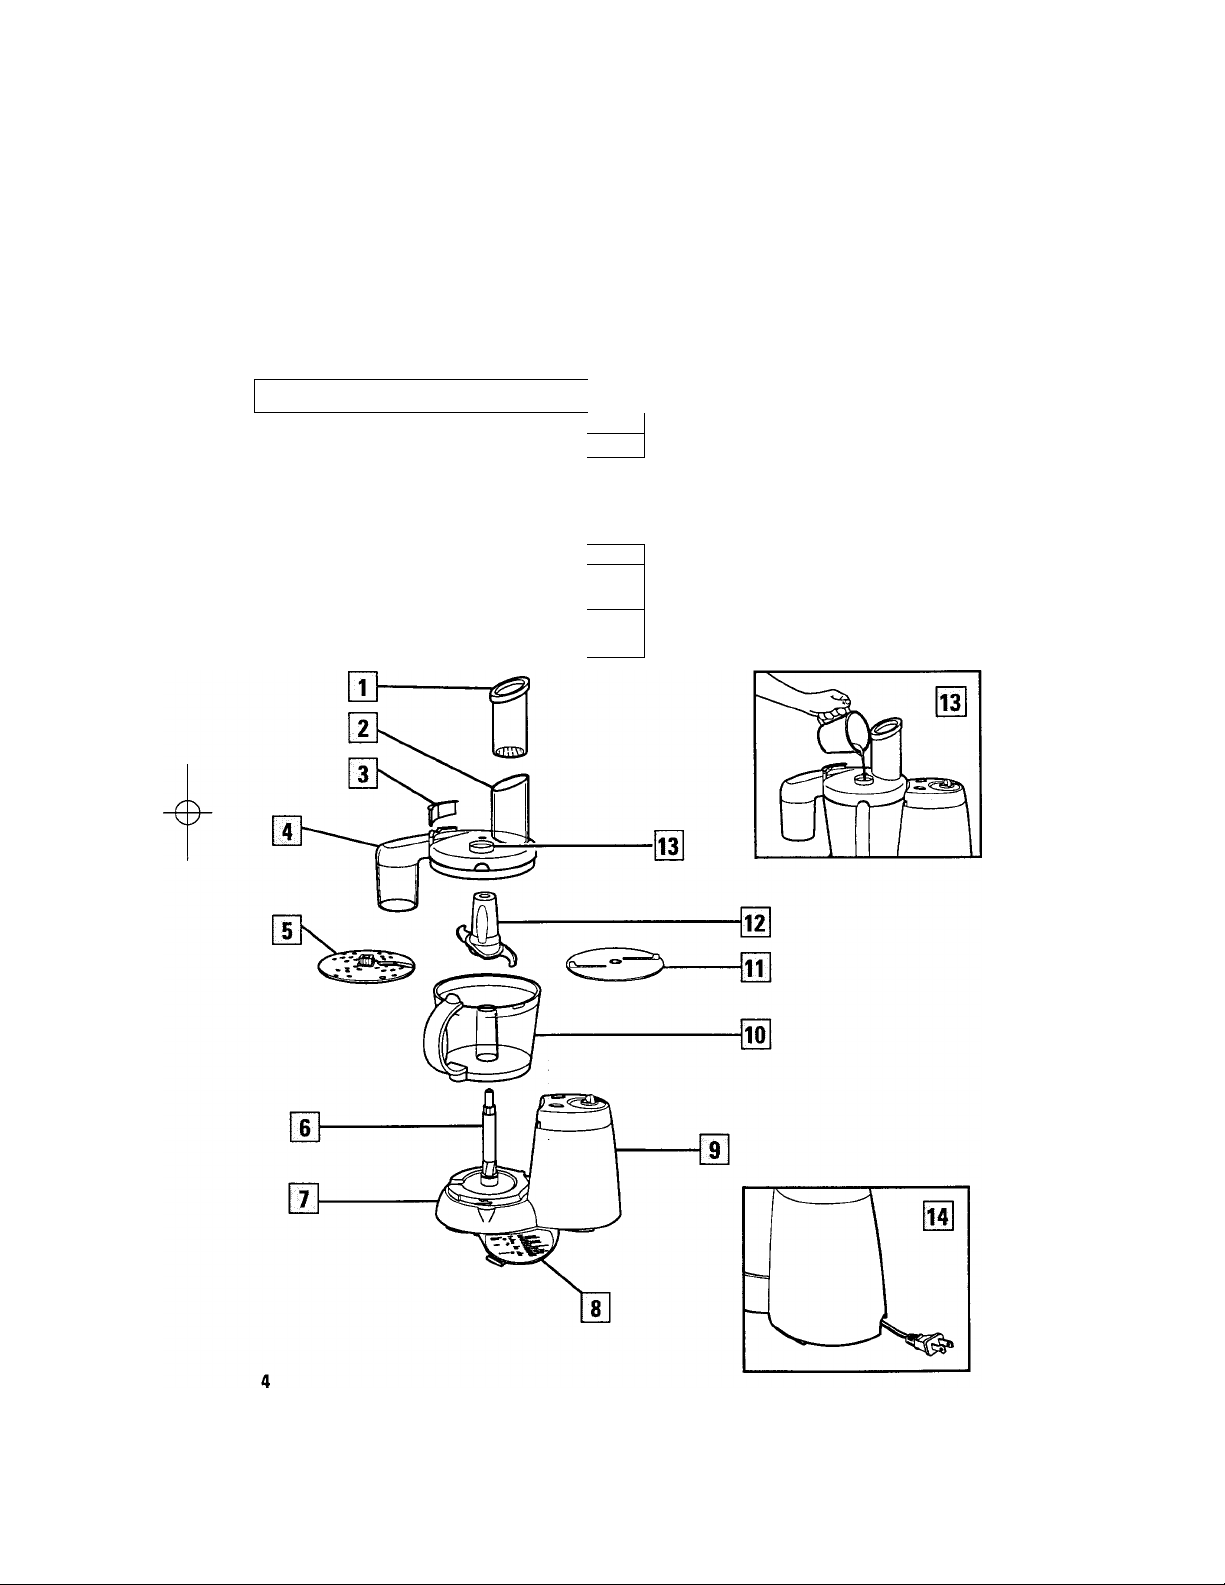
Parts and Features
Rage 4
€5
[~1~| Food Pusher
[~2~| Food Chute
3 Food Gate - leave in cover
tor regular processing; remove
for continuous processing.
Continuous Feed Chute
[~5~| Reversible Slicing/Shredding Disc
p6~| Motor Shaft
[Y] Base
Pull-Out User Guide
E
Control Panel
a
Bowl
n
Continuous Feed Disc - must be used
11
for continuous processing; this disc
“throws” the food through the
Continuous Feed Chute.
S-Blade
12
Dosing Cup (see inset)
13
Cord Storage
14
-€>
Page 5

840074400 EvOS.qxd 11/15/00 9:50 AM .age 5
Using Your Food Processor
NOTES:
• Always lock the bowl onto base before
putting on any blade or disc. Make
sure blade or disc is securely
in place before using.
• With this food processor you can
use the continuous feed chute for
slicing and shredding into a separate
container. The continuous feed chute
allows slicing or shredding foods not
limited to the processor bowl capacity.
How to Lock the Bowl
Hints!
• The howl will hold 9 cups of dry
ingredients or 2 cups of liquid.
Do not overfill.
• Do not use your food processor to
crush ice.
• For consistent texture, foods should
be cut into 1-inch cubes before
mincing or chopping with the
S-blade.
Place the bowl on processor base and
turn counterclockwise until the bowl
locks into place.
NOTE: The food processor will not work
unless the bowl is locked.
How to Lock the Cover
Place cover on bowl and turn the cover
counterclockwise until the cover locks
into place.
NOTE: The food processor will not work
unless the cover is locked.
Tipi
When the bowl and the cover are
properly locked and the unit is
plugged in, the Ready light should
be on.
Page 6

840074400 EvOS.qxd 11/15/00 9:50 AM
Processing with the Slicer/Shredder
ge 6
&
• To slice or shred cheese,
select a firm cheese like
Cheddar, Monterey Jack, or
Swiss. Place cheese in the freezer for 30
minutes before processing. Always use
the highest speed of food processor.
• The Reversible Slicer/Shredder Disc
has a slicing blade on one side and
shredding teeth on the other. Place on
motor shaft with desired cutting edge
facing up.
• To prepare julienne vegetables, slice
then remove from bowl and restack
the vegetables. Pack into food chute
with slices vertical. Slice again to make
matchstick cut vegetables.
1. Make sure the Qjntrol Switch is turned
OFF and the unit is unplugged.
2. Lock the bowl onto btise. (See “How
to Lock the Bowl” on page 5.)
3. Put Slicer/Shredder Disc on motor
shaft with the desired side facing up
for either slicing or shredding. Lock
cover onto bowl. (See “How to Lock
the Cover” on page 5.)
4. Cut food to fit food chute. Pack food
chute tightly with food. Insert food
pusher in chute. Always use the food
pusher to feed food into the chute.
NEVER PUSH FOOD THROUGH CHUTE
WITH HANDS.
5. Plug in unit and process food.
6. Select speed. While pressing on food
pusher, push ON or PULSE to
process food.
7. When food chute is empty, push
OFF or release fi-om PULSE position.
Wait until blade has stopped rotating
before removing cover.
Page 7

840074400 EvOS.qxd 11/15/00 9:50 AM
How to Operate the Controls
Processing with the S-Blade
.age 7
The controls are conveniently located
on top of the base. Rotate the center
knob to select a Low, Medium, or High
variable speed. If the bowl and cover are
properly locked the Ready light should
be on.
The S-blade can be used
to coarsely chop, finely mince,
mix, or puree food
to a smooth consistency.
1. Make sure the Control Switch is
turned OFF and the unit is
unplugged.
2. Lock the bowl onto base. (See “How
to Lock the Bowl” on page 5.)
3. Place the S-blade onto motor shaft
of food processor in center of bowl.
Turn slowly until blade drops into
place. Handle carefully; the hlade
is sharp.
Lock cover onto bowl. (See “How to
Lock the Cover” on page 5.) Insert
food pusher into food chute.
Pull all of cord out of cord storage.
This will help air flow and keep the
motor cool. Plug in unit and process
food. The processing speed and time
will determine the finished consisten
cy of the food. The Pulse button can
help you avoid overprocessing.
Page 8

840074400 EvOS.qxd 11/15/00 9:50 AM
Continuous Processing
ge 8
IMPORTANT: When using
the continuous feed chute
the food gate must be
removed and the continuous feed
disc must be in place.
1. Make sure the Control Switch is
turned to OFF and the unit is
unplugged.
2. Lock the bowl onto base. (See “How
to Lock the Bowl” on page 5.)
3. Place the continuous feed disc, ribbed
side up, onto the motor shaft. Turn
the disc slowly until it drops into
position (level with top of bowl).
4. Select desired side of reversible
slicing/shredding disc and place that
side up on the motor shaft.
5. REMOVE FOOD GATE FROM
CONTINUOUS FEED COVER TO
PREVENT DAMAGE TO UNIT.
6. Lock on cover. (See “How to Lock the
Cover” on page 5.) Place bowl under
feed chute.
7. Plug in unit and select speed. Process
food. Check the continuous feed
chute frequendy to make sure the
opening is not blocked. If blocked,
turn unit off and unplug. Clear
blockage, then reassemble and
continue processing.
NOTE: When using the continuous feed
chute, some food may fall into the food
processor bowl.
Hint!
Do not use the continuous feed chute
feature when shredding root vegetables
such as carrots and potatoes. As with
most continuous feed processors, the
shredded moist vegetables may clog in
the chute. It is best to shred these
vegetables into the food processor
bowl. Slicing these root vegetables
while using the continuous feed chute
will not present a problem.
Page 9

840074400 EvOS.qxd 11/15/00 10:59
Processing with the Dosing Cup
User Guide
age 9
The Dosing Cup opening in the cover
of the food processor allows you to add
liquids in a gradual, continuous flow.
To use, slowly pour the liquid through
the Dosing Cup while the processor is
running. The gradual adding of the
liquid tissures a uniform consistency or
a perfect emulsion in salad dressings.
MEDIUM HIGH
Slicing Disc (blade up)
Apples
All cheeses
Julienne vegetables
S-Blade
Pureed food
Chopped nuts
Chopped meat
Grated Parmesan
Fine grated foods
Shredding Disc (teeth up)
Zucchini All cheeses
Shredded vegetables
1 P o \
o o 0
n
OJI1 \
0 O 0 /
O. /
Vj/
LOW
\
Mushrooms
Cucumbers
All fruits
All vegetables
Bread crumbs
Cabbage
)
Apples
Onions
For best results do not exceed thè following amounts when chopping, mincing, or
pureeing with the S-blade.
FOOD
Fruits and Vegetables
Meats
Parmesan or Romano Cheese
Cheddar, Jack, or Mozzarella Cheese
MAXIMUM AMOUNT
1 pound or 2 to 3 cups
12 ounces or 1!4 cups, cubed
5 ounces, cubed
8 ounces, cubed
Page 10

840074400 EvOS.qxd 11/15/00 9:50 AM
Cleaning
.age 10
0
1. Wash the howl, cover, blade, discs,
food gate, and food pusher in hot,
soapy water. Rinse and dry thoroughly.
These parts may also be washed in the
top rack of a dishwasher.
NOTE: Do not store the food
processor with the cover in the
locked position, as this may put
strain on the interlock tab.
Recipes
Blue Cheese Dressing
I 2 cloves garlic
4 ounces blue cheese
2 cups mayonnaise
Using S-blade, with processor running, drop the garlic cloves into the food chute
and mince. Add cheese and process for 10 seconds. Add mayonnaise, sour cream,
lemon juice, and sugar. Process until smooth. Keep refrigerated. Makes 3 cups.
2. Wipe the base, control panel, and
cord with a damp cloth or sponge.
To remove stubborn soil, use a mild
non-abrasive cleanser.
NEVER IMMERSE THE BASE IN WATER
OR OTHER LIQUID.
3. To store, place bowl on base. Then
place onto the motor shaft, the
S-blade, continuous feed disc and
slicing/shredding disc. Place cover
on bowl but do not lock.
'A cup sour cream
'A cup fresh lemon Juice
2 tablespoons sugar
Sweet & Sour Salad Dressing
14 cup sugar
14 cup cider vinegar
14 cup boiling water
% teaspoon celery seeds
!4 teaspoon freshly ground black pepper
‘A cup vegetable oil
% teaspoon salt
Assemble food processor with S-blade. Place all ingredients in the food processor
except vegetable oil. Process on Low and slowly add the vegetable oil through the
dosing cup. Continue processing until all oil is mixed. Let stand at room temperature
for several hours and then shake well before using. Makes about 1 cup.
10
Page 11

840074400 EvOS.qxd 11/15/00 9:50 AM .age 11
Green Goddess Salad Dressing
3 tablespoons cider vinegar
2 tablespoons lemon juice
A cup loosely packed parsley sprigs
A cup loosely packed tarragon leaves
1 green onion
1 small garlic clove, peeled
1 cup mayonnaise
'A cup sour cream
!4 cup loosely packed chives
Combine vinegar and lemon juice in a small measuring cup. Set aside. Assemble food
processor with S-blade. Put remaining ingredients into food processor. Process on
Medium while adding the cider vinegar and lemon juice through the dosing cup.
Process until thoroughly mixed. Refrigerate until ready to serve. Makes about 2 cups.
Hummus
2 cloves garlic
2 green onions, white portion and
half of green top
15 ounces garbanzo beans (chickpeas),
drained, reserving 'A cup liquid
!4 cup tahini (sesame paste), stirred
2 teaspoons olive oil
'A teaspoon cumin
Dash cayenne
Salt and pepper to taste
Dash paprika
Pita bread or cut up vegetables, optional
3 to 4 tablespoons lemon or lime juice
Using S-blade and with processor running, drop garlic cloves and onion into food
chute. Then add garbanzo beans, tahini, lemon or lime juice, olive oil, cumin,
cayenne, salt, and pepper. Continue to process until smooth, scraping bowl as need
ed. Place into serving bowl and garnish with paprika. Serve with pita bread and/or
vegetables. To store, refrigerate. Makes about 2 cups.
Salsa
1 onion, peeled and quartered
1 clove garlic
1 hot pepper (jalapeno or finger hot),
cored, seeded, and quartered
4 tomatoes, quartered
14 cup cilantro, packed
A teaspoon cumin
1 tablespoon lime juice
Salt and pepper to taste
Hot sauce, optional
Using S-blade and with processor running, drop onion, garlic cloves, and hot pepper
through the food chute and chop until finely minced. Stop processor and add
tomatoes, cilantro, cumin, lime juice, salt, and pepper. Pulse until desired texture.
Add hot sauce if desired. Makes 2 to 3 cups.
Cranberry Orange Relish
12 ounces fresh cranberries, stems
removed, or frozen
1 cup sugar
3 tablespoons Grand Marnier liqueur
or orange juice
Dash ground cloves
1 small navel orange, washed and
cut into wedges
Using S-blade, place cranberries, sugar, orange. Grand Marnier, and cloves into the
work bowl. Process until cranberries are almost smooth, yet a bit chunky. Cover and
refrigerate overnight. This will thicken as it sits. Makes about 2'h cups.
Page 12

840074400 EvOS.qxd 11/15/00 9:50 AM .age 12
Chicken Puffs
1 pound cooked chicken,
{\A cups flnely chopped)
14 cup packed parsley sprigs
1 cup chicken broth
14 cup vegetable oil
'A teaspoon each: salt and celery seed
14 teaspoon each: dry mustard
and onion powder
1 cup flour
4 eggs
1 tablespoon Worcestershire sauce
Cut chicken in large chunks and using S-blade place chicken and parsley in work
bowl and pulse until finely chopped. Remove and set aside. In a large saucepan over
high heat, mix chicken broth, oil, and Worcestershire sauce. Bring to a boil. Sdr the
four seasonings into flour. When broth reaches a boil, dump in flour all at once.
Stir until the dough forms a ball. Place dough into mixing bowl. Add eggs one at a
time, mixing well after each egg. Stir in chicken and parsley. Drop by spoonfuls, size
of golf ball, onto baking sheet Bake at 450°F for 12 to 15 minutes. Makes 4 dozen.
Creamed Potatoes
4 pounds all-purpose white potatoes,
about 15 medium
3 cups half-and-half cream
\A teaspoons salt
!4 teaspoon pepper
4 tablespoons butter, melted
3 tablespoons finely minced onion
Scrub the potatoes but do not peel. Place in a large pot and cover with water. Bring
to boil then reduce heat and simmer for 45 minutes or until done. Refrigerate
overnight. Using slicer/shredder disc, shredding side up, grate the potatoes. It is not
necessary to peel them. Place grated potatoes, cream, onion, salt, and pepper in a
large bowl and stir to mix. Put butter in a 9x13-inch baking dish and rotate dish to
coat Spoon in potato mixture. Bake at 375°F for 1 hour. Makes 10 servings.
Sweet Potato Pudding
1 to 114 pounds sweet potatoes, scrubbed
but not peeled, and cut to fit food
chute (3 cups grated)
A cup sugar
1 cup milk
1 egg
!4 cup butter
1 teaspoon vanilla
14 cup maple syrup
Using slicer/shredder disc, shredding side up, grate sweet potatoes. Remove from
work bowl and place in medium mixing bowl. Set aside. Using S-blade, place sugar,
syrup, milk, egg, butter, and vanilla into work bowl. Process until smooth. Pour over
shredded sweet potatoes. Mix thoroughly. Pour into greased 114<}uart casserole dish.
Place casserole dish into a larger pan or dish. Add hot water to larger pan so water
will be 1 to 2 inches up side of casserole dish. This will prevent the edges from
burning. Bake at 350°F for 114 hours. Makes 6 servings.
12
Page 13

840074400 EvOS.qxd 11/15/00 9:50 AM .age 13
Roasted Sweet Peppers & Sausage
1 red bell pepper, cored and seeded
1 yellow bell pepper, cored and seeded
2 green bell peppers, cored and seeded
1 teaspoon dried oregano
2 tablespoons olive oil
2 pounds Italian sausage
2 medium onions, peeled and cut to fit
in food chute
Using a fork, pierce sausage casings several times. In a skillet over medium high
heat, brown sausages, turning frequendy, about 8 minutes. Set aside. Using the
slicer/shredder disc, slicing side up, slice peppers and onion. Place in 2-quart
baking dish. Add oregano and oil; stir to mix. Place sausage on peppers.
Bake at 350°F for 45 minutes. Serve peppers and sausage with noodles or spoon
onto toasted sub rolls. Makes 6 servings.
Cashew Chicken
2 pounds boneless,
skinless chicken breasts
4 cloves garlic
1-inch piece of ginger root, peeled
1 bunch green onions, roots trimmed
2 tablespoons vegetable oil
1 tablespoon flour
14 cup pineapple juice
3 tablespoons soy sauce
1 teaspoon dry mustard
8-ounce can sliced water chestnuts,
drained
1 cup roasted cashews
Cooked rice
% cup chicken stock or broth
^ Using S-blade, place chicken in bowl. Pulse until chicken is very coarsely chopped.
Remove chicken and set aside. Do not wash work bowl. Place garlic and ginger in
work bowl and pulse until minced. Add green onions, white part and 2-inches of
green top, and pulse until chopped. Heat oil in skillet over medium high heat. Add
the chopped vegetables and chicken to the skillet. Stir and cook about 7 minutes or
until chicken is done. Stir occasionally. Use a slotted spoon and remove chicken and
vegetables. Sprinkle flour into skillet. Stir and cook until Just beginning to turn
brown, about 1 minute. Add chicken broth, pineapple Juice, soy, and mustard.
Stirring frequently, bring to a boil and cook until thickened, about 5 minutes.
Return chicken/vegetables to skillet, add cashews and water chesmuts. Heat through.
Serve over rice. Makes 6 servings.
13
Page 14

840074400 EvOS.qxd 11/15/00 9:50 AM .age 14
Potato Leek Soup
3 pounds potatoes, peeled
3 to 4 leeks, both root and
leaf ends trimmed
A pound bacon
VA teaspoons salt
14 teaspoon pepper
A cup milk
3 tablespoons flour
2 quarts water
Using sheer/shredder disc, slicing side up, slice potatoes. Remove to large mixing
bowl and cover with cold water. Set aside. Slice leeks. To clean leeks, place in a
colander and toss gently under running water. In a soup pot or Dutch oven, cook
bacon until crisp. Remove bacon and set aside. Add the leeks to the bacon grease in
the pot. Cook and stir occasionally over medium heat for about 10 minutes.
Increase heat to high and add water, potatoes, salt, and pepper. Bring soup to a boil
then reduce heat and simmer uncovered for 15 to 20 minutes. In a small bowl, whisk
together milk with flour. Slowly stir milk mixture into simmering soup and simmer
for 5 minutes. Garnish with crumbled bacon bits. Makes 6 to 8 servings
Lasagna
1 pound mozzarella cheese
1 pound mild Italian sausage
1 pound ground beef
2 cloves garlic
1 medium onion, peeled and
cut in eighths
1 rib celery, cut in 2-inch pieces
26-ounce can spaghetti sauce
8-ounce can tomato sauce
2 A ounces Parmesan cheese, cut in
14-inch cubes {A cup grated)
1 cup parsley sprigs
1 pound small curd cottage cheese
15-ounce container ricotta cheese
2 eggs
12 lasagna noodles, uncooked
Using slicer/shredder disc, with slicing blade up, slice mozzarella and set aside.
Remove casings from sausage. In a large skillet or large, heavy saucepan over medium
high heat, cook and crumble sausage and ground beef. Using S-blade, with processor
running, drop garlic through food chute and mince. Stop processor. Add onion and
celery. Pulse until chopped then add to skillet. Cook until onion is soft. Place
cooked meats and vegetables in large bowl. Add spaghetti sauce and tomato sauce
and stir to mix. Using S-blade, process Parmesan cheese on High until finely grated,
about 20 seconds. Add parsley to the Parmesan and process until chopped. Add
cottage cheese, ricotta, and eggs and process until blended. In a 10 x 14-inch baking
dish or lasagna pan, layer meat sauce, noodles, cheese mixture, and then mozzarella
slices. Repeat layers. (The lasagna can be refrigerated at this time.) Cover tightly
wth aluminum foil and bake at 350°F for 45 minutes. Remove foil and bake 15 to 30
minutes more. Let sit 10 minutes before cutting to serve. Makes 8 to 10 servings.
NOTE: Mozzarella cheese will shred or slice more easily if placed in freezer 30 to 60
minutes before shredding. Always use highest speed to process cheese.
14
Page 15

840074400 EvOS.qxd 11/15/00 9:50 AM .age 15
Crispy Catfish Fillets
2 ounces Parmesan cheese
(J4 cup, grated)
20 buttery crackers, like Ritz
'A cup fresh parsley sprigs
!4 cup melted butter
4 catfish fillets, about 8 ounces each
or Townhouse
Cut cheese into '/i-inch cubes. Using S-blade, place cheese cubes, crackers, and
parsley in work bowl. Process until finely ground. Place cracker mixture in large
shallow bowl. Dip fillets in butter then place in cracker mixture to coat Lay fillets on
nonstick or aluminum foil-lined baking sheet Bake at 400°F for 15 to 20 minutes.
Makes 4 servings.
Vegetable Lasagna
8 ounces reduced-fat moz2arella cheese
1 medium onion, peeled, cut into chunks
4 garlic cloves
4 to 6 ounces fresh mushrooms
1 teaspoon vegetable oil
2 zucchini, approximately 6 inches
each, cut into chunks
2 ounces Parmesan cheese, cut into
8-ounce package light cream cheese,
cut into chunks
% cup skim milk ricotta cheese
14 cup light sour cream
1 egg
2 teaspoons dried Italian seasoning
26-ounce can spaghetti sauce
6 lasagna noodles, cooked
14-inch chunks (about 14 cup grated)
Using slicer/shredder disc, shredding side up, shred mozzarella. Place in a small
bowl and set aside. Using S-blade, place onion and garlic cloves into work bowl.
Pulse until coarsely chopped. Add mushrooms to bowl. Continue to pulse until
mushrooms are coarsely chopped. Place chopped vegetables in a large skillet with
oil, over medium heat. Using S-blade, place zucchini in work bowl. Pulse until
coarsely chopped. Add zucchini to skillet. Cook until tender, about 10 minutes;
set aside. Without washing the work bowl using S-blade, place Parmesan cheese
chunks in bowl and process on High until coarsely chopped. Add the cream
cheese, ricotta cheese, sour cream, egg, and Italian seasonings and process until
creamy, about 30 to 40 seconds. Grease a 9xl3-inch baking dish. Layer half each of
noodles, cream cheese mixture, chopped vegetable mixture, and spaghetti sauce.
Repeat layers once. Sprinkle with mozzarella. Bake, covered, at 350°F for 25 min
utes. Uncover and cook an additional 10 minutes. Let stand 10 minutes before
serving. Makes 8 servings.
NOTE: Mozzarella cheese will shred or slice more easily if placed in freezer 30 to 60
minutes before shredding. Always use highest speed to process cheese.
15
Page 16

840074400 EvOS.qxd 11/15/00 9:50 AM .age 16
Cheddar Onion Cornbread
4 ounces Cheddar cheese (1 cup grated)
1 small onion, peeled and cut in quarters
1 tablespoon butter
1 egg
14 cup milk
8-ounce package com muffin mix
8-ounce can cream style com
8-ounce container sour cream
Using slicer/shredder disc, shredding side up, shred cheddar and set tiside. Using
S-blade, place onion in work bowl and process until finely chopped. Place chopped
onion and butter in a skillet and cook over medium high heat until onions are soft.
Set aside and cool. Do not wash work bowl. Using S-blade, place egg, milk, muffin
mix, and com into work bowl. Pulse until JUST mixed. Pour batter into greased
8-inch square baking pan. Combine onions, cheese, and sour cream. Place small
spoonfuls of sour cream mixmre on top of batter. Bake at 425“F for 30 to 35 minutes.
Makes 6 to 8 servings.
Good Morning Muffins
4 medium carrots (2 cups grated),
washed, ends removed
1 large apple (1 cup grated), cored
and cut into wedges
3eggs
14 cup apple butter
14 cup vegetable oil
1 tablespoon vanilla
2 cups flour
2 teaspoons cinnamon
1 teaspoon baking soda
14 teaspoon baking powder
14 teaspoon salt
1 cup raisins
114 cups sugar
Using sheer/shredder disc, shredding side up, shred carrots and apple into work
bowl. Remove from bowl; put into a large mixing bowl. Set aside. Using S-blade,
place eggs, apple butter, oil, sugar, and vanilla into work bowl. Process until mixed
and smooth. Add flour, cinnamon, baking powder, baking soda, salt, and raisins.
Pulse until JUST mixed. Pour batter into mixing bowl with grated carrots/apple
mixture. Spoon into greased or paper lined muffin tin, filling about M fuU. Bake at
375°F for 15 to 20 minutes.
Makes 24 muffins.
Baked Pineapple Bread Pudding
12 slices of white bread, tom into
strips to fit food chute
20-ounce can pineapple chunks, drained
2 eggs
1 cup half-and-half cream
1 teaspoon vanilla
1 tablespoon melted butter or
margarine
114 cups sugar
3 pineapple slices, drained
Insert S-blade into food processor bowl. Then, with processor mnning, drop bread
through food chute to make soft breademmbs. Pour into a greased 2-quart casserole
dish. Place pineapple chunks in food processor bowl with S-blade. Process pineapple
for 20 seconds. Add eggs, cream, vanilla, melted butter or margarine, and sugar.
Process until mixed. Pour pineapple mixture over soft breademmbs. Garnish with
three pineapple rings overlapping in center. Bake at 350°F for 1 hour or until golden.
Makes 8 servings.
16
Page 17

840074400 EvOS.qxd 11/15/00 9:50 AM .age 17
Chocolate Chip Cheesecake
Filling:
3 8-ounce packages cream cheese,
cut into chunks
1 cup sugar
2 tablespoons flour
Crust
1 teaspoon butter, softened
22 chocolate chip cookies
3 to 4 tablespoons unsalted butter,
melted
4 eggs
’A cup milk
1 teaspoon vanilla
’A cup chocolate chips
Crust Use 1 teaspoon butter to grease a 9 to 914-inch Springform pan and set aside.
Using S-blade and with processor running, drop cookies through food chute and
process until an even crumb is formed. Continue processing, adding melted butter
through the food chute until mixed. Pour crumbs into prepared Springform pan
and press crumbs evenly on bottom of pan. Bake at 425“F for 10 minutes. Remove
from the oven and cool on rack.
Filling: Using S-blade, add cream cheese, sugar, flour, eggs, milk, and vanilla to work
bowl. Process until smooth. Pour fiUing over cooled crust and sprinkle with choco
late chips. Bake 15 minutes at 425°F. Reduce heat to 250°F and continue to bake
(without opening the oven door) for 45 minutes more or until cheesecake is set.
When cooled, cover and refrigerate several hours or overnight Makes 16 servings.
Cooking Tip: For a creamy smooth-textured cheesecake, bake it in a water bath. Tear
off a sheet of aluminum foil that extends about 6 inches larger than the Springform
pan. Place Springform pan in center of foil and form foil up around the sides. This
prevents water from leaking into the pan. Place the Springform pan in a larger pan
and fill larger pan with about
lA inches of hot tap water. Bake as directed.
Marissa's Apple Crisp
6 large Golden Delicious apples,
peeled and cored and cut to fit in
food chute (6 cups sliced)
1 tablespoon lemon juice
A cup sugar
Topping:
A cup butter, melted
1 cup flour
1 cup sugar
1 teaspoon cinnamon
1 tablespoon flour
1 teaspoon cinnamon
14 teaspoon nutmeg
Using slicer/shredder disc, slicing side up, slice apples. Put apples in a large bowl.
Drizzle lemon juice over apples. Sprinkle apples with sugar, flour, cinnamon, and
nutmeg. Stir to mix, then put apples in ungreased 2-quart baking dish. Using
S-blade, place topping ingredients in work bowl and pulse until mixed. Crumble
topping over apples. Bake at 375°F for 30 minutes. Serve topped with vanilla ice
cream. Makes 6 servings.
17
Page 18

840074400 EvOS.qxd 11/15/00 9:59 AM .age 18
Customer Assistance
If you have a claim under this warranty, please call our Customer Assistance Number.
For faster service please have model, series, and type numbers ready for operator to
assist you. These numbers can be found on the bottom of your food processor.
MODEL TYPE:
Customer Assistance Number 1-877-207-0923
Keep this number for future reference!
E-mail inquiries: www.wal-mart.com
Two-Year Limited Warranty
What does your warranty cover?
• Any defect in material or workmanship.
For how long after the original purchase?
• Two years.
What will we do?
How does state law relate to this warranty?
• This warranty gives you specific legal rights,
• WAL*MART expressly disclaims all responsi
• Provide you with a new, or at our option,
a reconditioned unit.
• The exchange unit is warranted for the
remainder of your product’s original
two-year warranty period.
How do you make a warranty claim?
• Save your receipt.
• Properly pack your unit. We recommend
using the original carton and packing
materials.
What if you purchased your product in the
U.S., Canada or Mexico and encounter a
problem while using it outside the country
of purchase?
• The warranty is valid only in the country of
• Return the product to your nearest
WAL*MART store or call Customer
Assistance at 1-877-207-0923.
What does yoiu warranty not cover?
• Glass parts, glass containers, cutter/strainer,
blades and/or agitators.
• Commercial use or any other use not
found in printed directions.
• Damage from misuse, abuse, or neglect
• Products purchased or serviced outside
the USA.
and you may also have other rights which
vary from state to state.
bility for consequential damages or
incidental losses caused by use of this
appliance. Some states do not allow this
exclusion or limitation of incidental or
consequential losses so the foregoing
disclaimer may not apply to you.
purchase and if you follow the warranty
claim procedure as noted.
SERIES:
a trademark of
General Electric Company
and Is used under license by
WAL*MART Stores, Inc.
Bentonvilie, AR 72716
840074400
18
WAL*MART Stores, Inc.
Bentonvilie, AR 72716 11/00
Page 19

840074400 SvOS.qxd 11/15/00 10:58 AM
Page 1
e
Procesadora de alimentos
<y-
Seguridad con su procesadora
de alimentos.....................................................2
Piezas y características
....................................
Cómo usar su procesadora
de alimentos.....................................................5
Para comunicarse con Asistencia al Cliente, llame al 1-877-207-0923
Guía de uso
Limpieza
4
Recetas............................................................10
Asistencia al cliente
......................................................
.........................................................
.......................................
840074400
9
10
18
Page 20

840074400 SvOS.qxd 11/15/00 10:58 AMePage 2
Seguridad con su procesadora
de alimentos
SALVAGUARDIAS IMPORTANTES
Cuando se están utilizando artefactos eléctricos
entre las que se incluyen las siguientes:
1. Lea todas las instrucciones.
2. Para protegerse de los choques eléctri
cos, nunca sumerja la base, el motor, el
cable o el enchufe en agua o en algún
otro líquido.
3. Cuando los niños estén cerca de
cualquier artefacto eléctrico o lo estén
usando, es necesario una supervisión
muy estricta.
4. Este aparato no debe ser usado por
niños.
5. Desconecte el cable del tomacorriente
cuando no lo esté usando, antes de agre
gar o quitar componentes y antes
de limpiarlo.
6. Evite el contacto con los componentes
móviles. Mantenga los dedos lejos de la
abertura de descarga.
7. No permita el funcionamiento de
ningún artefacto eléctrico que tenga el
cable o el enchufe dañado o después de
que el artefacto ha fallado o se ha caído
o dañado de alguna manera. Llame a
nuestro número de llamada gratis de
larga distancia de servicio al cliente para
obtener información o un examen,
reparación o ajuste de tipo eléctrico o
mecánico.
8. El uso de accesorios no recomendados ni
vendidos por el fabricante del aparato
puede causar incendio, choque eléctrico
o lesiones.
9. No use su procesadora de alimentos si
tiene partes cascadas, rajadas o rotas.
10. No use este aparato al aire libre.
11. No permita que el cable cuelgue por
fuera del borde de una mesa o de un
mostrador o que esté en contacto con
superficies calientes.
12. Nunca agregue los alimentos por la tolva
de alimentos usando las manos cuando
se encuentre rebanando o rallando ali
mentos. Siempre utilice el empujador de
alimentos.
deben seguirse ciertas precauciones básicas,
13. Las hojas y los discos están muy afilados.
Manéjelos con cuidado. Guárdelos fuera
del alcance de los niños.
14. Antes de quitar la tapa, cerciórese que el
disco o la hoja de corte se han detenido
totalmente.
15. Cerciórese que la tapa esté asegurada
firmemente en su sitio antes de poner a
funcionar el artefacto eléctrico.
16. Para reducir el riesgo de lesiones, nunca
coloque la hoja de corte o los discos en
la base sin que el tazón esté firmemente
colocado en su sitio.
17 Mientras esté procesando los alimentos,
mantenga las manos y los utensilios fuera
del alcance de las hojas y discos para evi
tar el riesgo de lesiones personales muy
severas y/o daños a su procesadora. Se
puede utilizar una espátula de hule pero
SOLAMENTE cuando no esté funcio
nando la procesadora.
18. No intente interferir con el mecanismo
de seguridad de cierre de la tapa.
19. Para reducir el riesgo de lesiones, cer
ciórese de insertar o quitar las hojas y los
discos utilizando los agujeros para los
dedos que se han previsto para este obje
to. Siempre tenga mucho cuidado
cuando quite las hojas y los discos del
tazón, cuando esté vaciando el tazón y
cuando lo esté lavando.
20. Asegúrese de colocar el interruptor en la
posición OFF (apagada) después de cada
uso. Siempre use el empujador para
despejar los restos de comida que hayan
quedado en el ducto. Cuando no sea
posible limpiarlos de esta forma, apague
el motor y desarme la unidad para reti
rar todos los restos de comida.
21. Este aparato no ha sido diseñado para
aplicaciones comerciales, profesionales o
industriales. Fia sido diseñado y construi
do exclusivamente para uso doméstico
solamente.
Page 21

840074400 SvOS.qxd 11/15/00 11:06 AM,
jPage 3
O
22. Nunca use el aparato por un período
más largo o con mayores cantidades de
ingredientes de las recomendadas por el
fabricante del mismo.
23. La clasificación nominal máxima de esta
unidad se basa en el uso de una cuchilla
en S. El uso del Disco Rebanador/
Rallador puede acarrear bastante menos
potencia.
24. No lo coloque sobre o cerca de un
quemador caliente a gas o eléctrico o
en un homo caliente.
25. No use este aparato en ninguna otra
aplicación que no sea la designada.
¡GUARDE ESTAS INSTRUCCIONES!
Información de seguridad para el usuario
Este artefacto debe utilizarse únicamente en
im entorno doméstico.
Este electrodoméstico está equipado con un
enchufe polarizado. Este tipo de enchufe
tiene una hoja más ancha que la otra. El
enchufe encajará en el tomacorriente en una
sola dirección. Esta es una medida de seguri
dad con la intención de ayudar a reducir el
riesgo de choque eléctrico. Si no puede
insertar el enchufe en el tomacorriente,
pruebe a darle vuelta al enchufe. Si, aún así,
no encaja, haga que un electricista reponga
el tomacorriente obsoleto. No intente invali
dar la medida de seguridad del enchufe
polarizado modificando el enchufe de algu
na forma.
Para evitar una sobrecarga en los circuitos
eléctricos, no utilice algún otro artefacto
eléctrico de potencia elevada en el mismo
circuito que su procesadora de alimentos.
Este electrodoméstico tiene un cordón corto
de alimentación eléctrica para reducir los
riesgos de enredarse o de tropezarse con un
cordón más largo. Si se necesita un cordón
más largo, se puede usar una extensión eléc
trica siempre que esté clasificada a una
capacidad igual o mayor que su procesadora
de alimentos. Se debe tener cuidado de
arreglar el cordón para que no cuelgue de
la mesa o mostrador donde puede ser jalado
por los niños o se pueda tropezar con él acci
dentalmente.
Antes del primer uso
Saque la procesadora de su envoltura. Tenga
cuidado con la Cuchilla en S y el Disco
Rebanador/Rallador ya que están muy afila
dos. Lave todas las piezas, excepto la base, en
Consejos y técnicas para el procesamiento
• Para obtener una consistencia uniforme
cuando esté picando, deje espacio en el
tazón para que el alimento pueda dar
vueltas.
> También para una consistencia más uni
forme comience con trozos de alimentos
de tamaño similar. Por ejemplo, las zanaho
rias deben cortarse en trozos de 1 pulgada.
No procese trozos de 4 pulgadas con trozos
de !ó pulgada.
> Esta procesadora de alimentos es excelente
para picar, mezclar, rebanar/cortar o ral
lar/triturar la mayoría de los alimentos. Sin
embargo, para permitir que se desempeñe
de la mejor forma posible, recomendamos
no moler granos, granos de café o especias;
no cortar carne congelada ni triturar hielo.
agua jabonosa caliente. Enjuague y luego
seque. Estas piezas también se pueden lavar
en el lavavajillas.
> No haga puré ni pise verduras de fécula
como papas. Se procesarán demasiado en
un segundo y se volverán gomosas.
’ El tiempo de operación dependerá de la
cantidad de alimento que se esté procesan
do. La mayoría de los alimentos se pueden
rebanar, picar o rallar en unos segundos.
No opere la procesadora por más de un
minuto a la vez. Si está procesando canti
dades grandes, deje que el aparato
descanse un minuto antes de continuar.
’ Para rebanar o rallar queso, seleccione un
queso firme como cheddar, Monterrey Jack
o suizo. Coloque el queso en el congelador
30 minutos antes de procesar. Siempre use
la velocidad más alta de la procesadora de
alimentos. •>
Page 22

840074400 SvOS.qxd 11/15/00 10:58 AM, Page 4
Piezas y características
[T] Empujador de alimentos Guía de uso desmontable
fzl Tolva de alimentos Tablero de control
3 Compuerta para alimentos - tapa que Tazón
se deja para procesamiento común
y que se saca para procesamiento
continuo.
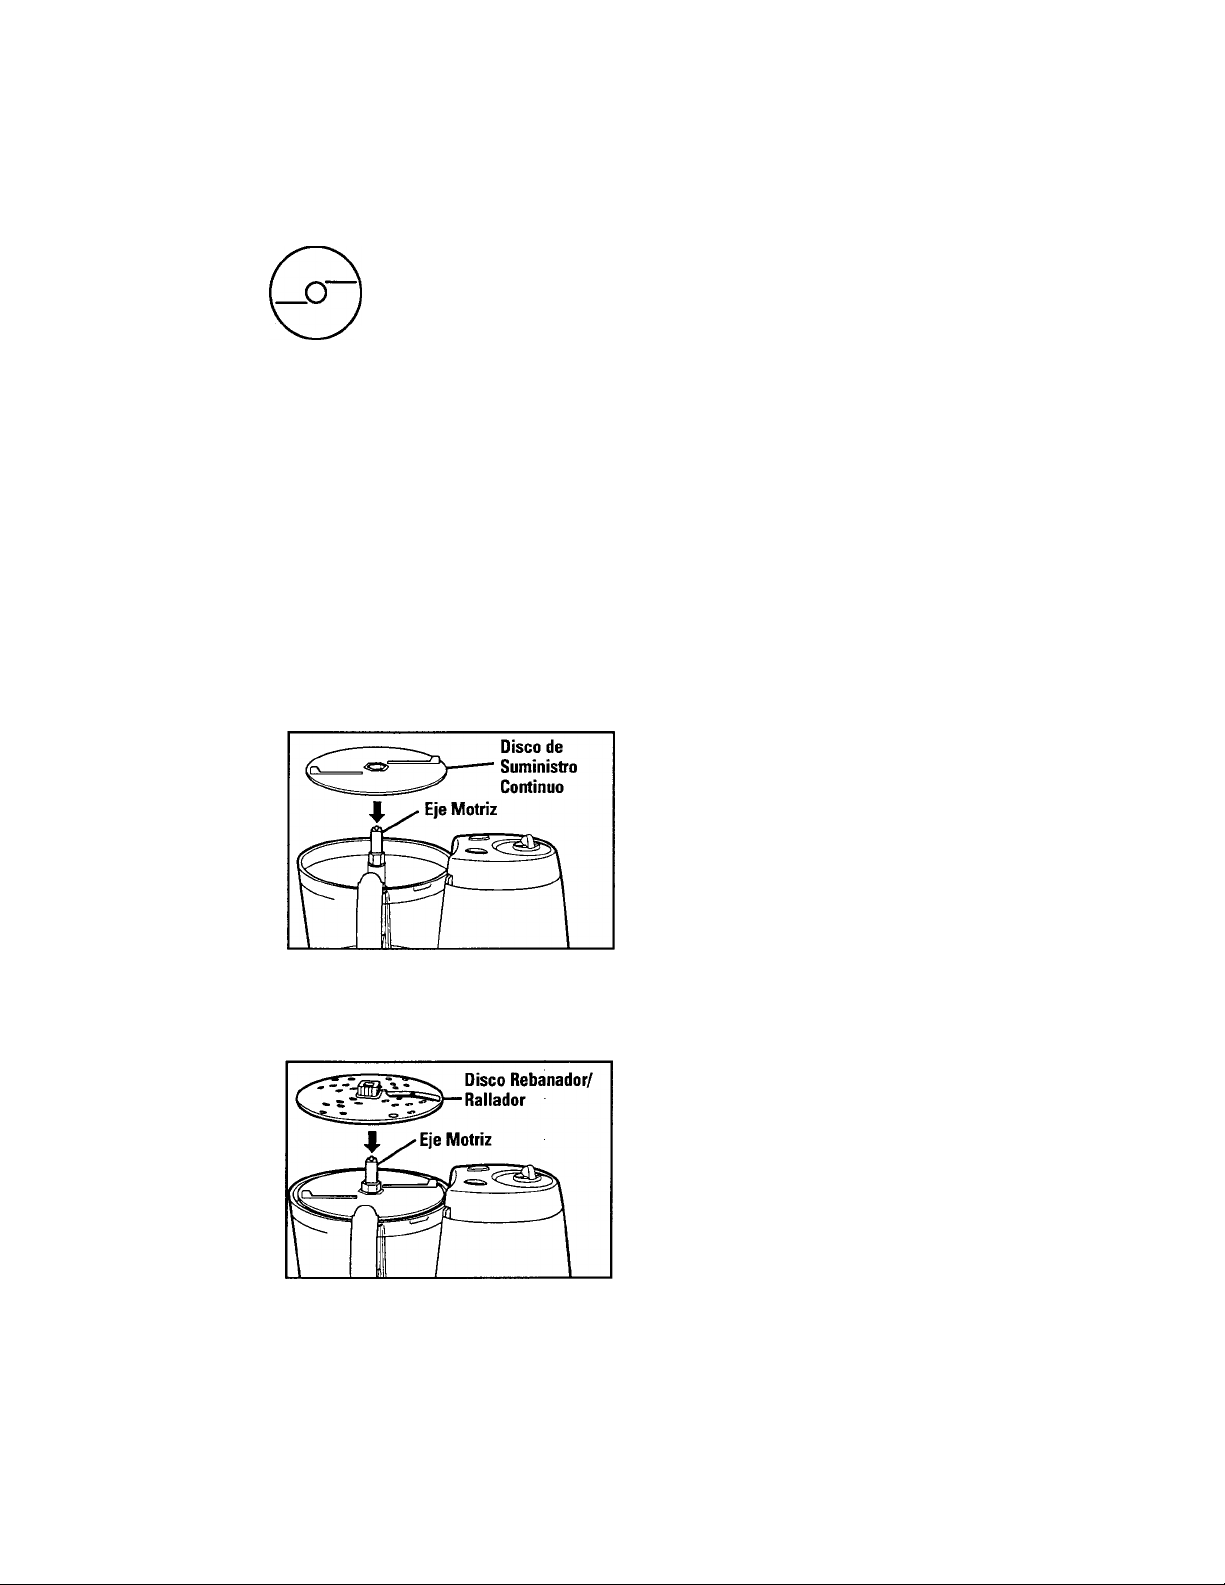
4 I Ducto para suministro continuo
[lT| Disco de suministro continuo - se debe
usar para procesamiento continuo.
Este disco “echa” los alimentos a través
del Ducto de Suministro Continuo.
5 Disco reversible rebanador/rallador
^ Eje motriz
Base
Cuchilla en S
12
13 Taza de aporcionamiento (ver recuadro)
14 Compartimiento para el cordón
Page 23

840074400 SvOS.qxd 11/15/00 11:06 AM,ePage 5
Cómo usar su procesadora
de alimentos
NOTAS;
• Siempre trabe el tazón en la base
antes de colocar la cuchilla o el disco.
Asegúrese de que la cuchilla o el
disco esté firme en su lugar antes
de usarlo.
• Con esta procesadora de alimentos
usted puede usar el ducto de sumi
nistro continuo para rebanar y rallar
en un tazón por separado. El ducto
de suministro continuo le permite
rebanar o rallar alimentos sin estar
limitado a la capacidad del tazón de
la procesadora
Cómo trabar el tazón
¡Consejos útiles!
• La capacidad del tazón es de 9 tazas
de ingredientes secos o 2 tazas de
ingredientes líquidos. No lo llene
excesivamente.
• No utilice su procesadora para
triturar hielo.
• Para lograr una textura consistente,
los alimentos deberán cortarse en
cubos de 1 pulgada antes de moler
los o picarlos con la hqja-S.
Coloque el tazón en la base de la
procesadora y gírelo en dirección
opuesta a las agujas del reloj hasta
que se trabe en posición.
Cómo trabar la tapa
NOTA: La procesadora de alimentos no
funcionará a menos que el tazón esté
trabado.
Coloque la tapa en el tazón y gírela en
dirección opuesta a las agujas del reloj
hasta que se trabe en posición.
NOTA: La procesadora de alimentos no
funcionará a menos que la tapa esté
trabado.
¡Consejo!
Cuando el tazón y la tapa estén
debidamente trabados y la
procesadora de alimentos esté
enchufada, la luz de
deberá estar encendida.
“Listo” (Ready)
Page 24

840074400 SvOS.qxd 11/15/00 11:06 AM Page 6
Procesamiento con el Rebanador/Rallador
• Para rebanar o rallar
queso, seleccione un queso
firme como cheddar,
MonterreyJack o suizo. Coloque el
queso en el congelador 30 minutos
antes de procesar. Siempre use la
velocidad más alta de la procesadora
de alimentos.
• El Disco Reversible Rebanador/
Rallador tiene una cuchilla
rebañadura de un lado y dientes
ralladores del otro. Colóquelo en el
eje motriz con el lado cortante que
desee mirando hacia arriba.
• Para preparar verduras cortadas fino
(estiloJuliana), córtelas y luego
sáquelas del tazón y vuelva a agregar
verduras. Colóquelas en el ducto de
suministro en posición vertical. Corte
nuevamente para que queden
rebanadas del grosor de un fósforo.
1. Asegúrese de que el Interruptor de
Control esté en la posición apagada
(OFF) y que la unidad esté
desenchufada.
2. Trabe el tazón a la base (Consulte
“Cómo trabar el tazón” en la
página 5).
3. Coloque el Disco Rebanador/
Rallador en el eje motriz con el lado
deseado mirando hacia arriba para
rebanar o rallar. Trabe la tapa del
tazón. (Consulte “Cómo trabar la
Tapa” en la página 5).
4. Corte los alimentos para que pasen
por el ducto de suministro. Llene el
ducto bien apretado con comida.
Introduzca el empujador en el ducto.
Siempre use el empujador de alimentos
para introducir los alimentos en el
ducto. NUNCA EMPUJE LOS
AUMENTOS POR EL DUCTO CON
LA MANO.
5. Enchufe la unidad y procese los
alimentos.
6. Seleccione la velocidad. Mientras
presiona el empujador de alimentos,
oprima el botón de encendido (ON)
o de impulso (PULSE) para procesar
los alimentos.
7. Cuando el ducto de suministro esté
vacío, oprima el botón para apagar
(OFF) o suelte el de impulso
(PULSE). Espere hasta que la cuchilla
haya dejado de girar antes de retirar la
tapa.
Page 25

840074400 SvOS.qxd 11/15/00 10:58 AM Page 7
Cómo operar los controles
Los controles están ubicados en forma
conveniente en la parte superior de la
base. Gire la perilla central para selec
cionar una velocidad variable Baja,
Mediana o Alta (Low, Medium o High).
Si el tazón y la tapa están debidamente
trabados, la luz de Listo (Ready) estará
iluminada.
Cómo procesar con la Cuchilla en S
La cuchilla en S se puede usar
para picar en trozos grandes,
picar bien finito, mezclar o hacer
puré a una consistencia cremosa.
1. Asegúrese de que el Interruptor de
Control esté en la posición apagada
(OFF) y que la unidad esté
desenchufada.
2. Trabe el tazón a la base (Consulte
“Cómo trabar el tazón” en la
página 5).
3. Coloque la cuchilla en S en el eje
motriz de la procesadora de alimentos
en el centro del tazón. Gire lenta
mente hasta que la cuchilla caiga en
su lugar. Tenga cuidado, la cuchilla está
bien afilada.
4. Trabe la tapa en el tazón. (Consulte
“Cómo trabar la tapa” en la página 5).
Introduzca el empujador de alimentos
en el ducto de suministro.
5. Saque todo el cordón fuera del
compartimiento. Esto aumentará el
flujo de aire y mantendrá el motor
frío. Enchufe la unidad y procese los
alimentos. La velocidad y el tiempo de
procesamiento determinará la
consistencia final de los alimentos.
El botón de Impulsos (“Pulse”) lo
ayudará a evitar que se procesen
demasiado.
Page 26
840074400 SvOS.qxd 11/15/00 10:58 AM
Procesamiento continuo
Page
e
IMPORTANTE: Cuando use
el ducto de suministro
continuo, deberá sacar la
compuerta para alimentos y colocar
el disco de suministro continuo en
su lugar.
1. Asegúrese de que el Interruptor de
Control esté en la posición apagada
(OFF) y que la unidad esté
desenchufada.
2. Trabe el tazón a la base (consulte
“Cómo trabar el tazón” en la
página 5).
3. Coloque el disco de suministro
continuo, con el lado estriado hacia
arriba, en el eje motriz. Gire el
disco lentamente hasta que caiga en
posición (al ras con la parte superior
del tazón).
4. Seleccione el lado deseado del disco
reversible rebanador/rallador y
coloque ese lado hacia arriba en el
eje motriz.
5. SAQUE LA COMPUERTA PARA
ALIMENTOS DE LA TAPA DE
SUMINISTRO CONTINUO PARA
EVITAR QUE LA UNIDAD SE
ESTROPEE.
6. Trabe la tapa (Consulte “Cómo tra
bar la Tapa” en la página 5). Coloque
el tazón debtyo del ducto de sumi
nistro.
7. Enchufe la unidad y seleccione la
velocidad. Procese los alimentos.
Chequee el ducto de suministro con
tinuo con frecuencia para asegurarse
de que la abertura no esté bloqueada.
Si está bloqueada, apague la unidad y
desenchúfela. Despeje el bloqueo y
luego vuelva a armarla y continúe
procesando.
NOTA: Cuando use el ducto de sumin
istro continuo, es posible que un poco
de comida caiga dentro del tazón de la
procesadora de alimentos.
¡Sugerencia!
No use la opción del ducto de sumi
nistro continuo cuando ralle verduras
de raíz como zanahorias y papas.
Como sucede con la mayoría de
procesadoras de suministro continuo,
las verduras húmedas ralladas pueden
tapar el ducto. Lo mejor es rallar estas
verduras en el tazón de la procesado
ra de alimentos. El rebanado de estas
verduras de raíz usando el ducto de
suministro continuo no representará
ningún problema.
Page 27

840074400 SvOB.qxd 11/15/00 11:05 AM¿
Page 9
e
El uso de la Taza de Aporcionamiento
La abertura de la Taza de
Aporcionamiento en la tapa de la
procesadora de alimentos le permite
agregar líquidos en forma gradual y
contìnua. Para usarla, vierta lentamente
el líquido por la Taza de
Aporcionamiento mientras la
procesadora está en marcha. La adición
gradual de líquido garantiza una
consistencia uniforme o una emulsión
perfecta en las vinagretas para ensalada.
Guía de Uso
BAJO MEDIANO ALTO
Disco rebanador (cuchilla hacia arriba)
Chcimpiñones Manzanas Todos los quesos
Pepinos
Verduras en tiras ('juliana")
Cuchilla en S
Todas las frutas
Todas las verduras
Migajas de pan
Alimentos pisados
Nueces picadas
Carne picadat
Queso palmesano
rallado
Alimentos rallados
finito
Disco rallador (dientes hacia arriba)
Col
Manzanas
Calabacita Todos los quesos
Verduras ralladas
Cebollas
Para obtener mejores resultados, no sobrepase las siguientes cantidades cuando
pique, triture o haga puré con la Cuchilla en S.
ALIMENTO CANTIDAD MÁXIMA
Frutas y verduras
Carnes
Queso parmesano o romano
Queso cheddar, Jack o mozzarella
1 libra o entre 2 y 3 tazas
12 onzas o lió tazas en cubitos
5 onzas en cubitos
8 onzas en cubitos
Page 28

840074400 SvOS.qxd 11/15/00 10:58 AM, Page 10
Limpieza
1. Usando agua caliente yjabonosa, lave
el tazón, la tapa, la hoja, los discos y
el empujador de alimentos. Enjuague
y seque meticulosamente. Enjuague y
seque bien. Estas piezas también se
pueden lavar en la canasta superior
del lavavajillas.
NOTA: Nunca guarde la procesadora
de alimentos con la tapa asegurada en
su sitio, ya que esto puede producir
tensión en la pestaña del mecanismo
de seguridad de cierre de la tapa.
2. Limpie la base, el panel de control y
el cordón con una esponja o un trapo
húmedo. Si necesita eliminar man
chas persistentes, use un limpiador
suave y no abrasivo.
NUNCA SUMERJA LA BASE EN AGUA 0
EN CUALQUIER OTRO ÜQUIDO.
3. Para guardar, coloque el tazón sobre
la base. Luego coloque lo siguiente
en el eje motriz: la cuchilla en S, el
disco de suministro contìnuo y el
disco rebanador/rallador. Coloque la
tapa en el tazón, pero no la trabe.
Recetas
Vinagreta de queso tipo Roquefort
2 dientes de ajo
4 onzas de queso tipo Roquefort
2 tazas de mayonesa
^ Usando la cuchilla en S, con la procesadora en marcha, deje caer los dientes de ajo
en la tolva de alimentos y pique. Agregue el queso y procese durante 10 segundos.
Agregue mayonesa, crema agria, Jugo de limón y azúcar. Procese hasta que quede
una mezcla uniforme. Refrigere. Se obtienen 3 tazas.
'Á taza de crema agria
'Á taza de Jugo de limón fresco
2 cucharadas de azúcar
Vinagreta para agridulce para ensalada
14 taza de azúcar
14 taza de vinagre de sidra
14 taza de agua hirviendo
Vi cucharadita de sal
Arme la procesadora de alimentos con la cuchilla en S. Coloque todos los
ingredientes en la procesadora con excepción del aceite vegetal. Procese a
Baja velocidad y lentamente agregue el aceite vegetal a través de la taza de
aporcionamiento. Continúe procesando hasta que se haya mezclado todo el aceite.
Deje reposar a temperatura ambiente por varias horas y entonces agite bien antes
de usar. Se obtiene alrededor de 1 taza.
Vinagreta de la "Diosa Verde" para ensaladas
3 cucharadas de vinagre de sidra
2 cucharadas de Jugo de limón
V¿ taza de ramitos de perejil no muy
apretados
14 taza de hojas de estragón no muy
apretadas
10
% cucharadita de semillas de apio
Va cucharadita de pimienta negra
molida fresca
Vi taza de aceite vegetal
Vi taza de cebollinos no muy apretados
1 cebolleta
1 diente de ajo pequeño, pelado
1 taza de mayonesa
V¡ taza de crema agria
Page 29

840074400 SvOS.qxd 11/15/00 10:58 AMePage 11
Combine el vinagre y el jugo de limón en una taza de medir pequeña. Déjela a un
lado, Arme la procesadora de alimentos con la cuchilla en S. Coloque el resto de los
ingredientes en la procesadora de alimentos. Procese a graduación Mediana mientras
agrega el vinagre de sidra y el jugo de limón a través de la tapa. Procese hasta que esté
bien mezclado. Refrigere hasta que el momento de servir.
Humus
2 dientes de ajo
2 cebolletas, la porción blanca y la
mitad de la porción verde
15 onzas de garbanzos, escurridos,
reservando !4 taza del líquido
'Á taza de "tahini" (pasta de sésamo),
revuelta.
2 cucharaditas de aceite de oliva
'A cucharadita de comino
Una pizca de pimienta de Cayena
Sal y pimienta a gusto
Una pizca de paprika
Pan tipo "pita" o verduras cortadas,
opcional
Se obtienen unas 2 tazas.
3 a 4 cucharadas de jugo de limón o lima
Usando la cuchilla en S y con la procesadora en marcha, deje caer los dientes de ajo
y las cebolletas en la tolva de alimentos. Luego agregue los garbanzos, tahini, jugo
de limón o de lima, aceite de oliva, comino, pimienta de Cayena, sal y pimienta.
Continúe procesando hasta que obtener una mezcla uniforme y raspe las paredes
del vaso según se requiera. Coloque la mezcla en una fuente y adorne con paprika.
Sirva con pan tipo pita y/o verduras. Guarde la mezcla en el refrigerador.
Se obtienen unas 2 tazas.
Salsa
' cebolla, pelada y cortada en cuartos
1 diente de ajo
1 chile picante (tipojalapeño),
sin centro, sin semillas y cortado
en cuartos
Vi taza de cilantro, apretado
/4 cucharadita de comino
1 cucharada de jugo de lima
Sal y pimienta a gusto
Salsa picante, opcional
4 tomates, cortados en cuartos
Usando la cuchilla en S y con la procesadora en marcha, deje caer la cebolla, los
dientes de ajo y el chile picante por la tolva de alimentos y corte hasta que queden
bien picados. Detenga la procesadora y agregue tomates, cilantro, comino, jugo de
lima, sal y pimienta. Pulse hasta obtener la textura deseada. Agregue salsa picante si
así lo desea.
Condimento de arándano y naranja
12 onzas de arándanos frescos, sin tallo,
o congelados
1 taza de azúcar
Se obtienen entre 2 y 3 tazas.
3 cucharadas de licor Grand Mamier
o de jugo de naranja
Una pizca de clavo de olor molido
1 naranja de ombligo pequeña,
lavada y cortada en tajadas
Usando la cuchilla en S, coloque los arándanos, el azúcar, la naranja, Grand
Mamier, y los calvos de olor en el tazón de procesamiento. Procese hasta que la
mezcla de los arándanos esté casi uniforme, pero con algunos trozitos. Cubra y
refrigere hasta el otro día. El reposo hará que se espese. Se obtienen unas 2'k tazas.
11
Page 30

840074400 SvOS.qxd 11/15/00 10:58 AM,ePage 12
Pastelitos de polio
1 libra de polio cocido {VA tazas si se
pica bien finito)
14 taza apretada de ramitos de perejil
1 taza de caldo de pollo
Aj taza de aceite vegetal
1 cucharada de salsa Worcestershire
A cucharadita de cada uno; sal y
semillas de apio
14 cucharadita de cada uno: mostaza
en polvo y polvo de cebolla
1 taza de harina
4 huevos
Corte el pollo en trozos grandes y usando la cuchilla en S coloque el pollo y el
perejil en el tazón de procesamiento y pulse hasta que queden picados bien finito.
Retire y coloque a un lado. En una cacerola grande sobre fuego fuerte, mezcle el
caldo de pollo, aceite y la salsa Worcestershire. Haga hervir. Agregue las cuatro
especias en la harina. Cuando el caldo haya hervido, vierta toda la harina al mismo
tiempo. Revuelva hasta que la masa forme una bola. Coloque la masa en un tazón
para mezclar. Agregue los huevos de a uno, mezclando bien después de cada uno.
Agregue el pollo y perejil. Deje caer en cucharadas del tamaño de una pelotilla de golf
sobre una asadera. Hornee a 450° F durante 12 a 15 minutos. Se obtienen 4 docenas.
Papas a la crema
4 libras de papas blancas para uso
general, unas 15 de tamaño mediano
3 tazas de crema de leche "medio y medio"
1A cucharaditas de sal
Vi cucharadita de pimienta
4 cucharadas de mantequilla, derretida
3 cucharadas de cebolla picada finito
Lave las papas pero no las pele. Colóquelas en una cazuela grande y cubra con agua.
Haga hervir y luego reduzca el calor y hierva a fuego lento por 45 minutos o hasta
que estén listas. Refrigere hasta el otro día. Usando el disco rebanador/rallador, con
el lado rallador hacia arriba, ralle las papas. No es necesario pelarlas. Coloque las
papas ralladas, la crema, la cebolla, la sal y pimienta en un tazón grande y mezcle.
Cubra una fuente de hornear de 9 x 13 pulgadas con mantequilla. Vierta la mezcla
de papas con una cuchara. Hornee a 375° F por una hora. Se obtienen 10 porciones.
Budín de camotes (boniatos)
1 a 1!4 libras de camotes, lavados pero
no pelados, y cortados para poder
pasarlos por la tolva de alimentos
(3 tazas ralladas)
1 taza de leche
1 huevo
Vi taza de mantequilla
1 cucharadita de vainilla
A taza de azúcar
14 taza de jarabe de arce
Usando el disco rebanador/rallador, con el lado rallador hacia arriba, ralle los
camotes. Sáquelos del tazón de procesamiento y colóquelos en un tazón para
mezclar de tamaño mediano. Colóquelo a un lado. Usando la cuchilla en S, coloque
el azúcar, el jarabe, la leche, el huevo, la mantequilla y la vainilla en el tazón de
procesamiento. Procese hasta que la mezcla quede uniforme. Vierta sobre los
camotes rallados. Mezcle bien. Vierta en una cazuela engrasada de lA cuarto de
galón. Coloque la cazuela en una fuente o cacerola más grande. Agregue agua
caliente a la fuente más grande de manera que el agua esté entre 1 y 2 pulgadas de
altura por los costados de la cazuela. Est evitará que se quemen los bordes. Hornee
a 350° F durante
12
lA horas. Se obtienen 6 porciones.
Page 31

840074400 SvOS.qxd 11/15/00 10:58 AM,ePage 13
Pimientos y salchicha asados
1 pimiento rojo, sin centro y sin semillas
1 pimiento amarillo, sin centro y sin semillas
2 pimientos verdes, sin centro y sin semillas
1 cucharadita de orégano deshidratado
2 cucharadas de aceite de oliva
2 libras de salchicha italiana
2 cebollas tamaño mediano, peladas y
cortas para que puedan pasar por
la tolva de alimentos.
Usando un tenedor, perfore la piel de las salchichas varias veces. En una sartén
sobre fuego medio alto, dore las salchichas, dándolas vuelta con frecuencia, durante
unos 8 minutos. Colóquelas a un lado. Usando el disco rebanador/rallador, con el
lado rebanador hacia arriba, corte los pimientos y la cebolla. Colóquelos en una
fuente de 2 cuartos de galón. Agregue orégano y aceite y mezcle. Coloque la
salchicha sobre los pimientos. Hornee a 350° F durante 45 minutos. Sirva los
pimientos y la salchicha con fideos o sobre tortas tostadas. Se obtienen 6 porciones.
Pollo a la castaña de cajú
2 libras de pechugas de pollo
deshuesadas y sin piel
4 dientes de ajo
1 trozo de raíz de jengibre de una
pulgada, pelada
1 ramillete de cebolletas, sin raíz
2 cucharadas de aceite vegetal
!4 taza de Jugo de piña
3 cucharadas de salsa de soja
1 cucharadita de mostaza en polvo
1 lata de 8 onzas de castañas de agua
cortadas y escurridas
1 taza de castañas de cajú tostadas
Arroz cocido
1 cucharada de harina
Vi taza de caldo de pollo
Usando la cuchilla en S, coloque el pollo en un tazón. Pulse hasta que el pollo
quede en trozos no muy pequeños. Retire el pollo y colóquelo a un lado. No lave el
tazón de procesamiento. Coloque el tyo y el jengibre en el tazón de procesamiento y
mezcle hasta que quede bien picado. Agregue las cebolletas, la parte blanca y 2
pulgadas de la parte verde, y mezcle hasta que quede bien picado. Caliente el aceite
en una sartén a fuego medio alto. Agregue las verduras picadas y el pollo a la sartén.
Revuelva y cocine unos 7 minutos o hasta que el pollo esté listo. Revuelva ocasional
mente. Use un cucharón ranurado y retire el pollo y las verduras. Espolvoree la
sartén con harina. Revuelva y cocine hasta que comience a dorarse, alrededor de 1
minuto. Agregue el caldo de pollo, el jugo de piña, la soja y la mostaza. Revolviendo
frecuentemente, haga hervir y cocine hasta que se espese, alrededor de 5 minutos.
Vuelva a verter la mezcla de pollo/verduras en la sartén, agregue las castañas de cajú
y de agua. Caliente la mezcla. Sirva sobre arroz.
Se obtienen 6 porciones.
13
Page 32

840074400 SvOS.qxd 11/15/00 10:58 AM, Page 14
Sopa de papas y puerros
3 libras de papas, peladas
3 a 4 puerros, sin raíz y sin los extremos
de las hojas
A libra de tocino
2 cuartos de galón de agua
Usando el disco rebanador/rallador, con el lado rebanador hacia arriba, corte las
papas. Sáquelas y colóquelas en un tazón grande para mezclar y cubra con agua fría.
Déjelas a un lado. Corte los puerros. Para limpiar los puerros, colóquelos en un
colador y sacúdalos delicadamente bajo agua corriente. En una olla para sopa o una
olla grande de hierro o barro, cocine el tocino hasta que esté crujiente. Retire el
tocino y déjelo a un lado. Agregue los puerros a la grasa del tocino en la olla.
Cocine y revuelva ocasionalmente sobre fuego mediano por unos 10 minutos.
Aumente el calor a alto y agregue el agua, las papas, la sal y la pimienta. Haga hervir
la sopa y reduzca el calor y hierva a fuego lento con la olla destapada durante 15 a
20 minutos. En un tazón pequeño, bata la leche con la harina. Vierta lentamente la
mezcla de la leche en la sopa y siga hirviendo a fuego lento durante 5 minutos.
Adorne con trozos de tocino desmenuzado. Se obtienen entre 6 y 8 porciones.
Lasaña
1 libra de queso mozzarella
1 libra de salchicha italiana suave
1 libra de carne picada
2 dientes de ajo
^ 1 cebolla mediana, pelada y
^ cortada en octavos
1 tallo de apio, cortado en trozos de
2 pulgadas
1 lata de 26 onzas de salsa para espagueti
Usando el disco rebanador/rallador, con el lado rebanador hacia arriba, corte la
mozzarella y déjela a un lado. Saque la piel de la salchicha. En una sartén grande o
en una cacerola pesada sobre fuego medio alto, cocine y desmenuce la salchicha y la
carne picada. Usando la cuchilla en S, con la procesadora en marcha, deje caer el
ajo por la tolva de alimentos y pique. Detenga la procesadora. Agregue la cebolla y
el apio. Pulse hasta que quede bien picado y agregue la mezcla a la sartén. Cocine
hasta que la cebolla esté blanda. Coloque las carnes y las verduras cocidas en un
tazón grande. Agregue la salsa de espagueti y la salsa de tomates y revuelva para
mezclar. Usando la cuchilla en S, procese el queso parmesano en la graduación alta
hasta que quede bien rallado, unos 20 segundos. Agregue el perejil al parmesano
procese hasta que quede bien picado. Agregue el requesón, la ricota y los huevos y
procese hasta mezclarlos. En una fuente de hornear o una fuente para lasaña de 10
X 14 pulgadcis, coloque capas de salsa de carne, fideos, mezcla de queso, y luego las
rodajas de mozzarella. Repita las capas. (Ahora se puede refrigerar la lasaña). Cubra
bien con papel de aluminio y hornee a 350° F durante 45 minutos. Retire el papel
de aluminio y hornee entre 15 y 30 minutos más. Deje reposar 10 minutos antes de
cortar para servir. Se obtienen entre 8 y 10 porciones.
l‘A cucharadita de sal
Vi cucharadita de pimienta
A taza de leche
3 cucharadas de harina
1 lata de 8 onzas de salsa de tomates
2 onzas de queso parmesano, en
cubitos de ló pulgada (!^ taza de
queso rallado)
1 taza de ramitos de perejil
1 libra de requesón de granos pequeños
1 recipiente de 15 onzas de queso ricota
2 huevos
12 fideos para lasaña, crudos
y
NOTA: La mozzarella se rebana o corta con mayor facilidad si se colocar en el
congelador entre 30 y 60 minutos antes de cortarla. Siempre use la velocidad más
alta para procesar el queso.
14
Page 33

840074400 SvOS.qxd 11/15/00 10:58 AM,
Filetes crujientes de bagre
2 */4 onzas de queso palmesano
('A taza, rallado)
20 galletitas de manteca tipo Ritz o
Page 15
A taza de ramitos de perejil fresco
14 taza de mantequilla derretida
4 filetes de bagre de unas 8 onzas cada uno
Townhouse
Corte el queso en cubitos de A pulgada. Usando la cuchilla en S., coloque los
cubitos de queso, las galletitas y el perejil en el tazón de procesamiento. Procese
hasta que queden bien molidos. Coloque la mezcla de galletitas en una fuente
grande. Sumeqa los filetes en la mantequilla y luego en la mezcla de galletitas para
cubrirlos. Coloque los filetes en una asadera antiadherente o revestida con papel de
aluminio. Hornee a 400° F entre 15 y 20 minutos. Se obtienen 4 porciones.
Lasaña de verduras
8 onzas de queso mozzarella magro
1 cebolla mediana, pelada cortada en
trozos
4 dientes de ajo
4 a 6 onzas de champiñones frescos
1 cucharadita de aceite vegetal
2 calabacitas de unas 6 pulgadas cada
uno, cortadas en trozos
2 onzas de queso palmesano, cortado
1 paquete de 8 onzas de queso crema
magro, cortado en trozos
Vi taza de queso ricota magro
A taza de crema agria magra
1 huevo
2 cucharaditas de condimento italiano
deshidratado
1 lata de 26 onzas de salsa para espagueti
6 fideos para lasaña, cocidos
en trozos de A pulgada (alrededor
de A taza rallado)
Ustmdo el disco rebanador/rallador, con el lado rallador hacia arriba, ralle la
mozzarella. Colóquela en un tazón pequeño y déjela a un lado. Usando la cuchilla
en S, coloque la cebolla y los dientes de ajo en el tazón de procesamiento. Pulse
hasta que queden picados en trozos no muy pequeños. Agregue los champiñones al
tazón. Continúe pulsando hasta que los champiñones estén picados en trozos no
muy pequeños. Coloque las verduras picadas en una sartén grande con aceite sobre
fuego mediano. Usando la cuchilla en S, coloque la calabacita en el tazón de
procesamiento. Pulse hasta que esté picada en trozos no muy pequeños. Agregue
la calabacita a la sartén. Cocine hasta que se ablande, unos 10 minutos; y déjela a un
lado. Sin lavar el tazón de procesamiento y usando la cuchilla en S, coloque los
trozos de queso palmesano en el tazón y procese a graduación Alta hasta que quede
picado en trozos no muy pequeños. Agregue el queso crema, la ricota, la crema
agria, el huevo y los condimentos italianos y procese hasta que la mezcla esté cremosa,
entre 30 y 40 segundos. Engrase una fuente de hornear de 9 x 13 pulgadas. Coloque
una capa con la mitad de los fideos, de la mezcla de queso crema, de la mezcla de
verduras picadas y de salsa para espagueti. Repita las capas una vez. Espolvoree con
mozzarella. Hornee, cubierto a 350° F durante 25 minutos. Destape y cocine
10 minutos más. Deje reposar por 10 minutos antes de servir. Se obtienen 8 porciones.
NOTA: La mozzarella se rebana o corta con mayor facilidad si se colocar en el
congelador entre 30 y 60 minutos antes de cortarla. Siempre use la velocidad más
alta para procesar el queso.
15
Page 34

840074400 SvOS.qxd 11/15/00 10:58 AM Page 16
Pan de maíz con queso y cebolla
4 onzas de queso cheddar (1 taza rallado) 'A taza de leche
1 ceboUa pequeña, pelada y cortada en
cuartos
1 cucharada de mantequilla
1 huevo
1 paquete de 8 onzas de mezcla para
molletes de maíz
1 lata de 8 onzas de maíz cremoso
1 recipiente de 8 onzas de crema agria
Usando el disco rebanador/rallador, con el lado rallador hacia arriba, ralle el queso
cheddar y déjelo a un lado. Usando la cuchilla en S, coloque la cebolla en el tazón
de procesamiento y procese hasta que esté bien picado. Coloque la cebolla picada y
la mantequilla en una sartén y cocine a fuego medio alto hasta que las cebollas estén
blandas. Deje enfriar a un lado. No lave el tazón de procesamiento. Usando la
cuchilla en S, coloque el huevo, la leche, la mezcla para molletes y el maíz en el
tazón de procesamiento. Pulse JUSTO hasta que queden mezclados. Vierta la masa
en una asadera cuadrada de 8 pulgadas engrasada. Combine las cebollas, el queso y
la crema agria. Coloque cucharadas pequeñas de la mezcla de crema agria sobre la
masa. Hornee a 425° F entre 30 y 35 minutos. Se obtienen entre 6 y 8 porciones.
Molletes de "Buen Día"
4 zanahorias medianas (2 tazas ralladas),
lavadas y sin los extremos
1 manzana grande (1 taza rallada) sin
centro y cortada en rodajas
3 huevos
A taza de mantequilla de manzana
!4 taza de aceite vegetal
1 cucharada de vainilla
2 tazas de harina
2 cucharaditas de canela
1 cucharadita de bicarbonato de soda
A cucharadita de polvo de hornear
A cucharadita de sal
1 taza de pasas de uva
1 !4 taza de azúcar
Usando el disco rebanador/rallador, con el lado rallador hacia arriba, ralle las
zanahorias y la manzana en el tazón de procesamiento. Sáquelas del tazón y
colóquelas en un tazón grande para mezclar. Déjelas a un lado. Usando la cuchilla
en S, coloque los huevos, la mantequilla de manzana, el aceite, azúcar y la vainilla
en el tazón de procesamiento. Procese htista que la mezcla sea uniforme. Agregue
harina, canela, polvo de hornear, bicarbonato de soda, sal y pasas de uva. Pulse
JUSTO hasta que estén mezcladas. Vierta la masa en el tazón para mezclar con la
combinación de zanahoritis/manzana. Vierta con una cuchara en una asadera para
molletes engrasada o revestida con papel de hornear, llenando % de cada división.
Hornee a 375° F entre 15 y 20 minutos. Se obtienen 24 molletes.
Budín de pan horneado con pinas
12 rebanadas de pan blanco, en tiras para 1 cucharadita de vainilla
que pasen por la tolva de alimentos
1 lata de 20 onzas de trozos de piña, escurrid
2 huevos
1 taza de crema de leche “medio y medio”
1 cucharada de mantequilla o
margarina derretida
lA tazas de azúcar
3 rodtyas de piña, escurridas
Introduzca la cuchilla en S en el tazón de la procesadora de alimentos. Luego, con la
procesadora en marcha, deje caer el pan por la tolva de alimentos para hacer migajas
blandas de pan. Vierta en una cacerola engrasada de 2 cuartos de galón. Coloque los
trozos de piña en el tazón de la procesadora de alimentos con la cuchilla en S. Procese
la piña unos 20 segundos. Agregue huevos, crema, vainilla, mantequilla o margarina
derretida y azúcar. Procese hasta que estén mezclados. Vierta la mezcla de piña sobre
las migajas blandas de pan. Adorne con los tres anillos de piña superpuestos en el
centro. Hornee a 350° F por 1 hora o hasta que esté dorado. Se obtienen 8 porciones.
16
Page 35

840074400 SvOS.qxd 11/15/00 10:58 AM, .Page 17
Pastel de queso y trozos de chocolate
Relleno:
3 paquetes de 8 onzas de queso crema,
cortados en trozos
1 taza de azúcar
2 cucharadas de harina
4 huevos
!4 taza de leche
Base:
1 cucharadita de mantequilla,
blanda
22 galletitas con trozos de
chocolate
3 a 4 cucharadas de mantequilla
sin sal, derretida
1 cucharadita de vainilla
'Á taza de trozos de chocolate (“chocolate chips”)
Base: Use una cucharadita de mantequilla para engrasar una tortera de fondo
desmontable de 9 a 9'/i pulgadas y déjela a un lado. Usando la cuchilla en S y con la
procesadora en marcha, deje caer las galletitas por la tolva de alimentos y procese
hasta que se haya formado una mezcla de migaja uniforme. Continúe procesando,
agregando mantequilla derretida por la tolva de alimentos, hasta que quede bien
mezclada. Vierta la mezcla en la tortera con fondo desmontable engrasada y
presione las migajas uniformemente cubriendo el fondo de la tortera. Hornee a
425° F durante 10 minutos. Saque del homo y enfríe sobre una rejilla.
Relleno: Usando la cuchilla en S, agregue el queso crema, azúcar, harina, huevos,
leche y vainilla en el tazón de procesamiento. Procese hasta que la mezcla sea
uniforme. Vierta el relleno sobre la base enfriada y espolvoree con trozos de
chocolate. Hornee 15 minutos a 425° F. Reduzca el calor a 250° F y continúe
horneando (sin abrir la puerta del homo) durante 45 minutos más o hasta que el
pastel de queso esté cuajado. Cuando se enfríe, cubra y refrigere varias horas o
hasta el otro día. Se obtienen 16 porciones.
Consejo de cocina: Para obtener un pastel de queso de textura suave, hornee en un
baño de agua. Corte una hoja de papel de aluminio que sea unas 6 pulgadas más
grande que la tortera de fondo desmontable. Coloque la tortera de fondo desmontable
en el centro de la hoja y moldee el papel de aluminio hacia arriba alrededor de los
costados. Esto evitará que el agfua penetre en la tortera. Coloque la tortera con
fondo desmontable en una tortera más grande y llene la tortera más grande con
alrededor de VA pulgadas de agua corriente caliente. Hornee según las instmcciones.
Pastel crujiente de manzana a
6 manzanas grandes de tipo Deliciosa Dorada,
peladíis, sin centro y cortadas para que pasen
por la tolva de alimentos (6 tazas cortadas)
1 cucharada de jugo de limón
A taza de azúcar
la Marissa
Topping:
A taza de mantequilla, derretida
1 taza de harina
1 taza de azúcar
1 cucharadita de canela
1 cucharada de harina
1 cucharadita de canela
!4 cucharadita de nuez moscada
Usando el disco rebanador/rallador, con el lado rebanador hacia arriba, corte las
manzanas. Coloque las manzanas en un tazón grande. Exprima jugo de limón sobre
las manzanas. Espolvoree azúcar, harina, canela y nuez moscada sobre las manzanas.
Revuelva para mezclar y luego coloque las manzanas en una fuente de hornear de 2
cuartos de galón sin engrasar. Usando la cuchilla en S, coloque los ingredientes de
la cobertura en el tazón de procesamiento y pulse hasta que queden mezclados.
Desmenuce la cobertura sobre las manzanas. Hornee a 375° F durante 30 minutos.
Sirva con helado de crema de vainilla. Se obtienen 6 porciones.
17
Page 36

840074400 SvOS.qxd 11/15/00 10:58 AM,öPage 18
Asistencia al Cliente
Si desea hacer un reclamo b^o esta garantía, sírvase llamar a nuestro Número de
Asistencia al Cliente. Para un servicio más rápido es importante que tenga el modelo,
la serie y los números del üpo listos para que el operador lo pueda ayudar. Estos
números se pueden encontrar en la parte inferior de su procesadora de alimentos.
MODELO:
Número de Asistencia al Cliente: 1-877-207-0923
i Guarde este número para referencia futura!
Solicitud de información por e-mail: www.wai-martcom
Garantía Limitada de Dos Años
¿Qué cubre su garantía?
• Todo defecto de material o mano de obra.
¿Por cuánto tiempo después de la
compra inicial?
• Dos años.
¿Qué haremos?
• Le suministraremos una unidad nueva
• La unidad de cambio estará garantizada
¿Cómo hacer un reclamo bqo garantía?
• Guarde su recibo.
• Empaque su unidad debidamente.
• Devuelva el producto a su tienda
WAL*MART más cercana o llame al
Número de Asistencia al Cliente al
¿Qué es lo que la garantía no cubre?
• Partes de vidrio, envases de vidrio,
• Uso comercial o cualquier otro uso que no se
• Daños debido al mal uso, abuso, o
• Productos comprados o reparados fuera
___________________
TIPO:
_______________________
o reacondicionada, a nuestra opción.
por el resto del período de garantía de
dos años de su producto original.
Recomendamos usar la caja y los
materiales de empaque originales.
1-877-207-0923.
cortador/colador, cuchillas y/o agitadores.
encuentre en las instrucciones impresas.
negligencia.
de los Estados Unidos.
SERIE:
_________________________
¿Cuál es la relación entre las leyes estatales
y esta garantía?
• Esta garantía le otorga derechos legales
específicos, y es posible que usted también
tenga otros derechos que varían de un estado
al otro.
• WAL*MART expresamente niega toda
responsabilidad por daños consecuentes o
pérdidas incidentales causadas por el uso de
este aparato. Ciertos estados no permiten
esta exclusión o limitación de pérdidas inci
dentales o consecuentes de manera que es
posible que el descargo de responsabilidad
que antecede no corresponda en su caso.
¿Qué sucede si usted adquirió su producto en
los Estados Unidos, Canadá o México y encuen
tra un problema cuando lo está usando fuera
del país de compra?
• La garantía es válida solamente en el país de
compra y si usted sigue el procedimiento de
reclamo bajo garantía que se indica.
-(>
840074400
18
WAL*MART Stores. Ine.
Bentonville, AR 72716
11/00
 Loading...