

Page 1
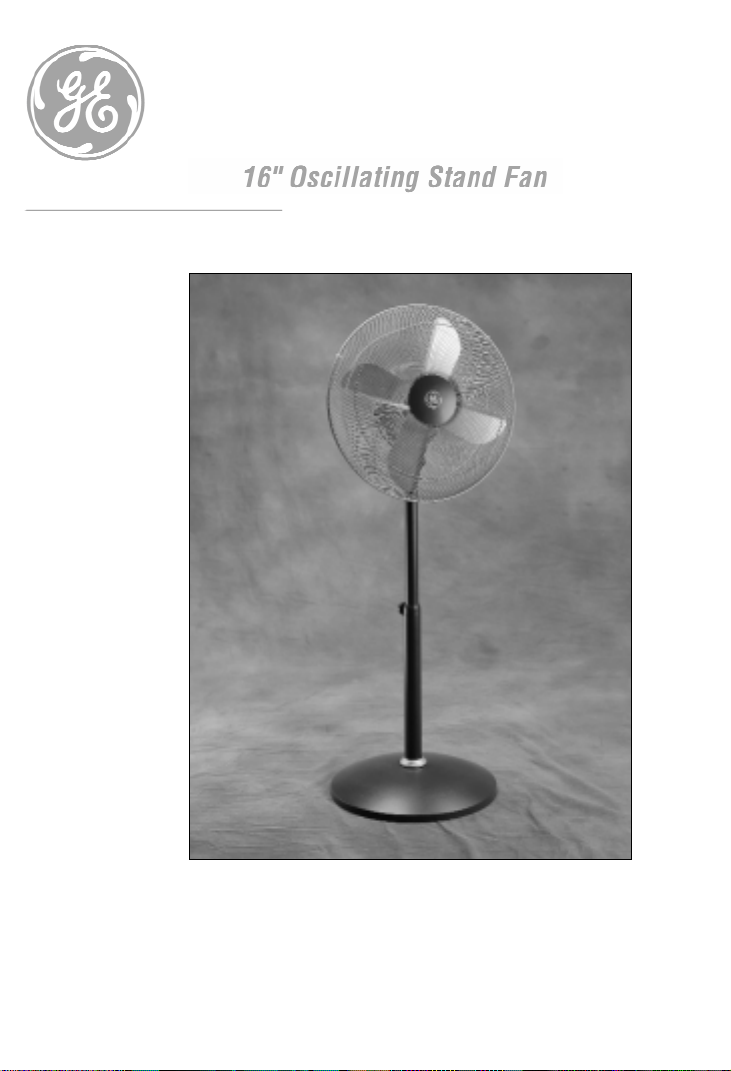
Owner’s Guide
PLEASE READ AND SAVE THESE
IMPORTANT INSTRUCTIONS
106573
☎
INFO HOT-LINE: If, after reading this owner’s
guide you have any questions or comments,
please call 1-877-207-0923 and a Consumer Service
Representative will be happy to assist you.
Page 2
When using electrical appliances, basic safety precautions should always be taken including the following:
• Use fan only for purposes described in the
instruction manual.
• To protect against electrical shock do not
immerse unit, plug or cord in water or spray
with liquids.
• Close supervision is necessary when any appliance is used by or near children.
• Unplug from outlet when not in use, when moving fan from one location to another, before put
ting on or taking off parts, and before cleaning.
• Avoid contact with moving parts.
• Do not operate in the presence of explosive and
or flammable fumes.
• Do not place fan or any parts near an open
flame, cooking or other heating appliance.
• Do not operate any appliance with a damaged
cord, plug, after the appliance malfunctions, or
has been dropped / damaged in any manner.
• The use of attachments not recommended or
sold by the appliance manufacturer may cause
hazards.
• Do not use outdoors.
• Do not let the cord hang over the edge of a
table, counter or come in contact with hot surfaces.
• To disconnect, grip plug and pull from wall out
let. Never yank on cord.
• Always use on a dry, level surface.
• Do not operate without fan grills properly in
place.
• This product is intended for household use
ONLY and not for commercial or industrial
applications.
WARNING: To reduce the risk of fire or electrical
shock, DO NOT USE THIS FAN, with any SOLID
STATE Fan Speed Control Device.
PLEASE READ AND
SAVE THESE
IMPORTANT SAFETY
INSTRUCTIONS
THIS PRODUCT IS EQUIPPED WITH A POLARIZED AC
(Alternating Current)PLUG (a plug having one blade
wider than the other).This plug will fit into the
power outlet only one way. If the plug does not fit
fully into the outlet, reverse the plug. If it still does
not fit, contact qualified personnel to install the
proper outlet. DO NOT DEFEAT THE SAFETY PURPOSE OF THIS POLARIZED PLUG IN ANY WAY.
PLEASE READ AND SAVE THESE
IMPORTANT SAFETY INSTRUCTIONS
ASSEMBLY INSTRUCTIONS
Base / Pole Assembly
Step 1: Slide the bottom end of the outer pole through
the pole ring.
Step 2: Turn the base cover upside down and place the
weighted insert and washer into the base cover.
Step 3: Insert the threaded end of the L shaped locking
lever into the hole of the washer, weighted insert
and through the base cover.
Step 4: While holding the base and weighted insert
together, connect the pole to the base, sliding the
washer and L shaped locking lever into the bottom of the outer pole.
Step 5: Turn the L shaped locking lever clockwise to
securely attach the pole to the base.
Step 6: Set the base on the floor, weight side down. Push
the pole ring down until it sits directly on the
base.
Fan Head Assembly
Step 1: Position the rear grill over the motor shaft, mak-
ing certain the notches at the top and bottom of
the rear grill fit over the prongs on the motor
housing. Please make sure the rear grill fits
securely against the motor housing.
Step 2: Secure the rear grill in its place using the rear
grill mounting-ring. Turn this ring clockwise and
tighten firmly.
Step 3: Slide the fan blade, with the hollowed interior of
the blade facing toward the rear grill, firmly
onto the motor shaft. The top of the motor shaft
should lie even with the center of the fan blade.
Page 3

ASSEMBLY INSTRUCTIONS CONT.
Step 4: Align the flat of the shaft with the securing screw
on the fan blade and slide the fan blade onto
the shaft with the securing screw facing the rear
grill.
Step 5: Center the front grill by aligning the GE Brand
logo on the logo plate so it is upright and
straight. Then, holding the front grill against the
rear grill snap each clip forward onto the front
grill.
Final Assembly
Step 1: First, slide the inner pole up from the outer pole.
Insert the Pole Lock Knob into the hole on the
outer pole, to securely hold this position. Next,
place the fan head assembly into the inner pole,
inserting the neck of the fan into the pole open
ing. Turn the fan head’s neck until the head is
securely locked into place. Finally, add the Tilt
Adjustment Knob to the hole of the fan head’s
neck. Tighten when fan head is in the desired
position.
OPERATING INSTRUCTIONS
Step 1: Set the fan base on a dry, level surface.
Step 2: Please make sure the On/Speed switch is in the
"Off" position. Plug the cord into any standard
120-volt A/C outlet.
Step 3: The SPEED is adjusted by moving the switch left
or right to the desired setting.
Step 4: The OSCILLATION knob is located on
the top of the fan motor housing. To start oscillation, push control knob down. To stop oscillation,
pull control knob up.
Q
G
H
I
F
E
J
K
L
M
O
P
A.) Front Grill
B.) Fan Blade
C.) Securing Screw
D.) Rear Grill Mounting-Ring
E.) Rear Grill
F.) Motor Shaft
G.) Motor Housing
H.) Tilt Adjustment Knob
I.) Inner Pole
J.) Pole Lock Knob
K.) Outer Pole
L.) Pole Ring
M.)Base
N.) Weighted Insert
O.) Washer
P.) L Shaped Locking Lever
Q.) Grill Clips (6)
C
D
A
B
ADJUSTMENT INSTRUCTIONS
Tilt Adjustment
Step 1: To change the tilting angle of the fan head, sim-
ply loosen the Tilt Adjustment Knob.
Step 2: Move the fan head to the desired angle, and then
firmly tighten the knob to lock the fan head in
place.
Height Adjustment
Step 1: Turn the Pole Lock Knob counter clockwise to
loosen the inner pole.
Step 2: Adjust the inner pole to the desired height, and
firmly tighten the pole lock knob in a clockwise
direction.
WARNING: Make sure to support the fan head
assembly when loosening the adjustable height
knob, as the weight of the fan head may cause the
inner pole to collapse.
CLEANING/MAINTENANCE
INSTRUCTIONS
Follow these instructions to correctly and safely care for
your GE Brand stand fan. Please remember:
• Always unplug the fan before cleaning or disassem-
bling.
• Do not allow water to drip on or into the fan motor
housing.
• Do not use any of the following as a cleaner: gasoline,
thinner, benzine.
(See instructions for fan head assembly)
Step 1: To access the fan blade, remove the front grill
and then unscrew the securing screw on the fan
blade.
Step 2: Clean the fan blade, both front and rear grills
with a soft cloth moistened with a mild soap solution.
Step 3: Replace blade, tighten the fan blade by screwing
the fan blade back on, and securely fasten the
front grill.
Fan Head, Base, and Pole Cleaning
Using a soft, moist cloth, with or without a mild soap solution, carefully clean the fan base, pole, and head. Please
use caution around the motor housing area. Do not allow
the motor or other electrical components to be exposed
to water.
FAN STORAGE
Your fan can be stored in the off-season either partially
disassembled or assembled. It is important to keep it in a
safe, dry location.
• If stored disassembled, we recommend using the origi-
N
nal (or appropriately sized) box.
• If stored assembled or partially assembled, remember
to protect the fan head from dust.
Page 4

1. Do NOT attempt to repair or adjust any electrical or mechanical functions on this unit. Doing so will void the warranty.
2. If you have any questions regarding this units operation or believe any repair is necessary, please call 1-877-207-0923 to
speak with a Consumer Service Representative.
3. If you need to exchange the unit, please return it in the original carton, with a sales receipt, to the store you purchased it.
If you are returning the unit more than 30 days after the date of purchase, please see the enclosed warranty.
4. If you have any other questions or comments, feel free to write us:
Consumer Service Department
P.O. Box 769, Milford, MA 01757-0769
For your own records, staple or attach your sales receipt to this manual. Also, please take a moment to write the store
name/location and date purchased below.
STORE NAME:
LOCATION:
DATE PURCHASED:
(STAPLE RECEIPT HERE)
SERVICE INSTRUCTIONS
WARRANTY INFORMATION
FIVE (5) YEAR LIMITED WARRANTY
SAVE THIS WARRANTY INFORMATION
What does your warranty cover?
•Any defect in material or workmanship
For how long after the original purchase?
•5 years.
What will we do?
•Provide you with a new, or at our option, a reconditioned unit.
•The exchange unit is warranted for the remainder of your product’s original five year warranty period.
How do you make a warranty claim?
•Return the product to your nearest WAL
★
MART store.
•Properly pack your unit. We recommend using the original carton and packing materials.
•Include in the package a copy of the sales receipt or other evidence of date of original purchase. If the
unit was a gift, provide a statement specifying the date received. Also print your name and address and a
description of the defect.
•A new or reconditioned unit will be provided.
What does your warranty not cover?
•Customer instruction. This instruction manual provides information regarding operating instructions
and user controls. For additional information, ask your dealer.
•Commercial use.
•Damage from misuse, abuse, or neglect.
•Products which have been modified or incorporated into other products.
•Products purchased or serviced outside the USA.
How does state law relate to this warranty?
•This warranty gives you specific legal rights, and you may also have other rights which vary from state to
state.
What if you purchased your product in the U.S., Canada or Mexico and encounter a problem while using it
outside the country of purchase?
•The warranty is valid only in the country of purchase and if you follow the warranty claim procedure as
noted.
GE is a trademark of General Electric Company and is used under the license by WAL
★
MART Stores, Inc.
Bentonville, AR 72716
GE10657300UM1 Printed in China 12/5/00 last update
 Loading...