

Page 1

PC S
Advanced Telephone Messaging
Revised 10/02
Network Client Guide
Operating Instructions and Install Guide
PhoneTree 2500 and 3500 series
Page 2

Table of Contents
2
Installation . . . . . . . . . . . . . . . . . . . . . . . . . . . . . . . . . . . . . . . . . . . . .3
Step One: Verify Your PC Compatibility . . . . . . . . . . . . . . . . . . . . . . . . .3
Step Two: Install the Software . . . . . . . . . . . . . . . . . . . . . . . . . . . . . . . . .4
Step Three: Configure Your Client . . . . . . . . . . . . . . . . . . . . . . . . . . . . .6
Initial Setups . . . . . . . . . . . . . . . . . . . . . . . . . . . . . . . . . . . . . . . . . . .8
Call Options . . . . . . . . . . . . . . . . . . . . . . . . . . . . . . . . . . . . . . . . . . . . .8
Daily Operation . . . . . . . . . . . . . . . . . . . . . . . . . . . . . . . . . . . . . . . .15
Starting a Call Job . . . . . . . . . . . . . . . . . . . . . . . . . . . . . . . . . . . . . . . .15
Checking Call Status . . . . . . . . . . . . . . . . . . . . . . . . . . . . . . . . . . . . . .16
Reference . . . . . . . . . . . . . . . . . . . . . . . . . . . . . . . . . . . . . . . . . . . . .21
Importing Data . . . . . . . . . . . . . . . . . . . . . . . . . . . . . . . . . . . . . . . . . .21
The PhoneTree Call Status Screen . . . . . . . . . . . . . . . . . . . . . . . . . . . . .25
Common Questions . . . . . . . . . . . . . . . . . . . . . . . . . . . . . . . . . . . . .28
The PhoneTree Website . . . . . . . . . . . . . . . . . . . . . . . . . . . . . . . . . .29
Contacting PCS . . . . . . . . . . . . . . . . . . . . . . . . . . . . . . . . . . . . . . . .31
Page 3
3
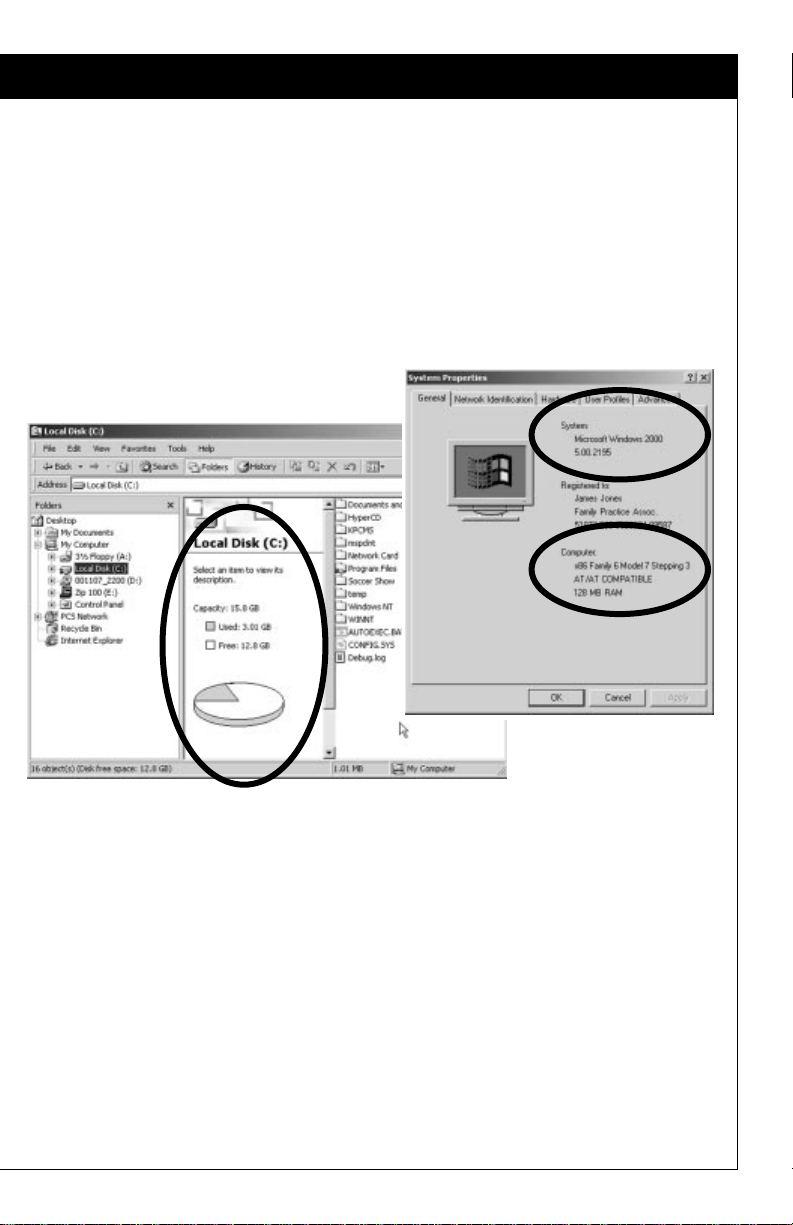
Installation:Verify Your PC Compatibility
Congratulations on your purchase of the PhoneTree Network Client! This
manual will guide you through the installation and setup of the PhoneTree
Network Client on your system. If you need assistance with the installation,
talk to the PhoneTree Network Administrator in your office or refer to the
PhoneTree 2500/3500 User’s Manual.
Step One: Verify Your PC Compatibility
1. Operating System
Your PC must have Microsoft Windows 95, 98, 2000, ME or XP as the
operating system. PhoneTree is not compatible with Windows 3.1 or NT.
2. PC Resources: PhoneTree client
• 32 MB RAM (64 MB recommended)
• CD ROM drive
• Color monitor
• sound card
• microphone
• speakers
3. Network Configuration
The PC that will be hosting PhoneTree must be configured and installed
on the office network, and the computer where you will be installing the
PhoneTree Client must be configured and installed on the same network
(but on a different computer).
Page 4
Installation: Install the Software
4
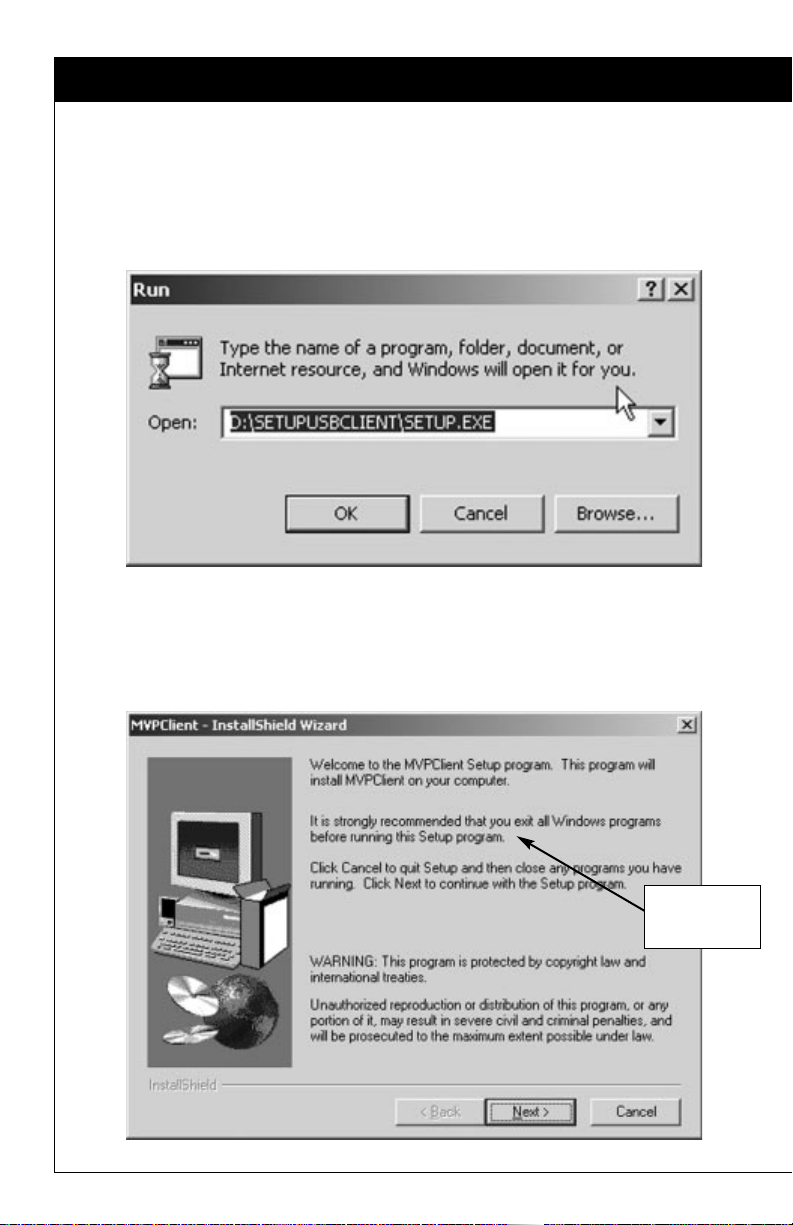
Step Two: Install the Software
1. Insert the CD
Insert the CD in your drive. Choose Start -> Run -> Browse... ->
SETUPUSBCLIENT\Setup.exe (look for this file on the CD) -> click
Open -> click OK. The installation should then begin.
2. Choose the Default Settings
Click on Next several times until the installation process starts. In order
to assure reliable operation and ease of service, please DO NOT change
the default information as it is presented.
Please note
this!
Page 5
5
Installation: Install the Software, continued
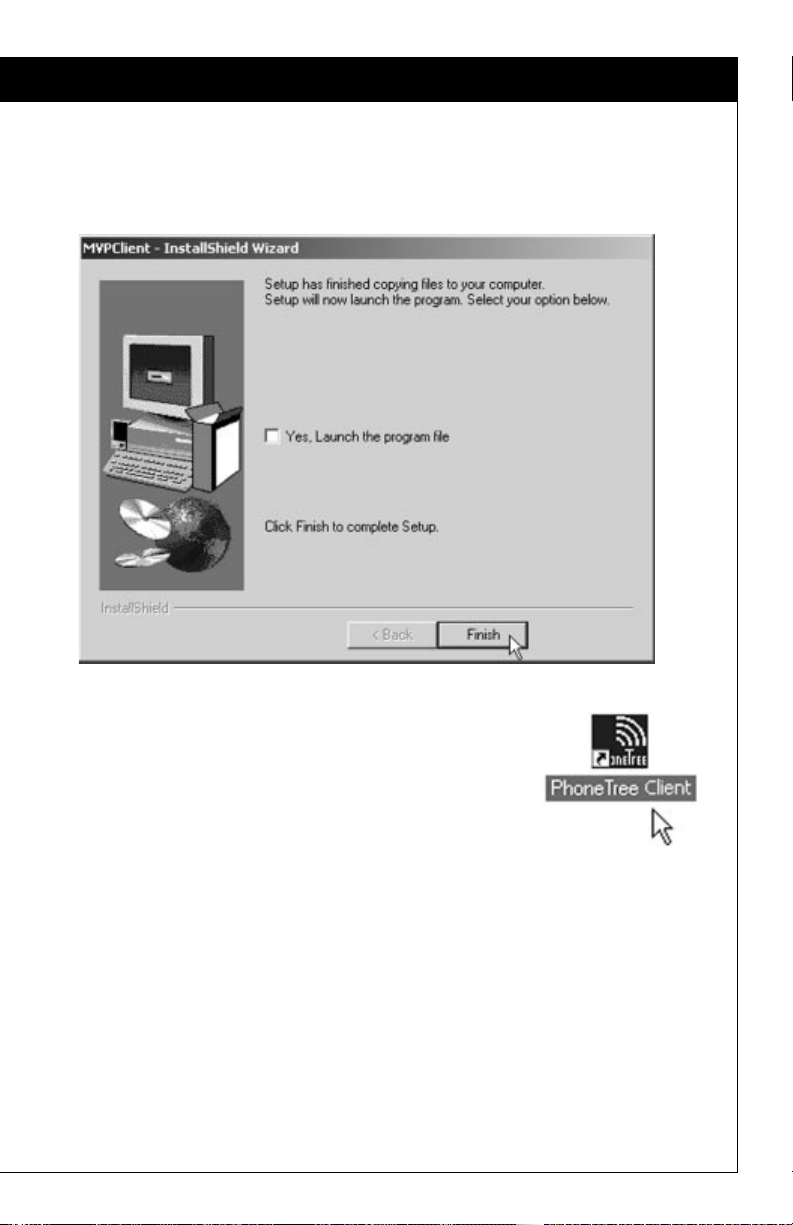
3. Finish Installation
When asked, click the Finish button. Do not start the PhoneTree
program at this time. Close the Client window.
4. Check for Icon on Desktop
Now you should have a PhoneTree Client icon on
your desktop (shown at right). You are now ready to
go on to Step Three: Configure Your Client.
Page 6
Installation: Configure Your Client
6
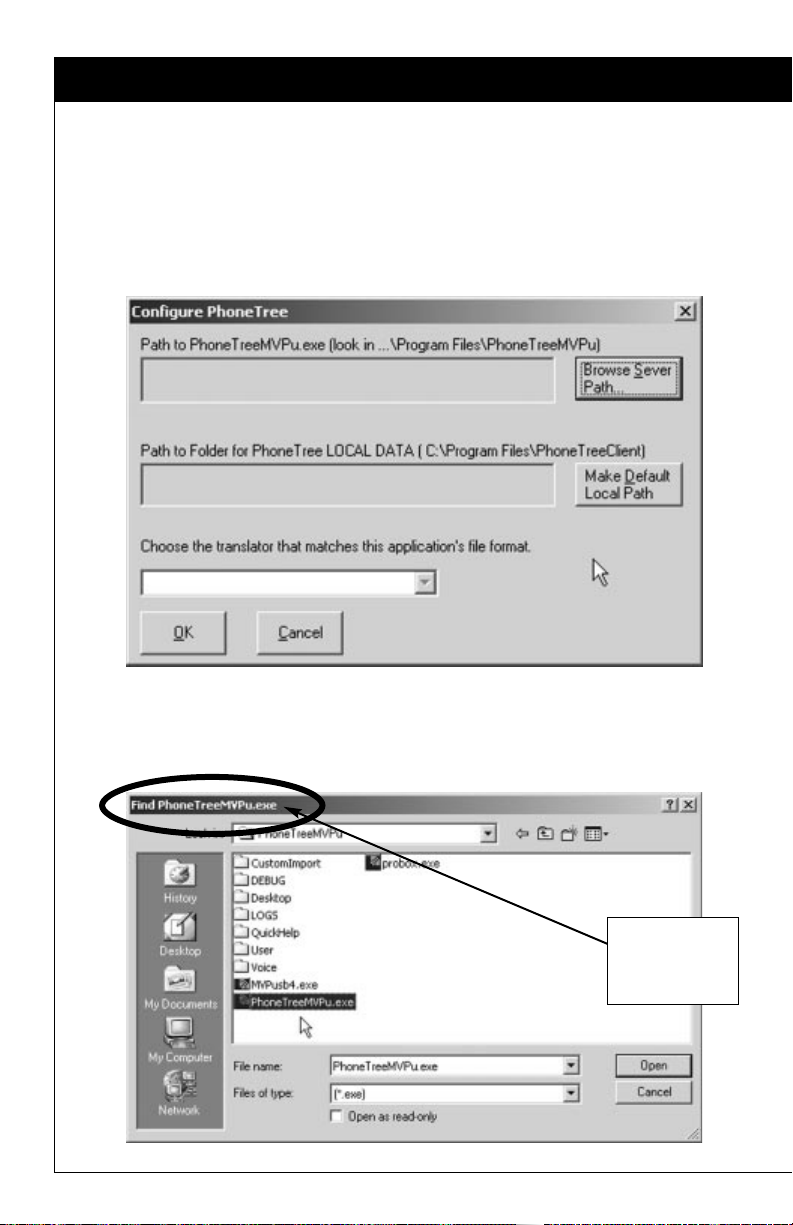
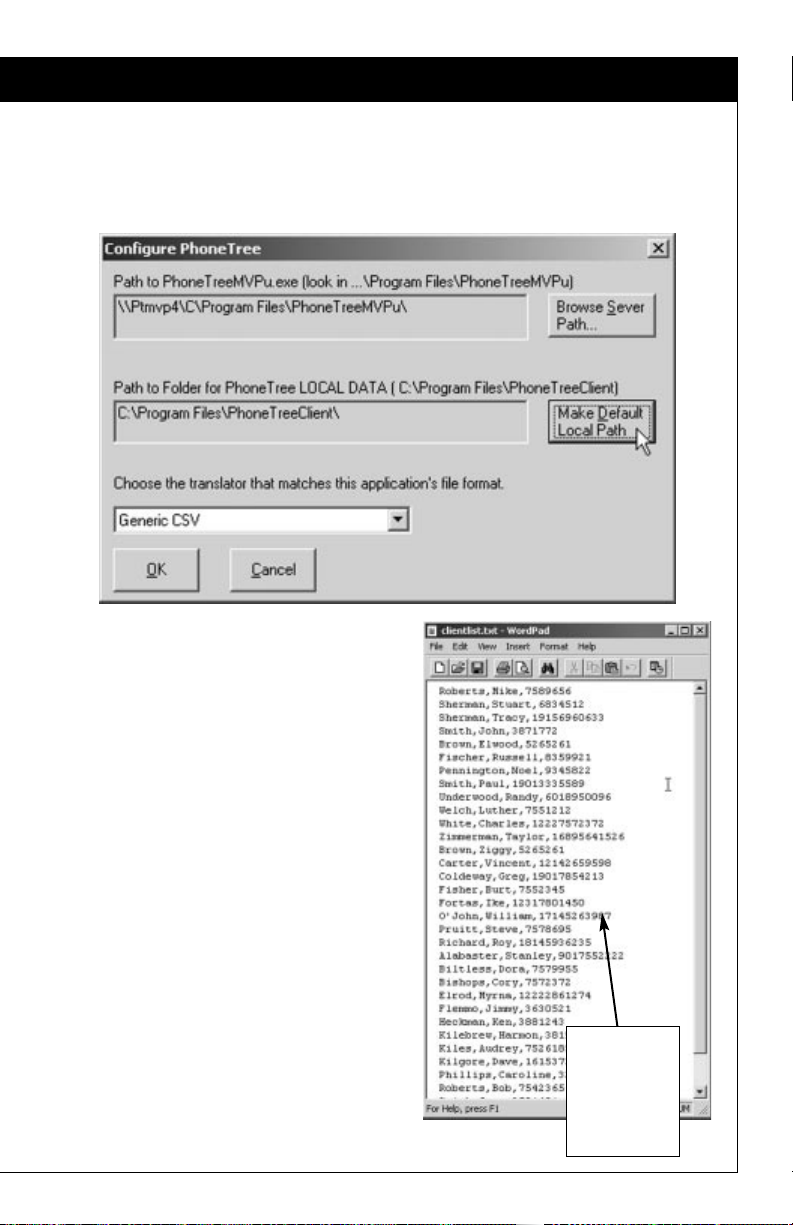
Step Three: Configure Your Client
1.
Double-click on the PhoneTree Client icon on your desktop. You will be
prompted to configure your client. The screen below will come up. You need
to do three things: tell the Client where the PhoneTree Server is located on the
network, create a default local path for all your local calling data, and tell the
Client which translator to use when sending calling data to the PhoneTree Server.
2. To tell the PhoneTree Client software where the Server software resides, click
the Browse Server Path button. Navigate to the location of the PhoneTree
software over your computer network. When you’ve found it, click Open.
Look for this
filename on
your network.
Page 7
7
Installation: Configure Your Client, continued
3. To create a default folder where all your calling preferences and other data
will be kept, click the Make Default Local Path button. A folder will be
created on your hard drive in the location shown, and this is where all data
that is generated by the PhoneTree Network Client software will be stored.
This is a
sample
ASCII file,
viewed in
WordPad.
4. Now you need to choose a translator
for your calling data. This translator
will be used if you generate a calling
list locally, on your own computer, and
you want to send it to PhoneTree to
use when starting a call session.
Generic CSV will translate any
comma-delimited text (ASCII) file that
follows the format at right (last
name,first name,phone)—use this
unless you commonly use a member
database program and its translator
appears in the drop-down menu.
5. Click OK. You are now ready to start
calling! Turn to the next section, Daily
Operation.
Page 8
Initial Setups: Call Options
8
Call Options
Once you are finished with configuration, you will see the Call Status screen,
which is the main screen for the PhoneTree Network Client. To initiate a call
session:
❶
Click on the PhoneTree button.
❷
Choose the PhoneTree you would like to access from the menu, then click
the OK button. PhoneTrees protected by a password will be marked with
an asterisk (*).
❶
❷
Page 9
9
Initial Setups: Call Options, continued
❸
❹
❹
❸
The Easy Call dialog will appear. From the Setup menu, choose Call Options.
❹
The Call Times tab will be active. Choose days to call on by clicking on
the box(es) next to the day. Change the Don’t Call Before and the
Don’t Call After times by clicking on them—a Set Time box will appear,
allowing you to make changes. There is a checkbox called Allow
Different Times for Each Day. If you choose this option you can
change the Don’t Call Before and the Don’t Call After times to
something different each day. Also, you can choose to use
Pause/Resume (to pause calling when people are eating dinner, for
instance). Turning this option ON brings up the pause/resume times.
Page 10
Initial Setups: Call Options, continued
10
a
i
c
b
j
h
g
f
d
e
❺
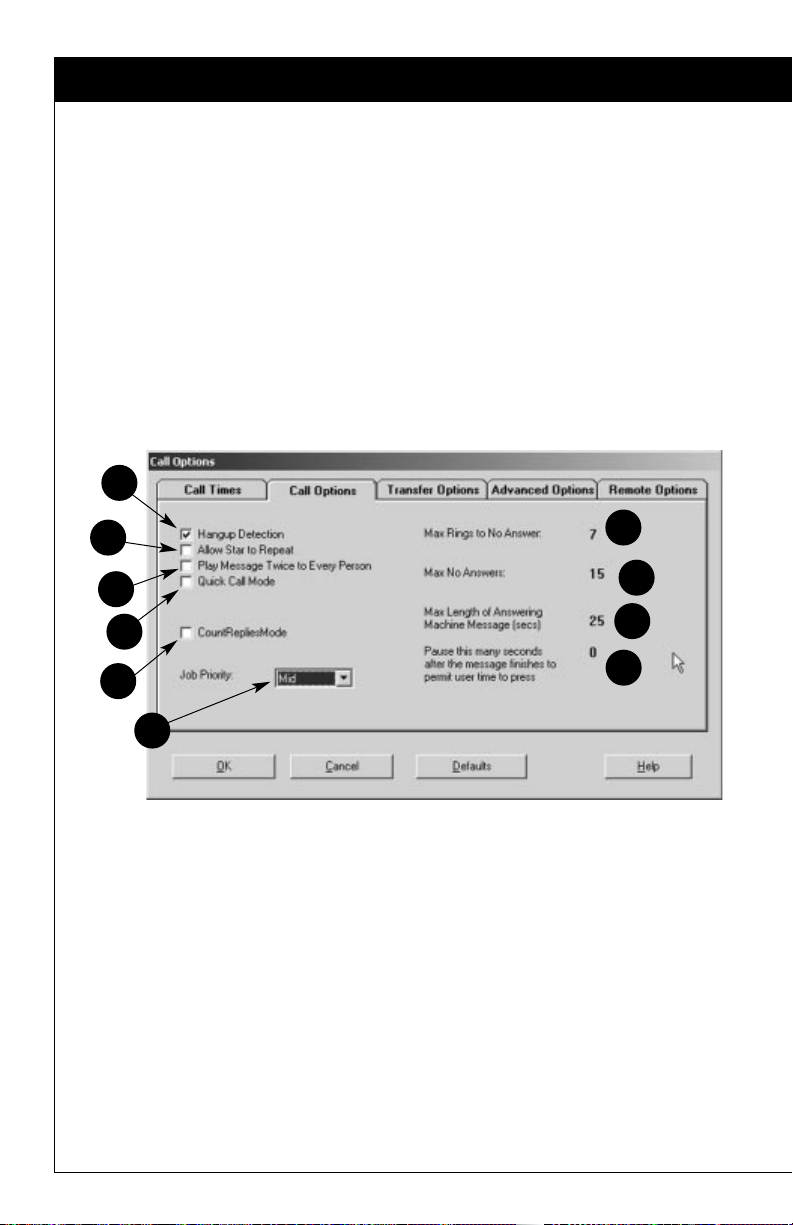
Click on the Call Options tab.
a. Selecting the “Hangup Detect” option means that if the called party
hangs up the phone early, PhoneTree will note this in the status report.
[Recommended setting: ON]
b. “Star to Repeat” gives the listener the option to repeat the message if
they wish by pressing the Star(*) key on their phone. If you choose
this option, you will need to add “To hear this message again, press the
star key now” toward the end of your message, followed by a pause (to
give the listener time to press Star). [Recommended setting: ON]
c. “Play Message 2 Times” means that each time PhoneTree delivers a
message, it will play the same message twice. This option significantly
lengthens the time it takes to finish a call job. [Recommended: OFF]
d. “
Quick Call Mode” speeds up message delivery by calling only people
who are at home. During the first round of calling, PhoneTree will
only ring 3 times at a number before hanging up and going to the next
number. The result is that answering machines, which traditionally
pick up after the 4th ring, will be called last. During subsequent
rounds of calling, PhoneTree will revert to its normal calling setups.
[Recommended setting: OFF]
e. “Count Replies Mode” tells PhoneTree to stop calling after the
desired number of people press 9 in response to your question. For
example: “Hi, this is Steve. I’m calling to get three volunteers to help
paint the gym. If you can help, please press 9 now. --pause-- Thanks!”
If this option is selected, a Replies Needed number appears (default:
5) where you can change the number of “yes” (9) replies you want
Page 11

11
Initial Setups: Call Options, continued
from 1 to 1000. This mode only recognizes 9 when dialed on touchtone phones. This feature is especially good for seeking a limited
number of volunteers, because PhoneTree will stop calling after the
number of desired 9 replies are received. [Recommended setting: OFF]
f. “Job Priority” enables you to specify whether your job is Low, Medium
(Mid), or High priority. Use Medium (Mid) for most call jobs, High for
when a job is urgent and needs to be completed quickly, and Low for
call jobs that aren’t as time-sensitive as most. If you select High, your
call job will precede all other current jobs and will be completed first.
[Recommended setting: Mid]
g. “Max Rings to No Answer” means the number of rings before
PhoneTree considers the call to be Not Answered. Select a value
between 3 and 8, keeping in mind that most answering machines will
pick up after the 4th ring. [Recommended setting: 7]
h. “Max No Answers” can be set from 1 to 15. PhoneTree will call a
number back this many times if it gets a busy signal or a No Answer.
PhoneTree automatically spreads these attempts out over the day.
[Recommended setting: 15]
i. “Max Length of Answering Machine Message (secs)” can be set
between 25 and 80 seconds. Change this only if you see “Ans Mach
OGM too long” in the Status report. [Recommended setting: 25]
j. “Pause this many seconds after the message finishes to permit
user time to press” is helpful if you are using the “Star to Repeat”
option—use it to assure that the member has enough time to press the
Star key. [Recommended setting: 0, when using Star to Repeat: 2]
Page 12

Initial Setups: Call Options, continued
12
❻
Click on the Transfer Options tab. There are four options in the dropdown menu, Off, a) Mailbox, b) Phone System and c) 3-Way Call. Unless
this is set to Off, any time your members press 0 during a PhoneTree
message they will be transferred to the location you specify here.
a. Mailbox: Choosing this option allows your members to leave you a
voice mail message, just as if you had an answering machine hooked
up to PhoneTree. You will need to record an OGM (outgoing message)
that will be played after a member presses 0. To do this, click OK on
this screen and read the instructions on page 44 of the PhoneTree
User’s Manual. Don’t forget to tell your members
in your PhoneTree
message to press 0 if they want to leave a message.
b. Phone System allows your members to be transferred to a live operator
in your office. You will be prompted to specify the extension to where
the call will be transferred, and also to specify a hook flash delay (leave
at 3 unless you experience problems). This option requires that
PhoneTree be connected to an analog extension on your phone system.
c. Choose the 3-Way Calling option if you subscribe to 3-Way Calling
through the phone company and you’d like your members to be able to
be transferred to another number. You will need to specify the number
to where the member will be transferred, and also to specify a hook
flash delay (leave at 3 unless you experience problems).
❼
Click on the Advanced Options tab. In general, we recommend you not
change these options unless directed to do so by PhoneTree technical
support. However, you may need to adjust these settings from time to time.
a
c
b
Page 13

13
Initial Setups: Call Options, continued
a. These dialing settings are included here if you need to make
adjustments on a per-PhoneTree basis. For example, suppose you want
this PhoneTree only to only talk to people who are at home (i.e., to
never leave a message on an answering machine). You would put an
“A” in the Suffix box (which tells PhoneTree to hang up when it
detects an answering machine). Remember, any Prefixes, Suffixes and
Library numbers you type here will be in addition to any others typed
on the Configure Phone Lines dialog on the Administrator Desktop of
the host machine (which are system-wide).
b. If this PhoneTree will be calling any pager numbers, type in the callback
number here in the Pager box, and be sure to put a “C” in your list
after any pager phone number (i.e. 722–5992C). Doing this will ensure
that PhoneTree will leave your callback number on the pagers it calls.
c. Duplicates/Blocked Numbers: PhoneTree will remove duplicates
automatically, if you check one of the two options here. Selecting Keep
Duplicates (default) will keep your list unchanged. Keep Removed
Blocked Numbers ON (default) unless for some reason you would not
like PhoneTree to remove the people on the Blocked Number list (see
the Admin Desktop on page 38 of the PhoneTree User’s Manual).
d. Daily Calling: If you would like this PhoneTree to call the same list
each day (during the call window(s) you set on the Call Times tab),
check this option. You can also print your call status report
automatically (choose from Never, No Answer/Not Confirmed or After
Max Tries). Default: OFF
a
e
c
b
f
d
Page 14

Initial Setups: Call Options, continued
14
e. Create Results File (Jobxx.out) for another application: If you would
like to save a call status file that another application (like your member
management program) can use later, check this option. Default: OFF
f. Call Logging: If you would like the calls made with this PhoneTree to be
included in the system-wide call log, choose either Log Completed Calls
or Log All Calls from the drop-down menu. Read more about call logging
on pages 27 and 28 of the PhoneTree User’s Manual. Default: OFF
❽
Click the OK button.
➒
You will be returned to the Easy Call screen. To record your message, press
the Record button. After you hear the beep, immediately start speaking your
message into your computer’s mic. You will see a counter displaying the time
elapsed. Once you have completed your message, press the Stop button. To
preview your message, click the Play button. If you don’t like your message,
press the Record button again and record over the old message (if the voice
quality is too soft, check the mixer settings for your sound card).
❿
When you are happy with your message, click one of the radio buttons at
the bottom of the screen:
a. Call the new list I have selected: Use File -> Select!: Use this if you
have generated a new list locally (on your own computer) using thirdparty software. Turn to the Importing Data section (page 21) for
instructions on how to do this.
b. Call the list PhoneTree already has: NameofFile.mdb: Use this if you
want PhoneTree to call using the file that is currently active on the
server machine for this PhoneTree. The correct name of this file will
appear here (if you see No list available! then you will need to go to
the PhoneTree host computer and select a list for this PhoneTree).
➒
❿
Page 15

15
Daily Operation: Starting a Call Job
Starting a Call Job
To start calling, click the Call List button on the Easy Call screen:
The light on the Server Status will turn from green (Calling) to orange
(Pausing!), to yellow (Paused) and finally back to green again, when you
will see your new call job appear in the list of PhoneTrees.
You can monitor calls for the currently active PhoneTrees right here from
your own computer. The information shown is updated every few seconds.
Click here to
start calls.
Calls will be
paused as your
new job is added.
Page 16

Daily Operation: Checking Call Status
16
Checking Call Status
Once your call job is complete, you will probably want to check the Call
Status, which will give you a complete report on the call job. Here’s how:
❶
First, you must contact your PhoneTree Administrator or visit the Host
computer. Go to the Edit screen of the PhoneTree for which you want to
view the Call Status, and choose Call Options from the Setup menu.
Click on the Advanced Options tab and make sure that the Allow
Client to View Call Status box is checked. This must be done on the
Host computer and cannot be done from within the PhoneTree Network
Client. You will only need to do this once for each PhoneTree.
❷
Now, go back to the PhoneTree Network Client on your computer and
click the PhoneTree button on the main screen (PhoneTree Call Status).
Make sure this
box is checked.
❷
Page 17

17
Daily Operation: Checking Call Status, continued
❸
Choose the PhoneTree for which you would like to view the Call Status
and click OK.
❹
Now you are back on the Easy Call screen for that PhoneTree. Choose
Update Call Results from the File menu.
❺
Click the Yes button on the dialog box that follows:
❸
Page 18

Daily Operation: Checking Call Status, continued
18
❻
Now you should get a notification that looks like the following. Click the
OK button.
❼
You will be taken back to the PhoneTree Call Status screen (the main
Client screen) and you can watch as calls are temporarily paused while an
up-to-date call list is generated on the Host machine.
❽
Once calls have resumed and the green light is back on, click on the
PhoneTree button again, and choose your PhoneTree from the Choose a
PhoneTree screen again (repeat steps 2 and 3).
➒
Choose View Call List from the File menu of the Easy Call screen:
❿
The Call List (including the most recent Call Statuses) for this PhoneTree
will be opened automatically as a text file (Job.txt) in WordPad. This is a
new text file generated by PhoneTree and now resides in your PhoneTree
Client folder locally, on your computer. It should look like the picture on
the opposite page.
Page 19

19
Daily Operation: Checking Call Status, continued
Call Status is in
this column.
Use Windows Explorer to locate and move a copy of Wordpad to the
directory shown in the dialog above (the PhoneTree Client software
needs to know where Wordpad is, since it uses Wordpad to display your
Call Status).
If instead of the
Job.txt, you get an error message like the one below:
Page 20

Daily Operation: Checking Call Status, continued
20
Standard Call Statuses
Not Called Yet — Person has not been called yet
Ans by Person — Message was delivered to a person
Phone Was Busy — Phone was busy on last call to person
Did Not Answer — Person did not answer last call
Ans By Machine — Message was delivered to member’s answering machine
Learned Machine — Person’s answering machine is ‘unique’ and was
learned (will call back)
9 Was Not Dialed — Delivery unconfirmed when asked to dial 9 (will call back)
Never Dialed 9! — Did not confirm delivery after 3 call attempts
Max No Answers — Line was busy or not answered for 15 call attempts
(FCC calling limit) or max attempts set by user
Not Selected — Person is not selected for calling
Hung Up Early — Call was answered but responder hung up before
message finished
If the following statuses appear, please check the phone number:
Call Failed! — Error detected during call (check for disconnected/
changed number)
OGM Too Long — Call was answered by machine, but its OGM
(outgoing message) was too long
Telco Message — Call was answered with a telephone company (Tri-
Tone) re-order tone (disconnect/change)
No Connect — No signal detected after dialing (phone number is
probably not valid)
FAX or Modem — Call was answered by a FAX machine or modem
Member Reply
In addition to the above statuses, a number may appear to the right of the
status. This indicates a TouchTone®was pressed by the person during the call:
0 — Indicates call was transferred to the Transfer Method you chose on
the Transfer Options tab of the Call Options dialog box (page 12)
1 thru 9 — Meaning will vary depending on message. You may request that
the person respond to a question with any touch-tone digit (ie,
dial ‘5’ to confirm that you will be at the meeting, dial ‘3’ if you
would like someone to call you back, etc...)
Page 21

21
Reference: Importing Data
❷
PhoneTree can use data generated in any
member management software package as
well as any common office software product
(Microsoft Word, Excel, etc.). If your
database application can produce an ASCII
(.dat or .txt), or a Comma Delimited
(.txt), CSV file, then you will be able to
import the data into a list that your
PhoneTree can use. Different applications
will have different ways of saving data into
one of these formats. Look for an Export or
Save As command in the file menu. Read
the documentation that came with your
database application for instructions. For
simplicity, save the exported data in the
PhoneTree Client folder. In addition, your
application may have a Custom Translator
(that will show up on the Configure
PhoneTree screen—see page 7). We will
show here the most common translator,
Generic CSV.
❶
First, confirm that Generic CSV is chosen on the Configure PhoneTree
screen (see page 7). This translator is actually stored on the PhoneTree
Host machine, not locally on your computer.
❷
Now, click the PhoneTree button on the main screen (PhoneTree Call
Status).
This is the exact
format that your
data will need to
be in to work with
the Generic CSV
translator.
Page 22

Reference: Importing Data, continued
22
❸
Click here
first, then…
…do this!
❸
Choose the PhoneTree for which you would like to import a file and click
OK.
❹
Choose the “Call the new list I have selected” radio button, then
choose Select Call List from the File menu.
Page 23

23
Reference: Importing Data, continued
❺
Choose the list you would like to use from the following dialog, then click
the Open button.
Note: this assumes you were able to export your file from the application
that created it as a comma-delimited text file (.txt, .dat or .csv) and that
you placed the exported file in the PhoneTree Client folder.
❻
You will now be given the opportunity to preview the file before sending it
to PhoneTree for translation. Click OK if you are satisfied that this is the
correct file.
Page 24

Reference: Importing Data, continued
24
Now the name of
your imported file
shows up here.
❼
You will be taken back to the Easy Call screen. Record a message if you
haven’t already (follow step 9 on page 14) and click the Call List button.
Notice that now the name of your list shows up on the screen.
❽
The light on the Server Status will turn from green (Calling) to orange
(Pausing!), to yellow (Paused) and finally back to green again, when you
will see your new call job appear in the list of PhoneTrees.
Calls will be
paused as your
new job is added.
Page 25

25
Reference:The PhoneTree Call Status Screen
❶
❷
❸
❹
❶
The File Menu: Allows you to Configure your Client settings (page 6) or
to Exit the program.
❷
The PhoneTree List: Displays a list of all PhoneTrees currently calling.
Check the entries in the Status, Pri(ority), Placed and Completed
columns for information about what is happening with each PhoneTree.
We will talk about each of these in more detail below.
❸
More Info: Click these arrows to see more information about each
PhoneTree, including Start Date, Start Time, Call From, Till, Call
Days, Pause At, Resume At, Night, Call File, MaxRings, MaxNo9s
and Xfer To. The More Info arrows are used instead of a scroll bar
because the PhoneTree Name remains on the left side of the screen while
you look at the other columns of information. We will discuss each of
these in more detail below.
❹
Server Status: There are three options here: Calling (green light),
Paused (yellow light) and Off (red light). Calling means that the
PhoneTree software is running and is currently in its call mode (the Call
Screen is up on the server machine). Pausing! or Paused means that the
PhoneTree software is running, but not in its call mode (one of the other
Desktops may be displayed). Off means that the PhoneTree software is
not running on the PhoneTree Host machine.
Page 26

Reference:The PhoneTree Call Status Screen, continued
26
Call Status Headers
Status: Will show Calling (calls are currently in progress), Done (call job is
complete) or Idle (no current call job scheduled).
Priority: Either Low, Mid (the default) or Hi. Turn to page 11 for
instructions on how to change the priority for a call job.
Placed: Will display the number of calls placed. This number is often larger
than the number of completed calls because PhoneTree will call back if no
one answers the phone or if the line is busy.
Completed: Shows two numbers, the first of which is the number of people
in your list who have been completed, and the second number is the total
number of people in your list.
Start Date: The day on which the current call job was initiated.
Start Time: The time (on the Start Date) when the current call job was
initiated.
Call From: Displays the Don’t Call Before time you specified on the Call
Times tab of the Call Options dialog (page 9).
Till: Displays the Don’t Call After time you specified on the Call Times tab
of the Call Options dialog (page 9).
Call Days: Displays the Call On Days you specified on the Call Times tab
of the Call Options dialog (page 9).
Page 27

27
Reference:The PhoneTree Call Status Screen, continued
Pause At: Displays the Pause Call At time you specified on the Call Times
tab of the Call Options dialog (page 9).
Resume At: Displays the Resume Call At time you specified on the Call
Times tab of the Call Options dialog (page 9).
Night: Displays the Start Night Messages At time you specified on the Call
Times tab of the Call Options dialog (page 9).
Call File: Shows the file that each PhoneTree is currently using for calling.
Note: any file that you sent from the Client will show up here as
ClientImport (regardless of the name you gave it locally).
Max Rings: Displays the Max Rings to No Answer number that you typed in
on the Call Options tab of the Call Options dialog (page 11).
MaxNo9s: Displays the number of attempts PhoneTree will make if you
have turned Intro w/9 ON using the Call Wizard (must be done on the
Host machine—page 68 in the PhoneTree User’s Manual). Default is 3.
Xfer To: Shows the Transfer extension number (not the Method) you
specified on the Transfer Options tab of the Call Options dialog (page 12).
Note: will only display a number if you chose Phone System as the Method.
Page 28

Common Questions
28
Common Questions
As a PhoneTree user, you have 24-hour technical support available via e-mail,
at support@phonetree.com, or on our website (www.phonetree.com).
Following is a list of common questions and their answers:
Q.I have chosen a PhoneTree, selected my calling preferences in Call Options,
recorded a message and clicked the Call List button but my new call job has
not been sent to the PhoneTree host. Why?
A. Make sure the PhoneTree host is network enabled (see page 25 in the
PhoneTree User’s Manual).
Q.I have chosen View Call List to look at the Call Status for a PhoneTree, but it
only brings up a text file that says “PhoneTree Call Status results are not
available for this PhoneTree.” Why?
A. Make sure that Allow Client to View Call Status is checked on the
Advanced Options tab of the Call Options dialog for that PhoneTree on
the Host computer (see page 16). This must be done once on the Host
computer and cannot be done from within the PhoneTree Network Client.
Also, make sure you have first chosen Update Call Results (page 17)—this
pauses calls temporarily to update the call statuses for all PhoneTrees.
Q.What happens if no one answers the phone?
A. PhoneTree’s sophisticated voice recognition software will do one of three
things when it calls:
a. Deliver the message if a person answers;
b. Wait for the beep of an answering machine when one is detected; or
c. Mark a call attempt as a “No Answer” and call back later if no one
picks up the phone or if it detects a busy signal.
You can set the number of rings PhoneTree will wait for before marking a
number as a “No Answer”—check the Call Options on page 10.
Q.Who can I call for help? When?
A. Call our technical support number toll-free at (866) 234-2943 during
the hours of 8:30 AM–5:00 PM Eastern Time, Monday through Friday
(holidays excluded). Or submit a question via e-mail at support@phonetree.com
24 hours a day, and look for a response soon, usually within 24 hours.
Q.How many calls will PhoneTree make?
A. PhoneTree will make an average of 60 calls per hour, per installed phone
line. Remember that PhoneTree will keep trying phone numbers if it
detects a busy signal or a “No Answer,” up to the maximums that you set
on the Call Options tab (page 10).
Page 29

29
The PhoneTree Website
Visit us at www.phonetree.com, where you have access to free software
updates, many answers to frequently asked questions, and answers to your
specific questions via our free online tech support, or call Tech Support
directly at 866.234.2943 (toll-free).
Page 30

Notes
30
Page 31

31
Contacting PCS
By Phone
Our technical support staff is available from 8:30 AM to 5:00 PM Eastern
Time, Monday through Friday at 866.234.2943. To expedite resolution of
your problem, please be near your PhoneTree and your computer, if
applicable. If possible, use a different telephone line than PhoneTree.
You may also fax your question or comment to 336.722.6877.
By E-Mail
Technical support via e-mail allows you to ask a technical question 24 hours
a day, at your convenience. In most cases, you will receive a reply the next
business day, or within 24 hours of your request. Send your questions to
support@phonetree.com.
By Mail
Personal Communication Systems
2400 Reynolda Road
Winston-Salem, NC 27106
Sales Contacts
Sales Phone: 800.951.8733
Sales E-Mail: sales@phonetree.com
www.phonetree.com
Page 32

Telephone Messaging Systems
Regulatory Information
Personal Communication Systems, Inc.
2400 Reynolda Road, Winston-Salem, NC 27106
Sales: (800) 951-8733 • Support: (336) 722–0087
www.phonetree.com • sales@phonetree.com • support@phonetree.com
©2002 by PCS.
Specifications subject to change without notice.
This equipment has been tested and found to comply with the limits
for a class B digital device, pursuant to Part 15 of the FCC rules.
These limits are designed to provide reasonable protection against
harmful interference in a residential installation. This equipment
generates, uses and can radiate radio frequency energy and, if not
installed and used in accordance with the instructions, may cause
harmful interference to radio communications. However, there is no
guarantee that interference will not occur in a particular installation.
If this equipment does cause harmful interference to radio or
television reception, which can be determined by turning the
equipment off and on, the user is encouraged to try to correct the
interference by one or more of the following measures:
• Reorient or relocate the receiving antenna.
• Increase the separation between the equipment and the
receiver.
• Connect the equipment into an outlet on a circuit different from
that to which the receiver is connected.
• Consult the dealer or an experienced Radio/TV technician for help.
This device requires the ferrite provided in the package on the
telephone line(s) to comply with FCC emission limits.
You are cautioned that any changes or modifications not expressly
approved in this manual could void your authority to operate this device.
This equipment complies with Part 68 of the FCC Rules. On the
bottom of this equipment is a label that contains among other
information, the FCC Registration Number and Ringer Equivalence
Number (REN) for this equipment.You must, upon request, provide
this information to your telephone company. (NOTE: REN is not
required f
or some types of analog or digital facilities.)
This equipment uses USOCs jacks RJ11.
An FCC compliant telephone cord and modular plug are provided
with this equipment. This equipment is designed to be connected to
the telephone network or premises wiring using a compatible
modular jack which is part 68 compliant. See installation instructions
for details.
The REN is useful to determine the quantity of devices you may
connect to your telephone line and still have all those device ring
when your number is called. In most, but not all areas, the sum of the
RENs of all devices connected to your line should not exceed five
(5.0). To be certain of the number of devices you may connect to
your line, as determined by the REN, you should contact your local
phone company to determine the maximum REN for your calling
area. (NOTE: REN are associated with loop-start and ground-
start ports. Do not use for E&M or digital ports)
If your telephone equipment causes harm to the telephone network,
the Telephone Company may discontinue your service temporarily. If
possible, they will notify you in advance. But if advance notice is not
practical, you will be notified as soon as possible. You will be
informed of your right to file a complaint with the FCC.
Your telephone company may make changes in its facilities,
equipment, operations or procedures that could affect the proper
functioning of your equipment. If they do, you will be notified in
advance to give you an opportunity to maintain uninterrupted
telephone service.
If you experience trouble with this telephone equipment, please
contact Personal Communication Systems (1 336-722-5008) for
information on obtaining service or repairs. The telephone company
may ask that you disconnect this equipment from the network until
the problem has been corrected or until you are sure that the
equipment is not malfunctioning.
The user may in some circumstances repair a unit by replacing a
plug-in telephone LINE board. There are no other user serviceable
parts inside.
This equipment may not be used on coin service provided by the
telephone company. Connection to party lines is subject state tariffs.
INDUSTRY CANADA (IC) NOTICE
"NOTICE: The Industry Canada (IC) label identifies certified
equipment. This certification means that the equipment meets
telecommunications network protective, operational and safety
requirements as prescribed in the appropriate Terminal Equipment
Technical Requirements document(s). The department does not
guarantee the equipment will operate to the user's satisfaction.
Before installing this equipment, users should ensure that it is
permissible to be connected to the facilities of the local
telecommunications company. The customer should be aware that
compliance with the above conditions may not prevent degradation
of service in some situations.
Repairs to certified equipment should be coordinated by a
representative designated by the supplier.Any repairs or alterations
made by a user to this equipment, or equipment malfunctions, may
give the telephone company cause to request the user to disconnect
the equipment.
Users should ensure for their own protection, that the electrical
ground connections of the power utility, telephone lines and internal
metallic water pipe system, if present, are connected together.This
precaution may be particularly important in rural areas.
CAUTION: Users should not attempt to make such connections
themselves, but should contact the appropriate electric inspection
authority, or electrician, as appropriate.
"NOTICE:The Ringer Equivalence Number (REN) assigned to each
terminal device provides an indication of the maximum number of
terminals allowed to be connected to a telephone interface. The
termination on any interface may consist of any combination of
devices subject only to the requirement that the sum of the Ringer
Equivalence Numbers of all the devices does not exceed 5."
REN: 0.9B
WARRANTY AND REPAIR SERVICE CENTER:
Advanced Products Design and Manufacturing, Inc.
314 Gordon DR
Exton, PA 19341
610.363.3070
 Loading...