


User Manual
GDU Byrd
User Manual V1.1

2
Table of Contents
Product features
.........................................................................................................................
4
Portable design
........................................................................................................................
4
Long endurance time
...............................................................................................................
4
Multi-adaptive aircraft platform
.............................................................................................
4
HD video downlink system
.....................................................................................................
4
Anti-shooting propellers
.........................................................................................................
4
Dual remote controller
............................................................................................................
4
Stowage dropping
...................................................................................................................
5
User Instructions
.........................................................................................................................
5
Warning
...................................................................................................................................
5
Tutorial video
..........................................................................................................................
6
App download
.........................................................................................................................
6
Register
...................................................................................................................................
6
Safety Overview
..........................................................................................................................
6
Aircraft
........................................................................................................................................
8
Flight mode
.............................................................................................................................
9
RTH mode
...............................................................................................................................
9
Aircraft status indicator
........................................................................................................
11
Vision positioning system
.....................................................................................................
12
Stowage dropping
.................................................................................................................
13
Remote controller
.....................................................................................................................
15
Dual remote controller
..........................................................................................................
16
HD video downlink system
...................................................................................................
16
Gimbal control
......................................................................................................................
16
Control of aircraft
.................................................................................................................
17
Link
.......................................................................................................................................
18
Gimbal camera
..........................................................................................................................
20
Byrd-001 gimbal
...................................................................................................................
20

3
Byrd-002 gimbal
...................................................................................................................
21
Byrd-003 gimbal
...................................................................................................................
22
Byrd-004 gimbal
...................................................................................................................
22
GDU Pro App
.............................................................................................................................
24
FCS Firmware Upgrade
.............................................................................................................
32
Product assembly
......................................................................................................................
34
Aircraft preparation
...............................................................................................................
34
Remote controller preparation
..............................................................................................
39
Flight
.........................................................................................................................................
42
Pre-check
..............................................................................................................................
42
Accelerator calibration
..........................................................................................................
42
Compass calibration
..............................................................................................................
42
Takeoff
..................................................................................................................................
44
Landing
.................................................................................................................................
45
FAQ
............................................................................................................................................
46
Technical parameters
...............................................................................................................
50
GDU Byrd Standard
..............................................................................................................
50
GDU Byrd Premium
.............................................................................................................
55
Authentication information
......................................................................................................
58
FCC Compliance
...................................................................................................................
58
FCC Warning Message
.........................................................................................................
58
FCC Radiation Exposure Statement:
....................................................................................
58
4
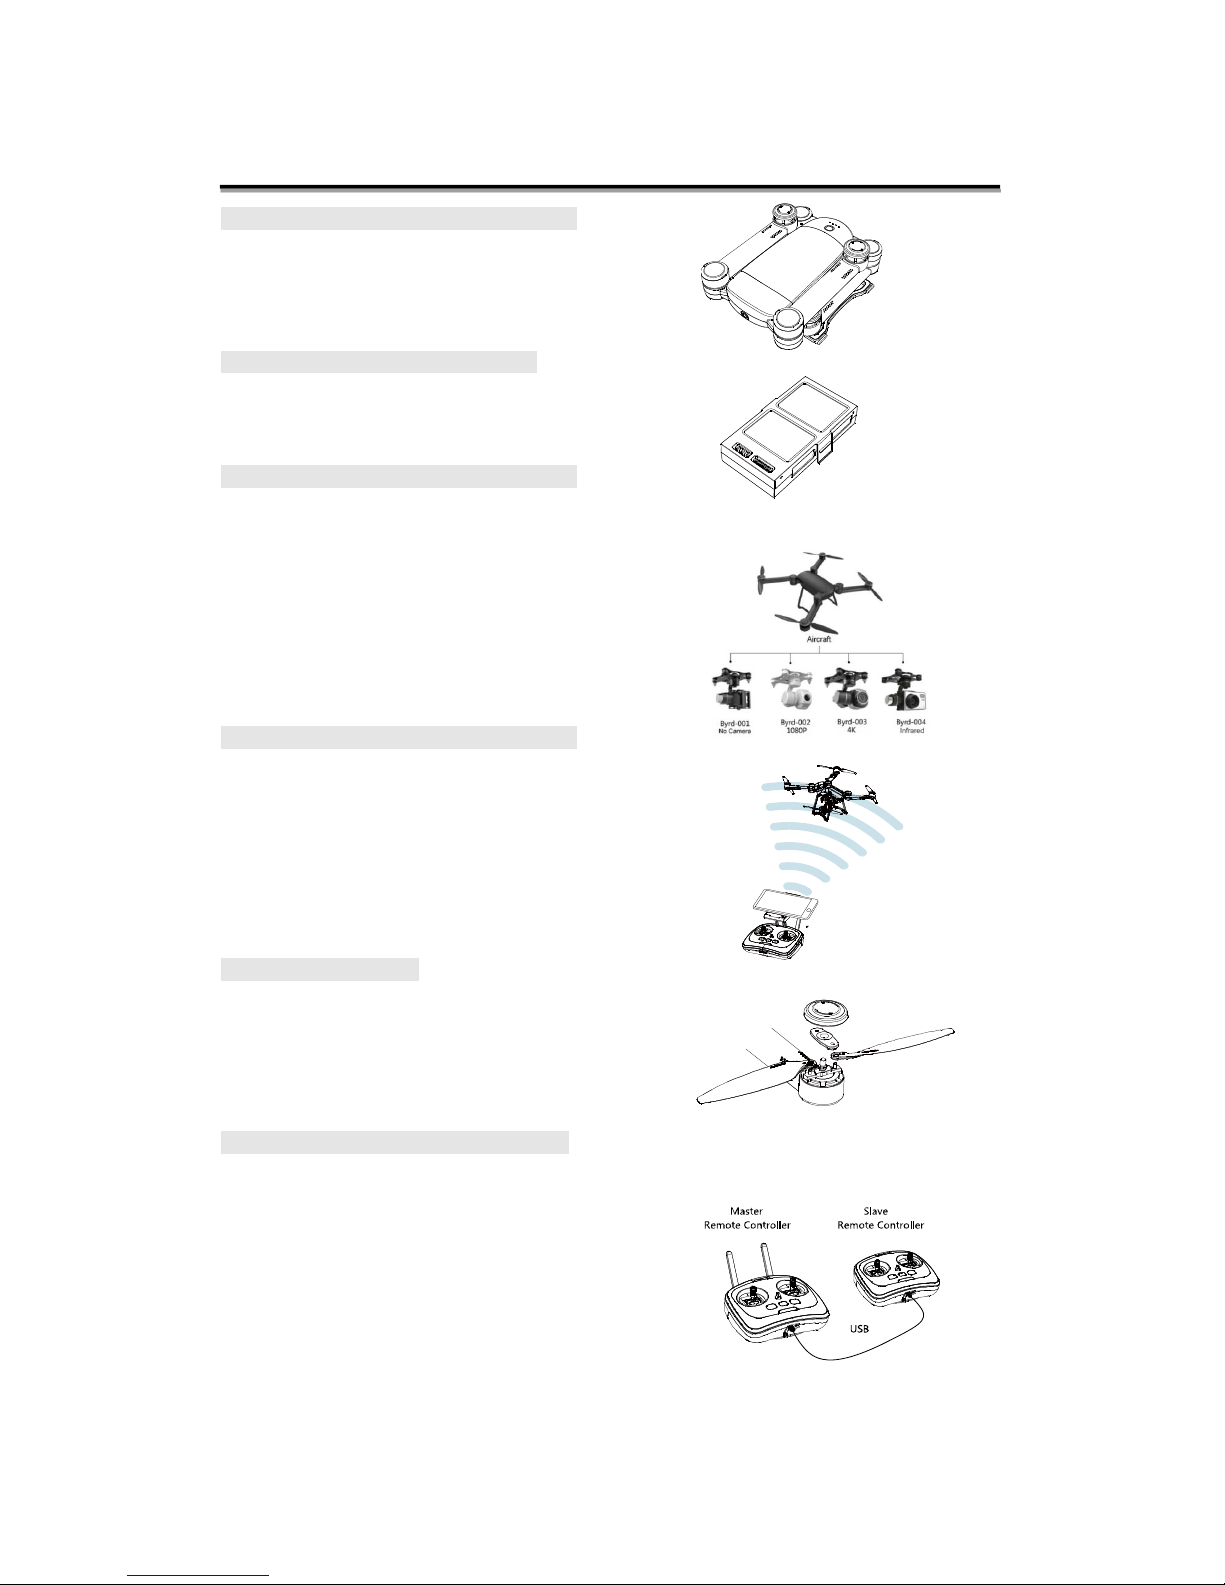
Product features
Portable design
While ensuring structural strength and comfortable
experience, the arms, landing gears and blades are
designed to be foldable and portable.
Long endurance time
Equipped with a large-capacity battery. This allows
the GDU Byrd to achieve 29 minutes flight time.
Multi-adaptive aircraft platform
Brand-new attitude integration control algorithm
together with three-axis high-precision image
stabilization design will bring you best photographing
effect and experience. Multi-adaptive aircraft platform
can carry 1080P, 4K high-definition sports camera
and infrared camera. Quick release design makes the
replacement easier.
HD video downlink system
GDU Byrd is equipped with HD video downlink
system, which supports real-time HD videos and
pictures transmitting. The transmission distance of
Advance2.0 and Premium2.0 can reach 2,000 meters.
Its USB interfaces allow Internet surfing during flight
time!
Anti-shooting propellers
The propellers offer dual safety protection, The
propeller cap is a self-locking device which can
prevent the blade from disconnecting.Even if the cap
falls off, the propellers will stay in place.
Dual remote controller
Joy of flight comes from participation,
communication and interaction.Dual remote controller
are designed particularly for sharing, the master unit
has higher priority than slave unit, offering safety
during training and allowing the operator to share the
flight experience.

5
CAUTION
RISK OF EXPLOSION IF BATTERY IS REPLACED
BY AN INCORRECT TYPE.
DISPOSE OF USED BATTERIES ACCORDING
TO THE INSTRUCTIONS
Stowage dropping
The strong dynamic system could release more load
task. You could choose objects for long distance
ejection according to your needs.
User Instructions
Warning
Thank you for purchasing the GDU Byrd. This product has the ability to cause serious bodily
harm and even death as well as property damage if operated improperly. The GDU Byrd is a
highly sensitive, highly tuned RC aircraft and should not be operated by persons under the age of
18. The operator is responsible for knowing the local laws and abiding by them. GDU is NOT
responsible for improper/illegal use of this product.
To ensure the quality of your experience and your personal security, please carefully read the
following sections before operating the aircraft;
1. Disclaimer
2. Battery safety guidelines
3. Routine Maintenance Manual
4. Item List
5. User Manual
6. After-sales Service Manual
7. First Flight Guide and Fast Flight Guide

6
Tutorial video
In addition to above written instructions, GDU also provides tutorial videos for you.
You can go to www.gdu-tech.com or scan the following QR code to watch and download the
tutorial video to better learn how to use the aircraft.
App download
To ensure the best experience, please go to www.gdu-tech.com or scan the QR code below to
download and install GDU Pro App.
Register
To enjoy perfect after-sale services, please register your aircraft by visiting www.gdu-tech.com.
Registering or not will not affect product’s normal use, but we still invite you to be our VIP.
Unscheduled official activities and more privileges have been prepared for you, stay tuned!
Your registration information would be kept strictly confidential.
Safety Overview
1. Environment
Do not fly in severe whether such as rain, thunder, high wind, snow, heavy fog, and the sand
and dust weather.
Do not fly between tall buildings. Doing so may lead to disabling of the GPS and affecting
flight characteristics. Please fly in wide open spaces with no buildings or other tall obstacles.
Always keep the aircraft in direct line of sight and avoid flying over people and water.
Do not fly in places where there are communication base stations of high-tension cable or
launch towers to avoid the interference of the signals from the remote controller.
Please operate with caution when flying above 4000 meters above sea level.

7
Do not fly in areas that are restricted by laws or regulations..
2. Caution
Do not answer the telephone or make telephone calls while flying the aircraft. Pay close
attention to the display of the APP interface to ensure safe flight.
Return to base and land as soon as possible when the low battery warning sounds;
The aircraft will land automatically when the battery reaches critical low voltage. The pilot can
guide the aircraft to a safe landing place though;
Turn the aircraft off upon landing and before removing the battery.
In case of an emergency during flight, please use the Return to Home button. DO NOT power
off the motors during flight as the aircraft will come crashing to the ground causing damage and
possible bodily injury.
The propellers spin at a high rate of speed and can cause serious bodily injury. Please maintain
a safe distance from the spinning motors during operation.
3. Maintenance
In case of damage, swell, leakage or other defects of battery, please replace the battery in time.
When starting up the motor without installing propeller, if abnormal sounds occur, it may be
caused by the bearing abrasion, please replace the motor.
Replace deformed and damaged propellers in time.
Please use special cleaning kit to keep the lens clean.

8
Aircraft
※ Only Advanced and Premium versions are provided with “vision positioning system”.
※ Only Advanced 2.0 and Premium versions are provided with “dropping box”.

9
Flight mode
GDU Byrd supports the following three flight modes:
1. P mode (positioning mode)
When the GPS signal is good, the GPS module is used to maintain the aircraft’s position;
When the GPS signal is not so good or is lost, it will turn to the visual and acoustic positioning
When both GPS positioning and the vision positioning do not work, only the attitude stabilization
is provided.
2. F Mode (Course lock mode)
In this mode, forward control of the aircraft is related to the direction the pilot is facing and is not
dependent upon the direction of the nose of the aircraft. Forward is forward even if the nose of the
aircraft is pointing backward. This allows new pilots to enjoy flying while learning to control the
orientation of the aircraft. This mode relies on GPS data, so please use it when GPS signal is good.
3. A mode (Attitude mode)
In this mode, GPS positioning and the visual and acoustic positioning are not used and only the
attitude stabilization is provided. It is a manual mode and should only be used by experienced
pilots.
※ To change flight modes, please use the FLIGHT MODE switch on the remote control.
RTH mode
GDU Byrd has the function of returning to home automatically. If the home point is recorded
successfully before the flight, then the aircraft will return to home point and land automatically
when connection between the remote and the aircraft is lost. The following three conditions can
cause this to happen: return to home is activated on remote control, when aircraft reaches low
battery and when the aircraft loses contact with the remote control.
1. Home point
Home point refers to the point at which the aircraft has been unlocked for the first time
successfully and in Mode P and the GPS signal is good. Home point will only be logged if starting
off in MODE P. IT WILL NOT WORK IF FLIGHT IS STARTED IN OTHER MODES.
2. RTH mechanism
When this mechanism is started,the aircraft will rise or descend to the pre-set height (if the current
height is lower than the pre-set height, the aircraft will rise to the pre-set height. If it is higher, and
the aircraft will descend to the pre-set height) and it will fly to the point above the home point and
hover for five seconds before slowly landing.

10
※ Connection between remote controls and mobile equipment are different for different Byrd models
(WiFi/USB connection) and the specific connection is subject to actual conditions.
※ When return to home is activated, the aircraft WILL NOT avoid obstacles. Please make sure that the
height is set to avoid any obstacles between you and the aircraft. IF YOU CANNOT SEE THE
AIRCRAFT, DO NOT ACTIVATE RETURN TO HOME.
※ Use the parameter adjustment software to change the altitude of the aircraft when return to home is
activated. A safe altitude is dependent upon the environment in which you fly.The return altitude can
be set through the FCS Configuration Software or the Flight setting page in the APP.
3. Return to home (RTH)
During flying, automatic return can be realized by pressing “Return to home” (RTH) button
in the remote control or click the RTH icon on the APP interface.
4. RTH in low battery
Before RTH automatically happens, there is a warning issued to the pilot regarding the state
of the flight battery.
Low battery warning
When the aircraft power is less than 30%, low battery warning will be activated and APP will
send alarm to you, so that you can return ASAP.
RTH in severe low battery
When the electric quantity is less than 20%, the battery is serious low and the aircraft will
return to home automatically.

11
5. Out-of-control return
In normal conditions, the GPS signal is good, the compass works normally and the aircraft will
record the home point successfully. If the signal between the remote controller and the aircraft is
interrupted or lost, the aircraft will hover until signal is regained. If the signal interruption lasts for
over three seconds, the aircraft will return to home automatically. During returning, if the signal is
back to normal, the returning will be stopped and the pilot can regain control of the aircraft.
※ When GPS signal is not good enough, automatic return won’t work.
Aircraft status indicator
The flight status of GDU Byrd can be judged by two groups of LED indicators at the head and tail
of the aircraft. Their locations are as shown in the following picture.
The two groups of LED indicator lights show the current status of the flight control system
through different groups of colors and flickers. See the following table for more details.

12
Vision positioning system
This positioning system consists of the visible light camera and the ultrasonic module. The former
is used to obtain the position information of the flight to provide reference for the horizontal
direction of the aircraft. And the latter will judge the current flight height to provide reference for
the height from the ground to maintain the flight at a certain height.
This system is adaptable to the environment in which the height is lower than 6 meters, where
there is no GPS signal or the GPS signal is not good enough. It is particularly suitable for indoor
flight.

13
The precision of the visual and acoustic system can be affected by the illumination intensity and
the surface texture of articles. And the ultrasonic will not measure the distance in certain damping
materials. If both vision and ultrasonic do not work, the flight mode will be turned into the
Attitude mode automatically. Therefore, please notice the following conditions during flight:
The normal flight height of this system ranges from 0.2m to 6m. Please stay in this range when
the aircraft is used indoor;
The illumination condition is 10 lux–100000 lux;
Within the required range of the illumination conditions, all textures could be used to position
the flight except pure colors (such as pure black, pure red, pure white and pure green);
Be cautious on the surface where there is intensive reflected light or inverted images;
The flight speed should not be too fast and the highest speed should not exceed 8m/s(17mph).
The maximum flight inclination should not be more than 30°.
The range of flight temperature is -10℃-55℃(14 F to 131 F).
The flight altitude should not be more than 4000 meters (13,000 feet).
※ In Mode P and when the GPS signal is lost or not good enough, the system will turn to the visual and
acoustic positioning mode and no manual operation is needed.
※ This system is only open to GDU Byrd Advanced/Premium version.
Stowage dropping
GDU Byrd is able to be loaded with loads less than 500g (not including gimbal and camera) and
deliver objects from a long distance.
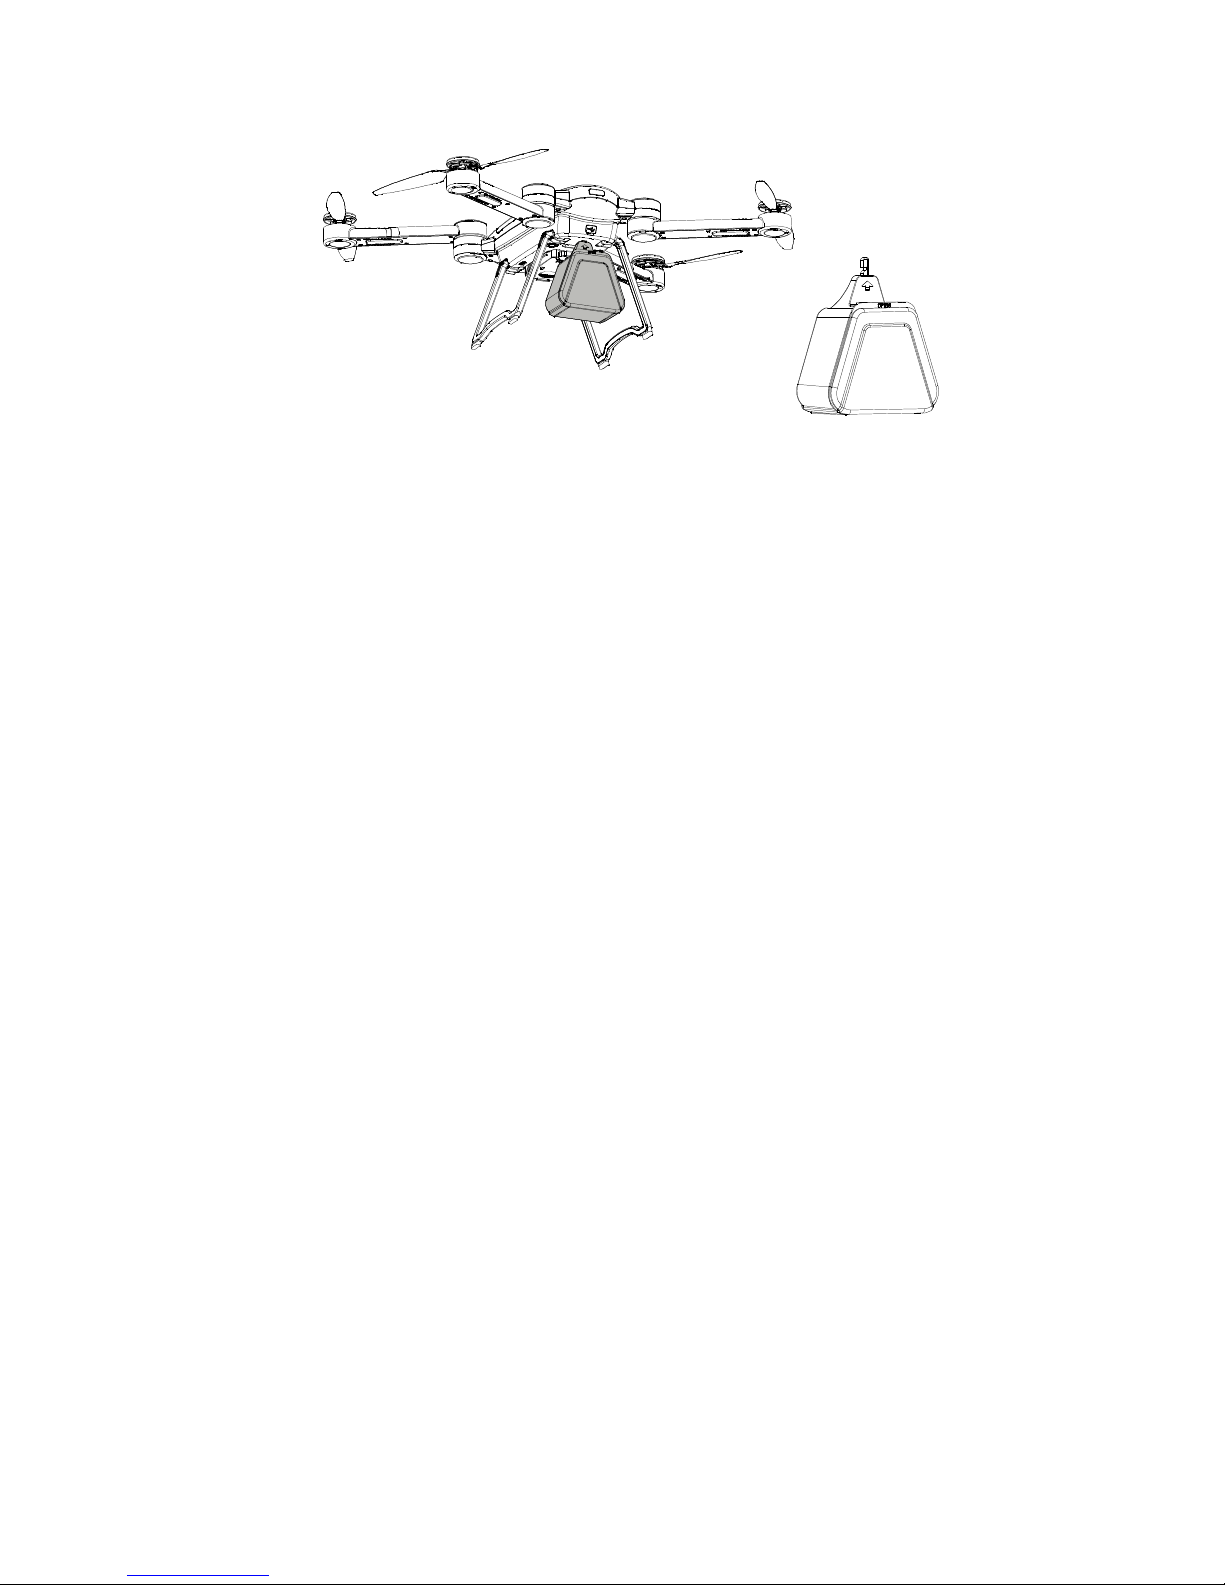
14
Before the ejection, the buttons C1 and C2 should be customized to choose the ‘steering gear
control’ in the APP setting interface. The objects to be ejected are to be put into the container
carrier and the container is inserted into the steering gear hole. Operate the aircraft to the place
above the ejection point and press C1 or C2 button to let the container break away from the
aircraft. The ejection is finished.
※ Stowage dropping function is only applicable to Advance 2.0 and Premium version.

15
Remote controller
The remote controller of GDU Byrd is an advanced wireless communication system that features
automatic frequency hopping to realize 3-DOF control of aircraft within control range. It allows
multiple aircrafts to work simultaneously in the same space.
The integrated wireless high-definition video transmission system within the controller is
connected to GDU Pro App via Wi-Fi (via USB data wire for Advance 2.0 and Premium 2.0
versions). You can watch the video in real time on your personal mobile device (mobile phone,
tablet). All parameters of the aircraft will be fully presented on the screen of your device. With
state-of-art folding innovation and delicate design, you surely won’t want to take your hands off it.
※ USB connector is only available on the remote controller of Advance 2.0 and Premium 2.0 versions.

16
Dual remote controller
※ The slave remote
controller is not included with the GDU Byrd
. For more information, please visit official
shop at www.gdu-tech.com
HD video downlink system
GDU Byrd series products are equipped with a high definition image transmission module which
consists of a transmitter and a receiver. It does 1080P at 60 frames per second. The high-def image
transmission module in GDU Byrd Standard, Advanced 1.0, and Premium 1.0 adopt common
WIFI system and the transmitting distance is 500m for Standard version, and 1000m for Advanced
1.0 and Premium 1.0 versions. This image transmission of high definition module in GDU Byrd
Advanced 2.0 and Premium 2.0 adopt OFDM system and the transmitting distance is 2000m.
Gimbal control
The control dial wheels for the gimbal yaw and pitch could control the yaw and pitch. The
Back-to-center button of the gimbal could let the gimbal return to the initialization place.

17
※ The type of the gimbal in the above picture is only for indication. Different types of gimbals are used
for different aircrafts with different configurations.
Control of aircraft
There are three different control schemes: American customization, Japanese customization, and
Chinese customization. Definitions of the control sticks of the three modes are as follows:
1. American customization: throttle and yaw on left stick and pitch and roll on right stick.
2. Japanese customization: pitch and yaw for left hand and throttle and roll for right hand.
3. Chinese customization: pitch and roll for left stick and throttle and yaw for right stick

18
The default operation mode of the remote controller is the “American customization". You can
modify with the parameter adjustment software or in “Control setting" on your APP. (See APP
control setting for more details)
Link
After leaving factory, the remote controller has been bound to the aircraft and ready to be
used. If the aircraft or the remote controller is replaced, then follow these steps to bind the units
together:
1. Turn on the aircraft.
2. Press and hold the ‘Return to home button’ in the remote controller and then press the ‘the
power switch’ button in the remote controller. At this moment, the remote controller gives a
warning tone, the red LED indicator light is on, and the four indicator lights of the power of the
aircraft in the remote controller flicker sequentially.
3. Press the power button of the aircraft for five times and wait for several seconds for the binding
procedure to finish. At this time, the green LED indicator light showing the status of the remote
controller is on.

19

20
Gimbal camera
There are many high precision triaxial stabilization gimbals for GDU Byrd series aircraft,
with brand new integrated control algorithm. The jittering of the angel is ±0.05 allowing for
stabilized video and photos.
According to the design philosophy of GDU Byrd series, aircraft platform and load mission
have been separated as two parts. The following four gimbals could be used in any type of Byrd’s
platform.
Byrd-001 gimbal
The standard configuration of GDU Byrd Advanced is Byrd-001 multi-function gimbal (without
camera). This gimbal supports GoPro camera that you can buy separately.
What’s more, Byrd-001 Gimbal can realize the controllable two-axis of pitch and yaw, providing

21
you with broader shooting angels.
Byrd-002 gimbal
The standard configuration of GDU Byrd Standard is the Byrd-002 integrated camera gimbal. The
independently developed 1080P high-definition sports camera is carried on this gimbal. You can
record and shoot 1080P videos and 16 mega-pixel photos with it. Camera and gimbal are
connected together that cannot be separated.
Byrd-002 Gimbal is controllable with two-axis of pitch and yaw, providing you with broader
shooting angels.

22
Byrd-003 gimbal
The standard configuration of GDU Byrd Standard is equipped with the Byrd-003 integrated
camera gimbal. The independently developed 4K high definition sports camera is carried on this
gimbal. And it could record and shoot 4K high definition videos and 12 mega-pixel photos.
Besides, the camera and the gimbal are connected together and cannot be separated.
Byrd-003 Gimbal is controllable with two-axis of pitch and yaw, providing you with broader
shooting angels.
Byrd-004 gimbal
The independently developed infrared camera is carried on Byrd-004 infrared camera gimbal. You
can record and shoot 640*480 pixels videos and photos with it. The infrared camera is separable
and can be used alone.

23
Byrd-004 Gimbal is controllable with two-axis of pitch and yaw, providing you with broader
shooting angels.

24
GDU Pro App
GDU Pro APP is an interactive software specially designed for GDU Byrd series aircraft. With
this software, you can control the aircraft, the gimbal, the camera to take pictures, record videos,
eject objects, and set parameters of the aircraft. To coordinate with the image transmission of high
definition, it is suggested to use on a tablet or mobile phones with large screens to get the best
visual experience.
With rhythmic starting music and active animation, you will enter the Homepage of GDU Pro
APP. There are three sections on the home page: real-time control, media center, and help center.
※ The interface and functions are subject to the latest updated edition.
Real-time control
Enter into real-time control page by selecting the corresponding button on the home page of
APP.
Camera interface:

25
1. Return to home page
Click to return to the home page of APP
2. Status of GPS
Show quantities of searched satellites;
3. Connection status of remote controller
/ Signal strength of remote controller;
※ Connection are different for different Byrd models (WiFi/USB connection) and the specific connection
is subject to actual conditions.
4. Connection status of aircraft
Display the connection status of aircraft;
5. Battery status of remote controller
Display the remaining power of remote controller;
6. Battery status of aircraft

26
Display the remaining power of aircraft;
7. Settings
Click to enter system setting page, including control setting, flight setting, general setting, and
camera setting;
8. Photo/video mode switch
Click to switch mode between photo and video;
9. Photo/video button
/ Display current mode: Photo/video;
10. View cloud media
Click to view media documents stored in the SD card of aircraft;
※ Some modes of Byrd do not support this function and have no this button.
11. Camera setting
Click to expand camera and gimbal settings which are customizable;
12. Compass
Display current position and direction of head;
13. Flight distance
Display current flying distance;
14. Flight mode
Display current flight mode;
15. Flight height
Display current flight height;

27
16. Mini map
Display mini map;
17. Follow me
Click to activate follow me mode;
18. Return to home
Click to activate Return to home;
19. Easy takeoff
Click to activate easy takeoff;
20. Warning window
Display warning or abnormal information.
Map page:
21. Course planning

28
Click to activate course planning function, where you can set and upload flying mark points
that the aircraft will follow;
22. Clear of flight path
Click to delete mark points on the map;
23. Switch map
Click to change form of map display, shift between 2D map and satellite map;
24. Compass
The red arrow indicates true north;
25. Positioning
Click to locate the current position;
26. Thumbnail real view image
Thumbnail display window of real view image.
Media center
Users can check the photos and videos taken in media center, as well as edit them and share on
social media.
Help center
Help center is included with manual and instructions for flying aircraft and the latest APP and
firmware are available to be viewed and downloaded here.
System settings
Click icon to enter system setting screen. Includes control setting, flight

29
setting, general setting, and camera setting.
[1] Control mode
There are three options are available to choose: Japanese customization, American customization,
and Chinese customization.
[2] Customized button of remote controller
Two buttons at the back of the remote controller can be customized. The buttons can be
customized for five functions: taking pictures, recording videos, back-to-center of the gimbal,
steering gear control and take off. (Need the connection with the Remote Controller)
To the right page, you can enter the ‘Flight Settings’.
In this page, settings could be made for the Return Height, Altitude Limit, and Distance Limit. We
strongly suggest you to set the altitude limit below 120m, although the maximum value allowed is
500m. If not, you will have to bear the risk.
Continue to the right page, you can enter the ‘General Settings’.

30
In this page, settings can be adjusted for units of the parameters, whether to show the grid,
whether to show the flight track and whether to broadcast the sound effect. This is also where you
can format the micro SD card for the camera.
To the right page, you can enter the ‘Camera Settings’.
In this page, settings could be adjusted for the photo format, video format, whether to reserve local
copies and the resolution ratio of the video. (Aircraft must be powered on!).
※ Settings may be changed subject to different gimbal models.
Takeoff button
In P mode, click icon after the aircraft is unlocked (or press button on the
remote controller). In this case, the aircraft will take off and hover at the height of 3m above the
ground.

31
Photo/video
: (Photograph)
: (Video)
The icons of Taking pictures/ Recording videos on GDU Pro App have the same functions with
those on remote controller. Click the button to take pictures or record videos, and click it again to
stop.
※ Connection between different Byrd remote controllers and mobile devices varies (WiFi/USB connection)
and the actual conditions shall prevail.
※ Language of App interface shall be consistent with the system language of mobile equipment.If
interface language needs to be changed, please change the system language of your mobile device
first.At present, App language supports simplified Chinese, English, French and German.

32
FCS Firmware Upgrade
The GDU development team will continuously improve and update the firmware in the flight
control system. You need to download and install the ‘Update tool of the firmware in the flight
control system’ on your own to update the firmware. The steps of using the software are as
follows:
1. PC user visits www.gdu-tech.com to download and unzip the latest version of firmware
package.
2. Run “GduUploader.exe” in the unzipped package and click “Auto Update”.
3. After the hardware is downloaded, connect the aircraft parameter-adjustment interface and PC
with USB cable when the aircraft is off and click OK.

33
4. Upgrading.
5. Exit software interface when upgrading completed.
※ When upgrading, please ensure that the aircraft is powered off.
※ The upgrade tools can be used on PC only.
※ PC will download and install the corresponding driver itself when such driver is not found on PC for
the first connection. The driver will be updated automatically after installation. If automatic
installation fails, please open driver files and install it manually.

34
Product assembly
Aircraft preparation
1. Unfold
Unfold the arms, landing gears and push them to limit positions as shown in the picture and
ensure the unfolded positions are geometrically symmetric.
2. Fold
※ Please control your force when rotating the arms and landing gears to unfold the aircraft. Stop rotating
when they are pushed to limiting positions.
※ Note the rotating direction of the arms and landing gears when folding the aircraft.Reverse rotation
will damage the position limiting mechanism.
35
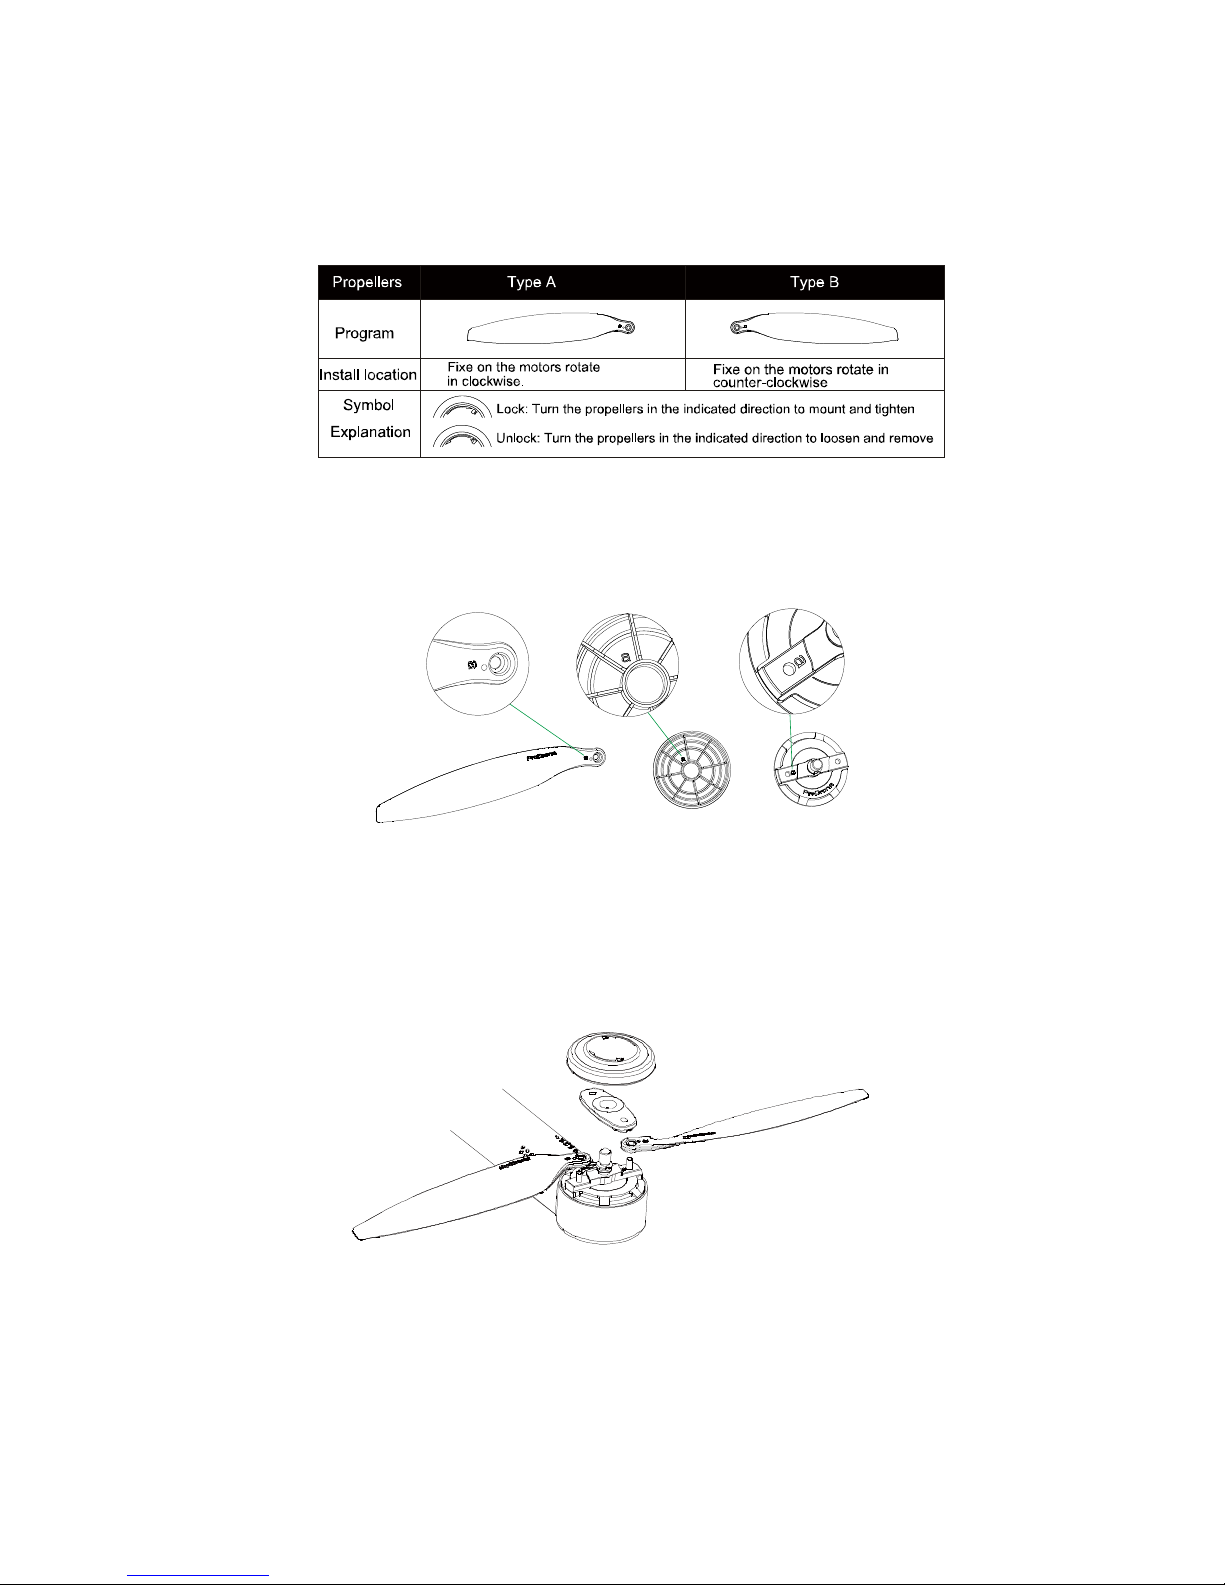
1. Propellers Installation and Dismounting
The GDU Byrd uses the foldable propellers. The propellers are marked A or B. Propellers A
rotate in the opposite direction of Propellers B.
Letters A and B are marked respectively on the hub of the propeller, in the internal surface of the
propeller cap, and the motor rotor. Make sure signs of the three are the same in the installation and
dismounting.
In installation, choose the same type of propeller with that on the motor rotor. Put the side with the
letter up and insert it to the spacer pin of the propeller in the electric motor. Press the base of the
propeller to the card slot of the motor spindle in the direction vertical to the spacer pin. Rotate for
90° to align the hole sides at two ends with the spacer pin and press it in. In the end, rotate the
propeller cap according to the direction shown in the cap.
To remove, take down the propeller cap according to the direction shown in the cap. Lift the
propeller cap up slightly and rotate it for 90° to remove the base. In the end, take down the
propeller.

36
2. Anti-shooting propellers
The anti-shooting propeller serves as the second security assurance besides the self-locking design
of the propeller cap. Even if the cap falls off in flight, this mechanism will prevent the propeller
from being ejected out. The card slot in the pin coordinates with that in the motor spindle. Only
when the base is rotated to certain angel, it could be removed from the spindle.
2. Battery Installation and Dismounting
A high capacity Li-polymer battery, whose capacity is 6700mAh and voltage is 14.8V, is used in
this aircraft. The snap joint design is used here and you can snap the battery into the battery cabin
in the direction shown in the following picture, and confirm that the battery on both sides of the
snap fastening. After installation, tighten the cover of the battery cabin according to the method
shown in the following picture.
After flight, please take down the battery according to the method shown in the following picture.
Take down the cover and press the snap joints at two sides of the battery at the same time. You
can dismount the battery.
Anti-shedding Device

37
※ Turn off the aircraft before taking out the battery.
※ The battery contains the dangerous chemical. Please read the Battery Safety Guidelines printed on the
surface of the battery carefully before using the aircraft.
3. Gimbal Installation
Insert, with a diagonal angle, the plug of the butt strap of the gimbal into the card slot at the
bottom of the aircraft. Pull to open the snap joint of the spring at the bottom of the aircraft. Press
the other end of the gimbal into the snap joint to connect the gimbal and the bottom surface of the
aircraft. Unclamp the snap joint to check whether the gimbal has been fixedly installed.
※ The type of the gimbal in the above picture is only for indication. Different types of gimbals are used
for different aircrafts with different configurations.
※ The gimbal is precise equipment and its performance would be reduced by crash or strong force.
Therefore, please pay special attention to the gimbal.
※ Do not move the aircraft while the gimbal is on self-checking.
※ Before installing and dismounting, please turn off the power of the aircraft. It is forbidden to install or
dismount the gimbal with the power on.
4. Dropping Box Installation and Dismounting
There is a plug at the top of the container. Insert it to the steering gear hole at the bottom of the
end of the aircraft and the installation is finished.

38
In dismounting, the powers of the aircraft and the remote controller should be turned on. And then
the ejection would be carried out and the container would break away from the aircraft.
※
Stowage dropping feature is only applicable to Advance 2.0 and Premium version.
4. On and off
Press the power switch of the aircraft for three seconds, and it will be turned on. Repeat this
operation and the aircraft will be turned off.
5. Battery check
There are two methods to examine the battery capacity:
After turning on the power switch of the aircraft, you can see the remaining battery capacity
by observing the LED indicator lights.
After turning on the power switches of the aircraft and the remote controller, you could see the
remaining capacity by observing the LED indicator lights for the aircraft in the remote
controller.
6. Charging
The battery cannot be charged while in the aircraft. Please remove it from the aircraft and charge it
with the included charger. It takes about 2.5 hours to finish the charging.
39
While charging, the LED indicator light in the charger is red. When the light turns solid green, it
means the battery has been fully charged. Please disconnect the charger after the battery is fully
charged.
※ Make sure to use the original charger to charge the battery and the remote controller. GDU will
assumes no responsibilities if faults or damages are caused by not using the original accessories.
※ If the type of the charger plug does not match with that of the power plug, please visit the official store
to buy the same type of the power line before trying to charge.
Remote controller preparation
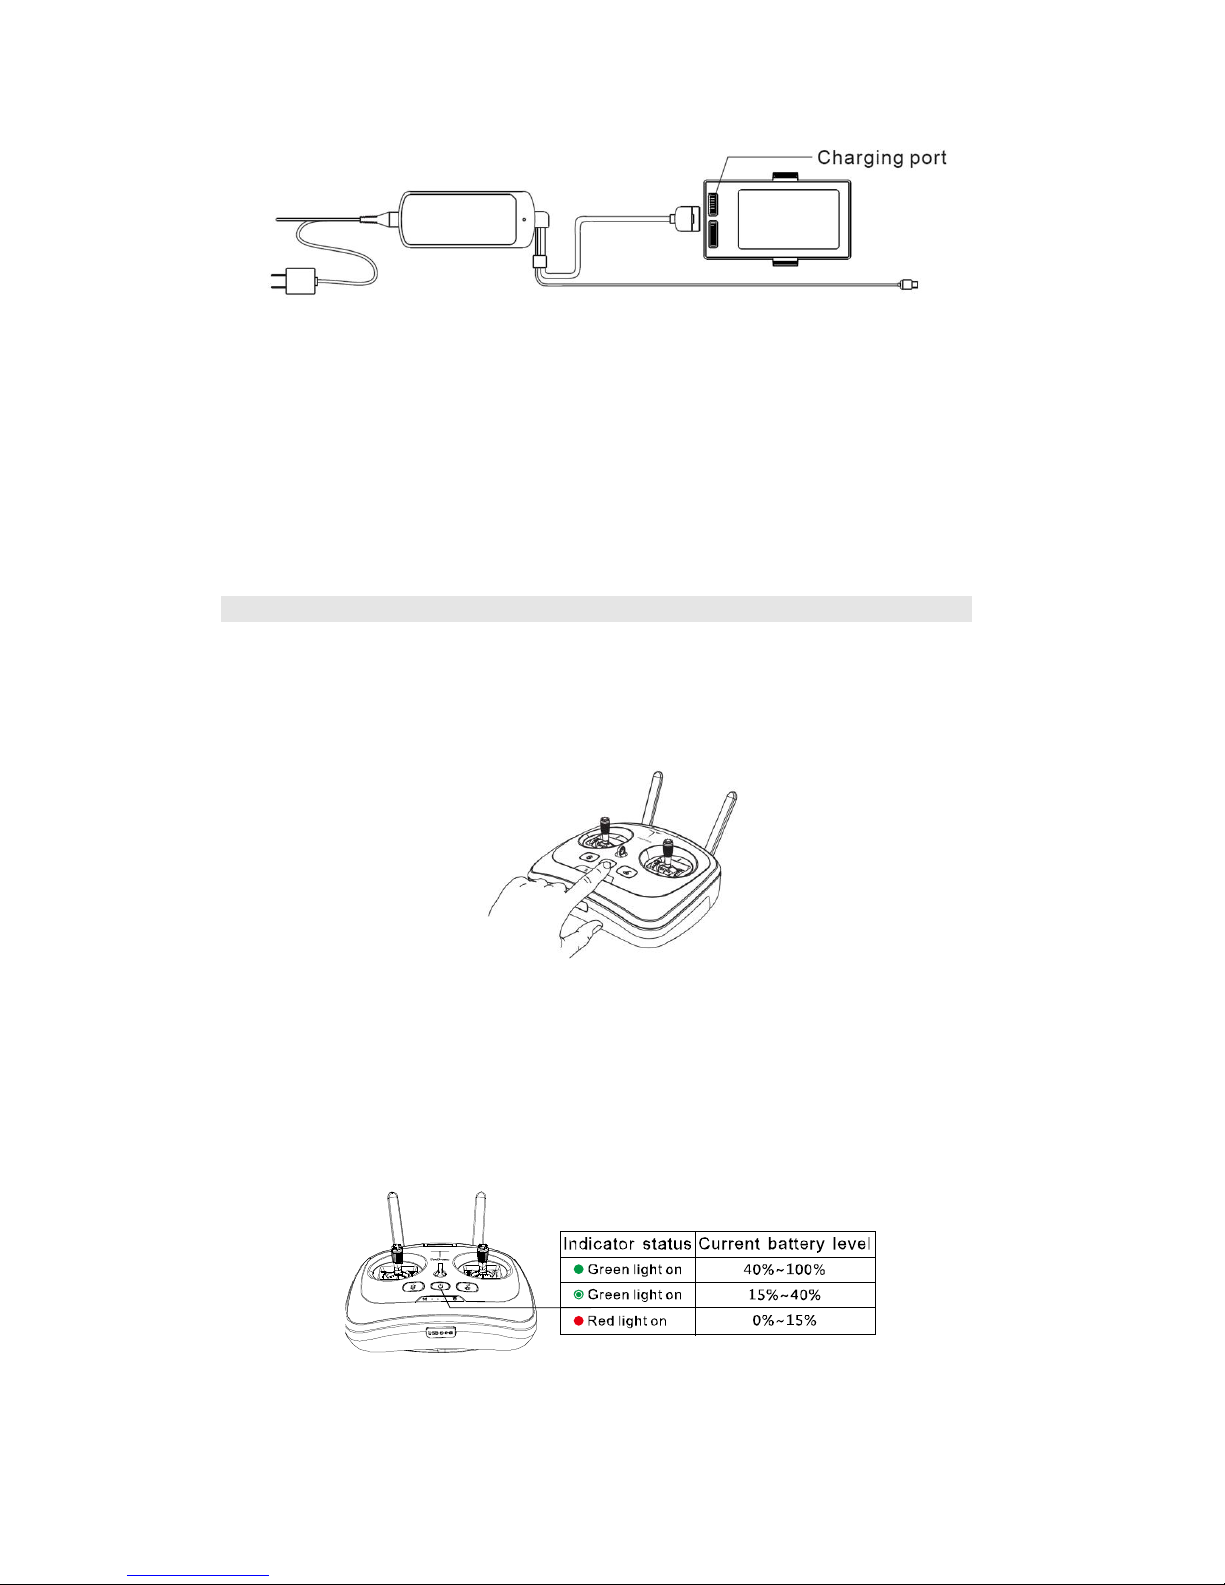
1. On and off
Press the power switch of the remote controller for three seconds, and it will be turned on. Repeat
this operation and the remote controller will be turned off.
2. Battery check
The battery capacity of the remote controller is shown through the color of the back light of the
power switch. If it is green, it means the battery capacity is enough for the flight; if it is red, it
means the battery needs to be charged.
3. Charging

40
The remote controller could be charged no matter it is on or off, but it is suggested to charge it
when it is off.
While charging, you could judge whether it has been fully charged by the color of the LED
indicator light. If the red light flickers, it means it is being charged. If the green light flickers, it
means it has been fully charged. It needs about five hours to finish the charging and the remote
controller could be used for about two weeks.
※ Make sure to use the original charger to charge the battery and the remote controller. GDU assumes no
responsibilities if faults and damages are caused by not using the original accessories.
※ If the type of the charger plug does not match with that of the power plug, please visit the official store
to buy the same type of the power line before trying to charge.
4. Antenna placement
Please hold the antenna in the direction shown in the following picture.
※ Only Advance 2.0 and Premiu2.0 remote controllers have USB port on the bottom.
The remote controller will receive signals of different strengths if the antenna is placed in different
positions. During flight, the direction of the antenna needs to be changed to keep the aircraft
within communication range.

41
※ When using the remote controller, please keep it away from the human body (especially the head) for
at least 8 inches in case that the antenna and the transmitter module might influence the body.
5. Mobile Device Holder Installation and Dismounting
Unfold the joint lever of the support of the mobile device to the limited position and insert it
downward to the installation hole and adjust fit the device being used.
To remove, press down the ‘Equipment support lock’ and pull the support upward.
※ Start up the WLAN of the mobile device. And search and connect the WiFi pot of the remote controller.
See the information on the label at the back of the remote controller for the pot name and its passwords
※ There is no need to connect Wi-Fi for Advance 2.0 and Premium 2.0 version. Just connect remote
controller with mobile device by USB cable.

42
Flight
Pre-check
Check all parts of the aircraft before each flight. Look for cracks in the propellers, cracks in
the arms and make sure that the motors spin freely. If there is any damage, please repair/replace
before trying to fly the aircraft.
Make sure the flight battery is fully charged and that the remote control has a good charge
before attempting to fly the aircraft.
Make sure the arms and landing legs are in their proper places and that the propellers are
properly installed.
Check whether the connection between the remote controller and the aircraft is normal.
Always operate with the latest firmware. And check whether the APP and the remote
controller are connected normally.
Check whether the electric motor and the gimbal are working properly after the aircraft is
powered on.
Make sure that the SD card has been inserted into the camera.
Accelerator calibration
When the aircraft leaves the factory, the accelerometer has already been calibrated. It is suggested
to calibrate it again if the drone has been updated to ensure the safe flight. Follow these steps:
Visit www.gdu-tech.com to download and install the ‘FCS Configuration Adjustion Software’
on your PC.
Make sure the aircraft is sitting on a level surface and POWERED ON. Then connect the
aircraft to your PC, the software will automatically indentify the aircraft.
Open the ‘Accelerometer’ which under the options of ‘Basic’ in the parameter adjustment
software, then click the button that says ‘Click to start the single axis calibration’.
Wait for three seconds and the calibration is finished.
※ It’s recommended to calibrate the accelerator on PC with configuration of Win 7 (64 bit) or higher.
※ Do not power on the remote controller during the whole process.
Compass calibration
Power on the remote control and then the aircraft. At this time, the aircraft will start a
self-check and a series of beeps will sound.
After the beep stops, toggle the “Flight Mode Switch” back and forth for several times.

43
Observe the color of the LED indicator light in the aircraft and stop toggling when the yellow
LED indicator light at the head of the aircraft is on and the yellow light at the tail flashes.
Compass calibration method II: After the beep stops, click icon on APP, and select page of
“Flight Settings”; click “compass calibration” in the lower right corner, and then click “aircraft”; it
enters into mode of compass calibration when the yellow light on nose keeps on and yellow light
on tail flickers.
1. Hold the aircraft UPSIDE DOWN and rotate it clock-wisely and horizontally. Observe the
color of the LED indicator light in the aircraft and go to the next step when the yellow light at the
head of the aircraft is on and the green light at the tail flashes. Otherwise, please return to the step
2.

44
Hold the aircraft with its HEAD DOWN and rotate it clock-wisely and vertically. Observe the
color of the LED indicator light in the aircraft; the compass calibration is successful when the
YELLOW lights at the head of the aircraft and the GREEN lights at the tail keep on. The
compass calibration is not so good when all the yellow light keep on. You’d better calibrate the
compass once more. Otherwise, please return to the step 2.
※ Do not move the aircraft during the self-check startup.
※ When the aircraft is used for the first time or it is moved to a new location since the last calibration,
please calibrate the compass.
※ When severe drifting occurs in flight or it couldn’t fly in straight line, please calibrate the compass.
※ Do not calibrate the compass indoor, or near large metal objects, or in the place where there may be
high magnetic fields.
※ When calibrating the compass, do not carry the mobile phone, hand-watch, keys and other metal
objects.
Takeoff
You can rise the aircraft by auto take-off or manual take-off. After compass calibration, push both

45
control sticks to bottom inner corners to start the motors. Once the motors have started spinning,
release both control sticks simultaneously. When the GPS signal is not good enough, P mode
could not unlock the motors. Please change to other wide-open spaces or turn to A mode at this
time. When unlocked, push the throttle up slowly, the aircraft will take-off.
American、Japanese:
Chinese configuration:
※ Before the flight, please put the head of the aircraft forward and keep over 10 feet away from the
aircraft.
※ Do not unlock the aircraft on steep slopes or hillsides.
Landing
During the flight, push the throttle downward slowly and the aircraft will land slowly. At this time,
push the throttle to its lowest place and hold for two seconds. The motor will stop and then loosen
the throttle to lock the aircraft.

46
FAQ
1. What is the control distance of the remote controller? How are the aircraft, the mobile
phone and the remote controller are connected?
The control distance of the remote controller is 2000 meters (the actual control distance depends
on the environment). The mobile device and the remote controller are connected via WIFI and the
aircraft and the remote controller communicate with each other by 5.8 G radio frequency.
2. What are the endurance, capacity and type of the battery?
The average flight time of the Standard model is 25 min and the Advanced/Premium models are
29min. All three models use a 6700mA, and 14.8V Lipo battery.
3. What is the resolution of the camera? (Can it be replaced by other cameras?)
The three different models are equipped with different cameras. The Standard model comes with a
1080P integrated cameral gimbal and the camera cannot be replaced. The Advanced model comes
with multi-function gimbal (without the camera), which perfectly compatible with Gopro camera.
The Premium model comes with a 4K integrated camera gimbal and the camera cannot be
replaced.
4. What is the maximum load of the aircraft?
The maximum load of the aircraft is 1200g and the flight time will be reduced if it is flown with
this load.
5. Does it have the function of transmitting real-time image?
The aircraft is equipped with high definition image transmission module and can transmit high
definition image in real time. The transmission distance for Standard version is 500m, Advance
1.0 and Premium 1.0 are 1000m, the transmissions are achieved via WIFI. Unlike them, Advance
2.0 and Premium 2.0 adopt the OFDM system so that the distance could be as long as 2000m.
6. Could this camera take pictures or record videos at night?
There is the LED indicator light of status in the airplane arms, so the direction of the aircraft head
could be judged correctly and it could fly at night. Whether the camera could take pictures or
record videos at night is decided by the whether the camera supports this function or not.
7. What will happen if the aircraft is low battery in flight? What will happen if there is
telephone call in flight? What will happen if the aircraft flies beyond the control range?
What will happen if it flies so far that there is no image transmission and there are
barriers? Does the aircraft have collision avoidance?

47
The aircraft will return to home automatically in the event of a low battery. When there is
telephone call in flight, APP will operate in the background automatically and continue to work.
However, it is not suggested to receive or make telephone calls. If the aircraft flown beyond the
maximum control distance, then return to home be triggered. When if flies beyond the distance of
transmitting images, please stop all operations and return to home. This product does NOT have a
collision avoidance system and cannot automatically avoid barriers.
8. How to download GDU Pro APP?
You can visit www.gdu-tech.com or scan the two-dimension code in the instruction profile to
download GDU Pro APP.
9. Whether it could take off in windows of high buildings or in comparatively narrow spaces?
(Whether it only could take off in flat ground?)
Yes, it can. However, the signals might disappear in high buildings, which can be very dangerous.
For safety, it is suggested to let only take off in an open place and keep it fly below the height of
400 feet.
10. The aircraft voice is loud during flight. Is that normal?
The noise of the aircraft’s propellers has a direct relationship to the speed of the propellers.
11. What’s the GPS precision of the map in the mobile phone?
The precision of the GPS on the map is determined by the quality of the GPS module in your
mobile device.
12. How fast can the aircraft fly?
The fastest ascent speed is 6 m/s and the fastest forward speed is 15 m/s.
13. Can aircraft return automatically without power?
Key: Two-stage warning mechanism for low battery is set in system. When only 30% of battery
volume is left, it will trigger early warning of low battery, and APP will remind you to return. If
you continue the flight, it will trigger serious low battery return after several minutes. At that
moment, the aircraft will be forced to return.
14. How dose APP control the aircraft?
The control instructions of the APP are transmitted to the remote controller by WIFI and to the
aircraft by the remote controller. Please read the help profiles in the first page of APP or read the
tutorial video in GDU Pro APP.
15. What is the shooting time of the camera?

48
The camera relies on the battery loaded in the aircraft for power supply. Therefore, the shooting
time is decided by the endurance of the aircraft and the memory capacity of the SD card.
16. Will there be a memory card in the products we buy?
There will be a 16G memory card included with the standard configuration of the Standard
version and a 64G for the Premium version. Visit www.gdu-tech.com for more accessories.
17. What kind of motors are your products using?
The high-performance brushless motor which was specially developed for this product’s power
system. Its service life could be as long as 40,000 hours. Each motor has undergone serious
routine inspection and its performance is reliable and stable.
18. Why could I not unlock the aircraft?
Watch the status indicator light of the remote controller to check whether the connection between
the remote controller and the aircraft is normal. The aircraft could not be unlocked if there is
strong magnetic interference, if the GPS signal is not good enough, and if the GPS precision does
not meet the requirements.
19. Will it show my place only if I turn on the WIFI and connect it to the internet?
Yes. The place of pilot is positioned by the GPS in the mobile phone and the place of the aircraft
is positioned by the GPS loaded in the aircraft. The information of the two places are transmitted
to the APP by the remote controller and are shown in the APP interface.Currently, GDU Byrd
Standard, Advance 1.0 and Premium 1.0 via WIFI; Byrd Advance 2.0 and Premium 2.0 via USB
cable to connect the aircraft to the internet.
20. What is the material of the gimbal? And what is the control range of the pitch?
This aircraft is equipped with a three-axis high definition gimbal developed by GDU. It is made of
light aluminum alloy. The three types of gimbals are two-axis controllable. Their controllable
pitch range is -90°- 0° and their controllable yaw range is -45°- 45°.
21. What’s the material of the body of the airplane? Is break-resistant?
The body of aircraft is made of compound materials of high strength. It has been testified that the
aircraft still keeps comparatively integral structure when it falls from a several meters high place.
22. What are the meanings of the red full lines and blue dotted lines in the map in the APP of
the mobile phone?
The red full lines show the flight track while the blue dotted line show the flight lines made by the
planning function of flight track.

49
23. How to charge the power battery?
Connect the battery and the charger and connect the charge with the 220 V power source to start
the charging. When the LED indicator light in the charger is red, it means the battery is being
charged; when the light is green, it means the battery has been fully charged.
24. What will the aircraft do if the mobile phone is power off?
If the mobile phone is power off, you only could not see the images sent by the image
transmission, but the remote controller could control the aircraft normally.
25. Why there are tweet sounds after turning on the power for a short time? Is it normal?
After turning on the power and there is no instruction for a long time, there will be tweet sounds.
This is normal and will happen in 12 minutes after turning on the power.

50
Technical parameters
GDU Byrd Standard
1. Aircraft
Weight 1890 g
Rated load 200 g
Max.load 500 g
Wind resistance Level 4
Max.vertical speed 6 m/s
Max.horizontal speed 15m/s
Hover accuracy (mode p) ±0.8 m (vertical)
±1.0m (horizontal)
Max.flight altitude 4000 m
Endurance 25 min
Operating temperature -10°C to 50°C

51
2. Gimbal
Controllable angle range pitching: -90°-0°
yawing: -45°-45°
3. Camera
Resolution 1080P (16:9), 960P (4:3),
720P (16:9)
Pixel 16M
Video format .MP4 (H.264 codec) & .AVI
Photo format .JPEG.RAW
Sensor Type CMOS
Video frame 1080P: 25/30/50/60fps
960P: 25/30/48/50/60fps
720P:25/30/50/60/100/120fps
Field angle (opposite angles) 1080P: 120°
960P: 140°
720P: 120°
Focal length 3.64 mm
Photo mode 16 / 14 /12M (4:3) pixel
Memory card type 32GB Micro-SD
Operating temperature range -10°C to 50°C
4. Remote controller
Work frequency 5745MHz ~ 5810MHz
Maximum communication distance 2000m
Battery voltage 7.4V
Battery capacity 5000mAh-2S lithium battery
Mobile device holder Support Pad & Mobile Phone
Equivalent isotropic radiated power (EIRP) 18mW

52
Operating emperature -10°C to 50°C
5. Charger
Voltage/current 16.8V / 2.5A (battery)
16.8V / 1A (remote controller)
Rated power 67.2 W
6. Battery
Capacity 6700 mAh
Voltage 14.8 V
Energy 99.16 Wh
Weight 560 g
Operating temperature 0°C to 40°C

53
GDU Byrd Advanced
1. Aircraft
Weight (with battery and gimbal camera) 1866 g
Rated load 200 g
Max.load 500 g
Wind resistance Level 4
Max. vertical speed 6 m/s
Max. horizontal speed 15m/s
Hover accuracy (mode p) ±0.2 m (vertical)
±0.2m (horizontal)
Max. flight altitude 4000 m
Endurance 29 min
Operating temperature -10°C to 50°C
2. Gimbal
Controllable angle range pitching: -90°-0°
yawing: -45°-45°
3. Visual positioning system
Velocity range < 8 m/s
Altitude range 20 cm-600 cm
Positioning accuracy ± 3.0cm (horizontal)
± 2.54cm (vertical)
Operating environment Surface with clear pattern and
Adequate lighting
4. Remote controller

54
Work frequency 5745MHz ~ 5810MHz
Maximum communication distance 2000m
Battery voltage 7.4V
Battery capacity 5000mAh-2S lithium battery
Mobile device holder Support Pad & Mobile Phone
Equivalent isotropic radiated power (EIRP) 18mW
5. Charger
Voltage/current 16.8V / 2.5A (battery)
16.8V / 1A (remote controller)
Rated power 67.2 W
6. Battery
Capacity 6700 mAh
Voltage 14.8 V
Energy 99.16 Wh
Weight 560 g
Operating temperature 0°C to 40°C

55
GDU Byrd Premium
1. Aircraft
Weight (with battery and gimbal camera) 1866 g
Rated load 200 g
Max.load 500 g
Wind resistance Level 4
Max. vertical speed 6 m/s
Max. horizontal speed 15m/s
Hover accuracy (mode p) ±0.2 m (vertical)
±0.2m (horizontal)
Max. flight altitude 4000 m
Endurance 29 min
Operating temperature -10°C to 50°C
2. Gimbal
Controllable angle range pitching: -90°-0°
yawing: -45°-45°
3. Visual positioning system
Velocity range < 8 m/s
Altitude range 20 cm-600 cm
Positioning accuracy ± 3.0cm (horizontal)
± 2.54cm (vertical)
Operating environment Surface with clear pattern and
Adequate lighting
3. Camera
Image Resolution 4K(16:9), 2.7K(16:9),

56
1440P(4:3), 1080P(16:9)
Effective Pixel 12million
Video Format .MP4(H.264 codec)and .AVI
Picture Format .JPEG & .RAW
Burst Shooting 30 pieces/s(12 million)
Aperture F/2.8
Frame Rate 4K:24/25/30 fps
2.7K:25/50/60 fps
1440P:25/50 fps
1080P:25/30/50/60/120 fps
Field Angle 104°(Opposite)
82°(Horizontal)
Distortion <27%
Output Mode USB
RAM 2GB flash + 8GB DDR
Supported SD Card Types Support Maximum 64GB
Operation Temperature -10℃ to 50℃
4. Remote controller
Operating frequency: 5745 MHz ~ 5810 MHz
Max. communication distance 2000m
Operating temperature -10°C to 50°C
Battery capacity 5000mAh-2S lithium battery
Mobile Device Holder Support Pad & Mobile Phone
Equivalent isotropic radiated power (EIRP) 18mW
5. Charger

57
Voltage/current 16.8V / 2.5A (battery)
16.8V / 1A (remote controller)
Rated power 67.2 W
6. Battery
Capacity 6700 mAh
Voltage 14.8 V
Energy 99.16 Wh
Weight 560 g
Operating temperature 0°C to 40°C

58
Authentication information
FCC Compliance
This device complies with part 15 of the FCC Rules. Operation is subject to the following two
conditions:
7. This device may not cause harmful interference, and
8. This device must accept any interference received, including interference that may cause
undesired operation.
Changes or modifications not expressly roved by the party responsible for compliance could void
the user’s authority to operate the equipment.
FCC Warning Message
Any Changes or modifications not expressly roved by the party responsible for compliance could
void the user’s authority to operate the equipment.
This device complies with part 15 of the FCC Rules. Operation is subject to the following two
conditions: (1) This device may not cause harmful interference, and (2) this device must accept
any interference received, including interference that may cause undesired operation.
FCC Radiation Exposure Statement:
This equipment complies with FCC radiation exposure limits set forth for an uncontrolled
environment. This equipment should be installed and operated with minimum distance 20cm
between the radiator and your body. This transmitter must not be co-located or operating in
conjunction with any other antenna or transmitter.
Note: This equipment has been tested and found to comply with the limits for a Class B digital
device, pursuant to part 15 of the FCC Rules. These limits are designed to provide reasonable
protection against harmful interference in a residential installation. This equipment generates uses
and can radiate radio frequency energy and, if not installed and used in accordance with the
instructions, may cause harmful interference to radio communications. However, there is no
guarantee that interference will not occur in a particular installation. If this equipment does cause
harmful interference to radio or television reception, which can be determined by turning the
equipment off and on, the user is encouraged to try to correct the interference by one or more of
the following measures:
---Reorient or relocate the receiving antenna.

59
---Increase the separation between the equipment and receiver.
---Connect the equipment into an outlet on a circuit different from that to which the receiver is
connected.
---Consult the dealer or an experience radio/TV technician for help.
 Loading...