

GDI XC-NT200 Owner's Manual

XC-NT200
ADSL Modem
Owners Manual
GDI COMMUNICATIONS LLC.
PO Box 1330 Verdi, NV 89439

WARRANTY
2
GDI Communications LLC.
warrants to the original consumer purchaser that
each of its hardware products, and all components thereof, will be free from
defects in materials and/or workmanship for one (1) year from the date of original
purchase and is not assignable.
In the event of malfunction or other indications of failure attributed directly to
faulty workmanship and/or materials, GDI Communications LLC. will, at its
option, repair or replace the defective products or components to whatever extent it
shal l deem necessary to restore the product or components to proper operating
condition, provided the consumer purchaser sends with the defective product
proof of the date of purchase of the product. Please note that GDI
Communications LLC. may replace the defective product with a new or re
manufactured functionally equivalent product of equ a l v a l u e at the o ption o f G DI
Communications LLC.
The customer shall be solely responsible for the failure of any GDI
Communications LLC. computer product, or component thereof, resulting from
accident, abuse, or misapplication of the product, and GDI Communications LLC.
assu me s no li a bi li ty as a consequence of such events under the terms of this
Warranty.
GDI Communications LLC. does not warrant the merchantability or fitness of
this product for any particular purpose. This limited warranty is in lieu of any and
all other warranties, expressed or implied.
GDI Communications LLC. 's liability shall not exceed the price of the defective
individual product, which is the basis for claim. In no event will GDI
Communications LLC. be liable for direct, indirect, incidental, or consequential
damages resulting from any defect in the product or in this manual, even if they
have been advised of the possibility of such damages. In no event shall GDI
Communications LLC. be liable for any loss of profits, loss of equipment or
facilities, or the loss of programs or data, or the cost of recovering or
reproducing the program or data. Some states do not allow the exclusions or
limitation of implied warranties or liability for incidental or consequential
damages, so the above limitations or exclusion may not apply to you.

TABLE OF CONTENTS
3
GENERAL INFORMATION ................................................................ 4
FEATURES ..................................................................................... 4
INSTALLATION .................................................................................... 5
CONNECTING TO THE ADSL LINE INTERFACE ........................ 6
CONNECTING THE LAN (ETHERNET) INTERFACE .................. 7
CONNECTING POWER .............................................................. 8
OPERATION ........................................................................................ 9
POWER UP ..................................................................................... 9
FRONT PANEL LED STATUS MONITORS .............................. 9
CUSTOMER SERVICE ................................................................ 11
SERVICE AND UNRESOLVED PROBLEMS .......................... 11
APPENDIX A ............................................................................ 12
SPECIFICATIONS ................................................................... 12
APPENDIX B .............................................................................. 14
FACTORY REPLACEMENT PARTS AND ACCESSORIES ..... 14
APPENDIX C .............................................................................. 15
INTERFACE PIN ASSIGNMENT .............................................. 15

GENERAL INFORMATION
4
Thank you for purchasing this GDI Communications LLC. product. The XCNT200 provides reliable, high-speed, Internet access to your existing phone
line. There is no special wiring or special networking knowledge required. This
modem is capable of data rates hundreds of times faster than a traditional analog
modem. Unlike the analog modem, the XC-NT200 allows you to use your
phone line for simultaneous voice/fax and high-speed communications, eliminating
the need for dedicated phone lines for voice and data communications. The XCNT200 provides reliable high-speed data communication in the harshest
operating environments. It can operate in uncontrolled environments such as
remote terminals or curb side distribution vaults. Installation is easy ... no tools ...
no headaches. Simply connect the hardware, apply power, and perform
t h e s i m pl e s o f t w a re configuration for your Modem.
Designed to operate in the harshest environments the XC-NT200H has an operating
temperature range of -37°C to +74°C, in non-condensing humidity of up to 95%.
It can be set up at altitudes of up to 10,000 feet.
This manual has been designed to enable you to install your XC-NT200 modem
by following the step-by-step installation procedure. Follow the step-by-step
installation instructions outlined in Section titled - Installation.
FEATURES
• Easy to install standalone ADSL modems—
• Environmentally hardened for operation in harsh environments
• Auto-sensing full or half-duplex Ethernet
• Auto-sensing 10/100 operation
• Transparent operation
• LED indicators for Power, Ethernet Link & Activity, ADSL Sync
no configuration required
INSTALLATION
5
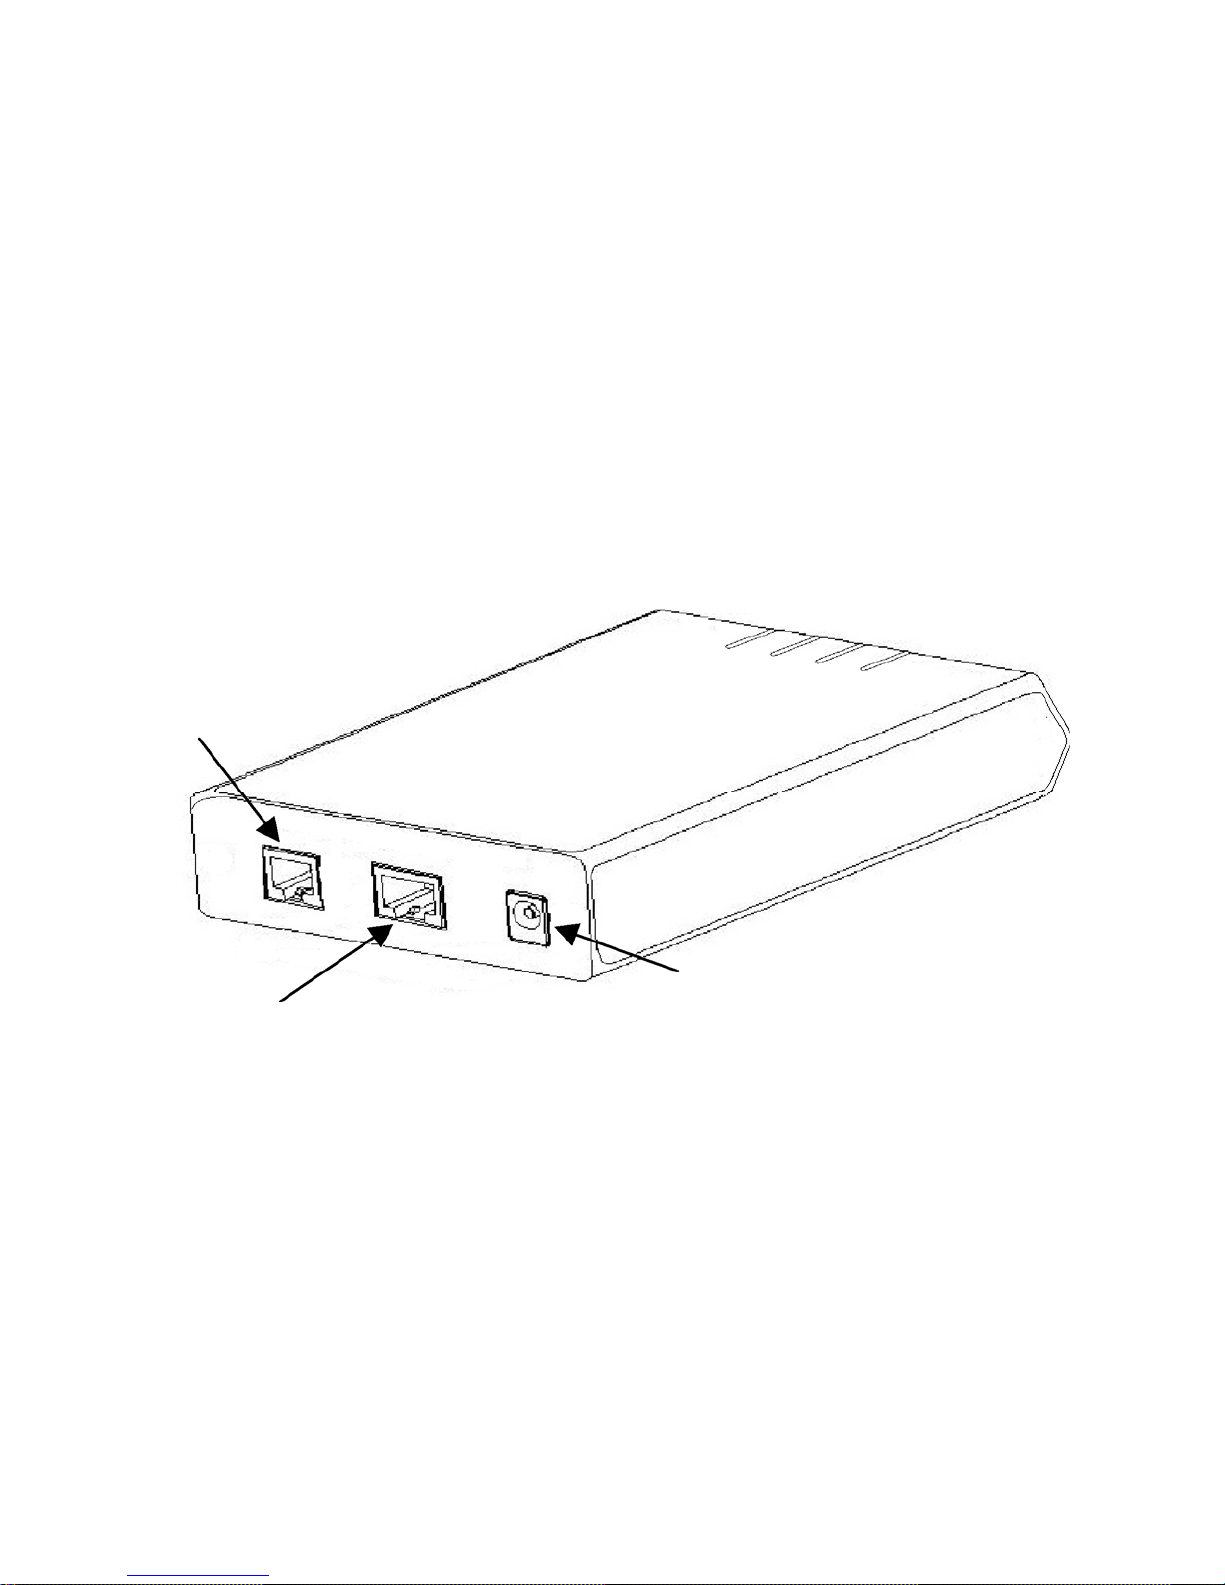
XC
ADSL Li
P
k
Because the XC-NT200 requires no configuration, it can be installed and made
operational quickly. Installation takes place as follows:
1. Connecting the ADSL line (refer to section titled, “Connecting the ADSL Line
Interface” on page 6) See Figure 4 for the rear panel connector arrangements.
2. Connecting the Ethernet interface (refer to section titled, “Connecting the LAN
(10/100Base-T) Ethernet Interface” on page 7).
3. Connecting the power plug (refer to section titled, “Connecting Power” on
page 8).
ne
Ethernet Access
(LAN)
-
ower Jac
Figure 1.
XC-NT200 standalone rear panel
 Loading...