

Page 1

1
MMAAGGNNAASSMMAARRT
T instructions manual
1
T
T instructions manual
1
Page 2

2
MMAAGGNNAASSMMAARRT
T
instructions manual
INTRODUCTION
Thank you for selecting a MAGNASMART magnetometer.
With your purchase you support GDI geophysical instruments to continue investing
into the research and development of new equipments in the future.
This is a new, Hi - Power, twin sensor gradiometer, a professional tool that has been
designed to be easy to use, practical and ergonomical.
It is the technological result from knowledge gained through many years involvement
in metal locators. All the features implemented in the MAGNASMART are to satisfy
our customer demands and specific requests.
Please take the time to study this instruction manual before searching using MAGNASMART.
As a manufacturer we wish you the best for all your surveys.
APPLICATIONS
MAGNASMART magnetometers are extremely sensitive devices for the underground
location of:
- Magnetic metal targets, for example iron objects and iron ore.
- Utilities, pipes, manhole covers that were buried under asphalt layer.
- Military for buried weapons, army bunkers, landmines, unexploded ordnance survey (UXO)
- Crime scene investigation ( CSI )
- Anomalies in magnetic ground caused by voids, tunnels, dug ground, old wells.
The stronger the mineralization is on the ground, the deeper the location will be for these
anomalies. For non mineralized ground, for example limestone, the location of anomalies
is poor.
- Human constructions from magnetic materials, like ceramics, foundations, stoneand brick
walls, ditches and pits
- Constructions or items that have been fire-heated, ceramic vases, burn out ancient
settlements, bricks, fire places etc.
– Treasure hunting for ferrous relics
The user adjustable sensitivity ( SENS knob ) is the key to adopt MAGNASMART
to any magnetometer application for example utility, archaeology and treasure hunting.
LOW SENSITIVITY : Ideal for industrial, utility & pipe location. To find shallow buried iron
pipes, manhole covers, ferrous targets at urban areas, even near fences, parkedautomobiles
and concrete bars.
HIGH SENSITIVITY : Archaeology applications to detect ceramics, landfills, voids, tombs,
tunnels, foundations, ancient ditches, pits, dug ground.
HIGH SENSITIVITY : Treasure hunting to locate ferrous relics, weapons, army bunkers
and bombs at depth.
Page 3
3
MMAAGGNNAASSMMAARRT
T instructions manual
FEATURES
High detection depth range
Adjustable sensitivity
Mini headphones plug
Push button for visual battery status check
Detachable "twist to lock" gradiometer probe
Data logger connection
Internal speaker
Dynamic VCO audio signals
Automatic ground balance after power on
Non motion operation and location at any speed
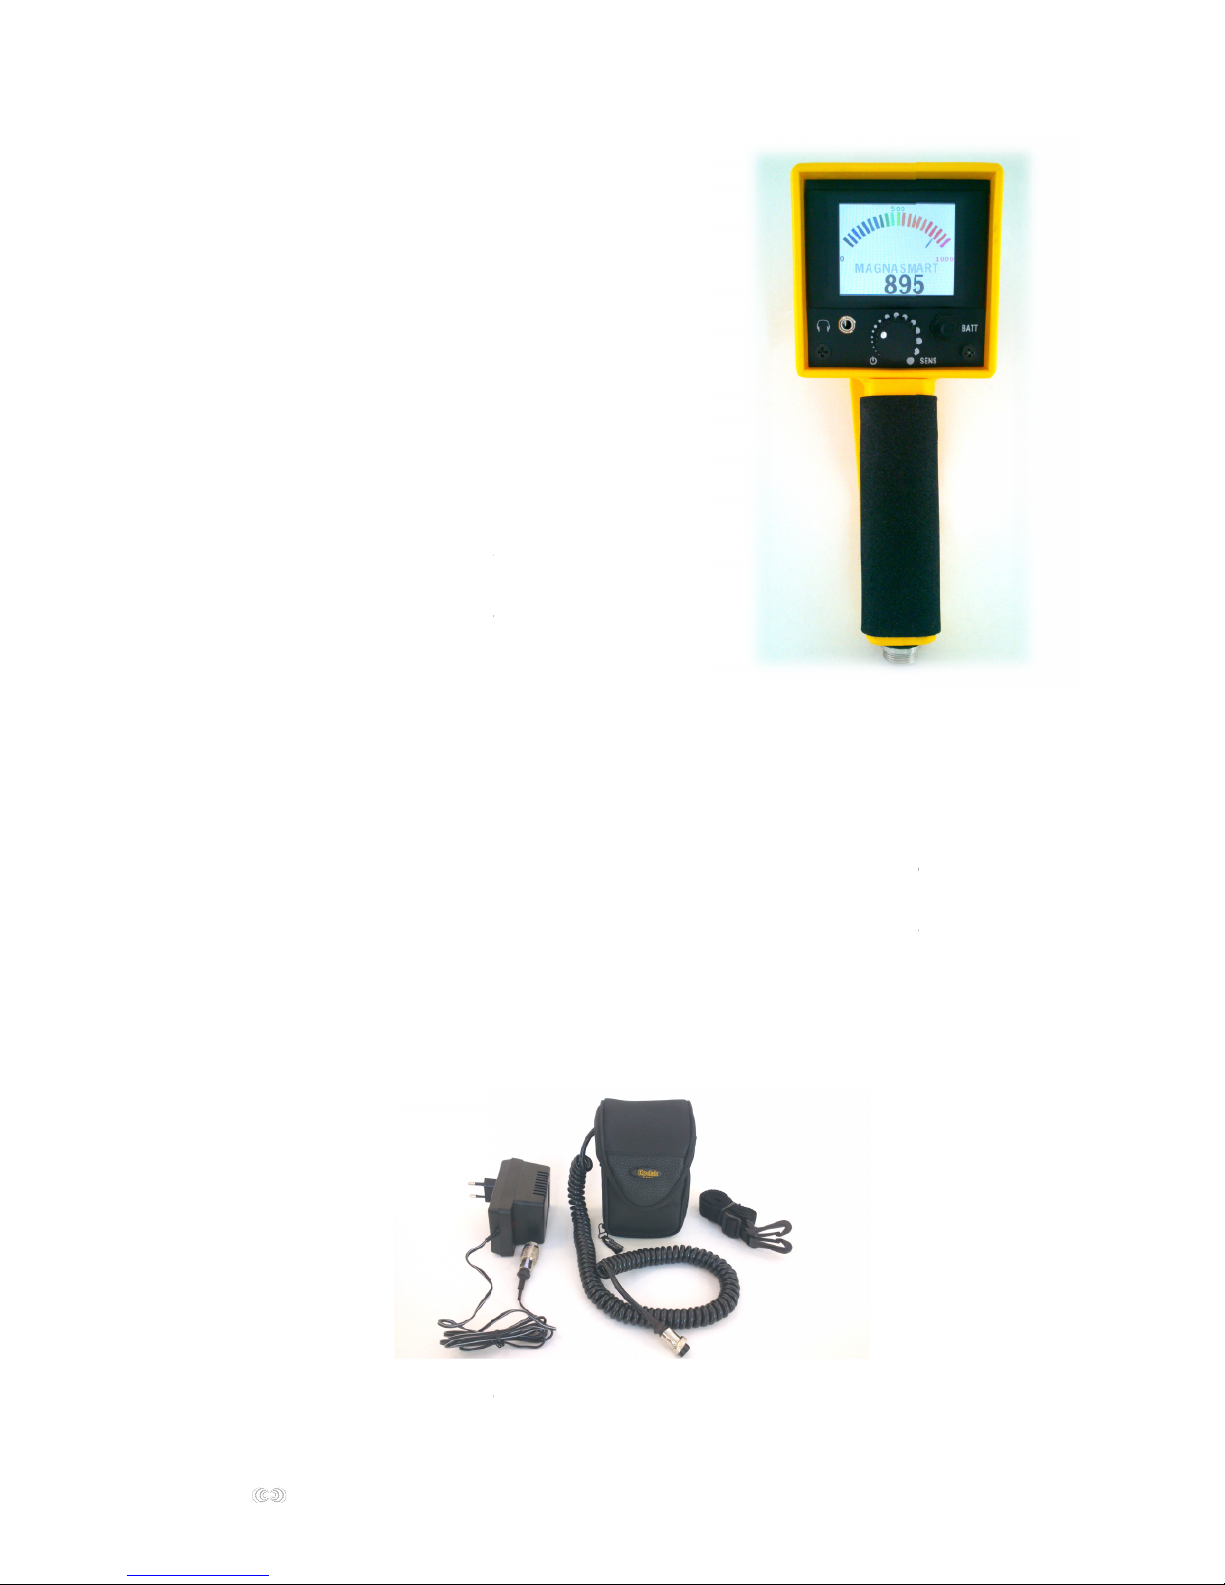
Color LCD with signal meter and numerical values
9 volt battery holder
External battery jack for a 12V power pack
Ergonomic handle
Quality construction materials
BATTERY
An external 12 V power battery pack with 220 V charger is available.
It permits operation up to 20 hours. The external battery jack can be found at the bottom
of the handle base. The external battery pack must be hanged away from the probe
during operation. For example if holding the magnetometer with your right hand, hang the
battery pack on your left side, and scan with the right arm extended away from your body.
Battery condition is shown by pressing the BATT key while observing the meter.
A good battery condition indicates 950 and higher. If 900 or less is shown,
recharge the battery. A low battery emits a continuous sound and full scale meter reading.
External 12V battery pack and 220V charger
3
T
T instructions manual
3
Page 4

4
MMAAGGNNAASSMMAARRT
T instructions manual
ASSEMBLY
MAGNASMART has a detachable “twist to lock” probe. To attach probe, observe
the metallic spring on probe’s upper end, and a small insert in the main unit probe
connector. Align both parts at these points and press firmly to join. Once they are joined,
twist the probe counter-clockwise until it locks. Now both parts are secured.
A small amount of lubricant on this locking mechanism will prevent worn out,
and has to be applied to both sides probe and main unit. Take special care however,
not to lubricate the inside of the electrical connectors and their pins.
To dismantle the probe, simply depress the metallic spring and pull it out.
GROUND BALANCE
Also the depth penetration expected might be reduced on areas with large mineral
concentrations.
Ground balance is the ability on the MAGNASMART magnetometer to ignore those ground
signals from minerals, while retaining the depth penetration unaffected from interference.
What is ground balance ?
Most soils contain a percentage of magnetic materials,
for example minerals - iron ore, and occasionally
magnetic stones called "hot rocks".
Sometimes magnetic materials are originated
from human activity, like ceramics, bricks etc in old
settlements. When working a magnetometer
on such an environment erratic ground signals may
occur, like a constant or drifting low audio threshold
tone from the speaker.
4
T
T instructions manual
4
What is ground balance ?
Most soils contain a percentage of magnetic materials,
for example minerals - iron ore, and occasionally
magnetic stones called "hot rocks".
Sometimes magnetic materials are originated
from human activity, like ceramics, bricks etc in old
settlements. When working a magnetometer
on such an environment erratic ground signals may
occur, like a constant or drifting low audio threshold
tone from the speaker.
Page 5
5
MMAAGGNNAASSMMAARRT
T
instructions manual
Procedure
1. Observe the area to decide the proper direction to scan it, according to the obstacles
to be encountered on your way, and the ground formation. The scanning method must
be on a grid, that has to be walked in parallel lines on a given direction, for example
North to South, or South to North are the most effective directions.
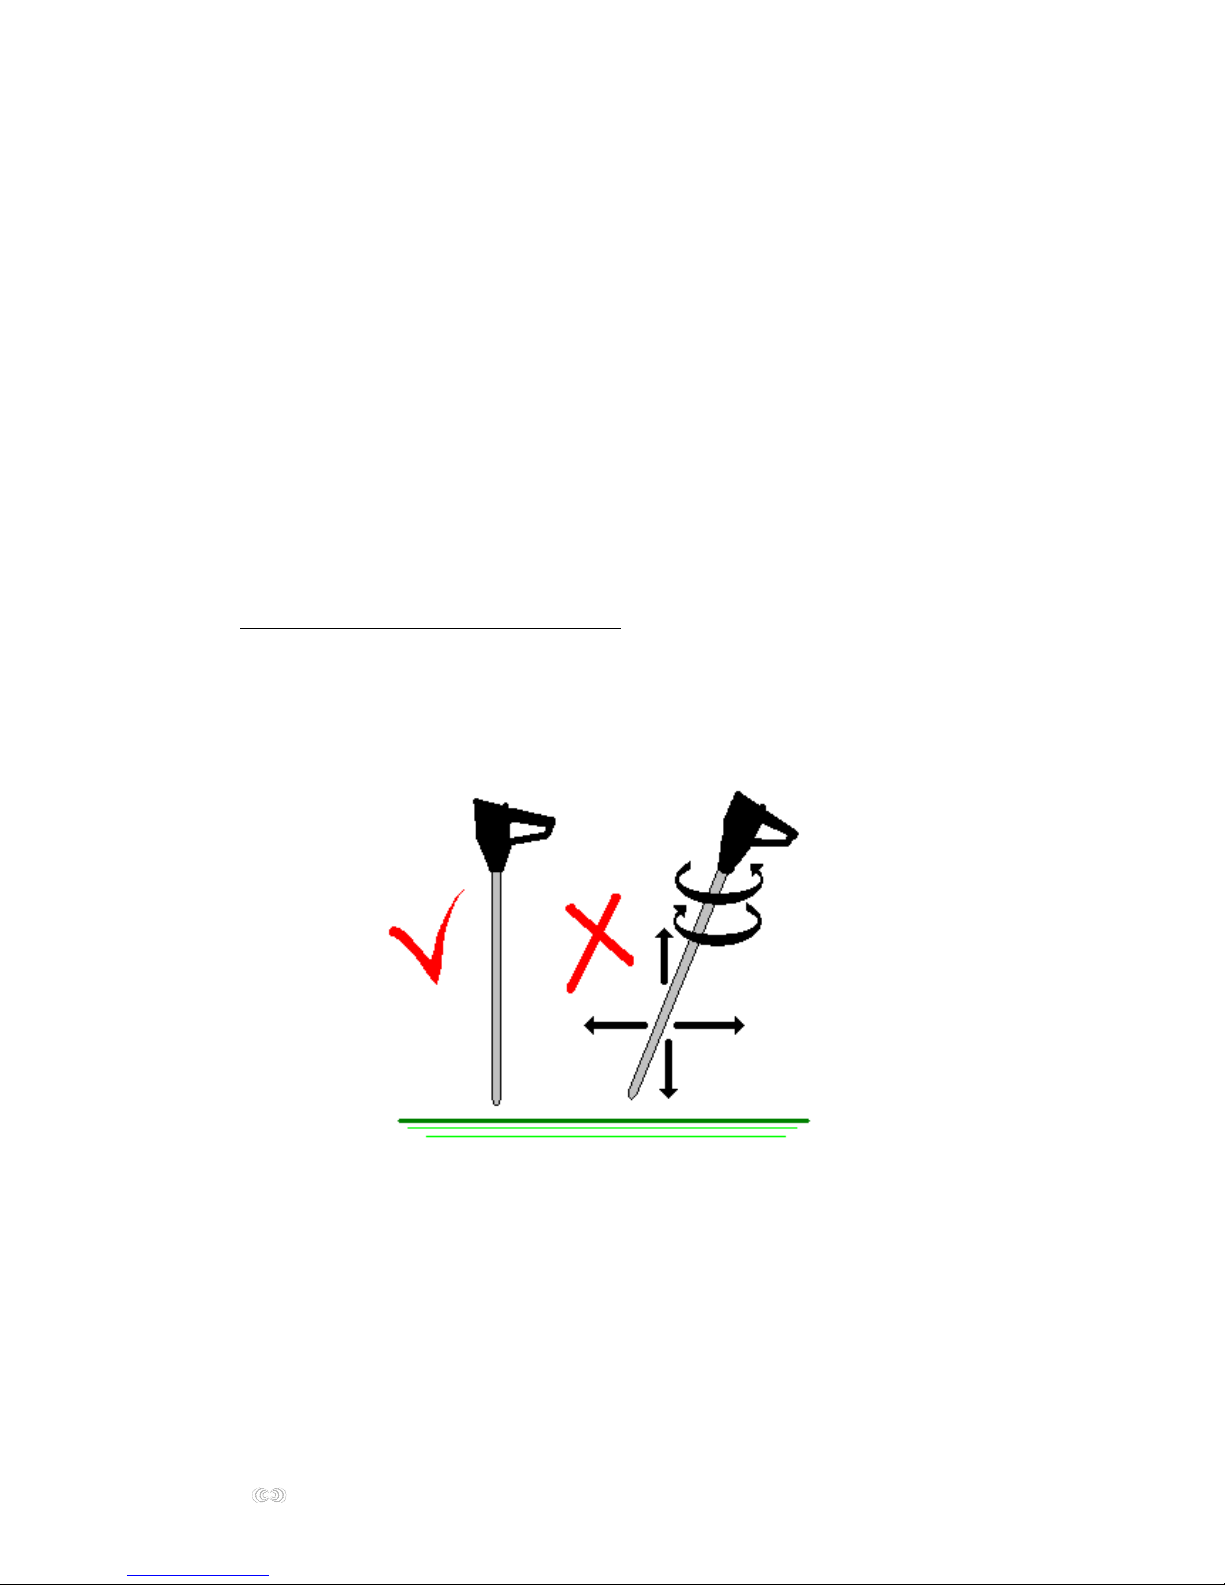
2. Stand at the starting position with the magnetometer probe vertical, tip on the ground
surface, main unit facing towards the scanning direction. Ensure by any means,
that the ground on this spot has not been dug and it is clean from buried junk metal.
Starting position has to be far way from any metals like fences, automobiles, metallic
constructions, buildings, concrete iron net, etc. The user must be free of metallic objects
with him, his shoes, clothing etc.
3. Power on the magnetometer by the SENSitivity knob and set it at 3/4 , just below the
point where the “ticks” are audible ( see SENSITIVITY page 6 )
4. Wait completely motionless 15 to 20 seconds approximately for the Ground Balance
procedure, while MAGNASMART electronics become adapted to the ground type
automatically. During the automated tuning process MAGNASMART magnetometer
must not be rotated or raised from the ground. In case of a fault, erratic signals come from
the speaker and the Ground Balance procedure must be repeated.
5. Start scanning ( see SEARCHING page 7 ) In case the ground properties change and erratic
signals occur, try lowering SENS slightly. If this does not solve the problem thenrepeat
Ground Balance procedure on the new ground.
Page 6
6
MMAAGGNNAASSMMAARRT
T instructions manual
SENSITIVITY
a. If false signals occur when the magnetometer is rotated to the left or right,
due to the earth's magnetic lines
b. When working on extremely mineralized ground
c. When searching closely to large metallic constructions, fences, buildings, automobiles etc.
d. On large targets that produce wide audio signals, hence becoming difficult
to pinpoint the exact target center
e. Electromagnetic interference, inside houses, near power lines, often indicates
as a fluctuating audio
Procedure
After Ground Balancing as described the MAGNASMART magnetometer set the SENSitivity
high to the point about 1 to 2 “ticks” per second are audible.
! Novice users should set SENS just below the ticking sound for a stable operation
Start scanning. The highest depth is achieved when setting sensitivity so that the "ticks"
are just heard. The ticking rate can be corrected anytime during operation using SENS,
for example if it is lost or when ticks are more than 2 per second.
In case erratic signals occur due to the above mentioned reasons,or a stable ticking rate
cannot be maintained, reduce SENSitivity slightly and continue searching. If not yet a stable
operation is achieved reduce it again a little, and so on, until the interference signals
disappear. When reducing SENS further, MAGNASMART enters into a “silent standby” mode
without any audible ticks.
At the opposite, if it is stable, increase SENSitivity , and continue increasing it in steps,
by checking the magnetometer while scanning, so that it does not start to betoo noisy,
if so reduce SENS as described.
What is sensitivity or SENS ?
It is a setting that controls the depth range
of the MAGNASMART magnetometer.
Users may desire the maximum depth range available from
their magnetometers, but there are certain occasions
when depth range must be reduced in order to achieve stable
operation without noises.
4 typical reasons to reduce sensitivity are:
6
T
T instructions manual
6
What is sensitivity or SENS ?
It is a setting that controls the depth range
of the MAGNASMART magnetometer.
Users may desire the maximum depth range available from
their magnetometers, but there are certain occasions
when depth range must be reduced in order to achieve stable
operation without noises.
4 typical reasons to reduce sensitivity are:
Page 7

7
MMAAGGNNAASSMMAARRT
T instructions manual
SEARCHING
The earth's magnetic lines (or magnetic North), are responsible for producing low audio
interference signals when working with extremely sensitive magnetometers
such as MAGNASMART.
When the MAGNASMART is rotated further away to the left or right from the original
direction it was Ground Balanced, it “crosses” magnetic lines, and a low audio threshold will
be heard.
One way to overcome this and still maintain maximum sensitivity, is to keep MAGNASMART
magnetometer firmly facing the original direction which was Ground Balanced,
during the search. To accomplish this, scan by walking parallel tracks on a grid.
When it comes to turn to the next track on your grid, you can either :
a. change track and walk backwards ( so that you do not turn or rotate the magnetometer
from it's original direction axis ) parallel to the first track. Once the new track completes,
turn normally, then again turn and walks backwards to the next track, and so on.
b. or change track turning normally but flip the
magnetometer handle so that it is held now “backwards”.
And so on, scan by flipping the handle at the end
of each track, maintain tracks parallel to each other,
and MAGNASMART direction unchanged.
Otherwise to make the MAGNASMART magnetometer unaffected by the magnetic North
lines, reduce the SENSitivity as described, up to the point where there is not any noise
when the magnetometer turns to the next track of your grid, or rotates.
By doing this depth penetration will be reduced also
7
T
T instructions manual
7
Page 8

8
MMAAGGNNAASSMMAARRT
T instructions manual
TARGET SIGNAL AUDIO & VISUAL
To pinpoint a wide target signal reduce SENSitivity progressively, and make several test
scans above the target.
Typical signal duration
thin oblong target laying large, deep target has weak medium target at surface
horizontally produces 2 peaks and wide signal strong and sharp signal
HEADPHONES
A mini headphones plug can be found below the LCD. Also a set of mini headphones
is included with your MAGNASMART purchase.
The use of headphones is highly recommended when working on a noisy environment
or when demanding a quiet and discreet operation.
Headphones also reduce the heavy battery drain of the speaker.
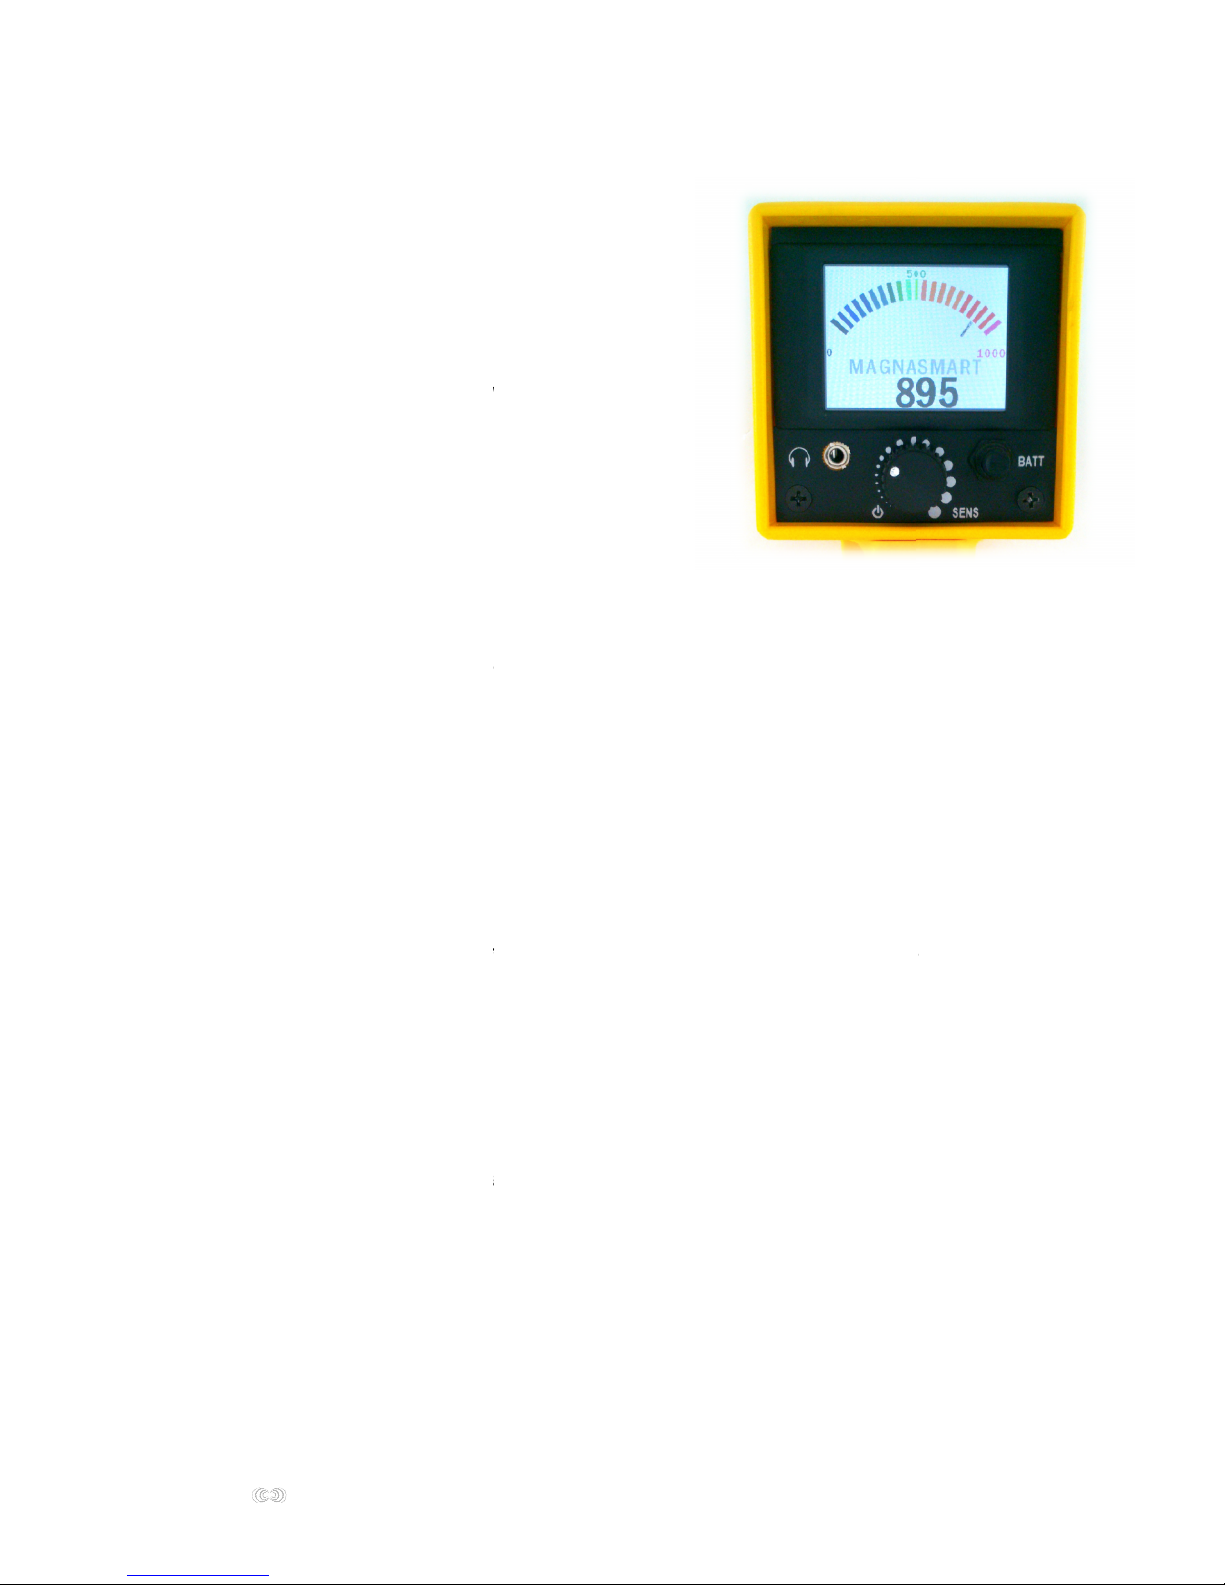
MAGNASMART has a color LCD meter for displaying
the signal intensity, as an aid for exact target localization plus
an audio speaker.
Signal meter and numerical values read high for surface
or metal targets, and low for deep or non metal targets.
Generally the audio frequency and the meter values
are higher when above target center.
If meter goes full scale, sweep the magnetometer
back and forth to determine the signal duration and center.
8
T
T instructions manual
8
MAGNASMART has a color LCD meter for displaying
the signal intensity, as an aid for exact target localization plus
an audio speaker.
Signal meter and numerical values read high for surface
or metal targets, and low for deep or non metal targets.
Generally the audio frequency and the meter values
are higher when above target center.
If meter goes full scale, sweep the magnetometer
back and forth to determine the signal duration and center.
Page 9

9
MMAAGGNNAASSMMAARRT
T
instructions manual
DETECTION DEPTHS
Detection depth increases as the target becomes larger, more magnetic and with oblong
targets buried vertically. Oblong targets aligned or parallel with the probe axis have
the strongest magnetic signal and depth. For non metal targets, ( for example ground
anomalies like voids, dug ground ) greater detection depth is achieved when thesurrounding
soil has a high level of magnetism ( iron oxides – ore ), this will permit the magnetometer
to sense the absence of soil, over the void, for example.
Below ranges for various targets when bench (air) testing. Please consider that these ranges
can vary according to ground mineralization, surrounding environment - metals, probe
orientation, target layout, faulting, oxidation, target magnetic properties, metal alloy and
temperature.
KIND OF OBJECT
DEPTH
Screwdriver 20 cm long
1,40 m.
Main water supply pipe 70 cm dia.
3,00 m.
Automobile
5,00 m.
Page 10

10
MMAAGGNNAASSMMAARRT
T
instructions manual
ICON DATA LOGGER
External
battery jack
Data logger
jack
ICON DATA
data logger
USB cable
to computer
Connect to the non marked jack!
Page 11

11
MMAAGGNNAASSMMAARRT
T instructions manual
MAGNASMART is data logger ready. Connects to ICON DATA real time magnetometer
& metal detector data logger. The data logger jack is at the base of the handle.
! Use ICON DATA once you are familiar with the magnetometer operation
Using the ICON DATA logger the sensitivity or depth penetration of MAGNASMART
is greatly improved over working with the speaker. Scan the field at a normal pace and 2D
& 3D maps of the scanned area are generated on a windows tablet PC or laptop in real time.
No need to upload data later to a PC. Data logger is a useful aid to determine target size,
shape and also depth reading for some cases .
Before connecting the ICON DATA logger, ensure that the MAGNASMART operates stable,
for that reason it is highly recommended to set SENS just below the ticking sound,
to “silent mode” and test.
The ICON DATA and it’s tablet PC must be held away from the MAGNASMART during
the Ground Balance procedure also during searching. To achieve this maintain your arm
extended with the magnetometer far from your body.
ICON DATA real time data logger
3D scan of a rifle using ICON DATA
11
T
T instructions manual
3D scan of a rifle using ICON DATA
11
ICON DATA real time data logger
Page 12

12
MMAAGGNNAASSMMAARRT
T
instructions manual
Procedure
1. Connect the USB cable fromICON DATA to the USB port it has been installed
on your laptop ( read the full instructions on how to install the hardware–software )
2. Power on your laptop computer
3. Double click theICON DATAsoftware icon, ensure that the laptop has enough
battery power by clicking on the battery power meter.
4. Click Options.
5. Observe the field youare going to search.According to your starting position
you have to scan it in parallel tracks (sweeps) starting left or right.
Then choose the suitablesweep direction for that field by clicking repeatedly
the sweep direction arrow. Figure 1
6. Note the field again to realize the size of it. Select how many estimated tracks you
need to scan for covering it onsweeps. Then select how many pointsyou have
to make per trackon points. Each point equals your step. The shorter steps you
make the better the scan image resolution will be.Tip: select equal number sweeps
and points. The larger the grid the higher the image resolution. Figure 2.
7. For uneven ground that does not permit constant step pace:selectmanual data
capture(then you have to clickCAPTURE after a step you make, for the graphics
to start appearing.)
For flat ground that does permit constant steps:select automaticdata capture,
then select theintervals time.For example if you select 3 sec., after you click
START, every 3 sec’s. you will hear “STEP!” and you have to make a step.
The computer will make the graphics on screenautomatically as you make your
steps. If for example you selected 7points, on the7th step you hear“TURN!”- you
need to turn to the next sweep, left or right according to the sweep direction, and hold
the handle backwards ( Figure 3),then walk 7steps prompted by the voice and turn
similarly, this time hold the handle normal…and so on
8. Ensure “auto scale data to full color range” ison and Op Amp Gainis 4.
ClickOKand exit Options
9. Move far away from metal targets, inside or outside the ground. Stand incleansoil
withοutmetals, cavities,voids.Ground BalanceMAGNASMART as described.
Connectthe supplied datacable from MAGNASMARTdata logger jack to theICON
DATA. Position probe near a ferrous target so that meter goes full scale,and then
use ICON DATAknob to set SOIL DATA to 950. Move away from the ferrous target
and SOIL DATA should go low. Now start scanning!
10. After you fill up all the sweeps / points you will havethe complete graphics image
of the field.Store the data file by click onFile / Save, or it will erased. Click on 3D
for a 3-dimensional view. Please study the fullICON DATA instructions to understand
how to interpret graphics andthe usage of the controls
Page 13

13
MMAAGGNNAASSMMAARRT
T
instructions manual
Figure 1. Examples of sweep direction selections according the starting position.
The 2 most frequently used sweep directions are shown, left to right and right to left
Figure 2. Example of sweeps &points selection. Thisgrid size is 10 sweeps X 7 points
Page 14

14
MMAAGGNNAASSMMAARRT
T instructions manual
Figure 3. Turning to the next sweep and flippinghandle
14
T
T instructions manual
14
Page 15

15
MMAAGGNNAASSMMAARRT
T instructions manual
ANALYZING THE SCAN IMAGE
1. Check that the scan image has a uniform base color on the background,
this represents the ground. Usually in blue, and should cover most of the scan cells.
If not a base tone, or scrambled colors then either a user fault or not any targets
exist on the scan see example a. If by fault the magnetometer is rotated when
turning the sweep lines the scan appears with repeating blue and red lines,
see example b.
2. Check the target to have a clear outlined shape without shades, and it’s size
compared to your grid.
Ground minerals appear either without a clear perimeter, or very large size.
3. Select 3D and compare the ground data versus target data. Ground data should be
near zero for a good scan. A true target data should read high.
Target data near zero often correspond to minerals.
Target data
Ground data
A. B.
15
T
T instructions manual
Target data
Ground data
A. B.
15
Target data
Ground data
Page 16

16
MMAAGGNNAASSMMAARRT
T instructions manual
SPECIFICATIONS
weight : 4,5 Kg ( with carry case ) 1,25 Kg ( without carry case )
dimensions of carry case : 126 cm X 27 cm x 12 cm
length : 1 m. ( assembled ) 86 cm ( collapsed )
Battery : 12 Volt rechargeable
Battery life : Up to 20 hours
80 cm gradiometer probe
Backlight LCD 2,5''
MAGNASMART KIT
Main unit and probe
Hard carry case with foam
12 volt external battery and 220 V charger
Mini headphones
Instruction manual in English
2 year guarantee
ACCESSOIRES
ICON DATA real time data logger, Windows XP, VISTA, 7, 8 including a software CD
for 2D & 3D target imaging and a data cable.
External battery pack 12 V and 220 V charger.
30 cm & 60 cm probes for finer scans, pinpointing and operation near metal objects
Probes longer than the standard 80 cm., are available upon request
16
T
T instructions manual
16
Page 17

17
MMAAGGNNAASSMMAARRT
T instructions manual
STORAGE
Always store the MAGNASMART probe disconnected from the main unit inside its carry
case. Away from direct sunlight and moisture. Remove the battery when left unused
for a long period, as it might leak and corrode the electronic circuit.
GUARANTEE
MAGNASMART is practically service free. Both the main unit and probe must be kept clean
and dry. This is particularly important for the connectors and sockets, which must not
be stored if been wet. Avoid submerging MAGNASMART into water. For probing on shallow
water, use the sensor into a nylon bag.
MAGNASMART guarantee is 2 years for parts and labor, except batteries and accessories.
The guarantee terminates when disregardingthe following:
- Do not comply with our instructions for usage
- Operation out of the above mentioned applications
- Tampering or alteration
- Mechanical damage due to other materials, accident, liquids, physical wear and tear
- Use with non approved accessories, and electrical connections
All MAGNASMART parts can be cleaned using a damp cloth, if necessary. If false signals
or unstable operation occurs, first check the condition of the battery and its holder,
and then the cables and jacks.
In case of a malfunction, please contact with your dealer, which will arrange under
guarantee, the transportation cost of the faulty unit back to our repair center.
GDI GEOPHYSICAL INSTRUMENTS
193 Athinon ave., 124 61 Athens Greece T. +30 210 4905398 F. +30 210 4256653
Web. : www.imagelocators.com Email. info@imagelocators.com
17
T
T instructions manual
17
 Loading...