

GDI HES7000 User Manual

HES7000
ICLI USER’S GUIDE
A01583 Rev. A

Page 2 of 37 HES7000 ICLI User’s Guide A01583 Rev. A
Proprietary Data
This document contains confidential, proprietary
data with all rights and titles reserved by
GDI Communications LLC. By accepting this
document, the recipient assumes custody hereof
and agrees not to dislcose this data or any portion
of this data to any unauthorized person without
the prior written consent of GDI Communications
LLC. Recipient further agrees not to incorporate
these drawings, specifications or technical
information, in whole or in part, in any other
product or endeavor.
THIS LEGEND SHALL BE INCLUDED ON
ANY REPRODUCTION OF THIS DOCUMENT
GDI COMMUNICATIONS, LLC
897 Deming Way
Sparks, Nevada 89431
Phone: 775-345-8000
FAX: 775-345-8010
www.sgdi.com
HES7000 ICLI User’s Guide A01583 Rev. A


HES7000 ICLI User’s Guide A01583 Rev. A
Table of Contents
1. Introduction .................................................................. 1
1.1. Front Panel Connectors, Indicators, and switches: ...................... 1
1.1. Using this guide: .......................................................................... 1
2. Quick Start .................................................................... 2
2.1. Log In and Reset Configuration to Factory Defaults ..................... 2
2.2. Set Device Hostname and admin User Password .......................... 2
2.3. Set VLAN 1 IP Address ................................................................. 3
2.4. Display and Save Configuration to FLASH .................................... 4
3. ICLI Basics .................................................................... 6
3.1. The ICLI has some key characteristics: ........................................ 6
3.2. Command Structure and Syntax ................................................... 6
3.2.1. Syntax 7
3.3. Ethernet Interface Naming .......................................................... 9
3.4. Using the Keyboard .................................................................... 10
3.4.1. Basic Line Editing ................................................................................................. 10
3.4.2. Command History ................................................................................................ 11
3.4.3. Context-sensitive Help .......................................................................................... 11
3.4.4. Other Special Keys ............................................................................................... 13
3.5. Filtering Output .......................................................................... 14
3.6. Understanding Modes and Sub-modes ....................................... 15
3.6.1. ICLI Mode Transitions ........................................................................................... 17
3.7. Understanding Privilege Levels .................................................. 19
3.8. Understanding Terminal Parameters .......................................... 20
3.8.1. Using Banners ..................................................................................................... 22
4. Configuring the System ............................................... 24
4.1. Resetting or Removing Configuration with “no”......................... 25

Page 2 of 37 HES7000 ICLI User’s Guide A01583 Rev. A
5. Managing Users ........................................................... 26
6. Using show Commands................................................ 28
6.1. show running-config .................................................................. 31
6.1.1. show running-config [ all-defaults ] ........................................................................ 32
6.1.2. show running-config feature feature_name [ all- defaults ] ........................................ 32
6.1.3. show running-config interface list [ all-defaults ] ...................................................... 32
6.1.4. show running-config vlan list [ all-defaults ] ............................................................ 32
6.1.5. show running-config interface vlan list [ all-defaults ] ............................................... 33
6.1.6. show running-config line { console | vty } list [ all- defaults ] .................................... 33
7. Working with Configuration Files ................................ 34
7.1. Reverting to Default Configuration ............................................ 35
8. Working with Software Images ................................... 37
HES7000 ICLI User’s Guide A01583 Rev. A Page 1 of 37
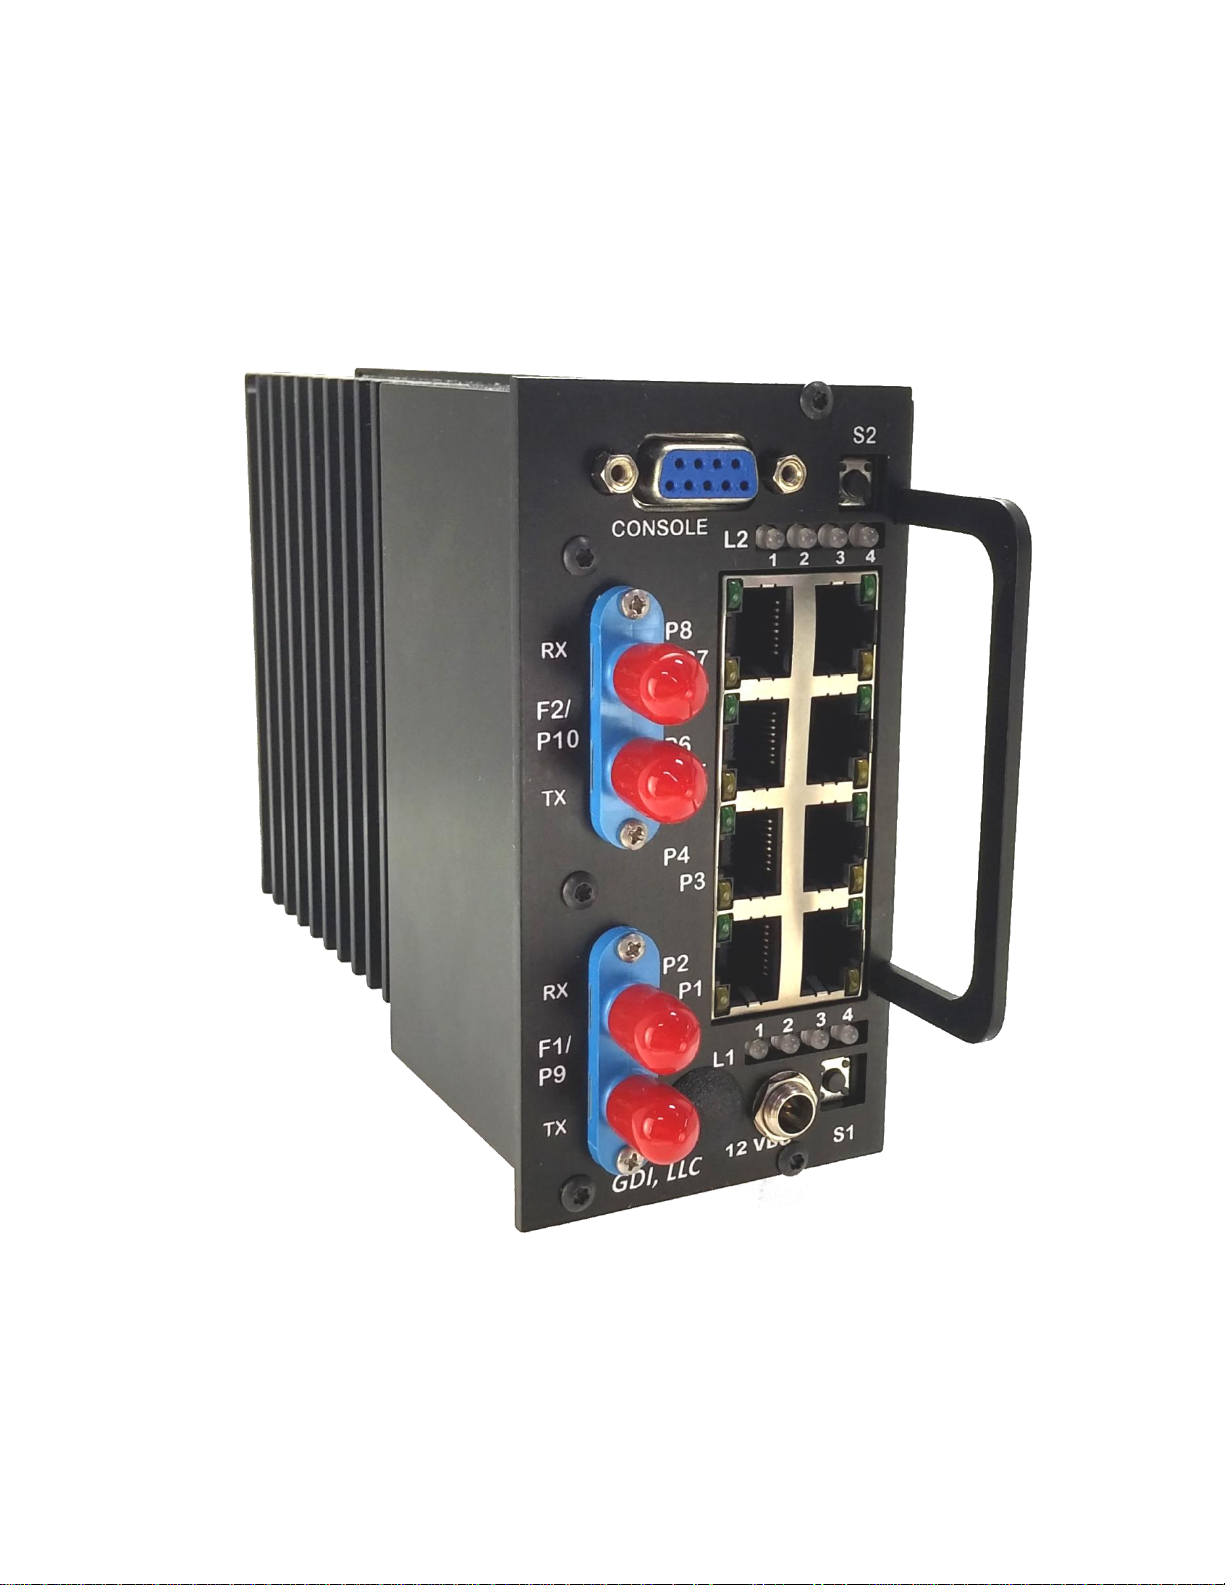
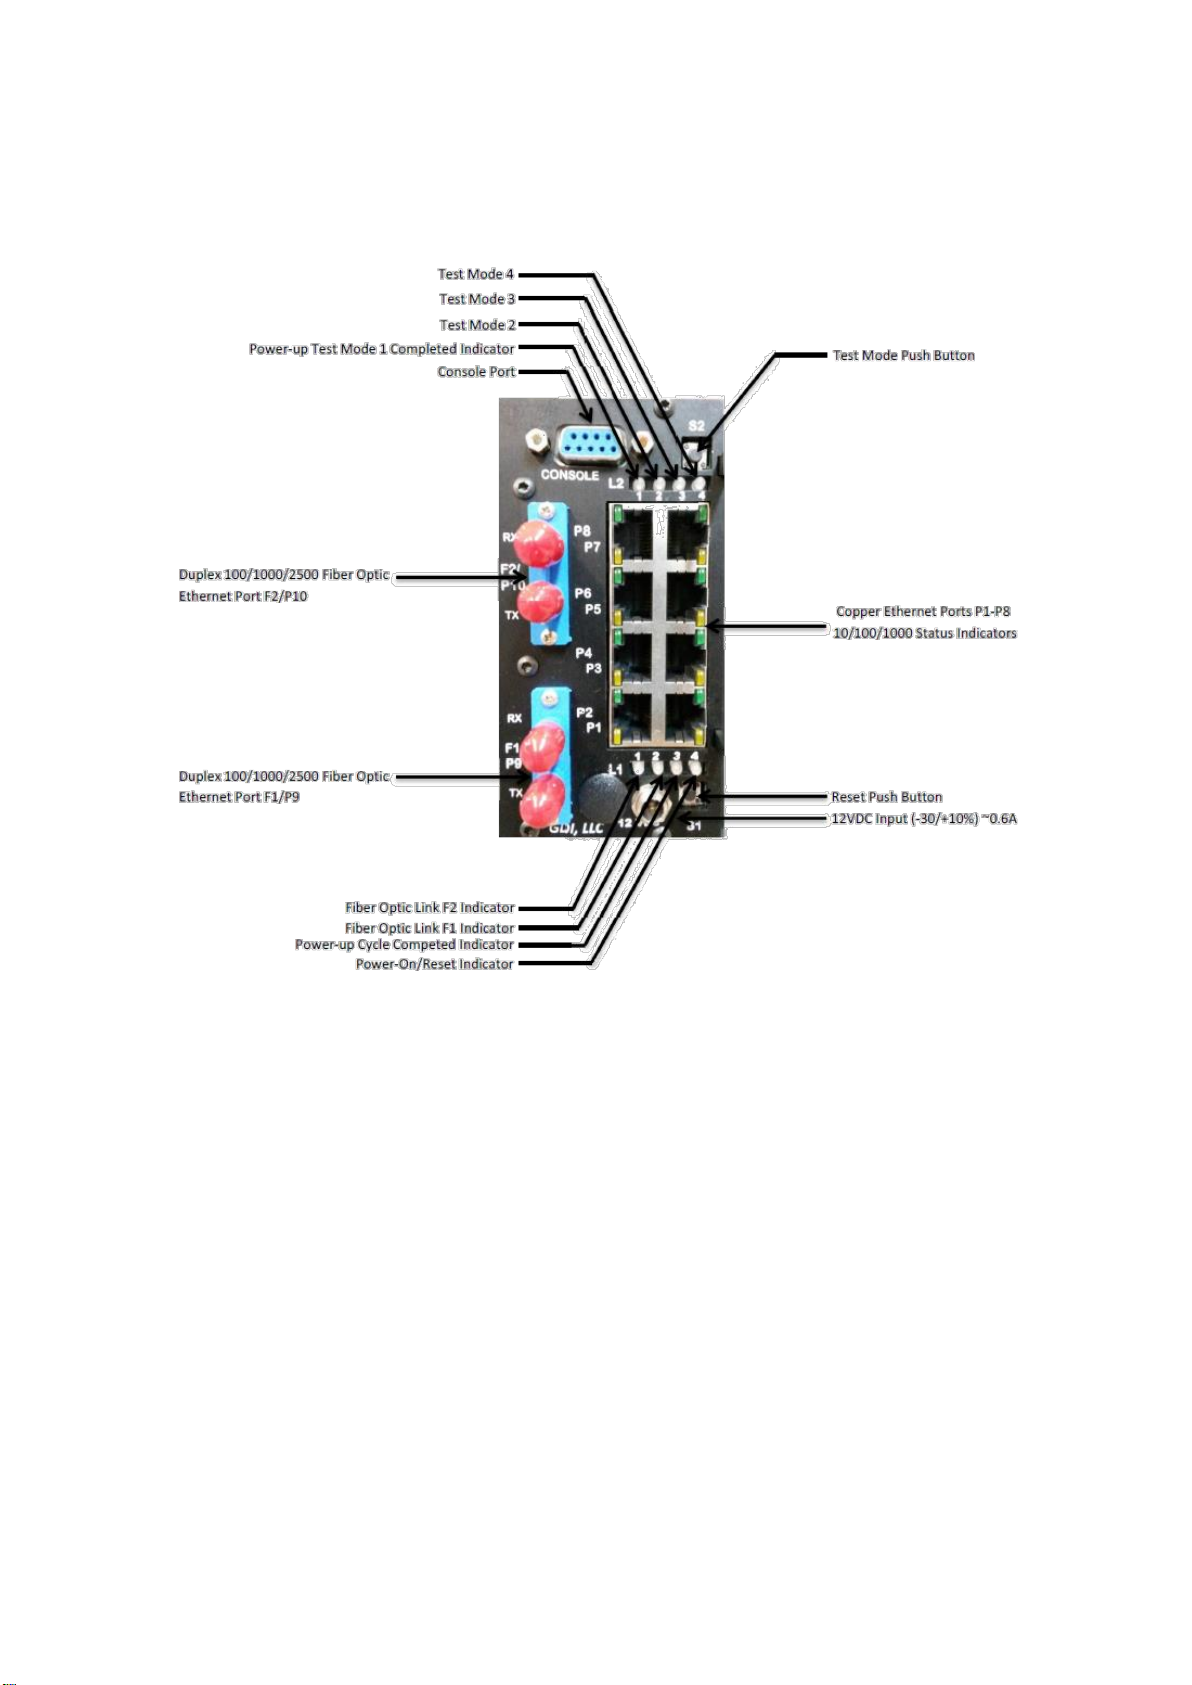
1. Introduction
1.1. Front Panel Connectors, Indicators, and switches:
1.1. Using this guide:
This User Guide describes basic usage and configuration of the Industrial Command Line
Interface (ICLI). The ICLI is a fully comprehensive, industrial class management interface on
the device, and the only management interface accessible on the serial console. That is to
say even if there is no network connectivity the device can still be managed using a serial
connection.
The style used within this document shows user input written in bold:
# show version
Terminal input/output is in the format shown below.
MEMORY : Total=86382 KBytes, Free=70497 KBytes, Max=70496 KBytes
FLASH : 0x40000000-0x40ffffff, 64 x 0x40000 blocks
MAC Address : 00-50-c2-0f-00-20
Previous Restart : Cold

Page 2 of 37 HES7000 ICLI User’s Guide A01583 Rev. A
2. Quick Start
This section will help the user perform the following:
Log in and reset configuration to factory defaults
Set device hostname and admin user password
Set VLAN 1 IP address
Verify connectivity using ‘ping’
Display the current configuration and save it to FLASH storage
The following assumes the device is powered on and its console port is connected to an
RS323 communications port on a computer.
The computer must be running a terminal emulator such as TeraTerm or PuTTY on
Windows, or Minicom on Linux set to the following configuration:
115200 baud, No parity, 8 data bits, 1 stop bit, no flow control
2.1. Log In and Reset Configuration to Factory Defaults
Press <Enter> one or more times until the Username: prompt appears. Type admin and
press <Enter>. At the “Password:” prompt, press <Enter> as there is no password required.
This completes the login sequence and displays the prompt, ‘#’.
Username: admin
Password:
#
At this point the admin user is operating at the highest privilege level, level 15. This implies
full control over the device and its configuration, and it is therefore possible to reset the
configuration to factory defaults.
Type reload defaults and then press <Enter>. When the prompt returns the system has
reverted to factory defaults as shown below.
# reload defaults
% Reloading defaults. Please stand by.
#
2.2. Set Device Hostname and admin User Password
The ICLI has several different modes. The current mode is called exec mode; it allows the
user to perform operations related to configuration files, reloading defaults, displaying system
information, etc., but it does not allow the user to change detailed configuration items. Such
operations are performed while in the configuration mode.
To set the hostname, first change the ICLI mode to configuration. Type configure terminal
then press <Enter>, then type hostname myDevice <Enter>, where myDevice is a suitable
name for the unit. Finally type exit <Enter>. The sequence should appear as shown here.
# configure terminal
(config)# hostname myDevice
myDevice(config)# exit
myDevice#
The commands are executed immediately, so ‘hostname’ changes the device hostname right
away. This is reflected in the prompt as well.

HES7000 ICLI User’s Guide A01583 Rev. A Page 3 of 37
To set the admin password perform the following:
myDevice# configure terminal
myDevice(config)# username admin privilege 15 password unencrypted very-secret
myDevice(config)# exit
myDevice#
The user, admin, now has the password “very-secret”. Other users can be added in similar
fashion.
2.3. Set VLAN 1 IP Address
The objective is to assign an IP address to the device on VLAN 1. This is often sufficient for
small local area networks that use Dynamic Host Configuration Protocol, DHCP, or static IP
address allocation.
A DHCP client function has been implemented in the device that, once enabled, will send out
requests for IP address configuration. Those requests are received by a DHCP server on
the network (if present and appropriately configured). The DHCP server will then search
through its pool of available IP addresses, allocate one and return it to the DHCP client. The
returned information includes IP address, netmask and default gateway, but may also
contain other information such as Domain Name Service server addresses.
The configuration proceeds in the same manner as setting the hostname: Enter configuration
mode, input and execute configuration commands, leave configuration mode. The following
commands instruct the device to use DHCP to obtain an IP address but if DHCP fails, use a
static “fallback” IP address. Inclusion of a fallback IP is optional and may be omitted.
myDevice# configure terminal
myDevice(config)# interface vlan 1
myDevice(config-if-vlan)# ip address dhcp fallback 172.16.1.2 255.255.0.0
myDevice(config-if-vlan)# exit
myDevice(config)#
Notice how the prompt changes; the interface vlan 1 command enters a configuration submode that allows, among other things, configuration of IP address.
NOTE that IP addresses can only be assigned to VLAN interfaces.
After configuration is complete the resulting IP address can be inspected. As seen below,
the DHCP negotiation succeeded and the device obtained an IP address:
myDevice# show ip interface brief
Vlan Address Method Status
---- -------------------- -------- ------
1 172.16.1.17/16 DHCP UP
myDevice#
show ip interface brief displays all configured and active IP interfaces. The status should
be UP. If it isn’t then the reason could be that there is no link on any port.
If DHCP negotiation had failed then the fallback IP of 172.16.1.2/255.255.0.0 would be
assigned.

Page 4 of 37 HES7000 ICLI User’s Guide A01583 Rev. A
The most basic system configuration is now complete. Connectivity
verified by issuing a ping command to a known IP address:
myDevice# ping ip 172.16.1.1
PING server 172.16.1.1, 56 bytes of data.
64 bytes from 172.16.1.1: icmp_seq=0, time=0ms
64 bytes from 172.16.1.1: icmp_seq=1, time=0ms
64 bytes from 172.16.1.1: icmp_seq=2, time=0ms
64 bytes from 172.16.1.1: icmp_seq=3, time=0ms
64 bytes from 172.16.1.1: icmp_seq=4, time=0ms Sent 5 packets, received 5 OK, 0 bad
myDevice#
If the ping is successful, network logins can now be performed via telnet or ssh to the
address on VLAN interface 1, 172.16.1.17 (or 172.16.1.2).
2.4. Display and Save Configuration to FLASH
The current configuration of the device can be displayed in the form of a virtual file containing
the full set of commands necessary to create an identical configuration. A few exceptions
exist since certain items are not displayed, such as private SSH keys.
This virtual file is called running-config and is volatile by nature; it does not survive across
reboots. It is therefore necessary to save the file to FLASH storage under the name startup-
config, as this file is read and executed upon every boot to restore the running configuration
of the system to the state it had when the saving took place.
The command show running-config will display the configuration settings as seen below.
For brevity some details were edited out. Note that the set of interfaces is dependent on
hardware capabilities.
myDevice# show running-config
Building configuration...
hostname myDevice
username admin privilege 15 password none
!
vlan 1
!
spanning-tree mst name 00-01-c1-00-8b-70 revision 0
snmp-server contact Extreme Copper Inc.
voice vlan oui 00-01-E3 description Siemens AG phones
network-clock wait-to-restore 5
!
…
interface GigabitEthernet 1/1
!
interface vlan 1
…
ip address dhcp
!
spanning-tree aggregation
spanning-tree link-type point-to-point
!
!
line console 0
!
line vty 0
!
end
myDevice#
Lines that begin with ‘!’ are comments. The file begins with the hostname command and the
password for the admin user, followed by VLANs 1 and 42 and other items, such as
Spanning Tree Protocol (STP). A list of all port interfaces on the device, ordered by switch
ID, type and port number comes next.
to the network
can be

HES7000 ICLI User’s Guide A01583 Rev. A Page 5 of 37
All interfaces except GigabitEthernet 1/1 are at default settings, so nothing is displayed for
them. As a general rule of thumb only non-default configuration is displayed, otherwise the
output would be huge and readability would suffer. There are a few exceptions which will be
discussed later.
Following the physical interfaces are VLAN interfaces, 1 and 42. Only the latter has an IP
address assigned. Finally the line section is shown. It specifies characteristics for the serial
console (line console 0) or network ICLI management connections (line vty x).
The configuration as displayed above is also what is saved to startup-config.
myDevice# copy running-config startup-config
Building configuration...
% Saving 1326 bytes to flash:startup-config
myDevice# dir
Directory of flash:
r- 1970-01-01 00:00:00 648 default-config
rw 1970-01-03 18:21:28 1326 startup-config
2 files, 1974 bytes total.
myDevice# more flash:startup-config
hostname myDevice
username admin privilege 15 password encrypted dmVyeS1zZWNyZXQ=
!
vlan 1
name default [...]
The command “dir” lists the files in the FLASH file system while the command “more”
outputs the contents of the designated file.

Page 6 of 37 HES7000 ICLI User’s Guide A01583 Rev. A
3. ICLI Basics
3.1. The ICLI has some key characteristics:
It is modal, (i.e., certain operations are possible or impossible in specific
It is line-based, (i.e., there are no screen editing features)
It executes commands instantly upon end-of-line
It is privilege-based, (i.e., certain operations require the user to have a certain
privilege level to succeed)
It implements industrial de-facto behavior for network equipment CLIs, (i.e., it
structurally and behaviorally resembles CLIs found on other equipment while still
possessing unique characteristics in some areas)
The ICLI can be accessed directly via the serial console, or over the network via telnet or
ssh. In each case the user has to login before ICLI commands can be executed. This begins
a session which lasts until logout.
Multiple sessions can co-exist at the same time, each providing separate environments:
Logged-in user ID, privilege level, command history, mode and session settings. It is
therefore perfectly possible for the same user to control several concurrent sessions, such as
one serial console session and one ssh session.
The user database is either local or provided by a RADIUS or TACACS+ server. In case of a
local user database, passwords and privilege levels are maintained on the device.
3.2. Command Structure and Syntax
A command is a single line of text consisting of keywords and parameters, for example:
myDevice# show vlan id 10
myDevice# show vlan id 20
The command is “show.” Argurments to that command are “vlan” and “id.” “10” and “20” are
parameters that could contain other values in another command invocation.
Commands are case-insensitive, thus show, SHOW and Show are identical. Conversely,
parameters may either be case-sensitive or case-insensitive depending on the command and
parameter in question.
Commands and certain parameters can be abbreviated as long as they are unambiguous.
For example, these commands are identical:
myDevice# show interface GigabitEthernet 1/5 capabilities
myDevice# sh in g 1/5 c
This works because:
1. There are many keywords that begin with ‘s’ but only one that begins with ‘sh’
2. There are several commands that begin with ‘show i’ but only one that begins with
‘show in’
3. The show interface command takes a port type as parameter. Depending on the
hardware capabilities, the options are: FastEthernet, GigabitEthernet and
2.5GigabitEthernet. Thus, ‘g’ is a unique abbreviation for GigabitEthernet
4. 1/5 identifies the interface as belonging to switch 1, port 5. This parameter cannot
be abbreviated and has to be written out in full
5. The show interface GigabitEthernet 1/5 command can output different kinds of
information: Capabilities, statistics, status, and several other. In this case ‘c’ is a
unique abbreviation for capabilities
With a bit of practice this allows for highly efficient keyboard entry, in particular when coupled
with the context-sensitive help features of the ICLI (see section 3.3.3)
modes)

HES7000 ICLI User’s Guide A01583 Rev. A Page 7 of 37
3.2.1. Syntax
A command is described by its syntax, for example:
and
Note Syntax is represented in a slightly different manner in this documentation as
compared to a ICLI session. In this document, variable parameters are written in italics,
whereas a ICLI session will display such items surrounded by ‘<’ and ‘>’.
The semantics are:
Thus, the first command syntax is simple: First show, then interface, then a list of
interfaces, then exactly one of ‘status’, ‘statistics’, ‘capabilities’, ‘switchport’ and ‘veriphy’.
The second command is a bit more complex: show and erps are mandatory, but then the
remaining parameters and keywords are optional: The user may enter group IDs; the user
may enter either ‘statistics’ or ‘detail’. For example:
! Show short-form ERPS (Ethernet Ring Protection Switching)
! information for all instances: myDevice# show erps
...
...
...
! But it is not allowed to show details and statistics at the same
! time:
^
% Invalid word detected at '^' marker.
...
show interface list { status | statistics | capabilities | switchport | veriphy }
show erps [ groups ] [ detail | statistics ]
keywords are written in bold
parameters are written in italics
[ ... ] indicates an optional construct: It may or may not be present
{ ... } indicates a grouping; the constructs within belong together
‘|’ indicates a choice between two or more alternatives, (e.g., a | b | c which
“a or b or c”).
! Show statistics for all instances:
myDevice# show erps statistics
! Show details for all instances:
myDevice# show erps detail
myDevice# show erps detail statistics
! Show details for specific set of instances:
myDevice# show erps 1-6 detail
reads as

Page 8 of 37 HES7000 ICLI User’s Guide A01583 Rev. A
There are some slightly more complex features of the syntax that center around sequences
of optional items such as [a] [b] [c].
Each of a, b, c may or may not be present, (e.g., “a c” is valid, as is no input)
Order is not important, (e.g., “a c” and “c a” are equivalent)
Each optional item can be present exactly zero or one time, (i.e., not repeated) There
are variations:
Group of options, of which at least one must be present: { [a] [b] [c] }*1
Group of options, where one or more has fixed position: [a] {[b]} [c]
o This says that ‘b’ is optional, but if it is present then it must follow after ‘a’ (if ‘a’ is
present) and it must come before ‘c’ (if ‘c’ is present)
For example, assume a command with this syntax:
a [b] [c] { d | e } {[f] [g]}*1
then valid input examples are:
‘a d f’, because ‘b’ and ‘c’ are optional, ‘d’ is picked instead of ‘e’, and ‘f’ is chosen
as the mandatory optional
‘a d f g’, because ‘b’ and ‘c’ are optional, ‘d’ is picked instead of ‘e’, and both ‘f’ and ‘g’
are chosen in the final group of optional
‘a c b e g’, because the ‘b’ optional is omitted, ‘e’ is picked instead of ‘d’, and ‘g’ is
chosen for the mandatory optional
 Loading...