

Page 1

USER MANUAL FOR
SR-1000 STANDALONE INTEGRATED MEDIA BLOCK™
Version 17.0
March 23, 2018
Page 2

- 1 -
March 23, 2018
User Manual for SR-1000 Standalone Integrated Media Block™
TABLE OF CONTENTS
Table of Contents
1! INTRODUCTION ............................................................................................ 6!
1.1! About This Manual ................................................................................. 6!
1.2! Safety Instructions ................................................................................. 7!
1.2.1! General Safety Instructions ..................................................................................... 7!
1.2.2! Electrical Safety ....................................................................................................... 7!
1.2.3! Testing & Certification .............................................................................................. 7!
2! The SR-1000 Web User Interface (WebUI) .................................................. 8!
2.1! Access Levels ........................................................................................ 9!
2.2! General Notes on the SR-1000 WebUI ................................................ 10!
2.2.1! Recommended web browsers ............................................................................... 10!
2.2.2! Single User Access ................................................................................................ 10!
2.2.3! Session Expiry ....................................................................................................... 11!
3! DASHBOARD ............................................................................................... 12!
4! PLAYBACK .................................................................................................. 14!
4.1! Playback ................................................................................................ 14!
4.2! Edit ......................................................................................................... 16!
4.2.1! Edit CPL Properties ............................................................................................... 18!
4.3! Schedule ............................................................................................... 19!
5! AUTOMATION .............................................................................................. 21!
5.1! Trigger ................................................................................................... 21!
5.2! Schedule ............................................................................................... 22!
5.3! Cue ......................................................................................................... 23!
5.4! Input ....................................................................................................... 25!
5.5! Device .................................................................................................... 26!
5.6! Option .................................................................................................... 27!
5.7! Import/ Export ....................................................................................... 28!
6! CONTENT ..................................................................................................... 29!
6.1! Summary ............................................................................................... 29!
6.2! Package ................................................................................................. 30!
Page 3

- 2 -
March 23, 2018
User Manual for SR-1000 Standalone Integrated Media Block™
TABLE OF CONTENTS
6.3! KDM ....................................................................................................... 32!
6.4! LDM ........................................................................................................ 33!
6.5! Source ................................................................................................... 34!
6.5.1! Live Source ............................................................................................................ 35!
6.6! Schedule ............................................................................................... 36!
6.7! Status .................................................................................................... 37!
7! CONFIGURATION ........................................................................................ 38!
7.1! General .................................................................................................. 38!
7.1.1! SNMP Configuration .............................................................................................. 39!
7.1.1.1! General ............................................................................................................ 40!
7.1.1.2! System Information ............................................................................................ 41!
7.1.1.3! System Setting ................................................................................................... 42!
7.1.1.4! Encrypt ............................................................................................................... 43!
7.1.1.5! Storage .............................................................................................................. 44!
7.1.1.6! Sensor ............................................................................................................... 45!
7.1.1.7! Ethernet ............................................................................................................. 46!
7.2! Playback ................................................................................................ 47!
7.2.1! Audio Channel Mapping ........................................................................................ 52!
7.2.1.1! Preset ................................................................................................................ 54!
7.3! Storage .................................................................................................. 55!
7.3.1! Actions of Portable/Enterprise Storage .................................................................. 57!
7.3.1.1! Create new RAID array ...................................................................................... 57!
7.3.1.2! Hard disk information ......................................................................................... 58!
7.3.1.3! RAID filesystem check ....................................................................................... 59!
7.3.1.4! Storage Performance ......................................................................................... 60!
7.3.1.5
! Increase Rebuild Speed .................................................................................... 61!
7.3.1.6! High bitrate playback test .................................................................................. 62!
7.4! System .................................................................................................. 63!
7.5! Maintenance .......................................................................................... 68!
8! APPENDIX Ⅰ ............................................................................................... 70!
8.1! IMB Sync ............................................................................................... 70!
8.1.1! IMB Synchronized Playback Operation ................................................................. 72!
9! APPENDIX Ⅱ ............................................................................................... 74!
!
Page 4

- 3 -
March 23, 2018
User Manual for SR-1000 Standalone Integrated Media Block™
Thank you for purchasing a GDC SR-1000 Standalone Integrated Media Block™ from
GDC Technology Limited.
To ensure proper operation and to maximize value of the SR-1000, please review this User Manual. It will guide you
through all the features and benefits of the new SR-1000 Standalone Integrated Media Block™.
COPYRIGHT NOTICE
Copyright © 2018 by GDC Technology Limited
All rights reserved. No part of this manual may be copied or distributed, transmitted, transcribed, stored in a retrieval system, or
translated into any human or computer language, in a form or by any means, electronic, mechanical, photocopying, recording,
magnetic, optical, manual or otherwise, or disclosed to third parties without prior written permission of
GDC Technology Limited.
MANUAL DISCLAIMER
This manual is made with version 17.0 and there might be slight differences depending on the software version the IMB is running.
The contents, features and specifications stated in this manual are subject to change without notice due to continuous product
development and improvements. In no other event shall GDC Technology Limited be liable for any loss of profit or any other
commercial damages, including but not limited to special, consequential, or other damages.
FCC COMPLIANCE STATEMENT
This device complies with Part 15 of the FCC Rules. Operation is subject to the following two conditions: (1) this device may not
cause harmful interference, and (2) this device must accept any interference received, including interference that may cause
undesired operation.
NOTE: This equipment has been tested and found to comply with the limits for a Class A digital device, pursuant to Part 15 of
the FCC Rules. These limits are designed to provide reasonable protection against harmful interference when the equipment is
operated in a commercial environment. This equipment generates, uses, and can radiate radio frequency energy and, if not
installed and used in accordance with the instruction manual, may cause harmful interference to radio communications.
Operation of this equipment in a residential area is likely to cause harmful interference in which case the user will be required to
correct the interference at his own expense.
Page 5
- 4 -
March 23, 2018
User Manual for SR-1000 Standalone Integrated Media Block™
CONTACTS AND OFFICES
CONTACTS AND OFFICES
Website: www.gdc-tech.com Email: [email protected]
24/7 Engineering Support Hotline:
Hong Kong
(Headquarters)
China (Beijing)
China (Shenzhen)
Spain(Barcelona)
Unit 1-7, 20th Floor,
Kodak House II,
39 Healthy Street East,
North Point, Hong Kong
Tel: +852 2507 9555
Rm. 609-618, Office
Building,20# Xinde Street,
Xicheng District, Beijing,
P.R. China 100088
Tel: +86 10 6205 7040
Room A701, 7/F,
Languang Technology Building,
No.7 Xinxi Road, North Zone,
HighTech Park, Nanshan District,
Shenzhen, China
Tel: +86 755 8608 6000
C/ Esteve Terradas, nº
27, esc. D, Despacho 1
08023 Barcelona, Spain
Tel: +34 93 159 51 75
Peru (Lima)
USA (Los Angeles)
Brazil (São Paulo)
Singapore
Calle Manuel Miota 170,
Miraflores Lima 18, Peru
Tel: +51 1 340 5146
1016 West Magnolia
Boulevard Burbank,
CA 91506, USA
Tel: +1 818 972 4370 /
+1 877 743 2872
(Toll Free)
Av. Antônio Carlos
Comitre, 540, 3º andar,
Conjunto 31, Campolim,
Sorocaba / São Paulo,
CEP 18047-620, Brasil
Tel: +55 15 33269301
10 Ubi Crescent,
Ubi Tech Park,
Lobby B, #06-25
Singapore 408564
Tel: +65 6222 1082
North America
+1 877 743 2872 (Toll Free)
Latin America
+52 55 8851 1198
Europe
+34 928 912 295
China
+86 400 886 0966 (Toll Free)
North Asia
+852 3520 0920
India
+91 022 4044 0500
South East Asia
+65 6100 4328
Australia/
New Zealand
+61 407 040 744
Page 6
- 5 -
March 23, 2018
User Manual for SR-1000 Standalone Integrated Media Block™
CONTACTS AND OFFICES
Indonesia (Jakarta)
Japan (Tokyo)
India (Mumbai)
Mexico
(Mexico City)
Total Building Lantai 4 Suite 0401,
Jl. Letjen S. Parman Kav. 106A,
Kel Tomang, Kec. Grogol
Petamburan,
Jakarta Barat 11440, Indonesia
Tel: +62 21 2920 4691
3F, Kyobashi-Chuo Bldg,
1-14-7 Kyobashi Chuo-ku
Tokyo 104-0031, Japan
Tel: +81 3 5524 2607
Office No. B-207/208,
Everest Chamber,
Andheri Kurla Road,
Marol, Andheri (East),
Mumbai-400 059, India
Tel: +91 22 4044 0500
Ave. Santa Fe 94,
Torre A Piso 8,
Col. Zedec Santa Fe,
Alvaro Obregon,
Mexico, D.F.,
C.P. 01210 Mexico
Tel: +52 55 8851 1198/
___+52 55 8851 1165
United Arab Emirates (Dubai)
Business Centre,
Dubai World Central,
PO Box 390667,
Dubai UAE
Page 7
- 6 -
March 23, 2018
User Manual for SR-1000 Standalone Integrated Media Block™
1. INTRODUCTION
1 INTRODUCTION
1.1 About This Manual
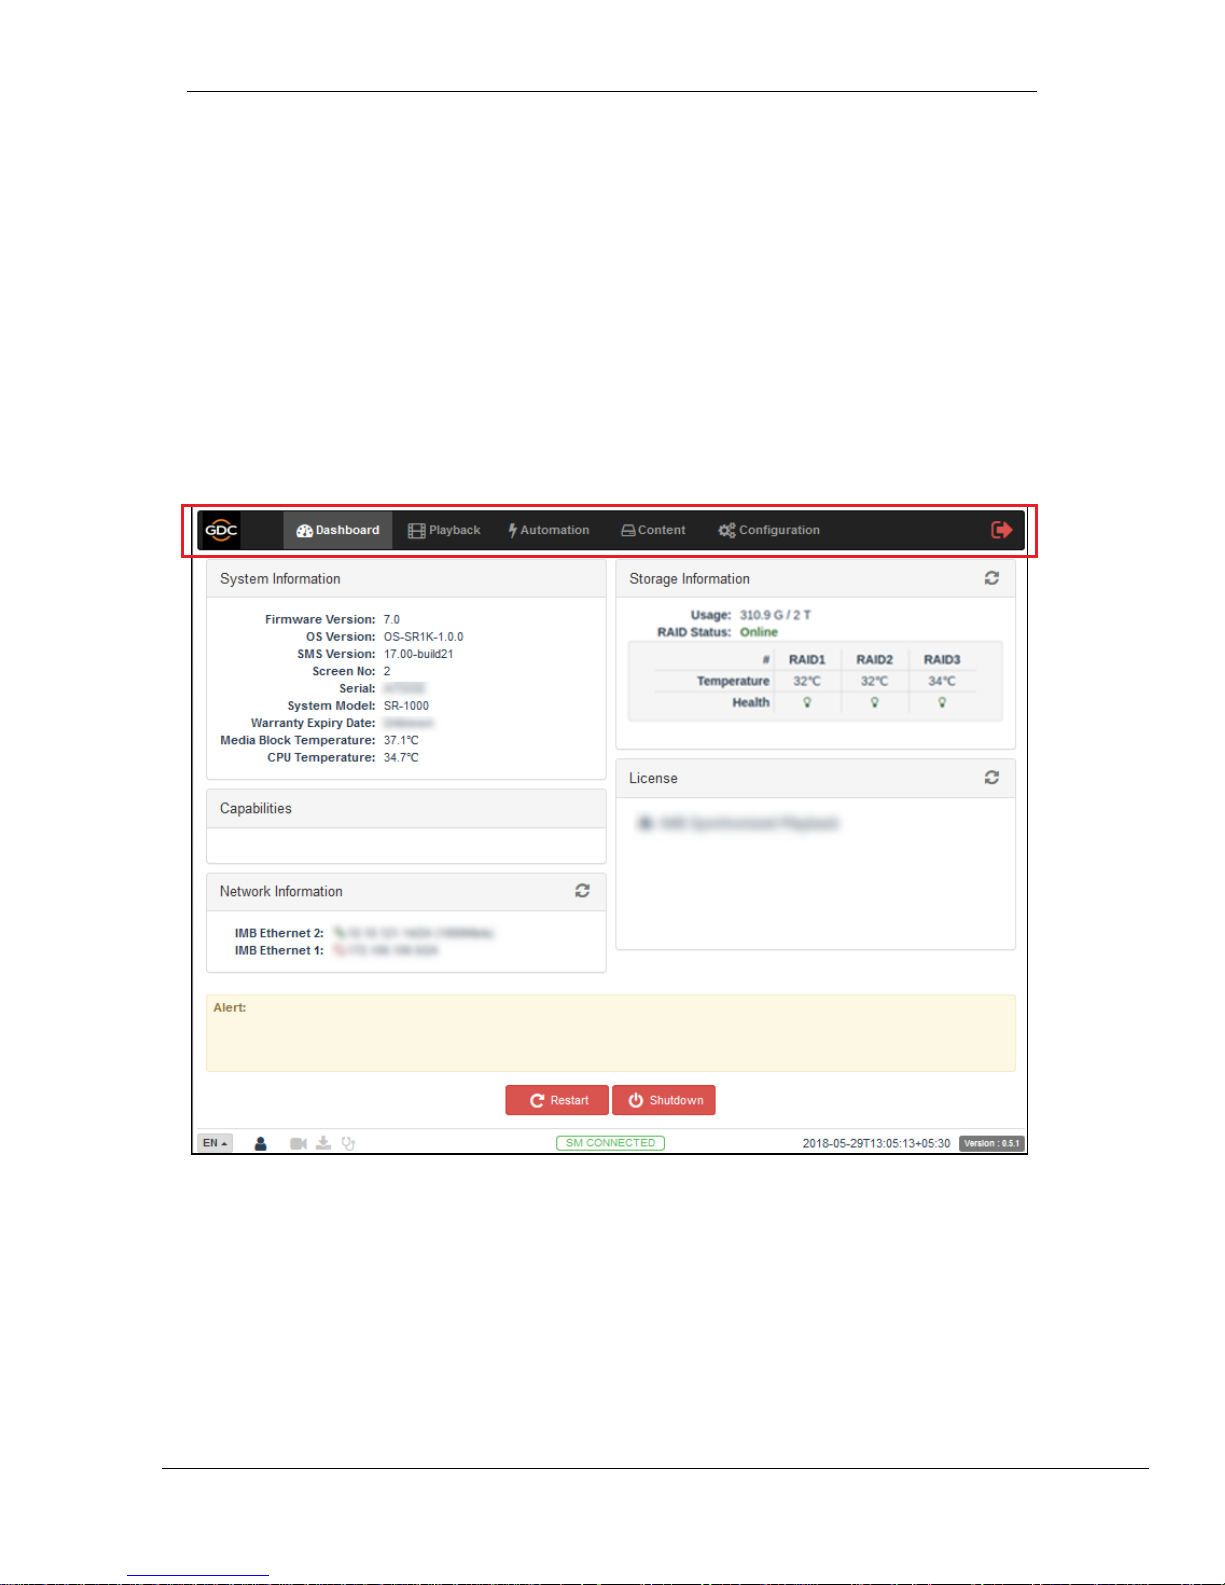
This manual provides instructions on how to use and manage the GDC SR-1000 Standalone
Integrated Media BlockTM. The SR-1000 has a web-based user interface (WebUI). The WebUI
functionality can be broken down into five main sections: Dashboard, Playback, Automation,
Content and Configuration. This manual will describe each of these in different sections.
Figure 1: Introduction to WebUI
Page 8

- 7 -
March 23, 2018
User Manual for SR-1000 Standalone Integrated Media Block™
1. INTRODUCTION
1.2 Safety Instructions
1.2.1 General Safety Instructions
•
The SR-1000 is intended for installation a DCI-compliant Digital Cinema Projector.
•
The operational temperature required should be within 0ºC - 40ºC (32ºF - 104ºF). 250 LFM
airflow must always be present over the IMB from right to left (looking from the front of the IMB)
when powered on.
•
The operating humidity should be within 20% to 90%, non-condensing.
•
Before operating the SR-1000, please read this manual thoroughly, and retain it for future
reference.
•
Installation and preliminary adjustments should be performed by qualified GDC Technology
personnel.
•
All warnings on the SR-1000 mentioned in this documentation manual should be adhered to.
•
All instructions for operating and maintaining the
SR-1000
must be followed closely.
1.2.2 Electrical Safety
Safety Warning
•
Do not expose the SR-1000 to rain or moisture, to prevent fire or electrical shock hazard.
•
Consult GDC Technical Support for servicing or maintaining the SR-1000.
•
You are cautioned that any change or modification not expressly approved in this manual or
approved in writing by an authorized representative of GDC Technology could void your
warranty and/or authority to operate the SR-1000.
1.2.3 Testing & Certification
•
The SR-1000 has passed multiple Quality Assurance & Quality Control certifications, issued
by SGS Labs - the world’s leading inspection, verification, testing and certification company.
•
Refer to Section 9 for detailed test reports
Page 9
- 8 -
March 23, 2018
User Manual for SR-1000 Standalone Integrated Media Block™
2. LOGIN
2 The SR-1000 Web User Interface (WebUI)
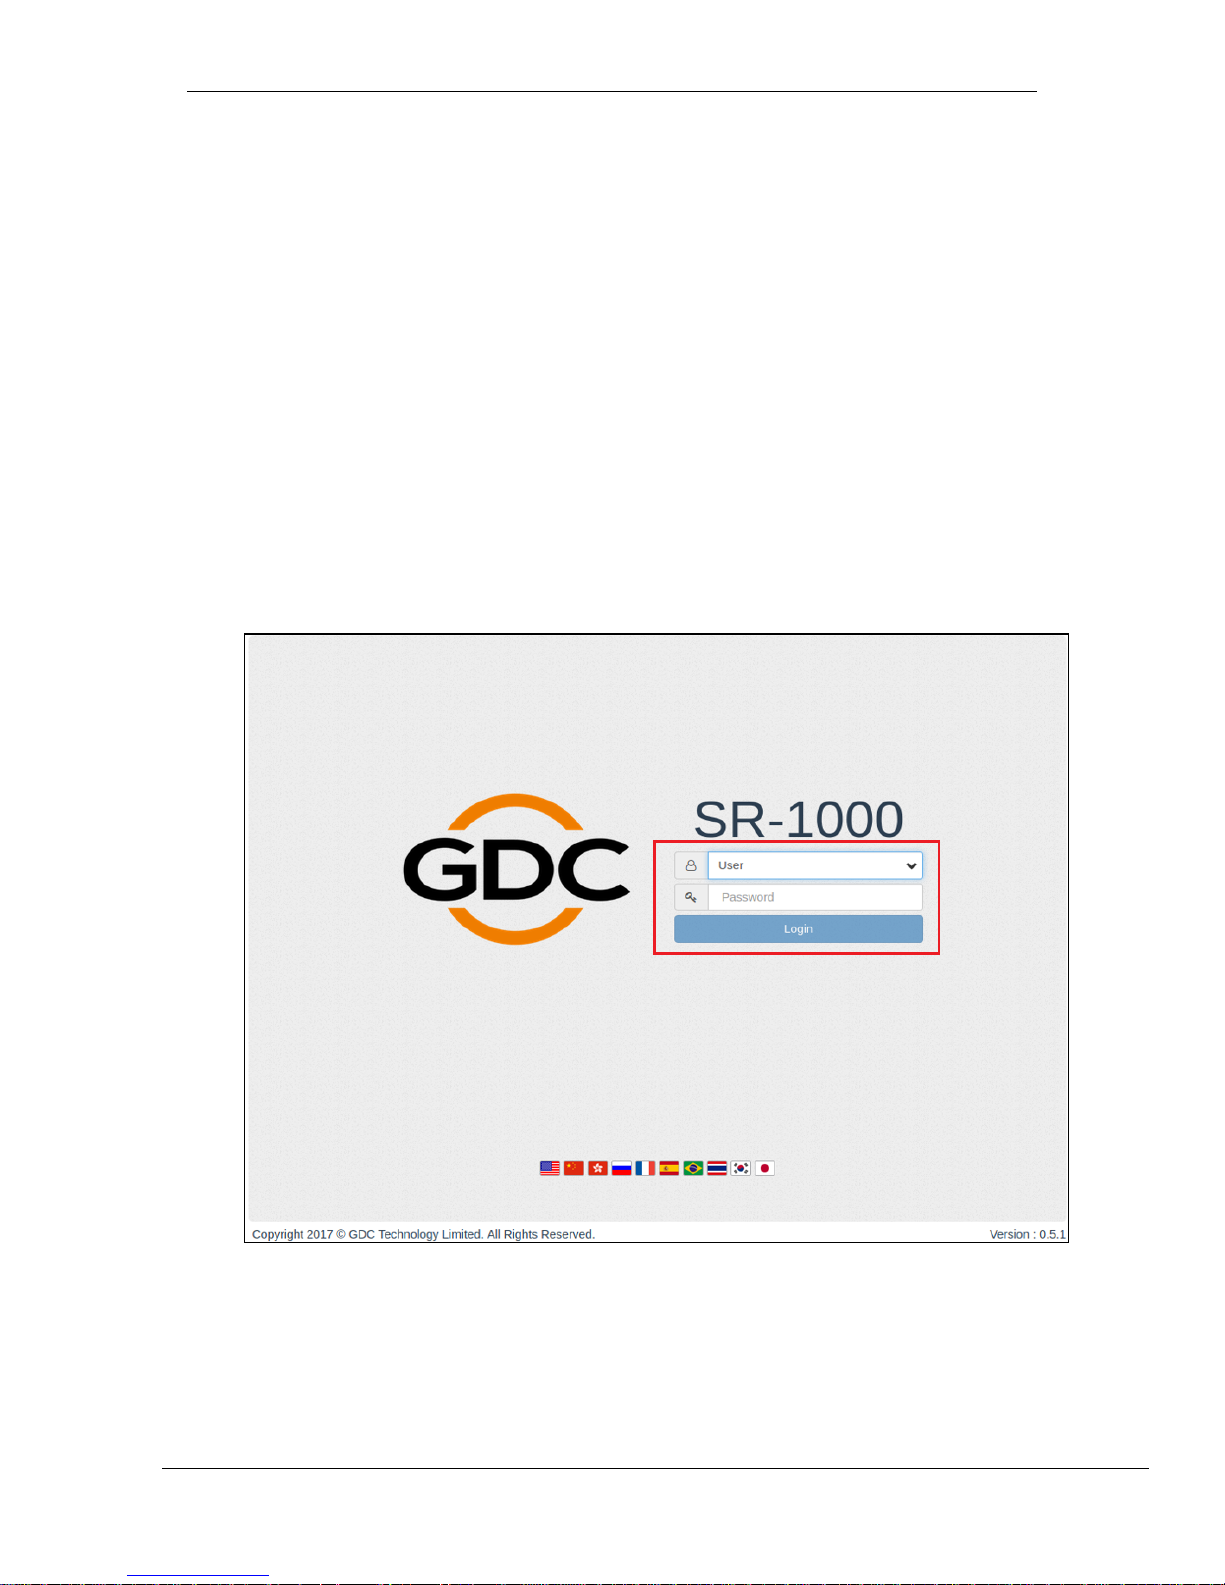
The SR-1000 has a web-based user interface (WebUI). The following steps show how to access
the SR-1000:
1. Connect a laptop or PC to the same network as the SR-1000.
2. The SR-1000 WebUI can be accessed by a web browser (Google Chrome or Mozilla
Firefox are recommended).
3. Enter the IP address of the SR-1000 on the web browser to access the login page on
the WebUI.
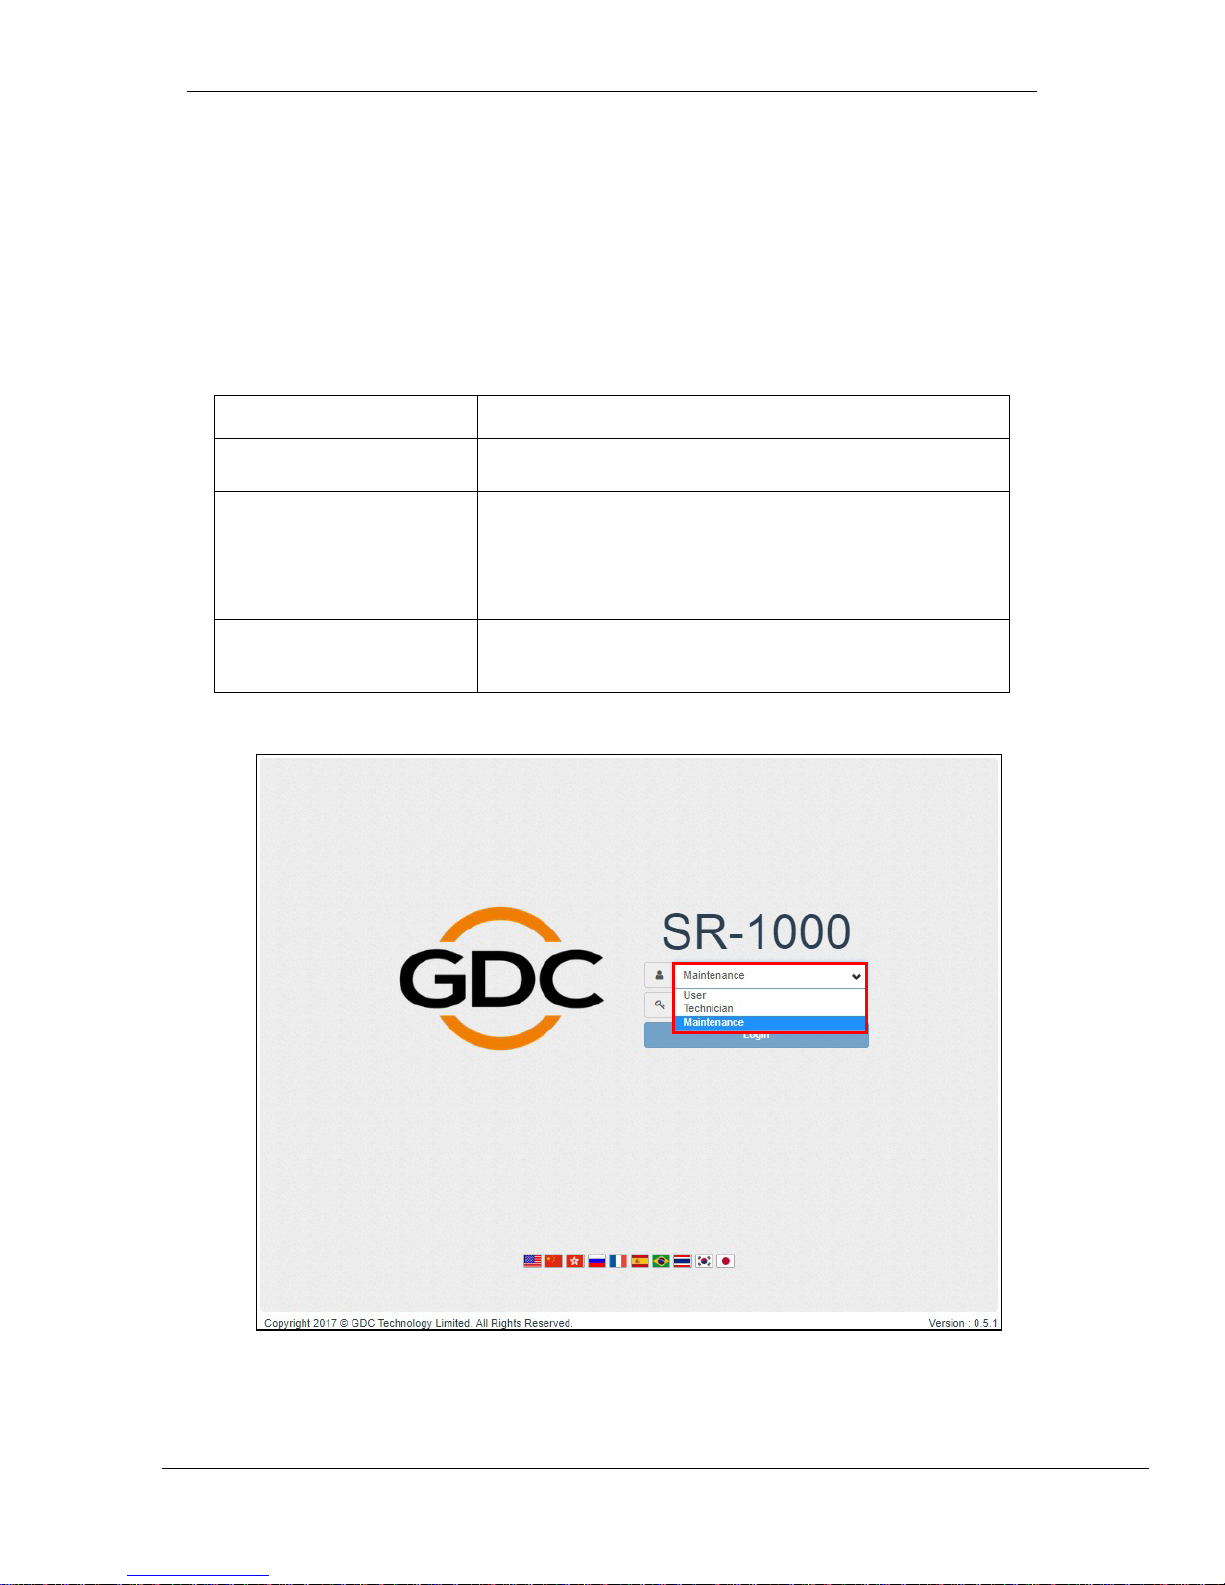
4. There are 3 levels of users available (User/Technician/Maintenance). Select the
required access level (see section 2.1 for more details) and enter the corresponding
password to login to the WebUI.
Figure 2: WebUI Login screen
Page 10
- 9 -
March 23, 2018
User Manual for SR-1000 Standalone Integrated Media Block™
3. DASHBOARD
2.1 Access Levels
On the login interface, select the user level and enter the corresponding correct Password to
access the SR-1000).
Different users will have different access levels on the WebUI Configuration tab.
Access Level
Available access:
User
Dashboard, Playback, Automation and Content tabs.
Technician
Dashboard, Playback, Automation, Content and
Configuration* tabs.
(*Only maintenance tab under Configuration is accessible.)
Maintenance
Dashboard, Playback, Automation, Content and
Configuration tabs.
Figure 3: User Accounts
Page 11
- 10 -
March 23, 2018
User Manual for SR-1000 Standalone Integrated Media Block™
3. DASHBOARD
2.2 General Notes on the SR-1000 WebUI
2.2.1 Recommended web browsers
!
The SR-1000 WebUI has been tested with Google Chrome and Mozilla Firefox web browsers.
These web browsers are recommended for use with the SR-1000 WebUI.
!
2.2.2 Single User Access
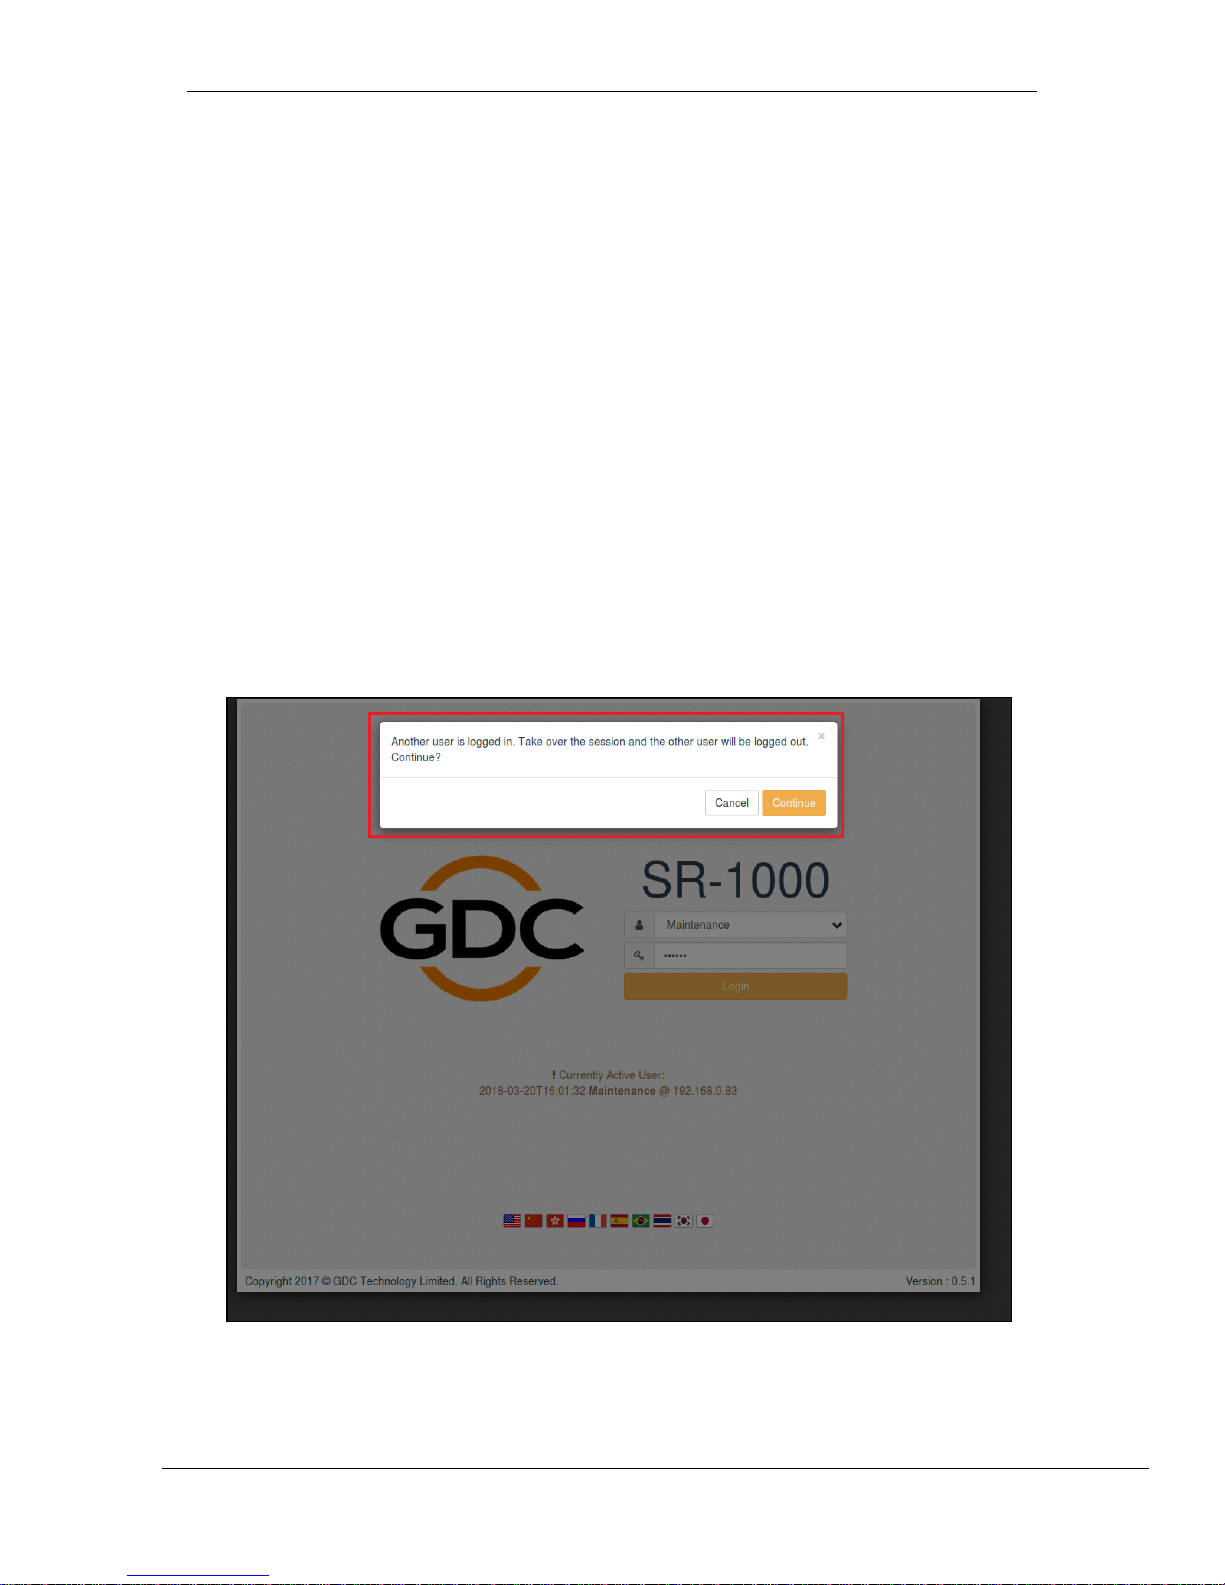
The SR-1000 WebUI allows single user access only. When a second user logs in using the same
or a higher access level, the second user is allowed to choose whether to take over the first
user’s session. Clicking on Continue will terminate the first user’s session and allow the second
user to log in.!
Figure 4: Single User Access
!
Page 12
- 11 -
March 23, 2018
User Manual for SR-1000 Standalone Integrated Media Block™
3. DASHBOARD
2.2.3 Session Expiry
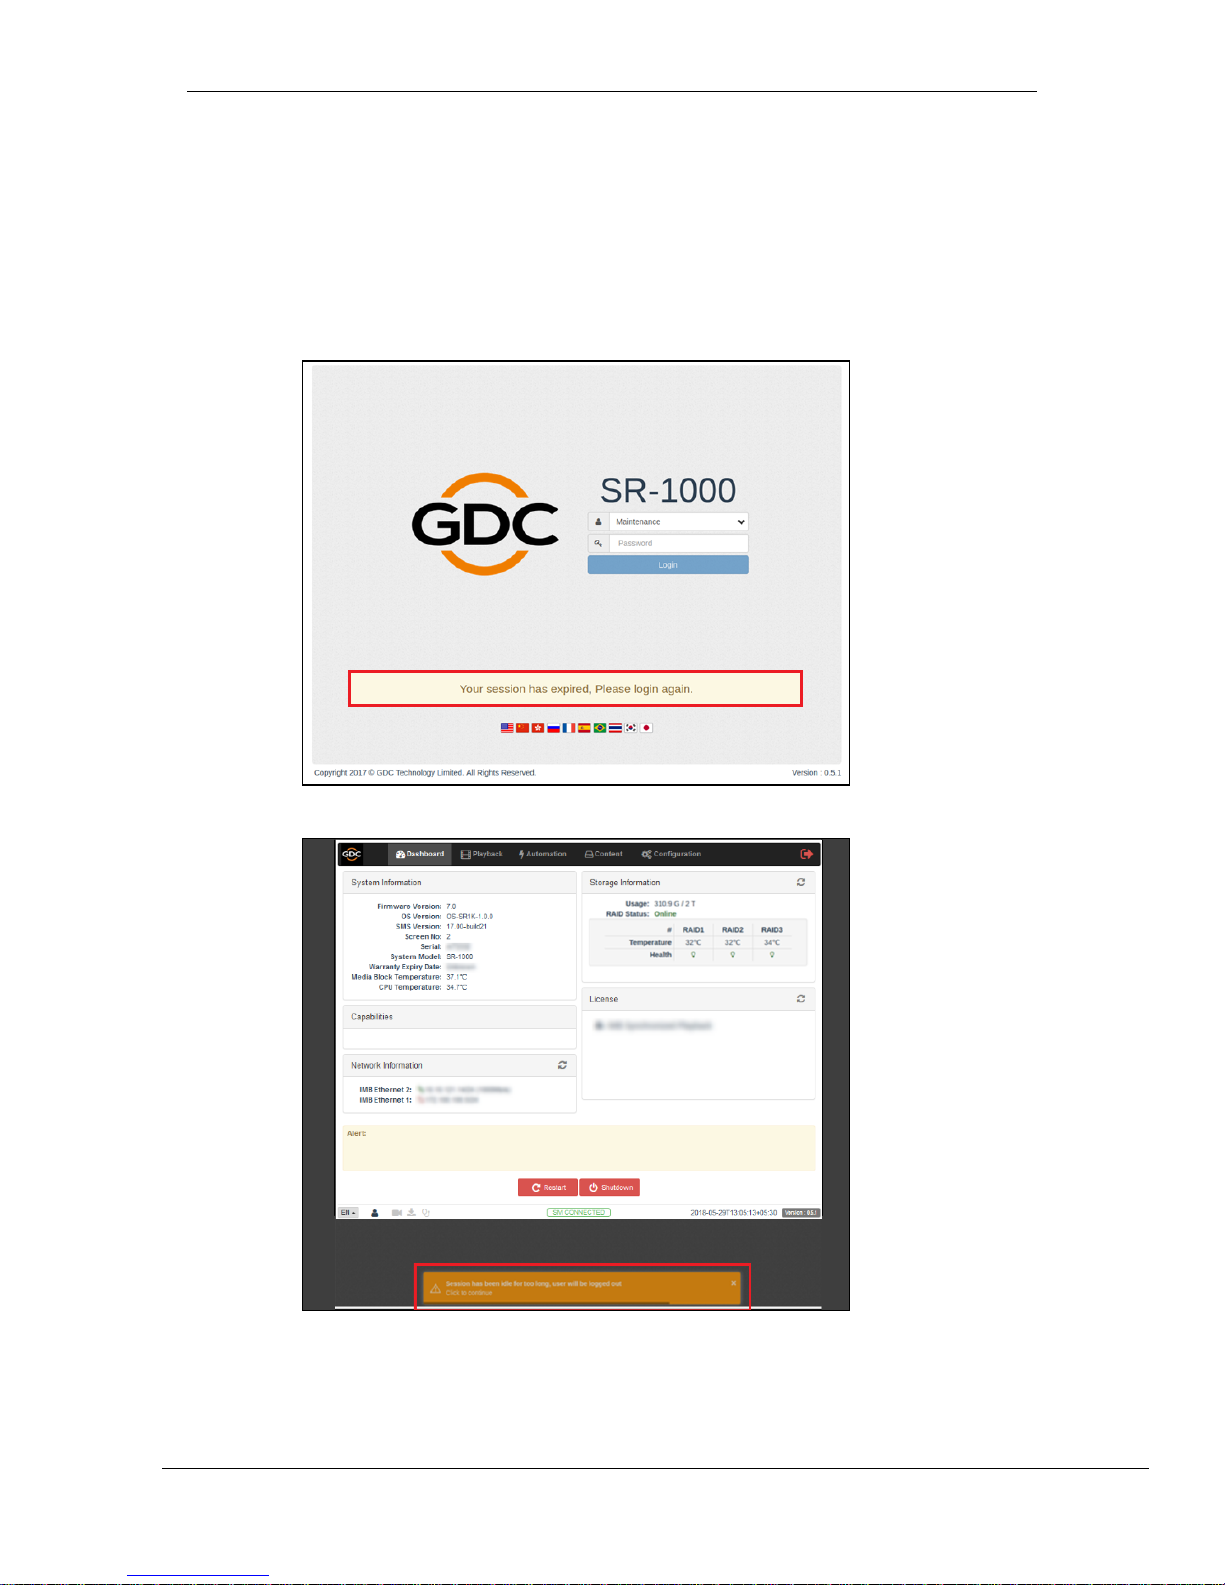
The SR-1000 WebUI session will expire if there is no activity from the user for 5 minutes.
A warning message will be displayed and the user will be logged out. Click on this warning message
to prevent automatic logout.
!
!
Figure 5: Logout upon Session Expiry
Figure 6: Session expiry warning
Page 13
- 12 -
March 23, 2018
User Manual for SR-1000 Standalone Integrated Media Block™
3. DASHBOARD
3 DASHBOARD
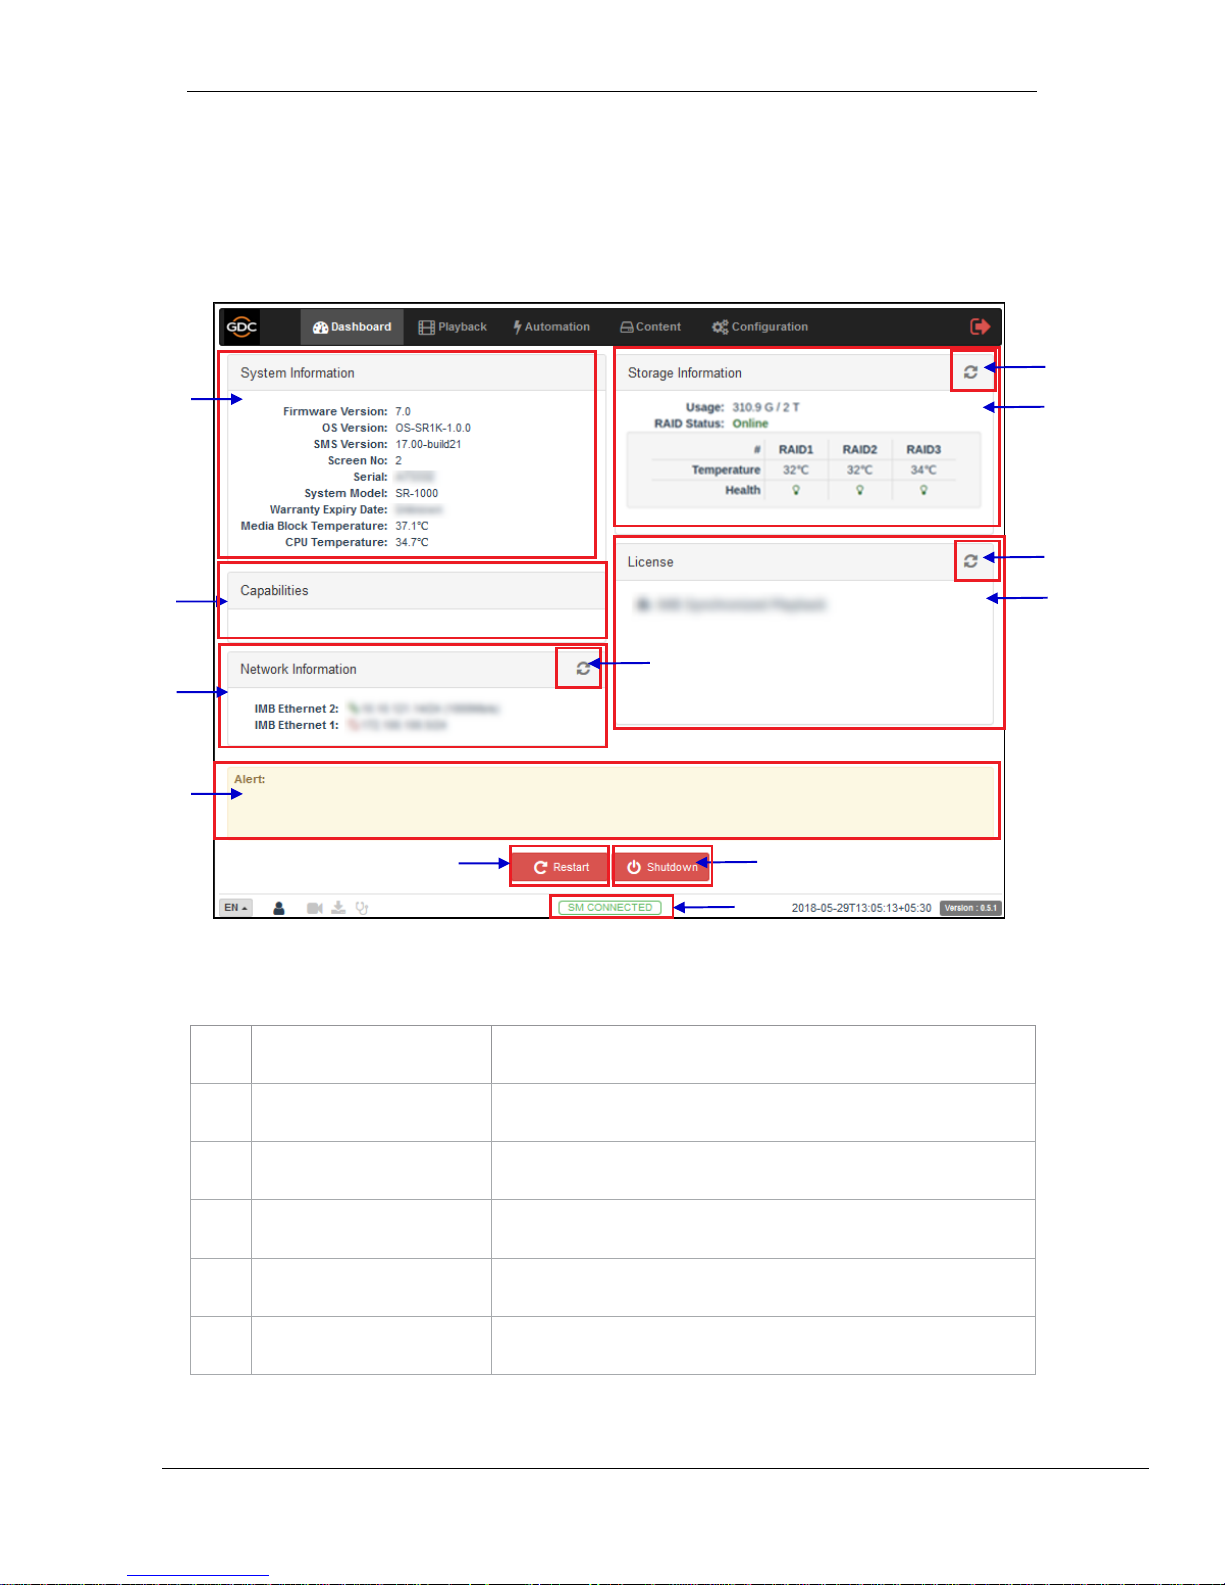
In the SR-1000 WebUI, the dashboard menu displays basic information related to the SR-1000,
such as System Information, Network Information, Storage Information, Licenses installed,
Capabilities and System alerts.
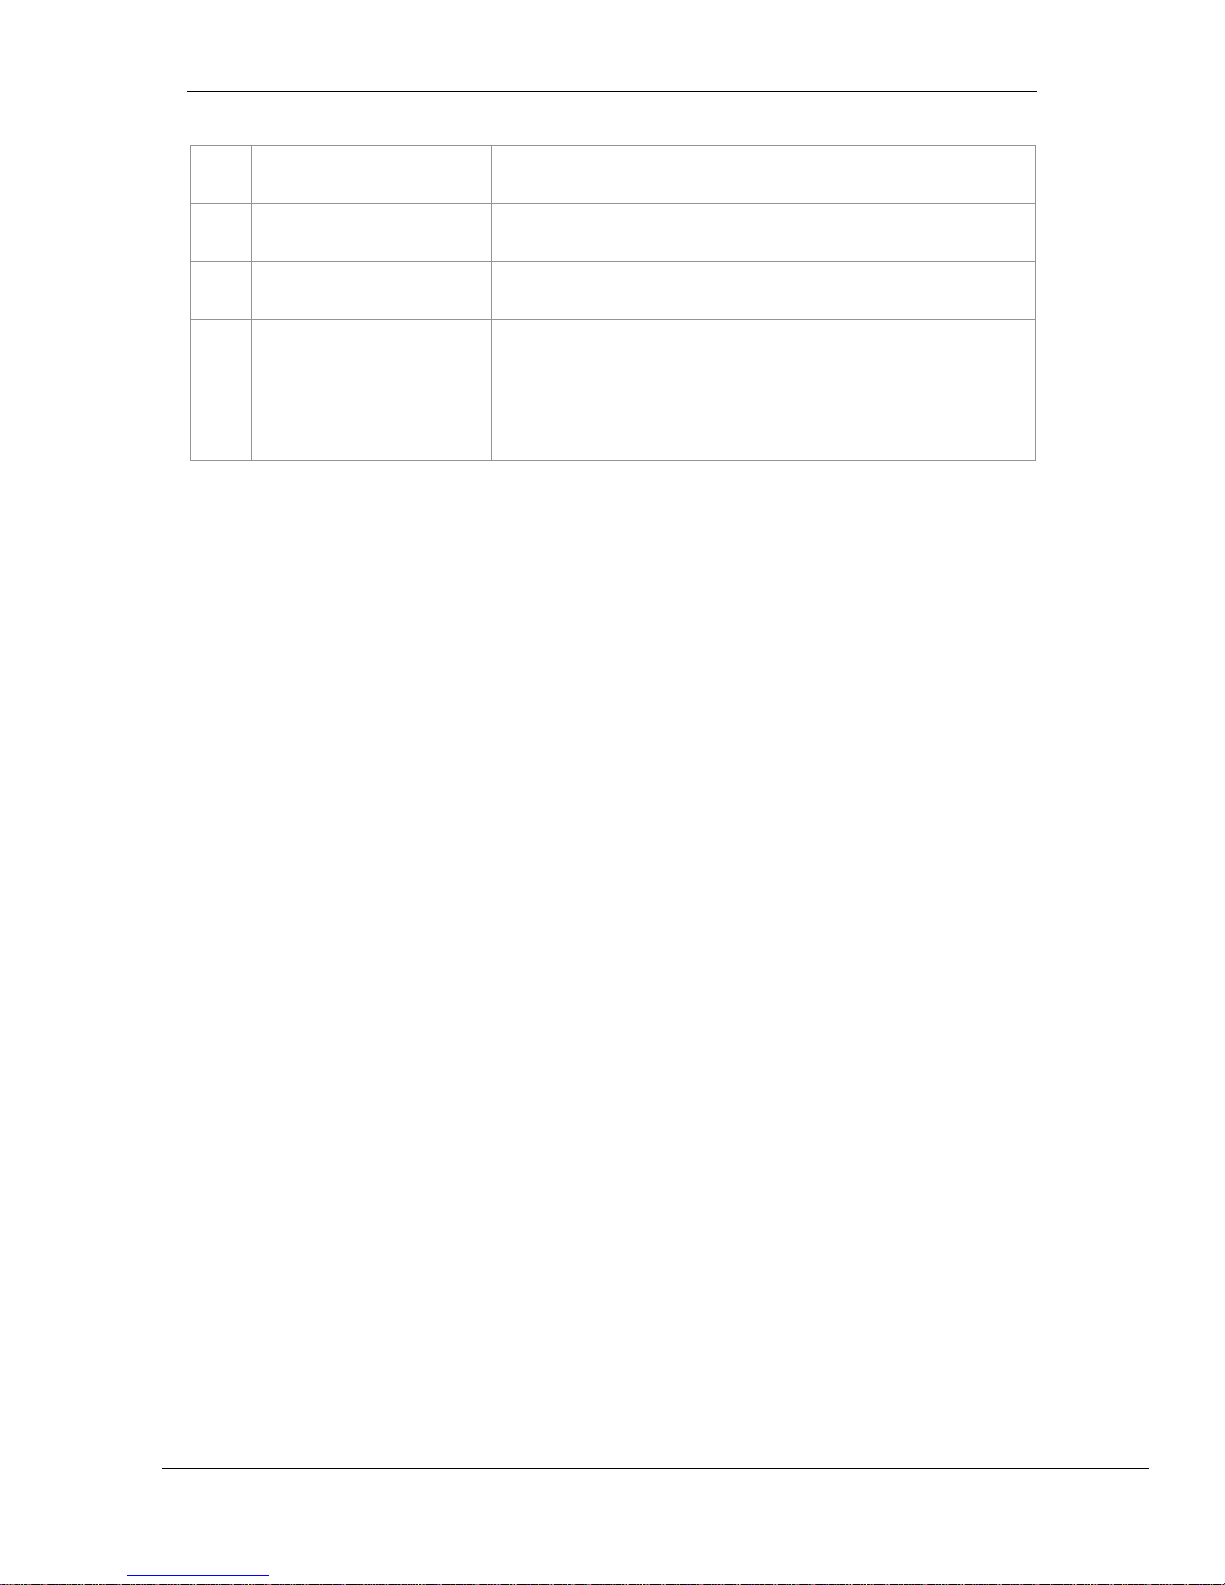
1
[System Information]
Displays SR-1000 system information.
2
[Storage Information]
Displays storage status on the SR-1000.
3
[Network Information]
Displays current network settings and network status.
4
[License]
Displays the licenses installed on the SR-1000.
5
[Refresh]
Refreshes the information on the respective sections.
6
[Alert]
System alerts are displayed here.
3
5 5 6 7 8
4
1
2 5 9
Figure 5: Dashboard layout
10
Page 14
- 13 -
March 23, 2018
User Manual for SR-1000 Standalone Integrated Media Block™
3. DASHBOARD
!
7
[Restart]
To restart the server, press Restart. A pop-up window will be displayed.
Click OK to confirm restart.
8
[Shutdown]
To shutdown the server, press Shutdown. A pop-up window will be
displayed. Click OK to confirm shutdown.
9
[Capabilities]
Displays the supported features or capabilities of the SR-1000.
10
[SM Connection Status]
Displays the connection status of the SM or Security Manager.
The SM should always be connected & the ‘SM CONNECTED’ status
should be highlighted in green color.
In case the SM is disconnected or the status appears in red color, please
contact GDC Technical Support
Page 15
- 14 -
March 23, 2018
User Manual for SR-1000 Standalone Integrated Media Block™
5. AUTOMATION
4 PLAYBACK
4.1 Playback
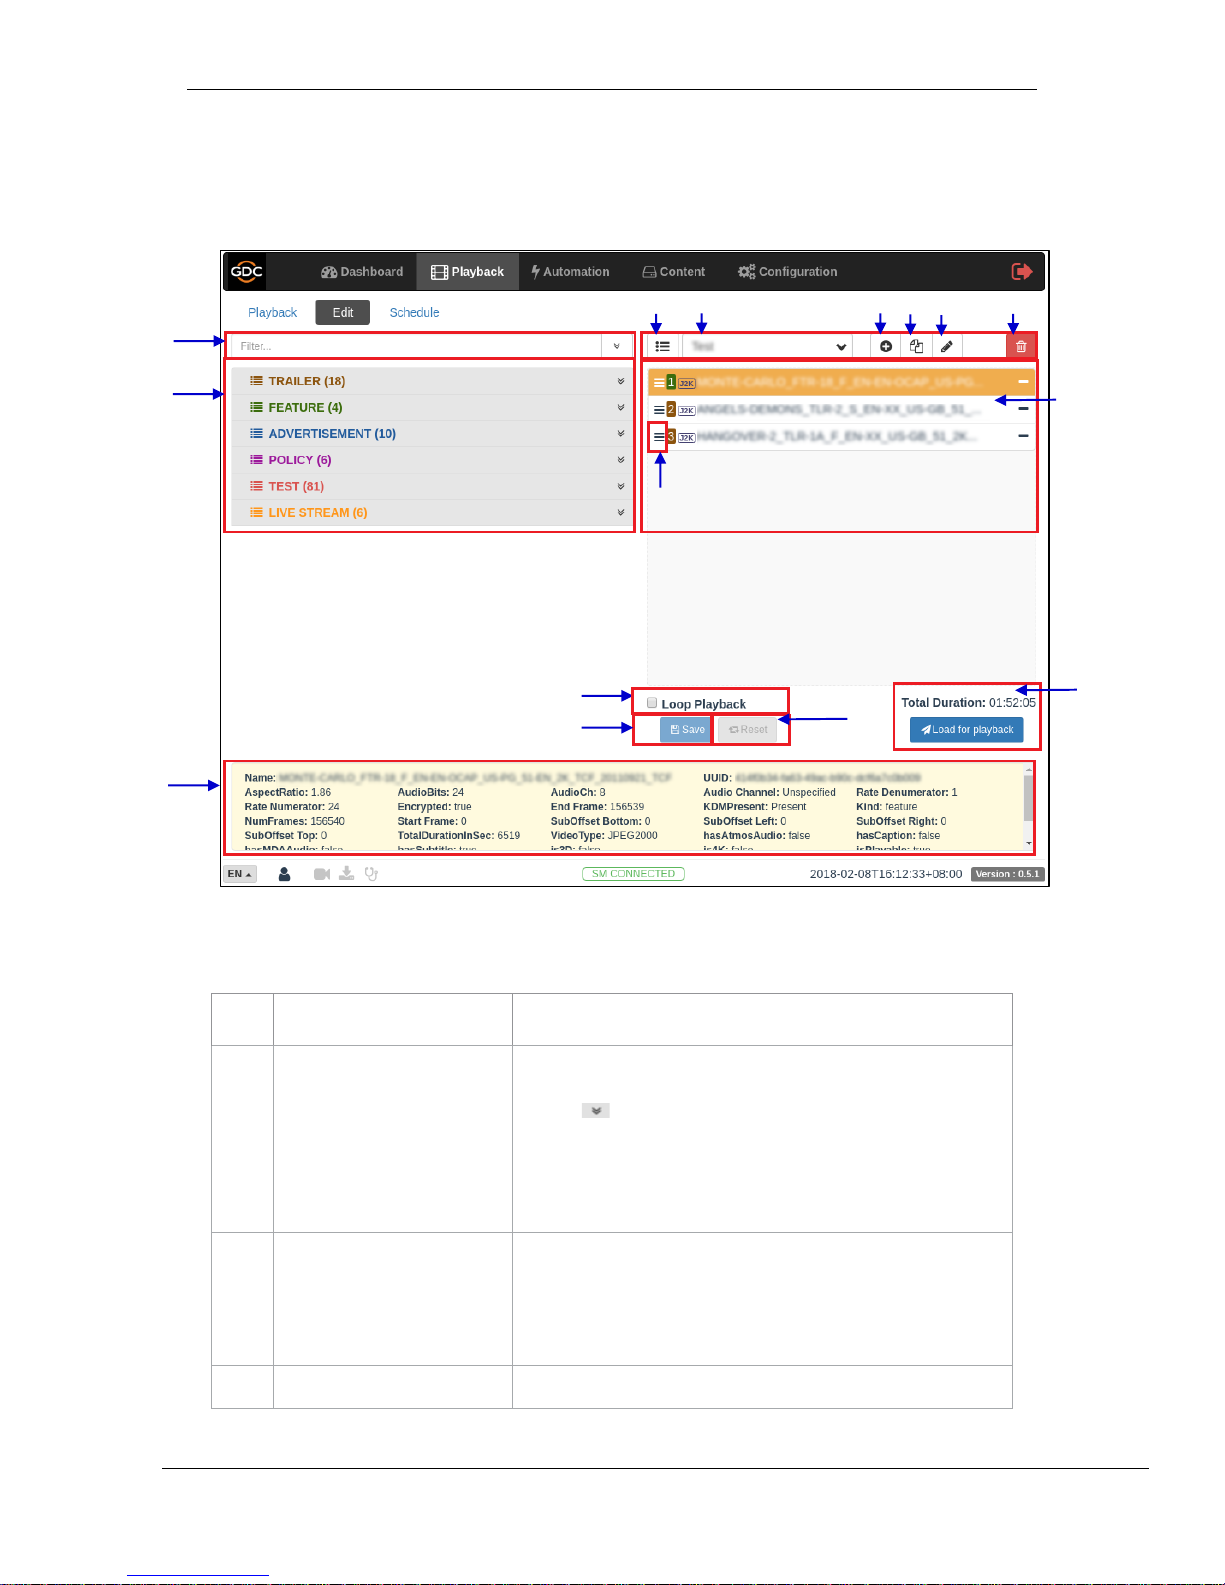
This tab displays playback progress and allow the operator to control playback.
1
[Clip Name Display]
Displays the name of the current loaded show and currently
playing clip.
2
[Clip Playback Time]
Displays the duration of the current clip played and total duration
of the clip.
3
[Playback Progress Bar]
This bar will start advancing to show playback progress.
Press [►] to start a playback. When [■] is pressed, the
Playback Progress Bar will stop and return to its starting point.
When playback is paused, the Playback Progress Bar can be
moved to the left or right to seek within the clip.
1
2 3 8
11
7
4/5
6 7 9
10
Figure 6: Playback
Page 16

- 15 -
March 23, 2018
User Manual for SR-1000 Standalone Integrated Media Block™
5. AUTOMATION
4
[►]
Play button. The [►] button starts playback when pressed.
5
[ || ]
Pause button. The [ || ] button pauses or resumes playback when
paused.
6
[■]
Stop button. The [■] button stops playback when pressed.
7
[
|◄◄
]
[||
]
[ }}
]
[►►
|
]
Move to the previous clip.
Rewind (move back) by 20 frames
Forward (move forward) by 20 frames
Move to the end of the clip.
8
[Playback Status Display]
Displays the current playback status: Playing, Paused, Stopped or
Preparing.
9
[Clip Format]
Displays information on the clip format.
10
[Playlist]
Displays all the clips in the current playlist.
11
[Status Display]
Displays the playback status of the system.
The display shows the name of the active playlist, and the name of
the clip currently being played.
Information and errors encountered during playback will also be
displayed here.
Page 17
- 16 -
March 23, 2018
User Manual for SR-1000 Standalone Integrated Media Block™
5. AUTOMATION
4.2 Edit
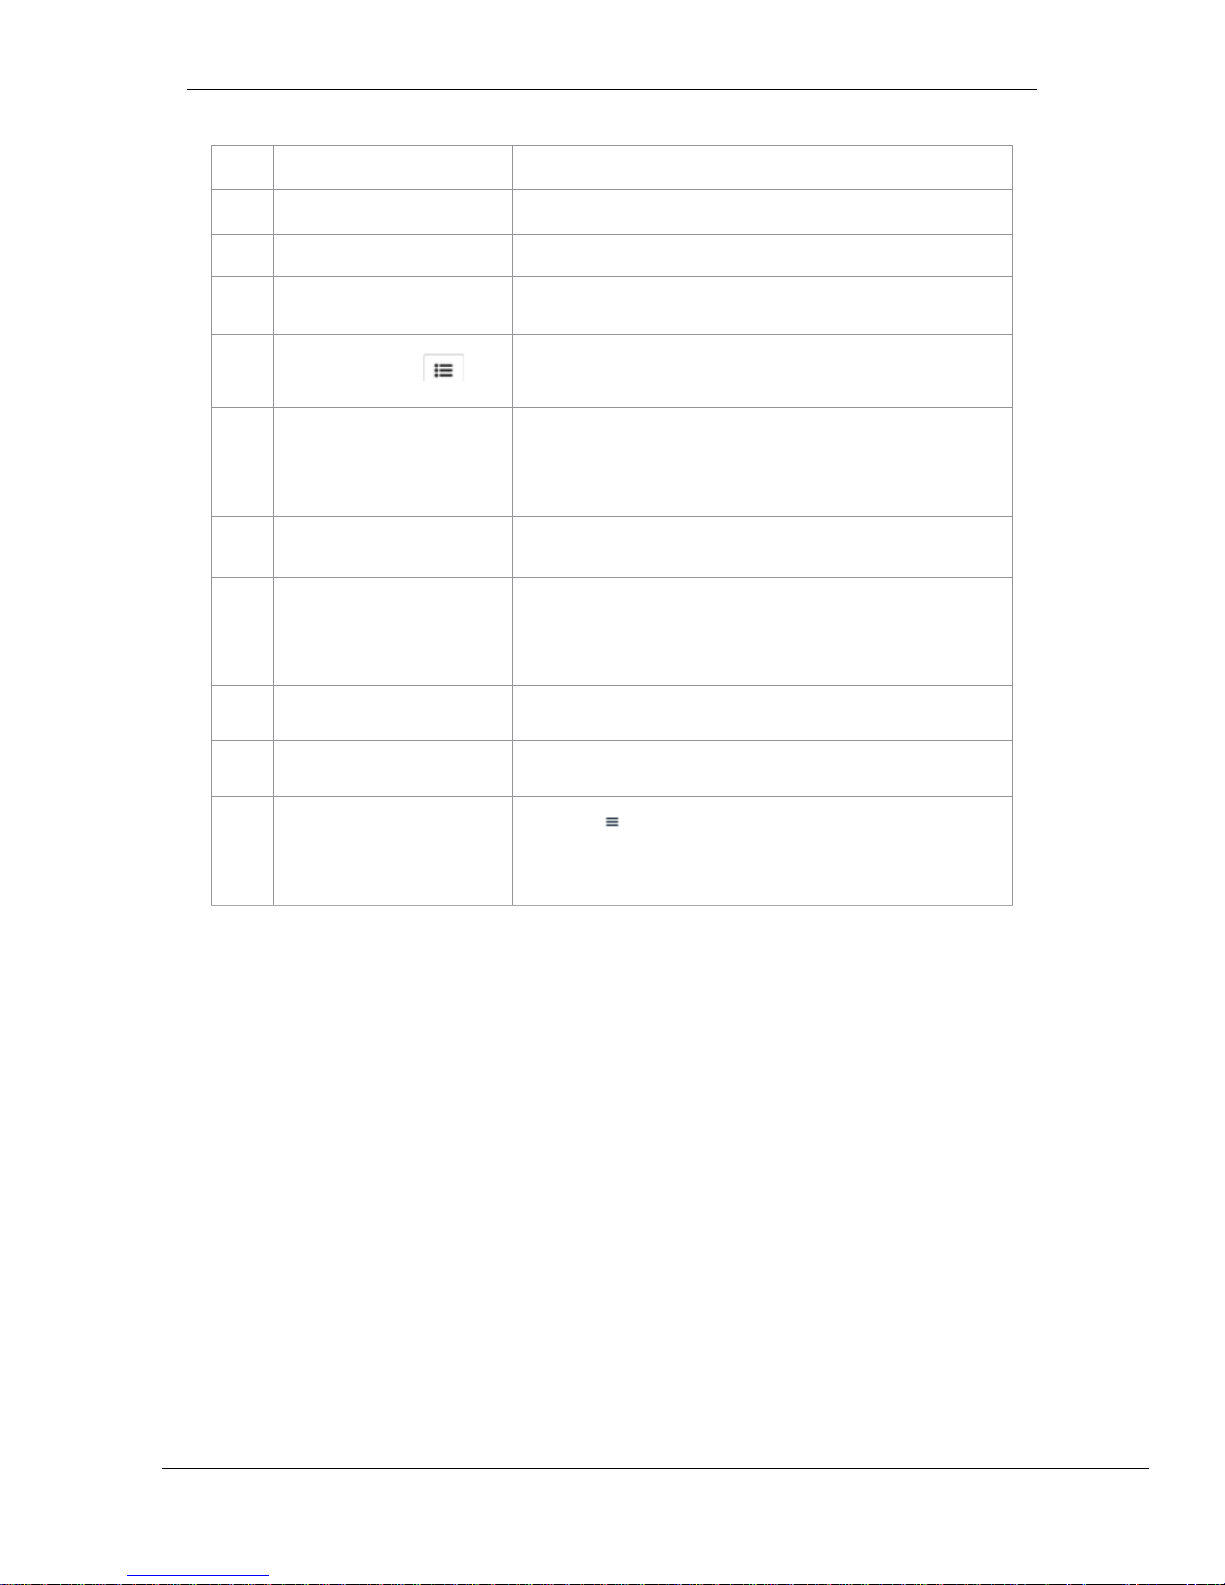
This tab is used to create and edit playlists.
1
[Filter]
Filter the content list based on content name.
2
[Content List]
Available content on the SR-1000 is listed here.
Use the arrow to expand and list all the clips under the
selected category.
Content can be dragged and dropped between [Content List] and
[Playlist Editor].
3
[Playlist Editor]
The contents of the playlist being currently edited are displayed.
Click the ‘-‘ button to remove a clip from the playlist.
Clips can be dragged and dropped within the playlist to change
playback order.
4
[Clip Information Display]
Displays the information on the selected clip.
4 2 1
5 143
8
9
10
11
12
6
7
13
Figure 7: Edit Playlist
15
Page 18
- 17 -
March 23, 2018
User Manual for SR-1000 Standalone Integrated Media Block™
5. AUTOMATION
5
[Loop Playback]
Enable Loop Playback of the current playlist.
6
[Save]
Save the playlist currently being edited.
7
[Reset]
Reset any changes to the playlist currently being edited.
8
[Load for playback]
Load the selected playlist into the player for playback.
9
[Manage Playlist ]
A pop-up window will be displayed, and show all the playlists with
options to Delete, Rename, Copy or Filter the playlists.
10
[Show List]
List of playlists available on the SR-1000. The selected playlist
content will be shown in the [Playlist Editor].
Note: A playlist that is currently playing cannot be edited.
11
[+ Add New playlist]
Create a new playlist. A name must be specified for the playlist.
12
[Copy Playlist]
Duplicate currently selected playlist.
Enter the name of the new playlist in the pop-up window and
click OK.
13
[Rename Playlist]
Rename the selected playlist.
14
[Delete Playlist]
Delete the selected playlist.
15
[Edit Props]
Clicking on button against a particular clip in the playlist opens a
pop-up window to edit properties of the selected clip.
Refer to Section 4.2.1 for details.
Page 19
- 18 -
March 23, 2018
User Manual for SR-1000 Standalone Integrated Media Block™
5. AUTOMATION
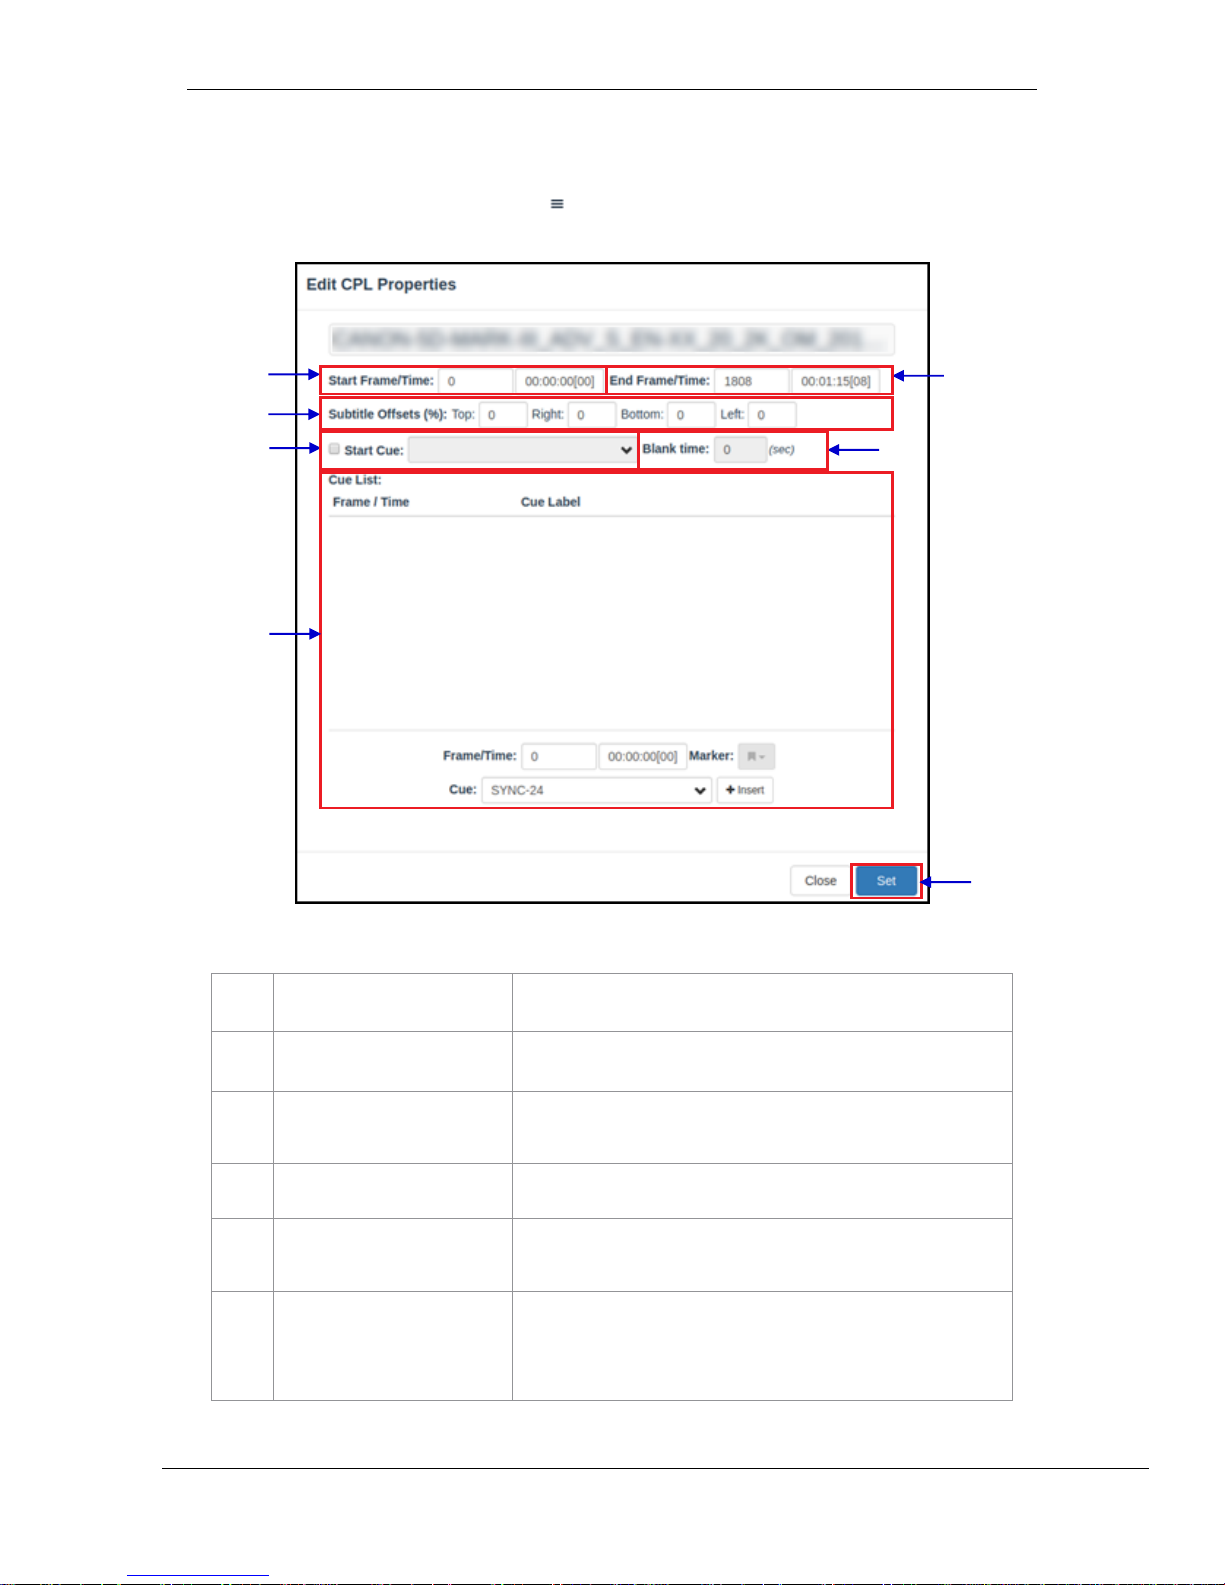
4.2.1 Edit CPL Properties
A pop-up window will open up by clicking button (Edit Props) button on a clip in the playlist
editor
Figure 8: Edit CPL Properties
1
[Start Frame/Time]
Set the time code/frame number where playback of the clip starts.
2
[End Frame/Time]
Set the time code/frame number where playback of the clip ends.
3
[Subtitle Offsets]
Set the Top, Right, Bottom and Left values to adjust the position of
the subtitles projected.
4
[Start Cue]
Set an automation cue to execute before the clip begins.
5
[Blank time]
Set the time interval between the end of the start cue and the start of
the clip playback.
6
[Cue list]
Sets automation cues to execute during playback.
Select the cue from the dropdown list, enter the Frame/Time and
click the + Insert button.
1 2 3 5 4 7 6
Page 20
- 19 -
March 23, 2018
User Manual for SR-1000 Standalone Integrated Media Block™
5. AUTOMATION
Cue list will display the inserted automation cue.
7
[Set]
Save the changes.
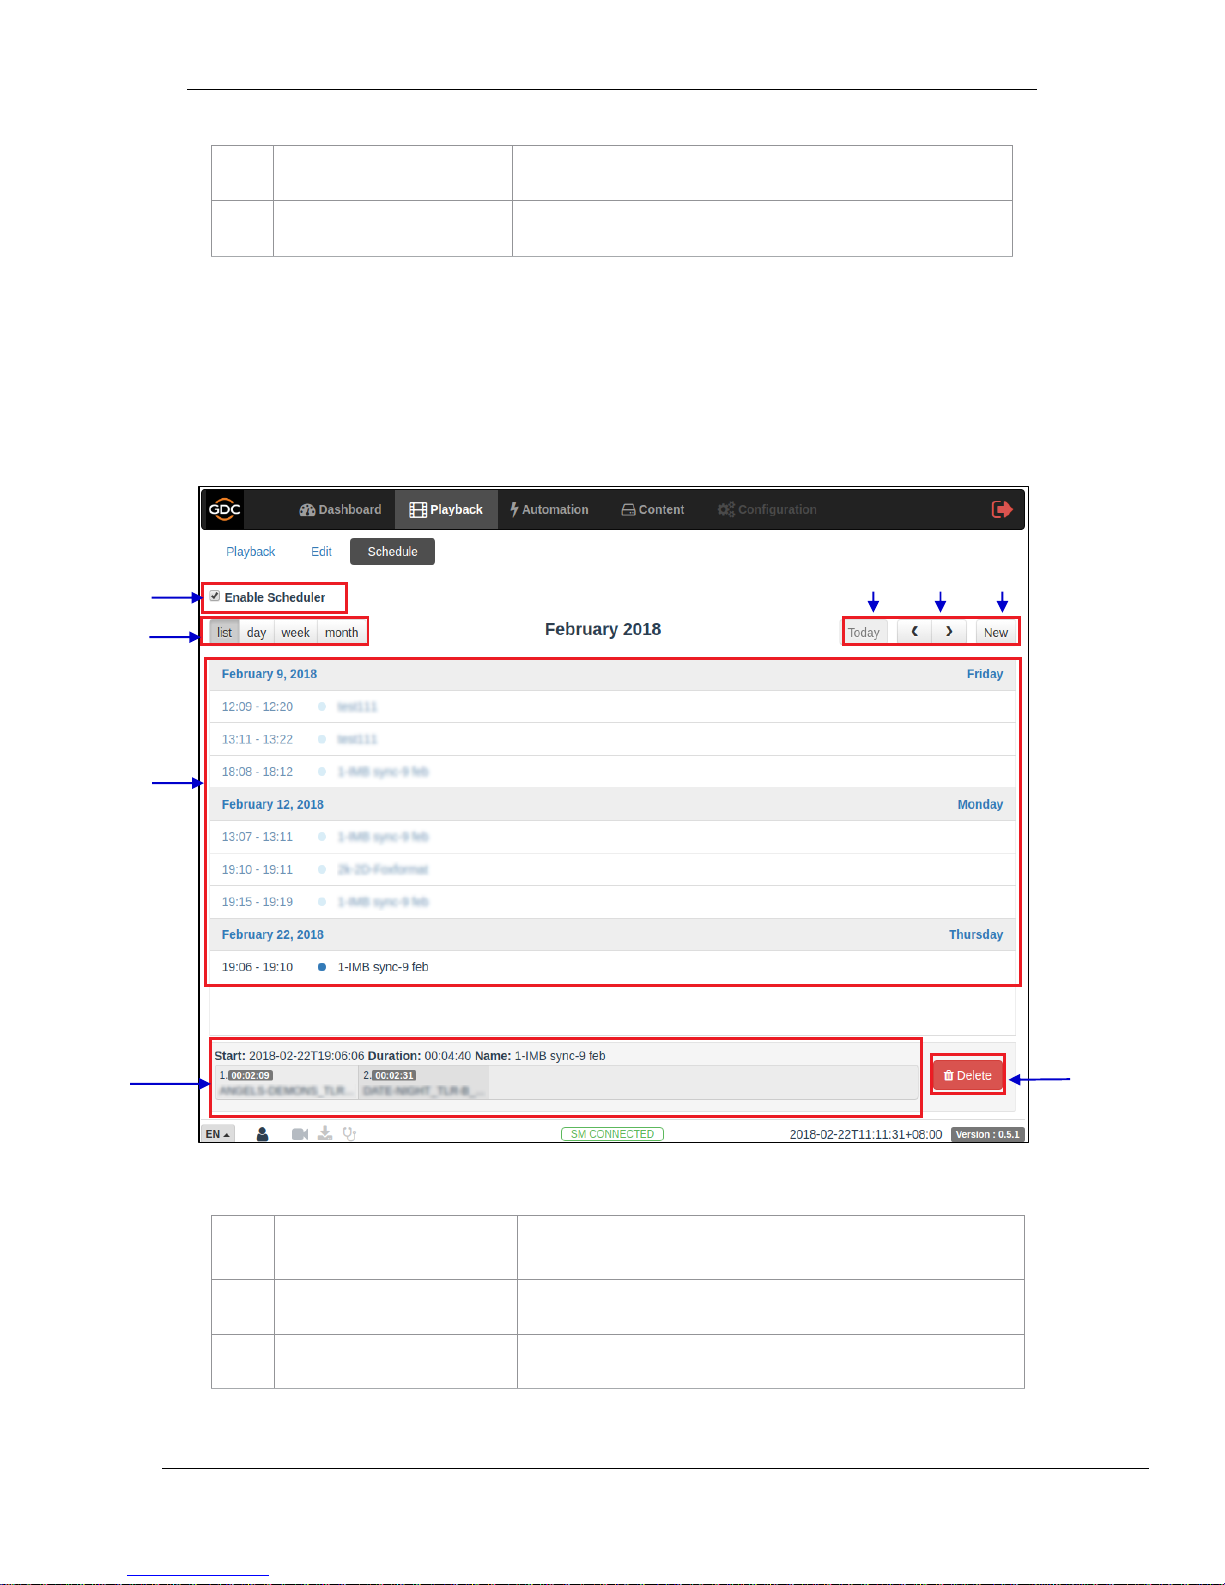
4.3 Schedule
This tab is used to schedule playback.
1
[List, Day, Week, Month]
Select to display the schedules on the SR-1000 in a list; per day,
per week or per month.
2
[Today]
Switch back to current day in month or week view.
3
[< Previous / > Next]
Displays the schedules of the previous or next day, week or month.
5 8 1
7
2 3 4
6
Figure 9: Scheduler
Page 21
- 20 -
March 23, 2018
User Manual for SR-1000 Standalone Integrated Media Block™
5. AUTOMATION
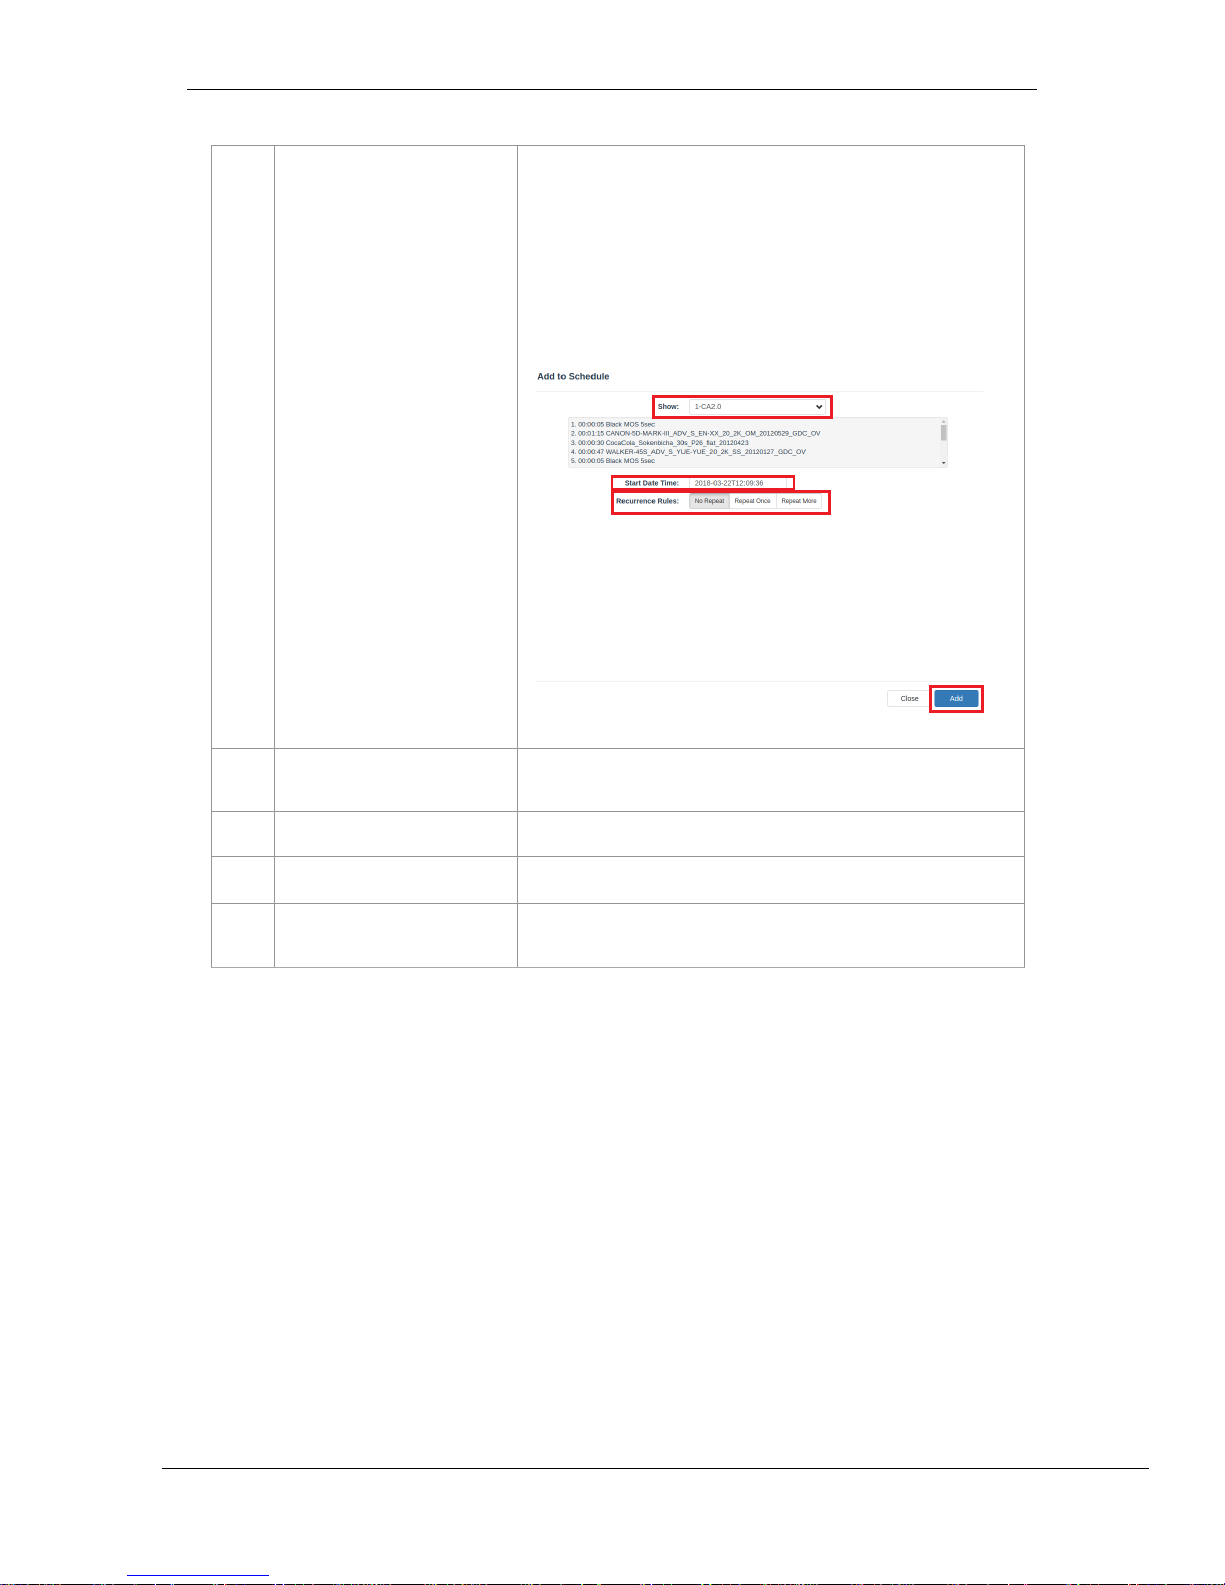
4
[New]
Add a new schedule.
Select the Show and Start Date Time.
Recurrence Rules by default is selected as No Repeat.
User can select Repeat Once or Repeat More and further enter
details.
Click the Add button to add the schedule
5
[Schedules]
Schedules are displayed here. Display will change according to
schedule in [1].
6
[Schedule Details]
Displays the details of the selected show.
7
[Delete]
Delete the selected schedule.
8
[Enable Scheduler]
Enable or disable the scheduler function. It is recommended to keep
the scheduler enabled.
!
Page 22
- 21 -
March 23, 2018
User Manual for SR-1000 Standalone Integrated Media Block™
5. AUTOMATION
5 AUTOMATION
!
This tab is used to set up automation and input triggers. Scheduling and manual triggering of
automation cues can be done here.
!
Figure 10: GDC Automation Workflow
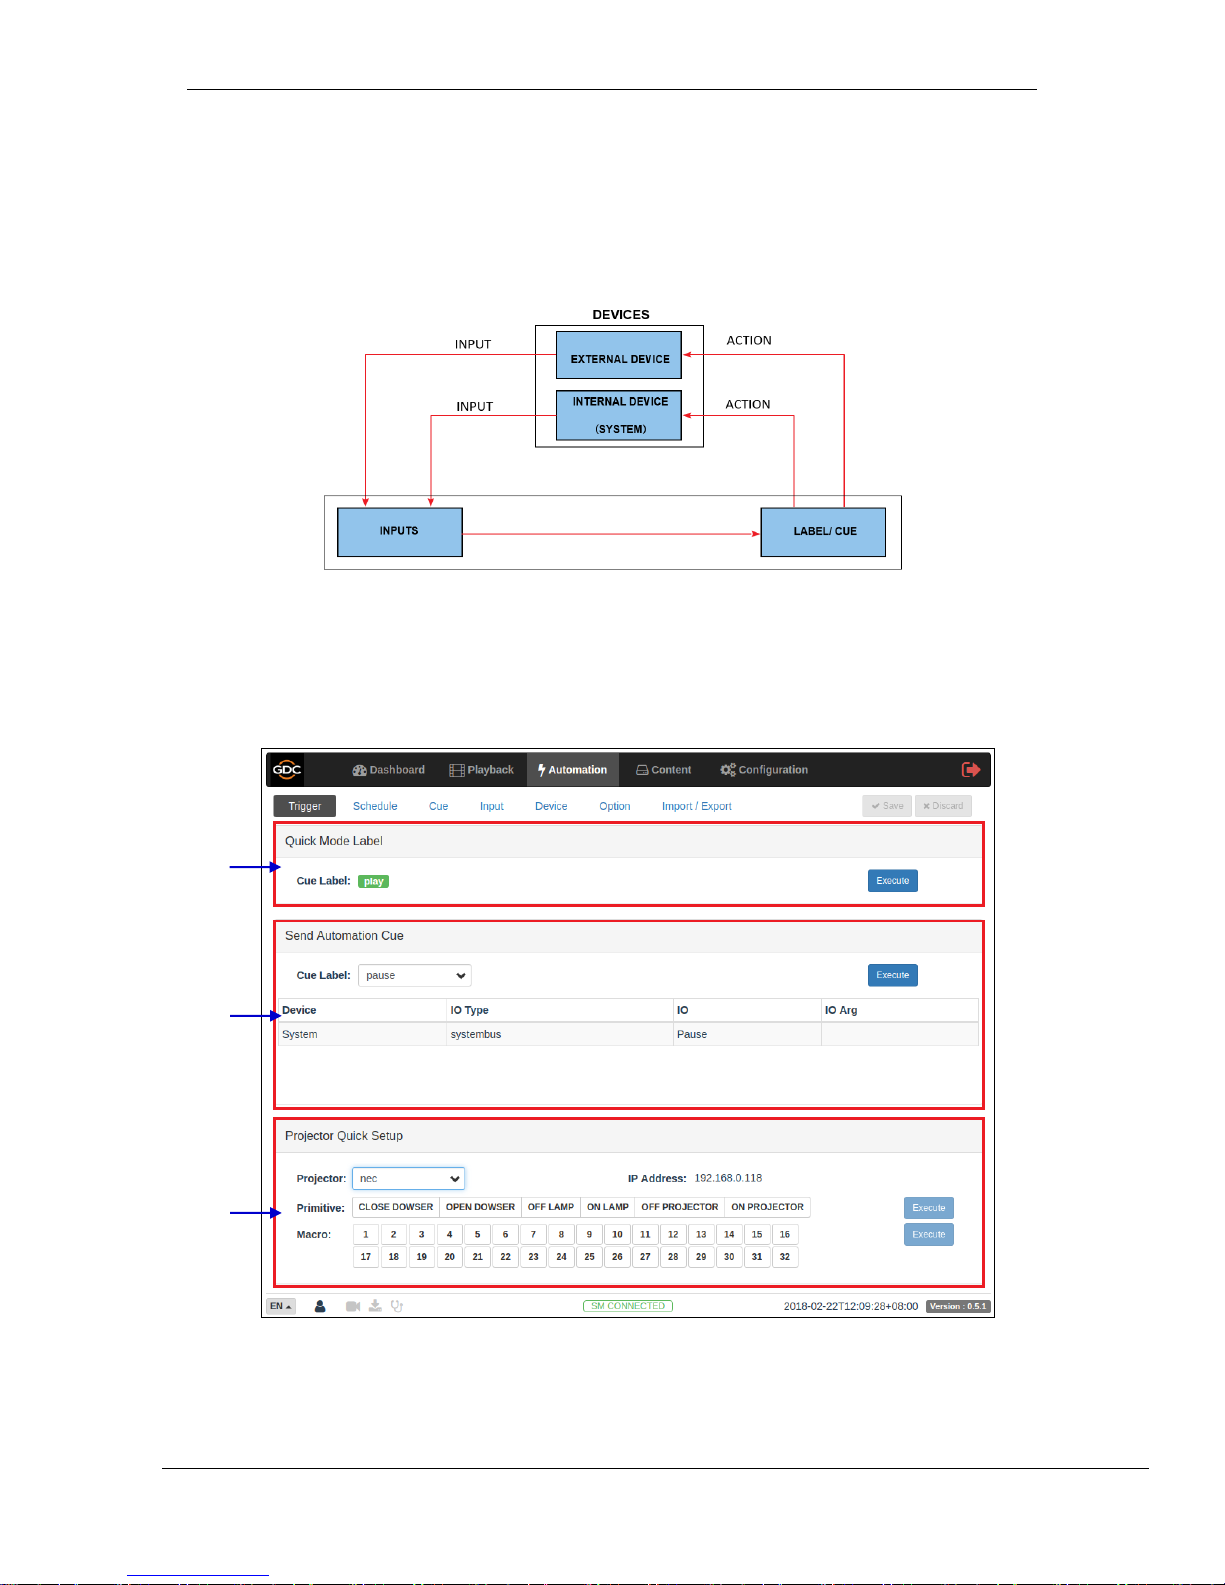
5.1 Trigger
This tab is used manually trigger automation cues and commands for configured devices.!
!
1
2
3
Figure 11: Cue Trigger Setup
Page 23
- 22 -
March 23, 2018
User Manual for SR-1000 Standalone Integrated Media Block™
5. AUTOMATION
1
[Quick Mode Label]
An automation label can be configured to be easily triggered here.
This label can be set in Automation à Option tab.
(Refer to Section 5.6)
Click the Execute button to execute the automation cue.
2
[Send Automation Cue]
This section is used to manually execute a configured automation
label.
Select a label and click the Execute button to execute the
automation label manually.
3
[Projector Quick Setup]
This section is used to manually send an automation command
to a configured projector.
Select the projector primitive or macro to be executed and click
the Execute button to send the command to the projector.
!
!
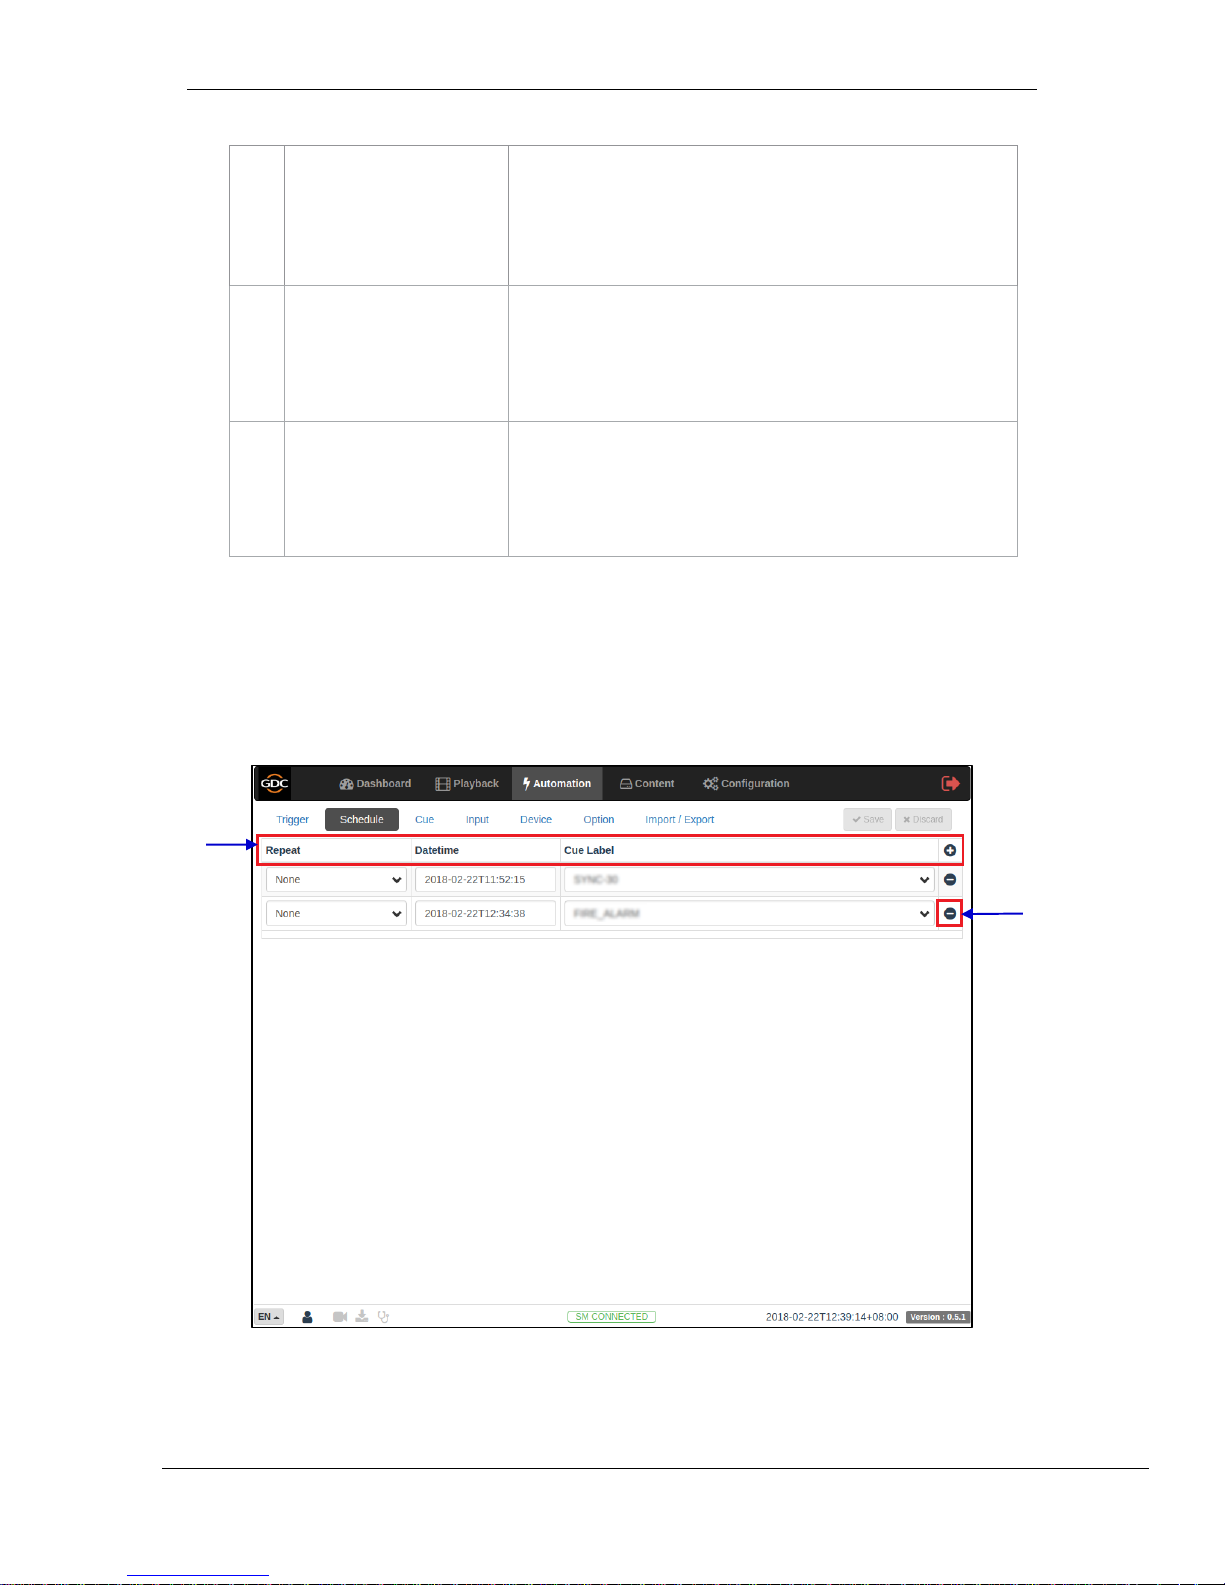
5.2 Schedule
This tab is used to schedule automation cues to execute at the specified date and time.
1
2
Figure 12: Scheduling Cues
Page 24
- 23 -
March 23, 2018
User Manual for SR-1000 Standalone Integrated Media Block™
5. AUTOMATION
1
[+ New Schedule]
Click + to add a new schedule.
Select the schedule date and time, and the label to be executed.
Schedules can be set to repeat daily.
Click Save to save the added schedule or click Discard to
remove.
2
[- Remove Schedule]
Click – to remove the selected scheduled automation cue.
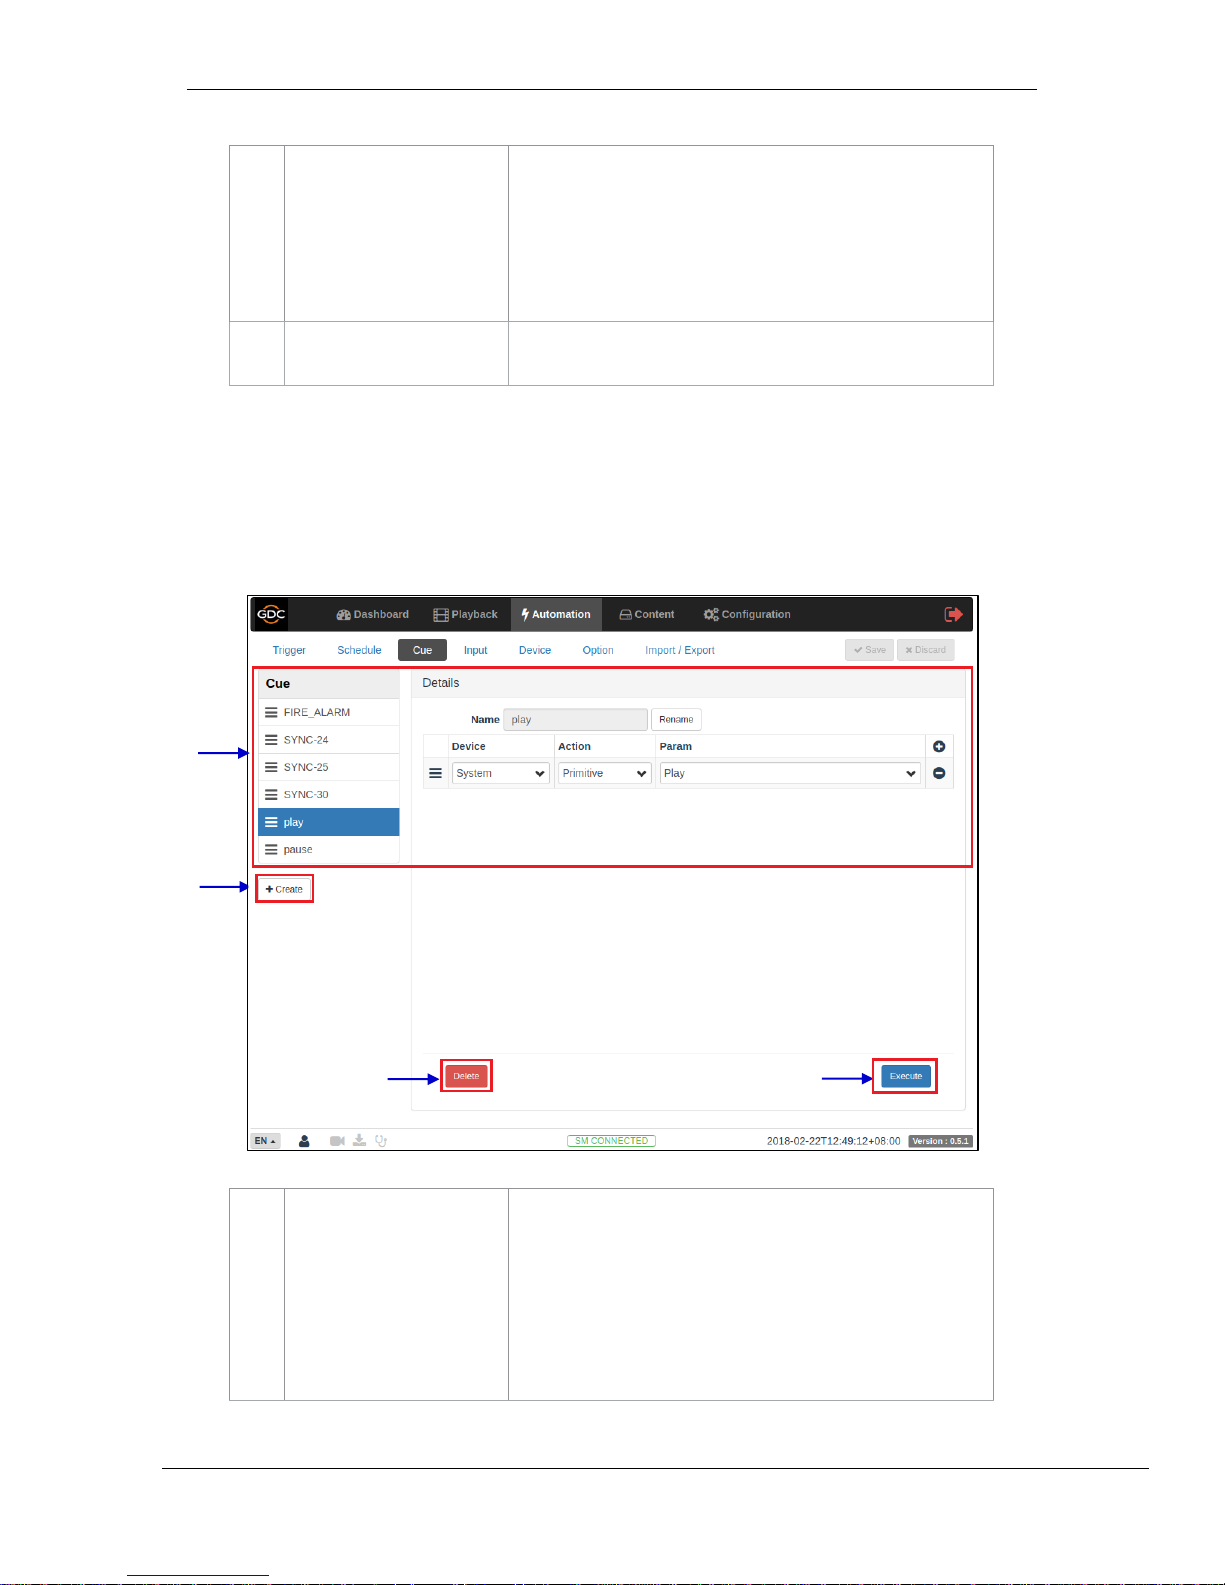
5.3 Cue
This tab shows the automation cues configured on the SR-1000. New automation cues can be
added and configured on this tab.
1
[Cue]
A complete list of configured cues is displayed here. Cues can
be rearranged by dragging and dropping.
When a cue is selected from the list, the cue details are
displayed.
Select and complete the fields for Device, Action and Param in
Details section.
1 2 3
4
Figure 13: Create and Edit Cues
Page 25
- 24 -
March 23, 2018
User Manual for SR-1000 Standalone Integrated Media Block™
5. AUTOMATION
Click + to add actions or click – to remove actions.
Click Execute [4] to manually execute this automation cue.
2
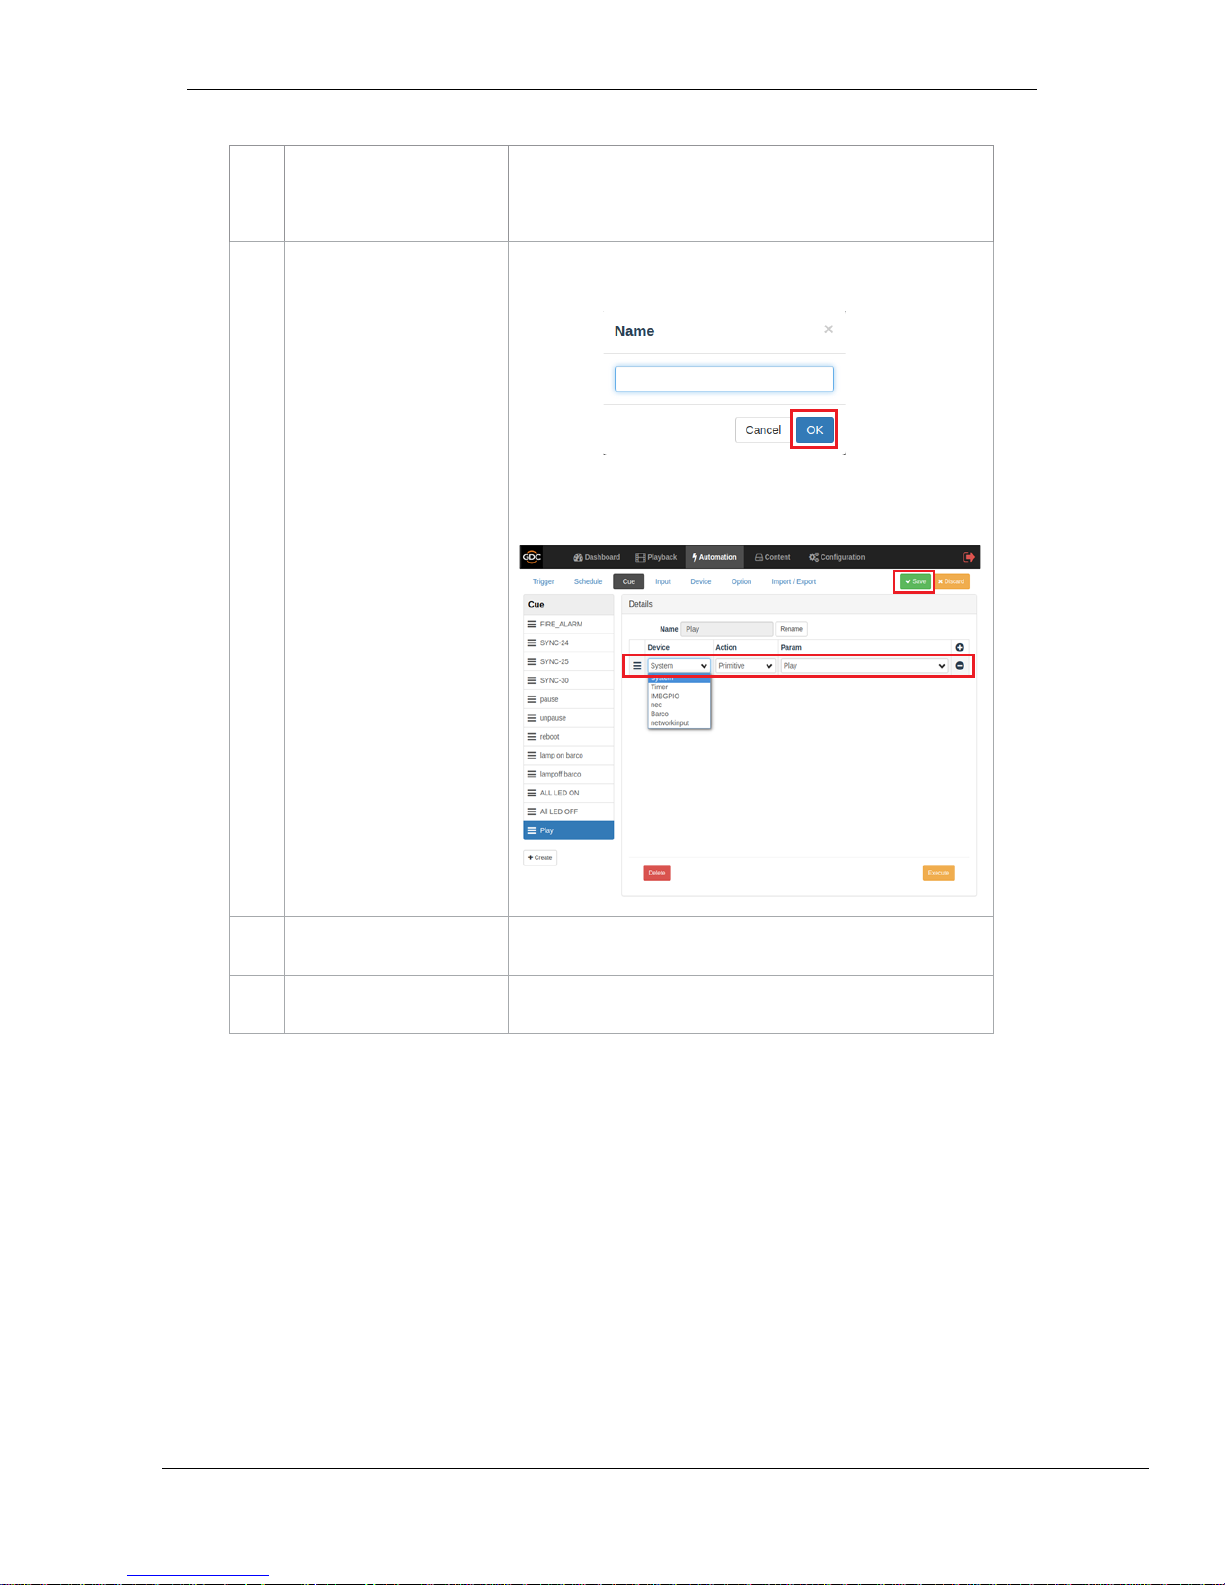
[+Create]
Click +Create to create a new cue. A pop-up window will be
shown. Enter the name of the cue and click OK.
Click + to add actions to the cue. Configure the Device, Action
and Param for each action then click the Save button to save
this cue.
3
[Delete]
Deletes the selected cue.
4
[Execute]
Executes the selected cue. This can be used to test the cue.
Page 26
- 25 -
March 23, 2018
User Manual for SR-1000 Standalone Integrated Media Block™
5. AUTOMATION
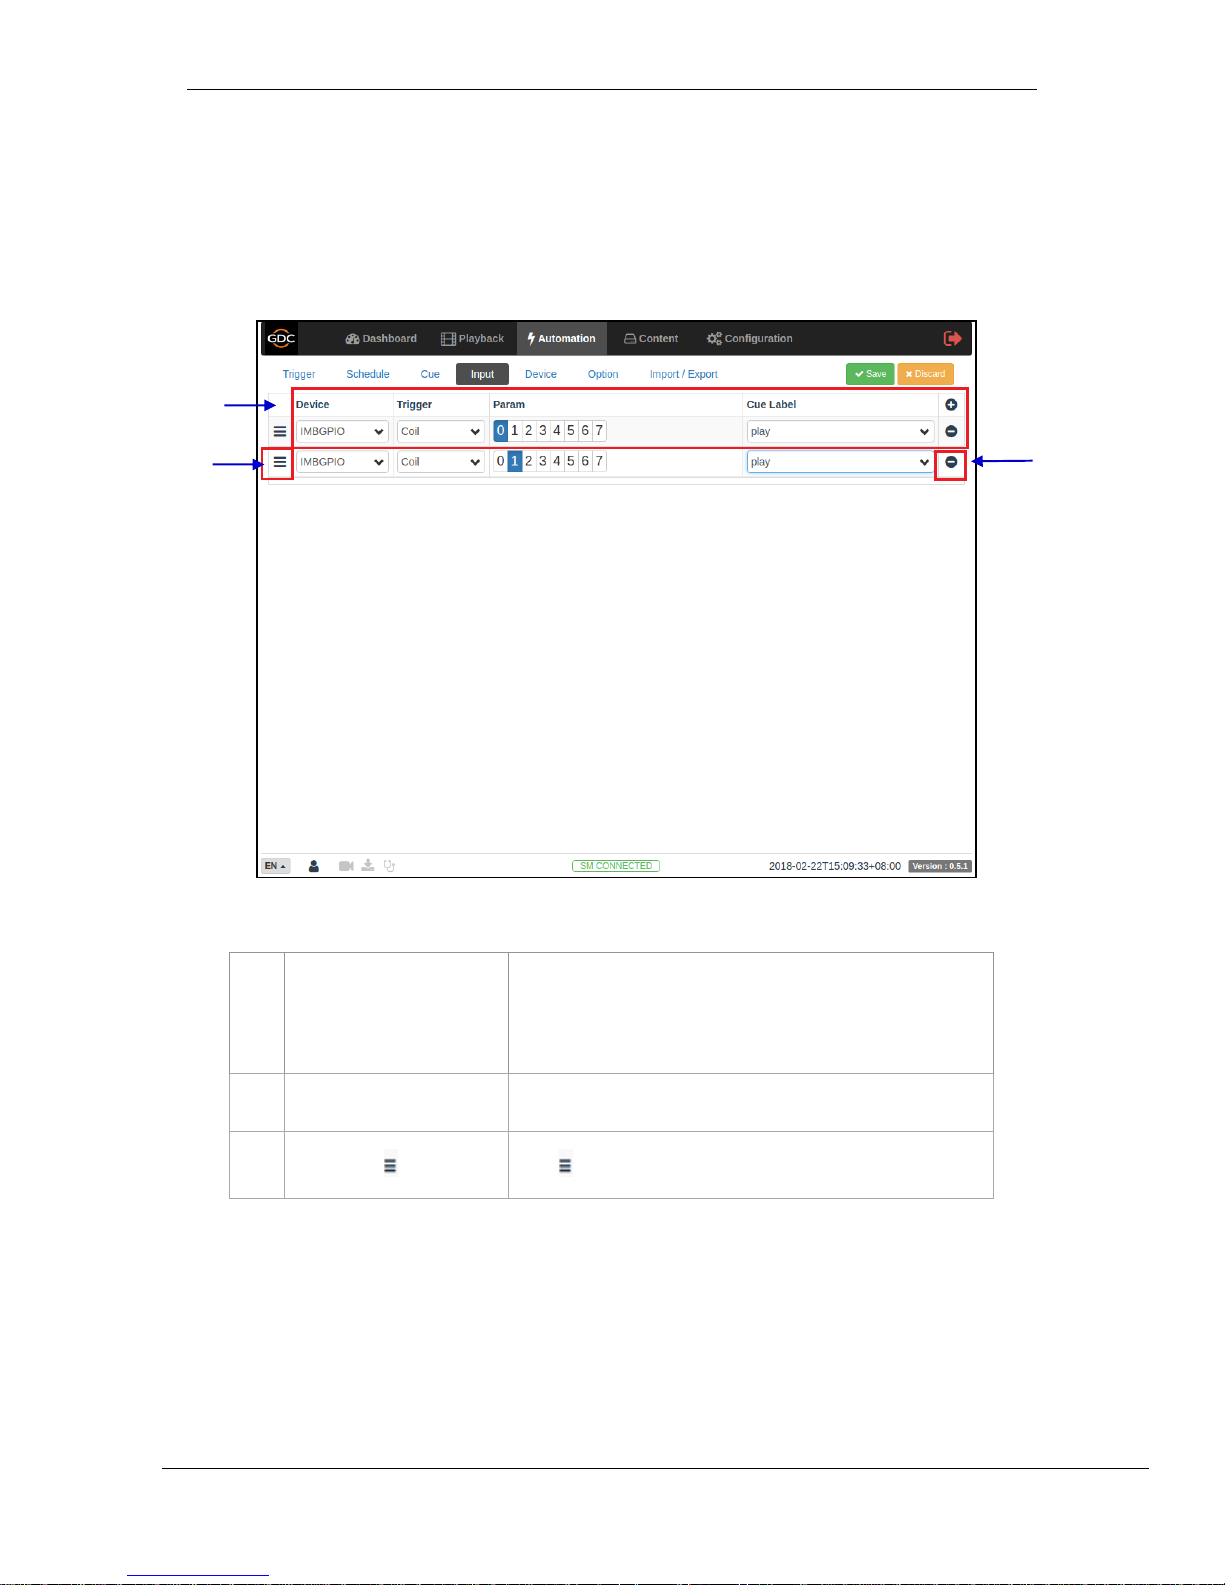
5.4 Input
This tab is used to configure input automation triggers on the SR-1000.
When input is detected on supported devices, the configured automation cues will be triggered on
the SR-1000.
1
[Add Trigger]
Click + to add an input trigger.
Select and complete the fields for Device, Trigger, Param, and
Cue label.
2
[ – ]
Click – to remove the selected input trigger.
3
[ ]
Click to reorder the input triggers using drag-and-drop.
1
3
2
Figure 14: Input Triggers
Page 27
- 26 -
March 23, 2018
User Manual for SR-1000 Standalone Integrated Media Block™
5. AUTOMATION
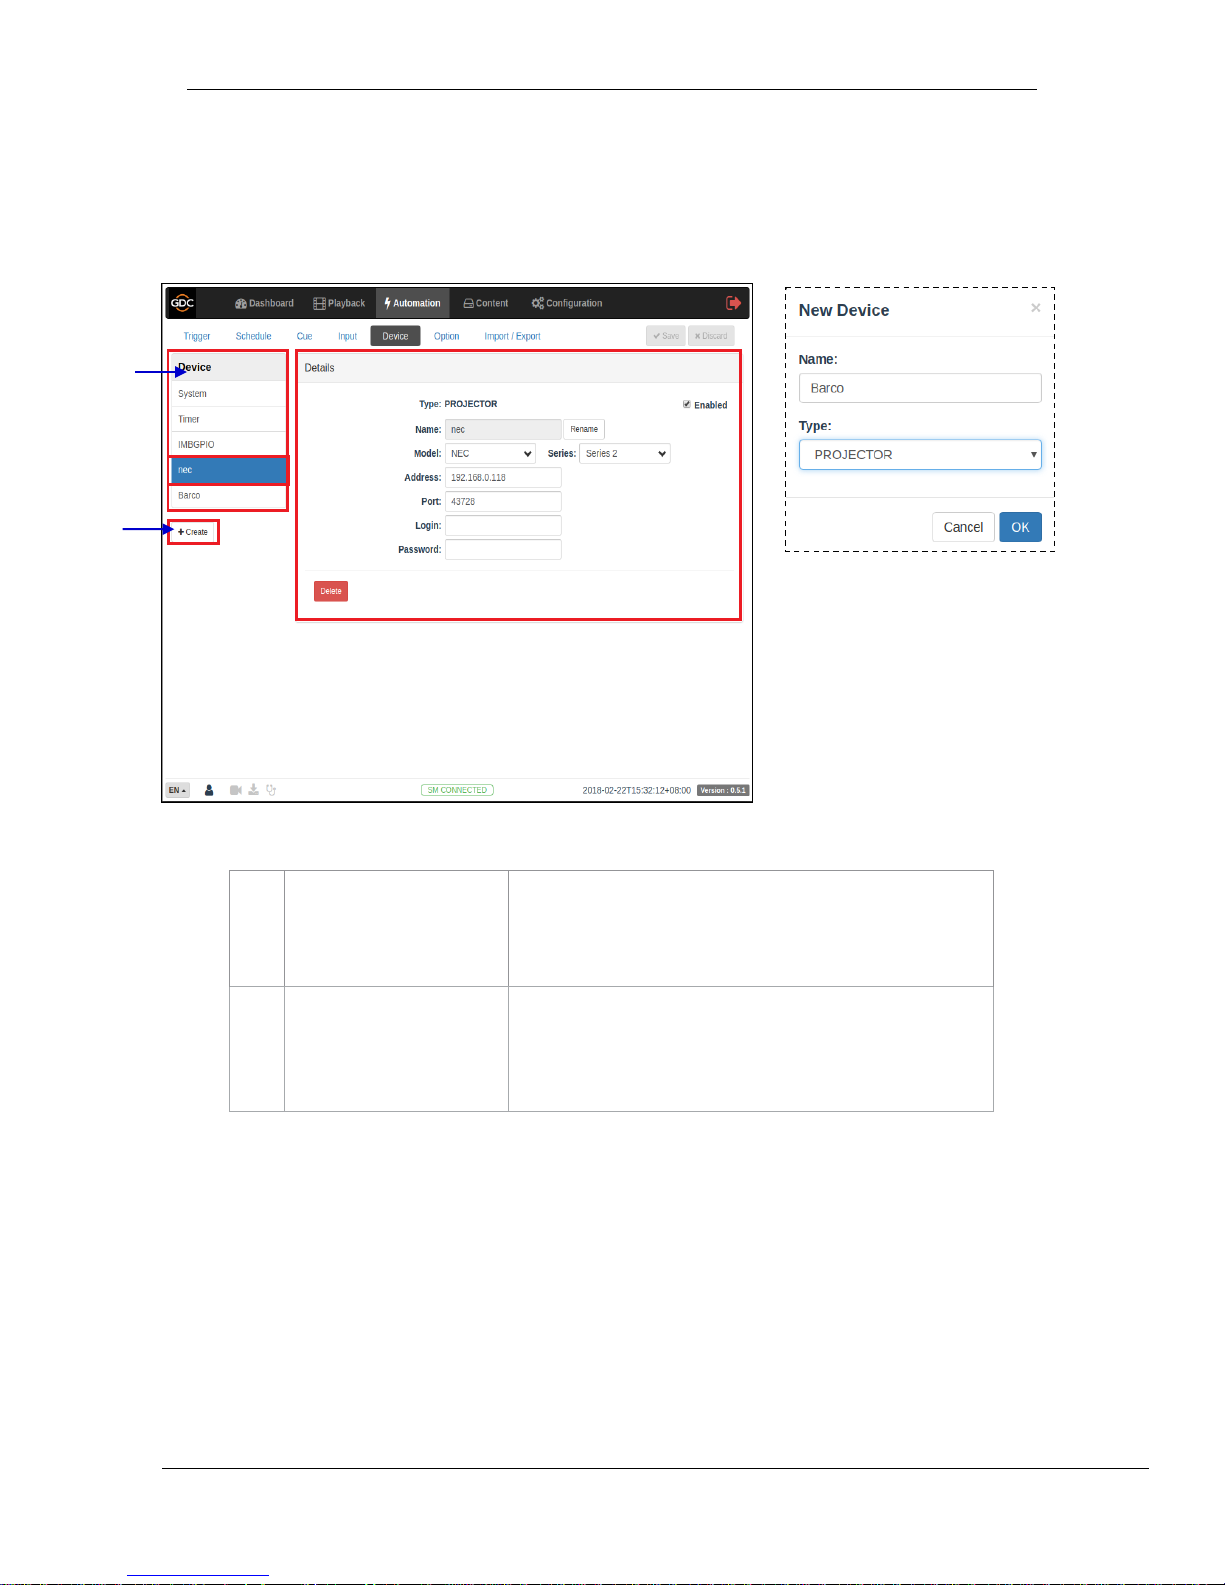
5.5 Device
This tab is used to configure the SR-1000 to communicate with external automation devices.
!
1
[Device]
This is a list of configured automation devices on the SR-1000.
When a device is selected from the list, device details are
displayed.
2
[+Create]
Click +Create to create a new device.
Enter Device Name and Type. Click OK to confirm or click
Cancel to cancel adding devices.
2
1
Figure 15: List of configured Automation devices
Page 28
- 27 -
March 23, 2018
User Manual for SR-1000 Standalone Integrated Media Block™
5. AUTOMATION
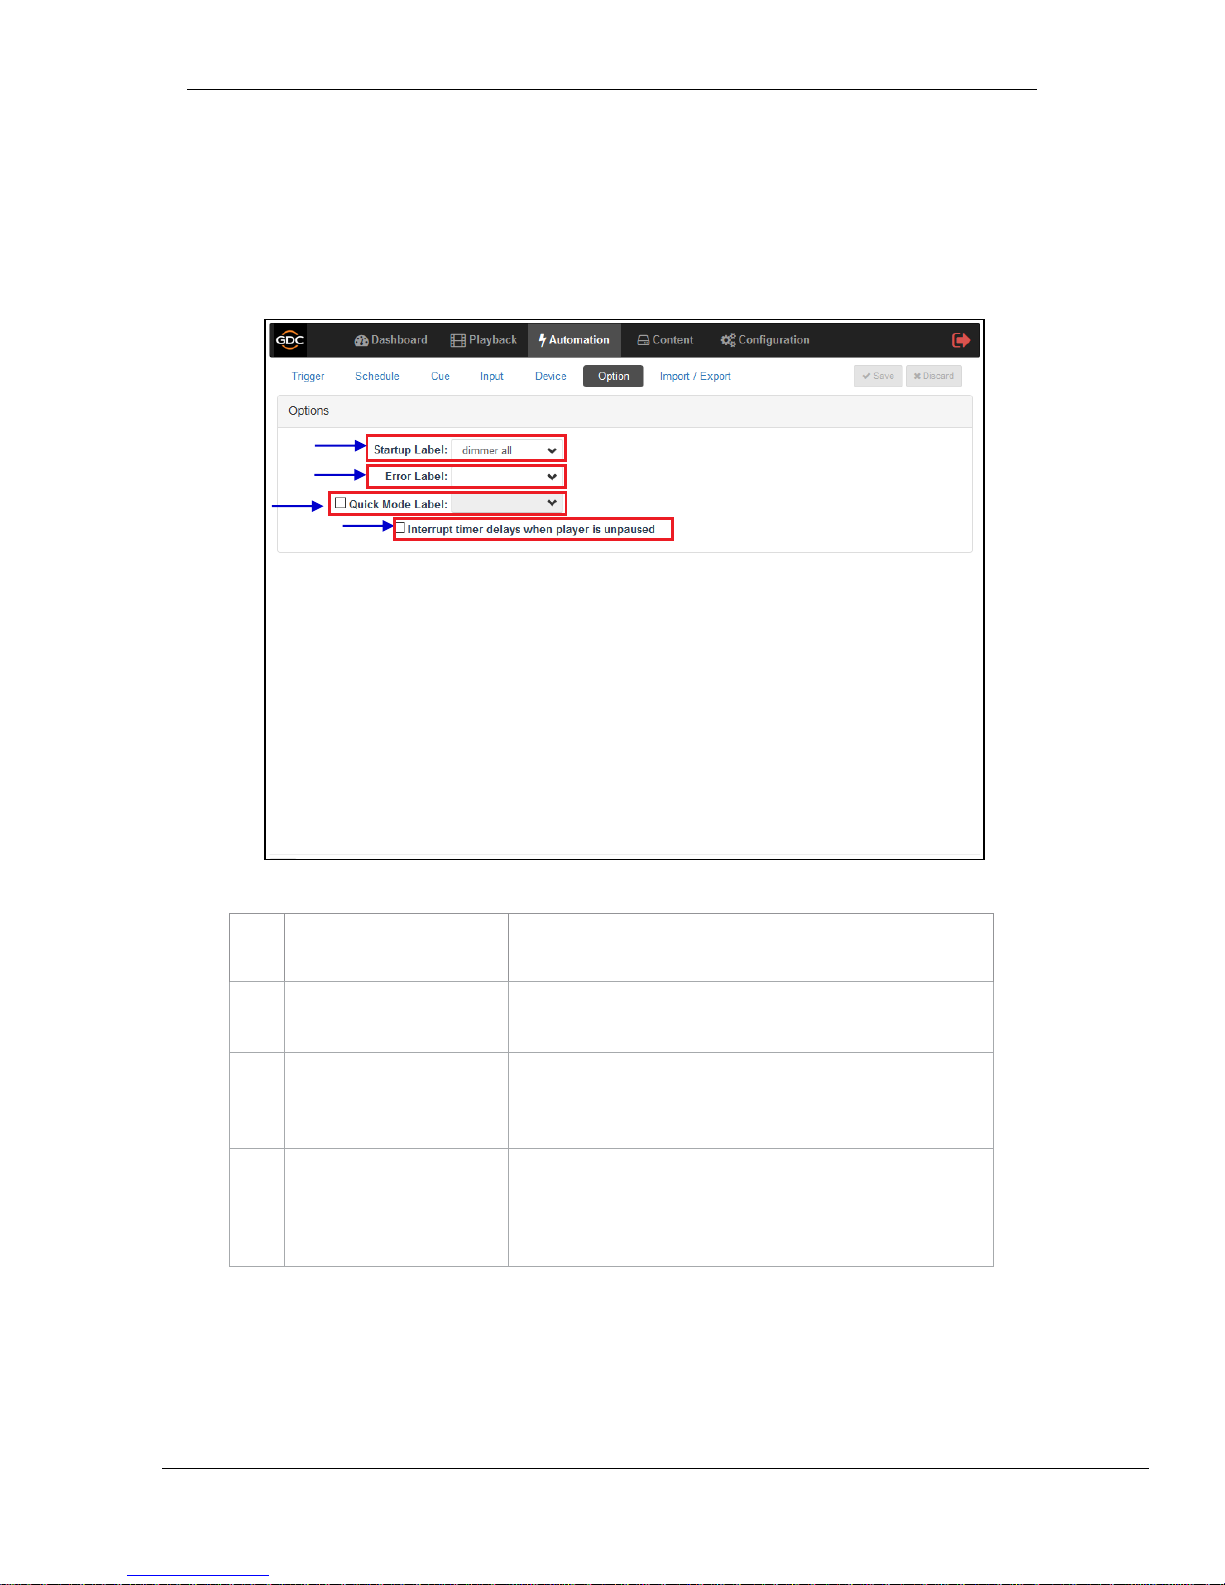
5.6 Option
This tab is used to configure automation cues that will be triggered on SR-1000 boot-up and
when playback errors occur.!
!
!
!
!
!
!
!
!
!
!
!
!
1
[Startup Label]
Select a specific automation cue which will be executed when
the server fully boots up
2
[Error Label]
Select a specific automation cue which will be executed
whenever a playback error occurs.
3
[Quick Mode Label]
Enables selection of a specific automation cue which can be
triggered quickly using the Execute button under Quick Mode
Label àTrigger tab
4
[Interrupt timer delays when
player is unpaused]
When this option is selected and the user clicks Unpause button
on the player, the next action in the automation cue will be
executed immediately without waiting for the Timer delay to
complete.
!
!
!
Figure 16: Option!
2
1
3
4
Page 29
- 28 -
March 23, 2018
User Manual for SR-1000 Standalone Integrated Media Block™
5. AUTOMATION
!
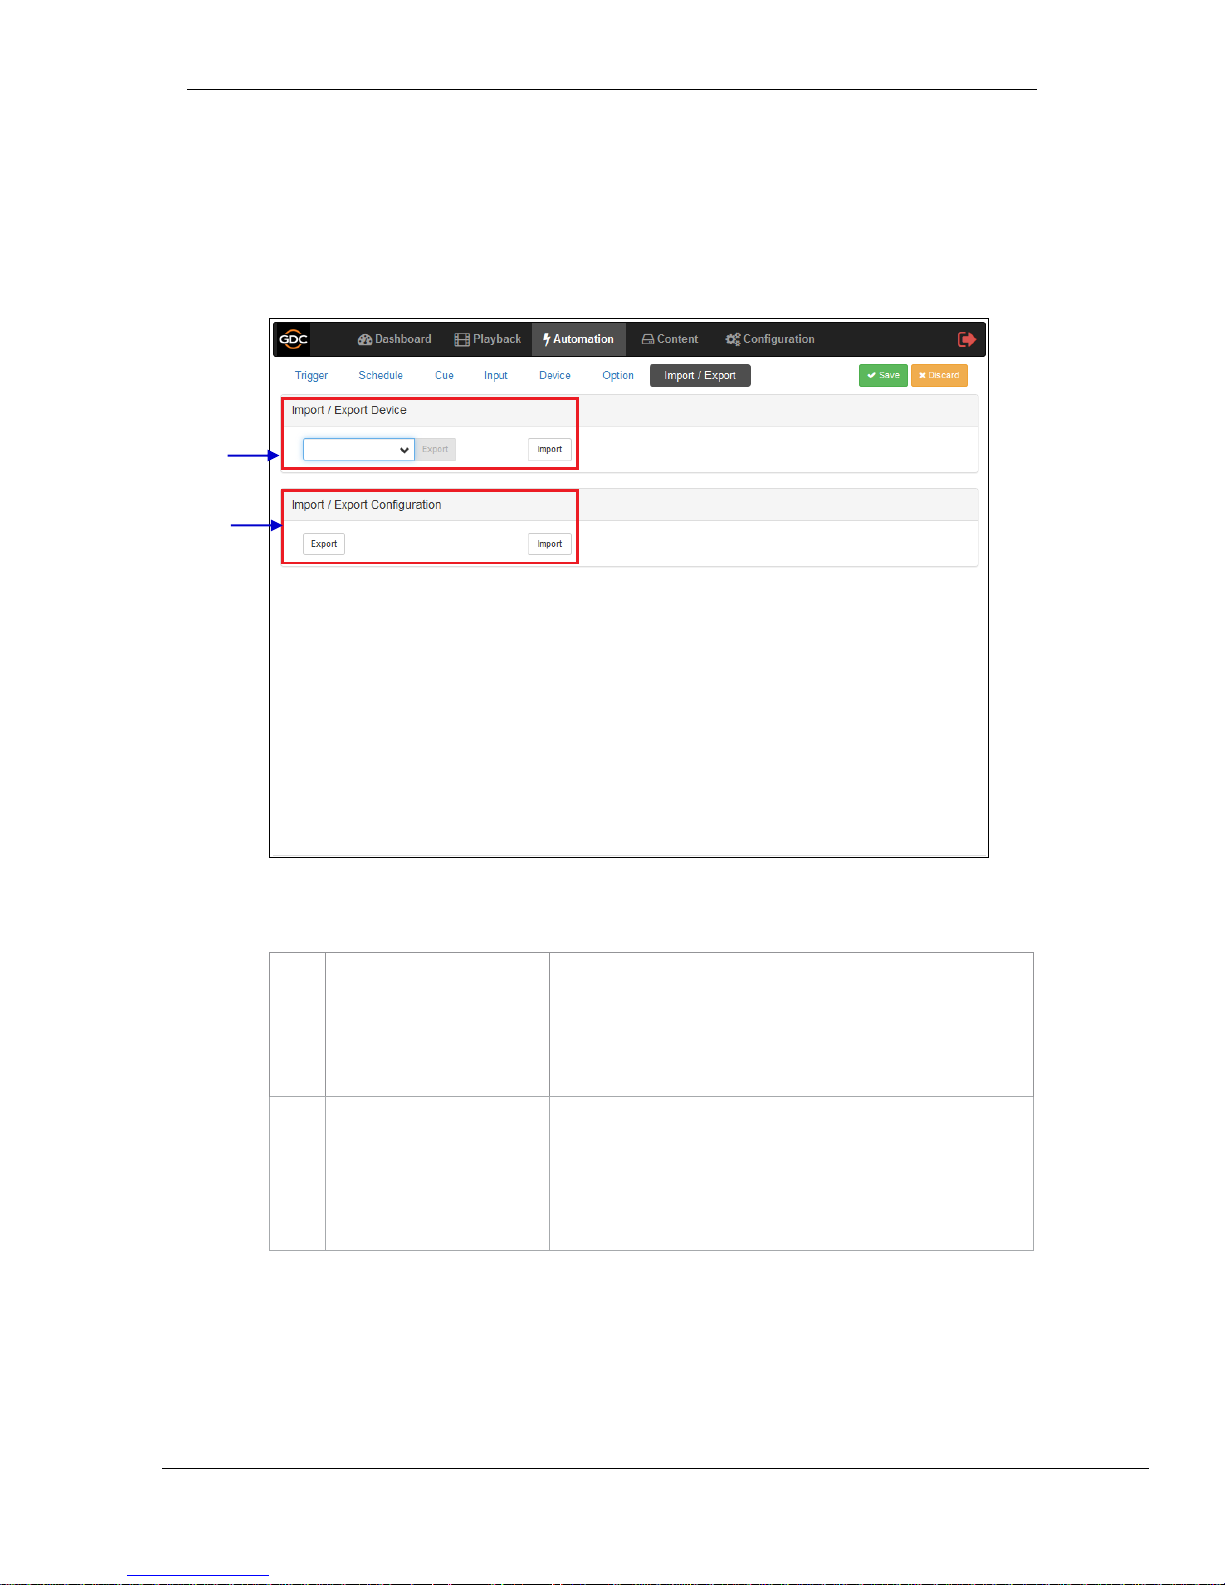
5.7 Import/ Export
This tab allows the import and export of automations cues which have been setup on the SR-
1000.
1
[Import/Export Device]
Import opens a pop-up window which allows the user to select a
configuration file for the selected automation device.
Export automatically saves the configuration file for the selected
automation device to your web browser’s default download
location.
2
[Import/Export Configuration]
Import allows user to select configuration file containing all
automation cues from an alternate server
Export automatically saves the configuration file containing all
automation cues to your web browser’s default download
location.
Figure 17: Import/Export!
2
1
Page 30
- 29 -
March 23, 2018
User Manual for SR-1000 Standalone Integrated Media Block™
7. CONFIGURATION
6 CONTENT
The Content tab is used to manage the content, keys and licenses on the SR-1000. It allows the
operator to:
1. Ingest content from disk or network source.
2. Ingest Key Delivery Messages (KDMs) required for playing encrypted content.
3. Ingest License Delivery Messages (LDMs).
4. Delete content from IMB storage.
5. Verify content on IMB storage.
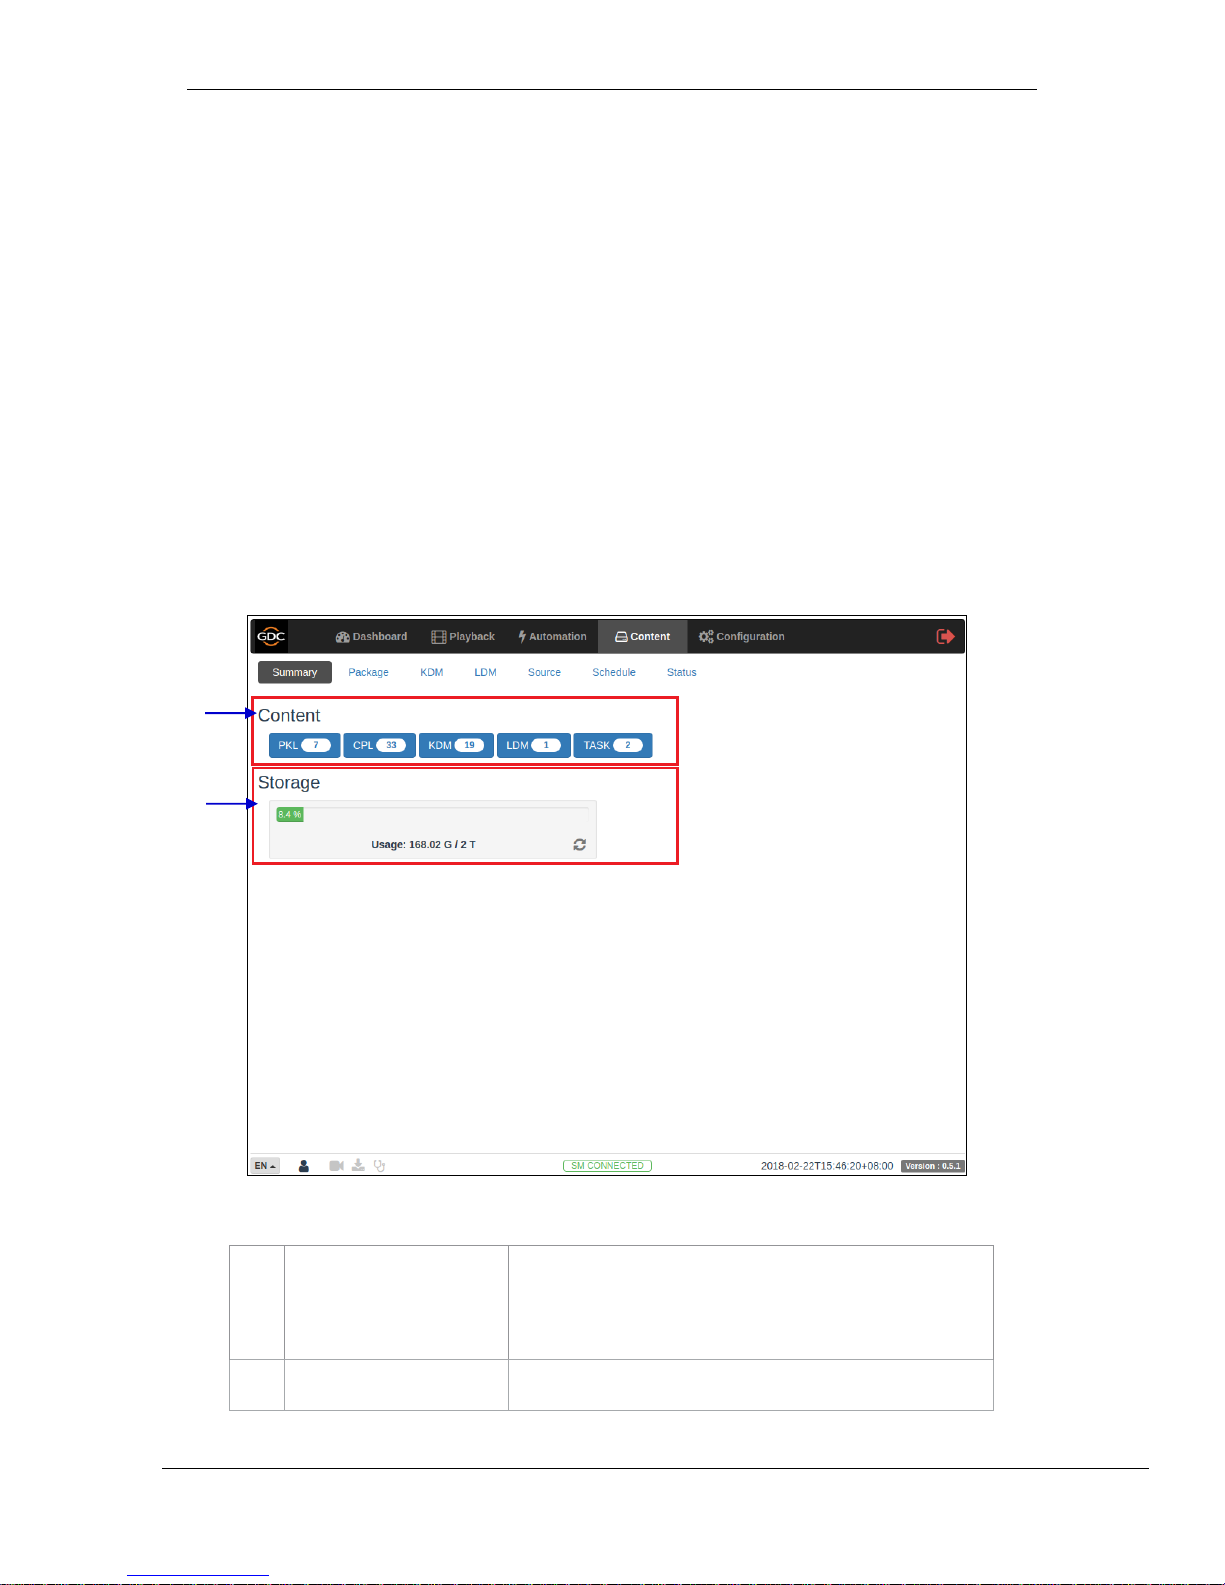
6.1 Summary
This tab shows a summary of the content and the storage space.!
1
[Content]
An overview of the number of PKL, CPL, KDM, LDM (licenses)
and Tasks available on the SR-1000 is displayed.
Each button can be clicked to access the respective tab.
2
[Storage]
Displays Storage Usage and Capacity.
1
2
Figure 18: Content and Storage summary
Page 31
- 30 -
March 23, 2018
User Manual for SR-1000 Standalone Integrated Media Block™
7. CONFIGURATION
Click the Refresh button to update the displayed
information.
!
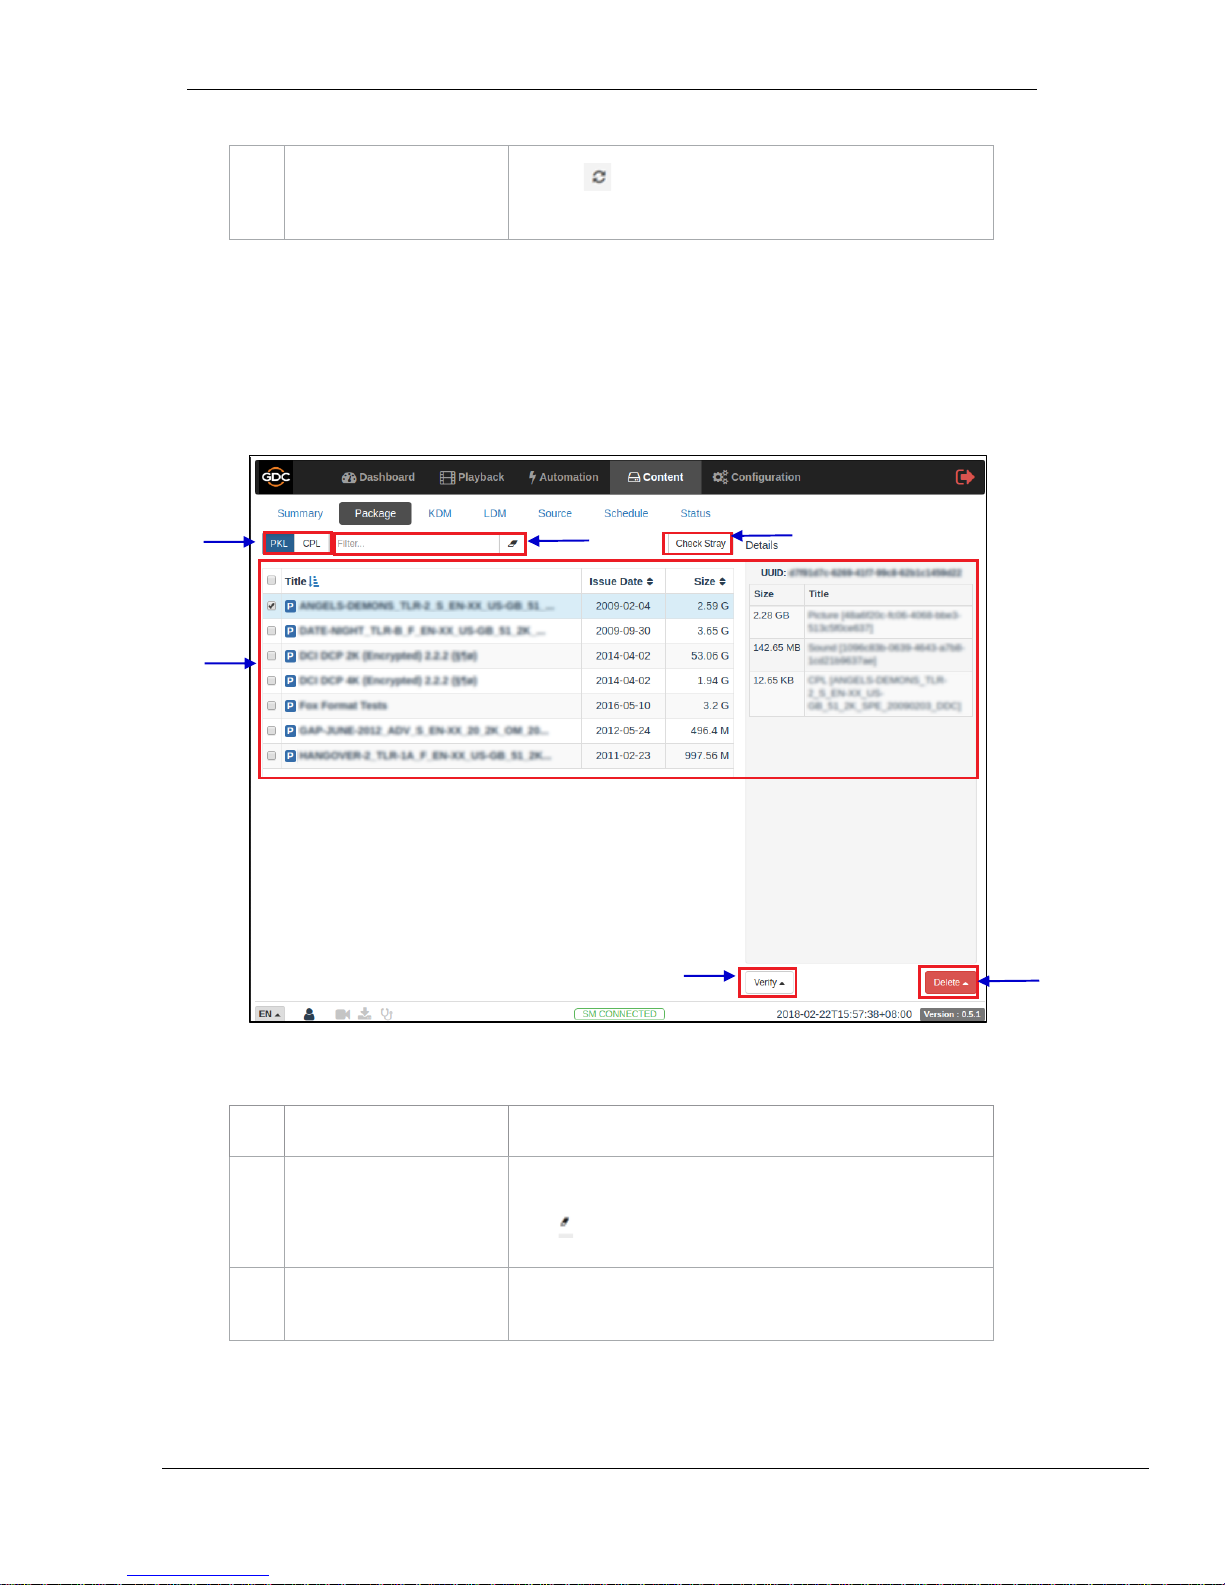
6.2 Package
This tab shows the content available on the SR-1000.!
1
[PKL/CPL]
Displays list by CPLs or PKLs.
2
[Filter]
PKL/CPL list will be filtered by the text entered here.
Click Clear Filter button to clear the search text.
3
[Check Stray]
Click Check Stray to detect and delete any of the stray files
from deleted PKLs and CPLs.
1
5
6
3 4 2
Figure 19: List of CPL’s or PKL’s
Page 32

- 31 -
March 23, 2018
User Manual for SR-1000 Standalone Integrated Media Block™
7. CONFIGURATION
4
[Content List]
Displays the list of content available on the server.
When an item is selected, details are displayed on the right
panel.
5
[Verify]
Verify that the content is correct. There are 3 options available:
Quick Verify, Schedule Verify and Immediately Verify.
Quick Verify: A pop-up window will be shown to display the
verification status. OK means no error is found. Otherwise, the
description of the error will be shown.
Immediately Verify: Immediate full verification of the selected
CPL/PKL. The Verification status will be displayed under the
Status tab.
Schedule Verify: Set a date and time for full verification of the
selected CPL/ PKL. A pop-up window will be shown to enter
Name, Time and Date. Click Create button to schedule the
verification. The scheduled verification will be displayed under
the Schedule tab and the verification status will be displayed
under the Status tab.
6
[Delete]
The following content delete options are available:
Immediately Delete: Delete the selected PKL and CPL
immediately.
Schedule Delete: Set a date and time to delete this content.
Page 33
- 32 -
March 23, 2018
User Manual for SR-1000 Standalone Integrated Media Block™
7. CONFIGURATION
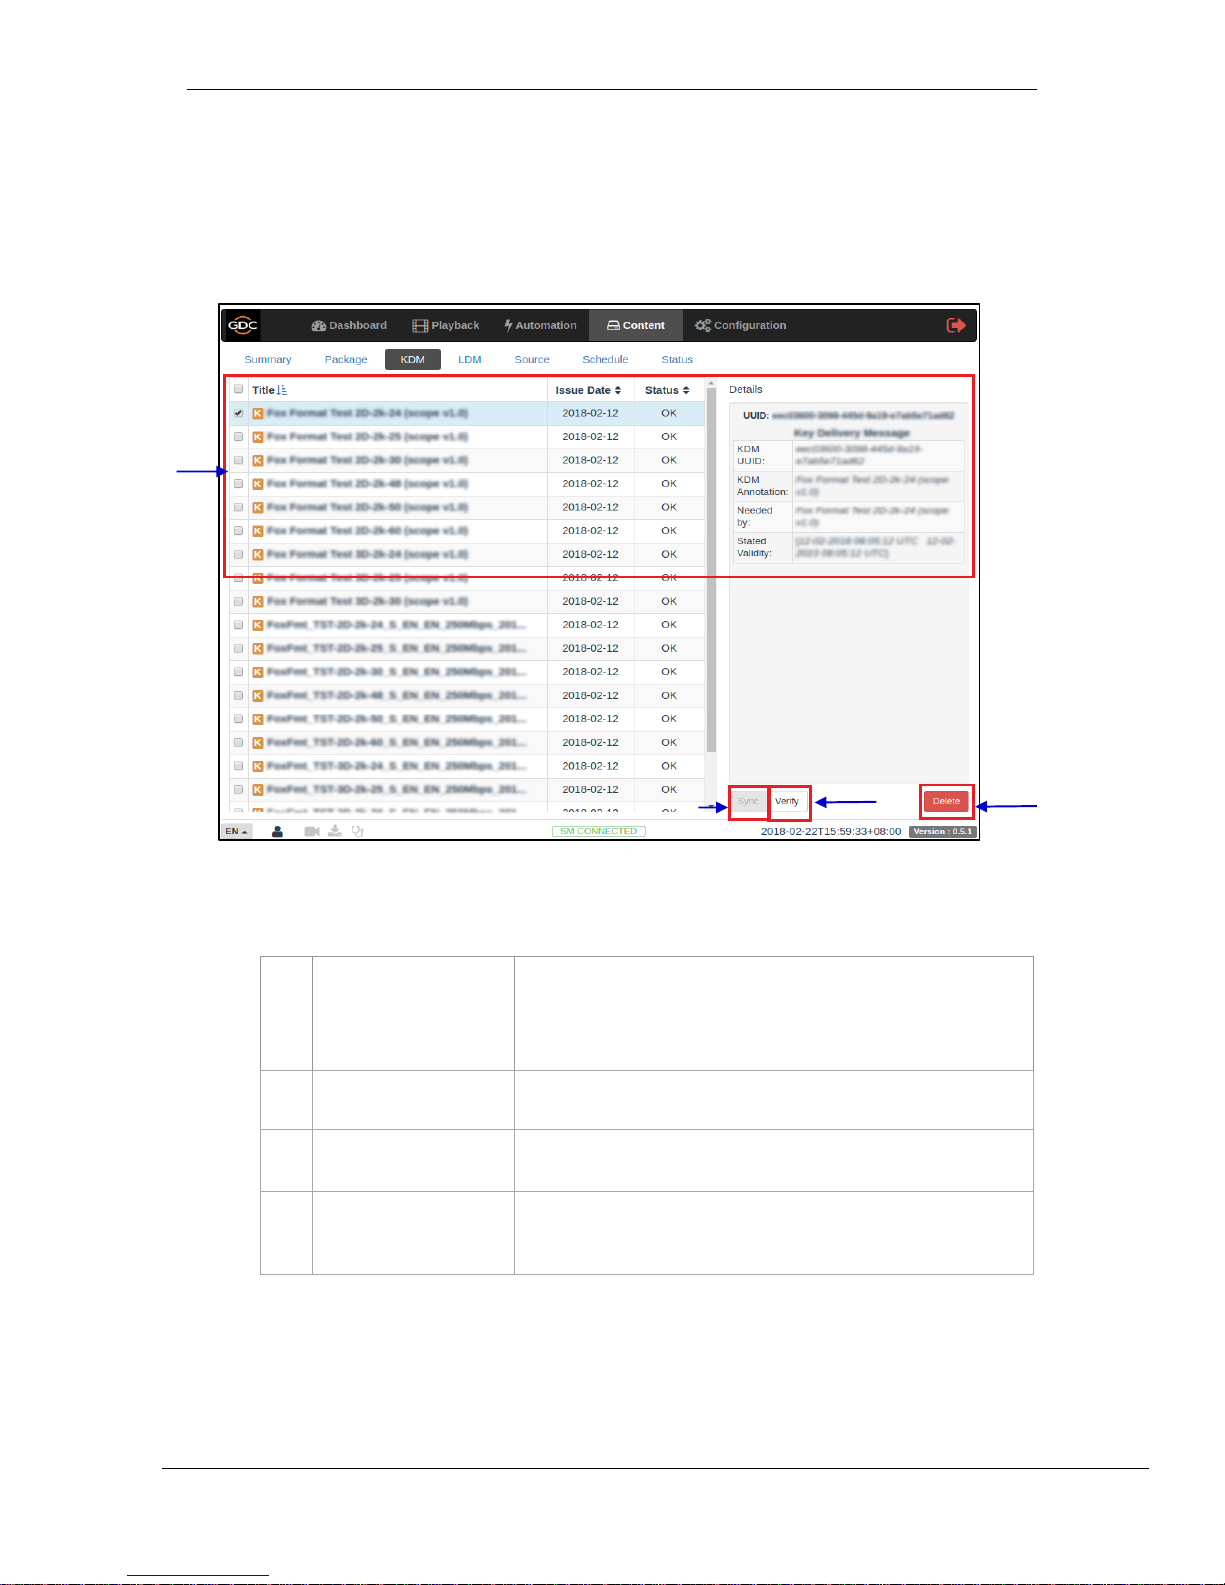
6.3 KDM
This tab displays all the KDMs present on the SR-1000!
1
[KDM List]
Displays a list of the KDMs on the SR-1000.
When a KDM is selected from the list, KDM details are displayed on
the right panel.
2
[Verify]
Verify the selected KDM. Any errors found will be displayed.
3
[Delete]
Delete the selected KDM.
4
[Sync]
When the status displays ‘Not in SM”, click the Sync button to
synchronize the KDM to the SM.
1
3
4
2
Figure 20: List of KDMs
Page 34
- 33 -
March 23, 2018
User Manual for SR-1000 Standalone Integrated Media Block™
7. CONFIGURATION
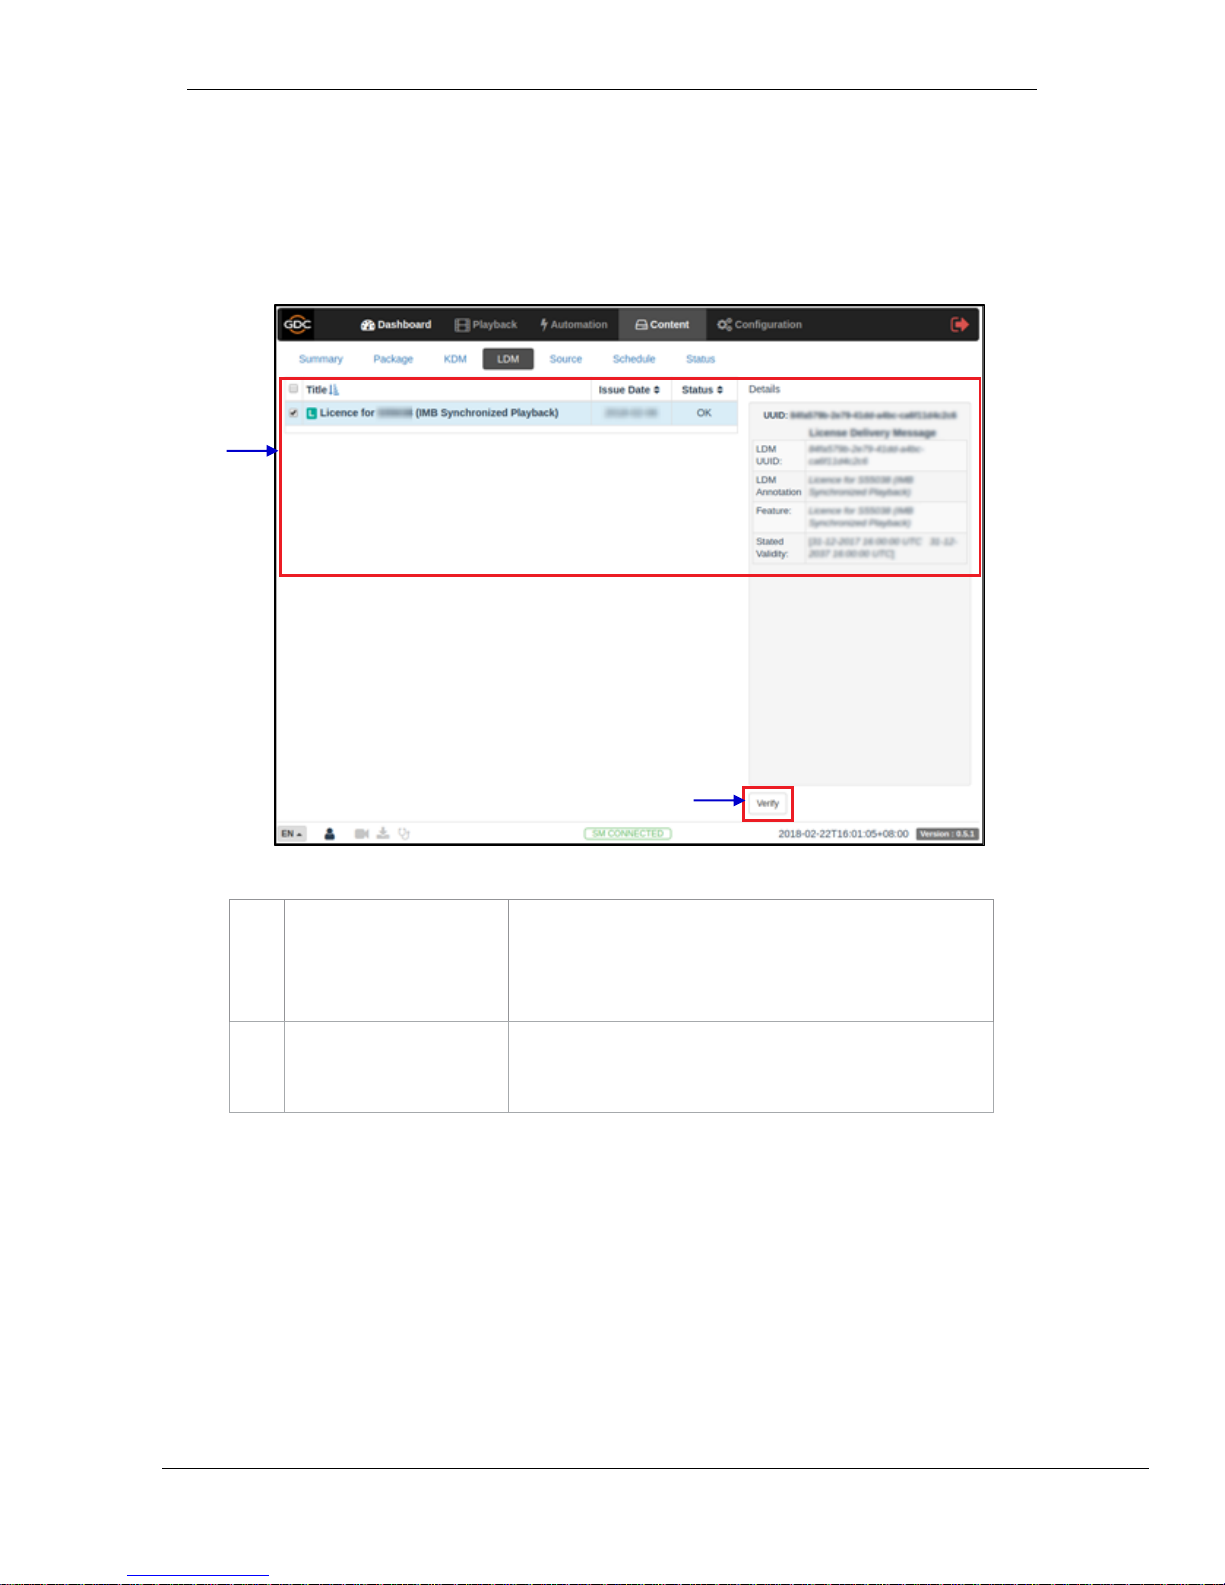
6.4 LDM
This tab displays the list of licenses on the SR-1000.!
!
!
!
!
!
!
!
!
!
!
!
!
1
[LDM List]
Displays a list of licenses installed on the SR-1000.
When an LDM is selected from the list, LDM details are
displayed on the right panel.
2
[Verify]
Verify that the LDM is valid. Any errors found will be displayed.
The Verification status will be displayed under the Status tab.
!
!
!
!
!
!
2
1
Figure 21: List of LDMs
Page 35
- 34 -
March 23, 2018
User Manual for SR-1000 Standalone Integrated Media Block™
7. CONFIGURATION
!
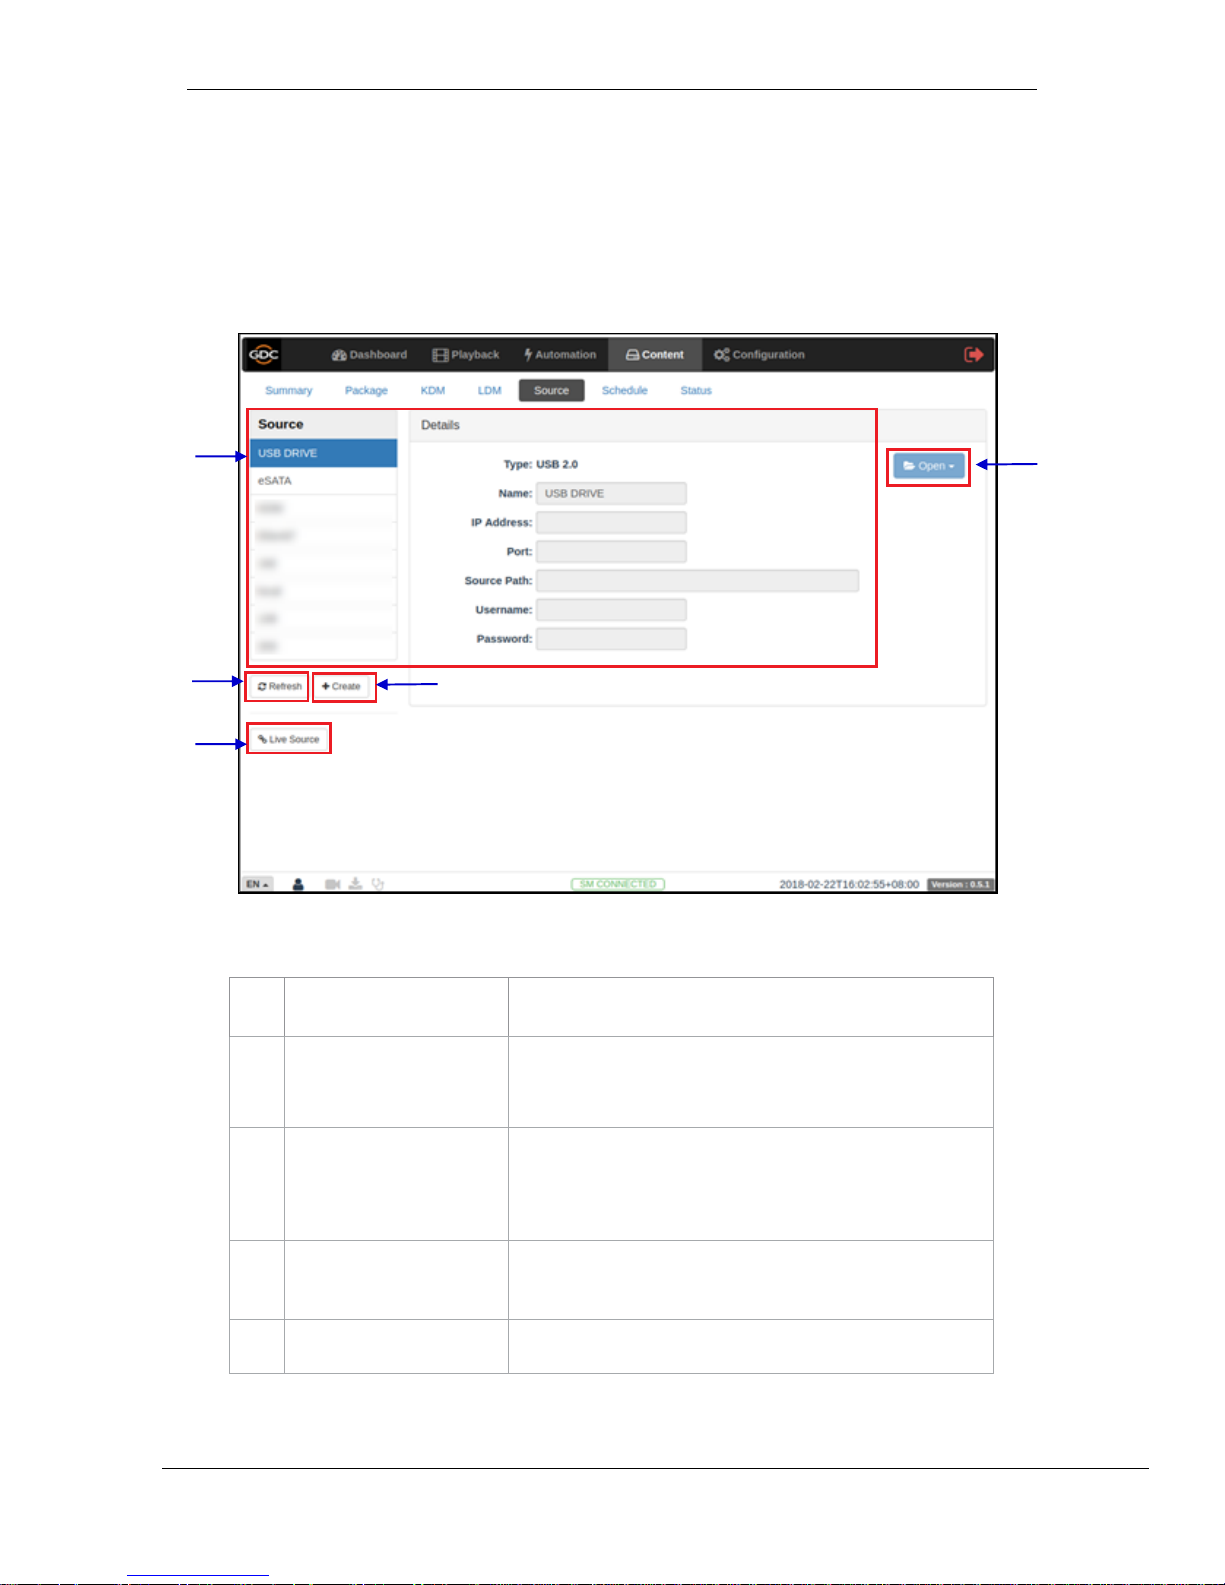
6.5 Source
This tab is used to configure the content ingest sources on the SR-1000.
1
[Source]
Displays a list of configured content ingest sources on the
SR-1000.
2
[Live Source]
Displays the list of content for Live Play
(Please refer to Section 6.5.1 for details.)
3
[+Create]
Click +Create to add a new content ingest source.
Fill in the details for the content ingest source and click Save to
save the changes.
4
[Open]
Click Open to mount the content ingest source and select the
content to be ingested.
5
[Refresh]
Click Refresh to refresh the list of content ingest sources
2
1
4
3
Figure 22: List of ingest sources
5
Page 36
- 35 -
March 23, 2018
User Manual for SR-1000 Standalone Integrated Media Block™
7. CONFIGURATION
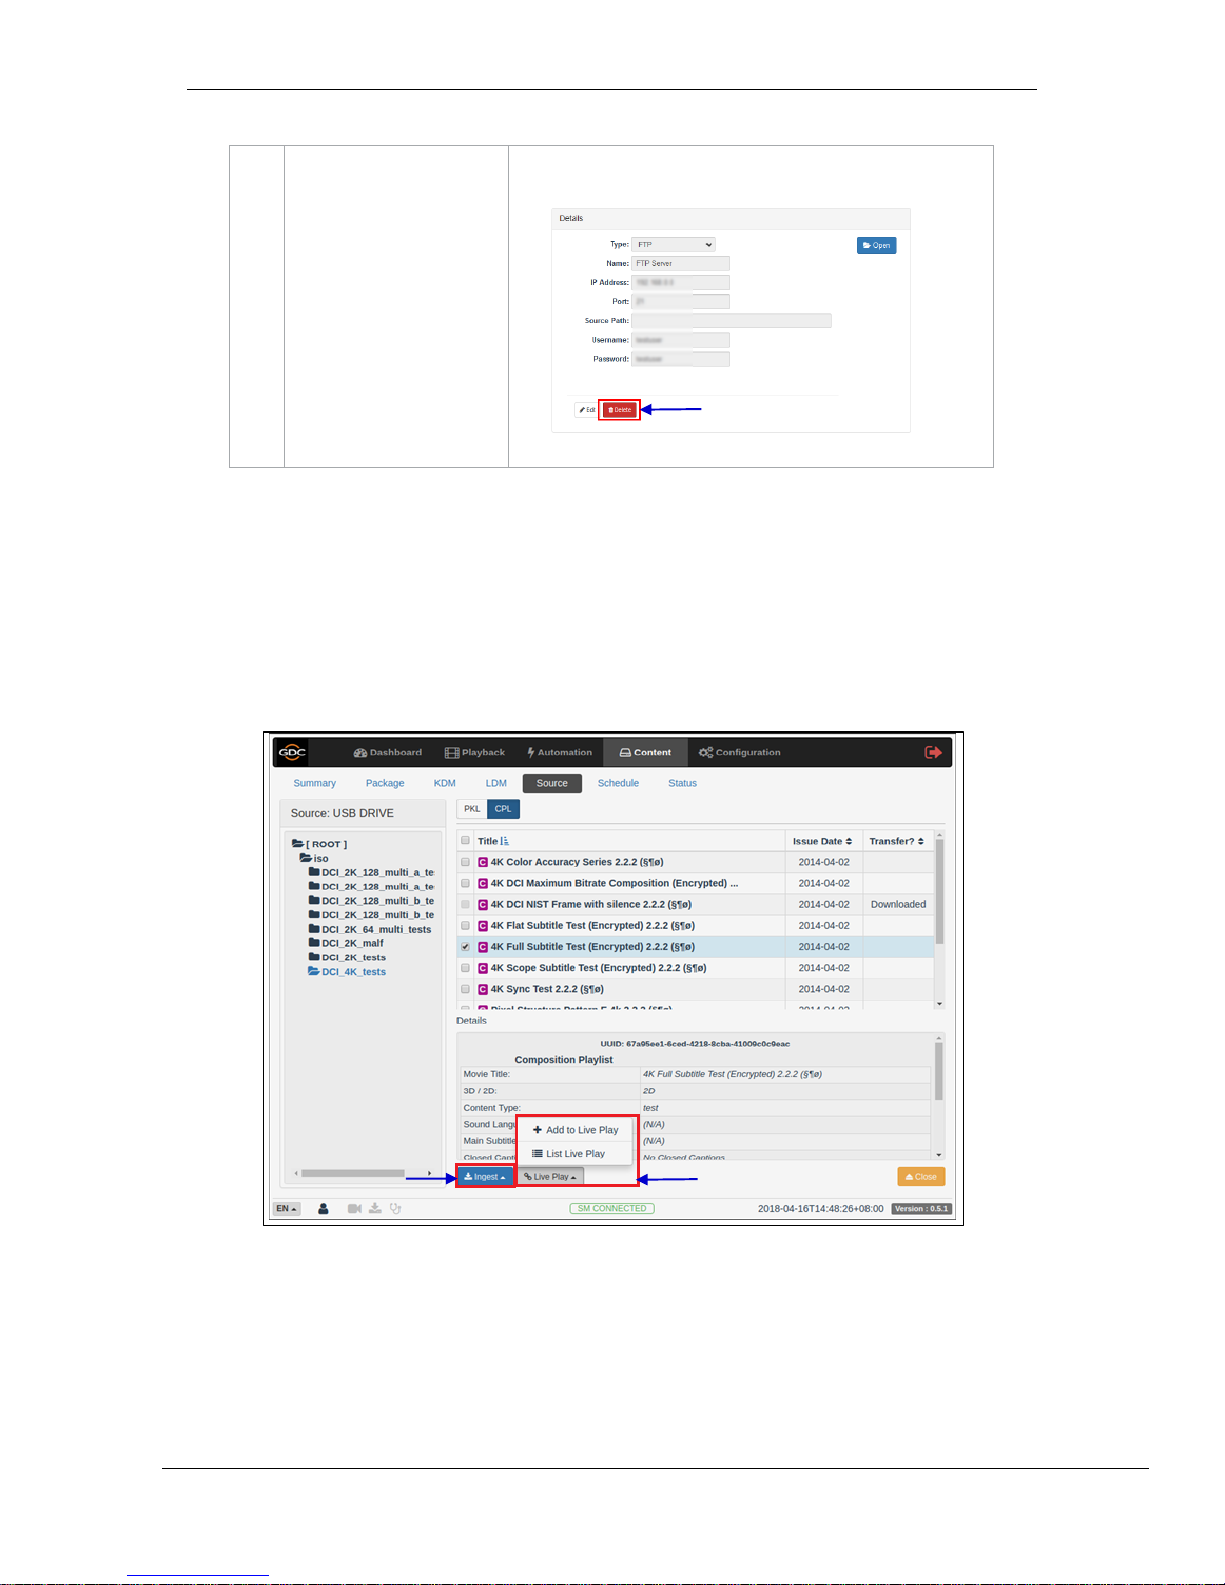
6
[Delete]
Click Delete to delete the selected content ingest source.
* Delete and Edit buttons only available on Created Sources
6.5.1 Live Source
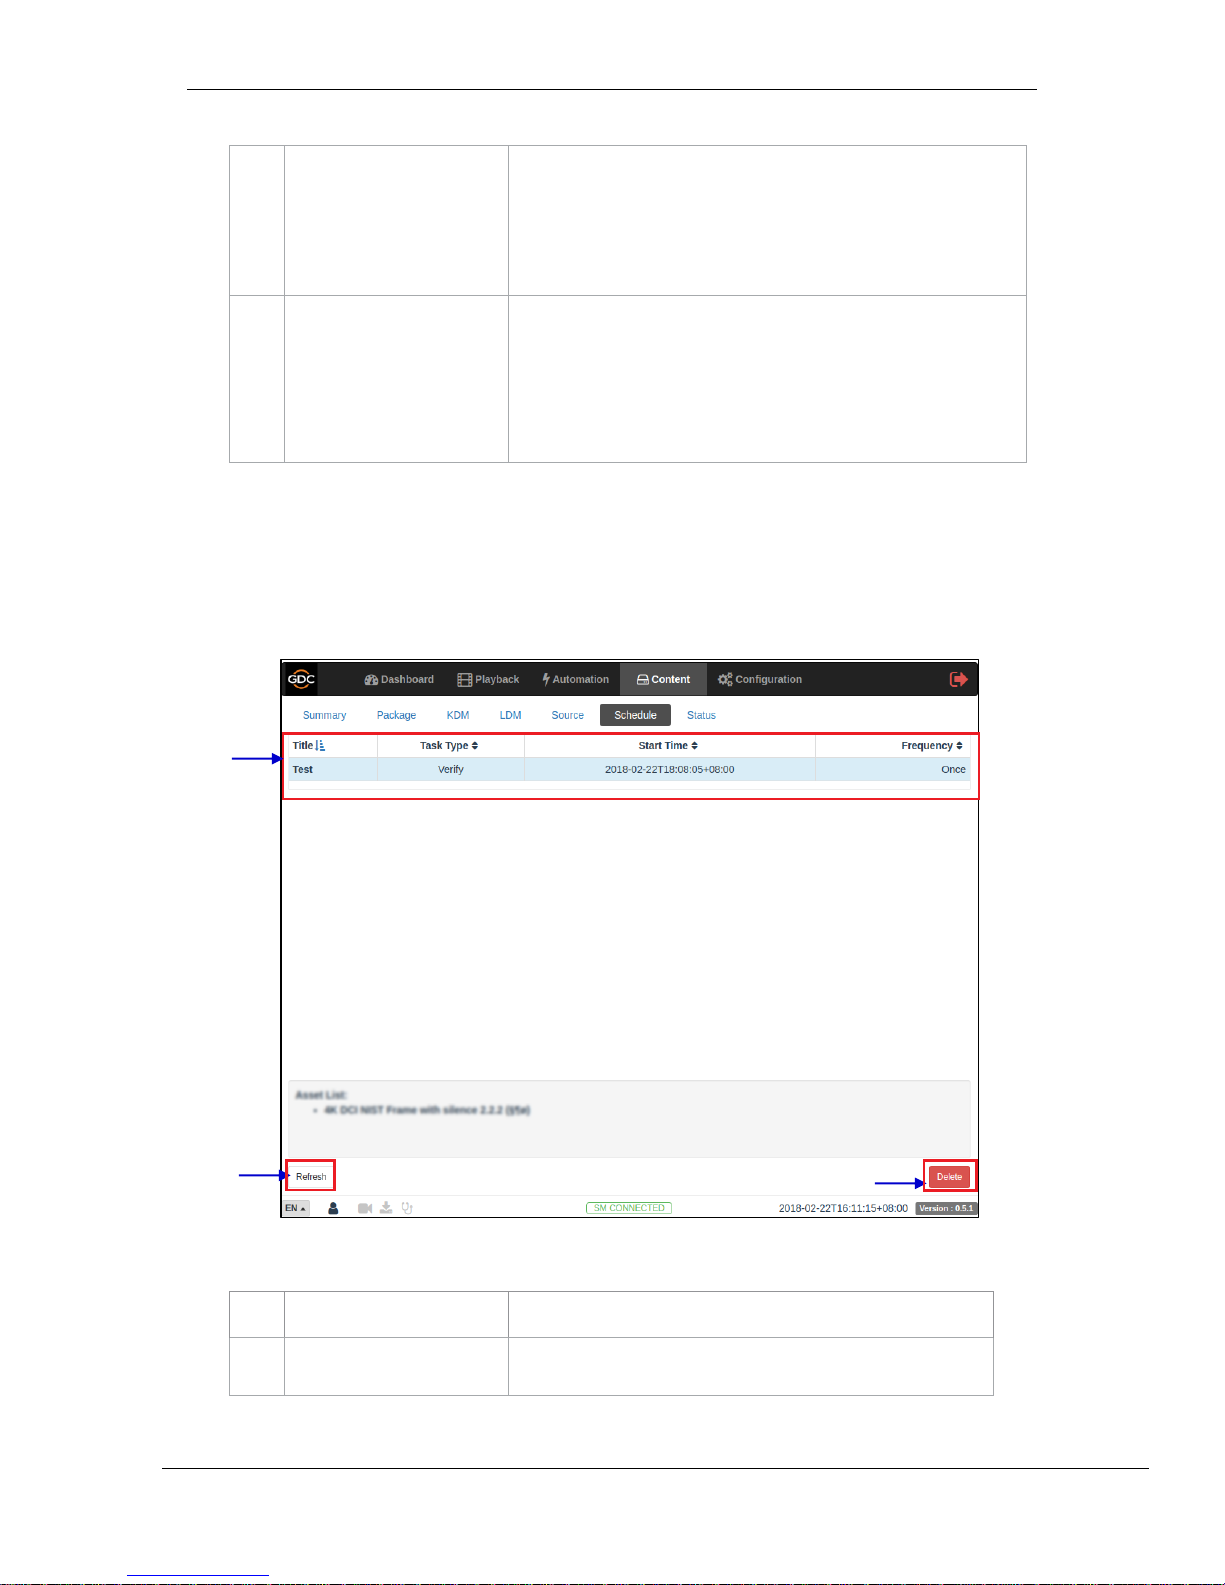
Live play allows playback from content ingest source without ingesting.
o Live play is supported for USB/ eSATA sources only.
o Content should always be ingested before playback whenever possible.
Figure 23: Live Play
7
6
8
Page 37
- 36 -
March 23, 2018
User Manual for SR-1000 Standalone Integrated Media Block™
7. CONFIGURATION
7
[Live Play]
2 options are available when the ‘Live Play’ button is clicked:
Add to Live Play: Add the selected content as a Live Play Source
List Live Play: A pop-up window will be shown to display the list of
Live Play Sources
8
[Ingest]
Two c onten t in gest op tions a re av aila ble:
Ingest: Start content ingest immediately.
Schedule Ingest: Set a date and time to ingest the scheduled
content.
6.6 Schedule
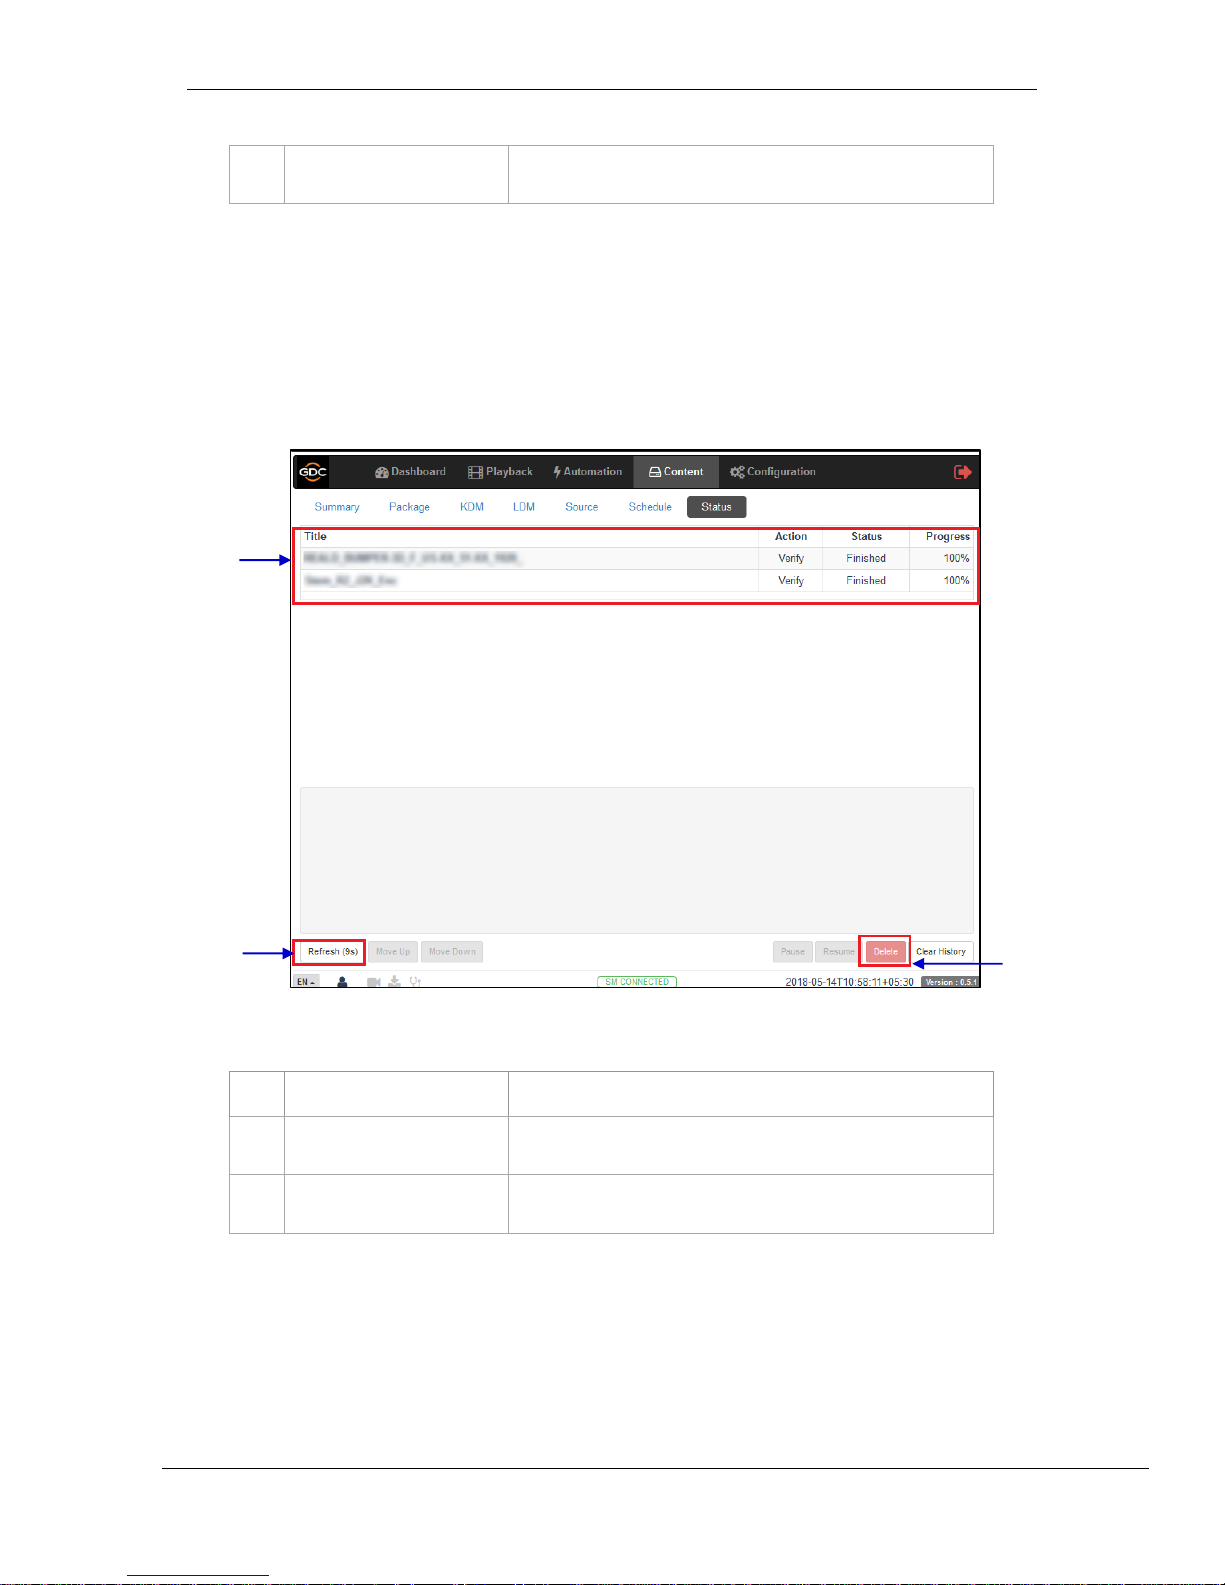
This tab shows the scheduled content ingest and verification tasks. !
!
!
!
!
!
!
!
!
!
!
!
1
[Schedule]
Displays a list of scheduled content ingest tasks.
2
[Refresh]
Click Refresh to refresh the list of schedules.
1
Figure 24: List of Scheduled Ingest tasks
2
3
Page 38
- 37 -
March 23, 2018
User Manual for SR-1000 Standalone Integrated Media Block™
7. CONFIGURATION
3
[Delete]
Click Delete to delete a selected schedule.
!
!
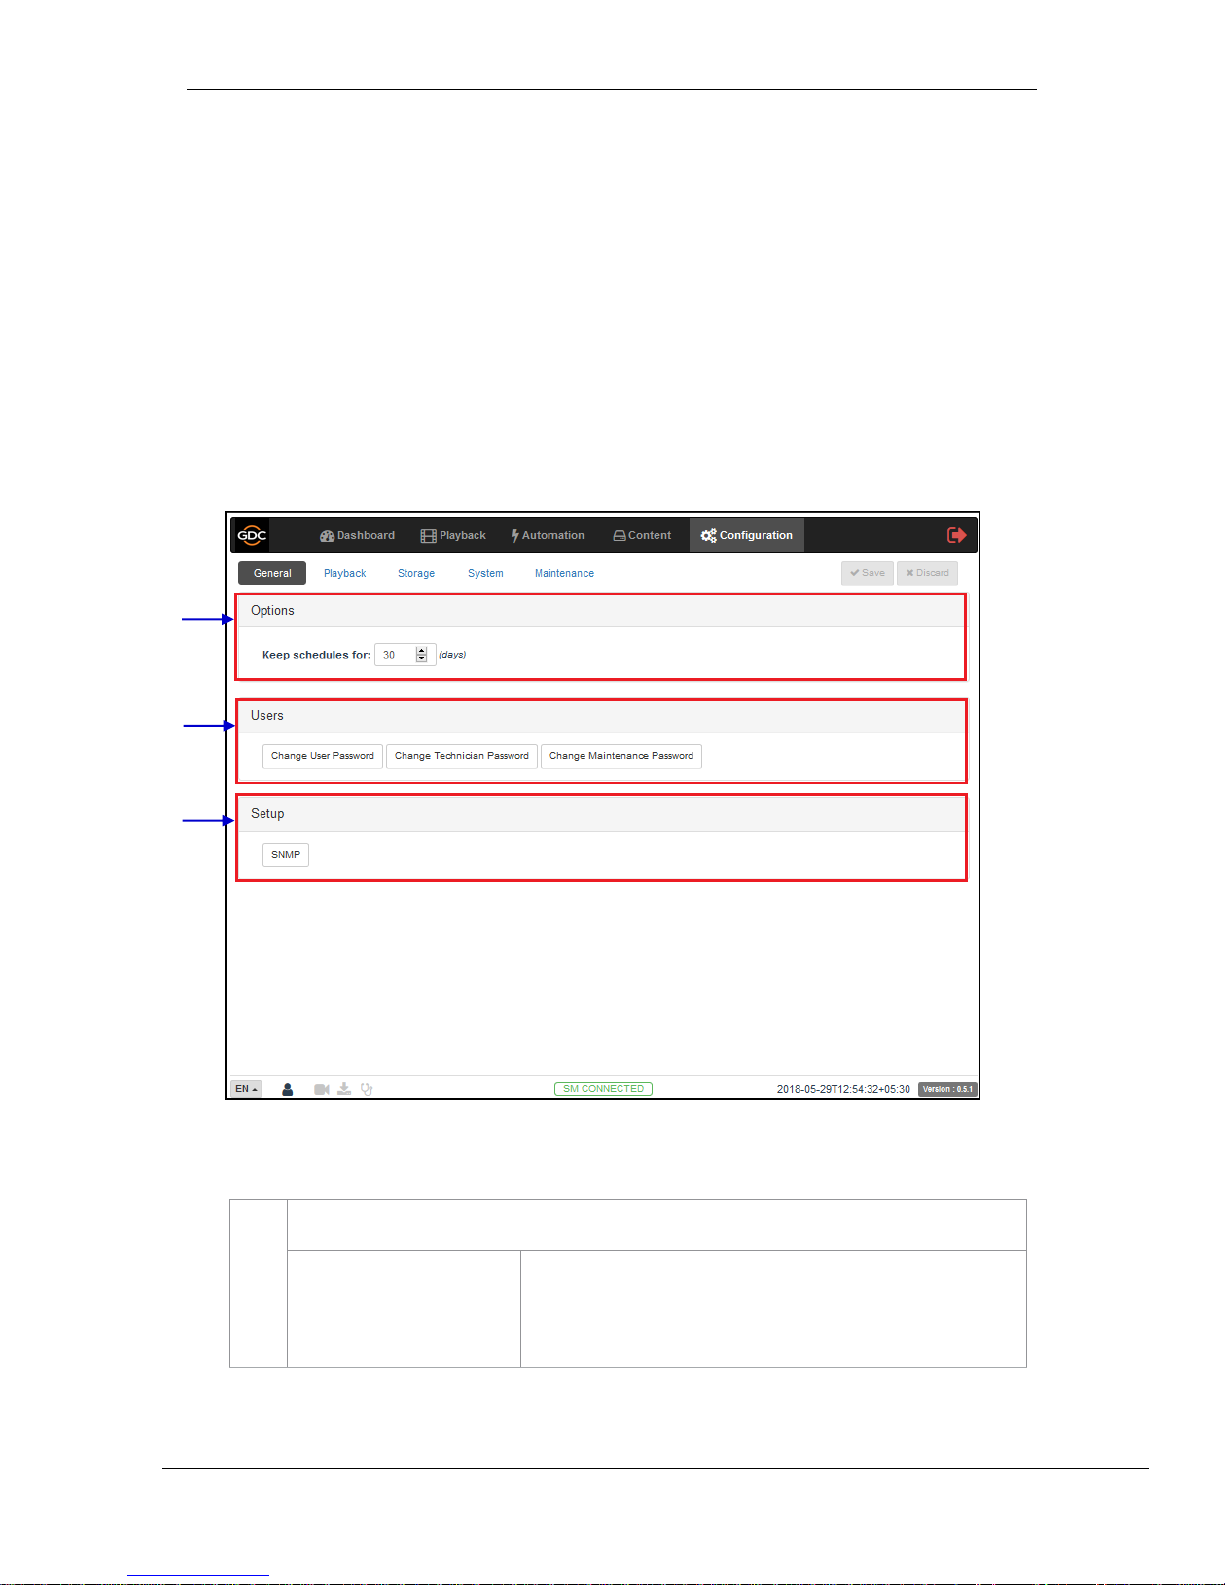
6.7 Status
This tab shows content ingest and verification status.
!
!
1
[Status]
Displays the list of content ingest, delete and verify tasks.
2
[Refresh]
Click Refresh to refresh the list of schedules.
3
[Delete]
Click Delete to delete a selected schedule.
!
!
1
Figure 25: Content Ingest and Verification Status
3
2
Page 39
- 38 -
March 23, 2018
User Manual for SR-1000 Standalone Integrated Media Block™
7. CONFIGURATION
7 CONFIGURATION
!
The configuration tab is used to change SR-1000 settings and configure aspects of SR-1000
operation. SR-1000 configuration consists of five categories: General, Playback, Storage, System
and Maintenance.
!
7.1 General
This tab is used to configure general options for the SR-1000. !
!
1
[Options]
Keep schedules for
Set the number of days that expired schedules are kept for.
1 2 3
Figure 26: General Configuration options
Page 40
- 39 -
March 23, 2018
User Manual for SR-1000 Standalone Integrated Media Block™
7. CONFIGURATION
2
[Users]
Change User Password
Change Technician
Password
Change Maintenance
Password
Change the password for User level
Change the password for Technician level
Change the password for Maintenance level
3
[Setup]
SNMP
Set up SNMP monitoring and reporting.
(Please refer to Section 7.1.1 for details.)
Click Save to save the settings or Close to cancel the changes.
7.1.1 SNMP Configuration
The SNMP feature is an option on the SR-1000 that enables the use of SNMP to monitor the
IMB. The SNMP interface contains many useful SNMP traps and is easy to configure.
!
A SNMP configuration pop-up window is shown with the following sections: General, System
Information, System Setting, Encrypt, Storage, Sensors, and Ethernet. Clicking on each
section will expand it.!
!
Page 41
- 40 -
March 23, 2018
User Manual for SR-1000 Standalone Integrated Media Block™
7. CONFIGURATION
7.1.1.1 General
!
!
!
!
!
!
!
!
!
!
!
!
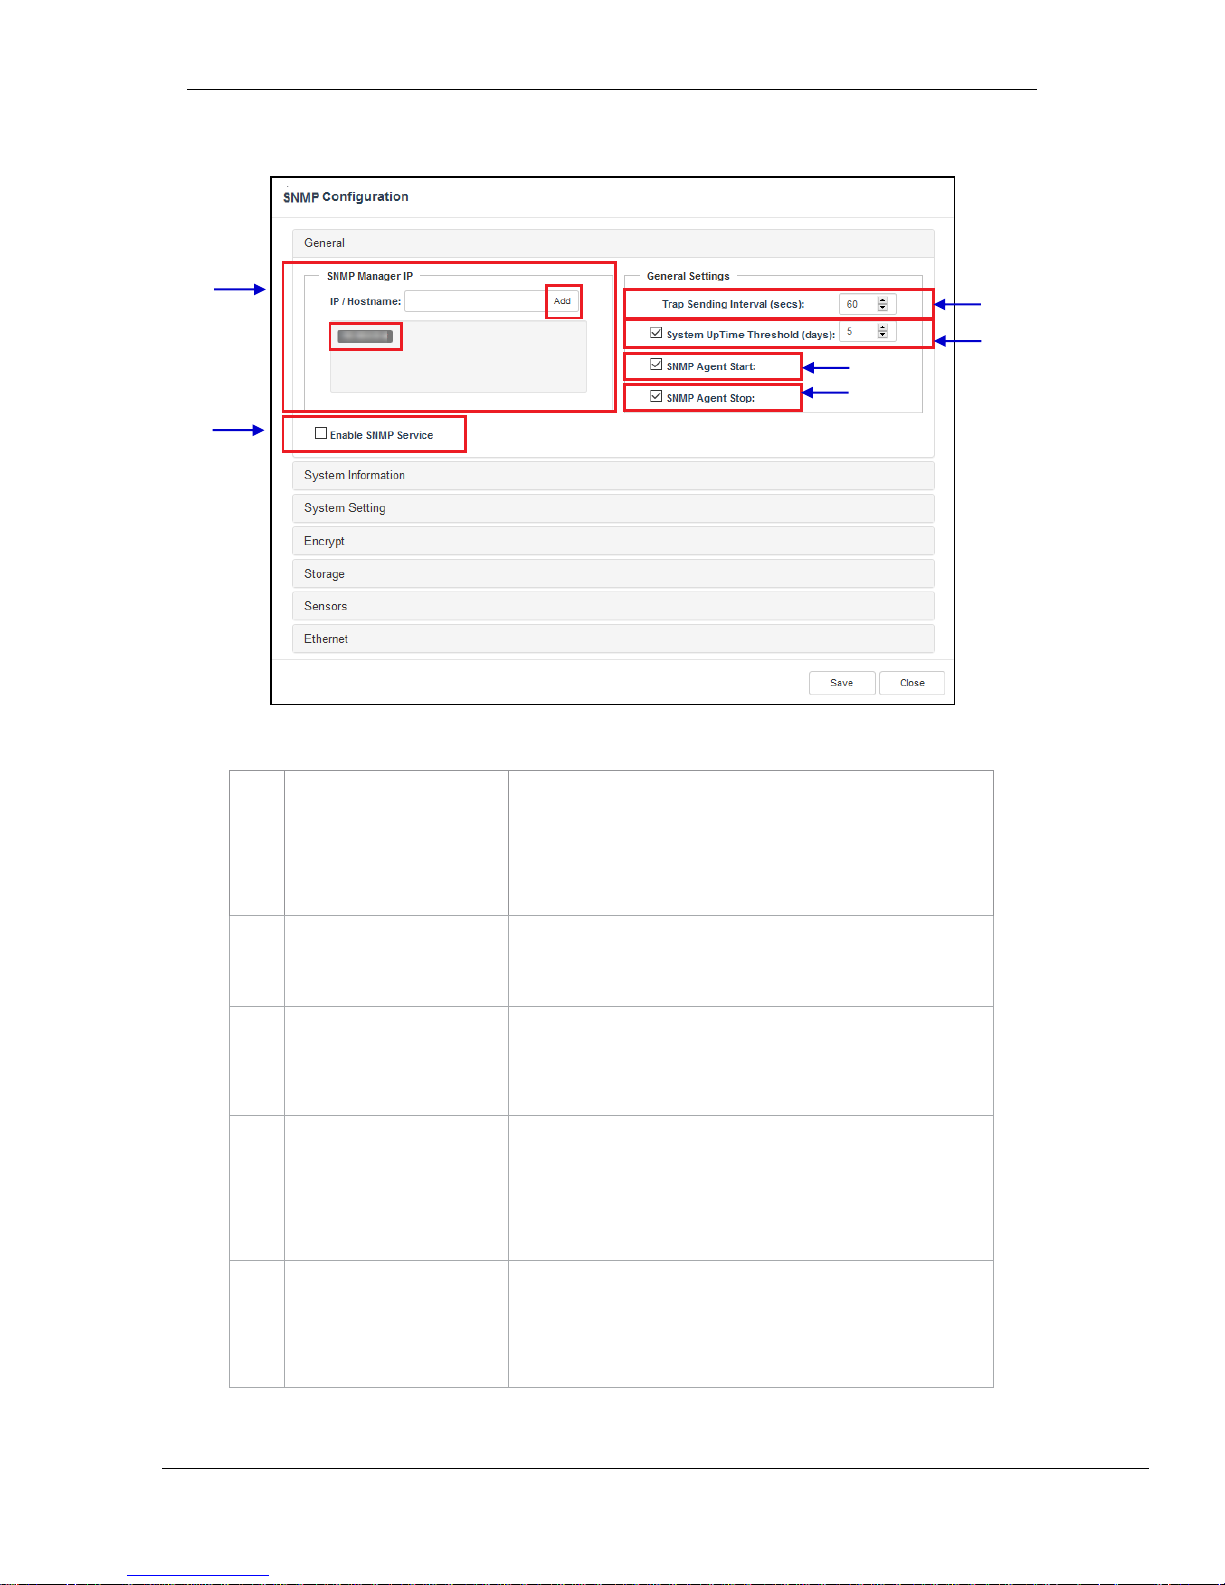
1
[SNMP Manager IP]
Indicate the IP address of the SNMP Manager where traps are
to be sent.
To add an SNMP Manager, Enter the IP Address of the SNMP
Manager and click Add.
Click the X next to the IP address to remove it.
2
[Trap Sending Interval]
Indicate the time interval in seconds after which a trap should be
resent to the SNMP Manager. The trap will continue to be resent
only as long as the error condition exists.
3
[System UpTime Threshold]
Indicate the threshold time in days.
NOTE: When Trap is On, a trap will be sent if the System
UpTime exceeds the threshold value.
4
[SNMP Agent Start]
Check SNMP Agent Start to activate the Trap.
Un-check the SNMP Agent Start to deactivate the Trap.
NOTE: When Trap is On, a trap is sent when the SNMP Agent is
started.
5
[SNMP Agent Stop]
Check SNMP Agent Stop to activate the Trap.
Un-check the SNMP Agent Stop to deactivate the Trap.
NOTE: When Trap is On, a trap is sent when the SNMP Agent is
stopped.
1 6 2
3 4 5
Figure 27: SNMP Configuration - General
Page 42
- 41 -
March 23, 2018
User Manual for SR-1000 Standalone Integrated Media Block™
7. CONFIGURATION
6
[Enable SNMP Service]
Enable or disable SNMP monitoring and reporting.
Click Save to save the settings or Close to cancel the changes.
7.1.1.2 System Information
!
!
!
!
!
!
!
!
!
!
!
!
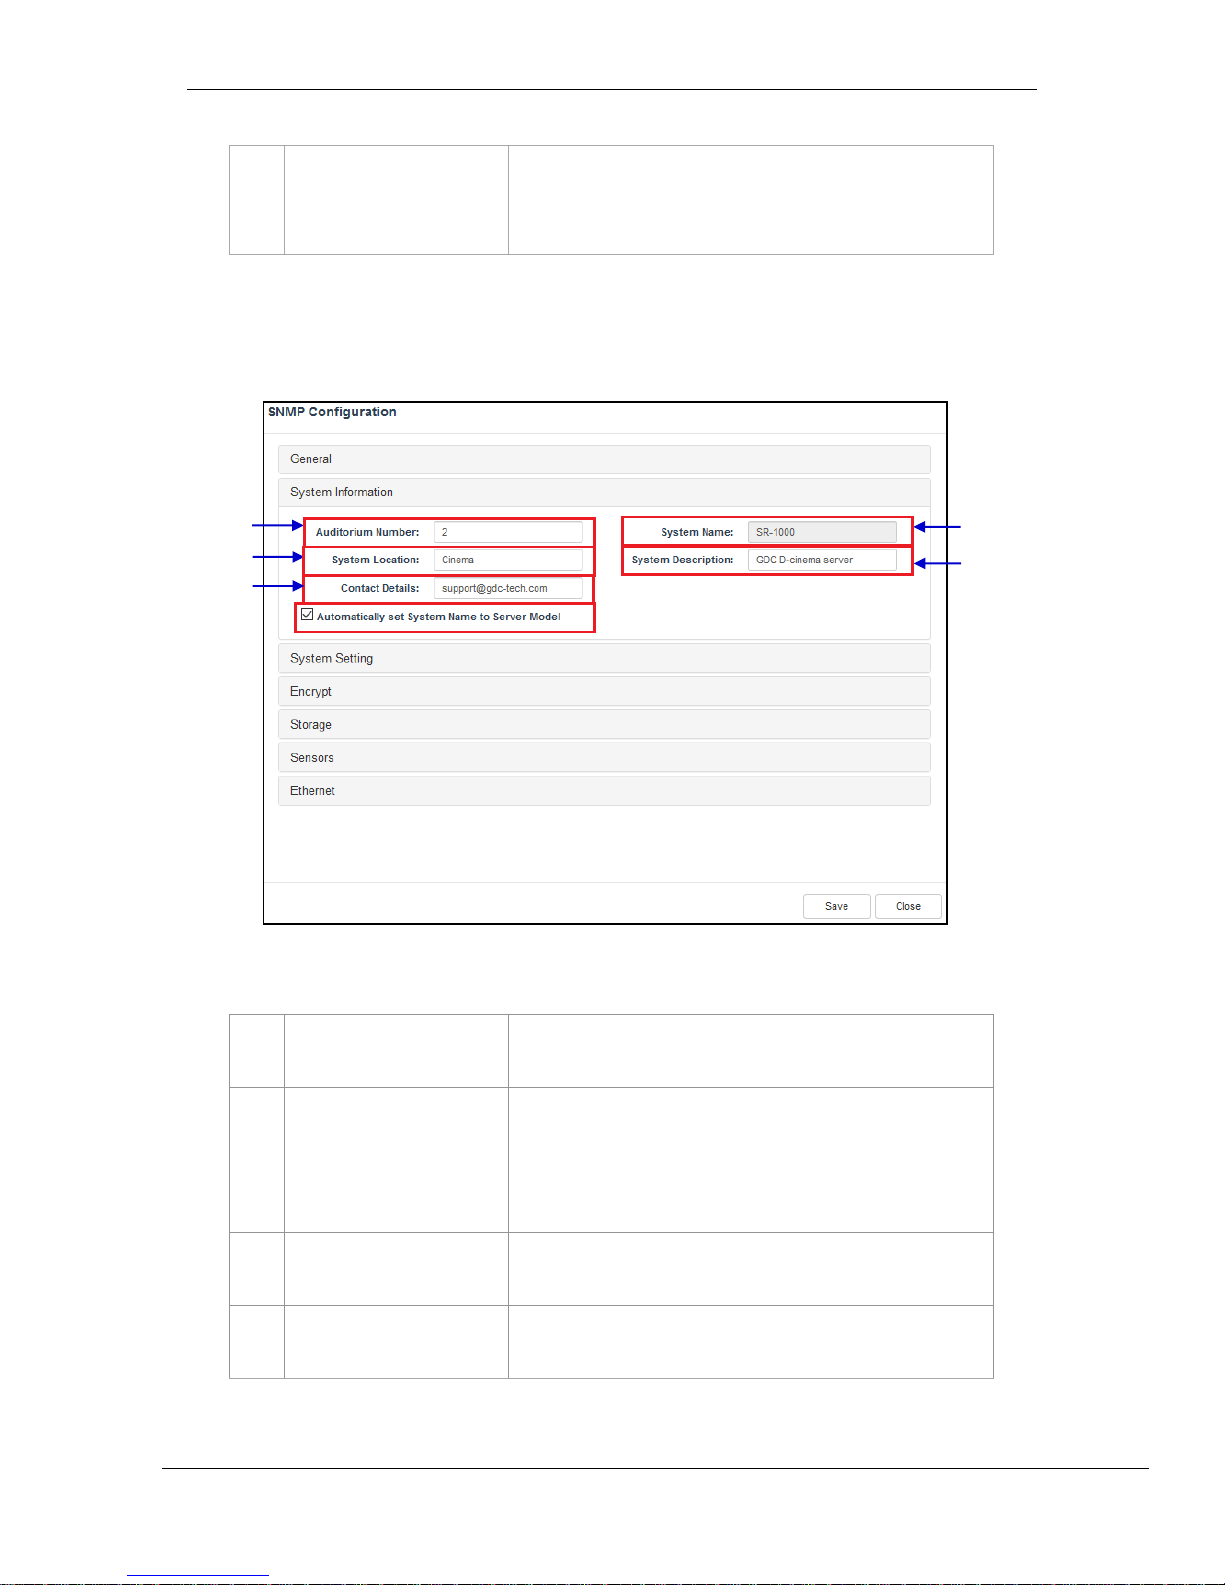
1
[Auditorium Number]
The auditorium where the SR-1000 is installed. This value will
be displayed when SNMP information is queried.
2
[System Name]
The name of the Server. This value will be displayed when
SNMP information is queried.
This will be automatically set to the server model if the
Automatically set System Name to Server model option is
enabled.
.
3
[System Location]
The location where the SR-1000 is installed. This value will be
displayed when SNMP information is queried.
4
[System Description]
A brief description of the server. This value will be displayed
when SNMP information is queried.
!
Figure 28: SNMP Configuration - System Information
1 3 2
4
5
Page 43
- 42 -
March 23, 2018
User Manual for SR-1000 Standalone Integrated Media Block™
7. CONFIGURATION
!
7.1.1.3 System Setting
!
!
!
!
!
!
!
!
!
!
!
!
!
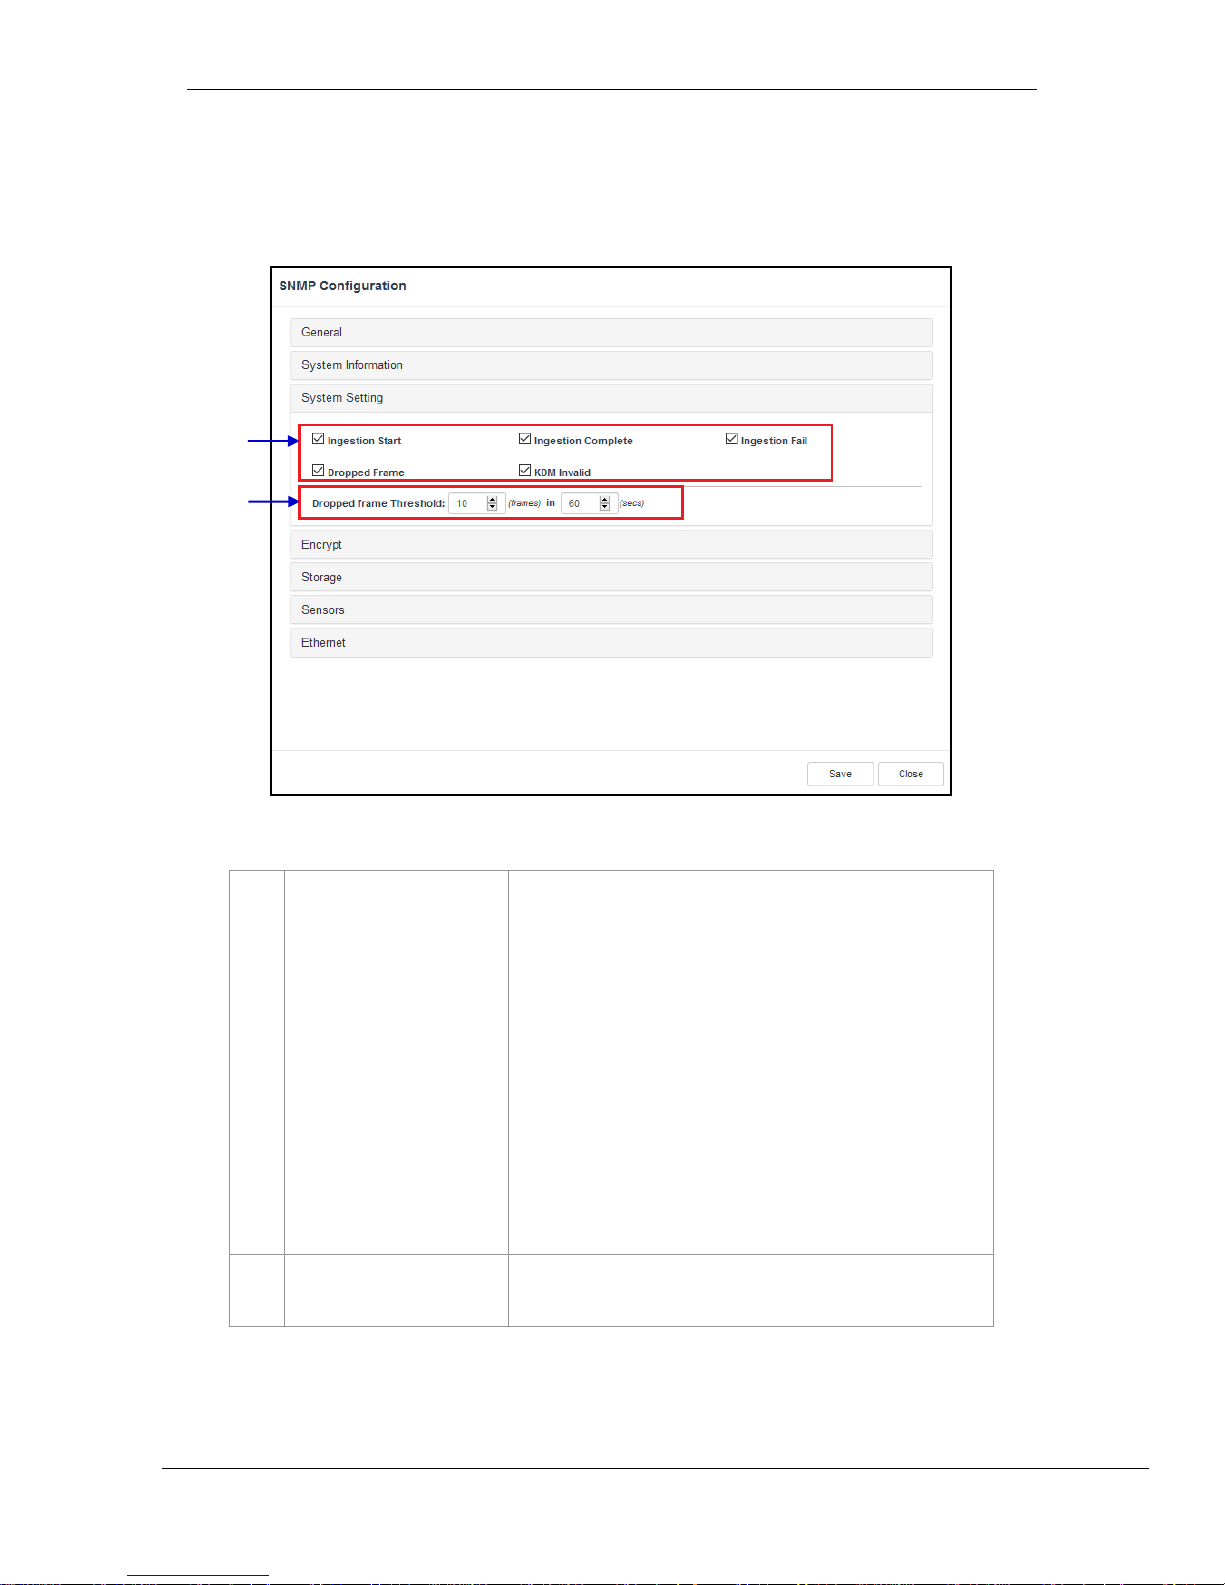
1
[Ingestion Start]
[Ingestion Complete]
[Ingestion Fail]
[Dropped Frame]
[KDM Invalid]
When this option is checked, an SNMP trap will be generated
when a DCP ingest starts.
When this option is checked, an SNMP trap will be generated
when a DCP ingest is completed.
When this option is checked, an SNMP trap will be generated
when a DCP ingest fails.
When this option is checked, an SNMP trap will be generated
when the playback has dropped frames
When this option is checked, an SNMP trap will be generated
when we try to play a playlist containing CPL without a valid
KDM
2
[Dropped Frame Threshold]
Set a threshold limit based on the number of frames dropped in
the specified time period (in seconds)
!
!
Figure 29: SNMP Configuration – System Setting
1
2
Page 44
- 43 -
March 23, 2018
User Manual for SR-1000 Standalone Integrated Media Block™
7. CONFIGURATION
!
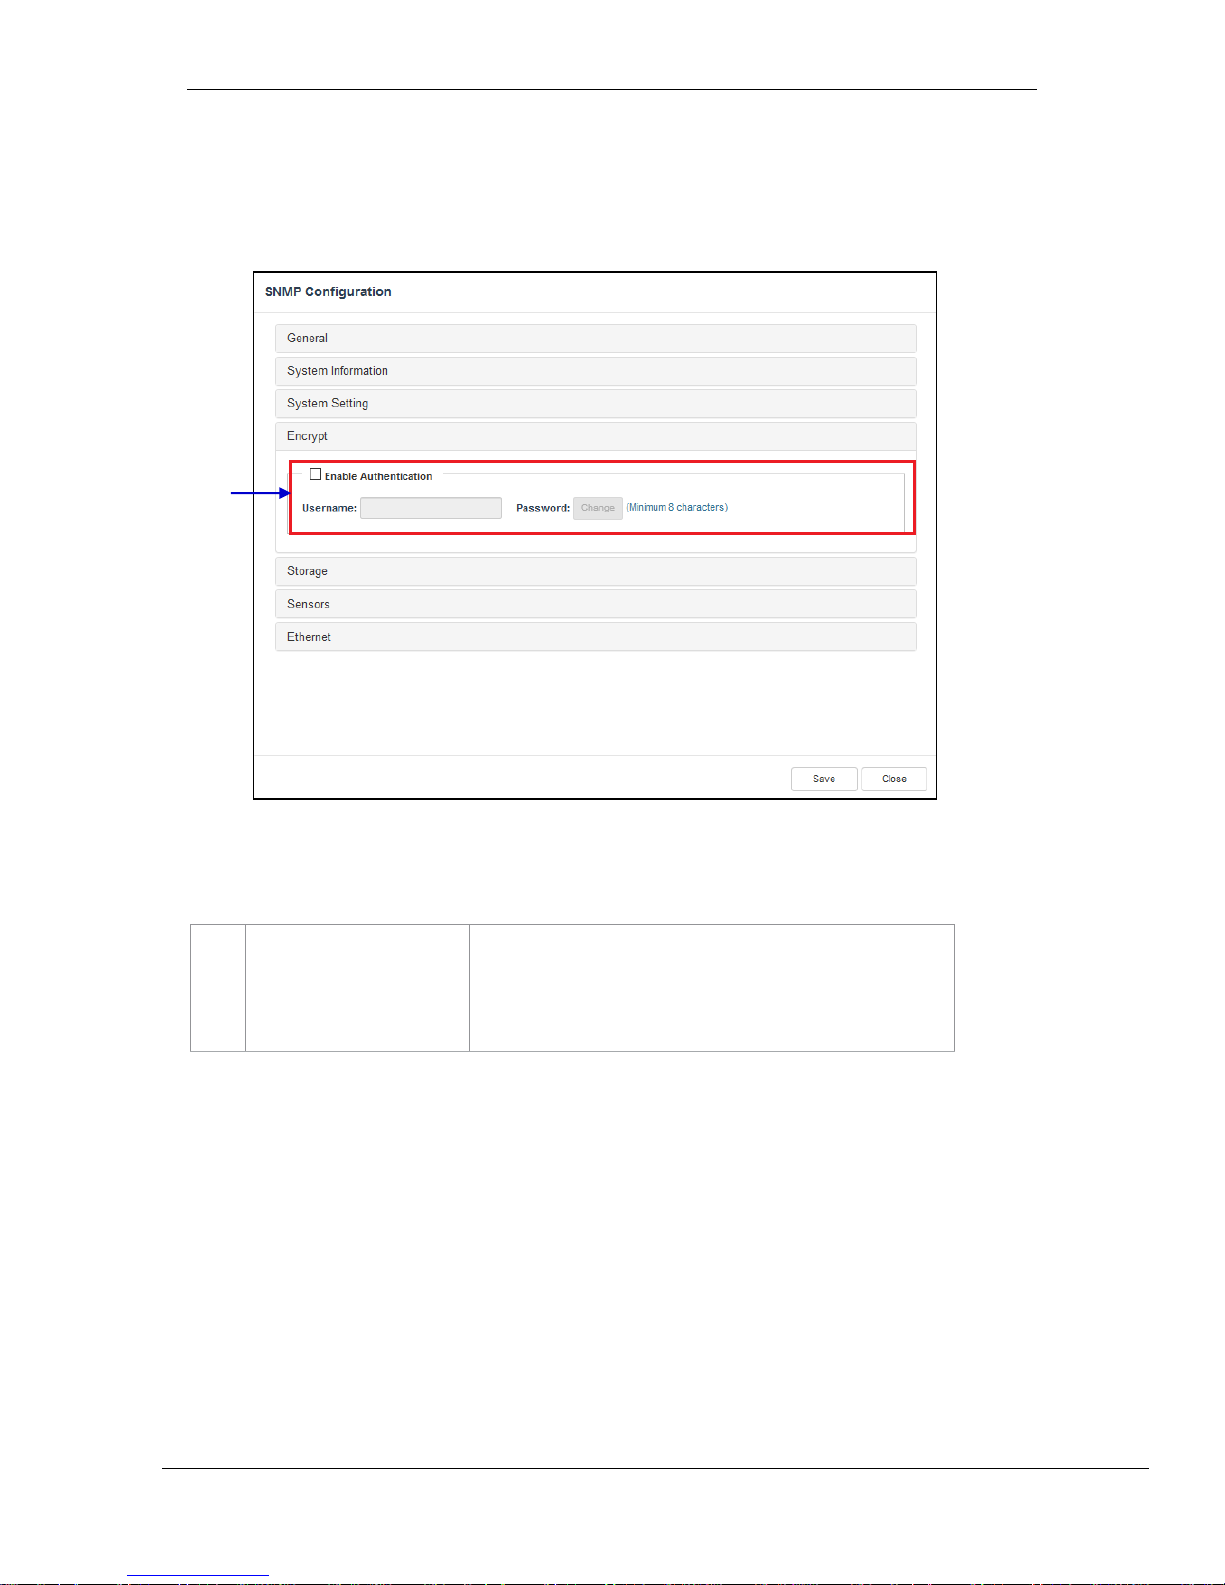
7.1.1.4 Encrypt
!
!
!
!
! !
1
[Enable Authentication]
Allows user to enable SNMP Authentication by providing
Username. The default Password can be changed using the
Change button.
Note: The new password should be atleast 8 characters long.
1
Figure 30: SNMP Configuration - Encrypt
Page 45
- 44 -
March 23, 2018
User Manual for SR-1000 Standalone Integrated Media Block™
7. CONFIGURATION
!
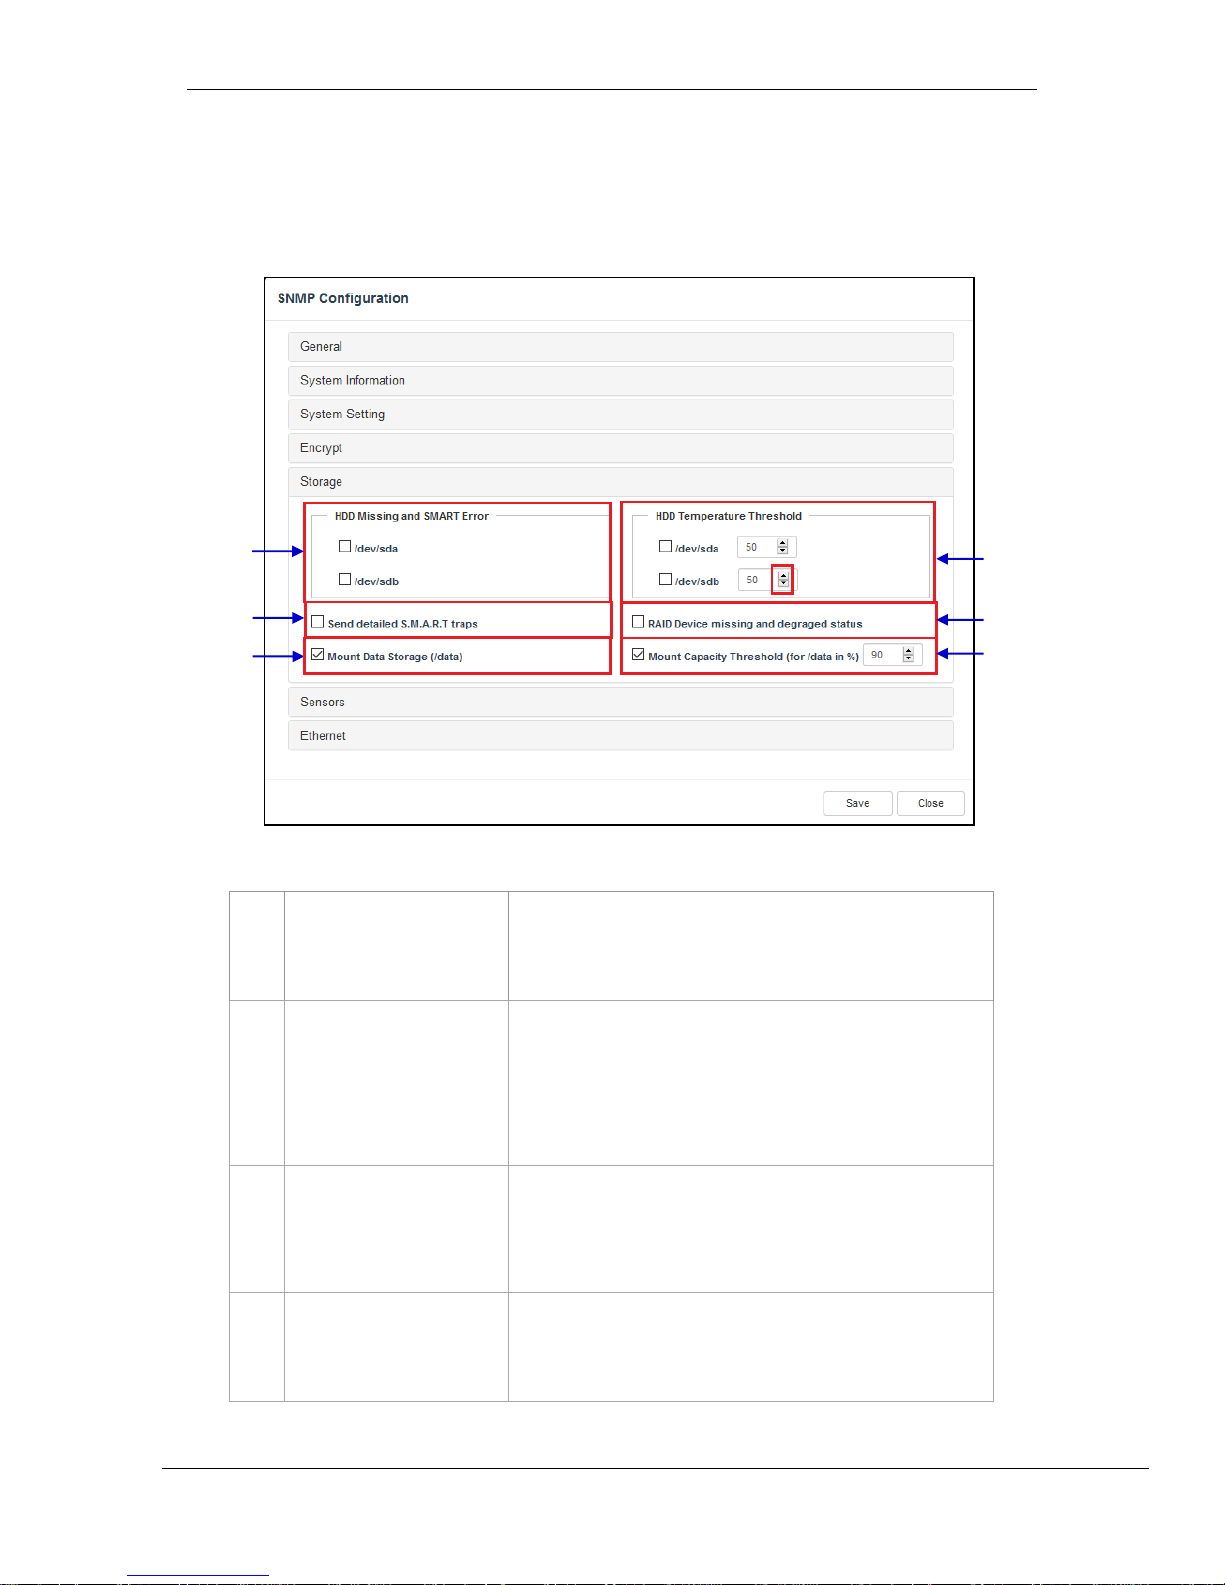
7.1.1.5 Storage
1
[HDD Missing and SMART
Error]
Check the corresponding storage devices to activate the Trap.
NOTE: When Trap is On, a trap will be sent to the SNMP
Manager if the system cannot detect the specified device.
2
[HDD Temperature
Threshold]
Set the desired threshold temperature for respective storage
device by using the [▲] and [▼] buttons.
Check the corresponding storage devices to activate the Trap.
NOTE: When Trap is On, a trap will be sent to the SNMP
Manager when the threshold temperature is reached.
3
[RAID Device missing and
degraded status]
Check RAID Device missing and degraded status to activate
the Trap.
NOTE: When Trap is On, a trap will be sent if the RAID Device
is missing or degraded.
4
[Mount Data Storage]
Check Mount Data Storage to activate the Trap.
NOTE: When Trap is On, a trap will be sent if the data storage is
not mounted on the system.
4 5 3 2 1
Figure 31: SNMP Configuration - Storage
6
Page 46
- 45 -
March 23, 2018
User Manual for SR-1000 Standalone Integrated Media Block™
7. CONFIGURATION
5
[Mount Capacity Threshold
(for data in %)]
Set the mount capacity threshold value for data (in percentage)
NOTE: When Trap is On, a trap will be sent if the mount
capacity threshold value is reached.
6
[Send detailed S.M.A.R.T.
traps]
Enables the sending of SNMP traps when specific hard disk
S.M.A.R.T. attributes change
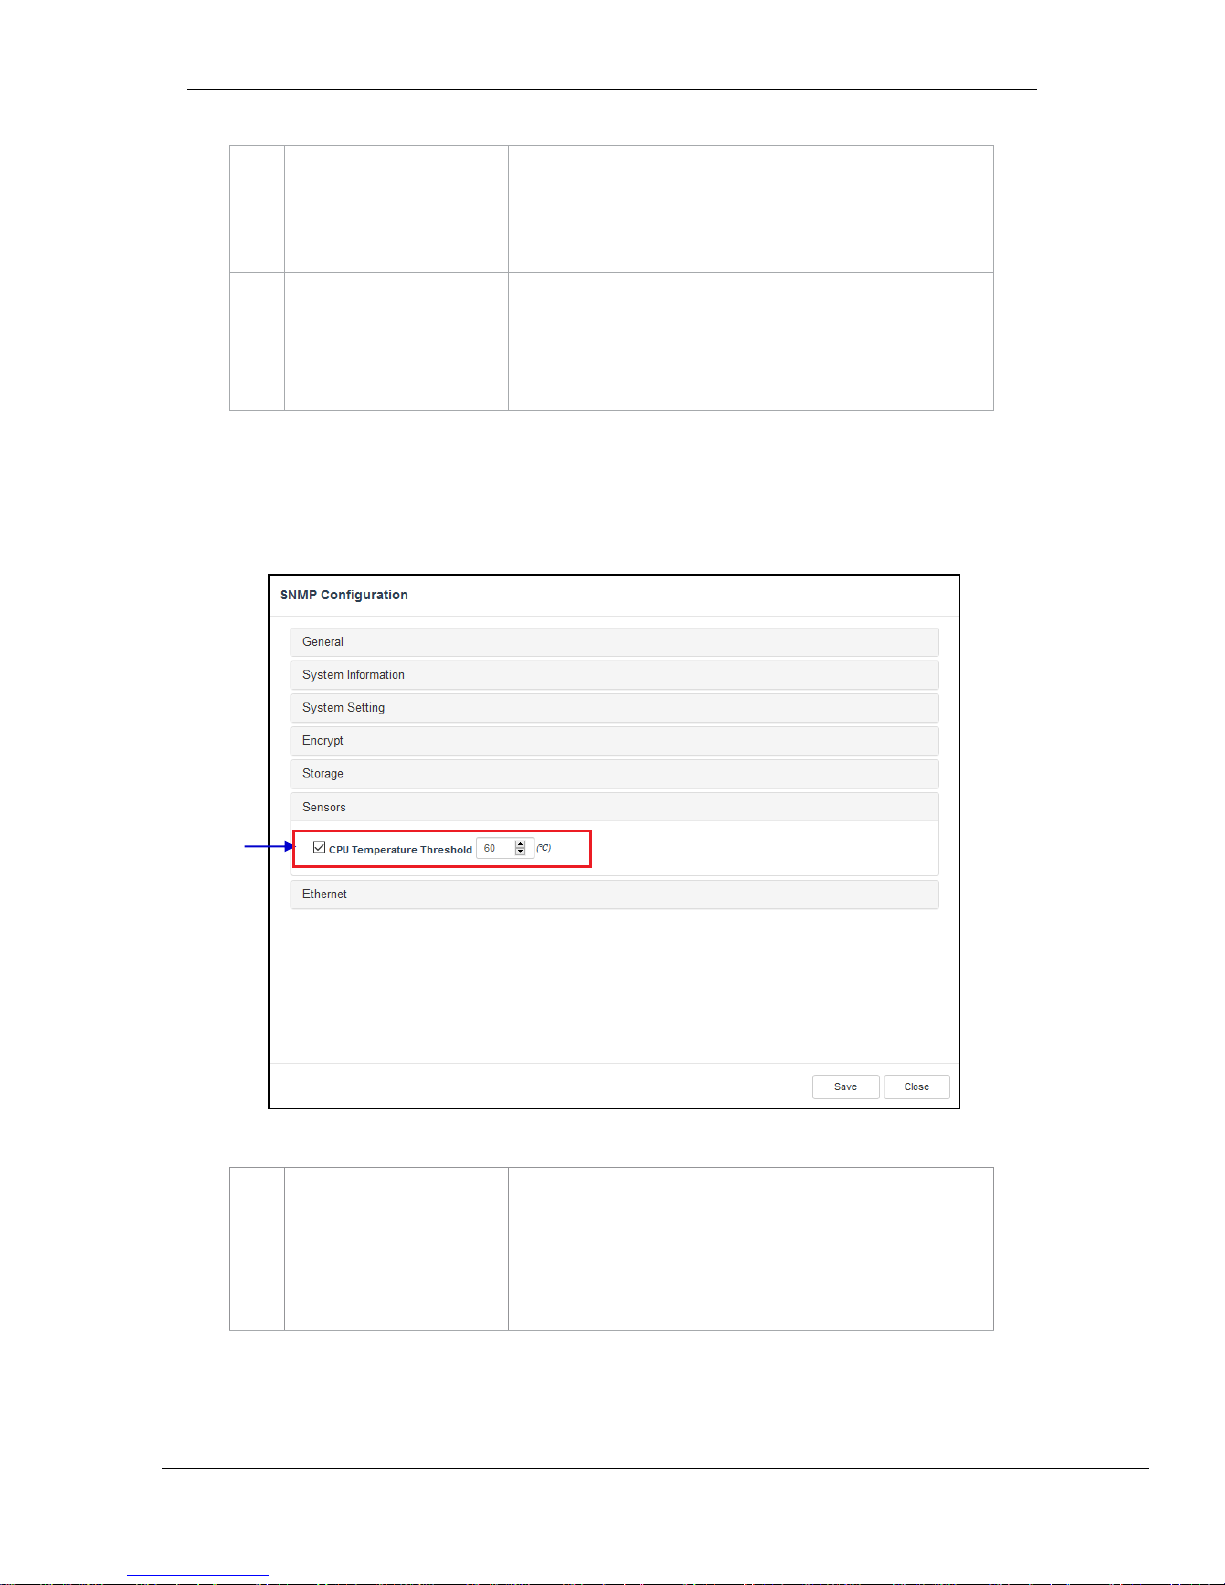
7.1.1.6 Sensor
1
[CPU Temperature
Threshold]
Set the threshold temperature required for the CPU sensors by
typing in the field or using an on-screen keyboard.
Check CPU Temperature Threshold to activate the Trap.
NOTE: When Trap is On, a trap is sent if the CPU temperature
exceeds the maximum threshold temperature.
1
Figure 32:SNMP Configuration - Sensor
Page 47
- 46 -
March 23, 2018
User Manual for SR-1000 Standalone Integrated Media Block™
7. CONFIGURATION
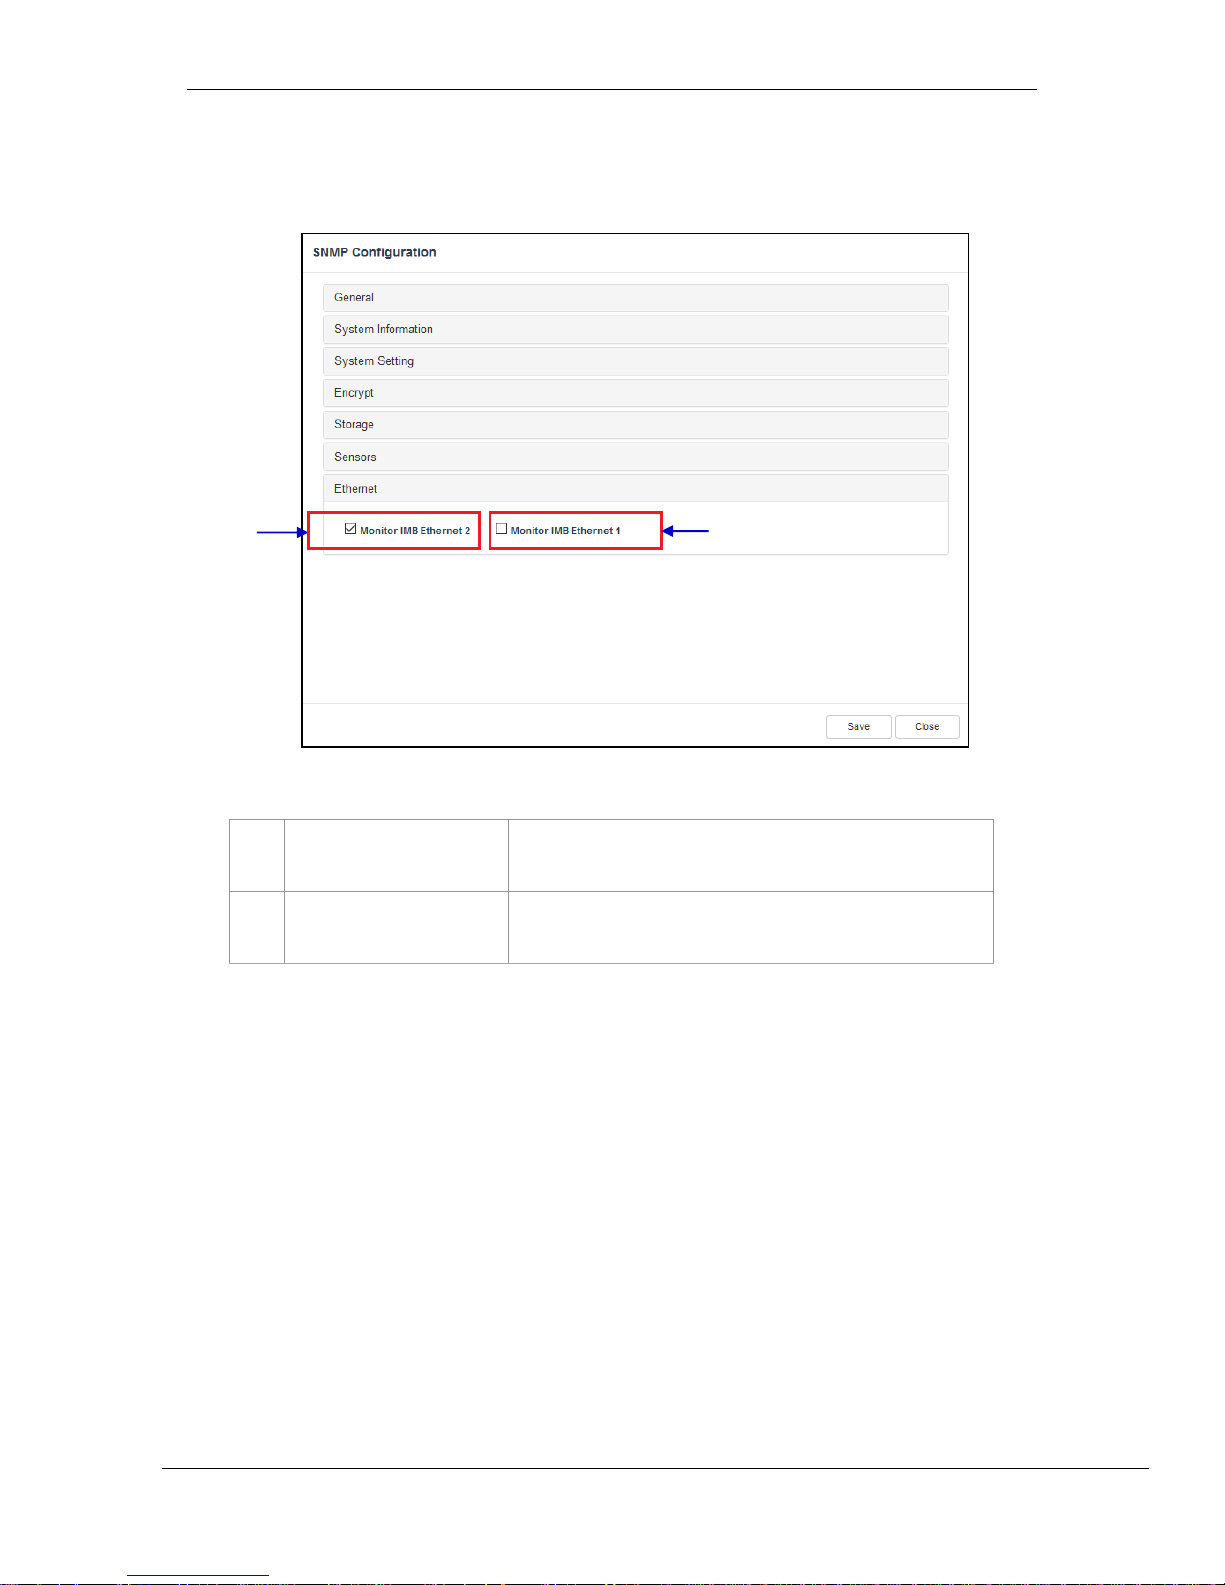
7.1.1.7 Ethernet
1
[Monitor IMB Ethernet 2]
Enables sending an SNMP trap if the system detects that the
selected network interface is down.
2
[Monitor IMB Ethernet 1]
Enables sending an SNMP trap if the system detects that the
selected network interface is down.
!
1
Figure 33: SNMP Configuration - Ethernet
2
Page 48
- 47 -
March 23, 2018
User Manual for SR-1000 Standalone Integrated Media Block™
7. CONFIGURATION
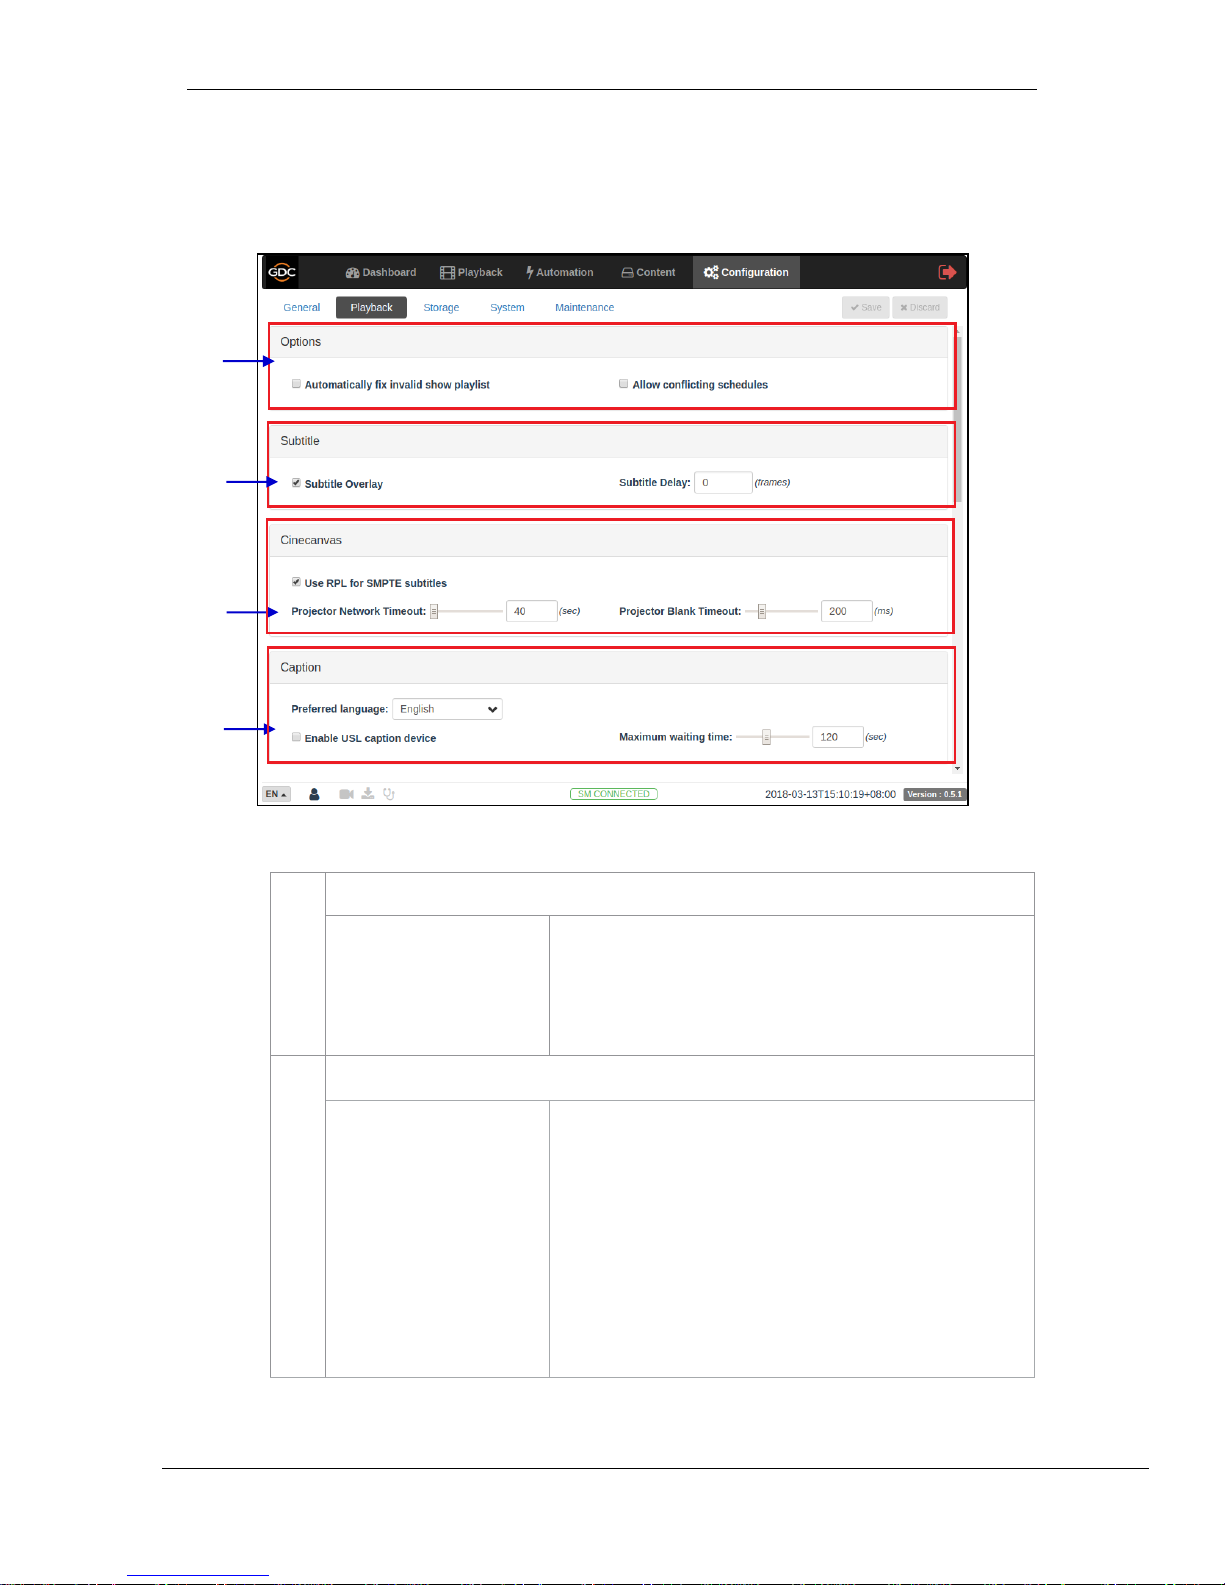
7.2 Playback
This tab is used to configure video, audio, subtitle and other playback settings on the SR-1000.
!
1
[Options]
Automatically fix invalid
show playlist
Allow conflicting
schedules
If this option is enabled, non-playable CPLs in a show playlist
will be skipped during playback.
Enabling this option allows adding of schedules with overlapping
start or end times.
2
[Subtitle]
Subtitle Overlay
Subtitle Delay:
When this option is enabled, subtitles are displayed using server
rendering. When this option is disabled, Cinecanvas is used for
subtitle display.
Enter a Subtitle Delay in number of frames, entering a negative
number will advance the subtitles by that number of frames.
1
2 3 4
Figure 34: Playback Configuration (1)
Page 49

- 48 -
March 23, 2018
User Manual for SR-1000 Standalone Integrated Media Block™
7. CONFIGURATION
3
[Cinecanvas]
Use RPL for SMPTE
subtitles
Projector Network Timeout
Projector Blank Timeout
Send a SMPTE-compatible Resource Presentation List (RPL)
instead of an Interop-compatible Subtitle
Presentation List to the projector for Cinecanvas subtitles. This is
only enabled when SMPTE subtitles are available for the CPL.
Timeout in seconds for communication with the projector.
Select the blank time of the projector during change of PCF or
format. This is to prevent noise when the PCF or format is
changed.
4
[Caption]
Preferred Language
Enable USL caption
device
Maximum waiting time
Select the preferred language for closed captions .
Enable communication with a closed caption device that
supports SMPTE 430-10 (USL CCE-100, etc.).
Note: the closed caption device must be configured to connect
to the SR-1000.
Specifies the maximum time to wait for the closed caption device
to report it is ready, before starting playback.
!
!
!
!
!
Page 50
- 49 -
March 23, 2018
User Manual for SR-1000 Standalone Integrated Media Block™
7. CONFIGURATION
!
!
!
!
!
!
!
!
!
!
!
!
5
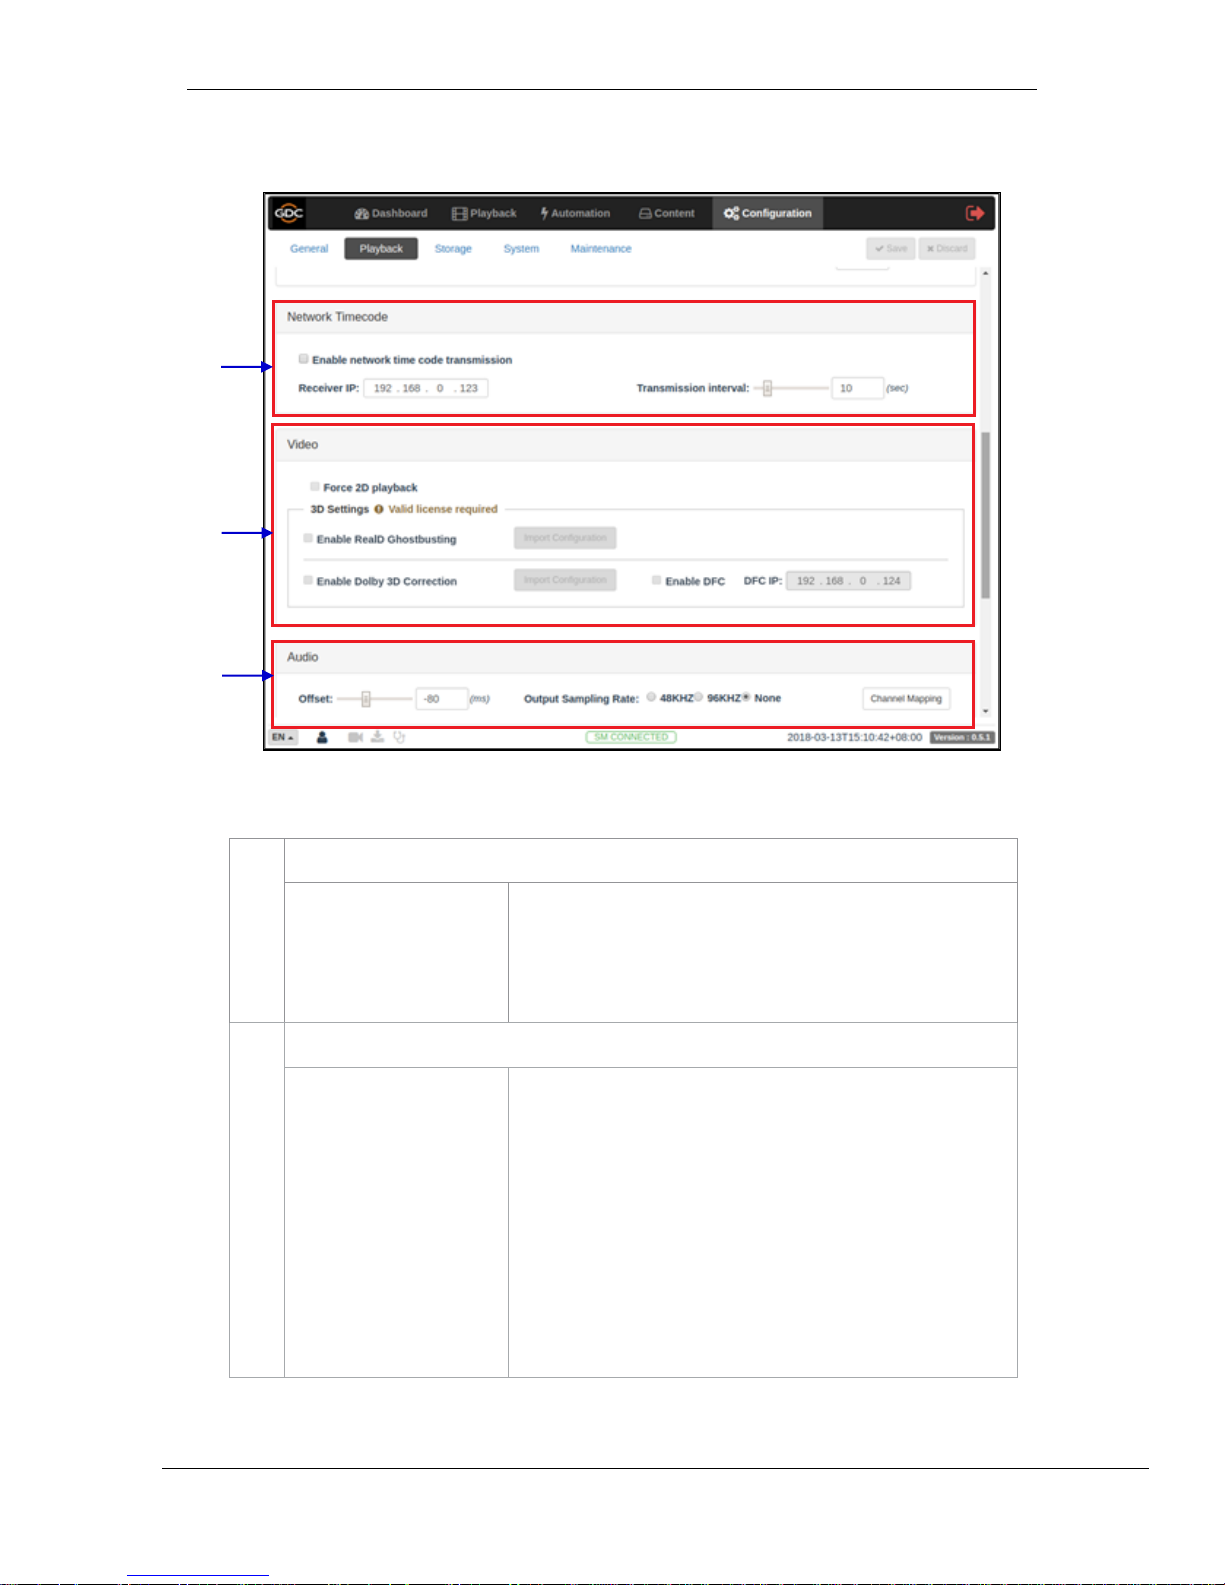
[Network Timecode]
Enable network time code
transmission
Receiver IP
Transmission interval
Activate transmission of playback time-code over UDP.
Enter the IP of the receiver of time-code transmission of UDP.
Indicates the time interval between transmissions
6
[Video]
Force 2D playback
Enable RealD
Ghostbusting
Enable Dolby 3D
Correction
Force 2D playback for 3D content. A valid license is required to
enable this option.
Valid license(s) are required to enable RealD Ghostbusting or
Dolby 3D color correction.
6
5
Figure 35: Playback Configuration (2)
Page 51

- 50 -
March 23, 2018
User Manual for SR-1000 Standalone Integrated Media Block™
7. CONFIGURATION
7
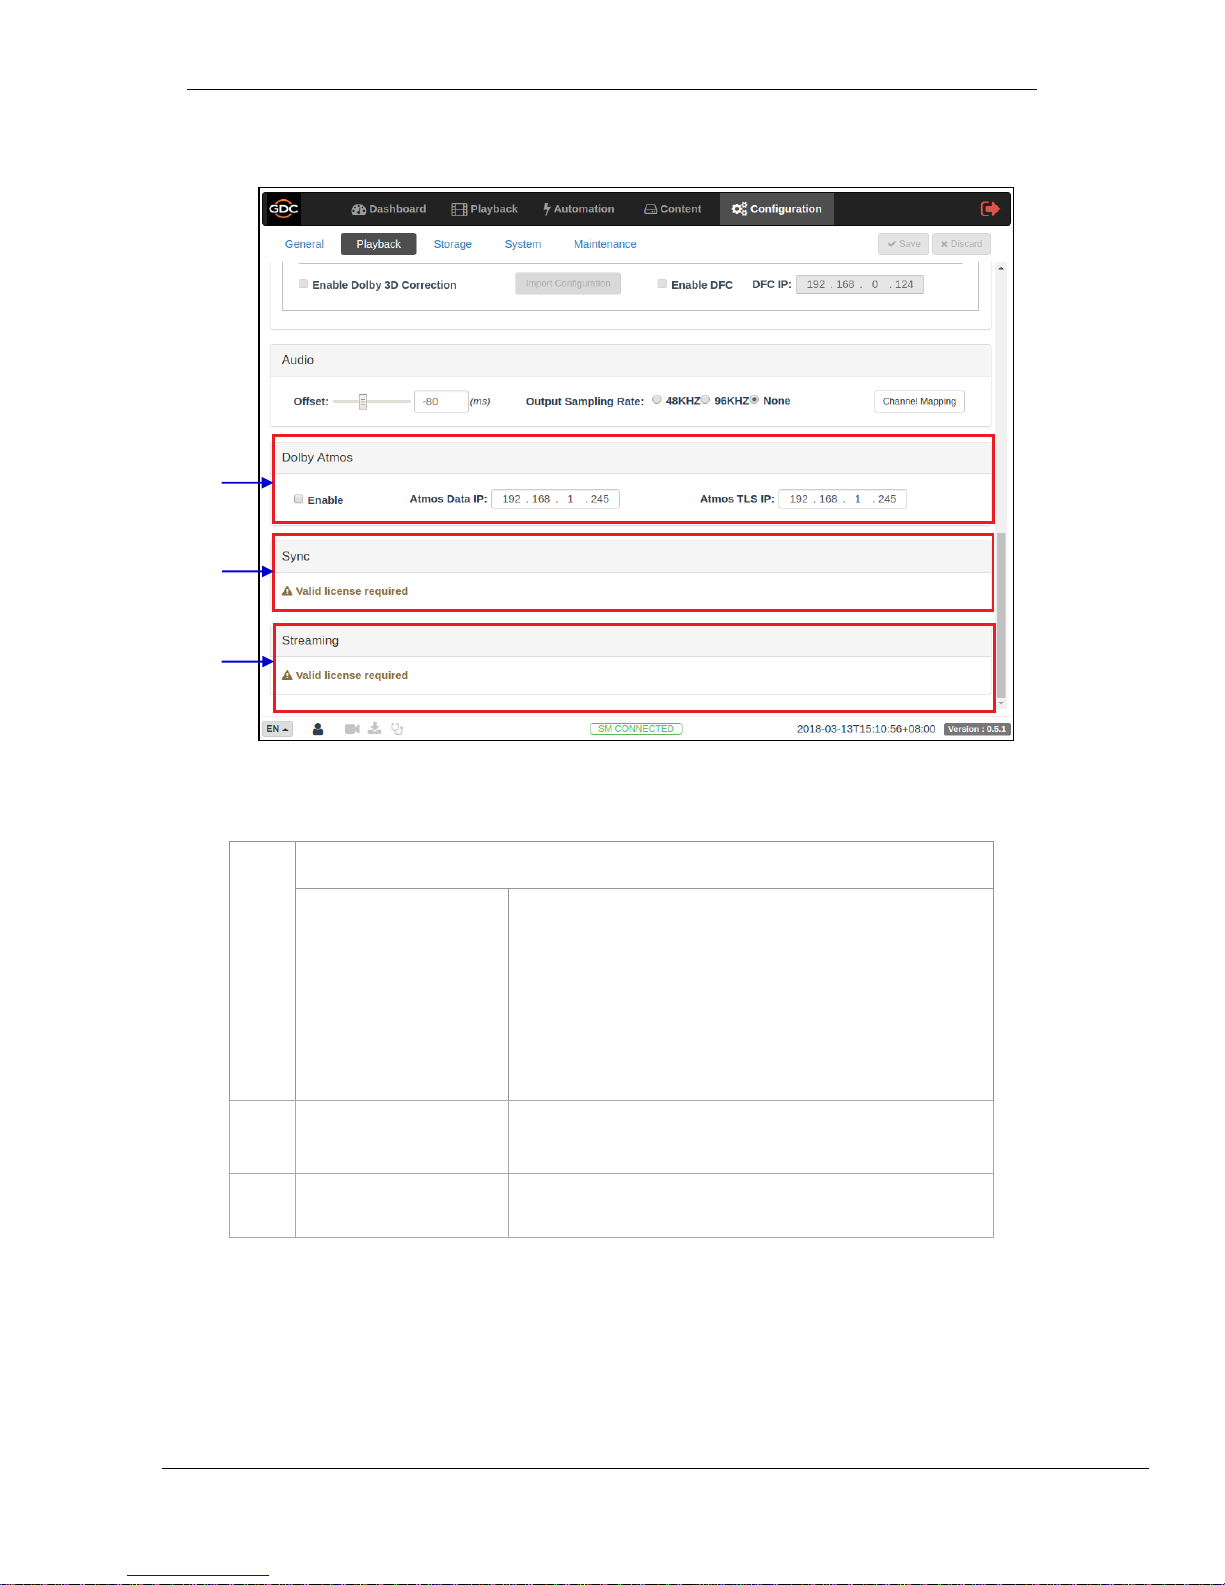
[Audio]
Offset
Output Sampling Rate
Channel Mapping
Specify an audio delay during playback. A negative audio delay will
cause audio to be played ahead of video. A positive audio delay will
cause audio to be played behind video.
Change audio output sampling rate. Output audio sampling rate can
be fixed at 48kHz or 96kHz for all content, or it can match the
content’s audio sampling rate (option ‘None’). If the output sampling
rate is set to a fixed value (48kHz or 96kHz), content audio is resampled if it does not match the output sampling rate.
Use the audio channel mapping interface to map content audio
channels to different audio output channels.
Refer to Section 7.2.1 for details related to Audio Channel
Mapping.
!
!
!
Page 52
- 51 -
March 23, 2018
User Manual for SR-1000 Standalone Integrated Media Block™
7. CONFIGURATION
!
!
!
!
!
!
!
!
!
!
!
!
!
!
8
[Dolby Atmos]
Enable
Configure the SR-1000 to work with a Dolby CP850 sound
processor with Dolby Atmos.
A valid license is required to enable Dolby Atmos support on
the SR-1000:
Check Enable to enable Dolby Atmos support.
Set the Atmos Data IP and Atmos TLS IP according to network
requirements.
9
[Sync]
A valid license is required for Sync settings.
(Please refer to Section 8.1 for details.)
10
[Streaming]
A valid license is required for Streaming settings.
!
!
8
10
Figure 36: Playback Configuration (3)
9
Page 53
- 52 -
March 23, 2018
User Manual for SR-1000 Standalone Integrated Media Block™
7. CONFIGURATION
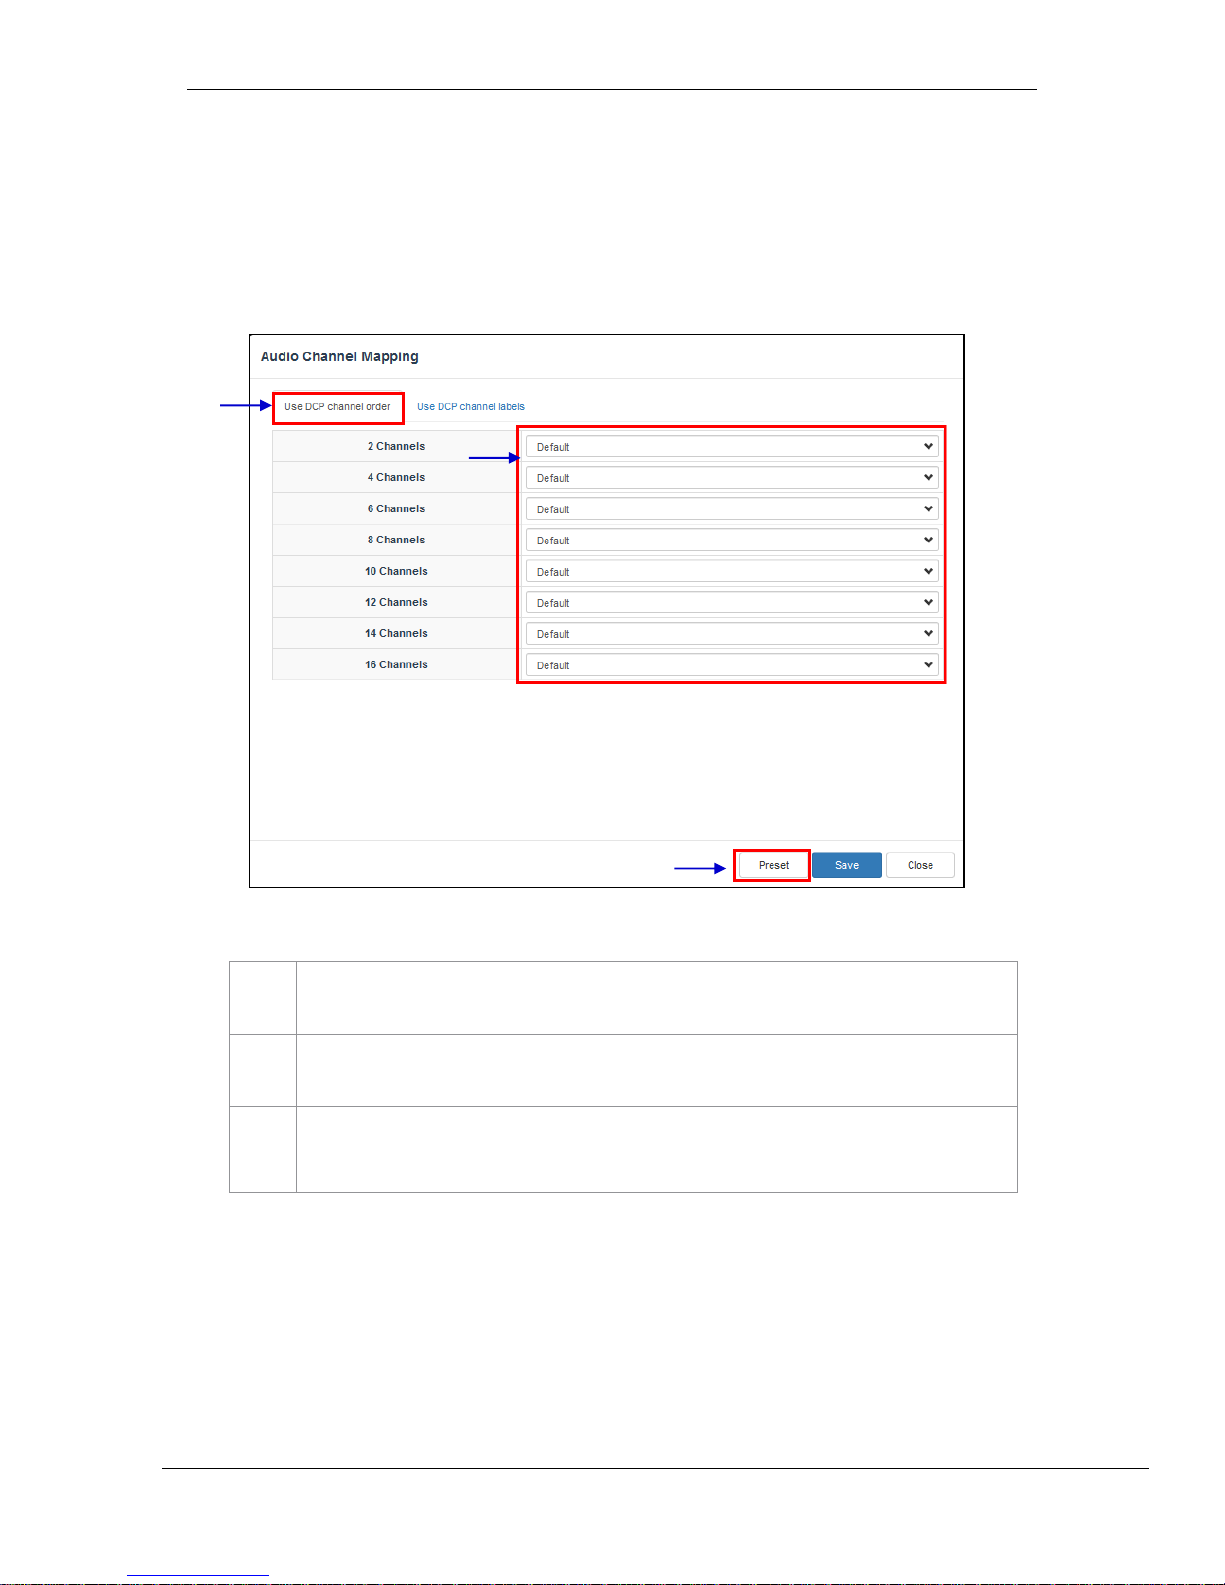
7.2.1 Audio Channel Mapping
!
Using Audio Channel Mapping, audio output from the SR-1000 can be re-mapped to appear on
different audio channels.!
1
Audio output based on the number of audio channels in the audio track of the DCP can be
configured in this tab.
2
The preset for the number of audio channels in the audio track can be changed here.
3
Use the Preset button to configure audio presets.
Refer to Section 7.2.1.1 for details
!
!
!
!
Figure 37: Using DCP Channel order
1 2 3
Page 54
- 53 -
March 23, 2018
User Manual for SR-1000 Standalone Integrated Media Block™
7. CONFIGURATION
!
!
!
!
!
!
!
!
1
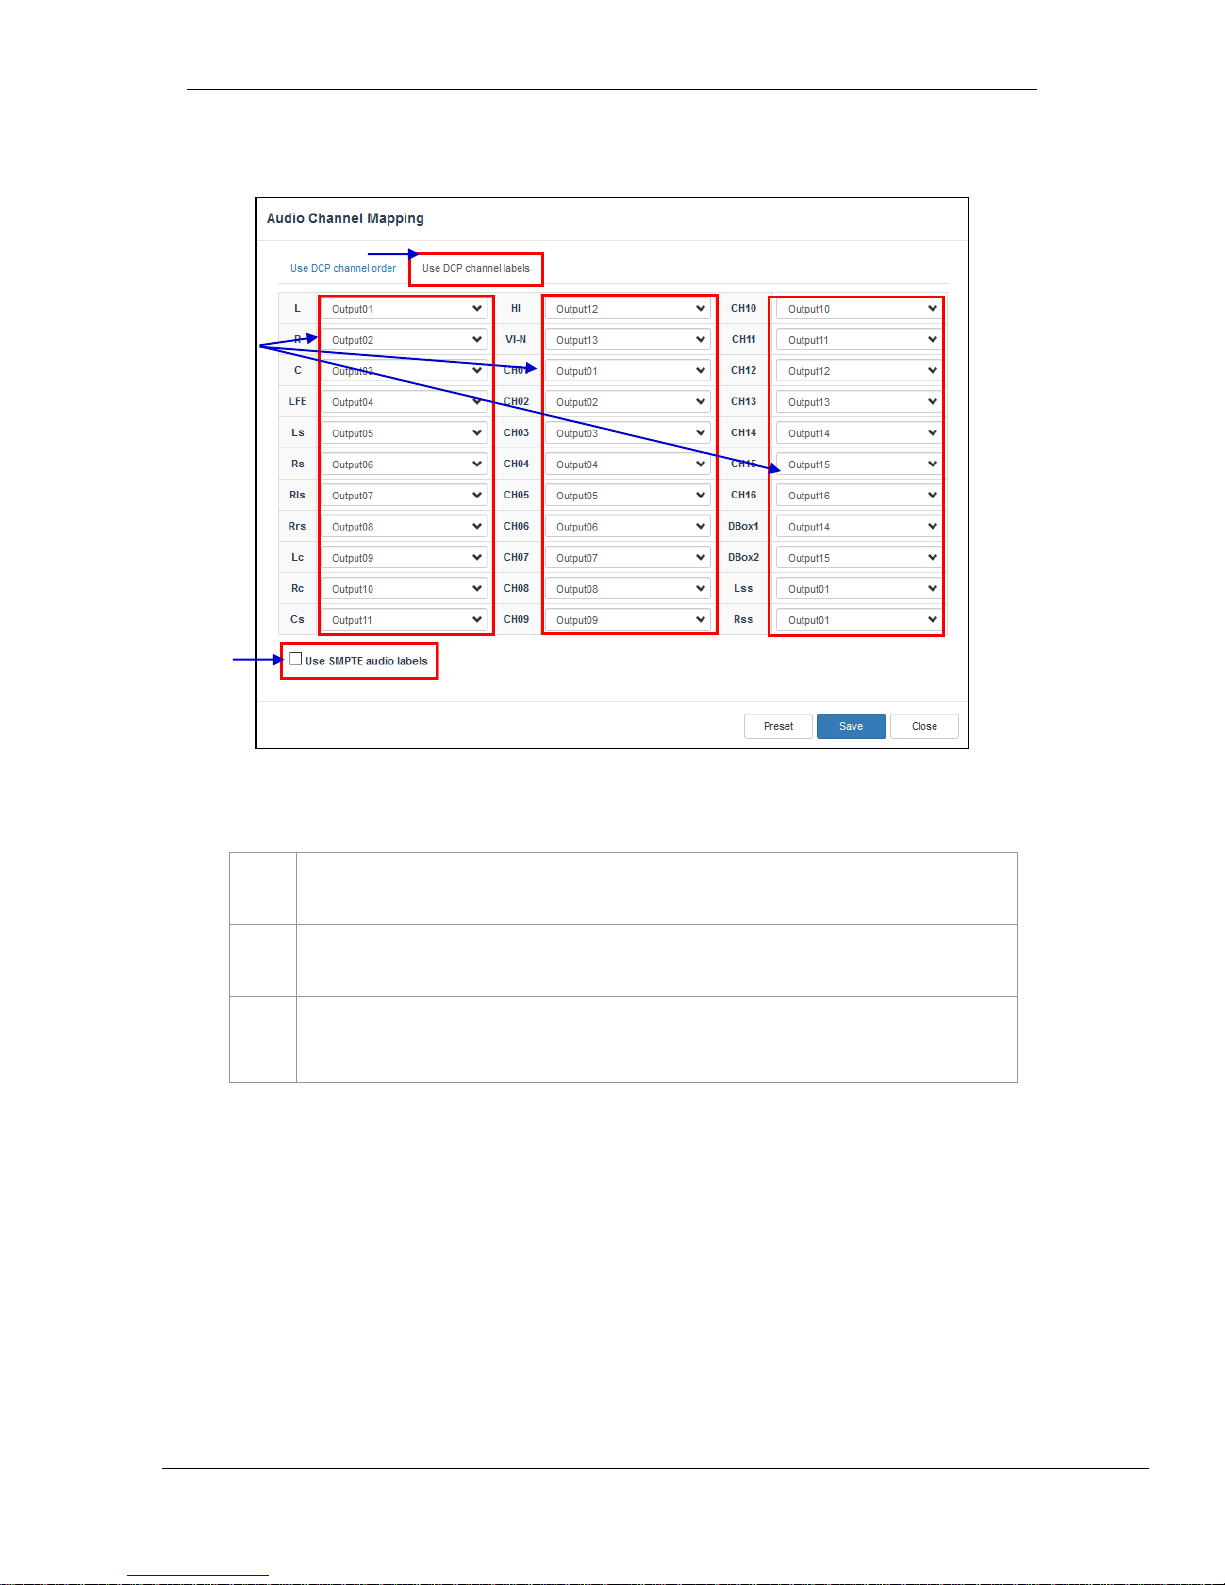
Audio output based on SMPTE audio channel configuration labels can be configured in this tab,
2
Audio output for individual SMPTE audio channel labels can be changed here.
3
Check the Use SMPTE audio labels checkbox to route audio output based on SMPTE audio
channel configuration labels.
2
3
Figure 38: Using DCP Channel labels
1
Page 55
- 54 -
March 23, 2018
User Manual for SR-1000 Standalone Integrated Media Block™
7. CONFIGURATION
7.2.1.1 Preset
1
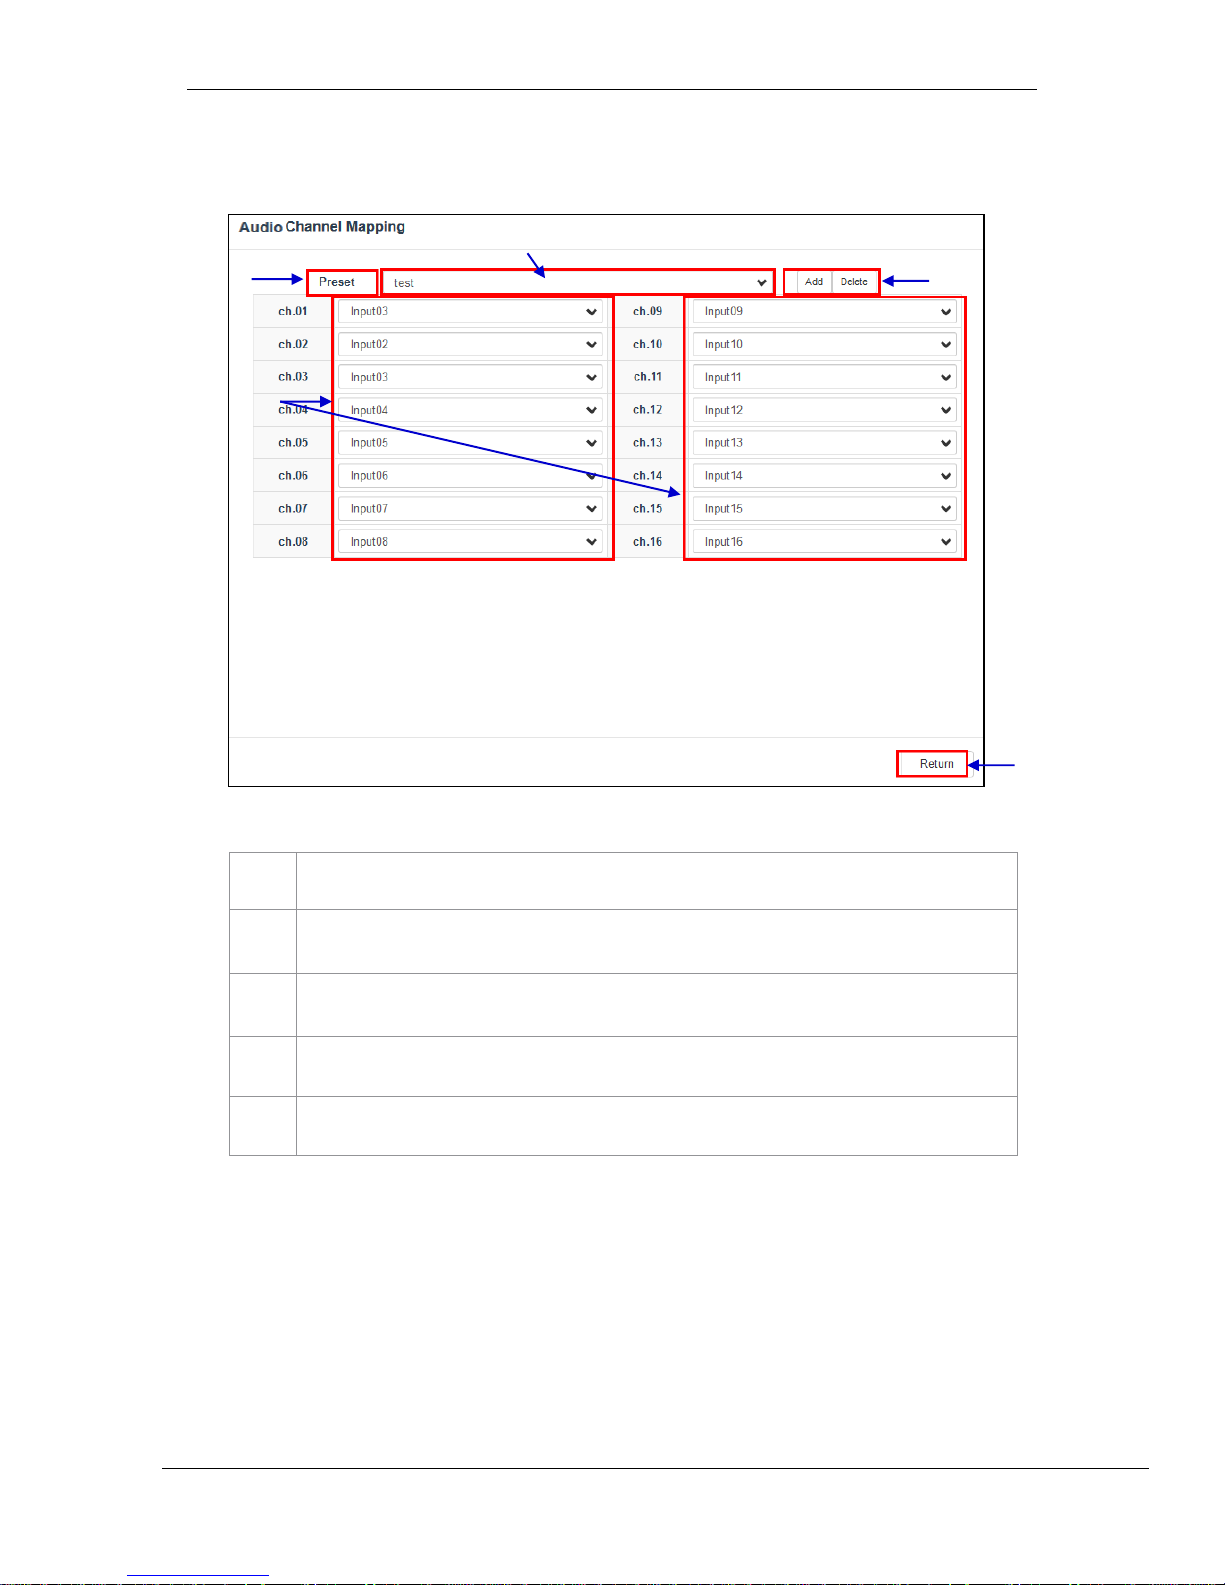
Audio channel output presets can be configured in this tab.
2
Select a preset to view or change preset settings
3
Add a new preset or delete the current preset.
4
Audio configuration for an audio preset can be changed here.
5
Click Return to return to Audio Channel Mapping configuration.
Figure 39: Preset
5 1 2 4
3
Page 56
- 55 -
March 23, 2018
User Manual for SR-1000 Standalone Integrated Media Block™
7. CONFIGURATION
7.3 Storage
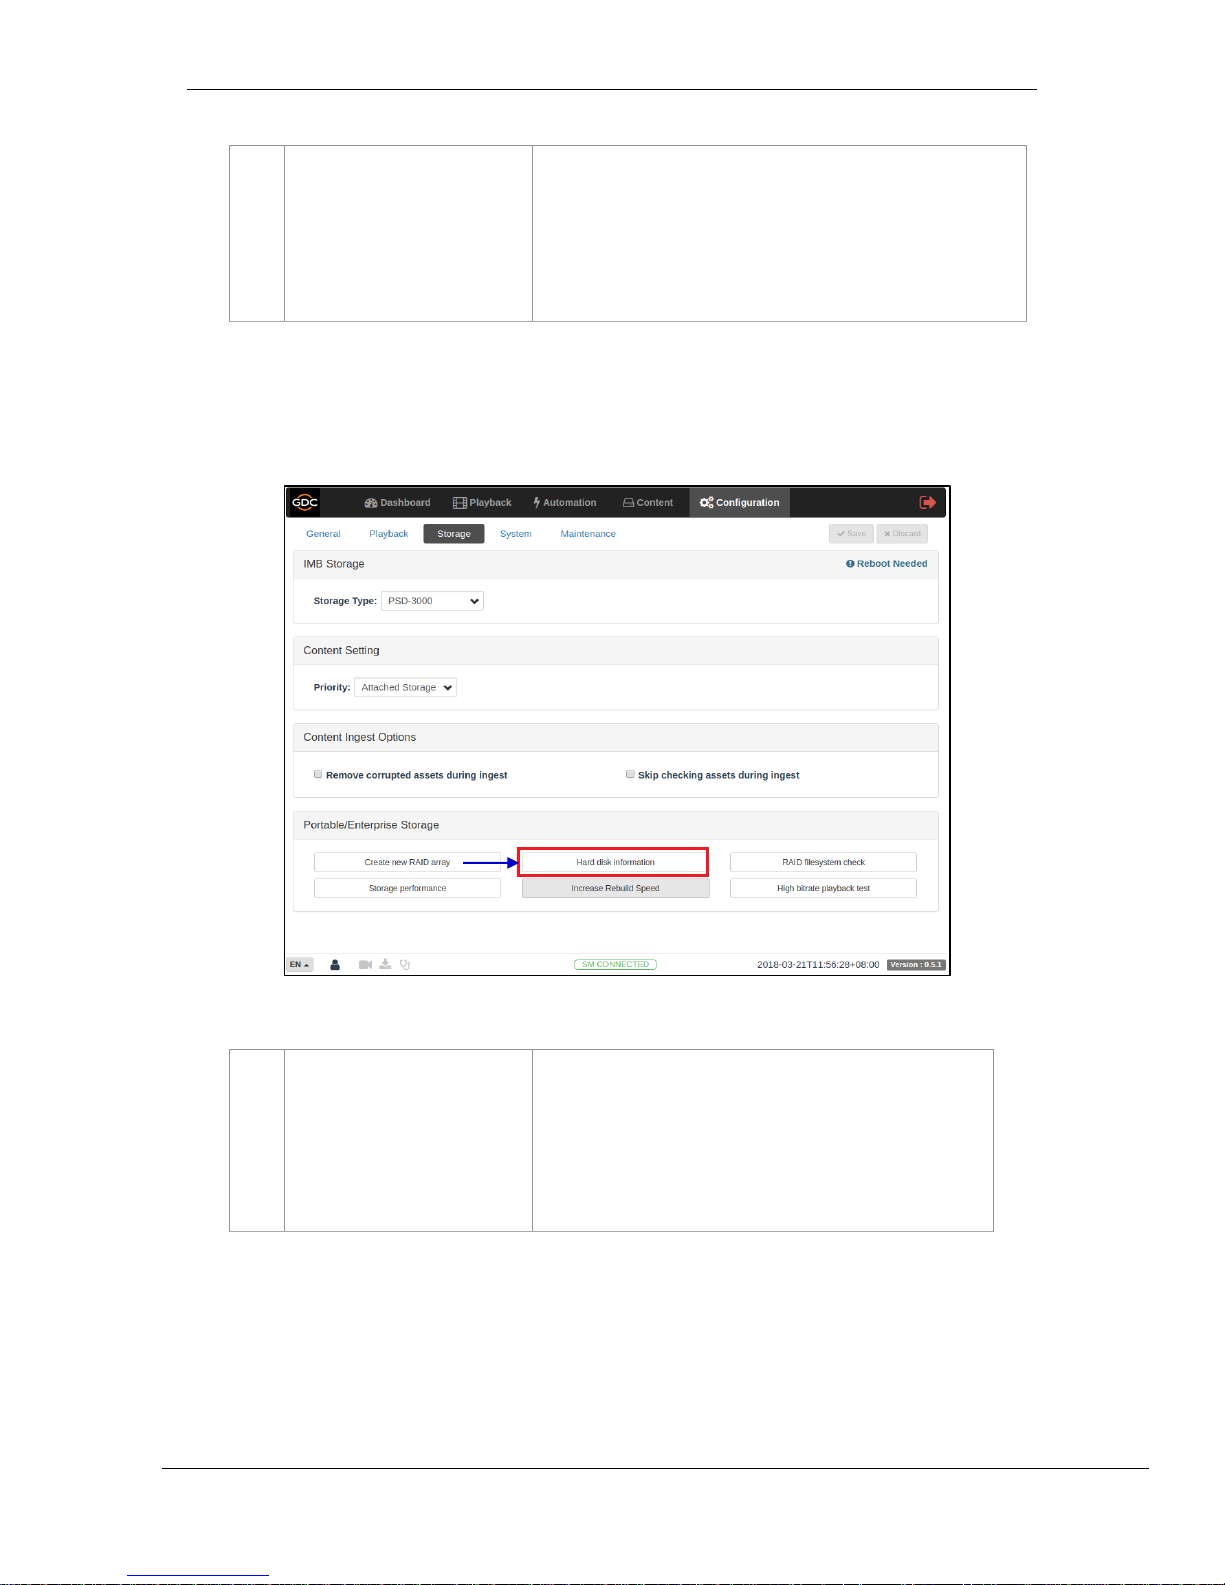
This tab is used to configure the storage settings on the SR-1000. !
1
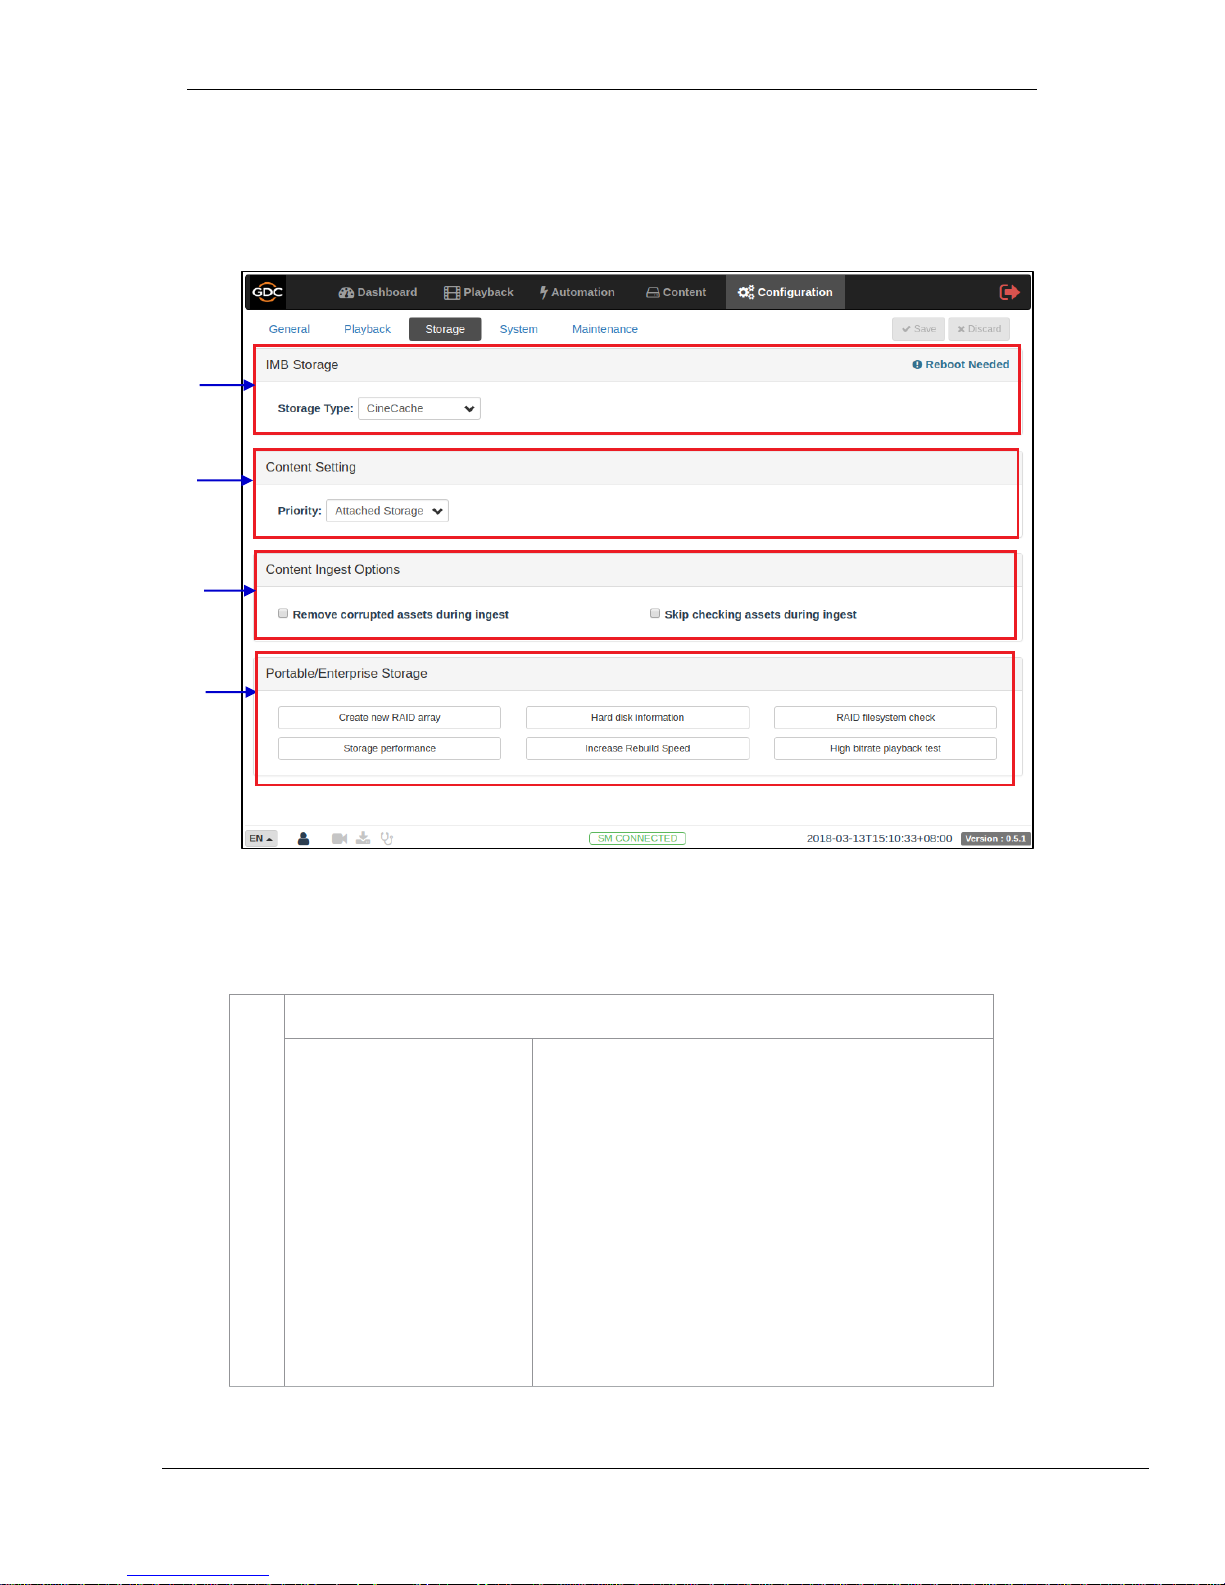
[IMB Storage]
Storage Type
Configure the primary storage for the SR-1000.
CineCache: Select this option to use the built-in CineCache
as storage.
NOTE: This is only available on SR-1000 with Cinecache
installed.
PSD-3000: Configure the SR-1000 to use Portable or
Enterprise Storage
NAS: Configure a Network-Attached Storage(NAS) as data
storage.
NOTE: Reboot is needed after the storage type is changed.
1 2 3
4
Figure 40: Storage Configuration
Page 57

- 56 -
March 23, 2018
User Manual for SR-1000 Standalone Integrated Media Block™
7. CONFIGURATION
2
[Content Setting]
Priority
Set the storage priority used for playback
Attached Storage: Playback will use attached storage (live
play) for playback. If there are issues with live play, playback
will fall back to local storage.
This setting should be selected for centralized playback with
the SCL-1000/SCL-2000.
IMB Storage: Playback will use local storage for playback.
3
[Content Ingest Options]
Remove corrupted assets
during ingest
Skip checking assets during
ingest
With this option enabled any corrupted assets encountered
during ingestion are removed.
With this option enabled the Digital Cinema Package assets
will not be checked for integrity during download.
This option will reduce ingestion time but decrease the
reliability of the ingestion.
4
[Portable/Enterprise Storage]
The following actions can be performed:
§ Create new RAID array
§ Hard disk information
§ RAID filesystem check
§ Storage performance
§ Increase Rebuild Speed
§ High bitrate playback test
(Please refer to Section 7.3.1 for details.)
Page 58
- 57 -
March 23, 2018
User Manual for SR-1000 Standalone Integrated Media Block™
7. CONFIGURATION
7.3.1 Actions of Portable/Enterprise Storage
7.3.1.1 Create new RAID array
1
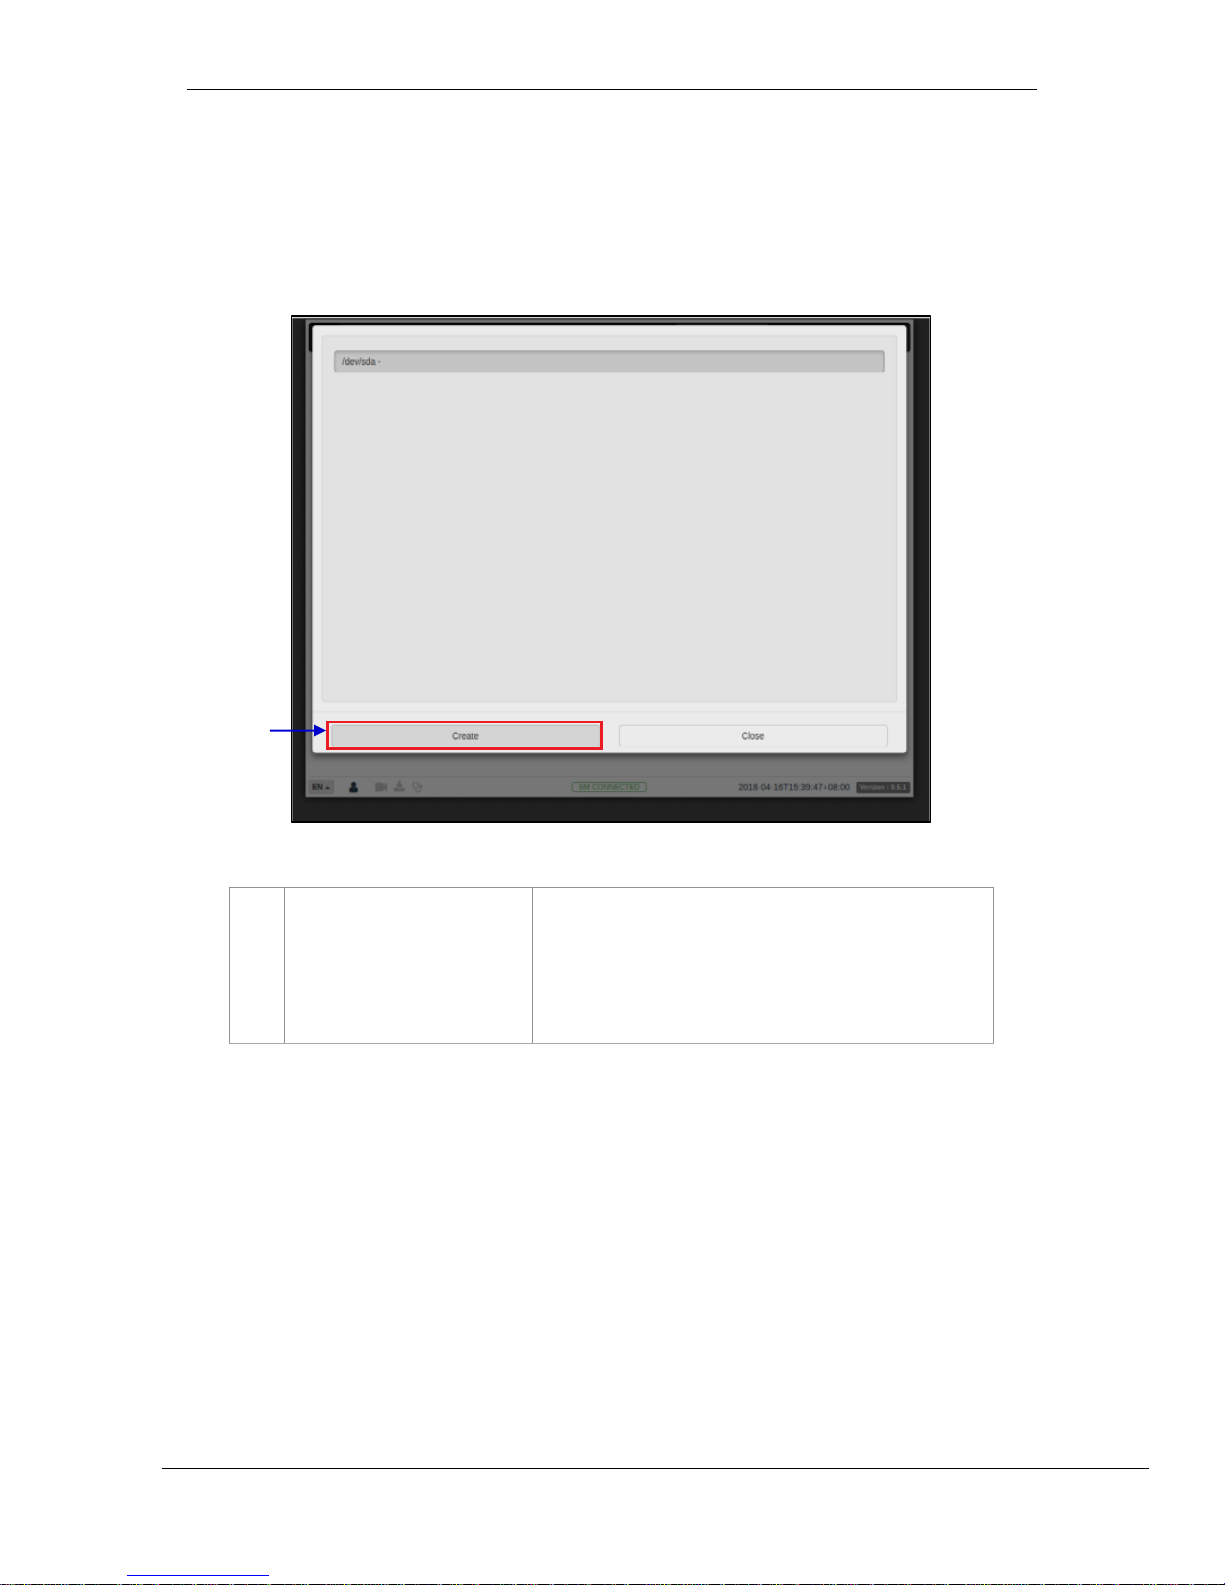
[Create new RAID array]
Clicking on the Create new RAID array option opens a pop-
up window. Select the drive name and click on Create.
The RAID creation process will be initiated and the progress
will be shown.
Once complete, click on Close to return to the Storage menu.
!
Figure 41: Create new RAID Array
1
Page 59
- 58 -
March 23, 2018
User Manual for SR-1000 Standalone Integrated Media Block™
7. CONFIGURATION
!
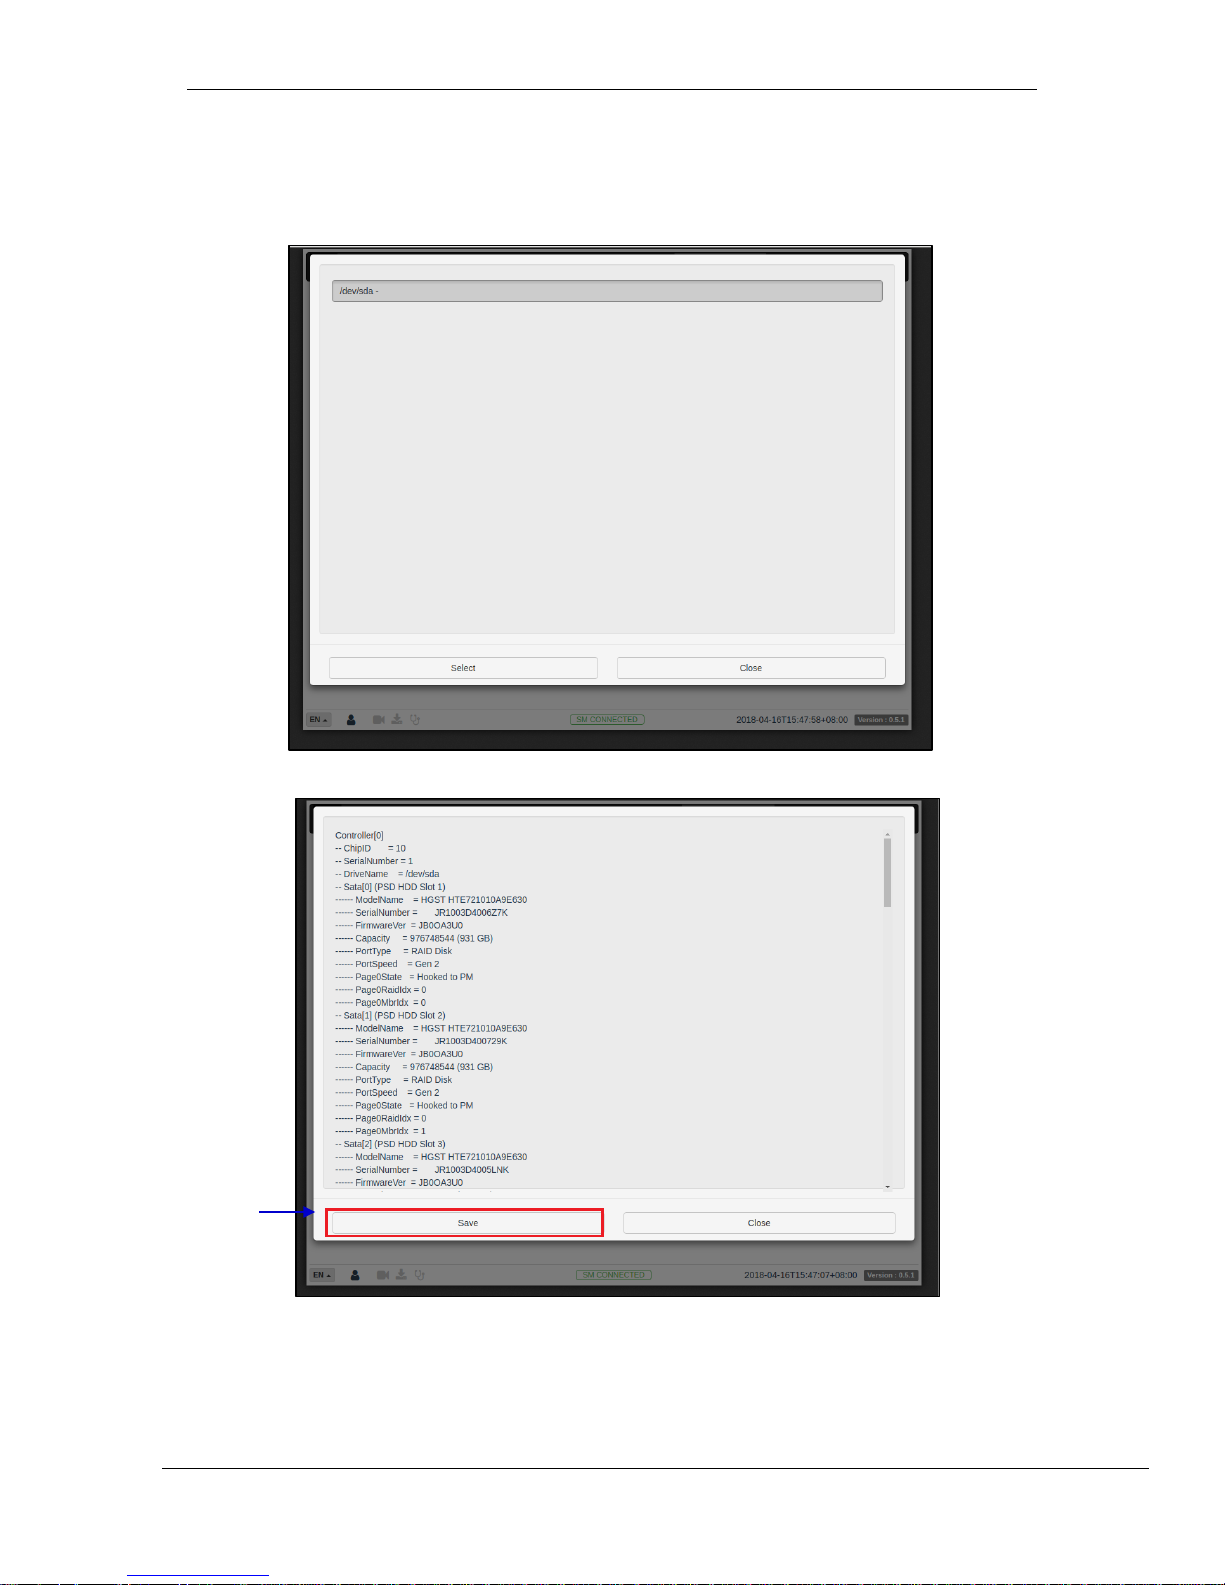
7.3.1.2 Hard disk information
Figure 42: Select disk
Figure 43: Hard Disk Information
1
Page 60
- 59 -
March 23, 2018
User Manual for SR-1000 Standalone Integrated Media Block™
7. CONFIGURATION
1
[Hard disk information]
Clicking on the Hard Disk information option opens a pop-up
window. Select the disk and click on Select.
Information about the selected disk will be displayed onscreen.
Click on Save to save the results to the local computer/ laptop
(in the form of a .txt file). Click on Close to return to the
Storage menu.
!
7.3.1.3 RAID filesystem check
!
!
!
!
!
!
!
!
!
!
1
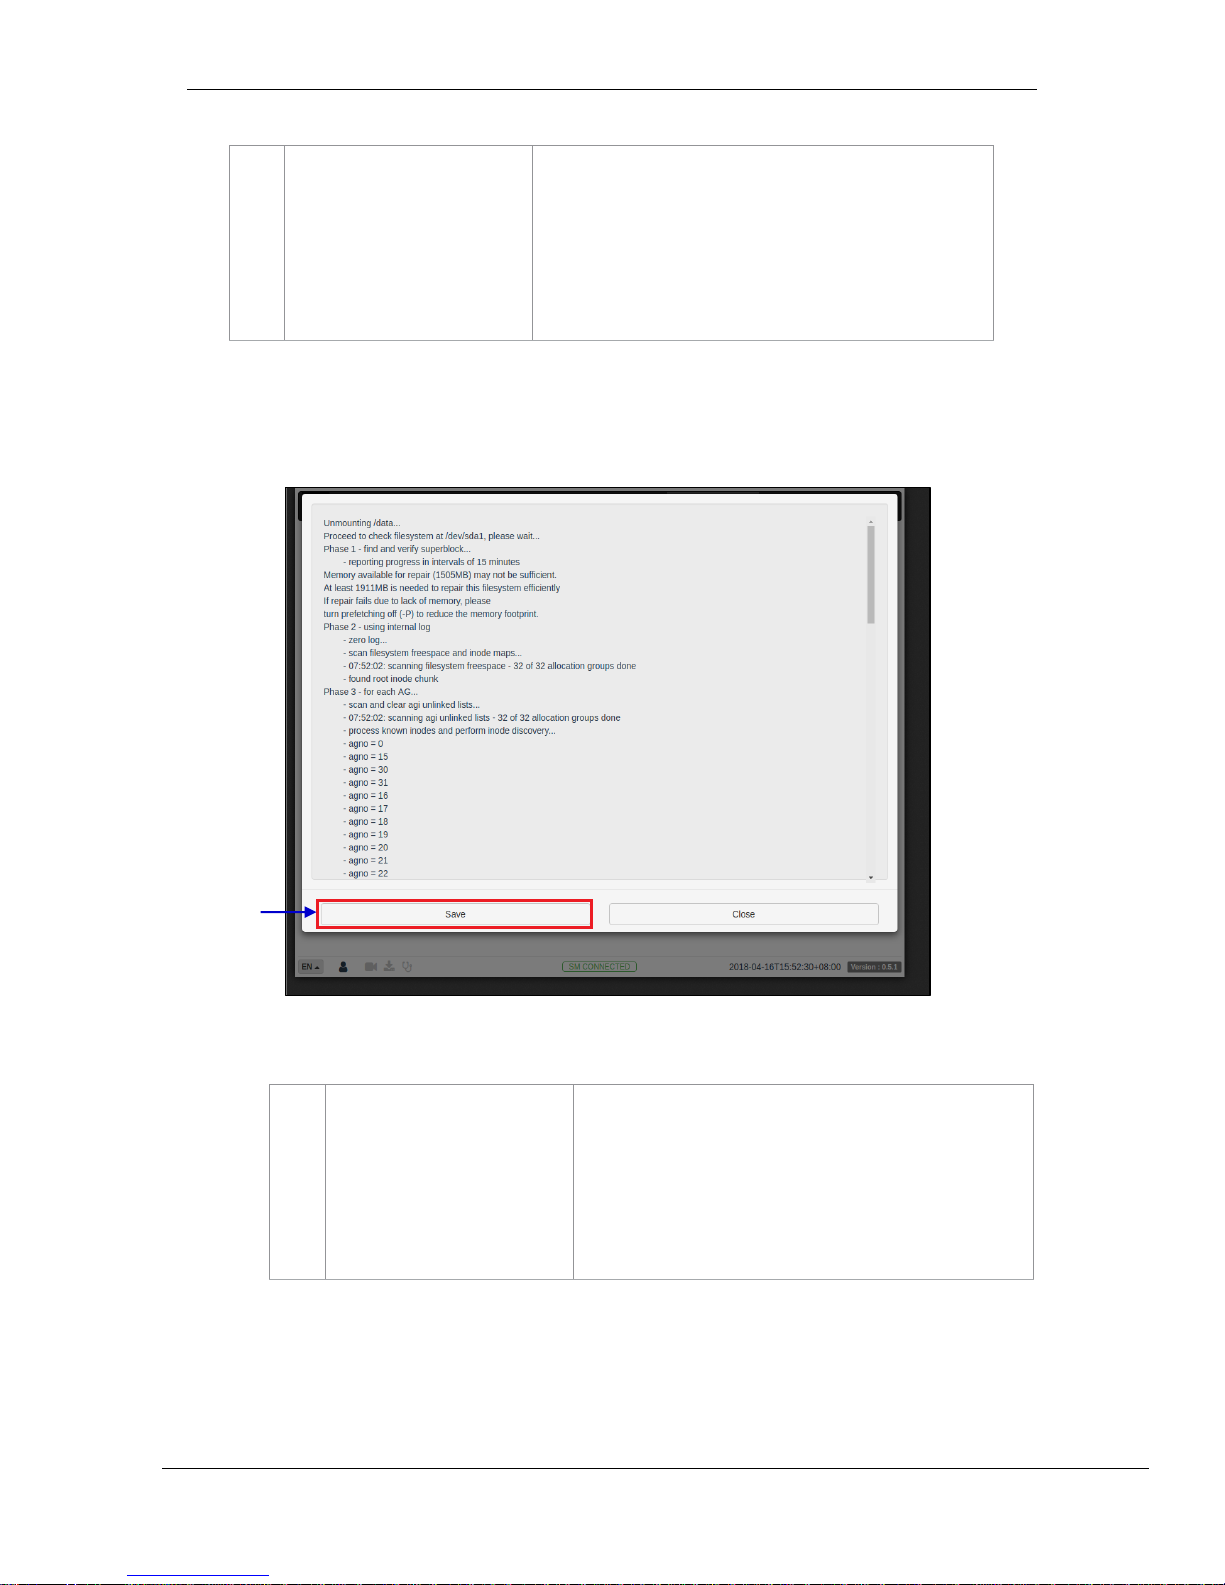
[RAID Filesystem check]
Clicking on the RAID Filesystem check option opens a pop-
up window and the file system check process will be initiated.
Information about the filesystem check progress will be
displayed on screen.
Click on Save to save the results to the local computer/ laptop
(in the form of a .txt file). Click on Close to return to the
Storage menu.
Figure 44: RAID Filesystem check
1
Page 61
- 60 -
March 23, 2018
User Manual for SR-1000 Standalone Integrated Media Block™
7. CONFIGURATION
7.3.1.4 Storage Performance
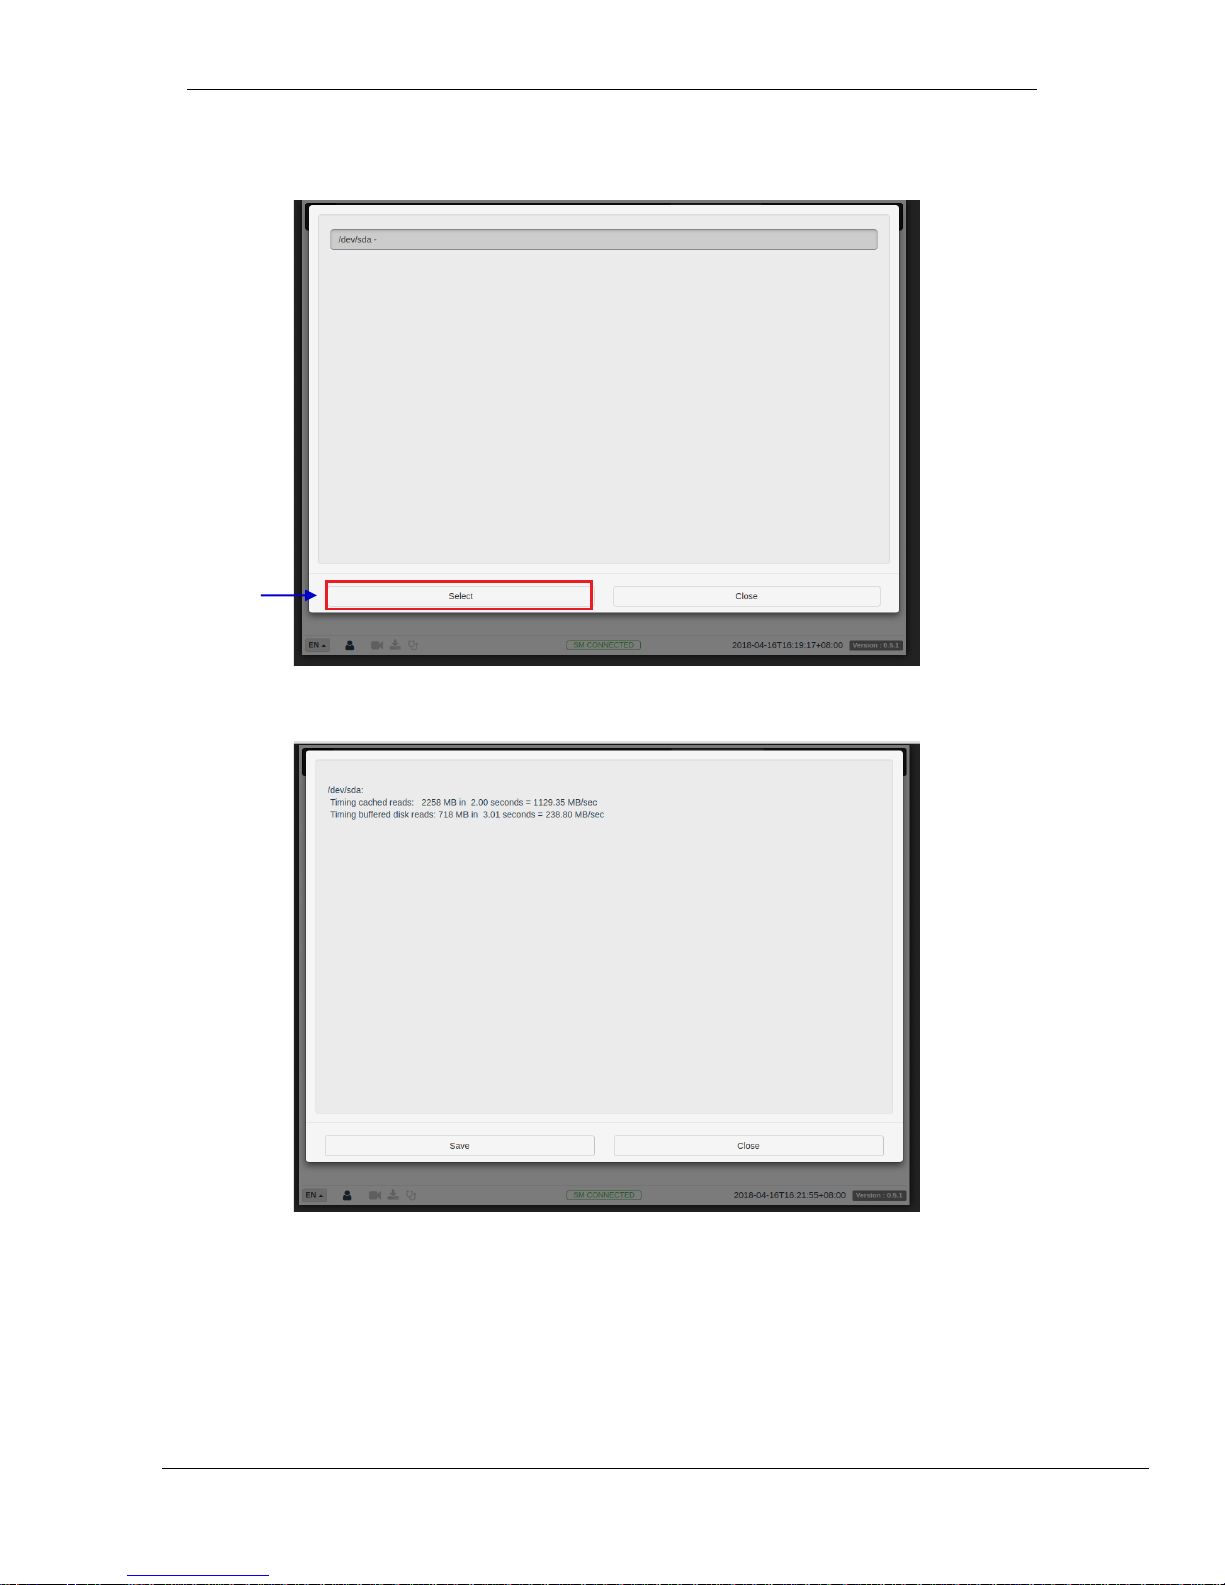
Figure 46: Select disk
Figure 45: Storage Performance
1
Page 62
- 61 -
March 23, 2018
User Manual for SR-1000 Standalone Integrated Media Block™
7. CONFIGURATION
1
[Storage performance]
Clicking on the Storage Performance option opens a pop-up
window.
Select the disk and click on Select. Information about the hard disk
performance will be displayed on screen.
Click on Save to save the results to the local computer/ laptop (in
the form of a .txt file). Click on Close to return to the Storage menu.
!
!
7.3.1.5
Increase Rebuild Speed
!
!
!
!
!
!
!
!
!
!
!
!
1
[Increase Rebuild Speed]
If the RAID array is being rebuilt during playback, the rebuild
speed will slow down significantly.
To resume highest rebuild speed after playback is finished,
click on Increase Rebuild Speed.
This will immediately set RAID array to rebuild at highest
speed.
Figure 47: Increase Rebuild Speed
1
Page 63
- 62 -
March 23, 2018
User Manual for SR-1000 Standalone Integrated Media Block™
7. CONFIGURATION
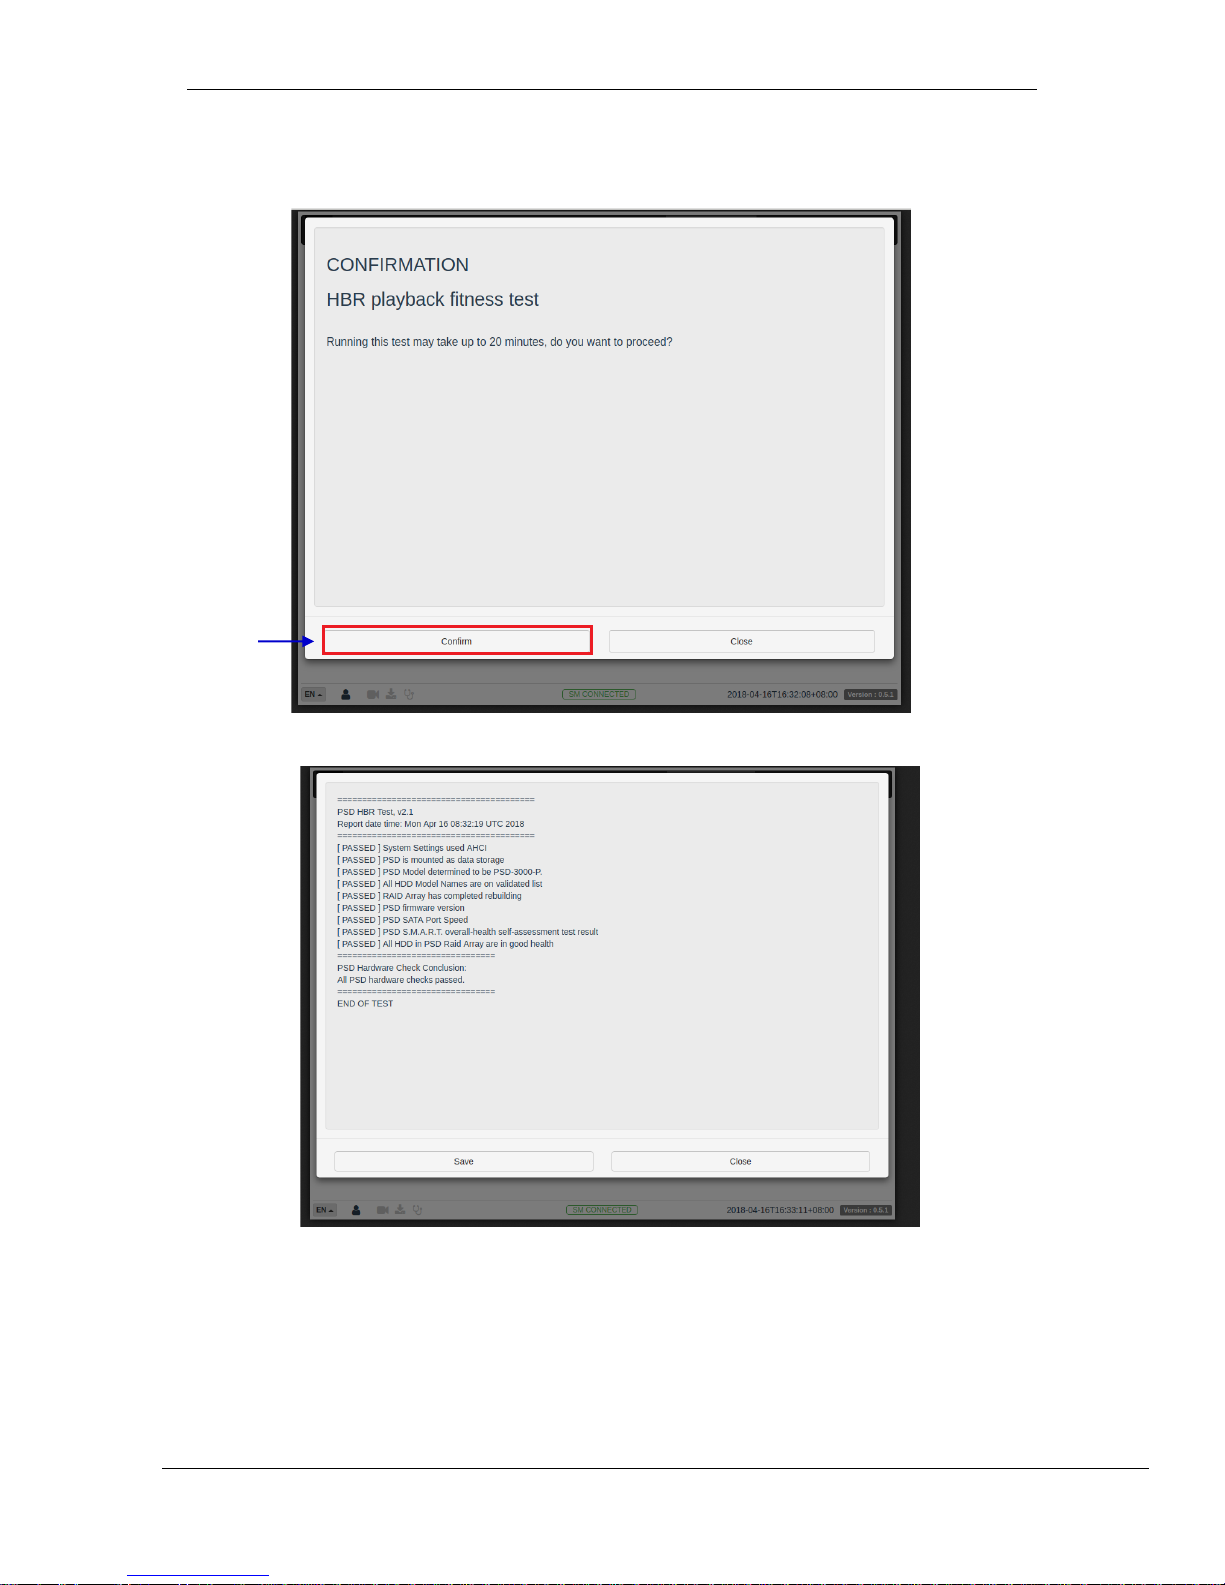
7.3.1.6 High bitrate playback test
Figure 49: HBR Playback fitness test (2)
Figure 48: HBR Playback fitness test (1)
1
Page 64
- 63 -
March 23, 2018
User Manual for SR-1000 Standalone Integrated Media Block™
7. CONFIGURATION
1
[High bitrate playback test]
Clicking on the High bitrate playback test option opens a
pop-up window.
Click on Confirm to initiate the test. The progress will be
displayed on-screen
Once complete, click on Save to save the results to the local
computer/ laptop (in the form of a .txt file). Click on Close to
return to the Storage menu.
!
7.4 System
This tab is used to configure the system settings on the SR-1000. !
!
!
!
!
!
!
!
!
!
!
!
!
!
!
!
!
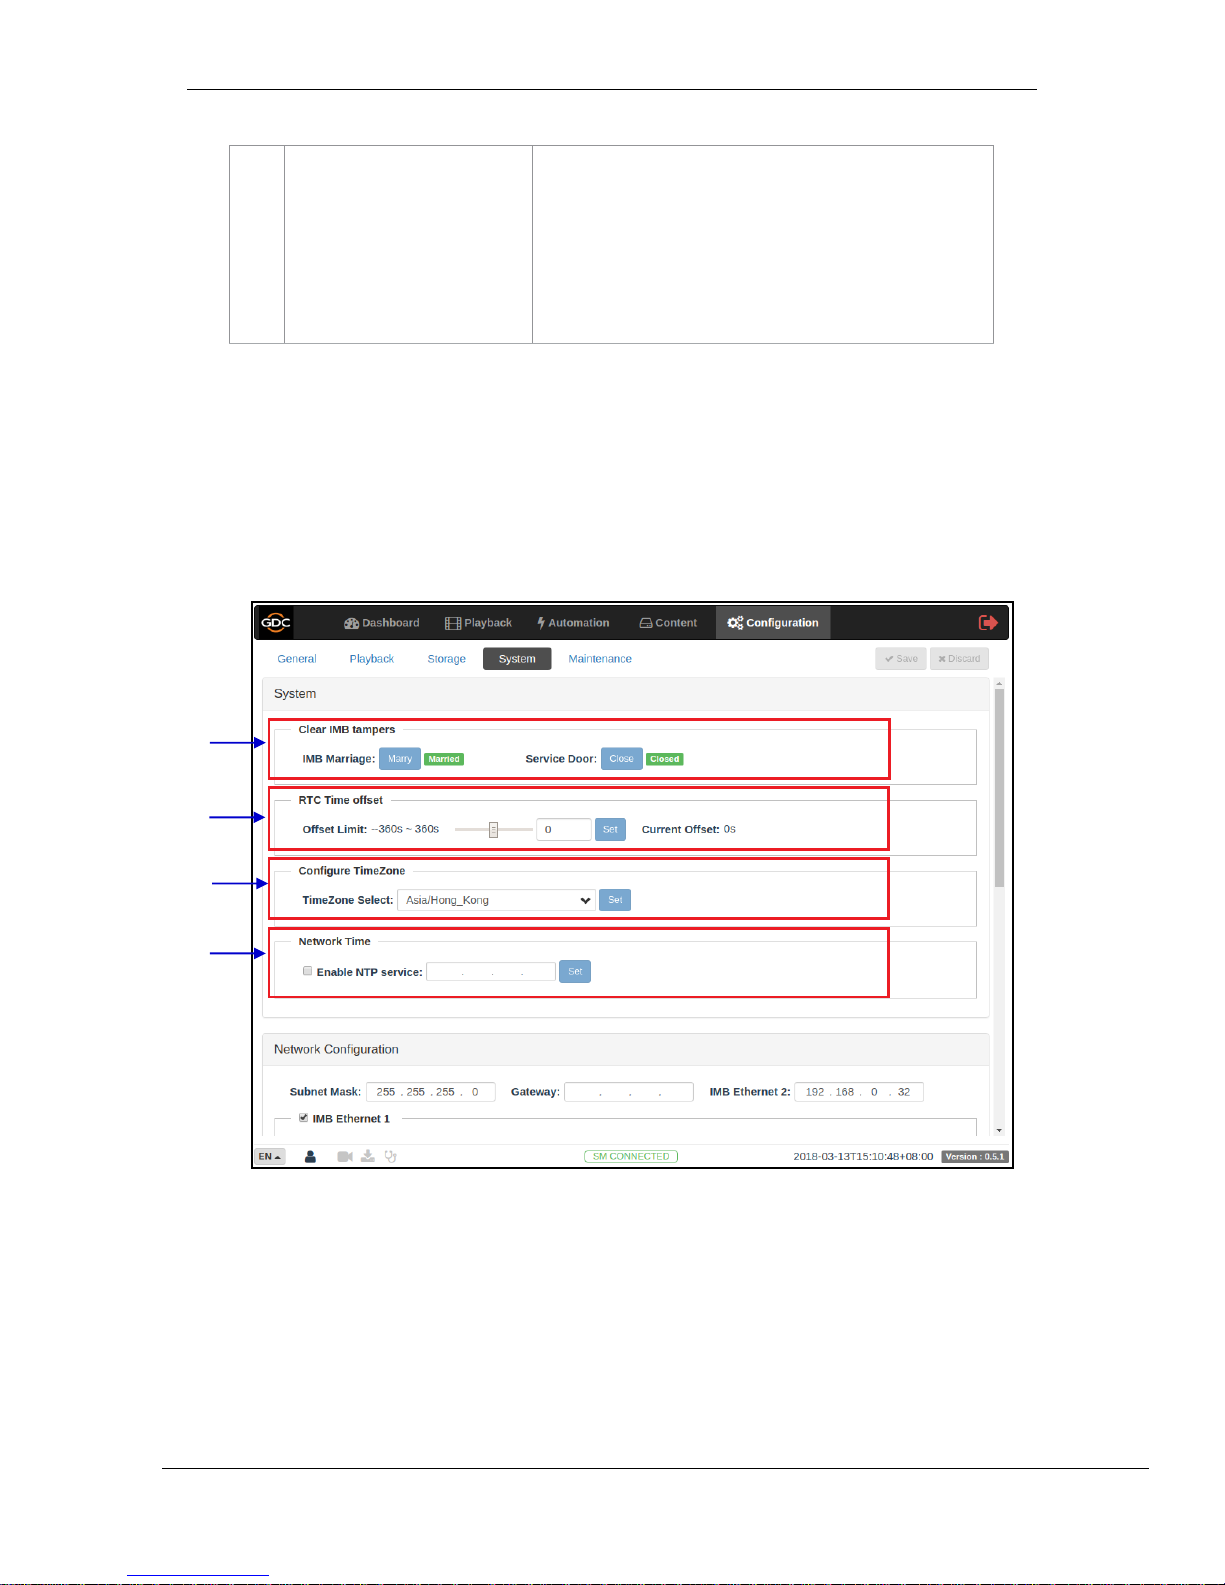
1
2 3 4
Figure 50: System Configuration (1)
Page 65
- 64 -
March 23, 2018
User Manual for SR-1000 Standalone Integrated Media Block™
7. CONFIGURATION
1
[Clear IMB tampers]
IMB Marriage
Service Door
Displays the Marriage and Service Door tamper status of
the IMB.
Click the Marry button to clear the Marriage Tamper.
Click the Close button to clear the Service Door tamper.
NOTE: The SR-1000 will not allow playback if these tampers are
not cleared.
For IMB Marriage please refer to the SR-1000 Installation
manual.
2
[RTC Time offset]
Offset Limit
Make adjustments to the time on the IMB.
In accordance with DCI specifications, the SR-1000 allows a
time offset from -360s to +360s .
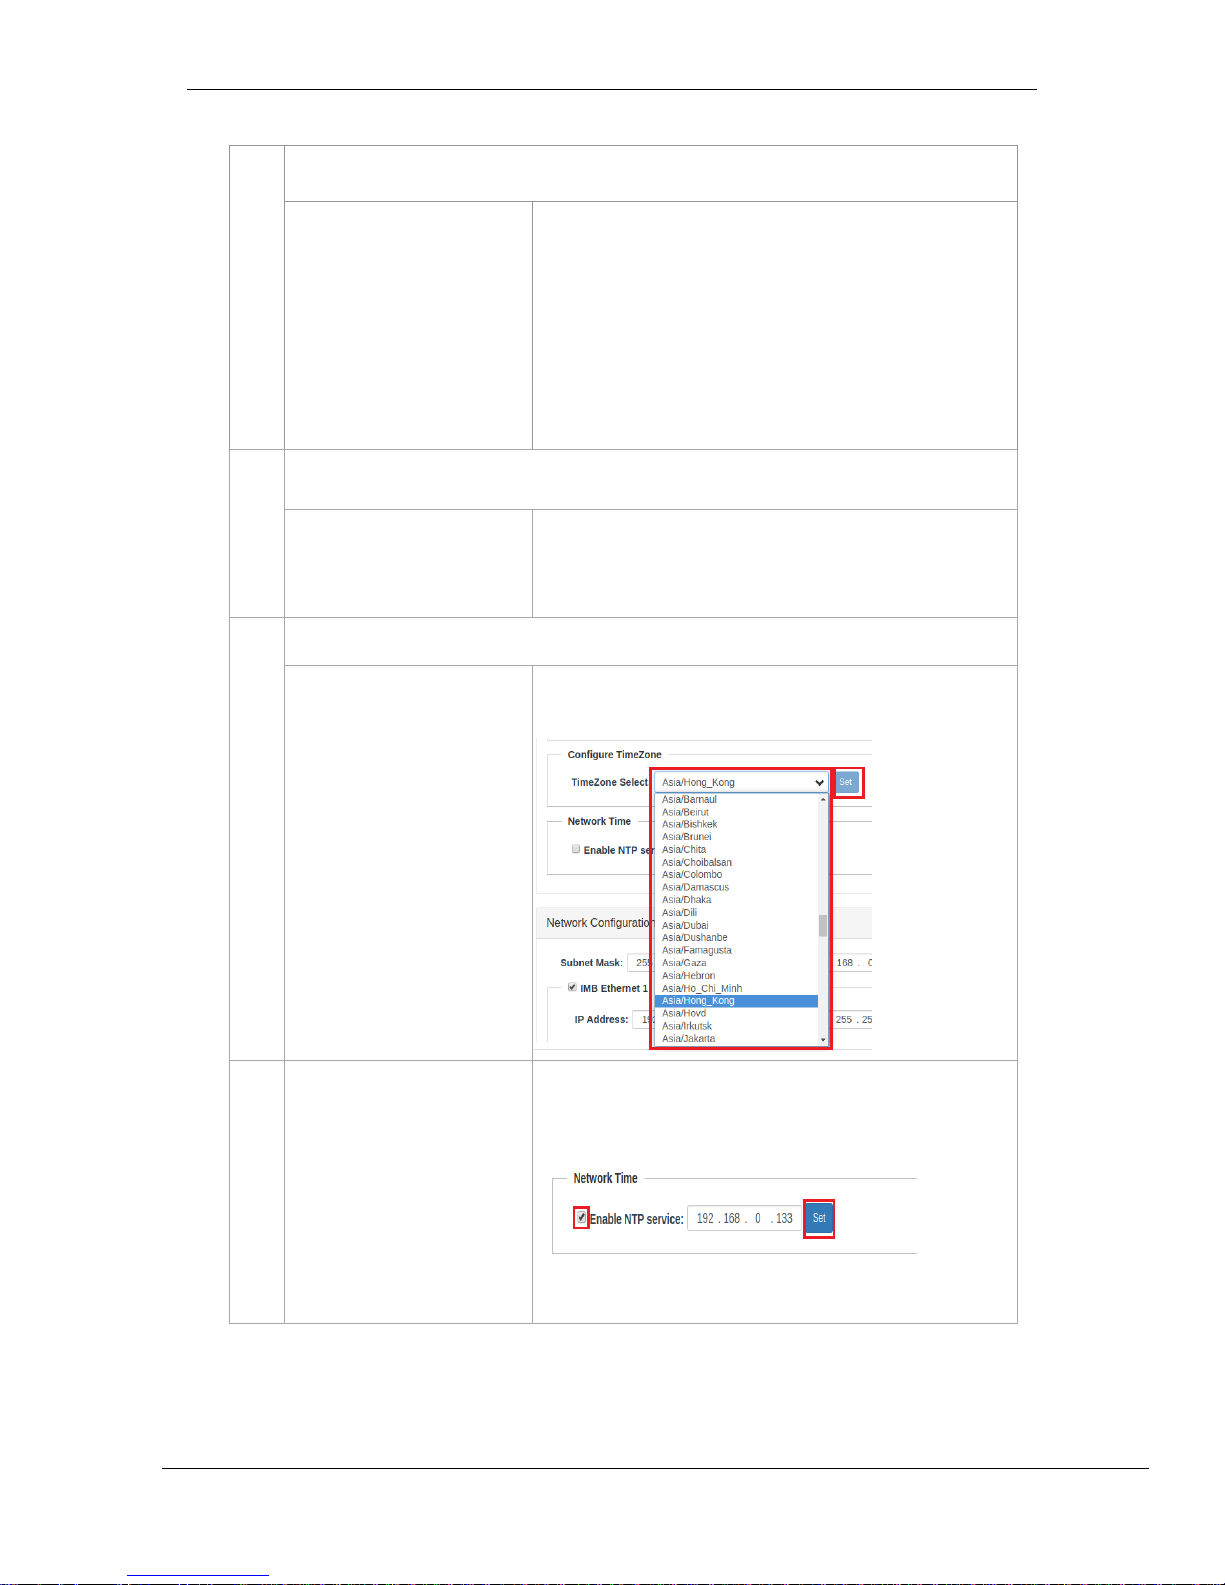
3
[Configure TimeZone]
TimeZone Select
Select specific area/country from the dropdown list and click Set
to configure the timezone.
4
[Network Time]
Sync the IMB time to an external NTP server.
Select Enable NTP service. Enter the specified time server’s IP
address and click Set to start using the NTP server.
NOTE: Time adjustments will be limited in accordance with DCI
specifications (+/-360 seconds).
Page 66
- 65 -
March 23, 2018
User Manual for SR-1000 Standalone Integrated Media Block™
7. CONFIGURATION
!
!
!
!
!
!
!
!
!
!
!
!
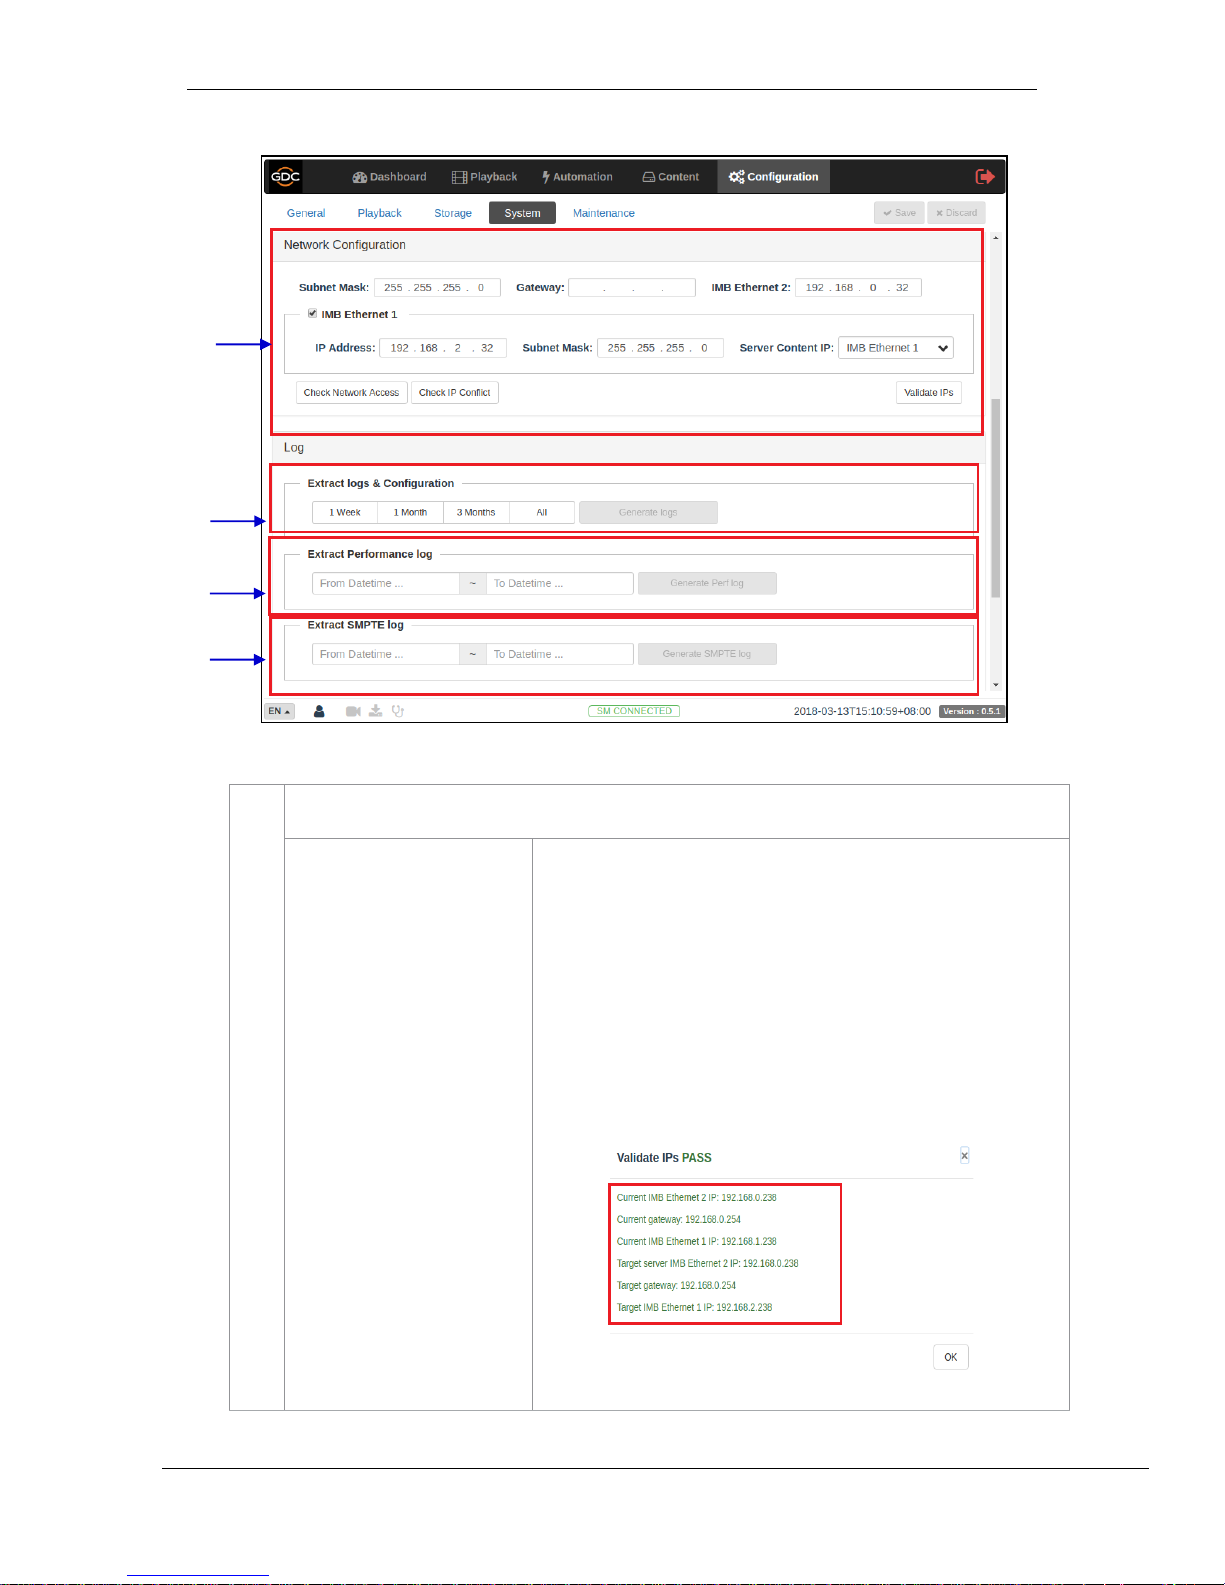
5
[Network Configuration]
Subnet Mask
Gateway
IMB Ethernet 2
IMB Ethernet 1
Validate IP’s
Specify the subnet mask..
Specify the network gateway for the SR-1000.
This is the main IP address of the SR-1000. The Web-UI interface can
be reached at this IP address.
Enable this to set up a secondary network on the SR-1000. This is
usually connected to a content management network. When it is
checked, IP address, Subnet Mask, Server Content IP can be set.
After setting the above network configurations, click Validate IP’s to
check the correctness of the IPs entered. A pop-up opens displaying
the result.
5
6 7 8
Figure 51: System Configuration (2)
Page 67
- 66 -
March 23, 2018
User Manual for SR-1000 Standalone Integrated Media Block™
7. CONFIGURATION
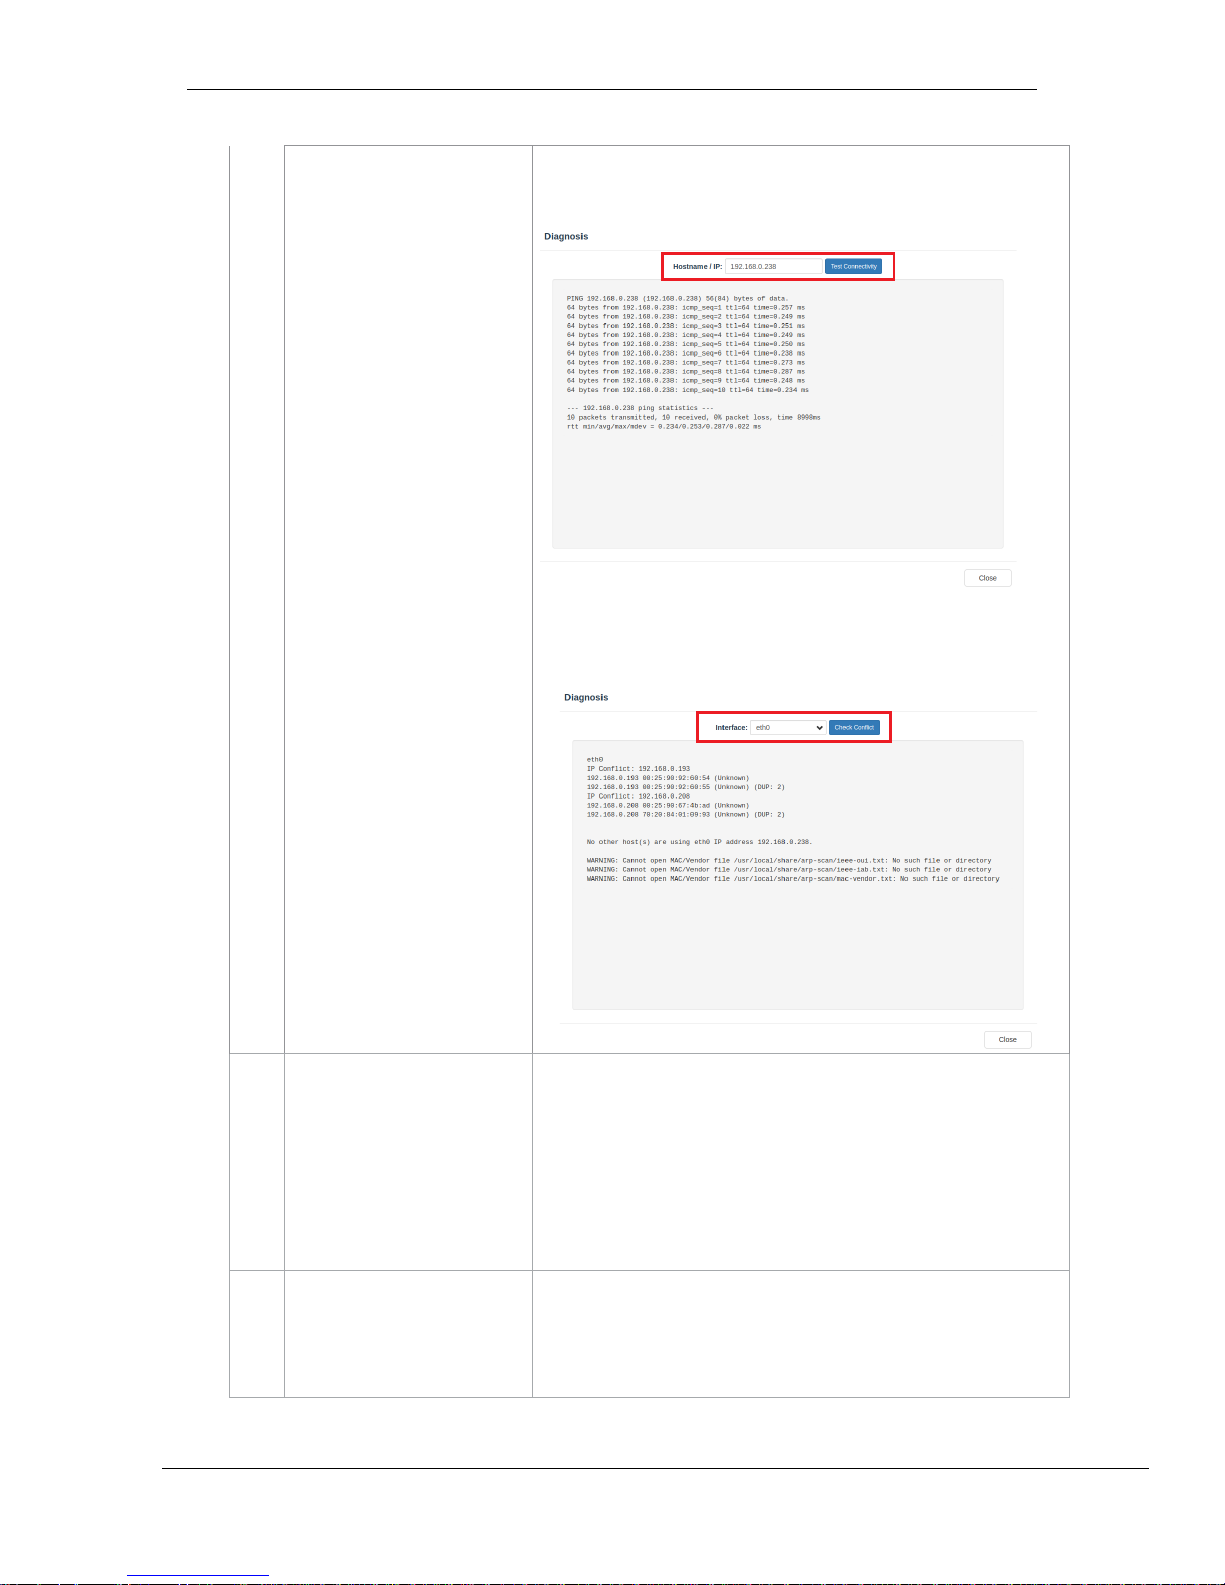
Check Network Access
Check IP Conflict
Click to open the pop-up window. Enter the Hostname / IP:
192.168.0.XX and click Test Connectivity.
Click to open the pop-up window. Select Interface from dropdown
“eth0” or “eth1” and click Check Conflict.
6
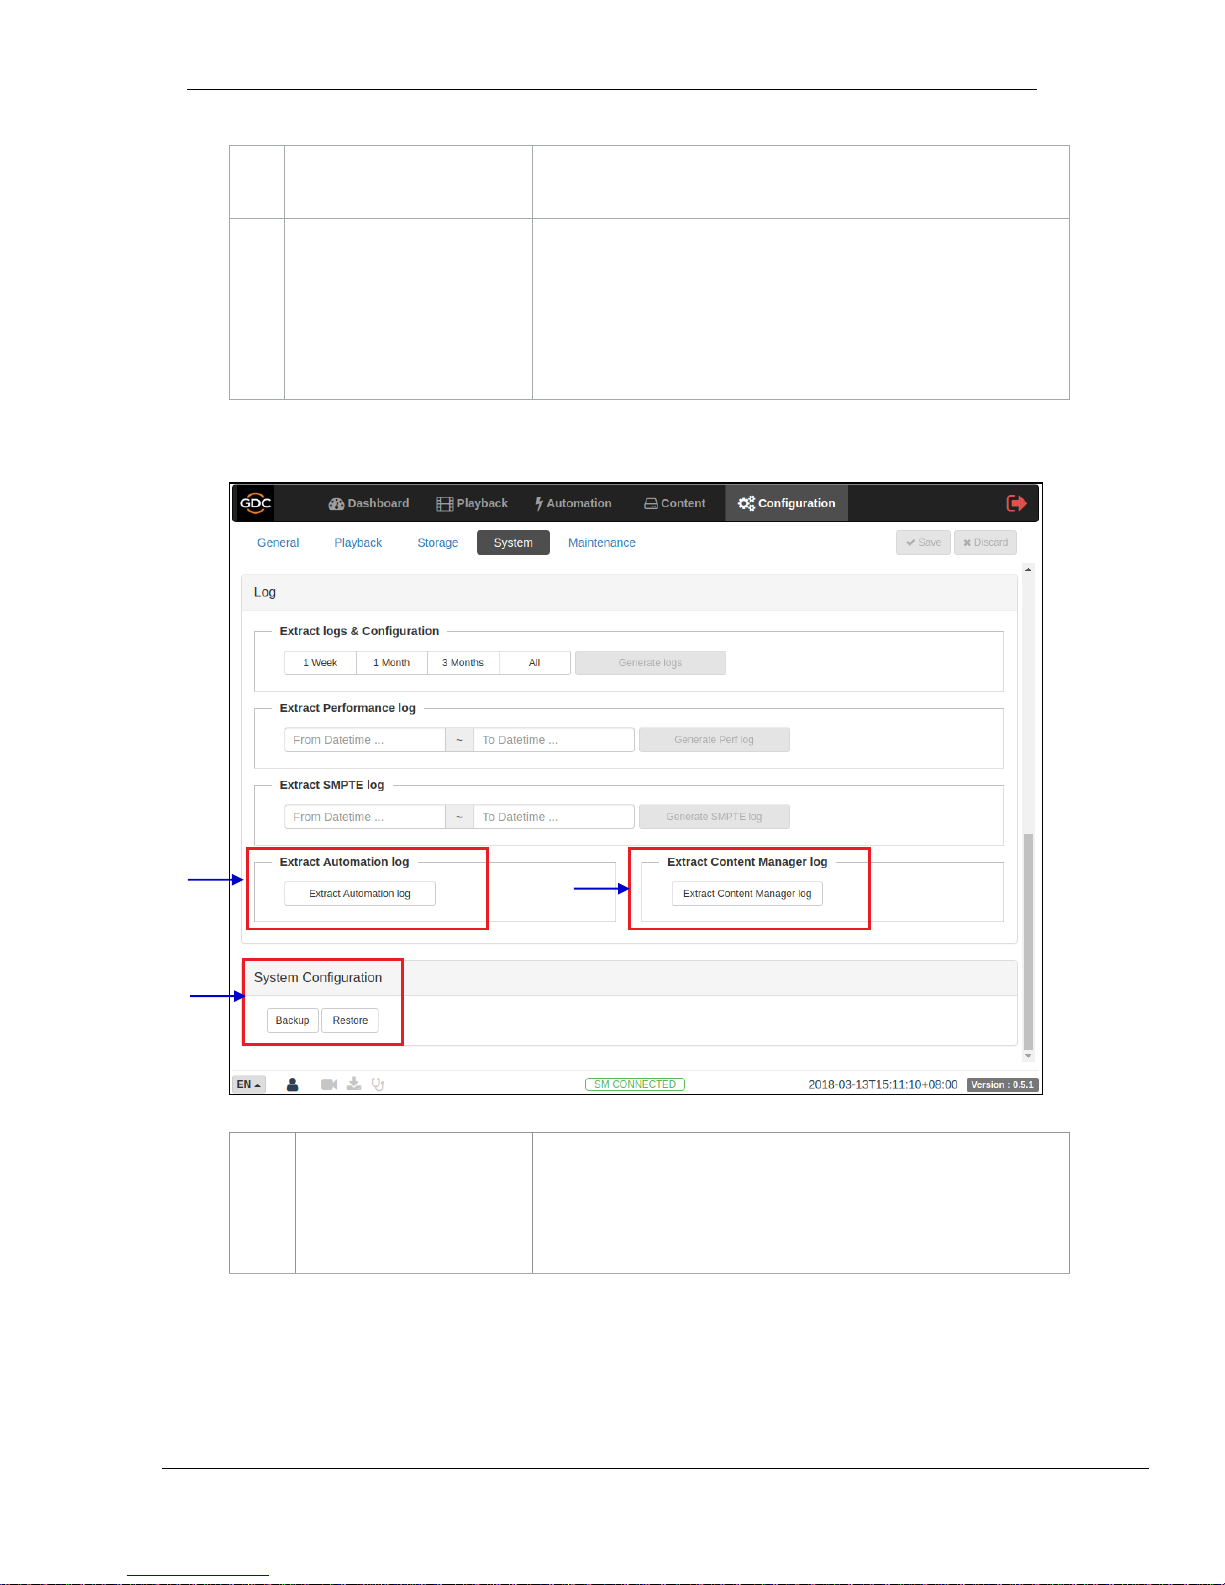
[Extract logs and configuration]
This allows the operator to extract debug logs from the SR-1000 for
analysis by GDC personnel.
Time duration includes 1 Week, 1 Month, 3 Months and All.
After selecting the time duration, Generate logs button will be enabled.
A pop-up window will be shown to display the log extraction progress.
After log generation, a pop-up window will be shown to save or open
the extracted file.
7
[Extract Performance Log]
This allows the operator to extract performance logs from the SR-1000.
After selecting the Date/Time, Generate Pref Log button will be
enabled. A pop-up window will be shown to display the log extraction
progress.
Page 68
- 67 -
March 23, 2018
User Manual for SR-1000 Standalone Integrated Media Block™
7. CONFIGURATION
After log generation, a pop-up window will be shown to save or open
the extracted file.
8
[Extract SMPTE Log]
This allows the operator to extract SMPTE audit logs from the SR-1000.
After selecting the Date/Time, Generate SMPTE Log button will be
enabled. A pop-up window will be shown to display the log extraction
progress.
After log generation, a pop-up window will be shown to save or open
the extracted file.
!
9
[Extract Automation Log]
Extract automation logs from the SR-1000.
After clicking Extract Automation Log button, a pop-up window will be
shown to save the file.
9
10
Figure 52: System Configuration (3)
11
Page 69
- 68 -
March 23, 2018
User Manual for SR-1000 Standalone Integrated Media Block™
7. CONFIGURATION
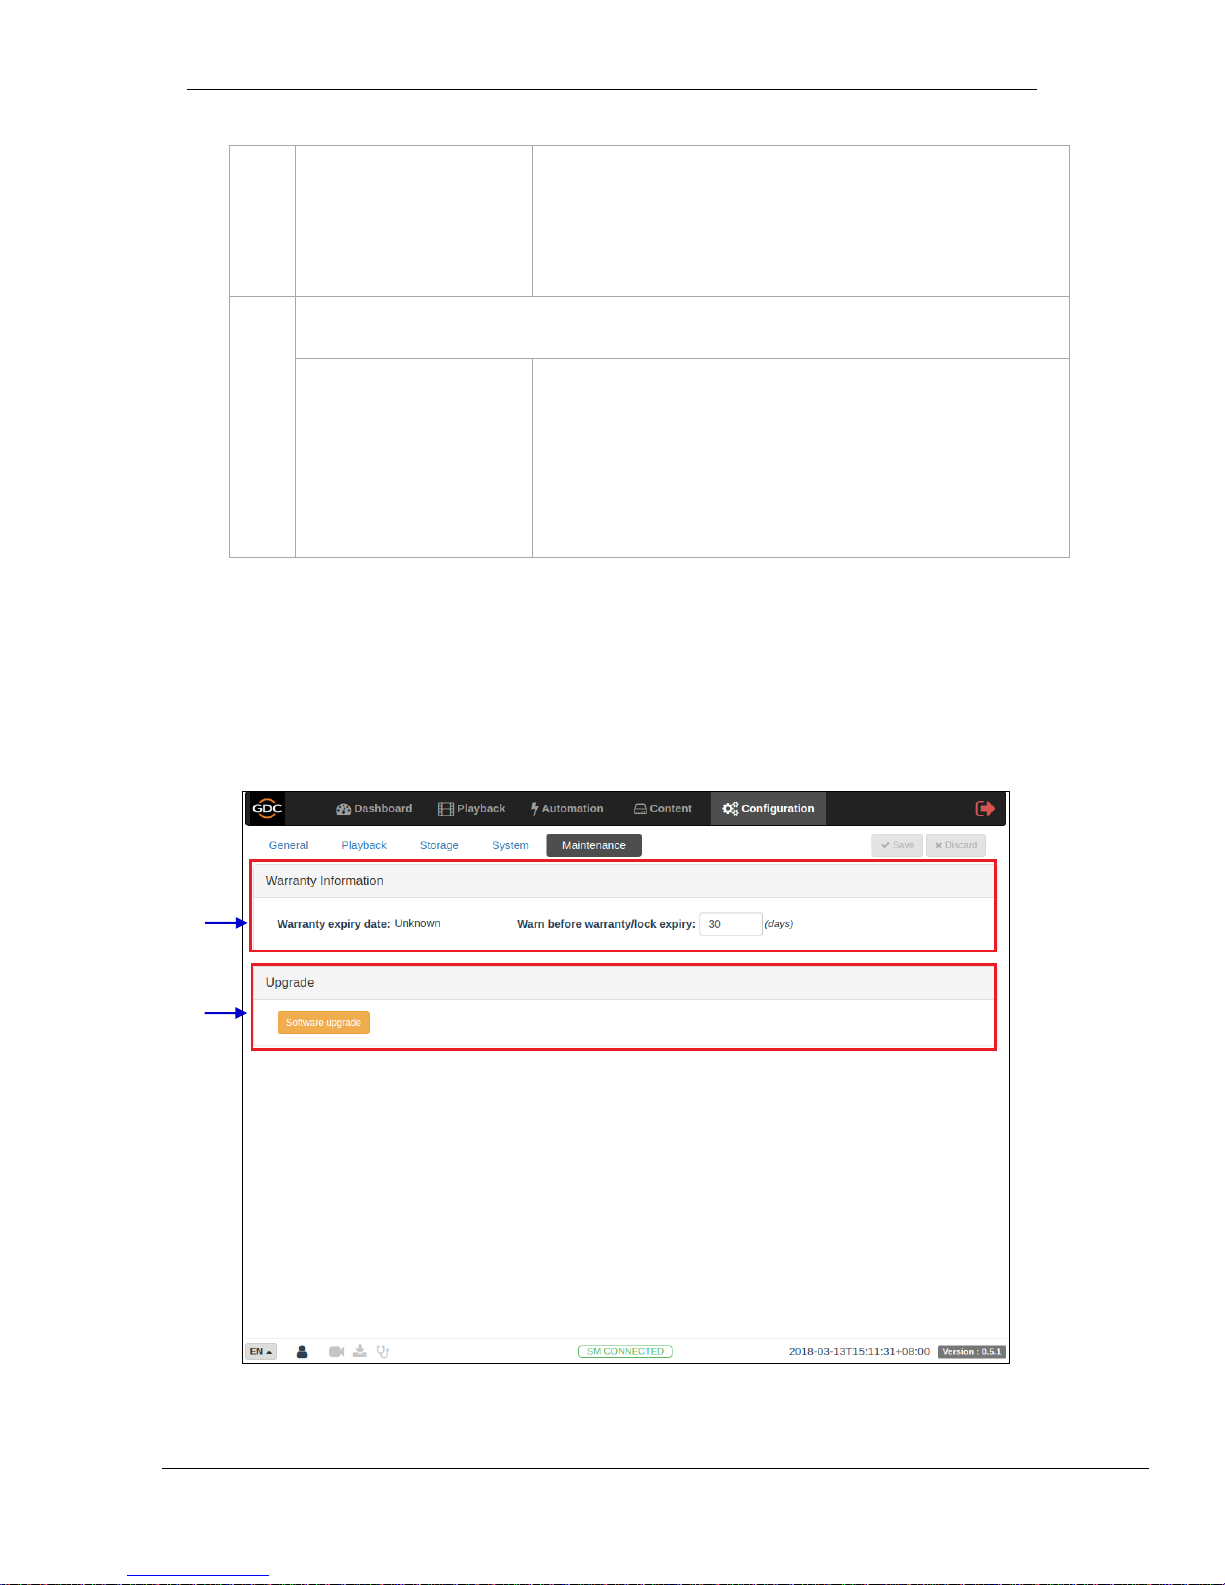
10
[Extract Content Manager Log]
Extract Content Management logs from the SR-1000.
After clicking Extract Content Manager Log button, a pop-up window
will be shown to save the file.
11
[System Configuration]
Backup
Restore
Backup and Restore options are available.
The Backup Configuration saves the IMB configuration to a backup file.
A pop-up window will be shown to save the configuration file.
The Restore Configuration will restore the IMB configuration from a
backup file. Users can upload the configuration files.
!
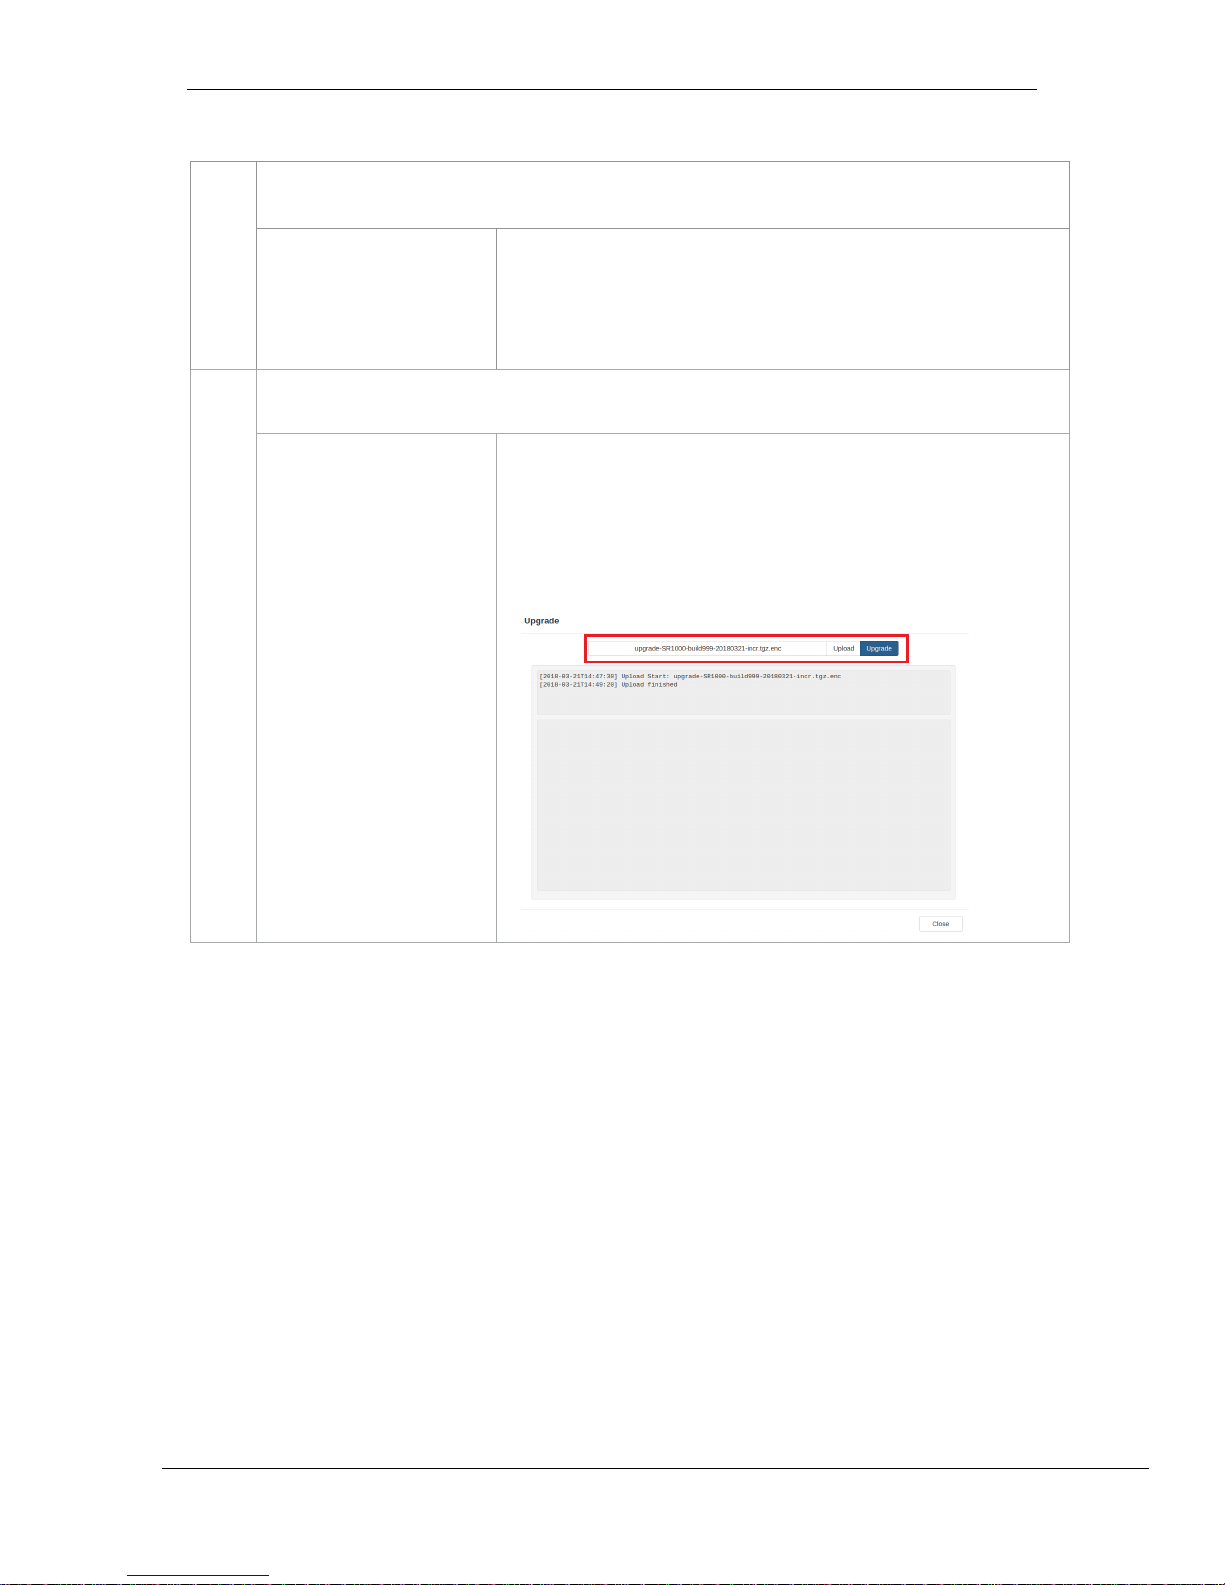
7.5 Maintenance
This tab is used to install software upgrades on the system. Warranty information is also
displayed in this section. !
2
1
Figure 53: Maintenance Configuration
Page 70
- 69 -
March 23, 2018
User Manual for SR-1000 Standalone Integrated Media Block™
7. CONFIGURATION
!
!
!
!
!
!
!
!
!
1
[Warranty Information]
Warranty expiry date
Warn before warranty/lock
expiry
Warranty expiry date is shown.
The number of days in advance to issue a warning before warranty/lock
expiry can be set.
2
[Upgrade]
Software Upgrade
When this button is clicked, a pop-up window will be shown with an option to
choose and upload files to be upgraded.
Select the upgrade package file and click Upload to upload it to
the SR-1000.
Once the upload is complete, the Upgrade button will be enabled. Click
Upgrade to start the upgrade process.
Page 71

- 70 -
March 23, 2018
User Manual for SR-1000 Standalone Integrated Media Block™
7. CONFIGURATION
8 APPENDIX Ⅰ
!
This section describes optional features on the SR-1000 that require licenses from GDC.
!
8.1 IMB Sync
Two SR-1000 systems can work in sync for dual projector playback of content. This can be used
for increasing the brightness of the image by overlaying the output from the projectors on the same
screen, for making a video-wall or any other applications where two systems need to play in sync.
Notes 1: The SR-1000 systems must be running a software version that supports IMB
synchronized playback. Please check with your regional GDC office for the correct software version
to be used.
Notes 2: IMB synchronized playback is only enabled with a license from GDC. Please check with
your regional GDC office for a license to enable IMB synchronized playback.
Notes 3: Both server systems that make up one sync solution must be the same model.
Notes 4: IMB synchronized playback works with JPEG2000 content only. MPEG is not supported
with IMB synchronized playback.
Two servers will be used for IMB synchronized playback:
The 'master server' will be used to control playback for the entire IMB sync system.
The 'slave server' will be controlled by the master server to play in sync with the master.
Page 72
- 71 -
March 23, 2018
User Manual for SR-1000 Standalone Integrated Media Block™
7. CONFIGURATION
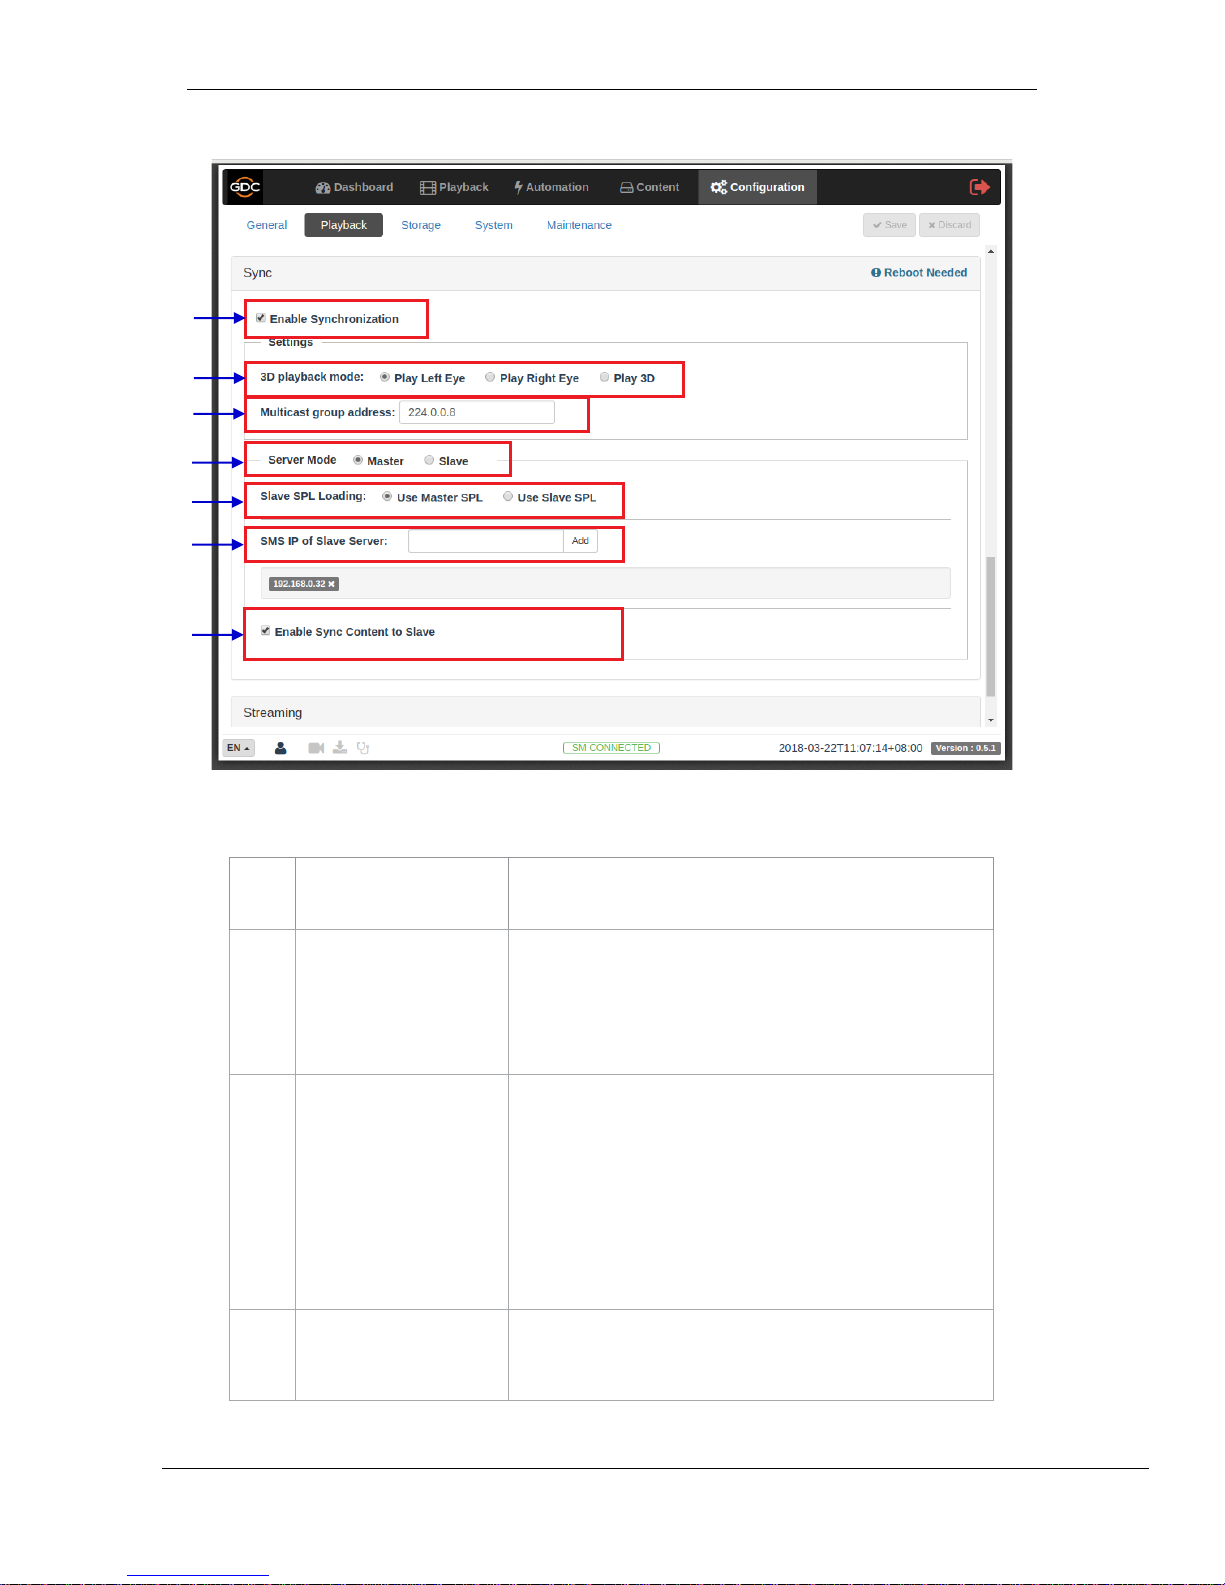
1
[Enable Synchronization]
Enable Synchronization must be set on both master and slave
servers.
2
[3D playback mode]
Select 3D playback mode for the master and slave server.
Each server can be configured to play either the left or right eye
frames or both for 3D content.
For example, the master server can be set to 'Play Left Eye', and
the slave server can be set to 'Play Right Eye'.
3
[Multicast group address]
Set Multicast group address for the master and slave server.
Multicast group addresses can range from 224.0.0.0 to
224.0.0.254.
Note 1: Multicast group address must be the same for both the
master and slave servers. The IMB Ethernet 1 ports on both
master and slave IMBs will use this setting for communication.
Note 2: If multiple sets of IMB sync systems are present in a
theater environment, the Multicast group address for each set
of IMB sync systems must be unique.
4
[Server Mode]
Select Master on the master server, and Slave on the slave
server.
1
2
3
4 5 6
Figure 54: IMB Sync Configuration
7
Page 73

- 72 -
March 23, 2018
User Manual for SR-1000 Standalone Integrated Media Block™
7. CONFIGURATION
Note: If this setting is changed, the server must be rebooted for
the setting to take effect.
5
[Slave SPL Loading]
Slave SPL Loading is only enabled on the master server.
Select a method for loading an SPL on the slave server.
Use Master SPL: the SPL on the master server will be
automatically copied and loaded on slave when playback starts.
Use Slave SPL: the master server will automatically find a SPL
with the same name on the slave server and play that SPL.
(Please refer to Section 8.1.1 for details.)
6
[SMS IP of Slave Server]
SMS IP of Slave Server is only enabled on the master server.
Enter the SMS IP of the slave server. This setting is required for
the master server to load an SPL on the slave server
7
[Enable Sync Content to
Slave]
When this option is enabled, the following actions on the master
server will trigger the same action on the slave server:
• DCP ingest from a network source (NFS/FTP/CIFS)
• DCP deletion
Note: This feature will not work for the following:
• DCP ingest from a local source (USB/eSATA/CRU)
• KDM ingest
!
8.1.1 IMB Synchronized Playback Operation
•
If the 'Use Master SPL' option is selected during configuration, the SPL playing on the
master server will be automatically copied and loaded on the slave server. SPL content must
be loaded on the slave server before playback is started.
1. Create and load an SPL on the 'master' server.
2. Make sure the 'slave' server has content and KDM required for this SPL.
3. Start playback from the 'master' server.
4. The 'slave' server will automatically start playback with the same SPL on the 'master'
server.
•
If the 'Use Slave SPL' option is selected during configuration, the 'master' server will load and
play an SPL with the same name on the 'slave' server. This SPL must be prepared on the
slave server before playback is started.
1. Create and load an SPL on the 'master' server.
2. Create an SPL with same name on the 'slave' server.
3. Start playback from the 'master' server.
4. The 'slave' server will automatically start playback of the SPL with the same name.
Page 74

- 73 -
March 23, 2018
User Manual for SR-1000 Standalone Integrated Media Block™
7. CONFIGURATION
Notes: The above operation implies that content must be downloaded on both servers used for
sync playback. For encrypted content, KDMs are needed for both servers and these must be
ingested to the respective servers prior to playback.
The following table shows video output mode for 2D and 3D SPLs. This can be used to configure
projector macros for IMB synchronized playback:
IMB sync playback with 'Play Left
Eye'/'Play Right Eye' selected
IMB sync playback with 'Play
3D' selected
2D SPL
Will play as 2D on each projector
Will play as 2D on each
projector
3D SPL
Will play as 2D left or right eye on each
projector
Will play as 3D on each
projector
SPL with 2D
and 3D content
Will play as 2D on each projector (3D is
played as left or right eye)
Will play as 3D on each
projector (2D content is played
as 3D)
!
!
!
!
!
!
!
!
!
!
!
!
Page 75

- 74 -
March 23, 2018
User Manual for SR-1000 Standalone Integrated Media Block™
7. CONFIGURATION
9
APPENDIX
Ⅱ
!
The SR-1000 has undergone and passed on first attempt the following quality assurance tests,
with reports issued by the world’s leading inspection, verification, testing and certification
company– SGS Labs (https://www.sgs.com).
1. Temperature Humidity Cycling Test
• SGS Test Report Number: SZRL2018010392_02
• Published Date : March 05th , 2018
2. Vibration Test
• SGS Test Report Number: SZRL2018030056
• Published Date : March 08th , 2018
3. Free Drop Test
• SGS Test Report Number: SZRL2018030081
• Published Date : March 15th , 2018
4. Thermal Shock Test
• SGS Test Report Number: SZRL2018030235_01
• Published Date : April 03rd , 2018.
! !
!
!
!
!
Page 76

GDC Technology Offices
Hong Kong (Headquarters) Brazil (São Paulo)
Unit 1-7, 20th Floor, Av. Antônio Carlos Comitre, 540,
Kodak House II, 3º andar, Conjunto 31, Campolim,
39 Healthy Street East, Sorocaba / São Paulo, CEP 18047-620, Brasil
North Point,Hong Kong. Tel: +55 15 33269301
Tel: +852 2507 9555
Singapore
10 Ubi Crescent, Ubi Tech Park
China (Beijing) Lobby B, #06-25, Singapore 408564
Rm. 609-618, Office Building, Tel: +65 6222 1082
20# Xinde Street,
Xicheng District, Indonesia (Jakarta)
Beijing, P.R. China 100088 Total Building Lantai 4 Suite 0401,
Tel: +86 10 6205 7040 Jl. Letjen S. Parman Kav. 106A,
Kel. Tomang, Kec. Grogol Petamburan,
China (Shenzhen) Jakarta Barat 11440, Indonesia
Room A701, 7/F, Tel: +65 21 2920 3607
Languang Technology Building,
No.7 Xinxi Road, Japan (Tokyo)
North Zone, 3F, Kyobashi-Chuo Bldg,
High-Tech Park, 1-14-7 Kyobashi Chuo-ku,
Nanshan District, Tokyo 104-0031,Japan
Shenzhen, China Tel: +81 3 5524 3607
Tel: +86 755 8608 6000
India (Mumbai)
Spain (Barcelona) Office No. B-207/208, Everest Chamber,
C/ Esteve Terradas, Andheri Kurla Road, Marol, Andheri (East),
nº 27, esc. D, Despacho 1, Mumbai-400 059, India
08023 Barcelona, Spain Tel: +91 22 4044 0500
Tel: +34 93 159 51 75
Mexico (Mexico City)
Peru (Lima) Av. Del peñon 411 esq. Ote 168
Calle Manuel Miota 170 Col. Moctezuma 2ª Sección,
Miraflores Lima 18, Perú Venustiano Carranza, Distrito Federal,
Tel: +51 1 340 5146 C.P. 01210 Mexico
Tel: +52 55 8526 6220
USA (Los Angeles) United Arab Emirates (Dubai)
1016 West Magnolia Boulevard Business Centre,
Burbank, CA 91506, USA Dubai World Central,
Tel: +1 818 972 4370 / PO Box 390667,
+1 877 743 2872 (Toll Free) Dubai UAE
Email: [email protected]
Website: www.gdc-tech.com
ISO 9001 QMS
Cert. No. CN09/32221
GDC Technology manufacturing facility is ISO 9001:2008 certified.
Copyright © 2018 GDC Technology Limited. All rights reserved.
All trademarks listed in this manual are properties of their respective owners.
Specifications are subject to change without notice due to ongoing
product development and improvement.
UM-0738-1803-V1E
 Loading...