


USER MANUAL FOR
LPU-1000 LED PLAYER UNIT™
[THIS DOCUMENT IS PROPRIETARY AND CONFIDENTIAL. NO PART OF THIS DOCUMENT MAY BE DISCLOSED IN ANY
MANNER TO A THIRD PARTY WITHOUT THE PRIOR WRITTEN CONSENT OF GDC TECHNOLOGY]
SMS version 10.0
Aug 01, 2018

TABLE OF CONTENTS
- 2 -
01 Aug 2018
User Manual for LPU-1000 LED Player Unit
TABLE OF CONTENTS
1 INTRODUCTION ................................................................................................................. 10
1.1 About This Manual ...................................................................................................... 10
1.2 Safety Instructions ...................................................................................................... 11
1.2.1 General Safety Instructions .............................................................................................................. 11
1.2.2 Electrical Safety ................................................................................................................................. 11
2 SMS ..................................................................................................................................... 12
2.1 About the SMS Interface ............................................................................................. 12
2.2 Accessing the SMS Interface ..................................................................................... 12
2.3 Understanding the SMS Interface .............................................................................. 13
2.3.1 SMS Interface ..................................................................................................................................... 13
2.3.2 Playlist Management ......................................................................................................................... 15
2.3.3 Scheduler ............................................................................................................................................ 18
2.3.4 Configuration ..................................................................................................................................... 19
2.3.4.1 General ........................................................................................................................................... 19
2.3.4.2 CineCanvas .................................................................................................................................... 22
2.3.4.3 Assistance ....................................................................................................................................... 23
2.3.4.4 Audio Option ................................................................................................................................... 24
2.3.4.4.1 Audio Channel Mapping ........................................................................................................... 25
2.3.4.5
Caption ............................................................................................................................................ 30
2.3.4.6 IMB Network ................................................................................................................................... 31
2.3.4.7 IMB Storage .................................................................................................................................... 33
2.3.5 SNMP Configuration .......................................................................................................................... 34
2.3.5.1 Introduction ..................................................................................................................................... 34
2.3.5.2 Accessing the SNMP Configuration Interface ................................................................................ 34
2.3.5.3 Understanding the SNMP Configuration Interface ......................................................................... 36
2.3.5.3.1 General ..................................................................................................................................... 36
2.3.5.3.2 System Information ................................................................................................................... 37
2.3.5.3.3 System Setting .......................................................................................................................... 38
2.3.5.3.4 Encrypt ...................................................................................................................................... 39
2.3.5.3.5 Storage ..................................................................................................................................... 40
2.3.5.3.6 Video Card ................................................................................................................................ 41
2.3.5.3.7 PCI ............................................................................................................................................ 42
2.3.5.3.8 Sensors ..................................................................................................................................... 43
2.3.5.3.9 Ethernet .................................................................................................................................... 44

User Manual for LPU-1000 LED Player Unit
01 Aug 2018
- 3 -
TABLE OF CONTENTS
2.3.5.3.10 Restart/Save/Cancel ............................................................................................................... 45
2.3.6 Automation ......................................................................................................................................... 46
2.3.6.1 Devices ........................................................................................................................................... 47
2.3.6.2 Inputs .............................................................................................................................................. 50
2.3.6.3 Actions ............................................................................................................................................ 51
2.3.6.4 Options ............................................................................................................................................ 54
2.3.6.5 Import/Export .................................................................................................................................. 55
2.4 Show Playlist ............................................................................................................... 56
2.4.1 Create a Show Playlist....................................................................................................................... 56
2.4.1.1 Access to Playlist Management ...................................................................................................... 56
2.4.1.2 Creating a Playlist ........................................................................................................................... 57
2.4.1.3 Editing Cues.................................................................................................................................... 58
2.4.1.4 Saving the Playlist .......................................................................................................................... 63
2.5 Show Schedule ............................................................................................................ 64
2.5.1 Schedule a Show ............................................................................................................................... 64
2.6 Synchronizing Shows ................................................................................................. 69
2.7 Subtitle Setting ............................................................................................................ 69
2.7.1 Subtitle Overlay .................................................................................................................................. 69
2.7.1.1 Subtitle Overlay Setup .................................................................................................................... 69
2.7.1.2 Subtitle Language Selection ........................................................................................................... 70
2.8 Shutdown/Restart Application ................................................................................... 75
2.8.1 Shutdown or Restart.......................................................................................................................... 75
3 CONTROL PANEL .............................................................................................................. 76
3.1 About Control Panel .................................................................................................... 76
3.2 Introduction to the Control Panel interface ................................................................... 77
3.3 Manual Automation Execution ....................................................................................... 78
3.4 Restarting the Control Panel ...................................................................................... 80
3.5 Shutting Down the System ............................................................................................. 82
4 CONTENT MANAGER ........................................................................................................ 83
4.1 About the Content Manager ....................................................................................... 83
4.1.1 Introduction ........................................................................................................................................ 83
4.1.2 Accessing the Content Manager ...................................................................................................... 83
4.2 Content Management .................................................................................................. 84
4.2.1 Ingesting Content .............................................................................................................................. 84
4.2.2 Ingesting Content from USB Disk .................................................................................................... 86

TABLE OF CONTENTS
- 4 -
01 Aug 2018
User Manual for LPU-1000 LED Player Unit
4.2.3 Ingesting KDMs .................................................................................................................................. 88
4.2.4 Monitor Ingest Progress ................................................................................................................... 89
4.2.5 Cancelling Ingest ............................................................................................................................... 90
4.2.6 Deleting Content ................................................................................................................................ 91
4.2.7 Checking Content Integrity ............................................................................................................... 92
4.3 KDM Management ....................................................................................................... 97
4.3.1 Manage KDM ...................................................................................................................................... 97
4.4 License Management .................................................................................................. 98
4.4.1 Manage Licenses ............................................................................................................................... 98
4.4.2 Ingesting Licenses ............................................................................................................................. 99
4.4.3 Monitor Ingest Progress ................................................................................................................. 100
4.5 Source Management ................................................................................................. 101
4.5.1 Adding a Data Source...................................................................................................................... 101
4.5.2 Deleting a Data Source .................................................................................................................... 104
4.5.3 Editing a Data Source ...................................................................................................................... 105
5 ADMIN PANEL .................................................................................................................. 107
5.1 General Introduction ................................................................................................. 107
5.2 User Interface (UI) ..................................................................................................... 107
5.2.1 Introduction ...................................................................................................................................... 107
5.2.2 Access to Admin Panel ................................................................................................................... 108
5.2.2.1 Access via Control Panel .............................................................................................................. 108
5.2.2.2 Login to Admin Panel .................................................................................................................... 109
5.2.2.3 Admin Panel Interface .................................................................................................................. 110
5.3 Configuration & Maintenance .................................................................................. 112
5.3.1 Storage System Management ......................................................................................................... 112
5.3.1.1 Create new RAID array ................................................................................................................. 113
5.3.1.2 Monitor RAID Status ..................................................................................................................... 115
5.3.1.3 Hard Disk Information ................................................................................................................... 116
5.3.1.4 Hard Disk Usage ........................................................................................................................... 118
5.3.1.5 Storage Performance .................................................................................................................... 119
5.3.1.6 Increase Rebuild Speed ............................................................................................................... 121
5.3.2 Diagnostics/Maintenance ................................................................................................................ 122
5.3.2.1 Access to Diagnostics/Maintenance ............................................................................................. 122
5.3.2.2 Extract Logs & Configuration ........................................................................................................ 123
5.3.2.3 Backup Configuration ................................................................................................................... 124
5.3.2.4 Restore Configuration ................................................................................................................... 125

User Manual for LPU-1000 LED Player Unit
01 Aug 2018
- 5 -
TABLE OF CONTENTS
5.3.2.5 Configure Timezone ..................................................................................................................... 127
5.3.2.6 Check Network Access ................................................................................................................. 129
5.3.2.7 Network Time ................................................................................................................................ 131
5.3.2.8 Software Upgrade ......................................................................................................................... 132
5.3.2.9 Check IP Conflict .......................................................................................................................... 134
5.3.3 System Information ......................................................................................................................... 136
5.3.3.1 Access to System Info .................................................................................................................. 136
5.3.3.2 Software/OS Version .................................................................................................................... 137
5.3.3.3 Hardware Information ................................................................................................................... 138
5.3.3.4 Licensing Information .................................................................................................................... 139
5.3.3.5 Hotfix Information .......................................................................................................................... 140
5.3.3.6 Module Information ....................................................................................................................... 141
5.3.4 Touchscreen ..................................................................................................................................... 142
5.3.4.1 Access to Touchscreen ................................................................................................................ 142
5.3.4.2 Select Touchscreen Type ............................................................................................................. 143
5.3.4.3 Calibrate Touchscreen .................................................................................................................. 144
5.4 User Manager ............................................................................................................ 145
5.4.1 Access to User Manager ................................................................................................................. 145
5.4.2 Add/Edit user .................................................................................................................................... 145
5.4.3 Delete User ....................................................................................................................................... 147
5.4.4 Change Current User Password ..................................................................................................... 149
5.5 DCI Compliance ......................................................................................................... 150
5.5.1 Access to DCI Compliance ............................................................................................................. 150
5.5.2 Offset RTC Time ............................................................................................................................... 151
5.5.3 Get SM Log ....................................................................................................................................... 152
5.6 Quit/Shutdown ........................................................................................................... 153
6 OPERATION NOTES ........................................................................................................ 155
6.1 Power On Sequence .................................................................................................. 155
6.2 Power Off Sequence ................................................................................................. 155
7 Appendix .......................................................................................................................... 156
7.1 Network Streaming .................................................................................................... 156
7.1.1 System Configuration...................................................................................................................... 156
7.1.2 Network Streaming Configuration ................................................................................................. 157
7.2 MDA Decoding ........................................................................................................... 159
7.2.1 Requirement ..................................................................................................................................... 159
7.2.2 Server configuration for MDA playback ........................................................................................ 159

TABLE OF CONTENTS
- 6 -
01 Aug 2018
User Manual for LPU-1000 LED Player Unit
7.2.2.1 Setting up the server for MDA playback ....................................................................................... 159
7.2.2.2 Setting up the MDA configuration file ........................................................................................... 160
7.2.3 Audio channel routing requirements ............................................................................................. 162
7.3 Audio Upmix .............................................................................................................. 163
7.3.1 Requirement ..................................................................................................................................... 163
7.3.2 Setup ................................................................................................................................................. 163
7.3.2.1 Enable audio upmix ...................................................................................................................... 163
7.3.2.2 Set CPL audio track properties ..................................................................................................... 164

User Manual for LPU-1000 LED Player Unit
01 Aug 2018
- 7 -
Thank you for purchasing a GDC LPU-1000 LED Player Unit from GDC Technology
Limited.
To ensure proper operation and to maximize value of LPU-1000, please review this User Manual. It will guide
you through all the features and benefits.
COPYRIGHT NOTICE
Copyright © 2018 by GDC Technology Limited
All rights reserved. No part of this manual may be copied or distributed, transmitted, transcribed, stored in a retrieval system,
or translated into any human or computer language, in a form or by any means, electronic, mechanical, photocopying, recording,
magnetic, optical, manual or otherwise, or disclosed to third parties without prior written permission of GDC Technology Limited.
MANUAL DISCLAIMER
This manual is made with SMS version 10.0 and there might be slight differences depending on the software version the IMB
is running. The contents, features and specifications stated in this manual are subject to change without notice due to
continuous product development and improvements. In no other event shall GDC Technology Limited be liable for any loss of
profit or any other commercial damages, including but not limited to special, consequential, or other damages.
FCC COMPLIANCE STATEMENT
This device complies with Part 15 of the FCC Rules. Operation is subject to the following two conditions: (1) this device may
not cause harmful interference, and (2) this device must accept any interference received, including interference that may
cause undesired operation.
NOTE: This equipment has been tested and found to comply with the limits for a Class A digital device, pursuant to Part 15 of
the FCC Rules. These limits are designed to provide reasonable protection against harmful interference when the equipment
is operated in a commercial environment. This equipment generates, uses, and can radiate radio frequency energy and, if not
installed and used in accordance with the instruction manual, may cause harmful interference to radio communications.
Operation of this equipment in a residential area is likely to cause harmful interference in which case the user will be required
to correct the interference at his own expense.

- 8 -
01 Aug 2018
User Manual for LPU-1000 LED Player Unit
CONTACTS AND OFFICES
CONTACTS AND OFFICES
Website: www.gdc-tech.com Email: info@gdc-tech.com
24/7 Engineering Support Hotline:
Hong Kong
(Headquarters)
China (Beijing)
China (Shenzhen)
Spain(Barcelona)
Unit 1-7, 20th Floor,
Kodak House II,
39 Healthy Street East,
North Point, Hong Kong
Tel: +852 2507 9555
Rm. 609-618, Office
Building,20# Xinde
Street, Xicheng
District, Beijing, P.R.
China 100088
Tel: +86 10 6205 7040
Room A701, 7/F,
Languang Technology Building,
No.7 Xinxi Road, North Zone,
HighTech Park, Nanshan District,
Shenzhen, China
Tel: +86 755 8608 6000
C/ Esteve Terradas, nº
27, esc. D, Despacho 1
08023 Barcelona, Spain
Tel: +34 93 159 51 75
Peru (Lima)
USA (Los Angeles)
Brazil
(São Paulo)
Singapore
Calle Manuel Miota 170,
Miraflores Lima 18, Peru
Tel: +51 1 340 5146
1016 West Magnolia
Boulevard, Burbank,
CA 91506, USA
Tel: +1 818 972 4370 /
+1 877 743 2872
(Toll Free)
Av. Antônio Carlos
Comitre, 540, 3º andar,
Conjunto 31, Campolim,
Sorocaba / São Paulo,
CEP 18047-620, Brasil
Tel: +55 15 33269301
10 Ubi Crescent,
Ubi Tech Park,
Lobby B, #06-25
Singapore 408564
Tel: +65 6222 1082
North America
+1 877 743 2872 (Toll Free)
Latin America
+52 55 8851 1198
Europe
+34 928 912 295
China
+86 400 886 0966
(Toll Free)
North Asia
+852 3520 0920
India
+91 022 4044 0500
South East Asia
+65 6100 4328
Australia/
New Zealand
+61 407 040 744

User Manual for LPU-1000 LED Player Unit
01 Aug 2018
- 9 -
CONTACTS AND OFFICES
CONTACTS AND OFFICES
Indonesia (Jakarta)
Japan (Tokyo)
India (Mumbai)
Mexico
(Mexico City)
Total Building Lantai 4 Suite 0401,
Jl. Letjen S. Parman Kav. 106A,
Kel Tomang, Kec. Grogol
Petamburan,
Jakarta Barat 11440, Indonesia
Tel: +62 21 2920 4691
3F, Kyobashi-Chuo Bldg,
1-14-7 Kyobashi Chuo-ku,
Tokyo 104-0031, Japan
Tel: +81 3 5524 2607
Office No. B-207/208,
Everest Chamber,
Andheri Kurla Road,
Marol, Andheri (East),
Mumbai-400 059, India
Tel: +91 22 4044 0500
S. de R.L. de C.V.,
Av. Del penon 411 esq. Ote 168,
Col. Moctezuma 2 ª Sección,
Venustiano Carranza, Distrito Federal,
C.P. 01210 Mexico
Tel: +52 55 8526 6220
United Arab Emirates
(Dubai)
Business Centre,
Dubai World Central,
PO Box 390667,
Dubai UAE

- 10 -
01 Aug 2018
User Manual for LPU-1000 LED Player Unit
1. INTRODUCTION
1 INTRODUCTION
1.1 About This Manual
This user manual provides instructions on how to use and manage the GDC LPU-1000 LED Player Unit
(LPU-1000). The user interface of the media block in LPU-1000 consists of a few key components
described in the diagram below in Figure 1. The manual has sections on each of these components
describing how it can be used to operate the media block.
Figure 1: Media Block UI components

User Manual for LPU-1000 LED Player Unit
01 Aug 2018
1. INTRODUCTION
- 11 -
1.2 Safety Instructions
1.2.1 General Safety Instructions
• The LPU-1000 is intended for installation in a restricted access location.
• The operation environment required should be 0ºC - 40ºC (32ºF - 104ºF).
• For PLUGGABLE EQUIPMENT, the socket outlet should be installed near the equipment and should be
easily accessible.
• Before operating your LPU-1000, please read this manual thoroughly, and retain it for future reference.
• Installation and preliminary adjustments should be performed by qualified GDC Technology personnel.
All warnings on the LPU-1000 in the documentation manual should be adhered to.
• All instructions for operating and maintaining
LPU-1000
must be followed closely.
1.2.2 Electrical Safety
Safety
Warning
• Do not expose the LPU-1000 to rain or moisture, to prevent fire or electrical shock hazard.
• Use a dry cloth when cleaning LPU-1000.
• Do not block any ventilation openings.
• Do not install near any heat sources (e.g. radiators, stove or other apparatus that produce heat).
• Consult Tech Support for servicing or maintaining LPU-1000.
• You are cautioned that any change or modification not expressly approved in this manual or approved in
writing by an authorized representative of GDC Technology could void your warranty and/or authority to
operate LPU-1000.

2. SMS
- 12 -
01 Aug 2018
User Manual for LPU-1000 LED Player Unit
2 SMS
2.1 About the SMS Interface
The SMS interface is used for playback control, creating and editing playlists, scheduling. It also
provides
access to advanced configuration
options.
2.2 Accessing the SMS Interface
1
Enter the user password to access the SMS interface as seen in Figure 2.
Figure 2: SMS interface

2. SMS
User Manual for LPU-1000 LED Player Unit
01 Aug 2018
- 13 -
Figure 3: SMS Interface
2.3 Understanding the SMS Interface
2.3.1 SMS Interface
1
[►]
Play button. The [►] button starts playback when pressed and is disabled when
the system is in Pause mode.
2
[ || ]
Pause button. The [ || ] button is enabled when the system is in playing or
pause mode. To resume from pause simply hit the Pause button again.
3
[■]
Stop button. The [■] button is enabled when the system is in playing mode and
stops playback when pressed.
4
[
]
Playlist button. Press to open the Playlist Management to create a
playlist. For more information about the Playlist Management, please refer to
Section 2.3.2. Playlist Management further below
.
1
5 6 10
11
2 3 8
9
4
12
7
13

2. SMS
- 14 -
01 Aug 2018
User Manual for LPU-1000 LED Player Unit
5
[Slider Bar]
It will start advancing when [►] is pressed to start a playback. One clip will
take one complete cycle from the left to the right. The Slider Bar always
returns to the starting point (extreme left) after a clip is finished. When [■]
is pressed, the Slider Bar will stop and return to its starting point.
When playback is paused, the Slider Bar can be moved to the left (for
rewinding) or to the right (for forwarding).
6
[|◄]
[
]
[]
[►|
]
Move to the first frame of the clip.
Rewind (move back) by the number of frames of the playback.
Forward (move forward) by the number of frames of the playback.
Move to the last frame of the clip.
7
[Status Display]
Reports the status of the system. The display shows the number of clips in
the active playlist, the name of the active playlist, and the name of the clip
currently being played.
8
[ i ]
INFORMATION button. If [ i ] is pressed when the system is in stopped mode
,
the system will show the serial number and the software version of the IMB.
A text box will appear beside the Timecode Display (replacing the navigating
buttons [|◄] [] [] [►|]) and the text box will show the serial number and
software version of the IMB.
9
[ ]
SCREEN LOCK button - The SCREEN LOCK function will prevent any
unintentional screen touches or mouse clicks that could disturb playback.
The screen will be locked when [ ] button is pressed. No access to the
SMS Interface (or associated interfaces) is allowed when the screen is
locked. The User level password or higher is needed to unlock the screen.
If the screen is locked while the system is playing, the name, duration and
the remaining time of the clip will be shown on the screen while the clip is
playing.
10
[Control Panel]
CONTROL PANEL button – For returning to the control panel screen of the
user interface.
11
[Scheduler]
SCHEDULER button – For scheduling the time and date of the playlists to
be shown. The playlist can also be looped for a period of time. For more
information about Scheduler, please refer to Section 2.3.3. Scheduler.
12
[Configuration]
CONFIGURATION button – For changing the general options on the system
(e.g. enable startup/ shutdown password, change access level passwords,
perform software upgrade, etc.). For more information, please refer to
Section 2.3.4. Configuration
.
13
[Shutdown]
SHUTDOWN button. For shutting down the IMB or restarting the application. For
more information, please refer to Section 2.8 Shutdown/Restart Application
Serial
Number
Software
Version

2. SMS
User Manual for LPU-1000 LED Player Unit
01 Aug 2018
- 15 -
Figure 4: Playlist Management
2.3.2 Playlist Management
1
[IMB Content]
The IMB content is listed here. Content is shown in alphabetical order
grouped by [Trailer, Feature, etc.]. Available automation cues are listed
under cues
. HDMI content can also be added to the playlist.
2
[Playlist Content]
The contents of the playlist being currently edited are shown here.
3
[Clip
Information]
Displays information about the selected item in the Content. This includes
the Name, total Duration, Sound (Audio) format, Content format, if
Encryption is present, if a Composition Playlist exists, if it has Subtitles and
if a current KDM is on the IMB.
4
[+]
Adds content to the Playlist by pressing [+] after an item from the Content
is selected.
5
[-]
Removes the selected item from the Playlist content.
13
15 21
14
16
17
18
19
11
12 9 8
4
7
10
5
6
3

2. SMS
- 16 -
01 Aug 2018
User Manual for LPU-1000 LED Player Unit
6
[Loop]
When [Loop] is selected, the contents in the Playlist will run continuously
in a loop when [►] is pressed.
7
[3D Sync]
Synchronizes clips for 3D showing.
8
[Clear]
Removes all clips on the playlist.
9
[Edit Cue]
Click the Edit Cue button to bring up the cue editing interface, used to add,
remove or edit existing automation cues for the selected clip in the playlist
(See Section 2.4.1.3 Editing Cues)
10
[CPL Properties]
Shows the properties of selected CPL
11
[
]
Moves the highlighted clip in the Playlist ahead in chronological order
.
Make sure an item is selected from the Playlist before pressing [
].
When
[ ] is pressed, the selected item will move before the previous clip.
12
[
]
Moves the highlighted clip in the Playlist down in chronological order
.
Make sure an item is selected from the Playlist before pressing [
].
When [ ] is pressed, the selected item will move after the next clip.
13
[Shows]
This displays a list of all the playlists saved. Selecting a playlist here
displays the contents of the playlist for editing. A playlist that is currently
playing may not be edited.
NOTE: Selecting a playlist here does not load it for playback. The “Load
Show to Play” button has to be pressed to load the playlist into the player
for playback.
14
[Load Show To Play]
Loads the selected playlist into the player for playback
.
15
[Save Show]
Saves the playlist currently being edited.
16
[New Show]
Creates a new blank show playlist. A name must be specified for the
playlist.
17
[Delete Show]
Make sure an item is selected in the Shows drop-down menu. When
[Delete Show] is pressed, the system will delete the selected playlist and
remove it from the Shows drop-down menu.
The delete action is irreversible. The system will prompt you to confirm the
delete action before it proceeds to delete the playlist.
18
[Copy Show]
Duplicates currently selected playlist. When [Copy Show] is pressed, a text
entry keypad will appear for you to enter the new name of the duplicate
playlist.

2. SMS
User Manual for LPU-1000 LED Player Unit
01 Aug 2018
- 17 -
Type in the desired name and press [Enter] to complete the action. To
cancel the action and return to the previous screen, press [Cancel]
.
19
[Close]
Exits the Playlist Management and returns to the SMS Interface.
Enter
Cancel

2. SMS
- 18 -
01 Aug 2018
User Manual for LPU-1000 LED Player Unit
Figure 5: Scheduler
2.3.3 Scheduler
1
[Select Date]
Specifies the date and time of the schedule.
2
[Timeline]
Displays shows scheduled on a 24-hour timeline for the date selected in
(1).
3
[Selected Schedule
Information]
Displays information such as name, time and duration of the selected
show schedule.
4
[Delete Schedule]
[Previous], [Next]
Deletes the currently selected show schedule.
Navigate show schedules by going forward and backward one at a time.
5
[Add to Schedule]
(a) Select the playlist to be scheduled. The contents of the selected
playlist will be displayed in the “Selected Playlist” window.
(b) Select the time for the scheduled show.
(c) To loop the show until a certain time, check ‘Loop until’ and select
the time.
(d) If the schedule is to be repeated every day or week, check ‘Set
recurrence rules’.
(e) Press the ‘Add’ button. A dialog will pop up for specifying the
recurrence rules if it was checked.
1
2
3 45

2. SMS
User Manual for LPU-1000 LED Player Unit
01 Aug 2018
- 19 -
Figure 6: Configuration - General
2.3.4 Configuration
2.3.4.1 General
10
11
14
17
15
12 7 6
3
2
1
4 5 9 8 13
16
18
20
19

2. SMS
- 20 -
01 Aug 2018
User Manual for LPU-1000 LED Player Unit
1
[Use startup / shutdown
password]
There are 3 levels of users on the system - User, Technician, and
Maintenance. If this option is checked, the system will start up with a
password dialog and the user will have to authenticate themselves as
one of the above 3 users to start using or shut down the system.
2
[Playlist Management
password protected]
If this option is checked, the User level will be denied the ability to edit
or create any playlists. Only Maintenance and Technician level users
will be able to create and edit playlists.
3
[Automatically fix invalid
show playlist]
If this option is checked, the invalid show playlists will be fixed
automatically.
4
[Reset TimeCode at end of clip]
If the ‘Reset TimeCode at end of clip’ option is selected, the timecode
will reset to zero [0:0:0:0] whenever a playback ends or stops. The
TimeCode Display will reset to zero [0:0:0:0] while the Duration and
Remaining time will reset to 00 hr. 00 min. 00 sec. The Slider Bar will
return to its starting point at the extreme left.
If the ‘Reset TimeCode at end of clip’ option is not selected, the
system will retain the timecode at the point in which playback ends
or stops. The Slider Bar will remain at where the playback ends or
stops.
5
[Skip checking assets during ingest]
With this option checked the Digital Cinema Package assets will not be
checked for their integrity, this option will reduce ingestion time but
decrease the reliability of the ingestion.
6
[Subtitle Overlay]
For more information, please refer to Section 2.7.1 Subtitle Overlay
7
[Subtitle Delay]
This option provides the ability to delay the on-screen subtitles, the
delay is set in number of frames.
8
[Font Size]
For changing the size of the font on the screen.
9
[ASI Packet]
This option is provided to select the size of the packets (204 or 188
bytes) on the incoming ASI signal.
10
[Date Format]
For changing the displayed format of the date.
11
[Language]
For changing the user interface language.
12
[Change User Password]
For changing the User Password. When [Change User Password] is
pressed, 3 prompts will appear. The first prompt is for the user to
enter the old password, the second prompt is for the user to enter the
new password, and the third prompt is for the system to verify the new
password.

2. SMS
User Manual for LPU-1000 LED Player Unit
01 Aug 2018
- 21 -
13
[Change Technician Password]
For changing the Technician Password. When [Change Technician
Password] is pressed, 3 prompts will appear. The first prompt is for the
user to enter the old password, the second prompt is for the user to enter
the new password and the third prompt is for the system to verify the
new password.
14
[Change Maintenance Password]
For changing the Maintenance Password. When [Change Maintenance
Password] is pressed, 3 prompts will appear. The first prompt is for the
user to enter the old password, the second prompt is for the user to enter
the new password and the third prompt is for the system to verify the new
password.
15
[SNMP Setup]
For accessing the SNMP Configuration Interface.
Please refer to Section 2.3.5 SNMP Configuration.
16
[Automation]
This will bring up the automation configuration user interface used to
integrate the IMB with external devices.
Please refer to Section 2.3.6 Automation.
17
[IMB]
After connecting to the IMB the window will display the IMB version
information as well as check the Marriage and Service Door status on the
cinema LED screen. For IMB Marriage, please refer to the LPU-1000
Installation Manual (see Section 8.2)
18
[Use 24-hour time display format]
When this option is selected, time on the SMS interface will be displayed in
24-hour format. If this option is not selected, time on the SMS interface will
be displayed in 12-hour format.
19
[Alternative Inputs]
This will bring up the Alternative Inputs configuration interface. This
interface can be used to configure video output formats for HDMI and SDI
formats.
20
[MoviePlaz Setup]
To setup the MoviePlaz configuration.

2. SMS
- 22 -
01 Aug 2018
User Manual for LPU-1000 LED Player Unit
Figure 7: Configuration - CineCanvas
2.3.4.2 CineCanvas
1
[XYZ output for MPEG]
Check this to display XYZ video output for MPEG playback.
2
[Resolution]
Allows playback of mixed 2K and 4K content at a constant resolution.
Video output will be scaled up or scaled down to the selected
resolution.
Note: This feature will only affect video and will not automatically scale
PNG subtitles to the target resolution.
2
1

2. SMS
User Manual for LPU-1000 LED Player Unit
01 Aug 2018
- 23 -
Figure 8: Configuration - Assistance
2.3.4.3 Assistance
1
[USB Disk]
Press to perform software upgrades from USB Disk.
2
[Server Information]
Displays serial number, OS version, software version, video
capabilities of the IMB and warranty expiry date.
3
[Warn before warranty
/lock expired]
To set the number of days to show a warning before warranty/lock
expired.
1
2
3

2. SMS
- 24 -
01 Aug 2018
User Manual for LPU-1000 LED Player Unit
Figure 9: Configuration - Audio
2.3.4.4 Audio Option
1
[Audio Offset]
Specify the audio delay to make the video and audio in sync. ‘+x’ will move
the audio x frames forward such that the audio comes earlier than before. ‘-x’
will delay the audio by x frames such that the audio comes later than before.
2
[Audio Output]
LTC output is always enabled on LPU-1000.
3
[Audio Output
Sampling Rate]
Change audio output sampling rate. Output audio sampling rate can be fixed at
48kHz or 96kHz for all content, or it can match the content’s audio sampling rate
(option ‘None’). If the output sampling rate is set to a fixed value (48kHz or
96kHz), content audio is re-sampled if it does not match the output sampling rate.
4
[MDA Decoding]
Please refer to Section 7.2 for the setting of MDA Decoding configuration.
5
[Audio Channel
Mapping]
Please refer to Section 2.3.4.4.1 for the setting of Audio Channel Mapping.
2
1
5
3
4

2. SMS
User Manual for LPU-1000 LED Player Unit
01 Aug 2018
- 25 -
Figure 10: Using DCP channel order
2.3.4.4.1 Audio Channel Mapping
1
Audio output based on the number of audio channels in the audio track of the DCP can be configured in
this tab.
2
The preset for the number of audio channels in the audio track can be changed here.
3
Use the 'Preset' button to configure audio presets.
1
2
3

2. SMS
- 26 -
01 Aug 2018
User Manual for LPU-1000 LED Player Unit
Figure 11: Use DCP channel labels
1
Audio output based on SMPTE audio channel configuration labels can be configured in this tab,
2
Check the 'Use SMPTE audio labels' checkbox to route audio output based on SMPTE audio channel
configuration labels.
3
Audio output for individual SMPTE audio channel labels can be changed here.
1 2 3

2. SMS
User Manual for LPU-1000 LED Player Unit
01 Aug 2018
- 27 -
Figure 12: Alternative Inputs
1
Audio output for alternative (HDMI, SDI) inputs can be configured in this tab.
2
The audio output preset for each alternative input can be changed here.
3
Use the 'Preset' button to configure audio presets.
1 2 3

2. SMS
- 28 -
01 Aug 2018
User Manual for LPU-1000 LED Player Unit
Figure 13: Upmix
1
Audio channel upmix can be enabled or disabled in this tab.
2
Check the 'Enable Upmix' checkbox to enable audio upmix.
Please refer to Section 7.3 for more details on audio upmix.
1
2

2. SMS
User Manual for LPU-1000 LED Player Unit
01 Aug 2018
- 29 -
Figure 14: Audio Preset
1
Audio channel output presets can be configured in this tab.
2
Select a preset to view or change preset settings
3
Add a new preset or delete the current preset.
4
Audio configuration for an audio preset can be changed here.
5
Click 'Save' to save current audio configuration to the selected preset. Click 'Quit' to return to Audio
Channel Mapping configuration.
1 2 3 4 5

2. SMS
- 30 -
01 Aug 2018
User Manual for LPU-1000 LED Player Unit
Figure 15: Configuration - Caption
2.3.4.5
Caption
1
[Rear Window Caption
Device]
Enable and configures a Rear Window display for closed captions.
Note: A USB-to-Serial converter is required for Rear Window display.
2
[Enable Device]
[Maximum waiting time]
Enable communication with a closed caption device that supports
SMPTE 430-10 (USL CCE-100, etc.).
Specifies the maximum time to wait for the closed caption device to
report it is ready, before starting playback.
2
1

2. SMS
User Manual for LPU-1000 LED Player Unit
01 Aug 2018
- 31 -
Figure 16: Configuration - IMB Network
2.3.4.6 IMB Network
1
[Subnet Mask]
Specify the subnet for all IP addresses.
2
[IMB Ethernet 2]
Specify the IP address of the IMB. This is the IP
address of the Security Manager.
3
[SOM IP Address]
This is the main IP address of the LPU-1000. The SMS
interface can be reached at this IP address using VNC.
4
[SOM Gateway]
Specify the network gateway for the LPU-1000.
5
[Enable IMB Ethernet 1]
Specify an IP address and Subnet Mask for IMB
Ethernet 1 of the LPU-1000. This network access can
be used for Dolby Atmos connections.
6
[Enable IMB Ethernet 3]
Specify an IP address and Subnet Mask for IMB
Ethernet 3 of the LPU-1000. This network access can
be used to connect to a Content management network.
1
2
3
4
7 5 6

2. SMS
- 32 -
01 Aug 2018
User Manual for LPU-1000 LED Player Unit
7
[Validate IPs]
Click to check all IP addresses entered above for
correctness. A dialog will be displayed showing the
source and target IP addresses, and any errors found
in the new network configuration as shown below:

2. SMS
User Manual for LPU-1000 LED Player Unit
01 Aug 2018
- 33 -
Figure 17: Configuration - IMB Storage
2.3.4.7 IMB Storage
1
Specify a Network-Attached Storage System (NAS) which has an NFS share available to this
LPU-1000 system for the use as data storage
2
Configure the LPU-1000 to use an attached single external eSATA hard disk as data storage. The
external eSATA hard disk must be attached to the eSATA Port 1 on the LPU-1000.
3
Configure the LPU-1000 to work with the Enterprise Storage. The Enterprise Storage must be
attached to the eSATA Port 1 on the LPU-1000.
1
2
3

2. SMS
- 34 -
01 Aug 2018
User Manual for LPU-1000 LED Player Unit
Figure 18: SNMP Setup
2.3.5 SNMP Configuration
2.3.5.1 Introduction
The SNMP feature is an option on the LPU-1000 that enables the use of SNMP to monitor the IMB. The SNMP
interface contains many useful SNMP traps and is easy to configure.
2.3.5.2 Accessing the SNMP Configuration Interface
Press Configuration to switch the display from the SMS interface to the Configuration panel as seen in Figure 18.
1
On the Configuration, select SNMP Setup. A new window appears as seen in
Figure 19.
1

2. SMS
User Manual for LPU-1000 LED Player Unit
01 Aug 2018
- 35 -
Figure 19: SNMP Configuration
1
On the SNMP Configuration, there are several tabs along the bottom of the screen. The
General option (shown in the above figure), System Info option, System Setting option,
Encrypt option, Storage option, Video Card option, PCI option and Sensors option.
1

2. SMS
- 36 -
01 Aug 2018
User Manual for LPU-1000 LED Player Unit
Figure 20: SNMP Configuration - General
2.3.5.3 Understanding the SNMP Configuration Interface
2.3.5.3.1 General
1
[SNMP Manager IP]
Indicates the IP address of the SNMP Manager where traps are to be
sent by typing in the IP Address, press the + or - button to insert
multiple SNMP addresses.
2
[Trap Sending Interval]
Indicates the time interval in seconds after which a trap should be
resent to the SNMP Manager. The trap will continue to be resent
only as long as the error condition exists.
3
[System UpTime Threshold]
Indicates the threshold time in days.
NOTE: When Trap is On, a trap will be sent if the System UpTime
exceeds the threshold value.
4
[SNMP Agent Start]
Check SNMP Agent Start to activate the Trap.
Un-check the SNMP Agent Start to deactivate the Trap.
NOTE: When Trap is On, a trap is sent if the SNMP Agent is started.
1 6 2 3 4
5

2. SMS
User Manual for LPU-1000 LED Player Unit
01 Aug 2018
- 37 -
2.3.5.3.2 System Information
1
[Auditorium Number]
The auditorium where the LPU-1000 is installed. This value will
be displayed when SNMP information is queried.
2
[System Name]
The name of the Server. This value will be displayed when
SNMP information is queried.
This will be automatically set to the server model if the
Automatically set System Name to Server model option is
checked.
3
[System Location]
The location where the LPU-1000 is installed. This value will be
displayed when SNMP information is queried.
5
[SNMP Agent Stop]
Check SNMP Agent Stop to activate the Trap.
Un-check the SNMP Agent Stop to deactivate the Trap.
NOTE: When Trap is On, a trap is sent if the SNMP Agent is stopped.
6
[Enable SNMP Service]
Enable or disable SNMP monitoring and reporting using this
checkbox.
1 2 3 4 5
Figure 21: SNMP Configuration – System Information

2. SMS
- 38 -
01 Aug 2018
User Manual for LPU-1000 LED Player Unit
4
[System Description]
A brief description of the server. This value will be displayed
when SNMP information is queried.
5
[Contact Details]
Contact details to be displayed when SNMP information is
queried.
2.3.5.3.3 System Setting
1
[Ingestion Start]
[Ingestion Complete]
[Ingestion Fail]
[Dropped Frame]
[KDM Invalid]
When this option is checked, an SNMP trap will be generated
when a DCP ingest starts.
When this option is checked, an SNMP trap will be generated
when a DCP ingest is completed.
When this option is checked, an SNMP trap will be generated
when a DCP ingest fails.
When this option is checked, an SNMP trap will be generated
when the playback has dropped frames
When this option is checked, an SNMP trap will be generated
when we try to play a playlist containing CPL without a valid
KDM
1
2
Figure 22: SNMP Configuration - System Setting

2. SMS
User Manual for LPU-1000 LED Player Unit
01 Aug 2018
- 39 -
2
[Dropped Frame Threshold]
Set a threshold limit based on the number of frames dropped in
the specified time period (in seconds)
2.3.5.3.4 Encrypt
1
[Enable Authentication]
Allows user to enable SNMP Authentication by providing
Username. The default Password can be changed using the
Change button. This option is unchecked by default.
Note: The new password should be at least 8 characters long.
Figure 23: SNMP Configuration - Encrypt
1

2. SMS
- 40 -
01 Aug 2018
User Manual for LPU-1000 LED Player Unit
Figure 24: SNMP Configuration - Storage
2.3.5.3.5 Storage
1
[Storage]
On the SNMP Configuration, select Storage. A new window opens as
seen in Figure 24 above.
2
[HDD Missing and SMART Error]
Check the corresponding storage devices to activate the Trap.
NOTE: When Trap is On, a trap will be sent to the SNMP Manager
if the system cannot detect the specified device.
3
[HDD Temperature Threshold]
Set the desired threshold temperature for respective storage device by
using the [▲] and [▼] buttons. Activate the Trap by checking the
checkbox opposite the corresponding storage device.
NOTE: When the Trap is On, a trap will be sent to the SNMP
Manager when the threshold temperature is reached.
4
[RAID Device missing and
degraded status]
Activate the Trap by checking the checkbox opposite RAID Device.
NOTE: When the Trap is On, a trap will be sent if the
RAID Device is missing or degraded.
5
[Mount Data Storage]
Activate the Trap by checking the checkbox opposite Mount Data
Storage.
NOTE: When the Trap is On, a trap will be sent if the data storage
is not mounted on the system.
2
4 5 6
1
3

2. SMS
User Manual for LPU-1000 LED Player Unit
01 Aug 2018
- 41 -
Figure 25: SNMP Configuration - Video Card
2.3.5.3.6 Video Card
6
[Mount Capacity Threshold (for
data in %)]
Set the threshold mount capacity of the mount data storage by
typing in the field or using the on-screen keyboard . Activate
the Trap by checking the checkbox.
NOTE: When the Trap is On, a trap will be sent to the SNMP
Manager if the mount capacity exceeds the threshold value.
1
On the SNMP Configuration, select Video Card. A new window opens as seen in
Figure 25 above.
2
Activate the Trap by checking the checkbox opposite Video Card Driver JPEG2000.
NOTE: When the Trap is On, a trap is sent to the SNMP Manager when the video card driver is
not loaded.
2
1

2. SMS
- 42 -
01 Aug 2018
User Manual for LPU-1000 LED Player Unit
2.3.5.3.7 PCI
1
On the SNMP Configuration, select PCI. A new window opens as seen in Figure 26
above.
2
Activate the Trap by checking the checkbox opposite the corresponding PCI Device.
NOTE: When the Trap is On, a trap is sent when the corresponding PCI device is missing.
2
1
Figure 26: SNMP Configuration - PCI

2. SMS
User Manual for LPU-1000 LED Player Unit
01 Aug 2018
- 43 -
2.3.5.3.8 Sensors
1
On the SNMP Configuration, select Sensors. A new window opens as seen in Figure 27
above.
2
Set the threshold temperature required for the system sensors by typing in the field or using
an on-screen keyboard . Activate the Trap by checking the checkbox opposite System
Temperature Threshold.
NOTE: When the Trap is On, a trap is sent if the system temperature exceeds the
maximum threshold temperature.
2
1
Figure 27: SNMP Configuration - Sensors

2. SMS
- 44 -
01 Aug 2018
User Manual for LPU-1000 LED Player Unit
Figure 28: SNMP Configuration - Ethernet
2.3.5.3.9 Ethernet
1
On the SNMP Configuration, select Ethernet. A new window opens as seen in Figure 28 above.
2
Enables sending an SNMP trap if the system detects that either eth0 or eth1 network interface is down.
2
1

2. SMS
User Manual for LPU-1000 LED Player Unit
01 Aug 2018
- 45 -
2.3.5.3.10 Restart/Save/Cancel
1
After the settings are complete, press OK to confirm. A small window pops out asking if you want to save the
current SNMP configuration:
a) Select OK to save the configuration.
b) Select Cancel to cancel the configuration
2
Press Cancel if you want to cancel the operation. A small window pops out to confirm if you want to quit without
saving:
c) Select Yes if you want to confirm.
d) Select No if you want to cancel the operation
2
1
(a)
(b)
(a)
(b)
Figure 29: Pop-up window for restarting SNMP service

2. SMS
- 46 -
01 Aug 2018
User Manual for LPU-1000 LED Player Unit
2.3.6 Automation
Please refer to Figure 6 to understand how transit from Configuration to Automation.
Figure 30: GDC Automation workflow

2. SMS
User Manual for LPU-1000 LED Player Unit
01 Aug 2018
- 47 -
Figure 31: Automation - Devices
2.3.6.1 Devices
Automation Device Setup
It should be noted that automation will only be executed within a playlist as long as that playlist is playing.
If playback stops or the Stop button is pushed automation will not run.
1
On the Automation, press Devices. In the
Devices, the System is the default device name.
The System device is the IMB from which all received commands will be forwarded to the
sub-systems in the IMB. (continued on next page)
2
4
6
1

2. SMS
- 48 -
01 Aug 2018
User Manual for LPU-1000 LED Player Unit
2
To add a new device, press Add. A new window appears as seen in. Type in the name you want
to assign to a particular device. Provide a name for the device (for example: “LED”) & select the
Type as ‘NETWORK SOCKET’
3
After adding the device name, assign the type of device you want to use. Select from a
dropdown list as seen below
.
4
You can edit or delete the device name on the dropdown list in the Devices
(please refer Figure 31). The device configuration window opens when you press Edit to edit the
existing device name. The device name is deleted immediately after pressing Delete
.
5
Figure 32: Editing the automation device settings
3

2. SMS
User Manual for LPU-1000 LED Player Unit
01 Aug 2018
- 49 -
5
Select the ‘LED’ Device created in (2) from the Device Name drop-down list.
Under the Network and Control Cues Settings:
a) The parameters such as IP address & Port of the selected device will already have
default values.
b)
The status of the device can be Enabled or Disabled. Select from the dropdown list as
seen below
:
c) The
Linefeed Type
can be selected from the dropdown list as seen below:
d) Use the
Edit Control Cues
option to Add or Remove the control cues:
6
To search for a device, click the Search Devices on Network button. This will scan the
network for available devices. Once discovered, select the device and press Add
.

2. SMS
- 50 -
01 Aug 2018
User Manual for LPU-1000 LED Player Unit
Figure 33: Inputs
2.3.6.2 Inputs
1
Press the Inputs tab. A new window opens as seen in Figure 33. On the Inputs, press
Add to enter the selected device.
NOTE: Only devices capable of sending a signal to the IMB can be added under Inputs.
(a) Select a Trigger event from the dropdown
(b) Select an event Label from the dropdown list. See the Actions.
2
Press Delete if you want to delete the selected input.
2
1

2. SMS
User Manual for LPU-1000 LED Player Unit
01 Aug 2018
- 51 -
2.3.6.3 Actions
1
Select Actions on the Automation. On the Actions, press Add, located at the top portion of the
screen. An on-screen keyboard opens. Type in your desired label name and press Enter
.
2
5
6 4 1
3

2. SMS
- 52 -
01 Aug 2018
User Manual for LPU-1000 LED Player Unit
Figure 34: Actions
2
Press Add, located at the lower portion the screen, to append an action to the selected Event
Label. Then select a device from the dropdown list as seen below. New devices can be added
to the list from the Devices.
a) If the selected device is System, the Output Type prompt is
Primitive. The Pins To Use option is disabled.
Then select the desired operation under the Value option.
(b) If the device type LED, the Event Action can be selected from the dropdown list:
2. SMS
User Manual for LPU-1000 LED Player Unit
01 Aug 2018
- 53 -
3
To edit an existing label’s name, select the label from the dropdown list and then press Edit. An
on-screen keyboard opens. Edit the existing label name and press Enter. To use an existing label
to copy to another label, select the label to be copied from the dropdown list and then press
Copy. Then enter a new label name for the newly copied label. To delete an existing label,
select the label name from the dropdown list and then press Delete.
4
Press Save after completing the settings to return to the Playlist Management.
5
By pressing the Execute button you can test if an automation command is working correctly
.
This button will trigger the event selected.
6
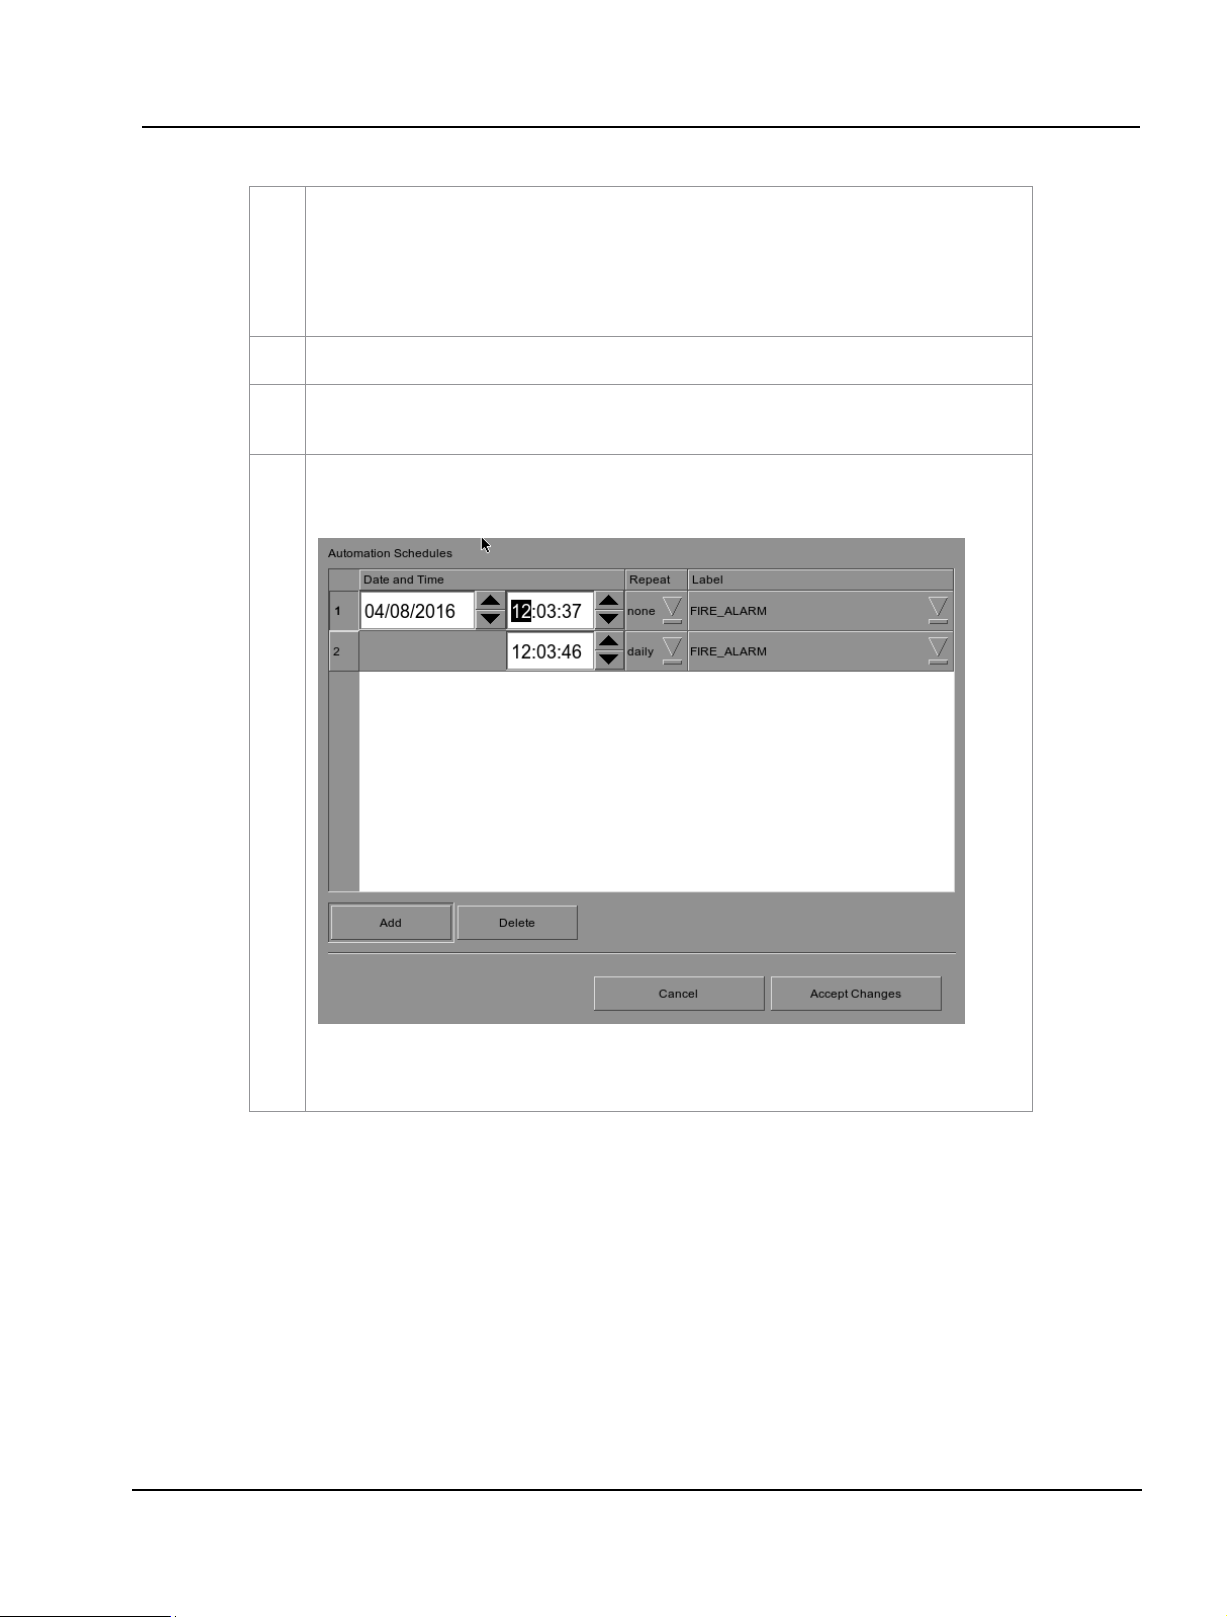
Automation for events can be scheduled. To access the automation schedule, select the
[Schedule] button. This will bring you to a setup screen.
To add an Automation Schedule, select the [Add] button. Select the repeat interval, options are
either daily or a single occurrence.

2. SMS
- 54 -
01 Aug 2018
User Manual for LPU-1000 LED Player Unit
2.3.6.4 Options
1
[Startup Label]
Select a specific automation cue which will be executed when
the server fully boots up
2
[Error Label]
Select a specific automation cue which will be executed
whenever a playback error occurs.
3
[Interrupt timer delays
when player is unpaused]
When this option is selected and the user clicks Unpause button
on the player, the next action in the automation cue will be
executed immediately without waiting for the Timer delay to
complete.
4
[Quick Mode Label]
Enables selection of a specific automation cue which can be
triggered quickly using the Execute button under Quick Mode
Label
→
Trigger tab.
Figure 35: Options
3 1 2
4

2. SMS
User Manual for LPU-1000 LED Player Unit
01 Aug 2018
- 55 -
2.3.6.5 Import/Export
1
[Import/Export Device]
Import opens a pop-up window which allows the user to select
a configuration file for the selected automation device.
Export automatically saves the configuration file for the
selected automation device to your web browser’s default
download location.
2
[Import/Export Configuration]
Import allows user to select configuration file containing all
automation cues from an alternate server
Export automatically saves the configuration file containing all
automation cues to your web browser’s default download
location.
1
2
Figure 36: Import/Export

2. SMS
- 56 -
01 Aug 2018
User Manual for LPU-1000 LED Player Unit
Figure 37: Creating a show playlist
2.4 Show Playlist
2.4.1 Create a Show Playlist
2.4.1.1 Access to Playlist Management
1
On the SMS interface, press [ ] to open a Playlist Management for creating playlists as seen in
Figure 38
below.
1

2. SMS
User Manual for LPU-1000 LED Player Unit
01 Aug 2018
- 57 -
Figure 38: Playlist Management
2.4.1.2 Creating a Playlist
1
Under the Playlist Management screen, all compositions stored are listed in the Content
column on the left. The content is shown in alphabetical order grouped by type [Trailer
,
Feature, etc.]. Available automation cues are listed under ‘cues’.
2
Select the composition to add to the playlist and press [ + ]. Repeat the same step to add other
compositions (e.g. trailers or advertisements) to the playlist.
3
Compositions in the playlist are shown in the Playlist column on the right. Use [ ] (move up) and
[
] (move down) to change the order of compositions in the playlist. The order of the
compositions in the playlist may also be changed by dragging their icons in the timeline display
.
4
You can remove compositions from the Playlist column by selecting the clip that you want to
remove and pressing [ - ].
1 24
3

2. SMS
- 58 -
01 Aug 2018
User Manual for LPU-1000 LED Player Unit
Figure 39: Playlist Management - Editing Cues
2.4.1.3 Editing Cues
1
To edit a cue of a composition on the playlist, select the desired composition from the Playlist
Management
and press Edit Cue. A new window displaying the Edit Cue opens as seen in
Figure 40.
1

2. SMS
User Manual for LPU-1000 LED Player Unit
01 Aug 2018
- 59 -
Figure 40: Cue Editor
3
4
2 6 5 78

2. SMS
- 60 -
01 Aug 2018
User Manual for LPU-1000 LED Player Unit
2
To specify a time code for the activation of the cue, press and a time code entry
window will open. Use the [▲] and [▼] buttons enter the desired time code. Press OK to
confirm your selection.
To specify a frame for the activation of the cue, press the Time button once and it will
toggle to display the Frame button as shown below:
Press and a frame number entry window will open. Key in the desired frame number
and
press Enter
.

2. SMS
User Manual for LPU-1000 LED Player Unit
01 Aug 2018
- 61 -
3
Press Marker to view any markers present in the composition.
If the composition does not contain any markers, a small window pops up to indicate that
there are no markers present.
4
To add an automation cue label, select the desired automation cue label from the dropdown
list as seen below
:
5
To add a start cue, tick the Start Cue option and select the desired automation cue label from
the dropdown list as seen below
:
To specify the blank time, press and a blank time entry window will open. Key in the
desired blank time and press Enter
.

2. SMS
- 62 -
01 Aug 2018
User Manual for LPU-1000 LED Player Unit
NOTE: A start cue is activated immediately before the composition plays. The blank
time indicates the time interval between the end of the start cue and the start of the
composition’s playback.
6
Press Add Cue to add the cue to the composition.
The cue’s details will then be displayed in the cue window as seen below
NOTE: You can select a cue from the cue window at any time to edit its properties.
7
To delete a cue from the composition, select the cue from the cue window and press Delete
Cue
.
8
To save the changes and exit, press OK.
To exit without saving any changes, press Cancel
.

2. SMS
User Manual for LPU-1000 LED Player Unit
01 Aug 2018
- 63 -
Figure 41: Saving the playlist
2.4.1.4 Saving the Playlist
1
Press Save Show to save the playlist. This ensures any changes to playlist will not be lost.
Note: The Save Show button will remain greyed out until any changes are made to the selected
playlist.
2
Press Load Show to Play and return to the SMS Interface.
1
2

2. SMS
- 64 -
01 Aug 2018
User Manual for LPU-1000 LED Player Unit
2.5 Show Schedule
2.5.1 Schedule a Show
Figure 42: SMS Interface [Scheduler]
1
On the SMS Interface, press Scheduler. A new window opens as seen in
Figure 43
.
1

2. SMS
User Manual for LPU-1000 LED Player Unit
01 Aug 2018
- 65 -
2
Go to the bottom section named Add to Schedule. At Date / Time, indicate the date and time
to
schedule the show.
(a) The date format is DD/MM/YYYY and the time format is HH:MM: SS.
To select the day, click on DD and adjust to the required day using [▲]
and [▼]. Repeat the same for MM, YYYY, HH, MM and SS
(b) At Shows, select the playlist for the show. Press to view all the playlists
already saved in the IMB. Select the required playlist.
(c) The Selected Playlist column on the right displays the clips in each playlist.
2
Figure 43: Scheduler

2. SMS
- 66 -
01 Aug 2018
User Manual for LPU-1000 LED Player Unit
(d) If you want the playlist to loop for a period of time, check Loop Until and indicate
the date and time to end the loop.
e) Press Add after the schedule date/time is fixed and playlist is selected.
(f) If the new show schedule does not conflict with other schedules already saved to
the IMB, the schedule will be added to the existing list of schedules in the IMB.

2. SMS
User Manual for LPU-1000 LED Player Unit
01 Aug 2018
- 67 -
3
Check the Enable Scheduler checkbox to enable scheduled playback
(a) At Select Date, indicate the date of the schedule. You should see a line
on the time-bar at the slot where the show is scheduled.
(b) Click on the line. Information about the show such as name, time and
duration will be displayed in the Selected Schedule Information column
beneath the time-bar
.
3
4
Figure 44: Viewing schedule information

2. SMS
- 68 -
01 Aug 2018
User Manual for LPU-1000 LED Player Unit
Figure 45: Replicating show schedule
5
A new window opens as seen in Figure 45
6
Press Apply recurrence rules to schedule the recurrence dates. If no option is selected, press
Return to the scheduler to return to Scheduler. When on the Scheduler, press back to return to
the SMS Interface.
(c) To navigate to the previously scheduled show just before the selected show,
press [Prev]
.
(d) To navigate to the succeeding show scheduled after the selected show, press
[Next]. (e) To delete a show schedule from the time-bar, just click on the relevant
color bar and press [Del. Schedule].
4
To replicate the same show schedule on other days, check Set recurrence rules and press Add
.
5
6

2. SMS
User Manual for LPU-1000 LED Player Unit
01 Aug 2018
- 69 -
2.6 Synchronizing Shows
PLEASE NOTE: This section has been intentionally deleted as this option is not applicable to the LPU-1000.
2.7 Subtitle Setting
There are several points to be noted when setting up the GDC IMB with cinema LED screen. SMS version 10.0
supports cinema LED screen. If any fields are left blank, the default values are assumed. Login and password fields
only need to be entered if the user has changed these parameters on the cinema LED screen.
2.7.1 Subtitle Overlay
2.7.1.1 Subtitle Overlay Setup
1
Subtitle Overlay is supported for 2D JPEG2000 content.
2
To setup Subtitle Overlay go to SMS -> Configuration -> Maintenance Access -> General.
Under Settings there is a box titled Subtitle Overlay. You can also enter a Subtitle Delay in
number of frames, entering a negative number will advance the subtitles by that number of
frames.

2. SMS
- 70 -
01 Aug 2018
User Manual for LPU-1000 LED Player Unit
Figure 46: SMS Interface [Control Panel]
2.7.1.2 Subtitle Language Selection
1
Press the Control Panel Button to navigate to the Control Panel.
1

2. SMS
User Manual for LPU-1000 LED Player Unit
01 Aug 2018
- 71 -
2
From the Control Panel select Manage Content.
2
Figure 47: Manage Content

2. SMS
- 72 -
01 Aug 2018
User Manual for LPU-1000 LED Player Unit
Figure 48: Editing the subtitle language
3
Select the Subtitle tab to change the subtitle language.
4
When subtitle overlay is selected, the language for clips with subtitles can be configured in the
Content Manager as seen in Figure 48. Setting the correct language for subtitles will ensure
that subtitles will be rendered properly for each clip.
5
Press Edit and enter the maintenance password to change the language for the displayed clips.
5
3
4

2. SMS
User Manual for LPU-1000 LED Player Unit
01 Aug 2018
- 73 -
Figure 49: Subtitle language options
6
As shown in
Figure 49
, the following languages can be set for each clip:
• Simplified Chinese
• Traditional Chinese
• Korean
• Japanese
• English
• Spanish
• Italian
• Russian
• French
The language setting can also be left as Default to automatically us e the original language
setting of the clip content.
6

2. SMS
- 74 -
01 Aug 2018
User Manual for LPU-1000 LED Player Unit
Figure 50: Returning to Control Panel
7
Click the Control Panel button to return to the Control Panel.
7

2. SMS
User Manual for LPU-1000 LED Player Unit
01 Aug 2018
- 75 -
Figure 51: Shutting down the system
2.8 Shutdown/Restart Application
2.8.1 Shutdown or Restart
1
On the SMS interface, when the Shutdown button is pressed, the system will prompt
the user to
select shutdown or restart application. Restarting the application will not
reboot the IMB. It will only restart the software without affecting the hardware.
Allow some time for the IMB to restart the application or shutdown properly.
If the Use startup/shutdown password option on the Configuration/General
is enabled, the system will prompt for a password before it shuts down.
Please enter the Technician or Maintenance Access password.
1

3. CONTROL PANEL
- 76 -
01 Aug 2018
User Manual for LPU-1000 LED Player Unit
Figure 52: Accessing the Control Panel
3 CONTROL PANEL
3.1 About Control Panel
The Control Panel UI provides access to all the other interfaces used to configure and operate the LPU-
1000. To get to the Control Panel,
press Control Panel button on the SMS interface as shown in
Figure 52
.

3. CONTROL PANEL
User Manual for LPU-1000 LED Player Unit
01 Aug 2018
- 77 -
3.2 Introduction to the Control Panel interface
1
Switch ON the IMB and allow it to boot up t o th e lo gi n windo w to the SMS interface.
When
the SMS interface is shown, press the Control Panel button and a new window for the
Control Panel opens as shown in Figure 53. The Control Panel includes the Automation button,
Admin panel button, Manage Content button, SMS button, Restart button, Shut Down button and
a Refresh status button. System information including the serial number, OS version, SMS version,
network and storage information can also be seen on the Control Panel UI.
NOTE: The Refresh status button is used to manually refresh the status of the hard disks in the
external storage device. This button should not be pressed during playback to prevent disruption of
playback.
The SMS software continues to run in the background when using the Control Panel. This
allows access to other IMB functions when playback is in progress. It is recommended that these
functions be used very sparingly to avoid unnecessary system load that can potentially affect
playback performance.
1
Figure 53: Introduction to the Control Panel interface

3. CONTROL PANEL
- 78 -
01 Aug 2018
User Manual for LPU-1000 LED Player Unit
Figure 54: Accessing Automation
3.3 Manual Automation Execution
1
Automation labels and LED Screen commands can now be executed from an interface on
the Control Panel. Press Automation on the Control Panel to start the manual automation
interface as shown in Figure 55.
1

3. CONTROL PANEL
User Manual for LPU-1000 LED Player Unit
01 Aug 2018
- 79 -
2
Select an automation label to view the actions associated with the label.
Press Execute to execute the automation label.
2
Figure 55: Executing Automation

3. CONTROL PANEL
- 80 -
01 Aug 2018
User Manual for LPU-1000 LED Player Unit
3.4 Restarting the Control Panel
1
Press Restart to restart the Control Panel. The Control Panel will restart and
display the SMS
interface as seen in Figure 57.
1
Figure 56: Selecting Restart on the Control Panel

3. CONTROL PANEL
User Manual for LPU-1000 LED Player Unit
01 Aug 2018
- 81 -
Figure 57: SMS interface

3. CONTROL PANEL
- 82 -
01 Aug 2018
User Manual for LPU-1000 LED Player Unit
3.5 Shutting Down the System
1
Select Shutdown on the Control Panel.
2
A small window appears as seen in Figure 58. Select Shutdown to continue shutdown of IMB or
Cancel to cancel shutdown of IMB. All current playback will be stopped upon shutdown of the
system.
WARNING: If current playback is still running in the background, it will be terminated once the
IMB is shutdown. Please use with CAUTION
.
1
2
Figure 58: Shutting down the system

4. CONTENT MANAGER
User Manual for LPU-1000 LED Player Unit
01 Aug 2018
- 83 -
4 CONTENT MANAGER
4.1 About the Content Manager
4.1.1 Introduction
The LPU-1000 Content Manager allows the user to manage the contents of the IMB in the following ways:
4.1.2 Accessing the Content Manager
1
Download content from a disk or source on the network.
2
Download keys [KDM’s] required for playing back content from disk or source on the network.
3
Delete content that exists in the IMB data storage.
4
Check that the content that is already on the IMB is fine and the files are complete and proper
.
2
Figure 59: Accessing the Content Manager

4. CONTENT MANAGER
- 84 -
01 Aug 2018
User Manual for LPU-1000 LED Player Unit
1
Press Control Panel on the SMS Interface.
2
Press Manage Content to go to the Content Manager.
NOTE: The Content Manager can run in the background and does NOT need to be exited.
4.2 Content Management
4.2.1 Ingesting Content
Figure 60: Ingesting a package or CPL from a source located in a specific directory in the network
7 9 3
4 8 6 2 1
5

4. CONTENT MANAGER
User Manual for LPU-1000 LED Player Unit
01 Aug 2018
- 85 -
1
Select the source of data you want to ingest content from and click Open.
Please refer to Section 4.5 Source Management configure the source of data.
2
Browse the source and select the directory where the package is located. The list of packages
in the directory will be displayed in the top right section of the screen.
3
Click View CPL to display the list of CPLs available in the packages. You can use this button to
toggle between the package list and CPL list displayed in the top right section of the screen.
4
Click under the Transfer? column to select the package or CPL you wish to download. A
green check ✓ indicates a selected package or CPL. You can select multiple packages or CPLs.
5
Information about the selected package or CPL, including the file size, is shown in the section
below the package or CPL list.
6
Press Import to queue downloading of the package or CPL. (To bypass ingestion for direct
playback you can press Live Play instead. Refer to Live Play below for more info.)
7
When done selecting the package(s), click the Close button.
IMPORTANT: Always press Close after you are done starting the download of content. You
can monitor the progress of ingest by pressing the Status button. Please refer to Section 4.2.4
Monitor Ingest Progress for more information about Status
.
8
Live Play can be used instead of Import in order to bypass content ingestion and play directly
back from network source. This is not supported through USB but can be used for direct
playback through network source (provided the network source has sufficient bandwidth to stream
the content).
IMPORTANT: You should always use Import whenever possible.
9
When you press the Live Source button you can view all clips currently mounted and available
through the Live Play feature. You can detach Live Play sources through this interface as well.
You should always detach live play sources whenever you are done using them via Live Play
.

4. CONTENT MANAGER
- 86 -
01 Aug 2018
User Manual for LPU-1000 LED Player Unit
4.2.2 Ingesting Content from USB Disk
1
Select USB drive from dropdown list and click Open. (Continued on next page)
1
Figure 61: Opening a USB disk connected to the IMB

4. CONTENT MANAGER
User Manual for LPU-1000 LED Player Unit
01 Aug 2018
- 87 -
2
Select a storage device and its partition from the dropdown lists.
3
Press OK to confirm the selection.
3
2
Figure 62: Selecting the USB storage device and its partition

4. CONTENT MANAGER
- 88 -
01 Aug 2018
User Manual for LPU-1000 LED Player Unit
Figure 63: Ingesting KDM from a directory in the selected source
4.2.3 Ingesting KDMs
1
Select the directory in the selected source where the KDM is located.
2
Shows the KDMs present in the selected directory that are valid for this IMB.
3
Click under the Transfer column to select the KDM you wish to download. A green check ✓
indicates the selected KDM.
4
Shows the details of the selected KDM, including target, CPL, and date of validity
.
5
Press Import to start the import of the KDM. The green check will change to Queued
.
6
When done selecting the KDM, press Close to close the Package Browser
.
1
6 2 3 54

4. CONTENT MANAGER
User Manual for LPU-1000 LED Player Unit
01 Aug 2018
- 89 -
4.2.4 Monitor Ingest Progress
1
Select the Status option.
2
Shows the download status of the packages or CPLs. In this example, downloading of some
packages or CPLs is incomplete.
2
1
Figure 64: Monitoring the progress of download of the packages

4. CONTENT MANAGER
- 90 -
01 Aug 2018
User Manual for LPU-1000 LED Player Unit
4.2.5 Cancelling Ingest
1
Press Pause to temporarily stop the download of the package(s) or CPL(s). The Pause button
will change to Start and will indicate that the download is being paused.
2
Use the Move Up and Move Down buttons to move the highlight bar up and down to select the
desired package or CPL when multiple packages or CPLs are being downloaded. You can only
move the highlighted bar to select the package or CPL when in Pause mode.
3
To cancel the download, select the desired package or CPL and press Remove
.
4
If you wish to resume download, press Start button to resume the download.
1
3
2
Figure 65: Content Manager - Status

4. CONTENT MANAGER
User Manual for LPU-1000 LED Player Unit
01 Aug 2018
- 91 -
Figure 66: Deleting a downloaded package or CPL
4.2.6 Deleting Content
1
To delete a package or CPL, go to Content and click under the Select column opposite the
package or CPL you want to delete. A green check
✓
indicates the selection.
2
Click View CPL to toggle between the package and CPL lists displayed in the content interface.
3
You can select all by clicking the Select All button and deselect by clicking the Deselect All
button.
4
Press Delete to delete the selected package or CPL. A small window pops up to confirm the
deletion of the package. Press OK to confirm.
2
1
3
4

4. CONTENT MANAGER
- 92 -
01 Aug 2018
User Manual for LPU-1000 LED Player Unit
Figure 67: Verifying the integrity of the files in the package(s) or CPL(s)
4.2.7 Checking Content Integrity
1
Click View CPL to toggle between the package and CPL lists displayed in the content interface. Click
under the Select column opposite the package or CPL you want to verify. A green check
indicates the selection.
2
Select if you want to verify Now or on a Schedule
.
1 23

4. CONTENT MANAGER
User Manual for LPU-1000 LED Player Unit
01 Aug 2018
- 93 -
3
Press Verify to check if all the required files are present in the selected package(s) or CPL(s).
(a) If Now is selected, the package will be verified immediately as seen below
.
(b) If Schedule is selected, you need to assign a name and schedule the time and
date when to verify the package(s) or CPL(s) in a new window as seen below
.
(c) You can select the frequency of verification.

4. CONTENT MANAGER
- 94 -
01 Aug 2018
User Manual for LPU-1000 LED Player Unit
4
You can check if there are stray files in the selected package(s) or CPL(s) by pressing Check
Stray. A small window pops out to confirm if there are no stray files.
4
Figure 68: Checking for stray files in package(s) or CPL(s)

4. CONTENT MANAGER
User Manual for LPU-1000 LED Player Unit
01 Aug 2018
- 95 -
Figure 69: Package [Quick Verify]
5
Select Quick Verify to quickly check the integrity of the files in case it is modified or corrupted by
calculating hash for each file in the selected package(s) or CPL(s).
6
You will see OK under the Status column after verifying that no problems are detected. If errors
are found, the description of the error will be shown instead as seen in Figure 69 above.
NOTE: If there is an error in the selected package, it will indicate Failed under the Status
column.
6
5

4. CONTENT MANAGER
- 96 -
01 Aug 2018
User Manual for LPU-1000 LED Player Unit
Figure 70: Content Manager [Schedule]
7
You can view the list of package(s)/CPL(s) that you have scheduled for verification by selecting
the Schedule option.
8
Select the desired package or CPL and press View to see its schedule details.
9
Select the desired package or CPL and press Remove to delete it from the schedule list.
7 8 9

4. CONTENT MANAGER
User Manual for LPU-1000 LED Player Unit
01 Aug 2018
- 97 -
Figure 71: KDM Manager
4.3 KDM Management
4.3.1 Manage KDM
1
Select the KDM tab in the Content Manager
2
Show the KDM’s present in the selected directory that are valid for this IMB.
3
Show the details of the selected KDM, including target, CPL, UUID and date of validity
.
4
Display date of issue for KDM.
5
Verify the integrity of the KDM.
6
Delete removes KDM from the IMB.
3
2 1 5
6
4

4. CONTENT MANAGER
- 98 -
01 Aug 2018
User Manual for LPU-1000 LED Player Unit
4.4 License Management
4.4.1 Manage Licenses
Figure 72: License Manager
1
Select the License tab in the Content Manager.
2
Shows the licenses that are valid for this system.
3
Shows the details of the selected license, including licensed feature and validity period.
4
Verify the integrity of the selected license.
1
2
3
4

4. CONTENT MANAGER
User Manual for LPU-1000 LED Player Unit
01 Aug 2018
- 99 -
4.4.2 Ingesting Licenses
1
Select the directory in the selected source where the license is located.
2
Shows the licenses present in the selected directory that are valid for this IMB.
3
Click under the Transfer column to select the license you wish to download. A green check
✓
indicates the selected license.
4
Shows the details of the selected license, including feature and date of validity.
5
Press Import to start the import of the license. The green check will change to Queued.
6
When done selecting the license, press Close to close the Package Browser.
1
2
3
4
5
Figure 73: Ingesting license from a directory in the selected source
6

4. CONTENT MANAGER
- 100 -
01 Aug 2018
User Manual for LPU-1000 LED Player Unit
4.4.3 Monitor Ingest Progress
Figure 74: Monitor the progress of download of the packages
1
Select the Status option.
2
Shows the download status of the packages or CPLs. In this example, downloading of some LDMs
is complete.
1
2
 Loading...