

Page 1
DU-LIL-0004-XX Rev A 9/26/19 GCX Corp. Page 1 of 3
The purpose of this guide is to:
1. Describe how to assemble customer-provided tablet to Mountable Tablet Enclosure (Page 1-2).
2. How to mount to VHM-T, Variable Height Tablet Arm (Pages 2-3).
3. How to mount to Patient Engagement Tablet Roll Stand, PTE-0001-60 (Page 3).
4. How to mount to GCX M-Series, VHM-25 Variable Height Arm and iPad Roll Stand IPA-0001-60 (Page 3-4).
Parts Reference
The following parts and hardware are included with this installation kit (hardware not shown):
Item #
Description
Qty
1
M4 x 8mm Pan Head Machine Screw (PHMS)
4
2
M4 x 10mm Pan Head Machine Screw (PHMS)
4
3
M4 x 14mm Pan Head Machine Screw (PHMS)
4
4
Mountable Tablet Enclosure
1
5
USB Charging Cable
1
6
Lilitab VESA Adapter
2
Tools Required: Philips #2 Screwdriver (not provided)
Tablet: Customer-supplied
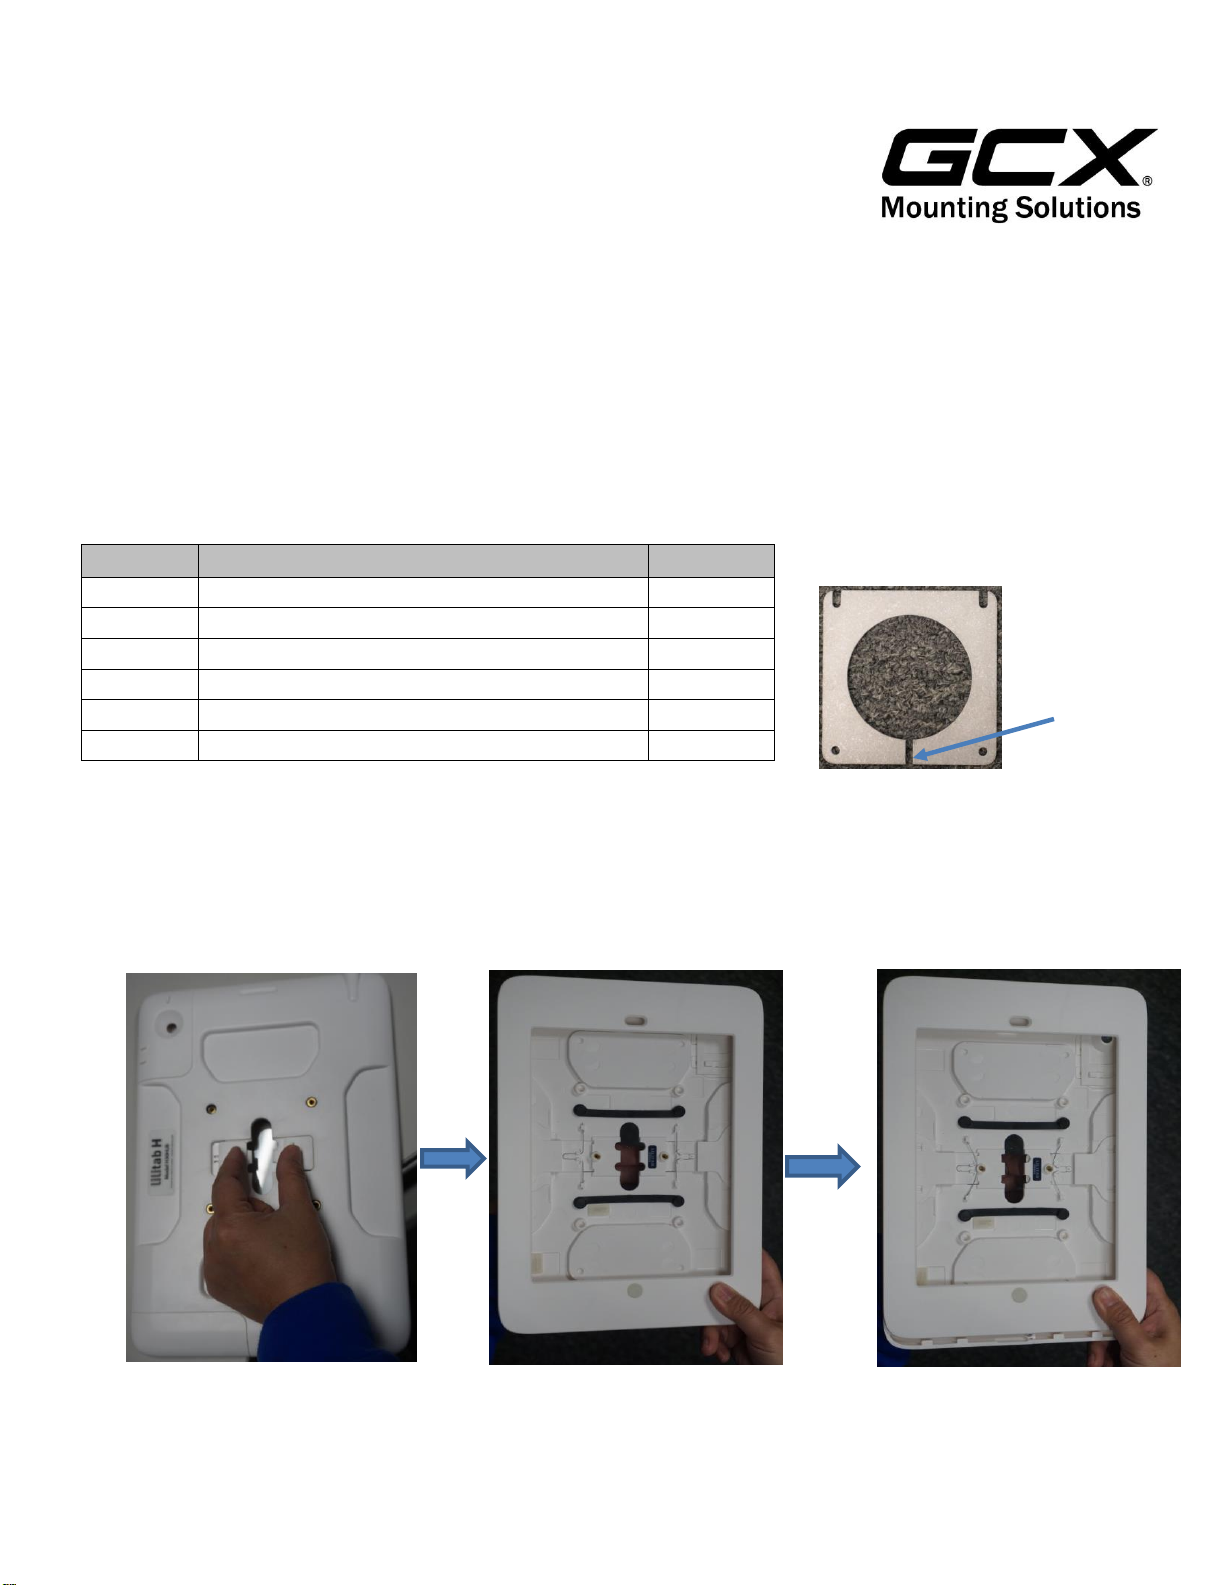
How to Assemble Mountable Tablet Enclosure:
1. On the rear of the Mountable Tablet Enclosure, pinch together the release clips.
2. While still pinching the release clips, flip the Mountable Tablet Enclosure over and slide the front of the enclosure
away from the home button.
Lilitab VESA Adapter
Installation Guide
LIL-0004-XX Mountable Tablet Enclosure Hardware Guide
3875 Cypress Drive Petaluma, CA 94954 • 800.228.2555 • +1.707.773.1100 • Fax 707.773.1180 • www.gcx.com
Lilitab VESA
Adapter Cable Slot
Page 2
DU-LIL-0004-XX Rev A 9/26/19 GCX Corp. Page 2 of 3
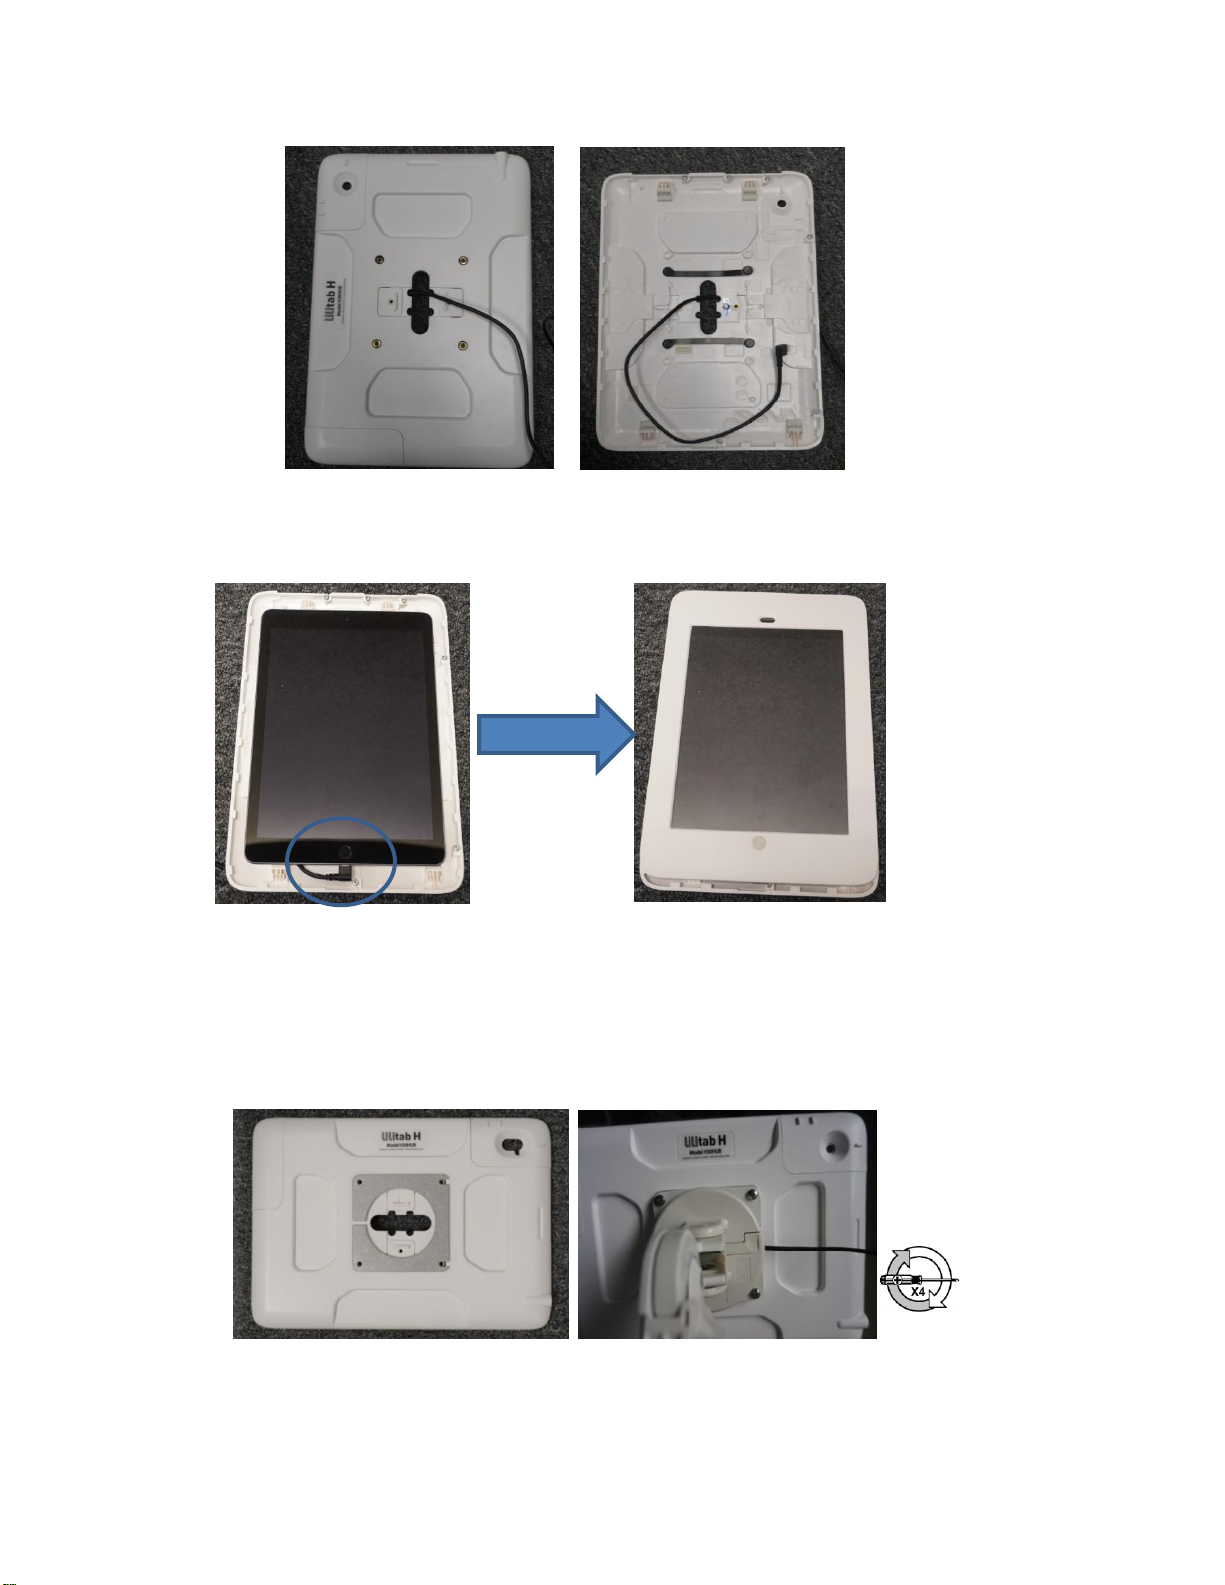
3. Insert the USB Charging Cable through the rear cable access of the Mountable Table Enclosure.
4. Before inserting your tablet, ensure the tablet charging port is on the same side as the USB Charging Cable. Lay the
Mountable Tablet Enclosure face up, insert your tablet and connect the USB Charging Cable.
5. Slide the front of the enclosure onto the rear of the enclosure the same way you removed it. The front of the enclosure
only fits in one direction, if it does not slide easily, reverse the orientation. Do not force it.
Mounting Tablet Enclosure to VHM-T, Variable Height Tablet Arm
1. Align the Lilitab VESA Adapter with the 75mm VESA on the rear of the Mountable Tablet Enclosure. The cable slot on
Lililtab VESA Adapter can be installed in any orientation.
2. Attach to the VHM-T, Variable Height Tablet Arm using a Philips #2 Screw Driver and (4) M4 x 14mm Pan Head
Machined Screws.
3. Orientation can be in portrait or landscape.
Page 3
DU-LIL-0004-XX Rev A 9/26/19 GCX Corp. Page 3 of 3
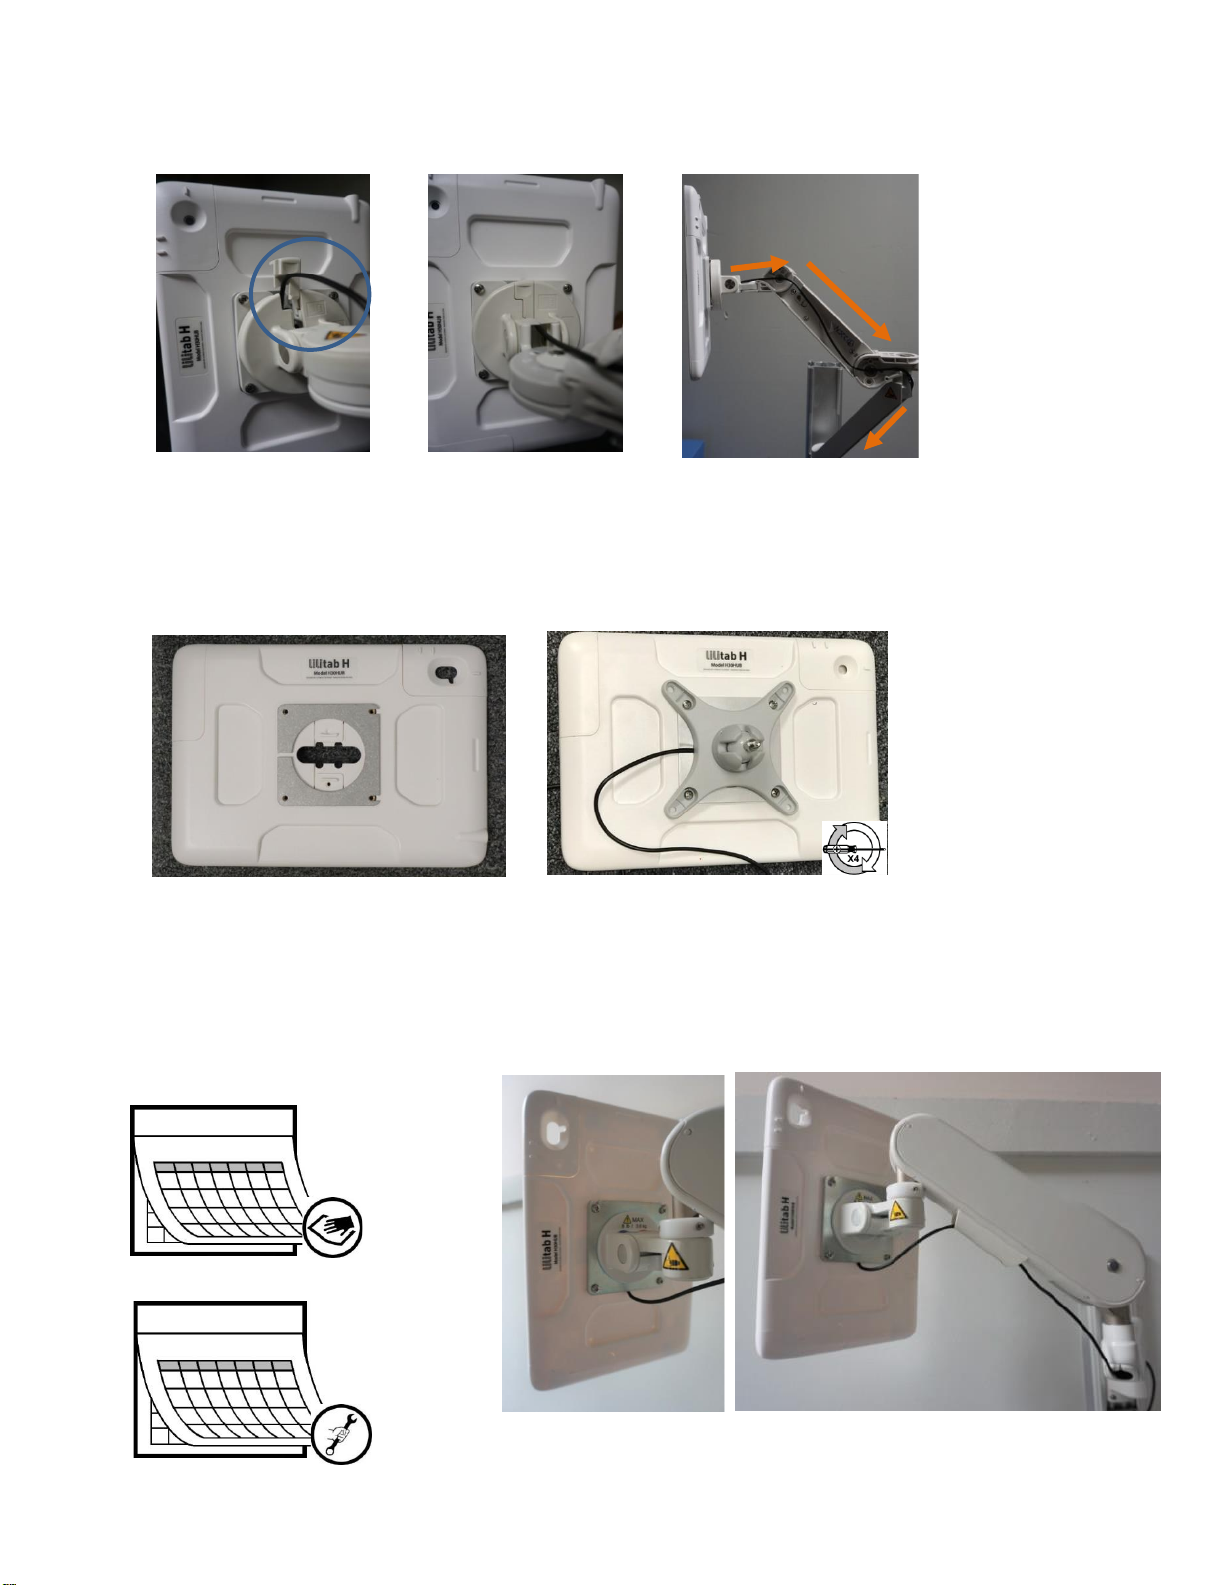
4. Cable Management: Open the cable plug on the front of the VHM-T, Variable Height Tablet Arm, to route the USB
Charging Cable through the arm.
Mounting Tablet Enclosure on Patient Engagement Tablet Roll Stand, PTE-0001-60
1. Align the Lilitab VESA Adapter with the 75mm VESA on the rear of the Mountable Tablet Enclosure. The cable slot on
the Lilitab VESA Adapter can be installed in any orientation.
2. Next, attach the Ball Joint VESA Mount using a Philips #2 Screw Driver with (4) M4 x 8mm Pan Head Machined
Screws.
3. Orientation can be in portrait or landscape.
Mounting Tablet Enclosure on M-series / VHM-25 Arms / iPad Roll Stand, IPA-0001-60
1. Align the Lilitab VESA Adapter with the 75mm VESA on the rear of the Mountable Tablet Enclosure. The cable slot on
the Lilitab VESA Adapter can be installed in any orientation.
2. Install using Philips #2 Screw Driver with (4) M4 X 10mm Pan Head Machined Screws.
3. Route the cables through the flexible Cable Guide beneath the arm. For further cable management instructions,
reference page 3 of DU-WMM-0001 for M-Series Arms or page 7 of DU-WS-0008-01 for VHM-25 Arms.
Photo
Includes Ball
Joint VESA Mount,
for Reference Only
 Loading...