

Page 1

We have made
the No.1
even better!
PATTERN RESIN
from GC
Low Shrinkage Modelling Resin
TIPS & TRICKS
Technique and Handling of
GC Pattern Resin
Page 2

Contents
Introduction 3
GC Pattern Resin LS 3
Indications 4
Features and Benefits 4
Physical Properties 5
Brush Technique – Step by Step 5 - 7
Implant Technique 8
Electroforming Technique 9
Core Build-up Technique 9
Investing and Casting 10
Questions and Answers 10
Related Products 11
Page 3

Introduction
Contemporary materials, equipment and techniques
enable dental technicians to manufacture high precision,
aesthetic restorations – and naturally they prefer
procedures, which are clear, easy to learn and safe to
apply. In this context, accessory materials, which may at
first glance appear unimportant, have in fact become
absolutely indispensable.
Dental prostheses are as individual as the patients. It
takes real teamwork to achieve perfect technical results
and genuine satisfaction for patients. An exact transfer of
intraoral situations to the laboratory using precise and
reproducible laboratory methods makes the teamoriented interaction of dentists and dental technicians
easier. ”Little helpers”, such as a universal high precision
modelling resin are invaluable for these procedures.
PATTERN RESIN LS
GC Pattern Resin LS
Low Shrinkage Modelling Resin
A modelling resin with unique properties
In more than 15 years of service to the dental and dental
technician professions Pattern Resin LS Low Shrinkage
modelling resin has proven a safe, versatile and easy to
handle material. Pattern Resin LS was specially developed
for the brush technique. Its unique handling properties
make it suitable for as different indications as attachment,
crown and bridge, implant and electroforming techniques.
Pattern Resin LS is further well established and proven
for a number of detail applications – such as resin dies,
fixation prior to soldering or milling, or core build-ups.
Our aim is to enable you to take full advantage of this
unique material. The present manual lists some of the
numerous chairside and laboratory indications and
provides you with application examples from various
fields of dental technology.
Take a look inside to learn some new Applications,
For a perfect touchdown
Tips & Tricks with Pattern Resin LS.
3
Page 4

Indications
Attachment technique Conical or telescopic crowns
Bars
Custom attachments
Resin dies
Fixation of crowns for transfer impressions
C&B technique Inlays, onlays
Adhesion bridges (Maryland)
Soldering Splinting for soldering procedures
Model cast partial dentures Modelling of extensions,
lingual bars and clasps
Implant technique Manufacture of custom implant abutments
Implant bite registrations
Intra-oral splinting of transfer abutments
Superstructures
Electroforming (Galvano) Resin dies for electroforming technique
Features
Features Benefits
Low polymerization shrinkage Perfect fit of the pattern and the cast object
Perfect handling properties for brush
technique
Favourable flow behaviour and high
wettability
Burns out without residues Homogeneous castings
High hardness and strength High stability even in thin layers
Short setting time Time-saving and economical, also for mixing technique
Perfect adhesion to already polymerized
Pattern Resin LS
Unlimited dimensional stability of
Pattern Resin LS dies
and Benefits
Easily controlled and precise application
Even large extensions can be built up
without problems
Quick setting, but convenient application
with brush technique
Economical usage
Easy workability
Does not flow from applied areas
Homogeneous resin workpieces
Optimally adapted to brush technique
Efficient and economical
Fine surface adjustments can be made with burs
Smooth surfaces after grinding or milling
Homogeneous, smooth casting surfaces with precise margins
Dimensionally stable dies even after hours or days
No dimensional changes due to room temperature
4
Page 5
PATTERN RESIN LS
Physical properties
Working time (23° C) 2-3 min
Setting time (23° C) 4 min
Flexural strength (37 °C, after 10 min) 63 MPa
Polymerization shrinkage after 30 min 0,36 %
Polymerization shrinkage after 24 h 0,37 %
Chemical composition
Powder: Polymethylmethacrylate
Polyethylmethacrylate
Dibenzoyl peroxide
Liquid: Methylmethacrylate
2-Hydroxyethyl-Methacrylate
Brush Technique – Packaging
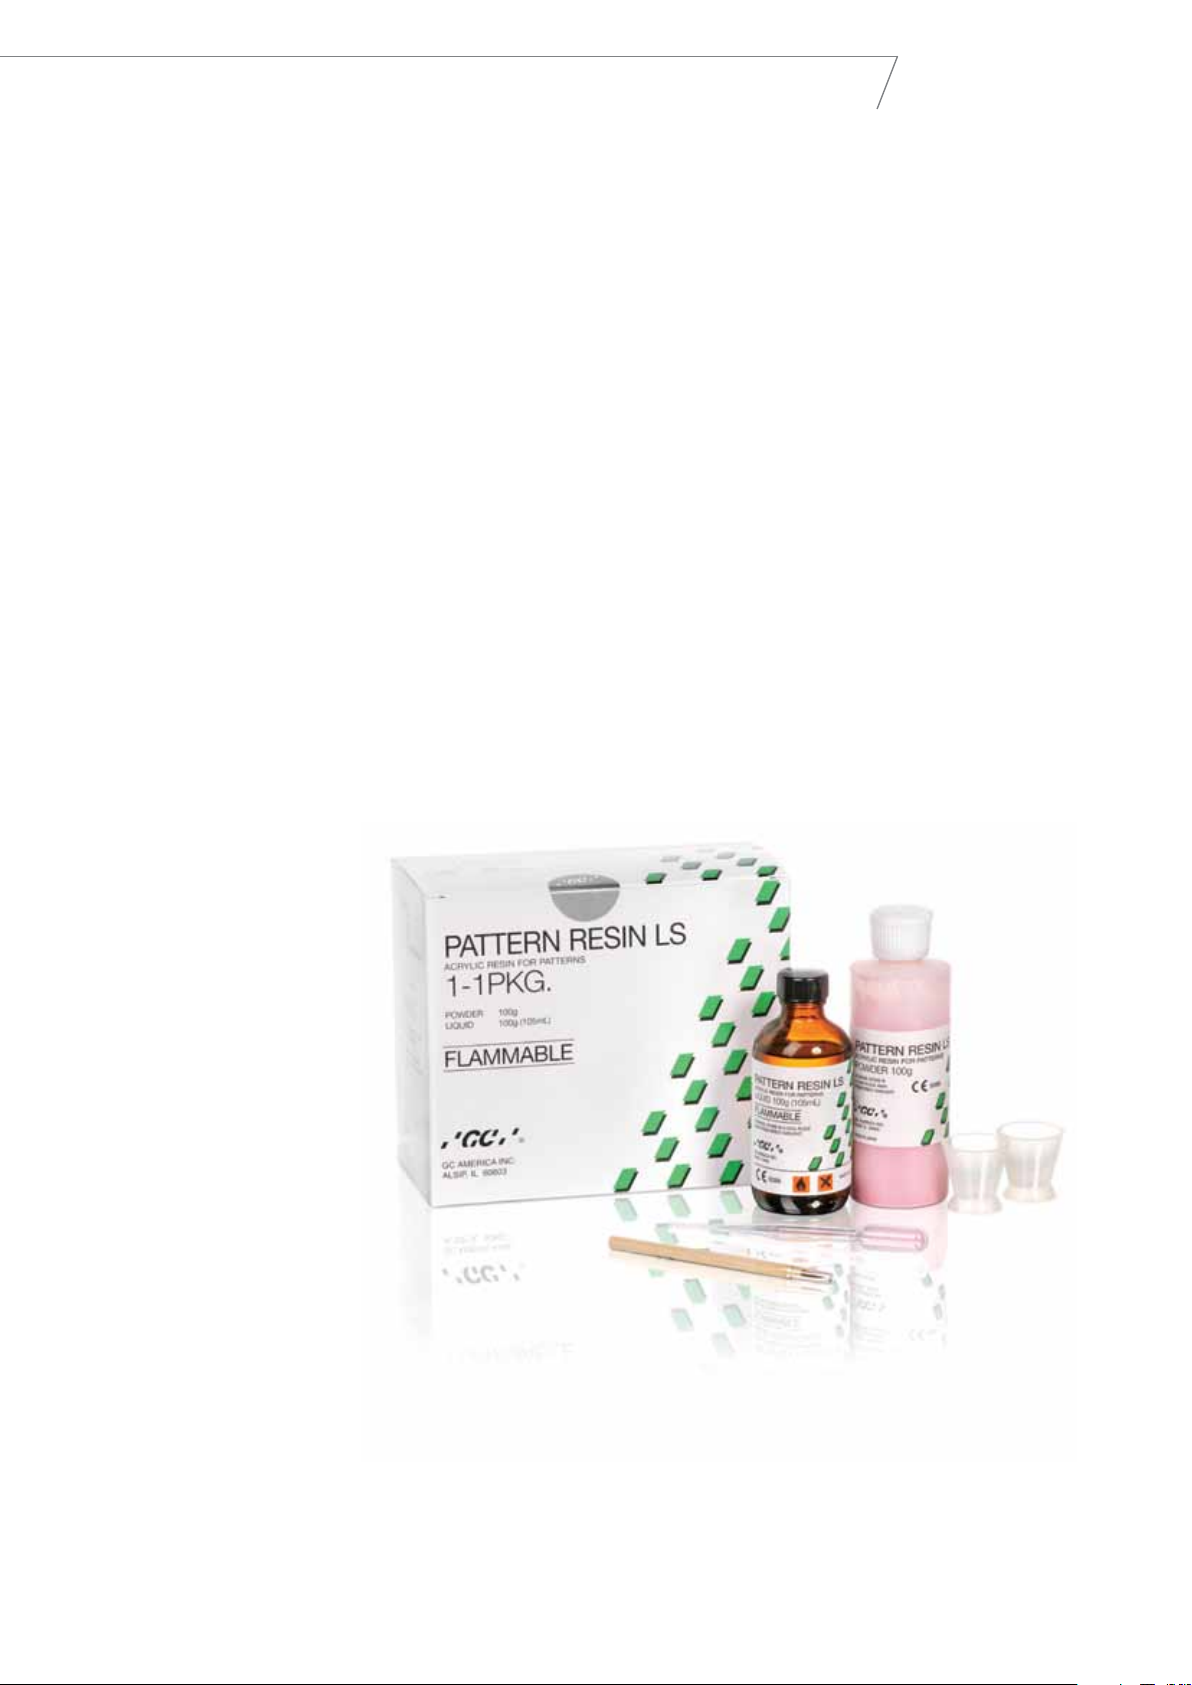
The 1-1 package of Pattern Resin LS contains everything
you need for the brush technique: 2 mixing cups,
1 brush, 1 pipette for exact liquid dosage, and Pattern
Resin LS powder and liquid to be mixed in suitable
ratios.
Pattern Resin LS
Low Shrinkage Modelling Resin
1-1 Pack: 100 g Powder,
105 ml Liquid
Accessories:
2 Mixing Cups,
1 Brush No. 4,
1 Pipette
5
Page 6
Brush Technique – Step by Step
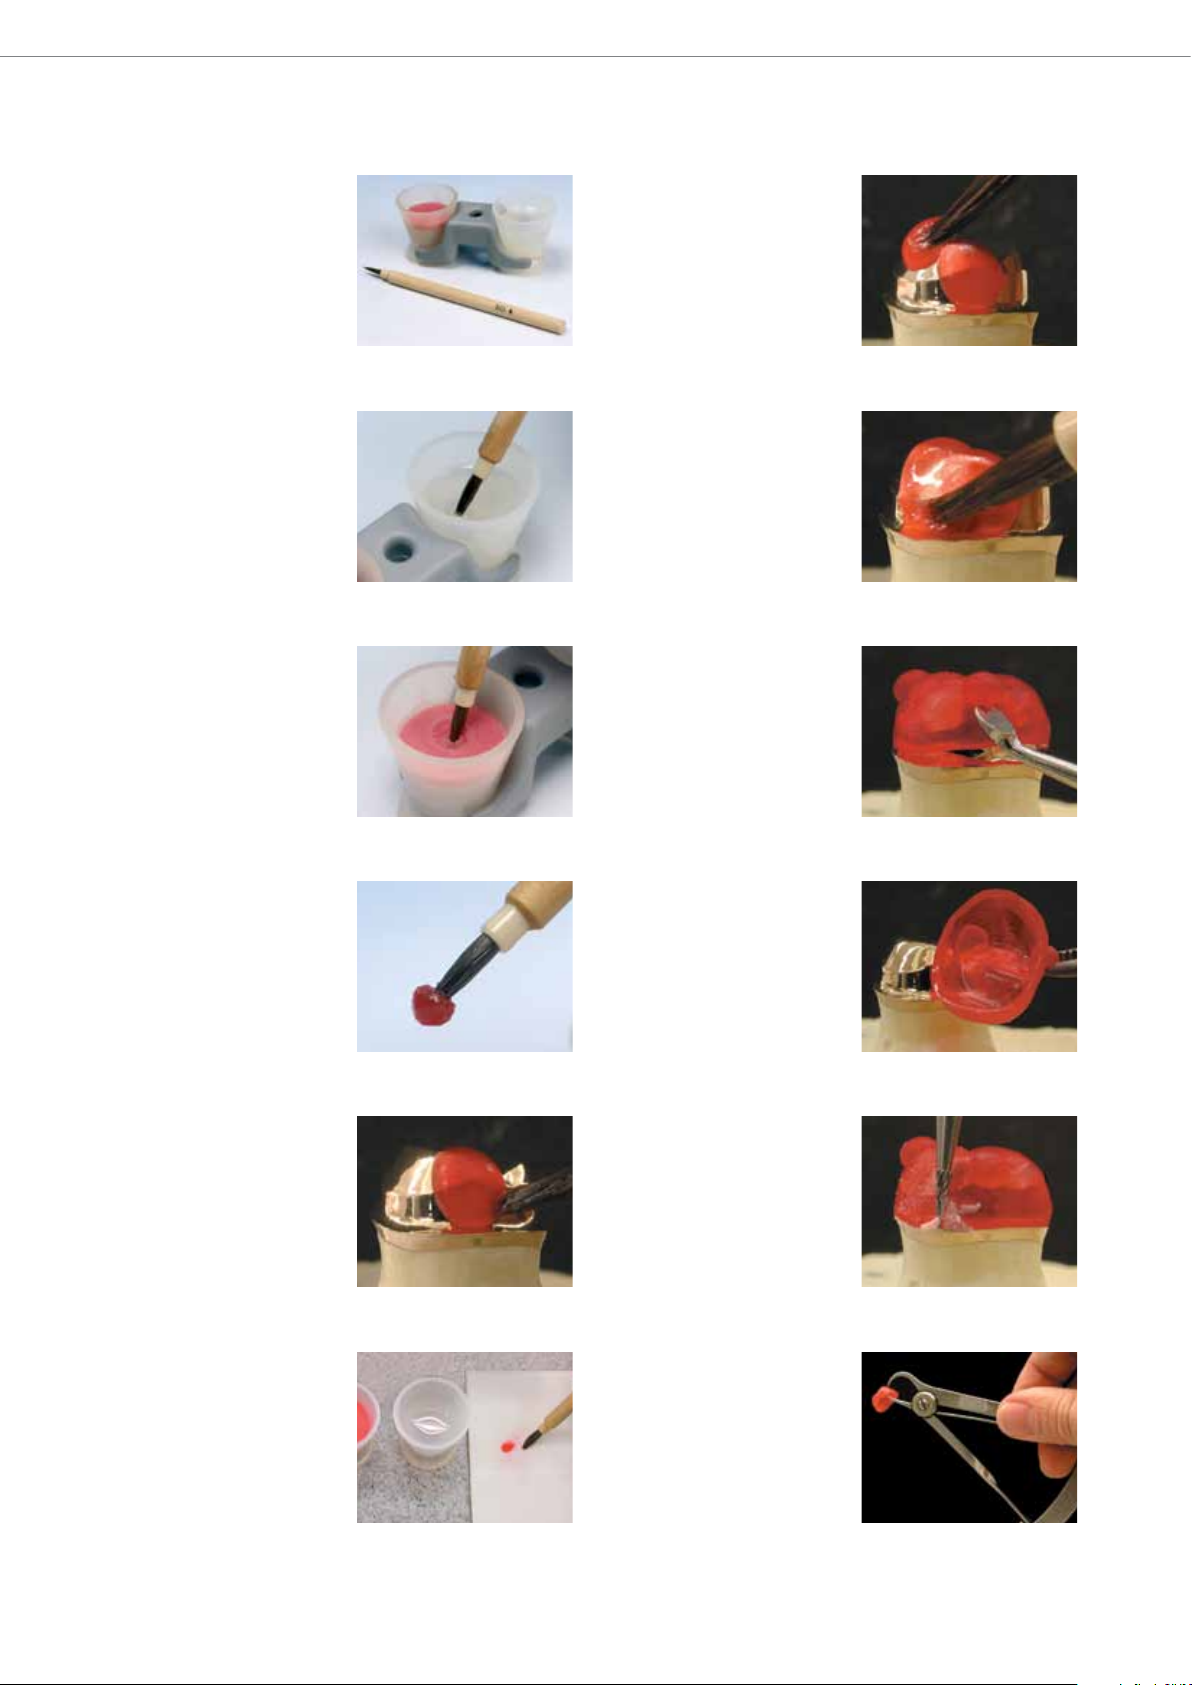
1. Mix powder and liquid:
Dispense adequate amounts
of powder and liquid into the
respective mixing cups.
Tip: The pipette helps to
dispense the exact amount of
liquid.
2. Slightly moisten the brush.
Tip: Squeeze out excess
moisture by pressing the tip
of the brush on the inner wall
of the mixing cup. This also
creates a finely pointed tip.
3. Pick up a small amount of
Pattern Resin LS powder with
the moist brush.
Due to the material’s
thixotropic properties, a small
resin bead will form on the tip
of the brush.
7. Repeat the above
procedure to cover the whole
surface with a thin layer of
Pattern Resin LS.
Tip: As fresh Pattern
Resin LS adheres perfectly to
already polymerized material
separate small dots can easily
be connected.
8. Even where high precision
is required, e. g. at primary
crown margins, Pattern
Resin LS exhibits perfect flow
and fit.
9. After polymerization of
Pattern Resin LS carefully
remove the pattern to check
the internal surface.
Tip: Small retentions help to
remove the pattern from the
primary crown.
4. The resin bead remains
stable on top of the brush
and is ready e. g. for
modelling of secondary crown
patterns.
5. Deposit the resin bead on
the metal surface of a primary
crown.
Working time: 2-3 min
Setting time: 4 min
Tip: No separating agent
is needed on smooth metal
surfaces.
6. Tip: To clean in between
times - dip the brush into
Pattern Resin LS liquid and
dry with a tissue.
10. The inside of the pattern
shows the same glossy
surface as the primary crown.
11. Place the pattern back
on the primary crown and
make fine adjustments with
a suitable grinding instrument
(e. g. cross-cut tungsten
carbide).
12. Evenly reduce the
thickness of the pattern to
0.3 - 0.4 mm and check
with a calliper. Also check
the margins.
6
Page 7
Brush Technique – Step by Step
PATTERN RESIN LS
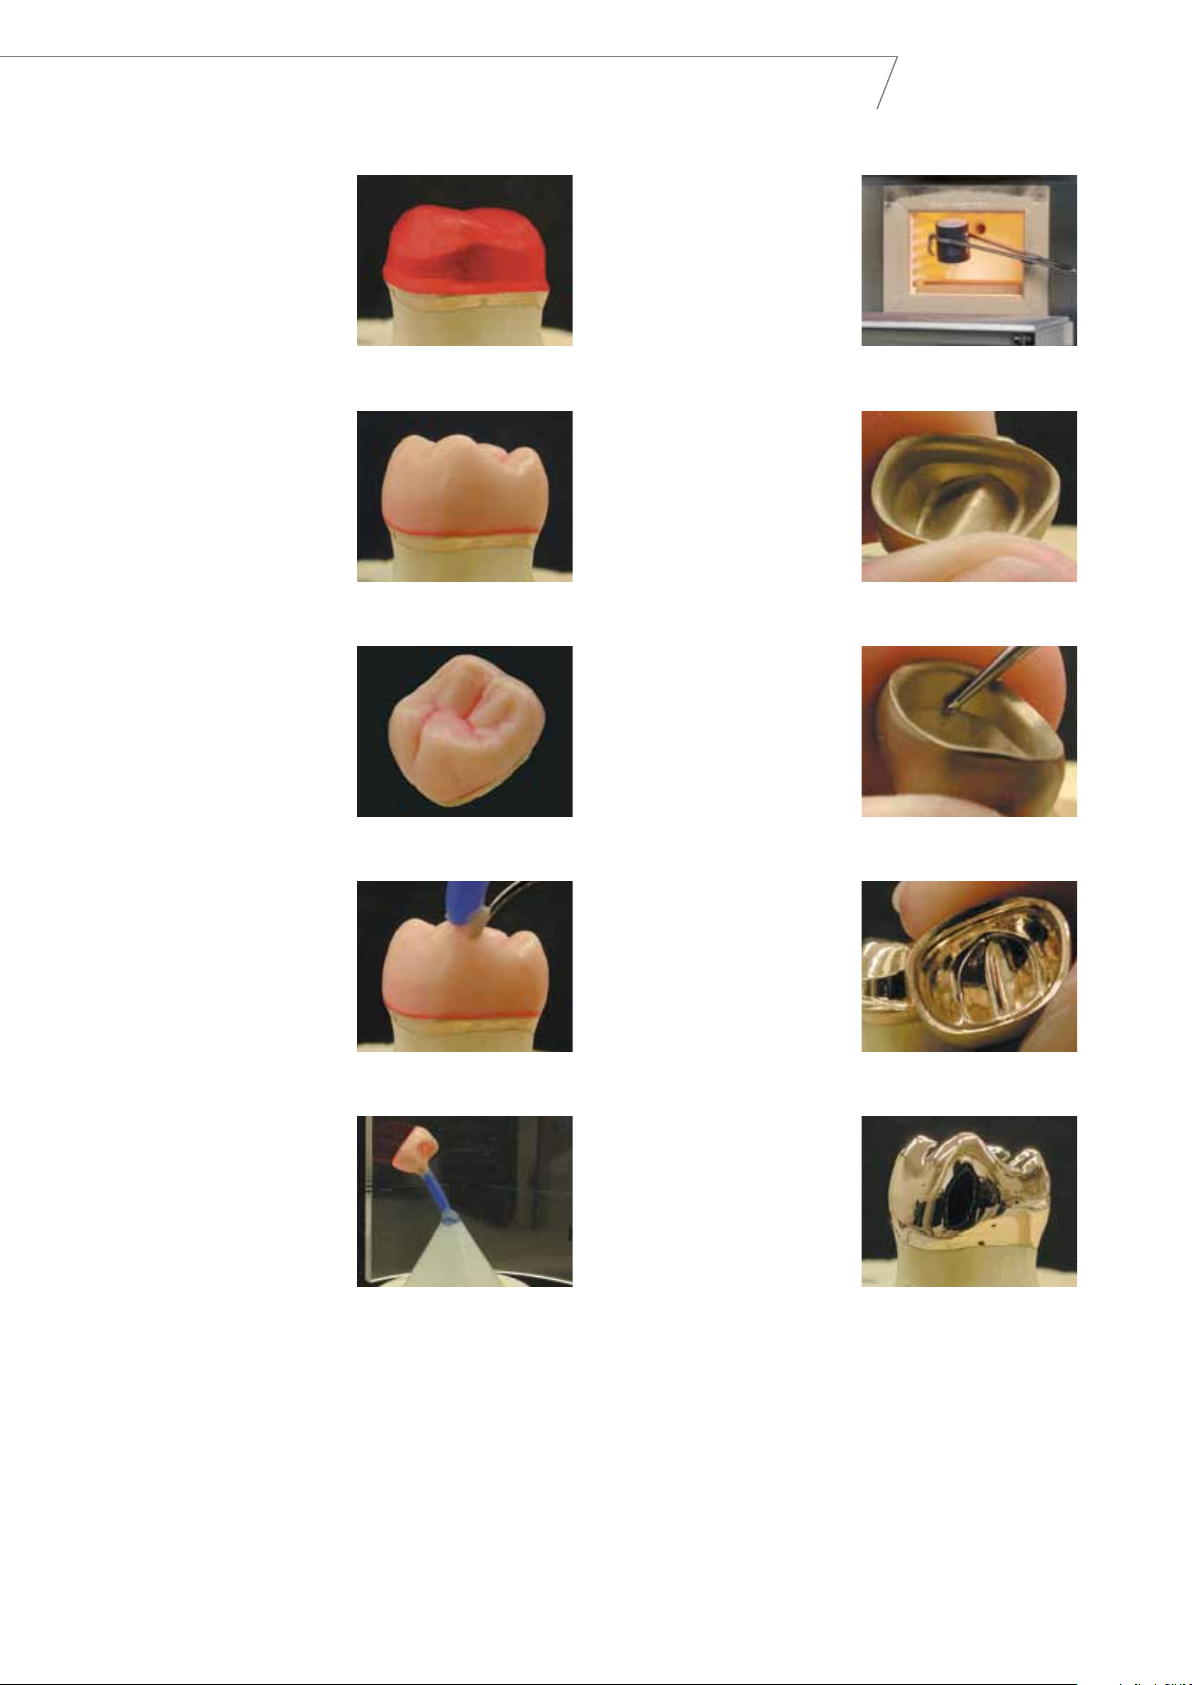
13. Place the pattern back on
the primary crown.
14. Prepare the wax-up using
an appropriate inlay wax.
Check occlusion, contact area
and contour as usual.
15. The wax-up is ready for
connection of the sprues.
19. Heating-up is carried out
according to the schedules
given in the instructions for
use. Cast in the usual manner.
20. Deflask in the usual way
and clean the cast metal
surface with glass beads.
21. Check the inner surface
carefully and remove
inaccuracies with an
appropriate grinding
instrument.
16. Connect the sprues
according to the casting
system and method used.
17. Position crown in the
casting ring.
18. Mix and pour
phosphate-bonded
investment (Fujivest Super,
Stellavest or Fujivest II)
according to the instructions
for use.
Tip: Investing Pattern Resin
LS workpieces always requires
a greater proportion of
investment liquid than wax
patterns. For detailed
information refer to the
respective instructions for
use.
22. The inside of the
secondary crown shows a
homogenous, glossy finish.
23. The secondary crown
fits perfectly on the primary
crown.
Photographs: ZTM V. Brosch
7
Page 8
Implant Restorations
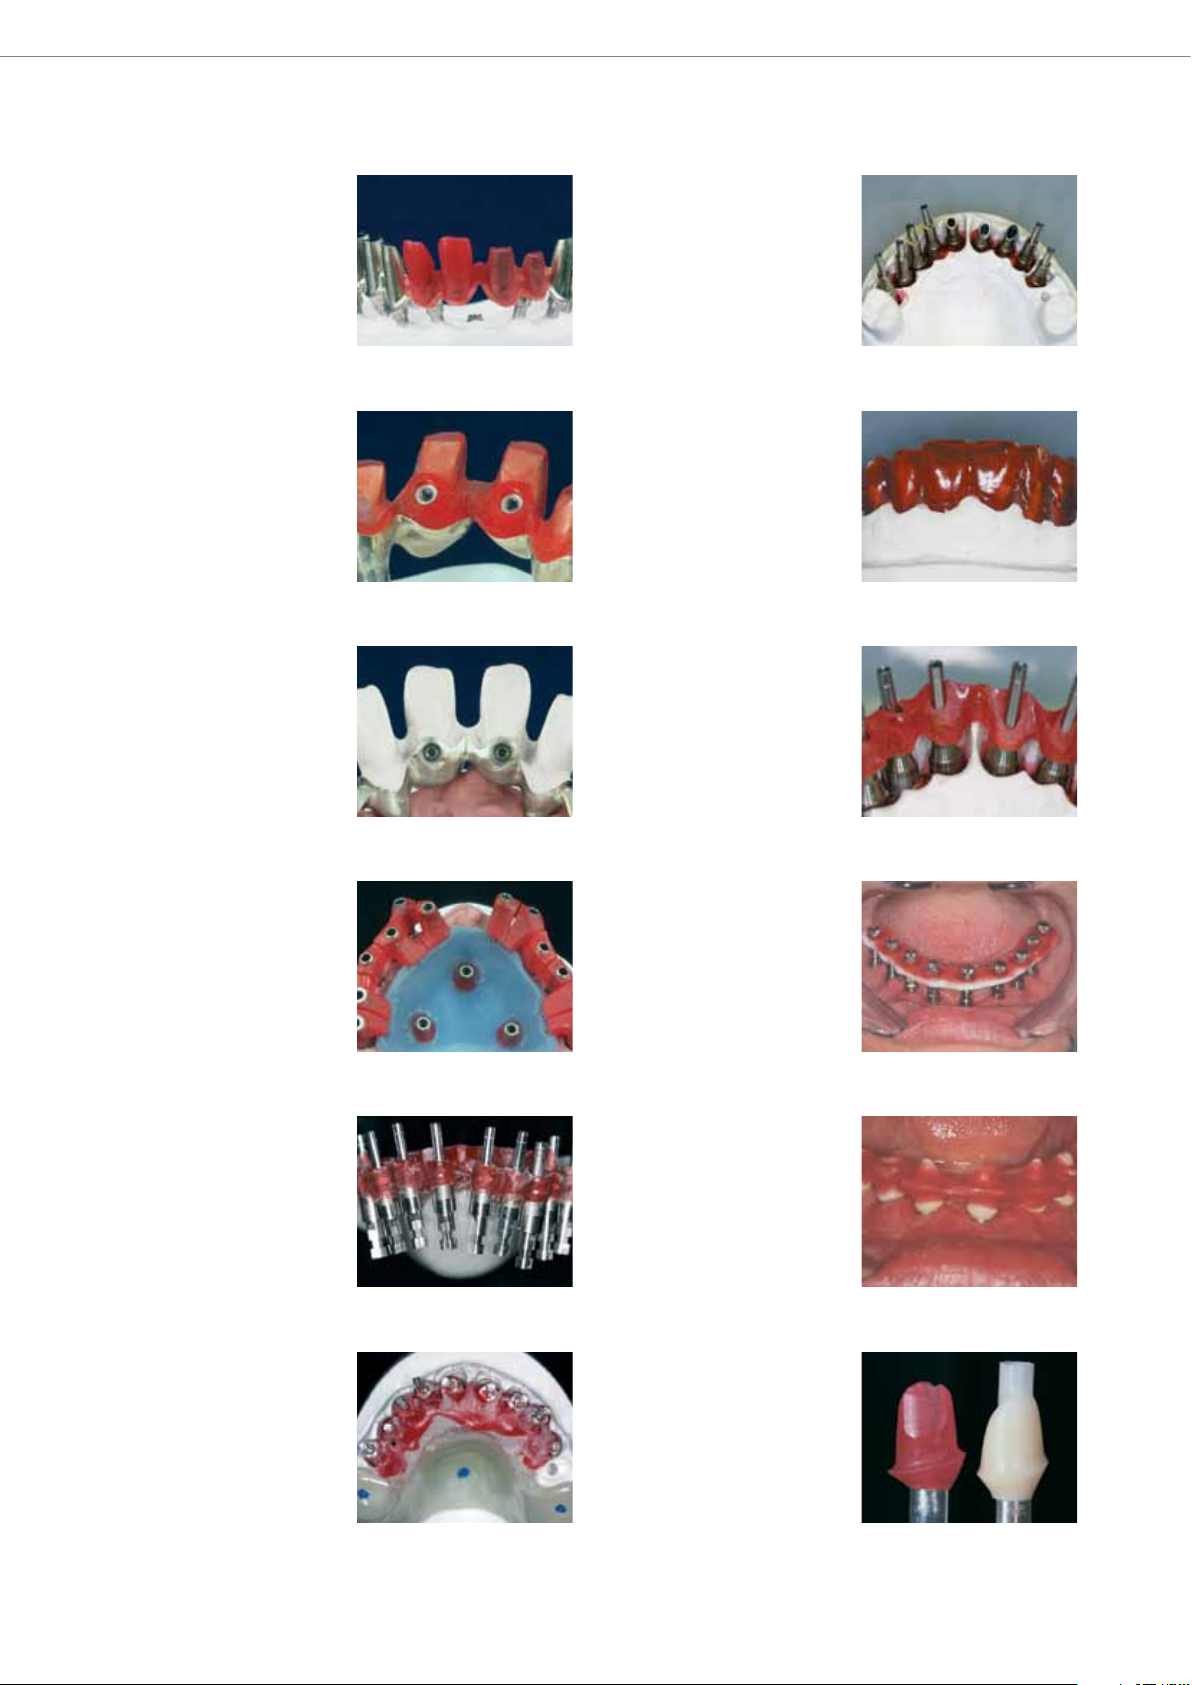
Some examples for the use
of Pattern Resin in
implantology:
Case 1
1. Step-by-step build-up of an
implant suprastructure with
Pattern Resin LS.
2. Suprastructure with
integrated horizontal screw
threads. Further crown buildup will be carried out with
modelling wax.
3. The high precision fit of the
cast suprastructure
manufactured with the aid of
Pattern Resin LS is
immediately evident.
3. The implant analogues
have been fixed with Pattern
Resin LS and cast-on titanium
tubes screwed into the
analogues prior to
manufacture of the
superstructure
4. Pattern Resin LS buildup as
a preparatory step for the
manufacture of the
superstructure
5. Reduced Pattern Resin LS
frame as a stabilizing basis for
the superstructure.
Case 2
Example of a technique
for passive transfer of the
intra-oral situation to the
working die.
Case 3
1. Maxillary transfer template
after intra-oral connection of
the transfer abutments with
Pattern Resin LS. Implant
analogues are already
inserted for preparation of
the working die.
2. The transfer template on
the working die.
Further examples:
Intra-oral splinting of transfer
abutments
Transfer of the intra-oral
positions of ceramic
abutments.
Customized abutment made
of Pattern Resin LS ready for
CAD/CAM technique
(left).Milled zirconium
abutment (right).
Photographs: ZTM U. Buhr,
ZTM B. Weissmann,
8
ZTM O. van Iperen
Page 9
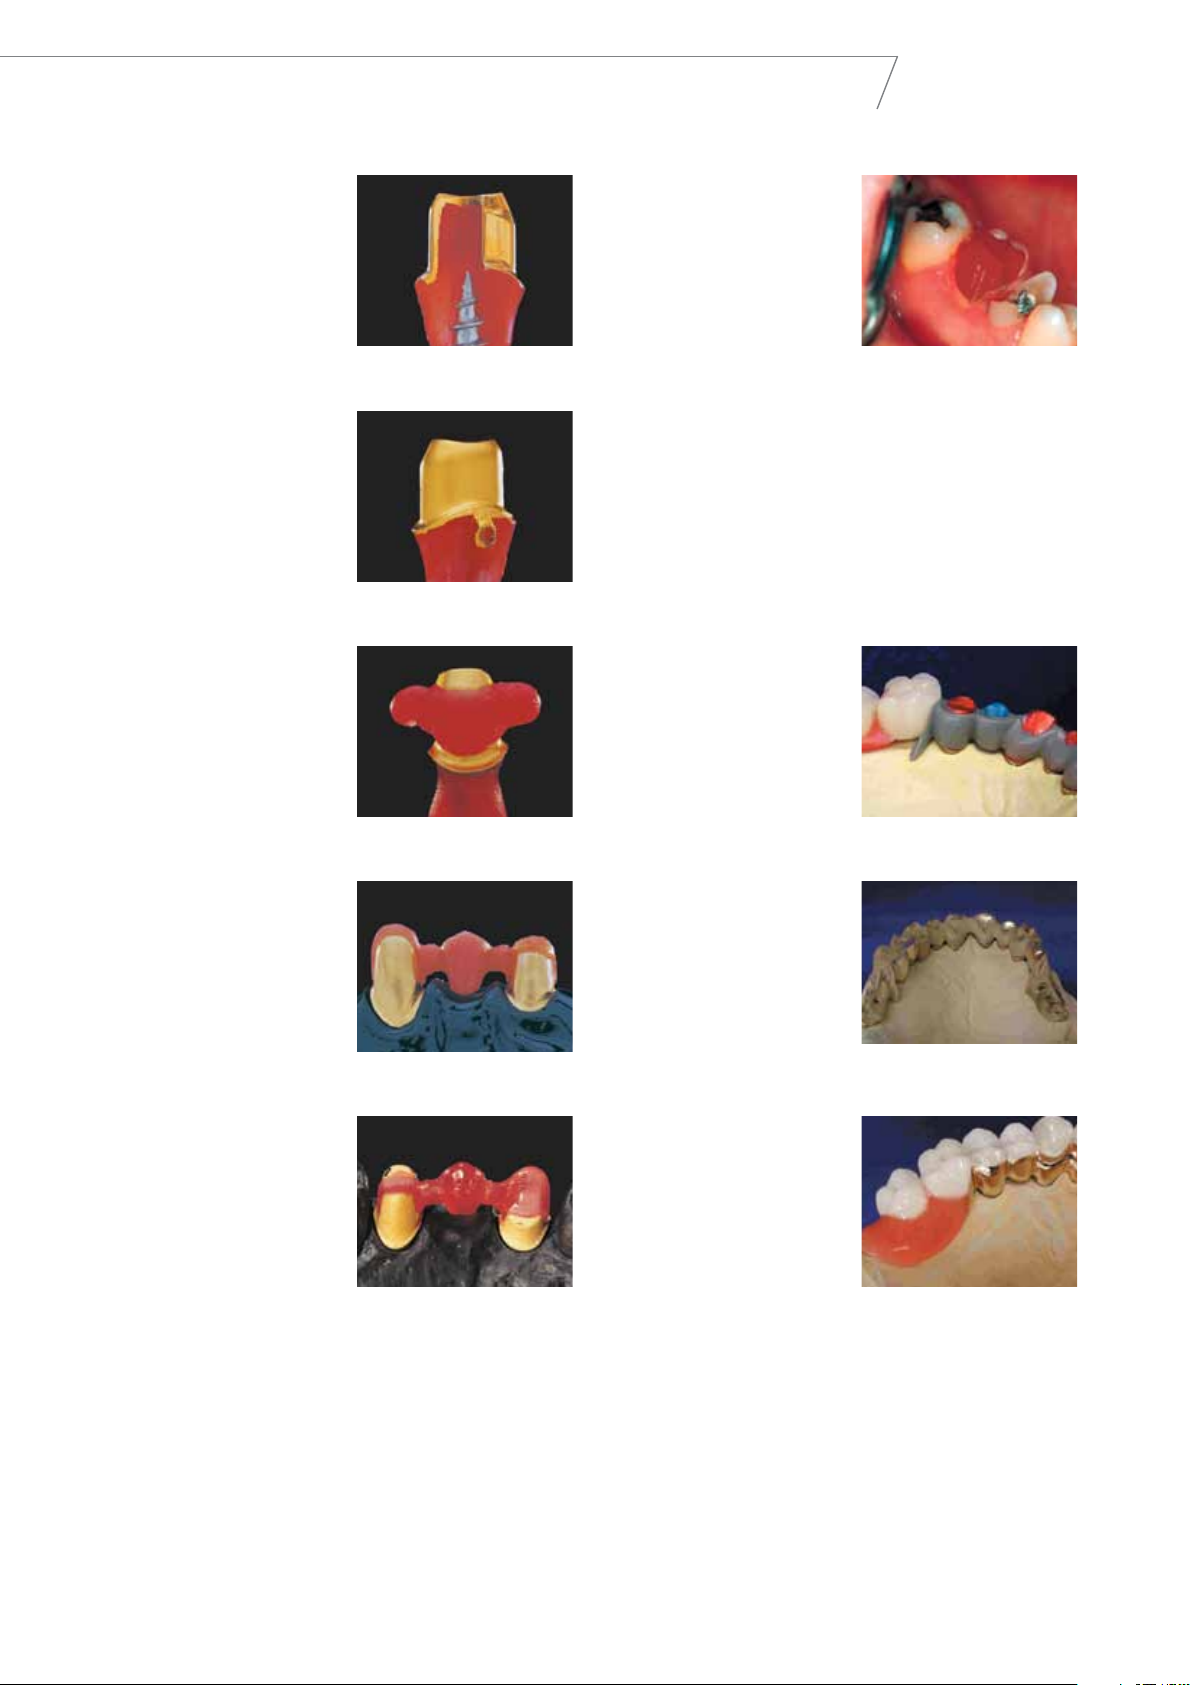
Electroforming
Restorations Core build-up
PATTERN RESIN LS
In connection with
electroforming technology
Pattern Resin LS has been
successfully applied in
several indications:
1. Electroformed die made of
Pattern Resin LS, with
stainless steel screw as a
removal aid
®
2. AGC
coping after gold deposition.
3. Removal aid made of
Pattern Resin LS, for easy
removal of the metal coping
to avoid deformation.
electroformed
Core build-up of a molar
crown, prior to preparation.
Telescopic
Pattern Resin LS secondary
crowns for a telescopic
bridge.
bridges
Electroforming in connection
with bridge techniques:
1. Tension-free pontic shaped
with Pattern Resin LS, for
galvano cast-on technique.
2. Occlusal view of a posterior
bridge.
(For technical details
please refer to ”AGC
Galvano technique”
instructions for use)
®
Photographs: Wieland Dental +
Technik, ZTM C. Gadau
The cast metal structure.
Completed restoration.
Photographs: ZTM V. Brosch
9
Page 10

Investing and casting
Mixing ratios:
When investing Pattern Resin LS workpieces, always use
a higher proportion of investment liquid than with wax
patterns. For details please refer to the instructions for
use of the respective phosphatebonded investments.
Modelations:
All Pattern Resin LS workpieces should be covered with a
thin layer of wax to avoid deterioration of the investment
surface during heating-up.
Heating-up:
In connection with larger Pattern Resin LS workpieces,
heat up progressively to avoid aggressive burningout. It
is recommended that the temperature is kept at 250° C
for 1 hour before raising to the final burn out.
Questions
1. Should I insulate the surface of the primary
component before building up Pattern Resin LS?
Insulation of the primary component is not required if
Pattern Resin LS is used on a smooth, milled metal
surface.
2. How can I tell that I am using the right mixing ratio
of powder and liquid for the brush technique?
After dipping the wet brush into the powder, the little
bead on the tip of the brush should be slightly wet and
have a shiny surface.
3. Which burs are recommended for adjustments of the
polymerized Pattern Resin LS surface?
For adjustments or milling use tungsten carbide burs or
cross-cut instruments.
4. Can I mill the surface of Pattern Resin LS in the same
manner as wax?
Dies and workpieces made of Pattern Resin LS can be
shaped, contoured and milled by means of a milling
machine.
5. Which steps should I observe when I use Pattern
Resin LS on stone dies?
Check the stone die, stumps or cavities for undercuts,
inaccuracies or rough surfaces. Block-out undercuts with
an appropriate wax and seal the die surface with Die
Hardener. Wet the cavity or stump surfaces with a
separating agent.
and answers
6. In connection with the brush technique, can I apply
Pattern Resin LS in small dots?
Pattern Resin LS can be built up in small sections or dots.
Each section will polymerize separately and adhere to
the other sections. After covering the complete base,
Pattern Resin LS shows a homogenous surface. This
technique minimizes total polymerization shrinkage.
7. How can I clean the brush?
For intermediate cleaning dip the brush into Pattern
Resin LS liquid and dry with a tissue.
8. How can I remove a secondary pattern from the
primary omponent in a safe and easy way?
Small opposing retention beads attached to the surface
help to remove the pattern.
9. Should I treat Pattern Resin LS objects with a wetting
agent before investing?
Generally, the quality of casting surfaces depends on the
use of a wetting agent. However, if Pattern Resin LS is
applied on smooth or polished metal surfaces without
undercuts, there is no need to use a wetting agent. If
there are wetting agent residues the internal surface of
the cast restoration will not be smooth.
10
Page 11
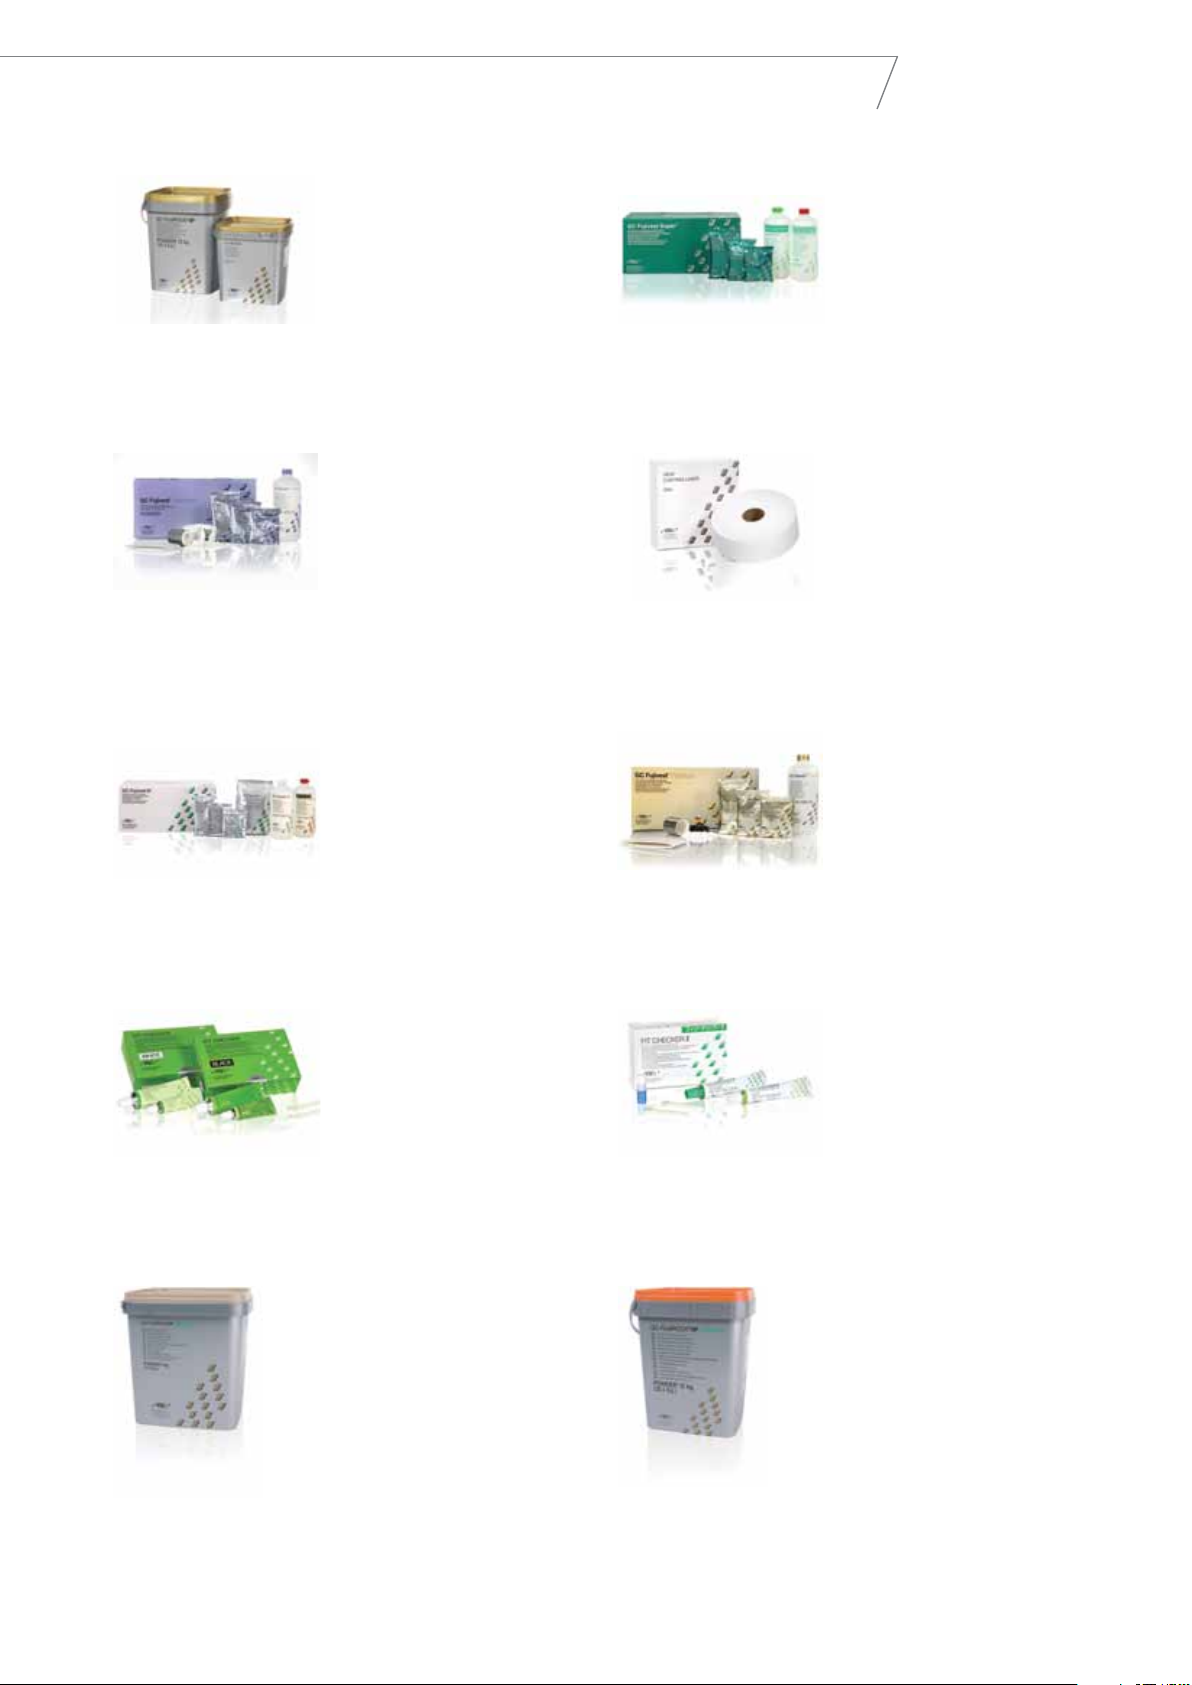
Related Products
PATTERN RESIN LS
GC Fujirock EP
Type 4 Dental Stone
The superior quality Type 4
Dental Die Stone is ideal for all
kinds of prosthetics, with high
precision, outstanding edge
hardness and high-pressure
stability. Thus a precise model as
a basis for precise prosthetics is
achieved.
GC Fujivest Premium
Exact solutions for flexible needs:
Fujivest Premium, crown &
bridges casting investment,
suitable for all types of dental
alloys with special attention for
non-precious alloys: versatile and
robust.
GC Fujivest II
GC Fujivest Super
The carbon-free phosphatebonded investment for precision
castings of precious, semiprecious and Pd-base alloys, with
special attention to complicated
implant castings. Fujivest Super
can be used in both quick heating
and slow heating procedures.
GC Casting Liner
A special ceramic-fibre liner to
allow a free expansion of all
investments.
GC Fujivest Platinum
A carbon-free phosphate-bonded
investment for precision crown
and bridge castings of all dental
alloys, including Ni-Cr and Co-Cr.
GC Fitchecker I
White and black easy-flowing
C-silicone for checking the
accuracy of dentures, crowns
,bridges, precast posts & inlays.
GC Fujirock OptiXscan
With CAD/CAM & implant
technologies gaining importance
every day, GC has
developed a special type 4 stone.
Thanks to its specially adapted
powder composition
Fujirock EP OptiXscan is
compatible with all existing
scanning devices.
Exact solutions for the highest
demands: Fujivest Platinum,
investment material for precious
and semi-precious alloys: highly
precise castings, offering
consistent top quality.
GC Fit Checker II
White A-silicone material,
especially for checking pressure
spots and the fit accuracy of
crowns, bridges, precast posts,
inlays & dentures.
GC Fujirock OptiFlow
Thin flowing Type 4 Dental Stone
for basing Fujirock EP arches. The
4 colours - Terracotta Red,
Dynamic Purple, Peppermint
Green and Sapphire Blue - meet
the requirements for the
individualised and aesthetic
construction of master models.
An optimal combination is
achieved in conjunction with the
four colours of Fujirock EP.
11
Page 12

GC EUROPE N.V.
Head Office
Researchpark Haasrode-Leuven 1240
Interleuvenlaan 33
B - 3001 Leuven
Tel. +3 2.16 .74.10 .00
Fax. +32.16.40.48.32
http://w ww.gceurope.com
GC UNITED KINGDOM Ltd.
12-15, Coopers Court
Newport Pagnell
UK - Bucks. MK16 8JS
Tel. +44.1908.218.999
Fax. +44.19 08.218.900
[email protected]
http://uk.gceurope.com
z L LF EN 6 12 04/12
 Loading...