

Page 1
Page 2

ELITE 21 SERIES INSTALLATION GUIDE
Page 3

FEDERAL COMMUNICATIONS COMMISSION
WARNING: This equipment was tested and found to comply with the limits for a Class B digital device,
pursuant to Part 15 of the FCC Rules. These limits are designed to provide reasonable protection against
harmful interference in a residential installation. This equipment generates, uses, and can radiate radio
frequency energy and, if not installed and used in accordance with the instructions in this manual, may
cause harmful interference to radio communications. However, there is no guarantee that interference will
not occur in a particular installation. For more information about radio frequency interference, refer to
the section of the Elite 21 User’s Manual on Radio and TV interference.
CANADIAN REGULATIONS
This equipment is a Class B digital apparatus that complies with the Radio Interference Regulations, CRC
c. 1374.
IMPORTANT: Changes or modifications to this product not authorized by GCC Technologies Inc. could
void the FCC Certification and negate your authority to operate the product. This product was tested for
FCC Compliance under conditions that included the use of shielded cables and connectors between system
components. It is important that you use shielded cables and connectors to reduce the possibility of
causing interference to radios, television sets, and other electronic devices. You can obtain the proper
shielded cables from GCC Technologies or from an Authorized GCC Technologies dealer.
CLASS 1 LASER PRODUCT
LASER SAFETY: This printer is certified as a Class 1 laser product under the U.S. Department of Health
and Human Services (DHHS) Radiation Performance Standard according to the Radiation Control for
Health and Safety Act of 1968. This means that the printer does not emit hazardous radiation. Since
radiation emitted inside the printer is completely confined within protective housings and external covers,
the laser beam cannot escape from the machine during any phase of user operation. The Center for
Devices and Radiological Health (CDRH) of the U.S. Food and Drug Administration implemented regulations
for laser products on August 1, 1976. These regulations apply to laser products marketed in the United
States. The label on the printer indicates compliance with the CDRH regulations and must be attached to
the laser products marketed in the United States.
Caution - Use of controls, adjustments, or performance of procedures other than those specified
in this manual may result in hazardous radiation exposure
.
CREDITS
© Copyright GCC Technologies Inc., 2000. All rights reserved.
The Elite 21 Series Installation Guide was written by David Nicholson.
It was edited by Donna Atwood, Kevin Curran, Donald Damon, Lee Doron, Laurie Freitas,
Brian Harriss and Gregg Linzey.
Illustrations courtesy Xerox International Partners,Technical Services Group. Additional
illustrations by Adam DeFanti. Layout by Adam DeFanti and David Nicholson. Cover design
and layout by Adam DeFanti.
Installation Guide printed in USA. Part number 030-16478 Rev A.
Page 4
1
Thank you for your purchase of a GCC Technologies Elite 21 laser printer.
You now have a high-quality, versatile solution to all of your printing needs.
The purpose of this guide is to show you how to set up your printer and
install the software on the computer(s) that will be using it.
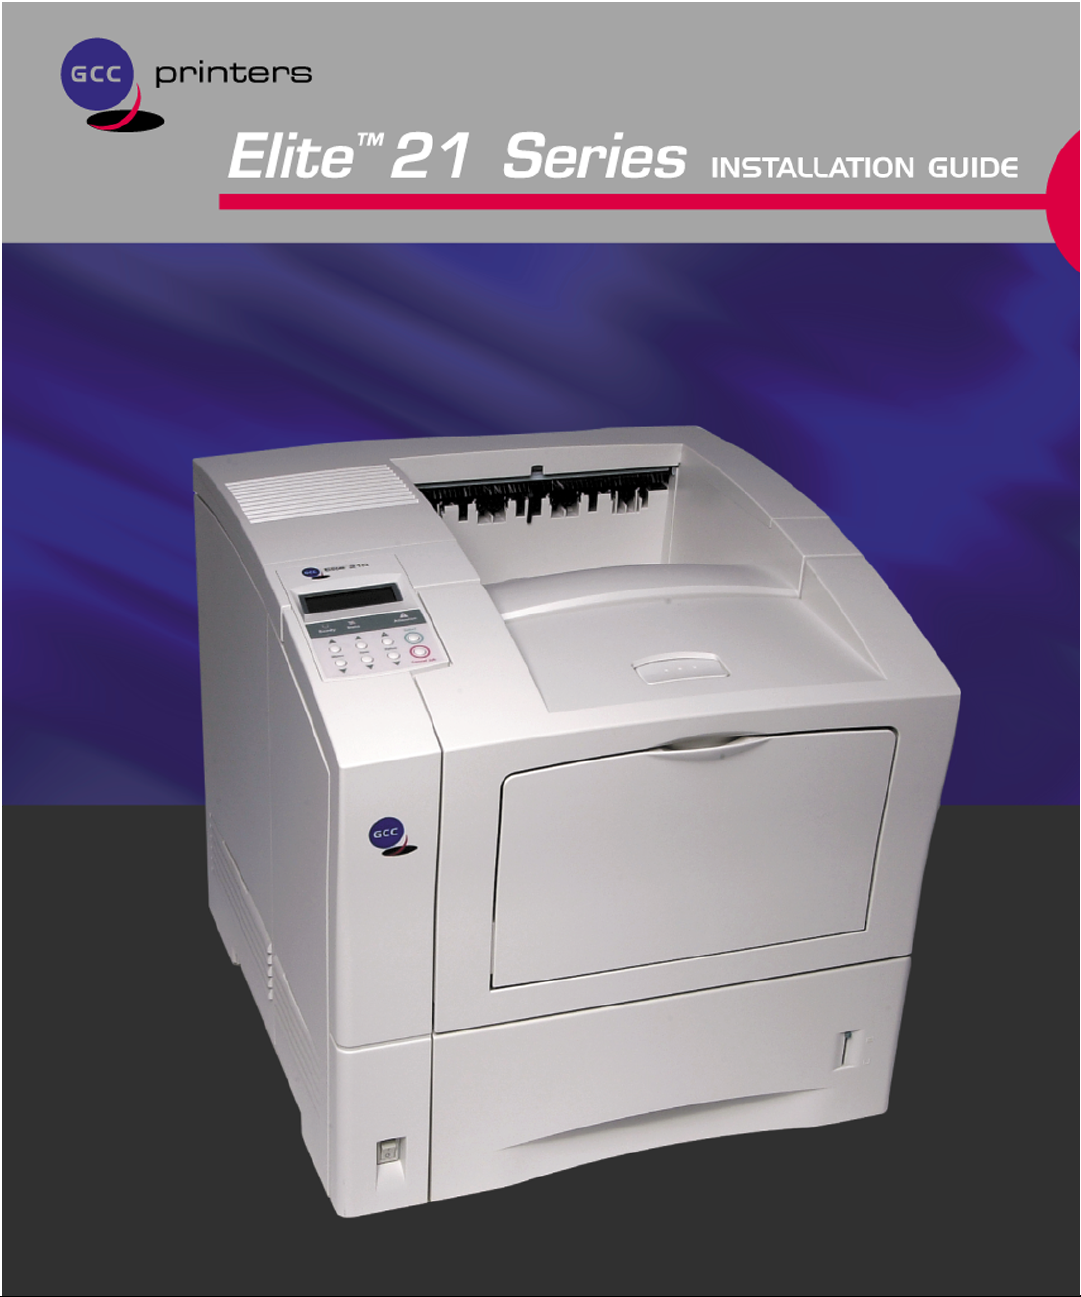
Configurations
This printer is available in three configurations, as described below:
Elite 21N
A high-resolution, networkable 1200 dpi
laser printer with USB, Parallel and
Ethernet ports. Comes with 16MB of RAM.
The Elite 21
SE also includes the Duplex
Unit standard, as well as a hard drive for
font storage and 64MB of RAM.
Introduction
Elite 21DN
The Elite 21DN adds the optional Duplex
Unit for double-sided printing and ships
with 32MB of RAM standard.
Elite 21SE
Page 5

2
Information Resources
This guide is intended to serve as a reference for installing the hardware
and software included with your printer. For more detailed information
about the configuration and usage of the printer, consult the Elite 21
User’s Manual.
The full User’s Manual for the Elite 21 printer is included in Adobe Acrobat
PDF format on the CD-ROM that shipped with the printer. See the “Using
the CD-ROM User’s Manual” section on page 86 of this manual for
instructions on accessing and using the full documentation.
For additional copies of this guide or of the Elite 21 CD-ROM, contact GCC
Direct Sales at 800 422-7777 (North America only, outside of North
America refer to the back cover) or contact your GCC authorized dealer.
Additional information is available via our web site at:
http://www.gccprinters.com/support
Page 6

3
Installation Checklist
For proper installation, please complete each section in order:
Step 1 Check Package Contents
Step 2 Prepare Printer Location
Step 3 Locate Printer Parts
Step 4 Remove Internal Packaging
Step 5 Install Toner Cartridge
Step 6 Load Paper Tray
Step 7 Connect Printer Cables
Step 8 Attach Power Cord
Step 9 Install Printing Software
Step 10 Install Accessories
Step 11 Verify Printer Setup
Page 7
4
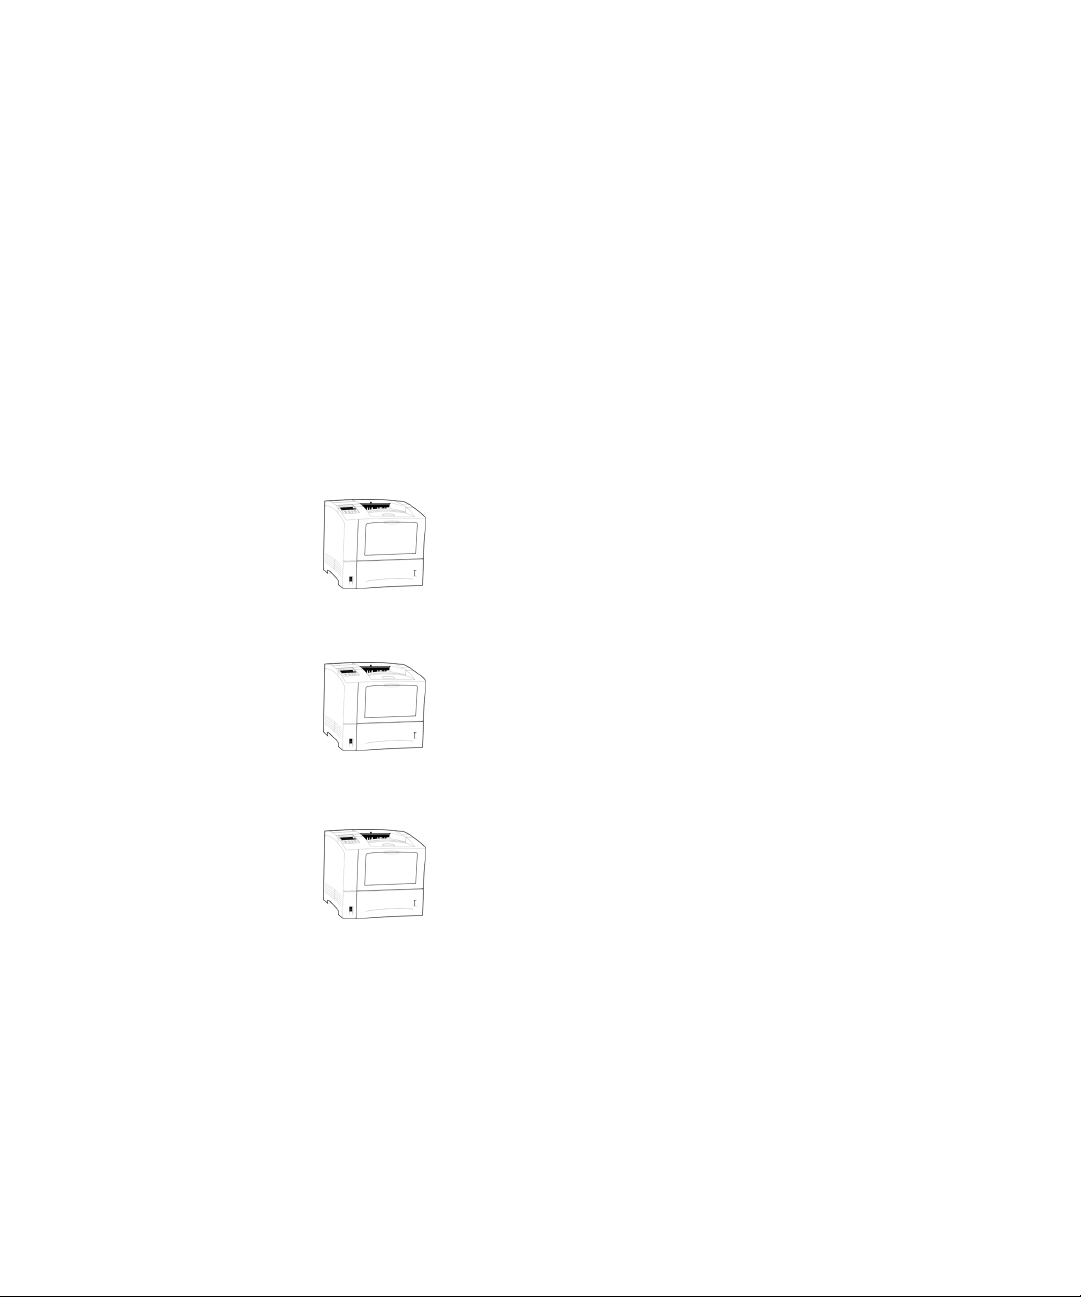
Step 1. Check Package Contents
Note:
No printer cables are included with the printer. For information on ordering cables,
contact GCC Direct Sales at 800 422-7777 (North America only, outside of North
America refer to the back cover) or visit our web site at:
http://www.gccprinters.com
Elite 21 Laser Printer
550-sheet Universal Paper Cassette
Power CordToner Cartridge
Customer Kit:
Elite 21 Series CD-ROM
Elite 21 Installation Guide
Elite 21 Installation Poster
Elite 21 Users Manual
(On CD-ROM)
Page 8
5
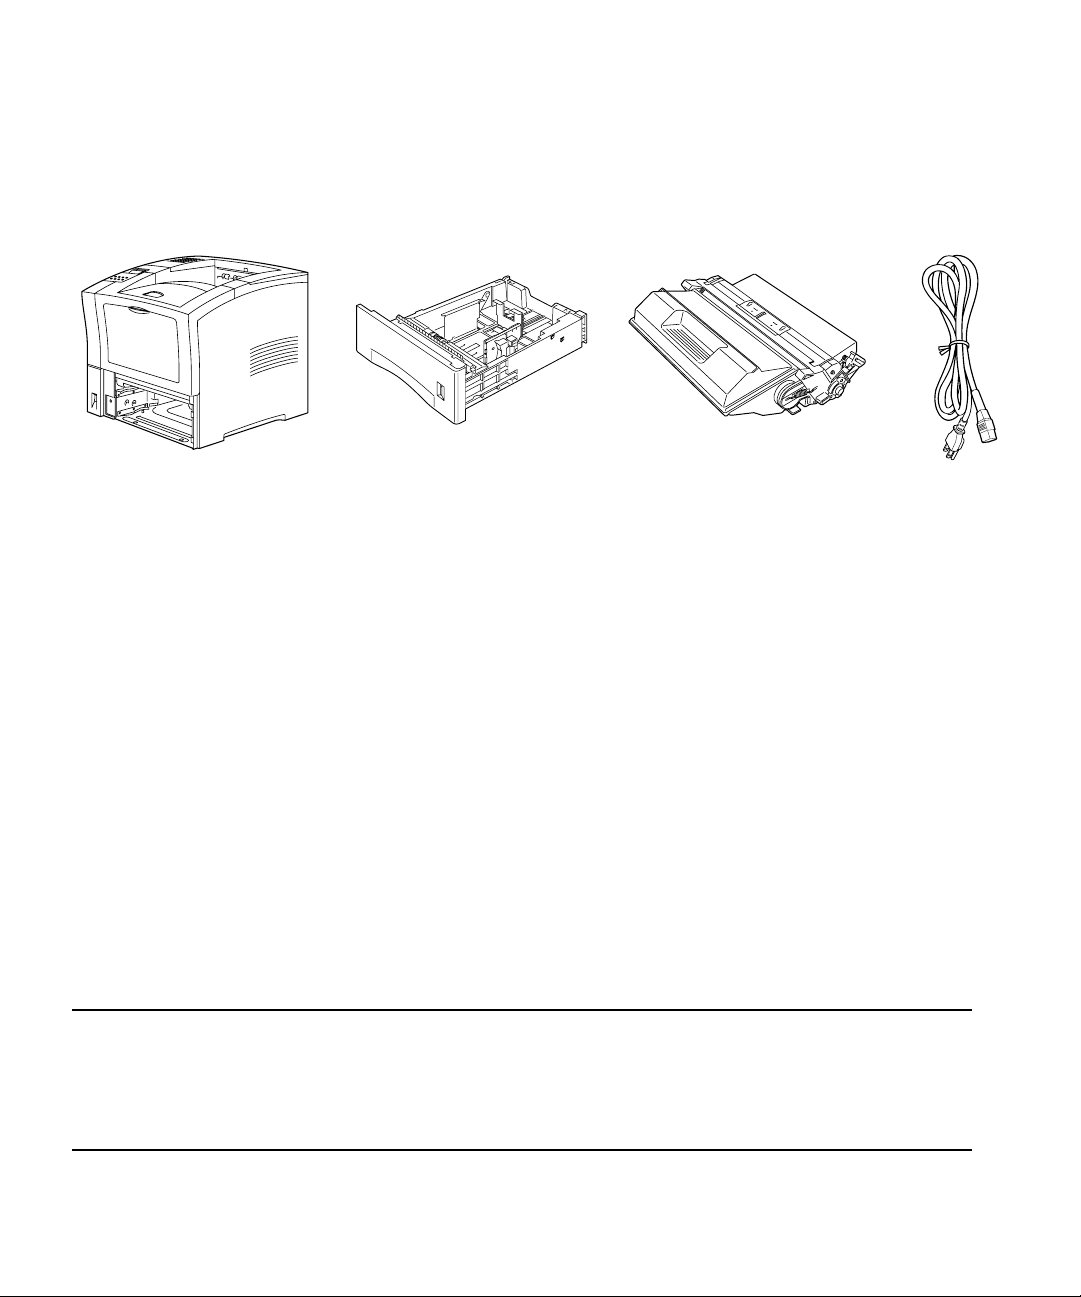
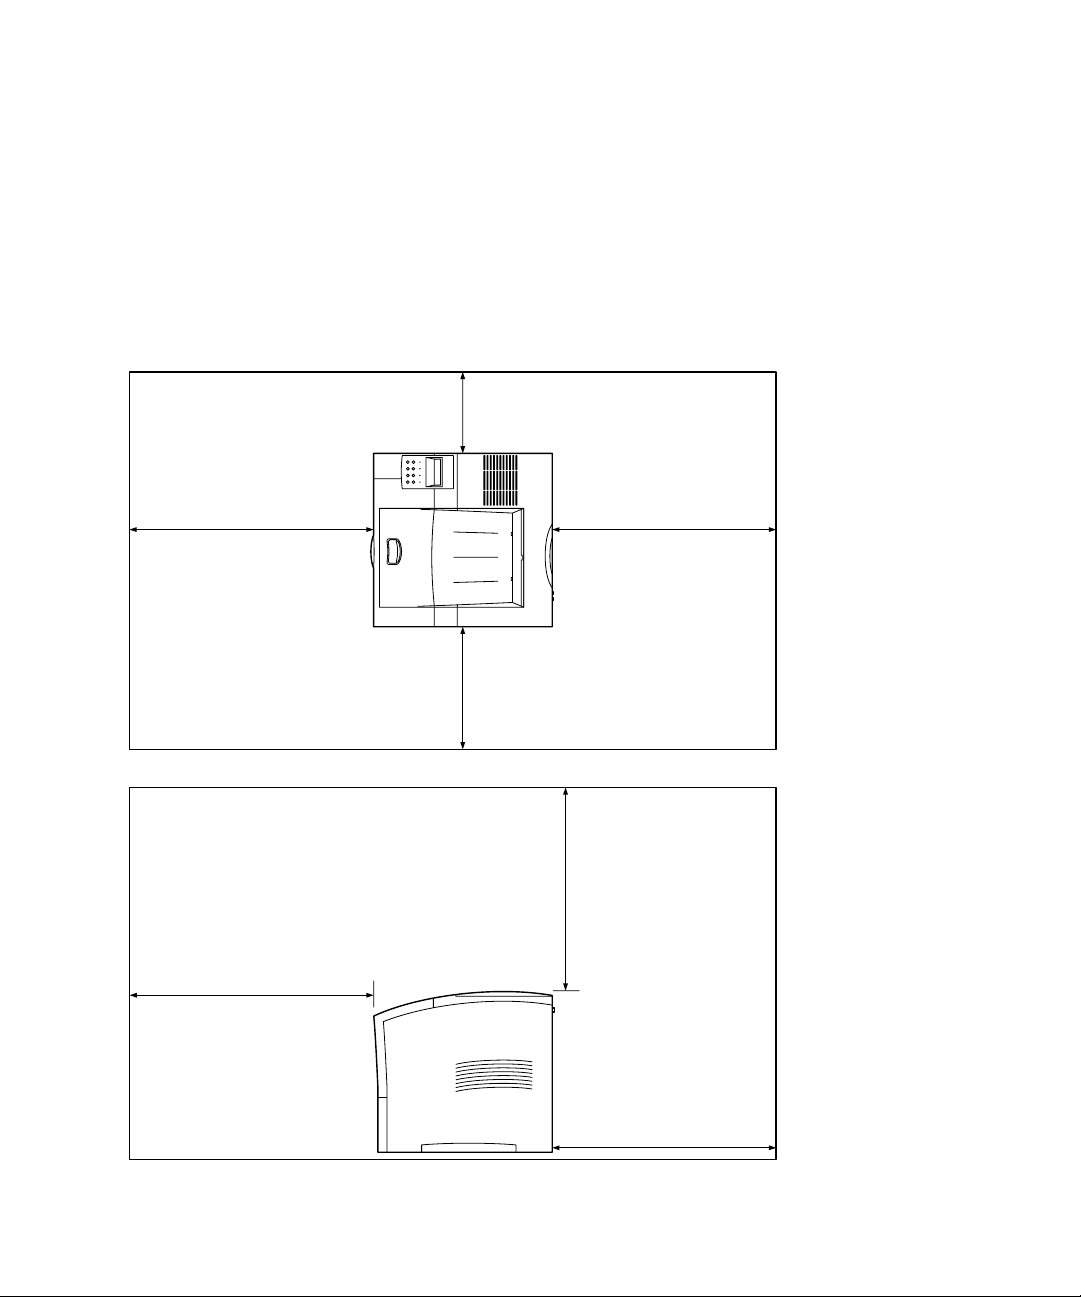
Step 2. Prepare Printer Location
Place the printer on a flat, level surface in a well-ventilated area away from
direct sunlight or areas where the air temperature and humidity can vary
widely. Do not obstruct the fan vent on the right side of the printer.
7.87” (200mm)
23.62” (600mm)
Minimum Recommended Clearances:
23.62” (600mm)
11.81” (300mm)
Top View
19.68” (500mm)
(with all options
installed)
23.62” (600mm)
23.62” (600mm)
Side View
Page 9
6
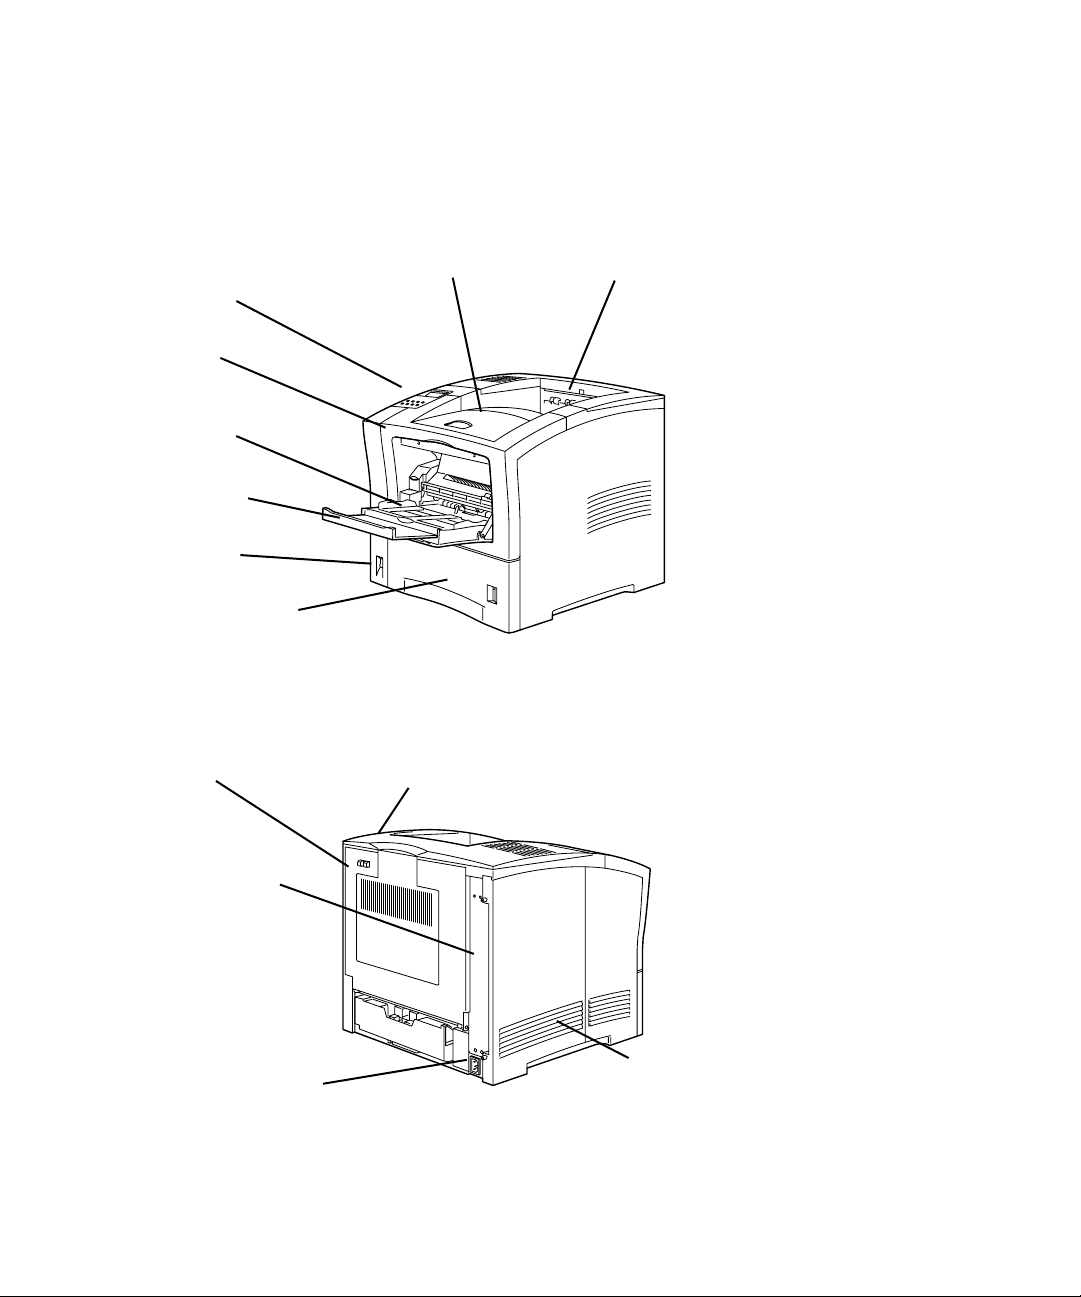
Step 3. Locate Printer Parts
Front View
Rear View
Paper Output Tray Paper Exit Slot
Top Cover
Ventilation Slots
Control Panel
Front Cover
Multi-Purpose Feeder
(Tray 1)
Tray Extension
Power Switch
550-sheet Universal
Cassette (Tray 2)
Rear Cover
Power Cord Receptacle
Connectivity Ports
(see next page for
details)
Page 10
7
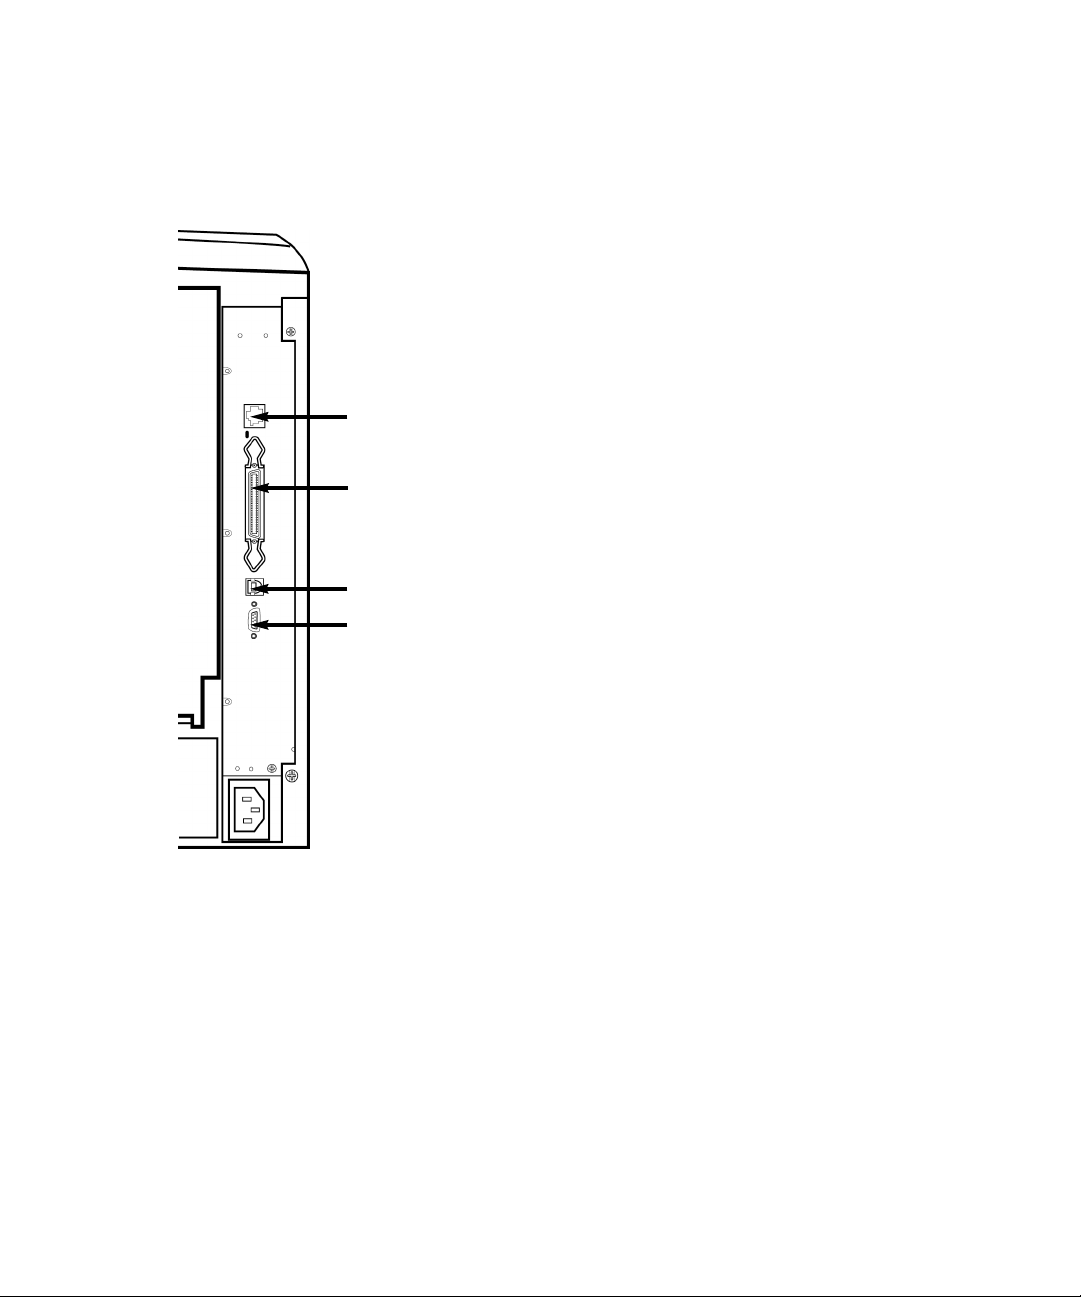
Connectivity Ports
With the printer’s all
ports active feature,
all the interfaces are
simultaneously active.
This means you can
connect more than
one interface at a
time. You don’t have
to select a port; this
feature works
automatically.
Ethernet 10/100BaseT
Bi-directional Parallel
Universal Serial Bus (USB)
RS-232 Serial
Page 11
8
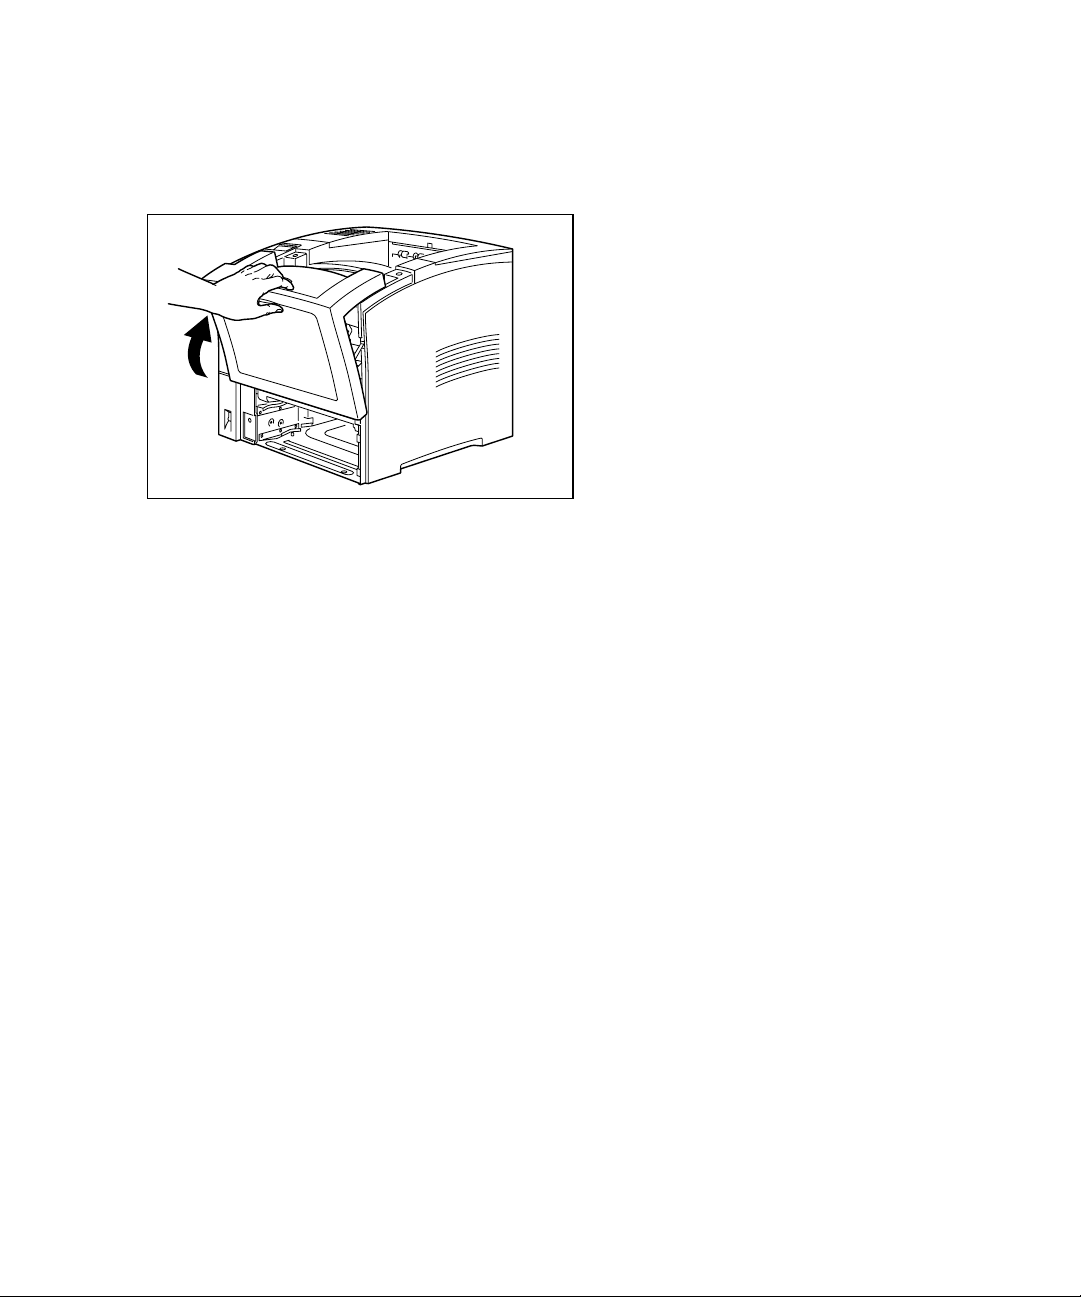
Step 4. Remove Tape
1. Remove packaging tape from the front
and rear covers of the printer.
Page 12
9
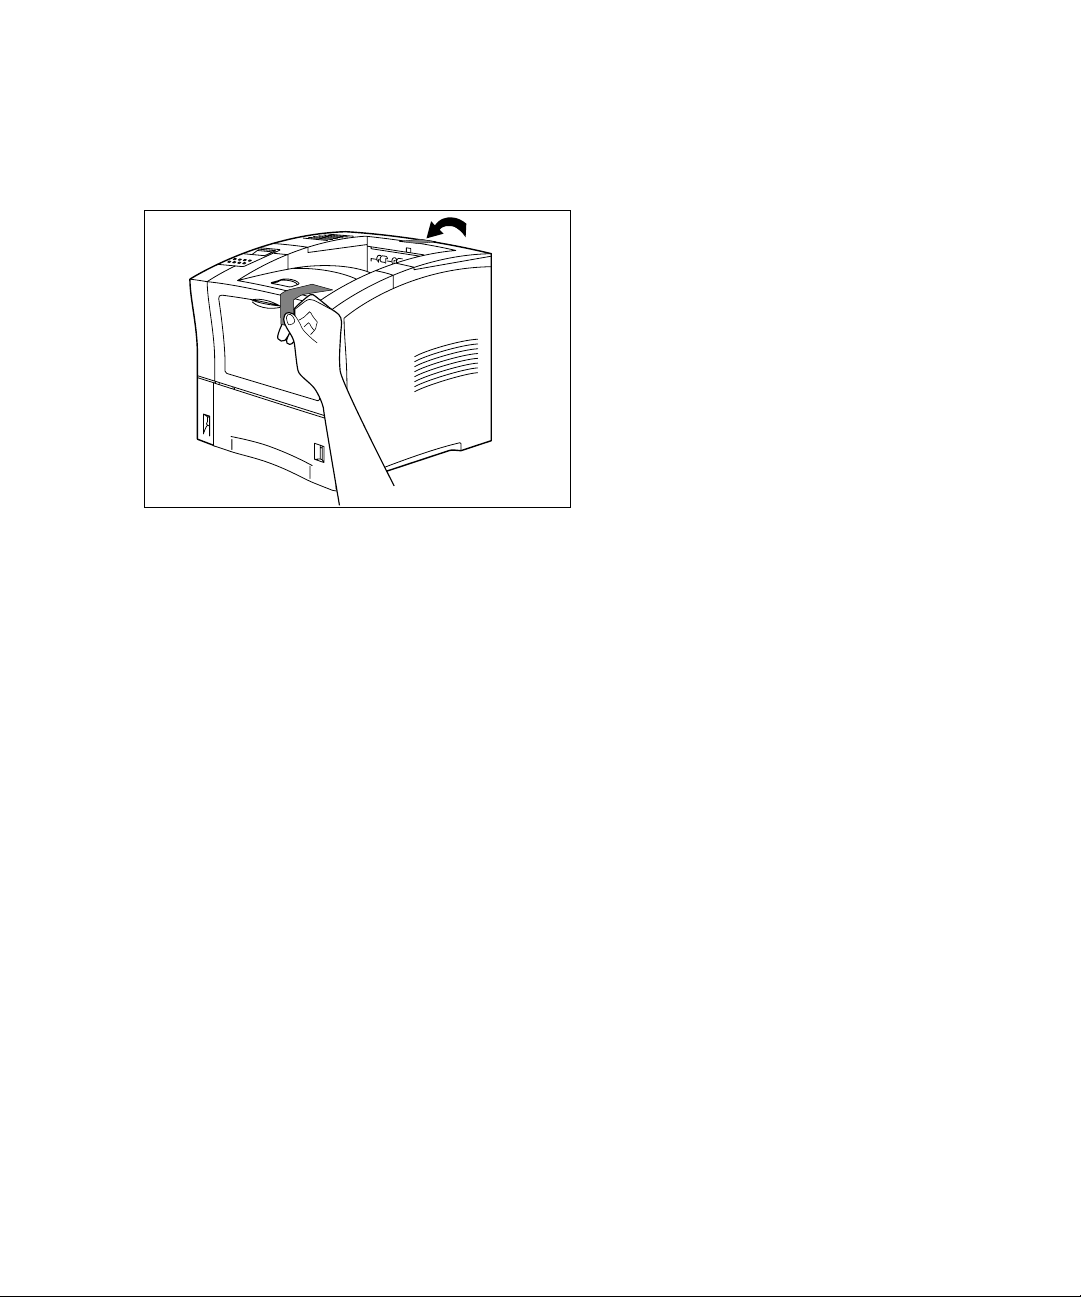
Step 5. Install Toner Cartridge
1. Press down on the release button at
the top of the printer to open the front
cover.
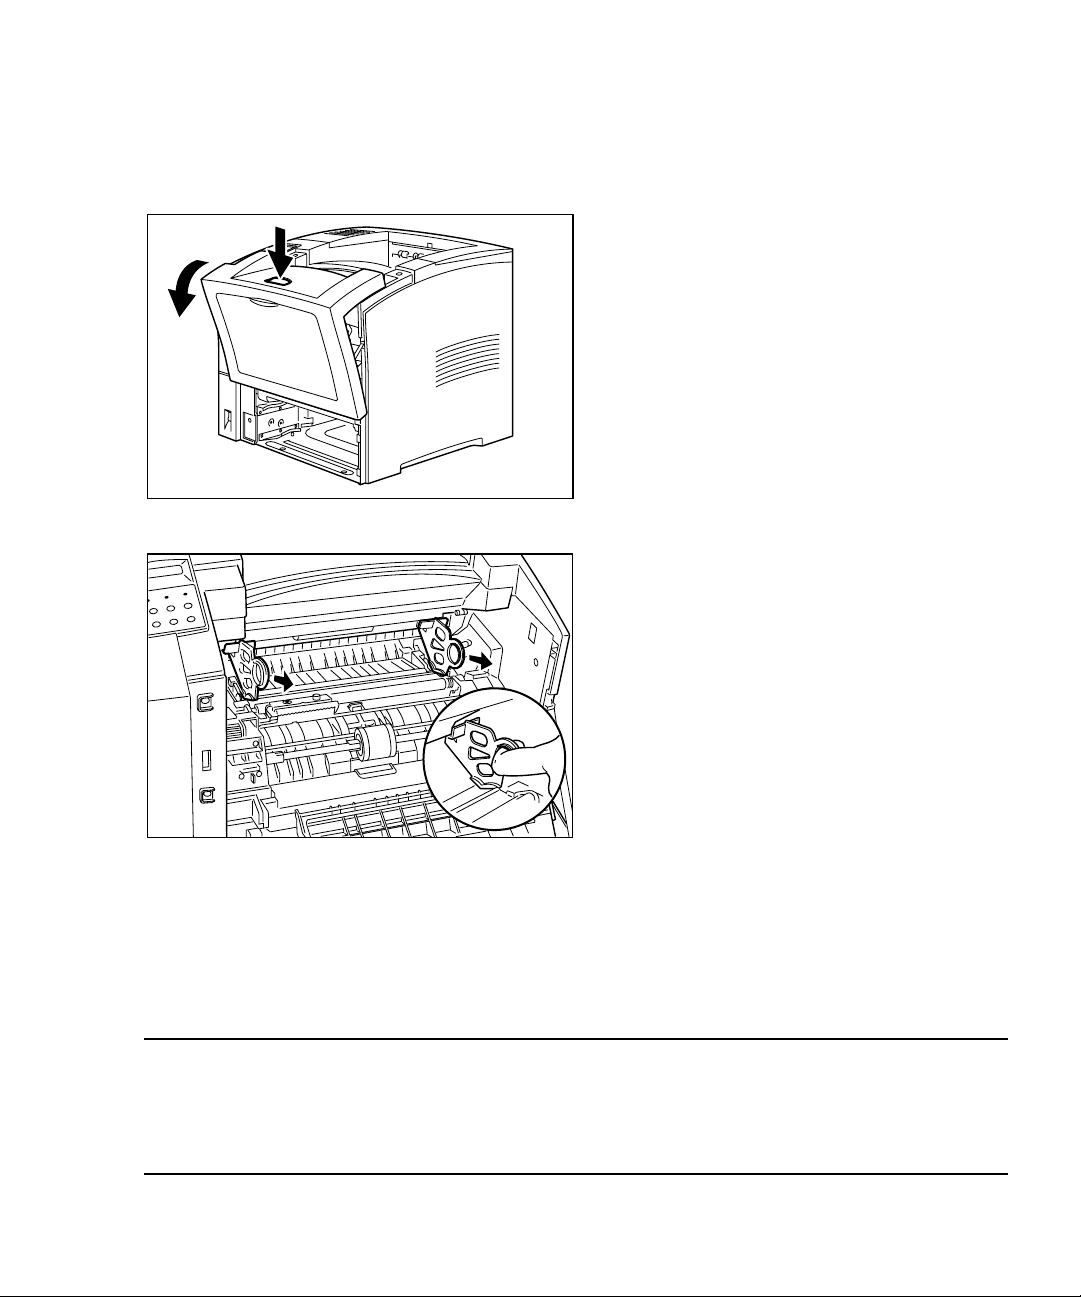
2. Remove the two orange plastic spacers
inserted in the printer by pulling them
out of the printer as shown.
Note:
The toner cartridge contains a microfine plastic powder that is fused to the paper
during the printing process. If toner spills onto your skin or clothing during installation,
wipe off with a dry cloth and rinse with cold water. Hot water can fuse the toner and
cause staining.
Page 13

10
3. Unwrap the toner cartridge and remove
the protective sheet of paper from
under the front flap of the cartridge.
Shake the cartridge from side to side
several times as shown to distribute
the toner.
4. Place the toner cartridge on a flat
surface and hold the cartridge securely
with one hand. Grasp and pull the
sealing tape straight out from the side
of the cartridge, as shown. Pulling the
tape out at an angle may cause it to
break.
Do not shake the cartridge or subject it
to shocks once the tape is removed, as
this may result in toner leakage.
5. Position the toner cartridge as shown.
Match up the tabs on the left and right
of the cartridge with the channels
within the printer. Gently slide the
cartridge into the printer as far as it
will go.
Page 14
11
6. Close the front cover. Press on the
center part of the front cover until the
cover locks securely.
Page 15
Smaller sizes can be fed through the Multipurpose feeder (Tray 1). The
standard paper tray will also handle up to 100 transparency or label
sheets in Letter or A4 size.
The standard paper tray holds up to 550 sheets of 20 lb. copier-type
paper. It can handle the following sizes of paper:
• Letter • Legal 13”• A4 • A5
• Executive • Legal 14”• B5
12
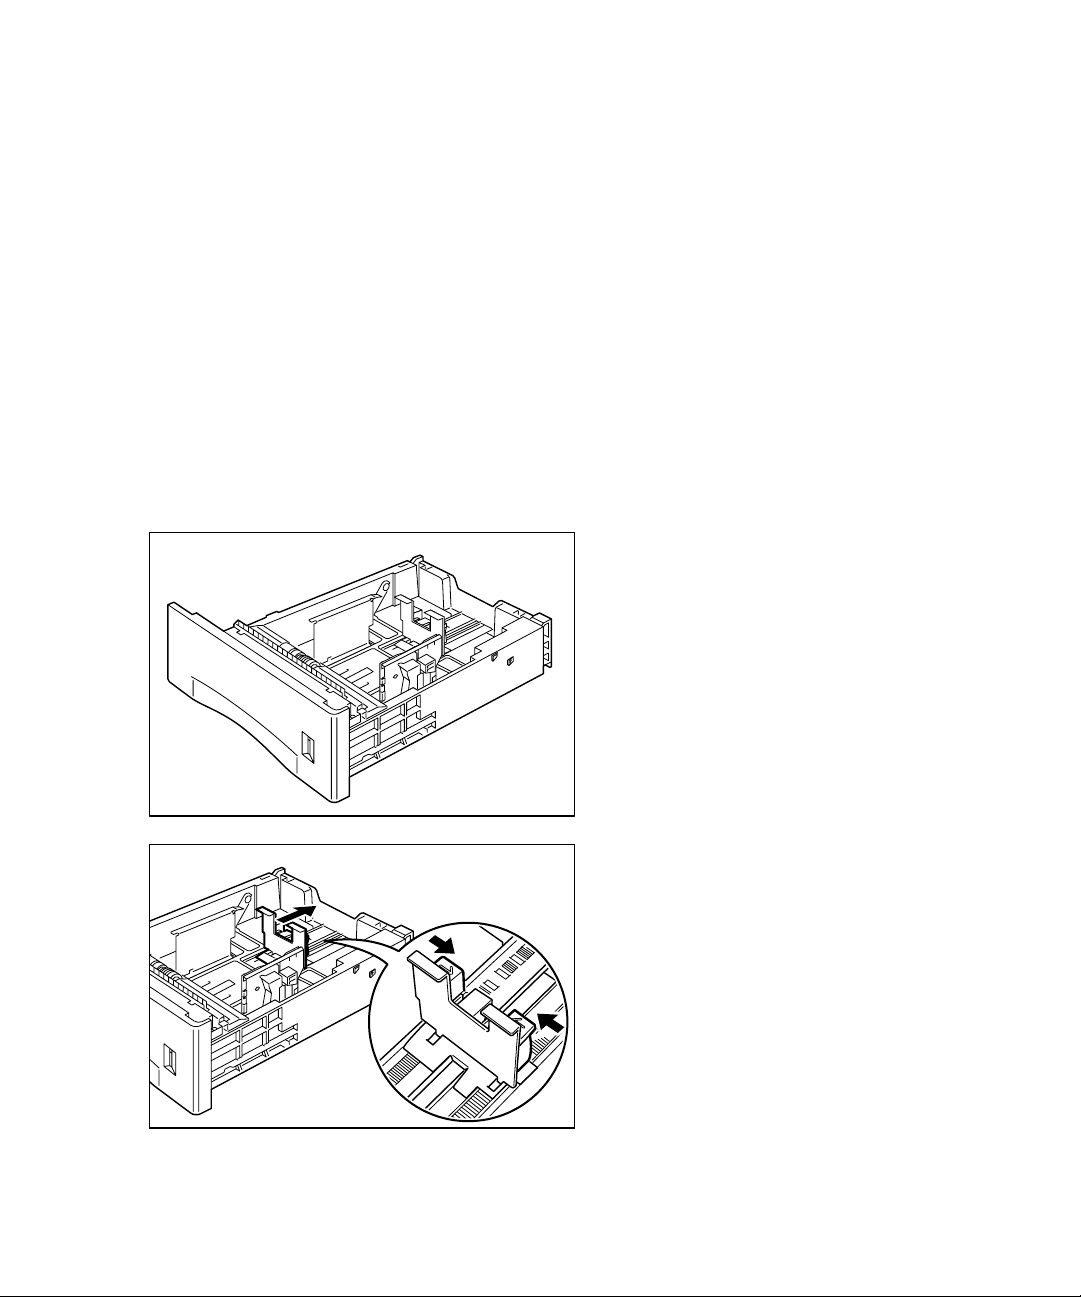
Step 6. Load Paper Tray
1. Place the paper tray on a desk or
other flat surface.
2. Squeeze the rear length guide tab as
shown and slide the tab all the way to
the back of the paper tray.
Page 16
13
3. For sizes larger than Letter/A4, press
down on the grey square at the bottom
of the tray. This will release the rear
section of the tray and the section can
be adjusted outward to extend the
tray’s length.
The rear section of the tray adjusts to
three different positions. Choose the
position that most closely matches the
paper size being loaded.
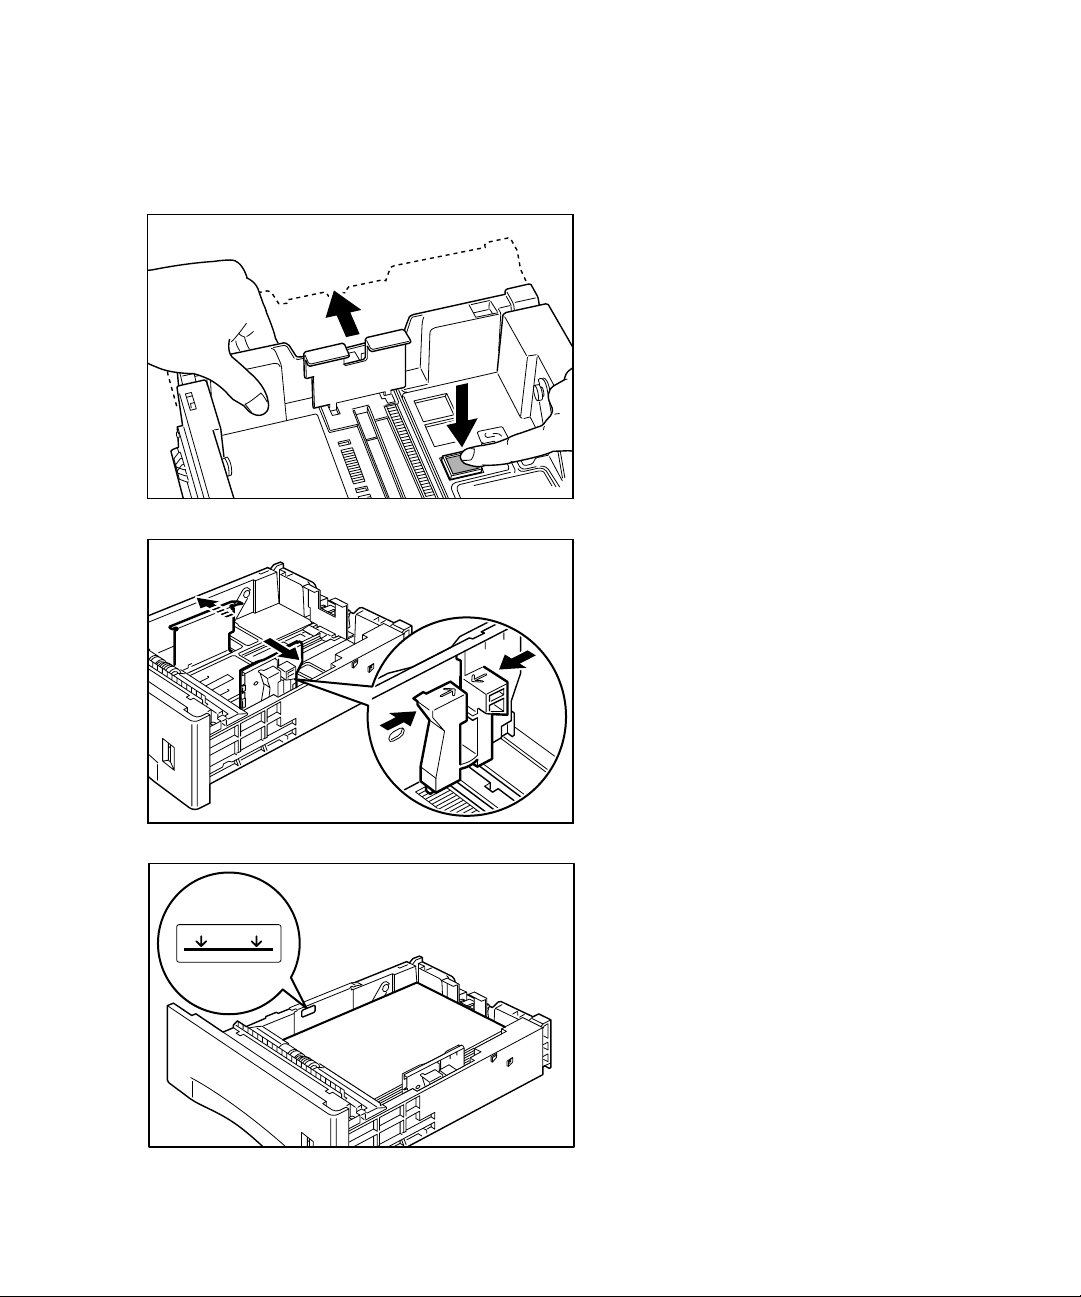
4. Squeeze the right side paper guide as
shown. Lift the guide slightly and slide it
all the way to the side of the tray.
5. Place the paper in the center of the
paper tray, being sure not to overfill the
tray. The paper should be placed in the
tray with the side to be printed on
facing down.
Page 17
14
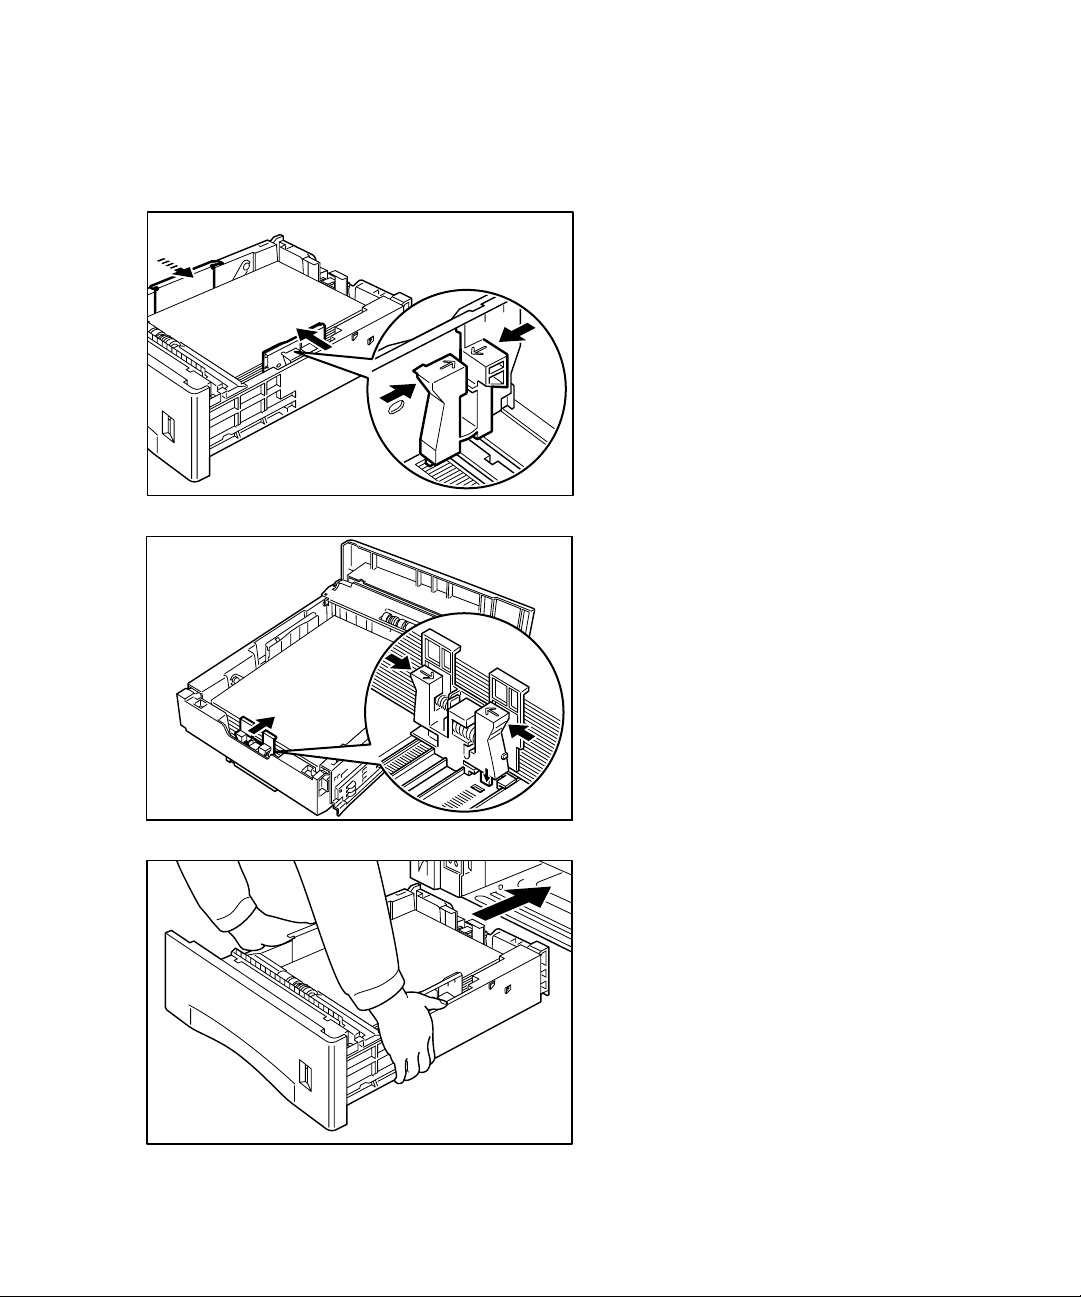
6. Squeeze the right side paper guide as
shown. Lift the guide slightly and slide it
towards the paper stack until it touches
the paper. Do not set the guide too
tightly against the paper stack, as this
could cause paper feed jams.
7. Squeeze the paper length guide at the
rear of the tray as shown. Lift the guide
slightly and slide it towards the paper
stack until the guide matches up with
the indentation in the bottom of the
paper tray which corresponds with the
paper size being used.
8. Grasp the paper tray with both hands
at the left and right, as shown.
Page 18
15
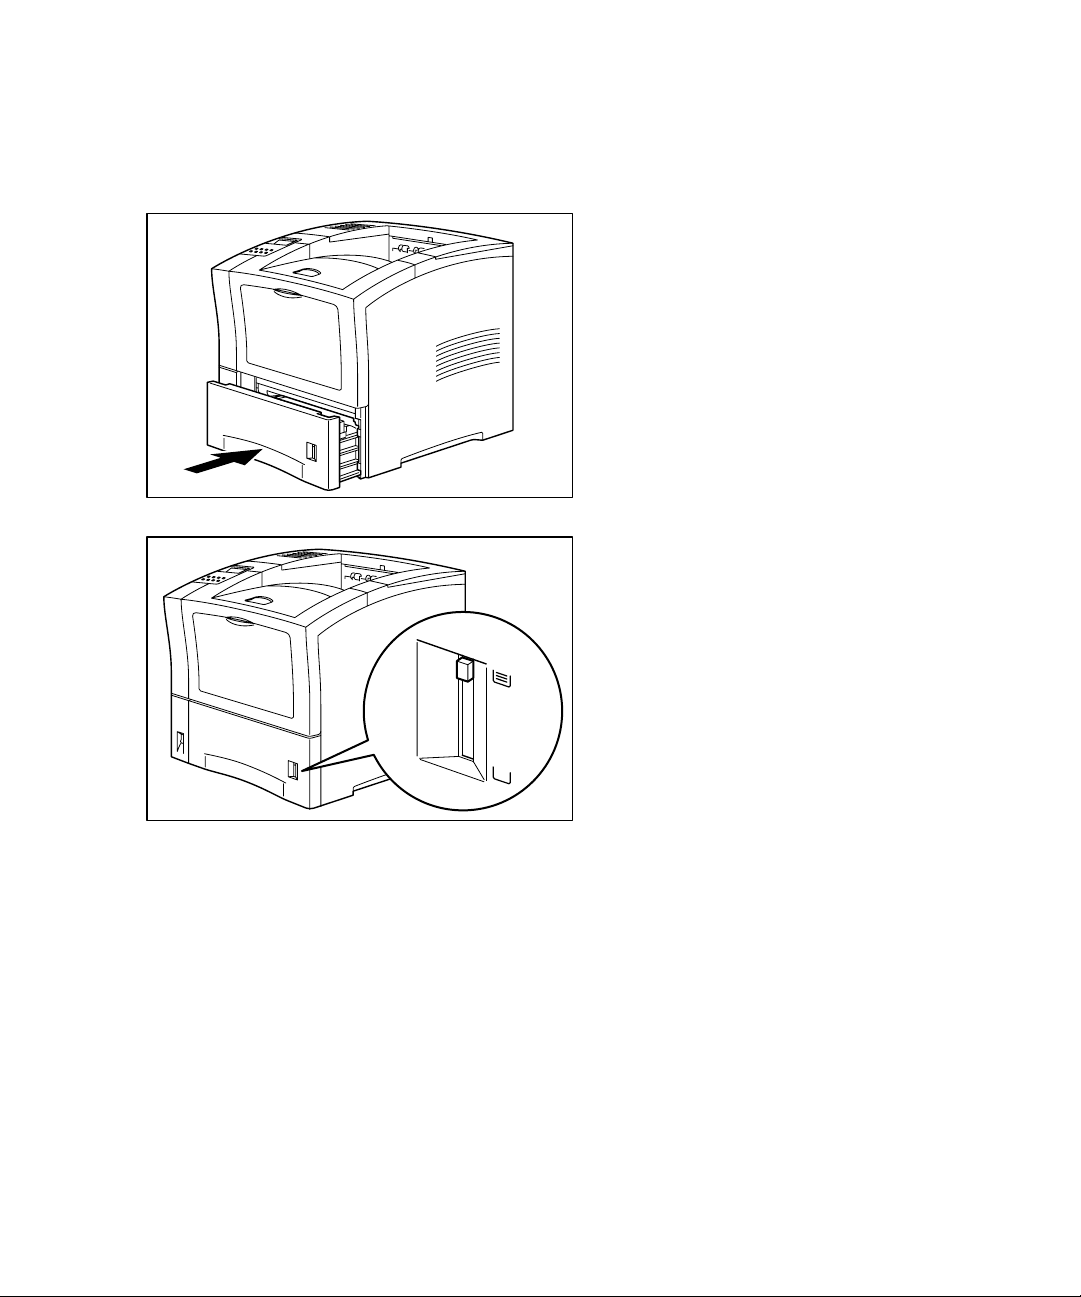
9. Gently slide the paper tray all the way
into the printer.
10.The paper level indicator on the front of
the tray will rise to show the remaining
level of paper in the tray. Replenish
paper as necessary.
Page 19

16
Connecting Cables Correctly
Most cables come with some kind of locking device to insure that the
connection is made. Be sure to use these locking devices, otherwise you
may experience intermittent errors or the printer will fail to operate
altogether.
• USB cables are keyed and can only be inserted one way.
• When you have inserted a Parallel port connector, lock the connector by lifting up
the wire clips at either end of the socket so that they fit into the slots on the
sides of the connector.
• Ethernet 10/100 BaseT connectors have a locking tab similar to connectors on
telephone cords. When the plug is fully inserted, the tab clicks into place.
• RS-232 Serial connectors have screws on either side that should be used to
secure the cable to the printer.
Improperly inserted cables are the cause of many networking and printerrelated problems.
Universal Serial Bus (USB) Connection
USB connection ports can be found on nearly all new computers. USB
technology allows faster communication than traditional serial connections
and is easily expandable through interconnected hubs. All USB cables are
the same. One end of the cable fits into the computer or hub only and the
other end fits into the printer only. You cannot connect the cable incorrectly.
Bi-directional Parallel Connection
The bi-directional parallel connection between the printer and a PC
requires a standard 36-pin bi-directional cable (to IEEE 1284 standards).
The length of this cable can be up to 6.5 feet (2 meters).
Step 7. Connect Printer Cables
Page 20

17
RS-232 Serial Connection
The RS-232 Serial connection between the printer and a PC requires
a standard 9-pin RS-232 cable. The length of this cable can be up to
50 feet (15.4 meters). Serial connections are slower than parallel or
Ethernet connections, therefore the RS-232 connection is only
recommended for users who require a cable connection greater than
6.5 feet and do not have access to an Ethernet network.
Ethernet Network Connection
The Ethernet interface on your printer lets you connect to an Ethernet
network via standard 10 BaseT or 100 BaseT cabling.
Page 21
18
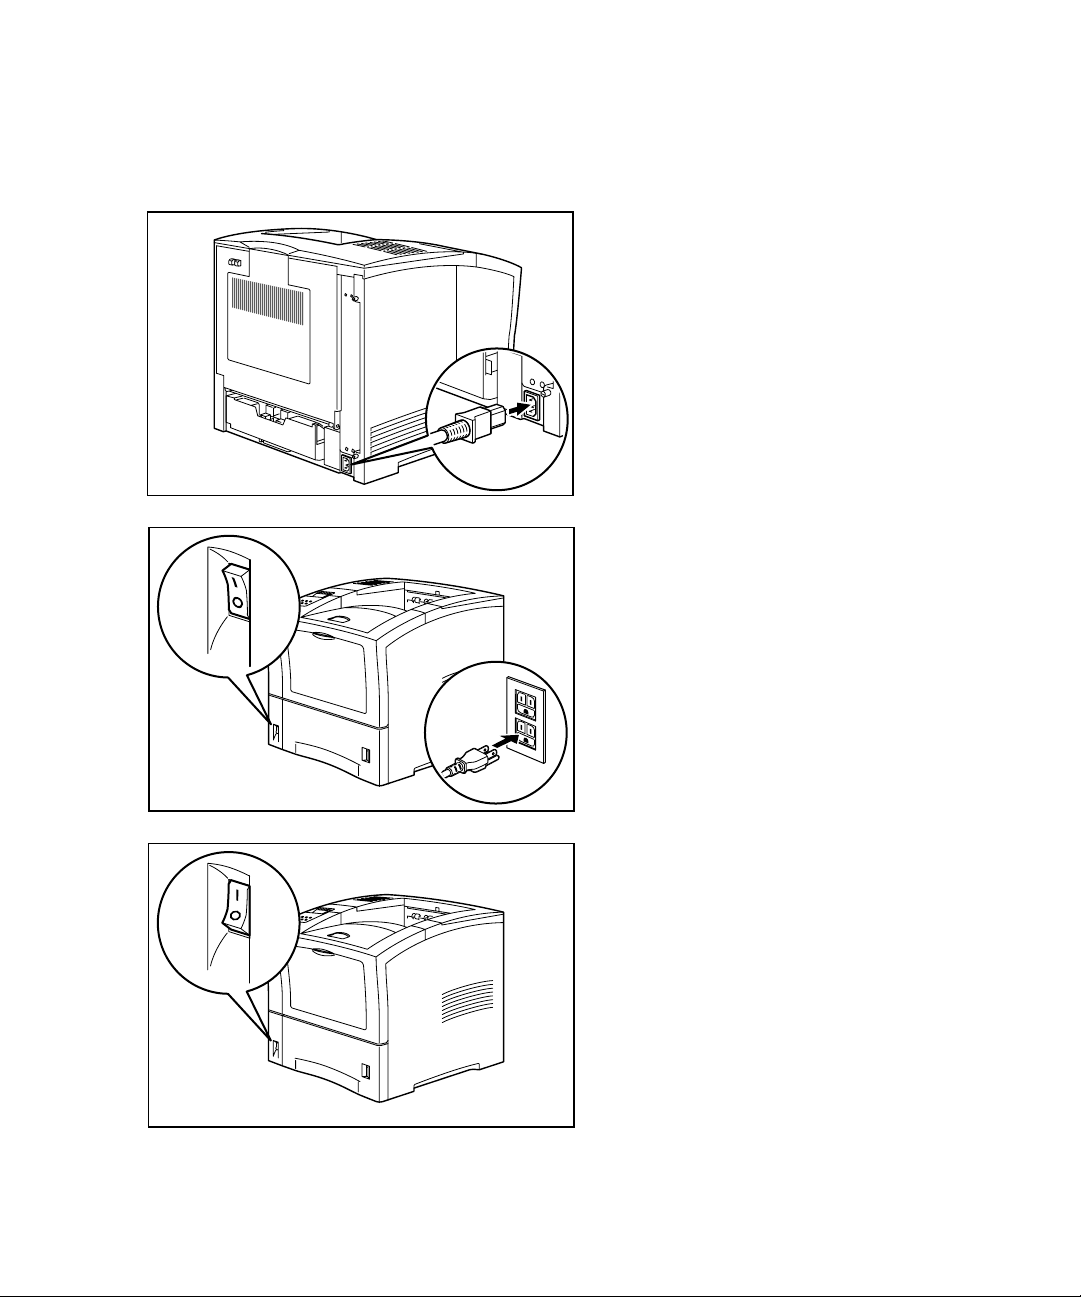
Step 8. Attach Power Cord
1. Insert the power cord into the AC
power connector on the back of the
printer as shown.
2. Check the power switch at the front of
the printer to confirm that it is in the
Off (O) position.
3. Plug the power cord into a grounded
wall outlet or power strip.
4. Switch the power switch to the On (I)
position. After the printer warms up,
the “Ready” message should be visible
on the control panel’s LCD display and
the Ready light will remain on.
Page 22

19
Step 9. Install Printing Software
Driver software for the printer must be installed on every computer that
will print to the unit. This section includes installation instructions for
Macintosh, Windows 95/98, Windows 2000 and Windows NT 4.0.
Page 23

20
Overview
You will need to set up your Macintosh computer to use the Elite 21
Series by installing the Elite 21 software for Macintosh. This software
is on the Elite 21 Series CD-ROM. The CD-ROM includes Apple
Laserwriter software version 8.6, customized PostScript Printer
Description (PPD) files for the Elite 21 Series and screen fonts for
each of the resident PostScript printer fonts.
This section details installation instructions for installing drivers for
Macintosh.
Important: Read the release notes contained in the Read Me First file
before installing the printer software. This file includes important lastminute feature and compatibility information about the Elite 21. This file
is located on the Elite 21 Series CD-ROM.
Step 9a. Install Macintosh Software
Page 24
21
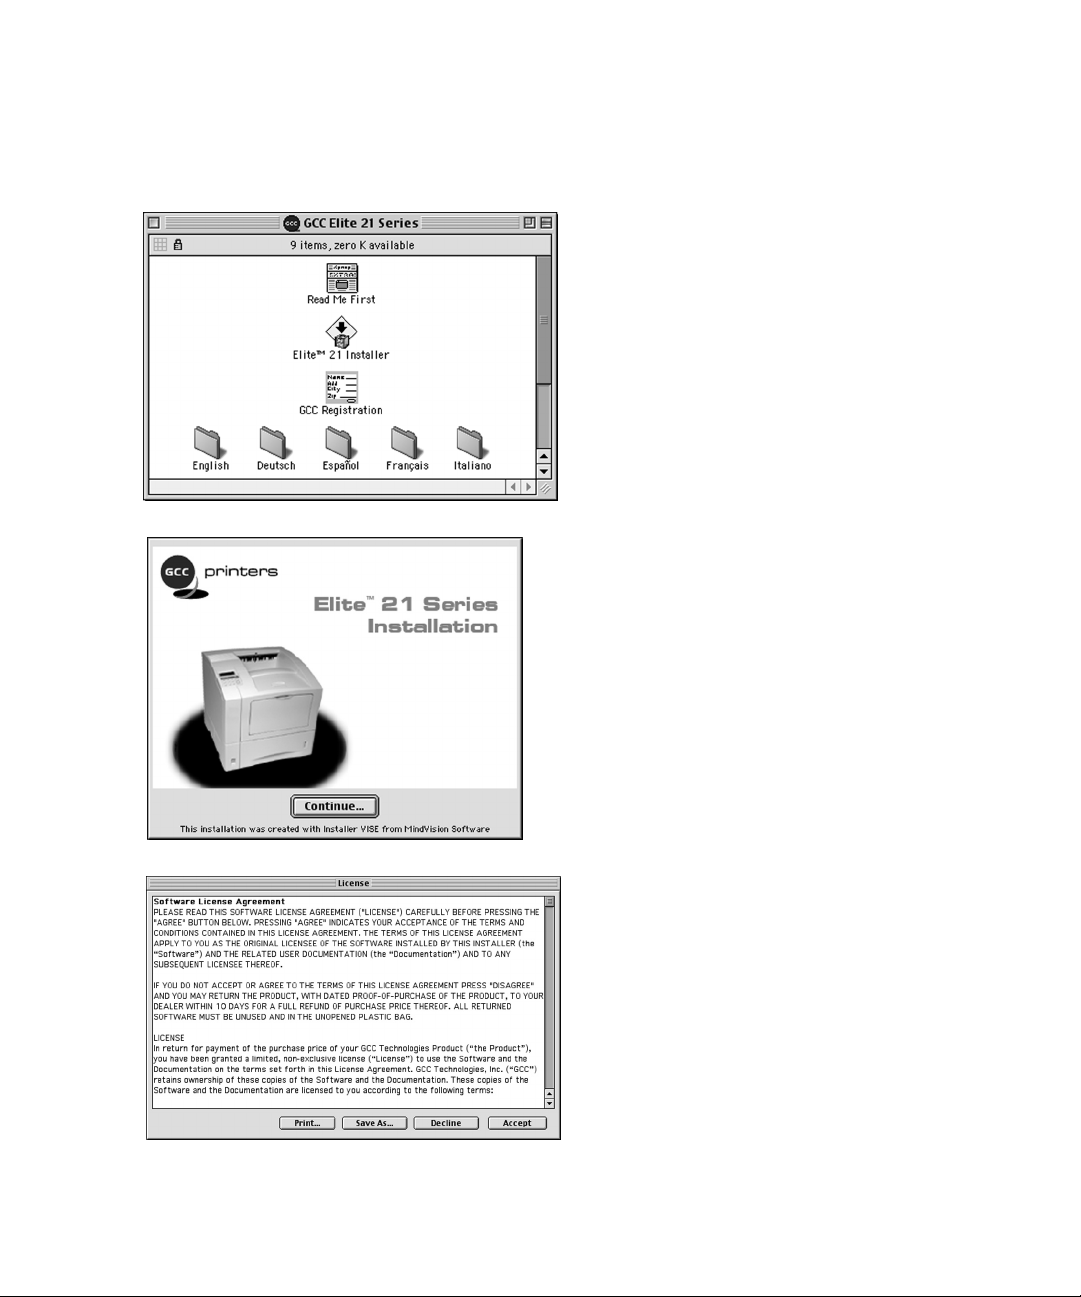
1. Insert the Elite 21 Series CD-ROM into
the computer and double-click the CD
icon to open the disk. Double-click the
“Elite 21 Installer” icon within the disk
window
2. An introduction screen marked “Elite
21 Series Installer” will appear.
Click OK.
3. The software license agreement will
appear. Read the agreement and click
Accept to accept its terms.
Part 1- Installing the GCC Printing Software and Fonts
Page 25
22
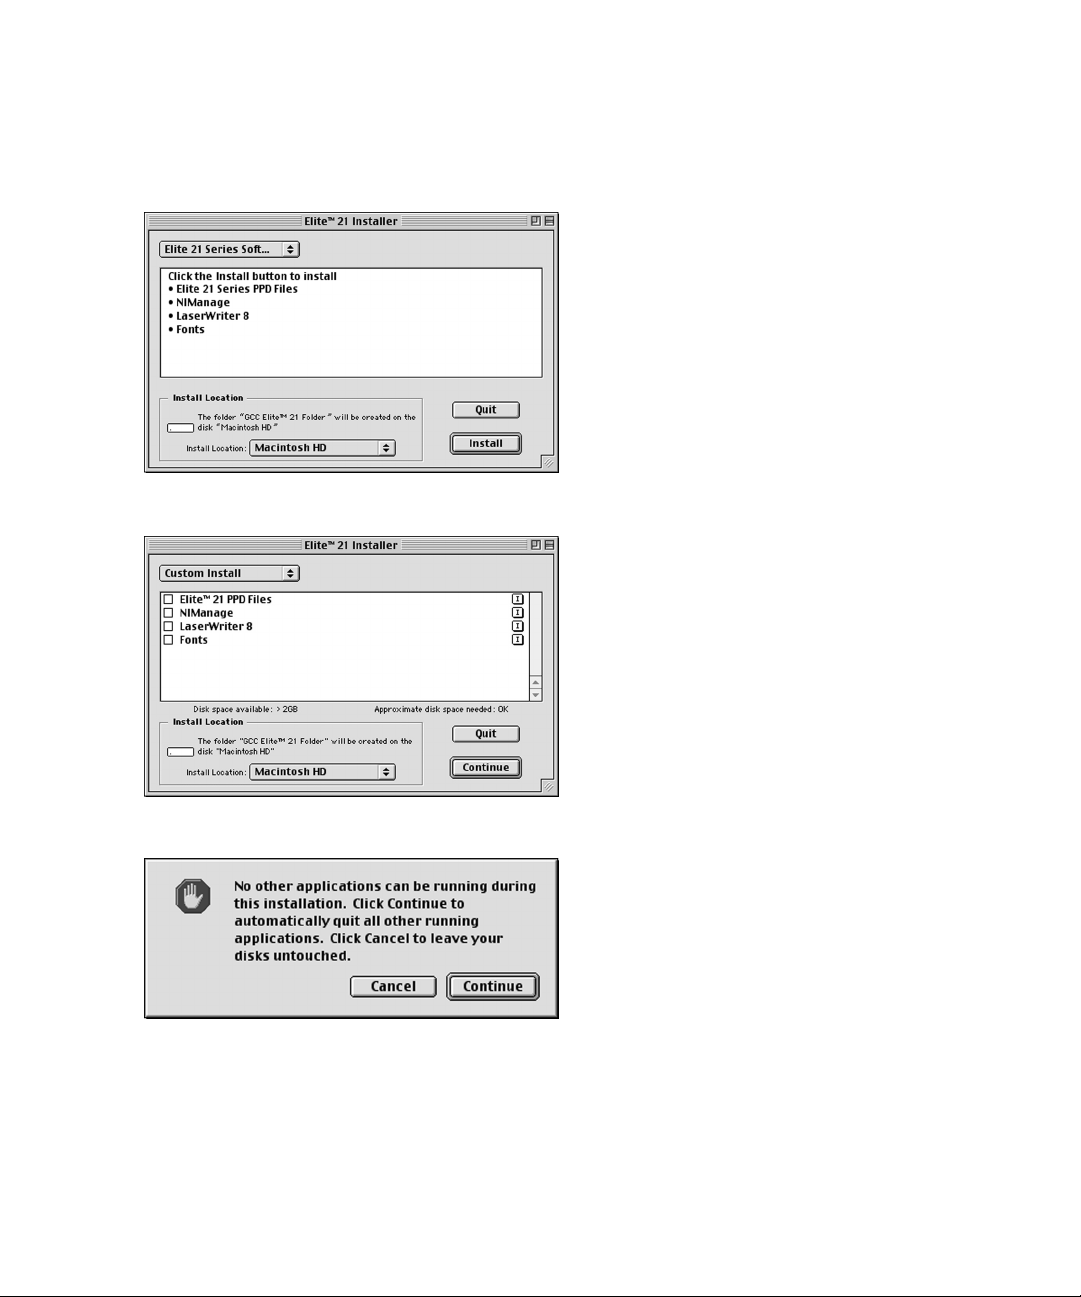
4. A window will appear listing the
components that will be installed and
asking for an Install Location. Choose
the disk that you wish to install the
software onto (the startup disk of the
Mac in most cases) and click Continue.
5. A Custom Install option is also available.
If you only wish to install certain
components of the printing software,
click on the Elite 21 Software pull-down
menu and select Custom Install. Select
the items you wish to install by clicking
on the check boxes next to them, and
click Continue.
6. A dialog box may appear informing you
that no other applications can be
running during the software installation.
Click Continue to quit any other
applications and continue with the
installation.
Page 26
23
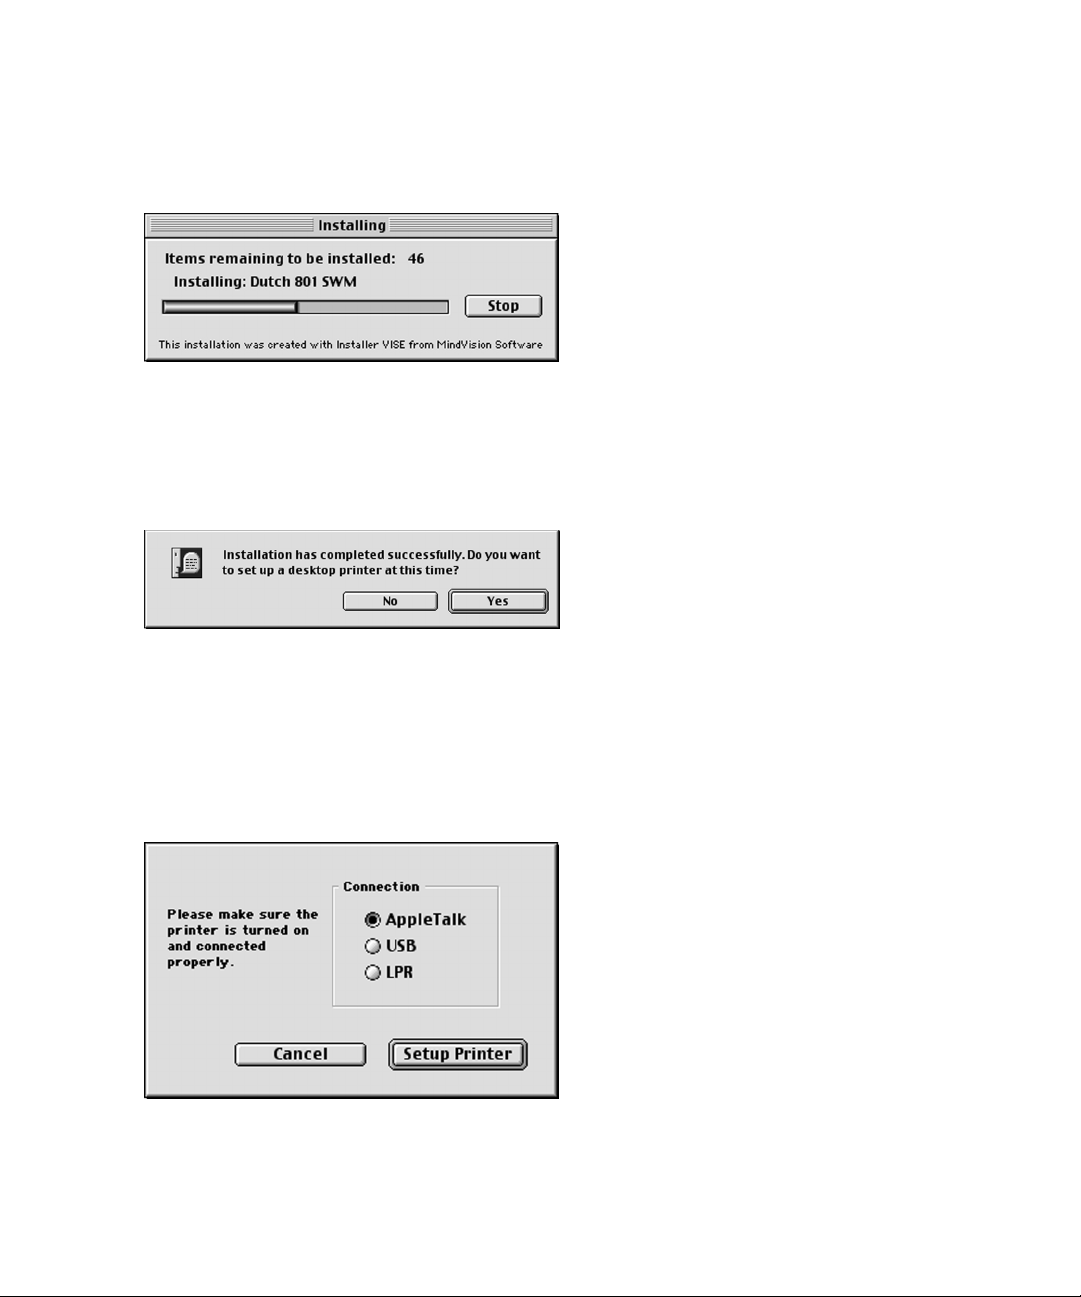
7. Installation of the files will begin. A
status window will appear showing the
progress of the installation.
8. When the installation is complete, a
dialog box will appear asking if you want
to setup a Desktop Printer. Click Yes to
setup the printer.
9. A dialog box asking how the printer is
connected will appear. Make sure the
printer is turned on and connected
properly. Select the connection method
being used for the printer (AppleTalk,
USB or LPR) and click Setup Printer.
Page 27

24
11.When the printer is setup, a Product
Registration screen will appear. You can
choose to register the printer over the
internet, which will access a
registration form via your web browser.
You can also select Other Registration
Method, which will allow for registration
via e-mail, fax or mail.
12.When the registration process is
complete, the installation will finish.
Click Restart to restart the Mac.
10. Clicking the “Setup Printer” button will open either Apple’s Desktop Printer Utility
(USB or LPR connections) or the Chooser (AppleTalk connections) in order to setup
the printer. Refer to the instructions for Creating a Desktop Printer, covered in
Step 2 of the Macintosh installation instructions in this guide as follows:
Connecting via USB: Step 2a, Page 25
Connecting via EtherTalk: Step 2b, Page 28
Connecting via LPR: Step 2c, Page 32
Page 28
25
Part 2a - Creating a Desktop Printer (via USB)
(Note: USB connection requires Mac OS 8.6 or higher)
1. Make sure that all steps in the
Hardware Setup section of this manual
have been followed. Follow the
Macintosh installation steps in Part 1
of this section. In Step 9, select “USB”
as the connection method and click
“Setup Printer.”
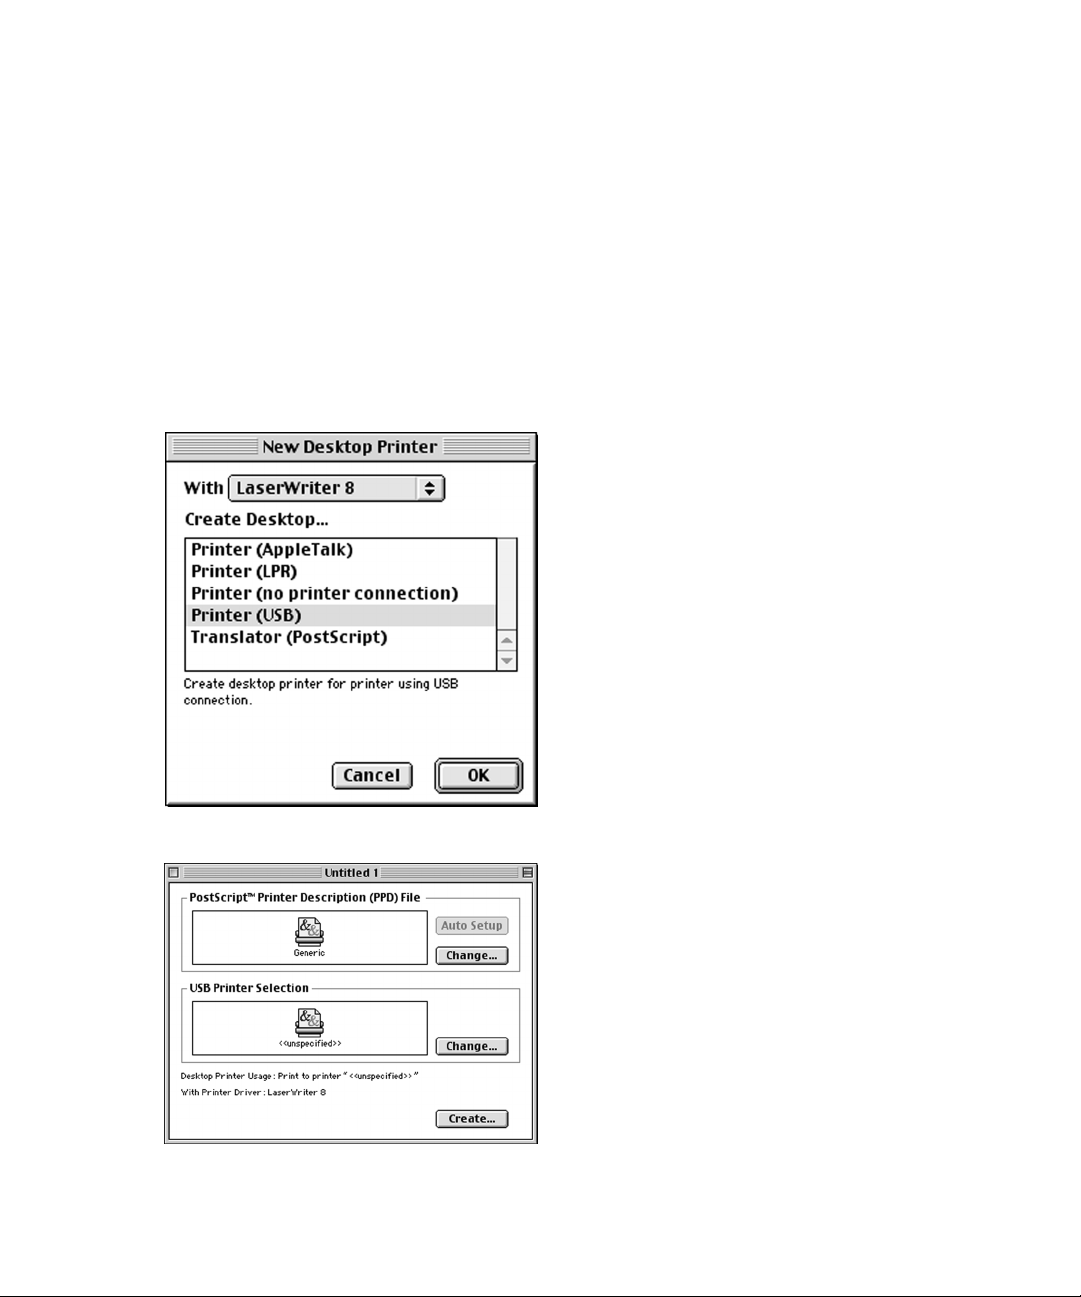
2. This will open up Apple’s Desktop
Printer Utility and the “New Desktop
Printer” dialog box will appear.
Highlight “Printer (USB)” from this list
and click OK.
3. A dialog box called “Untitled 1” opens,
containing two printer icons. Doubleclick the bottom icon, in the “USB
Printer Selection” box.
Page 29
26
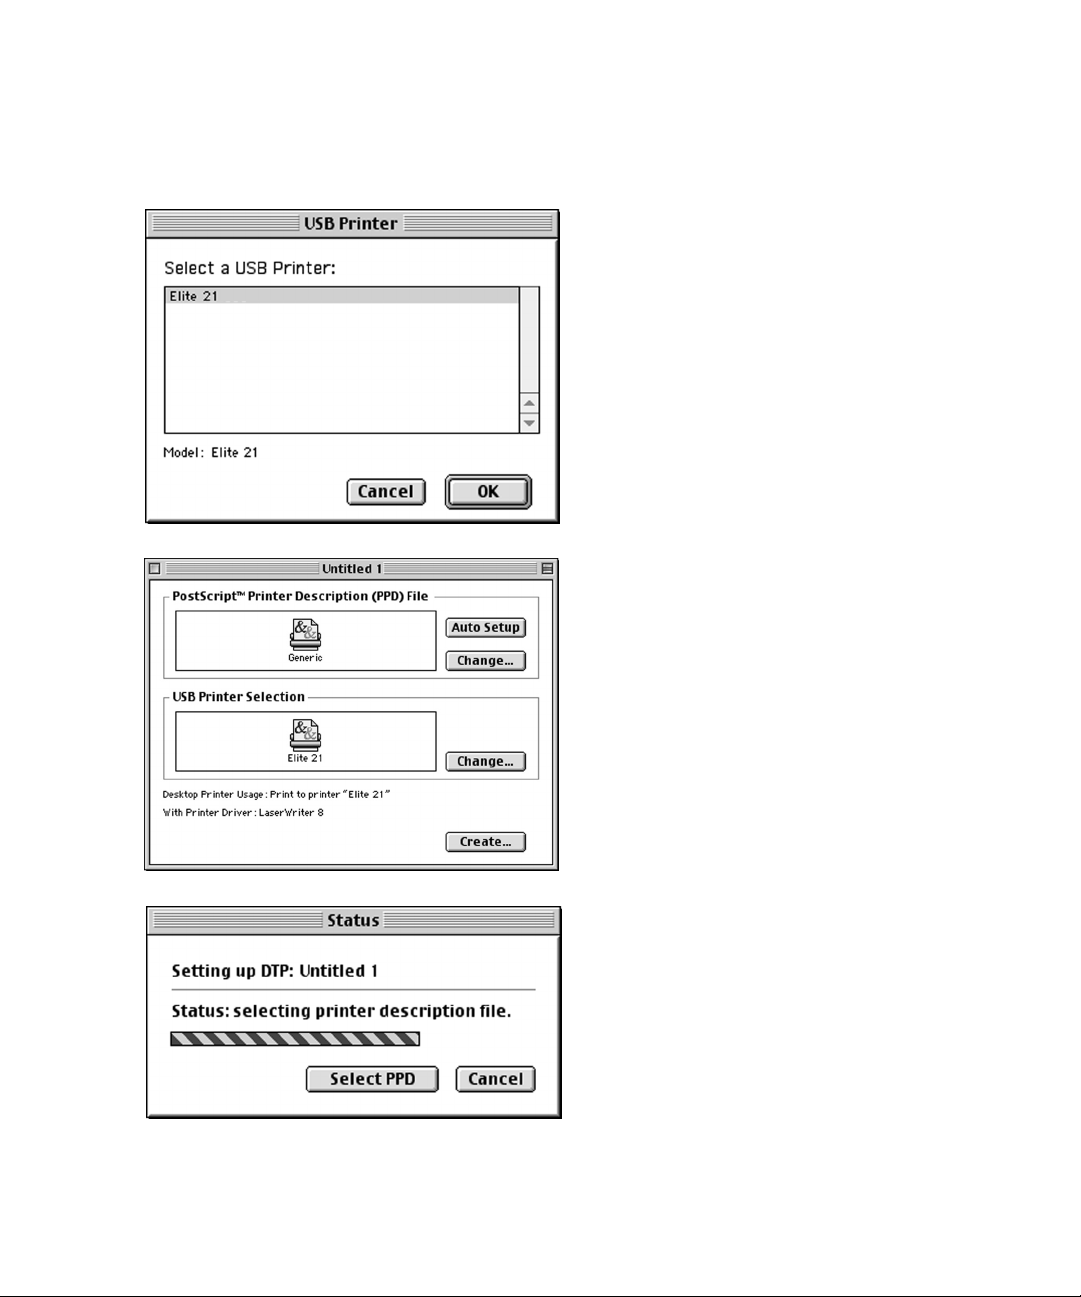
4. The “USB Printer” dialog box will
appear. Click on your printer model
from the list, then click OK.
5. The “Untitled 1” dialog box will return.
Click on the Auto Setup button at the
top right of the box.
6. A status window appears, showing the
progress of the installation.
Page 30

27
7. The “Untitled 1” dialog box returns
again. The icon in the “PostScript
Printer Description (PPD) File” box now
shows your printer.
Click Create to create the new desktop
printer.
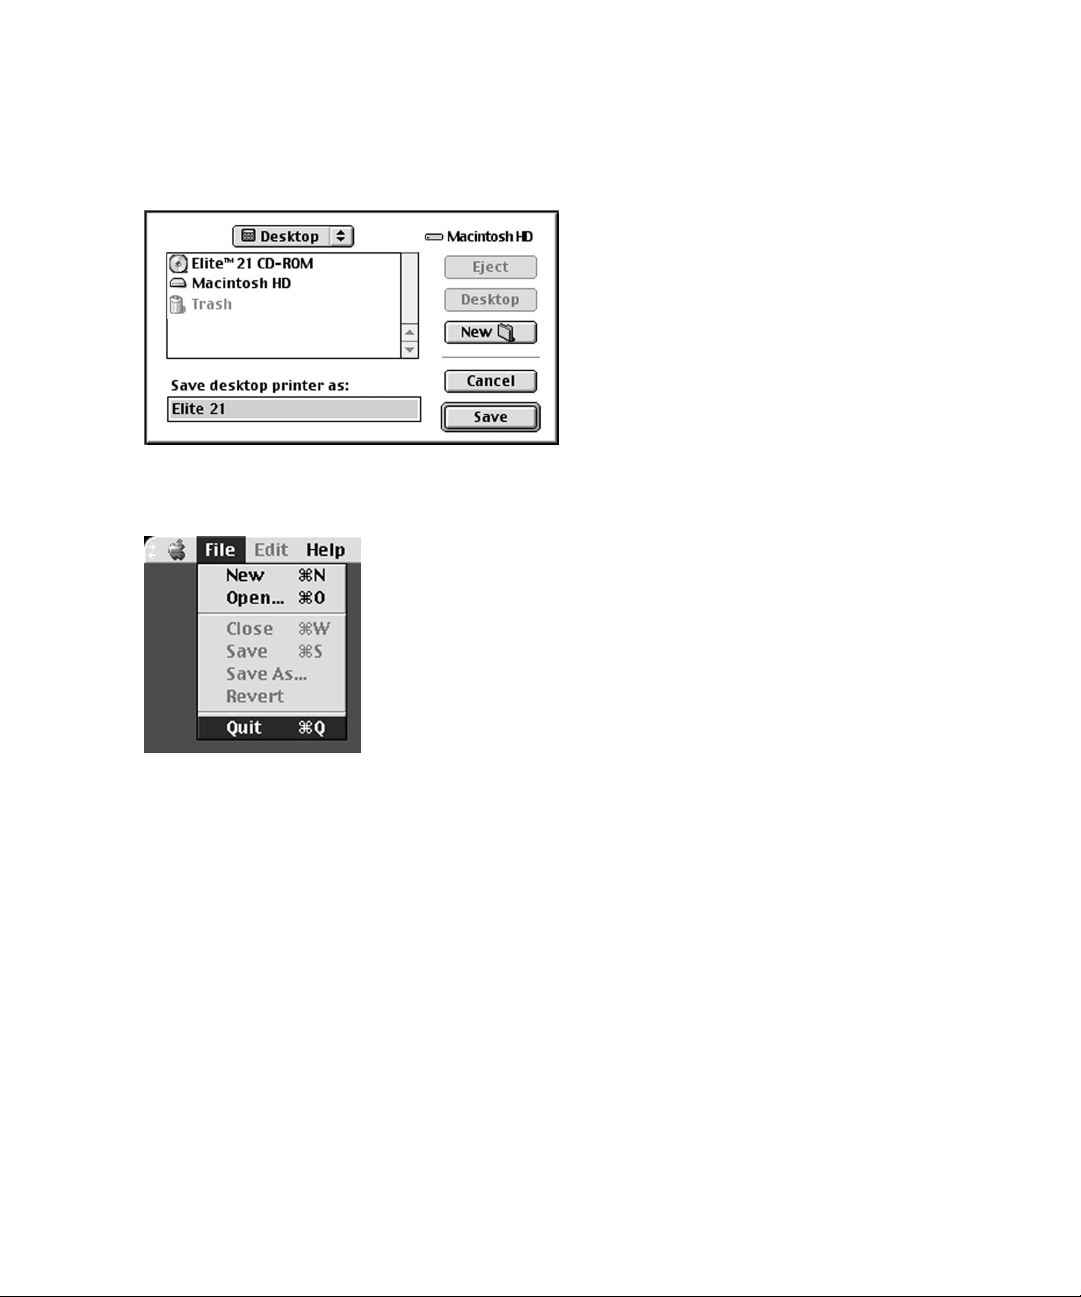
8. A Save dialog box opens, asking you to
save the desktop printer. Type in a
name for the desktop printer, or leave
the default name. Click Save.
A new Desktop Printer icon will appear
on the desktop with the name that you
assigned.
9. Go to File and Quit to exit the Desktop
Printer Utility. The printer is selected
and ready to print.
The GCC Product Registration utility will
run after the printer is setup. Please
follow the registration instructions to
register your printer.
Page 31

28
Part 2b - Creating a Desktop Printer (via EtherTalk)
1. Confirm that the Macintosh is properly
configured to communicate over
EtherTalk. Go to the Apple menu, then
to Control Panels and to AppleTalk. In
the AppleTalk window, confirm that the
“Connect via:” selection is set to
Ethernet. Close the control panel. Click
Save if prompted to save settings.
2. Make sure that all steps in the
Hardware Setup section of this manual
have been followed. Follow the
Macintosh installation steps in Part 1
of this section. In Step 9, select
“AppleTalk” as the connection method
and click “Setup Printer.”
Due to potential incompatibilities between Apple’s Desktop Printer Utility and certain
AppleTalk networks, GCC does not recommend using the Apple Desktop Printer Utility to
set up the Elite 21 series printer over EtherTalk. As a result, the Elite 21 Series
software uses the Chooser to set up the printer over EtherTalk rather than the Desktop
Printer Utility. Follow these steps to setup your printer over an EtherTalk connection.
Page 32
29
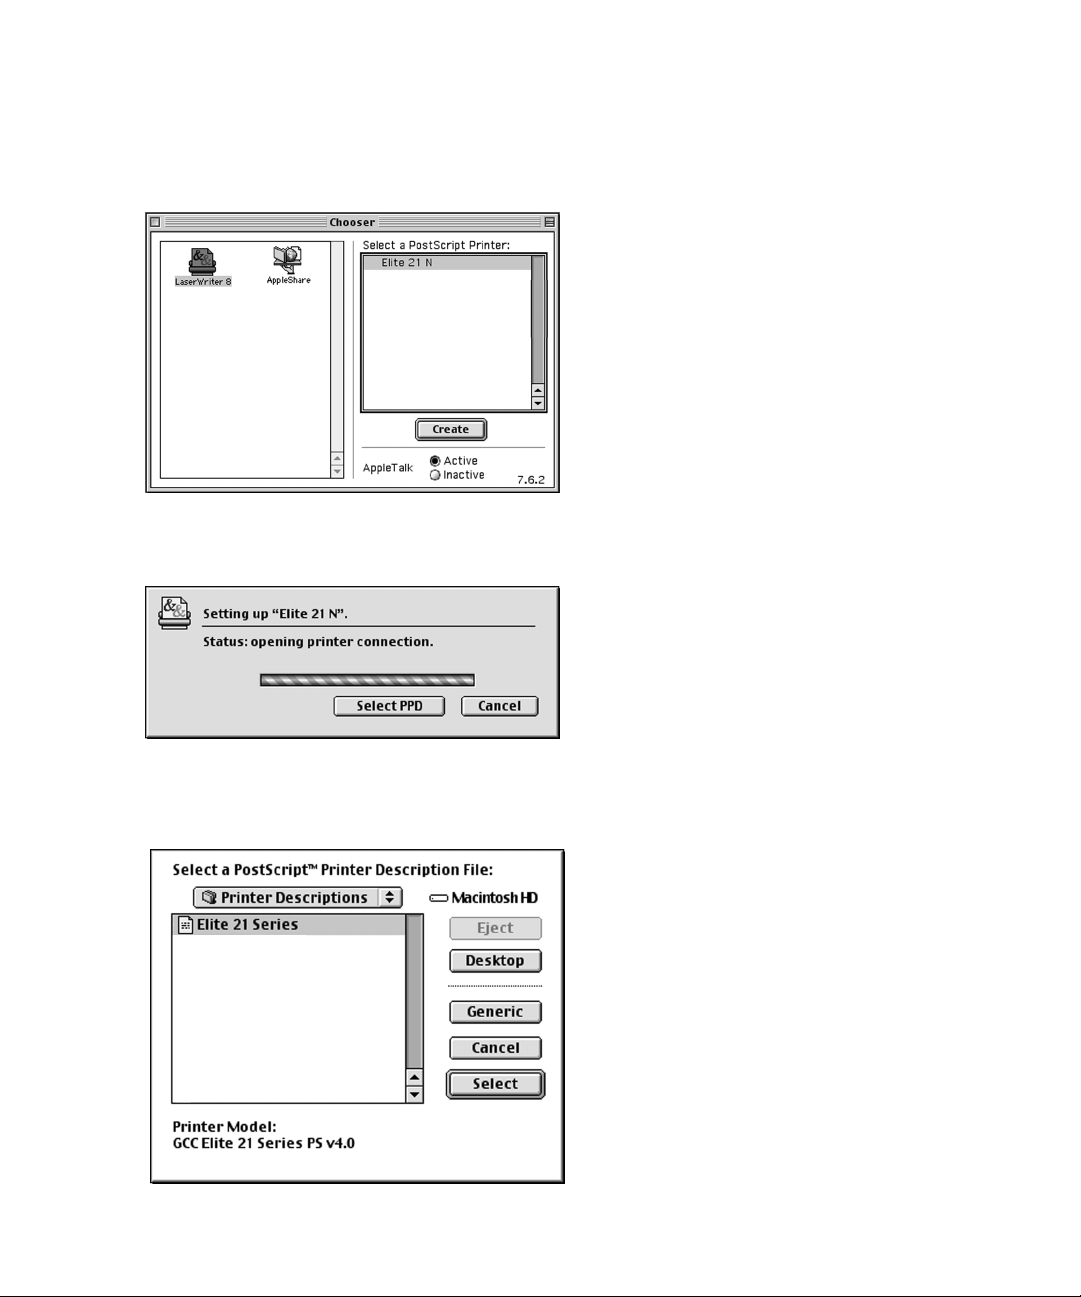
3. This will open up the Chooser window.
Click on the LaserWriter 8 icon in the
lefthand Chooser window. A list of
AppleTalk compatible printers will
appear on the right. Click on the name
of your printer from the list. The default
printer name will be the same as the
model name of the printer (i.e., “Elite
21
N”.) Click “Create.”
4. The Chooser will open a connection to
the printer and attempt to select the
proper PPD file for the printer.
5. A “Select a PostScript Printer
Description File” dialog may appear.
Click on “Elite 21 Series” from this list
and click “Select.”
Page 33
30
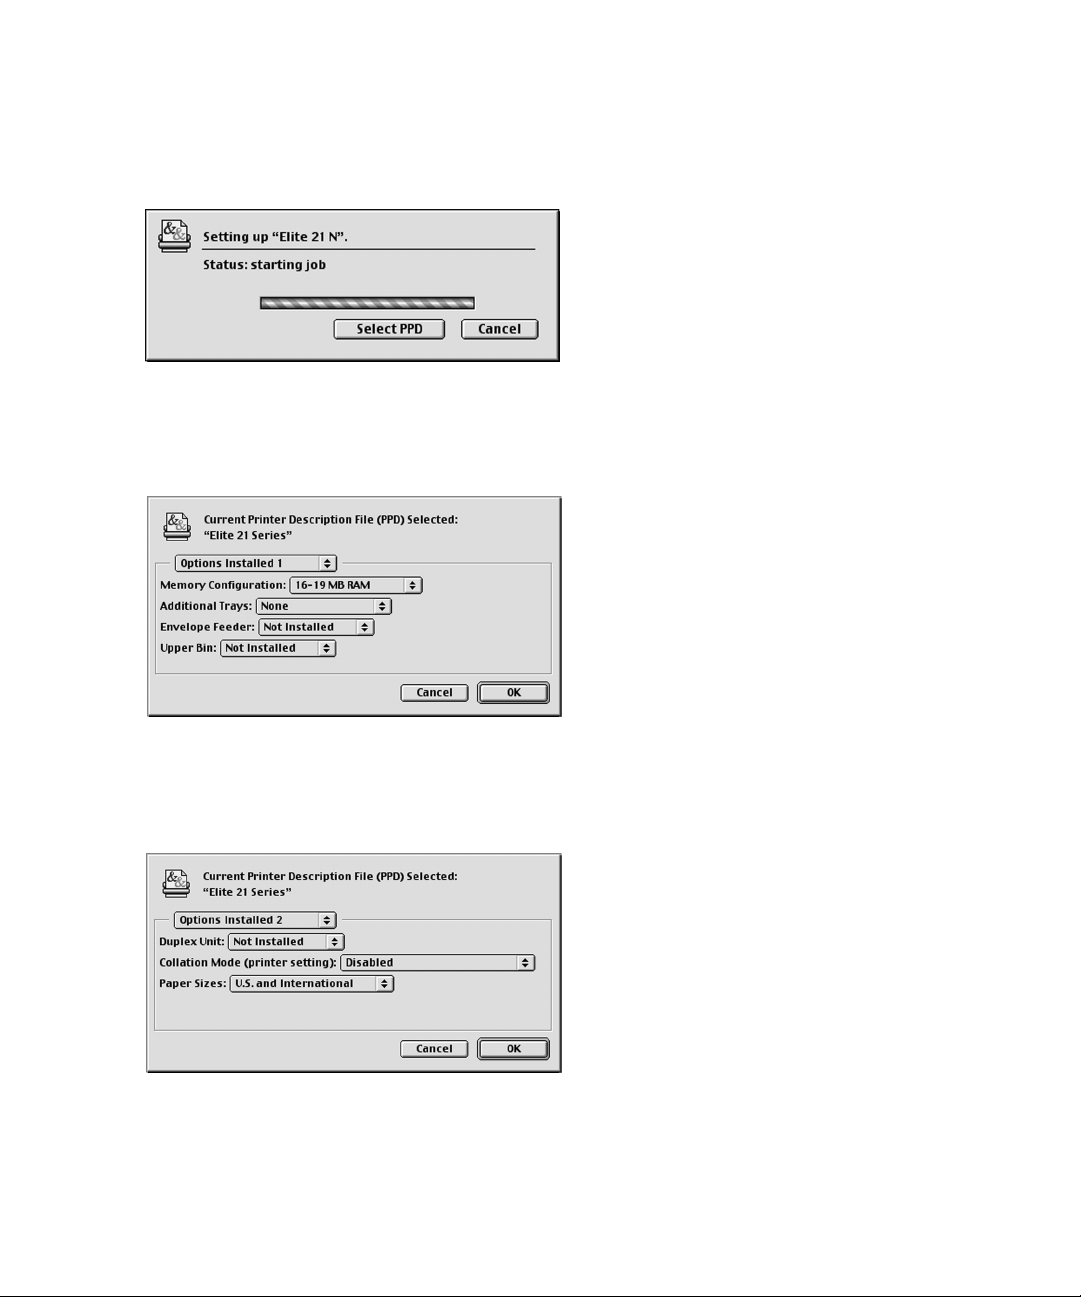
6. The Setup process will continue. A
status bar will show the progress of the
setup.
7. A window will appear asking for any
options on the printer to be configured.
The first page of options sets the
Memory Configuration, Additional Trays,
Envelope Feeder and Upper Bin status.
Set these items using the pull-down
menus and then click on the “Options
Installed 1” pull-down menu. Pull down
to “Options Installed 2.”
8. The second window of options contains
settings for Duplex Unit, Collation Mode
and Paper Sizes. Set these items using
the pull-down menus, then click OK to
continue.
Page 34

31
9. The setup will finish. A status window
will indicate that a Desktop Printer is
being built.
10.When complete, a Desktop Printer icon
for the Elite 21 will appear on the
Mac’s desktop. The setup is now
complete.
If this is the only printer installed on the
Mac, it will appear with a bold outline
around it, indicating that this is the
default printer for the computer. You
can set the printer as the default by
clicking once on the Desktop Printer
icon to highlight it, then going up to the
Printing menu at the top of the screen
and selecting “Set Default Printer.”
The GCC Product Registration utility will
run after the printer is setup. Please
follow the registration instructions to
register your printer.
Page 35
32
Part 2c - Creating a Desktop Printer (via LPR)
(Note: LPR connection requires a PowerPC-based Mac and LaserWriter 8.5.1 or higher)
1. Make sure that all steps in the
Hardware Setup section of this manual
have been followed. Follow the
Macintosh installation steps in Part 1
of this section. In Step 9, select “LPR”
as the connection method and click
“Setup Printer.”
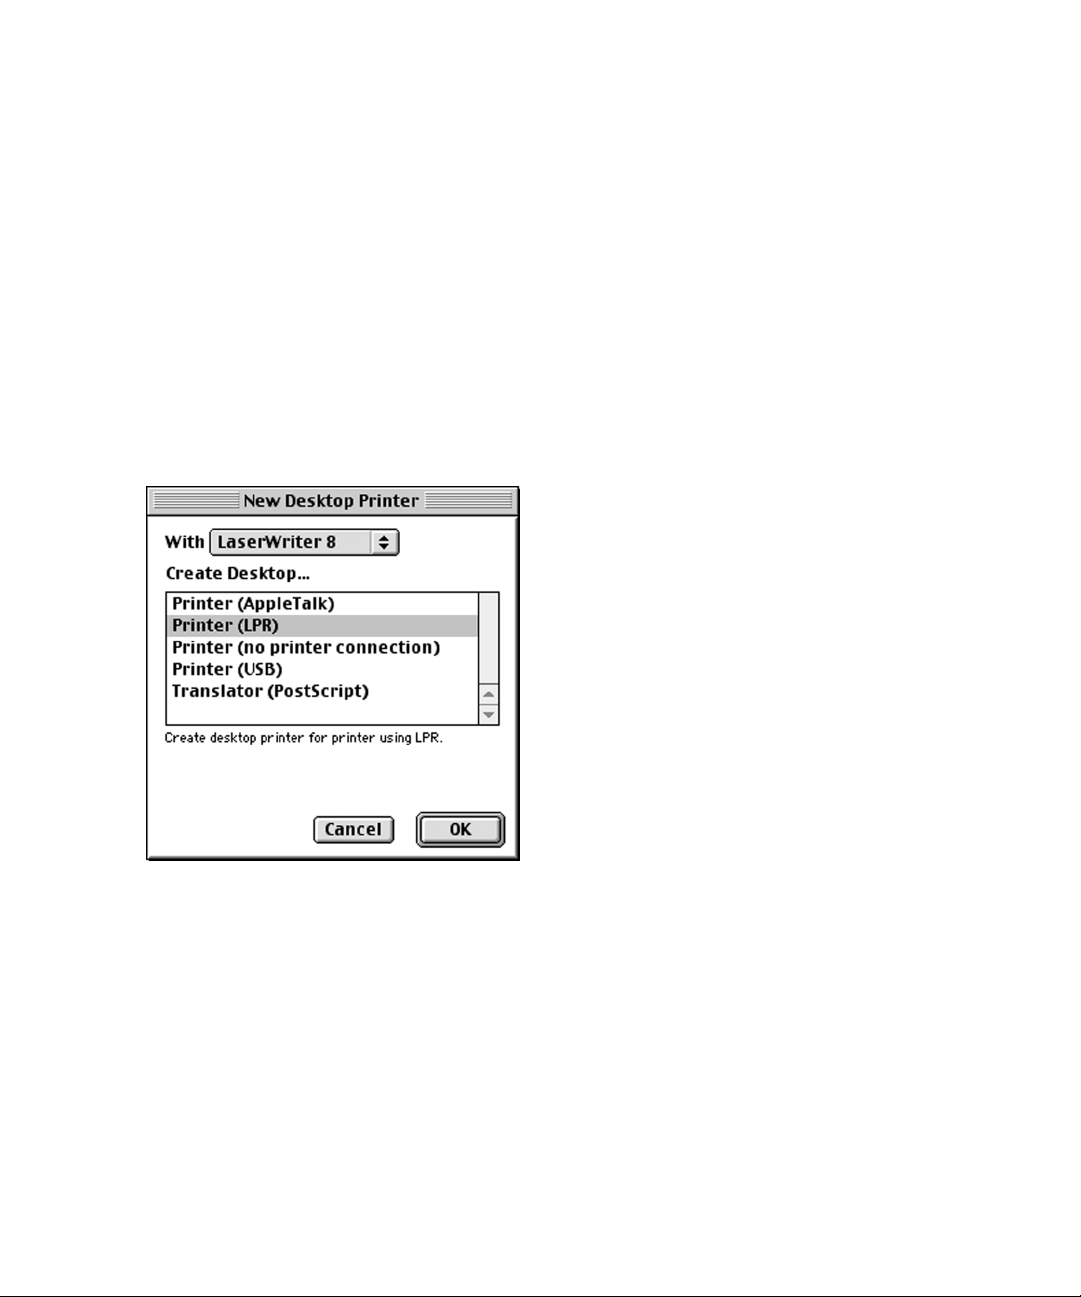
2. This will open up Apple’s Desktop
Printer Utility and the “New Desktop
Printer” dialog will appear.
Highlight “Printer (LPR)” from this list
and click OK.
Page 36
33
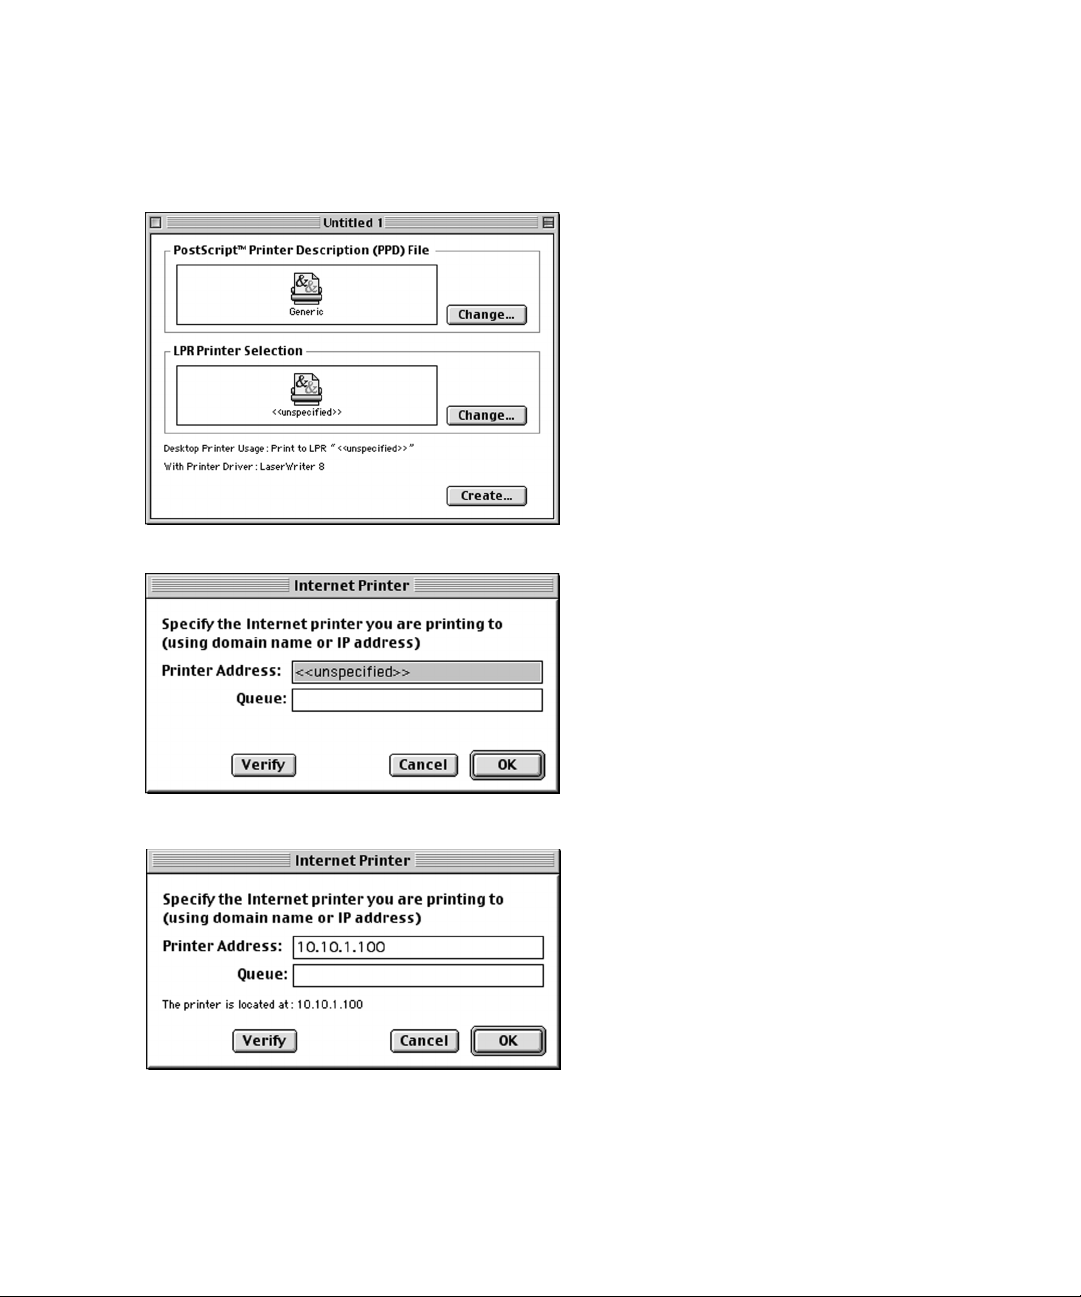
3. A dialog box called “Untitled 1” opens,
containing two printer icons. Doubleclick the bottom icon, in the “LPR
Printer Selection” box.
4. A dialog box called “Internet Printer”
appears. Enter the printer’s IP address
in the “Printer Address” field. If the
printer has not been assigned an IP
address, assign one following the
directions in Chapter 7 of the Elite 21
User’s Manual (Networking the Elite 21
Printer) on the printer’s CD-ROM.
If a Queue name is being used, enter it
in the “Queue” field.
5. After entering the IP address and
Queue (if needed), click Verify. If the
printer is configured and the IP Address
is correct, a message will appear that
the printer is located at the IP address
you specified. If not, a message will
appear that the printer cannot be
verified. In this case, check the
connection and the IP address entered
and try again. Click OK when the printer
is successfully verified.
Page 37
34
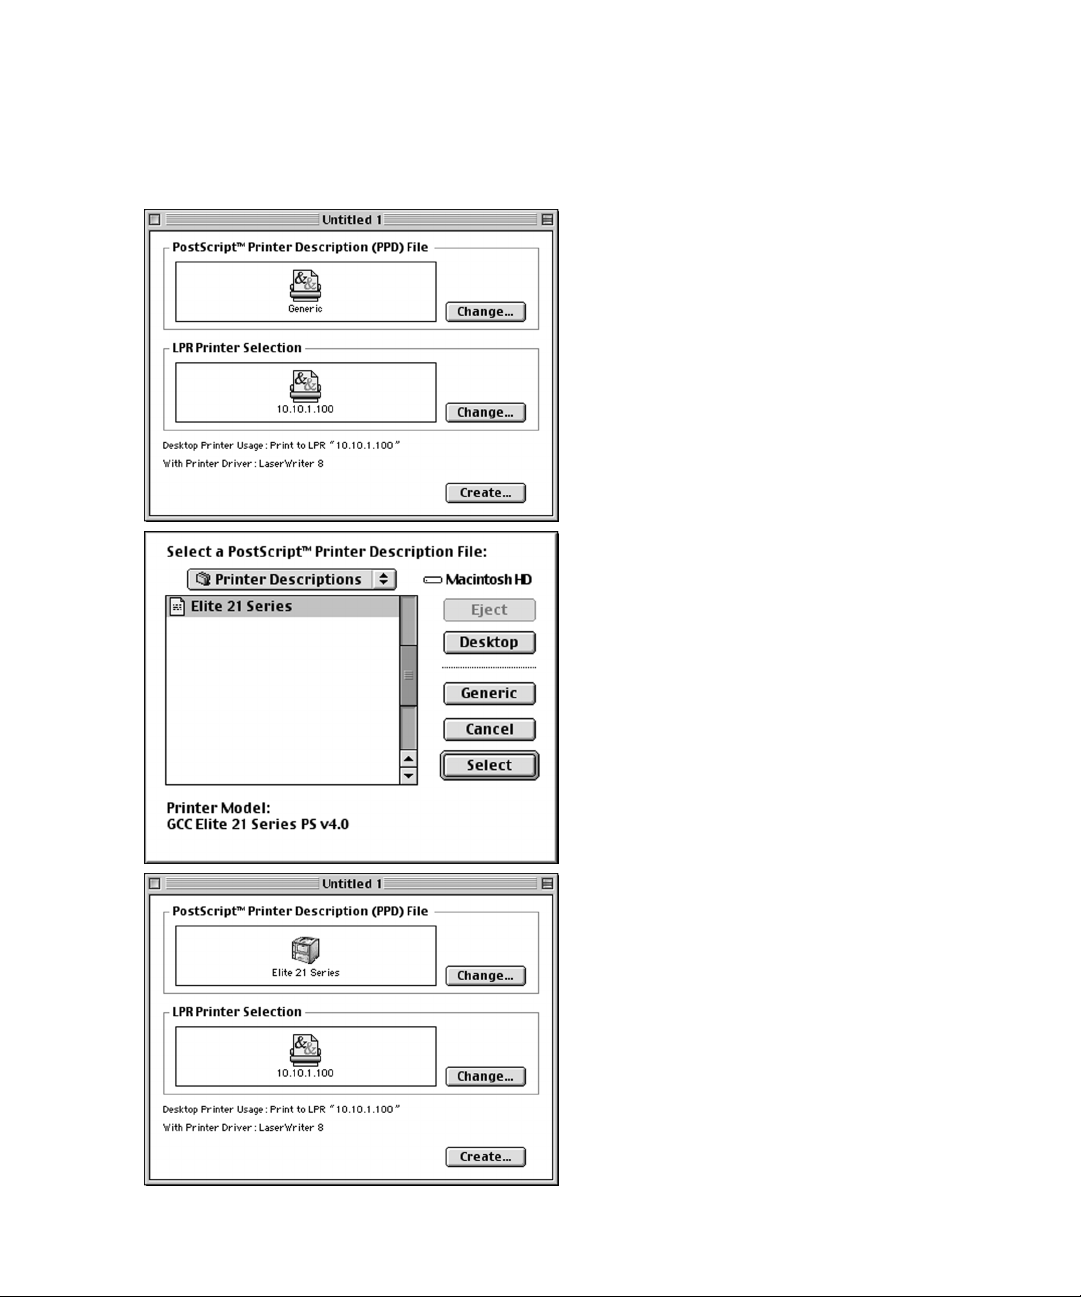
6. The “Untitled 1” dialog box will return.
Click on the Change button at the top
right of the box.
7. The “Select a PostScript Printer
Description File” box will open. Choose
your printer model from the list of
printers and click Select.
8. The “Untitled 1” dialog box returns
again. The icon in the “PostScript
Printer Description (PPD) File” box now
shows your printer.
Click Create to create the new desktop
printer.
Page 38
35
9. A Save dialog box opens, asking you to
save the desktop printer. Type in a
name for the desktop printer, or leave
the default name. Click Save.
A new Desktop Printer icon will appear
on the desktop with the name that you
assigned.
10.Go to File and Quit to exit the Desktop
Printer Utility. The printer is selected
and ready to print.
The GCC Product Registration utility will
run after the printer is setup. Please
follow the registration instructions to
register your printer.
Page 39

36
Overview
You will need to set up your Windows computer to use the Elite 21
Series by installing the Elite 21 software for PC-compatible computers.
This software is on the Elite 21 Series CD-ROM. The CD-ROM includes
customized Windows PostScript printer software for Windows 95/98,
Windows 2000, and Windows NT 4.0.
This section details installation instructions for installing drivers for
Windows 95/98, Windows 2000 and Windows NT 4.0. Information on
networking printers with Windows is on the Elite 21 Series CD-ROM.
Important: Read the release notes contained in the ReadMe.txt file
before installing the printer software. This file includes important lastminute feature and compatibility information about the Elite 21. This file
is located on the Elite 21 Series CD-ROM.
Step 9b. Install Windows Software
Page 40

37
Software Installation
The software required to set up your Windows 95/98 computer is
located on the Elite 21 Series CD-ROM.
You can install the Elite 21 software on your computer using Plug and
Play. This will work if you are installing the software on a computer which
is connected to the printer through the parallel or USB (Win98 only) port.
If the printer is not connected to the computer through the parallel or
USB port, go to the “Using Add Printer” section immediately following
Plug and Play instructions.
USB connection of the printer is not supported under Windows 95. If
installing the printer over USB using Windows 98, follow the USB Monitor
Installation instructions on the next page before attaching the USB cable
and proceeding to either the Plug and Play or Add Printer Wizard
installation steps.
Windows 95/98 uses a Wizard to help you install printer software. A
Wizard is a series of dialog boxes. In each dialog box you make
configuration choices then click the Next button to move to the next dialog
box.
Part of the software you will need is contained on the Windows 95/98
CD-ROM or floppy disks. Please have this software available when doing
the installation.
Note: These instructions cover installing the Elite 21 as a local printer
(connected via a parallel or serial port) on a Windows 95/98 PC.
If installing the printer as a stand-alone Ethernet device on a Windows
network, we recommend following the “Using Add Printer” instructions as
if the printer were being installed as a local device on port LPT1:. Once
the installation is complete, proceed to the Windows 95/98 section of
Chapter 7 of the Elite 21 User’s Manual (Networking the Elite 21 Printer)
on the printer CD-ROM for instructions for setting up the printer as an
Ethernet network device.
Installing the Elite 21 with Windows 95/98
Page 41

38
USB Monitor Installation (Windows 98 only)
1. Insert the GCC Elite 21 Series CD-ROM
into the Windows 98 PC. Click on My
Computer, then double-click the CD-ROM
icon to open the CD window. Double-click
the “Win98 USB” folder, then doubleclick the “Install.exe” icon within this
folder.
2. This will bring up the “USB Driver
Installer” window. Click Install.
3. A status window will appear telling you
that the USB Monitor software was
installed. Click OK.
You may now proceed to the Plug and
Play or Add Printer Wizard installation
process for your USB printer.
Page 42

39
Windows 95/98 Software Installation - Plug and Play
1. If the computer is running, shut it
down.
2. With the computer and printer both
powered off, attach the printer cable to
the computer and printer. Make sure
that there is paper in the printer’s tray.
3. Turn on the printer and wait for the
LCD display to read “Ready.” Turn on
the computer. A dialog box showing
“Building Printer Database” may appear.
4. The Add New Hardware Wizard will
appear automatically, telling you that
Windows has found new hardware.
Insert the Elite 21 CD-ROM and click
Next.
Windows 95 users: go to Step 7.
Windows 98 users: proceed to Step 5.
5. The next window will ask what you want
Windows to do. Choose “Search for the
best driver for your device” and click
Next.
Page 43

40
6. The system will then ask where to look
for new drivers. Make sure that the
Elite 21 Series CD-ROM is in the drive.
Check off “Specify a Location.” Use the
Browse button to select your Elite 21
Series CD-ROM. Open the folder on the
CD that corresponds to the language
being used (English, French, German,
Italian or Spanish.) Open the WIN9x
folder within this folder. Select the
GCCE21.INF item in this folder. Click
OK. Click Next.
7. The Wizard will display the driver that it
found.
Windows 95 users: click Finish.
Windows 98 users: click Next.
8. Proceed to Step 7 of the “Using Add
Printer” section for Windows 95/98
which follows.
Page 44

41
Windows 95/98 Software Installation - Using the Add Printer Wizard
1. Go to the Start menu of Windows
95/98, then up to Settings and select
Printers. In the Printers window,
double-click the Add Printer icon to
start the Add Printer Wizard.
Click Next to start the Wizard
2. The first window of the Add Printer
Wizard will ask if the printer is
connected to the local computer or to a
Network.
Select “Local Printer” unless the printer
that you are selecting is attached to
another PC or accessed via an NT or
Win2000 server. Click Next.
Note: If setting up the printer as a
stand-alone Ethernet network device,
select “Local Printer” at this point and
install the driver as if the printer were
connected to the parallel (LPT1:) port
of the PC. After the installation, refer to
the Windows 95/98 instructions in
Section 7 of the Elite 21 User’s Manual
on the printer CD-ROM (Networking the
Elite 21 Printer) for instructions on
configuring the printer as a network
device.
Page 45

42
3. A list of manufacturers and printer
models will appear. Insert the Elite 21
Series CD-ROM in the CD drive of your
computer and click Have Disk.
4. This will bring up the Install From Disk
window. Use the Browse button to
select your Elite 21 Series CD-ROM.
Open the folder on the CD that
corresponds to the language being
used (English, French, German, Italian
or Spanish.) Open the WIN9x folder
within this folder. Select the
GCCE21.INF item in this folder. Click
OK. You will be returned to the Install
From Disk window, click OK again.
5. The next window will display options to
install either the PostScript (PS) or PCL
driver for the Elite 21 Series. Most
users will want to use the PostScript
driver exclusively under Windows.
Choose “GCC Elite 21 Series PS” unless
you have a specific reason to use the
PCL driver.
Page 46

43
6. A list of ports will appear. Select the
appropriate local parallel or serial port
for the printer and click Next.
7. The next window will ask for a name for
the printer. You can type in a new
name, or keep the default name. Click
Next.
If more than one printer is installed on
this computer, this window will also ask
if you wish to make this printer the
default printer for your Windows
applications. Click Yes or No. Click Next.
8. A window will appear asking if you wish
to print a test page. Click Yes if you are
installing a local printer, click No if you
are installing the driver and will be
setting up the printer as a network
device later. Click Finish.
Page 47

44
9. A dialog box may appear asking you to
insert the Windows 95 or 98 CD.
Insert the CD and click OK.
10.A dialog box may appear telling you that
necessary files on the CD cannot be
found. Make sure the Windows CD is
inserted, then use the Browse button
to access the Windows CD. Select the
folder called ‘WIN95’ on the Windows
95 CD, or ‘WIN98’ on the Windows 98
CD. Click OK.
11.A status window will appear, showing
the progress of the installation.
Page 48
45
12.When finished, the test page will be
generated (if you chose to print a test
page in Step 8). If the page prints, click
Yes in this window. If not, click No and
follow the Windows troubleshooting
steps that appear.
13.When the installation is complete, you
will be returned to the Printers window
and a new icon for the printer will
appear.
If installing a local printer, you are now
ready to print to the Elite 21 printer. If
installing as a stand-alone Ethernet
network device, proceed to the
Windows 95/98 section of Chapter 7
of the Elite 21 User’s Manual on the
printer CD-ROM, Networking the Elite
21 Series Printer.
Page 49

46
Software Installation
The software required to set up your Windows 2000 computer is located
on the Elite 21 Series CD-ROM.
You can install the Elite 21 software on your computer using Plug and
Play. This will work if you are installing the software on a computer which
is connected to the printer through the parallel or USB port.
If the printer is not connected to the computer through the parallel or
USB port, go to the “Using Add Printer” section immediately following
Plug and Play instructions.
Windows 2000 uses a Wizard to help you install printer software. A
Wizard is a series of dialog boxes. In each dialog box you make
configuration choices then click the Next button to move to the next dialog
box.
Note: These instructions cover installing the Elite 21 as a local printer
(connected via a parallel or serial port) on a Windows 2000 workstation
or server.
If installing the printer as a stand-alone Ethernet device on a Windows
network, we recommend following these instructions as if the printer were
being installed as a local device on port LPT1:. Once the installation is
complete, proceed to the Windows 2000 section of Chapter 7 of the Elite
21 User’s Manual (Networking the Elite 21 Printer) on the printer CDROM for instructions for setting up the printer as an Ethernet network
device.
Installing the Elite 21 with Windows 2000
Page 50
47
Windows 2000 Software Installation - Plug and Play
1. If the computer is running, shut it down.
2. With the computer and printer both
powered off, attach the parallel or USB
cable to the computer and printer. Make
sure that there is paper in the printer’s
tray.
3. Turn on the printer and wait for the LCD
display to read “Ready.” Turn on the
computer.
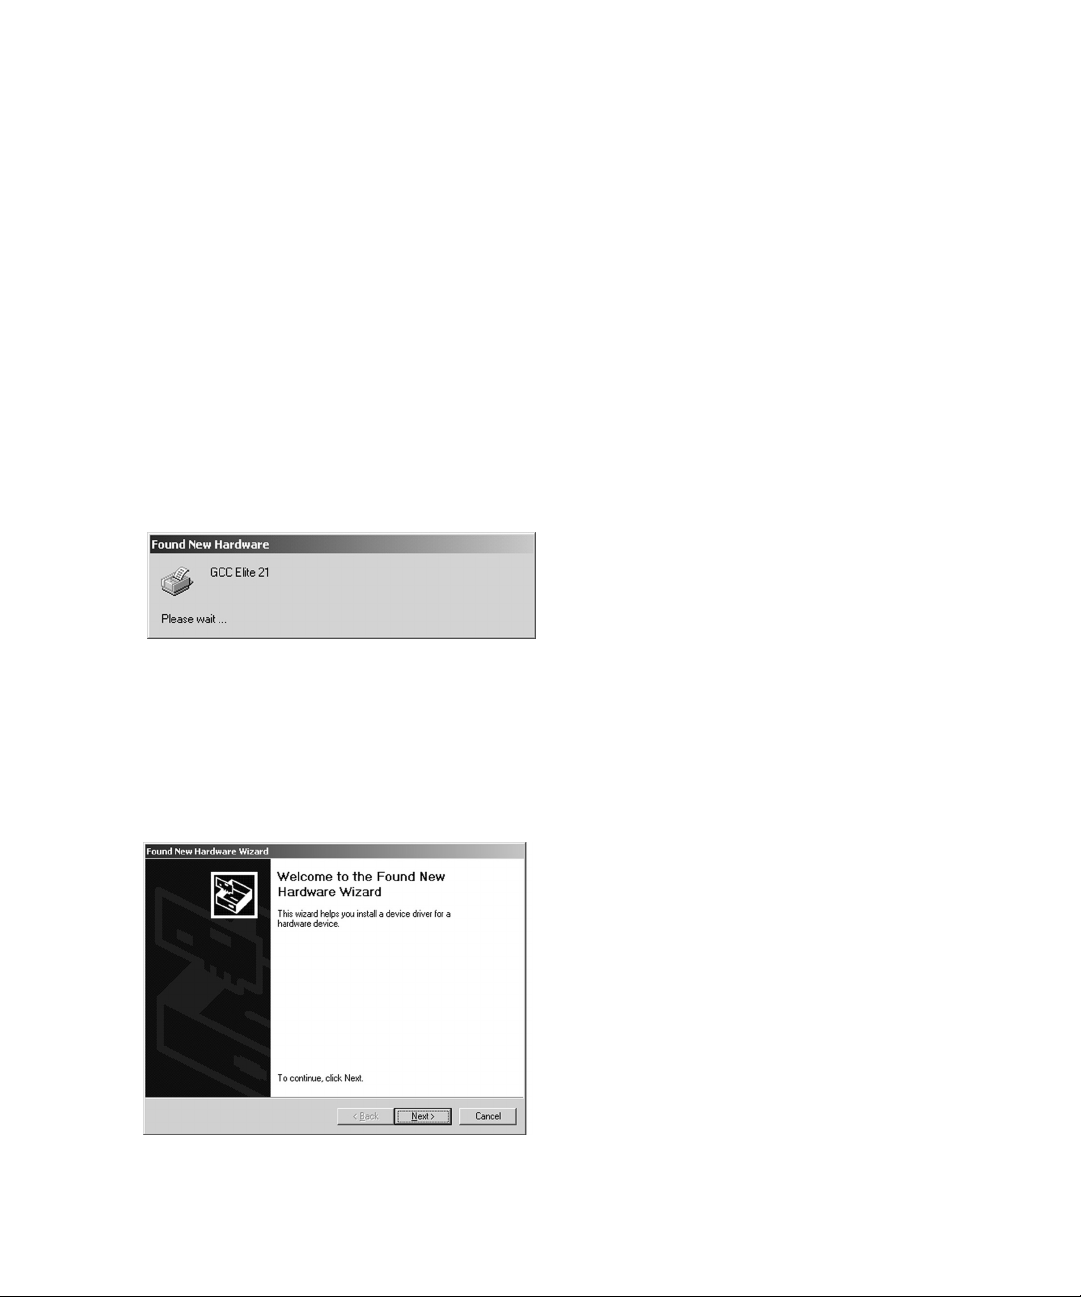
4. The “Found New Hardware” window will
appear, indicating that the PC has
recognized the printer.
5. The Found New Hardware wizard will
start up. Click Next to continue.
Page 51
48
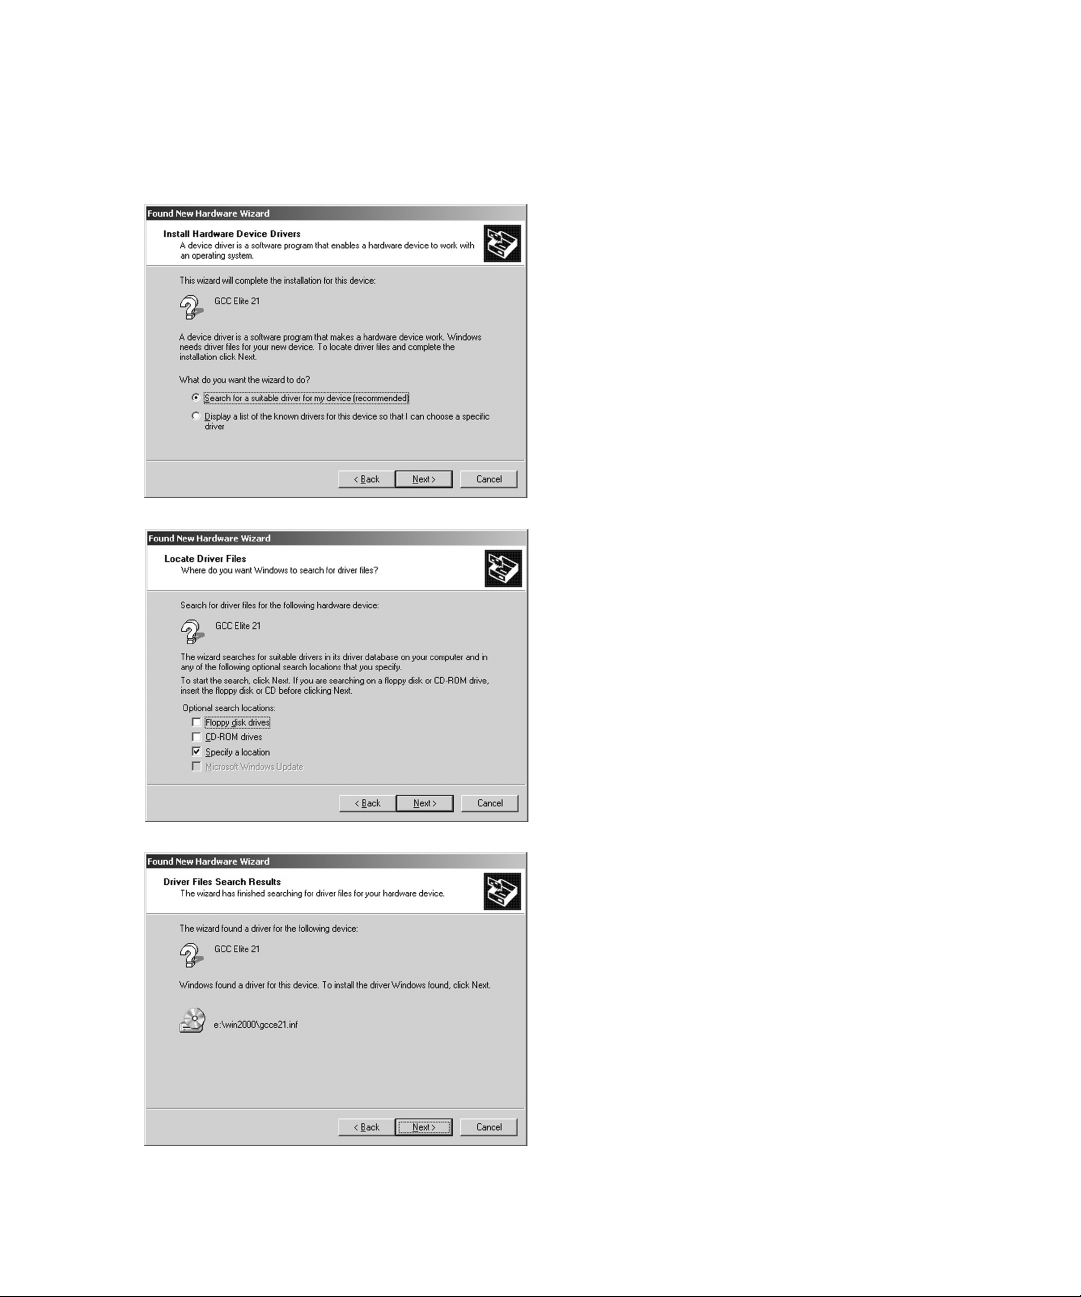
6. The next window will ask what you want
the Wizard to do. Check “Search for a
suitable driver for my device” and click
Next to continue.
7. The system will then ask where to look
for new drivers. Make sure that the Elite
21 Series CD-ROM is in the drive. Check
off “Specify a Location.” Use the Browse
button to select your Elite 21 Series CDROM. Open the folder on the CD that
corresponds to the language being used
(English, French, German, Italian or
Spanish.) Open the WIN9x folder within
this folder. Select the GCCE21.INF item
in this folder. Click OK. Click Next.
8. A window will appear showing the driver
that the Wizard found for the printer.
Click Next to continue the installation.
A dialog may follow stating that a Digital
Signature was not found for the printer.
Click Yes to continue the installation.
Page 52
49
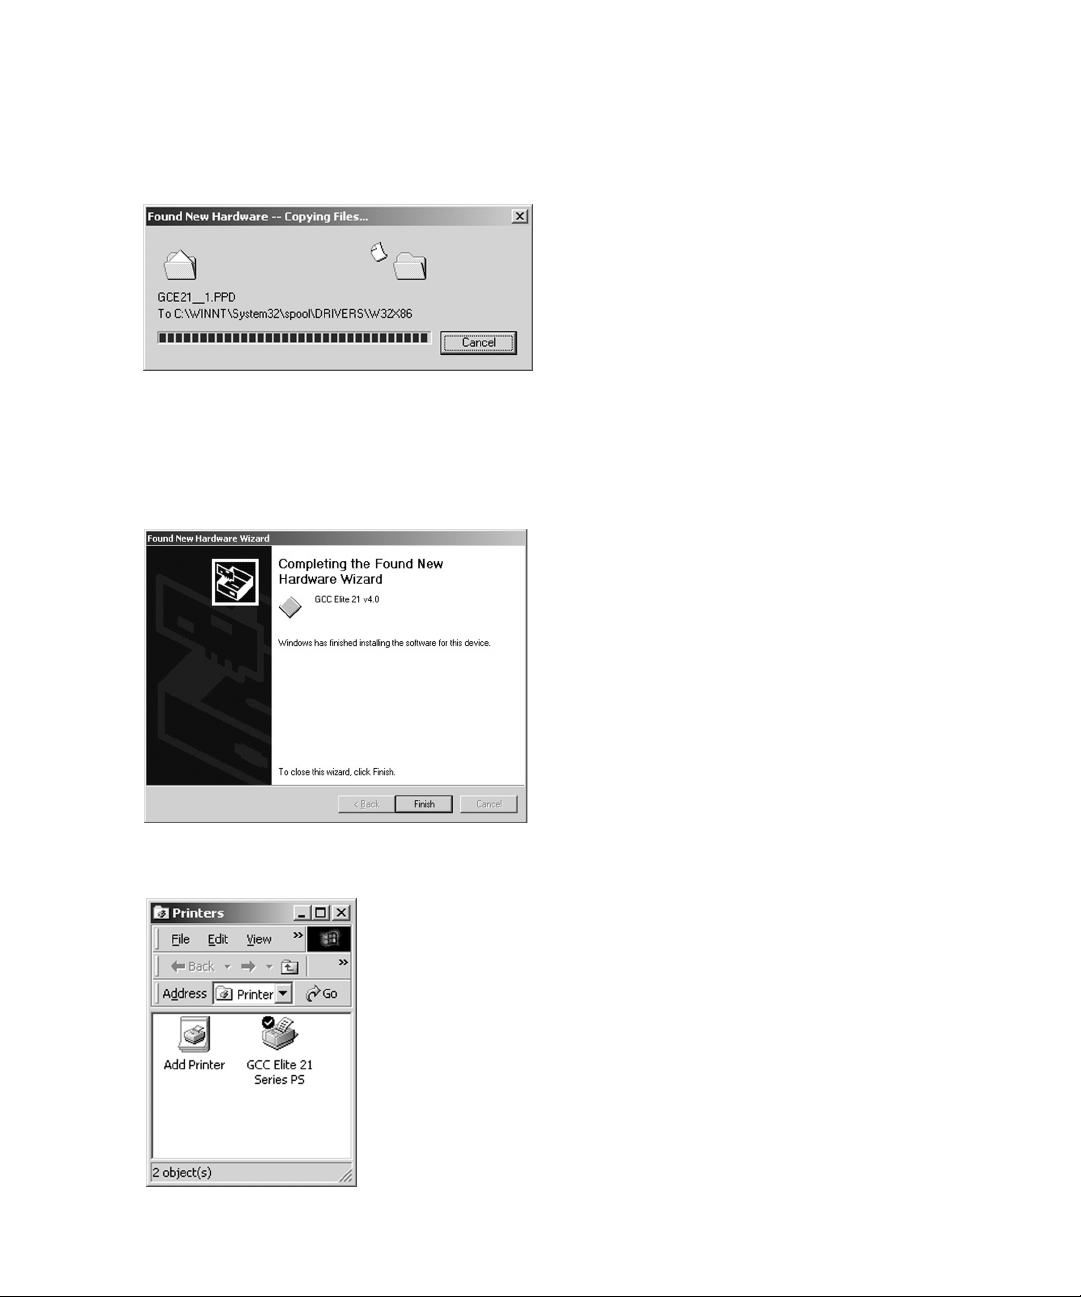
9. The Wizard will automatically copy the
driver files to their correct locations. A
status window will show the progress of
the installation.
If a “Files Needed” dialog box appears,
use the Browse button to select your
Elite 21 Series CD-ROM. Open the folder
on the CD that corresponds to the
language being used (English, French,
German, Italian or Spanish.) Open the
WIN2000 folder within this folder.
Select the GCCE21.INF item in this
folder. Click OK
10.The “Completing The Found New
Hardware Wizard” window will appear
when the installation is complete. Click
Finish to exit the Wizard.
11.After installation, a new icon for the
printer will appear in the Printers
window. You are now ready to print to
the Elite 21 printer.
Page 53
50
Windows 2000 Software Installation - Using the Add Printer Wizard
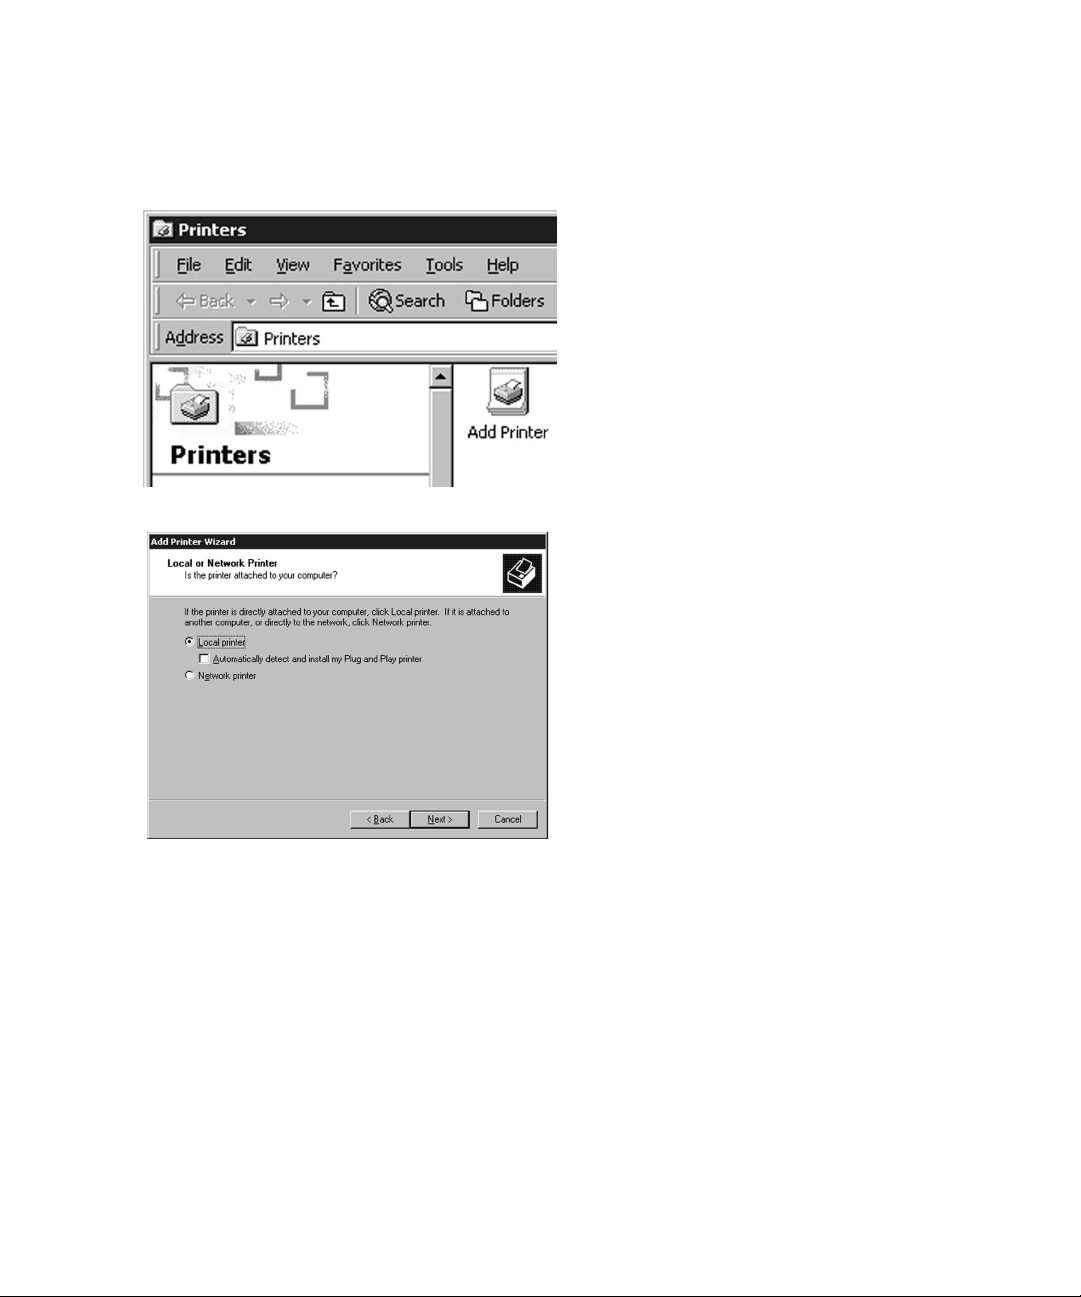
1. Go to the Start menu of Windows
2000, then up to Settings and select
Printers. In the Printers window,
double-click the Add Printer icon to
start the Add Printer Wizard.
Click “Next” at the Add Printer Wizard
welcome screen.
2. The next window of the Add Printer
Wizard will ask if the printer is
connected to the local computer or to a
Network Printer Server.
Select “Local Printer” unless the printer
that you are selecting is attached to
another PC or accessed via an NT or
2000 server. De-select the box marked
“Automatically detect and install my
Plug and Play printer.” Click Next.
Note: If setting up the printer as a
stand-alone Ethernet network device,
select “Local Printer” at this point and
install the driver as if the printer were
connected to the parallel (LPT1:) port
of the PC. After the installation, refer to
the Windows 2000 section of Chapter
7 of the Elite 21 User’s Manual on the
printer CD-ROM (Networking the Elite
21 Series Printer) for instructions on
configuring the printer as a network
device.
Page 54
51
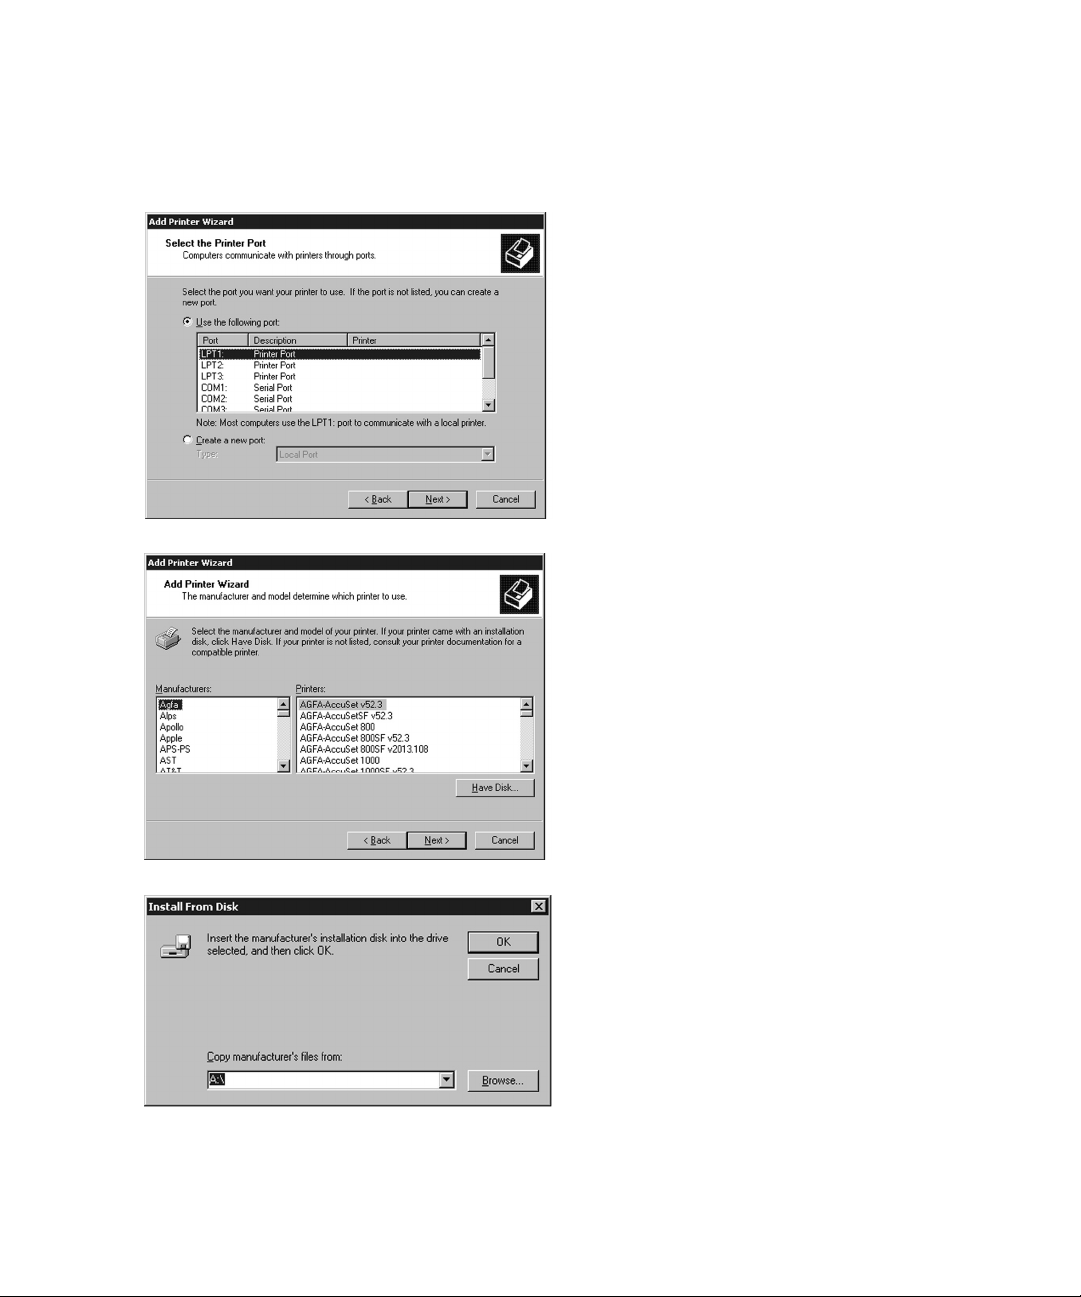
3. A list of ports will appear. Select the
appropriate local parallel or serial port
for the printer and click Next.
4. A list of manufacturers and printer
models will appear. Insert the Elite 21
Series CD-ROM in the CD drive of your
computer and click Have Disk.
5. This will bring up the Install From Disk
window. Use the Browse button to
select your Elite 21 Series CD-ROM.
Open the folder on the CD that
corresponds to the language being
used (English, French, German, Italian
or Spanish.) Open the WIN2000 folder
within this folder. Select the
GCCE21.INF item in this folder. Click
Open, then click OK.
Page 55

52
6. The next window will display options to
install either the PostScript (PS) or PCL
driver for the Elite 21 Series. Most
users will want to use the PostScript
driver exclusively under Windows.
Choose “GCC Elite 21 Series PS” unless
you have a specific reason to use the
PCL driver. Click Next.
7. The next window will ask for a printer
name. You can type in a new name, or
keep the default name.
If more than one printer is installed on
the system, this window will also ask if
you want to use this printer as the
Default Printer. Click Yes or No.
Click Next.
8. The printer sharing window will appear.
Select if the printer is to be shared
(other PCs will access it via this
workstation or server) or Not Shared.
If selecting “Do not share this printer,”
click Next and skip to Step 10.
If selecting Shared, type in a Share
Name for the printer. This will allow
users to identify the printer over the
Windows network. Click Next.
Page 56
53
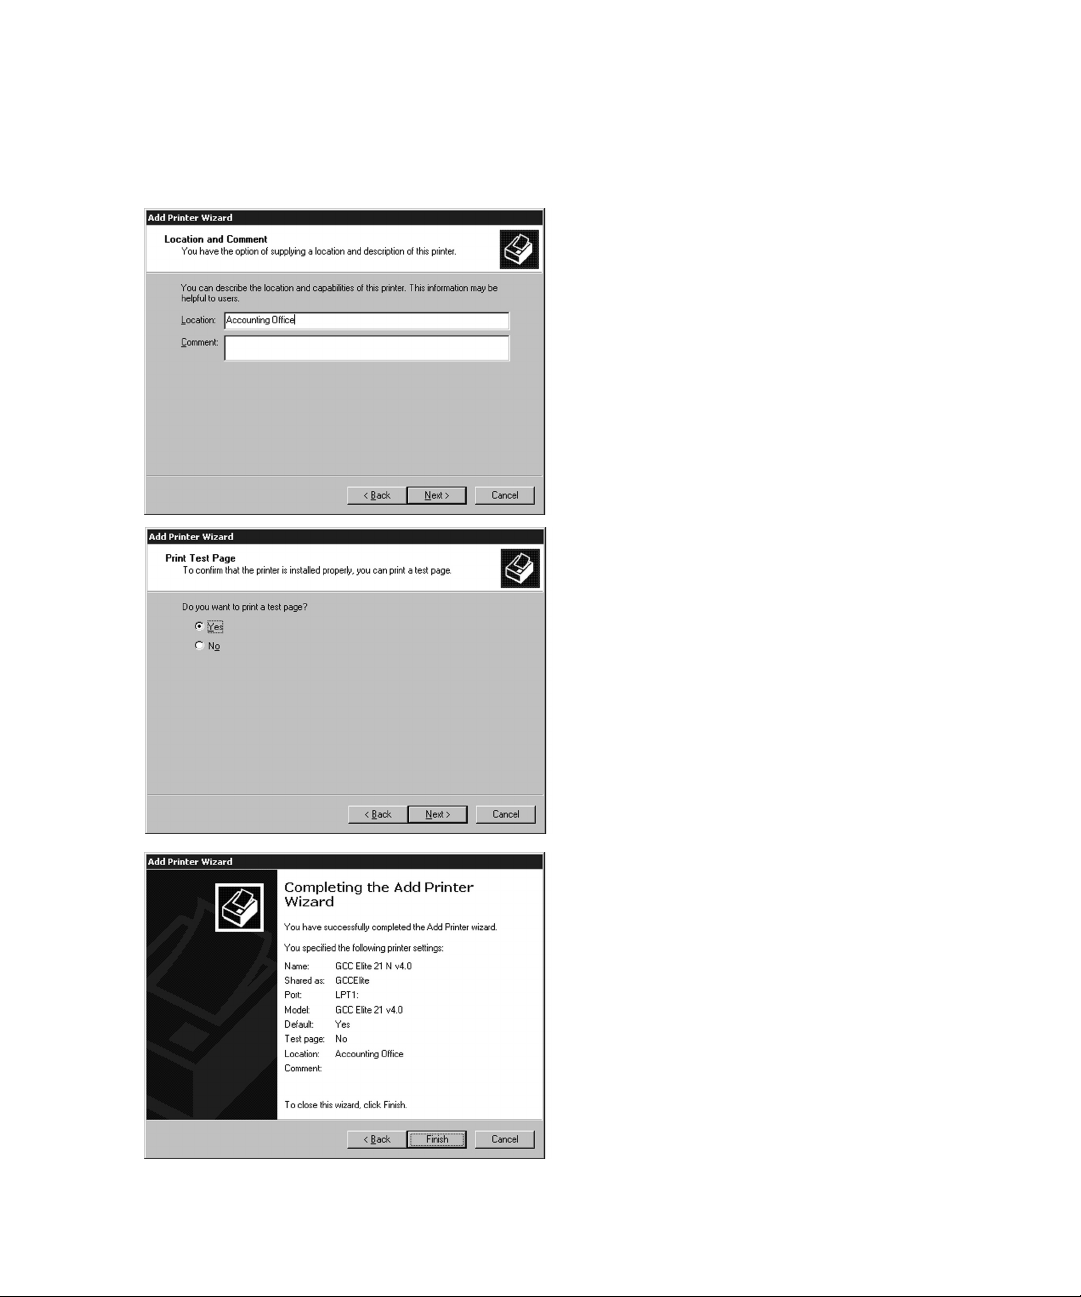
9. The next window allows you to specify
the location of the printer. This will
allow users to more easily identify the
printer on a large network. You can
also enter comments to specify the
printer’s capabilities, etc. to users (i.e.
“Duplex” to identify a printer that can
handle double-sided printing).
Enter information into these fields if
desired, then click Next.
10.A window will appear asking if you wish
to print a test page. Click Yes if you are
installing a local printer. Click No if you
are installing the driver and will be
setting up the printer as a network
device later. Click Next.
11.A final window will appear showing a
summary of the installation. Check over
all the information listed. If anything is
incorrect, click Back to go back and
change it. Otherwise, click Finish.
A window may appear informing you
that a Digital Signature cannot be found
for the printer and asking if you wish to
continue. Click Yes to continue and
complete the installation.
Page 57
54
12.When the installation is complete, you
will be returned to the Printers window
and a new icon for the printer will
appear.
If installing a local printer, you are now
ready to print to the Elite 21 printer. If
installing as a stand-alone Ethernet
network device, proceed to the
Windows 2000 section in Chapter 7 of
the Elite 21 User’s Manual on the
printer CD-ROM, Networking the Elite
21 Series Printer.
Page 58

55
Software Installation
The software required to set up your Windows NT 4.0 computer is
located on the Elite 21 Series CD-ROM.
Windows NT 4.0 uses a Wizard to help you install printer software. A
Wizard is a series of dialog boxes. In each dialog box you make configuration
choices then click the Next button to move to the next dialog box.
Part of the software you will need is contained on the Windows NT 4.0
CD-ROM. Please have this software available when doing the installation.
Note: These instructions cover installing the Elite 21 as a local printer
(connected via a parallel or serial port) on a Windows NT 4.0 workstation
or server.
If installing the printer as a stand-alone Ethernet device on a Windows NT
network, we recommend following these instructions as if the printer were
being installed as a local device on LPT1:. Once the installation is complete,
proceed to the Windows NT 4.0 section of Chapter 7 of the Elite 21
User’s Manual (Networking the Elite 21 Printer) on the printer CD-ROM for
instructions for setting up the printer as an Ethernet network device.
Installing the Elite 21 with Windows NT 4.0
Page 59

56
Windows NT 4.0 Software Installation
1. Go to the Start menu of Windows NT
4.0, then up to Settings and select
Printers. In the Printers window,
double-click the Add Printer icon to
start the Add Printer Wizard.
2. The first window of the Add Printer
Wizard will ask if the printer is
connected to the local computer (“My
Computer”) or to a Network Printer
Server.
Select “My Computer” unless the
printer that you are selecting is
attached to another PC or accessed via
an NT or Win2000 server.
Note: If setting up the printer as a
stand-alone Ethernet network device,
select “My Computer” at this point and
install the driver as if the printer were
connected to the parallel (LPT1:) port of
the PC. After the installation, refer to
the NT 4.0 section in Chapter 7 of the
Elite 21 User’s Manual on the printer
CD-ROM (Networking the Elite 21 Series
Printer) for instructions on configuring
the printer as a network device.
Click Next.
Page 60

57
3. A list of ports will appear. Select the
appropriate local parallel or serial port
for the printer and click Next.
4. A list of manufacturers and printer
models will appear. Insert the Elite 21
Series CD-ROM in the CD drive of your
computer and click Have Disk.
5. This will bring up the Install From Disk
window. Use the Browse button to
select your Elite 21 Series CD-ROM.
Open the folder on the CD that
corresponds to the language being
used (English, French, German, Italian
or Spanish.) Open the WINNT4 folder
within this folder. Select the
GCCE21.INF item in this folder. Click
Open, then click OK.
Page 61

58
6. The next window will display options to
install either the PostScript (PS) or PCL
driver for the Elite 21 Series. Most
users will want to use the PostScript
driver exclusively under Windows.
Choose “GCC Elite 21 Series PS” unless
you have a specific reason to use the
PCL driver. Click Next.
7. The next window will ask for a name for
the printer. You can type in a new
name, or keep the default name.
If more than one printer is installed on
the system, this window will also ask if
you want to use this printer as the
Default Printer. Click Yes or No.
Click Next
8. The printer sharing window will appear.
Select if the printer is to be shared
(other PCs will access it via this
workstation or server) or Not Shared.
If selecting Shared, type in a Share
Name for the printer. This will allow
users to identify the printer over the
Windows network.
Click Next.
Page 62

59
9. A window will appear asking if you wish
to print a test page. Click Yes if you are
installing a local printer. Click No if you
are installing the driver and will be
setting up the printer as a network
device later. Click Finish.
10.A dialog box may appear informing you
that some of the files needed for the
installation are located on the Windows
NT 4.0 CD-ROM. Eject the GCC Elite 21
CD and install the Windows NT 4.0 CD.
If the blue Windows NT CD window
appears, close this window. Use the
Browse button to access the NT CD.
Select the folder called ‘i386’ on the NT
CD, then click Open. Click the file called
“PSCRIPT.DLL.” Click Open, then click
OK.
A progress bar will appear, showing the
progress of the installation.
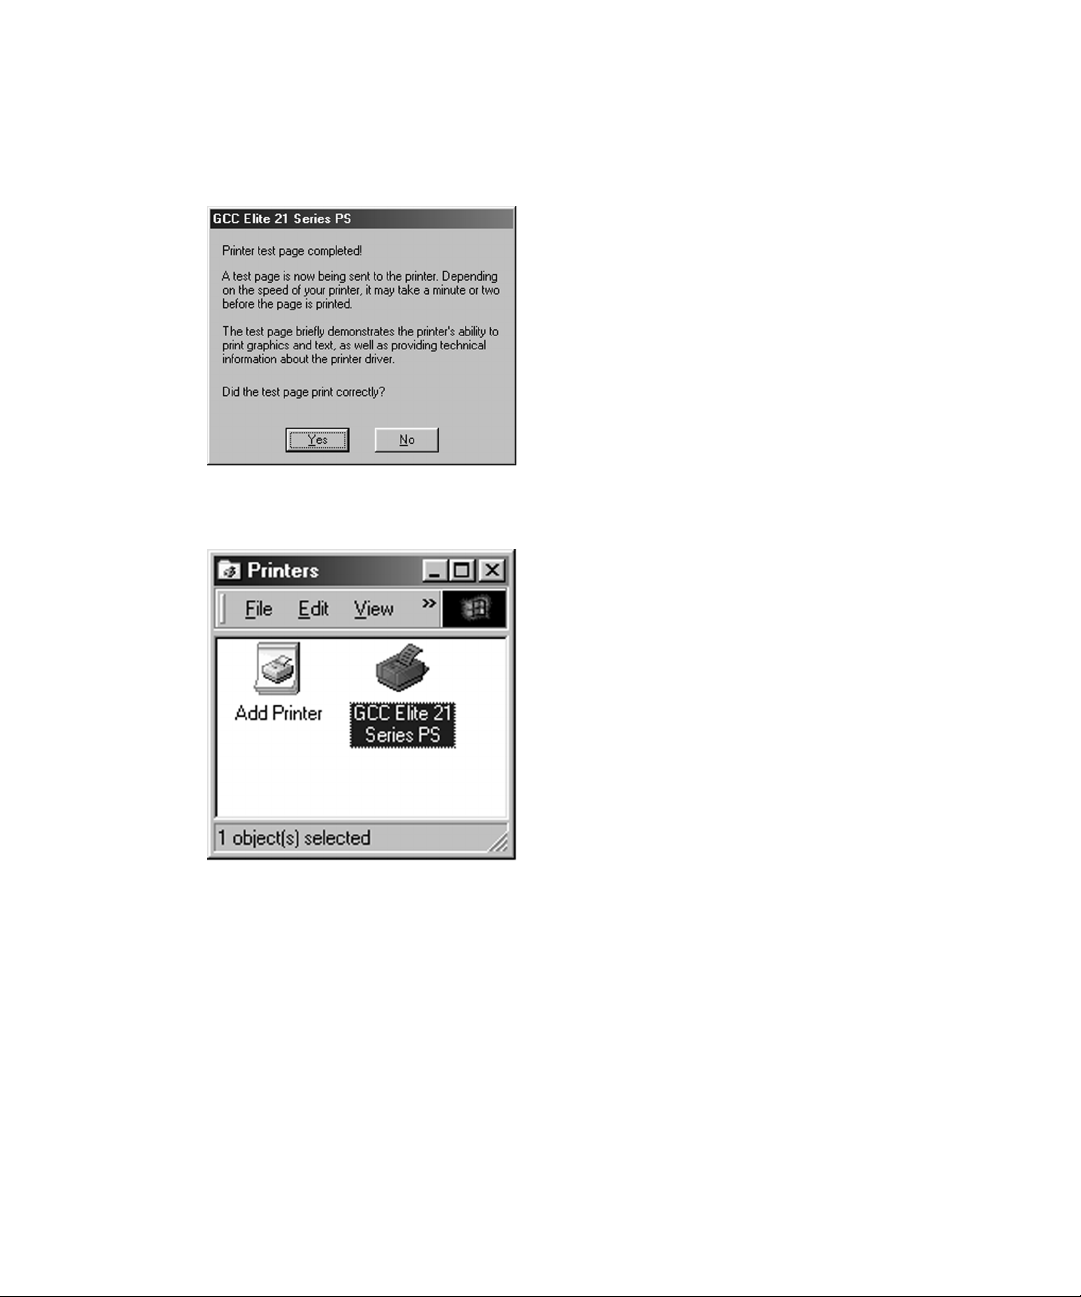
11.When finished, the test page will be
generated (if you chose to print a test
page in Step 9). If the page prints, click
Yes in this window. If not, click No and
follow the Windows troubleshooting
steps that appear.
Page 63

60
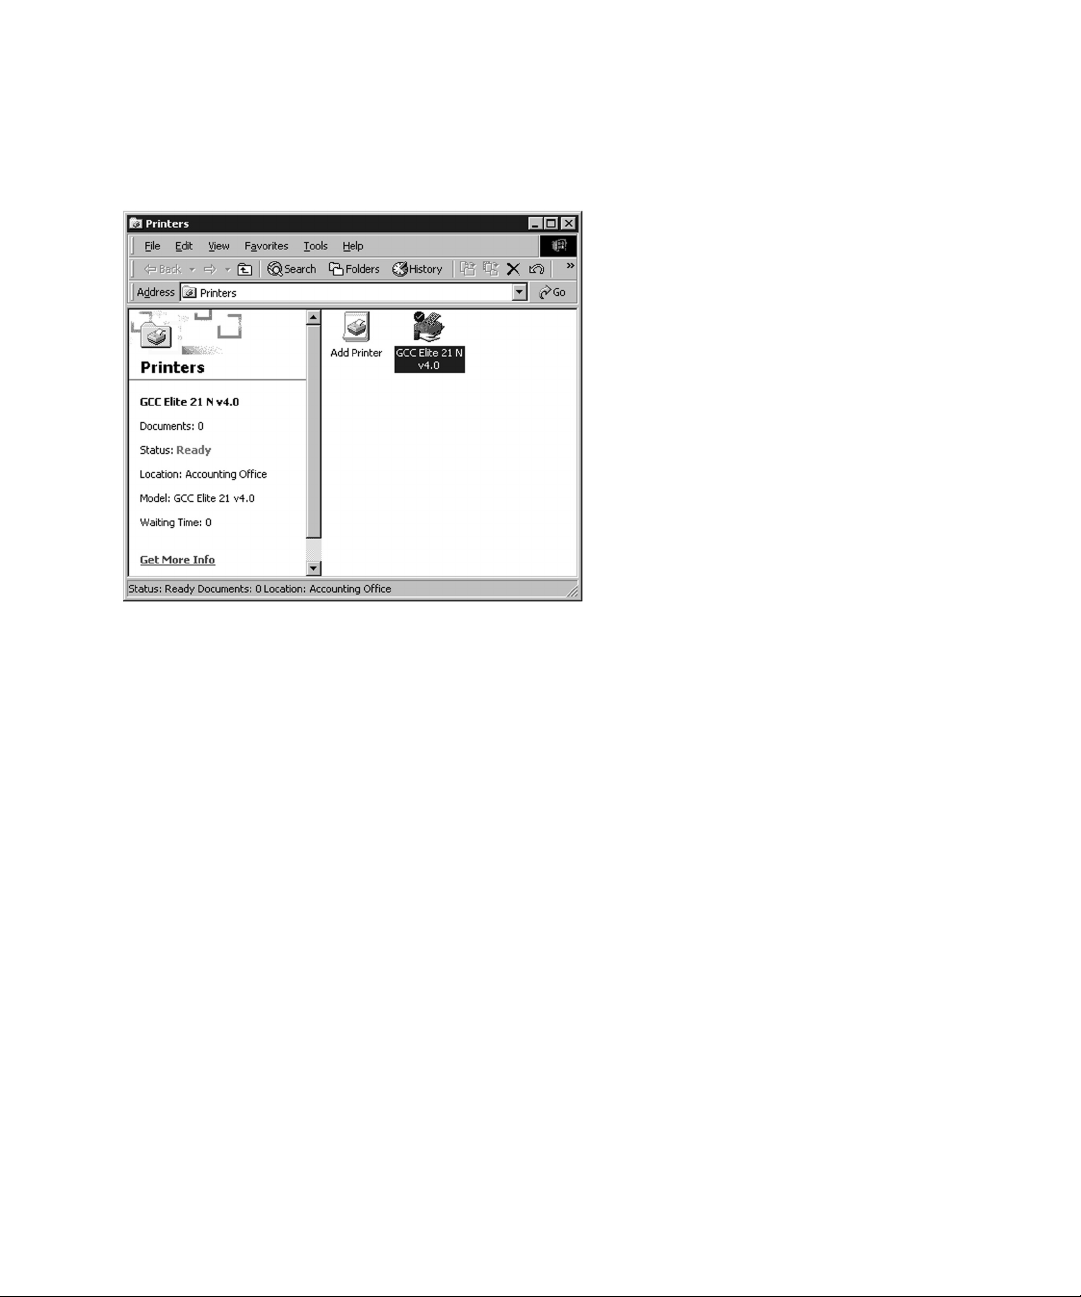
12.When the installation is complete, you
will be returned to the Printers window
and a new icon for the printer will
appear.
If installing a local printer, you are now
ready to print to the Elite 21 printer. If
installing as a stand-alone Ethernet
network device, proceed to the
Windows NT 4.0 section in Chapter 7
of the Elite 21 User’s Manual on the
printer CD-ROM, Networking the Elite
21 Series Printer.
Page 64

61
This section covers installation of any additional accessories that you may
have purchased with the printer. Accessories include:
• Additional Lower Paper Feeder(s)
• Duplex Unit (Elite 21
N only)
• Upper Output Bin
• Envelope Feeder
• Additional Memory (RAM)
Accessories can be ordered through GCC Technologies via our web site at:
http://www.gccprinters.com
You can also contact GCC Sales at 800 422-7777 (North America Only,
outside North America, refer to the back cover) or your local GCC authorized
dealer.
Step 10. Install Accessories
Page 65
62
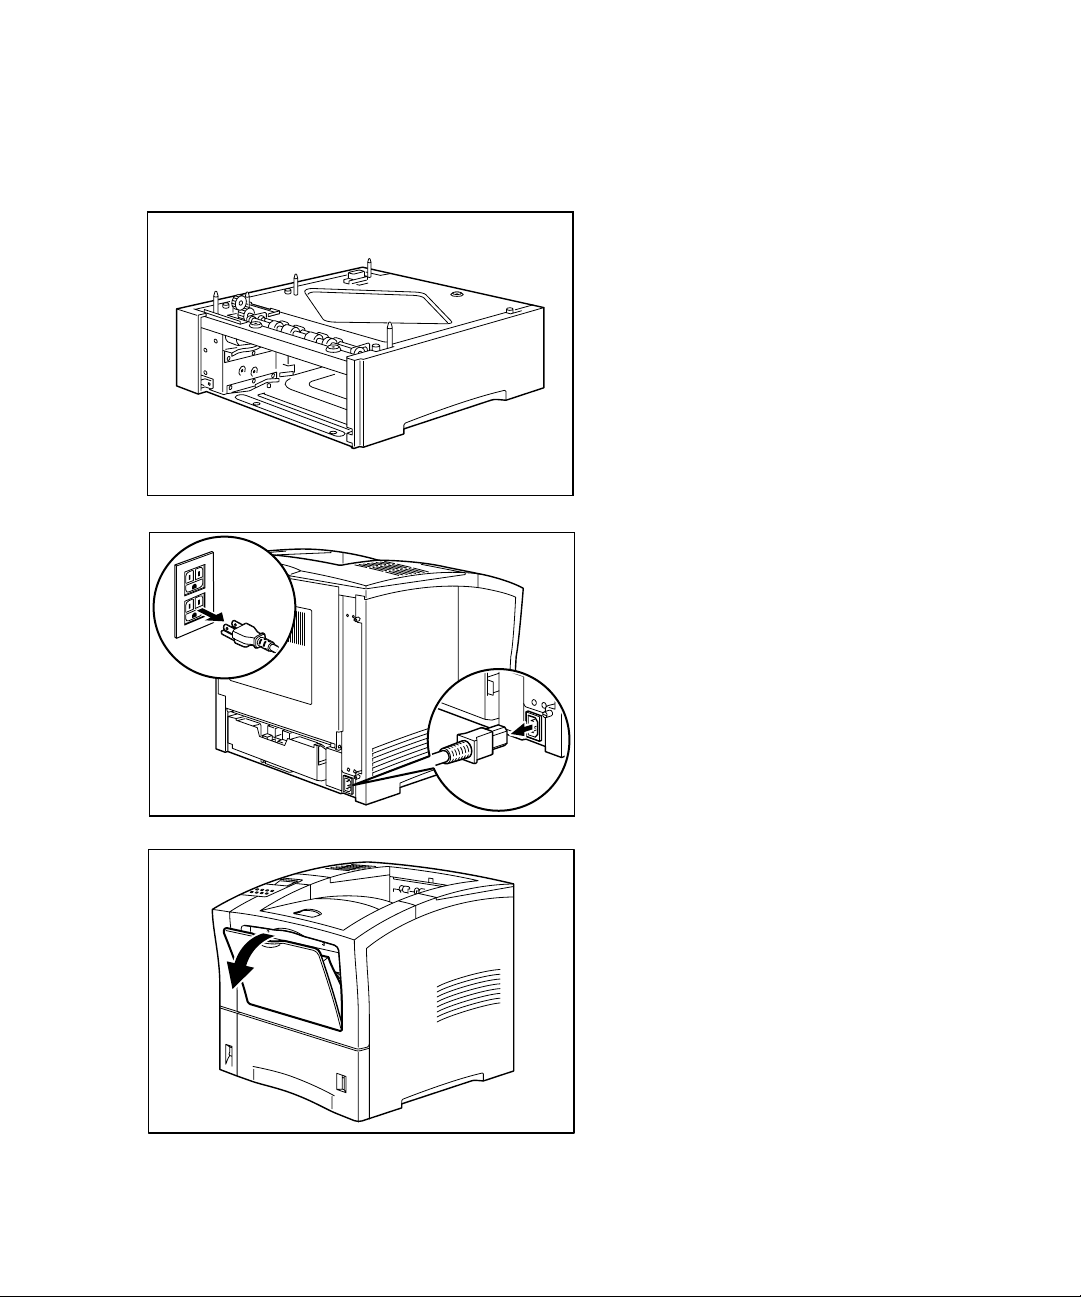
1. Place the paper feeder on a sturdy,
level surface.
2. Switch off the power to the printer and
disconnect the power cord from the AC
outlet and the printer.
3. Close the Multi-Purpose Feeder and
remove any printouts left in the paper
output tray.
Step 10a. Paper Feeder Installation
Part One - Instructions for installing one additional paper feeder and tray
Page 66
63
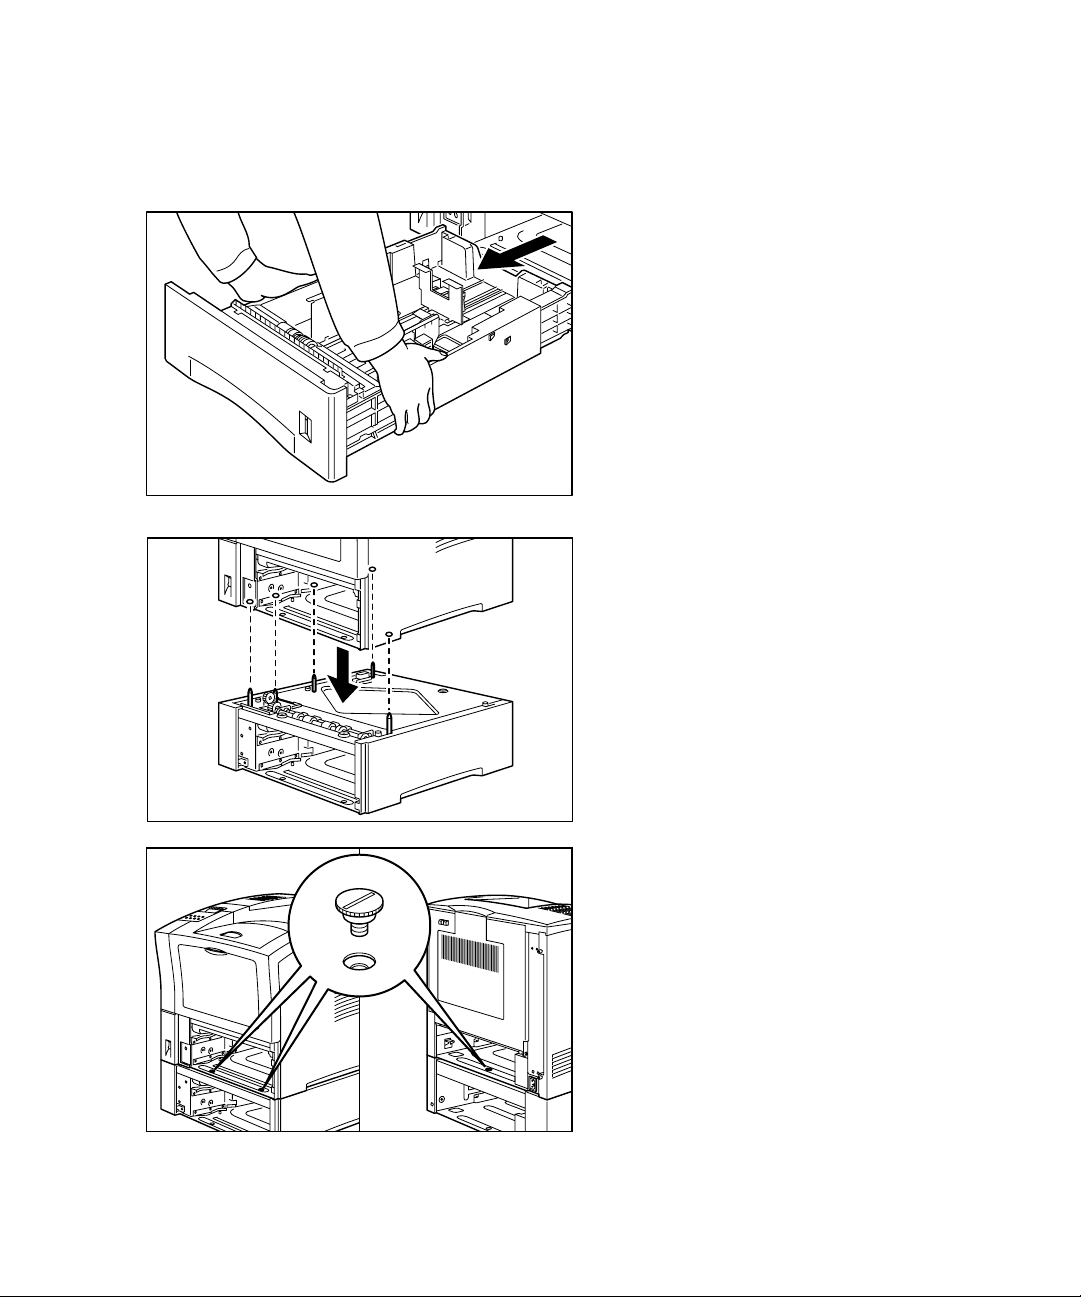
4. Remove the paper tray from the
printer.
5. Lift the printer up vertically and lower it
onto the optional paper feeder. Align
the five posts on the feeder with the
corresponding holes on the bottom of
the printer.
Be sure to lower the printer gently, as
lowering it too quickly may damage the
printer or feeder.
6. Insert the three supplied screws into
the holes inside of the paper feeder as
shown to secure the feeder to the
printer.
Page 67
64
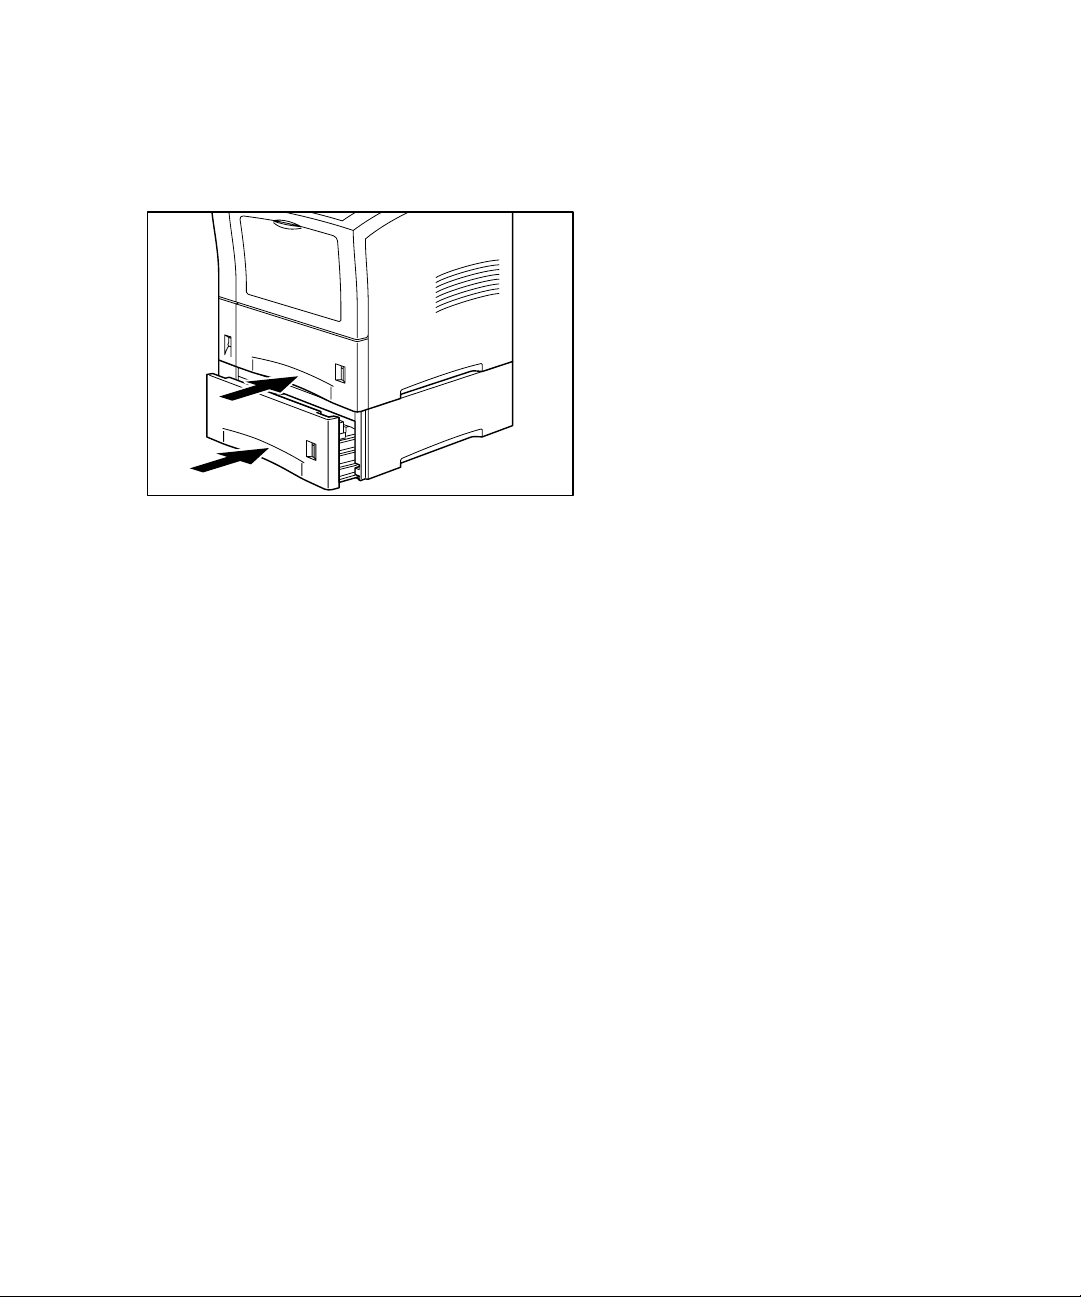
7. Load paper into the tray, then insert
both trays into the printer.
Reconnect the AC power cord to the
printer and outlet, then restart the
printer.
Page 68
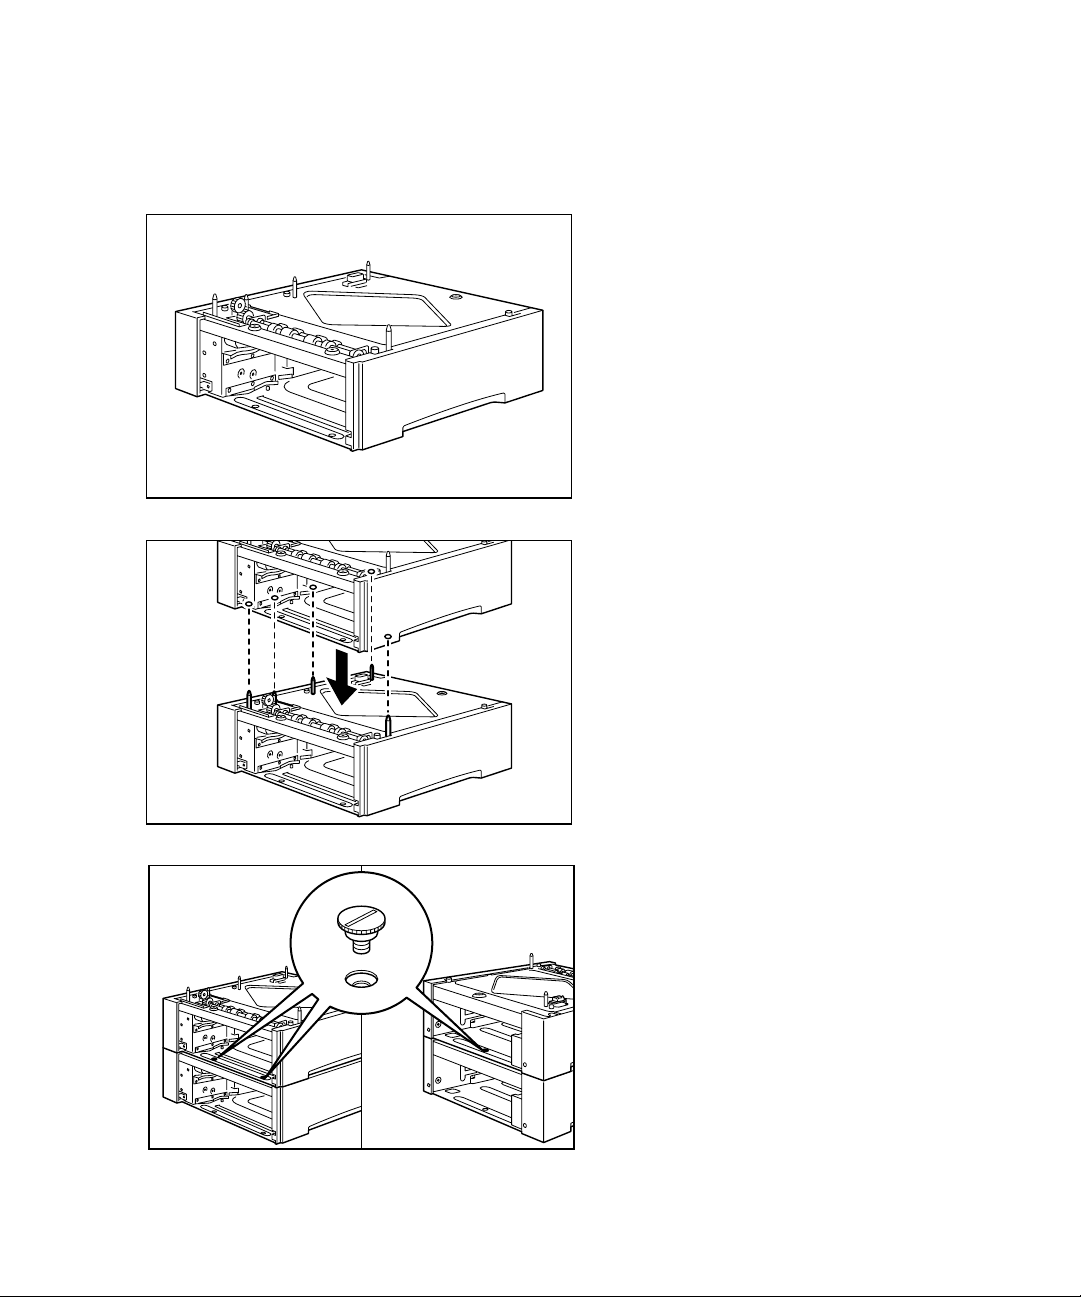
65
1. Place the second paper feeder on a
sturdy, level surface.
2. Align the five posts on the second
paper feeder with the holes on the
bottom of the first feeder and stack the
two feeders up together.
3. Insert the supplied screws into the
three holes on the inside of the top
feeder as shown to secure the two
feeders together.
Part Two - Instructions for installing two additional paper feeders and trays
Page 69
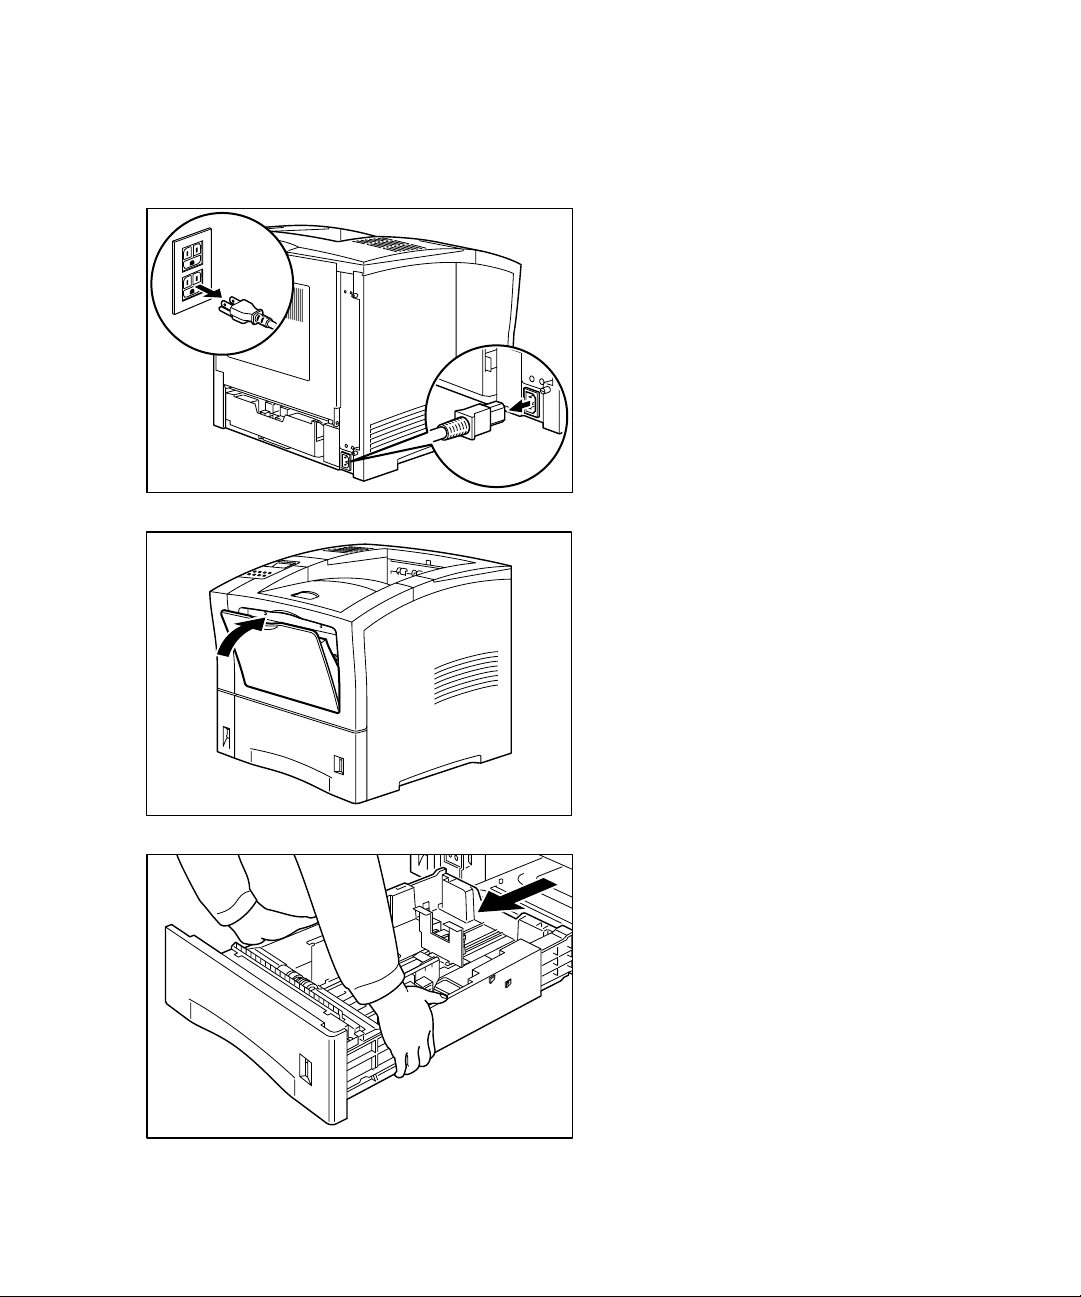
66
4. Switch off the power to the printer and
disconnect the power cord from the AC
outlet and the printer.
5. Close the Multi-Purpose Feeder and
remove any printouts left in the paper
output tray.
6. Remove the cassette from the printer.
Page 70
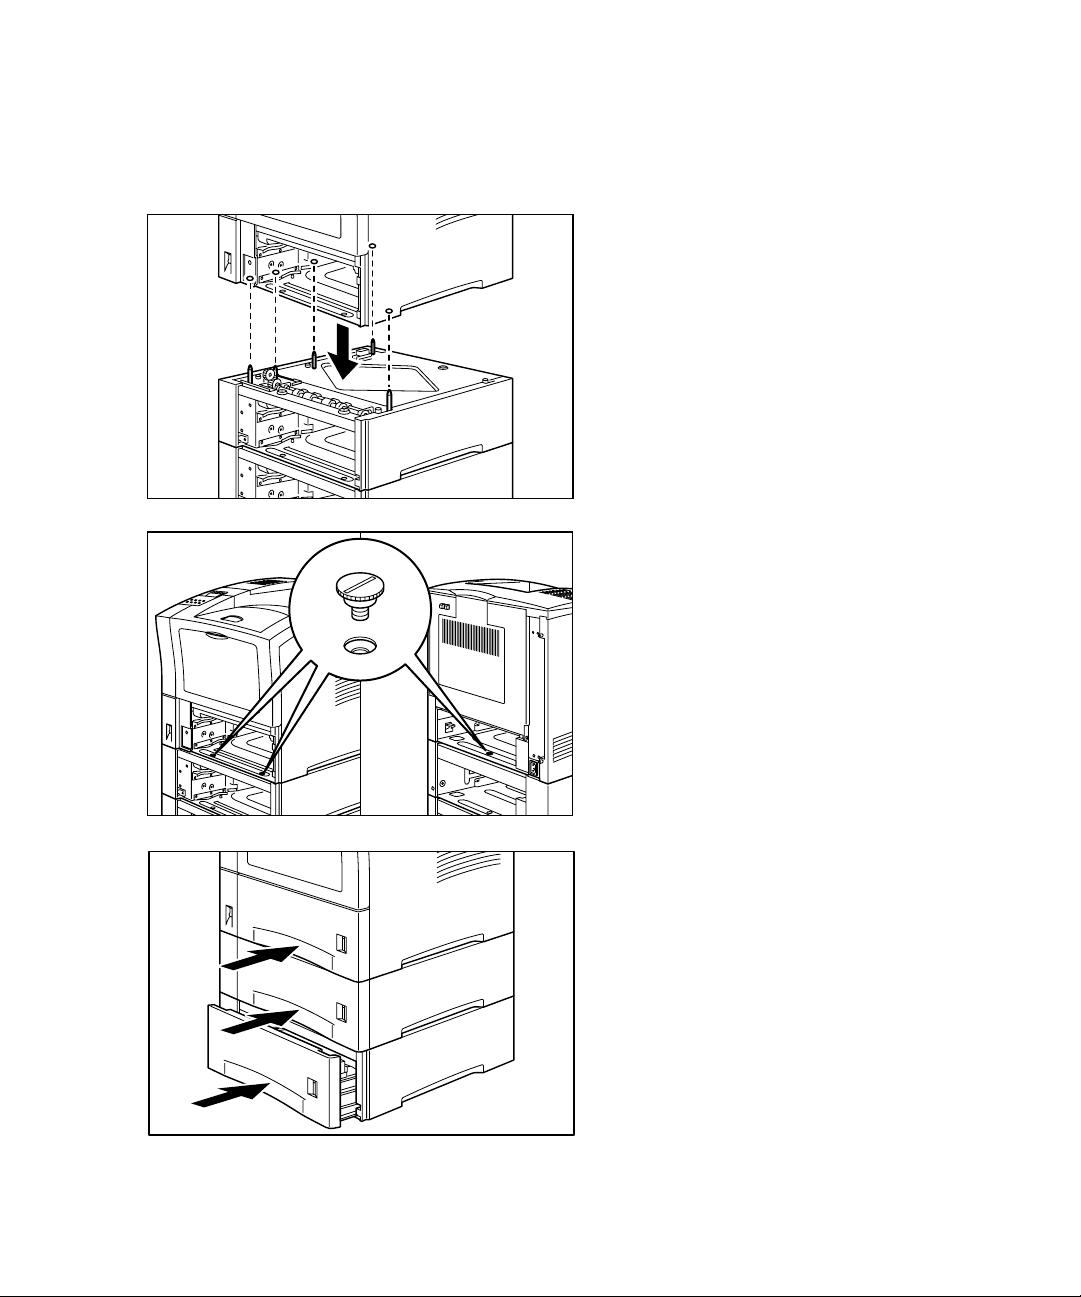
67
7. Lift the printer up vertically and lower it
onto the optional paper feeders. Align
the five posts on the first feeder with
the corresponding holes on the bottom
of the printer.
Be sure to lower the printer gently, as
lowering it too quickly may damage the
printer or feeders.
8. Insert the three supplied screws into
the holes inside of the printer as shown
to secure the feeders to the printer.
9. Load paper into the cassettes, then
insert all three cassettes into the
printer.
Reconnect the AC power cord to the
printer and outlet, then restart the
printer.
Page 71

68
Configuring Printer Drivers for use of the Additional Paper Feeder(s)
Once one or more additional feeders are installed, you will need to change settings within
the driver software on all the computers that use the printer. This will allow Tray 3
and/or Tray 4 to show up as options when selecting a paper source for your print jobs.
The drivers can be configured as follows:
Macintosh:
• Click once on the desktop printer icon for your printer to highlight it.
• Go to the Printing menu at the top of the screen, then down to “Change Setup...”
• In the Setup window, click on the “Change” pull-down menu and go down to “Additional
Trays.”
• Change the setting in the “To:” pull-down menu to either “Tray 3” (for one tray) or “Tray
3 and 4” (for two trays).
• Click OK to accept the change.
Windows 95/98:
• Go to the Start menu, then to Settings and Printers.
• Right-click the printer icon for your Elite 21 printer and select Properties.
• Click on the Device Options tab.
• Under Installable Options, click on “Additional Trays.”
• Under “Change Setting for:,” change the selection to either “Tray 3” (for one tray) or
“Tray 3 and 4” (for two trays).
• Click Apply and OK to accept the change.
Windows 2000:
• Go to the Start menu, then to Settings and Printers.
• Right-click the printer icon for your Elite 21 printer and select Properties.
• Click on the Device Settings tab, then scroll down to Installable Options.
• Click on the link next to Additional Trays that says “Not Installed.” This link will become a
pull-down menu.
• Change the selection to either “Tray 3” (for one tray) or “Tray 3 and 4” (for two trays).
• Click Apply and OK to accept the change.
Windows NT 4.0:
• Go to the Start menu, then to Settings and Printers.
• Right-click the printer icon for your Elite 21 printer and select Properties.
• Click on the Device Settings tab, then scroll down to Installable Options.
• Click on “Additional Trays” from the list of options.
• Under the “Change Setting to:” box, change the selection to either “Tray 3” (for one
tray) or “Tray 3 and 4” (for two trays).
• Click Apply and OK to accept the change.
Page 72
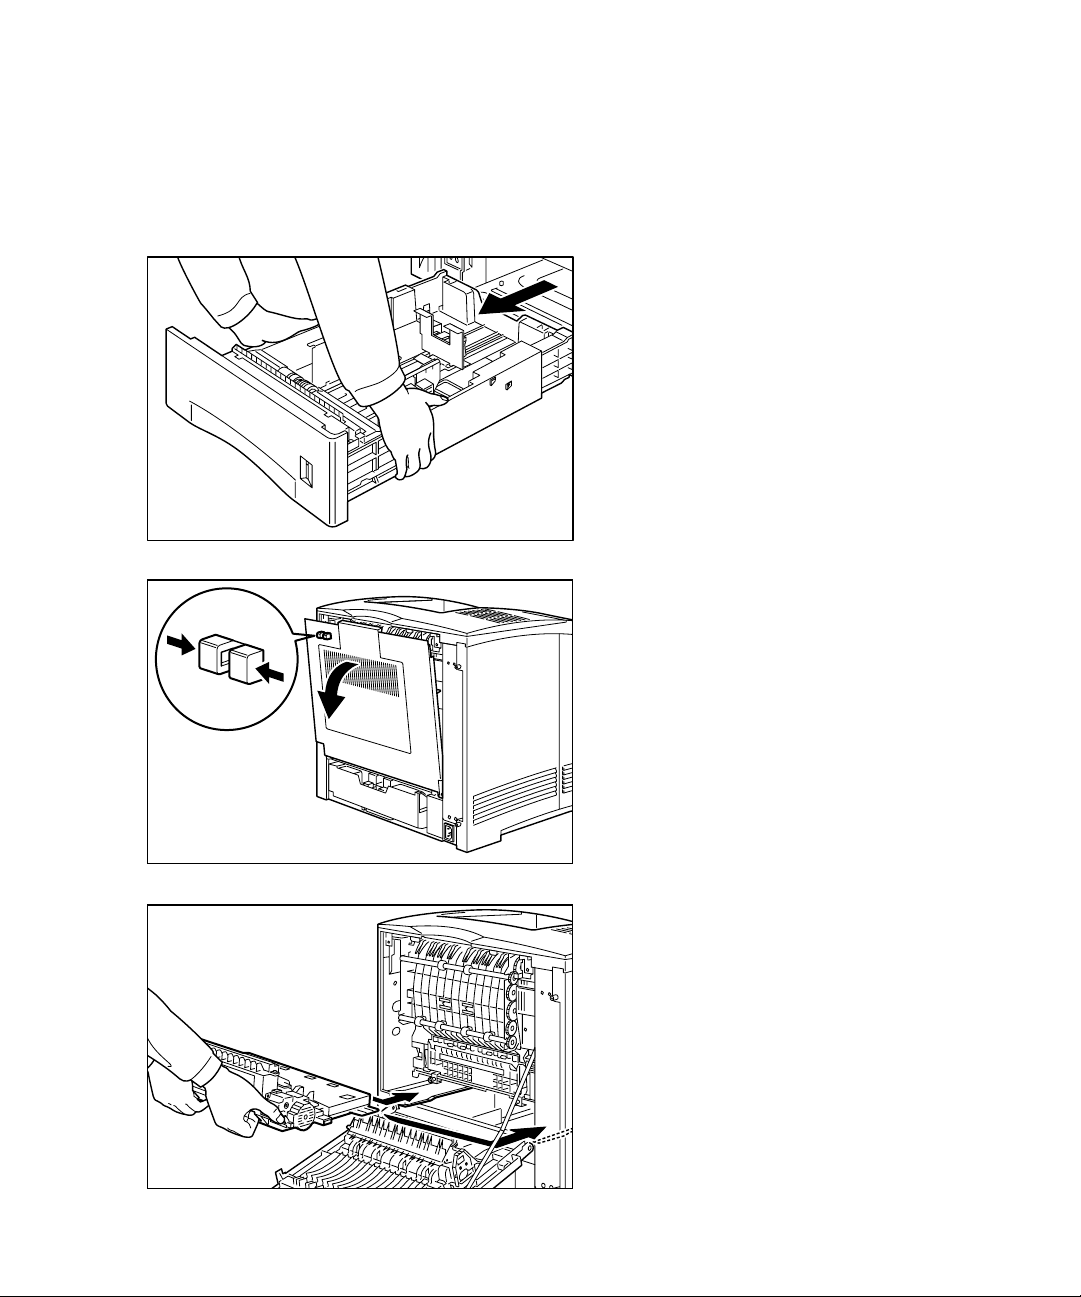
69
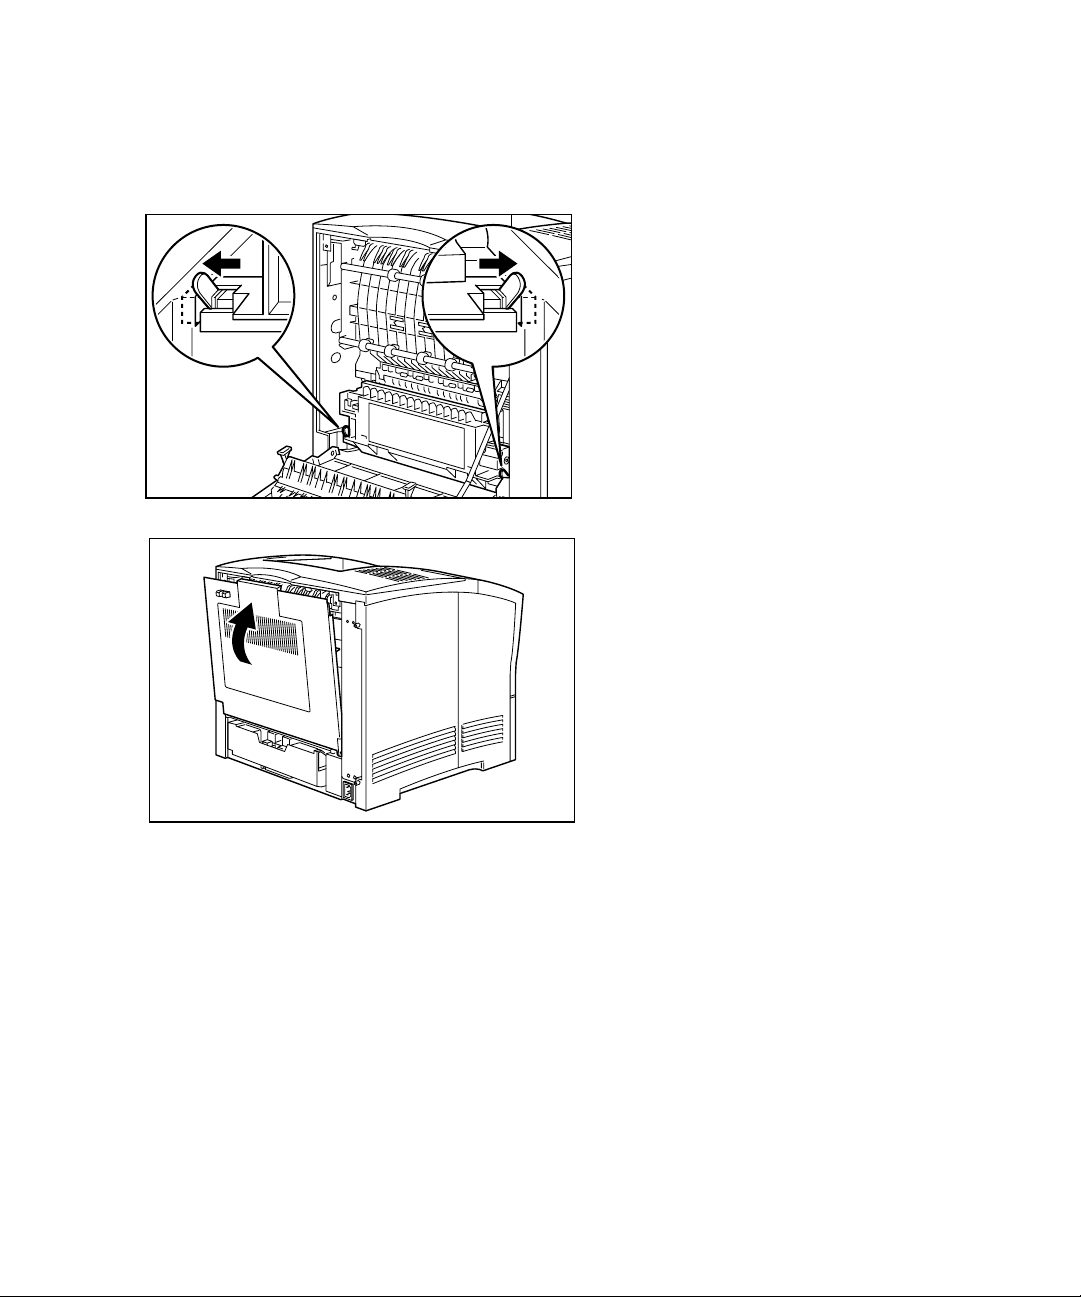
1. Switch off the power to the printer.
Remove the paper cassette from the
printer (if installed).
2. Squeeze the latch at the upper left of
the rear cover and pull towards you to
open the rear cover.
3. Line the Duplex Unit up with the left and
right channels inside the printer (as
shown) and slide the unit firmly all the
way into the printer.
Step 10b. Duplex Unit Installation
Note: These instructions apply to users of the Elite 21N model who are adding the Duplex Unit as
an option. The Elite 21
DN and Elite 21SE models ship with the Duplex Unit pre-installed.
Page 73
70
4. Slide the green tabs on the left and
right of the Duplex Unit outward to
secure the unit to the printer.
5. Close the rear cover, making sure it
latches completely.
Page 74

71
Configuring Printer Drivers for use of the Duplex Unit
Once the Duplex Unit is installed, you will need to change settings within the driver
software on all of the computers that use the printer. This will allow the Duplex Unit to
show up as an option when sending your print jobs. The drivers can be configured as
follows:
Macintosh:
• Click once on the desktop printer icon for your printer to highlight it.
• Go to the Printing menu at the top of the screen, then down to “Change Setup...”
• In the Setup window, click on the “Change” pull-down menu and go down to “Duplex
Unit.”
• Change the setting in the “To:” pull-down menu to “Installed.”
• Click OK to accept the change.
Windows 95/98:
• Go to the Start menu, then to Settings and Printers.
• Right-click the printer icon for your Elite 21 printer and select Properties.
• Click on the Device Options tab.
• Under Installable Options, click on “Duplex Unit.”
• Under “Change Setting for:,” change the selection to “Installed.”
• Click Apply and OK to accept the change.
Windows 2000:
• Go to the Start menu, then to Settings and Printers.
• Right-click the printer icon for your Elite 21 printer and select Properties.
• Click on the Device Settings tab, then scroll down to Installable Options.
• Click on the link next to “Duplex Unit” that says “Not Installed.” This link will become a
pull-down menu.
• Change the selection to “Installed.”
• Click Apply and OK to accept the change.
Windows NT 4.0:
• Go to the Start menu, then to Settings and Printers.
• Right-click the printer icon for your Elite 21 printer and select Properties.
• Click on the Device Settings tab, then scroll down to Installable Options.
• Click on “Duplex Unit” from the list of options.
• Under the “Change Setting to:” box, change the selection to “Installed.”
• Click Apply and OK to accept the change.
Page 75

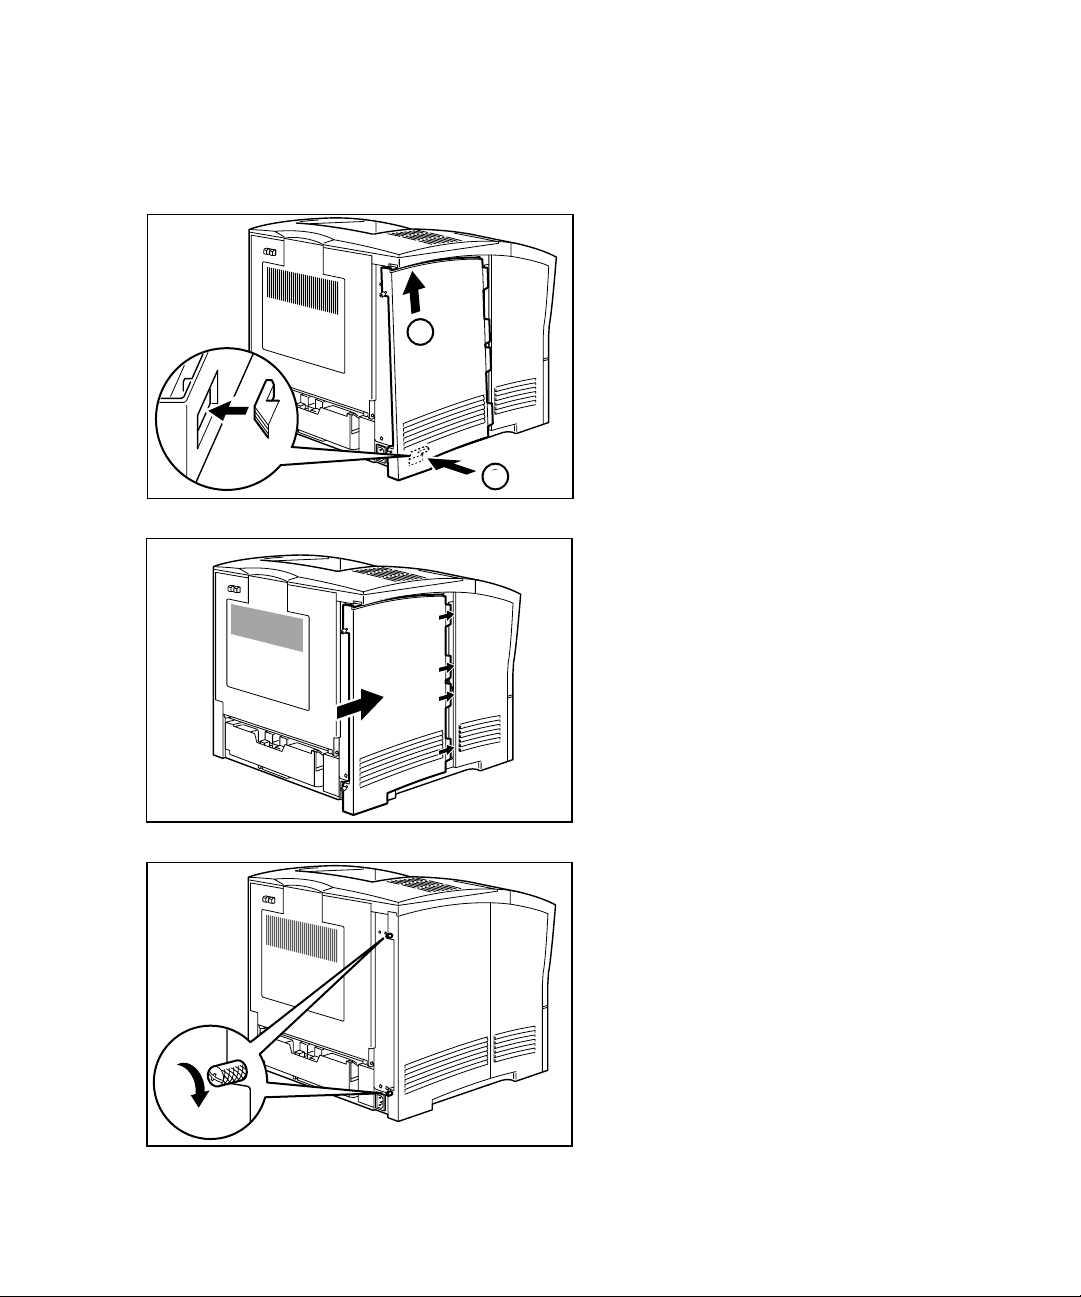
72
Step 10c. Upper Output Bin Installation
1. Switch off the power to the printer.
Remove the paper cassette from the
printer (if installed).
2. Squeeze the latch at the upper left of
the rear cover and pull towards you to
open the rear cover.
3. Locate the two plastic tabs which hold
the top cover in place, as shown.
Gently press in on these tabs to release
the cover and lift the cover off.
Store the cover in a safe place.
Page 76

73
4. Gently lower the front edge of the
Upper Output Bin into position, inserting
the tab at the front of the tray into the
slot on the printer as shown.
5. Lower the rear of the tray into position,
making sure that the two plastic tabs at
the rear of the tray match up with the
slots in the printer. The tabs should
click securely into place.
6. Close the rear cover, making sure it
latches completely.
Page 77

74
7. Lift up the paper stopper arm and open
the tray, as shown.
8. Extend the paper tray all the way out
and lift up the paper stopper.
9. Adjust the tray to match the paper size
being output.
Page 78

75
Configuring Printer Drivers for use of the Upper Output Bin
Once the upper output bin is installed, you will need to change settings within the driver
software on all of the computers that use the printer. This will allow the Upper Output Bin
to show up as an option when selecting an output location for your print jobs. The drivers
can be configured as follows:
Macintosh:
• Click once on the desktop printer icon for your printer to highlight it.
• Go to the Printing menu at the top of the screen, then down to “Change Setup...”
• In the Setup window, click on the “Change” pull-down menu and go down to “Upper Bin.”
• Change the setting in the “To:” pull-down menu to “Installed.”
• Click OK to accept the change.
Windows 95/98:
• Go to the Start menu, then to Settings and Printers.
• Right-click the printer icon for your Elite 21 printer and select Properties.
• Click on the Device Options tab.
• Under Installable Options, click on “Upper Bin.”
• Under “Change Setting for:,” change the selection to “Installed.”
• Click Apply and OK to accept the change.
Windows 2000:
• Go to the Start menu, then to Settings and Printers.
• Right-click the printer icon for your Elite 21 printer and select Properties.
• Click on the Device Settings tab, then scroll down to Installable Options.
• Click on the link next to “Upper Bin” that says “Not Installed.” This link will become a
pull-down menu.
• Change the selection to “Installed.”
• Click Apply and OK to accept the change.
Windows NT 4.0:
• Go to the Start menu, then to Settings and Printers.
• Right-click the printer icon for your Elite 21 printer and select Properties.
• Click on the Device Settings tab, then scroll down to Installable Options.
• Click on “Upper Bin” from the list of options.
• Under the “Change Setting to:” box, change the selection to “Installed.”
• Click Apply and OK to accept the change.
Page 79

76
1. Switch off the power to the printer.
Open the Multi-Purpose Feeder at the
front of the printer.
2. Remove the gear cover at the left rear
of the feeder opening by pushing it
inward while lifting up on its front edge
with your finger, as shown.
Store the gear cover in a safe place.
3. Push the Envelope Feeder into the
feeder opening as far as it will go.
Make sure the feeder is seated
securely in place.
Step 10d. Envelope Feeder Installation
Page 80

77
Configuring Printer Drivers for use of the Envelope Feeder
Once the envelope feeder is installed, you will need to change settings within the driver
software on all of the computers that use the printer. This will allow the Envelope Feeder
to show up as an option when selecting a paper source for your print jobs. The drivers
can be configured as follows:
Macintosh:
• Click once on the desktop printer icon for your printer to highlight it.
• Go to the Printing menu at the top of the screen, then down to “Change Setup...”
• In the Setup window, click on the “Change” pull-down menu and go down to “Envelope
Feeder.”
• Change the setting in the “To:” pull-down menu to “Installed.”
• Click OK to accept the change.
Windows 95/98:
• Go to the Start menu, then to Settings and Printers.
• Right-click the printer icon for your Elite 21 printer and select Properties.
• Click on the Device Options tab.
• Under Installable Options, click on “Envelope Feeder.”
• Under “Change Setting for:,” change the selection to “Installed.”
• Click Apply and OK to accept the change.
Windows 2000:
• Go to the Start menu, then to Settings and Printers.
• Right-click the printer icon for your Elite 21 printer and select Properties.
• Click on the Device Settings tab, then scroll down to Installable Options.
• Click on the link next to “Envelope Feeder” that says “Not Installed.” This link will become
a pull-down menu.
• Change the selection to “Installed.”
• Click Apply and OK to accept the change.
Windows NT 4.0:
• Go to the Start menu, then to Settings and Printers.
• Right-click the printer icon for your Elite 21 printer and select Properties.
• Click on the Device Settings tab, then scroll down to Installable Options.
• Click on “Envelope Feeder” from the list of options.
• Under the “Change Setting to:” box, change the selection to “Installed.”
• Click Apply and OK to accept the change.
Page 81

78
Step 10e. Installing Additional Memory
Introduction
You can print more documents and download more fonts to your printer if you add RAM.
To do this, you have to open up the printer and insert a SIMM (Single Inline Memory
Module). The printer can hold up to 256 MB of RAM, in two SIMM sockets. There is
already at least one SIMM installed in the printer.
Specifications
You can add SIMMs of any size from 2 MB to 128 MB. SIMMs must be non-parity 72pin, 70 nanoseconds or faster, non-composite, symmetrical, low-profile, 5-volt, and tin
leaded. This kind of memory is readily available from many sources, or you can order
upgrade kits direct from GCC. Use only EDO (extended data out) or FPM (fast page
mode). You cannot use DIMMs, SDRAM, or other special RAM technologies. Do not use
gold plated connectors. SIMMs do not have to be installed in pairs, nor do you have to
add a SIMM of the same size as that already installed. You can install any capacity SIMM
in either socket.
Why would I need to add memory to the printer?
GCC printers ship with enough standard RAM to handle most print jobs at the largest
page size and resolution supported by the printer. Some print jobs, however, may be
more complex than the standard RAM is able to handle and therefore require additional
RAM. Jobs with heavy graphical content and/or many font faces will typically require the
most memory.
In addition, you’ll need printer RAM for any fonts you download. These require as much
RAM as the space they occupy on the hard drive of your computer. In general, each font
occupies 50 -100k of RAM.
You will continue to obtain minor performance improvements as you add additional
memory up to a maximum of 256 MB of RAM.
Required tools and safety precautions
You should not need any tools to add memory to your printer. However, you should guard
against static discharges. Your body can easily accumulate a static charge; if you touch a
sensitive piece of circuitry, you can destroy it without realizing.
GCC strongly recommends that you use a grounding wrist strap. You can buy one from
any computer parts outlet. If you do not have a grounding wrist strap, touch the perforated metal chassis of the printer to discharge any static electric charge your body may
have.
Page 82

79
RAM Installation Steps
1. Set the printer’s power switch to the
Off (O) position and unplug the power
cord from the wall. Removing the side
cover of the printer while the unit is
turned on may result in damage to the
printer.
2. Loosen the two thumbscrews at the
top and bottom of the left side cover.
3. Pull the cover towards the back of the
printer and down to remove it.
Page 83
80
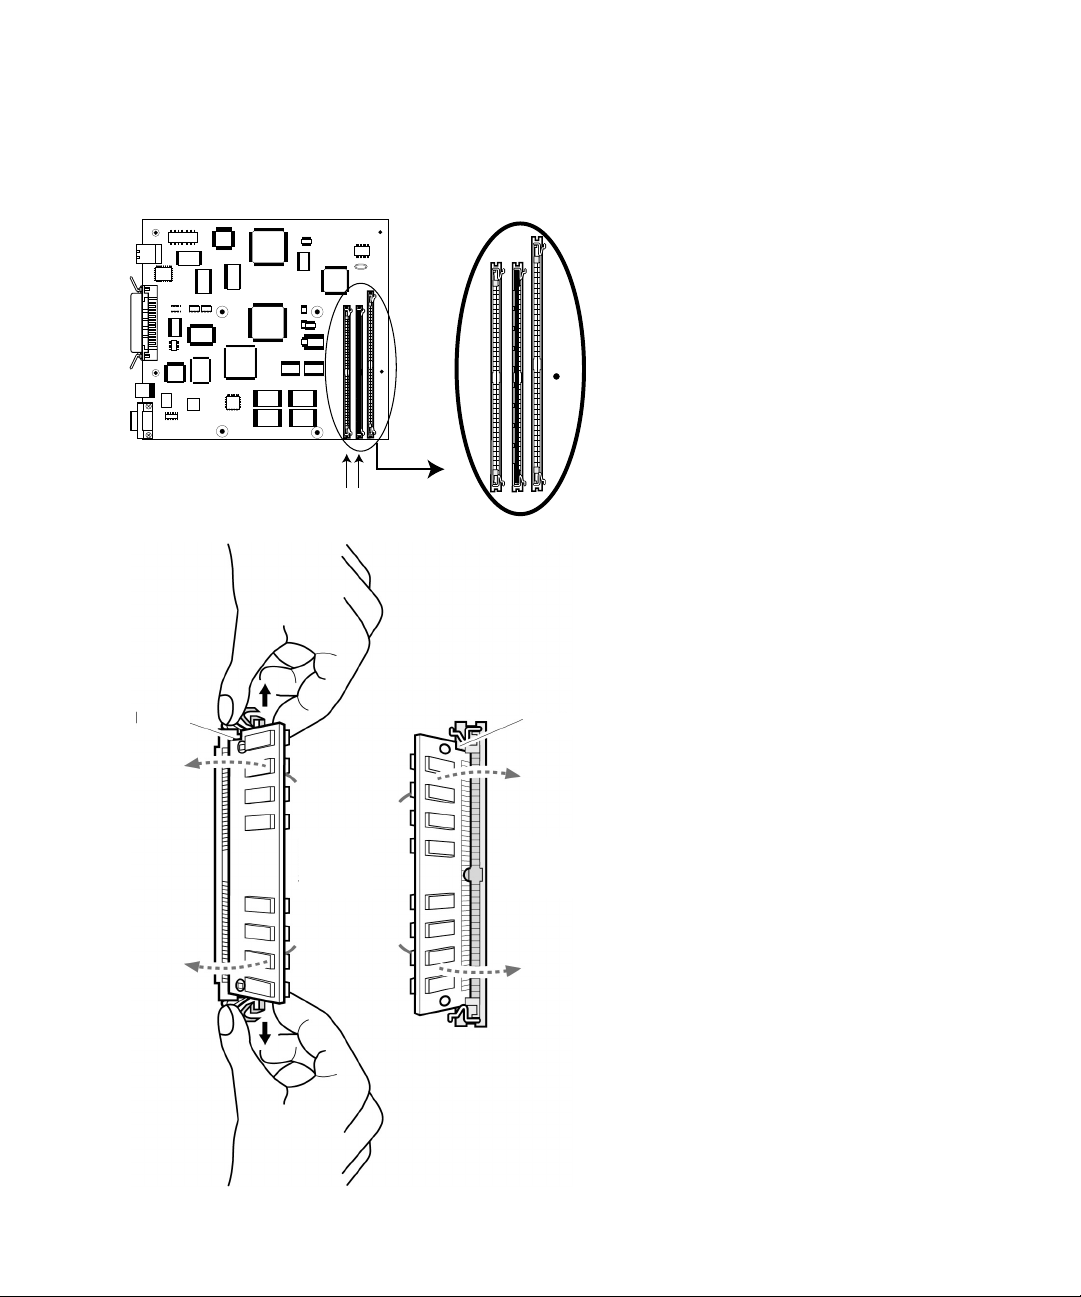
4. This will expose the main controller
board of the printer. The two RAM
SIMM slots are to the right of the
board. There are three slots in this
area of the board, the two slots to the
left are the RAM SIMM slots.
At least one of the SIMM slots should
have a RAM SIMM pre-installed.
Depending on the existing RAM
configuration of the printer, the other
slot may or may not be open.
5. If replacing existing memory with larger
capacity SIMMs, remove the existing
SIMM(s) as shown.
Install the new SIMM(s) by positioning
the SIMM into the slot at approximately
a 45 degree angle with its notched end
at the top of the slot. Gently rotate the
SIMM to the right until it clicks into
place under the metal guide clips.
SIMM Slots
Notch
Notch
Remove
RAM
SIMM
Install
RAM
SIMM
Page 84
81
6. Replace the side cover by matching up
the top of the cover with the slot at the
top of the printer (1) and the small tab
at the bottom of the cover with the slot
in the printer (2).
7. Slide the cover forward to lock it into
place, as shown.
8. Secure the screws at the top and
bottom of the side cover. Reconnect
the power cord and restart the printer.
1
2
Page 85

82
Configuring Printer Drivers for use of Additional Memory
Once the additional memory is installed, you will need to change settings within the
driver software on all of the computers that use the printer. This will allow the drivers to
properly account for the amount of installed RAM in the printer when sending print jobs.
The drivers can be configured as follows:
Macintosh:
• Click once on the desktop printer icon for your printer to highlight it.
• Go to the Printing menu at the top of the screen, then down to “Change Setup...”
• In the Setup window, click on the “Change” pull-down menu and go down to “Memory
Configuration.”
• Change the setting in the “To:” pull-down menu to the correct memory range for your
printer (i.e. - “48-55 MB” for a printer that has been upgraded to between 48 and 55 MB).
• Click OK to accept the change.
Windows 95/98:
• Go to the Start menu, then to Settings and Printers.
• Right-click the printer icon for your Elite 21 printer and select Properties.
• Click on the Device Options tab.
• Under Installable Options, click on “VM Option.”
• Under “Change Setting for:,” change the selection to the correct memory range for your
printer.
• Click Apply and OK to accept the change.
Windows 2000:
• Go to the Start menu, then to Settings and Printers.
• Right-click the printer icon for your Elite 21 printer and select Properties.
• Click on the Device Settings tab, then scroll down to “Installable Options.”
• Click on the link next to “Memory Configuration.” This link will become a pull-down menu.
• Change the selection to the correct memory range for your printer.
• Click Apply and OK to accept the change.
Windows NT 4.0:
• Go to the Start menu, then to Settings and Printers.
• Right-click the printer icon for your Elite 21 printer and select Properties.
• Click on the Device Settings tab, then scroll down to Installable Options.
• Click on “Memory Configuration” from the list of options.
• Under the “Change Setting to:” box, change the selection to the correct memory
range for your printer.
• Click Apply and OK to accept the change.
Page 86

83
Step 11. Verify Printer Setup
In order to verify that the printer has been set up properly, we recommend sending a
simple print job from the computer to the printer. To do this, make sure that the Elite
21 printer is selected as the default printer on your computer, as follows:
Macintosh: Single-click the printer’s icon on the Desktop. Go to the Printing menu, then
down to “Set Default Printer.”
Windows (all versions): Go to Start, then Settings, then Printers. Right-click the icon for
the printer. Select “Set as Default” from the list.
Once the printer is selected, open an application on the computer (such as SimpleText
on the Mac or NotePad in Windows) and create a simple file. Go to File and then to
Print to print the job.
If the job prints, installation is complete. If the job fails to print, confirm that Steps 1-10
in this manual have been performed correctly. If the printer still will not print, repeat
steps 1 -10. If you still have difficulty getting a document to print, contact GCC Technical
Support by phone at (781) 276-8620 (North America only; outside North America,
refer to the back cover) or http://www.gccprinters.com/support or contact your
authorized GCC dealer.
Page 87

84
Additional Installation Notes
Configuring Startup Page
The Elite 21 printer will print a Configuration Page each time that the printer is started
up. This page serves as a hardware test at startup, to make sure that all printer
systems are working properly and that the printer is able to print a page successfully.
This page also provides a listing of all user-configurable printer parameters and their
current settings, which can be useful in printer troubleshooting.
Some users, especially those who restart their printer often, may wish to disable this
page. The steps for disabling the Startup Page are as follows:
• Make sure the printer’s display is reading “Ready.”
• Press Menu up or down until “Configuration” appears.
• Press Item up or down until “Startup Page” appears.
• Press Value up or down until “Disabled” appears.
• Press Select to accept the new setting.
• Press Menu up or down until the display returns to “Ready.”
The Startup Page will not print out the next time the printer is started.
Note: The factory default for the Startup Page is Enabled, so if the printer is reset to
defaults using the “Restore Defaults” feature in the Resets menu, the page will be reenabled. Follow the steps above to disable to page again in this case.
Memory Configuration (Elite 21DN and Elite 21SE only)
The GCC Elite 21 Series uses a single PostScript Printer Description (PPD) file for all
three Elite 21 models. As a result, the default memory setting for the printer is set to
16MB (the minimum amount of shipping RAM for the series) within the PPD file. Users
of the Elite 21 DN and Elite 21 SE models should follow the instructions found on Page
78 to assure that the printer driver is set to use the appropriate amount of memory.
The Elite 21 DN ships with 32MB of standard RAM; the Elite 21 SE ships with 64MB
standard.
Page 88

85
Hard Drive Configuration (Elite 21 SE only)
The Elite 21SE ships with a standard 4GB hard drive pre-installed. The PPD file for the
Elite 21 Series, however, defaults to “Not Installed” for the hard drive option. Users of
the Elite 21SE model will therefore need to change the driver configuration to reflect the
presence of the hard drive, as follows:
Macintosh:
• Click once on the desktop printer icon for your printer to highlight it.
• Go to the Printing menu at the top of the screen, then down to “Change Setup...”
• In the Setup window, click on the “Change” pull-down menu and go down to “Internal
Hard Disk.”
• Change the setting in the “To:” pull-down menu to “Installed.”
• Click OK to accept the change.
Windows 95/98:
• Go to the Start menu, then to Settings and Printers.
• Right-click the printer icon for your Elite 21 printer and select Properties.
• Click on the Device Options tab.
• Under Installable Options, click on “Internal Hard Disk.”
• Under “Change Setting for:,” change the selection to “Installed.”
• Click Apply and OK to accept the change.
Windows 2000:
• Go to the Start menu, then to Settings and Printers.
• Right-click the printer icon for your Elite 21 printer and select Properties.
• Click on the Device Settings tab, then scroll down to “Installable Options.”
• Click on the link next to “Internal Hard Disk.” This link will become a pull-down menu.
• Change the selection to “Installed.”
• Click Apply and OK to accept the change.
Windows NT 4.0:
• Go to the Start menu, then to Settings and Printers.
• Right-click the printer icon for your Elite 21 printer and select Properties.
• Click on the Device Settings tab, then scroll down to Installable Options.
• Click on “Internal Hard Disk” from the list of options.
• Under the “Change Setting to:” box, change the selection to “Installed.”
• Click Apply and OK to accept the change.
Page 89

86
Using the CD-ROM User’s Manual
This installation guide is intended for you to set up your printer. The full User’s Manual
on the Elite 21 Series CD-ROM contains more detailed information about the
configuration and use of the printer. The full Elite 21 User’s Manual is found in Adobe
Acrobat PDF format in the English folder of the Elite 21 Series CD-ROM.
Adobe Acrobat Reader 4.0 is also included on the Elite 21 Series CD-ROM. If Acrobat is
not already installed on your computer, you can install it from the Elite 21 Series CDROM as follows:
• Put the Elite 21 Series CD-ROM in your CD-ROM drive.
• Open the Folder or Directory called “English” on the CD-ROM.
• Run the program called “Reader and Search 4.05 Installer” (PowerMac), “Reader 3.02
Installer” (68k Mac) or “rs405eng.exe” (Windows).
This installs the Reader program; follow the instructions on the screen.
Opening the Elite 21 User’s Manual in Acrobat Reader
The Elite 21 User’s Manual can be opened by double-clicking the file called “Elite 21
Manual.pdf” in the English folder of the Elite 21 Series CD-ROM. You can also open
Acrobat by double-clicking the Acrobat Reader icon, then open the manual file by going
to File, selecting Open and browsing to the English folder to find the file.
Understanding the Acrobat Screen
Once opened, the manual will appear on the Acrobat screen. The Acrobat screen is
divided into two parts, with bookmarks on the left and pages on the right. The
bookmarks act as a Table of Contents for the manual. Clicking on any bookmark will
bring you to that portion of the manual. If a bookmark has a triangle or plus sign to its
left, this indicates that there are sub-topics located under that bookmark. Click the
triangle or plus sign to view the sub-topics, click again to hide them.
Depending on the size of your computer’s screen, you may need to magnify the page.
You can choose the magnification you want by clicking on the magnification box in the
status bar at the bottom center of the screen.
• Fit Page shows the entire height of the page.
• Fit Width shows the entire width of the page. You won’t be able to see some of the top
or bottom of the page.
• Fit Visible is similar to Fit Width, but shows the width of the page between margins.
Page 90

87
You can also choose percentage views from the list, or choose Other to create a
specific percentage view. You can also use the magnifying glass button in the tool bar to
drag over an area of the page you want to enlarge.
When you change the magnification it remains at that setting for all pages until you
change it again.
Moving Through Pages
You can move forward and backward through the sections of the Elite 21 User’s Manual
by dragging the vertical scroll bar. When you do this, a window will appear showing
which page you are selecting.
If you click in the background area of the vertical scroll bar, you’ll move one page at a
time. If the magnification you’ve chosen shows less than a full page, you’ll see the top
part of each page followed by the bottom part.
You can also use the tool bar buttons to move from page to page.
The GCC manual also has a table of contents with entries in blue; click on these to go to
that section of the manual.
Finding Text
To find specific information in the manual, use the Find command within Acrobat. This
command takes the place of a traditional index. To use Find, follows these steps:
1. Click on the Find button in the tool bar, or go to the Edit menu and select Find.
2. The Find dialog box will appear. Enter the word(s) you want to find.
3. Click OK. The program takes you to the next place the word appears.
4. If you don’t find the information you’re looking for, press Command-G (Macintosh) or
Control-G (Windows) to Find Again. This will bring you to the next place the word
appears.
Page 91

88
Service and Support
You can contact GCC for technical assistance in several ways.
• Technical Support phones: (781) 276-8620.
(North America only; outside North America, refer to back cover)
• Fax: (781) 275-1115.
• GCC’s World Wide Web site: http://www.gccprinters.com/support
• Internet email: support@gccprinters.com
GCC’s World Wide Web site
GCC’s Web site offers a wealth of information. The full manual for the Elite 21 Series of
printers is here, along with technical bulletins that deal with any problems that arise over
the life of your printer. Check www.gccprinters.com to see if your problem has a solution.
Dealer and Service Center support
GCC offers worldwide services from its dealers and service centers. They are supported
by training, technical documentation, and technical support.
Extended warranties
GCC offers extended warranty programs for all its products. These extend the limited
warranty and cover all parts of the printer (except consumables, like the toner
cartridge). You can purchase an extended warranty during the limited warranty period,
and renew it year after year.
Software upgrades
Software upgrades are downloadable from GCC’s web site.
Consumables, accessories, and upgrades
You can purchase consumables such as toner cartridges, accessories, and upgrades
direct from GCC by calling 800 422-7777 (North America only; outside North America,
refer to back cover) or from our Web site at: http://www.gccprinters.com.
Page 92

89
SOFTWARE LICENSE AGREEMENT
OPENING OR INSTALLING THE SOFTWARE FROM THE DISTRIBUTION MEDIA (the “Software”) WHICH ACCOMPANIES THIS MANUAL
INDICATES YOUR ACCEPTANCE OF THE TERMS AND CONDITIONS CONTAINED IN THIS LICENSE AGREEMENT. THE TERMS OF THIS
LICENSE AGREEMENT APPLY TO YOU AS THE ORIGINAL LICENSEE OF THE SOFTWARE AND THE RELATED USER DOCUMENTATION (the
“Documentation”) AND TO ANY SUBSEQUENT LICENSEE THEREOF.
IF YOU DO NOT ACCEPT OR AGREE TO THE TERMS OF THIS LICENSE AGREEMENT YOU MAY RETURN THE PRODUCT, WITH DATED
PROOF-OF-PURCHASE OF THE PRODUCT, TO YOUR DEALER WITHIN 10 DAYS FOR A FULL REFUND OF PURCHASE PRICE THEREOF. ALL
RETURNED SOFTWARE MUST BE UNUSED AND IN THE UNOPENED PLASTIC BAG.
LICENSE
In return for payment of the purchase price of your GCC Technologies Product (“the Product”), you have been granted a limited, nonexclusive license (“License”) to use the Software and the Documentation on the terms set forth in this License Agreement.
GCC Technologies, Inc. (“GCC”) retains ownership of these copies of the Software and the Documentation. These copies of the Software
and the Documentation are licensed to you according to the following terms:
PERMITTED USES
YOU MAY:
1. Use the Software with any appropriate GCC product.
2. Copy the Software onto a single hard disk drive.
3. Transfer the Software to another party, if the other party agrees to the terms and conditions of this License Agreement and
completes and returns a Registration Card to GCC. The Registration Card may be obtained by writing to GCC’s Customer Service
department at the address set forth below. If you transfer the Software to any other party, you must transfer all copies and the
Documentation to such party.
4. Make a single copy of the Software on another diskette for backup purposes only.
PROHIBITED USES
THE LICENSE OF THE SOFTWARE AND THE DOCUMENTATION GRANTED TO YOU IS LIMITED, AND YOU MAY NOT:
1. Make copies of any of the Documentation or make copies of the Software other than as expressly set forth above.
2. Alter, modify or adapt the Software or the Documentation, including translating, decompiling, disassembling, creating derivative
works, or merging the Software with other software.
3. Use any backup media you have made or allow someone else to use any backup media unless the Software on the original media
is defective.
4. Rent, sublicense, assign or otherwise transfer any interest in any of the Software or the Documentation except as set forth
above.
5. Modify or erase any copyright, trademark or proprietary rights notice on any medium containing the Software or the
Documentation or copy or reproduce any of the Software or the Documentation without all of GCC’s copyright, trademark and
proprietary rights notices.
The License is effective until terminated. You may terminate it at any time by destroying all copies of the Software you have and mailing
your original Software media and the Documentation to GCC. The License and your right to use the Software will automatically terminate
upon your failure to comply with any provision of this License Agreement or upon GCC’s election to terminate the License as set forth
below. You agree upon such termination to destroy all copies of the Software which you have and to mail your original Software diskettes
and the Documentation to GCC.
GCC retains all rights and title to the Software and the Documentation except for the limited license contained herein. The Software and
the Documentation are protected by the copyright laws of the United States. There are severe penalties, civil and criminal, for copyright
infringement. Nothing in this License Agreement constitutes a waiver of GCC’s rights under the copyright laws of the United States or
any other law.
Page 93

90
LIMITED SOFTWARE WARRANTY
WARRANTY
If you discover physical defects in the medium on which the Software or the Documentation are distributed, at its option, GCC will
either replace the medium at no charge to you or terminate the License and require the return of your Product, and upon such
return, refund to you the purchase price thereof. To qualify for this warranty, you must return the defective medium with proof-ofpurchase to GCC during the one year period after you acquired the Software.
Except as set forth in the immediately preceding paragraph, GCC PROVIDES THE SOFTWARE AND THE DOCUMENTATION “AS IS”
AND WITHOUT WARRANTY OF ANY KIND, EITHER EXPRESS OR IMPLIED, INCLUDING, BUT NOT LIMITED TO, ANY IMPLIED
WARRANTIES OF MERCHANTABILITY OR FITNESS FOR A PARTICULAR PURPOSE OR WARRANTIES OF QUALITY OR PERFORMANCE. YOU THE LICENSEE ARE ASSUMING THE ENTIRE RISK AS TO THE QUALITY OF THE SOFTWARE AND THE DOCUMENTATION AND THE RESULTS OF ITS USE. Your exclusive remedy with respect to the Software, the Documentation and this License
Agreement, shall be limited to the replacement of any defective medium, or refund of the purchase price of your Product, as set
forth above.
APPLE COMPUTER, INC. MAKES NO WARRANTIES, EITHER EXPRESS OR IMPLIED, REGARDING THE ENCLOSED COMPUTER
SOFTWARE PACKAGE, ITS MERCHANTABILITY OR ITS FITNESS FOR ANY PARTICULAR PURPOSE. THE EXCLUSION OF IMPLIED
WARRANTIES IS NOT PERMITTED BY SOME STATES. THE ABOVE EXCLUSION MAY NOT APPLY TO YOU. THIS WARRANTY PROVIDES
YOU WITH SPECIFIC LEGAL RIGHTS. THERE MAY BE OTHER RIGHTS THAT YOU HAVE WHICH VARY FROM STATE TO STATE.
IN NO EVENT WILL GCC BE LIABLE FOR DIRECT, INDIRECT, SPECIAL, INCIDENTAL, OR CONSEQUENTIAL DAMAGES ARISING OUT
OF THE USE OR INABILITY TO USE THE SOFTWARE OR DOCUMENTATION, even if advised of the possibility of such damages. In
particular, GCC shall have no liability for any programs or data stored or used with the Software, including the costs of recovering
such programs or data. In no event shall GCC’s liability with respect to the Software, the Documentation and this License Agreement, in contract, tort (including negligence) or otherwise, exceed the original price paid by you for your Product.
THE WARRANTY AND REMEDIES SET FORTH ABOVE ARE EXCLUSIVE AND IN LIEU OF ALL OTHERS, ORAL OR WRITTEN, EXPRESS
OR IMPLIED. No GCC dealer, agent, or employee is authorized to make any modification or addition to this warranty.
SOME STATES DO NOT ALLOW THE EXCLUSION OF IMPLIED WARRANTIES OR LIABILITY FOR INCIDENTAL OR CONSEQUENTIAL
DAMAGES, SO THE ABOVE LIMITATION OR EXCLUSION MAY NOT APPLY TO YOU. THIS WARRANTY GIVES YOU SPECIFIC LEGAL
RIGHTS, AND YOU MAY ALSO HAVE OTHER RIGHTS WHICH VARY FROM STATE TO STATE.
GENERAL
This License Agreement is governed by the laws of the Commonwealth of Massachusetts. This License Agreement constitutes the
entire agreement between GCC and you concerning the Software and the Documentation, and supersedes all prior
communications, agreements and understandings, written or oral, between GCC and you with respect thereto.
Should you have any questions concerning this License Agreement, the Software or the Documentation, you may contact GCC by
writing to Customer Service, GCC Technologies Inc., 209 Burlington Road, Bedford, MA 01730. For the name of the nearest GCC
service center or representative, call (800) 422-7777.
TRADEMARKS
GCC Technologies is a registered trademarks of GCC Technologies Inc. GCC printers, the GCC printers logo and Elite are trademarks of GCC Technologies,
Inc. Apple, AppleTalk, LaserWriter, EtherTalk, Macintosh, and the Apple logo are registered trademarks of Apple Computer, Inc. Finder and TrueType are
trademarks of Apple Computer, Inc. PostScript is a registered trademark of Adobe Systems Incorporated. IBM is a registered trademark of International
Business Machines Corp. Centronics is a registered trademark of Centronics Data Computer Corp. Ethernet is a registered trademark of Xerox Corp.
Microsoft and Word are registered trademarks of Microsoft Corp. Windows, Windows 95, Windows 98, Windows 2000 and Windows NT 4.0 are
trademarks of Microsoft Corp. Bitstream is a registered trademark of Bitstream Inc. PCL is a registered trademark of Hewlett-Packard Company.
NetWare is a registered trademark of Novell Corp.
Page 94

91
LIMITED HARDWARE WARRANTY
GCC warrants, for the limited period of one year from the date of original purchase, the Elite 21 Series sold by GCC and any accompanying media on which GCC software is recorded (the “Product”) to be free from defects in materials and workmanship. During the
warranty period, GCC or its authorized representative will, at its option, repair, replace or refund the purchase price of any defective
product at no additional cost, provided you return it during the warranty period, transportation charges prepaid, to GCC or an
authorized GCC dealer or representative. You must attach your name, address and telephone number, a description of the problem,
and a dated proof-of-purchase bearing the serial number for each product returned for warranty service.
This Warranty is limited to the original purchaser of the product and is not transferable unless otherwise agreed by GCC in writing.
This Warranty does not apply to any product which has been damaged by accident, abuse, or misuse, which has been modified
without the prior written permission of GCC.
GCC MAKES NO WARRANTY OR REPRESENTATION, EITHER EXPRESS OR IMPLIED, WITH RESPECT TO THE SOFTWARE SUPPLIED
WITH THE PRODUCT, ITS QUALITY, PERFORMANCE, MERCHANTABILITY, OR FITNESS FOR A PARTICULAR PURPOSE. AS A RESULT,
THE SOFTWARE IS LICENSED “AS IS,” AND YOU THE LICENSEE ASSUME THE ENTIRE RISK AS TO ITS QUALITY AND PERFORMANCE.
EXCEPT AS EXPRESSLY SET FORTH ABOVE, GCC MAKES NO OTHER WARRANTIES WITH RESPECT TO THE PRODUCT, EXPRESS OR
IMPLIED, INCLUDING BUT NOT LIMITED TO, ANY IMPLIED WARRANTIES OF MERCHANTABILITY OR FITNESS FOR A PARTICULAR
PURPOSE.
UNDER NO CIRCUMSTANCES SHALL GCC’S LIABILITY ARISING OUT OF OR IN CONNECTION WITH THE PRODUCT OR THE USE OF, OR
THE INABILITY TO USE, THE PRODUCT, IN CONTRACT, IN TORT (INCLUDING NEGLIGENCE), OR OTHERWISE EXCEED THE PURCHASE
PRICE OF THE PRODUCT, AND IN NO EVENT SHALL GCC BE LIABLE FOR SPECIAL, INCIDENTAL OR CONSEQUENTIAL DAMAGES
INCLUDING, BUT NOT LIMITED TO, DAMAGES FOR DOWNTIME OR LOST PROFITS, BUSINESS, USE OF SOFTWARE OR EQUIPMENT,
OR GOODWILL, WHETHER OR NOT GCC HAS BEEN ADVISED OF THE POSSIBILITY OF SUCH DAMAGES.
Some states do not allow the exclusion or limitation of implied warranties or liability for incidental or consequential damages, or do
not allow limitations on how long an implied warranty lasts, so the above limitations or exclusions may not apply to you. ANY IMPLIED
WARRANTIES, INCLUDING ANY IMPLIED WARRANTIES OF MERCHANTABILITY OR FITNESS FOR A PARTICULAR PURPOSE, ARE
LIMITED IN DURATION TO ONE YEAR FROM THE DATE OF ORIGINAL PURCHASE OF THIS PRODUCT. This warranty gives you specific
legal rights, and you may also have other rights which vary from state to state.
No GCC dealer, representative, agent or employee is authorized to make any modification, extension or addition to this warranty on
behalf on GCC. THE WARRANTIES AND REMEDIES SET FORTH ABOVE ARE EXCLUSIVE AND IN LIEU OF ALL OTHERS, EXPRESS OR
IMPLIED.
For the name of the nearest GCC service facility or representative, call GCC at 800 422-7777, or write to:
Vice President of Customer Service, GCC Technologies Inc., 209 Burlington Road, Bedford, MA 01730.
Page 95

UNITED STATES
209 Burlington Road
Bedford, MA 01730
Tel: 781.275.5800
Fax:781.275.1115
AUSTRALIA
Unit 5/585 Blackburn Road
Notting Hill, VIC, 3168
Tel: +61 3 9562 1800
Fax:+61 3 9562 1900
UNITED KINGDOM
729 London Road
Hounslow, Middlesex TW3 1SE
Tel: +44 208 754 6000
Fax:+44 208 754 6060
GERMANY
Vertriebsbüro Deutschland
Hahnbuschweg 2-4
D-24147 Klausdorf bei Kiel
Tel: +49 431 7997610
Fax:+49 431 7997666
TO ORDER SUPPLIES OR ACCESSORIES VISIT OUR
WEBSITE www.gccprinters.com
OR CALL GCC SALES AT 1.800.422.7777
OUTSIDE NORTH AMERICA CONTACT YOUR LOCAL OFFICE.
INTERNET
sales & supplies: www.gccprinters.com
support: www.gccprinters.com/support
 Loading...