

Page 1

Elite XL Sheet Feeder Installation Guide
Elite XL Sheet Feeder
Contents
Introduction ................................................................................................. 2
Installation guidelines ................................................................................. 2
Sheet feeder kit contents ............................................................................2
Installation procedure ................................................................................. 3
Removal procedure ................................................................................. 10
500-sheet feeder accessor ies ................................................................... 11
250-sheet feeder accessor ies ................................................................... 11
GCC
T
ECHNOLOGIES
1
Page 2
Elite XL Sheet Feeder Installation Guide
Introduction
The sheet feeder is an optional accessory that provides an additional paper feed
source for your Elite XL printer. There are two sheet feeders available for the
Elite XL: 250-sheet capacity (part # AC15255) or 500-sheet capacity (part #
AC15366). The 500-sheet feeder supports Letter or A4 paper. The 250-sheet
feeder handles all paper sizes supported by the Elite XL printer.
Note: The illustrations in this guide use 250-sheet feeders to depict the installation procedures; they are also applicable to installation involving a 500-sheet
feeder.
Installation guidelines
8 page-per-minute (ppm) Elite XL models can have one 250- or one 500- sheet
feeder added to the printer.
16 page-per-minute (ppm) Elite XL models can have up to two sheet feeders
added to the printer, with the following restrictions:
• When adding two sheet feeders, only one of them can be a 500-sheet feeder.
• When attaching both a 250-and a 500-sheet feeder, the 500-sheet feeder must
be on the bottom.
Sheet feeder kit contents
Note: Paper cassettes are sold separately. See page 11 for ordering information.
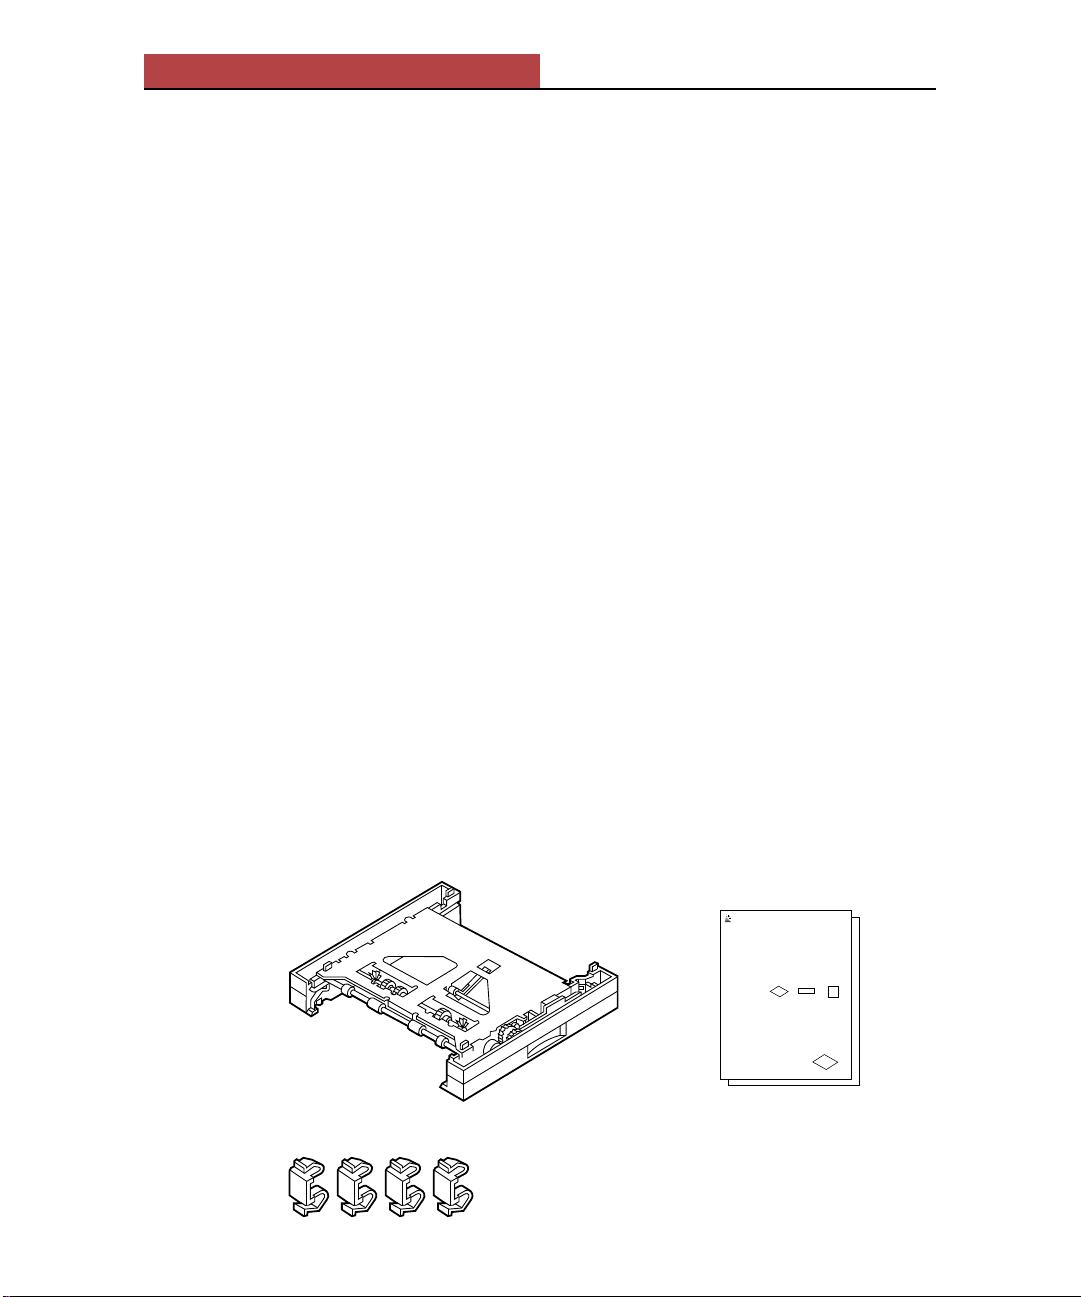
Each Elite XL sheet feeder kit contains:
1 sheet feeder (250- or 500-sheet capacity)
4 plastic retainer clips 1 installation guide
Lower sheet feeder installation guide
G
CC
T
ECHNOLOGIES
for Elite XL laser printers
The lower sheet feeder is an optional accessory that provides an additional
paper feed source for your Elite XL. There are two lower sheet feeders
available for the Elite XL: 250- or 500-sheet capacity.
Installation guidelines
8 page-per-minute (ppm) models of the Elite XL can have one 250- or
500-sheet lower sheet feeder added to the printer.
16 page-per-minute (ppm) models of the Elite XL can have up to two
lower sheet feeders added to the printer, with the following restrictions:
• When adding two lower sheet feeders, only one of them can be a
500-sheet feeder.
• When attaching both a 250- and a 500-sheet lower sheet feeder to a
16 ppm Elite XL the 500-sheet feeder must be attached below the
250-sheet feeder.
Each Elite XL lower sheet feeder kit contains:
Installation procedure
1 sheet feeder (250- or 500-sheet capacity) 4 plastic retainer clips 1 installation guide
Note: The illustrations in this
guide use 250-sheet feeders to
depict the installation procedures;
they are also applicable to
installation involving a 500-sheet
feeder.
Note: Steps marked 16ppm are only applicable to users of 16 page-per-minute
models of the Elite XL who are attaching two lower sheet feeders to the printer.
To add a lower sheet feeder(s) to the Elite XL:
Switch the printer off and unplug the power cord from the wall outlet.
1.
Disconnect the power cord and all interface cables from the back of the printer.
2.
Remove any paper tray(s) from the printer.
3.
Remove 500-sheet lower sheet feeder.
3a.
16ppm
If there is a 500-sheet feeder attached to the printer, you must remove it before
attaching the 250-sheet feeder. Reminder: You may not attach two 500-sheet
lower feeders to the printer.
Unpack the lower sheet feeder(s) and
4.
place on a flat surface.
Attach the two feeders together.
16ppm
4a.
Lower the 250-sheet feeder onto the 500-sheet
feeder or one 250-sheet feeder onto the other
one.
The sheet feeders have four pins that enable
proper alignment.
2
Page 3
Elite XL Sheet Feeder Installation Guide
Installation procedure
Note: Steps marked 16ppm are only applicable to 16 page-per-minute Elite XL
models.
To add one or two sheet feeder(s) to the Elite XL printer:
1. Switch off the printer and unplug the power cord from the AC outlet.
2. Disconnect the power cord and all interface cables from the back of the
printer.
3. Remove any paper tray(s) from the printer.
16ppm 4. If there is a 500-sheet feeder attached to the printer, you must remove it
before attaching the 250-sheet feeder. (See “Removal Procedure” on
page 10). Reminder: You may not attach two 500-sheet feeders to the
printer.
5. Unpack the sheet feeder(s) and place on a flat surface.
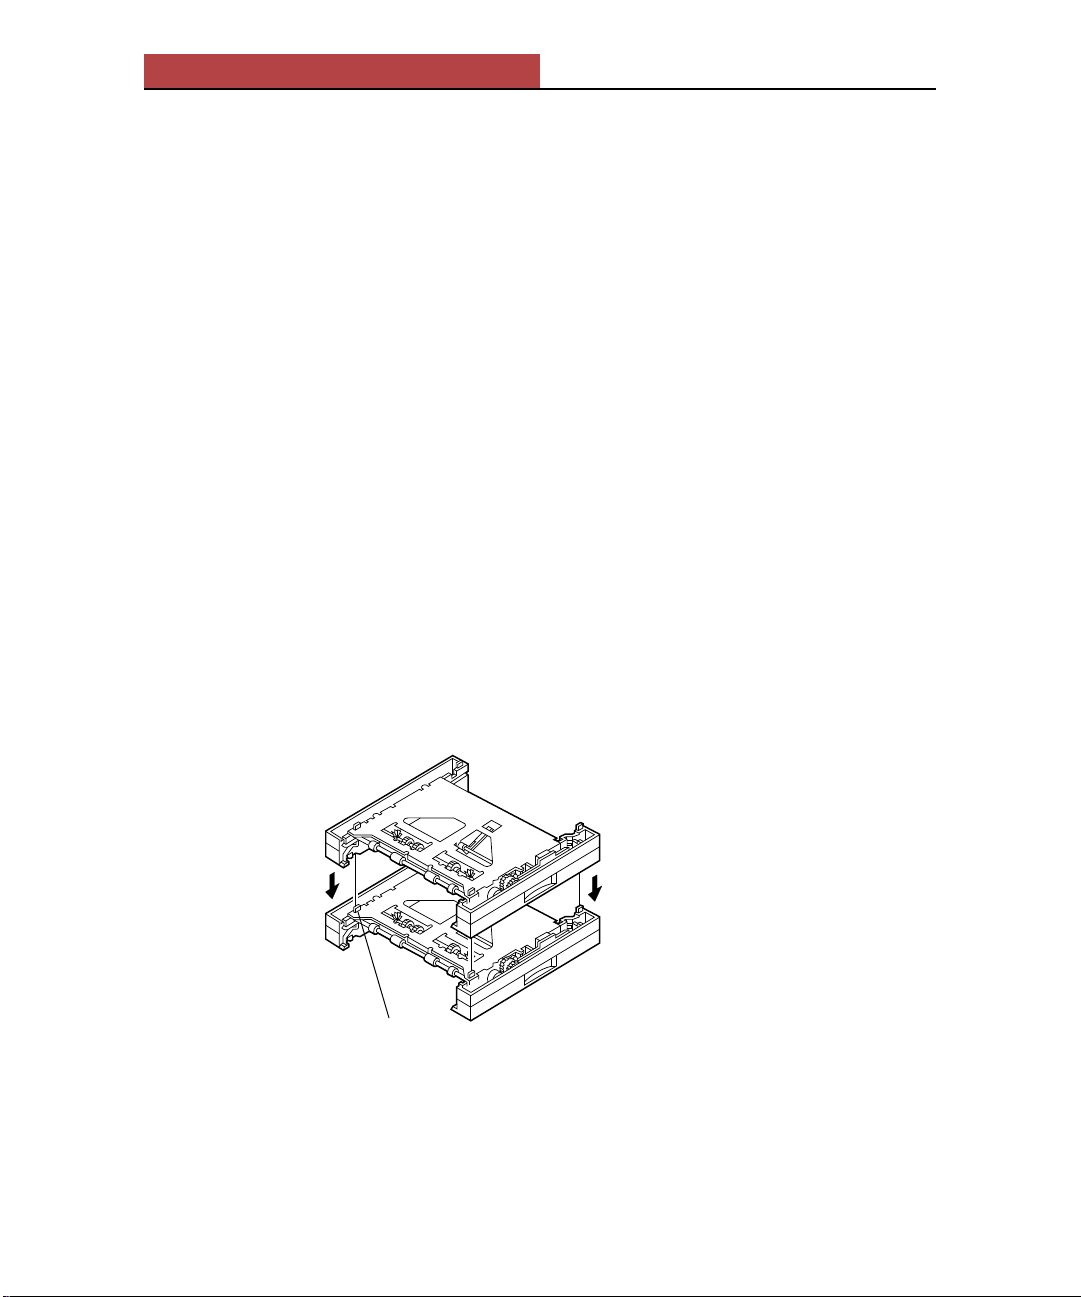
16ppm 5a. If there are two sheet feeders, attach the two feeders together. Lower
the 250-sheet feeder onto the 500-sheet feeder or the other 250-sheet feeder.
The sheet feeders have four pins that enable proper alignment.
alignment pin
16ppm 5b. Attach four retaining clips.
Use four of the plastic retaining clips to lock the feeders together.
The clips fit into slots located at the four corners where the sheet feeders
mate.
3
Page 4

Elite XL Sheet Feeder Installation Guide
6. Attach the sheet feeder(s) to the printer.
Slowly lower the printer onto the sheet feeder(s). The sheet feeder has four
pins that fit into the base of the printer enabling proper alignment.
Elite XL
G
8ppm
CC
T
ECHNOLOGIES
Elite XL
G
8ppm
CC
T
ECHNOLOGIES
7. Attach four retaining clips.
alignment pin
4
Page 5

Elite XL Sheet Feeder Installation Guide
Use the four plastic retaining clips to lock the Elite XL printer and sheet
feeder(s) together. The clips fit into slots located at the four inside corners
where the sheet feeders mate.
8. Remove the sheet feeder control cable cover.
5
Page 6

Elite XL Sheet Feeder Installation Guide
The control cable cover is located at the lower left corner of the back of the
sheet feeder. To remove the cover, grasp the cover’s handle, push it up, then
pull it out. With the cover removed, the control cable will be visible.
16ppm Note: If you are attaching two sheet feeders, remove the control cable cover
from each one.
9. Remove the printer’s control cable cover.
6
Page 7

Elite XL Sheet Feeder Installation Guide
The control cable cover is located at the lower left corner of the back of the
printer. To remove the cover, grasp the cover’s handle, push it up, then pull
it out.
10. Connect the sheet feeder control cable to the printer.
7
Page 8

Elite XL Sheet Feeder Installation Guide
Grasp the sheet feeder control cable and slowly extend it beyond the sheet
feeder’s housing. If you are attaching two feeders, use the cable from the
upper sheet feeder. Orient the cable’s connector so that the two “tabs” are
facing to the right and plug the cable into the connector in the printer.
Elite XL
Control cable
2 tabs should
face to the
right
Sheet feeder
8
Page 9

Elite XL Sheet Feeder Installation Guide
16ppm 10a.If there are two sheet feeders, connect the lower sheet feeder control
cable to the upper sheet feeder.
Grasp the control cable of the lower sheet feeder and slowly extend it
beyond the sheet feeder’s housing. Orient the cable’s connector so that the
two “tabs” are facing to the right and plug the cable into the connector in
the upper sheet feeder.
Elite XL
Control cable
Upper
sheet feeder
2 tabs should
face to the
right
Lower
sheet feeder
11. Replace all of the control cable covers.
Insert the top edge of the cover first and then pivot the bottom half
down and into place.
12. Reconnect the interface cables and the power cord to the printer.
9
Page 10

Elite XL Sheet Feeder Installation Guide
13. Plug the power cord into the wall outlet.
14. Switch on the printer.
15. Refer to Appendix D in the Elite XL User’s Manual for information
about printing with additional sheet feeders.
Removal Procedure
To remove a sheet feeder from the Elite XL printer:
1. Switch off the printer and unplug the power cord from the AC outlet.
2. Disconnect the power cord and all interface cables from the back of the
printer.
3. Remove any paper trays from the printer and sheet feeder(s).
4. Remove four retaining clips.
Remove the four plastic clips locking the feeder in place. The clips are
located at the four inside corners where the sheet feeder mates with the
printer.
5. Remove the sheet feeder control cable cover.
The control cable cover is located at the lower left corner of the back of the
sheet feeder. To remove the cover, grasp the cover’s handle, push it up, then
pull it out. With the cover removed, the control cable will be visible.
6. Remove the control cable cover from the printer.
The control cable cover is located at the lower left corner of the back of the
printer or sheet feeder. To remove the cover, grasp the cover’s handle, push
it up, then pull it out. With the cover removed, the control cable will be
visible.
7. Disconnect the control cable from the printer.
Grasp the control cable close to the connector and pull gently until the cable
is released.
8. Detach the sheet feeder from the printer.
Slowly lift the printer from the sheet feeder.
9. Replace all of the control cable covers.
10
Page 11

Elite XL Sheet Feeder Installation Guide
10. Reconnect the interface cables and power cord to the printer.
11. Plug the power cord into the wall outlet.
12. Switch on the printer.
For information on ordering consumable items and accessories for the Elite XL, please call
GCC Sales at (800) 422-7777 (U.S. and Canada only). Outside the U.S. and Canada, call your
local GCC dealer.
500-Sheet Feeder Accessories Part number
500-sheet Letter Cassette ................................ AC15362
500-sheet A4 Cassette .....................................AC15364
250-Sheet Feeder Accessories Part number
250-sheet Universal Cassette ..........................AC15249
30-sheet Envelope Cassette ............................AC15253
11
Page 12

Elite XL Sheet Feeder Installation Guide
WARRANTY
GCC Technologies Inc. (“GCC”) warrants, for the limited period of one year from the date of original purchase, the Elite XL Sheet Feeder sold by GCC is recorded
(the “product”) to be free from defects in materials and workmanship. During the warranty period, GCC or its authorized representative will, at its option, repair,
replace or refund the purchase price of any defective product at no additional cost, provided you return it during the warranty period, transportation charges prepaid,
to GCC or an authorized GCC dealer or representative. You must attach your name, address and telephone number, a description of the problem, and a dated proofof-purchase bearing the serial number for each product returned for warranty service.
This Warranty is limited to the original purchaser of the product and is not transferable unless otherwise agreed by GCC in writing. This warranty does not apply to
any product which has been damaged by accident, abuse, or misuse, which has been modified without the prior written permission of GCC.
GCC MAKES NO WARRANTY OR REPRESENTATION, EITHER EXPRESS OR IMPLIED, WITH RESPECT TO THE SOFTWARE SUPPLIED WITH THE
PRODUCT, ITS QUALITY, PERFORMANCE, MERCHANTABILITY, OR FITNESS FOR A PARTICULAR PURPOSE. AS A RESULT, THE SOFTWARE IS
LICENSED “AS IS,” AND YOU THE LICENSEE ASSUME THE ENTIRE RISK AS TO ITS QUALITY AND PERFORMANCE.
EXCEPT AS EXPRESSLY SET FORTH ABOVE, GCC MAKES NO OTHER WARRANTIES WITH RESPECT TO THE PRODUCT, EXPRESS OR IMPLIED,
INCLUDING BUT NOT LIMITED TO, ANY IMPLIED WARRANTIES OF MERCHANTABILITY OR FITNESS FOR A PARTICULAR PURPOSE.
UNDER NO CIRCUMSTANCES SHALL GCC’S LIABILITY ARISING OUT OF OR IN CONNECTION WITH THE PRODUCT OR THE USE OF, OR THE
INABILITY TO USE, THE PRODUCT, IN CONTRACT, IN TORT (INCLUDING NEGLIGENCE), OR OTHERWISE EXCEED THE PURCHASE PRICE OF
THE PRODUCT, AND IN NO EVENTS SHALL GCC BE LIABLE FOR SPECIAL, INCIDENTAL OR CONSEQUENTIAL DAMAGES INCLUDING, BUT
NOT LIMITED TO, DAMAGES FOR DOWNTIME OR LOST PROFITS, BUSINESS, USE OF SOFTWARE OR EQUIPMENT, OR GOODWILL, WHETHER
OR NOT GCC HAS BEEN ADVISED OF THE POSSIBILITY OF SUCH DAMAGES.
Some states do not allow the exclusion or limitation of implied warranties or liability for incidental or consequential damages, or do not allow limitations on how
long an implied warranty lasts, so the above limitations or exclusions may not apply to you. ANY IMPLIED WARRANTIES, INCLUDING ANY IMPLIED
WARRANTIES OF MERCHANTABILITY OR FITNESS FOR A PARTICULAR PURPOSE, ARE LIMITED IN DURATION TO ONE YEAR FROM THE DATE
OF ORIGINAL PURCHASE OF THIS PRODUCT. This warranty gives you specific legal rights, and you may also have other rights which vary from state to state.
No GCC dealer, representative, agent or employee is authorized to make any modification, extension or addition to this warranty on behalf of GCC. THE
WARRANTIES AND REMEDIES SET FORTH ABOVE ARE EXCLUSIVE AND IN LIEU OF ALL OTHERS, EXPRESS OR IMPLIED.
For the nearest GCC service facility or representative, call GCC at (800) 422-7777, or write to Customer Service, GCC Technologies Inc., 209 Burlington Road,
Bedford, MA 01730-9143.
TRADEMARKS
GCC Technologies and the GCC Technologies logo are registered trademarks of GCC Technologies Inc. Elite is a trademark of GCC Technologies Inc.
CREDITS
© Copyright GCC Technologies Inc., 1996. All rights reserved.
The Sheet Feeder Installation Guide for Elite XL Laser Printers written by Tom Veldran. Edited by Dave Hill, Eli Fuchs, Michael McCabe, Bill Krech.
Illustrations by Bill Krech.
12
 Loading...