

Page 1

TM
Elite
USER’S MANUAL
XL 20ppm
G
CC
T
ECHNOLOGIES
Page 2

Contents
1: Introduction and Installation
Elite XL 20ppm highlights ................................................................ 1-2
Elite XL 20ppm Optional Accessories ..............................................1-3
Installing the Elite XL 20ppm...........................................................1-5
Choosing a location for the printer ................................................ 1-5
Unpacking the Elite XL 20ppm ........................................................1-6
The Elite XL 20ppm Configuration Page.........................................1-7
Elite XL 20ppm Main Features ......................................................... 1-7
Installing or replacing the toner cartridge ..................................... 1-8
Connecting power to the Elite XL 20ppm .................................... 1-10
Using the paper tray ...................................................................... 1-11
Using the MultiPurpose feeder ..................................................... 1-15
Elite XL 20ppm interface connections...........................................1-17
Supported network protocols ....................................................... 1-22
2: Using a Macintosh
Software installation ........................................................................ 2-2
Selecting the LaserWriter 8 printer driver ......................................2-4
Printing documents using the LaserWriter 8 printer driver .......... 2-6
Selecting Page Setup options ..........................................................2-7
Page Attributes.................................................................................2-7
Selecting Print Options .................................................................... 2-9
Manual feed printing ..................................................................... 2-14
Naming the Elite XL 20ppm ........................................................... 2-15
Page 3

3: Using Windows 3.1
Setting Windows 3.1 printing options ............................................ 3-5
Advanced Options ............................................................................3-7
Port assignment- Windows 3.1 ........................................................3-8
Installing printer description files ................................................... 3-9
Printing from Windows 3.1 applications ...................................... 3-10
4: Using Windows 95
Windows 95 printing software overview ....................................... 4-2
Plug and Play installation ................................................................ 4-2
Using Add Printer .............................................................................4-3
Solutions to possible software installation problems .................. 4-11
Exploring the Properties dialog box ............................................. 4-14
The Device Options page ...............................................................4-15
Updating printer memory..............................................................4-16
The Details page ............................................................................. 4-17
The Paper page .............................................................................. 4-17
The Graphics page .......................................................................... 4-18
The Fonts page ...............................................................................4-19
The PostScript page ........................................................................ 4-19
Installing printer description files ................................................. 4-20
Installing printer description files using Windows Explorer ........ 4-20
Installing printer description files using an MS-DOS window .....4-22
Printing from Windows 95 applications ....................................... 4-23
Selecting print options ................................................................... 4-24
The Print Properties dialog box .................................................... 4-24
Page 4

5: Using Windows NT 3.51
Windows NT 3.51 printing software overview ............................... 5-2
Select and configure a communications port ................................. 5-4
Selecting Page Setup and Print options .......................................... 5-7
Print Setup options ..........................................................................5-7
Print options .....................................................................................5-8
6: Using Windows NT 4.0
Windows NT 4.0 printing software overview .................................6-2
Exploring the Properties and Document Defaults dialog boxes ... 6-5
The Properties dialog box ................................................................ 6-6
The Device Settings page ................................................................. 6-6
Updating the printer driver .............................................................6-7
Other general items in the Device Settings .................................... 6-8
Other GCC-specific items in the Device Settings ............................ 6-8
The Document Defaults dialog box ................................................ 6-8
Opening the Document Defaults dialog box ................................. 6-9
GCC-specific items ............................................................................6-9
Other items in the Advanced page ............................................... 6-10
Installing printer description files ................................................. 6-10
Installing printer description files using Windows Explorer ........ 6-10
Installing printer description files using MS-DOS window .......... 6-13
Printing from Windows NT 4.0 applications ................................. 6-14
Selecting print options ................................................................... 6-14
The Print Properties dialog box ..................................................... 6-15
Page 5

7: Using DOS
Overview of setup and printing from a DOS application .............. 7-2
Overview of setup and printing from DOS command line ............7-2
Port configuration – DOS ................................................................. 7-3
Selecting a printer driver .................................................................7-4
Using the Copy command ................................................................ 7-5
8: The Elite XL 20ppm control panel
Control panel (LCD) display window...............................................8-2
Control panel status LEDs ................................................................8-2
Control panel function keys ............................................................ 8-3
The Elite XL 20ppm menu system....................................................8-6
Do I need to change control panel menus?....................................8-6
Language ..........................................................................................8-7
Print Help Page ................................................................................. 8-7
Print (1) Sample Page (s) ..................................................................8-7
Printer Info........................................................................................8-8
Paper Handling ................................................................................. 8-9
Emulations ...................................................................................... 8-10
Interfaces ........................................................................................ 8-13
Info Pages .......................................................................................8-14
Print Control ...................................................................................8-14
Energy Save.....................................................................................8-15
Page 6

9: Fonts
Introduction ...................................................................................... 9-2
Resident PostScript fonts .................................................................9-2
PCL resident font catalog.................................................................9-5
Font compatibility ............................................................................9-6
Downloading fonts from a Macintosh ............................................ 9-6
Additional LaserWriter Utility functions ......................................... 9-9
Downloading fonts from Windows...............................................9-10
Using an external hard disk with the Elite XL 20ppm..................9-11
Initializing an external hard disk...................................................9-12
10: Adobe Acrobat
Installing Adobe Acrobat Reader ..................................................10-2
Opening Documents with Acrobat Reader...................................10-3
Understanding the Acrobat Screen ............................................... 10-3
Moving Through Pages ..................................................................10-3
Finding Text .................................................................................... 10-4
What is on this CD-ROM ................................................................ 10-4
11: Maintenance and Troubleshooting
Cleaning the rollers every 14,000 pages ....................................... 11-2
Handling and storing toner cartridges ......................................... 11-2
Toner spills ...................................................................................... 11-2
Packing the printer to transport it ................................................ 11-3
Printing Problems ........................................................................... 11-5
Detailed Troubleshooting ..............................................................11-9
Page 7

Diagnosing errors from print output ..........................................11-15
Service and Support ..................................................................... 11-17
GCC’s World Wide Web site ......................................................... 11-17
Dealer and Service Center support..............................................11-17
Extended warranties ....................................................................11-17
Software upgrades .......................................................................11-18
Transporting your printer ............................................................ 11-18
Consumables, accessories, and upgrades .................................... 11-18
Appendices
A: Printer specifications.................................................................. A-1
B: Paper specifications and recommendations ..............................B-1
C: Adding memory to your printer ................................................C-1
D: Adding and configuring optional paper trays ......................... D-1
E: PCL ............................................................................................... E-1
F: Interface connector pinouts ....................................................... F-1
G: Radio and television interference ............................................. G-1
H: Elite XL 20ppm consumables and optional accessories ........... H-1
I: Glossary.........................................................................................I-1
J: Warranties and Licenses ............................................................. J-1
Page 8
Introduction and Installation
Contents
Elite XL 20ppm highlights 1-2
Elite XL 20ppm optional accessories 1-3
Installing the Elite XL 20ppm 1-5
Overview 1-5
Unpacking the Elite XL 20ppm 1-6
The Elite XL 20ppm Configuration Page 1-7
Elite XL 20ppm main features 1-7
Installing or replacing the toner cartridge 1-8
CHAPTER
1
Connecting power to the Elite XL 20ppm 1-10
Using the paper tray 1-11
Using the MultiPurpose Feeder 1-15
Elite XL 20ppm interface connections 1-17
• 1 - 1
Page 9

1: Introduction and Installation
Congratulations on your purchase of a GCC Technologies Elite XL 20ppm laser
printer. You now have a fast, high-quality, versatile solution for all your printing
needs.
This manual presents installation instructions, basic day-to-day user information,
troubleshooting tips, and reference materials for your Elite XL 20ppm printer. The
contents of this manual are presented to help you quickly setup and begin using your
printer. Networking instructions and the printer software are contained on the CDROM provided with your printer.
Before you set up the printer, take a few minutes to understand its main features.
Elite XL 20ppm highlights
GCC offers several printers in the Elite XL 20ppm product family; the Elite XL 20/
600, the Elite XL 20/800 and the Elite XL 20/1200.
Razor sharp printing
• Depending on the model, Elite XL 20ppm printers can print at 1200, 800, 600,
400, and 300 dots per inch for high-quality images.
• GCC’s exclusive AccuGray software ensures that halftones reproduce with
consistent brightness, regardless of the screen frequencies used, giving you
more detailed photographs.
Large Format Printing/Exceptional Paper handling
• You can use paper up to 13 x 35 inches through the standard MultiPurpose
feeder or up to 13 x 18.5 inches using the standard paper cassette supplied with
the printer.
• The Elite XL 20ppm can print an area right up to the edge of the paper for full
bleeds or printing of documents with printer’s crop marks.
• The Elite XL 20ppm printer comes with a Universal Paper Cassette capable of
holding 500 sheets of all US and European paper sizes from Letter/A4 through
Tabloid/A3. You can also load 150 sheets of paper up to 13 x 35 inches (330.2 x
889 mm) in the MultiPurpose feeder.
• The Elite XL 20ppm printer has a total capacity of 1650 pages (using the
standard universal paper cassette and MultiPurpose feeder, and two optional
500 sheet lower paper tray assemblies).
1 - 2 • Introduction and Installation
Page 10

Flexibility/Compatibility/Connectivity
• The Elite XL 20ppm accepts jobs in PostScript Level 2 and PCL 5 formats from
Macintosh, Windows, MS-DOS, and UNIX based computers.
• The Elite XL 20ppm comes with Ethernet to let you connect to an Ethernet
network. It also has LocalTalk as standard, and supports NetWare and TCP/IP.
• If you have an Ethernet network that supports TCP/IP, you can remotely view
and configure any Elite XL 20ppm using a World Wide Web browser and
GCC’s WebAdmin utility.
• The Elite XL 20ppm supports Novell’s NEST system which allows you to
connect an Elite XL 20ppm to a Novell network without needing to dedicate a
computer as a print server.
• The Elite XL 20ppm can accept print jobs from a Bidirectional Parallel port and
LocalTalk/Serial and Ethernet networks at the same time.
• The Elite XL 20ppm has a SCSI interface that allows you to connect multiple
external SCSI hard drives for additional font storage and faster printing.
Environmentally friendly
• The Elite XL 20ppm is an Energy Star compliant low power consumption
printer, and its one-piece microfine toner cartridge prints an average of 14,000
letter-size pages.
• The Elite XL 20ppm emits extremely small amounts of ozone, well within the
safety limits, and is engineered to reduce dust emissions for a healthier work
area.
Optional Accessories
GCC supplies optional accessories for the Elite XL 20ppm printer. Additional paper
trays, memory upgrades, lower paper tray assemblies, interface cables and replacement toner cartridges (CRUs) can be purchased directly from GCC at 1-800-422-
7777. You can also order these items online at the GCC web store at
www.gccdirect.com.
There is more information in the Optional Accessories appendix in this manual.
• 1 - 3
Page 11

Interface
cables
Elite XL 20ppm Optional Accessories
On Line
Comm Paper
Service
500 sheet paper feeder
(includes cassette)
500 sheet universal
paper cassette
Toner
cartridge
Envelope
cassette
1 - 4 • Introduction and Installation
8 MB, 16 MB or 32 MB
memory expansion kit
Page 12
Installing the Elite XL 20ppm
Overview
Carry out these steps to get your printer up and running:
• Select a location for the printer.
• Unpack the printer and connect it to a power outlet.
• Install the toner cartridge.
• Connect the printer to a computer or network.
The detailed instructions for these steps are in this section of the manual.
Once you have the printer physically set up, you have to install software on every
computer that will use it. This includes:
• Install the printer driver on each Macintosh or Windows computer.
• Install PPD (PostScript Printer Description) and other files, if necessary.
• Configure the control panel, driver, and ports, if necessary.
The detailed instructions for these steps are in the appropriate section of this manual,
according to which type of computer or operating system you use.
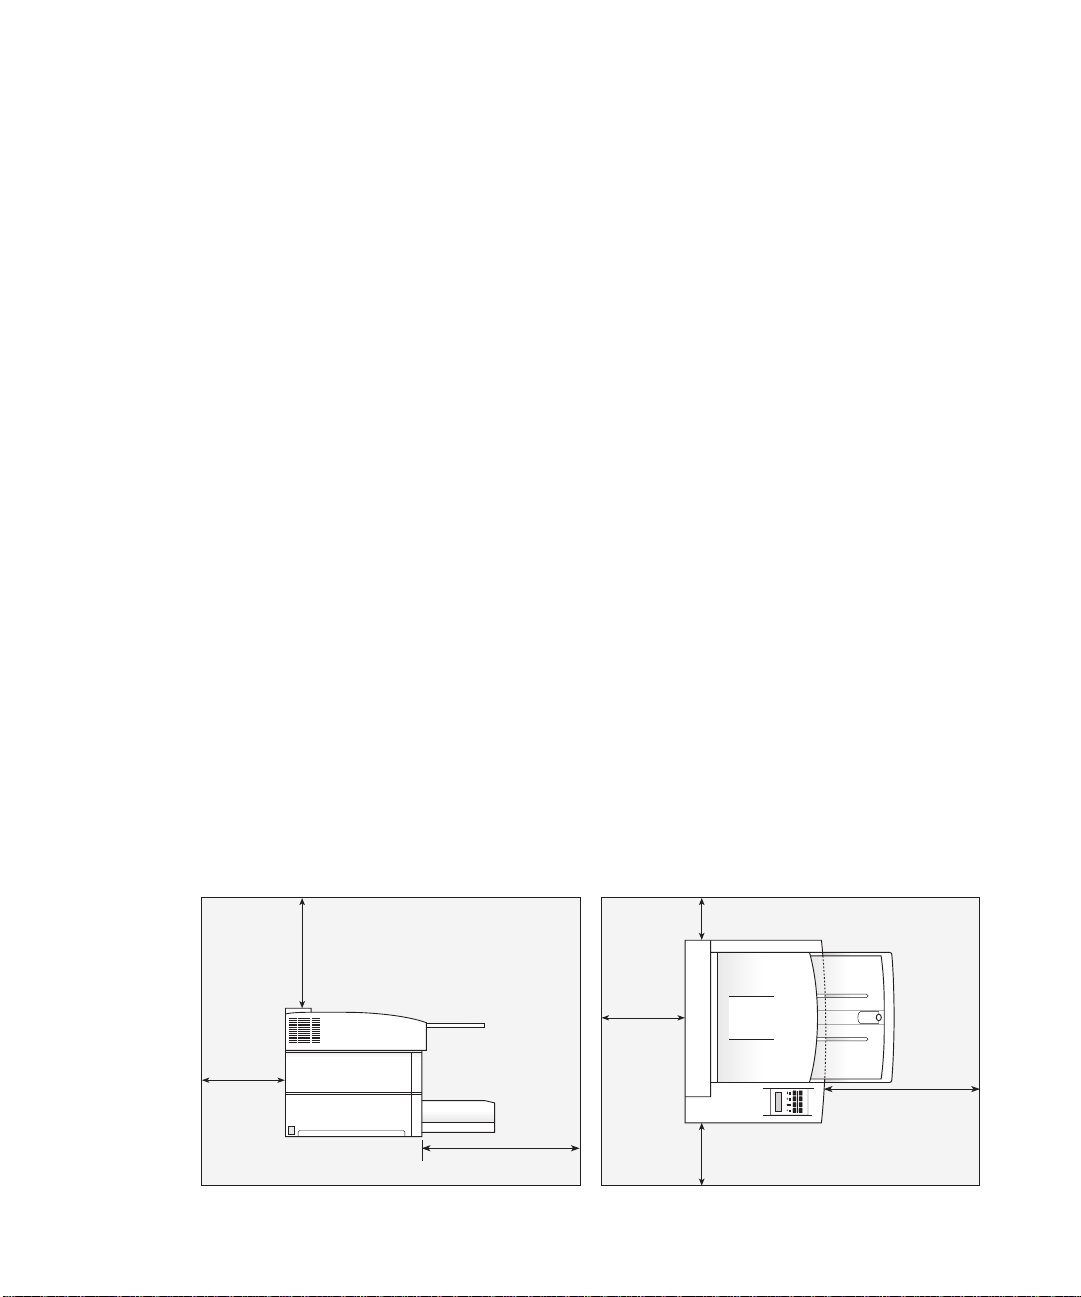
Choosing a location for the printer
Place the printer on a flat, level surface in a well ventilated area away from direct
sunlight and areas where the air temperature and humidity can vary. Do not obstruct
the fan vent on the left side of the printer, and make sure that the fan vent does not
blow air directly into someone’s face. Use the diagram below to determine where to
put your printer.
3.94”
100mm
7.87”
200mm
29.92”
760mm
12.59”
320mm
15.75”
400mm
29.92”
760mm
12.59”
320mm
• 1 - 5
Page 13

Unpacking the Elite XL 20ppm
G
CC
T
ECHNOLOGIES
G
CC
T
ECHNOLOGIES
Warning: The printer must be carried by two people. It weighs approximately 60
pounds unpacked (approximately 27 kilograms).
Note: Save the packing materials inside the shipping box and put the box in a safe
place; you will be able to repack the printer should you need to move it again.
1. Unlock and remove the four locking handles by pulling the tab.
2. Lift off the top of the box, and take out the printer.
3. Take the printer out of the plastic bag.
4. Remove the three pieces of tape from the top of the printer.
5. Take the documentation and CD-ROM out of the plastic bag.
6. Check that you have all of the following:
If any of these items
are missing, contact
your dealer or GCC
Technical Support
(781-276-8620)
immediately.
You will need to
provide a cable to
connect your computer or network to
the printer.
Universal paper
cassette
Elite XL
Elite XL 20ppm
ppm
20
USERS MANUAL
printer
O
n
L
in
e
C
o
m
m
P
a
p
e
r
S
e
rvice
Configuration
page
Elite
Configuration Page
™
XL 20ppm
Printer Information
Language: English
AppleTalk Name: Model
Page Count: 20
RAM Installed: 8MB
Hard disk: No disk
OS Version: 2.3
PostScript Level 2 Version: 2.3
ROM Version: 2.3
H/W Version: 1.0
AccuGray: Enabled
Interfaces
8-pin Serial: LocalTalk
RS422 Serial (Inactive)
Baude Rate: 9600
Data Bits: 8
Stop Bits: 1
Parity: None
Flow Control: Xon/Xoff
RS232 Serial (Active)
Baude Rate: 9600
Data Bits: 8
Stop Bits: 1
Parity: None
Flow Control: Xon/Xoff
Parallel Port (Active)
Line Termination: Normal
Paper Handling
Print Darkness: Normal
Default Source: Upper Tray
Default Size: Letter
Jam Recovery: Disabled
Paper Reserve: Enabled
Manual Feed Timeoutt: 5 Minutes
Emulations
PS/PCL Sensing: PostScript Only
Port Emulation
Parallel Port: Auto Switch
RS232 Port: Auto Switch
RS422 Port: Auto Switch
LocalTalk Port: PostScript Only
PostScript
Default Resolution: 800
Job Cancel: Enabled
Start Page: Disabled
Wait Timeout: 300 Seconds
PCL
Resolution: 600
Copies: 1
Font Source: Internal
Font Number: 1
Pitch: 10.0
Point Size: 12.0
Orientation: Portrait
Page Length: 60
Symbol Set: Roman-8
Wait Timeout: 120 Seconds
Line Wrap: Disabled
Toner cartridge
(in box)
1 - 6 • Introduction and Installation
Installation
Guide
AC power
cord
Elite XL 20ppm
CD-ROM
Page 14
The Elite XL 20ppm Configuration Page
Each Elite XL 20ppm package includes a configuration page. It was printed on your
printer, at GCC’s manufacturing facility. The page shows the hardware and software
versions of the printer, factory default settings, and the hardware configuration of
your Elite XL 20ppm. Please keep this page with the original documentation provided
with your product.
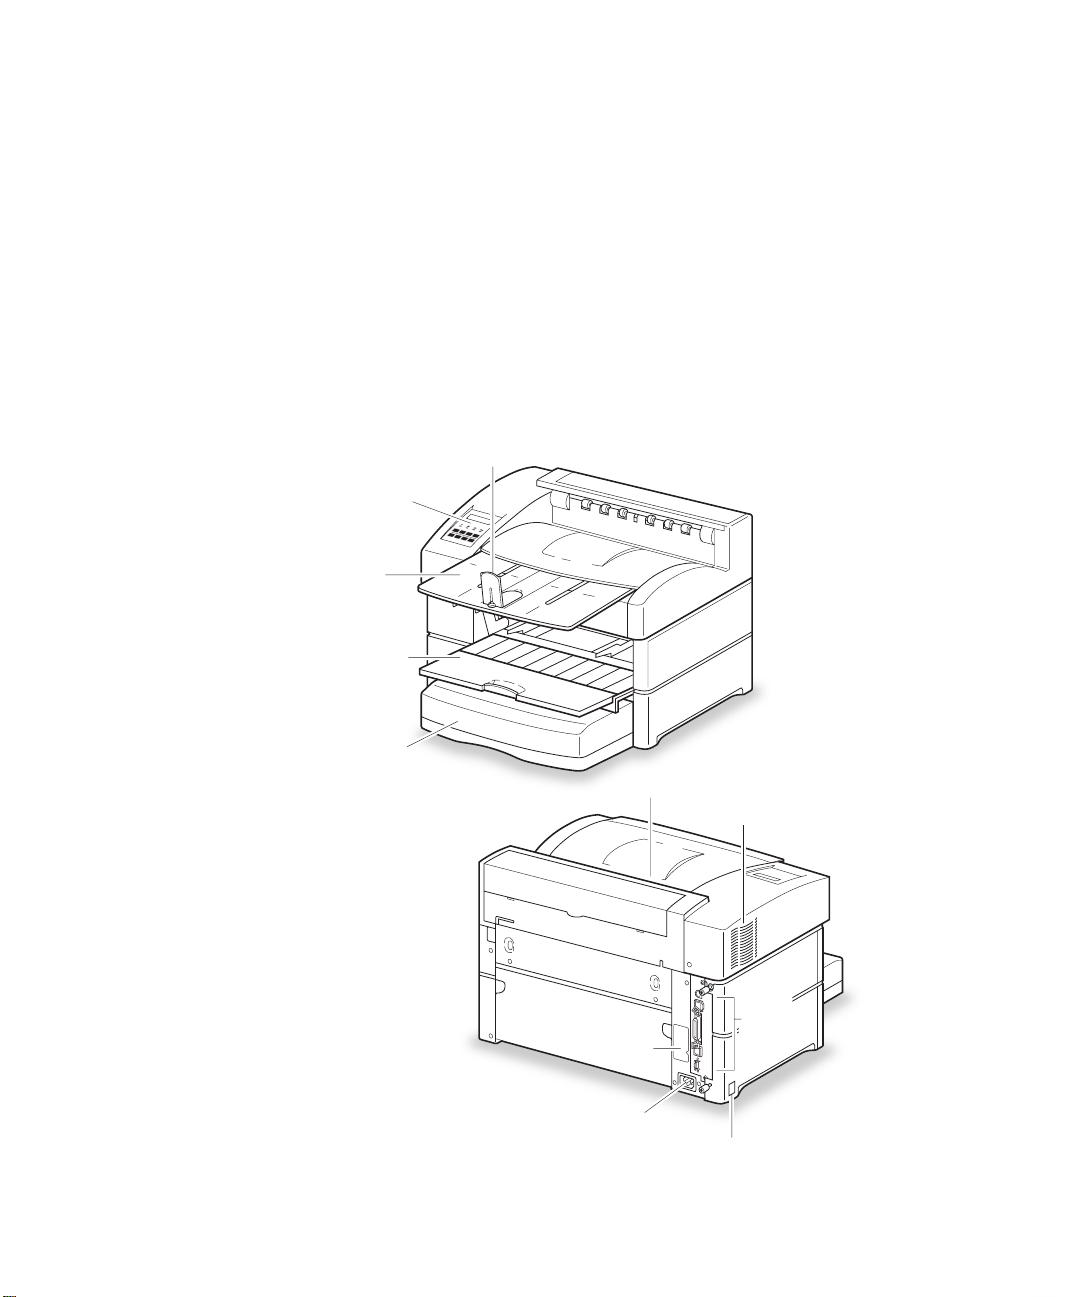
Elite XL 20ppm Main Features
The following diagrams show the main features of the Elite XL 20ppm printer. These
features are referenced throughout this manual.
Paper Stop
Control
Panel with
LCD display
Output
Tray
Extension
Multipurpose
Feeder
On Line
Comm Paper
Service
500-sheet
Universal
Paper Cassette
Top Output Tray
FCC label
Product
Serial number
Power
connector
Fan vent
(Do not block)
LOCALTALK
RS-422
SCSI
PARALLEL
10BASE-T
AAUI
Power
switch
Interface
Connections
• 1 - 7
Page 15
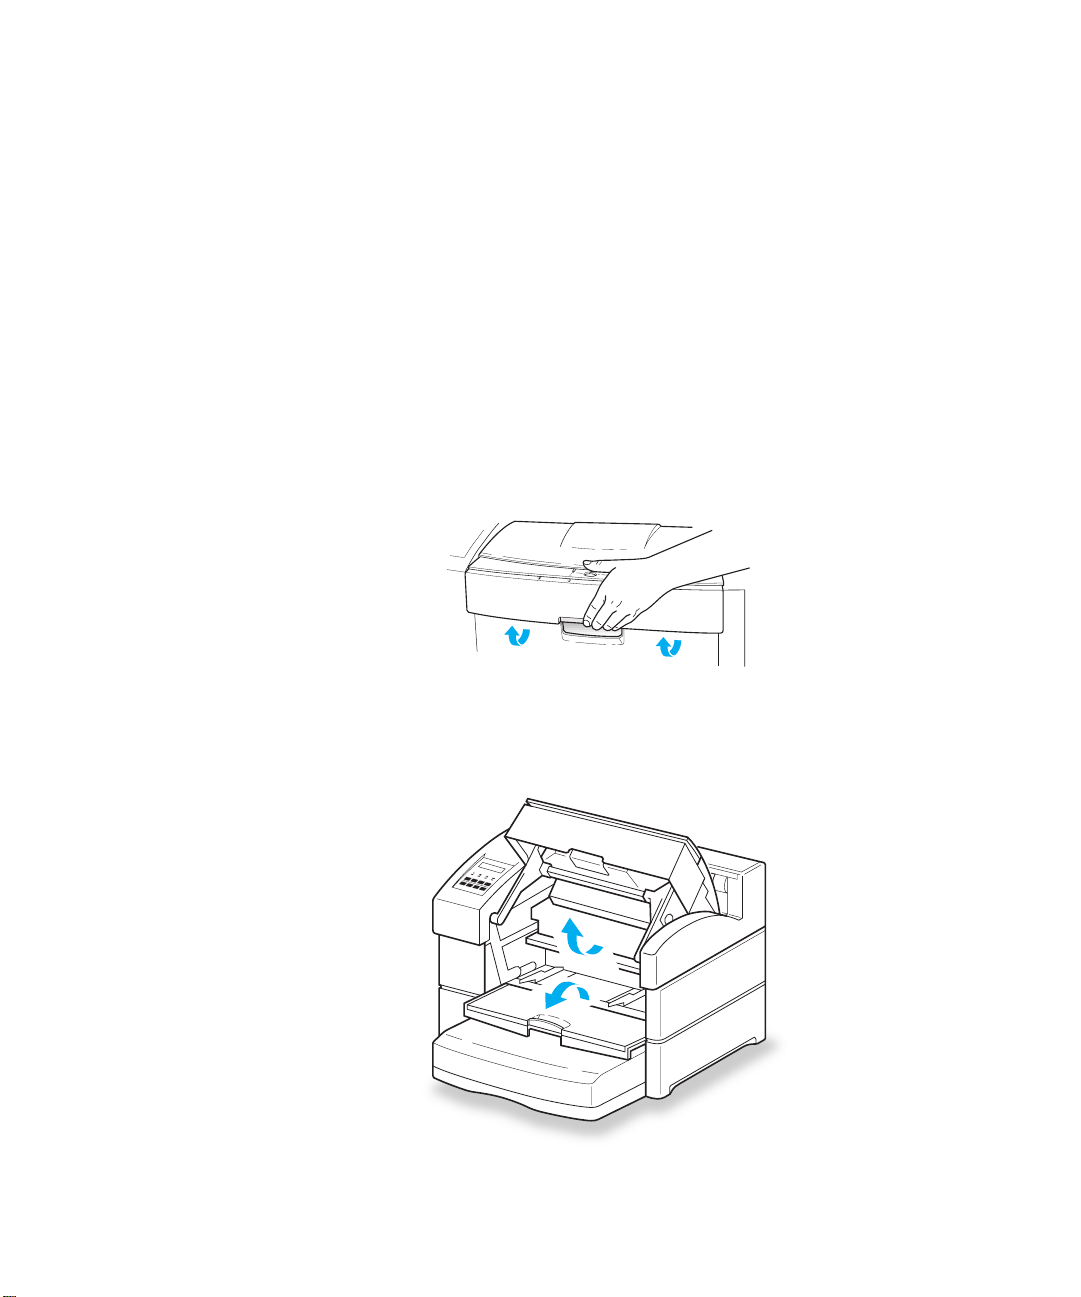
Installing or replacing the toner cartridge
The toner cartridge contains a microfine plastic powder that is fused to paper during
the print process. If your pages have an average of five percent coverage, you should
expect to print about 14,000 pages with each toner cartridge; if you print graphics
images you should expect to change the cartridge more often.
Note: Because the toner cartridge also contains a replacement drum, it is known as a
CRU (Customer Replaceable Unit).
Warning: The drum in the toner cartridge is sensitive to light. When you remove
the toner cartridge from its packaging do not place it in bright light (such as direct
sunlight) and complete the installation as soon as you can.
Warning: Do not touch other parts inside the printer. They may be hot.
1. Press the release button on the front of the printer to open the top cover.
2. Gently pull up on the front cover until the latches engage and the cover
remains open.
1 - 8 • Introduction and Installation
On Line
Comm Paper
Service
Page 16
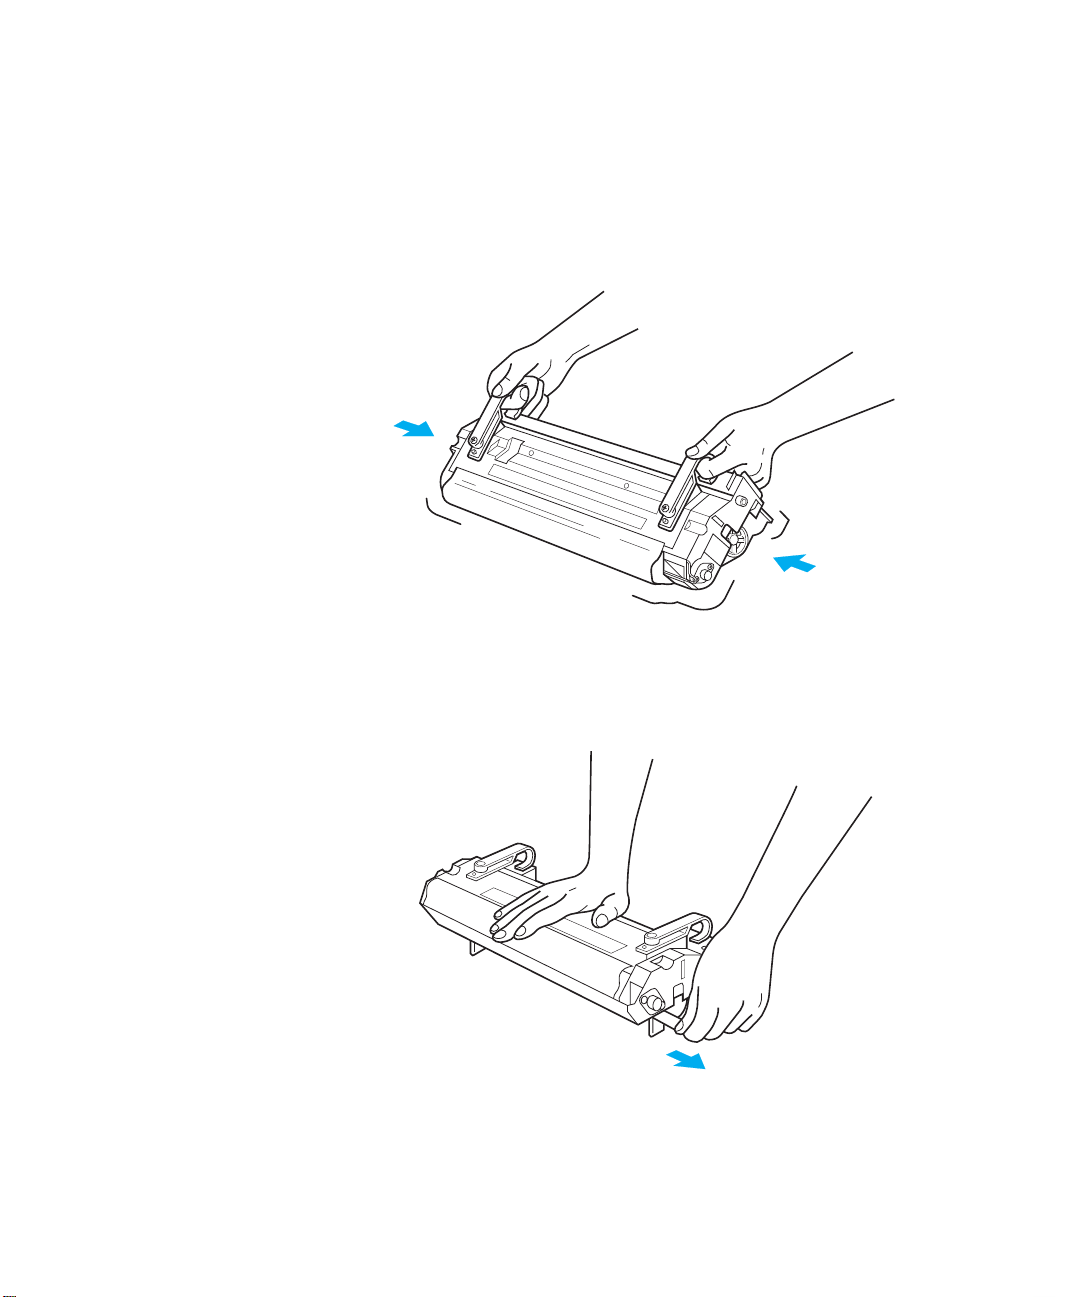
3. If you are replacing a cartridge, remove the old cartridge by holding the
handles and sliding it out of the printer; otherwise, go to the next step.
4. Take the new toner cartridge out of its box and wrappings.
5. Distribute the toner evenly by gently rocking the cartridge a few times.
6. Pull the seal on the cartridge gently but firmly to remove it completely. Do
not tug sharply or pull the seal at an angle.
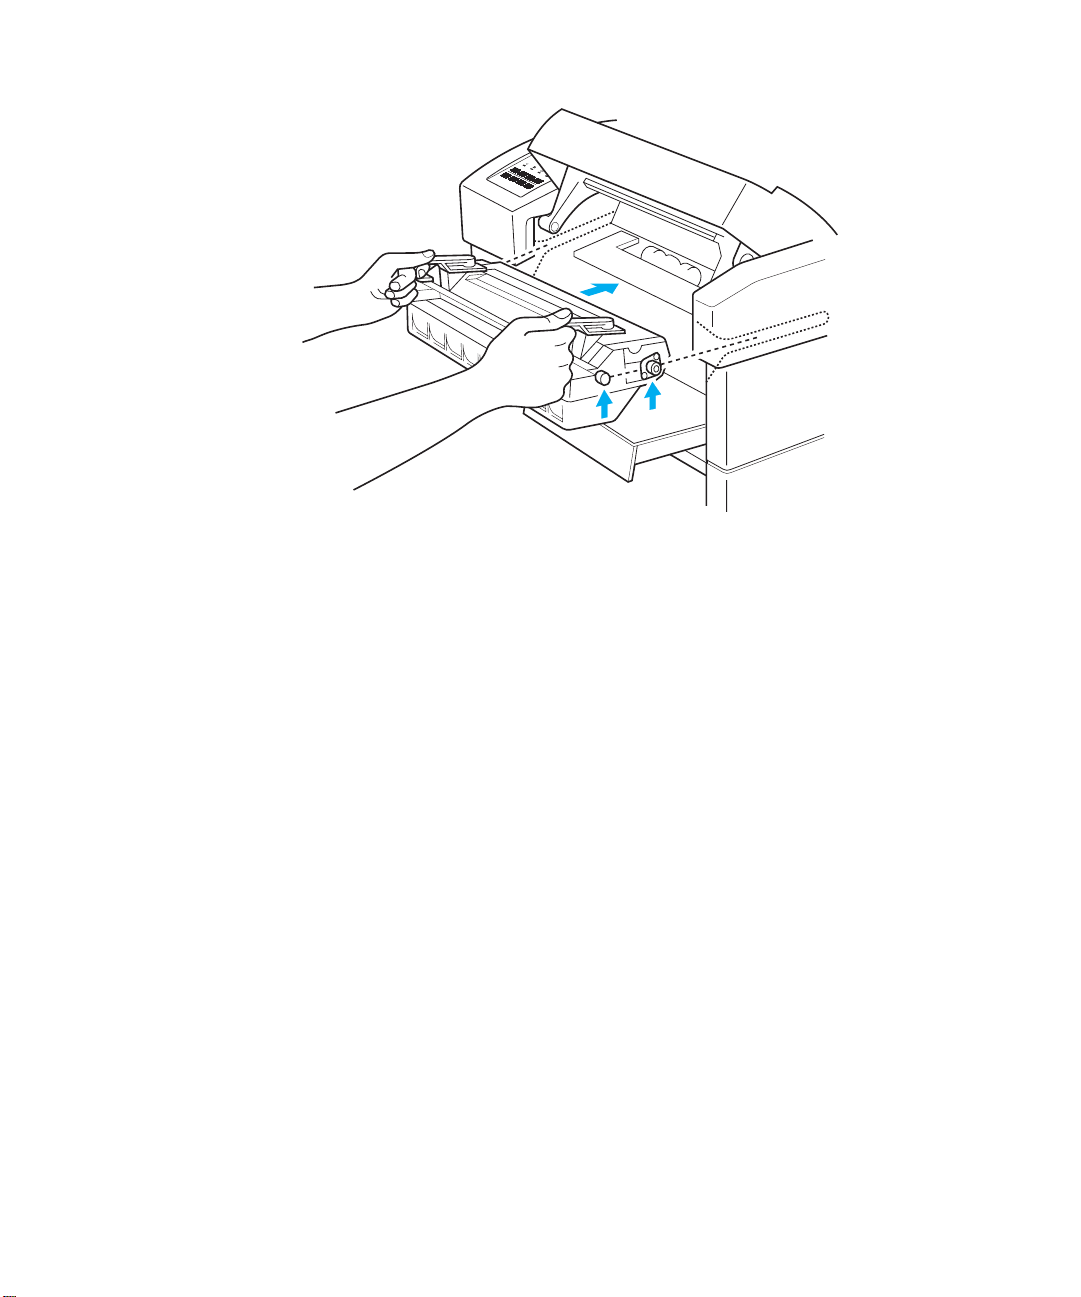
7. The pins on the sides of the toner cartridge fit in guide channels in the
printer (the channels have colored arrows pointing into the printer).
Locate the pins in the channels and slide the cartridge all the way into the
back of the printer.
• 1 - 9
Page 17
On Line
Comm Paper
Service
8. Close the cover. If you have replaced a used toner cartridge, you can
resume printing when the printer warms up.
Connecting power to the Elite XL 20ppm
Plug the power cord into the socket located on the back of the printer, then plug the
cord into an AC power outlet. Switch on the printer using the ON/OFF switch
located on the left side of the printer.
Warning: Do not attempt to use an adapter to plug the power cord into a 2-pin
socket. The third pin is for your protection; it grounds the printer. If you use a
printer (or any electronic or electrical equipment) that has no ground connection,
you run the risk of electric shock. If necessary, have a licensed electrician replace the
socket.
Unpacking the paper tray
1. Remove the paper tray from its box.
2. Take the tray out of its plastic bag.
3. Remove the three pieces of cardboard packing material from the tray.
4. Remove the two pieces of tape on the sides of the paper tray.
1 - 10 • Introduction and Installation
Page 18
Using the paper tray
The paper tray can hold paper either lengthways or sideways. These are referred to as
Long Edge Feed (LEF) or Short Edge Feed (SEF). Use LEF (sideways) wherever
possible; pages will print faster.
The universal (standard) paper tray holds up to 500 sheets of 20 lb. (75 g/m2) copiertype paper. If your printer requires 110 volts, it uses the U.S. paper group. If your
printer requires 220 volts it uses the International paper group. It can handle the
following paper sizes:
Either paper group: A4 (long edge feed), Letter (long edge feed), A3, B4, Ledger
(Tabloid), Legal (13" and 14"), 13" x 18", and 13" x 18.5" (all short edge feed), DL,
Monarch, Comm10 (optional envelope cassette).
U.S. only: Letter (short edge feed), C5 (short edge feed)(optional envelope cassette),
Executive, and Statement (both long edge feed).
International only: A4 (short edge feed), B5 and A5 (both long edge feed).
You can use other sizes of paper and envelopes in the MultiPurpose feeder; see the
next section for details. The standard paper tray will also handle up to 50 transparency or label sheets in Letter or A4 size.
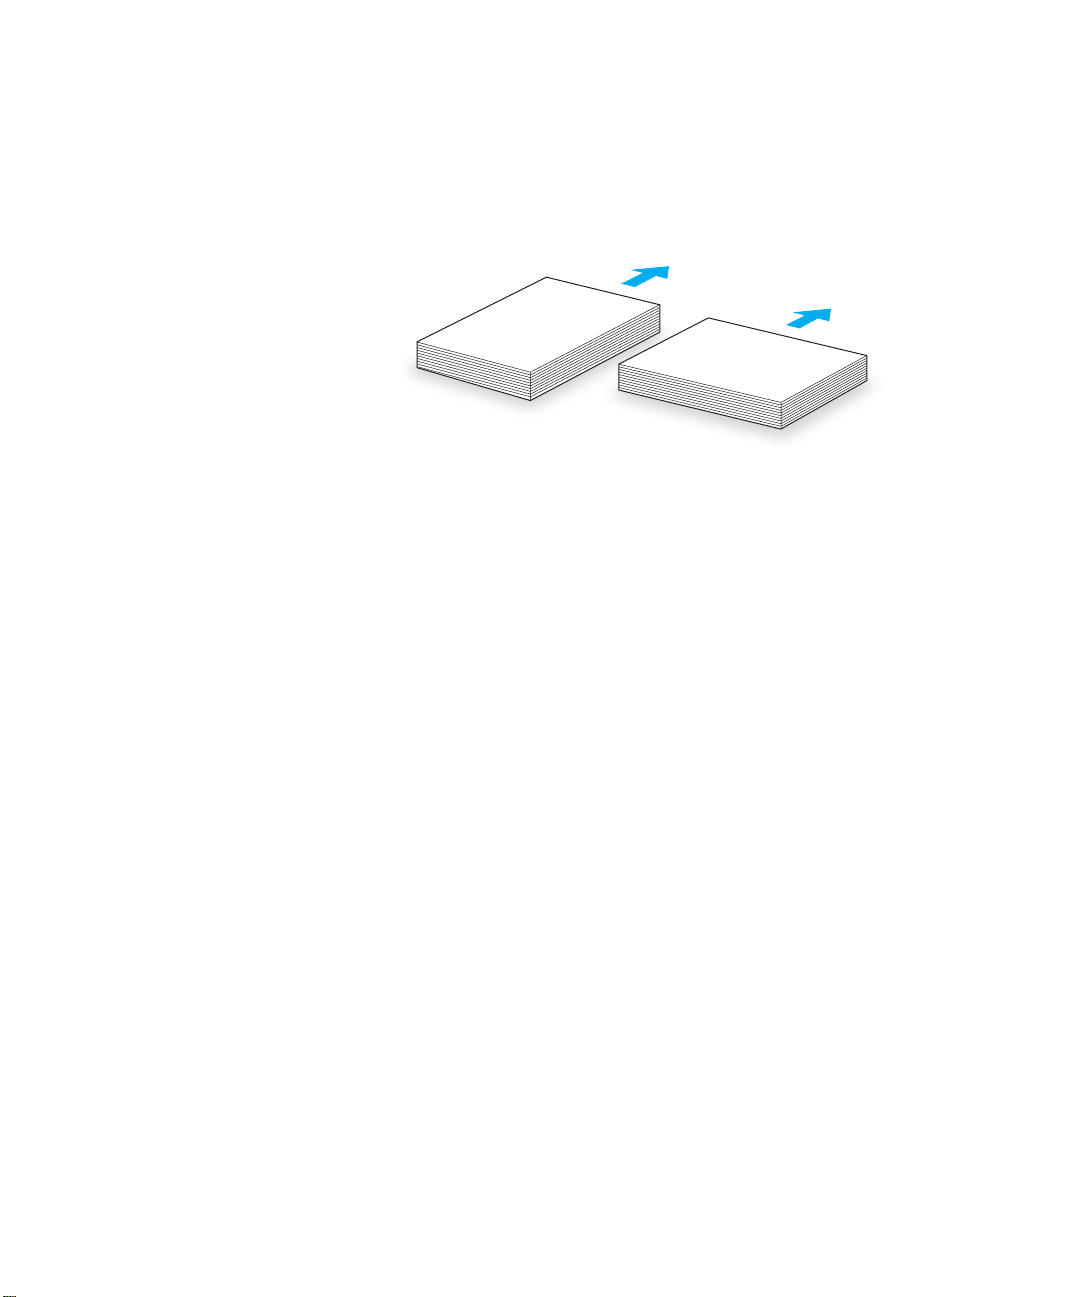
Loading paper into the tray
Short edge feed
Long edge feed
Note: Place letterhead paper face up and with the letterhead toward the left side of the
tray (LEF - sideways) or the rear of the tray (SEF - lengthways).
• 1 - 11
Page 19

1. Remove the paper tray from the printer. Pull firmly using the handle at the
front of the tray. The tray will stop when it is partly removed - this is a
safety precaution.
Lift the tray and slide it toward you to remove it completely. Remove the paper tray
cover, if necessary.
1 - 12 • Introduction and Installation
Page 20
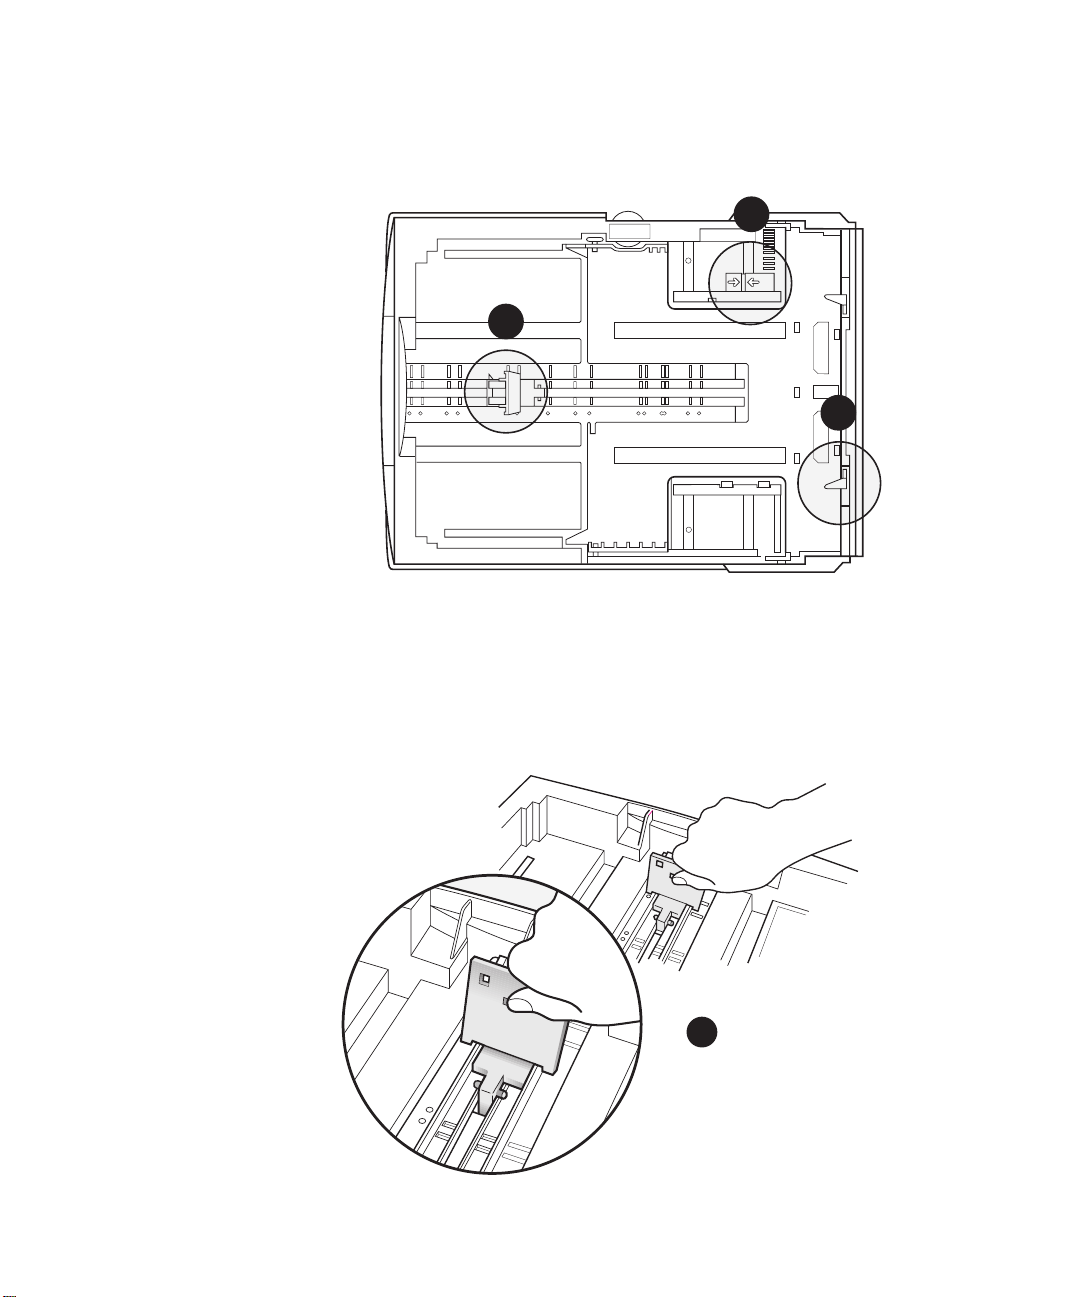
Note: The paper tray has three features that you can use when you install paper; the
Center guide (A), the Paper Width Guides (B) and the metal tab paper guides (C).
These features are explained below.
B
A
17”
B4
A3
14”
front
(handle)
2. If you need to change the length of paper, tilt the top of the center guide
away from you and move it to the front edge of the paper tray.
11”
8.5”
B5
A4
A4
A5
back
C
17”
A3
B4
14”
17”
A3
B4
14”
A
• 1 - 13
Page 21
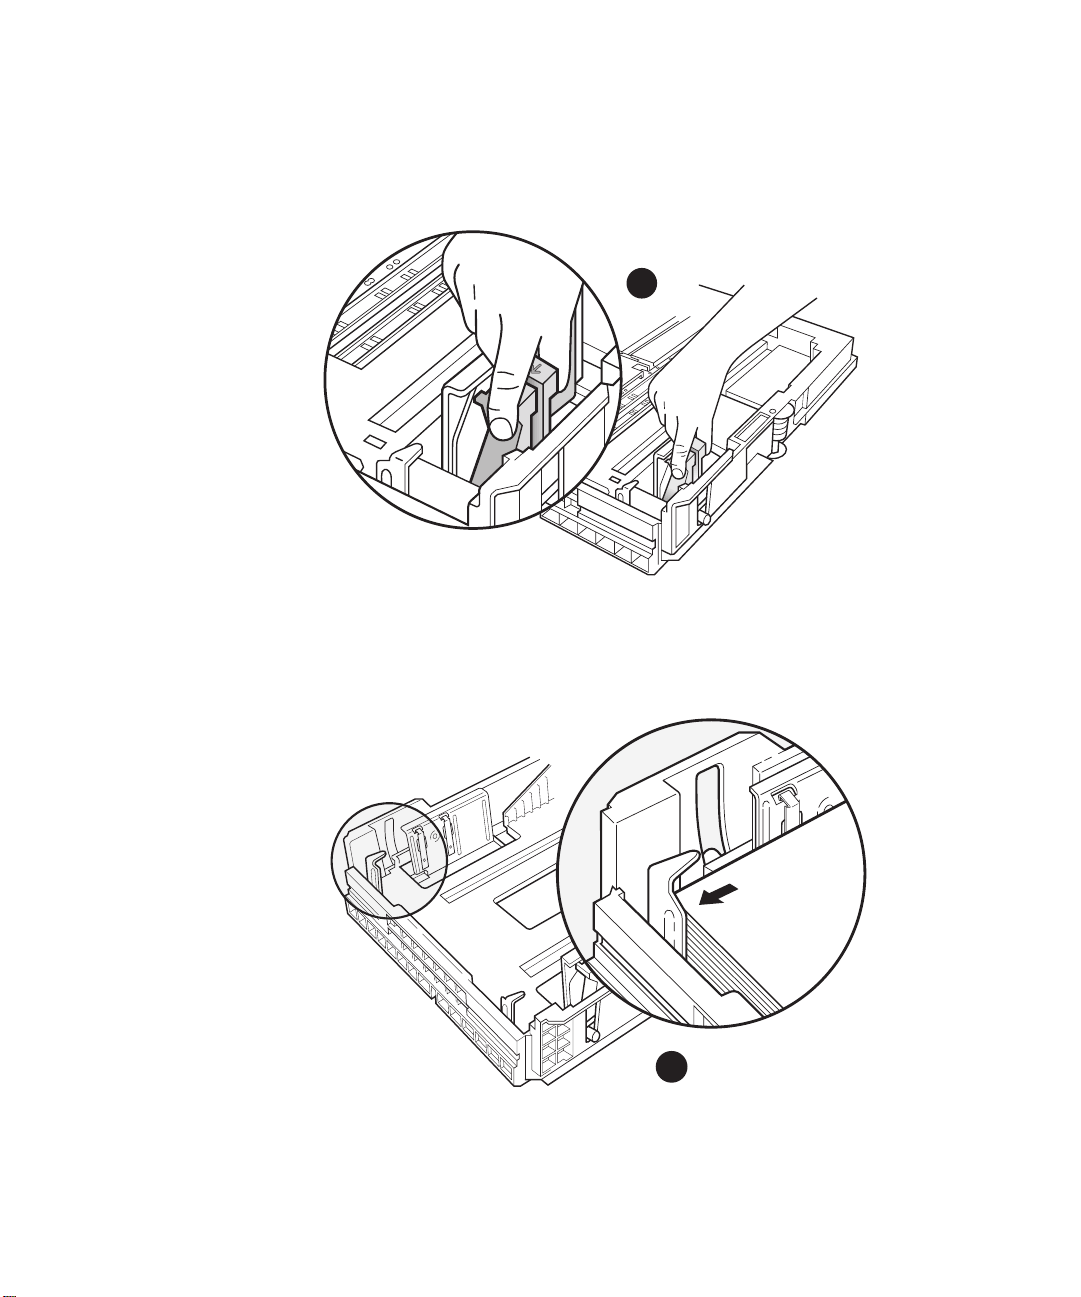
3. If you need to change the width of paper, move the paper width guides by
squeezing the two handles together on the left guide and sliding the
guide toward the edge of the tray. Moving one guide automatically moves
the other.
B
4. Insert the paper so that it fits under the two metal tabs at the rear of the
tray. Move the guides if necessary so that they fit next to the paper. They
should not be tight against the paper.
5. Replace the paper tray cover, if necessary. Replace the tray in the printer.
Make sure you push it all the way in so that the control panel displays the
“ready” message.
1 - 14 • Introduction and Installation
C
Page 22

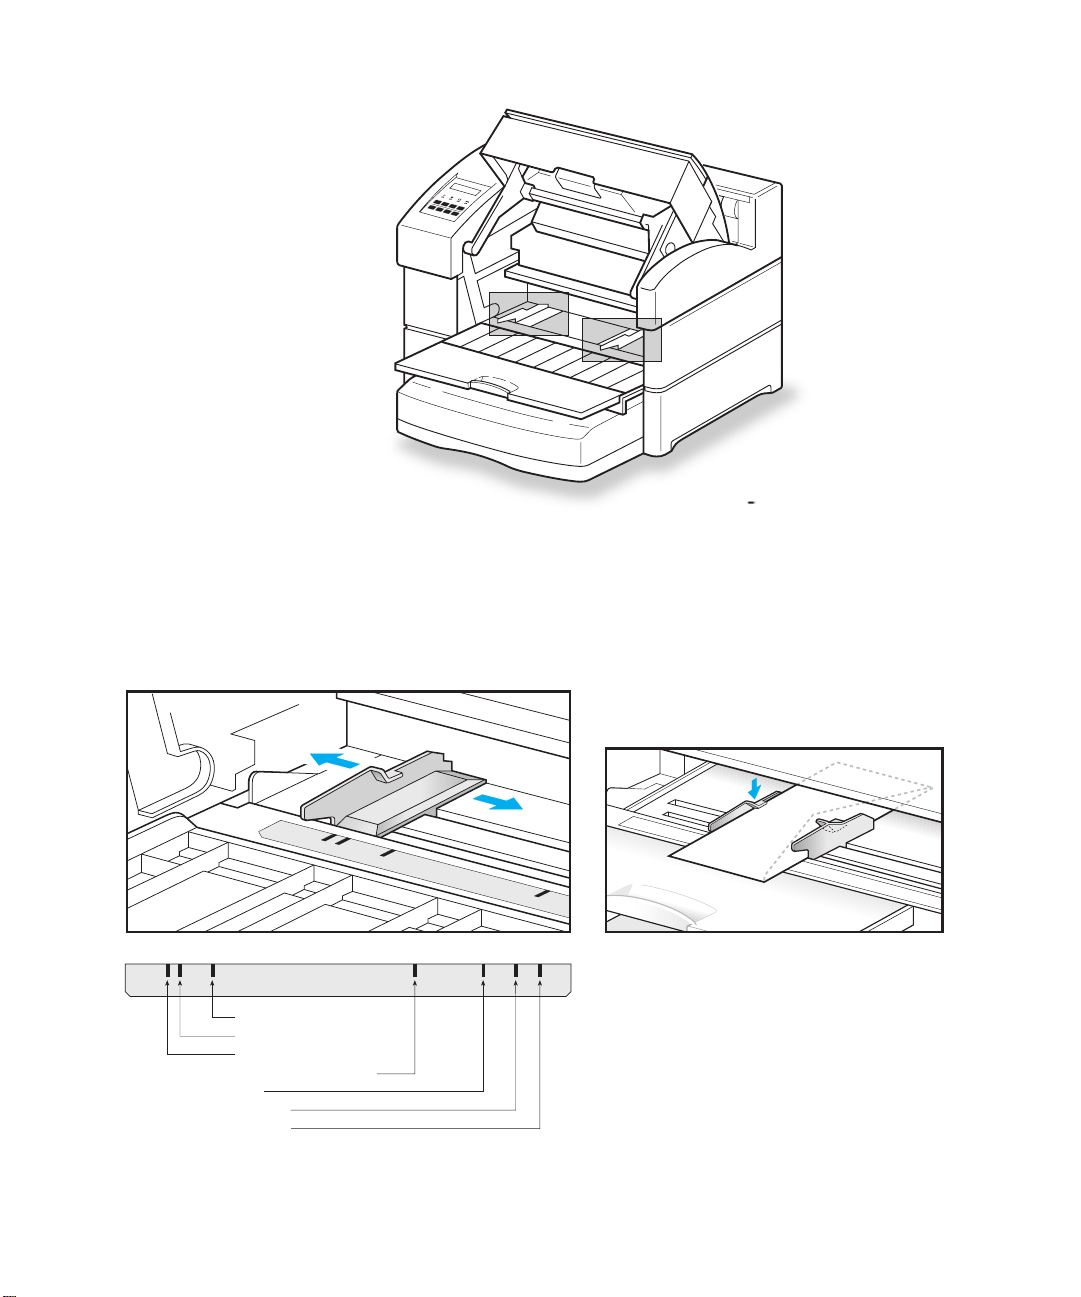
Using the MultiPurpose Feeder
The MultiPurpose Feeder (MP Feeder) holds up to an extra 150 sheets of 20 lb.
copier-style paper up to 13" x 35" (330mm x 888mm), 30 transparencies, 30 sheets
of labels, 10 envelopes or 75 postcards. You can also manually feed single sheets of
paper or other media. The MP Feeder handles all the paper sizes of the universal
paper tray, plus Japanese Postcard.
Exact measurements of these paper sizes are in the appendix “Specifications.”
You have to select the MP Feeder from a computer’s Print dialog box (assuming you
specified the main paper tray as the default paper source). See “Paper Source” in the
sections on Macintosh and Windows for information on how to select the MP
Feeder.
Loading Paper in the MultiPurpose Feeder
1. Open the cover of the MultiPurpose Feeder.
On Line
Comm Paper
Service
On Line
Comm
Paper
Service
2. Pull the tab on the feeder to slide out the extension.
3. The MultiPurpose Feeder has two paper guides, shown in the next illustration. You do not need to open the top cover of the printer as shown; the
illustration shows the cover open to allow you to view the paper guides.
• 1 - 15
Page 23
On Line
Comm Paper
Service
4. Insert paper (or other media) between the paper guides. If necessary, slide
the paper guides against the paper. Insert letterhead face up with the top
toward the left (LEF - sideways) or toward the back (SEF - lengthways).
Place envelopes face up with the flap down and to the right.
Statement, 8.5 x 14”
Executive
8.5 x 11”, 11 x 17”
Japanese Postcard
A5
B5, B4
A4, A3
1 - 16 • Introduction and Installation
Page 24
Note: The Elite XL 20ppm does not check the size of the media you insert in the MP
Feeder (unlike the paper trays). Make sure you are using the paper size you specified
in your application.
Note: If you are using very large size paper, you may need to support the stack to help
it feed properly.
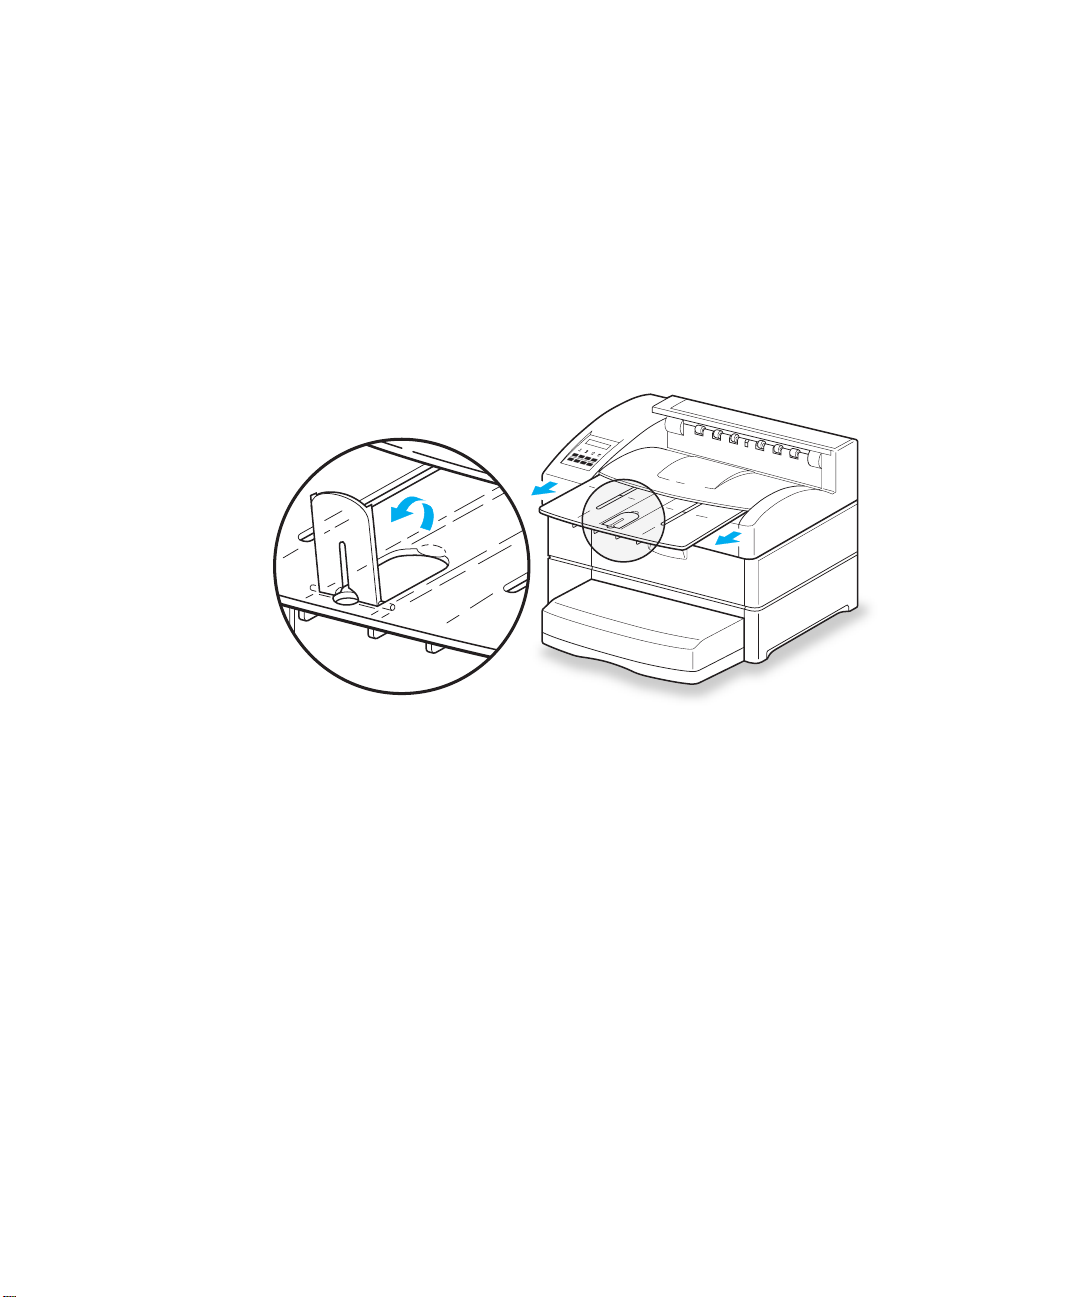
Output tray extension
If you are using larger sizes of paper you may need to extend the paper output tray.
Pull out the extension, and lift up the paper stop.
On Line
Comm Paper
Service
Output tray capacity
The output tray holds up to 500 sheets of standard copier 20 lb. (65 g/m2) paper. If
you are using thicker paper, you should remove it from the output tray when it
reaches a height equivalent to 500 sheets of copier paper.
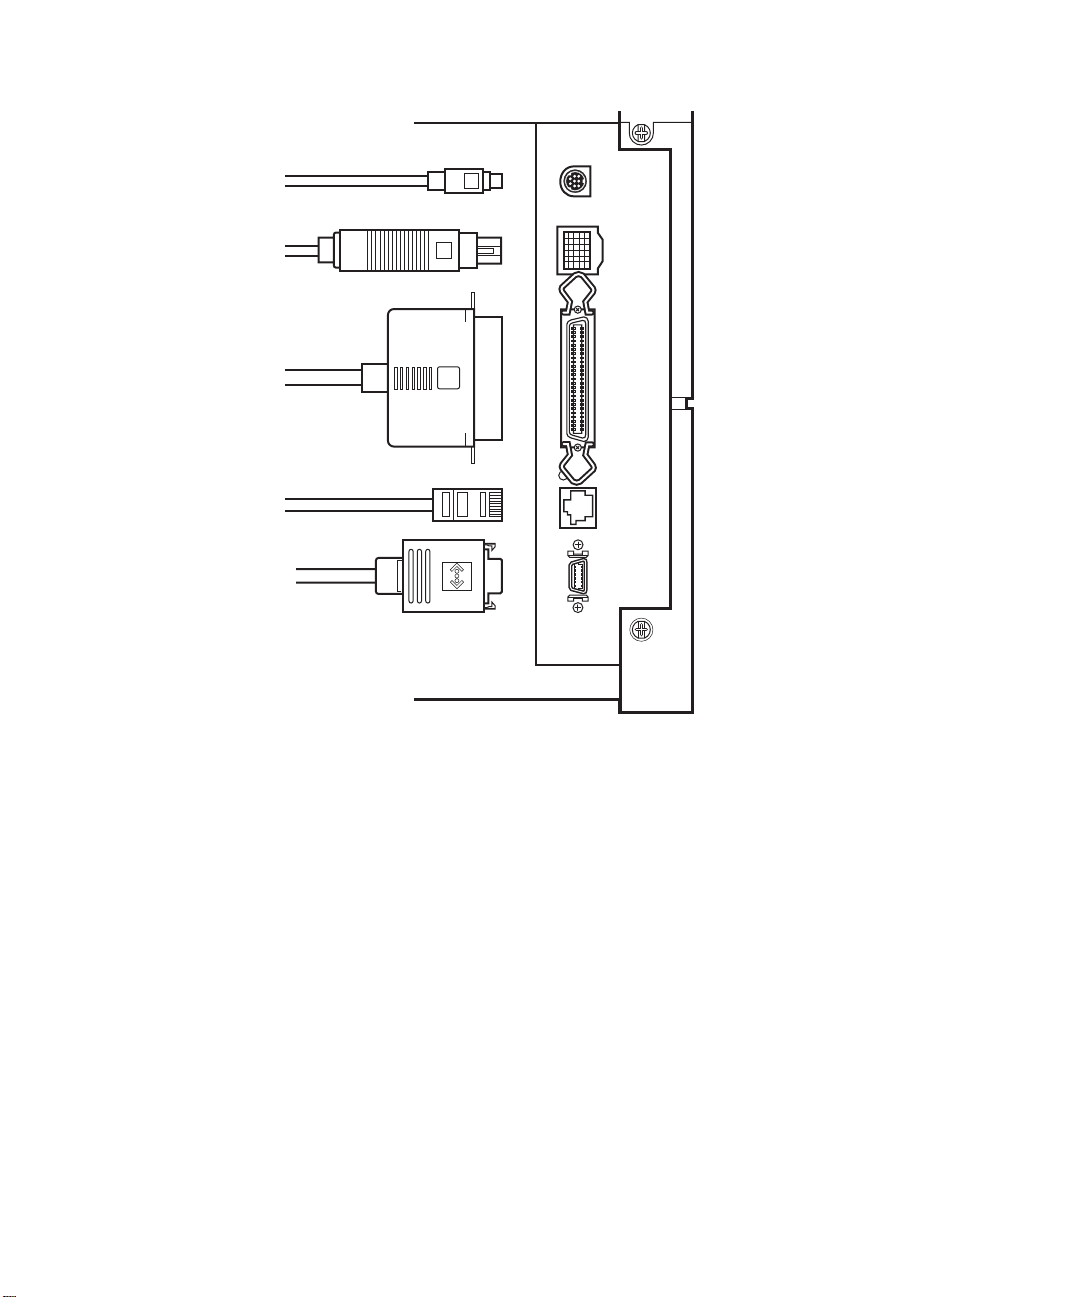
Elite XL 20ppm interface connections
The Elite XL 20ppm includes Ethernet, LocalTalk, RS-422 serial, and bidirectional
parallel interfaces; the LocalTalk and RS-422 serial interfaces share the same 8-pin
mini-DIN port.
With your printer’s all ports active feature, all the interfaces are simultaneously active,
which means you can print through more than one interface at a time. You do not
have to select a port; this feature works automatically.
Note: If you are connecting through the parallel interface, insert this plug before you
make any other interface connections. If other plugs are inserted it is difficult to
connect the parallel cable.
• 1 - 17
Page 25
LOCALTALK
RS-422
SCSI
PARALLEL
10BASE-T
AAUI
• The 8-pin DIN connector can be used as either a LocalTalk network interface or
an RS-422 serial interface. LocalTalk is the default setting. If you want to use
this as a serial interface, you will have to change settings in the printer’s control
panel menus.
• You can add an external hard disk for font storage using the SCSI interface. It is
not used for communication between the printer and computer.
• If you want to connect your printer to a single PC-compatible computer, use
the parallel interface. Alternatively, you can connect the RS-422 serial interface
port to the PC’s serial port, but the serial port transmits data much slower than
a parallel port or network. You will also need to make a serial cable.
• The Ethernet network interface is used to connect the printer to an Ethernet
network. The interface contains two connectors: an RJ-45 connector (upper)
for connecting to 10BASE-T networks and an AAUI connector (lower) for
connecting to 10BASE-2 networks, using an AAUI adapter. Connect to only
one Ethernet connector, not both at once.
1 - 18 • Introduction and Installation
Page 26

AAUI adapters are available from several manufacturers or direct from GCC.
Note: Some interfaces have specific settings that you must select through the printer’s
control panel Interfaces submenu.
Connecting cables correctly
Most cables come with some kind of mechanical locking device. Be sure to use these
locking devices, otherwise you may experience intermittent errors or the printer will
fail to operate altogether.
• There is no locking device on LocalTalk or RS-422 Serial connectors. Make sure
the plug is pushed all the way into the socket.
• When you have inserted a Parallel port cable, lift up the wire clips at both ends
of the socket so that they fit into the slots on the sides of the cable.
• 10BASE-T plugs have a locking tab similar to plugs on telephone cords. When
the plug is fully inserted the tab clicks into place.
• AAUI plugs are self-locking. Push the plug into the socket until you feel it lock.
• 10BASE-2 plugs have a rotating collar. Plug the cable into the socket, then
rotate the collar clockwise to lock it.
Improperly inserted cables are the cause of many networking and printer-related
problems.
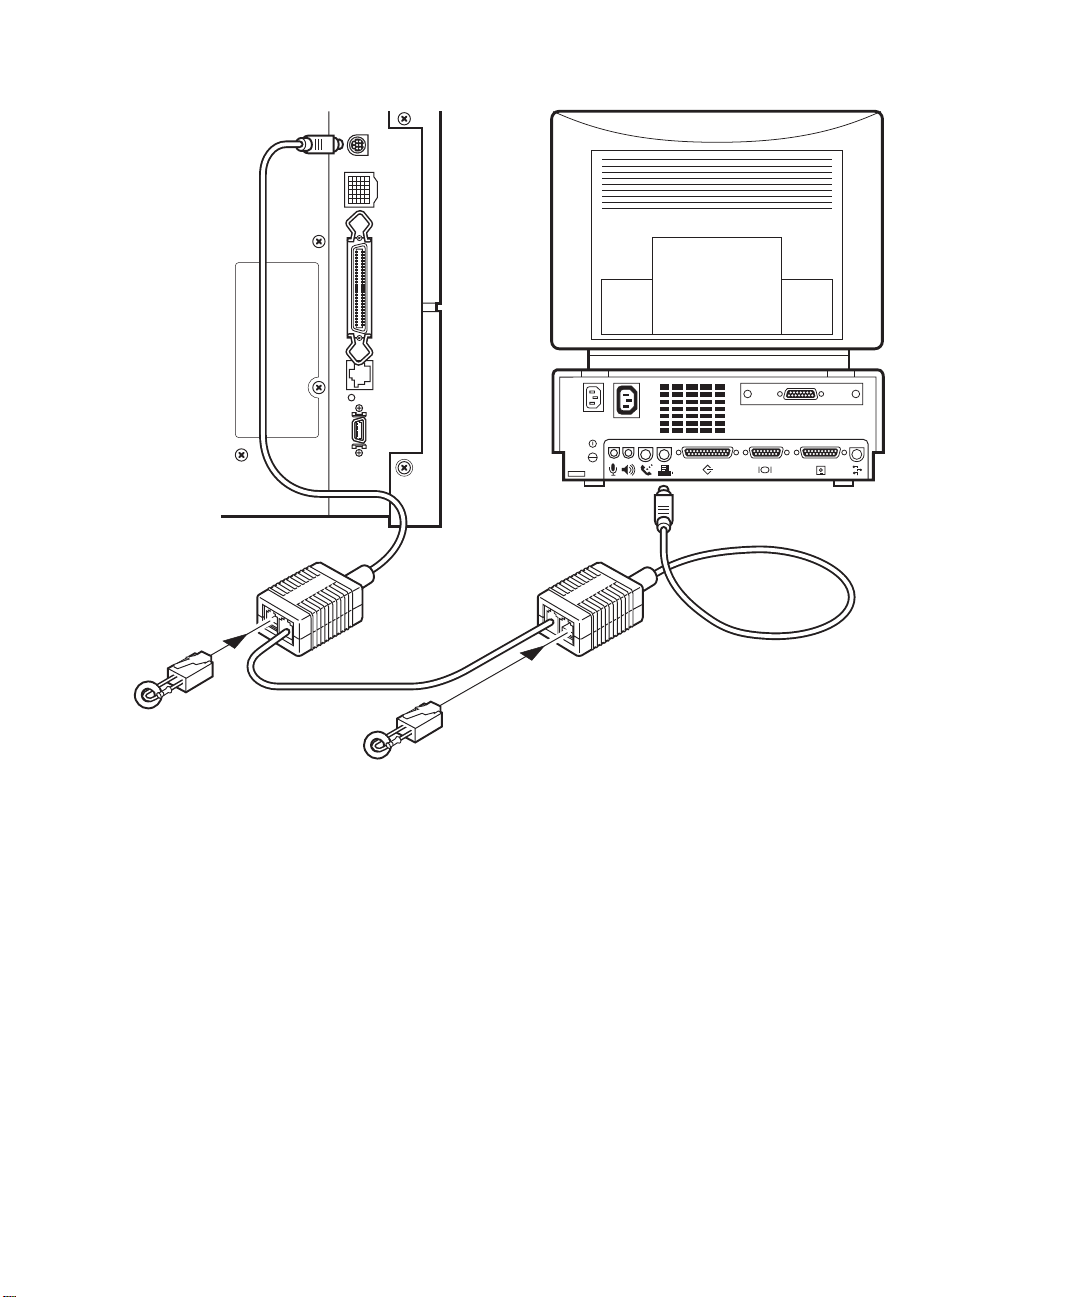
LocalTalk connection
The Elite XL 20ppm uses the LocalTalk cable system to connect to AppleTalkcompatible networks. This connection forms a chain; do not connect devices so that
it forms a circle.
Important: You need a connector kit for each device on the network. Therefore, you
need two connector kits to connect the printer to one computer, and so forth.
To plug in LocalTalk cables:
1. Switch off the printer.
2. Connect one LocalTalk connector box to the LocalTalk port on the printer.
• 1 - 19
Page 27
LOCALTALK
RS- 422
SCSI
PARALLEL
10BASE-T
AAUI
PhoneNET
~
PhoneNET
3. Connect one LocalTalk connector box to the printer port (identified by a
printer icon) on the back of the Macintosh.
4. Connect the LocalTalk boxes together with one of the LocalTalk cables.
You will only need one of the LocalTalk cables (for one Macintosh and one
printer).
5. Insert resistors. (Depending on the type of cables you are using, terminating resistors may be needed. Please refer to the documentation included
with your cable kit for instructions.)
6. Switch on the printer.
7. Verify the printer’s LocalTalk setting. The 8-pin serial submenu, accessed
from the printer’s control panel, should be set to LocalTalk. LocalTalk is
the factory default, so you should not need to change the setting.
1 - 20 • Introduction and Installation
Page 28

Bi-directional (parallel) connection
The bi-directional parallel connection between the printer and a PC requires a
standard 36-pin bi-directional cable (to IEEE 1284 standards). The length of a bidirectional cable can be up to 10 meters or 30 feet. This interface offers the fastest
communication between a PC and the printer (unless the PC supports Ethernet).
Serial connections
You can connect a PC to the printer by using the RS-422 connection and the
computer’s serial port. In general, this is not recommended, because data is transmitted more slowly than if you connect the parallel port on the PC to the parallel port
on the printer, or use a network. Therefore, printers connected through the serial
port take longer to print. Also, GCC has been unable to locate a supplier of a cable to
connect a PC serial port to the RS-422 socket.
RS-422 serial enables data to travel in either direction between the printer and a
single computer. For an RS-422 serial connection, use an 8-pin serial cable. The RS422 interface allows a cable length of up to 300 feet.
Note: You need to configure the printer for Serial communication. The 8-pin serial
submenu, accessed from the printer’s control panel, should be set to RS-422. LocalTalk is the factory default, so you will need to change the setting. Configure the serial
interface settings. In order for successful serial communications between the printer
and the PC to take place, the configuration of the serial interface of each device must
match.
Ethernet network connection
The Elite XL 20ppm printer includes an Ethernet network interface. The Ethernet
interface on your printer lets you connect to an Ethernet network via two types of
Ethernet cables: 10BASE-T and 10BASE-2.
• 10BASE-T (Unshielded Twisted-Pair or UTP) - Your printer connects to 10BASE-T
Ethernet via the 10BASE-T (RJ-45) connector. The cabling used is Unshielded
Twisted-Pair (UTP).
• 10BASE-2 (RG-58, Thin Coax, or Thinnet) - Your printer connects to 10BASE-2
Ethernet via an optional 10BASE-2 (BNC) AAUI adapter. The cabling used is called
RG-58 or Thin Coax.
• 1 - 21
Page 29
Supported network protocols
• EtherTalk - EtherTalk is Apple Computer’s name for the AppleTalk network
protocol running over Ethernet cabling.
• NetWare - NetWare is Novell’s system for Ethernet connection.
• TCP/IP - TCP/IP is a networking protocol used by various vendors of network
software. It is used by Windows 95, NT, and UNIX, among others.
Additional information about these protocols is located in the GCC Networking
Guide on the CD-ROM.
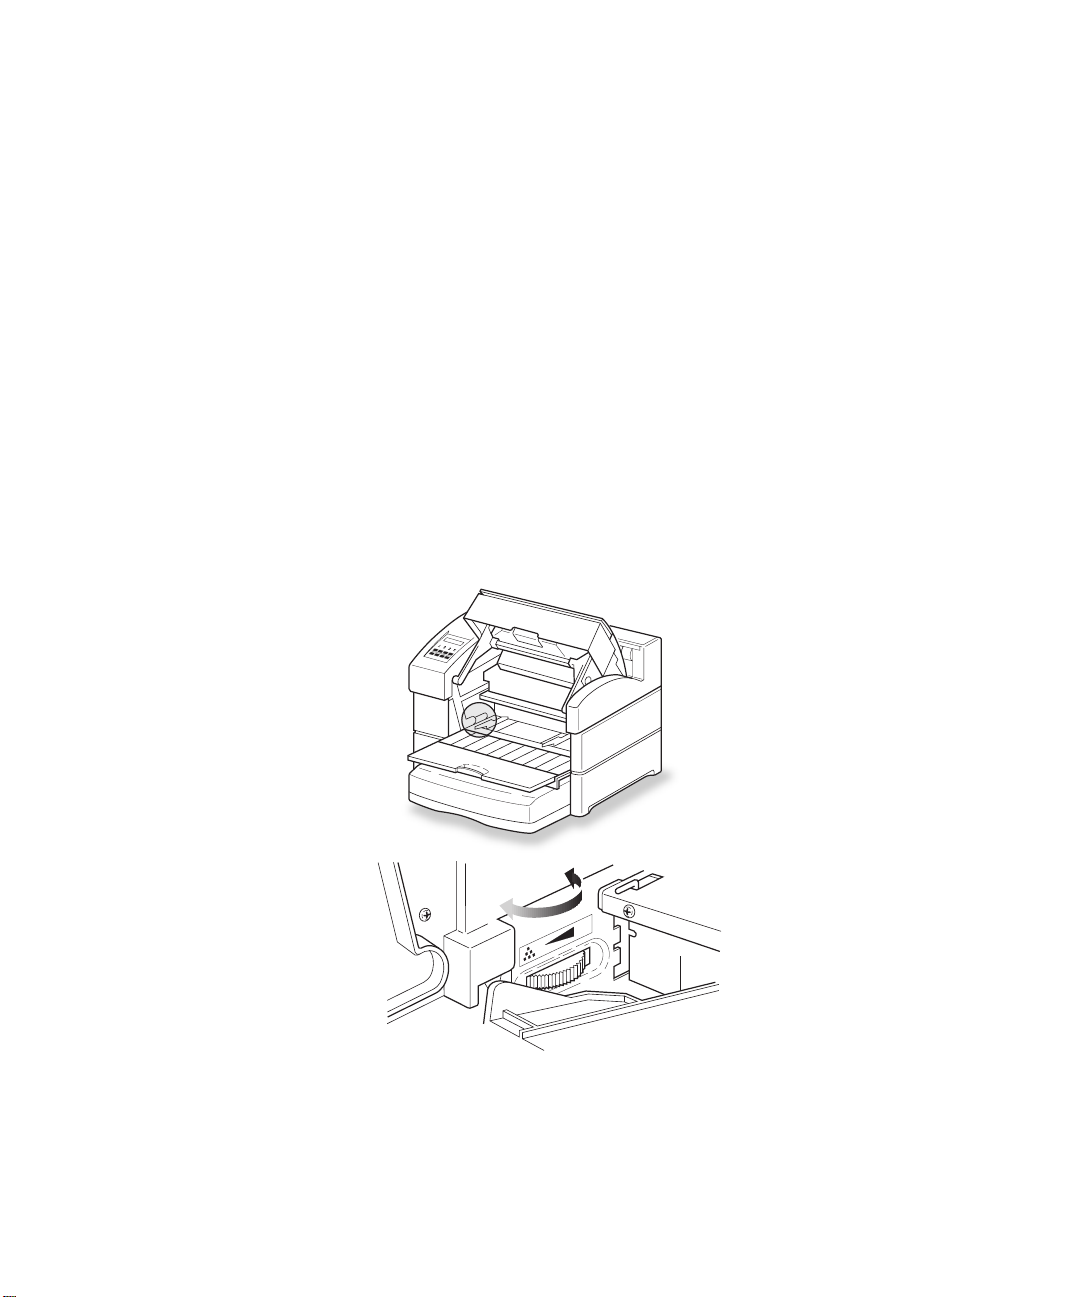
Print Density Control
At the left side of the MultiPurpose feeder is a wheel that lets you adjust print density. You can make images darker or lighter. GCC recommends that if you feel that
your printer is producing images that are too dark or light you adjust settings using
the Control Panel. See the chapter on the Control Panel in this manual in the section
on menus “9: Print Darkness.”
On Line
Comm Paper
Service
In extreme circumstances the Control Panel settings may not produce the results you
want. In that case adjust this wheel to get the required level of darkness. Otherwise
we recommend that you do not adjust this control.
1 - 22 • Introduction and Installation
H
L
Page 30

Printer Driver installation
At this point, you should be ready to install the printer drivers for your printer. The
following sections describe software installation on a Macintosh or a Windows based
machine.
Installing PPD files
Although the standard software install gives the computer all the details of the
printer, a few software applications need you to install special files. If none of these
applications are on your computer, you do not need to install the files. GCC supplies
PPD files for these applications:
• Adobe Illustrator® for Windows, versions 4.0 and 4.1.
• Adobe PageMaker® for Windows, versions 5.0 and 6.0.
• Aldus FreeHand® for Windows, all versions up to 4.0.
• MacroMedia FreeHand® for Windows, version 5.0.
• QuarkXPress® for Windows.
• Aldus FreeHand for Macintosh, versions 3.0 and 3.1.
• Aldus PageMaker for Macintosh, version 4.2.
• Adobe Separator for Macintosh, versions up to 3.2.
• Deneba Canvas® for Macintosh, version 3.x.
• QuarkXPress for Macintosh, versions 3.x.
• Ready, Set, Go!® for Macintosh, versions 5.x and 6.x.
You may need to install these files for certain other applications. If this is the case,
you will find details in your application’s manuals.
Instructions on how to install these files are in the sections for Macintosh or Windows.
Configuring the control panel, printer driver, and ports
Your Elite XL 20ppm printer has numerous settings you can adjust to make it meet
your printing needs. However, many users are satisfied with the settings as supplied.
If you are not aware of any special circumstances in your printing it is unlikely that
you will need to make any optional changes.
However, if you need to make changes, there are three ways you can do this:
• 1 - 23
Page 31

• Using the printer’s control panel menus (or GCC’s WebAdmin tool).
• Using the Printer Setup dialog box on your computer.
• In the Page Setup and Print dialog boxes of many applications.
The place where you make changes affects how widespread those changes will be.
• If you change settings in the Elite XL 20ppm’s control panel, this sets the
default for all computers using the printer. If you do not make any control
panel changes, the factory defaults will be the default settings. If you make
changes with GCC’s WebAdmin utility, this has the same effect as if you made
them at the printer’s control panel.
• If you change settings in the Printer Setup dialog boxes on a computer, the new
settings are now the defaults for all applications on the computer. If you change
something from “Printer’s Default,” this overrides the printer control panel
defaults for this computer only.
• If you change settings in the Page Setup or Print dialog boxes in an application,
this overrides any other settings for that feature.
❏ Some changes that you make revert to the defaults after you print
the document.
❏ Other changes become the defaults every time you print that document.
❏ Some will become the defaults every time you print from that application.
Different applications treat these changes in different ways.
GCC recommends that you make changes in the application’s Page Setup or Print
dialog boxes. If you find that you are making the same changes for every print job,
use the Printer Setup dialog boxes or the Elite XL 20ppm control panel menus to
make these settings the default.
You will find instructions on changing the settings through the control panel menus
in the chapter on the Control Panel. The Networking guide shows you how to change
settings using GCC'S WebAdmin tool. The instructions for changing the settings in
the Printer Setup dialog boxes are in the sections on each type of computer or
operating system.
Page Setup and Print dialog boxes vary from application to application. You will find
details in your application’s manuals.
1 - 24 • Introduction and Installation
Page 32

Using a Macintosh
Contents
Software installation 2-2
Selecting the LaserWriter 8 printer driver 2-4
Selecting the printer description file 2-5
Printing documents using the LaserWriter 8 printer
driver 2-6
Selecting Page Setup options 2-7
Page Attributes 2-7
Selecting Print Options 2-9
CHAPTER
2
Manual feed printing 2-14
Naming the Elite XL 20ppm 2-15
Page 33

2: Using a Macintosh
Software Installation
Software for the Macintosh is included on the Elite XL 20ppm CD-ROM provided
with your printer. The installer places all the printing software into the appropriate
locations on your startup disk (the startup disk is the hard disk that contains the
System and Finder files used to start your Macintosh).
To install the Elite XL 20ppm software:
1. Put the Elite XL 20ppm CD-ROM into the CD-ROM drive.
2. Open the folder labeled “Printing Software.”
3. Double-click the Elite XL 20ppm Installer icon.
4. Click Continue. You will see the Read Me file. Take some time to read this
file. It contains last-minute information on the installation procedure, as
well as updates on Elite XL 20ppm features and compatibility issues. After
reading the Read Me file, you can print it (if a printer is available) or save
it as a SimpleText document.
5. Click Continue. You will see the Install dialog box. Choose the file(s) you
want to install.
If you want to install all the
files for your 20ppm model
(recommended), choose the
model name and click the
Install button.
If you want to install certain
files, scroll through the list
and click on those files. You
can select more than one
file by holding down the
Shift key as you click on the
line. When you have
selected all the files you
want to install, click the
Install button.
2 - 2 • Using the Macintosh
Page 34

6. Click Install. You will see a progress box describing the status of the installation. When the installation is complete, you will see a dialog box indicating that the installation was successful.
Installing application-specific printer description files
A few applications require you to install additional files. These files give the application information about the capabilities of your printer and are often known as
Printer Description files. The manuals included with an application tell you whether
or not it requires these files. The LaserWriter 8 driver, shipped with the Elite XL
20ppm, uses printer descriptions called PostScript Printer Description (PPD) files.
When you install software from the Elite XL 20ppm CD-ROM, the printer description files are copied into a folder named Application Files in the Elite XL 20ppm
Folder. The Elite XL 20ppm Folder is then located in your startup disk’s window.
Follow the instructions below to copy each file into the folder specified by the
application.
Elite 20xx (format 4)
This file is automatically placed in the
Printer Descriptions folder during the
initial (complete) software installation
procedure. It is provided here because some
application(s) may require it to be placed in
a folder other than the standard Printer
Descriptions folder.
This is the extension to the PostScript
printer description file for Aldus FreeHand
3.0 and 3.1 and PageMaker 4.2x. Copy the
file into the PPD Folder located in the
Aldus Folder, which is located in the
System Folder.
GCxx.PDX
GCxx.PPD (format 3.0)
This is the printer description file for
Aldus® FreeHand™ versions 3.0 and 3.1,
Aldus PageMaker® version 4.2x, Adobe
Separator™ 3.2 or earlier, Canvas™ versions 3.x or later, and other applications
that require a .PPD file. Copy this file into
the appropriate PPD Folder specified by the
application you are using (e.g., the Aldus
PageMaker PPD Folder is located in the
Aldus Folder, which is located in the
System Folder).
Elite 20ppm xx.PDF
This is the PostScript printer description
file for QuarkXPress™ versions 3.x or later.
This file contains Elite 20ppm-specific
information for paper sizes. Copy this file
into the folder where the QuarkXPress
application resides.
Elite 20ppm xx.MPD
This extension is the PostScript printer
description file for Ready,Set,Go!® versions
5.x or 6.0x. Copy the file into the MPD
Folder located in the Ready,Set,Go! Folder.
• 2 - 3
Page 35

For more detailed information on printer description files, please refer to the documentation included with the application.
Selecting the LaserWriter 8 printer driver
The LaserWriter 8 driver shipped with the Elite XL 20ppm may look slightly different
(presentation and layout of dialog boxes, menu items, etc.) from other versions of
the LaserWriter 8 driver. However, the Elite XL 20ppm and the Elite XL 20ppm PPD
files are compatible with all versions of LaserWriter 8.
Before you can print, you must select the LaserWriter 8 printer driver in the Chooser.
To select the LaserWriter 8 printer driver:
1. Choose the Chooser from the Apple () menu.
If you do not see the LaserWriter 8 icon in the upper-left area of the Chooser (A),
reinstall your printing software. If you do not see the name of your printer in the
upper-right area of the Chooser (C), refer to the chapter on Maintenance and
Troubleshooting.
A. Click on the
LaserWriter 8
icon.
B. Select the
name of the
AppleTalk Zone
that the printer
is connected to.
Note: If you use the Apple LaserWriter Utility to change the zone that the Elite XL
20ppm appears in, this will not take effect until you switch the printer off and then
back on.
2 - 4 • Using the Macintosh
C. Click on the
name of your Elite
XL 20ppm printer
in this box.
D. Make sure
AppleTalk is active.
Page 36

Selecting the printer description file
The LaserWriter 8 printer driver in your computer uses PostScript Printer Descriptions (PPDs). The Elite XL 20ppm PPD gives the LaserWriter driver information
about capabilities common to every Elite XL 20ppm printer. This PPD is installed
when you install the software from the Elite XL 20ppm CD-ROM. When you select
the printer in the chooser, your computer communicates with the printer to get
specific information about it. This can include memory amount, which paper trays
are installed, and so on.
Creating the Printer Descriptions folder
When you install software from the Elite XL 20ppm CD-ROM, the Elite XL 20ppm
PPD is copied into the Printer Descriptions folder. If a Printer Descriptions folder
does not exist, the installer creates one and then copies the PPD into it. (For System
6, the Printer Descriptions folder is stored in the System Folder.)
Setting up the printer in the Chooser
You use the LaserWriter 8 Setup function in the Chooser to read the PostScript
printer description files.
To select the PostScript Printer Description:
1. Choose the Chooser from the Apple () menu.
2. Click the LaserWriter 8 icon in the upper-left area of the Chooser. The
name of the Elite XL 20ppm appears in the upper-right area of the
Chooser below “Select a PostScript Printer.” Click the printer’s name.
3. Click Setup ( ). A message box appears, informing you that the
Setup options
Your printer is now correctly set up and you can print to it. However, if in the future
you change something about it (like adding extra memory or new paper trays, for
instance), you use the Setup dialog box. You can also use the Printer Info function to
show you information about your printer.
To access the additional Setup functions:
Macintosh is communicating with the Elite XL 20ppm. The LaserWriter 8
driver is automatically configured with specific information about your
Elite XL 20ppm (model, memory, paper sizes, paper trays, etc.). After the
process is finished, the Chooser reappears with an icon placed next to the
Elite XL 20ppm name. Also, notice that “Setup” has an ellipsis (…) added
to it – . The ellipsis indicates that “Setup” now contains user-selectable functions.
• 2 - 5
Page 37

1. Choose the Chooser from the Apple menu and select LaserWriter 8.
2. Select the name of the Elite XL 20ppm in the right scroll box.
3. Click Setup. The Setup dialog box appears.
• Click Auto Setup to automatically reconfigure the printer driver after you have
upgraded your printer with additional memory or additional paper trays.
Normally, this will be all you need to do after making these changes.
• Click Select PPD to manually select a PostScript Printer Description file.
• Click Printer Info to display information about the Elite XL 20ppm. Click the
Update button to view the information about the Elite XL 20ppm currently
selected.
• Click Configure to manually reconfigure the printer driver after you have
upgraded your printer with new options. The available options for the Elite XL
20ppm are:
- Memory Configuration – After installing additional memory, select the memory
size range.
- Additional Tray – After installing additional paper trays, select the option that
corresponds to the new tray.
- Paper Sizes – This pop-up menu enables you to select the page sizes that will be
displayed in the Paper menu of the Page Setup dialog box.
Printing documents using the LaserWriter 8 printer driver
To print a document:
1. Open the document that you want to print.
2. Choose Page Setup from the File menu.
3. Make your selections in the Page Setup dialog box and click OK.
4. Choose Print from the File menu.
5. Make your selections in the Print dialog box and click OK.
Note: You may get error messages about insufficient disk space during printing. This
is because your Startup disk does not contain enough free space. If the amount of
free space on your Startup disk is insufficient, you will probably get other errors not
specifically related to printing. The amount of free space you need is determined by
the size and complexity of jobs that you print. If you do not get insufficient disk
space messages, then you have enough free space.
2 - 6 • Using the Macintosh
Page 38
When you print, the LaserWriter 8 driver makes a copy of the document before
sending it to the Elite XL 20ppm. This copy is temporarily saved onto the Startup
disk. If the Startup disk does not contain free space equal to the size of the document,
you will get an error.
Selecting Page Setup options
Most applications have a Page Setup menu command. This allows you to control
how a page will look. There is a pop-up menu at the top left of the dialog box which
lets you switch between various page setup windows.
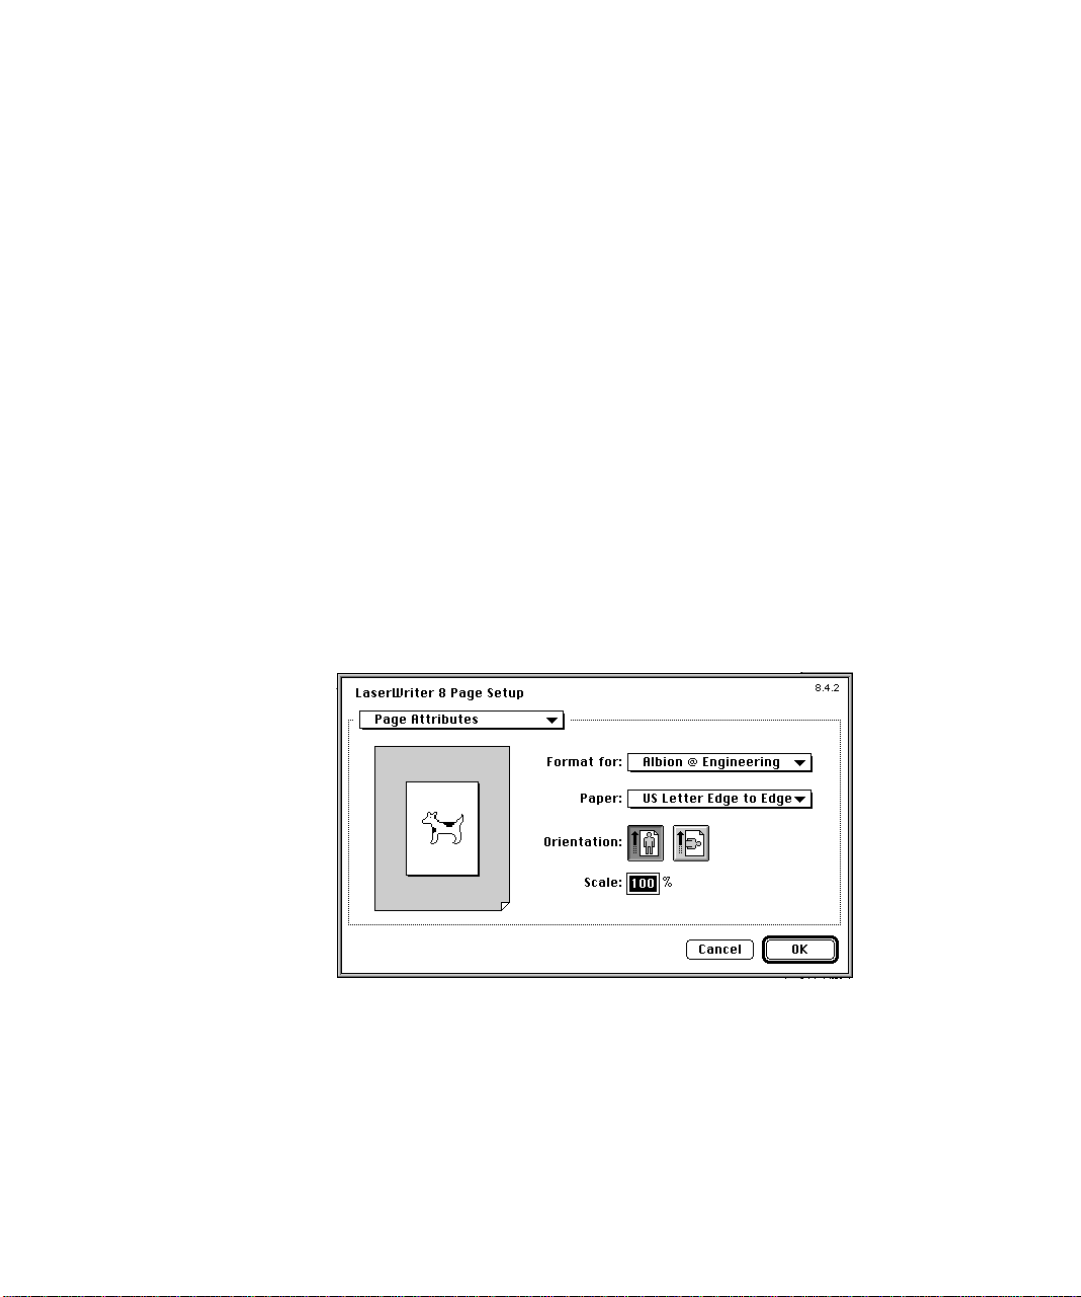
Page Attributes
Paper
You select paper sizes in the Paper pop-up menu. The default paper size is US Letter
Edge to Edge (or A4 if you use the international LaserWriter driver). To change the
paper size, click the Paper pop-up menu, drag the pointer to the paper size you want,
and release the mouse button. If you click on the menu again, you will see a check
mark next to the current paper size. If you choose a paper size that is not edge to
edge, anything closer than .35 inches (8.9 mm) from the edge of the paper will not
print.
If you click on the “Dogcow” icon at the left of the dialog box, the icon will change to
a list of paper and margin dimensions in inches. Click again to see the dimensions in
centimeters.
Edge-to-edge printing
You can print edge-to-edge with all supported paper sizes. Print quality is not
guaranteed within 4mm (0.16 inches) of each edge.
• 2 - 7
Page 39

Orientation
You can change the orientation of the print on the page using the Orientation icons.
Scale
You can print the contents of a page from 25 to 400 percent of its normal size, using
the Scale option. Enter a figure between these ranges (in 1 percent increments). The
default is 100 percent, meaning there is no reduction or enlargement.
Options
If you choose PostScript Options from the Page Attributes pop-up menu, you will
see additional layout and formatting options. (Note:
default setting.)
indicates an Elite XL 20ppm
Visual Effects
You can manipulate the image on the page using the visual effects section. Your
selections are graphically displayed in the image area in the left of the dialog box.
Flip Horizontal flips your document horizontally.
Flip Vertical flips your document vertically.
Invert Image inverts the image of your document. Black changes to white and
white changes to black.
Image and Text
Substitute Fonts prints high quality resident fonts for certain screen fonts.
When you select this checkbox, the following substitutions occur:
Times® for New York Helvetica® for Geneva Courier for Monaco
Smooth Text smooths the edges of text derived from screen fonts.
2 - 8 • Using the Macintosh
Page 40

Smooth Graphics smooths the edges of bitmapped graphics.
Precision Bitmap Alignment allows you to print bitmaps with less distortion,
but the document will print at a slightly smaller size (1% to 4% depending on
the printing resolution).
If you check Unlimited Downloadable Fontsyou can use as many downloadable
fonts as you need in a document, but it may take longer to print.
Selecting Print options
When you select Print from the File menu, you see a dialog box offering you printing
options. You will also see the name of the printer at the top of the dialog box. When
you click Print, you send the document to the Elite XL 20ppm. Clicking Cancel
cancels the print job.
If you make changes in the Print dialog box, some of these changes stay in effect until
you change them again. Others revert to the default settings the next time you print.
The pop-up menu named “General” gives you other options for printing.
Copies
Use the Copies option to specify the number of copies of the document to print,
from 1 to 999. The default is 1 copy. To change the number of copies, click in the box
and type the number of copies you want to print.
• 2 - 9
Page 41

Pages
The Pages option default is All, which prints all the pages in the document, from first
to last. From and To allow you to specify a range of pages to print. Click the button
labeled From and type the page numbers of the range you want to print into the
boxes (for example, From 9 and To 11 prints pages 9, 10 and 11).
Paper Source
The Paper Source pull-down menu lets you choose which paper trays supply paper to
the printer. For instance, you may want to print a business letter where the first page
is on letterhead and the remainder is on continuation sheets.
If you click on the All pages from button, all pages will be fed from the source you
select in the upper pop-up menu. When the All pages from button is selected, the
lower pop-up menu is dimmed. If you click on the First page from button, this lets
you choose which paper source is used for the first page of your document. When
First page from is selected, you can choose another paper source from the lower popup menu for the remaining pages.
If you choose Auto Select, paper is drawn from the tray (in the case of multiple
trays) that contains the paper size selected in the Paper option of the Page Setup
dialog box. If no optional trays are installed, Auto Select has no effect and paper
will be drawn from the internal tray.
If you choose Tray 1, paper is drawn from the tray that is currently inserted in
the Elite XL 20ppm’s main housing.
If you choose Tray 2 , paper is drawn from this tray if the corresponding
optional sheet feeder and cassette is installed.
If you choose Tray 3 , paper is drawn from this tray if the corresponding
optional sheet feeder and cassette is installed.
If you choose MPFeeder, paper is drawn from the multipurpose feeder.
If you choose Manual Feed, this bypasses the normal paper sources of the
printer so that you can place a single sheet of special paper or other media (e.g.,
transparency film) into the MultiPurpose feeder for printing.
Destination
The Destination pop-up menu lets you to send your document to the printer or save
it to a file.
2 - 10 • Using the Macintosh
Page 42
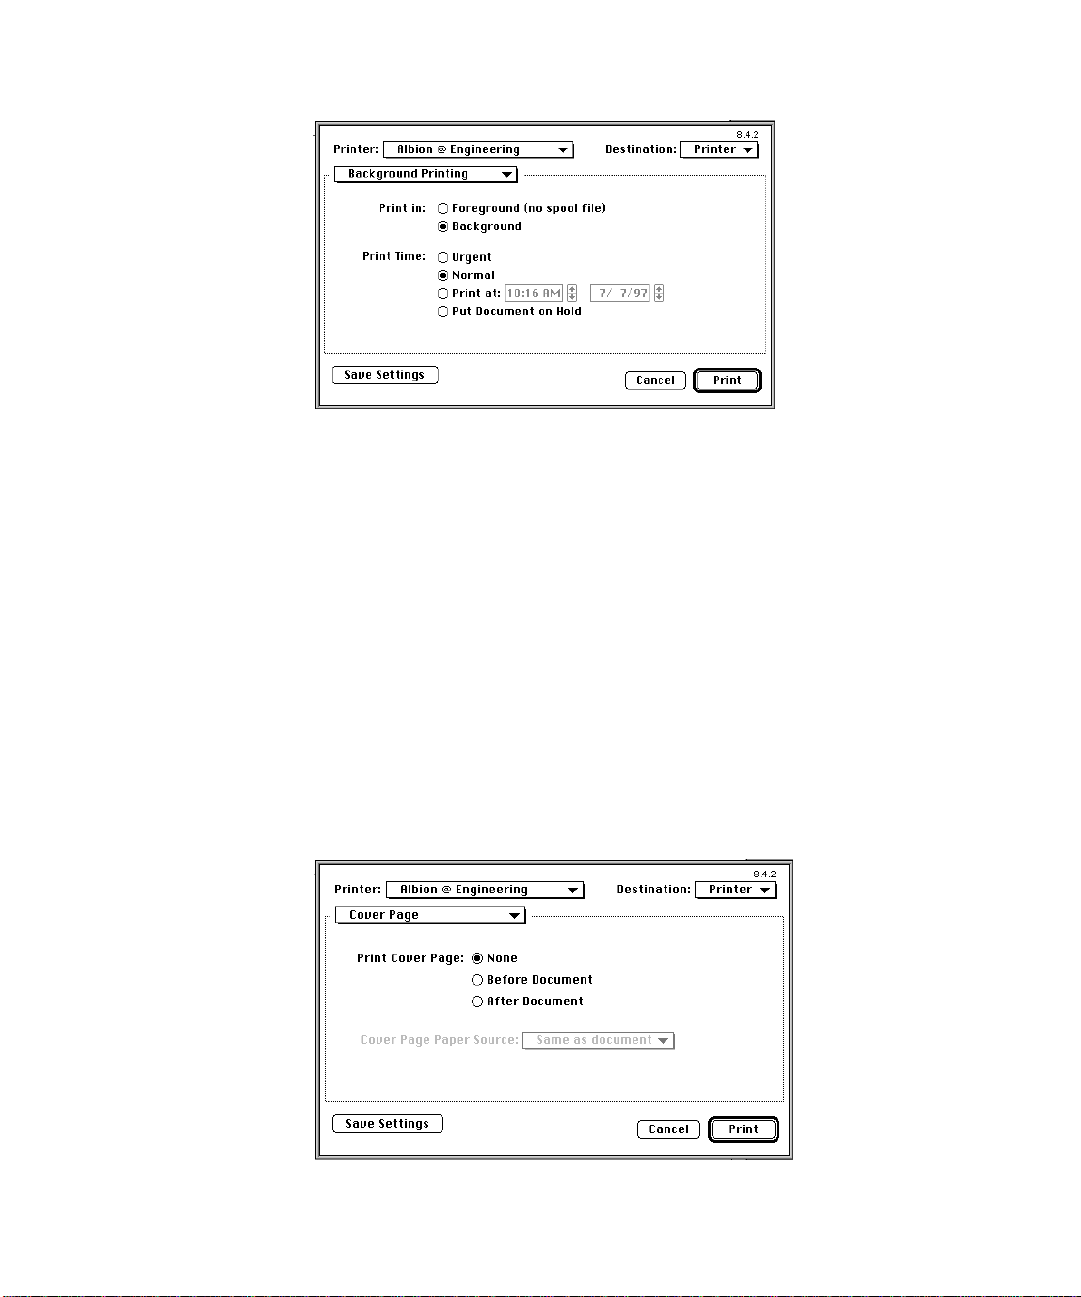
Background Printing
This allows you to choose whether your documents print in the foreground or
background. Foreground printing means that your Mac cannot be used until the last
page is printed. Background printing (recommended) stores the print file on your
hard disk and sends it from there to the printer. This method is slightly slower than
foreground printing, but it lets you use your computer before printing is completed.
You can also control the time when your job is printed.
Cover Page
If several people share your printer on a network, you may find that printing a cover
page lets you identify the beginning and end of your print job from a stack of jobs in
the output tray.
If you select Cover Page, an extra page (identifying the document) is printed. The
cover page contains: the user name, as specified in the Macintosh’s Sharing Setup
• 2 - 11
Page 43

control panel; the name of the document, if there is one; and the date and time the
document was printed. If you choose the None option, no cover page is printed. If
you choose either Before or After Document, a cover page will print in the appropriate position.
Color Matching
The Color Matching pop-up menu allows you to specify grayscale or black and white
printing.
If you choose Black and White, you get black and white output (no shades of
gray). Darker areas are converted to black, and lighter areas are converted to
white.
If you choose Color/Grayscale, you get grayscale output. Color images have
colors substituted by gray shades.
If you choose Color Matching, you get grayscale output that uses the advanced
color matching capabilities of ColorSync or PostScript Level 2 to match the
color and gray tones on the computer screen as closely as possible.
Layout
This option lets you print 1, 2 ,4, 6, 9, or 16 pages on a sheet and resizes the images to
fit. It also lets you choose a border to use between pages on a sheet.
Error Handling
The Error Handling dialog box allows you to specify how any PostScript errors are
reported during printing.
2 - 12 • Using the Macintosh
Page 44
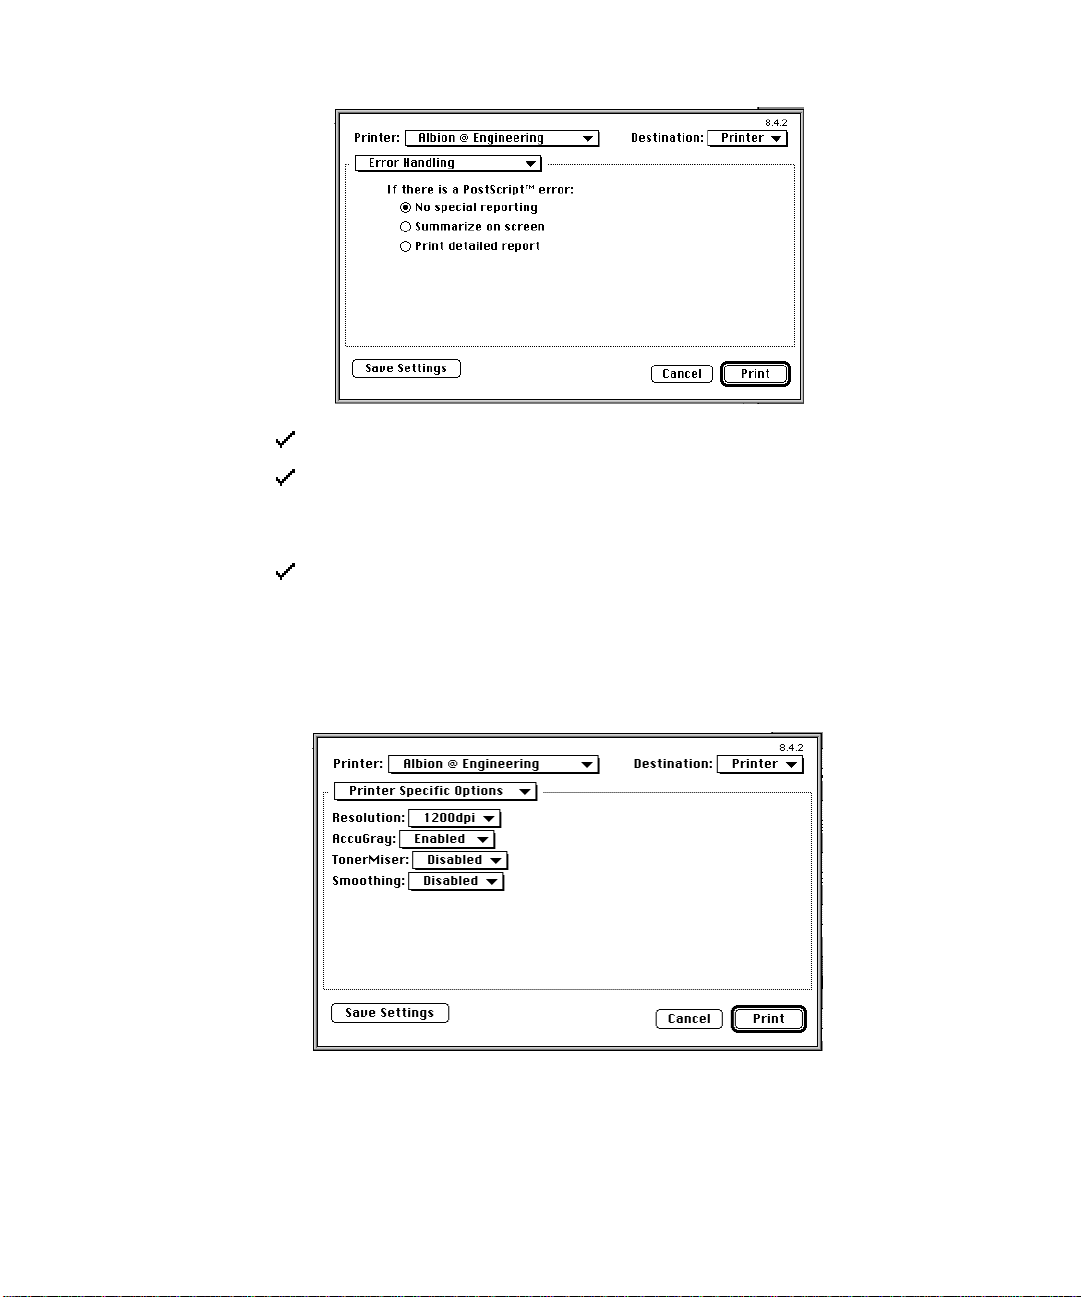
Save as File
This dialog box (not shown) lets you select options for print jobs that you save to the
hard disk as files.
If you choose No Special Reporting, no PostScript error reports are produced.
If you choose Summarize on Screen, you will see a message describing any
PostScript errors on the monitor. This option does not work when Background
Printing is on.
If you choose Print Detailed Report, you will get a printed report describing any
PostScript errors.
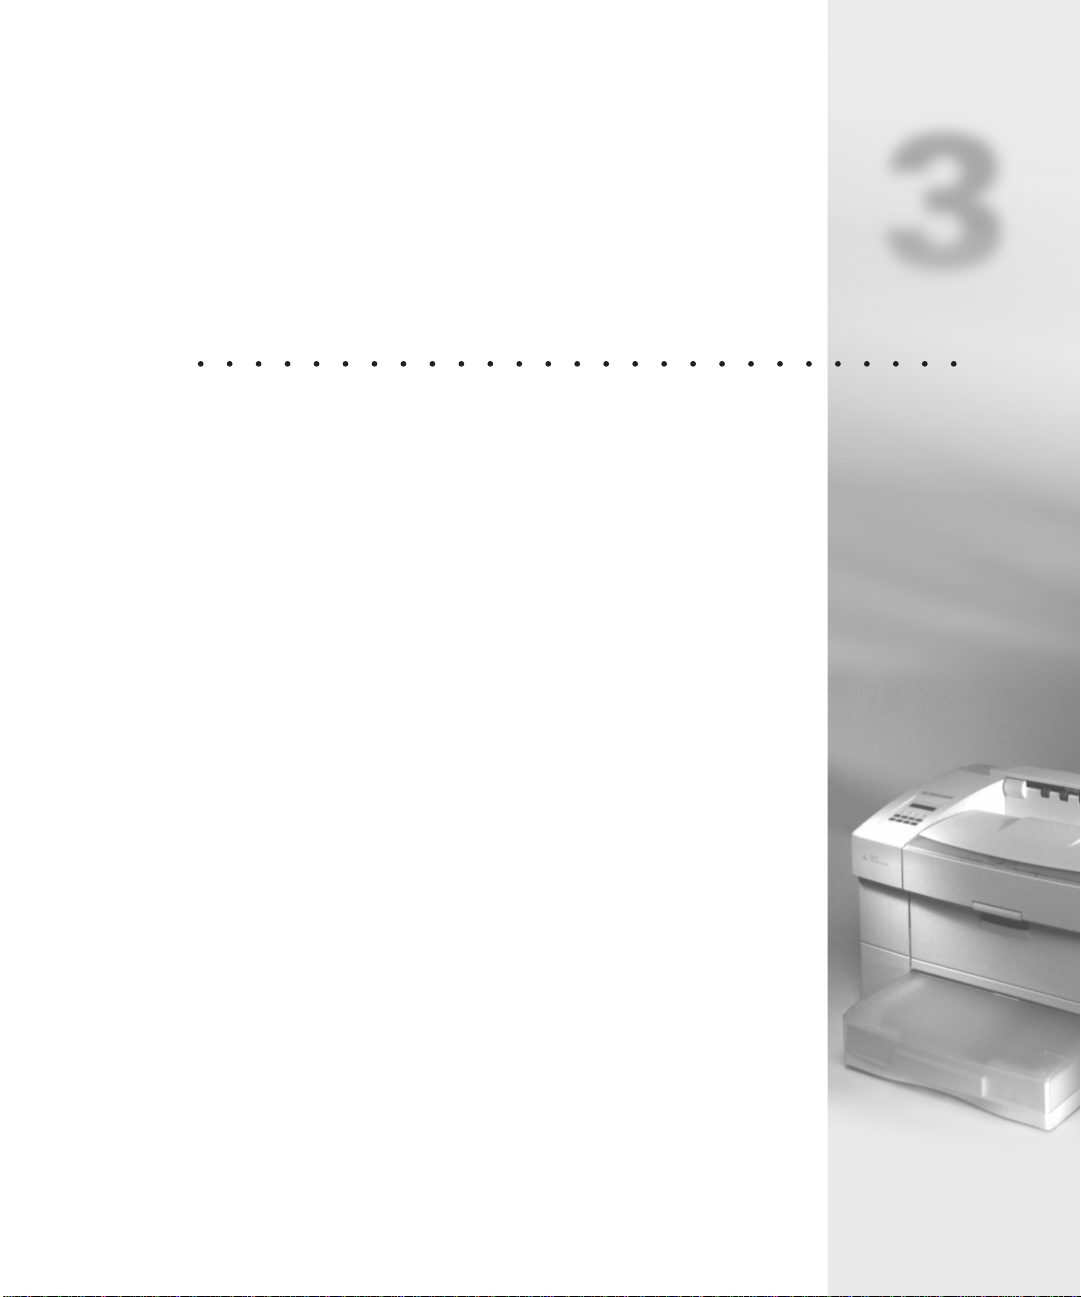
Printer Specific Options
You can choose the output resolution (in dots per inch) for the current print job.
This overrides the default resolution that was specified in the printer’s control panel
using the Resolution submenu.
• 2 - 13
Page 45

You can also choose to enable (recommended) or disable AccuGray. AccuGray is
GCC’s technology to control the tendency of laser images to print darker than
expected.
The Elite XL 20/800 and 20/1200 model add two further options to this dialog box:
Toner Miser and Smoothing. You can only use one of these at any one time.
Neither option is available on the 20/1200 if resolution is set to 1200 dpi. Toner
Miser uses less toner to let you print draft pages, and Smoothing reduces the jagged
effect on text and graphics.
Save
If you find that you are often changing the Printer’s Default options, you can save
your settings by clicking the Save Settings button. Your saved settings will carry over
to any application that uses these LaserWriter 8 menus.
Manual feed printing
The LaserWriter 8 driver supports manual feed printing.
When you want to manually feed paper, envelopes, or transparencies into the
printer:
1. Choose Print from the computer’s File menu.
2. Choose Manual Feed from the Paper Source pop-up menu.
3. Click the Print button.
The message, Manual Feed, appears in the printer’s control panel display to
indicate that the printer is ready for you to insert the paper. The control panel
display also indicates the paper size and orientation.
4. On the printer, open and extend the MultiPurpose feeder.
5. Adjust the paper guides on the MultiPurpose feeder for the size of the
paper that you are using.
6. Insert the paper into the MultiPurpose feeder. (Insert letterhead face up,
with the top of the page entering the printer first. Insert envelopes with
the flap down and the top edge on the right as you face the front of the
printer.)
7. Press the Manual Feed key on the control panel.
Note: If you realize that you want to use paper in the internal paper tray, do not
insert paper into the MultiPurpose feeder, and press the Form Feed/Continue key on
2 - 14 • Using the Macintosh
Page 46

the control panel. If you insert paper into the MultiPurpose feeder and you do not
press the Manual Feed key within the Manual Feed Timeout period, the job will be
cancelled. The default Manual Feed Timeout period is never timeout, and you can
change this through the printer’s control panel menus to be in the range from 30
seconds to ten minutes.
Naming the Elite XL 20ppm
You must assign each printer a unique name if there is more than one Elite XL
20ppm on the network. If you do not assign a unique name to each printer, a number is automatically added to duplicate names in the Chooser to distinguish the
printers from one another.
Note: If you change the name of a printer on the network system, every user on the
network system must select the new printer name in the Chooser.
If you want to name the Elite XL 20ppm:
1. Select the Elite XL 20ppm in the Chooser. Click the LaserWriter 8 icon in
the left scroll box and click the name of the printer in the “Select a LaserWriter” scroll box.
2. Double-click the LaserWriter Utility icon. (The LaserWriter Utility is located
on the startup disk in the Elite 20ppm Folder.) You will see the LaserWriter
Utility, with four menus in the menu bar.
3. Choose Name Printer from the Utilities menu. The “Rename the chosen
printer” dialog box appears displaying the current name of the printer.
4. Type the new name of the printer in the space provided. Names must be at
least two characters in length, but no more than 31 characters. Names
cannot contain a colon (:), an asterisk (*), or parentheses.
5. Click Rename.
6. Choose Quit from the File menu.
• 2 - 15
Page 47
Using Windows 3.1
Contents
Overview 3-2
Printing with Windows 3.1 3-2
Installing printer software 3-2
Setting Windows 3.1 printing options 3-5
Advanced Options 3-7
Port assignment - Windows 3.1 3-8
Installing printer description files 3-9
Printing from Windows 3.1 applications 3-10
CHAPTER
3
• 3 - 1
Page 48

3: Using Windows 3.1
Overview
You set up your Windows or DOS computer to use the Elite XL 20ppm by installing
the Elite XL 20ppm software for PC-compatibles. This software is on the Elite 20ppm
CD-ROM. It includes customized Windows PostScript printer drivers for Windows
3.1 (and Windows for Workgroups 3.11), and other versions of Windows. It also has
printer description files that let you use all the printing and paper handling features
of the Elite XL 20ppm.
This and the following sections detail installation and printing instructions for
Windows 3.1, Windows 95, Windows NT 4.0, and DOS. Information on networking
printers with Windows is in the Networking section of this manual.
Important: Read the release notes contained in the README.TXT file before installing the printing software. This file includes important last-minute feature and
compatibility information about the Elite XL 20ppm.
Printing with Windows 3.1
Installing printer software
If you want to install the GCC Windows 3.1 PostScript driver:
1. Switch on the PC.
2. Start Windows.
3. Double-click the Main group from the Program Manager window. You will
see the Main group window.
4. Double-click the Control Panel icon. You will see the Control Panel window.
5. Double-click the Printers icon. You will see the “Printers” dialog box.
6. Click the Add button.
3 - 2 • Using Windows 3.1
Page 49
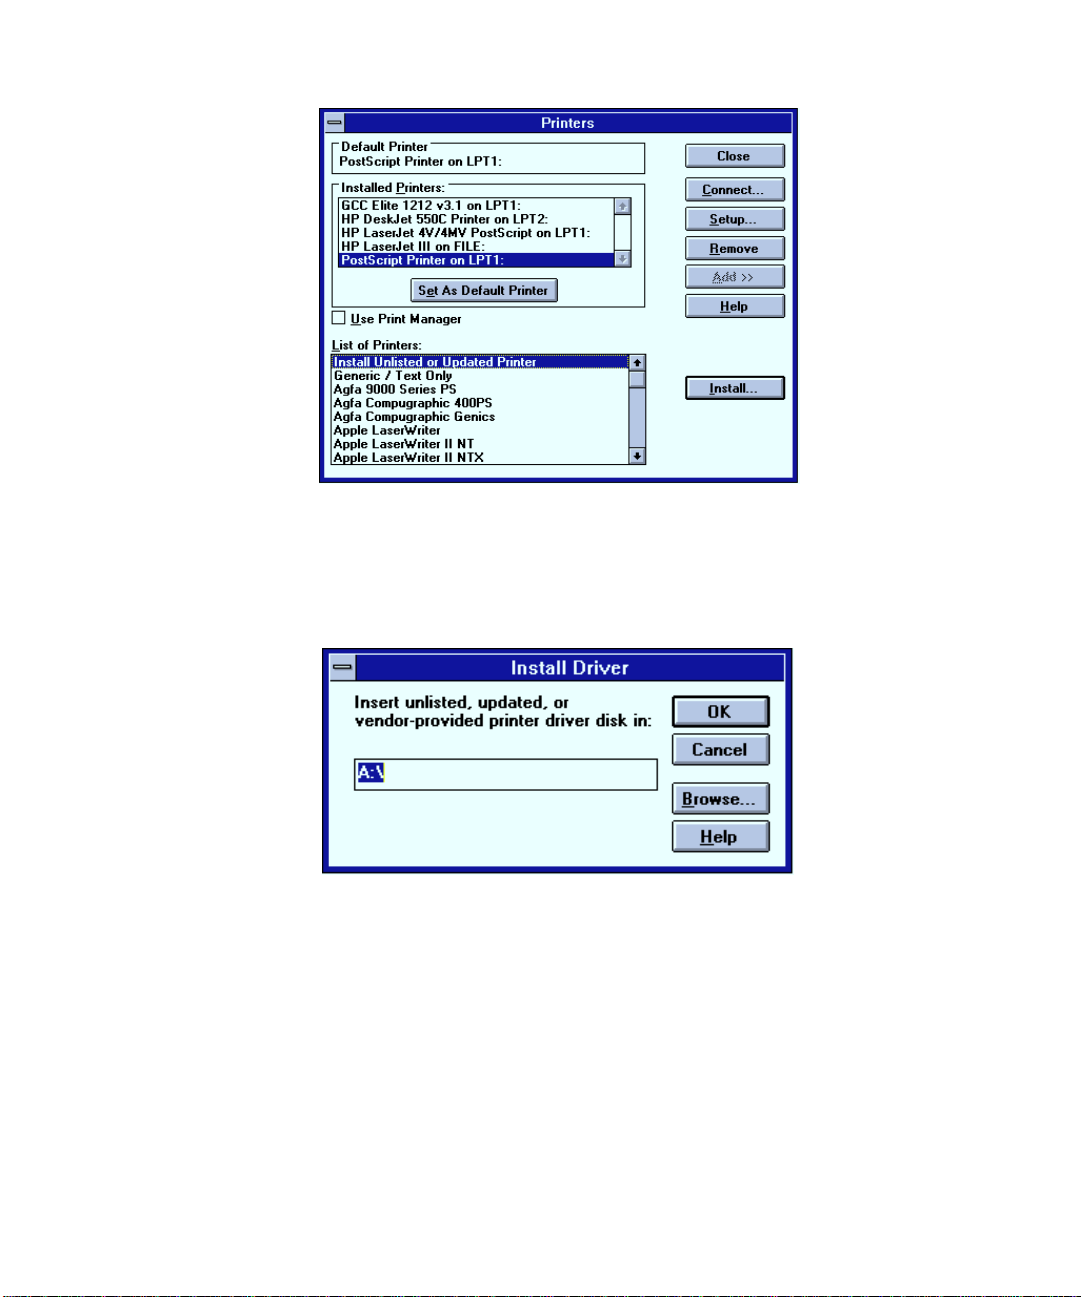
7. The dialog box expands, and shows you a list of printer drivers in the “List
of Printers” list box. These are the printer drivers that came on the disks
you received with your Windows software. Select Install Unlisted or Updated Printer and click the Install button.
8. The “Install Driver” dialog box appears displaying the message, “Insert
unlisted, updated, or vendor-provided printer driver disk in:” along with
the A:\ or B:\ prompt. Change the A:\ or B:\ to the letter of your CD-ROM
drive (for example, to D:\) and add the directory WIN31 (for example,
D:\WIN31).
9. Insert the Elite XL 20ppm CD-ROM into the CD drive and click OK in the
dialog box. You will see the “Add Unlisted or Updated Printer” dialog box
with a list of Elite XL 20ppm printer drivers. Select a driver and click OK.
• 3 - 3
Page 50

10. After the driver is installed, you will see the “Printers” dialog box again.
GCC Elite XL 20ppm appears in the “Installed Printers” list box with LPT1
(which is the first parallel port) designated as the default port. Select the
GCC Elite XL 20ppm printer driver in the “Installed Printers” list box and
click Set As Default Printer. The Elite XL 20ppm is now set as the default
printer and will appear in the “Default Printer” area of the “Printer”
dialog box.
Choose Use Print Manager to enable print spooling. With print spooling, you
have the full use of your computer after you press the Print button rather than
waiting until the print job is completed. This option allows your documents to
print in the background. Background printing is useful when printing large or
multiple documents, but documents do not print quite as fast.
11. Click Close, unless you want to change printer options (see the next section, “Setting Windows 3.1 Printer Options”).
You can now print from your computer to the Elite XL 20ppm.
You may also need to install printer description files if you use certain applications
that require them. Go to the section “Installing printer description files.”
3 - 4 • Using Windows 3.1
Page 51

Setting Windows 3.1 printing options
Now that you have installed the printer software in Windows, there are a number of
settings that you may need to change if you have special printing requirements. Most
users do not need to change these settings.
If you want to change print options:
1. Click Setup in the “Printers” dialog box. You will see the Setup dialog box.
Paper Source
You choose which paper tray supplies the printer from the Paper Source drop-down
menu.
• If you choose Auto Select, the printer selects the paper tray that holds the paper
size selected in the Paper option of the Page Setup dialog box. This option only
works if you have more than one paper tray.
• If you choose Tray 1, the printer uses paper from the Elite XL 20ppm’s main
tray.
• If you choose Tray 2, the printer uses paper from this lower tray (if this extra
tray is installed).
• If you choose Tray 3, the printer uses paper from this lower tray (if this extra
tray is installed).
• If you choose Manual Feed, the printer waits for you to place paper or other
media (transparency film, for example) in the multipurpose feeder. When you
have done this, you must press the Manual Feed key on the printer’s control
panel to draw the paper into the printer.
• If you choose MPFeeder, the printer uses paper from the MultiPurpose feeder.
Unlike the Manual Feed option, the printer does not require you to press the
• 3 - 5
Page 52

Manual Feed button on the control panel, but you must have paper ready in the
MultiPurpose feeder.
Paper Size
If you want to change the paper size, click the Paper Size drop-down menu, and
choose the paper size.
Edge-to-edge printing
The Elite XL 20ppm will print edge-to-edge on all supported paper sizes. However,
print quality is not guaranteed within 4mm of each edge.
Orientation
Use this option to change the position of the image on the page. If you choose
vertical, or Portrait, this prints the image upright on the page. If you choose horizontal, or Landscape, this prints the image sideways on the page. The default is Portrait.
Note: If you create a document and specify in the application’s page setup that it
should be vertical, then if you choose Landscape in this dialog box the image will be
cut off at the bottom.
Copies
If you want to print more than one copy, enter the figure here. The maximum
number of copies is 999.
Options
To make further changes, click on the Options button. You will see the Setup Options dialog box.
• Print to ...
If you choose Print To Encapsulated PostScript File, the document is not
printed but is saved in the location you specify as an (EPS) file. You may need
to do this if you send files to a service bureau or want to make a page into a
graphics file.
• Scaling % ...
If you change the Scaling figure from the default 100 percent, the image is
reduced or enlarged on a page. If you select 50 percent, the image prints at half
size; if you select 200 percent, the image prints at double size.
Note: We recommend that you use the application’s Scaling option and leave
the figure in the Print Options dialog box at 100 percent, unless an application
does not support scaling. If you set both this dialog box and the application’s
3 - 6 • Using Windows 3.1
Page 53

Print dialog box to scaling percentages other than 100 percent, you will get
unpredictable results.
• Margins
If you choose Default Margins, certain applications will be limited to placing
page elements (i.e., text and graphics) within the page’s margins. This is only
important if you are using Letter Small or A4 Small paper sizes, since the other
sizes are all edge-to-edge and thus have no margins. Letter Small and A4 Small
have margins of .35 inches (9 mm) all around.
If you select Default, the printer will tell your applications that these margins
exist on Letter Small and A4 Small. If you select None, your applications will be
told that there are no margins. However, the printer will not reproduce any text
or graphics in the margin area.
• Send Header ...
If you choose Send Header, a PostScript header will be sent at the beginning of
each print job you send to the printer.
• Smoothing ...
Select either printer’s default, enabled or disabled. If you enable smoothing
here, Windows 3.1 will smooth text and graphics.
• Toner Miser ...
Select either printer’s default, enabled or disabled. If you enable Toner Miser
here, pages will appear lighter. This is suitable for draft printing..
Advanced Options
To make more changes, click Advanced to see the Advanced Options dialog box.
• You can set a default resolution for this computer by choosing the output
resolution (in dots per inch) from the Resolution menu. The resolution you
select overrides the resolution selected in the printer’s front panel Default
Resolution submenu.
You may have a computer on a network that is used for work which can be
printed at lower resolutions than the maximum. For instance, spreadsheets and
internal documents can usually be printed satisfactorily at 300 dots per inch.
You can set the resolution in the Advanced Options dialog box and override
this as necessary in an application’s Page Setup or Print dialog boxes.
• 3 - 7
Page 54
• You need to change the Virtual Memory setting when you add RAM to the
printer or if you routinely download fonts to the printer’s memory. The figure
sets the amount of virtual memory that will be available for printing. The
amount of memory that can be allocated depends on the amount of RAM
installed in the printer.
Full instructions on how to change this figure are included in the Adding RAM
section of this manual.
Port assignment – Windows 3.1
You may need to change the port used by your PC; your PC’s LPT1 may be used by
another device or you may wish to use a serial port. (GCC recommends that you use
one of the LPT [parallel] ports, because they are considerably faster than a serial
port.)
If you want to change the port assignment:
1. In the Printers dialog box, select the GCC Elite XL 20ppm printer driver in
the “Installed Printers” list box (if it is not already selected).
2. Click Connect. You will see the Connect dialog box.
3. Select the new printer port assignment in the “Ports” list box. If the
printer is connected to a parallel interface, select one of the parallel ports
(labeled LPT1, LPT2, etc.). If the printer is connected to a serial interface,
select one of the serial ports (labeled COM1, COM2, etc.).
3 - 8 • Using Windows 3.1
Page 55

4. If you use a serial connection (as shown in step 3), click the Settings button. (The Settings button is dimmed if the Elite XL 20ppm is connected via
a parallel interface.)
5. You will see the “Settings” dialog box, displaying the PC’s serial port
default parameters. Use the following: 19,200 Baud Rate, 8 Data Bits,
None for Parity, 1 Stop Bit, and Hardware for Flow Control.
Note: The Elite XL 20ppm Windows driver is shipped with the baud rate set to
9600. If you change the baud rate to 19,200, you will also need to change the
baud rate in the RS-422 Baud Rate submenu in the printer’s front panel to
19,200. Also, some versions of DOS do not support 19,200 baud rate. If you
frequently print from one of these versions of DOS, leave the Windows serial
port baud rate at 9600 to prevent communication problems.
6. You now need to verify the serial port settings, if the Elite XL 20ppm is
connected via its serial interface. Verify that the printer’s control panel
serial port settings match those set in the Windows “Settings” dialog box.
Note that the Hardware Flow Control setting in Windows corresponds to
the DTR Flow Control setting on the Elite XL 20ppm control panel.
7. Click OK to save the settings and return to the “Connect” dialog box.
8. Click OK to close the “Connect” dialog box.
9. Click Close to close the “Printers” dialog box.
10. Choose Close from the Control menu to close the Control Panel window.
11. Choose Close from the Control menu to close the Main window.
Installing printer description files
Printer description files (file names with the following extensions: .PDF, .PDX, or
.PPD) are files that allow you to use Elite XL 20ppm-specific features from within
specific applications. Please refer to the documentation included with the application
for more information on where to copy these files and how to use them.
To install printer description files:
1. Insert the Elite XL 20ppm CD-ROM into your CD-ROM drive.
2. At the root directory (C:\), type the following command and path name for
the application you are using and press the Enter key. (Note: Depending
on where you have installed any of these applications, the path names
may be different).
• 3 - 9
Page 56

• Adobe Illustrator 4.0 or 4.1:
Type copy d:\*.ppd c:\ai4\ppd to install the PPD file.
• Adobe PageMaker 6.0:
Type copy d:\*.ppd c:\pm6\rsrc\usenglsh\ppd4\ to install the PPD
file.
• Aldus FreeHand 4.0 or PageMaker 5.0:
Type copy d:\*.ppd c:\aldus\usenglsh\ppd4 to install the PPD file.
• Aldus FreeHand 3.1 and earlier:
Type copy d:\ppd3\*.* c:\aldus\usenglsh\ppds to install the PPD and
PDX files.
• Macromedia FreeHand 5.0:
Type copy d:\*.ppd c:\fh5\usenglsh\ppd to install the PPD file.
• QuarkXPress:
Type copy d:\*.pdf c:\xpress to install the PDF file.
Printing from Windows 3.1 applications
The Elite XL 20 ppm is designed to work with all Windows 3.1 (or higher) compatible applications. The GCC Windows driver provides commonly used printing
options, along with options specific to the Elite XL 20 ppm.
The location of printing options can vary among Windows applications, and certain
options may be accessible from more than one dialog box. Options may also have
3 - 10 • Using Windows 3.1
Page 57

different names than those in the Printers control panel (e.g., print quality vs.
resolution). Refer to the application’s documentation for more information.
Selecting Print Setup options
The Print Setup option is usually located under the File menu. The following Print
Setup dialog box example is taken from Microsoft Write.
Note: Applications use different terminology to refer to the Print Setup dialog box.
For example, Microsoft Word
Printer or Print (depending on the version). These commands are usually found on
an application’s File menu; for more information, refer to the documentation
provided with the application you are using.
®
uses Print Setup and Adobe PageMaker uses Target
Selecting Print options
The Print option is usually located under the File menu. The following print dialog
box example is taken from Microsoft Write.
Print Range
The Print Range option default is All, which prints all the pages in the document,
from first to last. From and To allow you to specify a range of pages to print. Click in
the box labeled From and type the first page number of the range you want to print.
Then click in the box labeled To and type the last number of the range. The Print
Range option is the only option which cannot be set through the Print Manager or
Printers control panel.
Print Quality
The Print Quality option is identical to the Resolution option found in the Advanced
Options dialog box. The resolution selected in this menu will override the resolution
selected in the Print Manager and/or the printer’s front panel Default Resolution
• 3 - 11
Page 58

Print to file
submenu. After you have made your selection in the Print dialog box you can click
OK to print your document or Cancel to close the dialog box.
The Print to File option allows you to save your document to a PostScript file. This
file can then be sent to the printer with the DOS COPY command. If your application does not have a Print to File option you can still print to a file by selecting the
File: option available from the Ports list box in the “Connect” dialog box. Refer to
Windows Help for more information.
3 - 12 • Using Windows 3.1
Page 59

Introduction
Using Windows 95
Contents
Windows 95 printing software overview 4-2
Plug and Play installation 4-2
Using Add Printer 4-3
Solutions to possible software installation
problems 4-11
Exploring the Properties dialog box 4-14
Updating printer memory 4-16
Installing printer description files 4-20
CHAPTER
4
Printing from Windows 95 applications 4-23
Selecting print options 4-24
The Print Properties dialog box 4-24
Page 60

4: Using Windows 95
Windows 95 printing software overview
You set up your Windows 95 computer to use the Elite XL 20ppm by installing the
Elite XL 20ppm software for Windows 95. This software is on the Elite XL 20ppm
CD-ROM.
Windows 95 uses a Wizard to help you install printer software. A Wizard is a series of
dialog boxes. In each dialog box you make configuration choices then click the Next
button to move to the next dialog box.
Part of the software that you need is contained on the Windows 95 CDROM or floppy disks. Make sure you have the disk(s). If you cannot
locate the disk(s) or your computer was not supplied with them, follow
the special instructions when you reach step 15.
Plug and Play installation
You can install the Elite XL 20ppm software on your computer using Plug and Play.
This will work if you are installing the software on a computer which is connected to
the printer through the parallel port.
If the printer is not connected to the computer through the parallel port, go to the
section “Using Add Printer” below.
To use Plug and Play to install the software on the computer, connect the parallel
port of the computer to the parallel port interface on the printer using an IEEE-1284
parallel cable (it will be stamped “1284”). Turn on the printer and place paper in the
paper tray. Then:
1. Start the computer if it is not turned on, or go to Shut Down on the
Windows 95 Start menu and choose “Restart the computer.”
2. The computer will go through the normal startup procedures and then
show a dialog box telling you that it has found new hardware.
3. You will then see a dialog box which asks you to select which driver you
want to install. Choose the option “Driver from disk provided by hardware
manufacturer” and click OK.
4. Go to step 8 of the numbered steps in the “Using Add Printer” section.
4 - 2 • Using Windows 95
Page 61
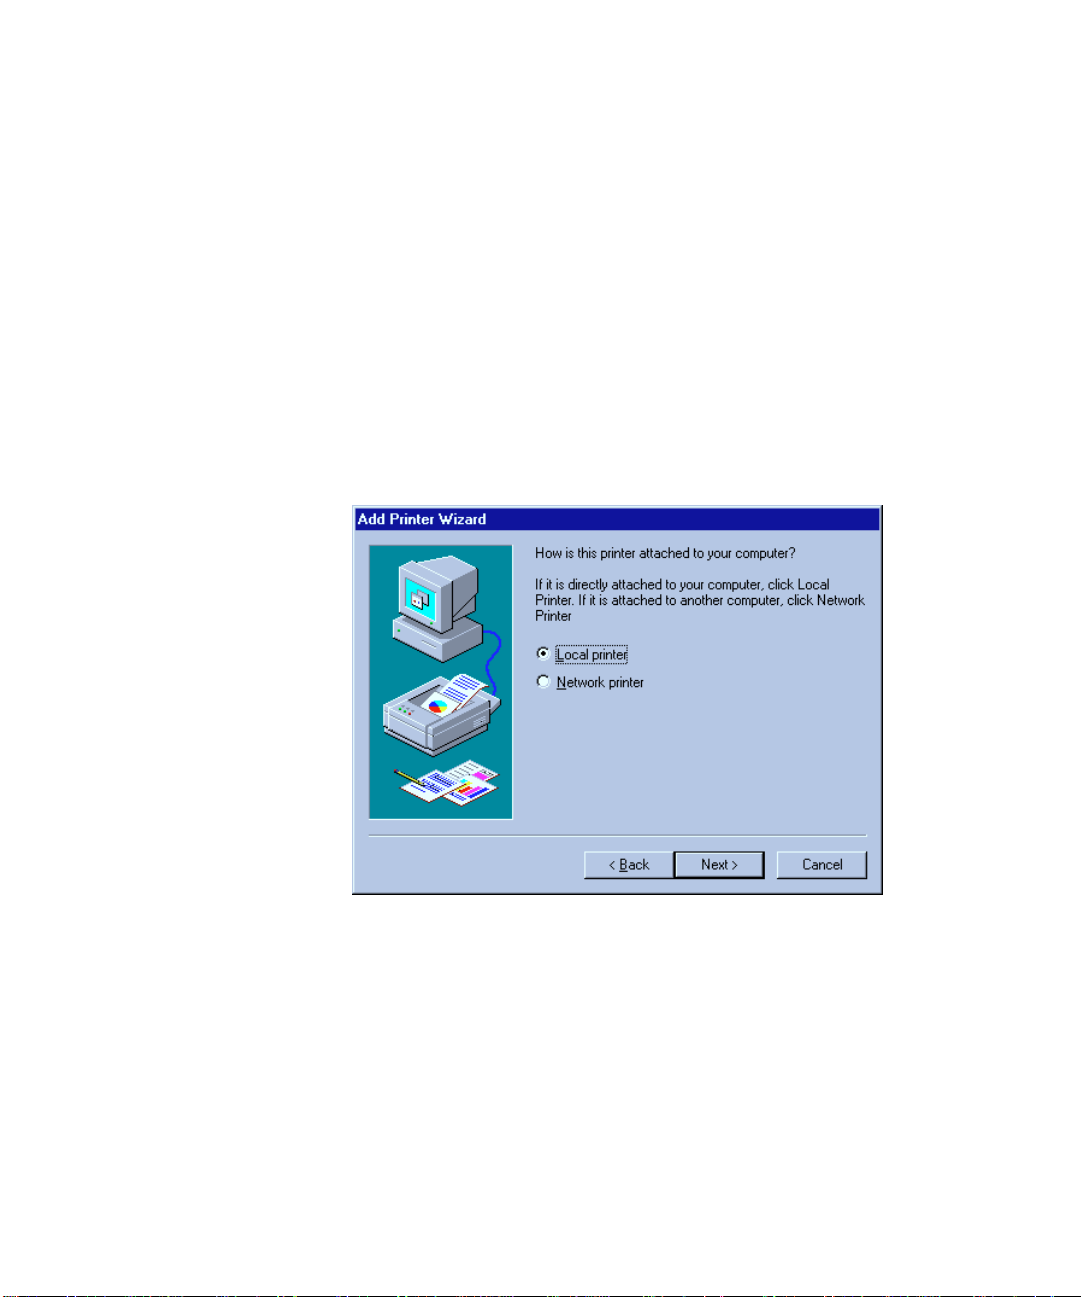
Using Add Printer
To install the printing software without using Plug and Play, make sure that the
printer is switched on, has paper, and is connected to the computer or network.
Then:
1. Click on the Start button in Windows 95.
2. You will see the Start menu. Click on Settings, then click on Printers on the
submenu.
3. You will see the Printers folder. Double-click the Add Printer icon.
4. You will see the first screen of the Add Printer Wizard dialog box. Click the
Next button at the bottom of the dialog box. If you see a list of printer
manufacturers and printer models, go to step 7. Otherwise, you will see
the local/network dialog box.
• Choose a connection:
- Select Local if your printer is attached directly to your computer, even if you
may intend others to use it through a network.
- Select Network only if your printer is not attached directly to your computer.
• If you selected Local, click Next and go to step 7. If you selected Network, click
Next and go to the next step.
• 4 - 3
Page 62

5. You will see the network path dialog.
• Type in the path or queue name of the printer. You can click Browse to display
a visual representation of your site’s network and the printer’s location on it.
• Click the Yes radio button if you print from MS-DOS based programs.
If you selected No for the MS-DOS printing question, click Next and go to step 7. If
you selected Yes, click Next and go to the next step.
6. You will see a dialog box that lets you print from MS-DOS applications to a
network printer. Click the Capture Printer Port button and select an
appropriate LPT port and print queue. Click OK.
• Click Next.
4 - 4 • Using Windows 95
Page 63
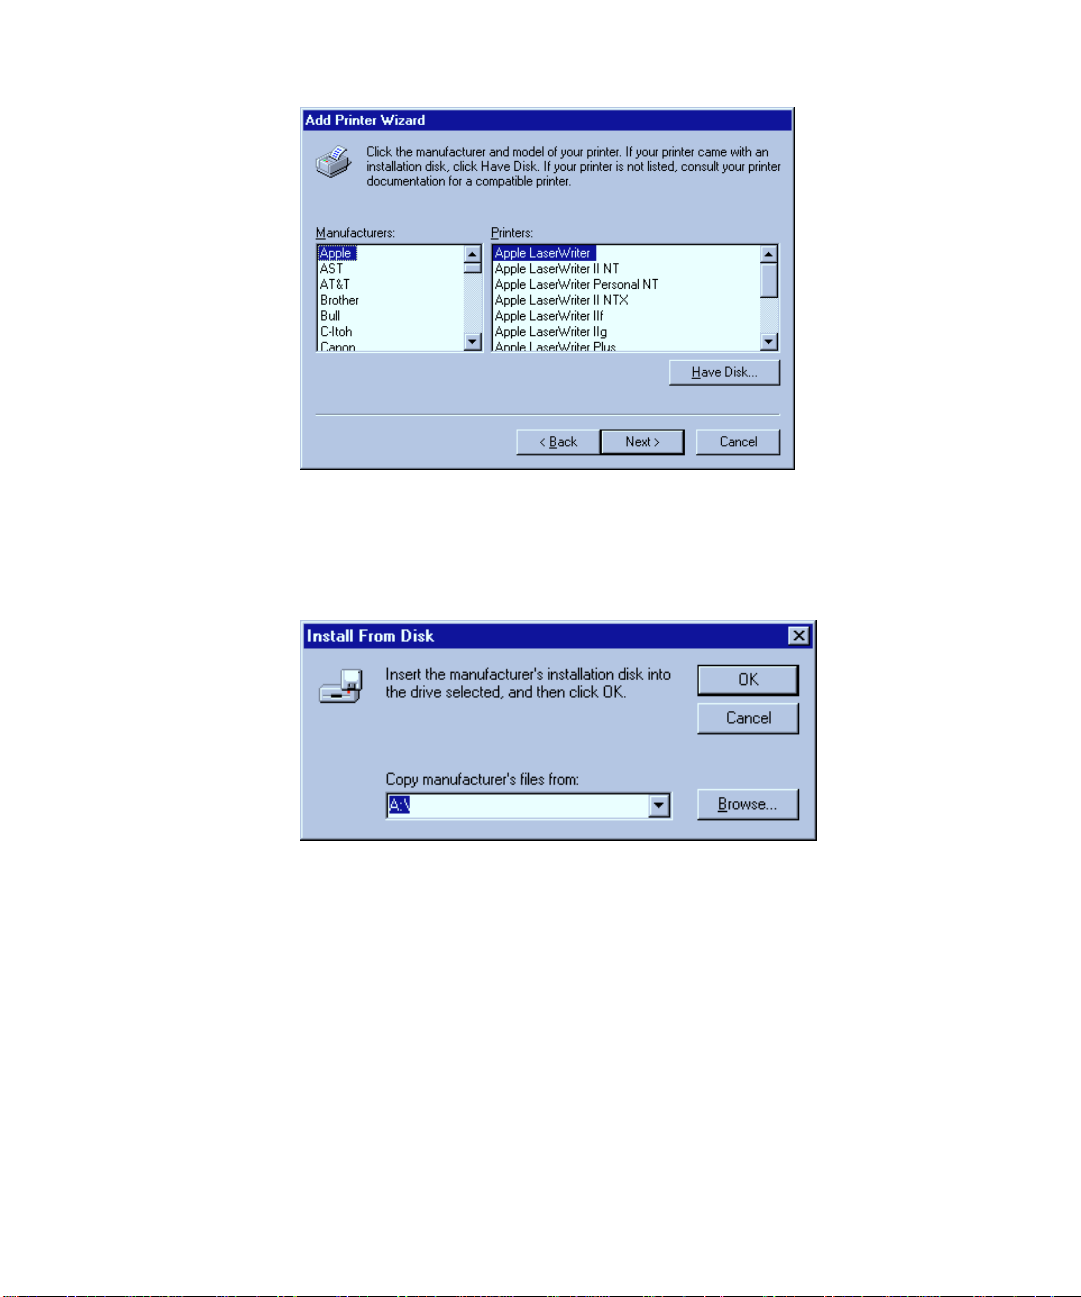
7. You will see the manufacturer/model selection dialog box.
This dialog box contains lists of printer manufacturers and their printer models.
• Ignore the settings in the boxes, and click the Have Disk button.
8. You will see the Install From Disk dialog box.
• Change the drive letter in the box at the bottom of the dialog box to the drive
letter of your CD-ROM drive.
9. Put the Elite XL 20ppm CD-ROM into the CD-ROM drive of your computer,
wait for a few seconds, then click the OK button.
• 4 - 5
Page 64
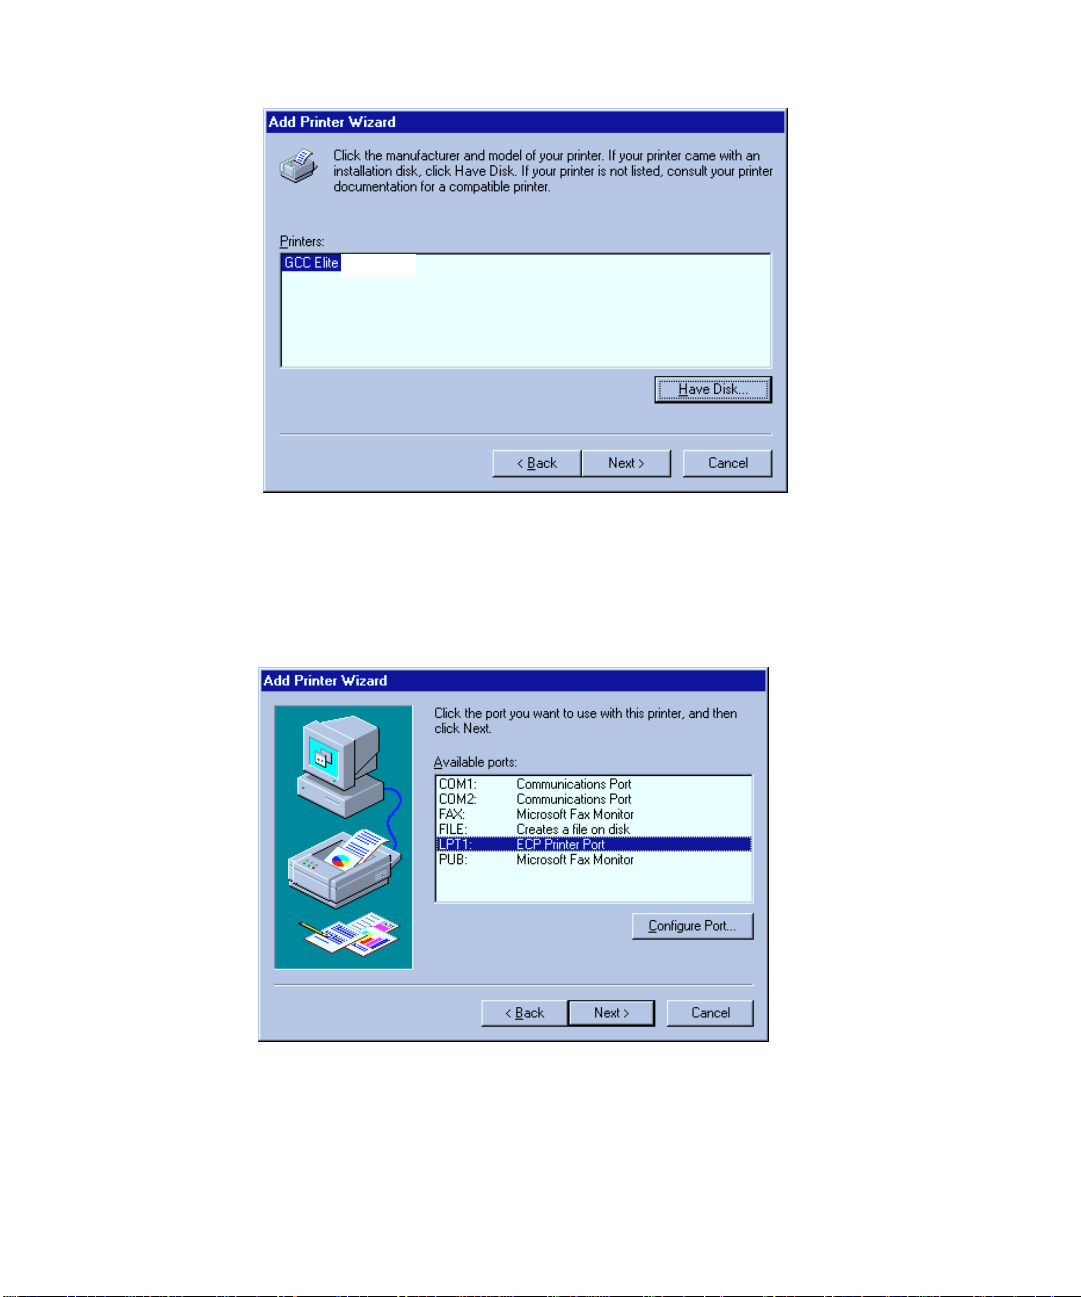
10. You will see a dialog box with the names of one or more Elite XL 20ppm
printers.
• Select your Elite XL 20ppm printer model from the list.
If you selected Network in step 4, click Next and go to step 14. If you selected Local,
click Next to go to the next step.
11. You will see the port selection dialog box.
GCC printers can accept jobs from either an LPT (Parallel) port or a COM (Serial)
port. We recommend that you use a parallel port (LPT) wherever possible.
• Choose a port, then click Configure Port.
4 - 6 • Using Windows 95
Page 65
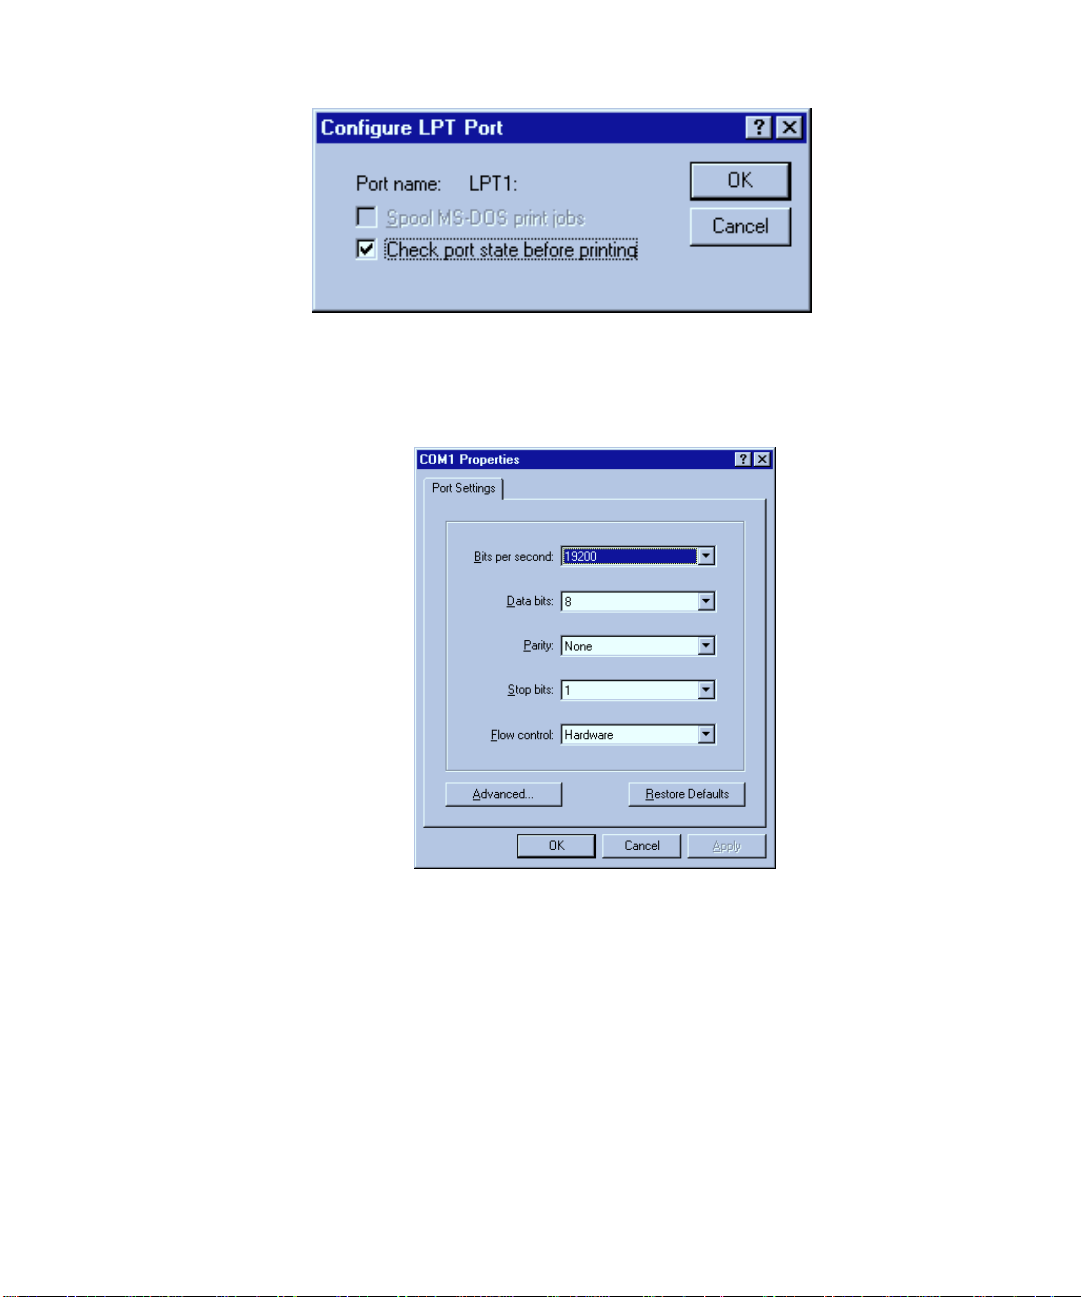
12. You will see a configuration window, specific to the type of port you chose
(LPT or COM).
This is what you will see if you chose an LPT port. We recommend that you check all
available check boxes.
This is what you will see if you chose a COM port. We recommend that you use these
settings.
Note: The serial port settings in the printer’s control panel menus must match the
settings in this dialog box. Check the settings and change them if necessary. The
serial port’s Baud Rate submenu corresponds to the Bits per second drop-down list
box in the dialog box. The DTR setting in the Flow Control submenu is the same as
the Hardware setting in the dialog box.
• Click OK.
13. You will see the port selection dialog box again.
• Click Next.
• 4 - 7
Page 66
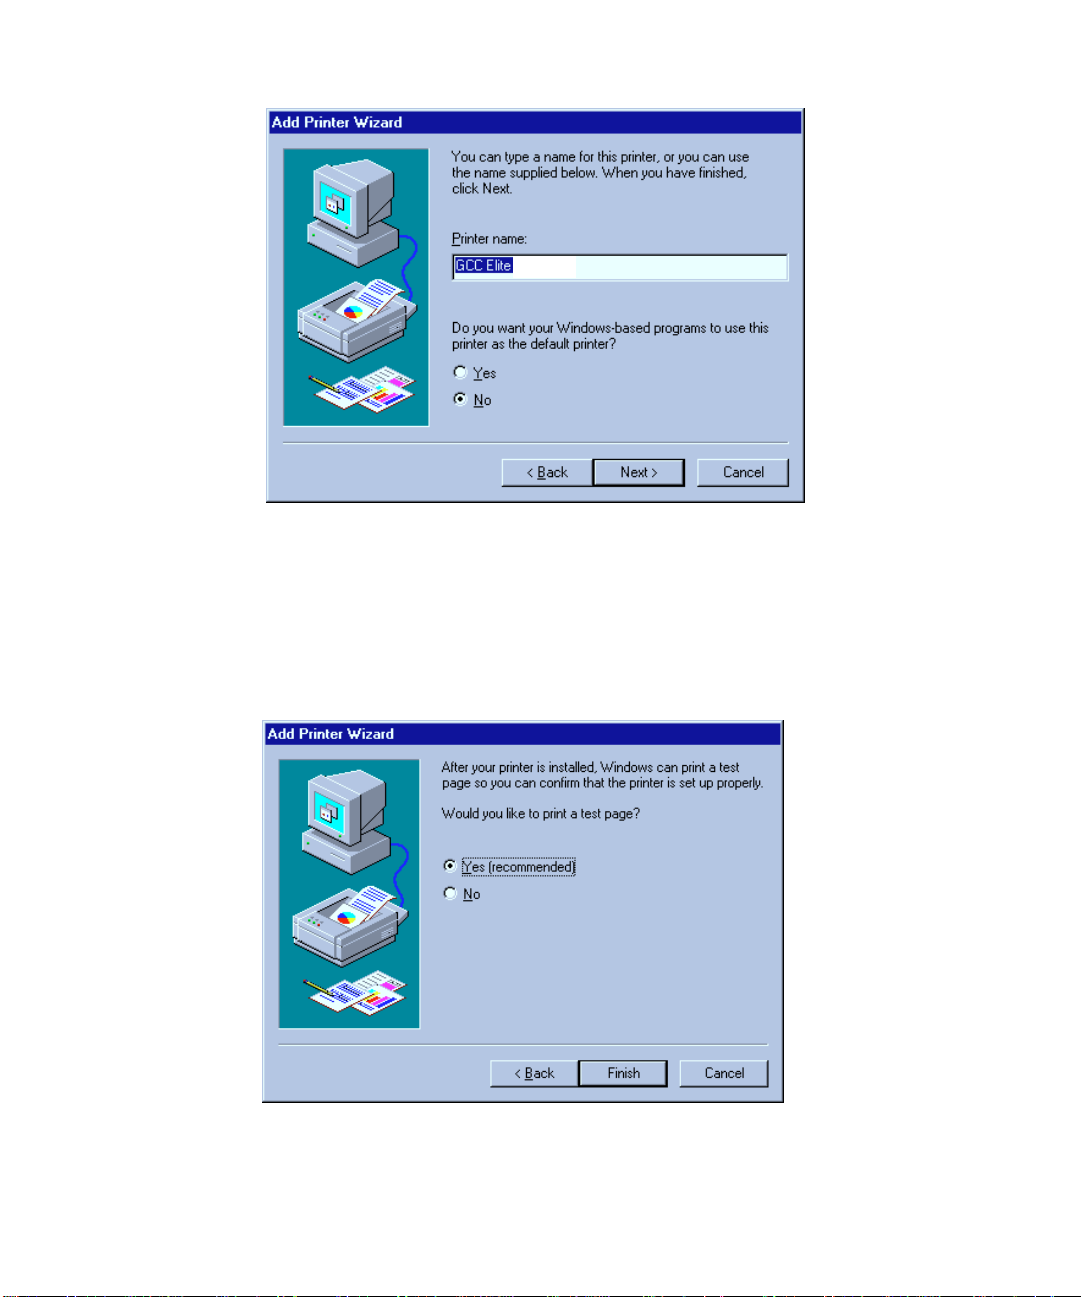
14. You will see the name printer dialog box.
• You can enter a new name for your printer if you wish, or you can leave the
default name. Also, at this point you should decide whether you want to make
this the default printer. If you say Yes, the Elite XL 20ppm will be the printer
selected every time you print from a Windows application.
• Click Next.
15. You will see the Print a Test Page dialog. Choose No.
• Because you have to make changes after the software is installed, we recom-
4 - 8 • Using Windows 95
Page 67

mend that you do not choose to print a test page yet. You will print a test page
when the installation is complete.
• Have your Windows 95 CD or disks ready, and click Finish.
• The software installation will now commence. At one point, a dialog box will
ask you to insert either the Windows 95 CD-ROM or the Windows 95 floppy
disk that contains the printer driver. The kind of disk you need depends on
whether Windows 95 was originally installed with a CD or floppy disks.
- If you are prompted to insert a CD, remove the Elite XL 20ppm CD-ROM,
insert the Windows 95 CD, and click OK.
- If you are prompted to insert a floppy disk, insert the appropriate Windows
95 floppy disk into the drive and click OK.
If you do not have Windows 95 on disk, or the installation process halts
because a file cannot be found, go to the section “Solutions to possible software installation problems” immediately after these numbered steps.
16. When the installation is complete, you will see the Printers folder, including an icon for the newly installed printer.
• Using the right mouse button, click on the printer’s icon. Select Properties from
the pop-up menu.
17. You will see the printer’s Properties dialog box.
• The next steps are for network printers only. If your printer is set up for local
operation go to step 21.
18. Click the Capture Settings tab at the top of the dialog box.
• 4 - 9
Page 68

19. You will see the Capture Settings panel. Deselect all the checkboxes, as
shown.
20. Click Apply.
21. Click on the General tab at the top of the dialog box.
22. Click Print Test Page.
4 - 10 • Using Windows 95
Page 69

The test page will be formatted and a message box will appear asking you if the test
page printed successfully. If the test page printed (this may take a minute), click Yes.
If the test page does not print, check that the printer is turned on and does not show
an error message in its control panel. Make sure there is paper in the printer and all
cables are properly connected. If there is still a problem, click No in the message box.
Windows 95 will display troubleshooting steps.
If your page printed correctly, you have completed the normal installation process.
You may need to install printer description files if your applications need them. Read
the section “Installing printer description files” later in this chapter.
A few users may have special printing requirements; for instance, they may have
added extra paper trays or more memory to their printer, or want the default resolution or paper size to be different from the factory default settings. Read the section
“Exploring the Properties dialog box” later in this chapter.
The next section, “Solutions to possible software installation problems,” refers only
to problems users may encounter in step 15 of the installation process. If you completed step 15 without problems this section does not apply to you.
If none of these situations applies to you, you have completed installing the printer
software on this computer. Install the software on any other computers that will use
the printer, and the printer is ready to use.
Solutions to possible software installation problems
In some cases you may not be able to complete the software installation process when
you click the Finish button in step 15. Normally, the program stops and asks you to
insert a Windows 95 floppy disk or the CD-ROM. Once you have removed the Elite
XL 20ppm CD-ROM (if necessary) and inserted the Windows 95 disk, the program
continues and the installation is complete.
Two things may prevent this:
• You may have a Windows 95 computer that was not supplied with the program
on floppy disks or CD-ROM.
• In some cases you may find that after you have inserted the Windows 95 CDROM in the drive and clicked OK, the printer installation does not continue
and you are prompted to insert the Windows 95 CD-ROM again.
The installation process requires you to install files that are found on the Windows
95 CD-ROM or disks. Some versions of the Windows 95 CD-ROM have these files in
• 4 - 11
Page 70
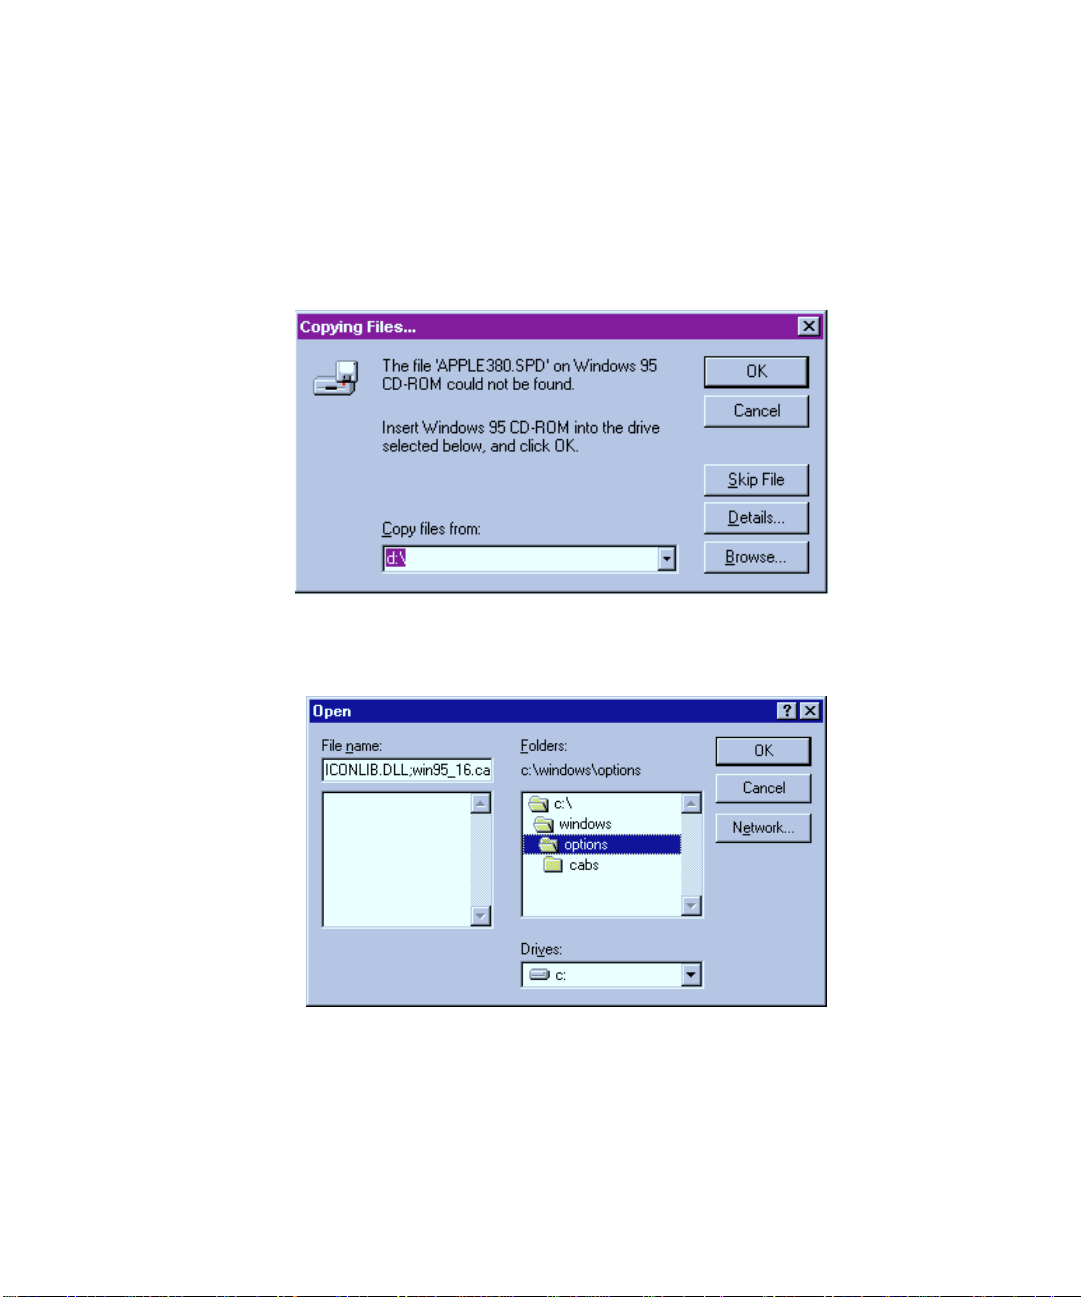
different places than others, and you have to show the install program where these
files are located.
If you use the original Windows CD-ROM that came with your computer this
problem should not arise.
If you do not have Windows 95 on disk or CD-ROM, continue the installation in
this way:
1. Click on the Browse button at the bottom right of the Copying Files dialog
box.
2. In the Open dialog box, choose drive C in the Drives window at the bottom center.
3. In the Folders list, scroll down till you see the windows folder.
4. Click on the folder name “windows” then click OK.
5. In the Folders list, scroll down until you see the options folder.
4 - 12 • Using Windows 95
Page 71
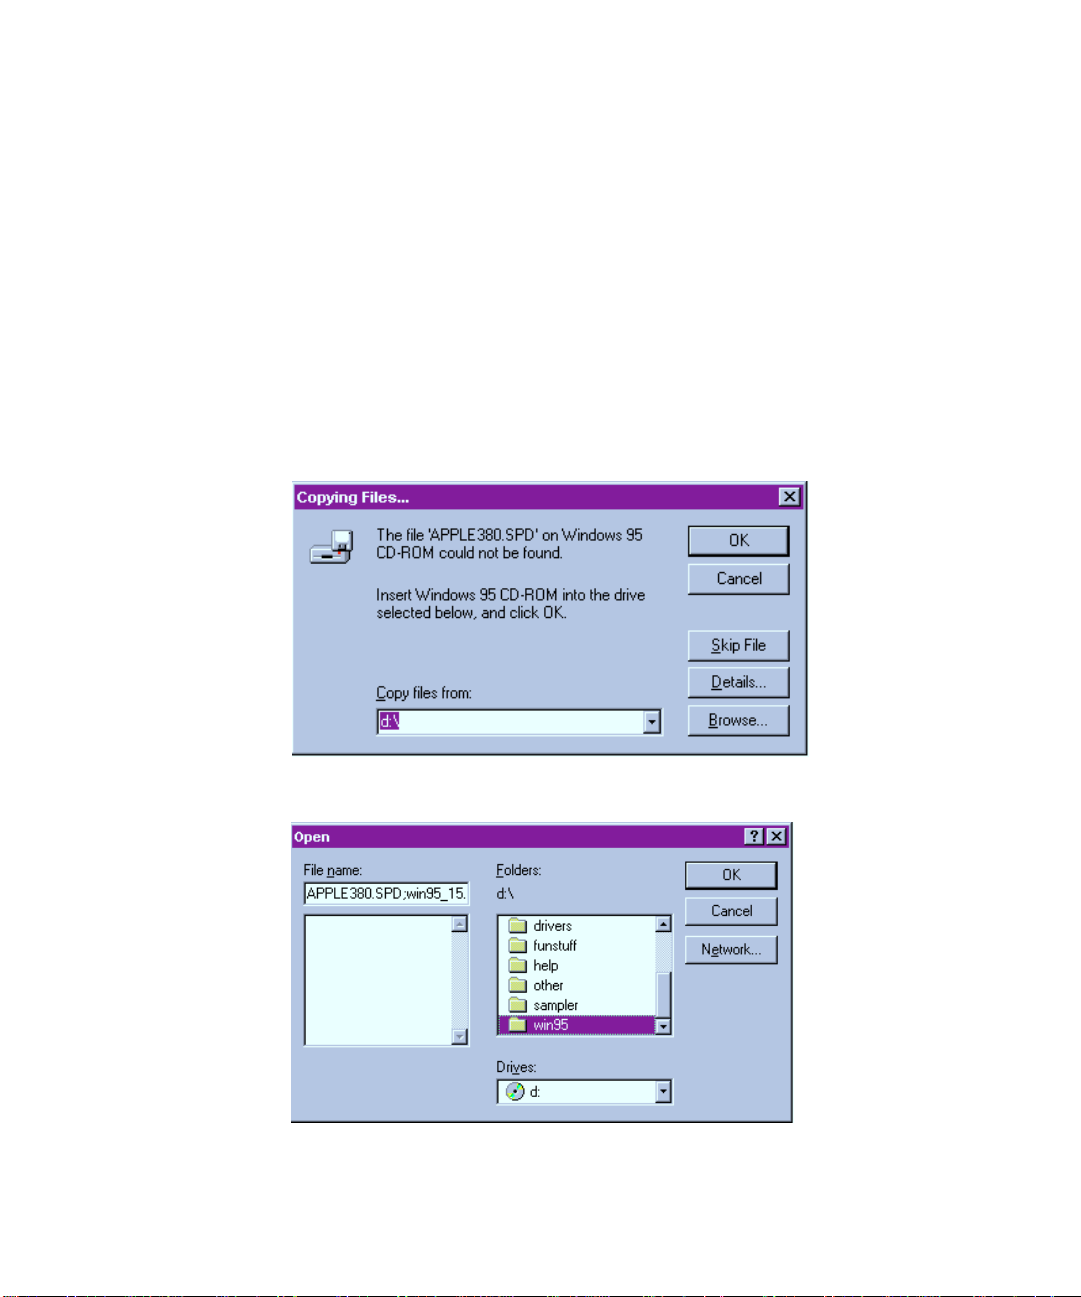
6. Click on the folder name “options” then click OK.
7. Click on the folder name “cabs.”
8. Click OK to accept this folder. You will see a file name similar to
win95_15.cab.
9. Click OK again to accept this file name.
10. Click OK in the Copying Files dialog box.
11. The installation will continue. Go back to step 16 in the installation instructions.
If you have a Windows 95 CD-ROM and the installation still does not continue, you
will see the Copying Files dialog box again. Make sure that you have the Windows 95
CD-ROM in the drive and continue the installation:
1. Click on the Browse button at the bottom right of the Copying Files dialog
box.
2. In the Open dialog box, scroll down the list of folders in the center pane
until you see a folder called win95.
• 4 - 13
Page 72

3. Click on the folder name win95.
4. Click OK to accept this folder. You will see a file name similar to
win95_15.cab.
5. Click OK again to accept this file name.
6. Click OK in the Copying Files dialog box.
7. The installation will continue. Go back to step 16 in the installation instructions.
Exploring the Properties dialog box
Now that you have installed the printing software in Windows 95, there are a number of settings that you may need to change if you have special printing requirements. Most users will not need to make any changes here.
Most of the Properties dialog box contains options that are the same for all printers
using Windows 95, so this section of this installation guide only covers the options
provided by GCC. If you want information on options for all Windows 95 printers,
refer to the Windows 95 on-line help system and Windows 95 documentation.
The changes you make in the Properties dialog box affect all applications, but on this
computer only.
If you do not already have the Properties dialog box displayed:
1. Click on the Start button. You will see the Start menu.
2. Choose Settings, then choose Printers from the submenu that appears.
3. You will see the Printers window. Use the right mouse button to click on
the Elite XL 20ppm icon, and choose Properties from the pop-up menu.
The Properties dialog box has tabs across the top. Click on the tabs to see other pages.
Each page has options to configure your printer.
If you configured your printer as a local printer, you will see a tab called Sharing. If
you configured your printer as a network printer, the Sharing tab is replaced by a
Capture Settings tab. Otherwise the tabs are the same.
You use Sharing if you want to share your printer and files over a network. This page
of the dialog box is the same on all Windows 95 computers; further details can be
found in the Windows 95 on-line help and documentation.
If you configured the printer for a network, you have already made the necessary
changes to the Capture Settings page.
4 - 14 • Using Windows 95
Page 73
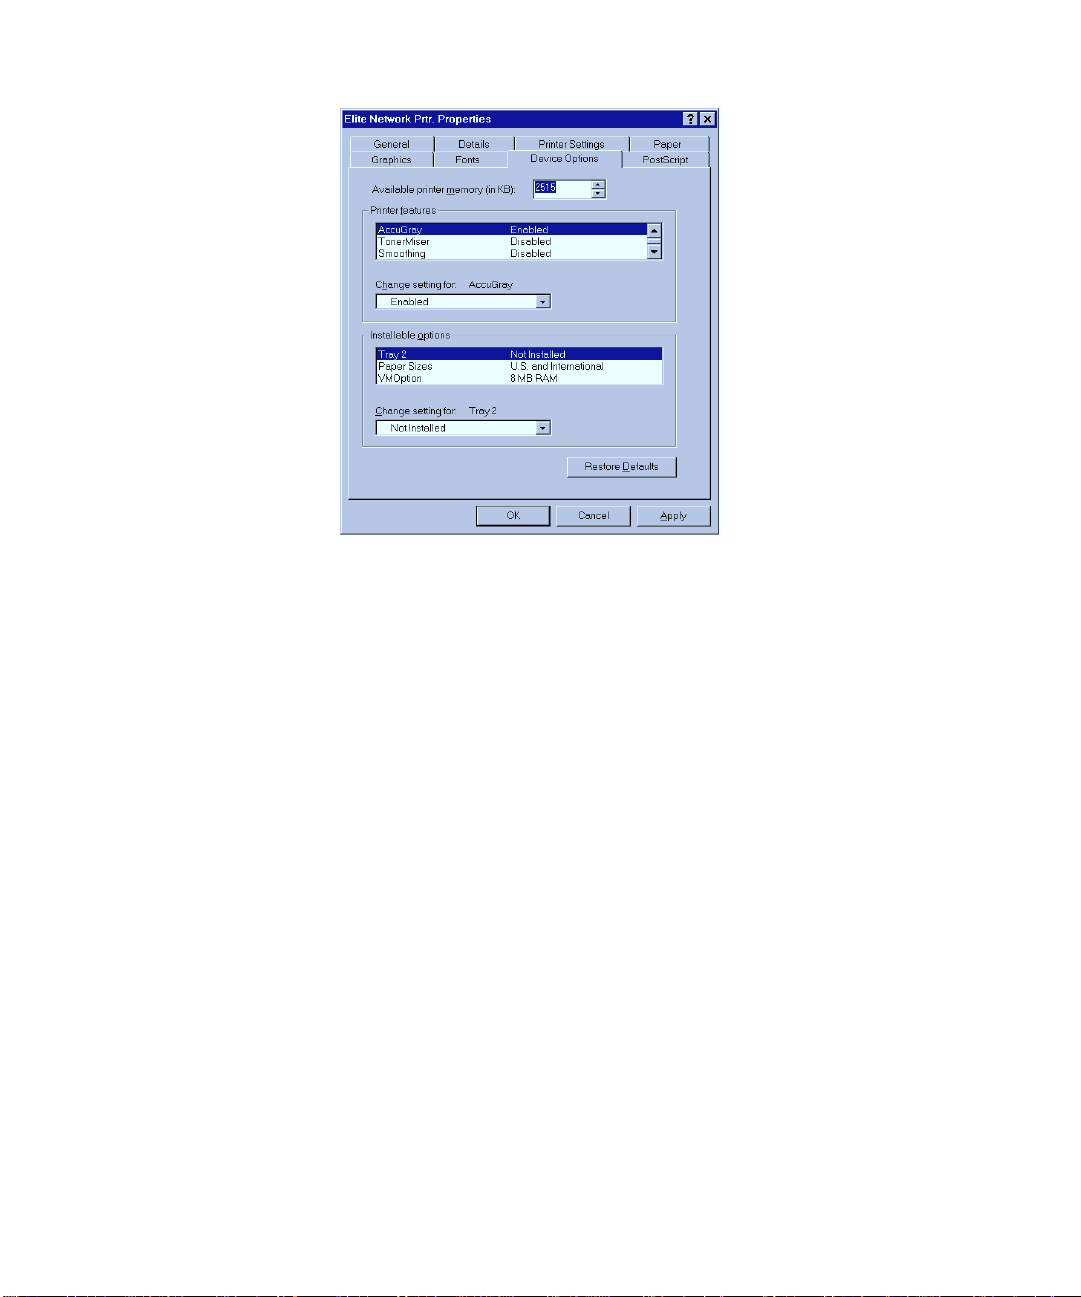
The Device Options page
Click on the Device Options tab to see the Device Options page. This page contains
settings specific to your GCC printer model.
Printer features
In the Printer features box you will see options specific to your printer. If you want
to change the current setting of any feature, click on its name in the upper box. You
will see settings in the “Change setting for” drop-down list box below. Click on the
setting you want.
Note: The features you see in the list may vary between printer models.
Installable options
If you add options (like more paper trays or extra printer RAM), you need to change
the Installable options list. After you have changed this option, Print dialog boxes in
this computer’s applications will show extra paper trays, for example.
Note on VMOption: The VMOption selection corresponds to the amount of RAM
installed in the printer. If you add or subtract printer memory, you will need to
change the amount shown under VMOption. If memory was added to your printer
before you installed the Windows 95 printer software, you will need to change the
VMOption amount.
• 4 - 15
Page 74

If you have to change the printer memory size, click on VMOption and select the
correct memory size from the drop-down list box. Answer Yes to the question about
available printer memory. Also, see the following section on upgrading printer
memory.
Updating printer memory
If you install additional memory in your printer, you must update the printer driver.
You do this by adjusting the Available printer memory setting at the top of the
Device Options page. When the Available printer memory figure is correct, your
computer will send files that print faster.
If you routinely download more than one or two fonts to the printer’s memory, you
should also update your Available printer memory, even if you have not added any
extra memory to the printer. Download your normal font set and then update the
memory.
If you want to update the printer driver, you first have to copy a file to the printer,
using a DOS window (do not use Windows 95’s Print command). This prints a page
that tells you the maximum suggested virtual memory for the printer. You then enter
the figure in this dialog box.
1. Copy the file TESTPS.TXT to the printer. This file is included with Windows
95.
• Click on the Start button, then choose Programs from the Start menu. Click on
MS-DOS Prompt in the program list; you will see a DOS window.
• Type:
copy c:\windows\system\testps.txt lpt1
• Press the Enter key, type exit and press the Enter key again to close the DOS
window.
The printer will produce a page which shows the maximum available virtual
memory and the maximum suggested virtual memory. Use the suggested value
(Max Suggested VM).
2. Enter the new suggested value into the Device Options page in the box
labeled Available printer memory (in KB).
4 - 16 • Using Windows 95
Page 75

The Details page
You can change the printer driver and port settings in the Details page.
The Paper page
You can change paper sizes, layout, orientation, and paper source in the Paper page.
Any changes you make will override the settings in the printer’s control panel for this
computer only.
Paper size
Paper source
You can set a default paper size by picking a new setting in the paper size box. You
can scroll to the right of this box to see more paper sizes. Click on the icon of the
paper size you want to be the new default.
Only the first few characters of the name of the paper size are shown beneath each
icon. If you click on an icon you will see the full name above the box. However, the
paper size you click on will now be the default, unless you click on another paper size
icon or click on the Cancel button at the bottom of the dialog box.
You can set a default paper source by choosing from the Paper source drop-down
list box. These options specify how paper will be provided to the printer. There are
selections for:
• 4 - 17
Page 76
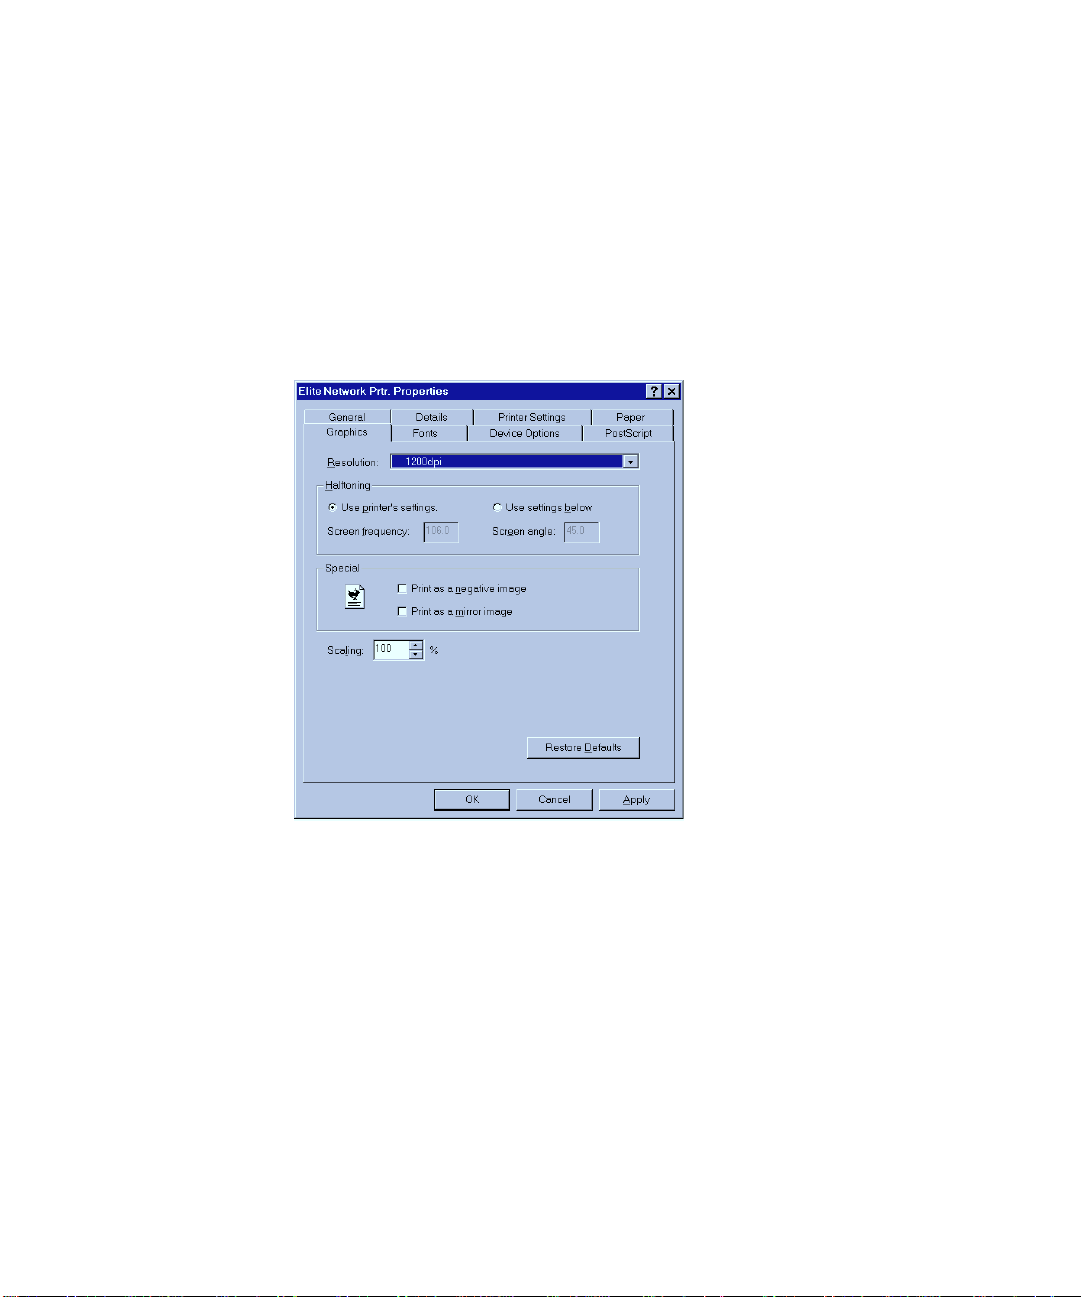
• Auto Select.
• Any installed paper trays.
• Manual feed.
• The MultiPurpose feeder.
We recommend that you leave other features at their default settings.
Remember that any changes you make anywhere in this page of the dialog box
become the default selections for all applications on this computer.
The Graphics page
You can change aspects of the way your documents look in the Graphics page. Any
changes you make will override the settings in the printer’s control panel for this
computer only.
Resolution
You can change the output resolution of your documents in the resolution dropdown list box. If some computers on a network are not used for documents that need
a high resolution, you can set the resolution to the lowest setting (typically 300 dots
per inch). Documents printed at low resolution print faster than those printed at
high resolution.
4 - 18 • Using Windows 95
Page 77

The figure you set here becomes the default setting for the dialog boxes in applications on this computer. All resolutions that the printer supports are still options
within application dialog boxes, so you can select higher resolutions if necessary.
Halftoning
This section controls the look of any photographs in your document. We recommend that you choose Use printer’s settings.
The only time you might need to change these settings is if you print a file to disk
before taking it to a service bureau. Your service bureau can advise you on the
settings you should use.
The Fonts page
The Fonts page enables you to specify how fonts are sent to the printer.
We recommend you use the default settings.
The PostScript page
The PostScript page provides settings for controlling the way print jobs are sent to
the printer.
We recommend you use the default settings.
• 4 - 19
Page 78

Installing printer description files
Some graphics applications need more information about the printer than the
standard printer software provides. This extra information comes in files known as
printer description files. You must copy one or more of these files from the Elite XL
20ppm CD-ROM into a specified folder in your application folder.
Printer description files have the following extensions: .PDF, .PDX, or .PPD. Please
refer to the documentation included with the application for more information on
where to copy these files and how to use them.
If you want to install printer description files, you can use Windows Explorer or
open a DOS window.
Installing printer description files using Windows Explorer
1. Insert the Elite XL 20ppm CD-ROM into your CD-ROM drive.
2. Open Windows Explorer and choose Details from the View menu.
3. In the left pane, find the CD-ROM icon and click on it. You will see the files
contained in the root directory of the CD-ROM.
4. Click on the Type button at the top of the column in the right pane. The
files are sorted into order by type (three-letter extension).
5. Follow the instructions below for each application you wish to install
printer description files for.
• Adobe Illustrator 4.0 or 4.1:
a. Select all files that end in .ppd.
b. Choose Copy from the Edit menu.
c. Locate the Ai4 folder in the left pane (you may have to click on the plus sign
next to a drive letter).
d. Click on this folder to show its contents in the right pane, then double-click
on the PPD folder.
e. Choose Paste from the Edit menu. You will see the ppd files in the window
(you may have to scroll to see them). The files are installed.
• Adobe PageMaker 6.0 (or 6.5):
a. Select all files that end in .ppd.
b. Choose Copy from the Edit menu.
4 - 20 • Using Windows 95
Page 79

c. Locate the Pm6 (or Pm65) folder in the left pane (you may have to click on
the plus sign next to a drive letter).
d. Click on this folder to show its contents in the right pane, then double-click
on the Rsrc folder.
e. Double-click on the Usenglsh folder, then double-click on the Ppd4 folder.
f. Choose Paste from the Edit menu. You will see the ppd files in the window
(you may have to scroll to see them). The files are installed.
• Aldus FreeHand 4.0 or PageMaker 5.0:
a. Select all files that end in .ppd.
b. Choose Copy from the Edit menu.
c. Locate the Aldus folder in the left pane (you may have to click on the plus
sign next to a drive letter).
d. Click on this folder to show its contents in the right pane, then double-click
on the Usenglsh folder.
e. Double-click on the ppd4 folder.
f. Choose Paste from the Edit menu. You will see the ppd files in the window
(you may have to scroll to see them). The files are installed.
• Aldus FreeHand 3.1 and earlier:
a. Open the Ppd3 folder on the Elite XL 20ppm CD-ROM.
b. Select all files in this folder.
b. Choose Copy from the Edit menu.
c. Locate the Aldus folder in the left pane (you may have to click on the plus
sign next to a drive letter).
d. Click on this folder to show its contents in the right pane, then double-click
on the Usenglsh folder.
e. Double-click on the Ppds folder.
f. Choose Paste from the Edit menu. You will see the ppd files in the window
(you may have to scroll to see them). The files are installed.
• Macromedia FreeHand 5.0:
a. Select all files that end in .ppd.
b. Choose Copy from the Edit menu.
• 4 - 21
Page 80

c. Locate the Fh5 folder in the left pane (you may have to click on the plus sign
next to a drive letter).
d. Click on this folder to show its contents in the right pane, then double-click
on the Usenglsh folder.
e. Double-click on the Ppd folder.
e. Choose Paste from the Edit menu. You will see the ppd files in the window
(you may have to scroll to see them). The files are installed.
• QuarkXPress:
a. Select all files that end in .pdf.
b. Choose Copy from the Edit menu.
c. Locate the Xpress folder in the left pane (you may have to click on the plus
sign next to a drive letter).
d. Click on this folder to show its contents in the right pane.
e. Choose Paste from the Edit menu. You will see the pdf files in the window
(you may have to scroll to see them). The files are installed.
Installing printer description files using an MS-DOS window
1. Insert the Elite XL 20ppm CD-ROM into your CD-ROM drive.
2. Click on the Start button, and choose Programs from the Start menu.
3. You will see the programs installed on this machine; click on MS-DOS
prompt and a DOS Window opens.
4. Type the following command and path name for the application you are
using and press the Enter key. These examples assume that your CD-ROM is
drive D: and your application is on drive C: If your CD-ROM uses another
drive letter, or your application is not on drive C:, change the drive letters
accordingly (for example, if your CD-ROM is drive E: and Adobe Illustrator
is on drive D:, the first example should read copy e:\*.ppd
d:\ai4\ppd).
• Adobe Illustrator 4.0 or 4.1:
Type copy d:\*.ppd c:\ai4\ppd to install the PPD file.
• Adobe PageMaker 6.0:
4 - 22 • Using Windows 95
Page 81

Type copy d:\*.ppd c:\pm6\rsrc\usenglsh\ppd4\ to install the
PPD file.
• Aldus FreeHand 4.0 or PageMaker 5.0:
Type copy d:\*.ppd c:\aldus\usenglsh\ppd4 to install the PPD
file.
• Aldus FreeHand 3.1 and earlier:
Type copy d:\ppd3\*.* c:\aldus\usenglsh\ppds to install the
PPD and PDX files.
• Macromedia FreeHand 5.0:
Type copy d:\*.ppd c:\fh5\usenglsh\ppd to install the PPD file.
• QuarkXPress:
Type copy d:\*.pdf c:\xpress to install the PDF file.
5. Type Exit and press the Enter key to close the DOS window.
Printing from Windows 95 applications
GCC printers are designed to work with all Windows 95 compatible applications.
The Print dialog box varies among applications, but all variations provide the
common print commands along with others that are available for that application
only.
The printer’s control panel menus and the settings in the Properties dialog box
provide the default settings for an application’s Print dialog box.
• 4 - 23
Page 82
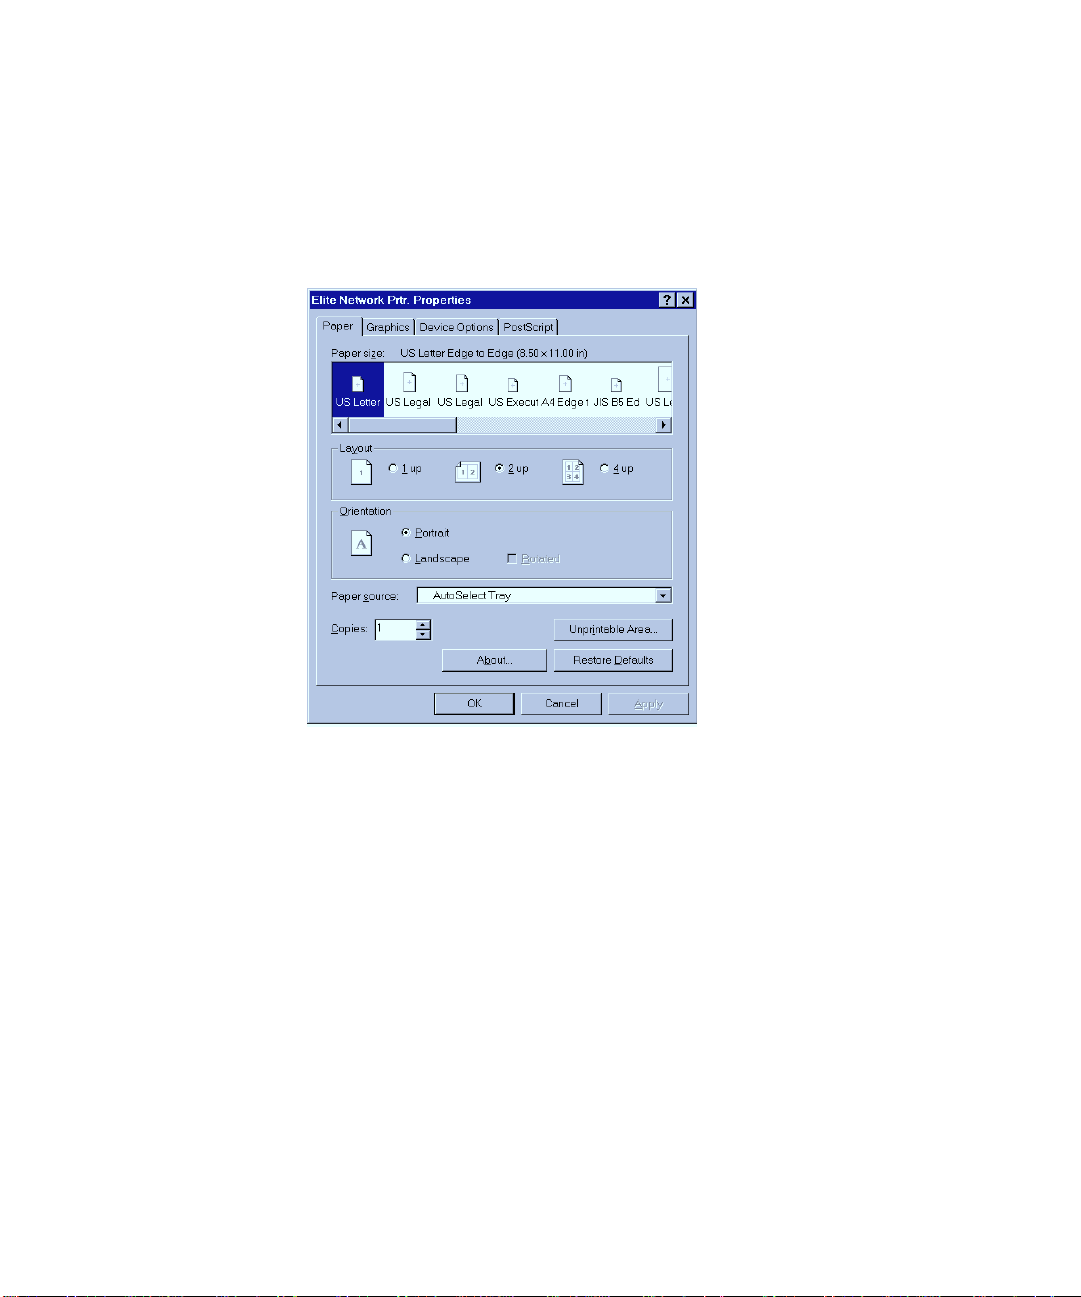
Selecting print options
This is the Print dialog box for WordPad, a simple word processing application
included with Windows 95. You will find the Print command in the File menu of
most applications. You can change the target printer, page range, and number of
copies in the main Print dialog box. You can also click on the Properties button to
make further changes. Other applications may provide more settings.
The Print Properties dialog box
If you click on Properties in WordPad’s Print dialog box, you will see this dialog box.
This Properties dialog box is similar to the Printer Properties dialog box, but there
are fewer pages.
4 - 24 • Using Windows 95
Page 83

Using Windows NT 3.51
Contents
Windows NT 3.51 printing software overview 5-2
Select and configure a communications port 5-4
Selecting Page Setup and Print options 5-7
Print Setup options 5-7
Print options 5-8
CHAPTER
5
• 5 - 1
Page 84

5: Using Windows NT 3.51
Windows NT printing software overview
You set up your Windows NT 3.51 computer to use the Elite XL 20ppm by installing
the Elite XL 20ppm software for Windows NT 3.51. This software is on the Elite XL
20ppm CD-ROM.
Part of the software that you need is contained on the Windows NT 3.51 CD-ROM
or floppy disks. You must have the Windows NT 3.51 CD-ROM or floppy
disks to install the software for the Elite XL 20ppm.
To install the printing software, make sure that the printer is switched on and
connected to the computer or network, and that the computer is switched on and
running Windows NT 3.51. Then:
1. Double-click the Main group from the Program Manager window.
You will see the Main group window.
2. Double-click the Control Panel icon.
You will see the Control Panel window.
3. Double-click the Printers icon.
You will see the Print Manager window.
4. Select Create Printer from the Printer menu.
You will see the Create Printer window.
5 - 2 • Using Windows NT 3.51
Page 85
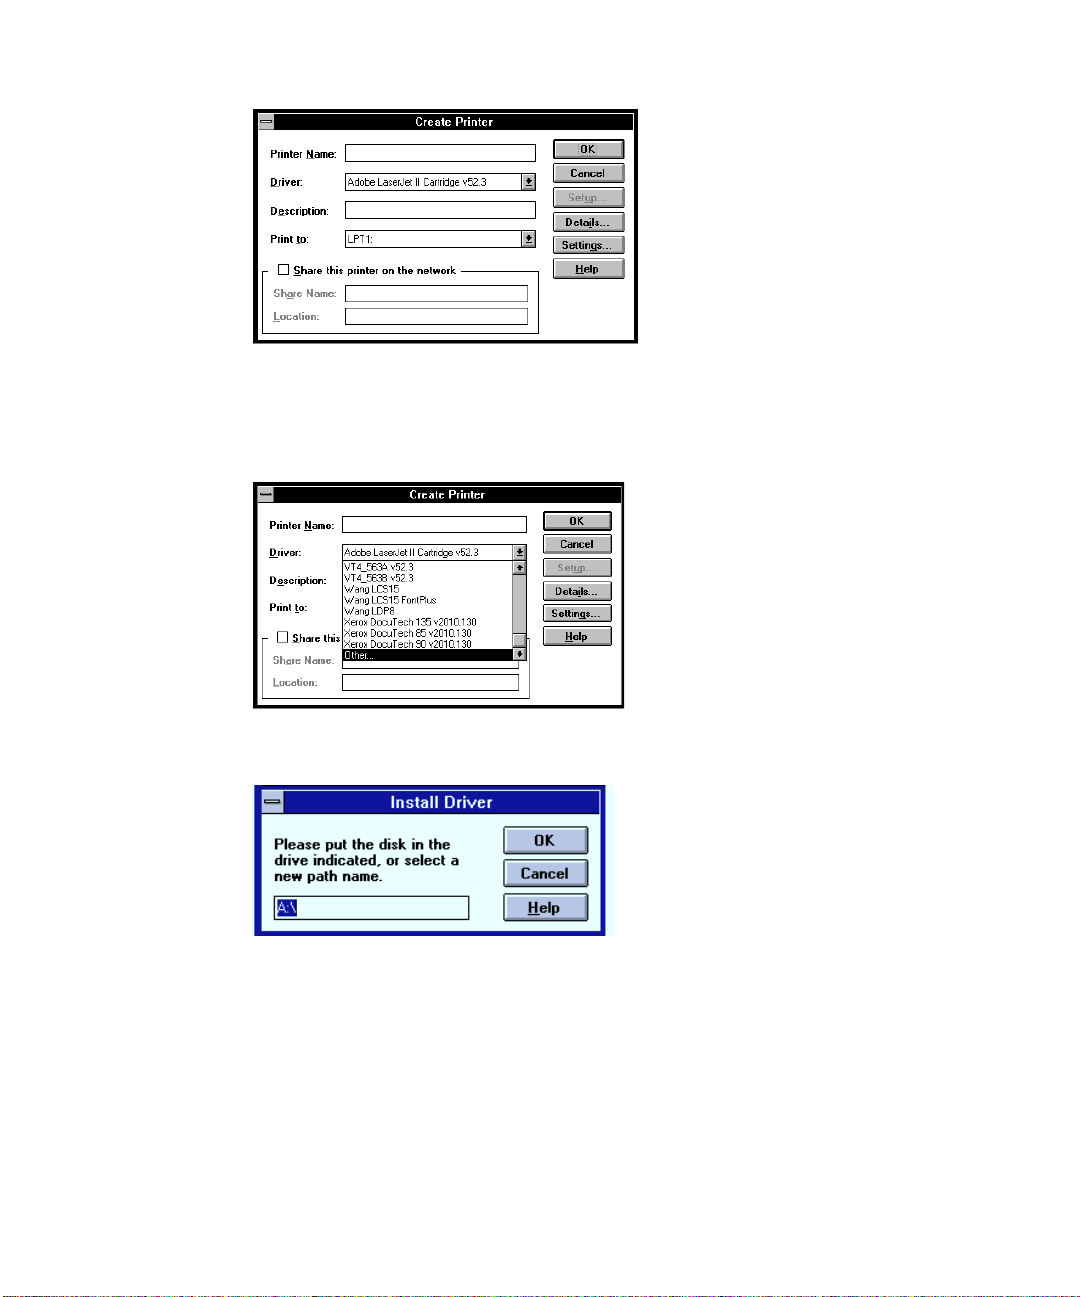
5. Insert the Elite XL 20ppm CD-ROM.
6. Select Other (from the bottom of the list) in the Driver drop-down list box.
You will see the Install driver dialog box.
Change A:\ to the drive letter of your CD-ROM drive.
7. Click OK.
You will see the Select Driver window, with one or more Elite XL 20ppm models.
• 5 - 3
Page 86

8. If necessary, select a driver.
Select the driver for the model you are installing.
9. Click OK.
You will see a progress box. After a few seconds, the printer software is in-
stalled, and you will see the Create Printer window again. This time it
shows the driver for your Elite XL 20ppm printer.
At this point you must give the printer a name, and, optionally, enter a description. If
the printer is on a network, the description could be its location.
10. Go on to Section 2.
Select and configure a communications port.
You must now select and configure a port. A port can be either a parallel port (also
called an LPT port), a serial port (also called a COM port), or you can select a
network queue.
Printing using a serial port is very slow compared to using a parallel port or a network.
1. Select a port from the Print to drop-down list box.
5 - 4 • Using Windows NT 3.51
Page 87
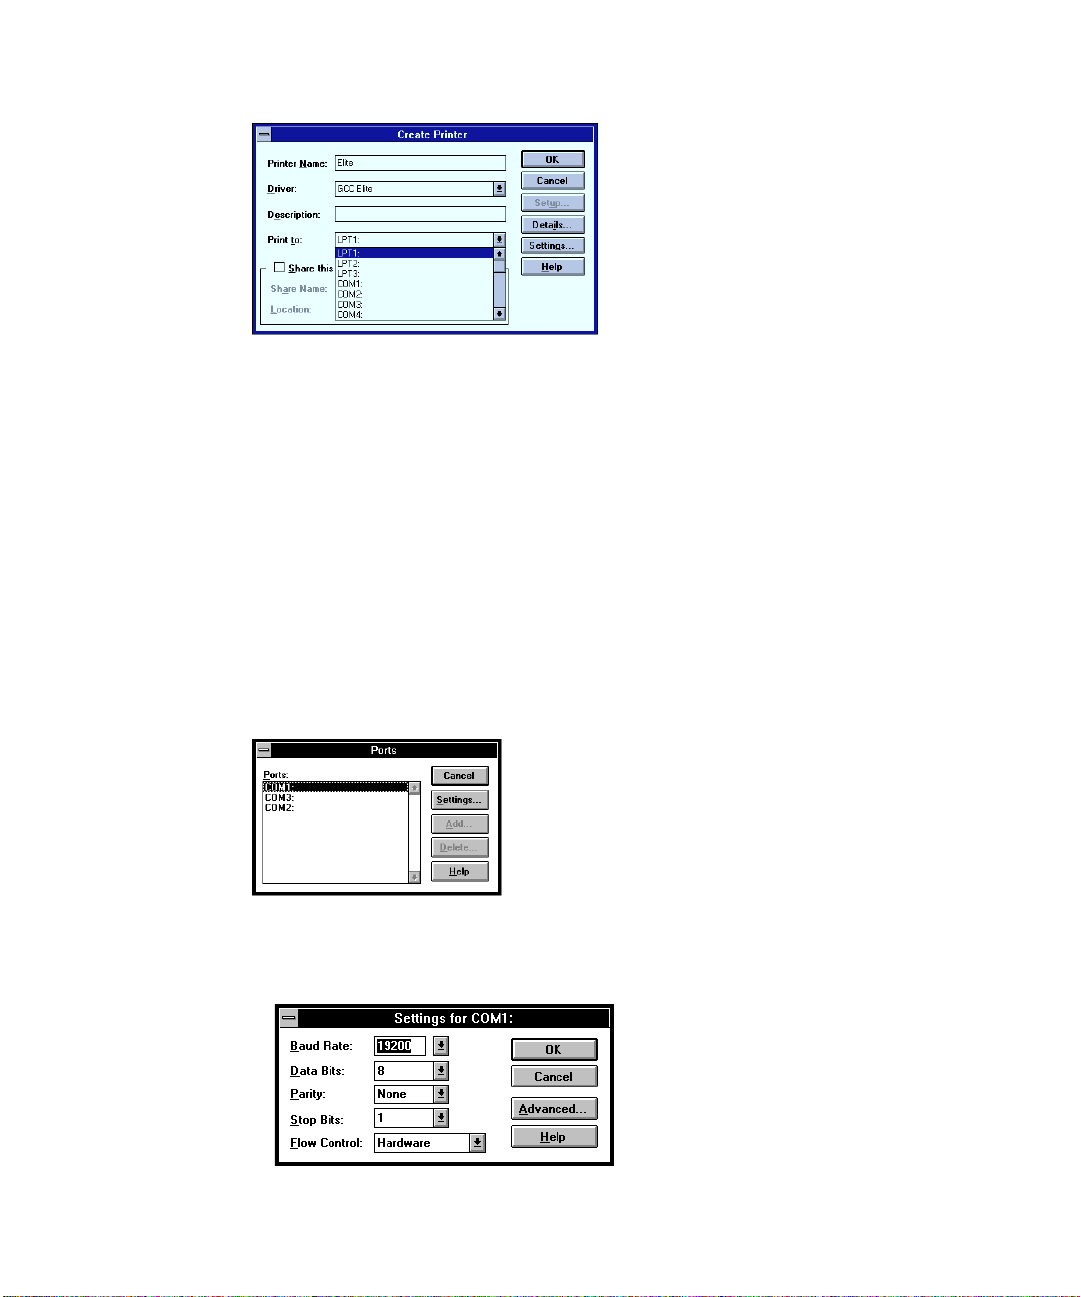
2. Click Settings.
Depending upon the type of port you chose, some type of dialog box will
appear.
• If you selected an LPT port: No settings are necessary.
• If you selected a Network print queue: Your network administrator or the
network software documentation has details of the settings you need to make in
this dialog box. A network print queue resides on a print server. Print queues
are established with the network software running your network. Any necessary
settings will be specific to the network software.
• If you selected a COM port:
You will see the Ports dialog box; the COM port you selected is highlighted.
• Click Settings
You will see the Settings dialog box.
• 5 - 5
Page 88
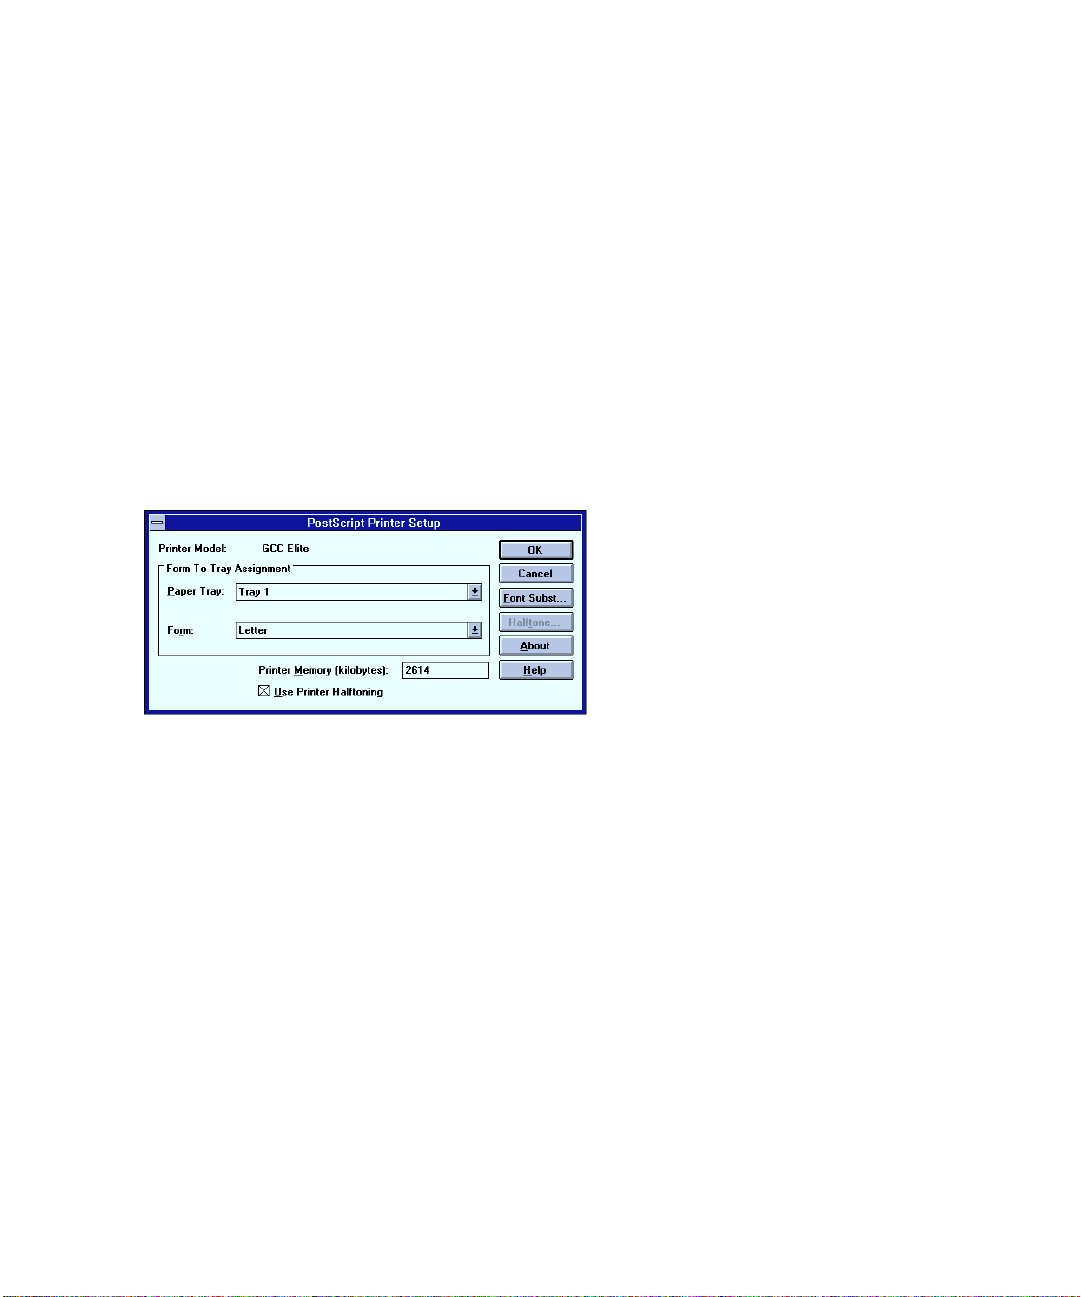
We recommend the above settings.
Note: The serial port settings in the printer’s control panel menus must match the
settings in this dialog box. Check the settings and change them if necessary (see the
section of the CD-ROM that deals with control panel menus). Note that the DTR
setting in the Flow Control submenu corresponds to the Hardware setting shown
above.
• Click OK.
• Close the Ports dialog box.
You will return to the Create Printers dialog box.
3. Click OK.
In a few seconds you will see the PostScript Printer Setup Window.
• In the Form to Tray section, choose a paper tray and paper size. Your selections
should be the usual paper tray and paper size that will be used for print jobs.
These settings become the default settings in the Print dialog box of all applications that run on this computer. You can override them from the Print dialog
box.
• Select Use Printer Halftoning. Halftoning controls the screen frequency and
screen angle for your documents. We recommend that you select Use Printer
Halftoning to use the printer’s default screen frequency. Note that you can
change the screen frequency by using the Default Screens submenu in the
printer’s control panel (see the section of the CD-ROM that deals with control
panel menus).
4. Click OK.
You will see the Print Manager window, now showing an icon for the newly
created printer.
5 - 6 • Using Windows NT 3.51
Page 89

You are now ready to print. Most users will not need to make any further changes.
You may have special print requirements, or you may need to install PPD files for
those applications that need them. You can change any of the settings by clicking
once on the printers icon, then choosing Properties from the Print Manager’s File
menu.
This section of the manual deals only with those parts of the Properties that are
specific to GCC printers. For more general information, see the Windows NT
documentation.
Selecting Page Setup and Print options
GCC printers are designed to work with all applications compatible with Windows
NT version 3.51 or later. The printing software provides commonly used printing
options along with some others (e.g. paper sizes and paper trays) that are specific to
your GCC printer model.
Printing options may be selected from within an application through the Print Setup
and Print dialog boxes, or from within the Windows NT Print Manager or the
Printers control panel. In general, options selected from within an application
document will override corresponding options in the printers control panel, Print
Manager, and the printer’s control panel submenus.
Most of the options found in the Print Setup and Print dialog boxes are standard to
Windows NT, while some are specific to your GCC printer model. This section
details the GCC-specific options. For information on other options, please refer to
the Windows NT on-line help system, and the Windows NT documentation.
The location of printing options can vary among applications, and certain options
may be accessible from more than one dialog box. Refer to the application’s documentation for further information.
Print Setup options
The Print Setup option is usually located under the File menu. The following Print
Setup dialog box example is taken from Microsoft Write.
• 5 - 7
Page 90

• Name - The Name drop-down list box enables you to select the printer that you
• Size - The Size drop-down list box enables you to select a paper size. Available
• Orientation - This option determines the orientation of the image on the page.
Print options
The Print command is usually located under the File menu. The following Print
dialog box example is taken from Microsoft Write.
wish to send a job to. The printer that initially appears in the box is the default
printer. The default printer is set through the Print Manager.
paper sizes will differ between GCC printer models.
Vertical, or Portrait, orients the image upright on the page. Horizontal, or
Landscape, orients the image sideways on the page. The default is Portrait.
• Print Range -The Print Range option default is All, which prints all of the pages
in the document, from first to last. From and To allow you to specify a range of
5 - 8 • Using Windows NT 3.51
Page 91

pages to print. Click in the box labeled From, and type the first page number of
the range you want to print. Then click in the box labeled To and type the last
number of the range.
• 5 - 9
Page 92
Using Windows NT 4.0
Contents
Windows NT 4.0 printing software overview 6-2
Exploring the Properties and Document Defaults
dialog boxes 6-5
The Properties dialog box 6-6
The Device Settings page 6-6
Updating the printer driver 6-7
The Document Defaults dialog box 6-8
GCC-specific items 6-9
CHAPTER
6
Installing printer description files 6-10
Printing from Windows NT 4.0 applications 6-14
Selecting print options 6-14
The Print Properties dialog box 6-15
Page 93

6: Using Windows NT 4.0
Windows NT 4.0 printing software overview
You set up your Windows NT 4.0 computer to use the Elite XL 20ppm by installing
the Elite XL 20ppm software for Windows NT 4.0. This software is on the Elite XL
20ppm CD-ROM.
Windows NT 4.0 uses a Wizard to help you install printer software. A Wizard is a
series of dialog boxes. In each dialog box you make configuration choices then click
the Next button to move to the next dialog box.
This installation guide does not cover connecting to a networked printer or making
your printer available for sharing by others. Details of these operations are contained
on your Windows NT 4.0 CD-ROM.
Important: Part of the software that you need is contained on the
Windows NT 4.0 CD-ROM. You must have the Windows NT 4.0 CD-ROM
to install the software for the Elite XL 20ppm.
To install the printing software, make sure that the printer is switched on and
connected to the computer or network. Also place the Elite XL 20ppm CD-ROM in
your CD-ROM drive. Then:
1. Click on the Start button.
2. You will see the Start menu. Click on Settings, then click on Printers on the
submenu.
3. You will see the Printers folder. Double-click the Add Printer icon.
4. You will see the local/network dialog box.
• Choose My Computer and click the Next button.
6 - 2 • Using Windows NT 4.0
Page 94

5. You will see a list of ports.
• Select the port(s) you will be using and click Next.
6. You will see a dialog box that lists makes and models of printers. Ignore
the settings in these boxes and click the Have Disk button.
7. You will see the Install from disk dialog box.
• Change the drive letter in the dialog box to the drive letter of your CD-ROM,
and click OK.
8. You will see a dialog box with the names of one or more Elite XL 20ppm
printers.
• Select your Elite XL 20ppm printer model from the disk, and click on the Next
button.
• 6 - 3
Page 95

9. You will see the printer name dialog box.
• You can type a name or accept the name in the box. Click Next.
10. You will see a dialog box that asks whether you want to share this printer
with others. Choose Not Shared, and click Next (Consult your Windows NT
documentation for details on sharing your printer with other users).
11. You will see the Print a Test Page dialog.
• Choose Yes. The test page prints when the installation is complete.
• Click Finish.
6 - 4 • Using Windows NT 4.0
Page 96

• The software installation will now commence. At one point, you will be
prompted to insert the Windows NT 4.0 CD-ROM that contains the NT 4.0
printer driver.
12. When you see a prompt, remove the Elite XL 20ppm CD-ROM and insert
the Windows 4.0 CD-ROM. Click OK.
13. You will see the Locate File dialog box. Click Browse. The Windows NT CDROM may run automatically if you have Autorun selected (the Windows
NT default). This opens a large Window over the screen; click on the close
box at the top right of the window.
• Select your CD-ROM drive. Choose the I386 folder.
• Choose the file called Pscript.dl_
• Click the Open button.
14. You will see the Locate File dialog box again. Click OK.
• The printer software is now installed and you will see the Printers Window with
your printer icon in it.
The test page will be formatted and a message box will appear asking you if the test
page printed successfully. Wait a few seconds to see if the test page prints. If the test
page printed, click Yes; if there is a problem, click No (Windows NT 4.0 will display
troubleshooting steps).
If your page printed correctly, you have completed the normal installation process.
You may need to install printer description files if your applications need them. Read
the section “installing printer description files” later in this guide.
Exploring the Properties and Document Defaults dialog boxes
Now that you have installed the printing software in Windows NT 4.0, there are a
number of settings that you may need to change if you have special printing requirements. Most users will not need to make any changes here.
You will make most of the changes in the Properties dialog box, but some settings are
in the Document Defaults. You can get to the Document Defaults dialog box by
highlighting your printer in the Printers window and choosing Document Defaults
from the File menu.
Most of the Properties dialog box contains options that are the same for all printers
using Windows NT 4.0, so this section of this installation guide only covers the
options provided by GCC. If you want information on options for all Windows NT
• 6 - 5
Page 97

4.0 printers, please refer to the Windows NT 4.0 on-line help system and Windows
NT 4.0 documentation. You can also get information about an item in a dialog box
by clicking on the question mark button at the top right of most dialog boxes.
The changes you make in the Properties and Document Default dialog boxes affect
all applications, but on this computer only.
The Properties dialog box
If you do not already have the Properties dialog box displayed:
1. Click on the Start button. You will see the Start menu.
2. Choose Settings, then choose Printers from the submenu that appears.
3. You will see the Printers window. Use the right mouse button to click on
the Elite XL 20ppm icon, and choose Properties from the pop-up menu.
The Properties dialog box has tabs across the top. Click on the tabs to see other pages.
Each page has options to configure your printer.
The Device Settings page
Click on the Device Settings tab to see the Device Settings page. This page contains
settings specific to your GCC printer model.
In the Printer features box you will see options specific to your printer. If you want
to change the current setting of any feature, click on its name in the upper box. You
will see settings in the “Change setting” area below. Click on the setting you want to
change.
Note: The features you see in the list vary between printer models. The Configuration
Page has details of the specific features in your printer.
If you add options (like more paper trays or extra printer RAM), you need to change
the Installable options list. After you have changed this option, Print dialog boxes in
this computer’s applications will show extra paper trays, for example.
Note on VMOption: The VMOption selection corresponds to the amount of RAM
installed in the printer. If you add or subtract printer memory, you will need to
change the amount shown under VMOption. If memory was added to your printer
before you installed the Windows NT 4.0 printer software, you will need to change
the VMOption amount.
If you have to change the printer memory size, click on VMOption and select the
correct memory size from the drop-down list box. Answer Yes to the question about
6 - 6 • Using Windows NT 4.0
Page 98

available printer memory. Also, see the following section on updating the printer
driver to reflect the new amount of printer memory.
Updating the printer driver to reflect the new amount of printer memory
If you install additional memory in your printer, you must update the printer driver.
You do this by adjusting the Available printer memory setting at the top of the
Device Settings page. When the Available printer memory figure is correct, your
computer will send files that print faster.
The Available Memory figure is less than the amount of RAM you have installed in
your printer, because part of the RAM is used by the printer for utilities.
If you routinely download more than one or two fonts to the printer’s memory, you
should also update your Available printer memory, even if you have not added any
extra memory to the printer. Download your normal font set and then update the
memory.
If you want to update the printer driver, you first have to copy a file to the printer,
using a DOS window (do not use Windows NT 4.0’s Print command). This prints a
page that tells you the maximum suggested virtual memory for the printer. You then
enter the figure in this dialog box.
1. Copy the file TESTPS.TXT to the printer. This file is included with Windows
NT 4.0.
• Click on the Start button, then choose Programs from the Start menu. Click on
MS-DOS Prompt in the program list; you will see a DOS window.
• The following example assumes that your printer is connected to your computer through the LPT1 port. Type:
copy c:\windows\system\testps.txt lpt1
• Press the Enter key, type exit and press the Enter key again to close the DOS
window.
The printer will produce a page which shows the maximum available virtual
memory and the maximum suggested virtual memory. Use the suggested value (Max
Suggested VM).
2. Enter the new suggested value into the Device Settings page in the box
labeled Available printer memory (in KB).
3. Update the new RAM value by clicking on Memory Configuration and
choosing a new value, equal to the amount of memory in your printer.
• 6 - 7
Page 99
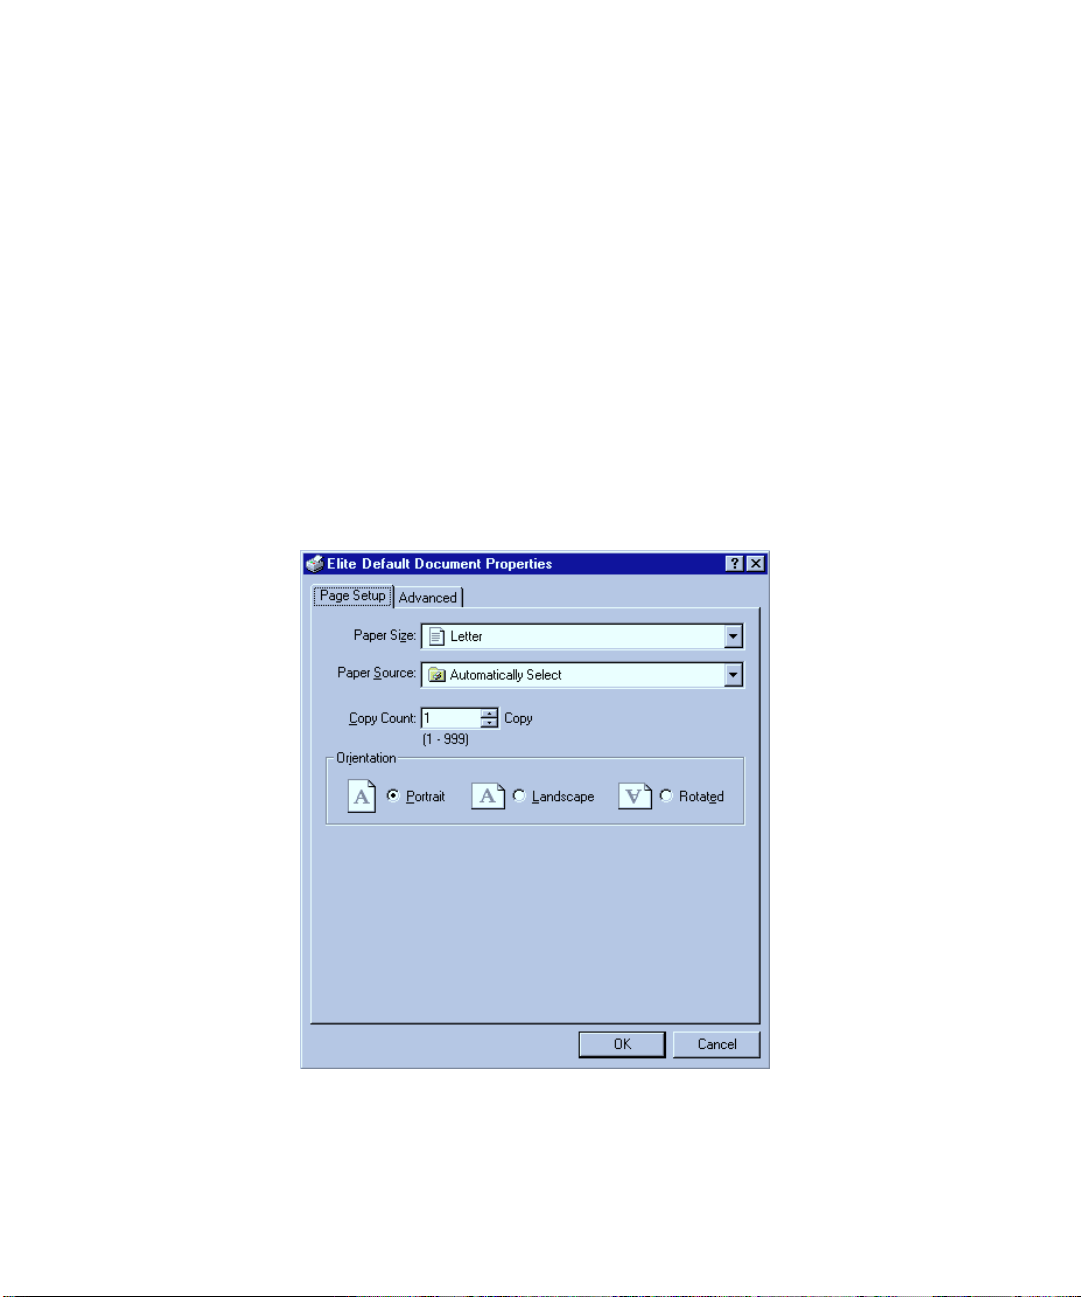
Other general items in Device Settings
• The form to tray assignment sets defaults for the paper size for each paper tray.
• Font substitution replaces certain common fonts on Windows systems (such as
Arial) with the PostScript equivalents on the printer (Helvetica replaces Arial).
We recommend that you keep the default settings.
• PS timeout values control how long the computer will attempt to print to a port
before reporting that it is unable to print. The default setting of zero actually
means that there is no limit. We recommend that you keep these settings.
Other GCC-specific items in Device Settings
• Additional paper trays lets you tell the computer that you have installed any
additional paper trays. These trays then appear as an option in the Print dialog
boxes of applications.
• Paper size lets you choose the default paper size. You can override this in an
application’s Page Setup dialog box.
The Document Defaults dialog box
You can set additional defaults in this dialog box. These defaults will apply to every
application running on this computer only, and can be overridden in an
application’s Page Setup and Print dialog boxes.
6 - 8 • Using Windows NT 4.0
Page 100
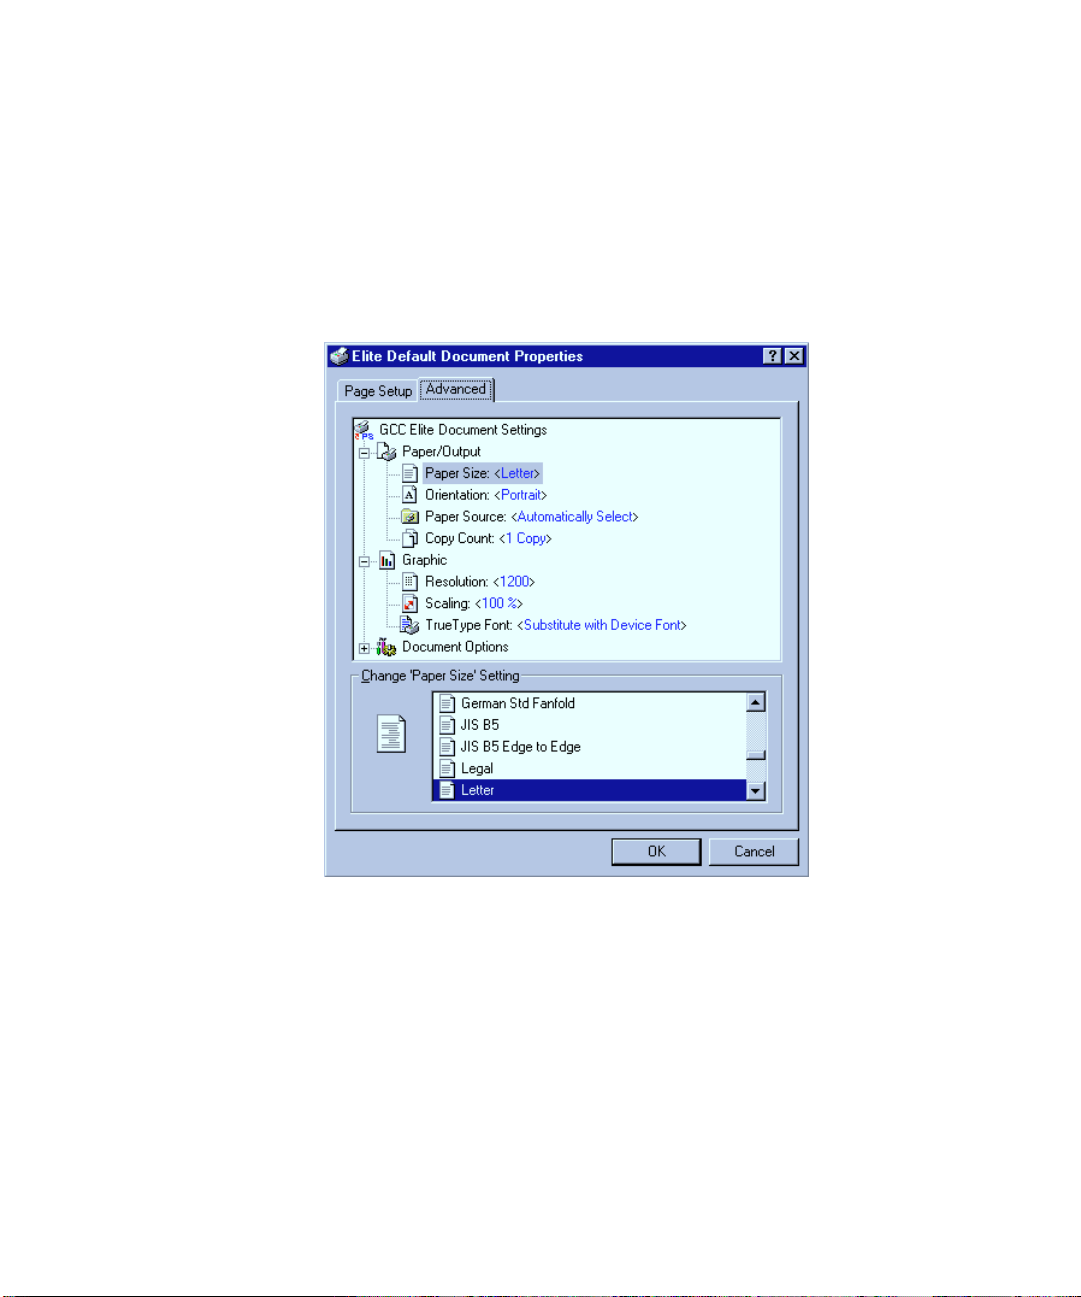
Opening the Document Defaults dialog box
If the Document Defaults dialog box is not already open, follow these steps:
1. On the Start Menu, choose Settings, and then choose Printers from the
sub-menu.
2. You will see the Printers window. Click once on your printer.
3. Go to the File menu in the Printers window, and choose Document Defaults from the menu.
GCC-specific items
There are two items in the Document Defaults dialog box which are added when you
install a GCC printer. You will find both of them if you click on the Advanced tab
and scroll to the bottom of the window.
• AccuGray is GCC’s technology for improving the reproduction of photographs.
We recommend that you leave this at the default setting of Enabled.
• 6 - 9
 Loading...