

gbo HiToP 1touch Instructions For Use Manual
HiToP 1touch
Instructions for use
HighTone Therapy Device

2
HiToP 1touch
gbo Medizintechnik AG has taken care in the preparation of this manual, but does not
assume any liability, expressed or implied, of any kind nor does it assume any
responsibility for errors or omissions.
All rights reserved. No part of this manual may be reproduced, in any form or by any
means (electronic, mechanical or otherwise) without the prior written permission of
gbo Medizintechnik AG.
© gbo Medizintechnik
Part-No: 027-7-0032
Version 1.2
Date of issue 2017-02-02
gbo Medizintechnik AG
Kleiststrasse 6
D-64668 Rimbach
Phone: + 49 6253/808-0
Telefax: + 49 6253/808-245
E-Mail: info@gbo-med.de
Internet: http://www.gbo-med.de
gbo Medizintechnik AG Version 1.2

HiToP 1touch
3
Table of Contents
1 INTRODUCTION ............................................................................................. 5
1.1 Purpose ........................................................................................................ 5
1.2 Note concerning the operating personnel .................................................... 5
1.3 Description of the unit .................................................................................. 5
1.4 Short operating instructions for SimulFAM® i ............................................... 6
1.5 Short operating instructions for SimulFAM® X ............................................. 7
2 START OF OPERATION ................................................................................ 7
2.1 Transport and Assembly .............................................................................. 7
2.1.1 Assembling .................................................................................................. 7
2.1.2 Preparing for the transport .......................................................................... 8
2.1.3 General Notes ............................................................................................. 8
2.2 Connection and Switch-On .......................................................................... 9
2.3 Placing out of order .................................................................................... 10
3 OPERATING ................................................................................................. 11
3.1 Control Panel ............................................................................................. 11
3.1.1 Touch screen............................................................................................. 11
3.1.2 Intensity and modification knob ................................................................. 12
3.1.3 Home screen ............................................................................................. 12
3.1.4 Screen for selecting an indication ............................................................. 13
3.1.5 Screen for selecting More Therapies (Standard Therapies) .................... 13
3.1.6 Screen for selecting More Therapies (Own Therapies) ............................. 14
3.2 Direct help .................................................................................................. 15
3.3 Settings ...................................................................................................... 16
3.4 Intensity monitoring .................................................................................... 18
3.4.1 Deactivate intensity monitoring ................................................................. 19
4 THERAPY ..................................................................................................... 20
4.1 General guidelines for therapy ................................................................... 20
4.2 Selection of therapies................................................................................. 20
4.2.1 Selection of therapy by More Therapies .................................................... 20
4.2.2 Selection of therapy by indications ........................................................... 21
4.2.3 Selection of therapy from the favorites list ................................................ 21
4.2.4 Individual settings ...................................................................................... 21
4.3 Setting SimulFAM i ..................................................................................... 21
4.4 Setting SimulFAM X ................................................................................... 22
5 ELECTRODES .............................................................................................. 23
5.1 General notes on conductive rubber electrodes ........................................ 23
5.1.1 Check the resistance of the electrodes ..................................................... 23
5.2 Advise on self-adhesive electrodes ........................................................... 24
5.3 Electrode positioning .................................................................................. 25
6 MAINTENANCE ............................................................................................ 26
6.1 Safety Controls ........................................................................................... 26
6.2 Disposal of the device and the accessories ............................................... 27
gbo Medizintechnik AG Version 1.2
4
Warning!
Warnings which have to be observed by all means!
Caution!
Observe the instructions for use!
!!
Note!
Information that will facilitate your work.
6.3 Cleaning and disinfection ........................................................................... 27
6.3.1 Cleaning the Device .................................................................................. 27
6.3.2 Cleaning the Elastic Bands ....................................................................... 27
6.3.3 Cleaning the Electrodes ............................................................................ 27
6.3.4 Disinfecting the Electrodes ........................................................................ 28
7 WARNINGS AND SAFETY PRECAUTIONS ............................................... 29
7.1 Contraindications ....................................................................................... 30
8 EXPLANATION OF THE PICTOGRAPHS USED ....................................... 31
9 TECHNICAL DATA ...................................................................................... 32
9.1 Current Types ............................................................................................ 33
10 ACCESSORIES ......................................................................................... 34
11 TROUBLESHOUTING ............................................................................... 35
12 APPENDIX A - STANDARD PROGRAMS ............................................. 36
13 APPENDIX B - EMC HINTS .................................................................... 37
14 INDEX ........................................................................................................ 40
HiToP 1touch
Warnings and safety precautions
gbo Medizintechnik AG Version 1.2

HiToP 1touch
5
1 Introduction
1.1 Purpose
Electrotherapy with sinusoidal alternating currents.
1.2 Note concerning the operating personnel
The device is to be operated by healthcare professionals only.
1.3 Description of the unit
The HiToP
knee arthrosis
hip arthrosis
lumbar spine syndrome
cervical spine syndrome
thoracic spine syndrome
1touch is a medical product and is well suited for:
shoulder-arm syndrome
tennis elbow
pain following injuries and operations
edema treatment
Diabetic PNP
The HiToP1touch is also well suited for:
“refreshment treatment” for overall vitalisation
muscle relaxation
muscle training
muscle stimulation (increase of energy consumption)
rehabilitation
Also patients with varicose veins, metal implants, endoprothesis and open wounds (ulcus cruris)
may be treated. Patients with cardiac pacemakers may be treated at the lower extremities.
The single channel HighTone Power Therapy device HiToP (High Tone Power)
provides a therapy with medium frequency sine waves. The therapy is absolutely free
of d.c. components. The frequency range used comprehends 3 octaves, the range
being 4096 – 32768 Hz. The therapy frequency is scanned with a defined frequency.
This method is called SimulFAM which stands for Simultaneous Frequency
Amplitude Modulation. In the following, the basic method is divided into two
different ones.
gbo Medizintechnik AG Version 1.2

6
HiToP 1touch
SimulFAM i
A slow frequency scan of up to three octaves is realized. The minimum amplitude is
passed with the minimum frequency. The maximum amplitude is passed with the
maximum frequency. This therapy activates the metabolism of the body without any
effect of irritation.
SimulFAM X
A frequency scan of three octaves is realized. The frequency scan is realized with
different speed (0.1 - 200 Hz). This therapy activates the metabolism in the body,
thus having an effect of irritation.
1.4 Short operating instructions for SimulFAM® i
(1) Switch on the device with the mains switch in the back of the device. Now the
device carries out an automatic check of all functions. If faultless, the device
automatically shows the home screen.
(2) Connect the accessories to the respective socket on the back side of the device.
(3) The display shows the window with the settings of the last treatment.
(4) Select SimulFAM
(5) Apply the electrodes to the patient (see chapter 5.3, Electrode Positioning).
(6) Increase the current slowly using the Intensity regulator.
(7) The display shows the message: “Increase the intensity at 4096 Hz until you
start to feel a prickling sensation and confirm with the button Continue. “.
(8) Press the button “Continue” to accept the intensity at 4096 Hz.
(9) The display shows the message: “Increase the intensity at 16384 Hz until you
start to feel a prickling sensation and confirm with the button Continue. “.
(10) Press the button “Continue” to accept the intensity at 16384 Hz.
(11) The current frequency of the SimulFAM
frequency is shown on the SimulFAM® i graph.
(12) A special tone marks the end of the treatment time.
(13) The current to the patient will decrease automatically.
®
i from the list of “More Therapies” or the favorites list.
®
i scan is shown on the display and the
gbo Medizintechnik AG Version 1.2

HiToP 1touch
7
1.5 Short operating instructions for SimulFAM® X
(1) Connect the device with the mains switch at the back of the device. The device
will then carry out an automatic check of all functions. If faultless, the device
automatically shows the home screen.
(2) Connect the accessories with the respective socket on the back side of the
device.
(3) In the display you see the window with the settings of the last treatment.
(4) Select SimulFAM
list.
(5) Apply the electrodes to the patient (see chapter 5.3, Position of the Electrodes).
(6) Increase the current slowly with the Intensity regulator until the patient feels a
tingling sensation.
(7) In case of a frequency scan the current stimulation frequency is shown. The
frequency values increase and decrease every second.
(8) A special tone marks the end of the treatment time.
(9) The current to the patient will decrease automatically.
®
X from the list of “More Therapies” or from the favorites
2 Start of Operation
2.1 Transport and Assembly
After unpacking check all components (unit with power cable, electrode connection
cables and electrodes) for external integrity.
The unit may be placed on any flat surface. It must not be placed on the floor. Keep a
wall distance of at least 20 cm. The device should neither be placed in front of
radiators nor should it be covered by pillows or blankets while in operation. The
device is not made for outdoor operation. Do not operate the device inside the
transport bag.
2.1.1 Assembling
On delivery, the two feet for placing the appliance are kept into the corresponding
holes. The feet are held by magnets. Remove the two feet and screw them clockwise
into the holes provided on the bottom of the device.
gbo Medizintechnik AG Version 1.2

8
Warning!
The unit is not designed to be operated in places with the inherent risk of
explosions. If it is used in dangerous areas of anesthesia departments, the
HiToP 1touch
Pull both feet well hand-tight so that the device has a good level and does not wobble.
2.1.2 Preparing for the transport
Unscrew both feet counter-clockwise from the holes in the lower part and slide them
into the holes on the rear panel. The feet are secured against falling out during
transport by magnets. For the transport use always the designated HiToP
1touch
transport bag. In this bag enough space for all the accessories is available. Also for
the Aloe Vera contact spray a bottle holder is provided.
2.1.3 General Notes
The HiToP 1touch corresponds to the regulations of EN 60601. It is a device of
protection class I. Within the scope of the Medical Device Directive (MDD) the current
stimulation device belongs to class IIa.
gbo Medizintechnik AG Version 1.2
HiToP 1touch
possibility of an explosion cannot be excluded.
If the patient and/or the patient cable is directly exposed to a radiator of a
medical device for high frequency heat therapy, damage of the device or
danger to the patient cannot be excluded. As a rule, a clearance distance
of 3 m is sufficient.
Warning!
To avoid the risk of electric shock, this equipment must only be
connected to supply mains with protective earth.
9
2.2 Connection and Switch-On
The HiToP 1touch is designed to be connected to a supply voltage of 100 to 240 V. It
is not necessary to switch over the voltage – the device adjusts automatically to the right
voltage.
Irrespective of the adjusted supply voltage, the device is appropriate for mains
frequencies of 50 to 60 Hz.
Connect the HiToP 1touch with the mains cable to a socket with protective ground.
The protective ground must work correctly.
The HiToP 1touch is switched on by the main switch on the back of the device.
gbo Medizintechnik AG Version 1.2
10
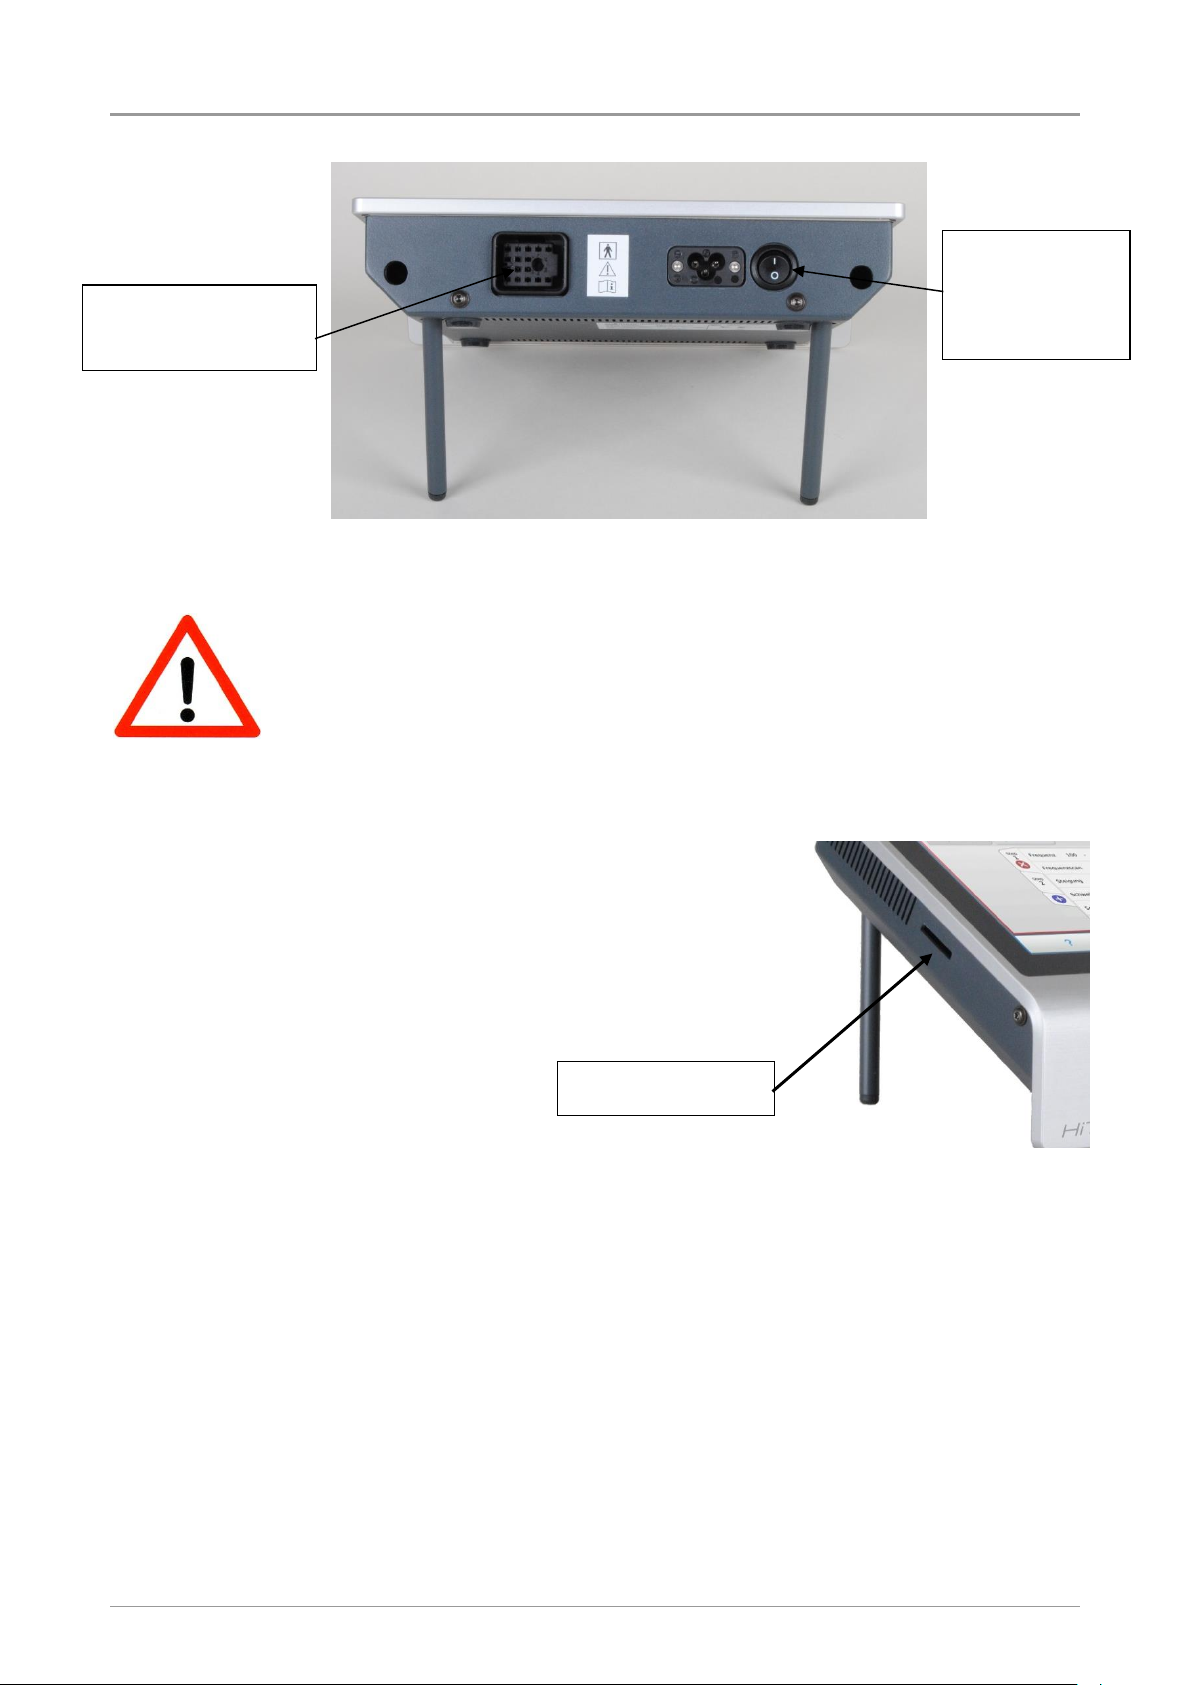
Warning!
The device must not be placed in such a position that the mains input
plug is inaccessible.
Mains switch
and appliance
inlet for the
mains cable
SD card slot
Connecting plug for
the patient cable
HiToP 1touch
HiToP 1touch is equipped with a SD card slot, located to
the left of the display.
2.3 Placing out of order
In order to disconnect the device just disconnect it from the mains power supply.
Before the disposal of the device, the electrodes should be cleaned one last time.
gbo Medizintechnik AG Version 1.2
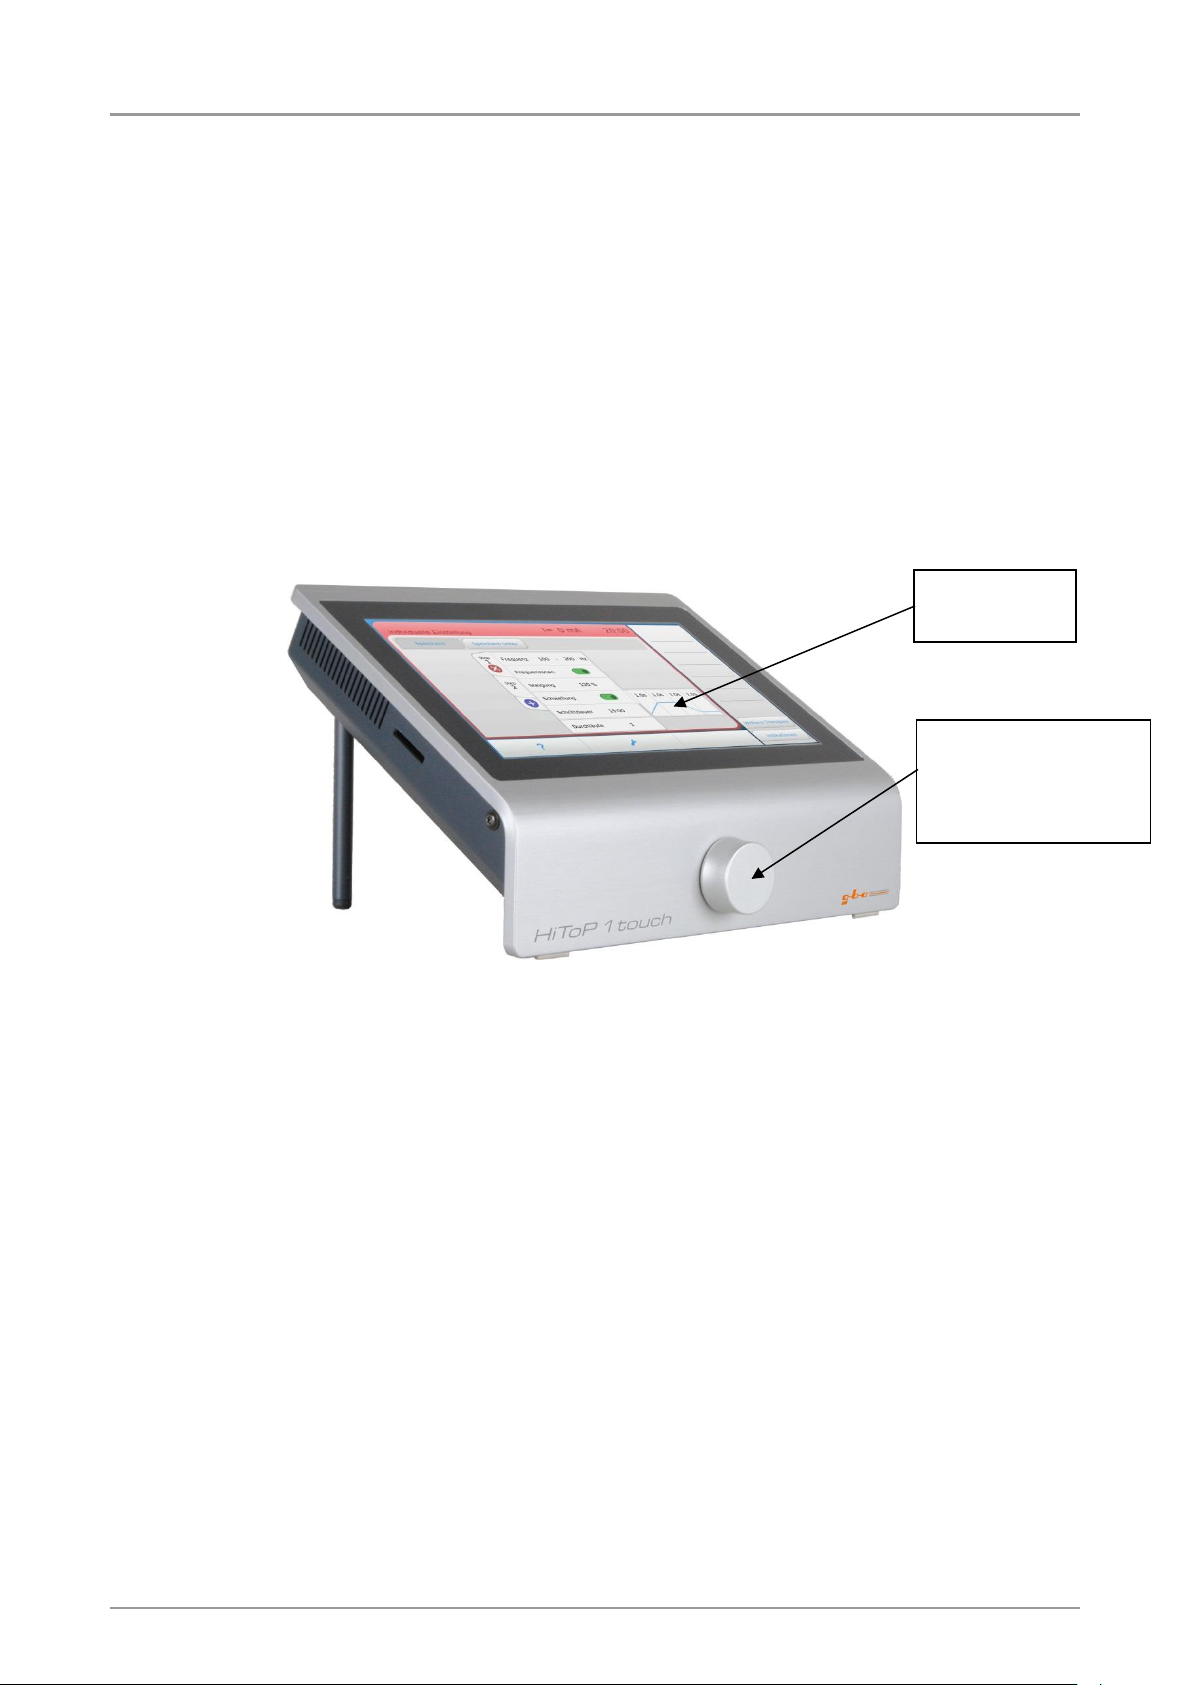
HiToP 1touch
Touch screen
display
Intensity and
modification
regulator (knob)
11
3 Operating
The HiToP
connecting plug for patient cables and the knob.
The HiToP
The user will obtain explanations regarding the device’s operation and functionality
of individual elements via a direct help system during operation. Consequently,
operation is explained in broad outline only.
3.1 Control Panel
1touch is equipped with a touch screen display, one on/off switch, one
1touch is being operated via the control panel of the large touch screen.
3.1.1 Touch screen
The touch screen should be operated with a distinct pressure of the fingertip. Pointed
objects are unsuited for operation and can destroy the touch screen.
Every button is clearly labelled. Optically, the user can differentiate operable buttons
from non-operable buttons. In case of doubt the user can obtain further information
via the direct help system.
The scrollbars are used like with a PC: press the slider and then move it into the
desired direction.
gbo Medizintechnik AG Version 1.2

12
Tennis elbow
Direct help
Button
Button
settings
Switch
Intensity monitoring
Selected
therapy
Selection
Favorite list
Selection
More
therapies
Selection
Indications
Detailed Settings
therapy parameters
Surge parameters with
activated surge
Therapy
duration
Save the set therapy parameters
as "own therapy"
Therapy
current
Detailed
information
HiToP 1touch
3.1.2 Intensity and modification knob
The intensity and modification knob is located on the front panel and is used as an
intensity knob to adjust the output voltage as well as a modification controller for
changing therapy parameters such as treatment duration or frequency.
The Knob will be used as a modification knob after pressing a button, such as the
changeable frequency. When the button is pressed, it is provided with a blue border
and the adjusting knob may be operated for 3 seconds.
3.1.3 Home screen
After power-up, and ready for operation, the device displays the home screen.
gbo Medizintechnik AG Version 1.2
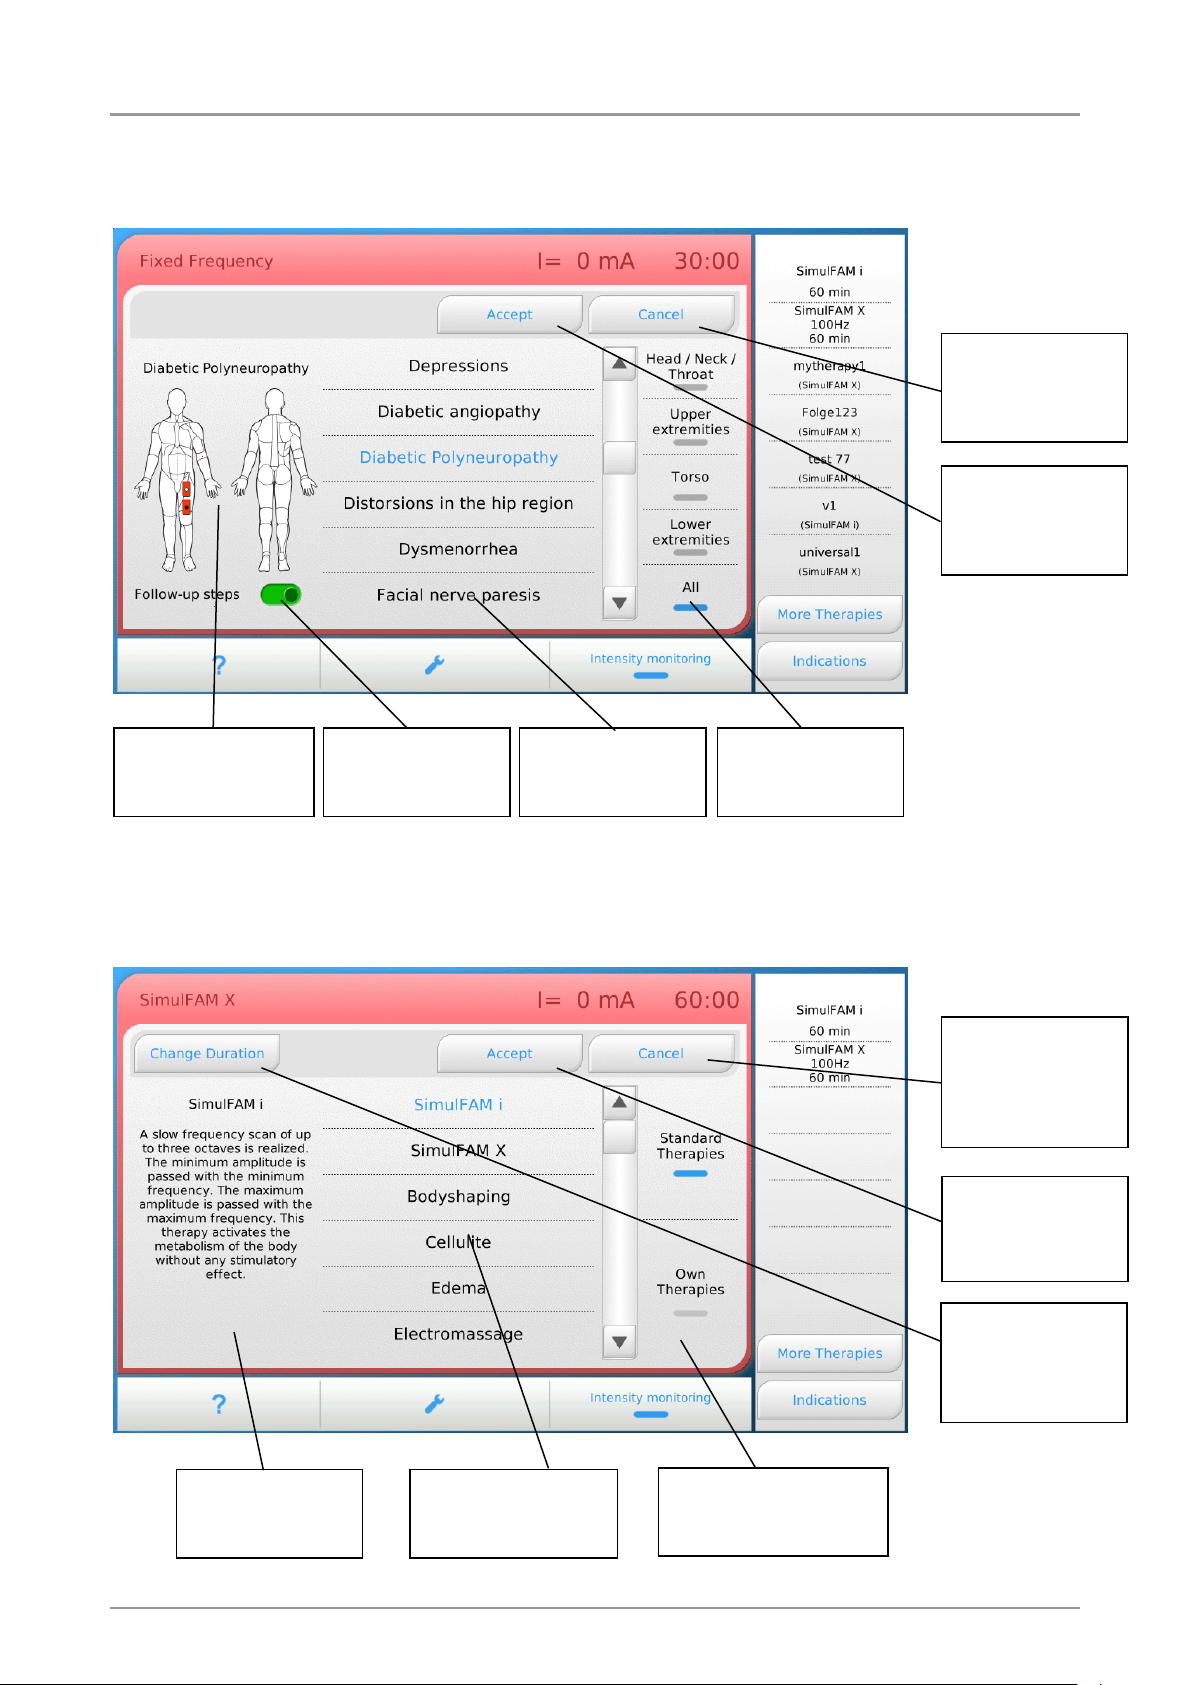
HiToP 1touch
Indication image
showing the
electrode placement
Indications list in
alphabetical order
Selection of
treatment area to
restrict the list.
Return to the
Home screen
without accepting
the indication.
Accept the selected
indication and
return to the home
screen.
List of Standard
Therapies in
alphabetical order
Information for the
Standard Therapies
Return to the
Home screen
without accepting
the own therapy.
Accept the selected
therapy and return
to the home screen.
Change the
duration for the
selected Standard
Therapy
Pre-selection between
Standard Therapies
and Own Therapies
Switch for follow
up steps on/off
13
3.1.4 Screen for selecting an indication
After pressing the button “Indications”, the device displays the following screen.
3.1.5 Screen for selecting More Therapies (Standard Therapies)
After pressing the button “More Therapies”, and selection of “Standard Therapies”
the device displays the following screen.
gbo Medizintechnik AG Version 1.2
 Loading...