

Page 1
G
Instruction Manual
F
Manuel d’utilisation
D
Bedienungsanleitung
I
Manuale d’istruzioni
O
Gebruiksaanwijzing
E
Manual de instrucciones
P
Manual de Instruções
S
Bruksanvisning
Q
Instrukcja obsługi
o
Návod k obsluze
H
Használati útmutató
o
Руководствo по
зкcплyатации
CZ
RUS
MultiBind 208
Page 2
English 4
Français 6
Deutsch 8
Italiano 10
Nederlands 12
Español 14
Português 16
Svenska 18
Polski 20
Česky 22
Magyar 24
Pyccкий 26
Page 3
4
4
7
1
6
3
5
2
7
1
2
7
6
4
5
3
Page 4
4
Special notice
Thank you for choosing a GBC Binding Machine. We aim
to produce quality binding machines at an affordable
price, with many advanced features to enable you to
create excellent results every time. Before using your
machine for the first time, please take a few minutes to
read through this guide.
Specifications
GBC MultiBind 208
8 Sheets
1 sheet PVC/PP Plastic Cover
(0.18mm)
DIN A4 (297mm)
21 hole (comb) /21 hole (wire)
125 Sheets
14mm
4.12kg
250x360x315mm
Max Punch Capacity
Max Punch Capacity
Max Document Size
Punching Pattern
Max Bind Capacity
Max Spine Size
Net Weight
Dimensions (hxwxd)
Safety instructions
YOUR SAFETY AS WELL AS THE SAFETY OF OTHERS
IS IMPORTANT TO ACCO BRANDS EUROPE. IN THIS
INSTRUCTION MANUAL AND ON THE PRODUCT
ARE IMPORTANT SAFETY MESSAGES. READ THESE
MESSAGES CAREFULLY.
m
General safeguards
• Please read the instructions and keep them safe for
future reference.
• Set the machine up on a stable surface.
• Test the punching system with a scrap piece of paper
first.
• Take care that there are no staples or such like in the
document prior to punching.
• Do not place anything in the punching entry other
than paper up to 8 sheets (80gsm) or one PVC plastic
cover up to 0.18mm.
• Only carry the machine using the carry handle, never
the punching arm.
• Empty the clippings tray regularly.
Maintenance
Remember to empty the clippings tray regularly (see
fig. 7).
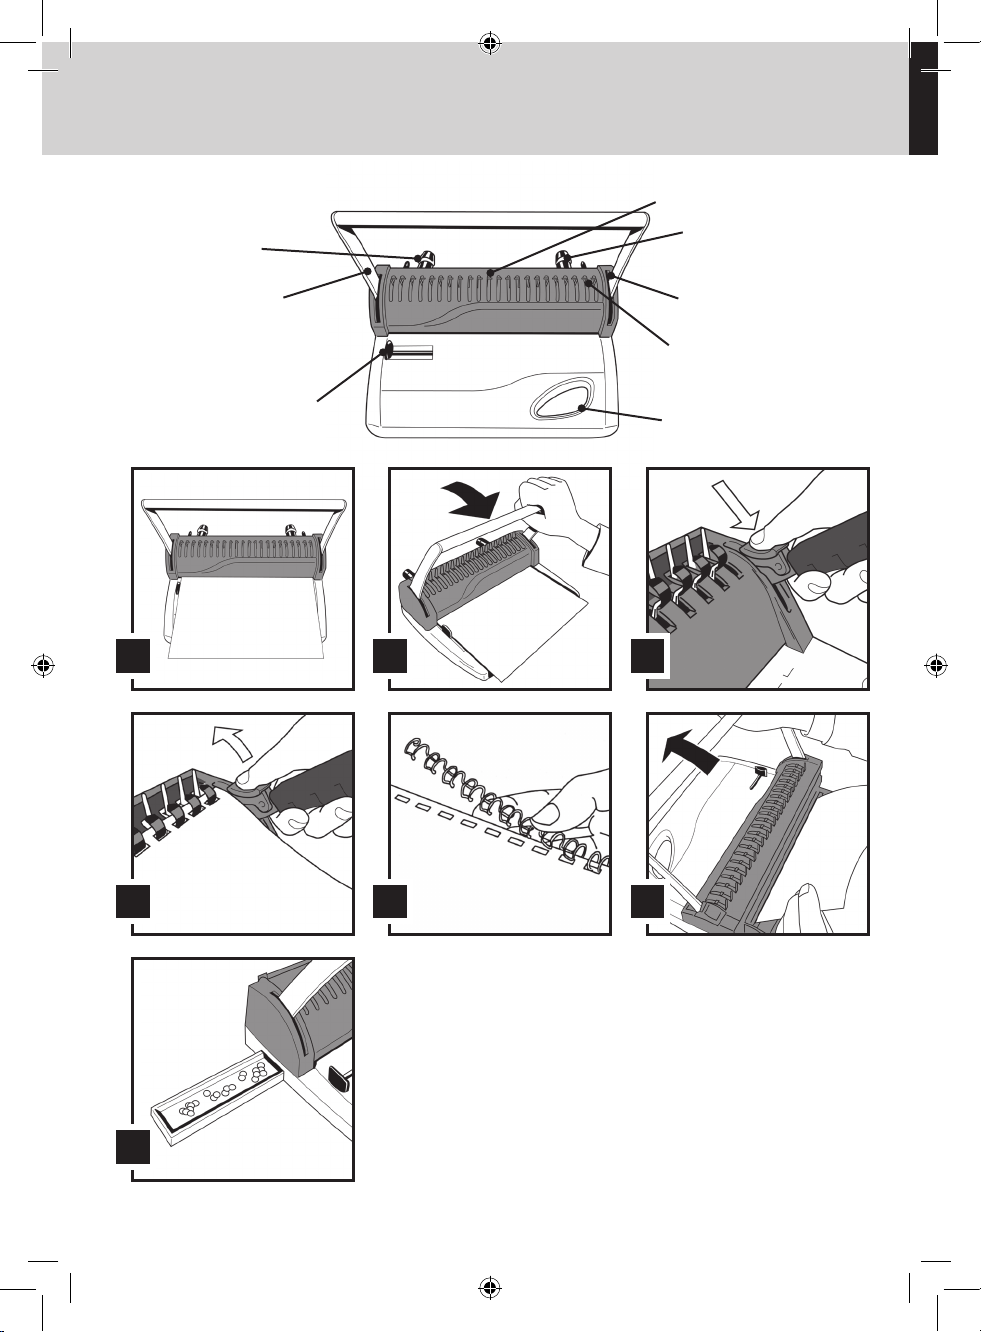
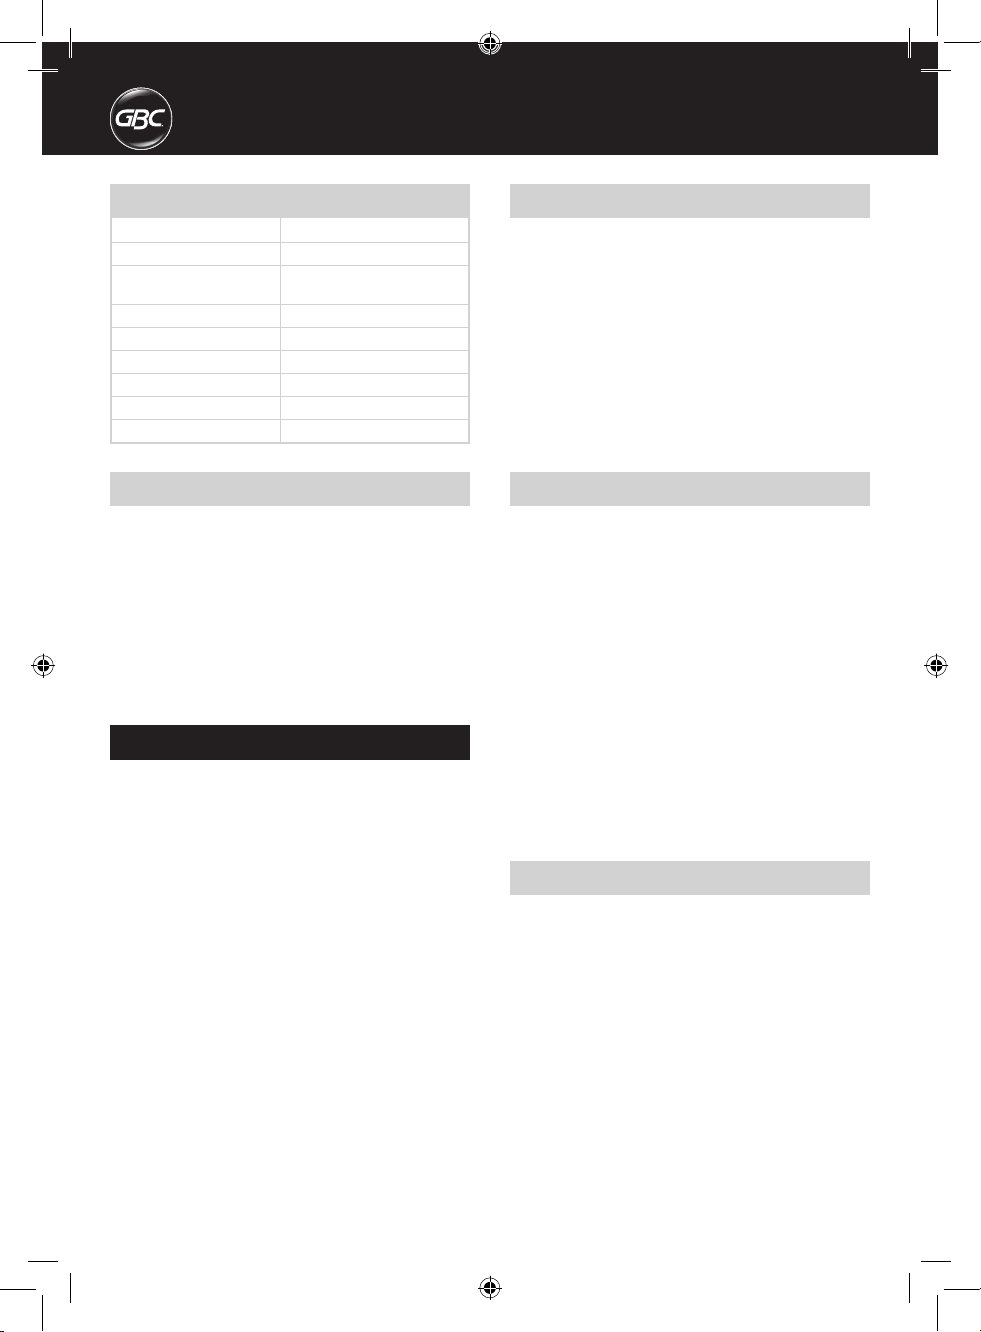
Location of controls
1
Paper Edge Guide
2
Punching Handle
3
Carry Handle
4
Comb Lock
5
Comb Opener
6
Wire Closing Channel
7
Wire Closing Adjusters
Page 5

5
G
Guarantee
Operation of this machine is guaranteed for two years
from date of purchase, subject to normal use. Within
the guarantee period, ACCO Brands Europe will at its
own discretion either repair or replace the defective
machine free of charge. Defects due to misuse or use
for inappropriate purposes are not covered under the
guarantee. Proof of date of purchase will be required.
Repairs or alterations made by persons not authorised
by ACCO Brands Europe will invalidate the guarantee.
It is our aim to ensure that our products perform to the
specifications stated. This guarantee does not affect
the legal rights which consumers have under applicable
national legislation governing the sale of goods.
Register this product online at www.accoeurope.com
Punching
1
Insert paper fully into the punching slot making sure
they are flush with the paper edge guide. (max 8
sheets 80gsm/1 x PVC Covers) (fig. 1).
2
Press down on the punching handle until all pages
are punched (fig. 2).
3
Lift handle to its original position and remove pages.
• When punching make sure the wire closing jaw is
in open position. Failing to do this will result in not
being able to punch through paper completely.
Comb binding
1
Place a comb (open side up) on the comb opener.
Pull down the punch handle to open the comb.
2
Once open fully lock the comb open using the comb
opening lock (see fig. 3).
3
Load your document onto the comb. Release the
comb opening lock to close the comb (see fig. 4).
Wire Binding
(using GBC 21 loop wires)
1
Using the edge of a desk feed the wire through the
punched document (fig. 5).
2
Using the wire closing guide, select the correct wire
closure by turning the left and right wire adjusters.
3
Insert the document into the wire closing jaws. (wire
opening face down) Support the document, then pull
down on the punch handle SLOWLY to close the wire
(fig. 6).
4
Lift the lever back to the vertical position and remove
the document.
Page 6

6
Notification spéciale
Merci d’avoir choisi une thermorelieuse GBC. Nous
visons à produire des machines de qualité à un
prix abordable et offrons de nombreuses fonctions
sophistiquées garantissant d’excellents résultats à
chaque usage. Avant d’utiliser votre machine pour la
première fois, veuillez prendre quelques minutes pour
lire attentivement ce guide.
Consignes de sécurité
VOTRE SÉCURITÉ AINSI QUE CELLE DES AUTRES
EST IMPORTANTE POUR ACCO BRANDS EUROPE.
DANS CE MANUEL D’UTILISATION ET SUR LE
PRODUIT, VOUS TROUVEREZ DES MESSAGES DE
SÉCURITÉ IMPORTANTS. MERCI DE LES LIRE TRÈS
ATTENTIVEMENT.
m
Emplacement des pièces
et commandes
1
Butée papier
2
Bras de perforation
3
Poignée de transport
4
Verrou de bloquage des peignes
5
Bouton ouverture des peignes
6
Canal de fermeture des reliures métalliques
7
Vis moletée
Spécifications
GBC MultiBind 208
8 feuilles
1 feuille PVC / PP Plastic Cover
(0,18 mm)
DIN A4 (297 mm)
21 hole (comb) / 21 hole (wire)
125 feuilles
14 mm
4,12 kg
250 x 360 x 315 mm
Capacité de perforation max.
Capacité de perforation max.
Taille max. de document
Modes de perforation
Capacité de reliure max.
Taille maxi peigne plastique/
métal
Poids net
Dimensions (L x l x H)
Consignes de sécurité générales
• Lisez attentivement ce manuel d’utilisation et
conservez-le en lieu sûr pour pouvoir en disposer
ultérieurement.
• Installez l’appareil sur une surface stable.
• Commencez par tester le système de perforation avec
une feuille de brouillon.
• Avant toute perforation, vériez que le document ne
contient aucune agrafe ni autre pièce similaire.
• Ne placez rien dans la fente de perforation si ce
n’est du papier, jusqu’à 8 feuilles (80 g/m²), ou une
couverture de reliure en plastique PVC de jusqu’à
0,18 mm d’épaisseur.
• Transportez uniquement l’appareil en le tenant par
la poignée de transport, et jamais par la poignée de
perforation.
• Videz régulièrement le bac à confettis.
Entretien
Videz régulièrement le tiroir à confettis (fig 7).
Page 7

7
F
Garantie
Le fonctionnement de ce produit est garanti pendant
2 ans à partir de la date d’achat, sous réserve d’un
usage normal. Pendant la période de garantie, ACCO
Brands Europe décidera, à son gré, de réparer ou
remplacer gratuitement l’appareil défectueux. Les
défauts dus à un usage abusif ou un usage à des
fins non appropriées ne sont pas couverts par cette
garantie. Une preuve de la date d’achat sera exigée.
Les réparations ou modifications effectués par des
personnes non autorisées par ACCO Brands Europe
annuleront la garantie. Notre objectif est d’assurer le
bon fonctionnement de nos produits conformément aux
spécifications précisées. Cette garantie ne compromet
pas les droits légaux des consommateurs au titre de la
législation nationale en vigueur régissant la vente des
biens de consommation.
Enregistrez ce produit en ligne à www.accoeurope.com
Perforation
1
Insérer le papier jusqu’au fond de la fente de
perforation (maximum 8 feuilles de 80g/m² +
couverture PVC), côté à perforer vers l’avant (fig 1).
2
Maintenez le document en position et abaissez
le bras, jusqu’à ce que toutes les feuilles soient
perforées (fig 2).
3
Relevez le bras et retirez le papier perforé.
• Qand vous perforez, assurez vous que le système
de fermeture des peignes est ouvert. Sans cela, la
perforation pourrait ne pas être complète.
Reliure en anneaux plastiques
1
Placez le peigne plastique côté ouvert vers le haut
dans les doigts métalliques. Abaissez le bras jusqu’à
ce que le peigne plastique soit suffisamment ouverte.
2
Une fois complètement ouverte, bloquer le peigne
plastique avec le verrou (fig 3).
3
Insérez le document dans les anneaux de la reliure.
Fermez le peigne plastique en débloquant le verrou
et en ramenant le bras dans sa position initiale (fig
4).
Reliure en anneaux métalliques
(21 boucles)
1
Placer le document à relier perforé sur une arrête de
table et insérez le peigne métal dans la perforation.
2
A l’aide de la règle de graduation inrégrée, réglez
la largeur de fermeture sur le diamètre de la reliure
utilisée.
3
La reliure métallique étant insérée dans le document,
placez celui-ci verticalement dans le canal de
reliure (ouverture de la reliure métallique vers le
bas). Abaissez lentement et à fond la poignée, puis
remettez celle-ci en position verticale.
4
Retirez le document relié et rabattez la dernière
feuille.
Page 8
8
Spezieller Begriff
Wir danken Ihnen, dass Sie sich für ein GBC
Bindegerät entschieden haben. Es ist unser
Ziel, Qualitätsbindegeräte mit vielen modernen
Leistungsmerkmalen zu einem günstigen Preis
anzubieten, damit Sie bei jedem Bindevorgang
ausgezeichnete Ergebnisse erzielen können. Vor dem
ersten Benutzen des Geräts sollten Sie sich bitte
einige Minuten Zeit nehmen, um diese Anweisungen
durchzulesen.
Sicherheits-Instruktionen
ACCO BRANDS EUROPE MÖCHTE IHRE UND DIE
SICHERHEIT ANDERER SICHERSTELLEN. IN DIESEM
BEDIENUNGSHANDBUCH UND AM PRODUKT BEFINDEN
SICH WICHTIGE SICHERHEITSHINWEISE. BITTE LESEN
SIE DIESE HINWEISE SORGFÄLTIG DURCH.
m
Technische Daten
GBC MultiBind 208
8 Blatt
1 Blatt PVC/PP Plastic Cover
(0,18mm)
DIN A4 (297mm)
21 hole (comb) / 21 hole (wire)
125 Blatt
14mm
4,12kg
250x360x315mm
Stanzleistung
Stanzleistung
Max. Dokumentformat
Stanzmuster
Bindekapazität
Max. Binderückengröße
Gewicht
Abmessungen (L x B x H)
Allgemeine Sicherheitshinweise
• Bitte lesen Sie diese Bedienungsanleitung sorgfältig
durch und bewahren Sie sie zum späteren
Nachschlagen gut auf.
• Gerät auf einer stabilen Fläche aufstellen.
• Stanzeinheit zunächst mit einem Stück Papier testen.
• Vor dem Stanzen sämtliche Heftklammern o. ä. aus
dem Dokument entfernen.
• In die Stanzöffnung darf ausschließlich Papier (bis zu
acht Blatt, 80 g/m²) bzw. ein Plastikeinbanddeckel (bis
zu 0,18 mm) eingelegt werden.
• Gerät zum Transport immer nur am Tragegriff
anfassen, niemals am Stanzhebel.
• Stanzabfallbehälter regelmäßig leeren.
Wartung
Leeren Sie regelmäßig den Stanzabfallbehälter (Bild 7).
Anordnung der Komponenten
1
Papieranschlag
2
Stanzgriff
3
Tragegriff
4
Verschluss Binderückenöffner
5
Binderückenöffner
6
Drahtbindeschacht
7
Drahtbinde-Einstellvorrichtung
Page 9

9
D
Gewährleistung
Der Betrieb des Geräts ist bei normaler Verwendung
für 2 Jahre ab Kaufdatum gewährleistet. Innerhalb
des Gewährleistungszeitraums wird ACCO Brands
Europe nach eigenem Ermessen das defekte Gerät
entweder kostenlos instandsetzen oder ersetzen. Die
Gewährleistung deckt keine Mängel ab, die aufgrund
missbräuchlicher Verwendung oder Verwendung
für unangemessene Zwecke entstanden sind. Ein
Nachweis des Kaufdatums muss vorgelegt werden.
Instandsetzungen oder Änderungen, die von nicht
durch ACCO Brands Europe autorisierten Personen
vorgenommen werden, setzen die Gewährleistung
außer Kraft. Es ist unser Ziel sicherzustellen, dass
die Leistung unserer Produkte den angegebenen
technischen Daten entspricht. Diese Gewährleistung
stellt keine Einschränkung der nach dem geltenden
Kaufvertragsrecht gültigen Rechte des
Verbrauchers dar.
Registrieren Sie dieses Produkt online bei www.accoeurope.com
Stanzen
1
Papier sauber in den Stanzschacht einlegen, so dass
es am Seitenanschlag anliegt (max. 8 Blatt 80g/m
2
/
1 PVC Deckblatt) (Bild 1).
2
Stanzgriff herunterdrücken bis alle Blätter gestanzt
sind (Bild 2).
3
Stanzgriff in Ausgangsposition zurückführen und
fertiges Dkument entnehmen.
• Vergewissern Sie sich vor dem Stanzen, dass der
Binderückenschließer geöffnet ist. Andernfalls kann
nicht komplett durchgestanzt werden.
Plastikbindung
1
Legen Sie einen Binderücken (offene Seite nach
oben) in den Binderückenöffner. Drücken Sie den
Stanzgriff herunter, um den Binderücken zu öffnen.
2
Ist der Binderücken komplett geöffnet, verriegeln Sie
den Binderückenöffner (Bild 3).
3
Legen Sie Ihr Dokument in den Binderücken ein.
Entriegeln Sie nun den Binderückenöffner und
schließen Sie den Binderücken (Bild 4).
Drahtbindung
(GBC 21-Ring Binderücken)
1
Legen Sie das gestanzte Dokument in den
Drahtbinderücken ein (Bild 5).
2
Wählen Sie die richtige Drahtbindeeinstellung durch
Anpassen der 2 Drahtbinde-Einstellvorrichtungen an
der Rückseite.
3
Legen Sie das Dokument in den
Binderückenschließer ein (Binderückenöffnung nach
unten). Halten Sie das Dokument fest, während Sie
den Stanzgriff LANGSAM herunterdrücken, um den
Binderücken zu schließen (Bild 6).
4
Führen sie den Stanzgriff wieder nach oben und
entnehmen Sie das fertige Dokument.
Page 10

10
Avviso speciale
Grazie per aver scelto una rilegatrice GBC. La nostra
azienda si propone di produrre rilegatrici di qualità ad
un prezzo accessibile che presentano molte funzioni
avanzate per ottenere ogni volta risultati eccellenti.
Prima di usare la macchina per la prima volta, è
opportuno leggere questa guida.
Istruzioni di sicurezza
ALLA ACCO BRANDS EUROPE STA A CUORE LA
SICUREZZA DEGLI UTENTI E DEI TERZI. IN QUESTO
MANUALE OPERATIVO E SUL PRODOTTO SONO
RIPORTATI IMPORTANTI INDICAZIONI DI SICUREZZA,
CHE VANNO LETTE ATTENTAMENTE.
m
Specifiche
GBC MultiBind 208
8 fogli
1 fogli PVC/PP Plastic Cover
(0,18mm)
DIN A4 (297mm)
21 hole (comb) /21 hole (wire)
125 fogli
14mm
4,12kg
250x360x315mm
Capacità max. perforazione
Capacità max. perforazione
Formato max. fascicolo
Modalità perforazione
Capacità max. rilegatura
Diametro max. anelli plastici/
spirali metalliche
Peso netto
Dimensioni (LxPxA)
Precauzioni generali di sicurezza
• Si prega di leggere attentamente le presenti istruzioni
d’uso e di conservarle a portata di mano per ogni
ulteriore consultazione.
• Collocare la macchina su una supercie stabile.
• Controllare che il sistema di perforazione funzioni
bene inserendo un pezzo di carta straccia.
• Assicurarsi che non vi siano punti o oggetti simili
nel documento prima di iniziare l’operazione di
perforatura.
• Inserire solo carta nell’imboccatura di perforazione, e
non più di 8 fogli (80 gm
2
) alla volta, oppure una sola
copertina di plastica in PVC di uno spessore massimo
di 0,18 mm.
• Trasportare la macchina utilizzando solo l’apposita
maniglia e non la maniglia per la perforazione dei fogli.
• Svuotare regolarmente il vassoio ritagli.
Manutenzione
Ricordare di svuotare il cassetto di raccolta sfridi
regolarmente (fig.7).
Parti e comandi
1
Margine per l’allineamento
2
Leva di perforazione
3
Maniglia per il trasporto
4
Blocco leva di perforazione
5
Pettine tendi anelli
6
Pressetta di chiusura per anelli metallici
7
Selettori diametro anelli metallici
Page 11

11
I
Garanzia
Questo prodotto è garantito per 2 anni dalla data di
acquisto, per quanto ne concerne il funzionamento,
subordinatamente ad uso normale. Durante il periodo
di garanzia, ACCO Brands Europe provvederà, a propria
discrezione, a riparare o sostituire gratuitamente la
macchina difettosa. Difetti risultanti dall’uso improprio o
dall’uso per scopi diversi da quelli per cui la macchina
è stata concepita non sono coperti dalla garanzia. Sarà
necessario fornire una prova di acquisto. Riparazioni
o modifiche effettuate da persone non autorizzate da
GBC invalideranno la garanzia. ACCO Brands Europe si
propone di assicurare che i propri prodotti funzionino
in conformità alle caratteristiche tecniche indicate.
La presente garanzia non pregiudica alcun diritto
riconosciuto ai consumatori dalla normativa nazionale
vigente in materia di vendita di prodotti.
Registrare il prodotto online presso www.accoeurope.com
Perforazione
1
Inserire i fogli nel canale di perforazione accertandosi
del corretto allineamento. (max 8 fogli 80gr / 1
copertina in PVC) (fig.1).
2
Abbassare la barra di perforazione fino a che i fogli
non sono perforati (fig.2).
3
Sollevare la barra di perforazione ed estrarre i fogli.
• Prima di perforare accertarsi che il canale di
rilegatura per la chiusura degli anelli metallici
sia completamente aperto: per ottenere questo
occorre deselezionare l’impostazione del diametro
della spirale. In caso contrario potrebbe non essere
possibile perforare completamente i fogli.
Rilegatura con dorsi ad
anelli plastici
1
Posizionare il dorso ad anelli plastici nell’apposito
supporto tendi anelli con il lato aperto rivolto verso
l’alto.
2
Quando il dorso è aperto in misura sufficiente,
bloccare la leva di apertura con il blocco apposito
(fig. 3).
3
Inserire i fogli perforati nel dorso (fig. 4).
Rilegatura con spirali metalliche
(utilizzando spirali metalliche
GBC a 21 anelli)
1
Con l’aiuto di un piano di appoggio allineare i fogli
perforati ed inserirli nella spirale (fig. 5).
2
Impostare il corretto diametro della spirale con gli
appositi regolatori.
3
Inserire il documento nel canale di rilegatura con
la parte aperta rivolta verso il basso. Sostenere il
documento e spingere verso il basso lentamente la
barra di rilegatura per chiudere la spirale (fig. 6).
4
Riportare la barra di rilegatura in posizione originale
ed estrarre il documento.
Page 12

12
Speciaal bericht
U bent nu de gelukkige eigenaar van een GBC
inbindmachine. Wij hebben ons tot doel gesteld om
betaalbare inbindmachines van uitstekende kwaliteit
te produceren, met vele extra functies, zodat u keer
op keer uitstekende resultaten behaalt. Lees deze
instructies goed door, voordat u de machine voor het
eerst gebruikt.
Veiligheidsvoorschriften
UW VEILIGHEID EN DIE VAN ANDEREN HEEFT VOOR
ACCO BRANDS EUROPE HOOGSTE PRIORITEIT.
IN DEZE HANDLEIDING EN OP DE MACHINE
ZELF TREFT U VERSCHILLENDE BELANGRIJKE
VEILIGHEIDSVOORSCHRIFTEN AAN. LEES DEZE
ZORGVULDIG.
m
Positie van onderdelen en
bedieningsknoppen
1
Paper Edge Guide
2
Punching Handle
3
Carry Handle
4
Comb Lock
5
Comb Opener
6
Wire Closing Channel
7
Wire Closing Adjusters
Specificaties
GBC MultiBind 208
8 vellen
1 vellen PVC/PP Plastic Cover
(0,18mm)
DIN A4 (297mm)
21 hole (comb) /21 hole (wire)
125 vellen
14mm
4,12kg
250x360x315mm
Max. ponscapaciteit
Max. ponscapaciteit
Max. documentformaat
Ponspatroon
Max. inbindcapaciteit
Max. maat draad- of plastic
bindrug
Netto gewicht
Afmetingen (L x B x H)
Algemene veiligheidsmaatregelen
• Lees deze gebruiksaanwijzing zorgvuldig door en
bewaar deze vervolgens op een makkelijke plaats bij
de machine, zodat u deze, indien nodig, nog eens kunt
raadplegen.
• Plaats de machine op een stevige ondergrond.
• Test het ponssysteem eerst met een proefvel.
• Zorg ervoor dat er zich geen nietjes en dergelijke in
het document bevinden, voordat u gaat ponsen.
• Plaats niets anders dan papier in de ponsopening.
Max. 8 vellen (80 gsm) of één PVC-plastic omslag van
max. 0,18 mm.
• Draag de machine alleen aan de draaggreep, nooit
aan de ponshendel.
• Leeg de snipperopvangbak regelmatig.
Onderhoud
Leeg het bakje voor het ponsresidu regelmatig (fig.7).
Page 13

13
O
Garantie
Het gebruik van dit product is gegarandeerd voor
2 jaar vanaf de datum van aankoop, uitgaand van
normaal gebruik. Binnen de garantieperiode zal ACCO
Brands Europe naar eigen oordeel de defecte machine
kosteloos repareren of vervangen. Defecten die te wijten
zijn aan verkeerd gebruik of gebruik voor ongeschikte
doeleinden, vallen niet onder de garantie. Bewijs van
datum van aankoop wordt vereist. De garantie vervalt
wanneer er reparaties of veranderingen worden
uitgevoerd door personen die niet door ACCO Brands
Europe zijn bevoegd. Het is ons doel ervoor te zorgen
dat onze producten functioneren volgens de vermelde
specificaties. Deze garantie maakt geen inbreuk op de
wettelijke rechten van consumenten onder de geldende
nationale wetgeving met betrekking tot de verkoop van
goederen.
Registreer dit product online op www.accoeurope.com
Ponsen
1
Plaats het papier volledig in de ponsopening - bepaal
de juiste plaatsing met de papiergeleider (max. 8 vel
80 grams of 1 PVC omslag) (fig.1).
2
Duw de ponshendel naar beneden totdat alle vellen
zijn geponst (fig.2).
3
Breng de hendel weer omhoog naar de
uitgangspositie en verwijder de vellen.
• Bij het ponsen dient de draadrug sluitinrichting
open te staan. Als deze niet open staat, dan kan
de machine niet volledig door het document heen
ponsen.
Inbinden met plastic bindruggen
1
Plaats een bindrug (open zijde boven) op de bindrug
opener. Duw de ponshendel naar beneden om de
bindrug te openen.
2
Als de bindrug volledig geopend is, zet deze dan vast
met het bindrugvergrendeling (zie fig. 3).
3
Plaats uw document in de open bindrug. Ontgrendel
deze en sluit de bindrug (zie fig. 4).
Inbinden met metalen
draadruggen (21-rings)
1
Gebruik de rand van een bureau om de draadrug
door het geponste document te voeren (fig.5).
2
Stel het apparaat in op het correct sluiten van de
draaddrug met de met linker en rechter verstelknop.
3
Steek het document met de draadrug in de
draadrugsluitinrichting (met open deel van de
draadrug naar beneden). Ondersteun het document
met één hand en duw LANGZAAM met de andere
hand de ponshendel naar beneden om de bindrug te
sluiten (fig. 6).
4
Haal de hendel weer omhoog naar de verticale stand
en verwijder het document.
Page 14

14
Aviso especial
Gracias por escoger una máquina encuadernadora
GBC. Nuestro objetivo es producir máquinas
encuadernadoras de calidad a precios asequibles y con
muchas funciones avanzadas que le permitan obtener
unos resultados excelentes cada vez. Antes de utilizar su
máquina por primera vez le rogamos pase unos minutos
leyendo esta guía.
Instrucciones de seguridad
SU SEGURIDAD AL IGUAL QUE LA SEGURIDAD DE
LOS DEMÁS ES IMPORTANTE PARA ACCO BRANDS
EUROPE. EN ESTE MANUAL DE INSTRUCCIONES Y
EN EL PRODUCTO SE ENCUENTRAN IMPORTANTES
MENSAJES DE SEGURIDAD. LEA ESTOS MENSAJES
CON ATENCIÓN.
m
Situación de las piezas y
los controles
1
Guía del borde de papel
2
Palanca de perforación
3
Asa de transporte
4
Bloqueo de canutillo
5
Abridor del canutilllo
6
Cerrador de Wire
7
Ajustes del Cerrador de Wire
Especificaciones
GBC MultiBind 208
8 hojas
1 hoja PVC/PP Plastic Cover
(0,18mm)
DIN A4 (297mm)
21 hole (comb) /21 hole (wire)
125 hojas
14mm
4,12kg
250x360x315mm
Capacidad de perforación
máxima
Capacidad de perforación
máxima
Tamaño máximo de
documento
Tipo de perforación
Capacidad de
encuadernación máxima
Tamaño máx. canutillo/
espiral metálica
Peso neto
Dimensiones (L X A x A)
Precauciones generales
• Lea detenidamente el el manual de instrucciones y
consérvelo para futuras consultas.
• Coloque la máquina sobre una supercie estable.
• Pruebe el sistema de perforación primero con un trozo
de papel sobrante.
• Tenga cuidado de que no queden grapas u objetos
similares en el documento antes de perforarlo.
• No coloque ningún objeto distinto de papel en la
ranura de perforación. Admite un máximo de 8 hojas
(80 gsm) o una tapa de encuadernación de plástico
PVC de hasta 0,18 mm.
• Transporte la encuadernadora solo con el asa de
transporte. No use nunca el brazo de perforación para
este fin.
• Vacíe la bandeja de residuos con frecuencia.
Mantenimiento
Recuerde vaciar regularmente la bandeja de residuos
(fig. 7).
Page 15

15
E
Garantía
El funcionamiento de este producto está garantizado
durante un período de 2 años a partir de la fecha de
adquisición, siempre que su utilización sea normal.
Durante el plazo de garantía, ACCO Brands Europe, a
su propia discreción, reparará o sustituirá el aparato
defectuoso gratuitamente. La garantía no cubre
los defectos causados por uso indebido o por su
utilización para nes inadecuados. Se requerirá un
comprobante de la fecha de compra. Las reparaciones
o modificaciones realizadas por personas no autorizadas
por ACCO Brands Europe anularán la garantía. Nuestro
objetivo es asegurar que nuestros productos funcionan
según las especicaciones indicadas. Esta garantía no
afecta los derechos legales que tienen los consumidores
en virtud de la legislación vigente aplicable que rige la
venta de artículos.
Registre este producto en línea en www.accoeurope.com
Perforación
1
Coloque el papel en el hueco de perforación
asegurando que todas las hojas están perfectamente
alineadas (máx 8 hojas de 80 gsm o 1 Portada PVC
(fig. 1).
2
Presione la palanca de perforación hasta taladrar
todas las hojas (fig. 2).
3
Suba la palanca hasta su posición original y saque
las hojas.
• Cuando realice la perforación asegurarse que el
cierre de wiro está en la posición abierta. De no
hacerlo tendrá como resultado no poder taladrar el
papel completamente.
Encuadernación Canutillo
1
Coloque un canutillo (con la parte abierta hacia
arriba) en el abridor. Baje la palanca para abrir el
canutillo.
2
Una vez esté totalmente abierto el canutillo, ponga el
bloqueo (ver fig. 3).
3
Meta el documento en el canutillo. Libere el bloqueo
para cerrar el canutillo (ver fig. 4).
Encuadernación Wire
1
Utilizando el borde de una mesa, introduzca el wire a
través del documento perforado.
2
Utilizando la guía de cierre de Wire, seleccione el
cierre adecuado con el ajustador de Wire
3
Introduzca el documento en el cerrador de Wire (el
wire con la parte abierta hacia abajo). Coloque el
documento y baje la palanca suavemente para cerrar
el wire (fig. 6).
4
Suba la palanca a su posición vertical y saque el
documento.
Page 16

16
Observação Especial
Agradecemos a sua escolha de uma encadernadora
GBC. Empenhamo-nos em produzir encadernadoras
de qualidade a um preço competitivo, com muitas
características avançadas para poder obter sempre
resultados excelentes. Antes de utilizar a sua máquina
pela primeira vez, dedique uns minutos à leitura deste
guia.
Instruções de segurança
A SUA SEGURANÇA, BEM COMO A SEGURANÇA DOS
OUTROS, É IMPORTANTE PARA A ACCO BRANDS
EUROPE. MENSAGENS IMPORTANTES SOBRE
SEGURANÇA ESTÃO PRESENTES NO SEU MANUAL
DE OPERADOR E NO PRÓPRIO PRODUTO. LEIA
ESSAS MENSAGENS CUIDADOSAMENTE. A SEGUINTE
ADVERTÊNCIA ENCONTRA-SE NA PARTE DE BAIXO DO
APARELHO.
m
Considerações gerais
de segurança
• Favor ler esta instrução de manejo com atenção e
guardá-la bem para futuras consultas.
• Coloque a máquina sobre uma superfície estável.
• Em primeiro lugar teste o sistema de furação com
uma folha de papel qualquer.
• Verique que o documento não tem agrafos ou
semelhante antes de furar as folhas.
• Não coloque nada na ranhura de entrada do sistema
de furação além de folhas de papel, até um máximo
de 8 folhas (gramagem do papel 80 gsm), ou uma
capa de encadernação de PVC de espessura máxima
0,18 mm.
• Transporte a máquina segurando apenas pela pega de
transporte e nunca pela alavanca de furação.
• Despeje periodicamente o tabuleiro de aparas de
papel.
Localização das Peças e
dos Controlos
1
Guia da margem do papel
2
Alavanca de perfuração
3
Pega de transporte
4
Bloqueio da argola
5
Abridor da argola
6
Fecho de Arame
7
Ajuste do Fecho de Arame
Especificação
GBC MultiBind 208
8 folhas
1 folha PVC/PP Plastic Cover
(0,18mm)
DIN A4 (297mm)
21 hole (comb) /21 hole (wire)
125 folhas
14mm
4,12kg
250x360x315mm
Capacidade Máx. de Furação
Capacidade Máx. de Furação
Largura Máx. de
Encadernação
Número de Cortantes
Capacidade Máx. de
Encadernação
Diâmetro Máx. da Lombada
de Plástico/Arame
Peso Líquido
Dimensões (CxLxA)
Manutenção
Lembre-se de despejar regularmente o recipiente de
resíduos (fig. 7).
Page 17

17
P
Garantia
Este produto está garantido por 2 anos a contar da
sua data de compra, em condições de uso normal. No
período de garantia a ACCO Brands Europe efectuará
a reparação ou substituição gratuita de uma máquina
defeituosa, segundo o seu critério exclusivo. Os defeitos
resultantes de má utilização ou utilização imprópria
não estão abrangidos por esta garantia. É necessária
a apresentação de prova de compra. As reparações ou
alterações efectuadas por pessoas não autorizadas pela
ACCO Brands Europe anularão esta garantia. Estamos
empenhados em assegurar que o desempenho dos
nossos produtos está de acordo com as especificações
indicadas. Esta garantia não afecta os direitos legais dos
consumidores ao abrigo da legislação nacional aplicável
que regula a venda de mercadorias.
Registe este produto on-line em www.accoeurope.com
Punching
1
Coloque o papel na abertura de perfuração
assegurando-se que todas as folhas estão
perfeitamente alinhadas (máximo 8 folhas de 80 grs.
ou 1 Capa de PVC (fig. 1).
2
Pressione a alavanca de perfuração até furar todas
as folhas (fig. 2).
3
Suba a alavanca até à sua posição original e retire as
folhas.
• Quando realizar a perfuração verique que o fecho
de arame está na posição de aberto. Se não estiver
aberto o resultado será não poder furar o papel
completamente.
Encadernação com Argola
de Plástico
1
Coloque uma argola de plástico (com a parte aberta
para cima) no abridor. Baixe a alavanca para abrir a
argola.
2
Quando a argola estiver completamente aberta,
coloque o bloqueador (ver fig. 3).
3
Introduza as folhas na argola. Liberte o bloqueador
para fechar a argola (ver fig. 4).
Encadernação com Arame
1
Utilizando a extremidade de uma mesa, introduza o
arame no documento perfurado.
2
Utilizando a guía de fechar o arame, seleccione o
fecho adequado com o regulador de arame
3
Introduza o documento no fecho do arame (o
arame com a parte aberta para baixo). Coloque o
documento e baixe a alavanca suavemente para
fechar o arame (fig. 6).
4
Suba a alavanca para a sua posição vertical e retire o
documento.
Page 18

18
Speciell märka
Tack för att du valde en GBC värmebindare. Vår
målsättning är att tillverka bindnings-maskiner av hög
kvalitet till överkomligt pris med många avancerade
funktioner som ger dig utmärkta resultat varje gång.
Innan du använder maskinen för första gången ber vi
dig sätta av några minuter till att läsa genom denna
bruksanvisning.
Säkerhetsinstuktioner
DIN SÄKERHET LIKAVÄL SOM ANDRAS ÄR EN
BETYDELSEFULL ANGELÄGENHET FÖR ACCO
BRANDS EUROPE. I DENNA ANVÄNDARHANDBOK
OCH PÅ SJÄLVA ENHETEN FINNS VIKTIGA
SÄKERHETSFÖRESKRIFTER. LÄS NOGGRANT IGENOM
DESSA FÖRESKRIFTER.
m
Specifikationer
GBC MultiBind 208
8 ark
1 ark PVC/PP Plastic Cover
(0,18mm)
DIN A4 (297mm)
21 hole (comb) /21 hole (wire)
125 ark
14mm
4,12kg
250x360x315mm
Max. stansnings-kapacitet
Max. stansnings-kapacitet
Max. dokumentstorlek
Hålmönster
Max. bindnings-kapacitet
Max. storlek på spiral/tråd
Nettovikt
Mått (LxBxH)
Allmänna säkerhetsråd
• Lås igenom denna bruksanvisning noggrant och
förvara den på säkert stãlle så att du kan slå upp i den
vid behov.
• Ställ maskinen på stadigt underlag.
• Gör en provstansning på oviktigt papper först.
• Se till att det inte nns några häftklamrar eller dylikt i
dokumentet innan du börjar stansa.
• Lägg högst 8 ark papper (80 g/m
2
) eller ett PVComslag på upp till 0,18 mm i stansningsspringan,
aldrig något annat.
• Bär alltid maskinen i bärhandtaget, aldrig i
stansningsspaken.
• Töm avfallsbrickan regelbundet.
Underhåll
Kom ihåg att tömma avfallskorgen regelbundet (fig.7)
Delarnas och reglagens placering
1
Papperskant guide
2
Stansningshandtag
3
Bärhandtag
4
Plastspiral lås
5
Plastspiral öppnare
6
Wirestängnings kontroll
7
Wirestängnings justerare
Page 19

19
S
Garanti
Denna produkt har två års garanti från inköpsdatum
vid normal användning. Inom denna garantiperiod
reparerar eller ersätter ACCO Brands Europe efter eget
gottfinnande en defekt maskin utan extra kostnad.
Garantin gäller inte för fel som uppstått på grund av
felaktig användning eller användning av utrustningen till
uppgifter den inte är avsedd för. Kvitto med inköpsdatum
måste uppvisas. Om reparationer eller ändringar utförts
av personer som inte är auktoriserade av ACCO Brands
Europe gäller inte garantin. Vår målsättning är att se
till att våra produkter uppfyller angivna specifikationer.
Denna garanti påverkar inte de rättigheter du har som
konsument enligt lagen.
Registrera produkten online på www.accoeurope.com
Stansning
1
För in dina papper i stansningsspringan och se till
att de ligger rakt i enlighet med papperskant guiden.
(max 8 ark, 80gr, åt gången eller 1 PVC omslag)
(fig.1).
2
Pressa ner stansningshandtaget tills alla papper är
stansade (fig.2).
3
Lyft handtaget till dess originalposition.
• När man stansar (hålar pappret) var noga med att
wirestängnings “tänderna” i öppen position. Om
man inte gör detta kommer man inte kunna stansa
igenom pappret ordentligt.
Plast inbindning
1
Placera en plastspiral (med den öppna delen uppåt)
på spiralöppningensdelen. Tryck ner handtaget för att
öppna spiralen.
2
När spiralen är öppen lås fast den i detta läge med
öppningslåset (se fig.3).
3
Lägg på dina dokument på plastspiralen. Frigör
spiralöppnarens lås för att stänga spiralen (se fig.4).
Wire Inbindning
(med GBC 21 ringars spiral)
1
För försiktigt igenom wirespiralen igenom dem
stansade hålen i dokumentet (fig.5).
2
Använd wire-stängningsguiden, välj rätt spiralstorlek
genom att vrida höger och vänster på wirejusteraren.
3
För in dokumentet i wire stängnings “tänderna” (med
wirespiralens öppning neråt). Håll fast dokumentet,
för sedan ner stansningshandtaget SAKTA för att
stänga spiralen (fig.6).
4
För tillbaka handtaget tillbaka till dess vertikala
position och ta bort dokumentet.
Page 20

20
Dziękujemy za wybranie bindownicy marki GBC.
Naszym celem jest produkowanie wysokiej jakości
urządzeń po przystępnych cenach, posiadających wiele
zaawansowanych funkcji, umożliwiających każdorazowe
osiąganie doskonałych rezultatów. Przed rozpoczęciem
pracy, prosimy o poświęcenie kilku minut na przeczytanie
niniejszej instrukcji obsługi.
Nadzwyczajnewydanie
gazetyzawiadomienie
Ważneinformacjedotyczące
bezpieczeństwa
BEZPIECZEŃSTWO, ZARÓWNO TWOJE JAK I
INNYCH OSÓB, JEST DLA FIRMY ACCO BRANDS
EUROPE BARDZO ISTOTNE. W NINIEJSZEJ
INSTRUKCJI OBSŁUGI, JAK I NA SAMYM
URZĄDZENIU, UMIESZCZONE SĄ WAŻNE
INFORMACJE DOTYCZĄCE BEZPIECZEŃSTWA.
PROSIMY O ICH UWAŻNE PRZECZYTANIE.
m
Ogólnezasadybezpiecznej
obsługiurządzenia
•
Prosimy o uważne zapoznanie się z poniższą instrukcją
i przechowywanie jej w dostępnym miejscu, tak by była
zawsze dostępna.
•
Ustaw bindownicę na stabilnym podłożu.
•
Wypróbuj działanie dziurkacza na kilku arkuszach
makulatury.
•
Przed przystąpieniem do dziurkowania upewnij się, czy
dokument nie jest spięty zszywkami itp.
•
Do szczeliny dziurkacza wkładaj wyłącznie papier (do 8
arkuszy o gramaturze 80 g/m
2
) lub pojedyncze arkusze
folii PCV o grubości do 0,18 mm (okładki).
•
Urządzenie podnoś wyłącznie za uchwyt, nigdy za
dźwignię dziurkacza.
•
Regularnie opróżniaj pojemnik na ścinki.
Opistechniczny
GBC MultiBind 208
8 arkuszy
1 arkuszy PVC/PP Plastic Cover
(0,18mm)
DIN A4 (297mm)
21 hole (comb) /21 hole (wire)
125 arkuszy
14mm
4,12kg
250x360x315mm
Maksymalnaliczbaarkuszy,
któremożnajednocześnie
przedziurkować
Maksymalnaliczbaarkuszy,
któremożnajednocześnie
przedziurkować
Maksymalnyformat
dokumentu
Liczba otworów
Maksymalnaliczbaarkuszyw
oprawionymdokumencie
Maksymalnyrozmiargrzbietu
plastikowego/drucianego
Waga netto
Gabaryty(dł.xszer.xwys.)
Konserwacja
Pamiętaj o regularnym opróżnianiu tacy na confetti (rys.
7).
Położenieczęściiregulatorów
1
Wskaźnikgrubościgrzbietu
2
Dźwignia
3
Uchwytdoprzenoszenia
4
Blokada otwartego grzbietu
5
Otwieracz grzbietu
6
Kanałzamykającygrzbiet
7
Regulatorzamknięciagrzbietu
Page 21

21
Q
Gwarancja
Urządzenie objęte jest dwuletnią gwarancją
eksploatacyjną. Okres gwarancyjny liczy się od daty
zakupu. W okresie gwarancyjnym producent (ACCO
Brands Europe) zobowiązuje się za darmo naprawić
lub wymienić uszkodzone urządzenie. Gwarancja nie
obejmuje uszkodzeń spowodowanych nieprawidłowym
użytkowaniem bindownicy lub wykorzystywaniem jej do
celów, do których nie jest przeznaczona. Aby skorzystać
z gwarancji należy przedstawić dowód zakupu.
Dokonanie napraw i modykacji urządzenia przez osoby
nie upoważnione do tego przez rmę ACCO Brands
Europe powoduje unieważnienie gwarancji. Chcemy,
aby nasze produkty działały zgodnie ze specykacją.
Niniejsza gwarancja nie narusza praw konsumentów
wynikających z przepisów obowiązujących w danym
kraju i dotyczących warunków sprzedaży towarów.
Prosimy o zarejestrowanie produktu na stronie internetowej www.accoeurope.com
Punching
1
Włóż papier do kanału dziurkującego upewniając
się przy użyciu wskaźnika ułożenia papieru, że kartki
są włożone równo ( max. 8 kartek dla 80g/m
2
lub 1 x
okładka PCV (rys.1).
2
Przyciśnij w dół dźwignię dziurkującą aż wszytskie
kartki zostaną przedziurkowane.
3
Unieś dźwignię do pozycji wyjściowej i usuń kartki z
kanału dziurkującego.
•
Kiedy dziurkujesz kartki upewnij się, że szczęki
zamykające drut są w pozycji otwartej. Jeśli będą
zamknięte, papier może zostać niewłaściwe
przedziurkowany.
Oprawastylemgrzebieniowym
1
Ułoż grzbiet grzebieniowy (częścią otwartą
skierowaną ku górze) na otwieracz grzbietu. Przysuń
w dół dźwignię dziurkujacą, aby otworzyć grzbiet.
2
Kiedy grzbiet zostanie dokładnie otwarty, użyj blokady
otwartego grzbietu, aby utrzymąc grzbiet otwarty.
3
Załóż kartki na grzbiet. Zwolnij blokadę otwartego
grzbiety, aby zamknąć grzbiet (patrz rys. 4).
Oprawastylemdrutowym
(przyużyciugrzbietów21zwojów)
1
Przy użyciu krawędzi blatu bindownicy nałóż
przedziurkowane kartki na drut.
2
Używając wskaźnika grubości grzbietu drutowego,
wybierz odpowiedni rozmiar poprzez przekręcenie
prawego i lewego regulatora zamknięcia grzbietu.
3
Włóż dokument w szczęki zamykające grzbiet
drutowy ( otwartym grzbietem do dołu) podtrzymując
dokument, POWOLI przenieś dźwignię na dół
zamykając grzbiet (rys.6).
4
Podnieś dźwignię do pozycji wyjściowej i wyjmnij
dokument.
Page 22

22
Zvláštníoznámení
Děkujeme vám, že jste si vybrali vazač značky
GBC. Za přístupné ceny se snažíme nabízet kvalitní
vazače, jejichž užitné vlastnosti vám zaručí dosažení
konzistentně výborných výsledků. Než vazač poprvé
použijete, přečtěte si pečlivě tuto příručku.
Důležitébezpečnostnípokyny
VAŠE BEZPEČNOST I BEZPEČNOST OSTATNÍCH
OSOB JE PRO ACCO BRANDS EUROPE DŮLEŽITÁ.
V TÉTO PŘÍRUČCE A NA PŘÍSTROJÍCH JSOU
DŮLEŽITÉ BEZPEČNOSTNÍ POKYNY. ČTÊTE TYTO
POKYNY POZORNĚ.
m
Umístěnísoučástía
ovládacíchprvků
1
Vodítkookrajepapíru
2
Děrovacípáka
3
Držadlo
4
Zámekhřbetu
5
Otvíračhřbetu
6
Drážkaprovazbudrátu
7
Nastavovacímechanismusdrátu
Technickéúdaje
GBC MultiBind 208
8 listů
1 listů PVC/PP Plastic Cover
(0,18mm)
DIN A4 (297mm)
21 hole (comb) /21 hole (wire)
125 listů
14mm
4,12kg
250x360x315mm
Max.kapacitaděrování
Max.kapacitaděrování
Max.velikostdokumentu
Způsobděrování
Max.kapacitavázání
Max.velikostplastového/
drátěnéhohřebenu
Čistáhmotnost
Rozměry(DxŠxV)
Bezpečnostnípokyny
•
Prosim, čtěte tento návod pozorně a uchovejte jej na
bezpečném mistě pro pozdější použití.
•
Umístěte přístroj na pevnou plochu.
•
Děrování si nejprve vyzkoušejte na odpadovém listu
papíru.
•
Před děrováním zkontrolujte, zda na dokumentu nejsou
žádné kovové svorky a podobně.
•
Do děrovací štěrbiny se nesmí vkládat nic jiného, než
listy papíru (maximálně 8 listů papíru o hmotnosti do
80 g/m
2
) nebo jedna plastová krycí deska z PVC do
tloušťky 0,18 mm.
•
K přenášení přístroje použijte pouze držadlový otvor,
děrovací páka se k přenášení nesmí používat.
•
Nezapomeňte pravidelně vyprázdnit zásobník na
odpad.
Údržba
Nezapomeňte vyprazdňovat odpadový prostor (viz. Obr.
7).
Page 23

23
o
CZ
Záruka
Na provoz tohoto přístroje platí při běžném použití
2-letá záruka ode dne nákupu. Během záruční doby
rma ACCO Brands Europe podle své vlastní úvahy
vadný přístroj bezplatně opraví nebo vymění. Na závady
způsobené zneužitím a použitím pro nevhodné účely se
záruka nevztahuje. V každém případě je nutno předložit
nákupní lístek. Opravy a změny přístroje, provedené
osobou, jež k tomu není oprávněna rmou ACCO Brands
Europe, platnost záruky zruší. Snažíme se zajistit,
aby naše výrobky fungovaly v souladu s uvedenými
technickými údaji. Touto zárukou nejsou ovlivněna
zákonná práva vztahující se na prodej zboží, která
spotřebitelům přísluší podle příslušných státních zákonů.
Tento výrobek si můžete zaregistrovat online na www.accoeurope.com
Děrování
1
Vložte papír do děrovacího otvoru a ujistěte se, že je
zarovnaný podle okraje šablony. (max 8 listů papíru
80g nebo 1x plastové desky) (viz. Obr. 1)
2
Stiskněte děrovací páku směrem dolů, dokud
nebudou všechny stránky proděrovány. (viz. Obr. 2)
3
Zvedněte páku do původní pozice a vyjměte papír.
•
Při děrování se ujistěte, že čelisti jsou v otevřené
pozici. V případě, že necháte čelisti zavřeny,
nebudete schopni papír správně proděravět.
Plastová vazba
1
Vložte plastový hřbet (otvíráním vzhůru) na otvírač
hřbetů. Stiskněte páku směrem dolů a tím otevřete
plastový hřbet.
2
Jakmile plně rozevřete plastový hřbet, zajistěte jej
zámkem (viz. Obr. 3)
3
Vložte dokument do hřbetu. Odjistěte zámek a
uzavřete hřbet. (viz. Obr. 4)
Drátěnávazba
1
S pomocí okraje desky vložte drát do zaděrovaného
dokumentu.
2
S pomocí vodítka na zavírání drátu, vyberte správnou
velikost k uzavření drátu posouváním nastavovacího
mechanismu směrem doleva a doprava.
3
Vložte dokument do drážky pro zavírání drátu
(otevřenou částí drátu směrem dolů). Podržte
dokument a poté pomalu stiskněte páku směrem
dolů.
4
Vraťte páku zpět do vertikální pozice a vyjměte
dokumenty.
Page 24

24
Üzenet
Köszönjük, hogy GBC fűzőgépet vásárolt. Célunk,
hogy minőségi, és értékes jellemzőkkel rendelkező
spirálozógépeket gyártsunk elérhető áron, melyek
segítségével munkájának végeredménye minden
alkalommal tökéletes lehet. Mielőtt használatba veszi a
gépet, fordítson néhány percet arra, hogy elolvassa ezt
az útmutatót.
Fontosbiztonságielőírások
AZ ÖN ÉS KÖRNYEZETÉBEN LÉVŐK BIZTONSÁGA
KIEMELKEDŐEN FONTOS AZ ACCO BRANDS
EUROPE SZÁMÁRA. EBBEN A HASZNÁLATI
ÚTMUTATÓBAN ÉS MAGÁN A TERMÉKENIS, FONTOS
BIZTONSÁGI ELŐÍRÁSOK TALÁLHATÓK. KÉRJÜK,
FIGYELMESEN OLVASSA EL AZ ÚTMUTATÁSOKAT.
m
Azalkatrészekés
kezelőszervekhelye
1
Szélvezető
2
Lyukasztókar
3
Hordozókar
4
Spirálrögzítőgomb
5
Spriálnyitó
6
Spriálzáró
7
Méretigazító
Műszakiadatok
GBC MultiBind 208
8 lap
1 lap PVC/PP Plastic Cover
(0,18mm)
DIN A4 (297mm)
21 hole (comb) /21 hole (wire)
125 lap
14mm
4,12kg
250x360x315mm
Lyukasztókapacitás
Lyukasztókapacitás
Max.dokumentumméret
Lyukasztásimód
Spirálozókapacitás
Spirál/drótmax.átmérője
Nettósúly
Méretek(HxSzxM)
Általánosóvintézkedések
•
Kérjük gondosan olvassa el a kezelési útmutatót és
tárolja biztonságos helyen.
•
Állítsa a készüléket stabil felületre.
•
A lyukasztó működését ellenőrizze egy hulladék
papírlappal.
•
A lyukasztás előtt mindig ellenőrizze, hogy a
dokumentumban ne legyenek tűzőkapcsok vagy
hasonlók.
•
A lyukasztónyílásba csak papírt, maximum 8 lapot (80
g/m
2
), vagy egy PVC műanyag borítólapot (max. 0,18
mm) helyezzen.
•
Szállításkor mindig a hordozófogantyúnál fogja meg a
készüléket, ne a lyukasztókarnál.
•
A hulladéktálcát rendszeresen ürítse.
Karbantartás
Ne felejtse el rendszeresen üríteni a hulladéktálcát (7.
ábra)
Page 25

25
H
Garancia
A termék működéséért rendeltetésszerű használat
esetén a vásárlás dátumát követő két éven keresztül
vállalunk jótállást. A jótállási időszak alatt a ACCO
Brands Europe – saját belátása szerint – díjmentesen
megjavítja vagy kicseréli a hibás gépet. A jótállás nem
vonatkozik a helytelen vagy nem rendeltetésszerű
használat miatt fellépő hibákra. A jótállás igénybe
vételéhez kérjük bemutatni a vásárlás dátumát igazoló
dokumentumot. Az ACCO Brands Europe által nem
feljogosított személy által végzett javítás vagy átalakítás
érvényteleníti a garanciát. Mindent megteszünk annak
érdekében, hogy termékeink a specikációban leírtaknak
megfelelő teljesítményt nyújtsanak. Jelen jótállás nem
befolyásolja azokat a törvényes jogokat, amelyekkel
ügyfeleink az áruértékesítésre nézve irányadó nemzeti
jogszabályok szerint rendelkeznek.
A termék az interneten a következő címen regisztrálható: www.accoeurope.com
Lyukasztás
1
Helyezze a lapokat a lyukasztó nyílásba. Győződjön
meg róla hogy a lapok pontosan illeszkednek a
szélvezetőhöz. (Max 8 db 80gms lap vagy 1 db PVC
borító) (1. ábra)
2
Nyomja le a lyukasztókart amíg az összes lapot
átlyukasztja (2. ábra)
3
Emelje fel a kart az eredeti állapotba és húzza ki a
lapokat.
•
Lyukasztás előtt győződjön meg róla, hogy a
spriálzáró nyitott állapotban van. Ha ez nem így
történik, a papír teljes átlyukasztása nem valósul
meg.
Spirálozásműanyagspirállal
1
Helyezze a spirált (nyitott felével felfelé) a
spirálnyitóba. Nyomja le a lyukasztókart, ezáltal a
spirál kinyílik.
2
Amint a spirál teljesen kinyílt, rögzítse a spriálrögzítő
gombbal. (3. ábra)
3
Helyezze a dokumentumot a spirálba majd oldja ki a
spirálrögzítő gombot. (4. ábra)
Spirálozásfémspirállal
(GBC21gyűrűsfémsiprál)
1
A kilyukasztott lapokat helyezze a fémspirálba. (5.
ábra)
2
Válassza ki a megfelelő spirálméretet, majd ennek
megfelelően állítsa be a spirálzárót a bal és jobb oldali
méretigazítóval.
3
Helyezze a dokumentumot a spriálzáróba (a spirál
nyílása lefelé nézzen). Tartsa a dokumentumot
miközben LASSAN lefelé nyomja a lyukasztókart,
ezzel zárva a spirált. (6. ábra)
4
Emelje fel a kart az eredeti állapotba és vegye ki a
dokumentumot.
Page 26

26
Внимание
Благодарим за выбор переплетной машины GBC. Мы
стремимся производить качественные переплетные
машины по доступной цене. Машины имеют
множество современных функций, обеспечивающих
великолепный результат при каждом использовании.
Перед первым использованием Вашей машины,
просим посвятить несколько минут чтению этой
инструкции.
ПРАВИЛАТЕХНИКИ
БЕЗОПАСНОСТИ
ВАША БЕЗОПАСНОСТЬ И БЕЗОПАСНОСТЬ
ДРУГИХ ЛЮДЕЙ ВАЖНЫ ДЛЯ КОМПАНИИ ACCO
BRANDS EUROPE. B ЭТОЙ ИНСТРУКЦИИ И НА
УСТРОЙСТВЕ СОДЕРЖАТСЯ ВАЖНЫЕ УКАЗАНИЯ
ПО ТЕХНИКЕ БЕЗОПАСНОСТИ. ВНИМАТЕЛЬНО
ПРОЧИТАЙТЕ ЭТИ УКАЗАНИЯ.
m
Общиерекомендациидля
пользователя
•
Пoжалyйста, внимательно ознакомьтесь с данным
pyководством и храните его в надежном месте для
дальнейшего пользования.
•
Определите требуемый вид переплетной схемы
(для сшивания с четырьмя отверстиями установите
переключатель в левое положение, а для
переплета гребенкой – в правое положение).
•
Вставьте бумагу в приемное окно и перемещайте
переплетный рычаг вниз до тех пор, пока не будут
отперфорированы все листы.
•
Установите гребенку на зубцы механизма
раскрытия гребенки. Для открытия гребенки
переместите переплетный рычаг вниз, после чего
заблокируйте раскрытую гребенку при помощи
фиксатора гребенки.
•
Положите проперфорированный документ на
открытую гребенку. Отпустите фиксатор для
установки гребенки в закрытое положение.
•
Очистите поддон для бумажных отходов.
Техническиехарактеристики
GBC MultiBind 208
8 листов
1 листов PVC/PP Plastic Cover
(0,18 мм)
DIN A4 (297 мм)
21 hole (comb) /21 hole (wire)
125 листов
14 мм
4,12kg
250x360x315 мм
Максимальное
количествоодновременно
перфорируемыхлистов
Максимальное
количествоодновременно
перфорируемыхлистов
Максимальныйразмер
документа
Переплетнаясхема
Максимальноеколичество
сшиваемыхлистов
Максимальныйразмер
пластмассовойгребенки/
пружины
Массамашины
Габаритныеразмеры
(ДxШxВ)
Обслуживание
Не забывайте регулярно очищать лоток для
конфетти. (рис. 7)
Схемапереплетноймашины
1
Боковойфиксаторотступа
2
Ручкадляперфорации
3
Ручкадляпереносаброшюровщика
4
Фиксаторпластиковойпружины
5
Раскрытиепластиковойпружины
6
Паздлясшиванияметаллическойпружиной
7
Контрользазакрытиемметаллической
пружины
Page 27

27
o
RUS
Гарантийныеобязательства
Гарантия на данное изделие составляет 2 года
с момента его продажи при условии правильной
эксплуатации. Во время гарантийного периода
компания ACCO Brands Europe проводит по своему
усмотрению бесплатный ремонт или замену
вышедших из строя машин. Данная гарантия
не распространяется на поломки, вызванные
неправильной эксплуатацией машины или ее
использованием для других целей. Предоставление
отметки о дате продажи обязательно. Проведение
ремонта неавторизованным персоналом прекращает
действие гарантийных обязательств. Мы стремимся
обеспечить высокие эксплуатационные свойства
изделия согласно предоставленной спецификации.
Данные гарантийные обязательства не влияют на
права потребителей, установленные местными
законодательными органами.
Информация о данном изделии находится на сайте www.accoeurope.com
Перфорация
1
Загрузите бумагу в паз для перфорации и
выровняйте бумагу по боковому фиксатору
отступа (макс. 8 листов 80 г/м² или 1 обложка из
ПВХ) (рис. 1)
2
Опустите ручку для перфорации до упора (рис. 2)
3
Поднимите ручку для перфорации и извлеките
листы
•
Перед перфорацией убедитесь, что паз для
сшивания металлических пружин открыт. При
закрытом пазе вы не сможете пробить бумагу
до конца.
Переплетнапластиковую
пружину
1
Разместите пластиковую пружину на штырьки.
Опустите ручку для перфорации, пружина
откроется.
2
Зафиксируйте пружину в открытом состоянии при
помощи специального фиксатора (рис. 3).
3
Переплетите листы. Отпустите фиксатор, и
закройте пружину (рис. 4).
Переплетметаллической
пружиной(21отверстие,шаг2:1)
1
Разместите перфорированные листы бумаги в
пружине (рис. 5)
2
Выберите нужный диаметр пружины на кнопке
контроля закрытия пружины.
3
Загрузите документ в паз для сшивания.
Поддерживая документ, МЕДЛЕННО опустите
ручку для перфорации для закрытия пружины.
(рис. 6)
4
Поднимите ручку и достаньте документ.
Page 28

Page 29

Page 30

ACCO Brands Europe
Oxford House
Aylesbury HP21 8SZ
United Kingdom
www.accoeurope.com
Ref: CBT.6517
Issue: 1 (06/09)
G ACCO Service Division
Hereward Rise, Halesowen, West Midlands, B62 8AN
Tel: 0845 658 6600, Fax: 0870 421 5576
www.acco.co.uk/service
F ACCO France
Service Aprés-Vente
Tel: 0820 872 356, Fax: 03 80 68 60 49
contact@vmbs.fr
D ACCO Deutschland
Arnoldstrasse 5, 73614 Schorndorf, Germany
Tel: +49 7181/887-420, Fax: +49 7181/887-498
E ACCO Iberia SL
P Isaac Peral 19, 28820 Coslada (Madrid)
Tel: 91 669 9391, Fax: 91 672 07 11
I ACCO Brands Italia Srl
Via Pietro Nenni 13, Settimo Torinese (TO)
Tel: +39 011 896 11 11, Fax: +39 011 896 11 13
assistenzaitalia@acco.com
B ACCO Brands Benelux B.V.
Peppelkade 64, 3992AK Houten, Nederland/Les Pays-Bas
Tel: 0800-73362, Fax: 02-4140784
info@accobenelux.be, www.accobenelux.be
o ACCO Brands Benelux B.V.
Peppelkade 64, 3992AK Houten, Nederland/Les Pays-Bas
Tel: 0800-21132, Fax: 02-4140784
info@accobenelux.be, www.accobenelux.be
O ACCO Brands Benelux B.V.
Peppelkade 64, 3992AK Houten, Nederland/Les Pays-Bas
Tel: 030-6346060, Fax: 030-6346070
info@accobenelux.nl, www.accobenelux.nl
S ACCO Brands Nordic AB
c Makadamgatan 5, 254 64 Helsingborg, Sweden
N Tel: +46 42 38 36 00, Fax: +46 42 38 36 10
g service.nordic@acco.com
o
o
o
o
XERTEC a.s.
o U Továren, 770/1b, 102 00, Praha 10, Ceska Republika
Tel: +420 271 741 800, Fax: +420 271 743 143
www.xertec.cz
Q SERWIS ACCO
05-300 Mińsk Mazowiecki, Ul. Grobelnego 4, Polska
Tel: +48 25 758 11 90, Fax: +48 25 758 11 90
H ACCO Hungária Kft
Budapest, Ócsai út 4., 1239, Hungária
Tel: +36 1 283 1645, Fax: +36 0 283 0928
o
Представительствокомпании
«АККОДойчландГМБХиКО.КГ»
Россия 105005, Москва, Денисовский пер., д.26
Тел: (495) 933-51-63, Факс: (495) 933-51-64
o
«Полиграфическиесистемы»
ул. Набережно-Корчеватская, 78, г. Киев, 03035, Украина
Тел.: (+38) 044 252-7103, (+38) 044 252-7104
A ACCO Österreich
Sallmann Bürotechnik GmbH, Schumacherstr.13, 5020 Salzburg
Tel: 0662 4345 160, Fax: 0662 4345 164
bachinger@sallmann.at
C ACCO Schweiz
ABC Bürotechnik AG, Winkelbüel 4, 6043 Adligenswil
Tel: 041 375 6060, Fax: 041 375 6061
bl@abc-buerotechnik.ch
o ACCO-Rexel Ltd
Clonshaugh Business & Technology Park, Clonshaugh, Dublin 17, Ireland
Tel: 01 816 4300, Fax: 01 816 4302
information-ie@acco.com, www.accorexel.ie
Z Rexel Office Products (PTY) Ltd
Crusher Road, Crown Ext.3, PO Box 102,
Crown Mines, Johannesburg 2025, South Africa
Tel: +27 (0) 11 837 7723
service@rexelsa.co.za
o GBC Asia Pte Ltd
o 47 Ayer Rajah Crescent, #05-08/17, Singapore 139947
o Tel: +65 6776 0195, Fax: +65 6779 1041
webmaster@gbcasia.com.sg
o GBC-Japan K.K.
14F Harmony Tower, 1-32-2 Honcho, Nakano-ku, Tokyo 164-8721
Tel: (81)-03-5351-1801, Fax: (81)-03-5351-1831
serv@gbc-japan.co.jp, www.gbc-japan.co.jp
o ACCO Australia
Level 2, 8 Lord Street, Botany, NSW 2019
Tel: +61 2 9695 2574, Fax: +61 2 9700 0189
www.acco.com.au
IRL
RUS
Service
LUX
CZ
LV
EST
LT
SK
UA
JPN
AUS
IND
PAK
BD
 Loading...