

Page 1
General Binding Corporation
Northbrook, IL 60062-4195
®
®
13 PRO
Operating Instructions. . . . . . . . . . 2
Manuel d’Utilisation. . . . . . . . . . . . 3
Manual de Utilización . . . . . . . . . . 5
Page 2
Operating Instructions
IMPORTANT SAFETY INSTRUCTIONS
YOUR SAFETY AS WELL AS THE SAFETY
OF OTHERS IS IMPORTANT TO US. IN THIS
INSTRUCTION MANUAL AND ON THE
PRODUCT ARE IMPORTANT SAFETY
MESSAGES.READ THESE MESSAGES
CAREFULLY.
THE SAFETY ALERT SYMBOL PRE-
CEDES EACH SAFETY MESSA GE IN
THIS INSTRUCTION MANUAL.THIS SYMBOL
INDICA TES A POTENTIAL PERSONAL SAFETY HAZARD THA T COULD HURT Y OU OR
OTHERS,AS WELL AS CAUSE PRODUCT
DAMA GE OR PROPERTY DAMAGE.
THE FOLLOWING WARNING IS FOUND ON
THE BOTTOM OF THE PRODUCT.
This safety message means that you could
be seriously hurt or killed if you open the
product and expose yourself to hazardous
voltage.
IMPORTANT SAFEGUARDS
WARNING:FOR YOUR PROTECTION
DO NOT CONNECT THE POUCH
LAMINATOR TO ELECTRICAL POWER
UNTIL YOU READ THESE INSTRUCTIONS
COMPLETEL Y . KEEP THESE INSTRUCTIONS
IN A CONVENIENT LOCATION FOR FUTURE
REFERENCE.TO GUARD AGAINST INJURY,
THE FOLLOWING BASIC SAFETY PRECAUTIONS MUST BE OBSERVED IN THE SET-UP
AND USE OF THIS PRODUCT.
GENERAL SAFEGUARDS
• Use the pouch laminator only for its
intended purpose of laminating
documents according to the indicated
specifications.
• Do not place anything in the throat
opening of the machine other than
carriers with pouches/documents.
• Place unit on a secure, stable work area
to prevent the machine falling and
possibly causing personal injury and
damage to the unit.
• Turn unit off when not in use for an
extended period of time.
• Follow all warnings and instructions
marked on the product.
ELECTRICAL SAFEGUARDS
• The pouch laminator must be connected
to a supply voltage corresponding to the
electrical rating of the machine as
indicated.
• Unplug the pouch laminator before
moving it, or when it is not in use for an
extended period of time.
• Do not operate with a damaged supply
cord or plug, after it malfunctions, or after
it has been damaged in any manner.
• Do not overload electrical outlets beyond
their capacity as this can result in fire or
electrical shock.
• Do not alter attachment plug. Plug is
configured for the appropriate electrical
supply.
• The unit is intended for indoor use only.
• Never push objects into this product
through cabinet slots. Do not spill liquid of
any kind on this product.
SERVICE
• Do not attempt to service or repair the
pouch laminator yourself. Unplug the unit
and contact an authorized service
representative for any required repairs.
CLEANING
CAUTION: Unplug this product before
cleaning.
• Wipe exterior only with a damp cloth. Do
not use detergents or solvents.
OPERATION
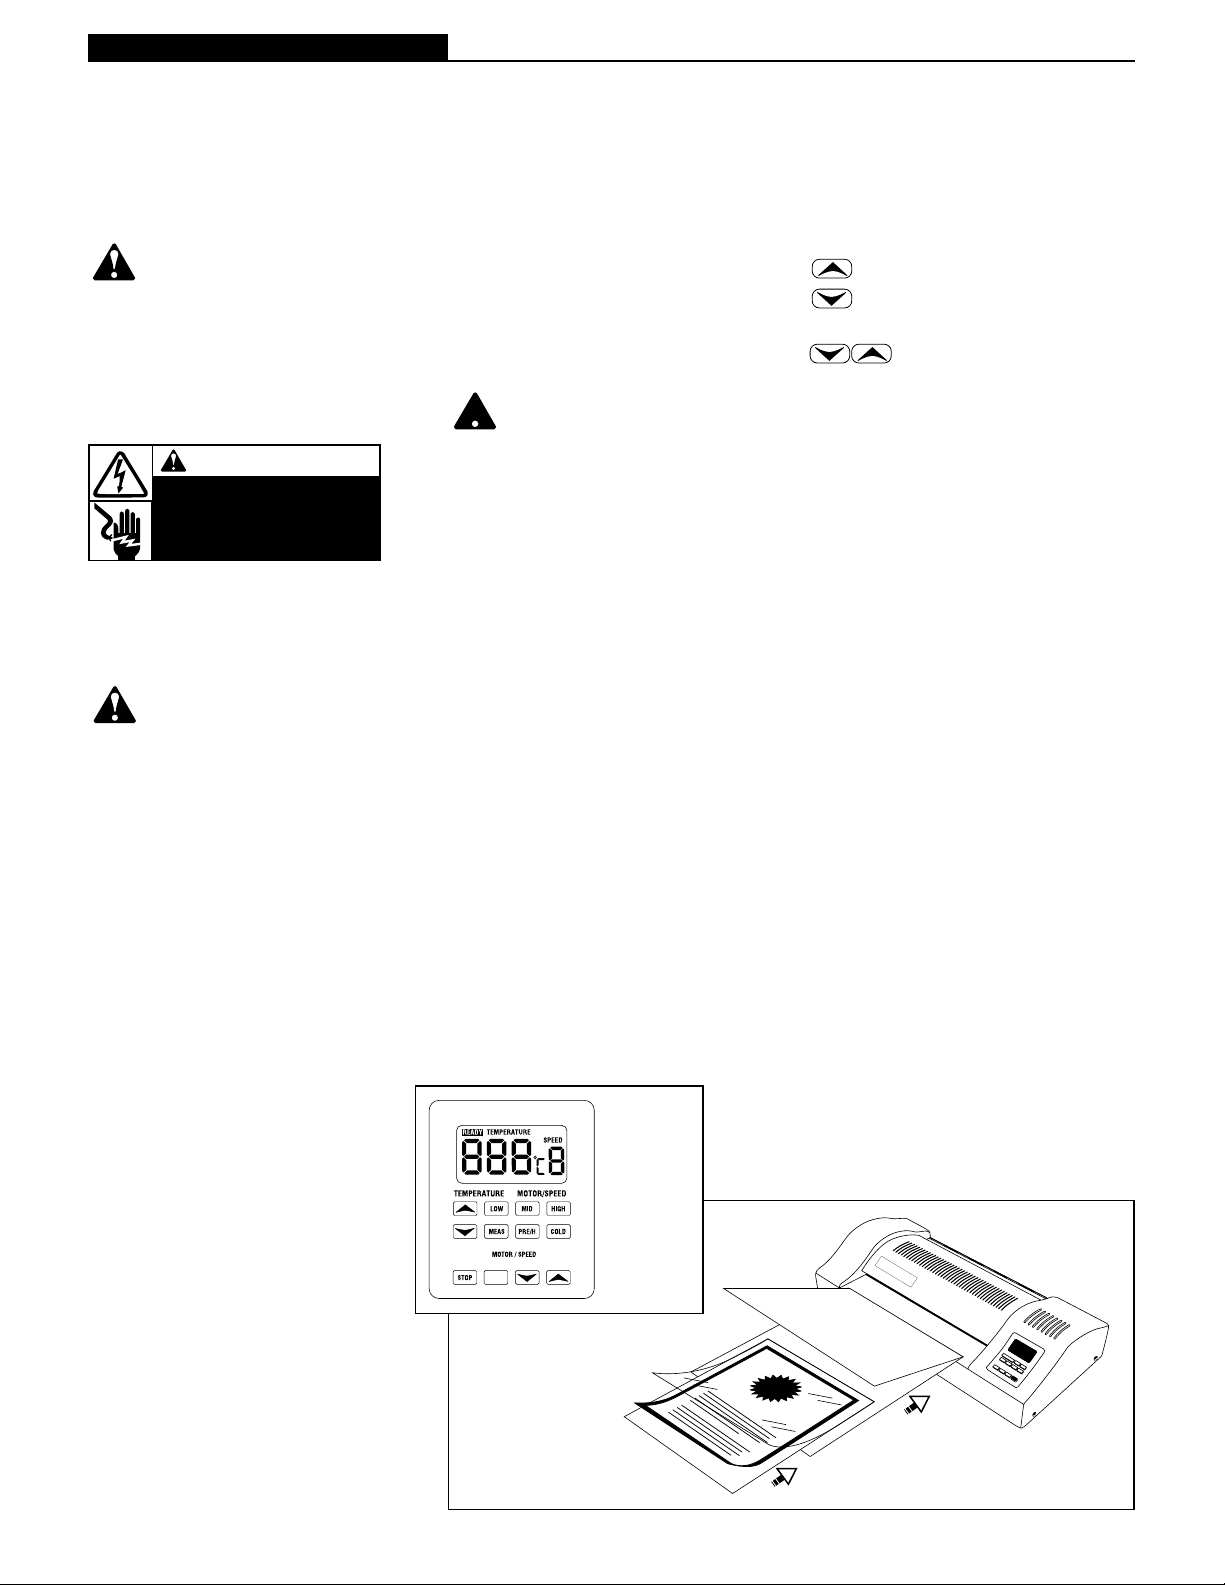
Control Panel LCD. The following
information is displayed on the LCD:
READY - Indicates that the machine is at the
requested laminating temperature.
TEMPERA TURE - The numbers directly
below the word TEMPERATURE indicate the
user requested temperature setting.
SPEED - The numbers directly below the
word SPEED indicate the speed setting.
Selecting Functions. Pressing keys
performs functions as follows:
Low - Sets the machine to 230°F (110°C),
speed 5
Mid - Sets the machine to 266°F (130°C),
speed 3.
High - Sets the machine to 302°F (150°C)
speed 3.
Note: Use of a carrier is recommended with
all films for better quality output and
protection of rollers.
PRE/H - Sets the machine to 176˚ F (80˚ C),
Speed 2, stand-by.
MEAS - Measures the current machine
temperature.
COLD - This is the setting that is
automatically selected when the machine is
first turned on. Sets the machine to 0, no
temperature and no speed. If the
temperature of the heater platen is above 90˚
C (194˚ F), then speed “2” is automatically
set to protect the rollers.
TEMPERA TURE -These keys are used to
increase or decrease temperature by
1˚F. Temperature can be adjusted up
to 160˚ C or 320˚ F.
SPEED - Adjust the speed of the rollers.
Speed 6 is the fastest speed.
STOP - Stops the revolution of the rollers. To
protect the rollers, the machine should not be
stopped for long periods of time when the
temperature is above 90˚ C (194˚ F).
REV - Reverses the revolution of the
rollers to correct misfeeds.
SET-UP
1. Connect power cord to appropriate power
source.
2. Push the power switch located on the back
of the machine to the “on” position.
HOT LAMINATION
After the laminator has been turned on using
the power switch located on the back of the
machine, the Cold mode is automatically set.
“Ready ,” temperature setting “0” and speed
setting “0” should be displayed on the LCD.
1. Select either “LOW, MID, or HIGH”
function key. The LCD will indicate the
temperature and speed selected. “Ready”
will not be indicated until the laminator
has reached the set temperature.
2. Use the Laminating Guide included with
the machine to select the proper temperature and speed for the material to be
laminated.
3. Center the item to be laminated into a
laminating pouch, so that the borders are
even on all sides.
4. Insert the pouch with the item sealed-edge
first into the paper CARRIER that is included with each carton of pouches. Position
the sealed edge of the pouch against the
inside folded edge of the carrier.
5. Insert the carrier and its contents straight
into the machine, leading with the folded
edge. handle carriers carefully so that
they can be reused.
WARNING
Electrical shock hazard. Do not
open. No user servicable parts
inside. Refer servicing to
qualified service personnel.
2
13 Pro
!
Selecting
Functions
}
}
Control
Panel
LCD
REV
Page 3
INSTRUCTIONS CONCERNANT
LA SECURITE
VOTRE SÉCURITÉ, COMME CELLE
DES AUTRES,EST IMPORTANTE
POUR NOUS. CES INSTRUCTIONS
CONTIENNENT D'IMPORTANTS MESSAGES
RELATIFS À LA SÉCURITÉ. MERCI DE LES
LIRE TRÈS A TTENTIVEMENT.
CE SYMBOLE “ATTENTION SÉCURITÉ”
PRÉCÈDE, DANS CE MANUEL D'UTILISATION, CHAQUE MESSAGE CONCERNANT
LA SÉCURITÉ. CE SYMBOLE INDIQUE UN
RISQUE POTENTIEL DE BLESSURE POUR
VOUS OU D'AUTRES PERSONNES, OU UN
RISQUE DE DOMMAGE POUR LA MACHINE
OU VOS BIENS PERSONNELS.
L’AVERTISSEMENT SUIVANT EST NOTIFIÉ
SUR LA PARTIE INFÉRIEURE DE
L’APPAREIL.
Ce message signifie que vous pourriez être
très sérieusement blessé si vous tentiez
d’ouvrir l'appareil en vous exposant ainsi à
un risque de choc électrique.
INSTRUCTIONS CONCERNANT
LA SECURITE
ATTENTION: PAR MESURE DE
SÉCURITÉ, NE BRANCHEZ PAS LA
PLASTIFIEUSE À POCHETTES AVANT
D'AVOIR LU EN TOTALITÉ CES INSTRUCTIONS. CONSERVEZ LES DANS UN
ENDROIT APPROPRIÉ AFIN DE POUVOIR
VOUS Y RÉFÉRER SI NÉCESSAIRE. AFIN
D'ÉVITER TOUTE BLESSURE, LES
PRÉCAUTIONS DE BASE SUIVANTES
DOIVENT ÊTRE OBSERVÉES À
L'INSTALLATION ET LORS DE
L'UTILISATION DE CET APPAREIL.
MESURES DE SECURITE GENERALES
• N’utilisez la plastifieuse à pochettes que
pour la plastification de documents en
vous conformant aux spécifications
indiquées.
• N’introduisez pas dans la fente
d'alimentation de la machine autre chose
que des transporteurs, des pochettes et
des documents.
• Installez la machine en sécurité sur un
emplacement stable pour éviter qu’elle
ne tombe; cela pourrait l'endommager et
causer d'éventuelles blessures
corporelles aux utilisateurs.
6 The laminated item will automatically exit
the rear of the pouch laminator. After the
pouch has stopped moving, place the
carrier on a flat surface to cool briefly
before removing the finished pouch.
7. If the laminated product looks hazy, then
the temperature may need to be
increased or the speed decreased. If the
laminated product looks wavy, then the
temperature may need to be decreased
or the speed increased.
8. Select PRE/H to keep the machine on
stand-by at 80˚C (176˚ F).
9. If finished laminating, press the “COLD”
key. Temperature 0 and Speed 2 will be
displayed. When the temperature
reaches 85˚ C (186˚ F) the rollers will
stop automatically. Cooling down the
machine before turning off the power
switch protects and extends the life of the
rollers.
10.Turn off the power switch.
11. Unplug the power cord if the machine will
not be used for a long period of time.
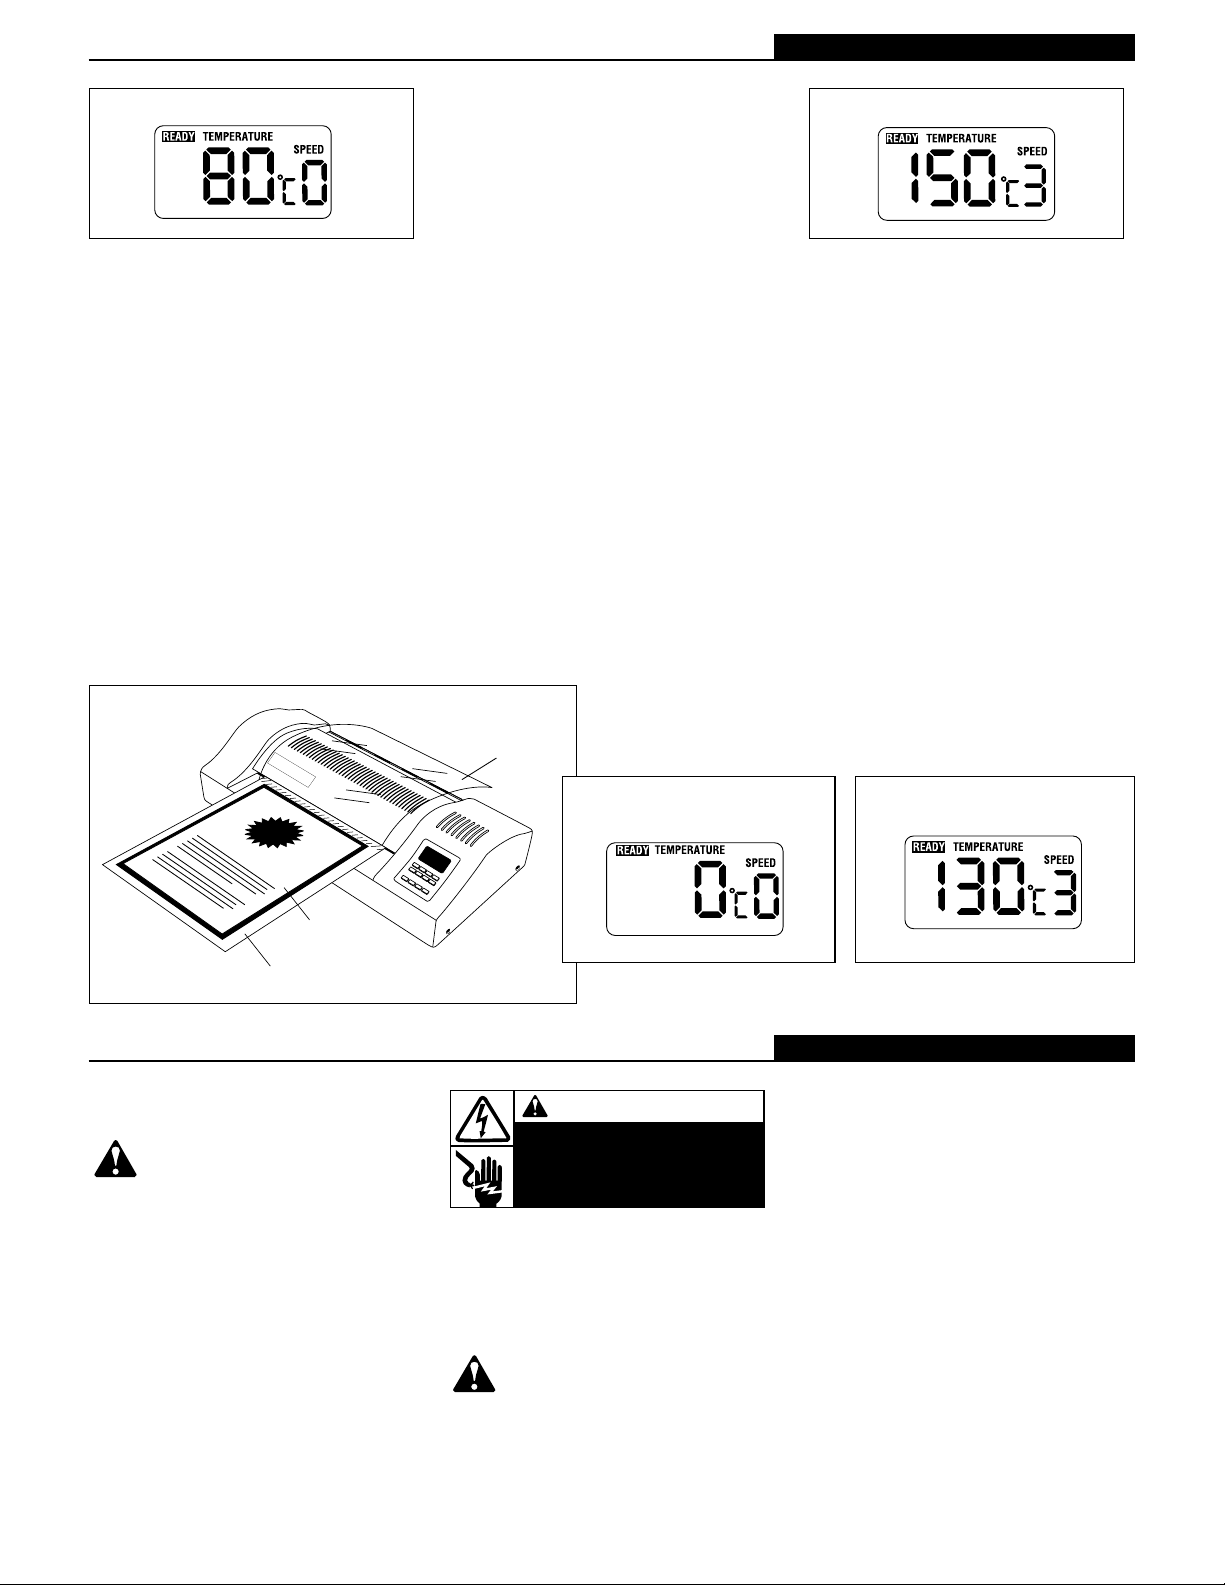
OPERATION, COLD LAMINATION
After the laminator has been turned on using
the power switch located on the back of the
machine, the Cold mode is automatically set.
“Ready ,” temperature setting “0” and speed
setting “0” should be displayed on the LCD.
If the machine has just recently been used
for Hot Lamination, then the machine must
reach a temperature of no hotter than 30˚ C
(86˚ F) before starting Cold Lamination.
1. Select a GBC No-Heat Laminate that is
slightly larger than the document to be
laminated.
2. Run the film, film-side faced up, for about
3-6mm (1/8 - 1/4”) into the laminator, and
then press STOP to stop the rollers.
3. Carefully separate the backing release
paper from the film, and drape the clear
film over the top of the laminator.
4. Place the document between the
separated film and backing, and select
Speed 1.
5. After the laminated document exits the
rear of the laminator, then either cut off
the excess pouch edge for a flush-cut
appearance, or leave the
edge as an adhesive
border for signage.
OTHER APPLICATIONS
GBC CREATIVE FOILS™
1. Select 150˚ C (302˚ F) and speed 3, and
wait for the READY indicator.
2. Place GBC Creative Foil color-side-out
over output from a toner-based laser
printer or photocopier. When printing
various colors on the same original piece,
arrange the different colors and secure
with the stickers included with the
Creative Foils.
3. Insert the document and foil into a carrier
and laminate.
4. When the item exits the rear of the laminator, then remove the document from
the carrier and remove the excess foil.
GBC SOFT TOUCH POUCHES™
1. Select 130˚ C (266˚ F) and speed 3, and
wait for the READY indicator.
2. Start laminating.
3. When the pouch exits the rear of the
laminator, carefully rub a finger against a
front corner to remove the protective
carrier film.
ATTENTION
Risque de secousse électrique.
Ne pas ouvrir. Aucune piéce
réparable par l'utilisateur.
Entretien par personnel qualifié.
Manuel d’Utilisation
3
13 Pro
Operating Instructions
GBC Creative Foils™
GBC Soft Touch Pouches™
PRE/H Stand-by
Cold
Lamination
Cold Lamination with
GBC No-Heat Laminate™
film draped
over laminator
document
backing release paper
Page 4

Manuel d’Utilisation
• Coupez l’alimentation si vous n'utilisez
pas l'appareil.
• Conformez-vous aux avertissements et
aux instructions mentionnés sur
l’appareil.
MESURES DE SECURITE
ELECTRIQUES
• La plastifieuse ne doit être branchée que
sur une prise de courant dont le voltage
correspond à celui indiqué sur la plaque
d’identification de la machine.
• Débranchez la plastifieuse avant de la
déplacer ou en cas de non utilisation
prolongée.
• Ne l'utilisez pas avec une prise ou un
cordon endommagés, après un mauvais
fonctionnement ou après tout dommage
quel qu'il soit.
• Ne surchargez pas l’alimentation
électrique au-delà de ses capacités. Il
pourrait en résulter un incendie ou une
électrocution.
• Ne modifiez pas la prise de courant. Elle
a été prévue pour l’alimentation
appropriée.
• N’utilisez pas la plastifieuse à l’extérieur
des locaux.
• N’introduisez pas d’objet dans la fente
d’alimentation. Veillez à ne pas renverser
de liquide sur la machine.
SERVICE APRES-VENTE
• N'essayez pas de réparer vous-même la
plastifieuse à pochettes. Débranchez
l'appareil et contactez le Service Après-
Vente ou de votre fournisseur pour toute
réparation.
NETTOYAGE
A TTENTION: débranchez l'appareil
avant de le nettoyer.
• Essuyez l'extérieur avec un chiffon
humide. N'utilisez pas de détergents ou
de solvants.
MODE D’EMPLOI
Ecran de contrôle, donne accès
aux
informations suivantes:
READY (PRÊT) - Indique que la machine est
à la température de plastification désirée.
TEMPERA TURE - Le chiffre mentionné sous
le mot TEMPERATURE indique le réglage
de température requis pour la plastification.
SPEED (VITESSE) - Le chiffre mentionné
sous le mot SPEED indique la vitesse de
rotation des rouleaux de la plastifieuse.
Sélection des
Utilisez les fonctions
suivantes pour
obtenir de meilleurs
résultats:
Low (BAS) - Règle la
machine sur 110 °C
(230 °F), vitesse 5.
Mid (MOYEN) -
Règle la machine sur
130 °C (266 °F),
vitesse 3.
High (ÉLEVÉ) -
Règle la machine sur
150 °C (302 °F),
vitesse 3.
Nota : Pour obtenir des résultats de
meilleure qualité et une protection des
rouleaux, il est conseillé d'utiliser un
transporteur. avec tous les films.
PRE/H (PRÉCHAUFFAGE) - Règle la
machine sur 80 °C (176 °F), vitesse 2,
standby.
MEAS (MEASURE) - Mesure la température
actuelle de la machine.
COLD (FROID) - Ce réglage est sélectionné
automatiquement lors de la mise sous
tension de la plastifieuse: position 0, sans
température ni vitesse. Lorsque la
température des rouleaux dépasse 90°C, la
vitesse 2 est aussitôt sélectionnée afin de
protéger les rouleaux.
TEMPERATURE - Ces fonctions sont
utilisées pour augmenter ou réduire la tem-
pérature par palier de 1°C, la tem-
pérature maximale étant de 160°C.
Speed (VITESSE) - Règle la vitesse
des rouleaux. La vitesse 6 est la
plus grande vitesse.
STOP
- Permet d’arrêter la
rotation des rouleaux. Pour
une meilleure protection des rouleaux, il est
recommandé de ne pas arrêter la machine
trop longtemps lorsque la température est
supérieure à 90°C.
REV
- Inverse la rotation des rouleaux en
cas de mauvaise alimentation.
MODE D’EMPLOI
1. Branchez la prise sur une source de
courant appropriée.
2. Positionnez sur “ON” le commutateur
situé à l’arrière de la machine.
PLASTIFICATION A CHAUD
La mise en fonctionnement se fait à l’aide
du commutateur situé à l’arrière de la
plastifieuse. La fonction “COLD” (FROID) est
alors automatiquement sélectionnée. Les
indications “READY” (PRET), température
“O” et vitesse “O” doivent alors apparaître sur
l’écran de contrôle.
1. Sélectionnez l'une des touches de
fonction "LOW, MID, ou HIGH" (BAS,
MOYEN, ELEVÉ). L'écran de contrôle
affiche la température et la vitesse
sélectionnées. "Ready" (Prêt) n'est
indiqué qu'à partir du moment où la
plastifieuse a atteint la température de
réglage.
2. Consultez le Guide de Plastification fourni
avec chaque équipement pour sélectionner la température et la vitesse correspondant au document à plastifier.
3. Centrez le document à plastifier dans une
pochette de plastification.
4. Placez la pochette contenant le
document, côté fermé en premier, dans
le transporteur fourni avec chaque boîte
de pochettes G.B.C. Positionnez le côté
fermé de la pochette dans le côté fermé
du transporteur.
5. Introduisez le transporteur et son
contenu dans la plastifieuse, côté fermé
en premier. Manipulez le transporteur
avec précautions afin de pouvoir le
réutiliser plusieurs fois.
6. Le document plastifié ressort automatiquement à l’arrière de la plastifieuse.
Posez le transporteur sur une surface
plane et laissez le refroidir quelques secondes
avant d’ôter le document plastifier.
7. Si le document plastifié vous semble flou,
augmentez la température ou réduisez le
vitesse. Si le document vous semble
ondulé, baissez la température ou
augmentez la vitesse.
8. Sélectionnez “PRE/H” (préchauffage)
pour laisser la plastifieuse en position
d’attente, à 80°C.
9. Si vous avez terminé de plastifier,
appuyez sur la touche COLD (FROID).
Température 0 et vitesse 2 s’affichent. La
rotation des rouleaux cesse immédiatement dès que la température atteint
85°C. Afin de préserver les rouleaux, laissez refroidir la machine avant de positionner le commutateur sur “OFF” (arrêt).
10. Positionnez le commutateur sur “OFF”
(arrêt).
11. Débranchez la machine en cas de non
utilisation prolongée.
4
13 Pro
PRE/H Stand-by
Selecting
Functions
}
}
Control
Panel
LCD
REV
Page 5

13 Pro
Operating InstructionsManuel D’Utilisation
ADVERTENCIAS IMPORTANTES
VUESTRA SEGURIDAD ES IMPORTANTE
PARA NOSOTROS.EN ESTE MANUAL
EXISTEN IMPORTANTES MEDIDAS PARA
VUESTRA SEGURIDAD,INDICADAS
TAMBIÉN EN LA MÁQUINA. POR FAVOR,
LEALAS CUIDADOSAMENTE.
ESTE SÍMBOLO PRECEDE CADA
MENSAJE P ARA SU SEGURIDAD EN
EL MANUAL.ÉSTE INDICA UN RIESGO
POTENCIAL PARA LA SEGURIDAD VUESTRA
Y DE LAS DEMÁS PERSONAS, ASÍ COMO
POTENCIALES DAÑOS PARA LA MÁQUINA.
EL SIGUIENTE ADVERTIMIENTO SE
ENCUENTRA EN LA PARTE INFERIOR DE
LA MÁQUINA.
Este mensaje indica que ud. podría resultar
gravemente herido o muerto si abre la
máquina y se expone al riesgo del alto
voltaje.
IMPORTANTES PRECAUCIONES
ATENCIÓN: NO CONECTAR LA
PLASTIFICADORA A LA RED
ELÉCTRICA HASTA NO HABER LEIDO
TOTALMENTE ESTE MANUAL.TENER ESTE
MANUAL,SIEMPRE A MANO PARA
FUTURAS CONSULTACIONES. LAS
SIGUIENTES PRECAUCIONES DEBEN SER
TENIDAS EN CUENTA PARA LA PUESTA EN
MARCHA DE LA MÁQUINA Y LA
UTILIZACIÓN DE ´ESTA.
PRECAUCIONES GENERALES
• Usar la plastificadora sólo para plastificar
documentos en base a las especificaciones indicadas.
• No inserir objetos en la máquina que no
sean los documentos para plastificar.
• Colocar la máquina en un lugar estable y
seguro para prevenir la caida y los
consiguientes daños para las personas y
la máquina.
• Apagar la máquina (off) cuando no va a
ser utilizada por un largo período de
tiempo.
• Seguir todas las instrucciones y
precauciones indicadas en la máquina.
PRECAUCIONES RELATIVES A LA
INSTALACCION ELÉCTRICA
• Enchufar la máquina con un voltaje igual
al indicado en la misma.
• Desconectar de la red eléctrica la
máquina antes de moverla, o cuando no
sea utilizada durante un cierto periodo de
tiempo.
• No utilizar la máquina con un cable o
enchufe estropeado, o en mal
funcionamiento.
• No sobrecargar la toma eléctrica. Peligro
de incendio o de descarga eléctrica.
• No modificar el enchufe. Este está
preparado para la correcta alimentación
eléctrica.
• No utilizar la plsatificadora en el exterior
de los locales.
• No introducir objectos en la máquina. No
verter ningún tipo de líquidos sobre la
máquina.
MANUTENCION
• No realizar trabajos de mantenimiento de
la máquina personalmente. Desenchufar
la máquina y contactar con el servicio de
asistencia autorizado.
ATENCION
Riesgo de descarga eléctrica.
No abrir. Adentro, no hay
piezas reparables para el
usuario. Solamente por el
personal técnico cualificado.
Manual de Utilización
MODE D'EMPLOI, PLASTIFICATION
FROID GBC NO-HEAT LAMINATE™
La mise en fonctionnement se fait à l’aide
du commutateur situé à l’arrière de la
plastifieuse. La fonction “COLD” (FROID) est
alors automatiquement sélectionnée. Les
indications “READY” (prêt), température “0”
et vitesse “0” doivent alors apparaître sur
l’écran de contrôle. Si la machine vient d’être
utilisée pour une plastification à chaud,
laissez la température retomber à 30°C
avant de commencer la plastification à froid.
1. Sélectionnez une pochette G.B.C.
spéciale plastification à froid légèrement
plus grande que le document à plastifier.
2. Engagez la pochette (côté film sur le
dessus) d’environ 3 à 6 mm dans la
plastifieuse, puis appuyez sur STOP pour
arrêter les rouleaux.
3. Séparez délicatement le support papier
du film et tendez le film au-dessus de la
plastifieuse.
4. Placez le document entre le film et le
support papier du film que vous aurez
séparés et choisissez la vitesse 1.
5. Le document plastifié ressort à l’arrière
de la machine. Vous pouvez, soit couper
l’excédent de film pour l’égaliser avec le
format de votre document, soit conserver
l’excédent de film pour obtenir une
bordure adhésive.
AUTRES APPLICATIONS
LES “SUPPORTS DE CREATION”G.B.C.
1. Sélectionnez 150 °C (302 °F), la vitesse
3 et attendez que le voyant READY
(PRÊT) s'allume.
2. Positionnez un
“support de création”
G.B.C., côté couleur vers
l’extérieur, sur un
document laser ou photocopie. Si vous désirez
associer plusieurs couleurs
sur un même document, utilisez les
adhésifs fournis avec les “supports de
création” G.B.C.
3. Introduisez le document et le support
avec le transporteur dans la plastifieuse.
4. Une fois la plastification terminée, sortez
le document du transporteur et coupez
l’excédent de film.
GBC SOFT TOUCH POUCHES™
1. Sélectionnez 130 oC (266 oF), la vitesse 3
et attendez que le voyant READY
(PRÊT) s'allume.
2. Introduisez le document dans la
plastifieuse.
3. Une fois la plastification terminée, ôtez
délicatement le film de protection de la
pochette.
GBC Creative Foils™
GBC Soft Touch Pouches™
PLASTIFICA TION
FROID
Cold Lamination with
GBC No-Heat Laminate™
5
Film au-dessus de
la plastifieuse
Support papier
film draped
over laminator
document
backing release paper
Page 6

LIMPIEZA
A TENCIÓN: quitar el enchufe antes
de proceder a la limpieza de la
máquina.
• Limpiar la superficie sólo con un paño
húmedo. No utilizar ningún tipo de
detergentes o disolventes.
OPERACIONES
Panel de control LCD. Las siguientes informaciones aparecen en el display del LCD.
READY- Indica que la máquina está a la
temperatura necesaria para laminación.
TEMPERA TURA
- Los números inmediata-
mente debajo de la palabra TEMPERATURA
indican la temperatura requerida.
SPEED - Los números inmediatamente
debajo de la palabra SPEED indican la
velocidad de rotación de los rodillos.
Para seleccionar las funciones.
Presionar
los botones para las varias funciones como
se indica a continuación:
Low - Configura la máquina para 110ºC
(230ºF), velocidad 5.
Mid - Configura la máquina para 130ºC
(266ºF), velocidad 3.
High - Configura la máquina para 150ºC
(302ºF), velocidad 3.
Nota: Se recomienda el uso de un transportador con todas las películas para una
mejora en la calidad de la producción y para
la protección de los rodillos.
PRE/H - Configura la máquina para 80ºC
(176ºF), velocidad 2, en espera.
MEAS - Mide la temperatura actual de la
máquina.
COLD - Máquina preparada automática-
mente a la primera vuelta. Poner la máquina
a 0, nínguna temperatura, nínguna velocidad. Si la temperatura del rodillo supera los
90˚C. viene impuesta automáticamente para
proteger los rodillos.
TEMPERATURA - Estas teclas se usan para
aumentar o disminuir la temperatura
de 1 grados F. La temperatura puede
ser regulada hasta 160˚C.
VELOCIDAD - Ajusta la velocidad de los
rodillos. La velocidad 6 es la
más rápida.
STOP - Para la rotación de los rodillos. Para
proteger los rodillos, la máquina tendría que
ser parada por un periodo de tiempo largo,
cuando la temperatura supera los 90˚C.
REV - Invertir la
rotación de los
rodillos para corregir
eventuales errores en
su carga.
OPERACIONES
1. Inserir el cable en
un enchufe
adapto.
2. Presionar el interruptor, puesto en la parte
de atras de la máquina,en posición ON.
PLASTIFICACION EN CALIENTE
Despues que la máquina ha sido encendida,
se impuesta automáticamente el modo cold.
Las palabras ready, temperatura 0 y
velocidad 0, tendrían que aparecer en LCD.
1. Seleccione la tecla de función “LOW,
MID o HIGH.” El LCD indicará la temperatura y velocidad seleccionadas. “Ready”
no se indicará hasta que el laminador
haya alcanzado la temperatura
configurada.
2. Segir la guía que acompaña a la
máquina para seleccionar la correcta
temperatua y velocidad, en base al
material que quereis plastificar.
3. Centrar el documento para plastificar en
una pouch, de manera que los bordes
sean equidistantes.
4. Inserir la pouch con el documento por la
parte del lado saldado en el carrier que
hay en cada confección de pouches.
Situar el lado saldado de la pouch contra
el borde interno del carrier.
5. Inserir el carrier y su contenido recto en
la máquina, del lado saldado. Mover con
cuidado el carrier para que pueda ser
reutilizo.
6. El documento plastificado saldrá
automáticamente del fondo de la plastificadora. Con la completa salida de la
pouch meter el carrier en una superficie
llana para enfriarlo brevemente antes de
extraer la pouch.
7. Si el producto laminado
tiene un aspecto poco
transparente, habrá que
aumentar la temperatura o reducir la velocidad. Si el producto laminado tiene un aspecto
ondulado, será necesario reducir la
temperatura o aumentar la velocidad.
8. Seleccionar PRE/H para tener la
máquina pronta para comenzar el trabajo
a 80˚C.
9. Al terminar la laminación, pulse la tecla
“COLD”. El display mostrará temperatura
0 y velocidad 2. Cuando la temperatura
alcanze los 85˚C., los rodillos se pararán
automáticamente. Enfriar la máquina
antes de apagarla, protege y alarga la
vida de los rodillos.
10. Apagar el interruptor.
11. Desconectar el enchufe si la máquina no
tendrá que ser usada por un cierto
periodo de tiempo.
OPERACIONES, PLASTIFICACION EN
FRIO GBC NO-HEAT LAMINATE™
Despues que la plastificadora ha sido
encendida trámite el interruptor situado en la
parte de atras de la máquina, viene impuesto
automáticamente el sistema de plastificación
en frio. Las palabras Ready, la temperatura
es a 0 y la velocidad es a 0 apareceran en el
display LCD. Si la maquina acaba de usarse
para la plastificacion en caliente, deve
alcanzar una temperatura no superior a
30˚C.antes de comenzar con la
plastificacion en frio.
1. Escoger una película para plastificar en
frio ligeramente más ancha que el
documento a plastifcar.
2. Hacer correr la película en la máquina,
con el lado de la pelÌcula vuelto hacÌa el
alto, durante 3 ó 6 mm. y pulsar STOP
para parar los rodillos.
3. Delicadamente, separar el papel de la
6
13 Pro
Manual de Utilización
Selecting
Functions
}
}
Control
Panel
LCD
PRE/H Stand-by
PLASTIFICACION
EN FRIO
Cold Lamination with
GBC No-Heat Laminate™
Película extendida
sobre la máquina
Documento
Papel de respaldo
film draped
over laminator
REV
backing release paper
document
Page 7

SPECIFICA TIONS
Electrical: 120V, 50/60 Hz, 7.8A, 940W
Machine Dimensions: Width: 492 mm (19.37")
Depth: 241 mm (9.5")
Height: 122 mm (4.8")
Packaged Weight: 11.9 kg (26.25 lbs)
Machine Weight: 10 kg (22.16 lbs)
Maximum Pouch Width: 330 mm (13")
Maximum Pouch
Thickness: 2 mm (.079")
Warm-Up Time: 2 1/2 - 8 1/2 mins.
SPECIFICA TIONS:
Alimentation électrique: 120 V, 50/60 Hz, 7.8 A, 940 W
Dimensions machine: Largeur: 492 mm (19.37")
Profondeur: 241 mm (9.5")
Hauteur: 122 mm (4.8")
Poids avec emballage: 11.9 kg (26.25 lbs)
Poids machine: 10 kg (22.16 lbs)
Largeur maximum
de plastification: 330 mm (13”)
Epaisseur maximum: 2 mm (.079”)
Temps de préchauffage: 2 1/2 - 8 1/2 mins
ESPECIFICACIONES:
Eléctrica: 120 V, 50/60 Hz, 7.8 A, 940 W
Dimensiones Ancho: 492 mm (19.37")
de la Máquina: Profundidad: 241 mm (9.5")
Alto: 122 mm (4.8")
Peso (con empaque): 11.9 kg (26.25 lbs)
Peso de la Máquina: 10 kg (22.16 lbs)
Anchura Máxima
del Pouch: 330 mm (13”)
Espesor Máximo: 2 mm (.079”)
Tiempo de
Calentamiento: 2 1/2 - 8 1/2 mins
Warranty
Our local sales offices provide final customers with
a warranty on material and workmanship defects in
unused and new machines for a period of 1 year.
Within this warranty period, GBC will, at its own
discretion, repair or replace defective original parts
in the machines at no charge. This is dependent on
the machine being delivered carriage paid to one of
the authorized GBC service partners or an GBC
agency.
Garantie
Vis-à-vis du consommateur final, les succursales
de vente offrent une garantie de 1 an sur les
défauts de matière et de fabrication pour les
appareils non encore utilisés et à l’état neuf.
Pendant la durée de la garantie, GBC décidera de
remplacer ou de réparer gratuitement les pièces
originales défectueuses de I’appareil. En contrepartie, les frais du retour de l’appareil au service technique agréé restent à la charge du demandeur.
Garantia
Las filiales comerciales locales se encargan de
prestar garantia de 1 año al cliente final por defectos de material y de producción, siendo aplicable a
aparatos nuevos y no usados. Durante el periodo
de garantía, GBC reparará o cambiará gratuitamente piezas originales defectuosas del aparato y
según su propia consideración. Una condición
indispensable para ello es la entrega libre de gastos a un colaborador autorizado de asistencia técnica de GBC o bien a una de las representaciones
de GBC.
parte de atras de la pelÌcula, y extenderlo
en la parte superior de la máquina.
4. Coloque el documento entre la película
separada y el soporte, y seleccione
Velocidad 1
5. Despues que el documento plastificado
ha salido de la parte posterior de la
máquina, o cortais el borde en exceso, o
lo dejais como contorno.
OTRAS APLICACIONES
GBC CREATIVE FOILS™
1. Seleccione 150ºC (302ºF) y velocidad 3,
y espere al indicador READY.
2. Meter el folio con el lado colorado hacía
el externo. Cuando imprimais diversos
colores en el mismo original, sistemar los
diversos colores y aseguradlos con los
stickers incluidos en los folios GBC.
3. Inserir el documento y el folio de color en
el carrier y plastificarlo.
4. Cuando el documente sale del fondo de
la máquina, moverlo del carrier y mover
tambien el folio de color.
GBC SOFT TOUCH POUCHES™
1. Seleccione 130ºC (266ºF) y velocidad 3,
y espere al indicador READY.
2. Iniciar a plastificar.
3. Cuando el documente sale por la parte
de atras de la máquina, con cuidado
mover el carrier.
13 Pro
Manual de Utilización
7
GBC Creative Foils™
GBC Soft Touch Pouches™
Page 8

Skokie, IL 60077 USA
 Loading...