

Gazer H714 User Manual

USER MANUAL
MOBILE VIDEO RECORDER


User manual 4-20
ENG
Руководство пользователя 21-37
RU
Посібник користувача 38-54
UA
3
Congratulations on your purchase of Gazer mobile video recorder.
Please read this manual carefully, before using the device.
Do not apply any chemicals when cleaning the device.
Only use soft cloth to clean the frame and the mirror surface.
Prevent the device from falling or damaged from other objects.
Do not use or store the device in hot or cold places.
- Storage Temperature: -20°C to +40°C
- Operating temperature: +5°C to +40°C
Make sure the recorder warms up before starting, if it was
exposed to the low temperatures for too long.
Do not attempt to repair the appliance yourself. In case of
damage, contact your dealer or service center.
The manufacturer is not responsible for any losses or missed
opportunities due to use of videos and data obtained with the
help of this MVR.
1.
2.
3.
4.
5.
6.
7.
Warnings
Gazer H714
ENG
Contents
1. Warnings 5
2. Important information 6
3. Package contents 7
4. Controls 8
5. Connection 9
6. Usage 10
7. Installation 11
8. MVR control 12
Indicator functions 12
9. Button functions 13
10. Preparing memory card 14
11. Preparing MVR 15
Connection with a display 15
Connection without a display 15
12. Settings 16
13. Viewing records 17
Viewing using recorder menu 17
Viewing using Gazer Player 17
14. Gazer Player 18
Files playback 18
Display mode 18
G-sensor graphics 18
Button functions 19
File designation in a playlist 19
15. Specifications 20
1GB memory recording time 20
4

Gazer H714
Congratulations on your purchase of Gazer mobile video recorder.
Please read this manual carefully, before using the device.
1.
Do not apply any chemicals when cleaning the device.
2.
Only use soft cloth to clean the frame and the mirror surface.
Prevent the device from falling or damaged from other objects.
Do not use or store the device in hot or cold places.
3.
- Storage Temperature: -20°C to +40°C
- Operating temperature: +5°C to +40°C
4.
Make sure the recorder warms up before starting, if it was
exposed to the low temperatures for too long.
Do not attempt to repair the appliance yourself. In case of
damage, contact your dealer or service center.
5.
The manufacturer is not responsible for any losses or missed
opportunities due to use of videos and data obtained with the
help of this MVR.
6.
7.
Warnings
ENG
5
Important information
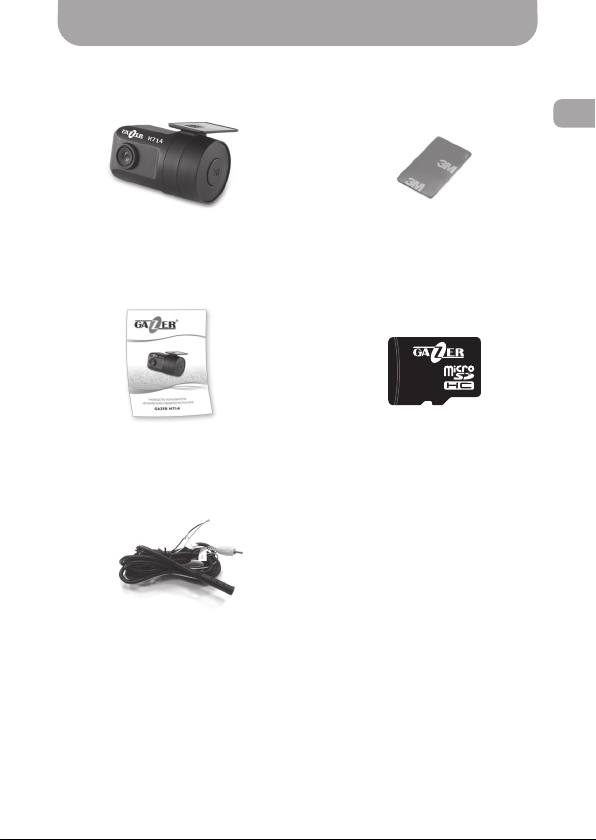
Package contents
Gazer MVR H714
Gazer micro SDHC
memory card+ adapter
Extra 3M scotch
tape for mounting
User Manual
Power supply
cable and composite RCA
video output
ENG
Warning!
1.
Do not insert or remove the SD card when the device is on this can lead to MVR malfunction.
Wait for 30 seconds after MVR shutdown, make sure that all
the lights are off for at least 10 seconds, and only then safely
remove the memory card.
Set the correct time and date before using the device. The
2.
MVR may not record in case these settings were entered
incorrectly.
Use at least 0.5 seconds time interval while pressing control
buttons, otherwise you may need to unplug the MVR power
3.
supply cable to reboot the system.
Do not turn off the power for at least 20 seconds after the
power supply cable is connected. This is necessary to help the
MVR function correctly.
4.
If after starting the car (when the power supply cable is
connected to the MVR), the device fails to switch to the
recording mode automatically, simply turn off the ACC power
5.
6.
for ten seconds and then try again.
Please consult your car service station for device installation
assistance to prevent the violation of your car warranty rules
and conditions.
Files protected from overwriting by the G-sensor are recorded
in a loop taking up 30% of the total storage space.
Files protected by pressing a special button use the same
storage space but cannot be overwritten.
It is strongly recommended to back up the recordings stored
on your memory card to a computer or other media to prevent
data loss (this happens when the memory card is full).
6
Package contents
ENG
Gazer MVR H714
User Manual
Power supply
cable and composite RCA
video output
Extra 3M scotch
tape for mounting
Gazer micro SDHC
memory card+ adapter
7
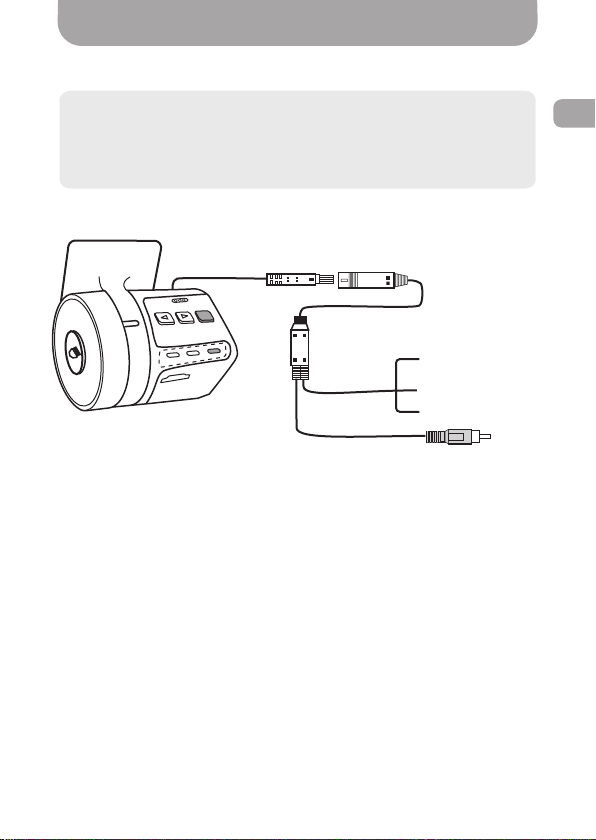
Connecting MVR
GND
BATT+
ACC
(red)
(yellow)
(black)
Note: Gazer H714 MVR must be connected to the car’s onboard
electrical system. For correct MVR installation, please contact
your car dealer or service station. To prevent the violation of
your car warranty rules and conditions, please consult with the
car service station authorized to perform warranty maintenance.
Connect the black wire (GND) to the car ground line. Connect the
yellow wire cable (BATT +) directly to +12V car battery terminal or
DC +12V power line. The red wire (ACC) must be connected to the
car’s +12V ACC power line (ACC power goes ON and OFF
automatically when the car engine is ON or OFF).
This connection guarantees that the MVR turns on and starts
recording automatically when your car engine starts. The MVR
continues recording for one hour (set by default) after the engine is
switched off and only then the system shuts down. You can change
these settings (recording duration after the engine is off) by pressing
«Auto-off time» and «Parking Mode» icons in the settings menu.
Power consumption in this mode is 110 mA.
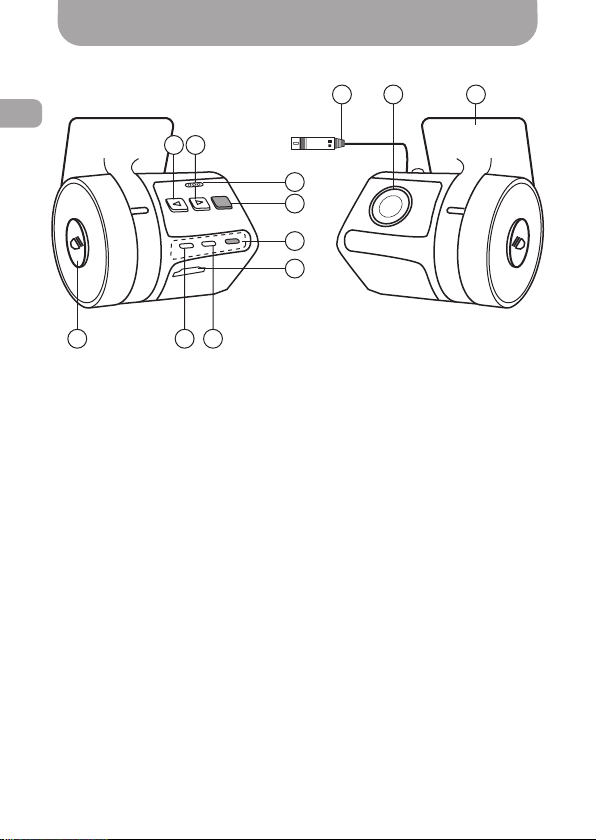
Controls
ENG
1 6 7
•REC Button – start or stop
1.
recording.
2.
LEFT button – menu navigation.
3.
RIGHT button – menu
navigation.
4.
OK button – selecting of the
function needed.
5.
Microphone
The MVR can also be turned off manually. To prevent the loss of
the last recorded data, first stop the recording by pressing the REC
button, and then turn off the device by long pressing REC. Use the
same button to turn the MVR back on.
All button functions and indicator operation modes are described
in detail on p. 12-13.
2
3
5
4
8
9
6.
PWR - power indicator (red).
7.
А - sound recording indicator (yellow).
8.
V - video recording indicator (blue).
9.
Memory card slot micro SD.
Do not insert or remove your memory
card if the power or indicators are on.
10.
Mounting set
.
11.
Lens.
12.
Connector - for power cable
connection and image display.
.
1012 11
8
Connecting MVR
Note: Gazer H714 MVR must be connected to the car’s onboard
electrical system. For correct MVR installation, please contact
your car dealer or service station. To prevent the violation of
your car warranty rules and conditions, please consult with the
car service station authorized to perform warranty maintenance.
(red)
ACC
(yellow)
BATT+
(black)
GND
Connect the black wire (GND) to the car ground line. Connect the
yellow wire cable (BATT +) directly to +12V car battery terminal or
DC +12V power line. The red wire (ACC) must be connected to the
car’s +12V ACC power line (ACC power goes ON and OFF
automatically when the car engine is ON or OFF).
This connection guarantees that the MVR turns on and starts
recording automatically when your car engine starts. The MVR
continues recording for one hour (set by default) after the engine is
switched off and only then the system shuts down. You can change
these settings (recording duration after the engine is off) by pressing
«Auto-off time» and «Parking Mode» icons in the settings menu.
Power consumption in this mode is 110 mA.
ENG
9

Usage
MVR installation
Warning! Wipe the surface of the windshield before installing. Make sure
the installation place is dry and clean. Do not install the mount on 3M
scotch tape at temperature below +5°C. Because of such low
temperature and the difference between the temperature inside the car
and outdoors, the 3M scotch will lose its adhesive properties and will not
be able to fix the mount properly.
Prior to installing, determine the exact
MVR position on the windshield. Mark the
installation place. Remember that once
the mount is installed on the car
windshield, you cannot change the
horizontal position of the device (side to
side), only vertical position (up and down)
can be changed afterwards.
Make sure that the device is installed
in a position from which hit can be
conveniently removed later. Fix the
mount so that other objects do not
prevent you from monitoring status
indicators, removing the memory card
or pressing any of the buttons.
By vertically turning the MVR frame point
the lens down at about 15°.
Remove the protective film from
3M tape.
Mount the device on the car windshield.
To remove the mount from the 3M
tape on the car windshield, take a
ruler or credit card and push it gently
between the mount and the
windshield.
1 2
3 4
5 6
You can use the MVR for security recordings when the car is parked.
ENG
When the ACC powers off the MVR will continue recording for the
period set in the «Auto-off time». Only after that will it shut down.
If «Never» setting is selected, the MVR continues recording and
shuts down only when the battery voltage drops below the value set
in the «Car battery protect» menu. This prevents the car battery
from complete discharge.
Note: Before adjusting the «Car battery protect» setting consult
with your car service station.
When the ACC power is off, the MVR can operate in two modes that can
be selected in the «Parking Mode» menu.
1. MVR operation with the «Parking Mode» off.
In this mode, once the ACC power is turned off, the MVR continues
recording for one hour (set as default) but its recording speed is
reduced to 10 frames per second to save space on your memory
card. If the G-sensor detects an impact, this recording will be
automatically protected to prevent accidental overwriting. The
G-sensor can be adjusted in the «Shock Sensitivity» menu where 10
is maximum value and 2 - minimum. Power consumption in this mode
is 90mA.
2. MVR operation with the «Parking Mode» on.
In this mode, once the ACC power is turned off, the MVR stops
recording the video and switches to the standby mode. If the
G-sensor detects an impact, the system will record a 60-90 sec
video at the speed of 30 frames per second. The resulting video file
will protect the file from overwriting. If the «Shock Sensitivity» is
disabled and the engine is off the G-sensor default sensitivity is 5.
Power consumption in this mode is 80mA.
10
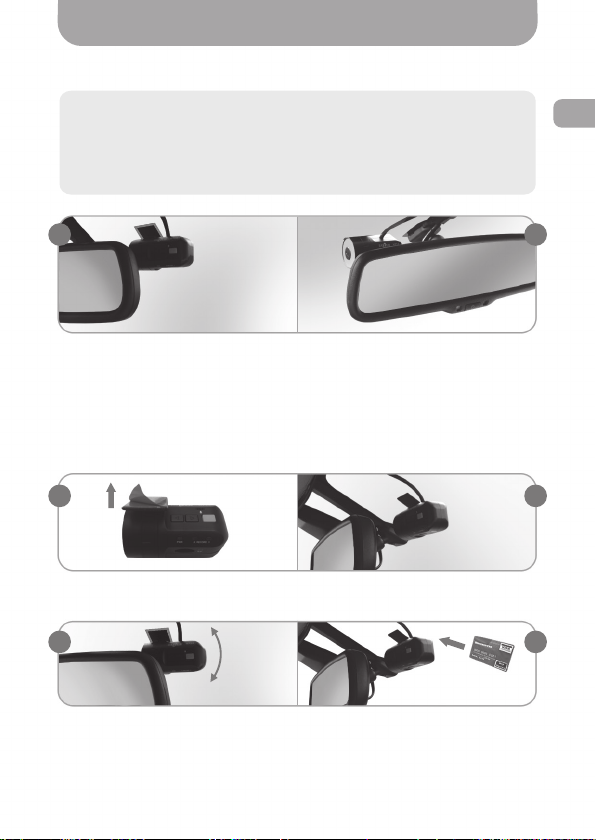
MVR installation
Warning! Wipe the surface of the windshield before installing. Make sure
the installation place is dry and clean. Do not install the mount on 3M
scotch tape at temperature below +5°C. Because of such low
temperature and the difference between the temperature inside the car
and outdoors, the 3M scotch will lose its adhesive properties and will not
be able to fix the mount properly.
1 2
Prior to installing, determine the exact
MVR position on the windshield. Mark the
installation place. Remember that once
the mount is installed on the car
windshield, you cannot change the
horizontal position of the device (side to
side), only vertical position (up and down)
can be changed afterwards.
Make sure that the device is installed
in a position from which hit can be
conveniently removed later. Fix the
mount so that other objects do not
prevent you from monitoring status
indicators, removing the memory card
or pressing any of the buttons.
3 4
Remove the protective film from
3M tape.
Mount the device on the car windshield.
5 6
ENG
By vertically turning the MVR frame point
the lens down at about 15°.
To remove the mount from the 3M
tape on the car windshield, take a
ruler or credit card and push it gently
between the mount and the
windshield.
11
Short press – press and release the button.
Long press – press and hold for 5 seconds and then release the
button.
Functions of buttons
In standby mode
Button Pressing Function
Button Pressing Function
Button Pressing Function
Button Pressing Function
Short
Long
Short
Long
Short
Long
Short
Turn on the video recording
Enable or disable the MVR
Enable or disable the microphone
Switch between PAL and NTSC video output formats
Video viewing mode
MVR settings menu
Switching on the «emergency» recording
While menu navigating
LEFT
LEFT
RIGHT
•REC
Switch between menu items (up), changing
the setting (increase)
RIGHT
Switch between menu items (down), changing the
setting (decrease)
Exit the MVR setup menu
ОК
ОК
Select and save the setting
Recording mode
•REC
LEFT
ОК
Short
Short
Short
Recording mode is off
Enable or disable microphone
Switch on the «emergency» recording
Playback mode
•REC
LEFT
RIGHT
ОК
Short
Short
Short
Short
Short
Short
Long
Short
Exit playback mode
Navigate between videos
Navigate between videos
Start or stop playback
ENG
12
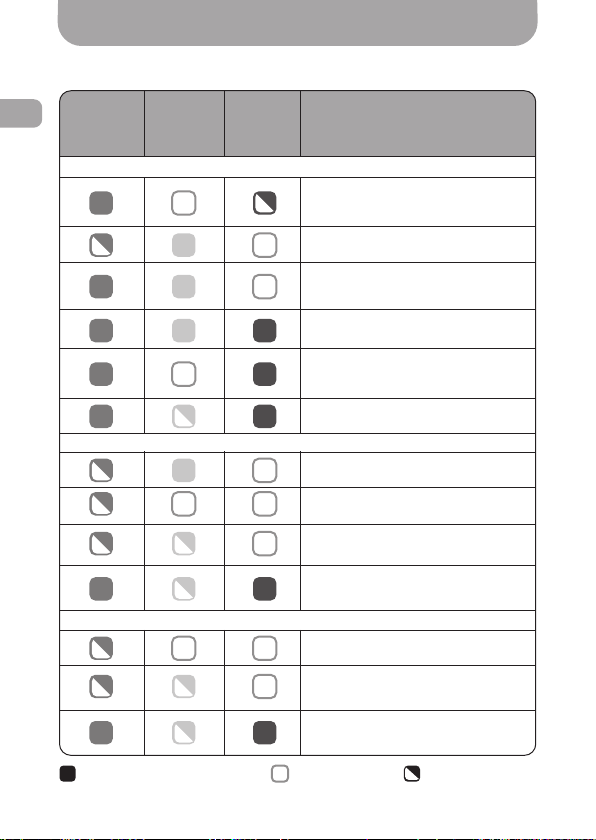
MVR control
Power
indicator
PWR
(red)
the indicator is constantly working the indicator is off the indicator flashes
Sound
indicator
(yellow)
Recording
indicator
А
АСС is off, parking mode is off
ACC is off, parking mode is on
V
(blue)
АСС is on
Status
description
MVR is connected to the power
supply, memory card is missing,
damaged or full
MVR is connected to the power
supply, date and time are not set
MVR is connected to the power
supply, the microphone is on, and
video recording is not working
MVR is connected to the power
supply, video and sound are recorded
MVR is connected to the power
supply, video is recorded but there is
no sound
MVR is connected to the power supply,
«emergency» video is recorded
Recording video with sound,
speed 10 fps
Recording video without sound,
speed 10 fps
«
Recording
(G-sensor detection), speed 30 fps
Recording
(manually pressed button),
speed 30 fps
MVR is in standby mode
Recording
(G-sensor detection), speed 30 fps
Recording
(manually pressed button),
speed 30 fps
emergency» video
«
emergency» video
«
emergency» video
«
emergency» video
Functions of buttons
Short press – press and release the button.
Long press – press and hold for 5 seconds and then release the
button.
In standby mode
Button Pressing Function
•REC
LEFT
RIGHT
ОК
Short
Long
Short
Long
Short
Long
Short
Turn on the video recording
Enable or disable the MVR
Enable or disable the microphone
Switch between PAL and NTSC video output formats
Video viewing mode
MVR settings menu
Switching on the «emergency» recording
Recording mode
Button Pressing Function
•REC
LEFT
ОК
Short
Short
Short
Recording mode is off
Enable or disable microphone
Switch on the «emergency» recording
Playback mode
Button Pressing Function
•REC
LEFT
RIGHT
ОК
Short
Short
Short
Short
Exit playback mode
Navigate between videos
Navigate between videos
Start or stop playback
While menu navigating
Button Pressing Function
LEFT
RIGHT
ОК
Short
Short
Long
Short
Switch between menu items (up), changing
the setting (increase)
Switch between menu items (down), changing the
setting (decrease)
Exit the MVR setup menu
Select and save the setting
ENG
13
Preparing Memory Card
Preparing MVR ready
Connecting with a display
One must adjust the MVR settings before using the device. The main
settings are optimal by default (factory settings) but in any case, you
must set the exact time and date. This is necessary for correct
functioning in the recording mode and further analysis of recorded
video sequences.
For the correct adjustment of settings, we recommend connecting the
MVR to a display. You can use the Gazer monitor, Gazer Rearview Mirror
with a built-in monitor, or any other display with a composite video input.
Do not connect the MVR to the power supply yet. First make sure that
all the indicators are off and then insert the memory card.
The memory card is inserted with connectors towards the display.
Connect the MVR to a display and plug in the power supply.
The recorder will ask to format the memory card if it is used for the
first time. This way the MVR will be able to write Gazer Player software
on the memory card for future video viewing.
If you want to access the setup menu, press the • REC button and stop
the recording first (the recording mode will take some time to shut
down as it is closing and saving the current file), then press and hold
the RIGHT button for 5 seconds. Use LEFT and RIGHT buttons while
navigating the menu, press OK to go to the submenu and select the
setting, long press the RIGHT button to exit from the menu.
Connecting without a display
Insert a memory card into the slot and connect the MVR to a power
supply. After a few seconds the recorder will turn on and ask to format
the memory card. In this case, the PWR (Red) indicator will be
constantly on and the V indicator (blue) will flash. To start formatting,
press the RIGHT button once and then click OK. The formatting
process will take a few seconds, and then the MVR will automatically
switch to the recording mode. In this case, the indicator PWR (red) will
flash and the V (blue) indicator will be always on.
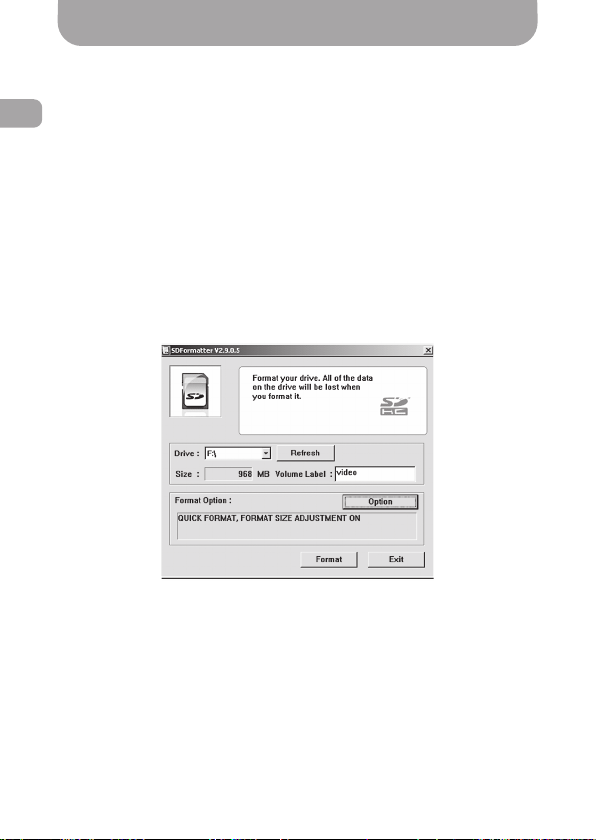
Before using the MVR, it is important to format your memory card
ENG
using specialized tools. We recommend using a free SD
Formatter utility. Use a search engine to find and download it
from one of many Internet resources or from the web portal
http://www.sdcard.org.
Formatting is necessary to optimize the memory card access
speed. The system formats the card in accordance with SD
Memory Card Format Specification, which allows the MVR to
access the card faster. This cannot be done with regular Windows
formatting tools. SD Formatter also (by selecting option of
Format Size Adjustment = ON) creates an optimal file system
structure (cluster size, etc.).
If you use an unformatted memory card, the MVR may fail to
record or record incorrectly (long pauses between the videos).
Formatting with
minimum.
SD formatter
reduces the duration of pauses to a
14

Preparing MVR ready
One must adjust the MVR settings before using the device. The main
settings are optimal by default (factory settings) but in any case, you
must set the exact time and date. This is necessary for correct
functioning in the recording mode and further analysis of recorded
video sequences.
For the correct adjustment of settings, we recommend connecting the
MVR to a display. You can use the Gazer monitor, Gazer Rearview Mirror
with a built-in monitor, or any other display with a composite video input.
Do not connect the MVR to the power supply yet. First make sure that
all the indicators are off and then insert the memory card.
The memory card is inserted with connectors towards the display.
Connecting with a display
Connect the MVR to a display and plug in the power supply.
The recorder will ask to format the memory card if it is used for the
first time. This way the MVR will be able to write Gazer Player software
on the memory card for future video viewing.
If you want to access the setup menu, press the • REC button and stop
the recording first (the recording mode will take some time to shut
down as it is closing and saving the current file), then press and hold
the RIGHT button for 5 seconds. Use LEFT and RIGHT buttons while
navigating the menu, press OK to go to the submenu and select the
setting, long press the RIGHT button to exit from the menu.
Connecting without a display
Insert a memory card into the slot and connect the MVR to a power
supply. After a few seconds the recorder will turn on and ask to format
the memory card. In this case, the PWR (Red) indicator will be
constantly on and the V indicator (blue) will flash. To start formatting,
press the RIGHT button once and then click OK. The formatting
process will take a few seconds, and then the MVR will automatically
switch to the recording mode. In this case, the indicator PWR (red) will
flash and the V (blue) indicator will be always on.
ENG
15
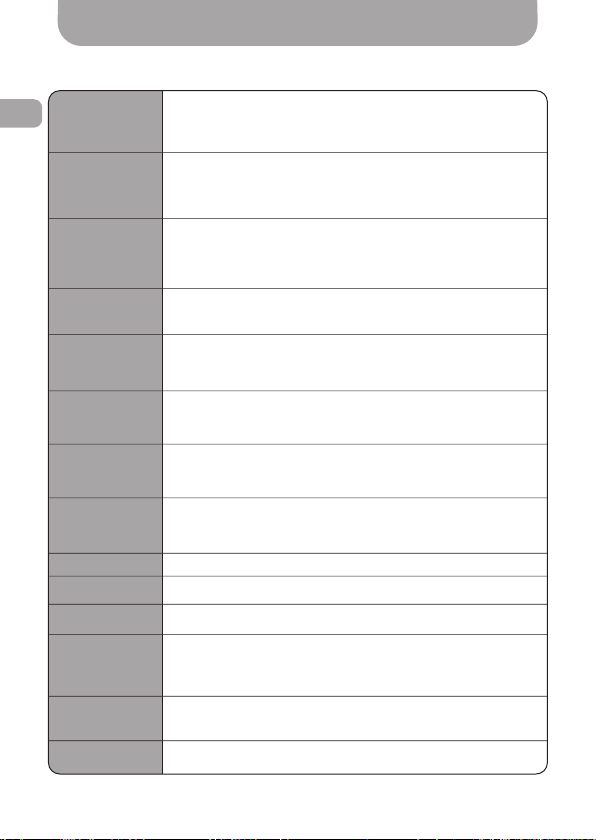
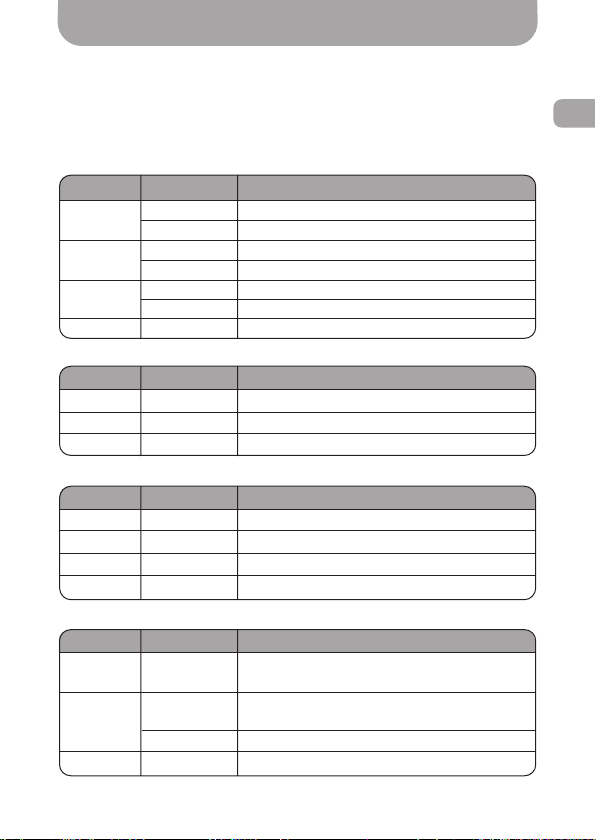
Settings menu
Viewing records
You can view the records with the MVR. Alternatively, you can
remove your memory card and watch the records on your personal
computer.
Connect the recorder to a monitor or a TV set using the RCA
composite video output. Make sure the device is connected to a
power supply.
Stop the current recording by pressing the • REC button, then
switch to «view» by short pressing the RIGHT button.
To navigate through videos, use the LEFT and RIGHT buttons.
OK button will start or stop playback. When you finish viewing, do
not forget to resume the recording by pressing the • REC button.
MVR viewing
Connect the memory card to your computer and run the file.
After that, the Gazer Player window will appear on the screen.
Using this program you can view your videos, make screenshots,
delete or save videos in AVI format on the your PC.
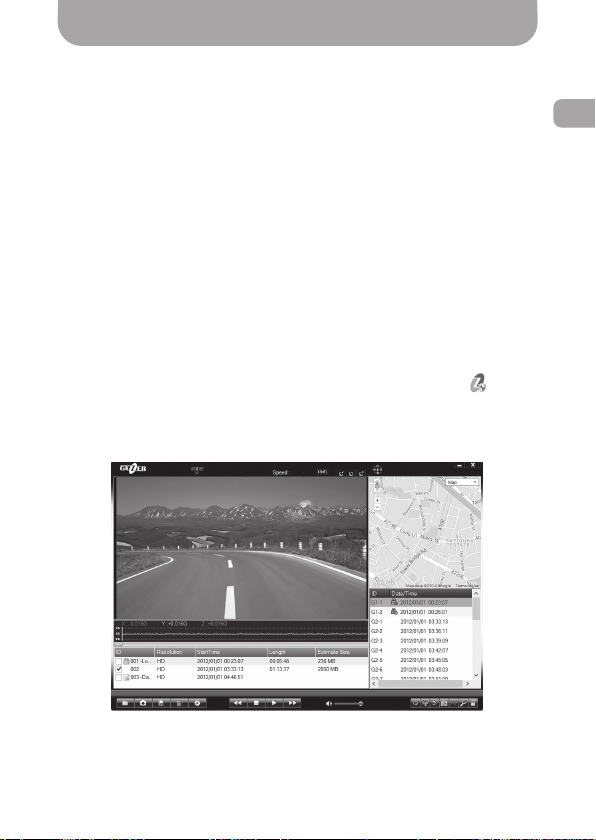
Gazer Player viewing
Gazer Player
ENG
Recording quality
Shock sensitivity
Frame rate
Time setup
Auto rec
Audio recording
Auto-off time
G-SENSOR
sensitivity
Light frequency
Language
Format
Parking mode
Car battery
protect
Default setting
HD (1280x720), SD (648x480)
Specifies the resolution of recorded videos.
It is recommended to use the 1280x720 mode, 30fps, if you use
a 8-32 GB memory card.
30 fps, 15 fps, 5 fps
Recording speed setting.
It is recommended to use the 30 fps recording speed. The lower the recording
speed, the more difficult it is to reconstruct the course of traffic events and use
the video as evidence.
YY:MM:DD, HH:MM:SS
Date and time setting.
We recommend that you use accurate date and time settings and check
periodically. Date format used: YY: MM: DD (Year: Month: Day). Time
format used: 24-hours (hour: minute: second).
On, Off
Automatic activation and recording when ACC power is supplied.
It is recommended to use the auto recording setting.
On, Off
Turning on/off the sound recording option.
Default microphone setting on the recorder startup. The new setting will be saved
automatically when the device is used next time.
1M, 1H, 6H, 12H, 1D, 2D, Never
Automatic recorder shutdown after a certain period following the ACC
power off.
Set the required operation time after the ACC power is off.
Disable, Low, Normal, High
Setting the three axes shock sensor sensitivity.
Files, recorded during the shock sensor operation (sudden acceleration,
braking, and collision) are automatically.
50 Hz, 60 Hz
Setting up the built-in video camera.
The recommended frequency for USA is 60 HZ. The recommended
frequency for Europe is 50 HZ.
Select the menu language.
No, Yes
Format the memory card.
Off, On
Select the MVR operation mode after the ACC power is off.
Disable, 2X, 3X, 5X, 10X
Adjust the three axes shock sensor sensitivity when the vehicle is parked.
As the value increases, the sensitivity of the sensor goes up and similarly
as the value decreases, the sensitivity goes down. Files, recorded during
the shock sensor operation are automatically protected from overwriting.
11.7V, 11.5V
Minimum voltage of the car’s cigarette lighter socket. When reached, the
MVR switches off automatically.
No, Yes
Restart the system and revert to factory settings.
16
Viewing records
You can view the records with the MVR. Alternatively, you can
remove your memory card and watch the records on your personal
computer.
MVR viewing
Connect the recorder to a monitor or a TV set using the RCA
composite video output. Make sure the device is connected to a
power supply.
Stop the current recording by pressing the • REC button, then
switch to «view» by short pressing the RIGHT button.
To navigate through videos, use the LEFT and RIGHT buttons.
OK button will start or stop playback. When you finish viewing, do
not forget to resume the recording by pressing the • REC button.
Gazer Player viewing
Connect the memory card to your computer and run the file.
After that, the Gazer Player window will appear on the screen.
Using this program you can view your videos, make screenshots,
delete or save videos in AVI format on the your PC.
Gazer Player
ENG
17
 Loading...