

Gazer CM70 Series User Manual


User manual ..................................................................................................................................................................4-21
EN
RU
Руководство пользователя
Посібник користувача
UK
.................................................................................................................................... 22-39
............................................................................................................................................ 40-57

Content
EN
1. Gazer Multimedia System Package Contents .......................................................................................................................................... 6
2. Connection diagram
3. Installation Tips
4. Radio App
5. Music App
6. Video App
......................................................................................................................................................................................................... 9
....................................................................................................................................................................................................... 11
....................................................................................................................................................................................................... 12
7. Bluetooth App
8. BT Music App
9. AirPlay and MirrorLink Functions
• AirPlay
........................................................................................................................................................................................................ 15
• MirrorLink USB
• MirrorLink Wi-Fi
10. Installing Apps from Google Play
11. Conguring Equalizer
12. Display Customization
13. Front Panel Buttons
....................................................................................................................................................................................... 7
.............................................................................................................................................................................................. 8
................................................................................................................................................................................................ 13
................................................................................................................................................................................................. 14
.............................................................................................................................................................. 15
........................................................................................................................................................................................... 17
......................................................................................................................................................................................... 18
........................................................................................................................................................... 19
................................................................................................................................................................................ 19
.............................................................................................................................................................................. 20
................................................................................................................................................................................... 20
4

Gazer multimedia system
We congratulate you on purchasing Gazer multimedia system!
Please, carefully read this guide in full before mounting and using the Gazer multimedia system. Keep this
guide for future reference.
Gazer multimedia systems are designed for standard installation in a specic car model or model range. The Gazer multimedia system is mounted and connected based on the Plug&Play principle. Operation via control bus and CAB-BUS data transfer
is also supported.
When connected to CAN bus via a special module, the system is controlled by the car’s onboard computer (turning on/off,
climate control status, steering wheel buttons, car speed data, door opening sensors status and other functions supported by
the CAN bus of a specic car). The user can program the steering wheel control buttons at his/her own discretion.
EN
5
EN
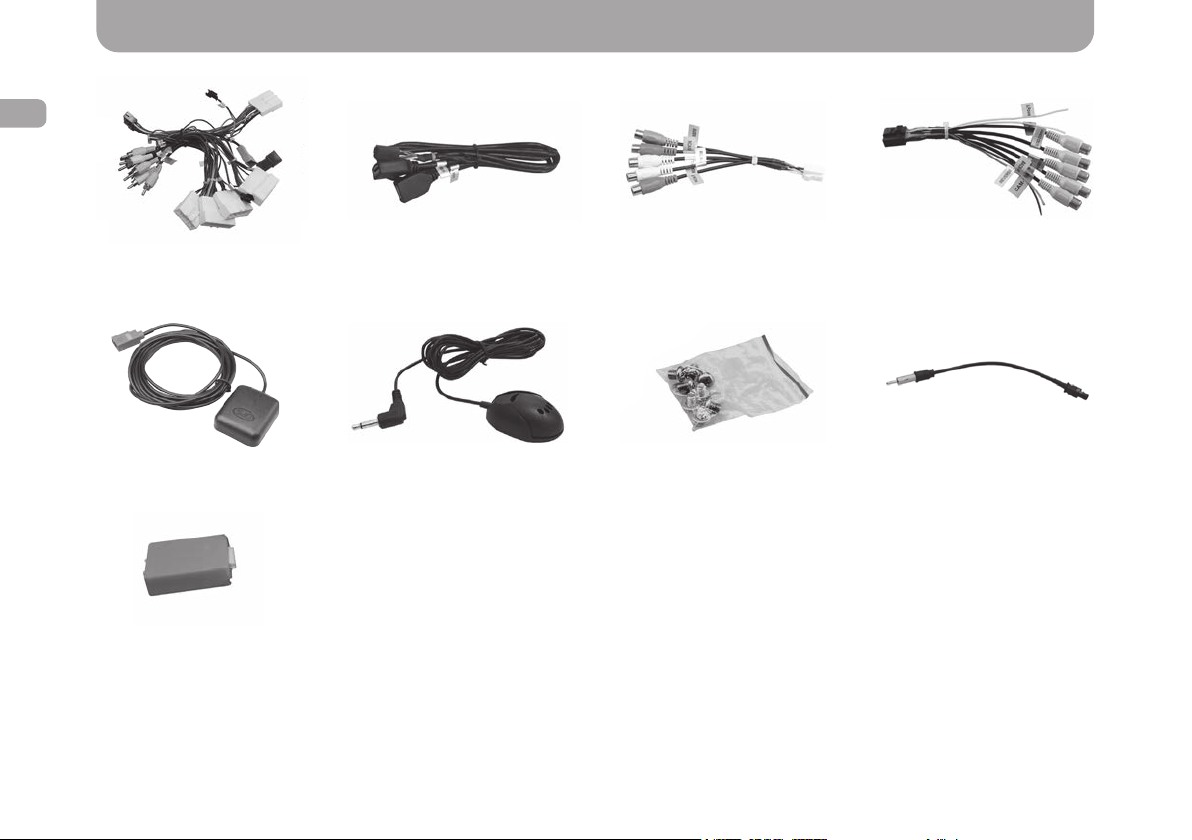
Gazer CM70XX-XX multimedia system package contents
Power cable and Speakers
USB cable Audio out cable
cable
GPS antenna Microphone* Mounting screws*
Signal/
Video in/out cable
Antenna adapter*
CAN unit*
* Package contents and appearance can differ depending on the model
6
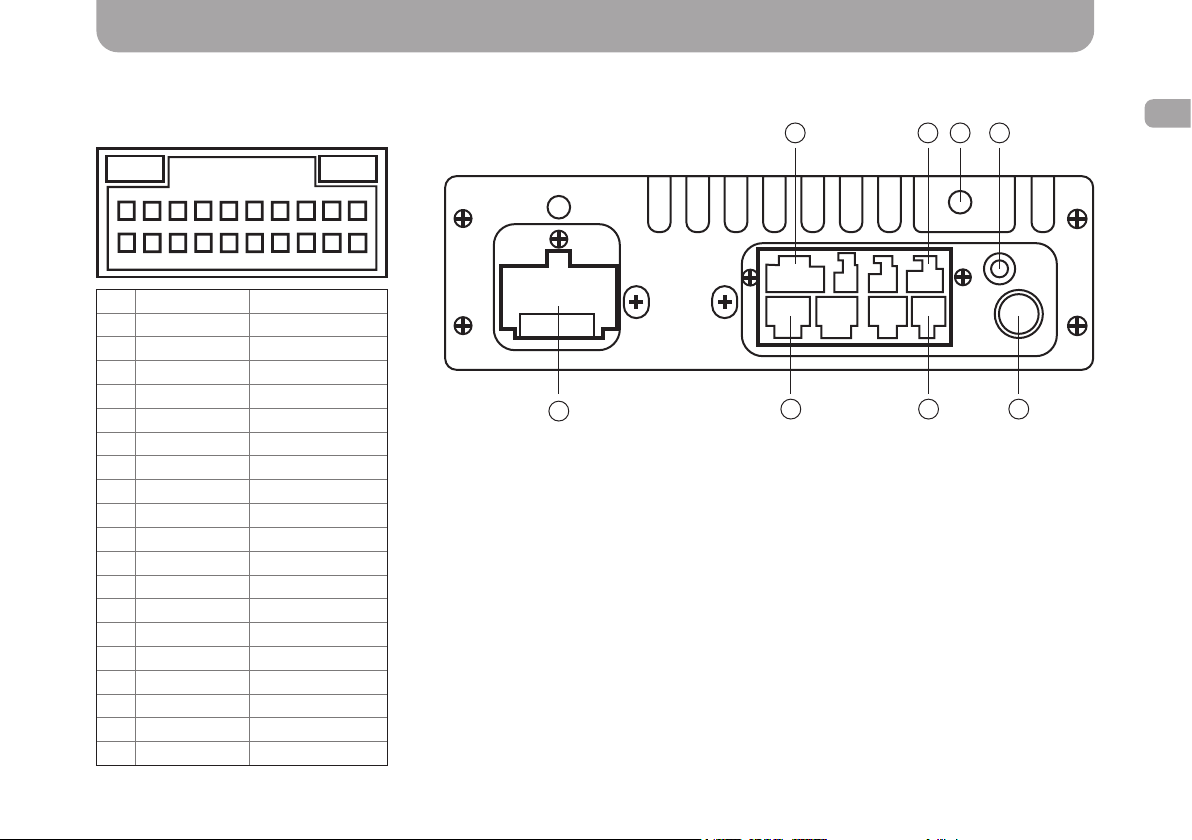
Connection diagram
10
20
1 FL+ WHITE
2 FL- WHITE/BLACK
3 FR+ GRAY
4 FR- GRAY/BLACK
5 ACC RED
6 BRAKE PINK
7 WHEEL/KEYI ORANGE/BLACK
8 CAN_RXD BLUE/BLACK
9 IR BROWN/WHITE
10 ILL ORANGE
11 RL+ GREEN
12 RL- GREEN/BLACK
13 RR+ PURPLE
14 RR- PURPLE/BLACK
15 BATT+12V YELLOW
16 GND BLACK
17 WHEEL/KEY2 ORANGE/WHITE
18 BROWN BROWN/BLACK
19 ANT BLUE
20 BACK BROWN
123456789
111213141516171819
Connection diagram Gazer CM70XX-XX
1
1. Power jack
2. Video in/out
3. USB cable jack
4. External Wi-Fi antenna
5. GPS antenna jack
6. 4.1 jack
7. AUX (Audio L/R, Video-in) jack
8. FM antenna jack
2
6
4 5
3
7
8
Connection diagram
Power: 12V
EN
7

Installation tips
EN
• For Gazer CM70XX-XXX multimedia system installation, the original climate control buttons must be unmounted. Free
plugs must be connected with the multimedia system. Climate control is further set up using the sensor panel of the
Gazer CM70XX-XX multimedia system.
• For Gazer multimedia system installation, one must check that all plugs and jacks are connected in accordance with the
connection diagram.
• Make sure that the yellow BAT+ wire of the power cable is connected to the plus terminal of the car battery, while the
red ACC wire is connected to the auxiliary equipment bus (+12V voltage is supplied when the ignition key is turned to
АСС position).
Caution! Incorrect power connection may cause the multimedia system to malfunction or fail.
• Prior to installing the system, one must consider where to place the remote elements such as GPS antennas and USB
ports.
• Lay all cables under the trim.
• Connect the stock USB and AUX connectors to the multimedia system (depending on the car model).
• Connect the system to the Internet to take full advantage of all features of the Gazer multimedia system.
8
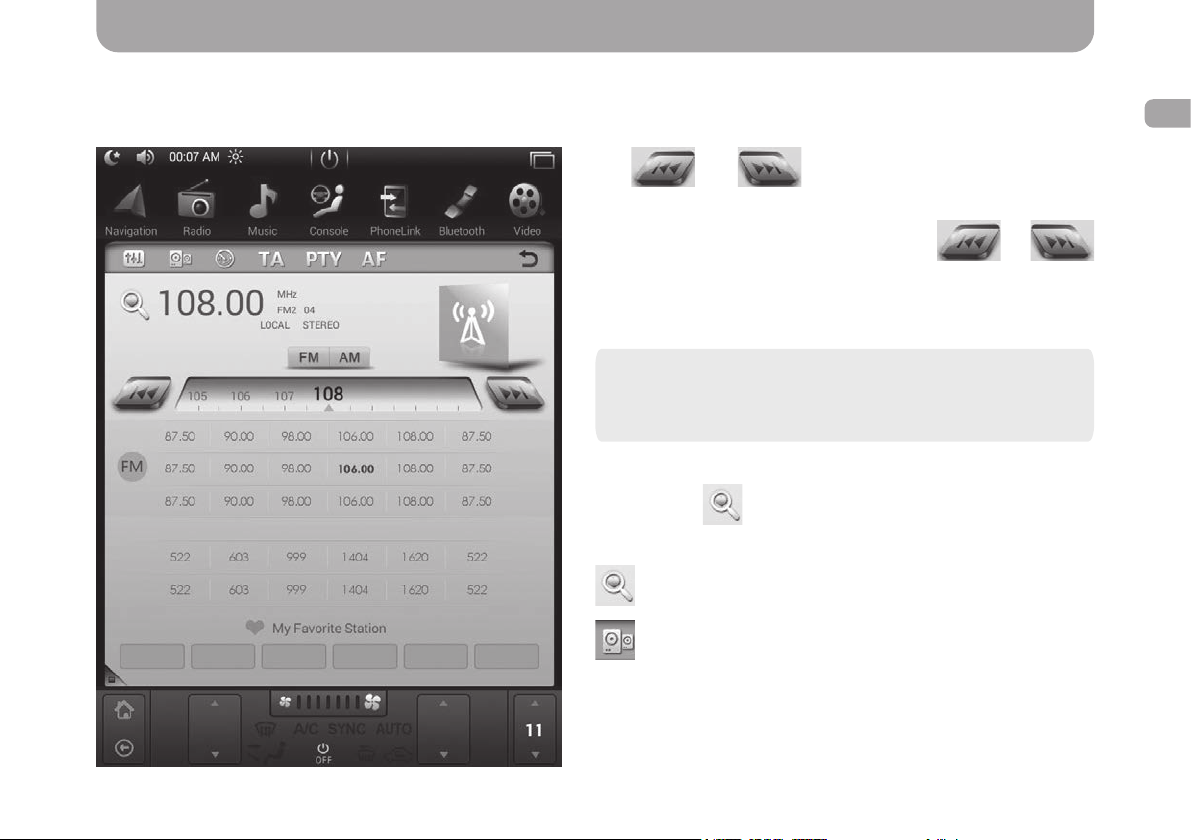
Radio App
To launch Radio app, tap on the corresponding icon on the main home screen, the corresponding icon in the installed apps
list, or press the BAND key on the multimedia device front panel.
Use
and buttons to automatically search for
radio stations.
To enable manual ne-tuning, hold down
or
button for 2 sec.
To save a radio station to one of the memory buttons, hold
down the required button for 2 sec.
Note. Keep in mind that the multimedia system has 6
memory buttons in each group, which allows memorizing
a total of 18 radio stations for FM frequency range and 12
radio stations for AM frequency range.
To enable the Scanthrough function for the memorized sta-
tions, press
button. When this function is enabled, the
radio receiver will recall all memorized stations one by one and
run them for 5 sec. To disable this operation mode, press
button again.
button enables or disables the Stereo mode.
EN
9
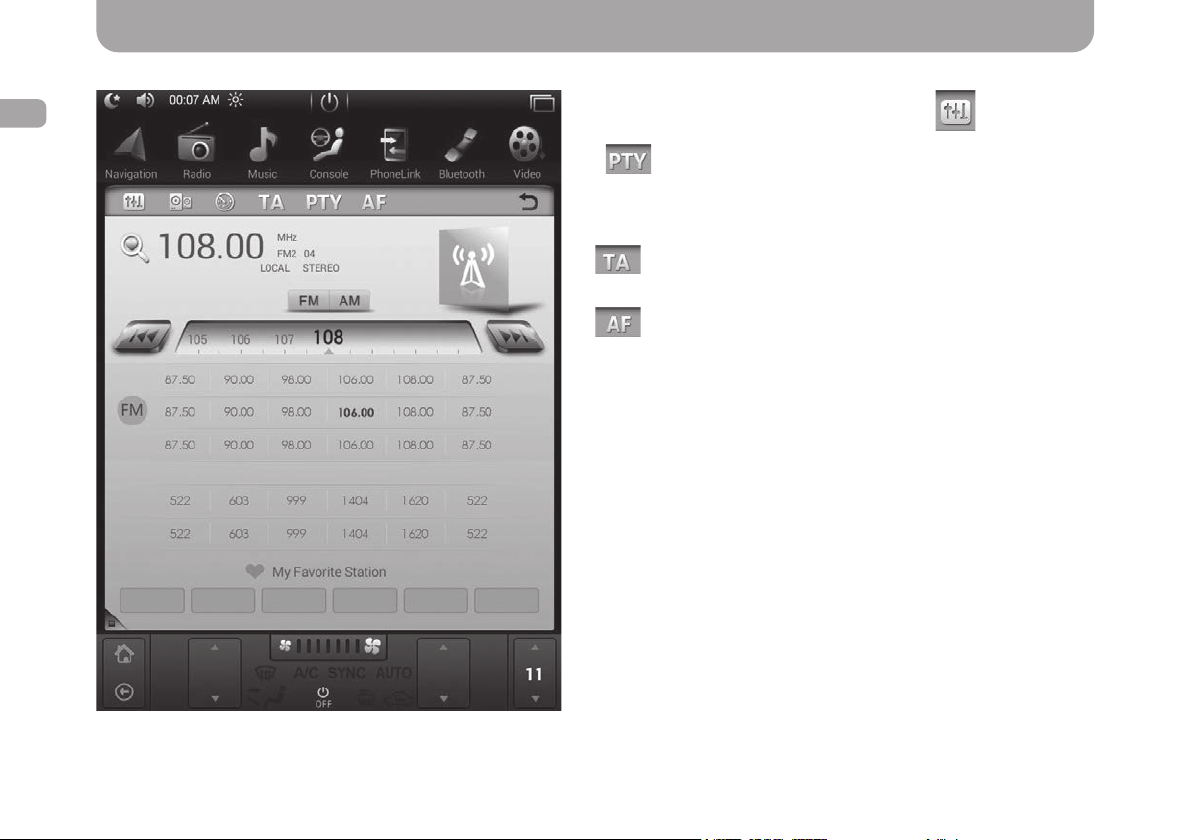
Radio App
EN
You can open the equalizer settings using button.
button is designed for searching radio stations by
genre. Once this button is pressed, a drop-down list is dis-
played where one can select the genre of the required radio
station.
button is designed for searching radio stations broad-
casting live trafc information.
button enables automatic retuning of the radio receiver
(e.g., in case of poor signal on the current frequency) to a
different frequency where the current program is also broad-
casted.
10
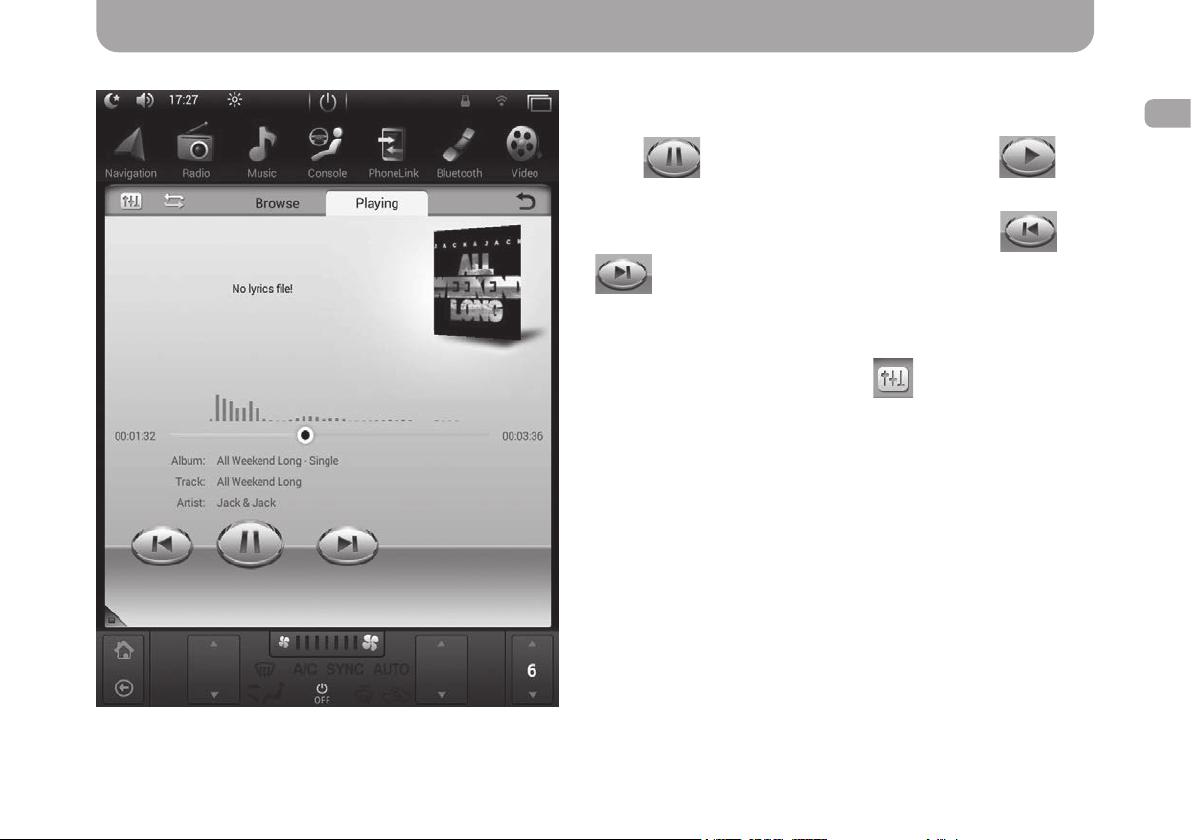
Music App
To launch Music app, tap on the corresponding icon in the
installed apps list.
Press
button to pause audio playback and but-
ton to resume it.
To skip to the next or previous audio track, use
and
buttons.
To fast forward/rewind the recording, move the slider on the
audio track progress bar.
To open equalizer settings, press
button in the left top
corner. To select a media source or a folder for playback, press
the Browse button.
To view the current playlist, press the Playing button.
EN
11
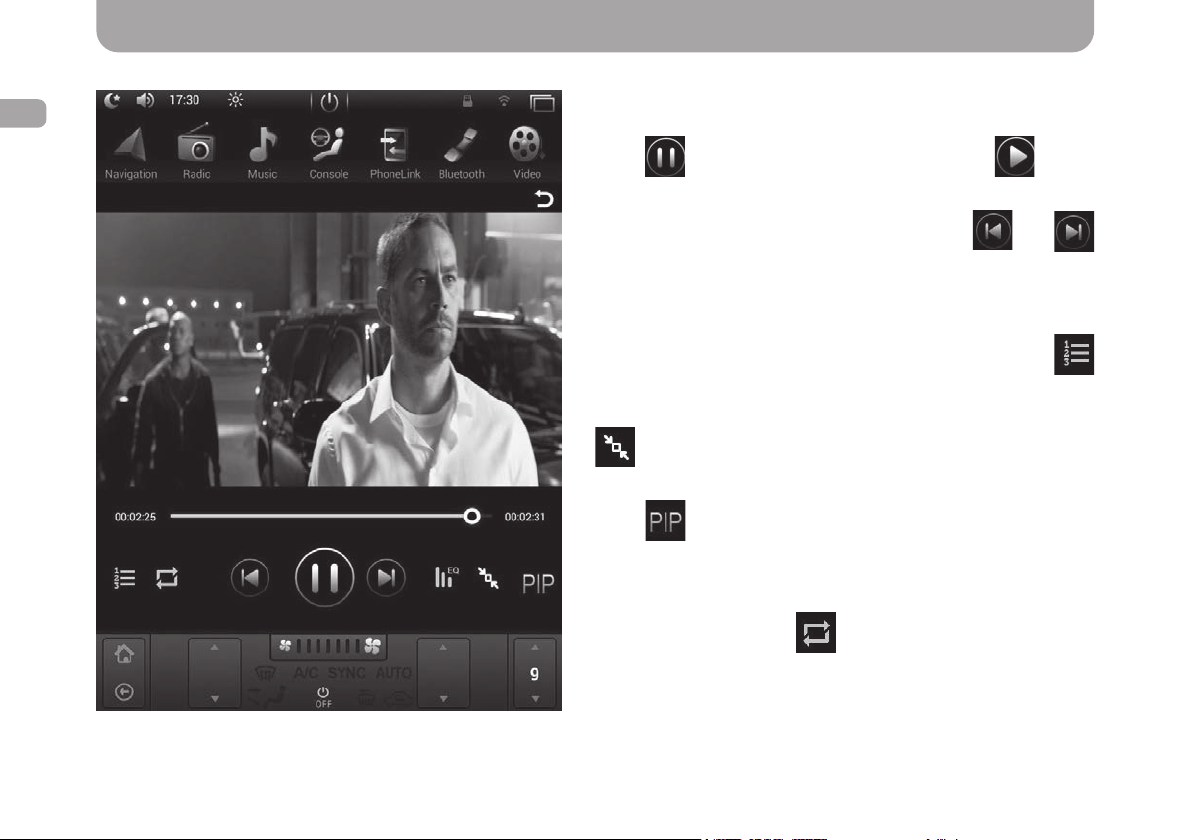
Video App
EN
To launch Video app, tap on the corresponding icon in the
installed apps list.
Press
button to pause video playback and button
to start playback.
To skip to the next or previous video clip, use
and
buttons.
T o fast forw ard/rewind the video, mo ve the slider on the video
playback progress bar.
To select a media source or a folder for playback, press
button.
The video image will be stretched to t the screen size once
button is pressed and to half the size of the display when
the button is pressed again.
When
button is pressed, the «picture in picture» function
is enabled, and the video will be played in a small window over
the desktop and other applications. Tap on the video twice to
disable the «picture in picture» mode.
Set playback order using
button on the lower panel. Once
pressed, the order changes depending on the selected mode.
12

Bluetooth App
Bluetooth app allows using the multimedia system as a hand-free communication system, and making and receiving calls.
To connect a mobile phone to the multimedia system, follow the instructions below:
• Enable Bluetooth in the mobile phone
• Find the multimedia system in the list of available Bluetooth devices («Gazer CM» by default)
• Pair your phone with the multimedia system and enter the password («0000» by default)
If mobile phone pairing is successful, its name will appear in the Search tab of the Bluetooth app, and the other tabs in the
app will also become active.
One may open Bluetooth app anywhere in the interface by pressing a button with a handset image on the front panel of the
device or using the button on the main screen.
To disconnect the device, use button.
To remove the mobile device from the list of paired devices,
press
To navigate to the dialer tab, press
To navigate to the contacts tab, press
.
button.
button.
Use the search bar to search in the contacts list. You can also
use quick alphabetic navigation.
To dial the selected number, use
button.
EN
13
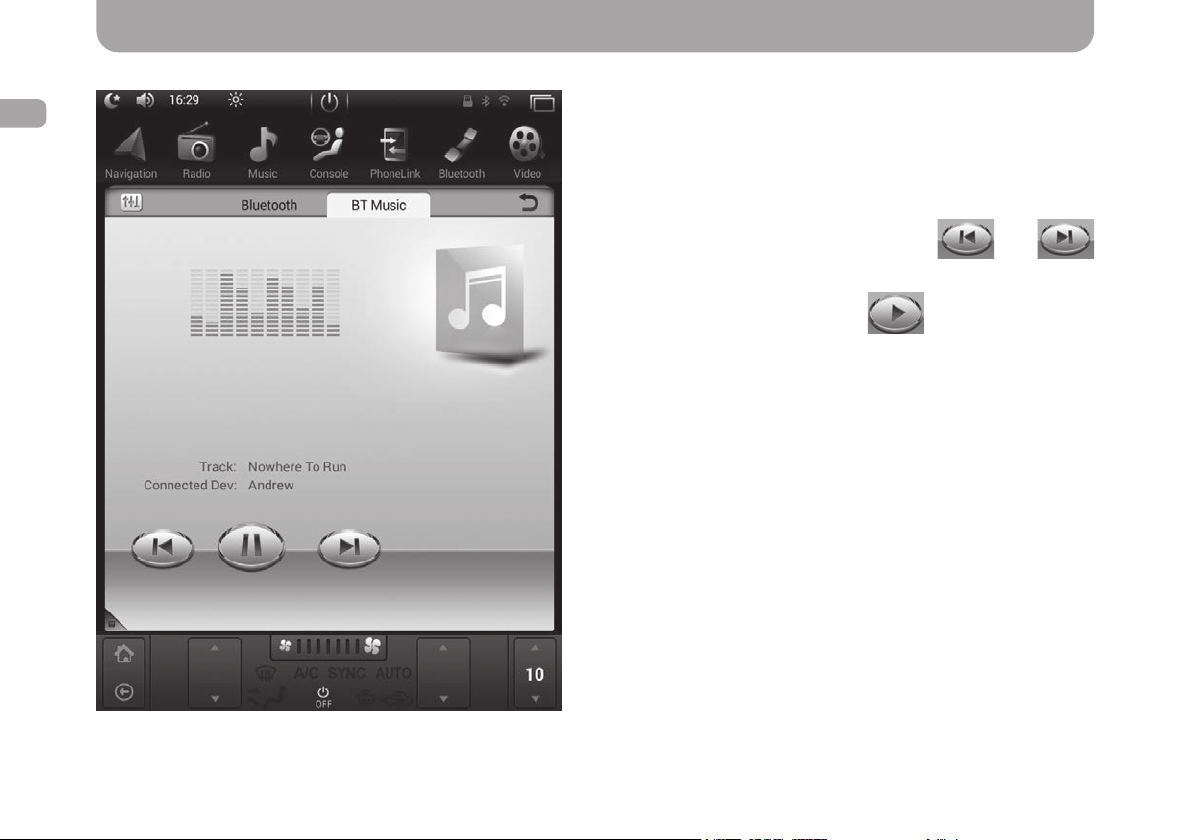
BT Music App
EN
BT Music app is designed for listening music from the mobile
phone via Bluetooth connection.
To use the app, connect your mobile phone to the multimedia
system via Bluetooth, as described above.
The app can be launched by tapping on the corresponding icon
in the installed apps list.
Switch between audio tracks by pressing
and
buttons.
To start or pause playback, press
button.
During audio playback, one can see the name of the current
track and the artist.
14

AirPlay and MirrorLink Functions
AirPlay
AirPlay function is designed for mirroring the screen and playing back audio les iOS-running devices on the multimedia
system display.
To use AirPlay function, the multimedia system and iOS mobile device must be connected to the same Wi-Fi network. One
can connect the devices into a single network in a number of ways:
• By connecting both devices (a mobile device and a multimedia system) to the same Wi-Fi network (home network,
public network, Wi-Fi network of mobile 3G router, etc.).
• By creating a Wi-Fi network on a mobile device and connecting the multimedia system to it.
• By creating a Wi-Fi network on the multimedia system and connecting the mobile device to it.
To setup a Wi-Fi network on an iOS mobile device, do as follows:
• Open «Settings» – «Router mode»
• Activate the personal hotspot
Note. This menu also allows changing the access password to the newly created network.
To setup a Wi-Fi network on the multimedia system, do as follows:
• Open «Settings» – «Router mode»
• Enable the «Wi-Fi hotspot» option
Note. Use the «Set up Wi-Fi hotspot» item of this menu to change the access password and the name of the newly
created network.
EN
Once both the devices (the multimedia system and the iOS mobile device) are connected within a single Wi-Fi network, one
can proceed to enabling AirPlay function.
15

AirPlay and MirrorLink Functions
EN
To enable AirPlay function, do as follows:
• Open PhoneLink app available in the installed apps list
• Select «iPhone WiFi» option
16
• Select «AirPlay mirroring» in the mobile
device control panel and establish connection with the «EC-Mirror-XX» device

AirPlay and MirrorLink Functions
MirrorLink USB
MirrorLink function allows mirroring the screen of an OC Android mobile device to a multimedia system display.
For this function to work, one must enable the «USB debugging» option on the mobile device. To do this, follow the steps
below:
• Open «Settings» – «About device»
• Tap «Build number» 5 times to activate the developer mode (for the majority of smartphones)
Caution! Developer mode activation method may differ depending on the smartphone model.
• Then open «Settings» – «Developer options» and activate «USB debugging»
Perform this procedure once for each device you want to connect.
To complete the connection process, do as follows:
• Open PhoneLink app available in the installed apps list
• Select the «Android USB» option
• Use a USB cable to connect the mobile device to the multimedia system
• Conrm the connection on the mobile device
Important notice! When conrming the connection on the mobile device, we recommend activating «Always allow USB
debugging from this computer» option for faster MirrorLink connection of previously congured devices.
EN
17

AirPlay and MirrorLink Functions
EN
MirrorLink Wi-Fi
For MirrorLink function to work via Wi-Fi, both devices (the multimedia system and the OC Android mobile device) must be
connected to the same Wi-Fi network. There are several ways to do that:
1. By connecting both devices (a mobile device and the multimedia system) to the same Wi-Fi network (home network,
public network, Wi-Fi network of mobile 3G router, etc.).
2. By creating a Wi-Fi network on a mobile device and connecting the multimedia system to it.
3. By creating a Wi-Fi network on the multimedia system and connecting a mobile device to it.
To setup a Wi-Fi network on the multimedia system or an OC Android mobile device, do as follows:
• Open «Settings» – «Router mode»
• Enable the «Wi-Fi hotspot» option
Note. Use the «Set up Wi-Fi hotspot» item of this menu to change the access password and the name of the newly
created network.
When this function is used for the rst time, one needs to connect the mobile device with a USB cable and enable the «USB
debugging» function on the mobile device. See MirrorLink USB item of this guide for a detailed description of the activation
procedure.
Once both the devices (the multimedia system and the Android mobile device) are connected within a single Wi-Fi network,
one can proceed to enabling MirrorLink function.
To do this, follow the steps below:
• Open PhoneLink app available in the installed apps list
• Select «Android WiFi» option
• Use a USB cable to connect the mobile device to the multimedia system
• Conrm the connection on the mobile device
• Disconnect the USB cable after the successful connection when «Disconnect the USB cable» message appears on the
screen
18
Note. Connection with a USB cable is required only when MirrorLink Wi-Fi function is used for the rst time. After that,
the devices will only need to be connected to the same Wi-Fi network.
 Loading...