

Gazelle bike, Bicycle User Manual

User Manual
www.gazelle.nl

2
3
Note down your frame
number on this page
and put the sticker of the
safety lock on the spot
indicated below. If your
bike doesn’t have a lock
(as is the case with racing
bikes or mountain bikes)
only note down the
frame number.
First Service after
service a year
Adjusting brakes: Front brake O O
Rear brake O O
Inspection lighting: Dynamo O O
Light wiring O O
Headlight O O
Taillight O O
Tyres/wheels: Front tyre O O
Rear tyre O O
Front axle nuts O O
Rear axle nuts O O
Spoke tension, optionally truing the O O
weel if it is buckled
Chain tension O O
Gear system: Adjusting gear shifters O O
Adjusting derailleur / gear hub, O O
if necessary
Seat O O
Signed as correct: ............................................. ............................................
City: ............................................. ............................................
Date: ............................................. ............................................
Owner
Name: ...................................................................................
Address: ................................................................................
Postcode: ............. City of residence: .......................................
Bike model: ...........................................................................
Brake system: .........................................................................
Lock number: ....................... Key number: ..............................
Frame number: ......................................................................
Date of purchase: ......................
Seller: ...................................................................................
Signature seller: Signature owner:
..................................... ........................................
What to do in the case of theft?
If you are unfor tunate enough to h ave you r bike stole n repo rt it to
the p olice. Whe n you do so , bring t his book let so th at the po lice wil l
have the detai ls fo r yo ur bi ke w hich will make it easier to identi fy
shou ld it be recovered . I f your local pol ice force oper ates a cycle
tagging scheme registering your bike will make it easier to identify.
It is imp ortan t tha t you bring your b ike t o your Gazel le de aler t o have it se rvice d wit hin 3 months and
within 1 year after you start using it. This servicing consists of the following actions / inspections:
All Gaz elle bik es ha ve a uniq ue f rame num ber. Th is a nd o ther deta ils can be re cord ed h ere.
If your loc al po lice forc e ru ns a cyc le t aggin g sc heme then we recom mend tha t you get you r
bike registered. The details that you record here will be necessary for that registration.
Keep it safe!
Always properly lock
your bike and attach
it to a fixed object as
well, if possible. Use a
Sold Secure approved
lock.

4
5
Content
INTRODUCTION ......................................................................................... 6-7
CYCLING COMFORTABLY The seat ............................................................................. 8
The handlebar
................................................................. 10
Suspension
...................................................................... 12
Handlebar grips
............................................................... 13
Kickstand
......................................................................... 13
On your way
.................................................................... 13
THE USE OF THE BIKE Lights ............................................................................... 14
Brake systems
.................................................................. 18
Hub gears
........................................................................ 20
Derailleurs
....................................................................... 21
Tyres and wheels
..............................................................22
The chain
......................................................................... 23
Bottom bracket, cranks and pedals
................................ 23
MAINTENANCE AND INSPECTION Maintenance of the frame .............................................. 24
Technical maintenance
................................................... 25
Adjusting the derailleurs
................................................ 30
Recommended tightening torques
................................ 33
Tyre inspection and maintenance
.................................. 33
MINOR REPAIRS Repairing a puncture ...................................................... 34
Removing the front wheel
.............................................. 35
Removing the rear wheel
................................................ 36
Repairing the lights
........................................................ 37
Repairing the rear light
................................................... 38
Repairing the dynamo
.................................................... 38
Tensioning the chain
....................................................... 40
Replacing the chain
........................................................ 41
Replacing the pedals
...................................................... 41
AND WHAT ELSE YOU NEED TO KNOW… Cycling safely ...................................................................42
Theft prevention
............................................................. 43
Certificate of guarantee
...................................................45
General
............................................................................ 46
In conclusion
................................................................... 46
OVERVIEW COMPONENT NAMES .......................................................................................... 48

6
7
Introduction
Congratulations on your new Gazelle! It ensures that you
will enjoy thousands of kilometres of relaxed and carefree
cycling fun. Ever since Gazelle produced its first bike in 1892,
your comfort and safety have been a priority. As the premier
bike brand in the Netherlands, Gazelle was the first bicycle
manufacturer to receive the ISO 9001-2000 certificate for its
quality system.
You can be certain that your bike has been designed and
manufactured with the utmost care using high grade and resilient
materials. That’s why Gazelle can offer you a long-lasting
warranty. In the back of this booklet you will find the certificate
of guarantee.
To get the best out of your new bike on a continuous basis it
is recommended that you maintain it well and have it checked
regularly by your Gazelle dealer. This book let will advise you how
best to do this and how to do minor repairs yourself. In addition,
you will find all the information that you need for an exact and
tailor-made adjustment of your bike.
We advise you to read this user manual carefully and to keep it in
a safe place. Your Gazelle dealer is always prepared to help you
out with advice and assistance.
We wish you lots of cycling fun!
Royal Dutch Gazelle N.V.
P.O. Box 1
6950 AA Dieren, the Netherlands
www.gazelle.nl
2
H
A
B
3
8
9
Upon delivery, the Gazelle dealer has adjusted your bike just right for you.
However, sometimes it’s convenient to slightly change the sitting position.
To prevent muscular pain during a long ride, for instance. Gazelle bikes are
designed in such a way that you can easily do this. This chapter will advise
you how to adjust your Gazelle in order to make it most comfortable.
The seat
The seat is an important part of your bike and comes in different varieties.
For instance, the seat of a racing bike is hard and small, whereas the seat of a
comfort bike is wider and softer. Many of our bikes are fitted with Gel seats.
These are designed to change shape in order to distribute the pressure of
the rider’s backside more evenly.
Saddle Height Adjustment
The best way to check the ideal height of your seat is by sitting on the bike.
The toes of one foot must be able to touch the ground, whereas the heel of
your other foot rests on the pedal that is in its lowest position. In that case
your leg is stretched almost completely, but still feels relaxed. I f you can
touch the ground with both feet, the seat is too low. If you want to adjust
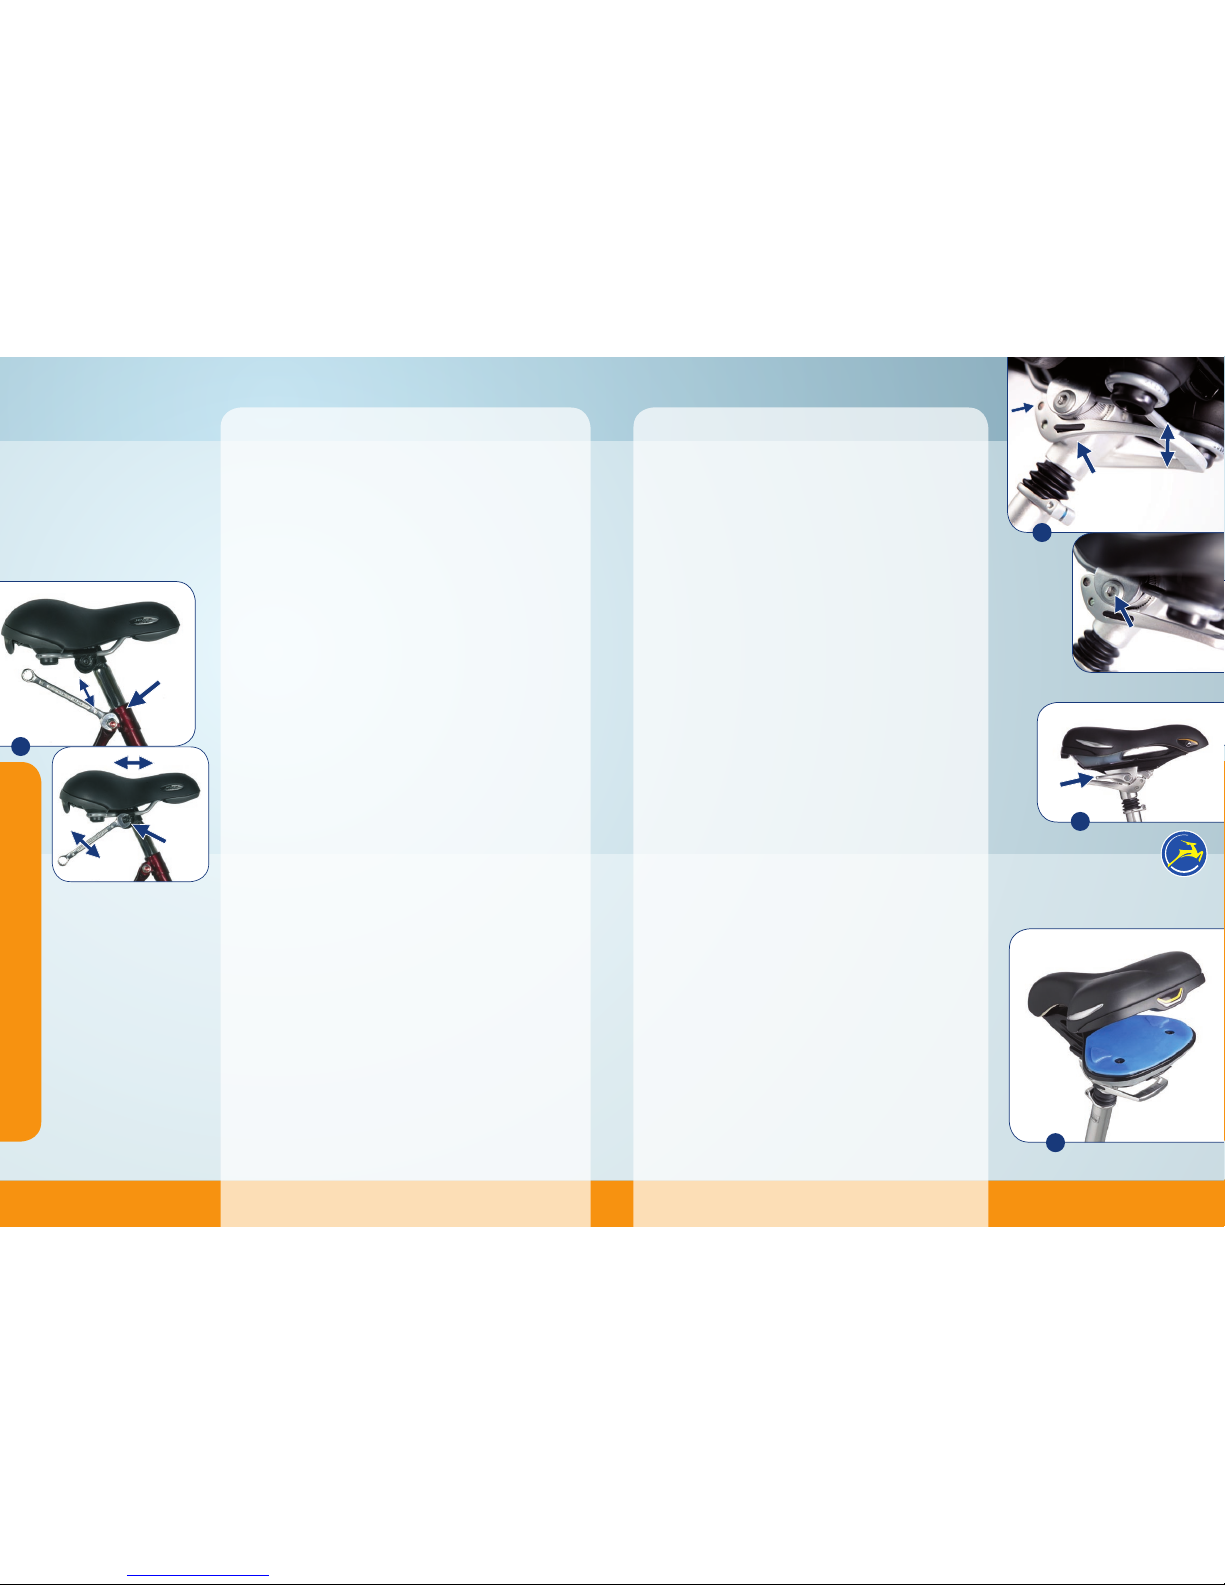
the height of the seat, simply loosen bolt (A) or the Allen bolt on the chain
side. Then you can adjust the seat according to your wishes. Firmly retighten
the bolt after (fig. 1).
When you do this, please be aware that the safety indication MIN
or STOP isn’t visible.
Normal seat
Using bolt (B) you can adjust the seat to the front or back and set the seat’s
angle. The comfort is determined not only by the seat’s height, but by its
adjustment as well (fig. 1).
Seat Switch and Gel Seat
In the case of models with a Seat Switch seat angle adjuster you can adjust
the seat without tools. All you have to do is push down the lever (H) beneath
the seat and determine the ideal position. Subsequently you push the lever
(H) back up. If it is difficult to operate the lever, you can slightly loosen nut
(M). If you loosen the nut too much, the seat will tilt. If you loosen bolt (B),
you can adjust the seat to the front or back (fig. 2).
Gazelle Comfort Post and Gazelle Comfort Seat
With the Comfort Post seat post (fig. 2) it is possible to adjust the seat
angle without tools. By pushing the safety catch (A) you can lower the
lever (H). This makes it possible to set the ideal seat angle by moving the
seat up or down. You can shift the seat to the front or back by loosening
Allen bolt (B). Once the seat is positioned correctly, retighten Allen bolt
(B) with 1 Nm.
With the Comfort Seat’s seat post (fig. 3) you can adjust the seat to the
front or back by lowering lever (A). Subsequently you lock the seat in the
right position by shifting the lever back up.
Comfort Seat inserts
Inserts (fig. 4) determine the seat’s cushioning. Standard, the seat is
provided without insert. If you weigh between 80 and 100 kg, you are
advised to apply the green insert. If you weigh between 100 and 130
kg it’s best to choose the blue insert. If you weigh less than 80 kg, for
instance, and want a less flexible seat an insert can offer a solution also
(e.g. for longer rides). To place the inserts loosen the three bolts and take
off the seat cover. Add the insert and put back the seat cover. Now you
can retighten the bolts. When demounting the seat the stopper on the
bottom of the seat should be removed. Do not adjust the bolts on
both
sides of the seat post, because these keep important components in place.
They do not clamp the seat post. All inserts are available via Gazelle’s O&A.
The ideal sitting position
The seat’s ideal position is different for everyone. It often takes a bit of
time before you have found the perfect position. Furthermore, it depends
on the kind of bike ride you take. If you take a long, sporty ride it is best to
point the seat slightly downwards. If you take a short bike trip it is often
more convenient to sit upright and point the seat slightly upwards.
Warning: the seat should never be adjusted while riding the bike!
Cycling comfortably
4
1
B
C
A
A
A
M
10 11
6
B
S
8
Cycling comfortably
If you own a Gazelle bike with an infinitely adjustable Shuttle QR,
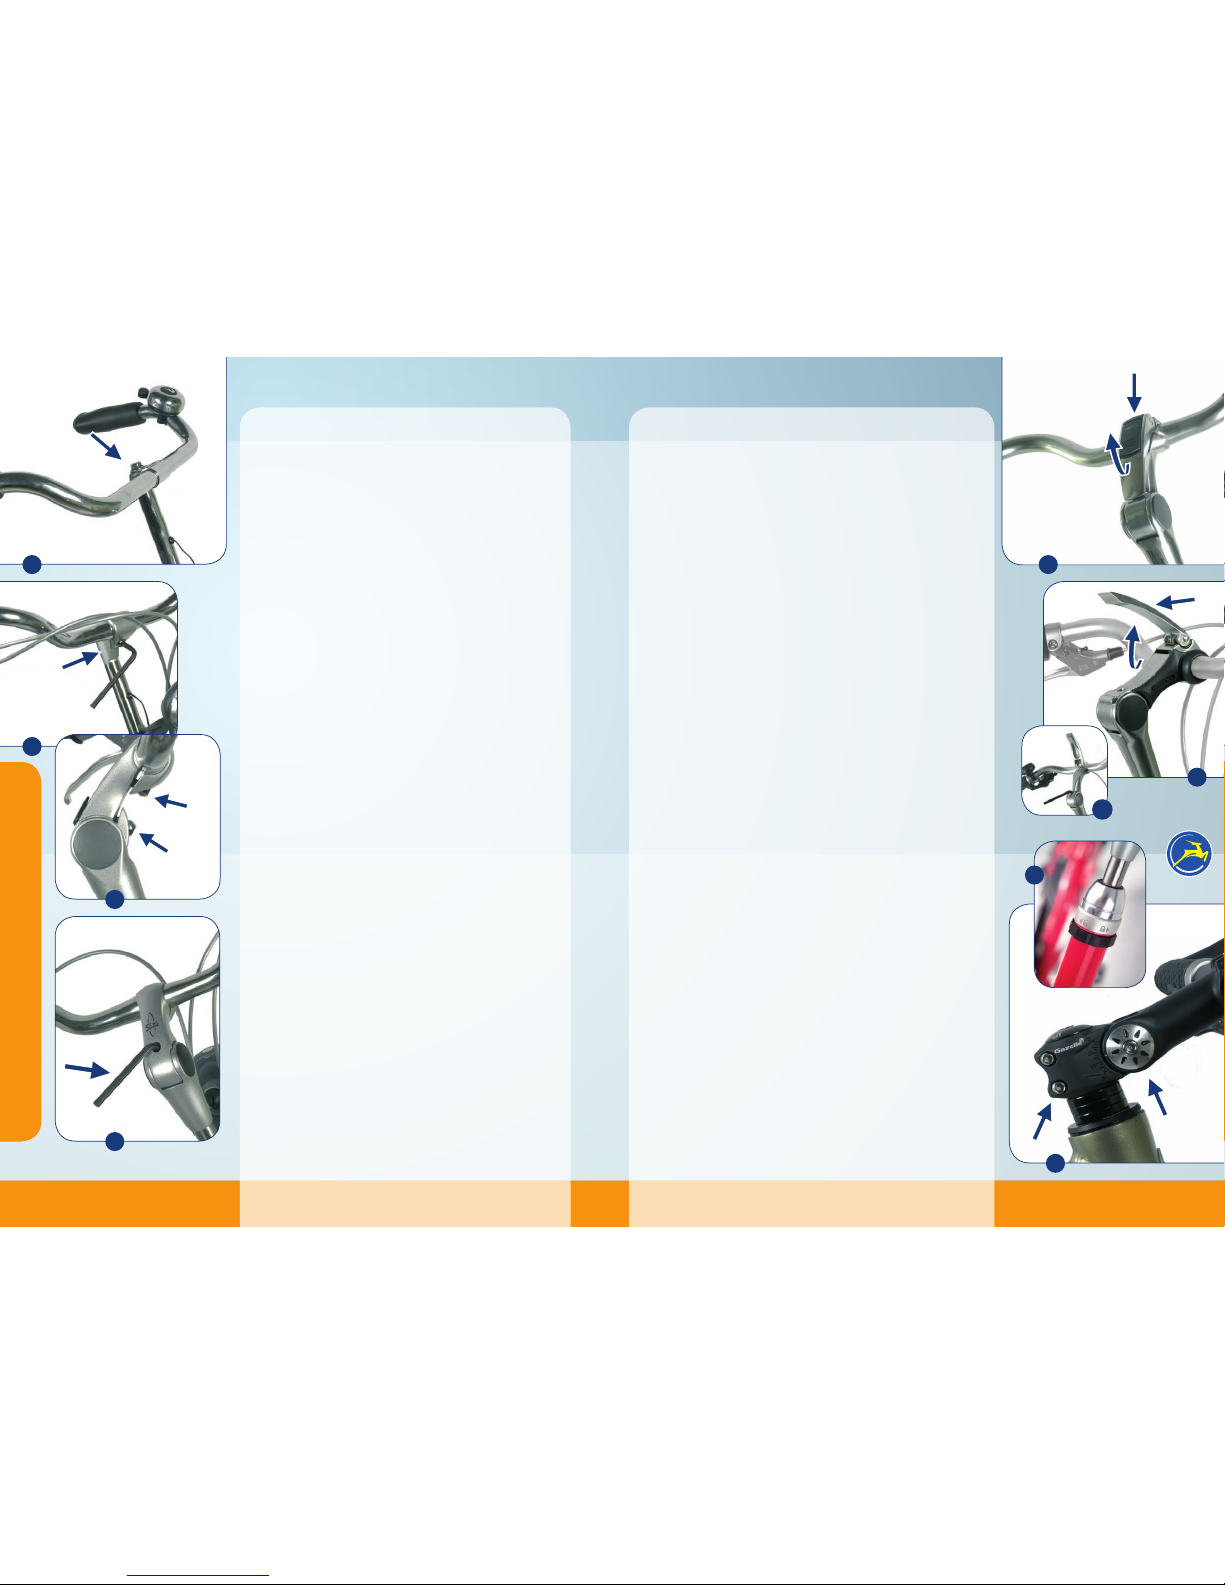
Shuttle QR Comfort or Switch handlebar stem, you don’t even need tools
to position the handlebar. Then the only thing you have to do is lift the
lever (H) (with the Switch and Shuttle QR Comfort first pull back sliding
safety bolt (C)) and tilt the handlebar to the desired height (fig. 9). At the
moment you push the lever back down the handlebar is locked (fig. 10).
If you want to adjust the height of the handlebar stem itself, use a 6 mm
Allen key (10A) to loosen the bolt (fig. 10A). You can see this bolt if you lift
the lever.
After prolonged use the handlebar might become a bit loose. In that
case visit your Gazelle dealer. He has the know-how and tools to fix this
problem immediately. Should the handlebar be bent or damaged in any
way, it should always be replaced. Bending back the handlebar after an
accident is potentially dangerous and not recommended as it might
cause a weakness that could lead to failure at any time. Deep scratches in
aluminium handlebars create the risk of breaking the handlebar. In this
case the handlebar should also be replaced.
Various MTB, X-Road and Racing models are outfitted with an Ahead
System stem extension. In Ahead system headsets the handlebar stem
is mounted directly onto the steerer tube of the front fork (the long tube
that passes through the front part [called the head tube] of the bike’s
frame). To align the handlebar stem with the front wheel, loosen the
clamp bolts (A). By loosening bolt (B) (tightening torques are indicated
on the stem) the angle of the stem extension, and thus the height of the
handlebar can be adjusted (fig 12). Afterwards firmly retighten all bolts
after adjustment. Never attempt to adjust your handlebars while riding
the bike and always check if everything is tightened properly before
setting off the ride.
The handlebar locking system
Some models have a handlebar locking system on the headset (fig. 11).
This can be activated by turning the black ring to the left (counter
clockwise) which engages a ratchet mechanism. The turning direction
is indicated by arrows and an open and closed lock on the aluminium
ring. A red band becomes visible when the handlebar has been locked.
For safety reasons it is still possible to turn the handlebar when locked
– made evident by the clicking sound of the ratchet. The handlebar can
be unlocked by turning the black ring back to the right (clockwise), after
which it is possible to steer normally again.
The handlebar
Your riding comfort is not only influenced by the position of the
seat, but by the height of the handlebar as well. That is because it
determines the pressure on your hands and the posture of your back.
Gazelle bikes are fitted with various types of handlebars. Obviously
these can all be adjusted in height according to your wishes.
If you have a fixed handlebar, loosen bolt (A) a few turns. Then
give it a few taps with a rubber hammer. You can now position
the handlebar to the desired height by using a back-and-forth
turning movement. Then firmly retighten the bolt (fig. 5).
When adjusting the handlebar height, beware that the safety
indication MAX on the handlebar stem is not visible. In that case
the handlebar is too high.
A number of Gazelle models feature a handlebar stem that
enables you to adjust the position of the handlebar by means
of a clamping bolt (B) (fig. 6).
Some of our Gazelle models are fitted with an infinitely
adjustable Shuttle handlebar stem. With bolt (A) you can adjust
the position of the stem extension and with bolt (B) that of the
handlebar (fig. 7).
To adjust the height of this handlebar you have to remove
the cap from the stem. Subsequently you can turn the stem
extension in such a way that an additional bolt becomes visible.
You can loosen this bolt with a long 6 mm Allen key (S), after
which you can adjust the handlebar height according to your
wishes. Afterwards firmly retighten the bolt (fig. 8).
C
H
C
H
9
10
S
10 A
B
A
12
A
5
A
B
7
11
12
13
Suspension
Some models feature suspension for optimum comfort. The
correct adjustment of the suspension system depends on the
weight of the rider and the terrain on which you bike.
Suspension seat post
In many models, Gazelle has put a suspension system within
the seat post. In the chapter “Maintenance and inspection”, on
page 26, it is indicated how you can set the spring tension of the
suspension seat post.
Beware: If you brake hard, the front suspension will deliver an up and
downward movement that can be dangerous, especially in curves.
This effect is weakened if you use the front brake as well as the rear
brake. Therefore, never brake with the front brake only!
Suspension front fork
Gazelle’s suspension front forks can be divided into two
categories. The first type works by means of mechanical springs
with elastomers, the other type uses air pressure.
Front forks using air pressure
These front forks can be adjusted by increasing or lowering the
air pressure. The desired pressure depends on the weight of the
rider and the desired suspension action. The air pressure can be
adjusted using the supplied pump.
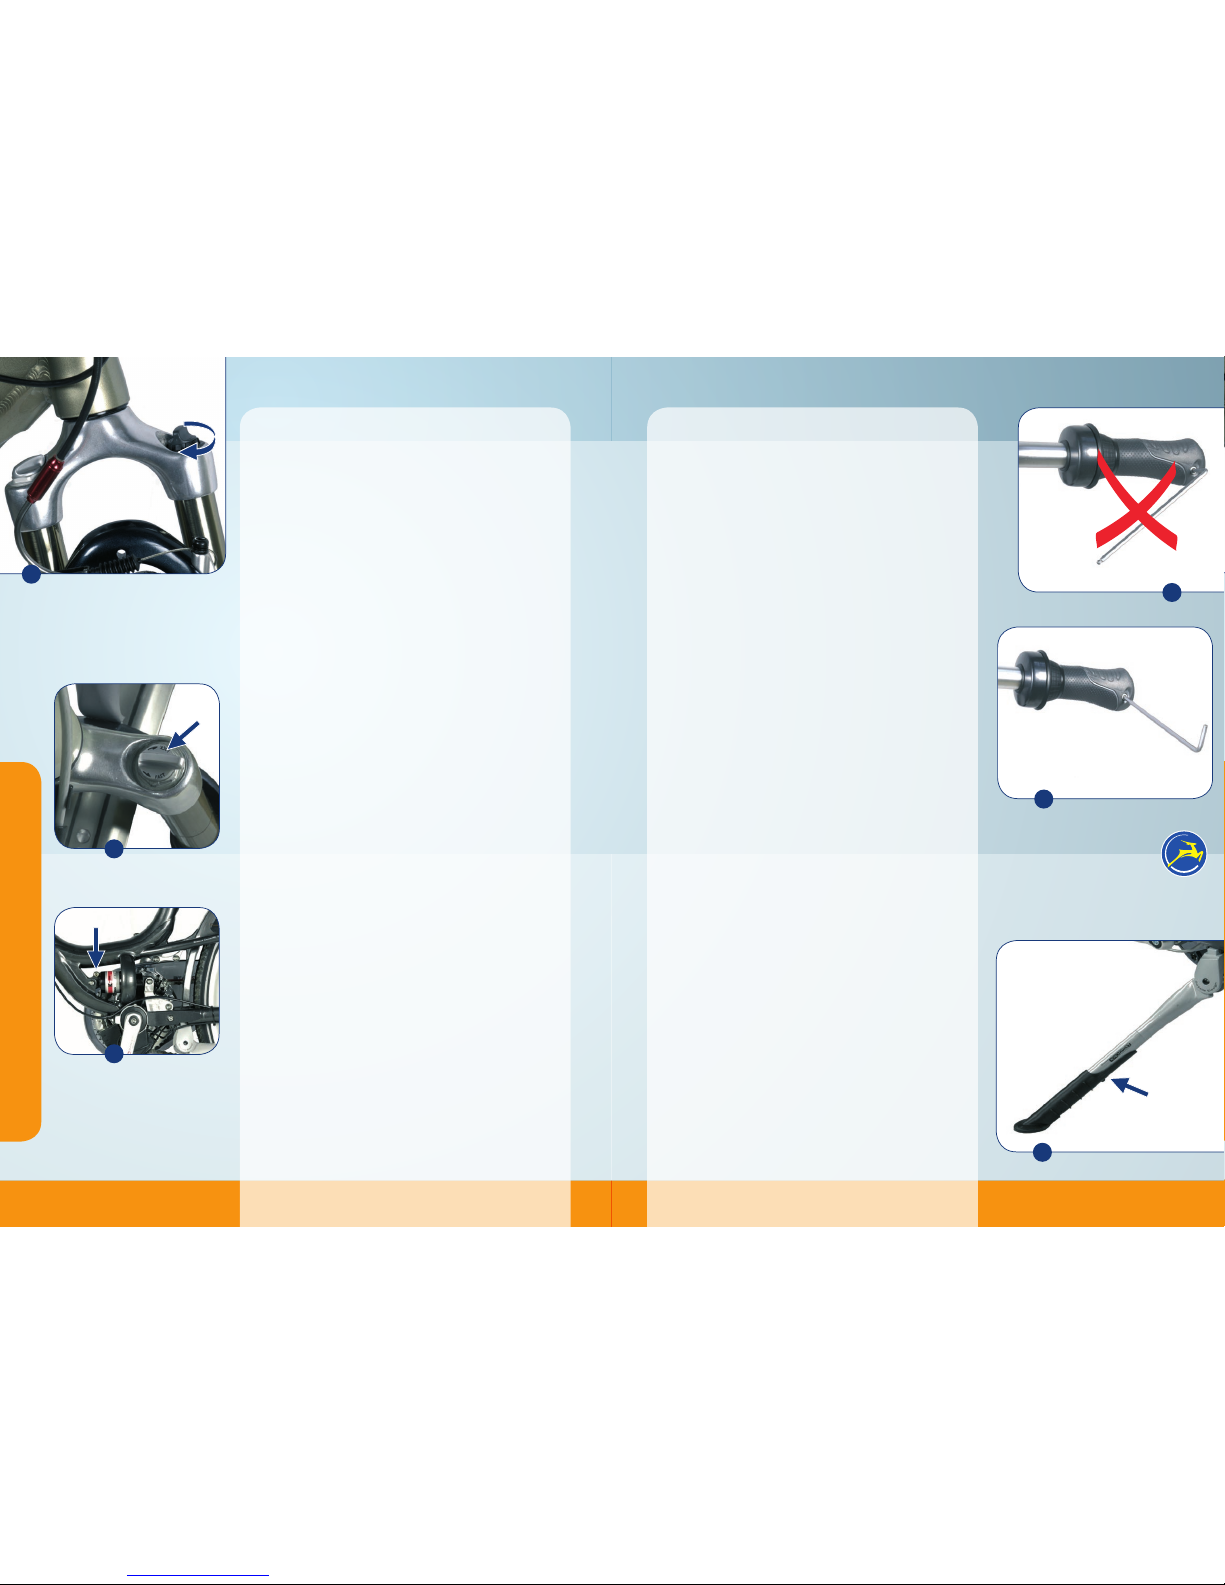
Instead of using air, the suspension front fork with elastomers uses
mechanical springs with elastomers for suspension. This is a cell-
like, plastic spring element. This type of suspension can be adjusted
by means of the turning knobs on top of the front fork (A in fig. 13).
Please note that the tension of the springs on both sides should
be the same. More information about this can be found in the
chapter “Maintenance and inspection”, on page 26.
Some models with a suspension front fork offer not only the
possibility to adjust the spring tension but also to temporarily
turn off the suspension completely, the “Lock-out ” function (B).
This is recommended to prevent loss of energy during a climb
(fig. 14).
Adjusting the rear suspension unit
For Gazelle bikes with rear (air shock) suspension, the firmness
of the ride can be altered by adjusting the air pressure in the
rear suspension unit. This can be done using the pump supplied
(fig. 15).
Handlebar grips
The ergonomically designed handles ensure that the load on
your hands during cycling is minimized. Due to temperature
differences, the action of sunlight or as a result of intensive use,
the handles can become loose over time. In that case they need
replacement. Your Gazelle dealer will be happy to take care of that.
Adjustable handles
To prevent handles from becoming loose, Gazelle has developed
handles that can be secured with a bolt. If you like to slightly twist
your handles over the handlebar, you first need to slightly loosen
this bolt. After setting them to the desired position you must
secure the handle again. Don’t turn the bolt too tight, max. 5 Nm
tightening torque (fig. 16). By holding the Allen key on its short
side you apply the right amount of strength (fig. 17).
Kickstand
Since you won’t find bike racks everywhere, almost all
Gazelle bikes are fitted with a sturdy, stable PowerClick stand.
Lengthwise adjustment with screw (A) is simple and ensures
that your bike always sits rock solid fig. 18).
On your way
Now your bike has been adjusted correctly. Before you start
riding, check if everything is secure. Now you can start enjoying
your new Gazelle. If you want to know more about the technical
aspects of your bike you can read about the various parts,
maintenance and minor repairs in the following chapters.
Cycling comfortably
13
14
15
16
17
18
B
A
INCORRECT
CORRECT
A
14
15
Lights
To ride safely in traffic it is important that other road users can see
you. Therefore, effec tive lighting has been one of our main concerns
in the design of your bike. In this chapter you can read about the
operation of the various types of lights that you can find on your
new Gazelle.
Dynamo
The taillight of your Gazelle works on batteries. The energy needed
for the headlight is usually generated by a dynamo. There are
dynamos that are driven via a device that rolls against the tyre and
dynamos that are integrated into the hub. In the chapter “Minor
repairs”, on page 38, you can read exactly how to simply solve
possible problems with your dynamo.
Headlights
Many Gazelle bike models are fitted with a headlight with a built-in
reflector. The advantage of this is that you are still properly visible to
approaching traffic when you’re standing still. Some models feature
Gazelle Double-Sight LED battery headlights with one or more LEDs
(Light Emitting Diode). The service life of LEDs is almost unlimited.
Gazelle Double-Sight LED headlight
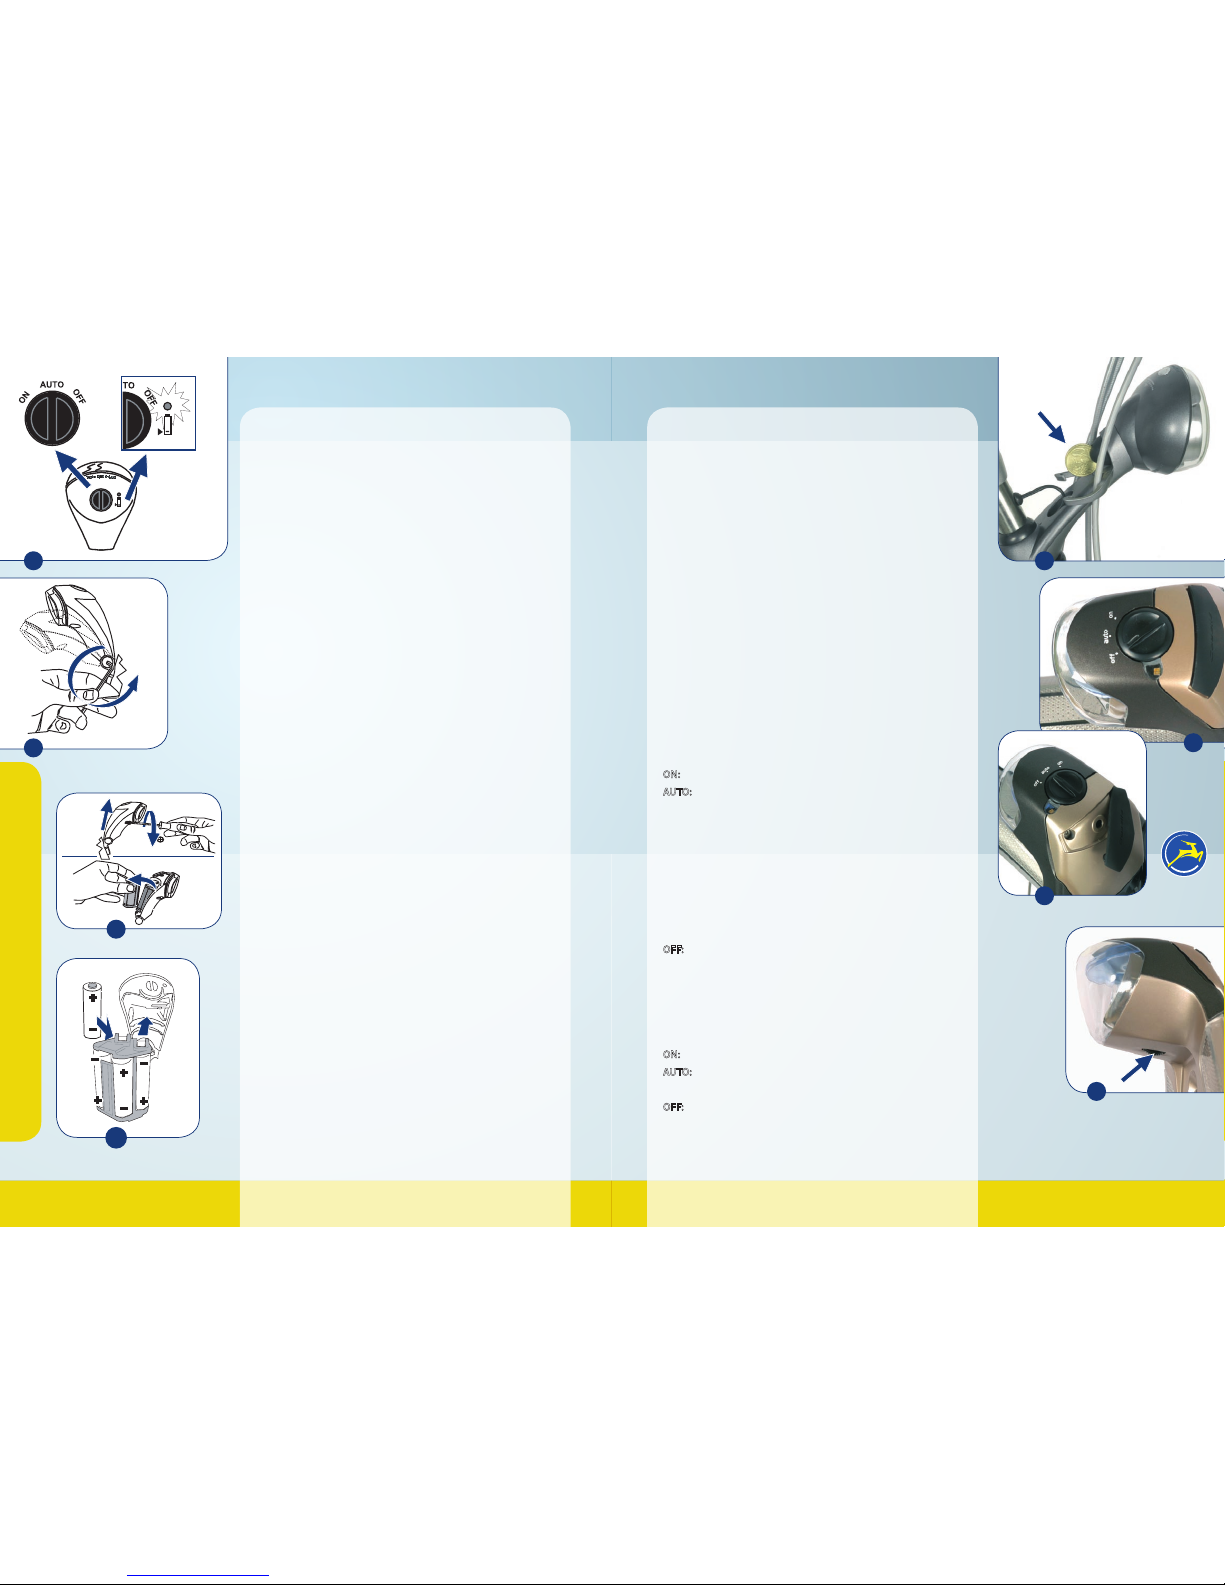
The Gazelle LED battery headlight has a switch with three positions
(fig. 19):
AUTO: In this mode the headlight switches on automatically when
darkness sets in and the bike starts to move. If you’re standing still
and the bike isn’t moving, the headlight continues to shine for
another 30 seconds (standlight light function).
ON: This enables you to have the headlight on at all times. This can
be important in misty weather, for instance, when it is desired that
the headlight is on while it’s still too light to have the automatic
mode switched on.
OFF: This enables you to completely switch off the headlight at
all times. Handy when you transport your bike on a carrier that is
attached to your car: under those circumstances it is undesirable
that the light switches on. It’s also a convenient way to quickly stop
the standlight function.
The use of the bike
The beam angle of the Gazelle LED battery headlight is adjustable.
By slightly loosening the bolt (A) you can easily direct the light.
Subsequently, properly retighten the bolt (fig. 20). To replace the
batteries, unscrew the light’s rear casing, remove the bolts and slide
the cap upwards. Then you can change the batteries (figs. 21 and 22).
Gazelle Power Vision rear batter y light
If your Gazelle is equipped with a Power Vision headlight with a
halogen light bulb and you want to adjust this headlight, you first
have to loosen the front part. If you don’t do this there is a risk that
the light’s connection will break off. Loosening and retightening
can be done by using a coin (A in fig. 23). There are 2 models of the
Gazelle In-Sight headlight available: a battery model and a dynamo
model. This headlight has 3 modes (fig. 24).
Gazelle In-Sight headlight, battery version:
ON: The light is on continuously with full power.
AUTO: The light switches on automatically when the bike is moving
and it’s dark. The light switches automatically between Eco and Full
power depending on the ambient light. This means that if you ride
in a built-up area and pass a beam of light (e.g. a street light) the
light slowly (in about 3 seconds = Soft down) switches over to Eco
and remains in that mode for 10 seconds. If no new light stimulus is
received within that period of time, the light switches back to Full
Power again (in about 3 seconds = Soft start), etc. If you park the
bike, the light stays on for another 20 seconds (safe stop).
OFF: The light is switched off permanently.
Replacing the batteries is easily done after removing the black cap
and unscrewing both bolts (fig. 25).
Gazelle In-Sight headlight, dynamo version:
ON: The light is on.
AUTO: The light switches on automatically if you start to bike and
it is dark.
OFF: The light is switched off permanently.
Safe stop function: The light stays on for a few minutes after you’ve
stopped. This works both in the “on” and “auto” mode.
19
20
21
22
23
24
25
26
AUTO
O
F
F
O
N
A
1
2
A
A “scroll wheel” with which you can adjust
the beam of light (closer by/further away) is
located at the bottom of the headlight (fig. 26).
 Loading...